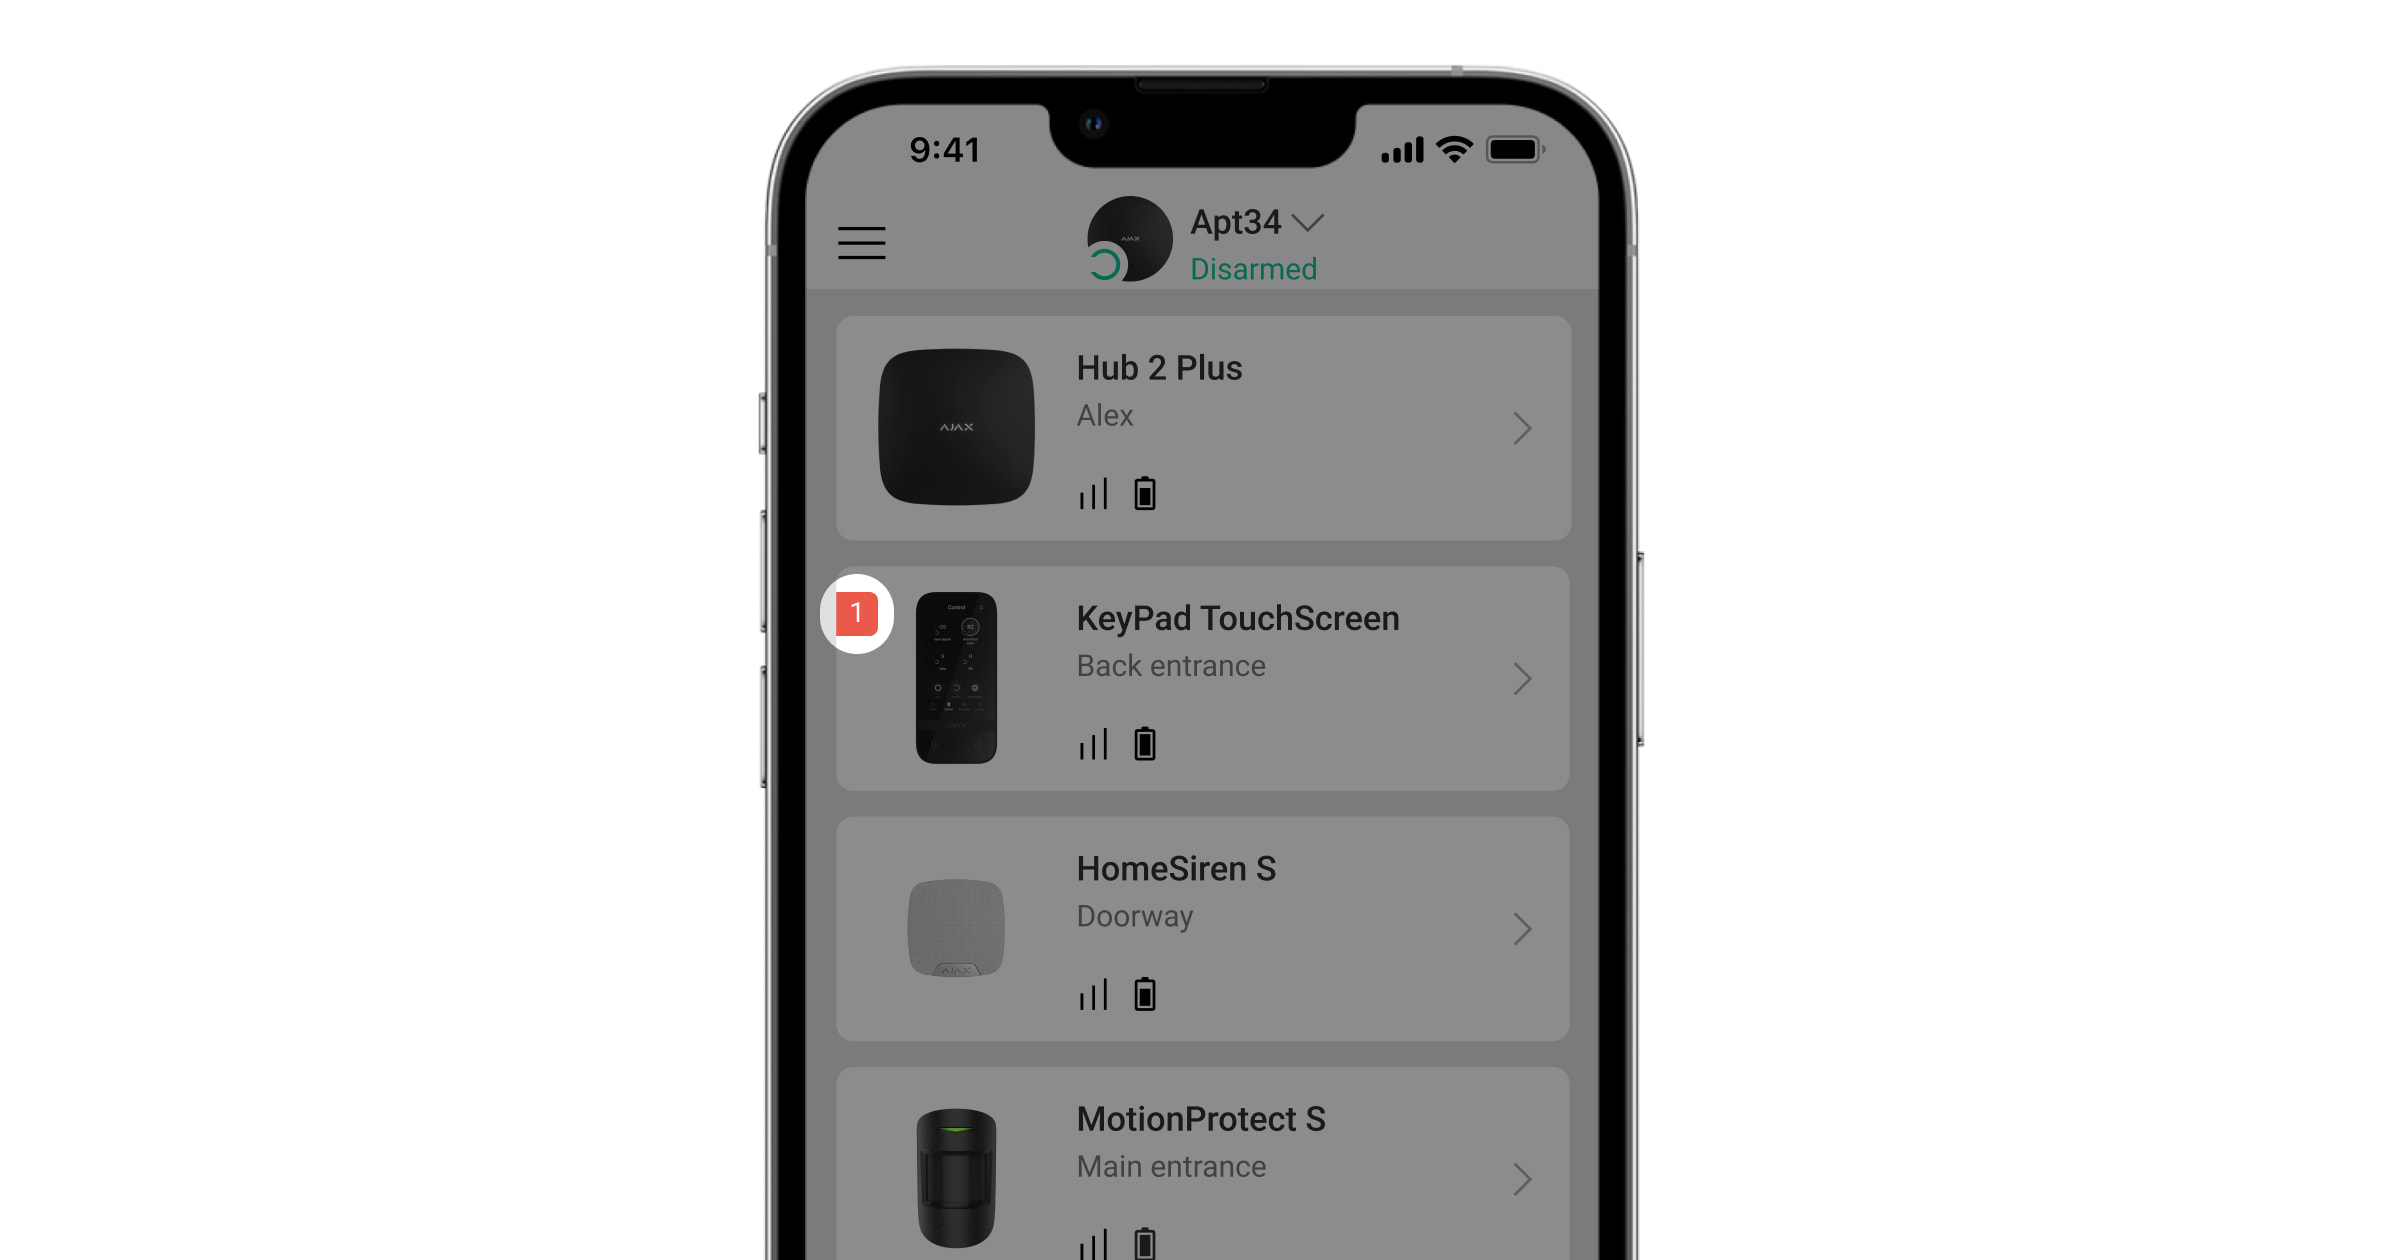
KeyPad TouchScreen is a wireless keypad with a touch screen designed for managing Ajax security systems. Users can authenticate using smartphones, Tag key fobs, Pass cards, and codes. The device is intended for indoor use only.
KeyPad TouchScreen communicates with a hub over two secure radio protocols. The keypad uses the Jeweller protocol to transmit alarms and events, and the Wings protocol to update firmware, transmit the list of groups, rooms, and other additional information. The communication range in an open space is up to 5,550 ft.
Functional elements
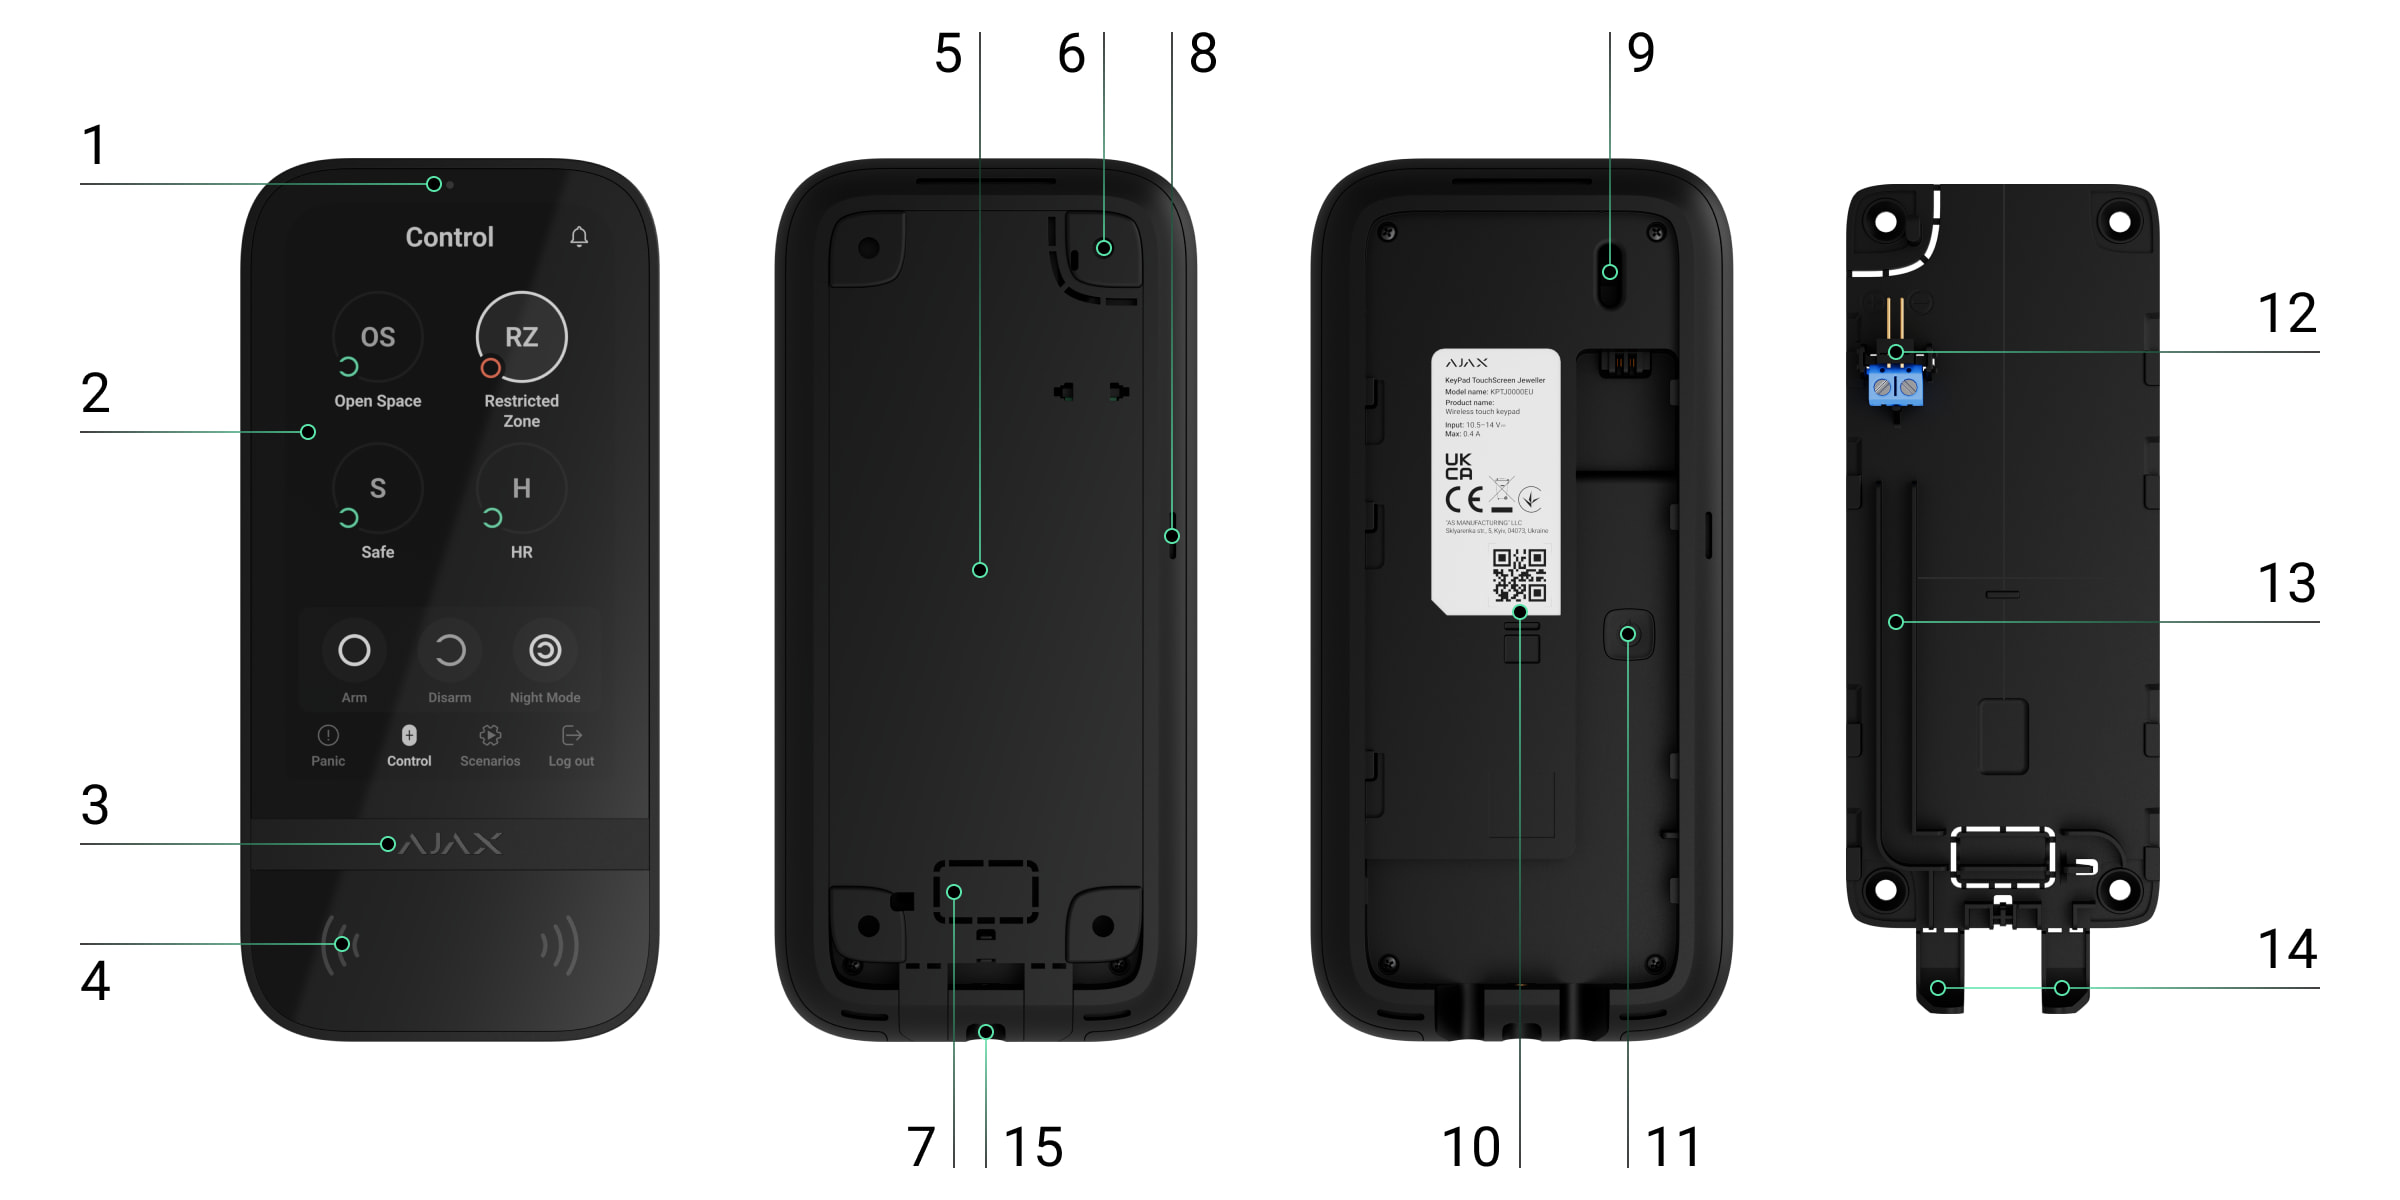
- Ambient light sensor for automatically adjusting the backlight brightness.
- IPS touch display with a 5-inch diagonal.
- Ajax logo with an LED indicator.
- Card/key fob/Bluetooth reader.
- SmartBracket mounting panel. To remove the panel, slide it down.
- Perforated part of the mounting panel for triggering a tamper in case of any attempt to detach the keypad from the surface. Do not break it off.
- Perforated part of the mounting panel for routing cables through the wall.
- Built-in buzzer.
- Tamper button.
- QR code with the device ID for adding the keypad to the Ajax system.
- Power button.
- Terminals for connecting an external power supply unit (not included). The terminals can be removed from the holders when necessary.
- Cable channel for routing the cable from the third-party power supply unit.
- Perforated part of the mounting panel for routing cables from the bottom.
- The hole for attaching the SmartBracket mounting panel with a holding screw.
Compatible hubs and range extenders
The keypad requires a compatible Ajax hub with OS Malevich 2.16.1 and later to operate.
Operating principle
KeyPad TouchScreen features a built-in buzzer, a touch display, and a reader for contactless authorization. The keypad can be used to change security modes and control automation devices, as well as to notify about system alarms.
The keypad automatically adjusts the backlight brightness and wakes up upon approach. Sensitivity is adjustable in the app. KeyPad TouchScreen interface is inherited from the Ajax Security System app. There are dark and light interface appearances to choose from. A 5-inch touch screen provides access to the security mode of a facility or any group and can control automation scenarios. The display also indicates system malfunctions, if present (when system integrity check is enabled).
Depending on the settings, the KeyPad TouchScreen built-in buzzer notifies about:
- alarms;
- security mode changes;
- entry/exit delays;
- triggering of the opening detectors.
The keypad operates using pre-installed batteries. It can also be powered by a third-party power supply unit with a voltage range of 10.5–14 V⎓ and an operating current of at least 0.5 A. When external power is connected, the pre-installed batteries serve as a backup power source.
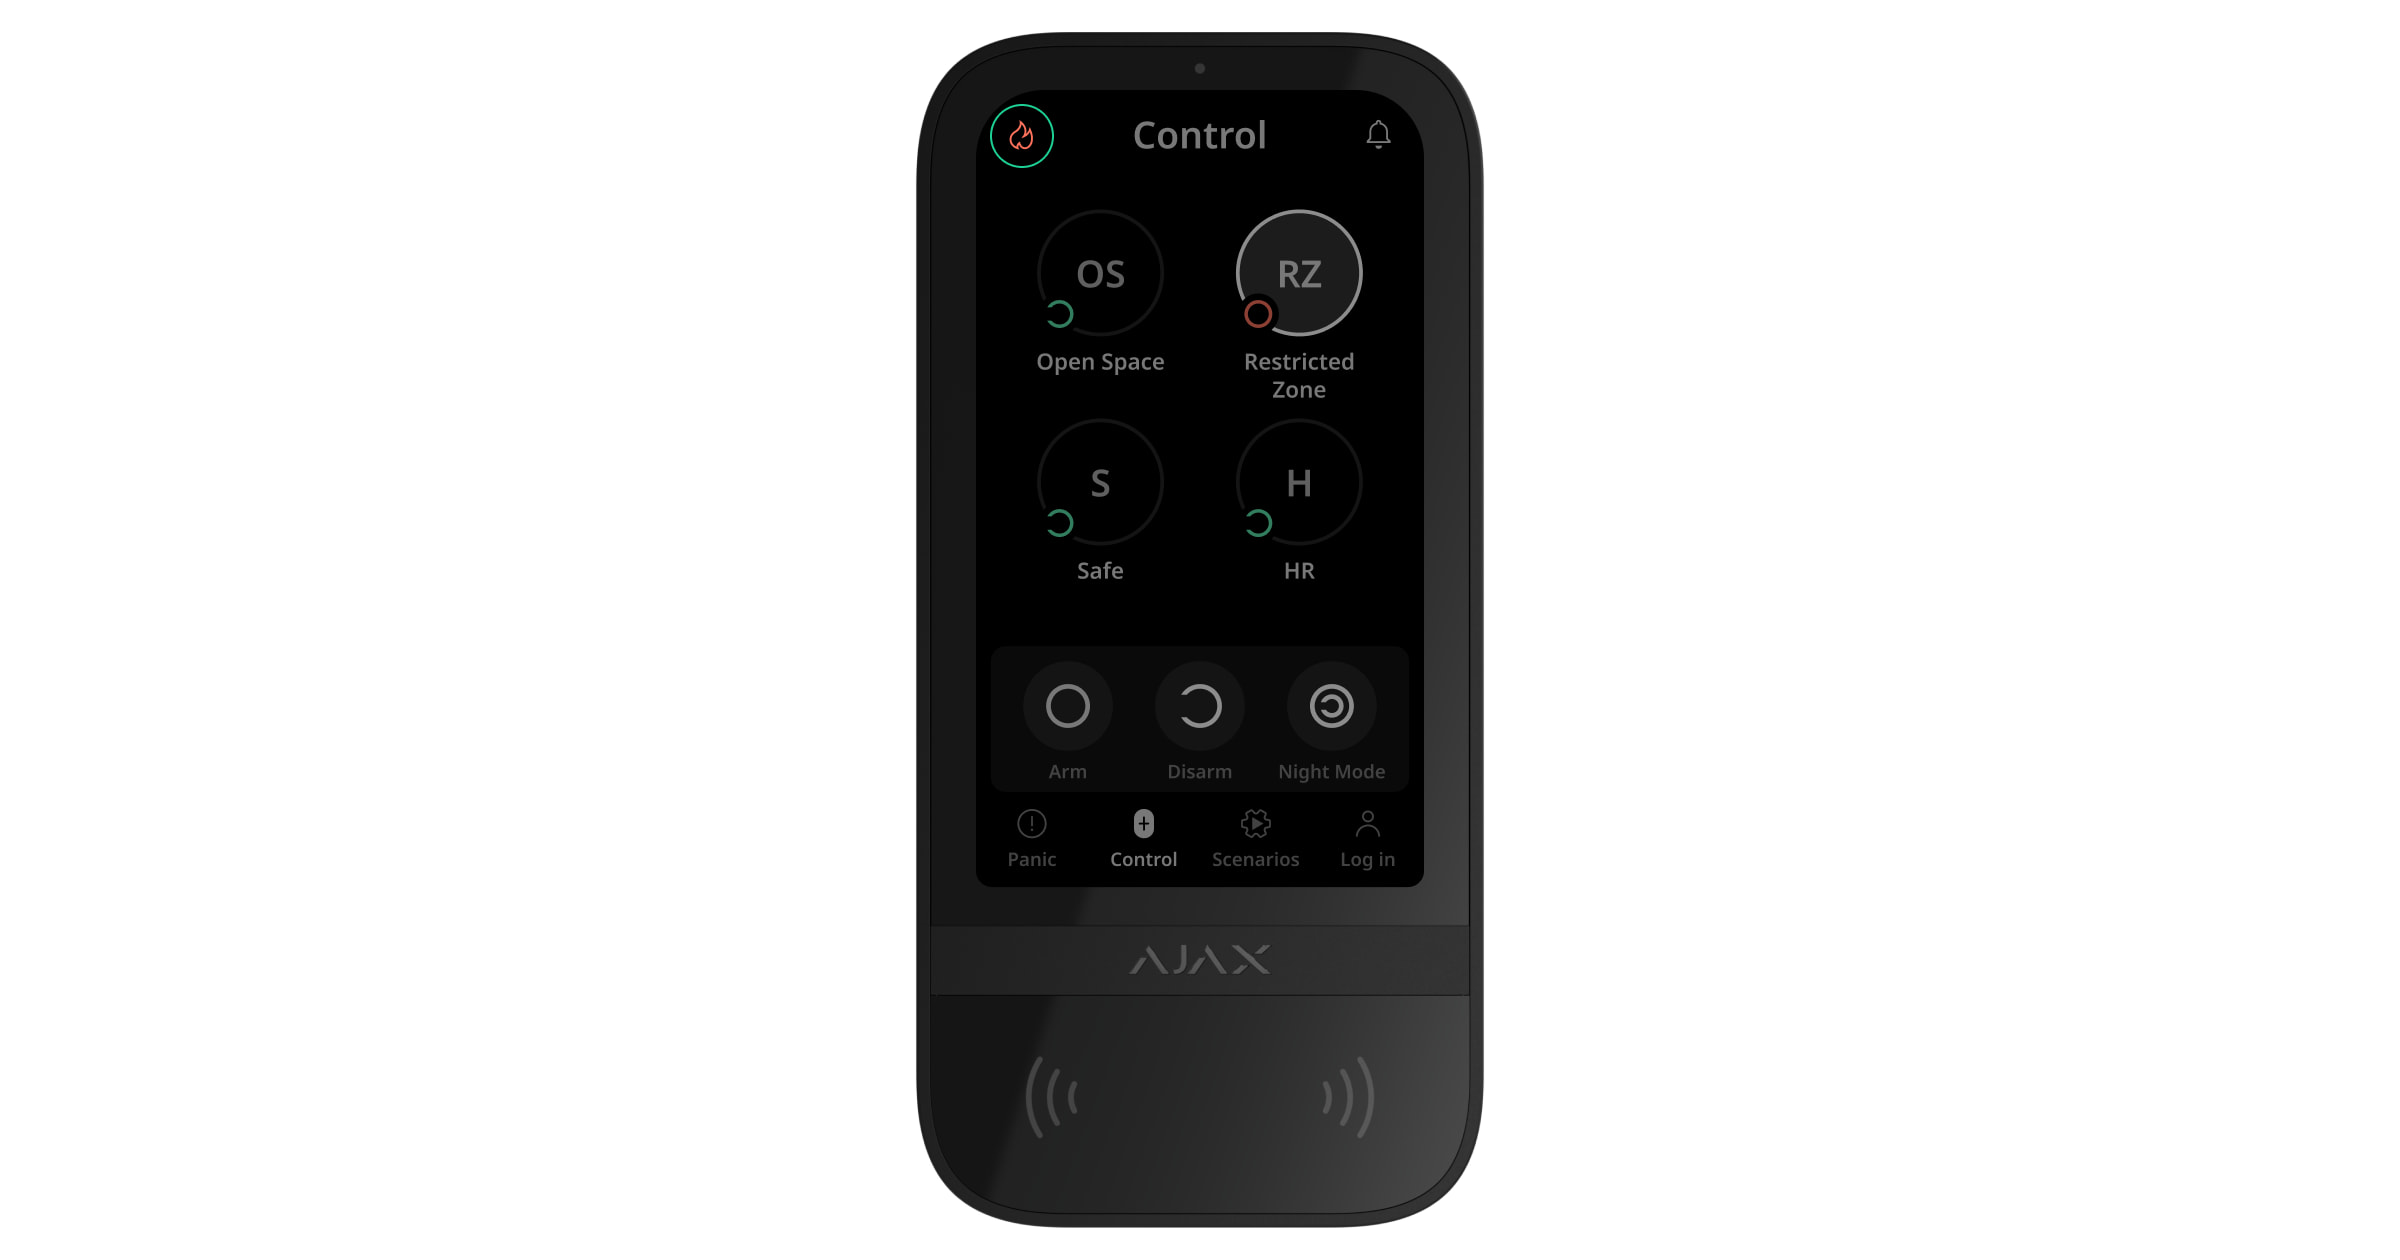
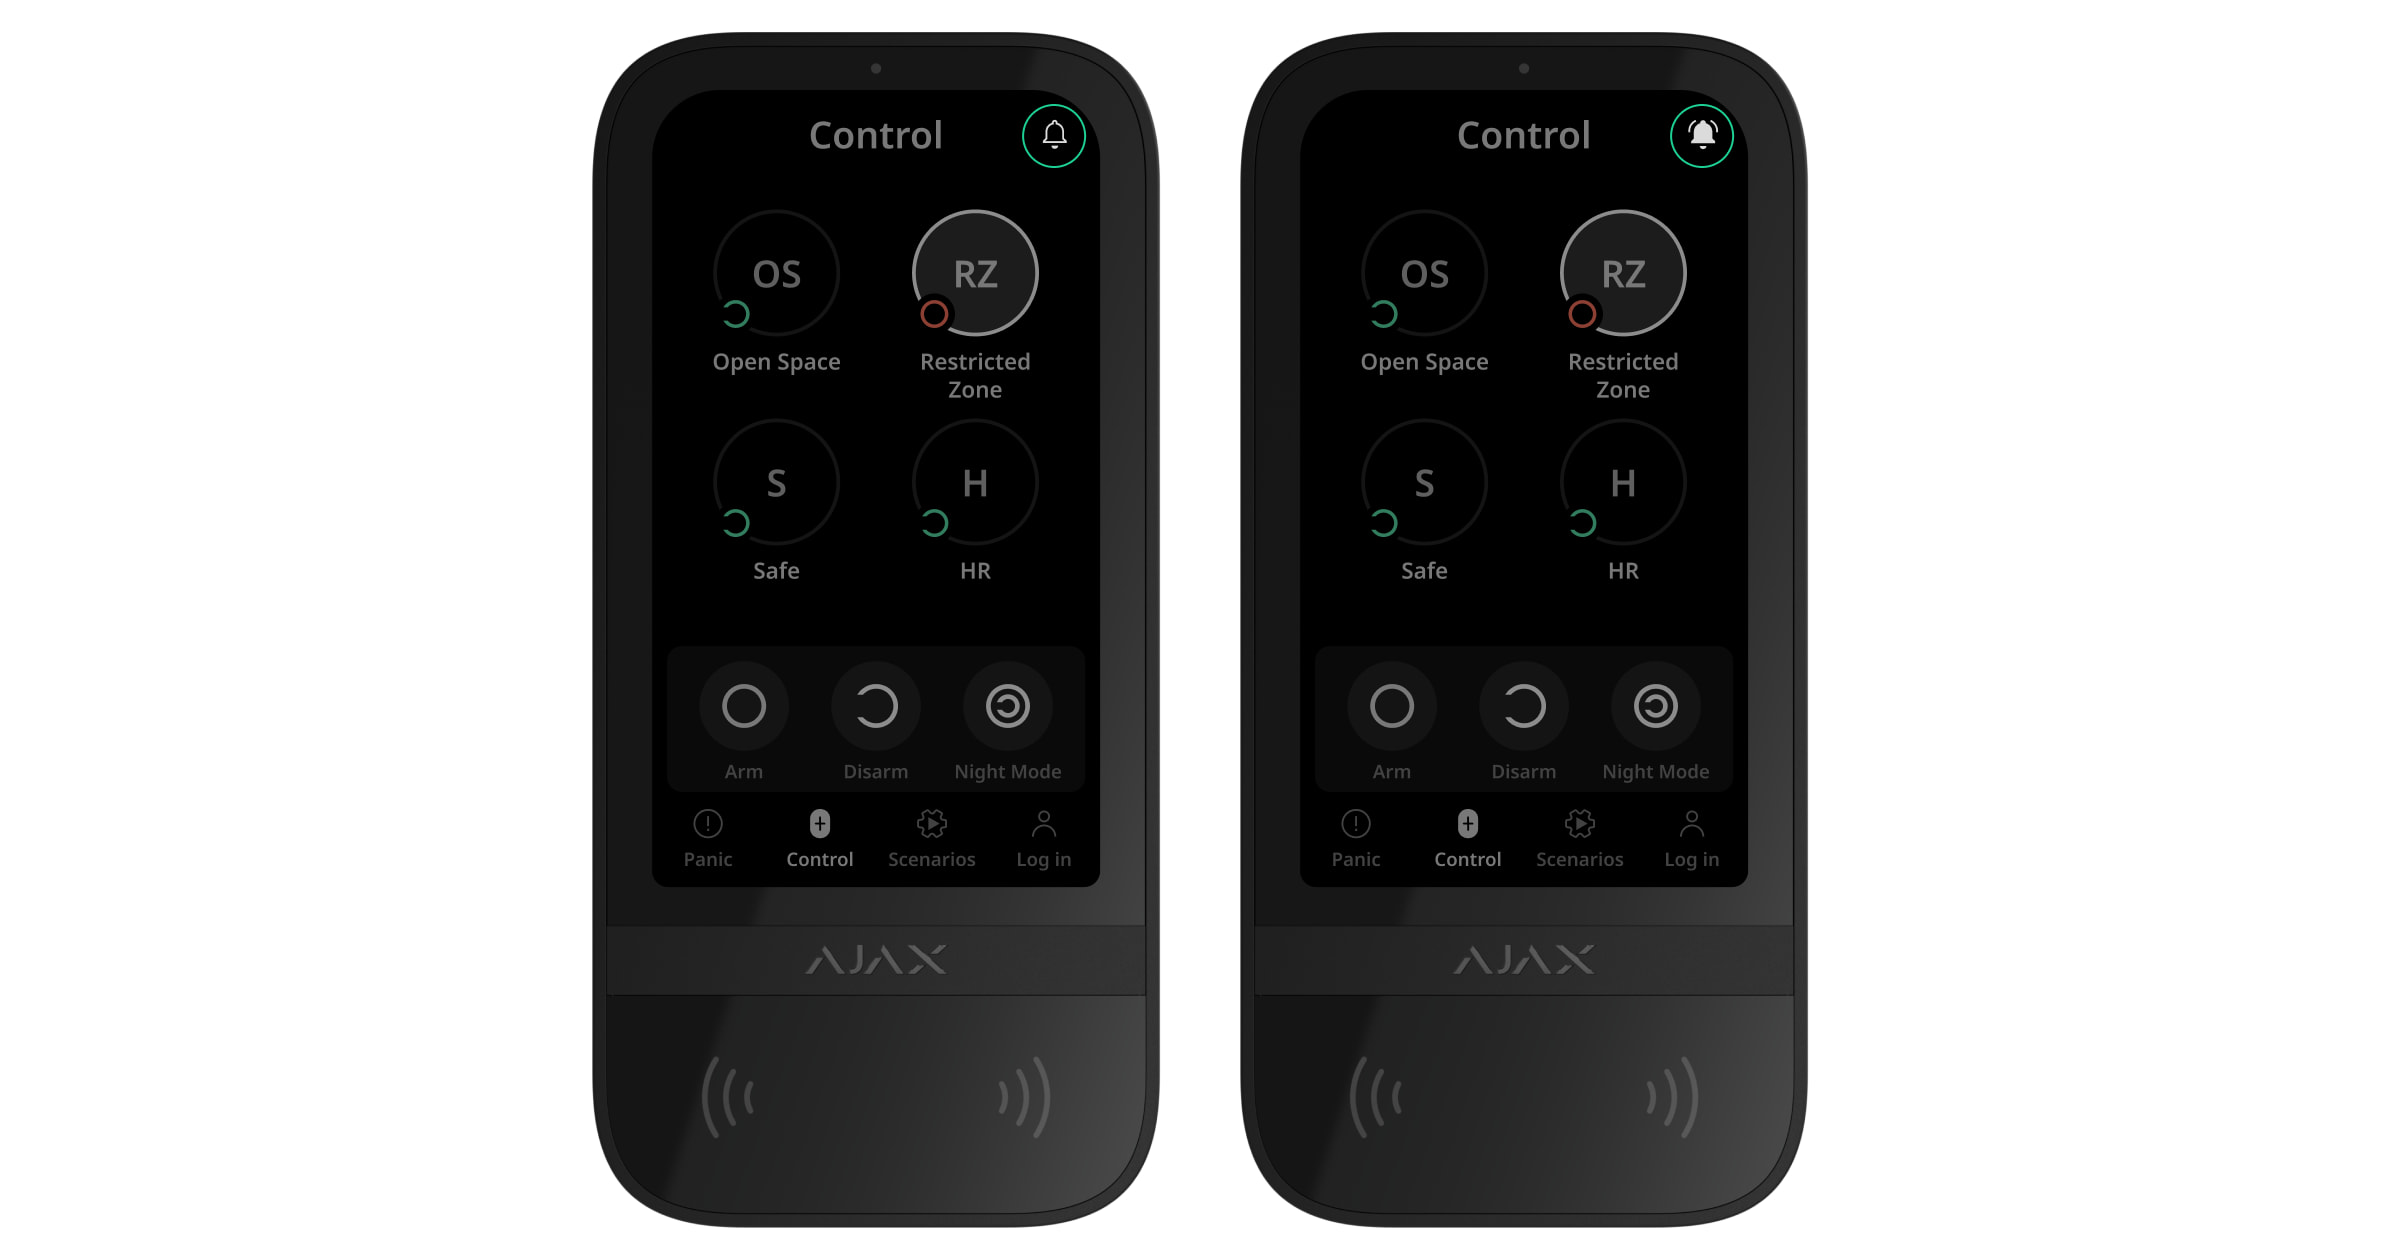
Security control
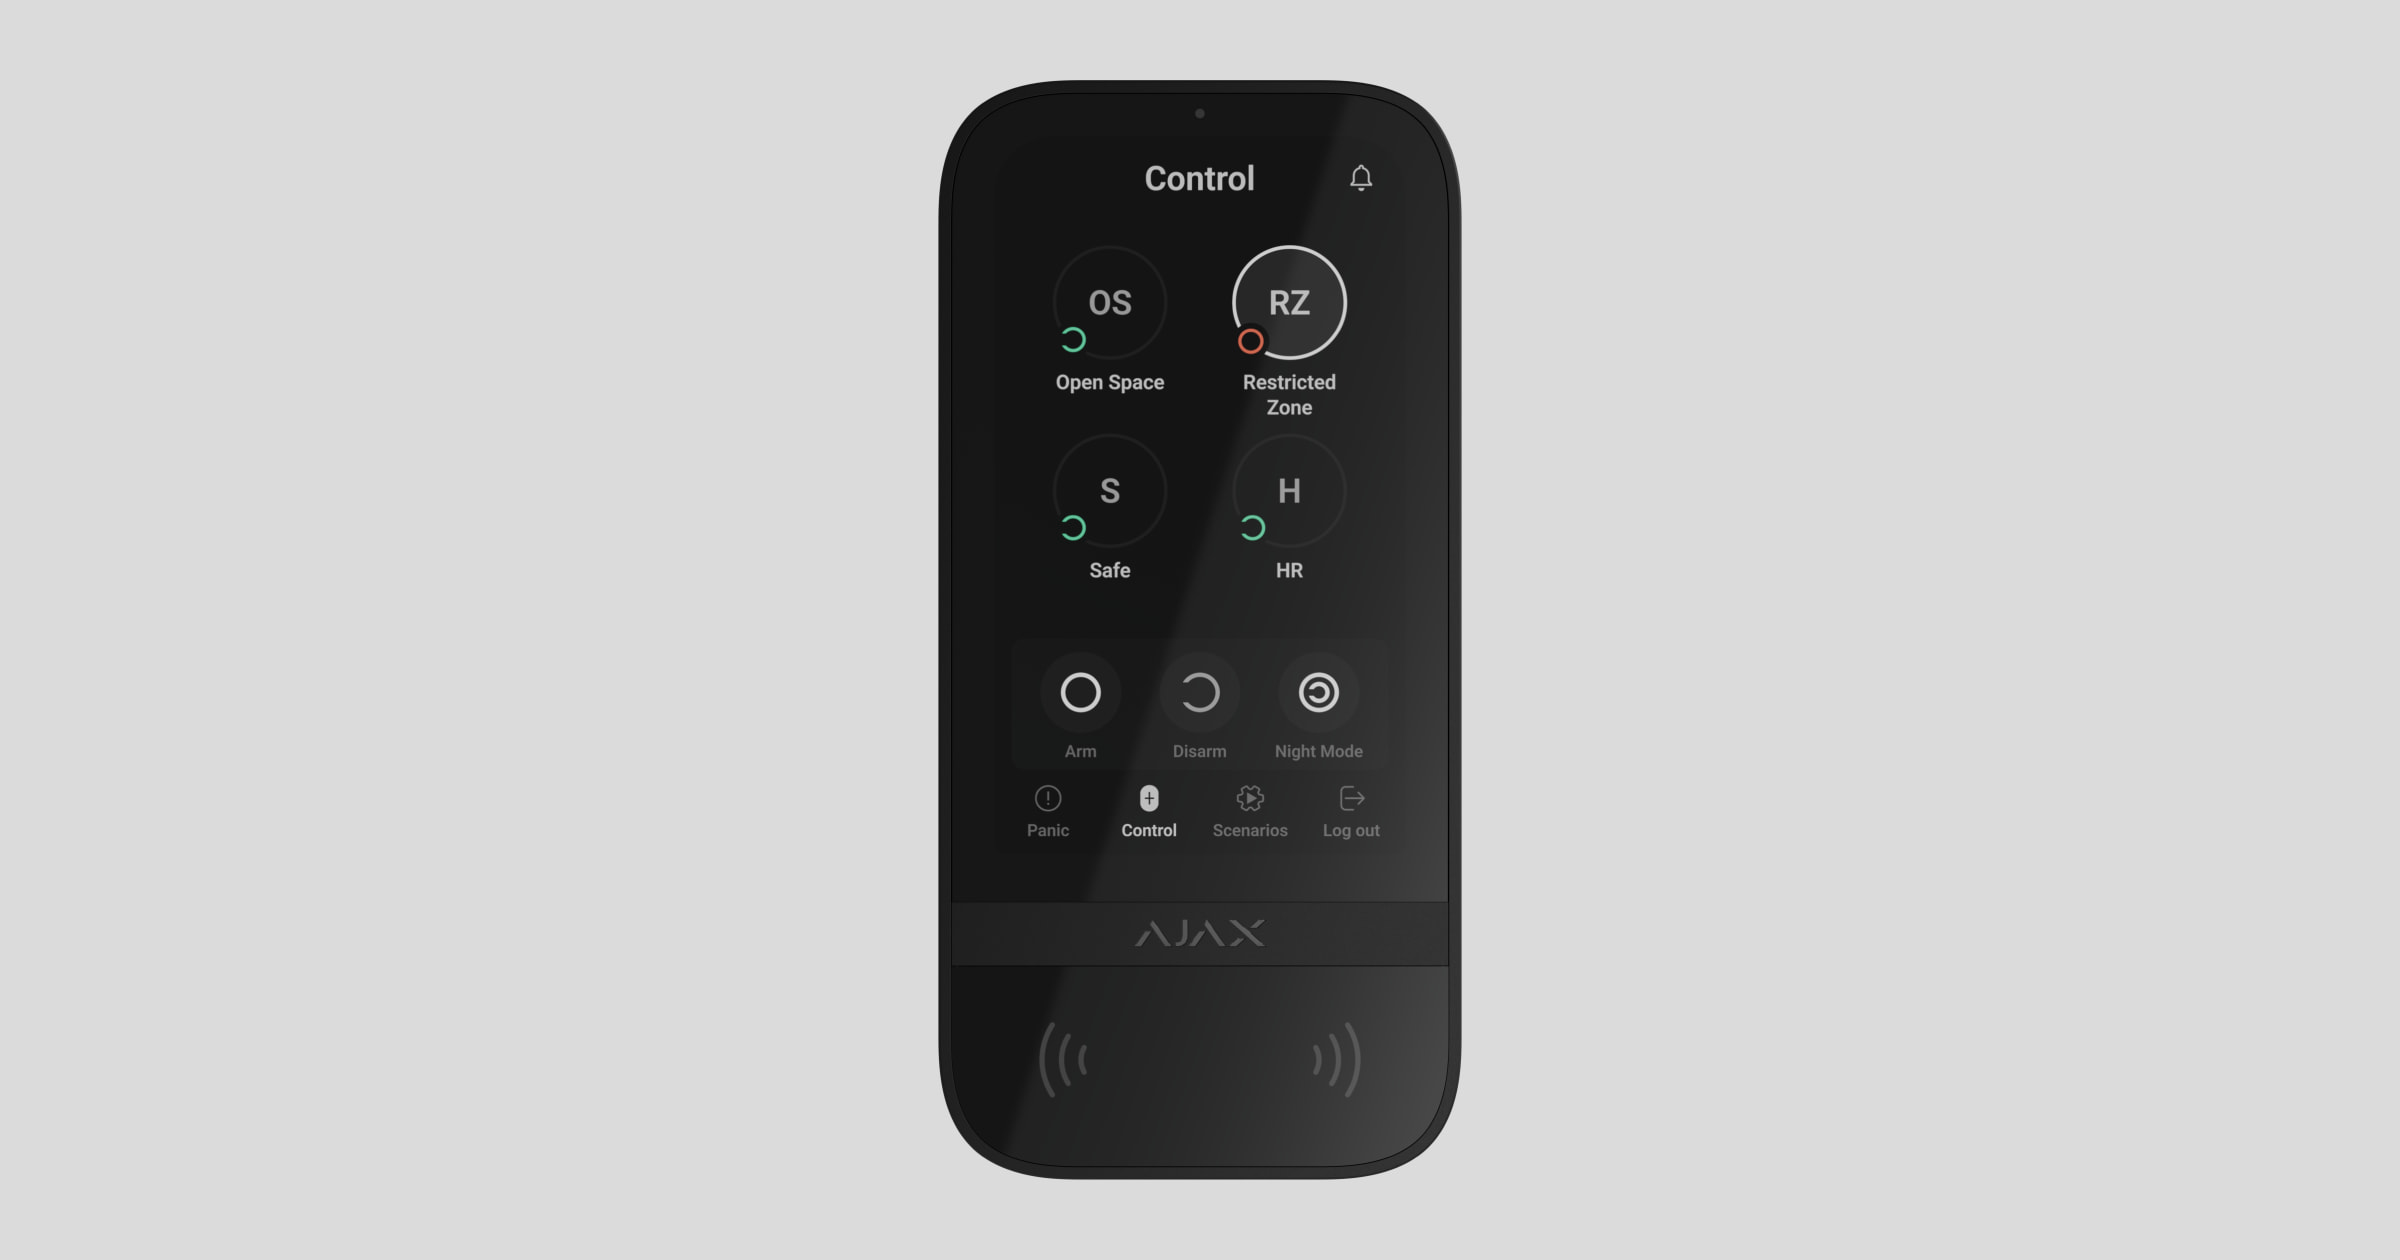
KeyPad TouchScreen can arm and disarm the entire facility or specific groups, and activate Night Mode. Use the Control ![]() tab to change the security mode. You can control the security using KeyPad TouchScreen through:
tab to change the security mode. You can control the security using KeyPad TouchScreen through:
- Smartphones. With the installed Ajax Security System app and Bluetooth Low Energy (BLE) support. Smartphones can be used instead of Tag or Pass for user authorization. BLE is a low-power consumption radio protocol. The keypad supports Android and iOS smartphones with BLE version 4.2 and later.
- Cards or key fobs. To quickly and securely identify users, KeyPad TouchScreen uses the DESFire® technology. DESFire® is based on the ISO 14443 international standard and combines 128-bit encryption and copy protection.
- Codes. KeyPad TouchScreen supports general, personal codes, and codes for unregistered users.
Access codes
- Keypad code is a general code set up for the keypad. When used, all events are sent to Ajax apps on behalf of the keypad.
- User code is a personal code set up for users connected to the hub. When used, all events are sent to Ajax apps on behalf of the user.
- Keypad access code is a code set up for a person who is not registered in the system. When used, events are sent to Ajax apps with a name associated with this code.
- RRU code is an access code for the rapid response units (RRU) activated after the alarm and valid for a specified period. When the code is activated and used, events are delivered to Ajax apps with a title associated with this code.
The number of personal, keypad access, and RRU codes depends on the hub model.
Access rights and codes can be adjusted in Ajax apps. If the code is compromised, it can be changed remotely, so there is no need to call an installer to the facility. If a user loses their Pass, Tag, or smartphone, an admin or a PRO with system configuration rights can instantly block the device in the app. Meanwhile, a user can use a personal code to control the system.
Security control of the groups
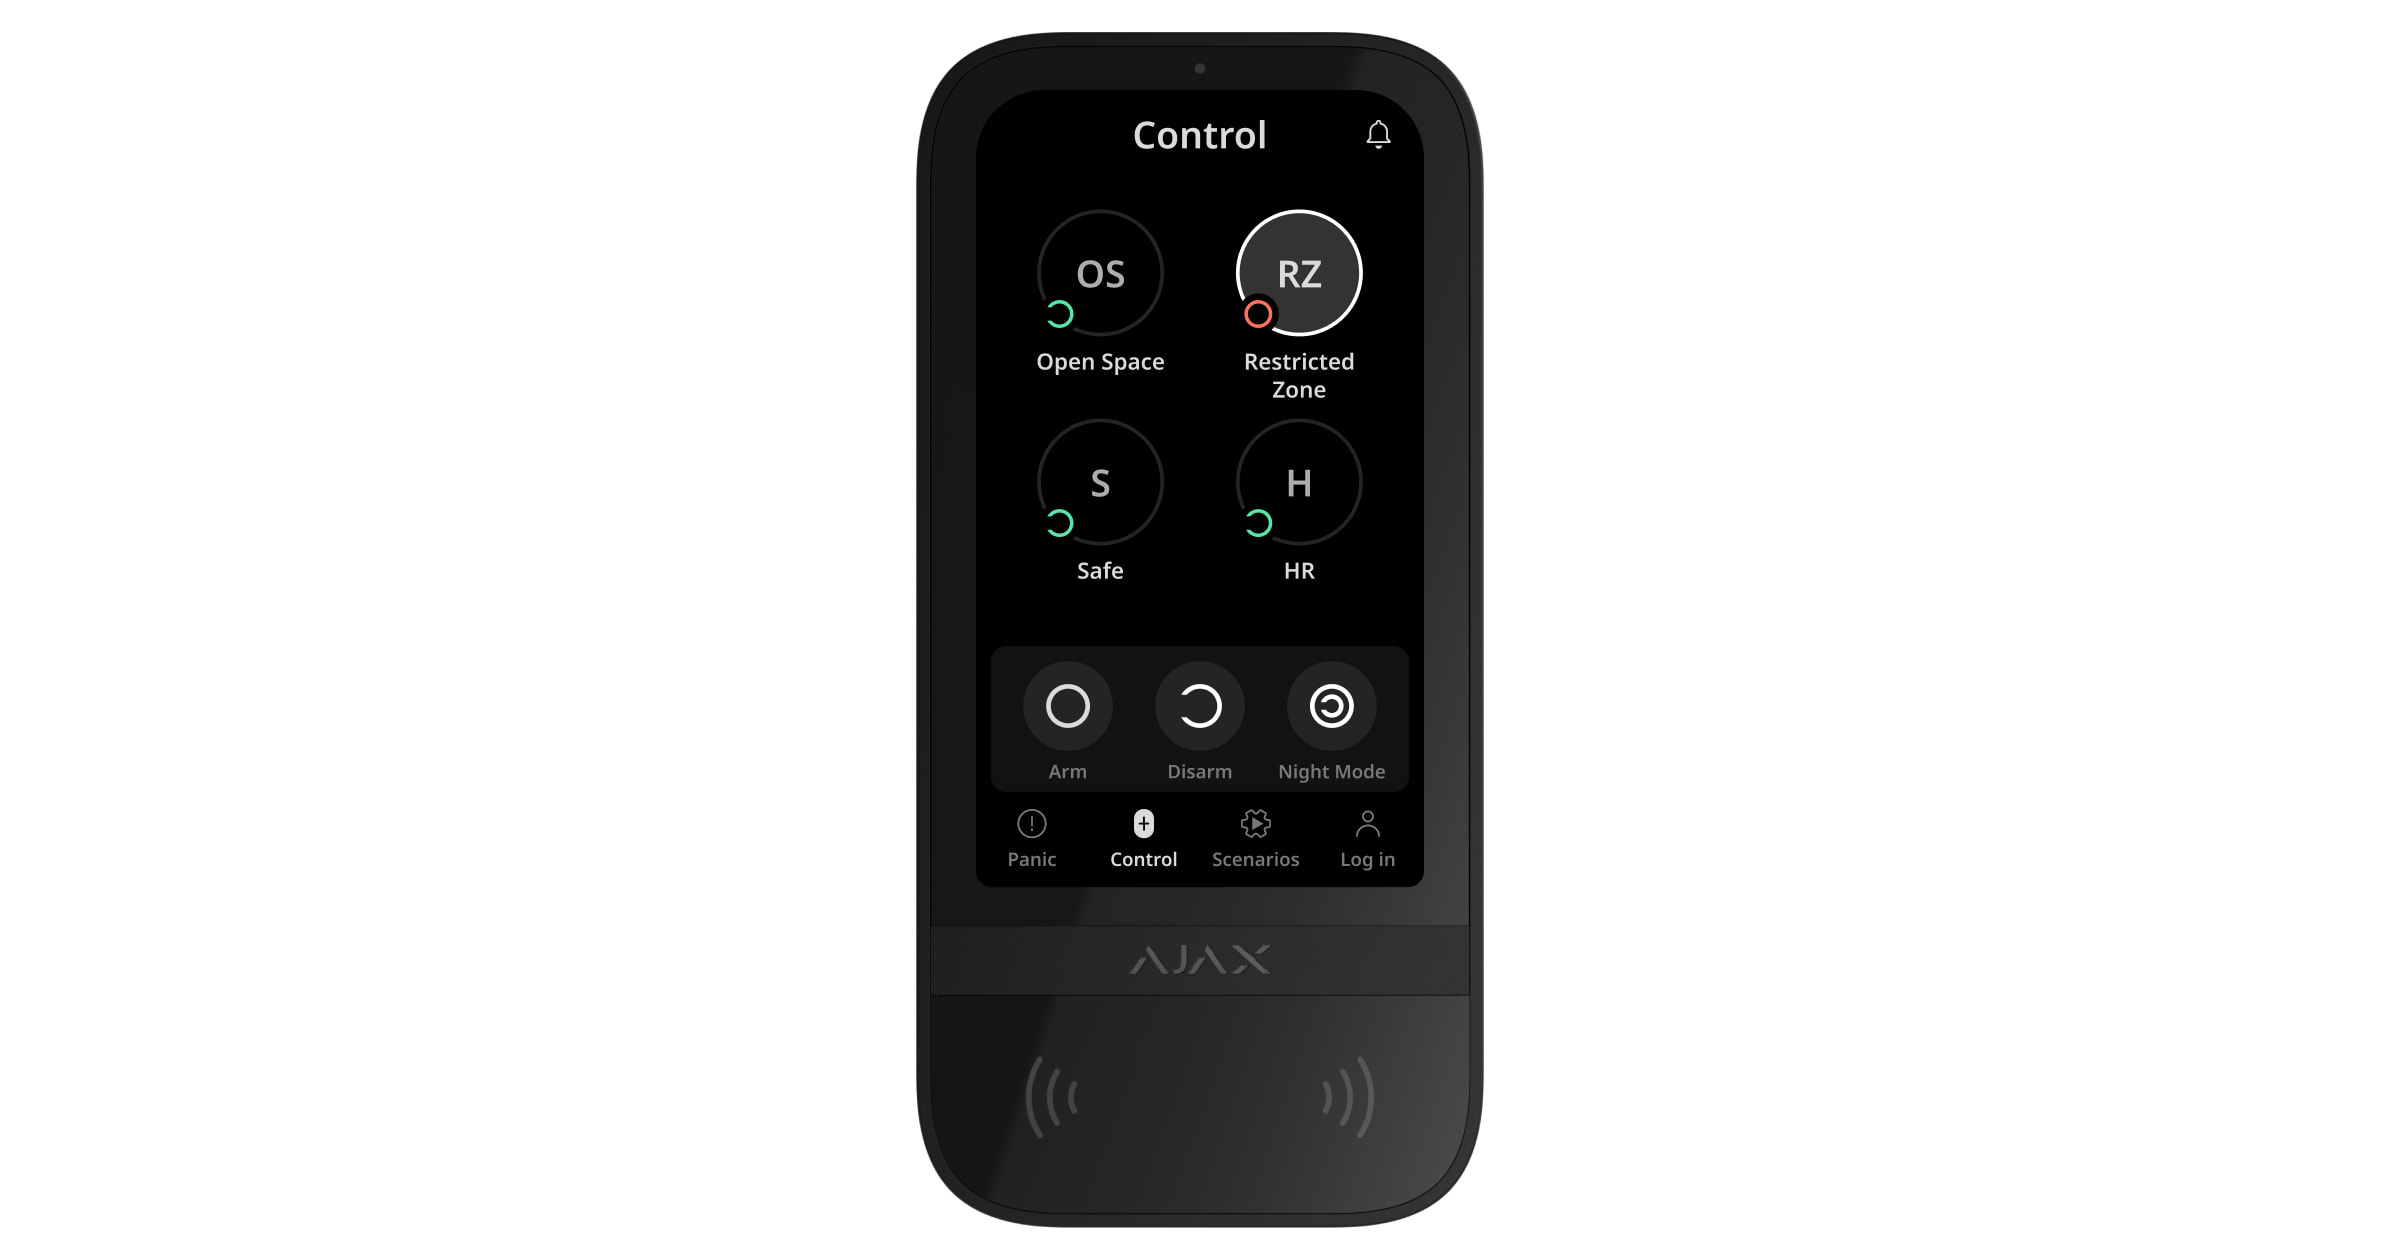
KeyPad TouchScreen allows controlling the groups’ security (if Group Mode is enabled). You can also adjust the keypad settings to determine which groups will be shared (keypad groups). By default, all groups are visible on the keypad display in the Control ![]() tab. You can learn more about group security management in this section.
tab. You can learn more about group security management in this section.
If the Followed group feature is configured for groups, their security state can automatically change depending on their settings and initiators’ states.
.
Emergency buttons
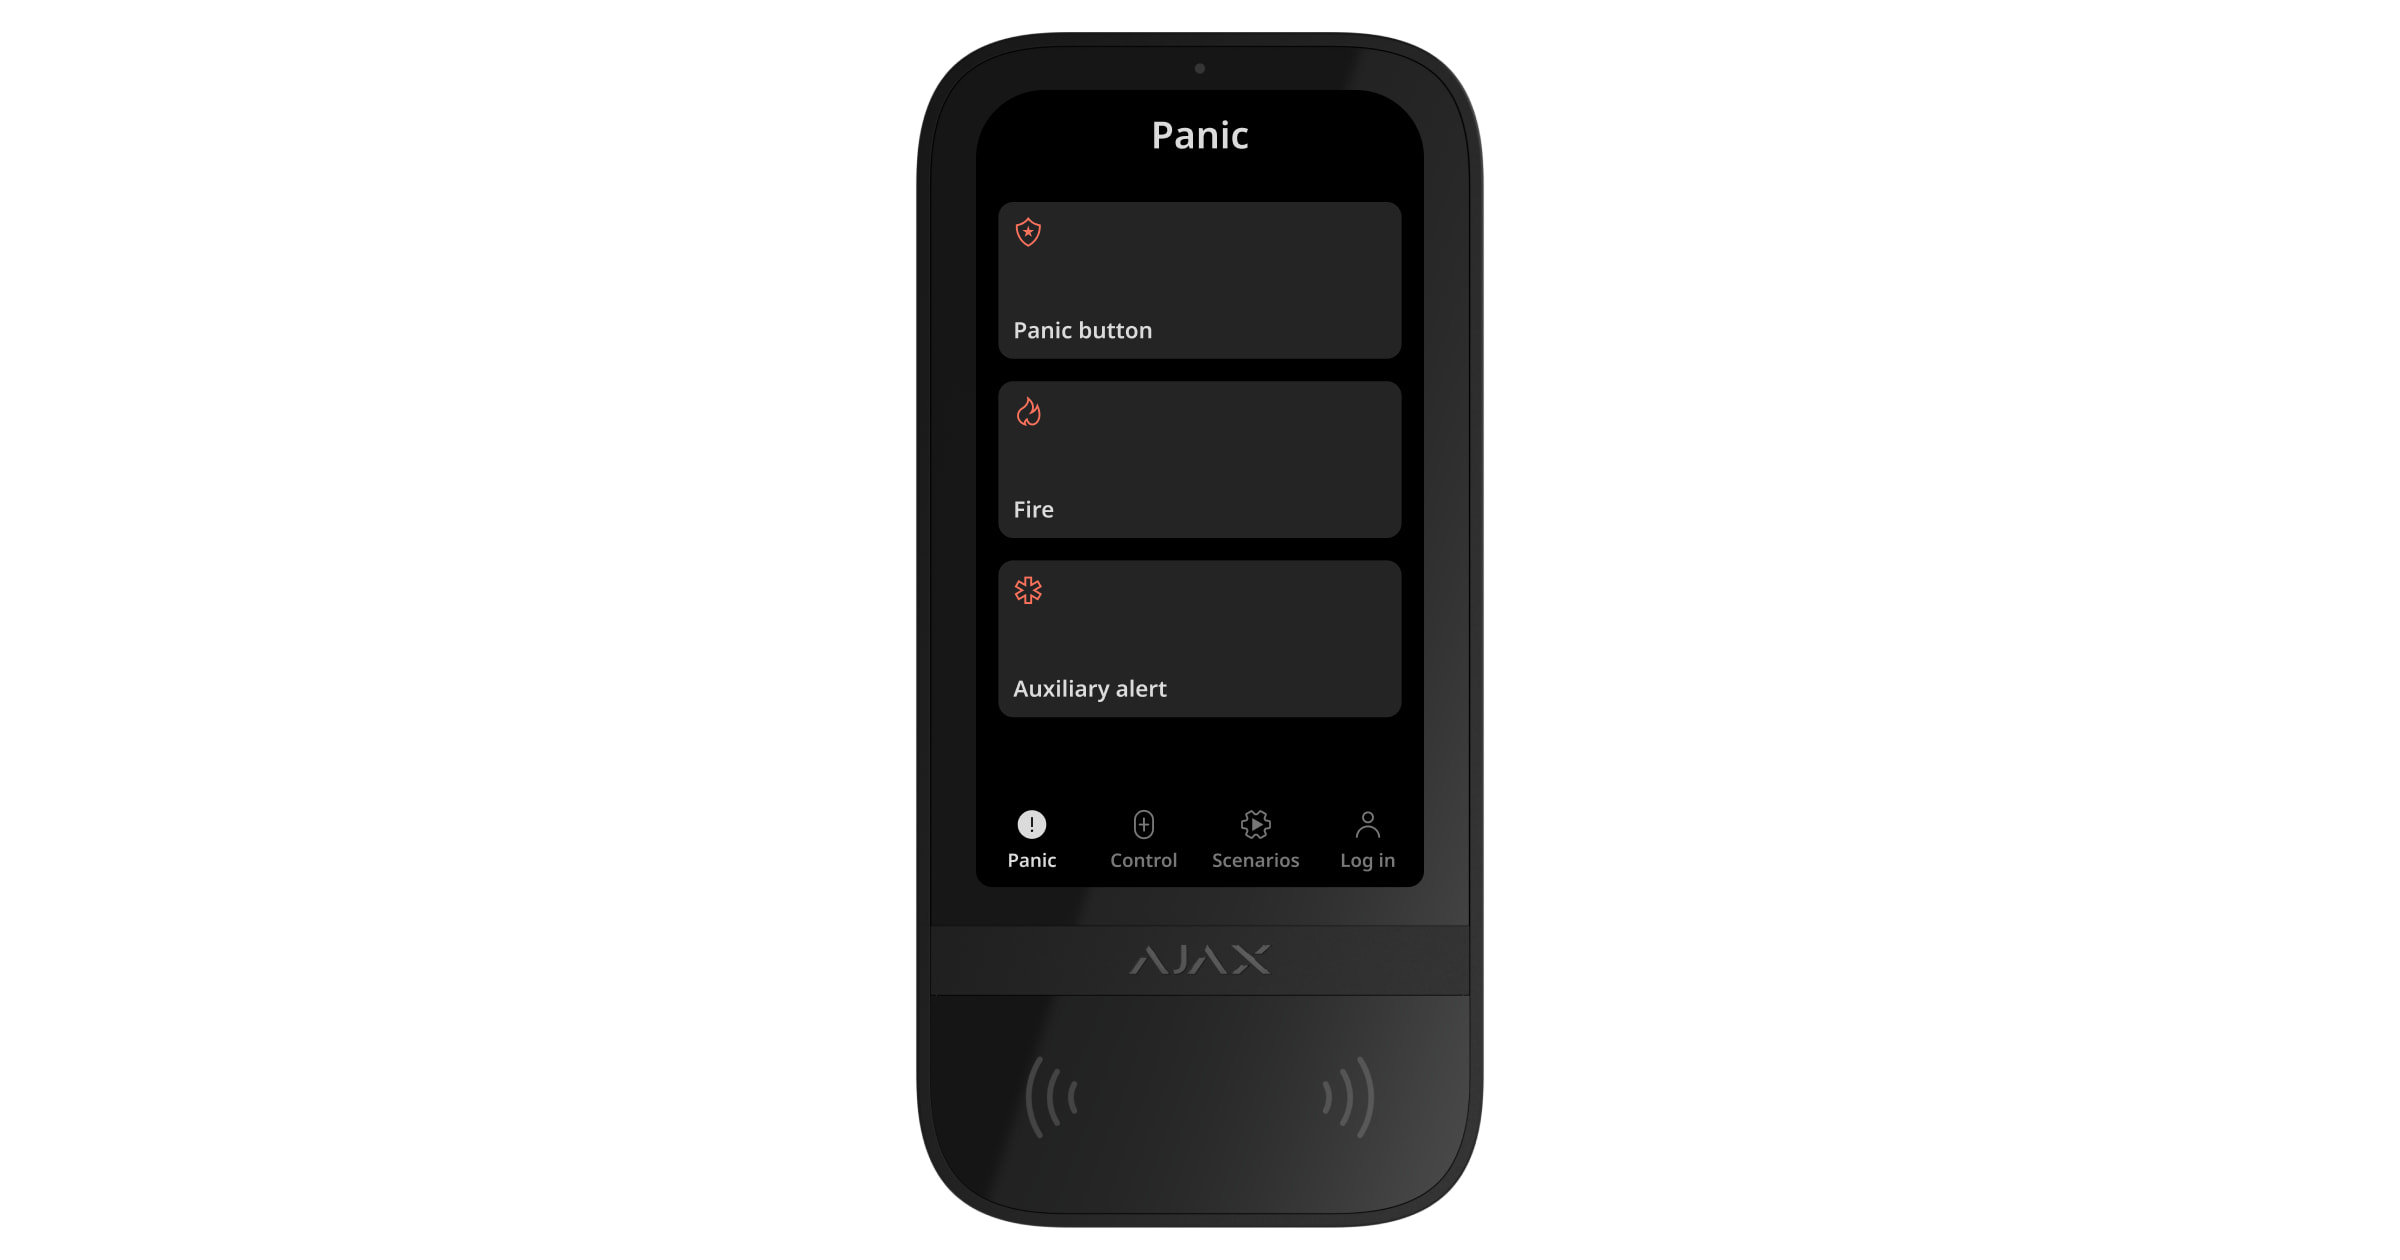
For emergencies, the keypad features the Panic ![]() tab with three buttons:
tab with three buttons:
- Panic button;
- Fire;
- Auxiliary alert.
In Ajax app, an admin or a PRO with the rights to configure the system can select the number of buttons displayed in the Panic ![]() tab. There are two options available in the KeyPad TouchScreen settings: only Panic button (by default) or all three buttons. The text of notifications in apps and event codes transmitted to the Central Monitoring Station (CMS) depend on the selected button type.
tab. There are two options available in the KeyPad TouchScreen settings: only Panic button (by default) or all three buttons. The text of notifications in apps and event codes transmitted to the Central Monitoring Station (CMS) depend on the selected button type.
You can also activate accidental press protection. In this case, the user confirms alarm transmission by pressing the Send button on the keypad display. The confirmation screen appears after pressing any panic button.
Pressing emergency buttons can trigger Alarm scenarios in Ajax system.
Scenarios management
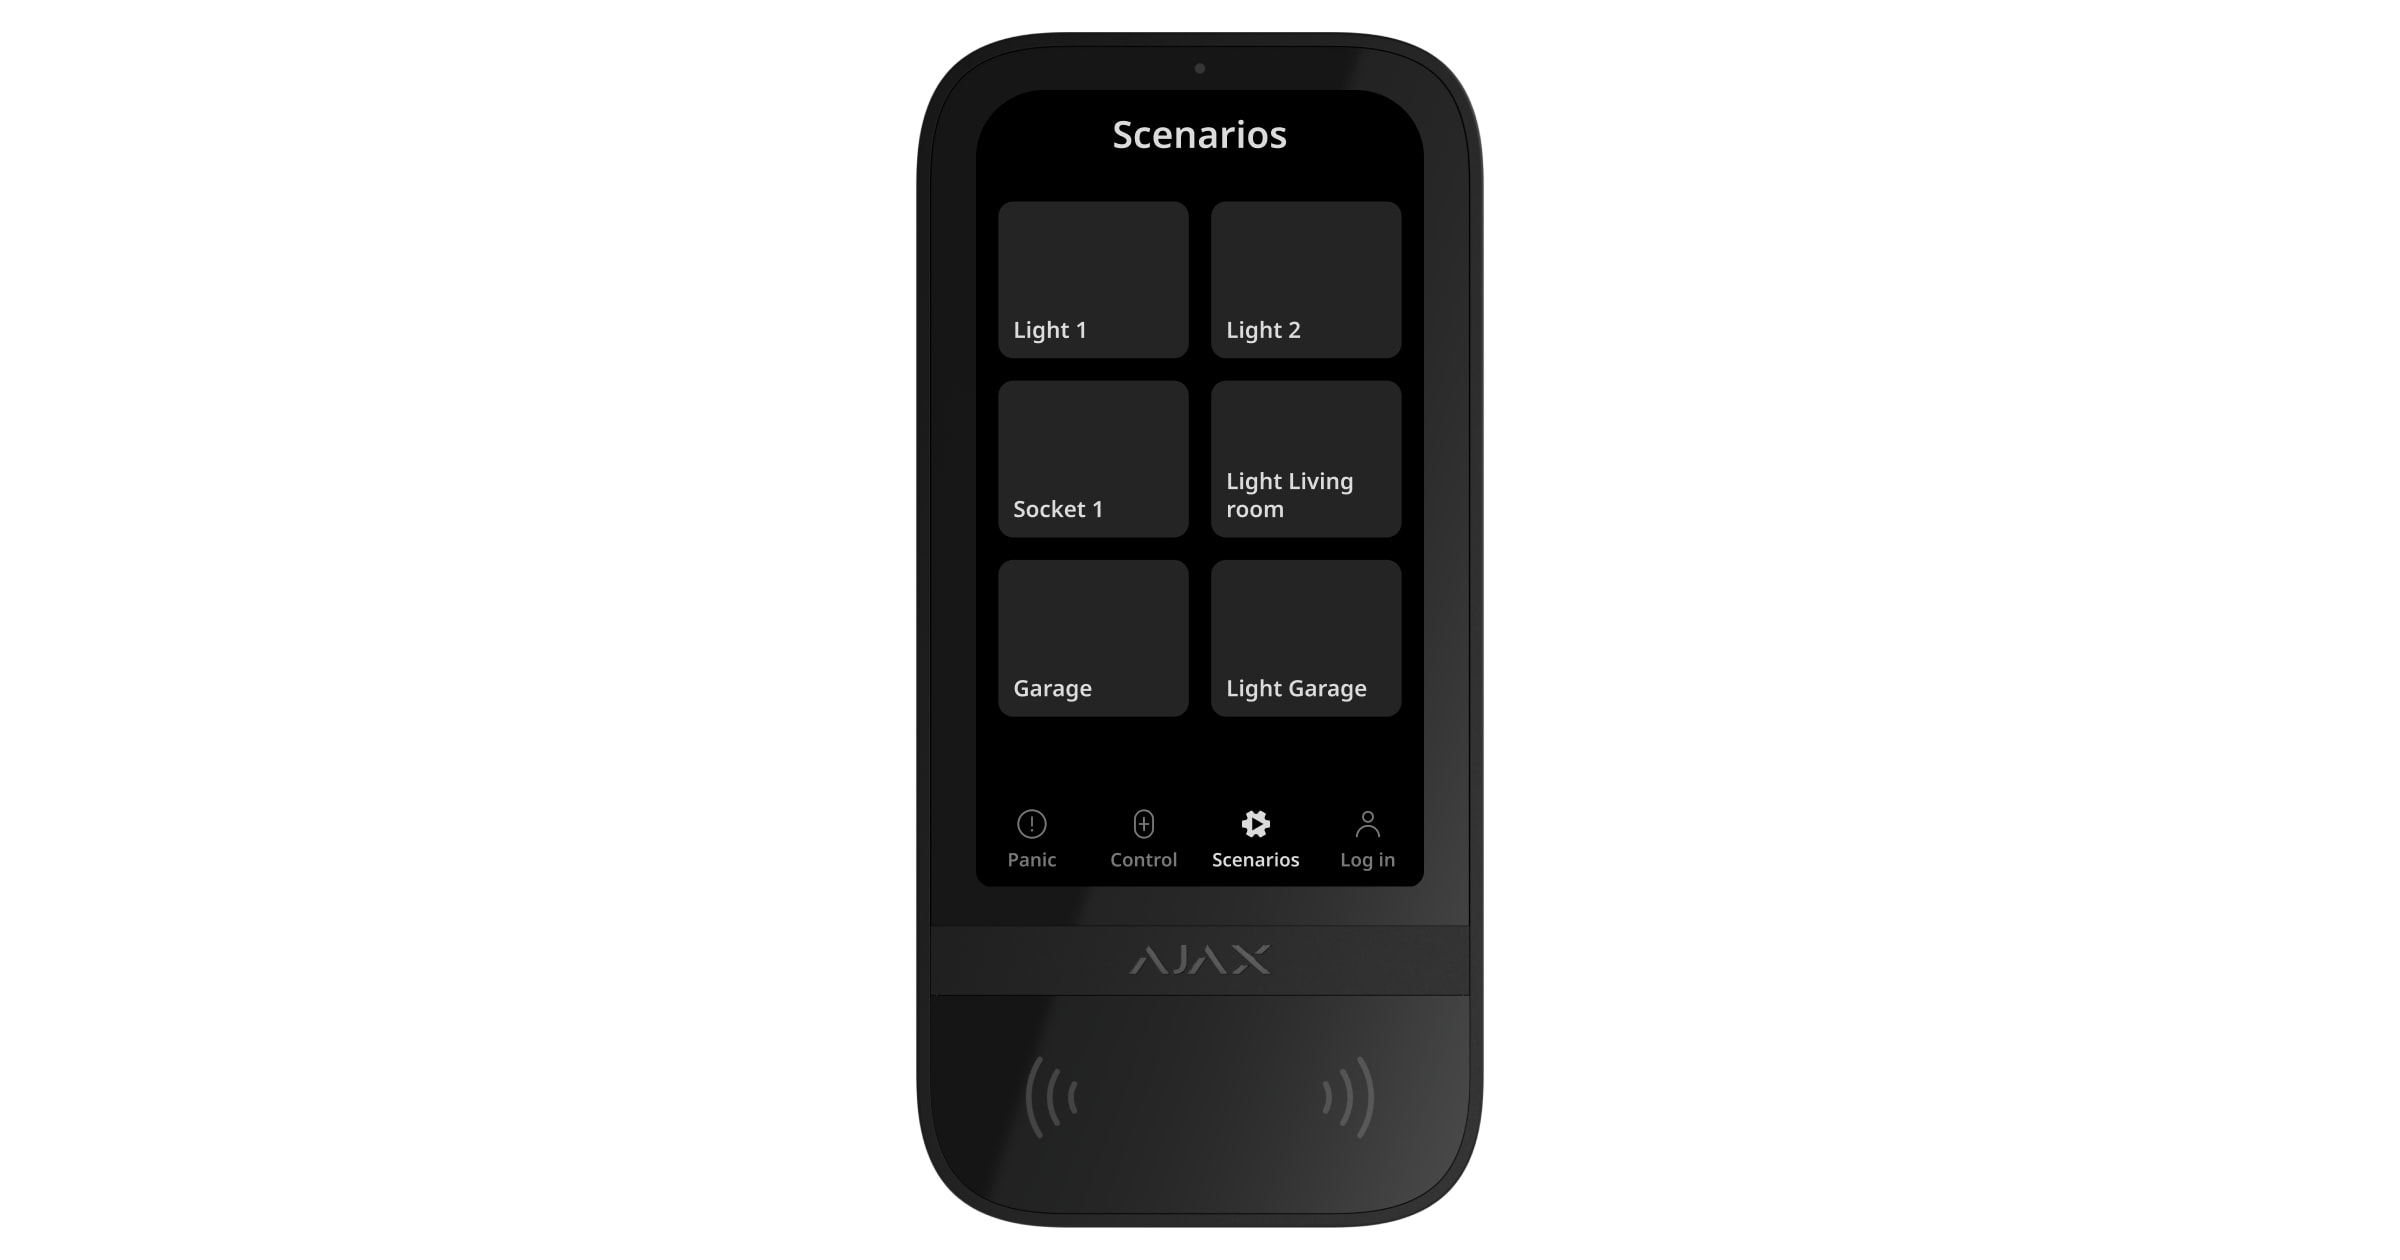
The separate keypad tab holds up to six buttons that control one automation device or a group of devices. Group scenarios provide more convenient control over multiple switches, relays, or sockets simultaneously.
Create automation scenarios in the keypad settings and manage them using KeyPad TouchScreen.
Starting with OS Malevich 2.38 after authorization on the keypad the system records which user initiated an automation scenario from the keypad. This information is displayed in the hub event feed.
Indication of malfunctions and security mode
KeyPad TouchScreen informs users about system malfunctions and security mode through:
- display;
- logo;
- sound indication.
Depending on the settings, the logo lights up red continuously or when the system or group is armed. KeyPad TouchScreen indication is shown on the display only when it is active. The built-in buzzer notifies about alarms, door openings, and entry/exit delays.
Acknowledgment of the latest events
This functionality is available for KeyPad TouchScreen Jeweller with firmware version 11.60.20.8, 12.60.20.4 or later added to a hub with OS Malevich 2.33 and later version.
KeyPad TouchScreen Jeweller displays up to 100 latest system events since the last check. Events are grouped and sorted by the date of their occurrence.
An event contains the following information:
- device name;
- action;
- room;
- actual time (HH:MM).
To enable the view of the latest events on the keypad:
- Open an Ajax app. Select a space with the added device.
- Go to the Devices
 tab.
tab. - Select KeyPad TouchScreen Jeweller and go to its Settings by tapping on the gear icon
 .
. - Select the Keypad notification center section.
- Enable the Event acknowledgement section toggle.
- Tap Back to save the new settings.
To view the latest events on the keypad display:
- Go to the Control
 tab.
tab. - Tap the
 icon to view a list of the latest events. The icon will have a red badge in the upper right corner if there are new events.
 - Tap the Mark all as read button to clear the list of the latest events. Events will remain in the event feed in Ajax apps.
Marking all events as read clears the list of the latest events on the keypad currently in use. Other keypads added to the same hub will still display the latest events.
Fire alarm muting
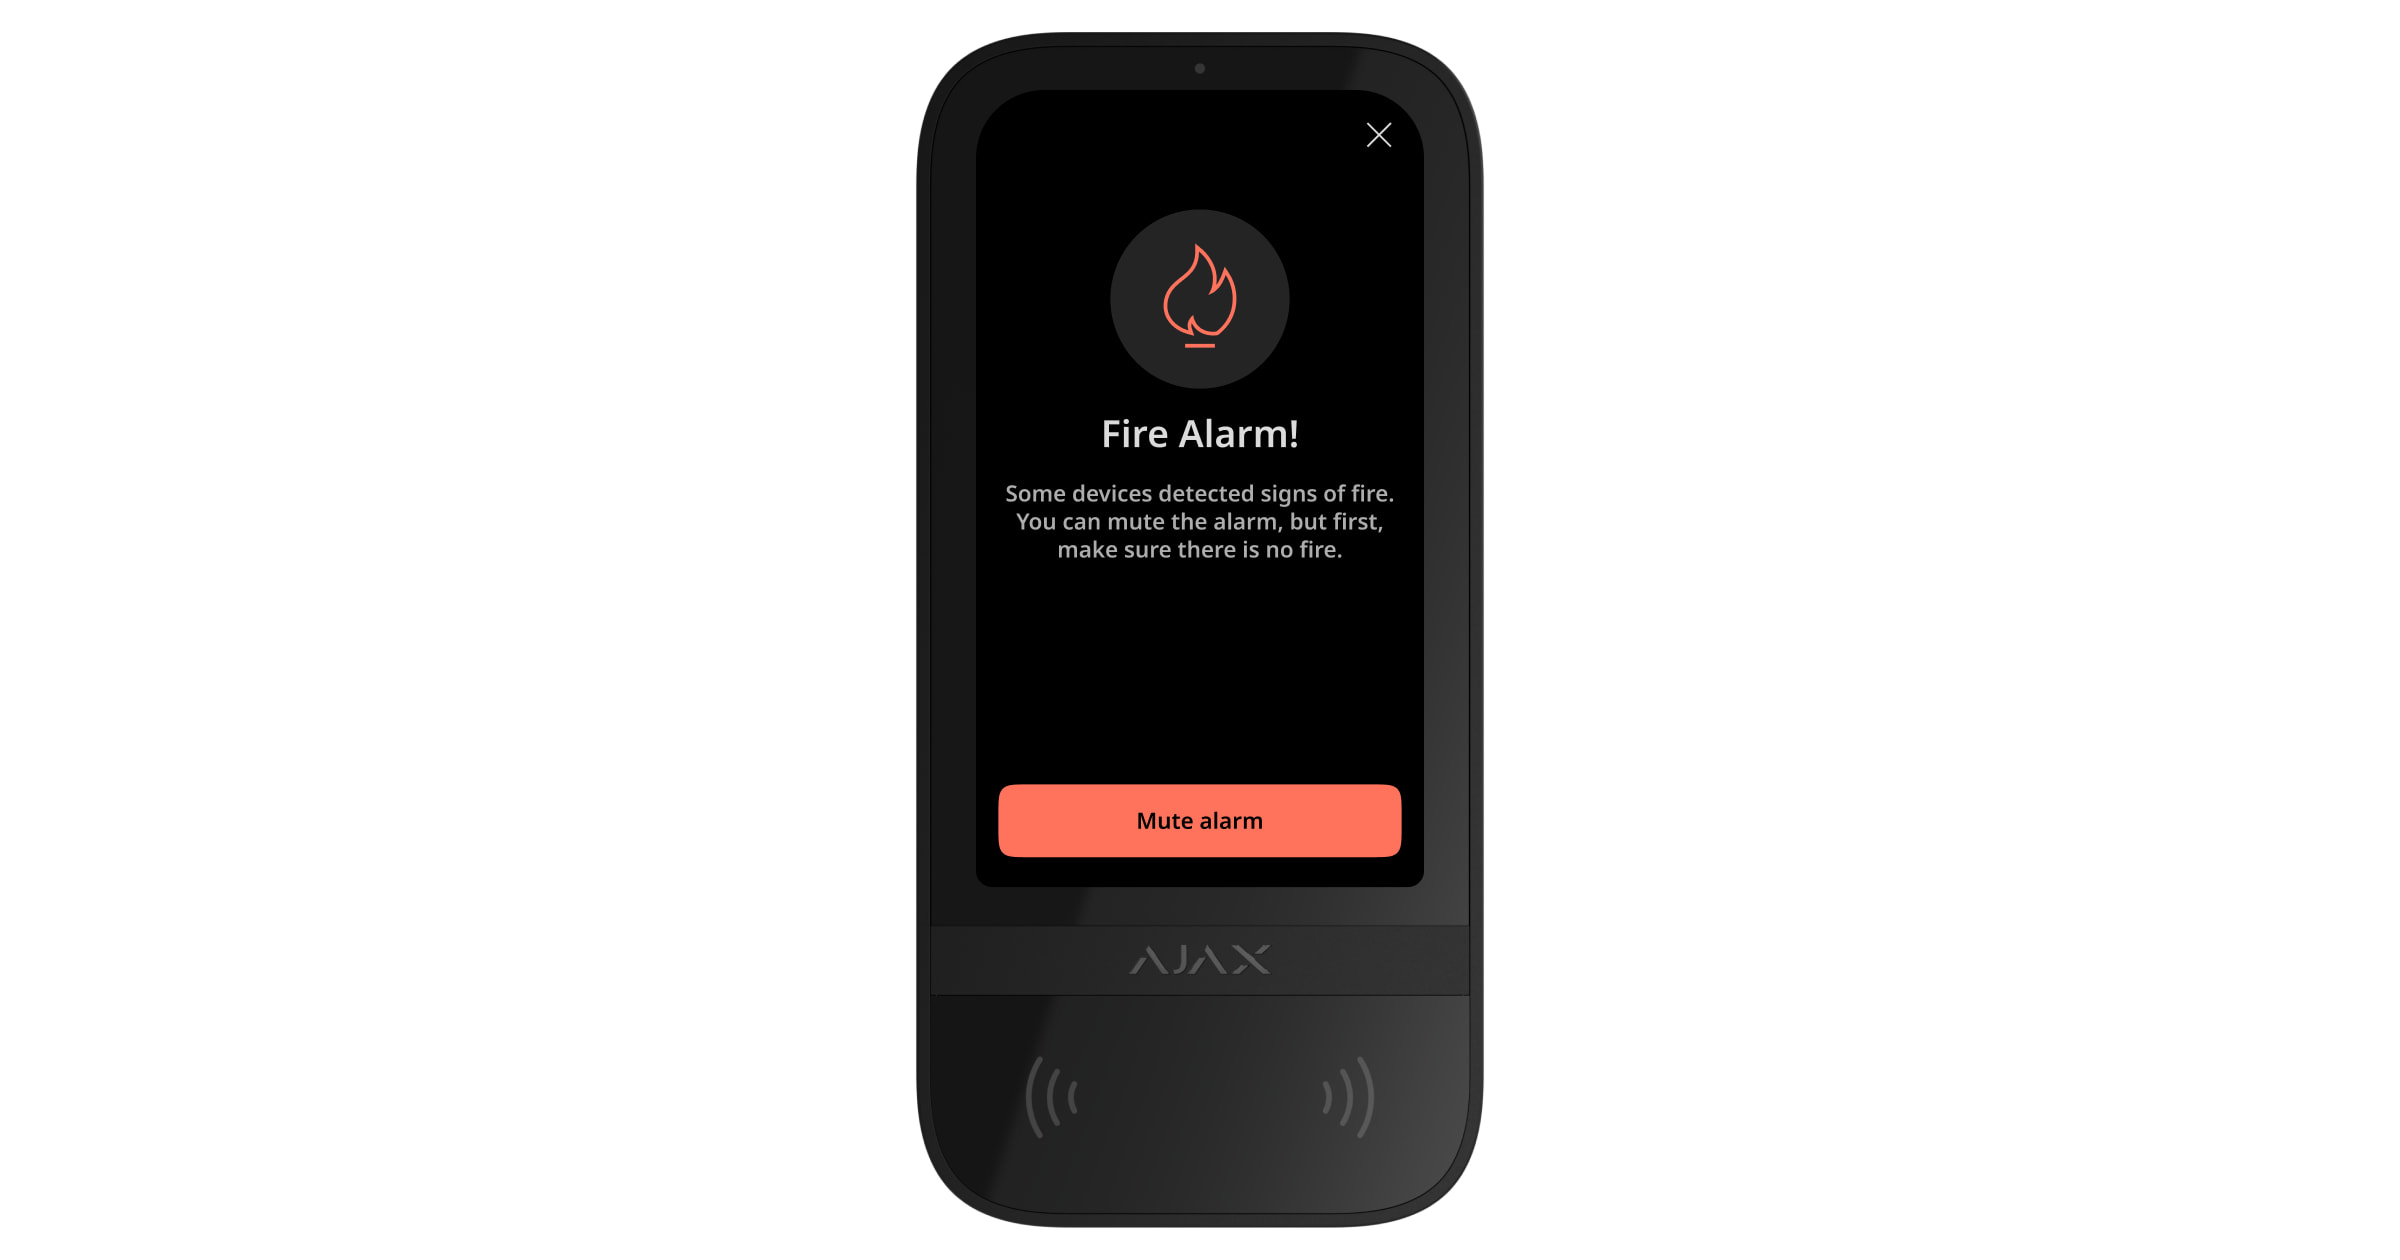
In case of a fire alarm in the system, you can mute it using KeyPad TouchScreen.
Pressing the Fire emergency button in the Panic tab doesn’t activate Interconnected Fire Detectors Alarm (if enabled). When sending an emergency signal from the keypad, an appropriate notification will be transmitted to the app and the CMS.
The screen with information about the fire alarm and the button to mute it will appear on all KeyPad TouchScreen with the Mute Fire Alarm feature enabled. If the mute button has already been pressed on the other keypad, a corresponding notification appears on the remaining KeyPad TouchScreen displays. Users can close the fire alarm muting screen and use other keypad features. To reopen the muting screen, press the icon ![]() on the KeyPad TouchScreen display.
on the KeyPad TouchScreen display.
If the fire alarm is triggered by ManualCallPoint Jeweller, CO or smoke level is critical, the alarm can’t be muted from the keypad.
These fire alarm types are available for KeyPad TouchScreen Jeweller with firmware version 11.60.10.19 or later.
To instantly display the fire alarm muting screen on the KeyPad TouchScreen, enable the Always Active Display toggle in the KeyPad settings. Also, connect the third-party power supply.
Otherwise, the muting screen will only be displayed when the keypad wakes up.
Duress code
KeyPad TouchScreen supports a duress code that allows you to simulate alarm deactivation. In this case, neither the Ajax app nor the sirens installed at the facility will reveal your actions. Still, the security company and other security system users will be alerted about the incident.
User pre-authorization
Pre-authorization feature is essential to prevent unauthorized access to the control panel and the current system state. The feature can be activated separately for the Control ![]() and Scenarios
and Scenarios ![]() tabs in the keypad settings.
tabs in the keypad settings.
The screen for entering the code is displayed on the tabs for which pre-authorization is activated. The user should authenticate first, either by entering a code or presenting a personal access device to the keypad. The exception is the Alarm ![]() tab, which allows unauthorized users to send an emergency signal.
tab, which allows unauthorized users to send an emergency signal.
Unauthorized Access Auto-Lock
If an incorrect code is entered or a non-verified access device is used three times in a row within 1 minute, the keypad will lock for the time specified in its settings. During this time, the hub will ignore all codes and access devices, while informing the security system users about attempted unauthorized access. KeyPad TouchScreen will turn off the reader and block access to all tabs. The keypad’s display will show an appropriate notification.
PRO or a user with system configuration rights can unlock the keypad through the app before the specified locking time expires.
Two-Stage Arming
KeyPad TouchScreen can participate in two-stage arming, but cannot be used as a second-stage device. The two-stage arming process using Tag, Pass, or smartphone is similar to using a personal or general code on the keypad.
Jeweller and Wings data transfer protocols
Jeweller and Wings are two-way wireless data transfer protocols that provide fast and reliable communication between the hub and devices. The keypad uses a Jeweller to transmit alarms and events, and Wings to update firmware, transmit the list of groups, rooms, and other additional information.
Sending events to the monitoring station
The Ajax system can transmit alarms to both PRO Desktop monitoring app and the central monitoring station (CMS) in the formats of SurGard (Contact ID), SIA (DC-09), ADEMCO 685, and other protocols.
KeyPad TouchScreen can transmit the following events:
- Entry of the duress code.
- Pressing the panic button. Each button has its own event code.
- Keypad lock due to an unauthorized access attempt.
- Tamper alarm/recovery.
- Loss/restoration of connection with the hub (or radio signal range extender).
- Arming/disarming the system.
- Unsuccessful attempt to arm the security system (with the system integrity check enabled).
- Permanent deactivation/activation of the keypad.
- One-time deactivation/activation of the keypad.
When an alarm is received, the operator at the security company’s monitoring station knows what happened and precisely where to dispatch a rapid response team. The addressability of Ajax devices allows sending events to PRO Desktop or the CMS, including the device type, its name, security group, and virtual room. Note that the list of transmitted parameters may vary depending on the CMS type and the selected communication protocol for the monitoring station.
The ID and device number can be found in its states in the Ajax app.
Adding to the system
KeyPad TouchScreen is incompatible with Hub Jeweller, Hub Plus Jeweller, and third-party security control panels.
To connect KeyPad TouchScreen to the hub, the keypad must be located at the same secured facility as the system (within the range of the hubs radio network). For the keypad to work via the ReX 2 radio signal range extender, you must first add the keypad to the hub and then connect it to ReX 2 in the range extender’s settings.
The hub and the device must operate at the same radio frequency; otherwise, they are incompatible. The radio-frequency range of the device might vary based on the region. We recommend purchasing and using Ajax devices in the same region. You can verify the range of operating radio frequencies with the technical support service.
Before adding a device
- Install the Ajax app.
- Log in to your account or create a new one.
- Select a space or create a new one.

The space functionality is available for apps of the following and later versions:
- Ajax Security System 3.0 for iOS;
- Ajax Security System 3.0 for Android;
- Ajax PRO: Tool for Engineers 2.0 for iOS;
- Ajax PRO: Tool for Engineers 2.0 for Android;
- Ajax PRO Desktop 4.0 for macOS;
- Ajax PRO Desktop 4.0 for Windows.
- Add at least one virtual room.
- Add a compatible hub to the space. Ensure the hub is switched on and has internet access via Ethernet, Wi-Fi, and/or mobile network.
- Ensure the space is disarmed, and the hub is not starting an update by checking statuses in the Ajax app.
Only a PRO or a space admin with the rights to configure the system can add a device to the hub.
Connecting to the hub
- Open the Ajax app. Select the hub where you want to add the keypad.
- Go to the Devices tab. Click Add Device.
- Name the device, scan or manually input the QR code (placed on the keypad and the package box), and select a room and a group (if Group Mode is enabled).
- Press Add.
- Switch on the keypad by holding the power button for 3 seconds.
If the connection fails, turn off the keypad and try again in 5 seconds. Note that if the maximum number of devices has already been added to the hub (depending on the hub model), you will be notified when you try to add a new one.
KeyPad TouchScreen features a built-in buzzer that can notify of alarms and specific system states, but it is not a siren. You can add up to 10 such devices (including sirens) to the hub. Consider this when planning your security system.
Once connected to the hub, the keypad will appear in the list of hub devices in the Ajax app. The update frequency for device statuses in the list depends on the Jeweller or Jeweller/Fibra settings, with the default value of 36 seconds.
KeyPad TouchScreen works with only one hub. When connected to a new hub, it stops sending events to the old one. Adding the keypad to a new hub does not automatically remove it from the device list of the old hub. This must be done through the Ajax app.
Malfunctions
When a KeyPad TouchScreen malfunction is detected, the Ajax app displays a malfunction counter on the device icon. All malfunctions are indicated in the keypad’s states. Fields with malfunctions will be highlighted in red.
A malfunction is displayed if:
- the keypad enclosure is open (tamper is triggered);
- there is no connection with the hub or radio signal range extender via Jeweller;
- there is no connection with the hub or radio signal range extender via Wings;
- the keypad’s battery is low;
- the keypad’s temperature is outside acceptable limits.
Icons
Icons in the app
The icons in the app display some keypad states. To access them:
- Sign in to the Ajax app.
- Select the hub.
- Go to the Devices tab.
| Icon | Meaning |
|
Jeweller signal strength. Displays the signal strength between the hub and the device. The recommended value is 2–3 bars. |
|
| The keypad battery level is OK. | |
|
The keypad has a malfunction. The list of malfunctions is available in the keypad states. |
|
| Displayed when the keypad Bluetooth module is enabled. | |
| Bluetooth setup is not complete. The description is available in the keypad states. | |
|
A firmware update is available. Go to the keypad states or settings to find the description and launch an update. The icon is not available in the Ajax Security System app with version 3.0 and later for iOS and Android. To update the firmware, connect the external power supply to KeyPad TouchScreen. |
|
| Displayed when the keypad is operating via a radio signal range extender. | |
| Pass/Tag reading is enabled in KeyPad TouchScreen settings. | |
| Chime on opening is enabled in KeyPad TouchScreen settings. | |
|
The device is in the signal attenuation test mode. |
|
|
Device is permanently deactivated. |
|
|
Tamper alarm notifications are permanently deactivated. |
|
|
Device is deactivated until the first disarming of the system. |
|
|
Tamper alarm notifications are deactivated until the first disarming of the system. |
|
| The device has lost connection with the hub or the hub has lost connection with the Ajax Cloud server. | |
|
The device has not been transferred to the new hub. |
Icons on the display
Icons appear on top of the display and inform about specific system states or events.
| Icon | Meaning |
|
System restoration is required after an alarm. The user can either send a request or restore the system depending on their account type. To do so, click the icon and select the required button on the screen. |
|
|
Mute fire alarm. It appears after closing the fire alarm muting screen. Users can click the icon anytime and mute the fire alarm, including the interconnected fire alarm. If the fire alarm is triggered by ManualCallPoint Jeweller, the CO level or smoke level is critical, the alarm can’t be muted from the keypad. These fire alarm types are available for KeyPad TouchScreen Jeweller with firmware version 11.60.10.19 or later. |
|
|
Chime on opening is disabled. Click the icon to enable. Appears on the display when the required settings are adjusted. |
|
|
Chime on opening is enabled. Click the icon to disable. Appears on the display when the required settings are adjusted. |
States
The states provide information about the device and its operating parameters. The states of KeyPad TouchScreen can be found in the Ajax apps:
- Go to the Devices tab.
- Select KeyPad TouchScreen from the list.
| Parameter | Value |
| Data import | Displays the error when transferring data to the new hub:
|
| Malfunction |
Clicking on The field is displayed only if a malfunction is detected. |
| New firmware version available |
Clicking on The field is displayed if a new firmware version is available. The state is not displayed in the Ajax Security System app with version 3.0 and later for iOS and Android. To update the firmware, connect an external power supply to KeyPad TouchScreen. |
| Warning |
Clicking on |
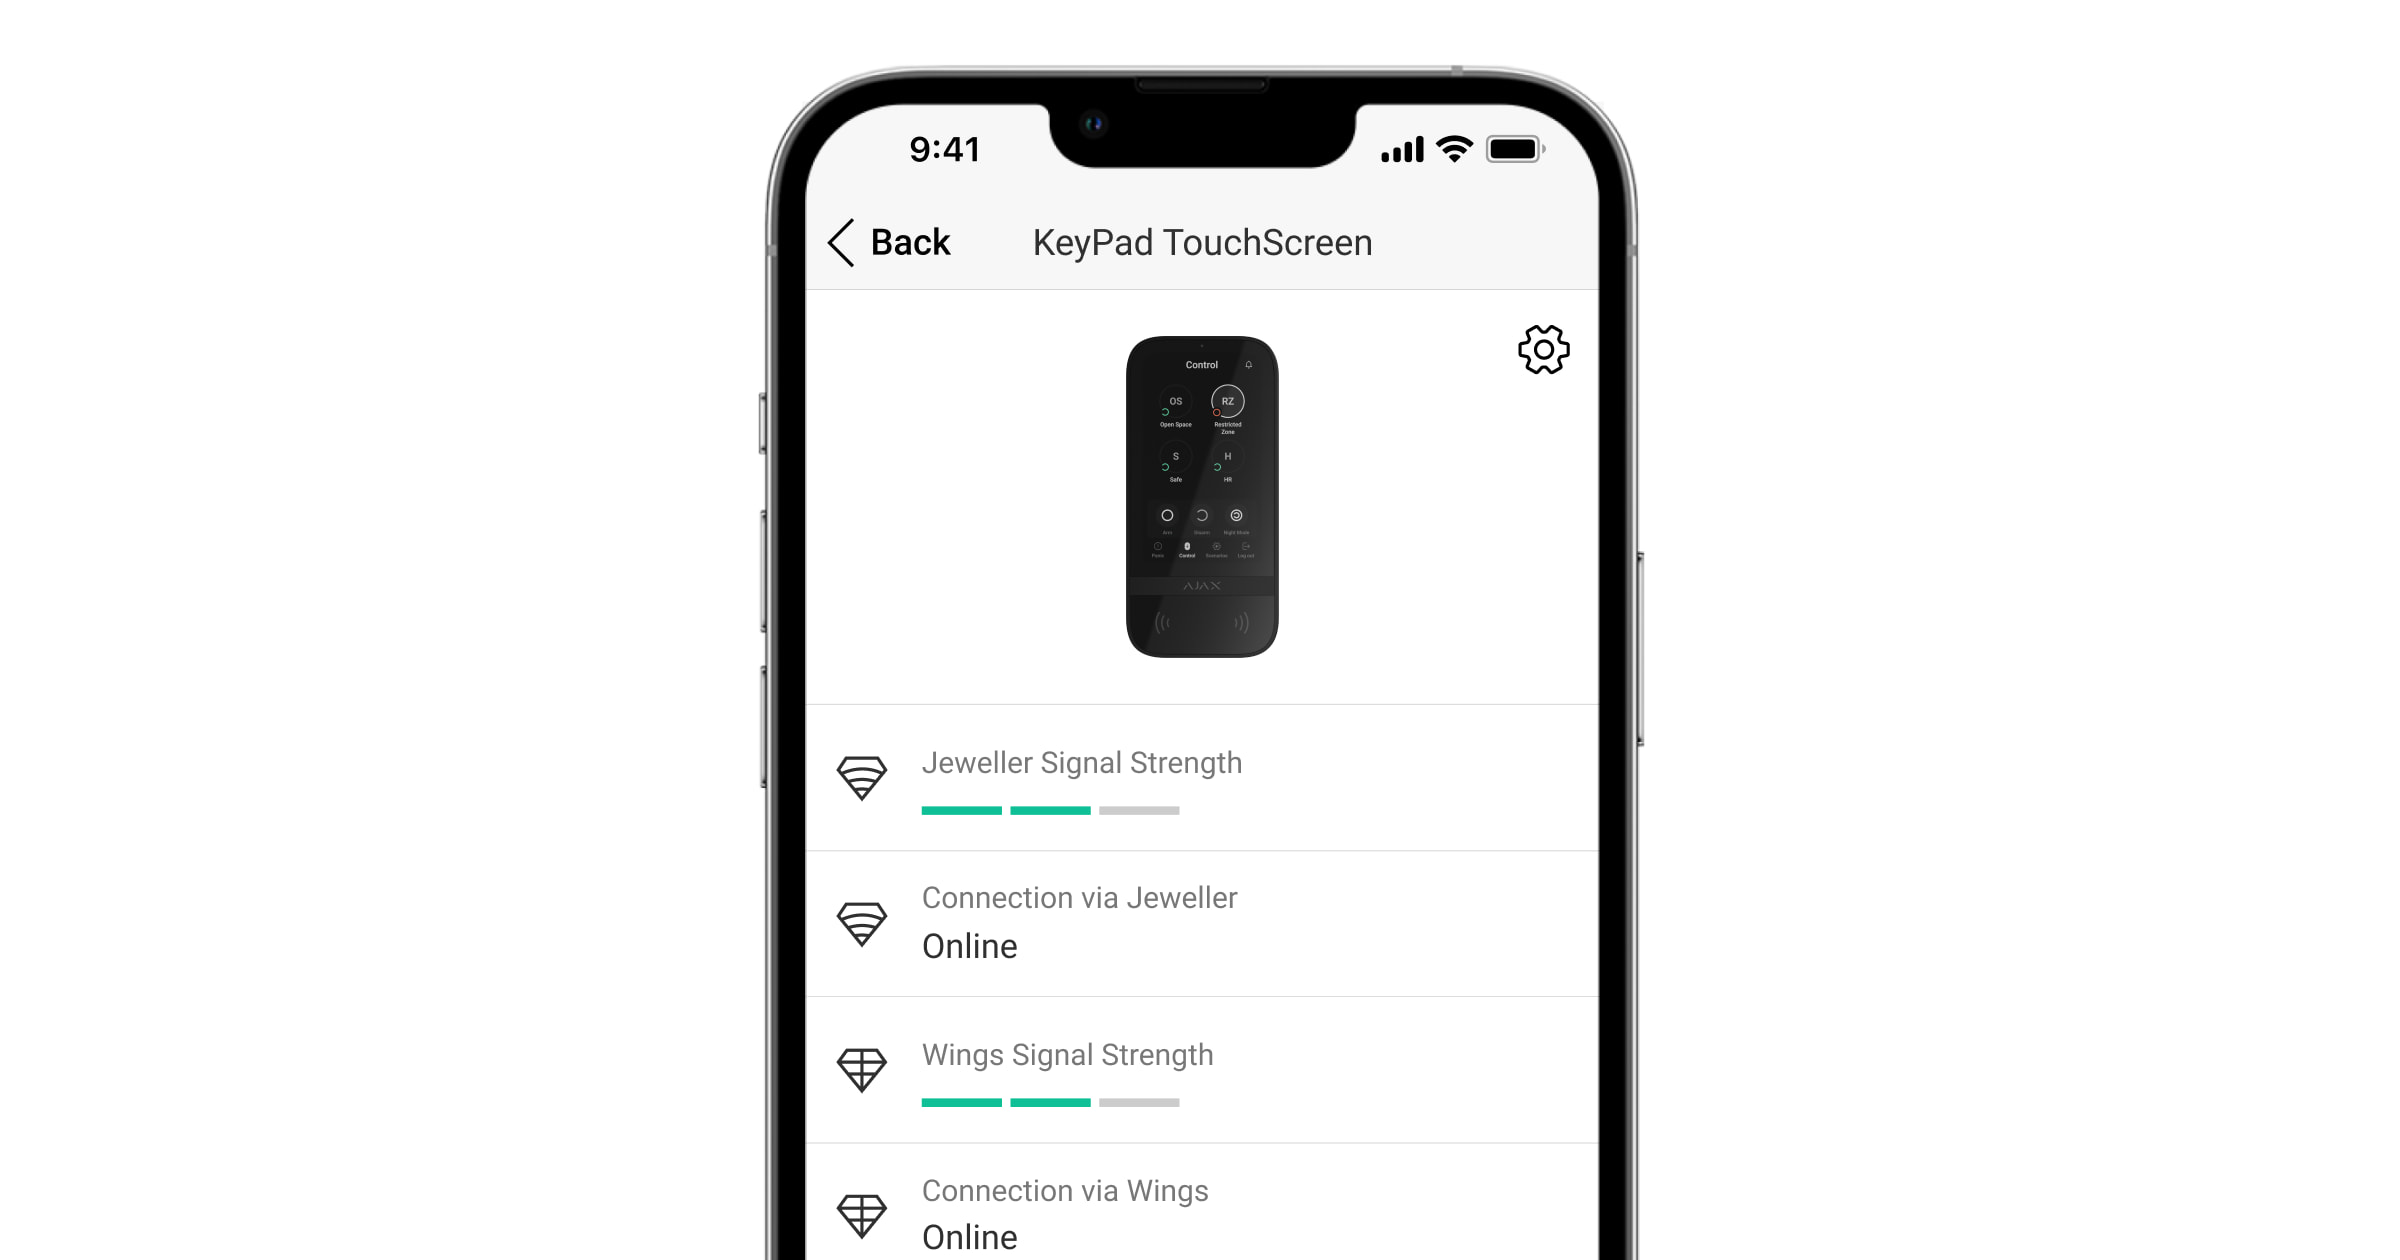
| Jeweller Signal Strength |
Signal strength between the hub or range extender and the device on the Jeweller channel. The recommended value is 2–3 bars. Jeweller is a protocol for transmitting KeyPad TouchScreen events and alarms. |
| Connection via Jeweller | Connection status on the Jeweller channel between the device and the hub (or the range extender):
|
| Wings Signal Strength |
Signal strength between the hub or the range extender and the device on the Wings channel. The recommended value is 2–3 bars. Wings is a protocol for updating a firmware and transmitting the list of the groups, rooms and other additional information. |
| Connection via Wings | Connection status on the Wings channel between the hub or the range extender and the device:
|
| Transmitter power |
Displays the selected power of the transmitter. The parameter appears when the Max or Attenuation option is selected in the Signal attenuation test menu. |
| Battery Charge | The battery charge level of the device:
When the batteries are low, the Ajax apps and the security company will receive appropriate notifications. After sending a low battery notification, the keypad can work for up to 2 weeks. |
| Lid | The status of the keypad tamper that responds to detachment or opening of the device enclosure:
|
| External Power | Keypad external power supply connection status:
|
| Always Active Display | Displayed when the Always Active Display toggle is enabled in the keypad settings and external power supply is connected. |
| Alarms Sound Indication | Shows the status of the Activate keypad buzzer if an alarm in the system is detected setting. |
| Alarm duration |
Duration of sound signal in case of alarm. Sets in increments of 3 seconds. Displayed when the Activate keypad buzzer if alarm in the system is detected toggle is enabled. |
| Pass/Tag Reading | Displays if the reader for cards and key fobs is enabled. |
| Bluetooth | Displays if the keypad’s Bluetooth module is enabled for controlling the system with a smartphone. |
| Easy armed mode change | Shows the configuration for the Easy armed mode change feature:
|
| Beeps Settings | |
| Arming/Disarming | When enabled, the keypad notifies about arming and disarming with a short beep. |
| Night Mode Activation/Deactivation | When enabled, the keypad notifies you when the Night Mode is switched on/off by making a short beep. |
| Entry Delays | When enabled, the keypad beeps about delays when entering. |
| Exit Delays | When enabled, the keypad beeps about delays when leaving. |
| Entry Delays in Night Mode | When enabled, the keypad beeps about delays when entering in Night Mode. |
| Exit Delays in Night Mode | When enabled, the keypad beeps about delays when leaving in Night Mode. |
| Chime on opening |
When enabled, a siren notifies about opening detectors triggering in the Disarmed system mode. |
| Beep Volume | Displayed if the notifications about arming/disarming, entry/exit delay, and opening are activated. Shows the buzzer volume level for notifications. |
| Permanent Deactivation | Shows the status of the keypad permanent deactivation setting:
|
| One-Time Deactivation | Shows the status of the keypad one-time deactivation setting:
|
| Firmware | Keypad firmware version. |
| ID | Keypad ID. Also available on the QR code on the device enclosure and its package box. |
| Device No. | Number of the device loop (zone). |
Settings
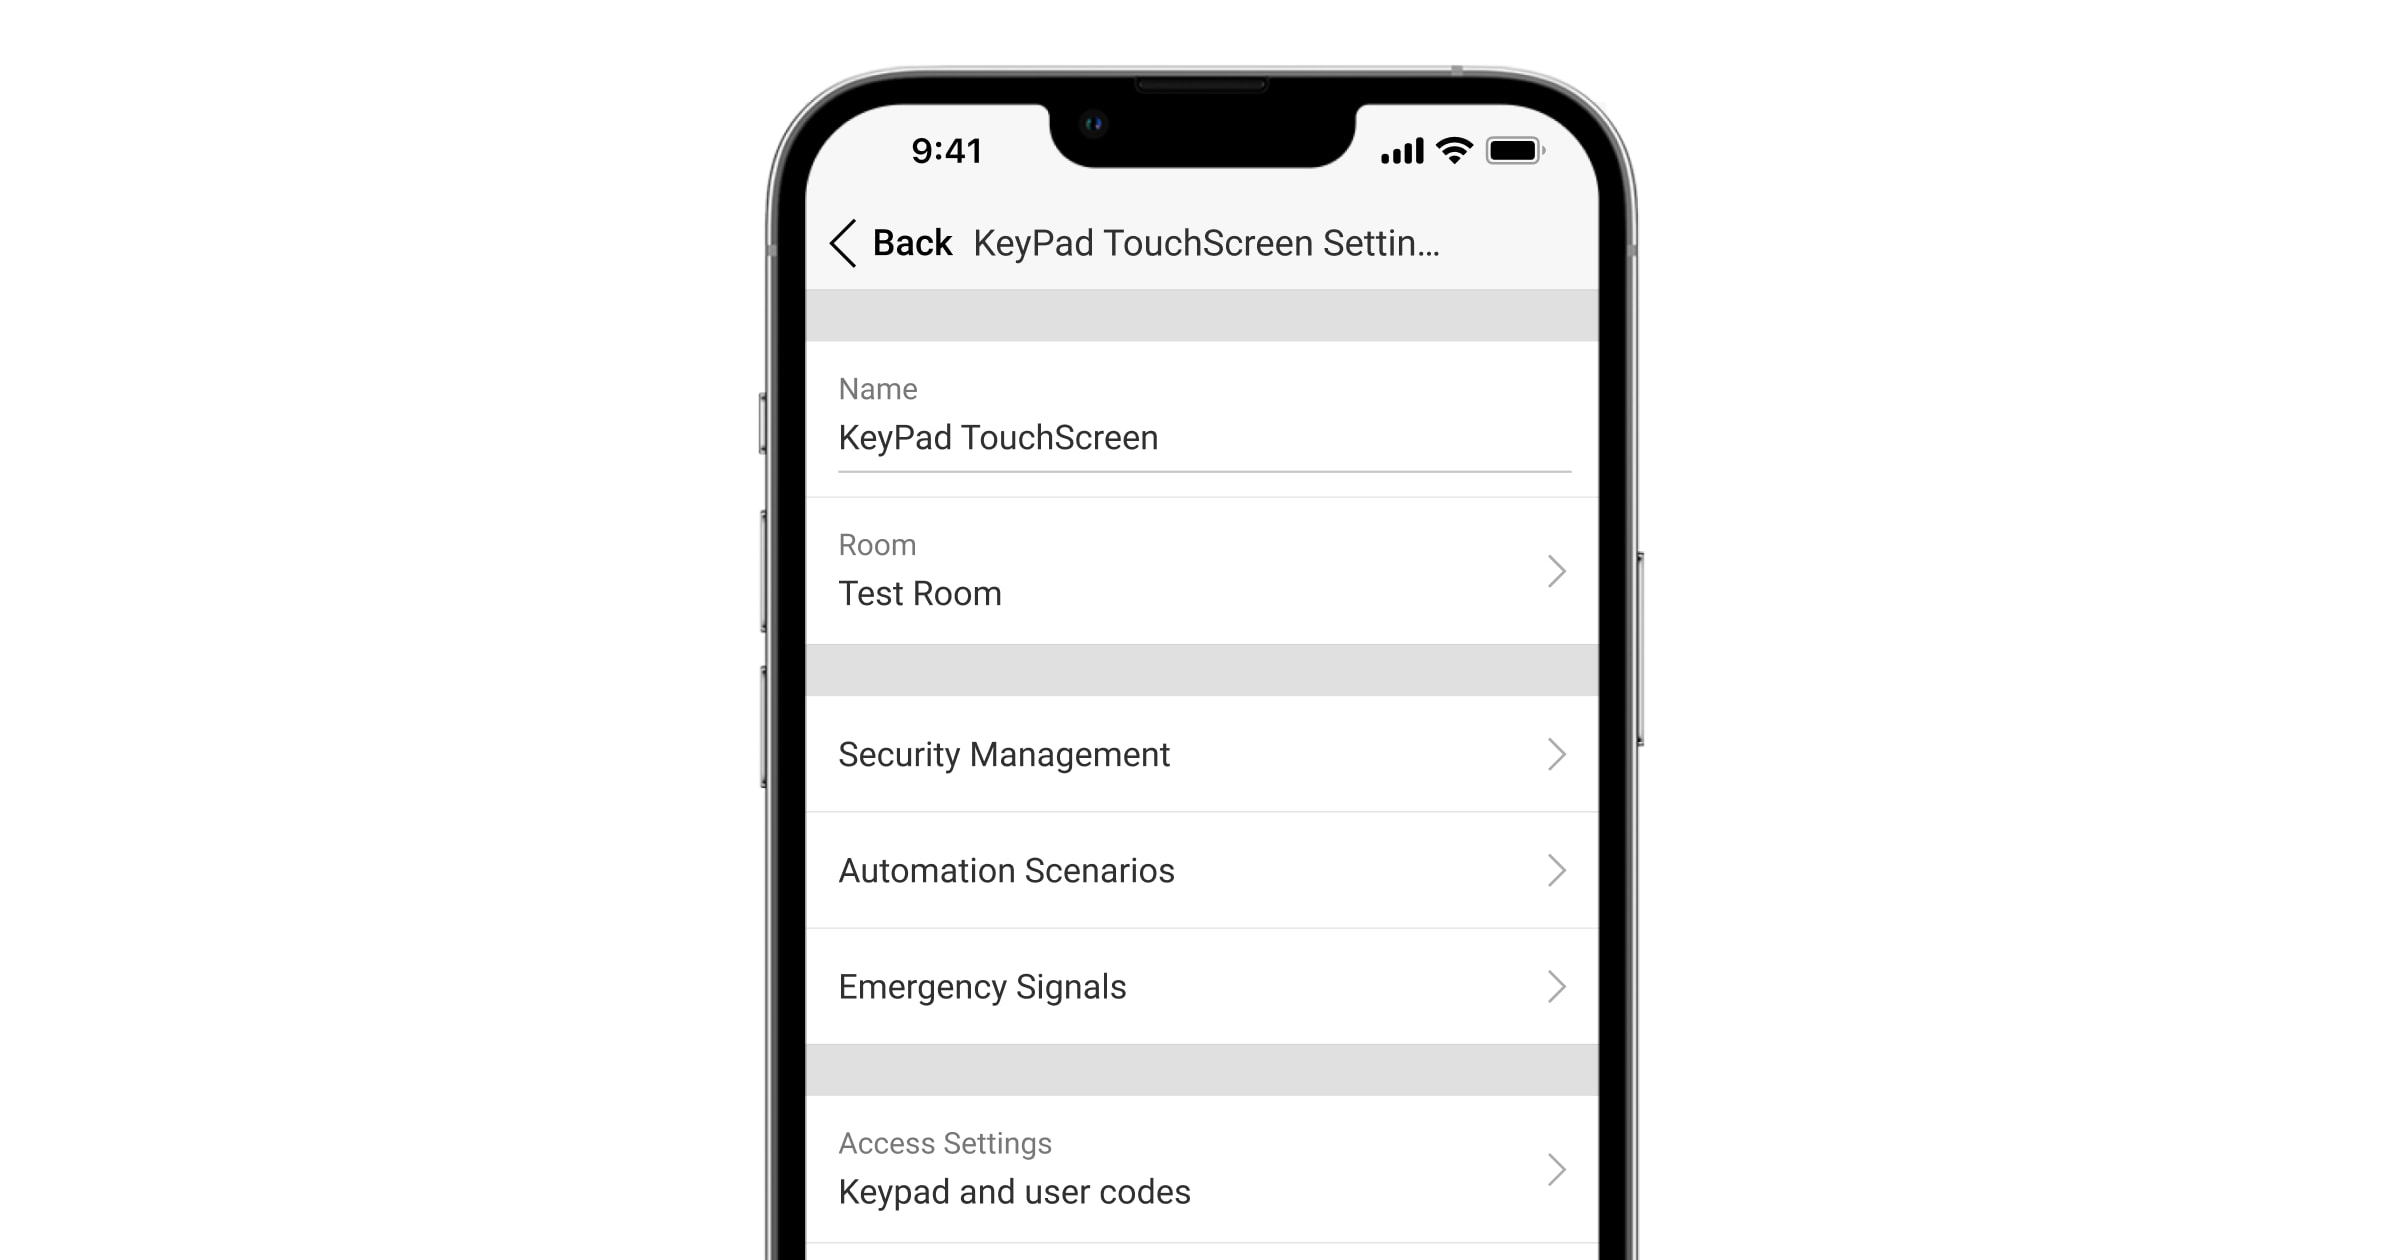
To change the KeyPad TouchScreen settings in the Ajax app:
- Go to the Devices tab.
- Select KeyPad TouchScreen from the list.
- Go to Settings by clicking on the icon.
- Set the required parameters.
- Click Back to save the new settings.
| Setting | Value |
| Name |
Name of the keypad. Displayed in the list of hub devices, text of SMS and notifications in the events feed. To change the name of the device, click on the text field. The name can contain up to 12 Cyrillic characters or up to 24 Latin characters. |
| Room |
Selecting the virtual room to which KeyPad TouchScreen is assigned. The room name is displayed in the text of SMS and notifications in the events feed. |
| Access Settings | Selecting the method of arming/disarming:
To activate the Keypad Access Codes set up for people who are not registered in the system, select the options on the keypad: Keypad codes only or Keypad and user codes. |
| Keypad Code | Selection of a general code for security control. Contains 4 to 6 digits. |
| Duress Code |
Selecting a general duress code for silent alarm. Contains 4 to 6 digits. |
| Screen Detection Range | Configuring a distance at which the keypad reacts to approaching and turns on a display:
Select the optimal sensitivity the keypad will respond to approaching as you prefer. |
| Mute Fire Alarm |
When enabled, users can mute Ajax fire detectors alarm (even Interconnected) with a keypad. If the fire alarm is triggered by ManualCallPoint Jeweller, CO or smoke level is critical, the alarm can’t be muted from the keypad. These fire alarm types are available for KeyPad TouchScreen Jeweller with firmware version 11.60.10.19 or later. |
| Pass/Tag Reading | When enabled, the security mode can be controlled with Pass and Tag access devices. |
| Bluetooth | When enabled, the security mode can be controlled with a smartphone. |
| Bluetooth Sensitivity | Adjusting sensitivity of the keypad’s Bluetooth module:
Available if the Bluetooth toggle is enabled. |
| Unauthorized Access Auto-Lock |
When enabled, the keypad will be locked for a pre-set time if an incorrect code is entered or unverified access devices are used more than three times in a row within 1 minute. PRO or a user with the rights to configure the system can unlock the keypad through the app before the specified locking time expires. |
| Auto-lock Time, min | Selecting the keypad lock period after unauthorized access attempts:
Available if the Unauthorized Access Auto-Lock toggle is enabled. |
| Chime managing with keypad |
When enabled, the user can activate/deactivate from the keypad display notifications about triggering the opening detectors. Enable additionally Chime on opening at keypad’s settings and for at least one bistable detector. |
| Firmware Update |
Switches the device to the firmware updating mode. To update the firmware, connect an external power supply to KeyPad TouchScreen. |
| Jeweller Signal Strength Test |
Switches the device to the Jeweller signal strength test mode. |
| Wings Signal Strength Test |
Switches the device to the Wings signal strength test mode. |
| Signal attenuation test |
Switches the device to the signal attenuation test mode. |
| Pass/Tag Reset |
Allows deleting all hubs associated with Tag or Pass from device memory. |
| User Guide | Opens the KeyPad TouchScreen user manual in the Ajax app. |
| Permanent Deactivation |
Allows the user to disable the device without removing it from the system. Three options are available:
|
| One-Time Deactivation |
Allows the user to disable events of the device until the first disarm. Three options are available:
|
| Delete Device | Unpairs the device, disconnects it from the hub, and deletes its settings. |
Security Management
| Setting | Value |
| Control Screen |
Activates/deactivates security control from the keypad. When disabled, the Control |
| Shared Groups |
Selecting which groups will be shared and available for management by all authorized users. All system groups and groups created after adding KeyPad TouchScreen to the hub are shared by default. Available if Group Mode is enabled. |
| Pre-authorization | When enabled, to have access to the control panel and current system state, the user should authenticate first: enter a code or present a personal access device. |
| Authorization confirmation with a passcode |
If enabled, system authorization using access devices requires confirmation of the action with a user code or keypad code. The user can also choose time for action confirmation. |
| Arming without Code |
When enabled, the user can arm the facility without entering a code or presenting the personal access device. If disabled, enter a code or present the access device to arm the system. The screen for entering code appears after pressing Arm Available if the Authorization confirmation with a passcode and Pre-authorization toggle is disabled. |
| Easy Armed Mode Change | When enabled, users can switch the armed mode of the system (or group) using access devices without confirmation with keypad buttons:
|
| Show malfunctions list on a screen |
When enabled, the list of malfunctions preventing arming will appear on the keypad display. Enable system integrity check for this. It may take some time to display the list. This reduces the time of the keypad operation from the pre-installed batteries. |
Automation Scenarios
| Setting | Value |
| Scenarios Management |
Activates/deactivates scenarios management from the keypad. When disabled, the Scenarios |
| Keypad Scenarios |
The menu allows you to create up to six scenarios to control one automation device or a group of devices. When the settings are saved, buttons for managing scenarios appear on the keypad display (Scenarios A user or PRO with rights to configure the system can add or delete and turn on/off scenarios. Disabled scenarios don’t appear on the Scenarios |
| Pre-authorization | When enabled, to have access to manage scenarios, the user should authenticate first: enter a code or present a personal access device. |
Emergency Signals
| Setting | Value |
| On-Screen Emergency Buttons |
When enabled, the user can send an emergency signal or call for help from the keypad Panic When disabled, the Panic |
| Button type | Selecting the number of buttons to display on the Panic
|
| Accidental Press Protection | When enabled, sending an alarm requires additional confirmation from the user. |
| Alert with a siren | |
| If panic button is pressed | When enabled, the sirens added to the system are activated when the Panic button is pressed. |
| If fire alarm button is pressed |
When enabled, the sirens added to the system are activated when the Fire button is pressed. The toggle is displayed if an option with three buttons is enabled in the Button type menu. |
| If auxiliary request button is pressed |
When enabled, the sirens added to the system are activated when the Auxiliary alert button is pressed. The toggle is displayed if an option with three buttons is enabled in the Button type menu. |
Display Settings
| Setting | Value |
| Auto Adjust | The toggle is enabled by default. The display backlight brightness is automatically adjusted depending on the ambient light level. |
| Manual brightness adjustment |
Selecting the display backlight level: from 0 to 100% (0 — the backlight is minimal, 100 — the backlight is maximum). Sets in increments of 10%. The backlight is on when the display is active only. Manual adjustment is available when the Auto Adjust toggle is disabled. |
| Appearance | Interface appearance adjustment:
|
| Always Active Display |
The keypad display always remains enabled when the toggle is enabled and the external power supply is connected. The toggle is disabled by default. In this case, the keypad sleeps after a certain time from the last interaction with the display. |
| Armed Mode Indication | Setting the LED indication of the keypad:
|
| Language |
Configuring the keypad interface language. English is set by default. To change the language, select the required one and click Save. |
Sound Indication Settings
KeyPad TouchScreen has a built-in buzzer that performs the following functions depending on the settings:
- Indicates the security status and also the Entry/Exit delays.
- Chimes on opening.
- Informs about alarms.
We do not recommend using KeyPad TouchScreen instead of the siren. The keypad’s buzzer is meant for additional notifications only. Ajax sirens are designed to deter intruders and draw attention. A properly installed siren is more difficult to dismantle due to its elevated mounting position compared to a keypad at eye level.
| Setting | Value |
| Beeps Settings. Beep on armed mode change | |
| Arming/Disarming |
When enabled: an audible notification is sent if the security mode is changed from the keypad, another device, or the app. When disabled: an audible notification is sent if the security mode is changed from the keypad only. The volume of the beep depends on the configured buttons’ volume. |
| Night Mode Activation/Deactivation |
When enabled: an audible notification is sent if the Night Mode is activated/deactivated from the keypad, another device, or the app. When disabled: an audible notification is sent if the Night Mode is activated/deactivated from the keypad only. The volume of the beep depends on the configured buttons’ volume. |
| Mute the device when code on keypad is being entered | When this option is enabled, the keypad stops beeping once the user starts entering the code on it. |
| Beep on delays | |
| Entry Delays |
When enabled, the built-in buzzer beeps about a delay when entering. |
| Exit Delays |
When enabled, the built-in buzzer beeps about a delay when leaving. |
| Entry Delays in Night Mode |
When enabled, the built-in buzzer beeps about a delay when entering in the Night Mode. |
| Exit Delays in Night Mode |
When enabled, the built-in buzzer beeps about a delay when leaving in the Night Mode. |
| Fast beep on delays | |
| Fast beep on Entry delay expiration | Notifies a user that the Delay when entering time is running out. There are 4 options to choose from when the fast beep should start:
|
| Fast beep on Exit delay expiration | Notifies a user that the Delay when leaving time is running out. There are 4 options to choose from when the fast beep should start:
|
| Beep when disarmed | |
| Chime on opening |
When enabled, the built-in buzzer informs you with a short beep that the opening detectors are triggered in the Disarmed system mode. |
| Beep Volume | Selecting the built-in buzzer volume level for notifications about arming/disarming, entry/exit delay, and opening:
|
| Buttons | |
| Volume | Adjusting the buzzer notification volume for interactions with the keypad display. |
| Alarms reaction | |
| Audible Alarm | Setting the mode when the built-in buzzer enables an alarm:
|
| Activate keypad buzzer if alarm in the system is detected | When enabled, the built-in buzzer notifies an alarm in the system. |
| Alarm in Group Mode |
Selecting the group (from the shared) which alarm the keypad will notify. The All Shared Groups option is set by default. If the keypad has only one shared group and it is deleted, the setting will return to its initial value. Displayed if the Group Mode is enabled. |
| Alarm Duration |
Duration of sound signal in case of alarm: from 3 seconds to 3 minutes. The connection of external power supply to the keypad is recommended for an audible signal duration of more than 30 seconds. |
Adjust the entry/exit delays in the appropriate detectors settings, not the keypad settings.
Setting the keypad response to device alarms
KeyPad TouchScreen can respond to alarms from each detector in the system with a built-in buzzer. The function is useful when you do not need to activate the buzzer for the alarm of a specific device. For example, this can be applied to the triggering of LeaksProtect leakage detector.
By default, the keypad response is enabled for alarms of all devices in the system.
To set the keypad response to a device alarm:
- Open the Ajax app.
- Go to the Devices tab.
- Select the device for which you want to configure the keypad response from the list.
- Go to the device Settings by clicking on the icon.
- Find the Alert with a siren option and select the toggles which will activate it. Enable or disable the function.
- Repeat steps 3–5 for the rest of the system devices.
Setting the keypad response to tamper alarm
KeyPad TouchScreen can respond to enclosure alarms from each system device with a built-in buzzer. When the function is activated, the keypad built-in buzzer will emit a sound signal upon triggering the tamper button of the device.
To set the keypad response to a tamper alarm:
- Open the Ajax app.
- Go to the Devices tab.
- Select the hub and go to its Settings .
- Select the Service menu.
- Go to the section Sounds and Alerts.
- Enable the If lid of hub or any detector is open toggle.
- Click Back to save the new settings.
Tamper button reacts to opening and closing of the enclosure, regardless of the armed mode of the device or system.
Setting the keypad response to pressing the panic button in the Ajax apps
You can configure the keypad response to alarm when the panic button is pressed in the Ajax apps. To do this, follow these steps:
- Open the Ajax app.
- Go to the Devices tab.
- Select the hub and go to its Settings .
- Select the Service menu.
- Go to the section Sounds and Alerts.
- Enable the If in-app panic button is pressed toggle.
- Click Back to save the new settings.
Setting the keypad after-alarm indication

The keypad can inform about triggering in the armed system through LED indication.
The option functions as follows:
- The system registers the alarm.
- The keypad plays an alarm signal (if enabled). The duration and volume of the signal depend on the device settings.
- The keypad’s LED flashes twice (once every 3 seconds) until the system is disarmed.
Thanks to this feature, system users and security company patrols can understand that the alarm has occurred.
The KeyPad TouchScreen after-alarm indication does not work for always active detectors, if the detector was triggered when the system was disarmed.
To enable the KeyPad TouchScreen after-alarm indication, in Ajax PRO app:
- Go to hub settings:
- Hub → Settings → Service → LED Indication.
- Hub → Settings
- Specify which events KeyPad TouchScreen will inform about by double flashing of the LED indicator before the system is disarmed:
- Confirmed intrusion/hold-up alarm.
- Single intrusion/hold-up alarm.
- Lid Opening.
- Select the required KeyPad TouchScreen in the Devices menu. Click Back to save the parameters.
- Click Back. All values will be applied.
How to set Chime
If Chime on opening is enabled, KeyPad TouchScreen notify you with a short beep if the opening detectors are triggered when the system is disarmed. The feature is used, for example, in stores to notify employees that someone has entered the building.
Notifications are configured in two stages: setting up the keypad and setting up opening detectors. This article provides more information about Chime and how to set up detectors.
To set the keypad response:
- Open the Ajax app.
- Go to the Devices tab.
- Select KeyPad TouchScreen and go to its Settings .
- Go to the Sound Indication menu → Beeps Settings.
- Enable the Chime on opening toggle in the Beep when disarmed category.
- Set the required notifications volume.
- Click Back to save the settings.
If the settings are made correctly, a bell icon appears in the Control tab of the Ajax app. Click it to activate or deactivate chime on opening.
To set the chime control from the keypad display:
- Open the Ajax app.
- Go to the Devices tab.
- Select KeyPad TouchScreen and go to its Settings .
- Enable the Chime managing with keypad toggle.
If the settings are made correctly, a bell icon appears in the Control ![]() tab on the keypad display. Click it to activate/deactivate chime on opening.
tab on the keypad display. Click it to activate/deactivate chime on opening.
Codes setting
To set keypad and keypad duress codes:
- In the Ajax app, go to the Devices tab.
- Select the keypad for which you want to set up an access code.
- Go to its Settings .
- Select Keypad codes only or Keypad and user codes option in the Access Settings menu.
- Find the Keypad Code menu and click it.
- Set the keypad code. Contains from 4 to 6 digits.
- Press Done.
- Find the Duress Code menu and click it.
- Set the keypad duress code. Contains from 4 to 6 digits.
- Press Done.
To set a personal code and a personal duress code:
- Select the hub in the Ajax app.
- Go to the Settings menu.
- Open the Users menu.
- Find your account in the list and click on it.
- Go to the Passcode Settings menu.
- Set the User Code. Contains from 4 to 6 digits.
- Press Save.
- Set the Duress Code. Contains from 4 to 6 digits.
- Press Save.
- Click Back to save the settings.
To set an access code for a user without an account:
- Select the hub in the Ajax app.
- Go to the Settings menu.
- Go to the Keypad Access Codes menu.
- Click Add Code. Set up Name and Access Code. Contains from 4 to 6 digits.
- Click Add to save the data.
To set a duress code for a user without an account:
- Select Keypad Access Codes menu in the hub settings.
- Select the required unregistered user.
- Click Add Duress Code. Set the code. Contains from 4 to 6 digits.
- Click Done.
For unregistered users, you can adjust the access to security management. First, enable Group Mode. Then, select the Keypad Access Codes menu in the hub settings, find the required user, and set the appropriate parameters in the Security Management menu.
Only a PRO with the rights to configure the system can create and configure the RRU codes in the Ajax PRO apps. More information about configuring this feature you can find in this article.
The RRU codes are supported by hubs (except the Hub model) with OS Malevich 2.17 and later.
Cards and key fobs adding
KeyPad TouchScreen can work with Tag key fobs, Pass cards, and third-party devices that support DESFire® technology.
Before adding third-party devices that support DESFire®, make sure they have enough free memory to handle the new keypad. Preferably, the third-party device should be pre-formatted.
This article provides information on how to reset Tag or Pass.
The maximum number of connected Passes and Tags depends on the hub model. The connected Passes and Tags do not affect the total device limit on the hub.
| Hub model | Number of Tag or Pass devices |
| Hub 2 (2G) | 50 |
| Hub 2 (4G) | 50 |
| Hub 2 Plus | 200 |
| Superior Hub Hybrid (2G) | 50 |
| Superior Hub Hybrid (4G) | 50 |
How to add a Tag or Pass to the system

- Open the Ajax app.
- Select the hub to which you want to add a Tag or Pass.
- Go to the Devices tab.
Make sure the Pass/Tag Reading feature is enabled in at least one keypad setting.
- Click Add Device.
- Select Add Pass/Tag.
- Specify the type (Tag or Pass), color, device name, and user (if necessary).
- Click Next. After that, the hub will switch to the device registration mode.
- Go to any compatible keypad with Pass/Tag Reading enabled and activate it.
After activation, KeyPad TouchScreen will display a screen for switching the keypad to the access devices registration mode. Click the Start button.
A screen updates automatically if the external power supply is connected and the Always Active Display toggle is enabled in the keypad settings.
The screen for switching the keypad to the registration mode will appear on all KeyPad TouchScreen of the system. When an admin or PRO with rights to configure the system starts registering Tag/Pass at one keypad, the rest will switch to their initial state.
- Present Pass or Tag with the wide side to the keypad reader for a few seconds. It is marked with wave
 icons on the body. Upon successful addition, you will receive a notification in the Ajax app and on the keypad display.
If the connection fails, try again in 5 seconds. Please note that if the maximum number of Tag or Pass devices has already been added to the hub, you will receive a corresponding notification in the Ajax app when adding a new device.
Both Tag and Pass can work with several hubs at the same time. The maximum number of hubs is 13. If you try to bind a Tag or Pass to a hub that has already reached the hub limit, you will receive a corresponding notification. To bind such a key fob/card to a new hub, you will need to reset it.
If you need to add another Tag or Pass, click Add Another Pass/Tag in the app. Repeat steps 6–9.
How to delete a Tag or Pass from the hub
Resetting will delete all settings and bindings of key fobs and cards. In this case, the reset Tag and Pass are only removed from the hub from which the reset was made. On other hubs, Tag or Pass are still displayed in the app but cannot be used to manage the security modes. These devices should be removed manually.
- Open the Ajax app.
- Select the hub.
- Go to the Devices tab.
- Select a compatible keypad from the device list.
Make sure the Pass/Tag Reading feature is enabled in the keypad settings.
- Go to the keypad settings by clicking the icon.
- Click Pass/Tag Reset menu.
- Click Continue.
- Go to any compatible keypad with Pass/Tag Reading enabled and activate it.
After activation, KeyPad TouchScreen will display a screen for switching the keypad to the access devices resetting mode. Click the Start button.
A screen updates automatically if the external power supply is connected and the Always Active Display toggle is enabled in the keypad settings.
The screen for switching the keypad to the resetting mode will appear on all KeyPad TouchScreen of the system. When an admin or PRO with rights to configure the system starts resetting Tag/Pass at one keypad, the rest will switch to the initial state.
- Put Pass or Tag with the wide side to the keypad reader for a few seconds. It is marked with wave icons on the body. Upon successful formatting, you will receive a notification in the Ajax app and on the keypad display. If the formatting fails, try again.
- If you need to reset another Tag or Pass, click Reset another Pass/Tag in the app. Repeat step 9.
Bluetooth Setting
KeyPad TouchScreen supports security modes control by presenting a smartphone to the sensor. Security management is established through a Bluetooth communication channel. This method is convenient, secure, and fast, as there is no need to enter a passcode, add a phone to the keypad, or use a Tag or Pass that could be lost.
Bluetooth authentication is available only for Ajax Security System users.
To enable Bluetooth authentication in the app
- Connect KeyPad TouchScreen to the hub.
- Enable the keypad Bluetooth sensor:
Devices
→ KeyPad Touchscreen → Settings → Enable the Bluetooth toggle. - Click Back to save the settings.
To set up Bluetooth authentication
- Open the Ajax Security System app and select the hub to which the KeyPad TouchScreen with enabled Bluetooth authentication is added. By default, authentication with Bluetooth is available for all users of such system.
To prohibit Bluetooth authentication for certain users:
- In the Devices
 tab, select the hub and go to its settings
  .
. - Open Users menu and the required user from the list.
- In the Permissions section, disable the Security management via Bluetooth toggle.
- In the Devices
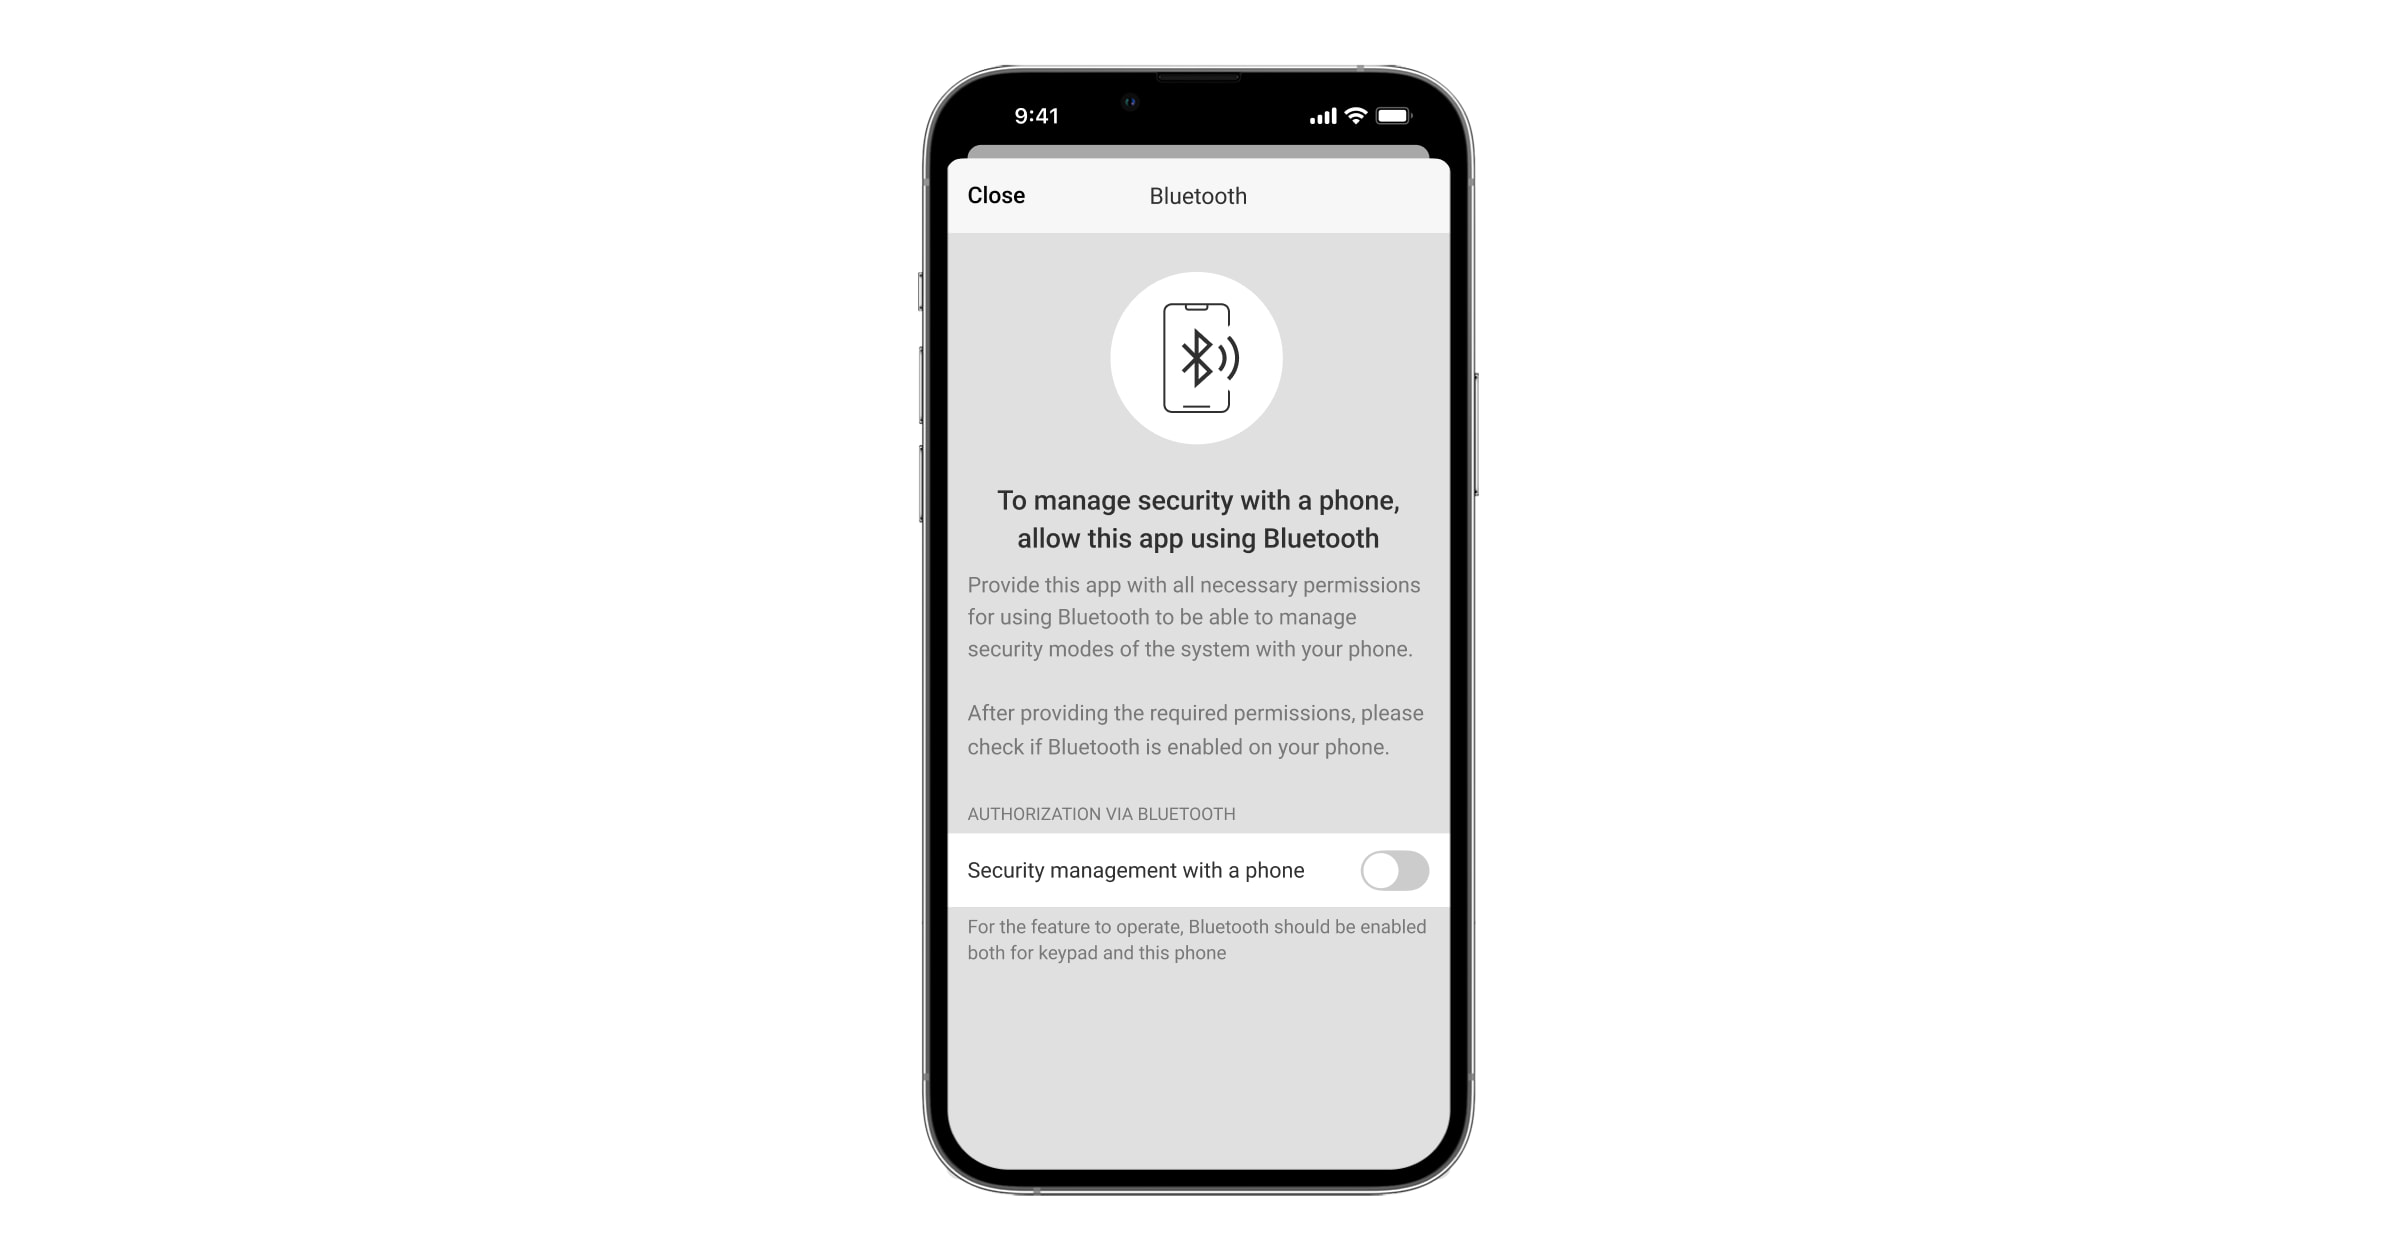
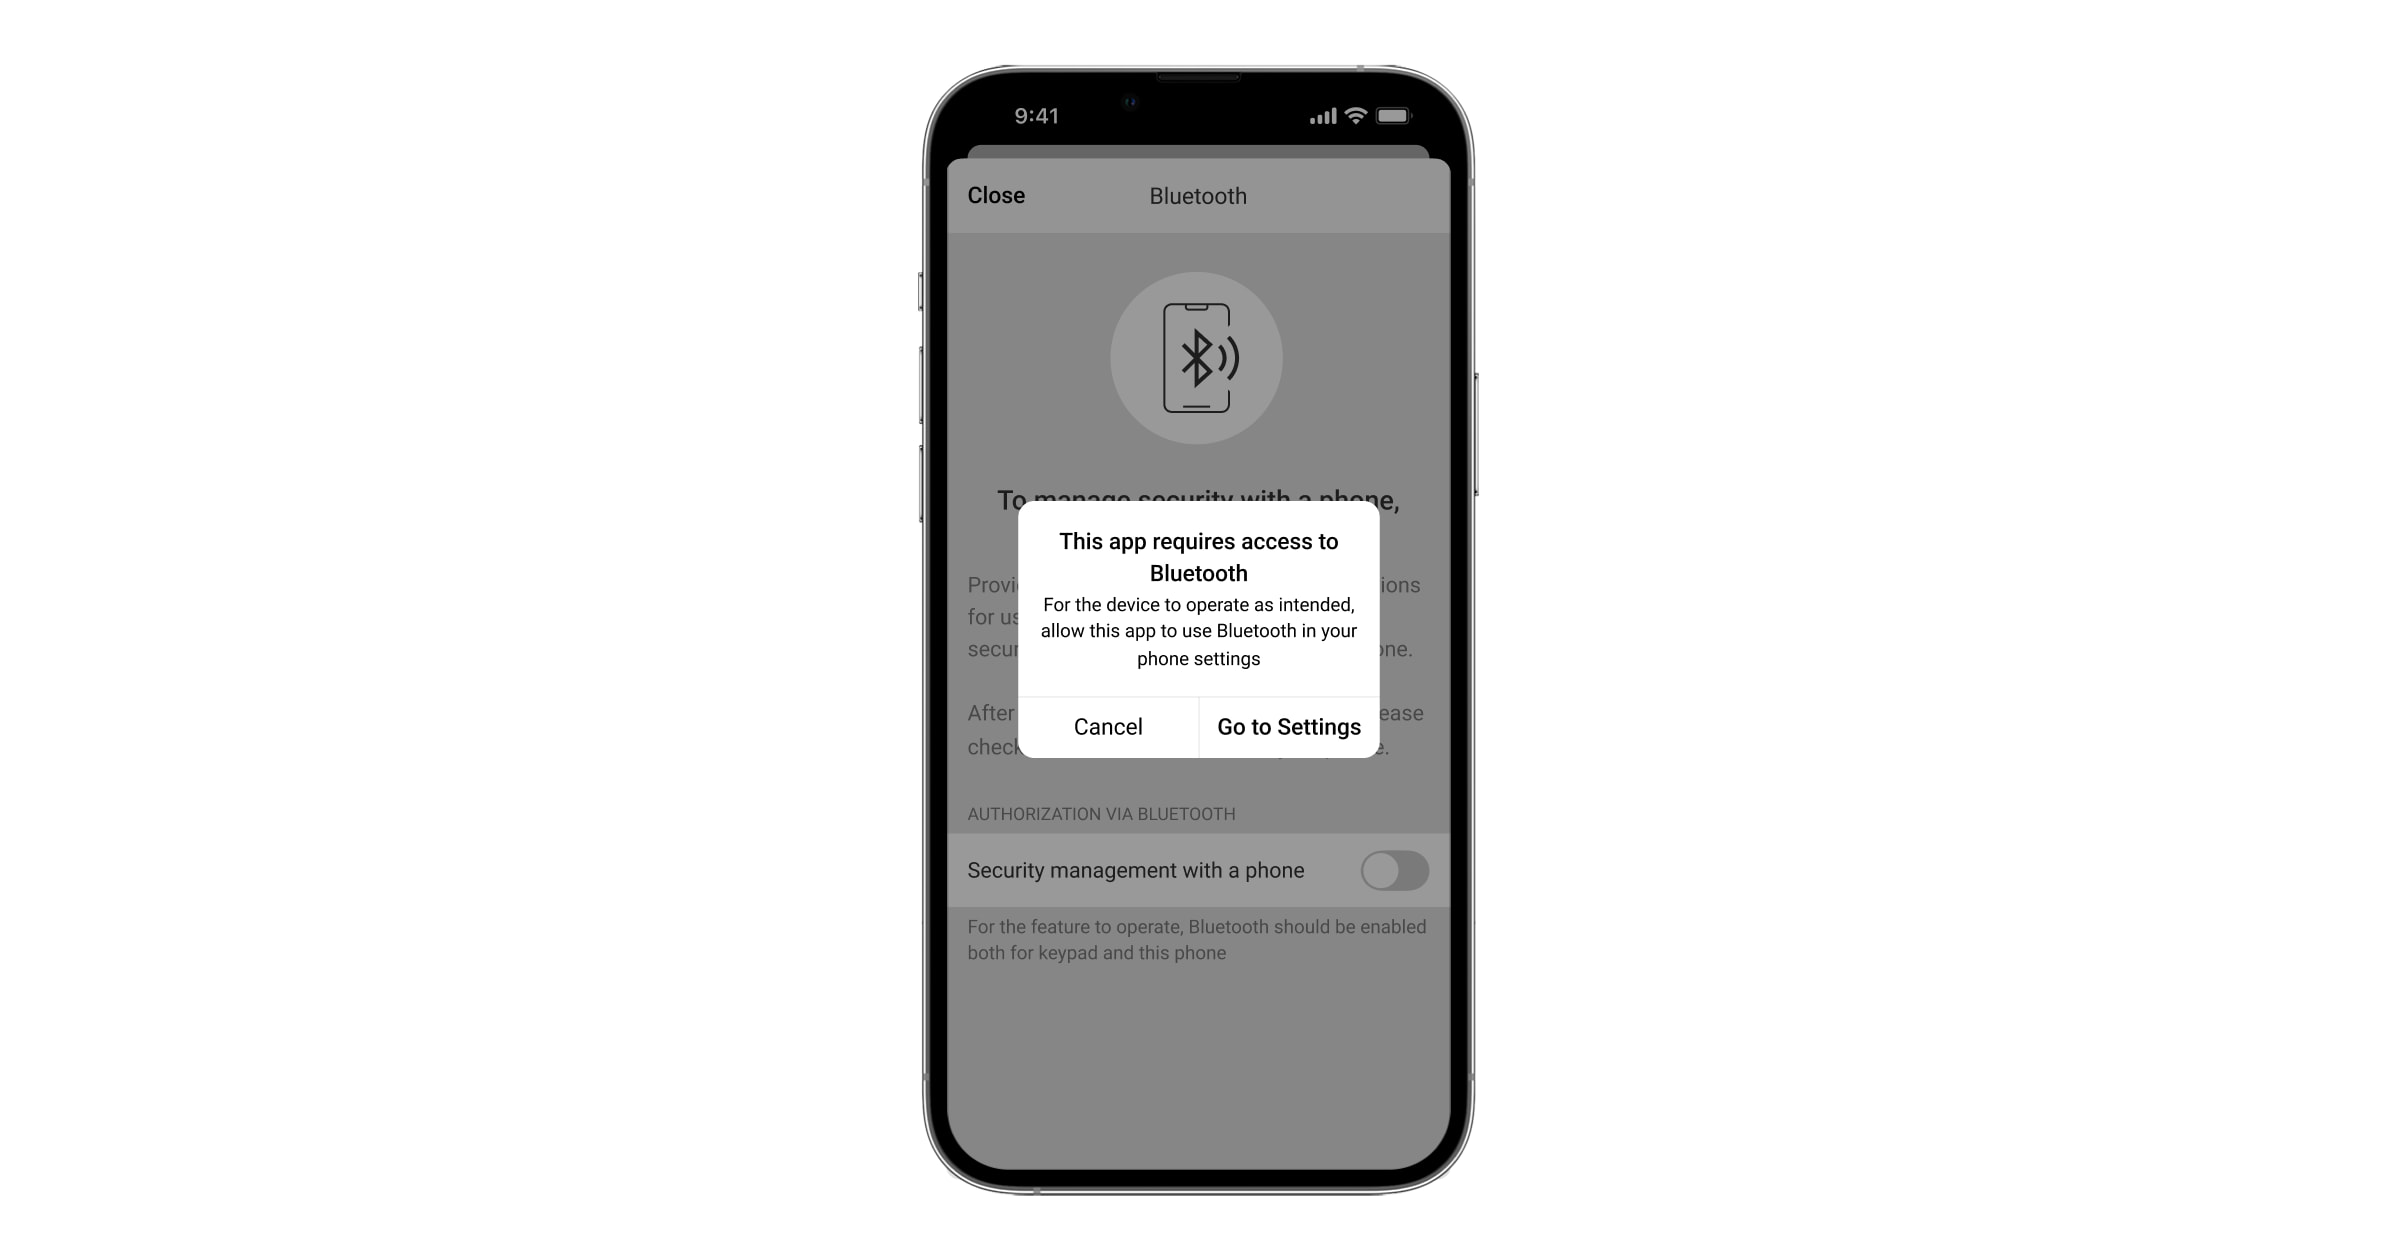
- Allow the Ajax Security System app to use Bluetooth if it was not previously granted. In this case, the warning
 appears at KeyPad TouchScreen States. Pressing the
  symbol opens the window with explanations of what to do. Enable the Security management with a phone toggle at the bottom of the opened window.
Grant the app permission to find and connect to nearby devices. The popup window for Android and iOS smartphones can differ.
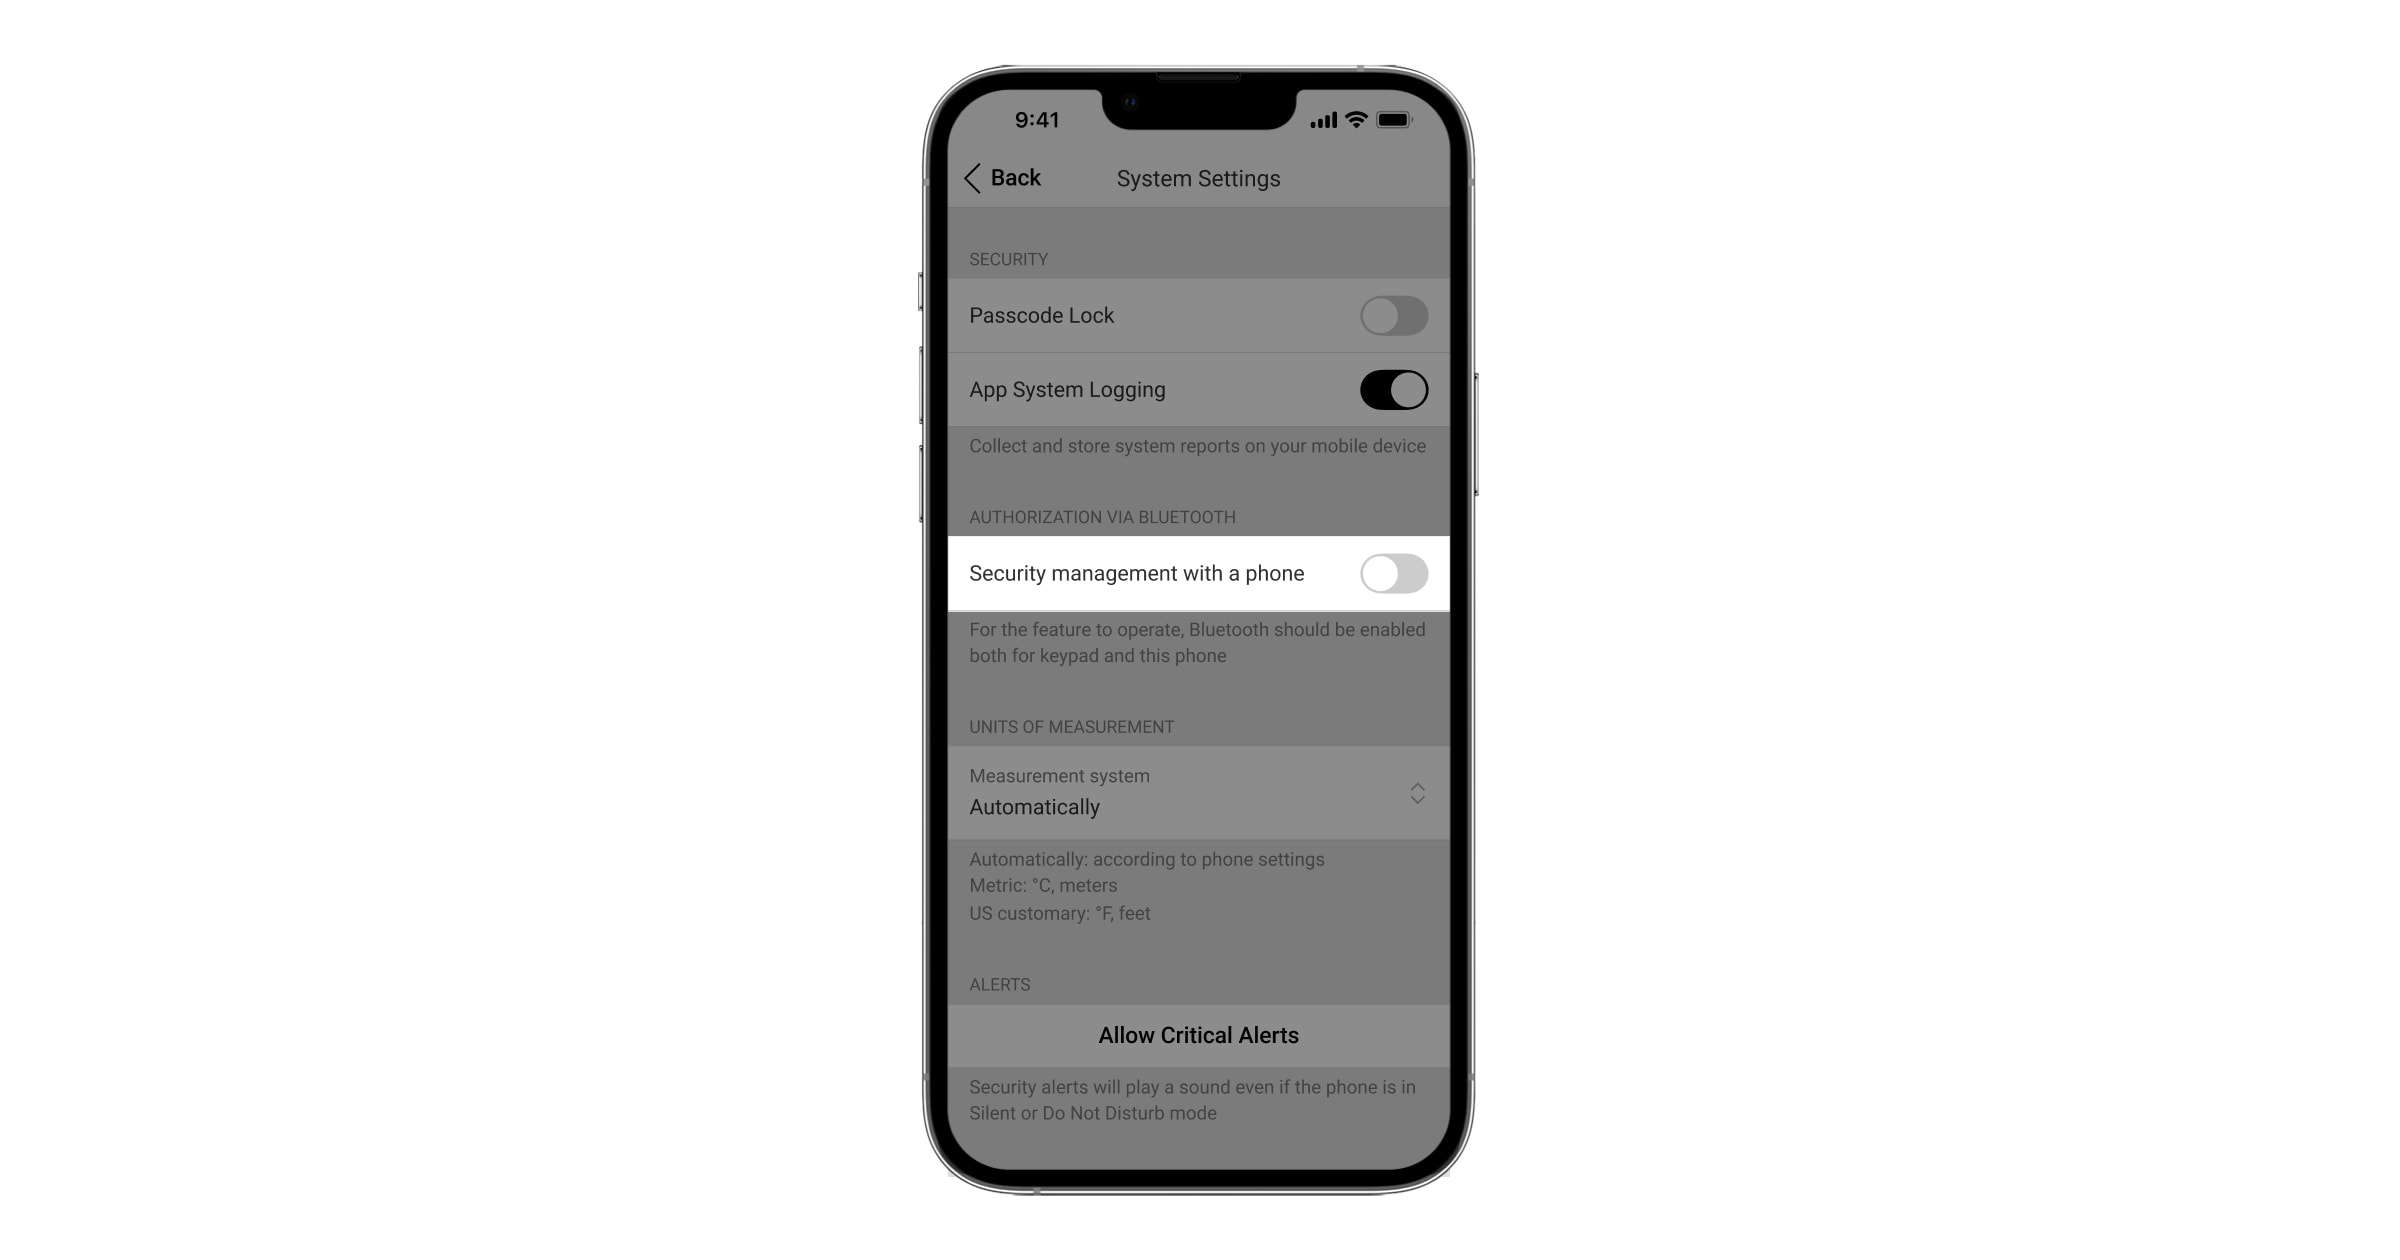
Also, the Security management with a phone toggle can be enabled in the app settings:
- Click the
 icon in the upper left corner of the screen, select the App Settings menu.
 - Open menu System Settings and enable Security management with a phone toggle.
- Click the
- We recommend configuring Geofence for the stable performance of Bluetooth authentication. The warning appears at KeyPad TouchScreen States if Geofence is disabled and the app is not allowed to use the smartphone location. Pressing the symbol opens the window with explanations of what to do.
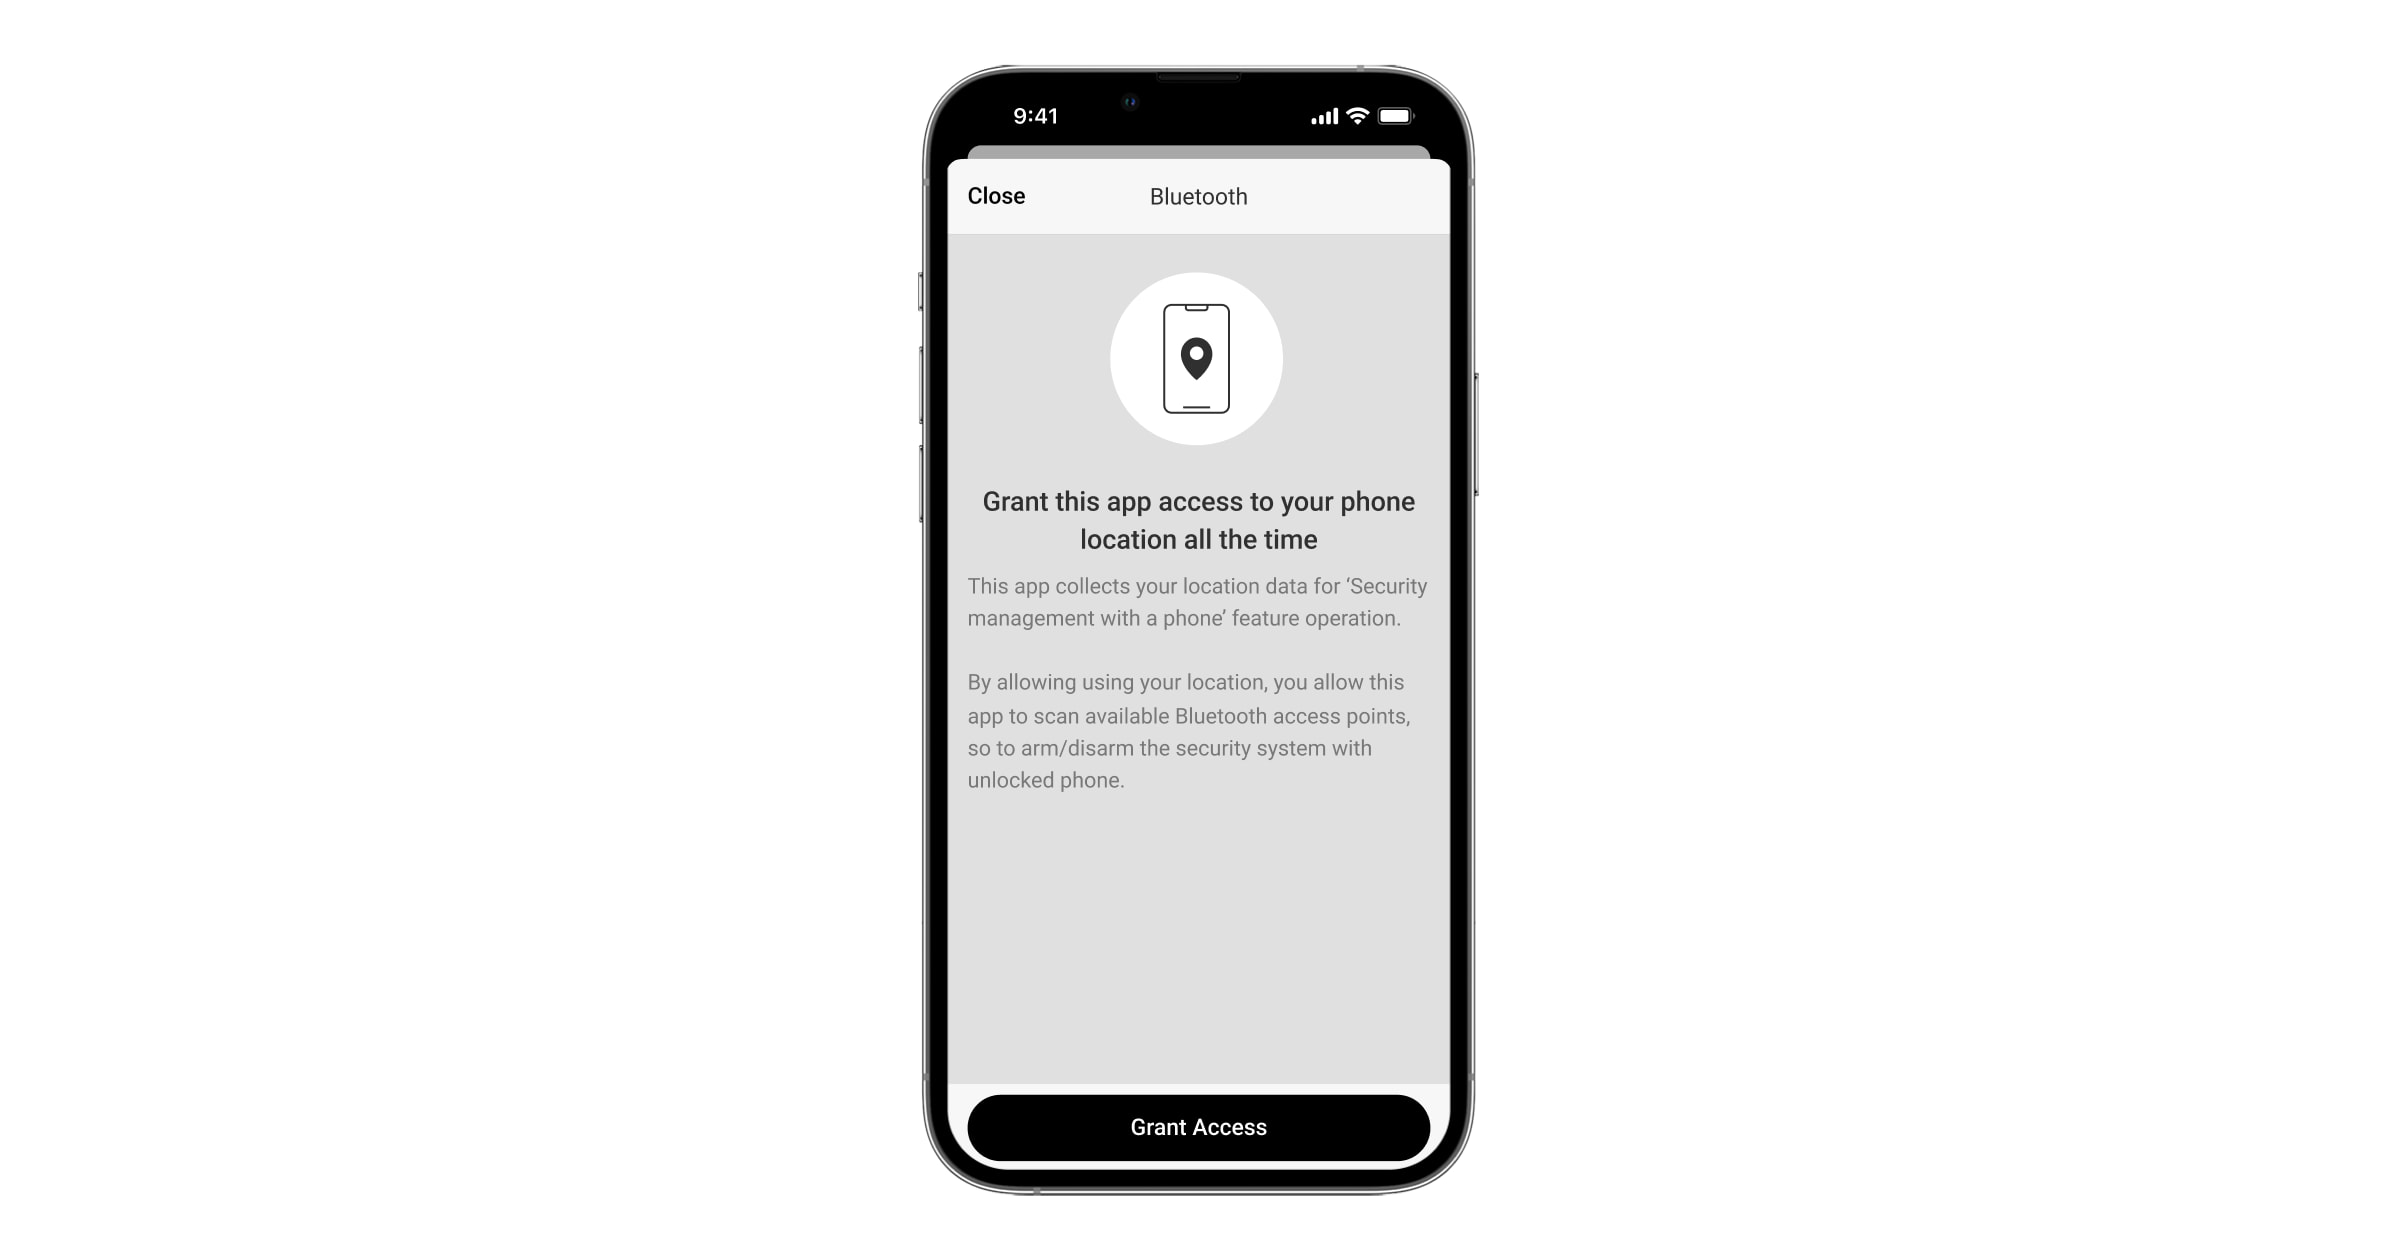
Bluetooth authentication can be unstable if Geofence function is disabled. You will need to launch and minimize the app if the system switches it to the sleep mode.
You can control the system faster via Bluetooth, when the Geofence function is activated and configured. All you need is to unlock the phone and present it to the keypad sensor.
- Enable the Keep app alive to manage security via Bluetooth toggle. For this, go to Devices → Hub → Settings → Geofence.
- Ensure that Bluetooth is enabled on your smartphone. If it is disabled, the warning appears in the keypad States. Pressing the symbol opens the window with explanations of what to do.
- Enable the Keep-Alive Service toggle in the app settings for Android smartphones. For this, in the upper left corner of the screen, click the → App Settings → System Settings.
Pre-authorization
When the feature is enabled, access to the control panel and current system state is blocked. To unblock it, the user should authenticate: enter an appropriate code or present a personal access device to the keypad.
If pre-authorization is enabled, the Arming without Code feature is unavailable in the keypad settings.
You can authenticate in two ways:
- In the Control tab. After login, the user will see the shared groups of the system (if Group Mode is activated). They are specified in the keypad settings: Security Management → Shared Groups. By default, all the system groups are shared.

- In the Log in
 tab. After login, the user will see available groups that were hidden from the shared group list.
The keypad display switches to the initial screen after 10 seconds from the last interaction with it. Enter the code or present a personal access device again to control the system with KeyPad TouchScreen.
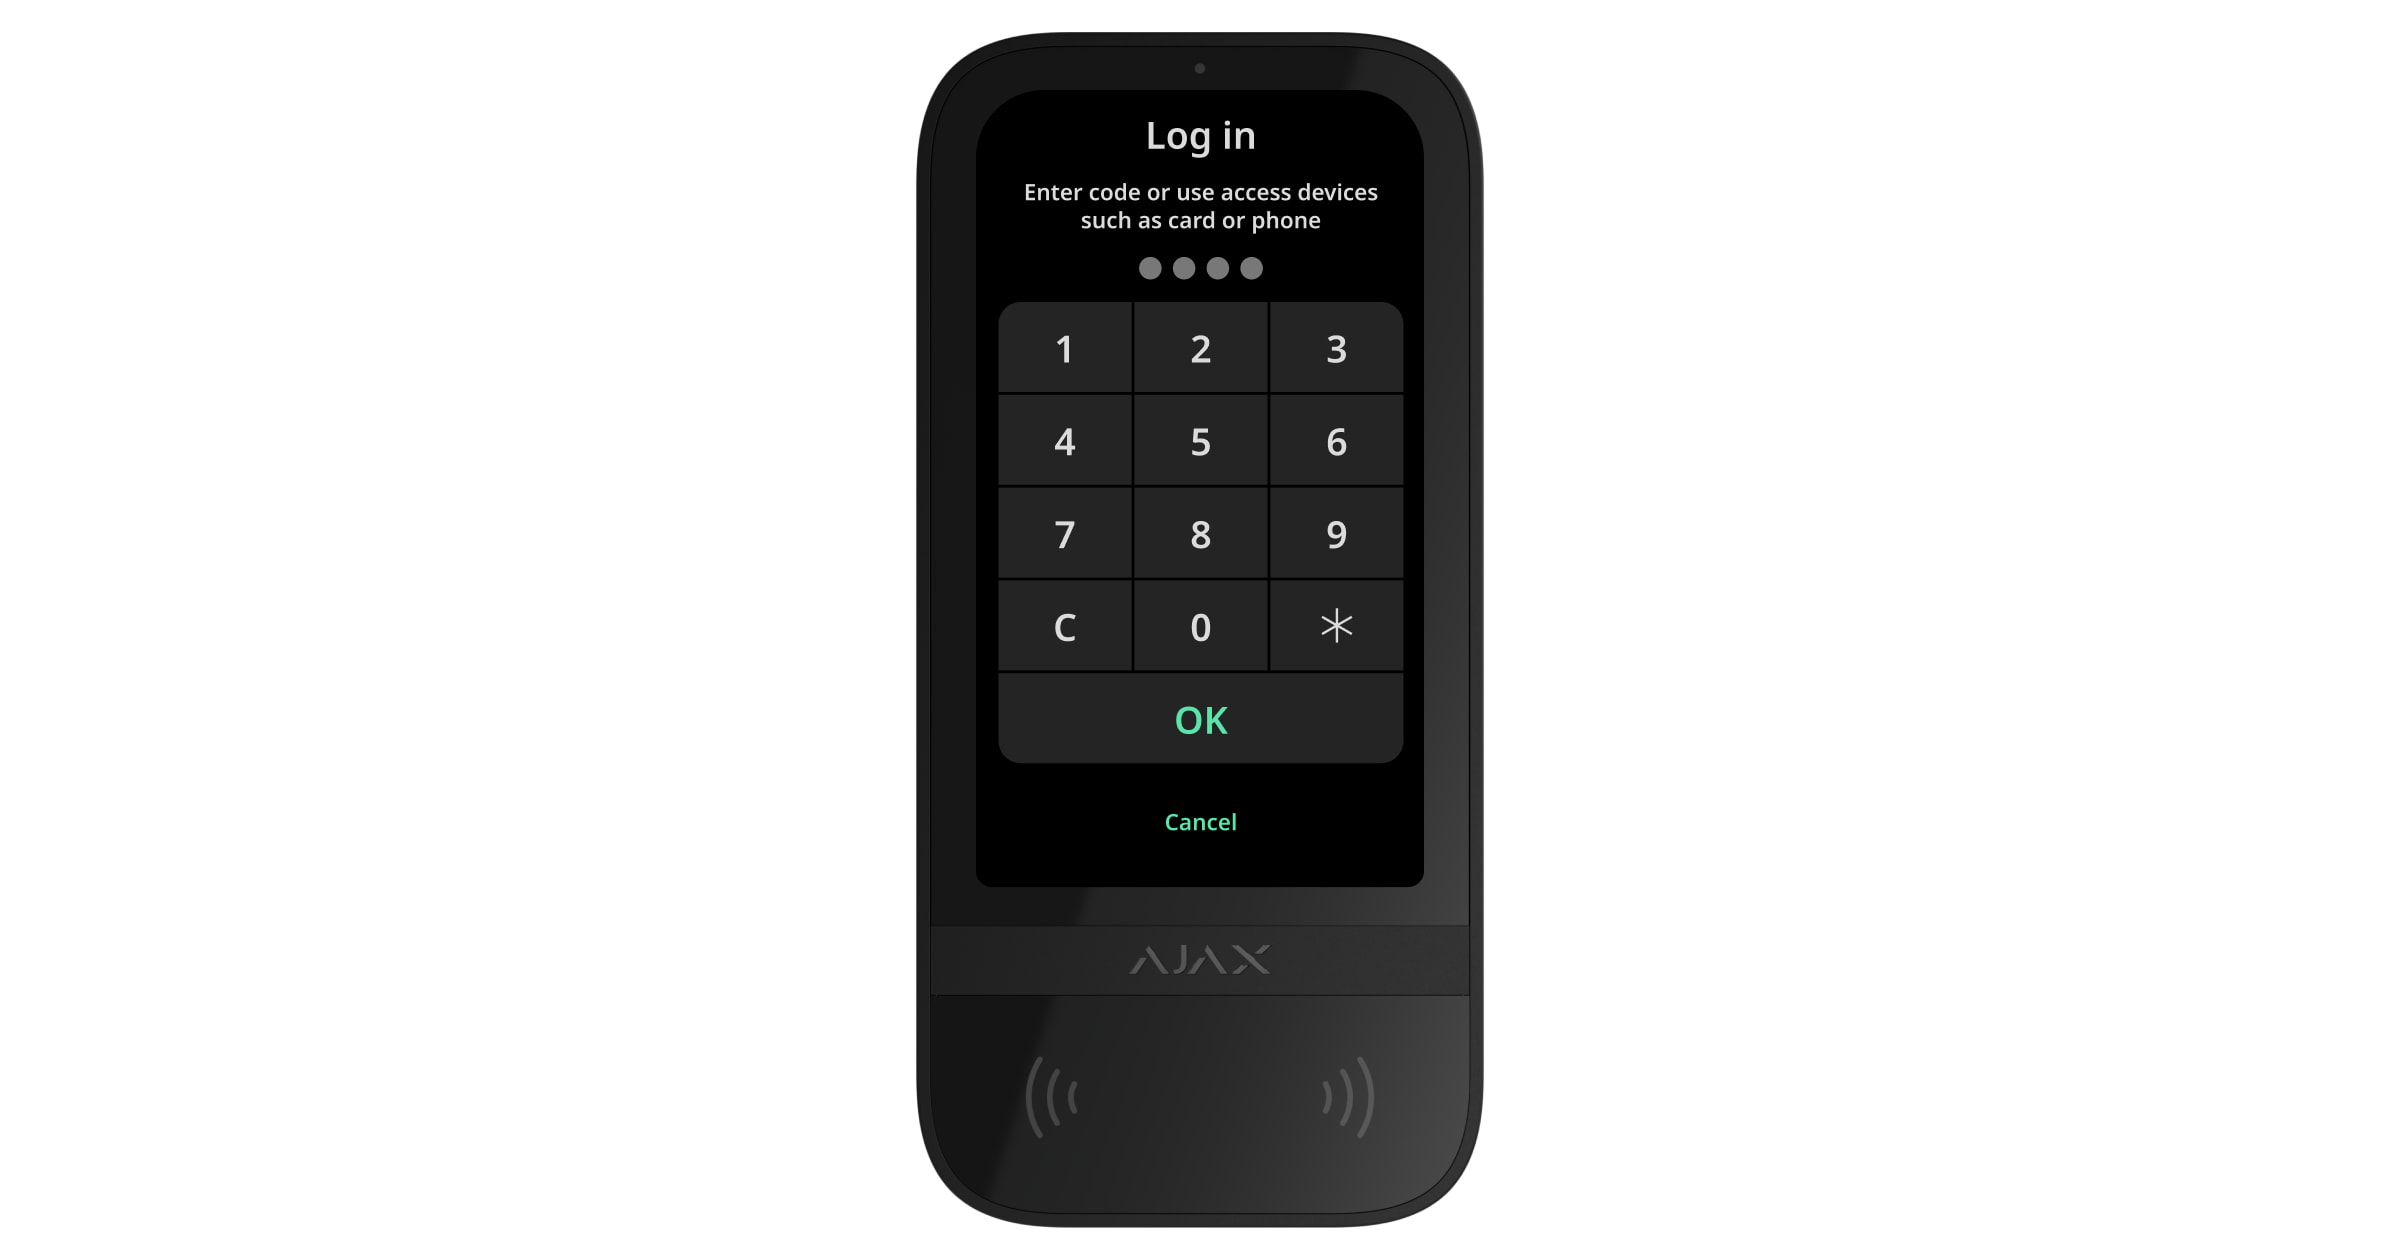
- Enter the keypad code or keypad duress code (if needed).
- Press OK.
For example: 1234 → OK.
Incorrectly entered numbers can be cleared with the ![]() button.
button.
- Enter the User ID.
- Press the
 .
. - Enter the personal code or the personal duress code (if needed).
- Press OK.
For example: 4 → ![]() → 1234 → OK.
→ 1234 → OK.
- Enter the access code or duress access code (if needed) of an unregistered user.
- Press OK.
For example: 1234 → OK.
- Enter the RRU Code.
- Press OK.
For example: 1234 → OK.
Present verified Tag or Pass to the keypad reader. It is marked with wave ![]() icons on the body. This chapter provides information on how to add a card/key fob to the system.
icons on the body. This chapter provides information on how to add a card/key fob to the system.
Present a verified smartphone with enabled Bluetooth and an unlocked screen to the keypad reader. It is marked with wave ![]() icons on the body. This chapter provides information on how to adjust Bluetooth settings for the keypad.
icons on the body. This chapter provides information on how to adjust Bluetooth settings for the keypad.
Controlling security
Using codes, Tag/Pass, or a smartphone, you can control the Night Mode and the security of the entire facility or separate groups. The user or PRO with the rights to configure the system can set up access codes. This chapter provides information on how to add Tag or Pass to the hub. To control with a smartphone, adjust the appropriate Bluetooth parameters in the keypad settings. Turn on the smartphone Bluetooth, Location, and unlock the screen.
KeyPad TouchScreen is locked for the time specified in the settings if an incorrect code is entered, or an unverified access device is presented three times in a row within 1 minute. The corresponding notifications are sent to users and the monitoring station of the security company. A user or PRO with the rights to configure the system can unlock KeyPad TouchScreen in the Ajax app.
If Group Mode is disabled, an appropriate icon on the keypad display indicates the current security mode:
 — Armed.
 — Disarmed.
 — Night Mode.
If Group Mode is enabled, users see the security mode of each group separately. The group is armed if its button outline is white and marked with the ![]() icon. The group is disarmed if its button outline is grey and marked with the
icon. The group is disarmed if its button outline is grey and marked with the ![]() icon.
icon.
The buttons of the groups in the Night Mode are framed in a white square on the keypad display.
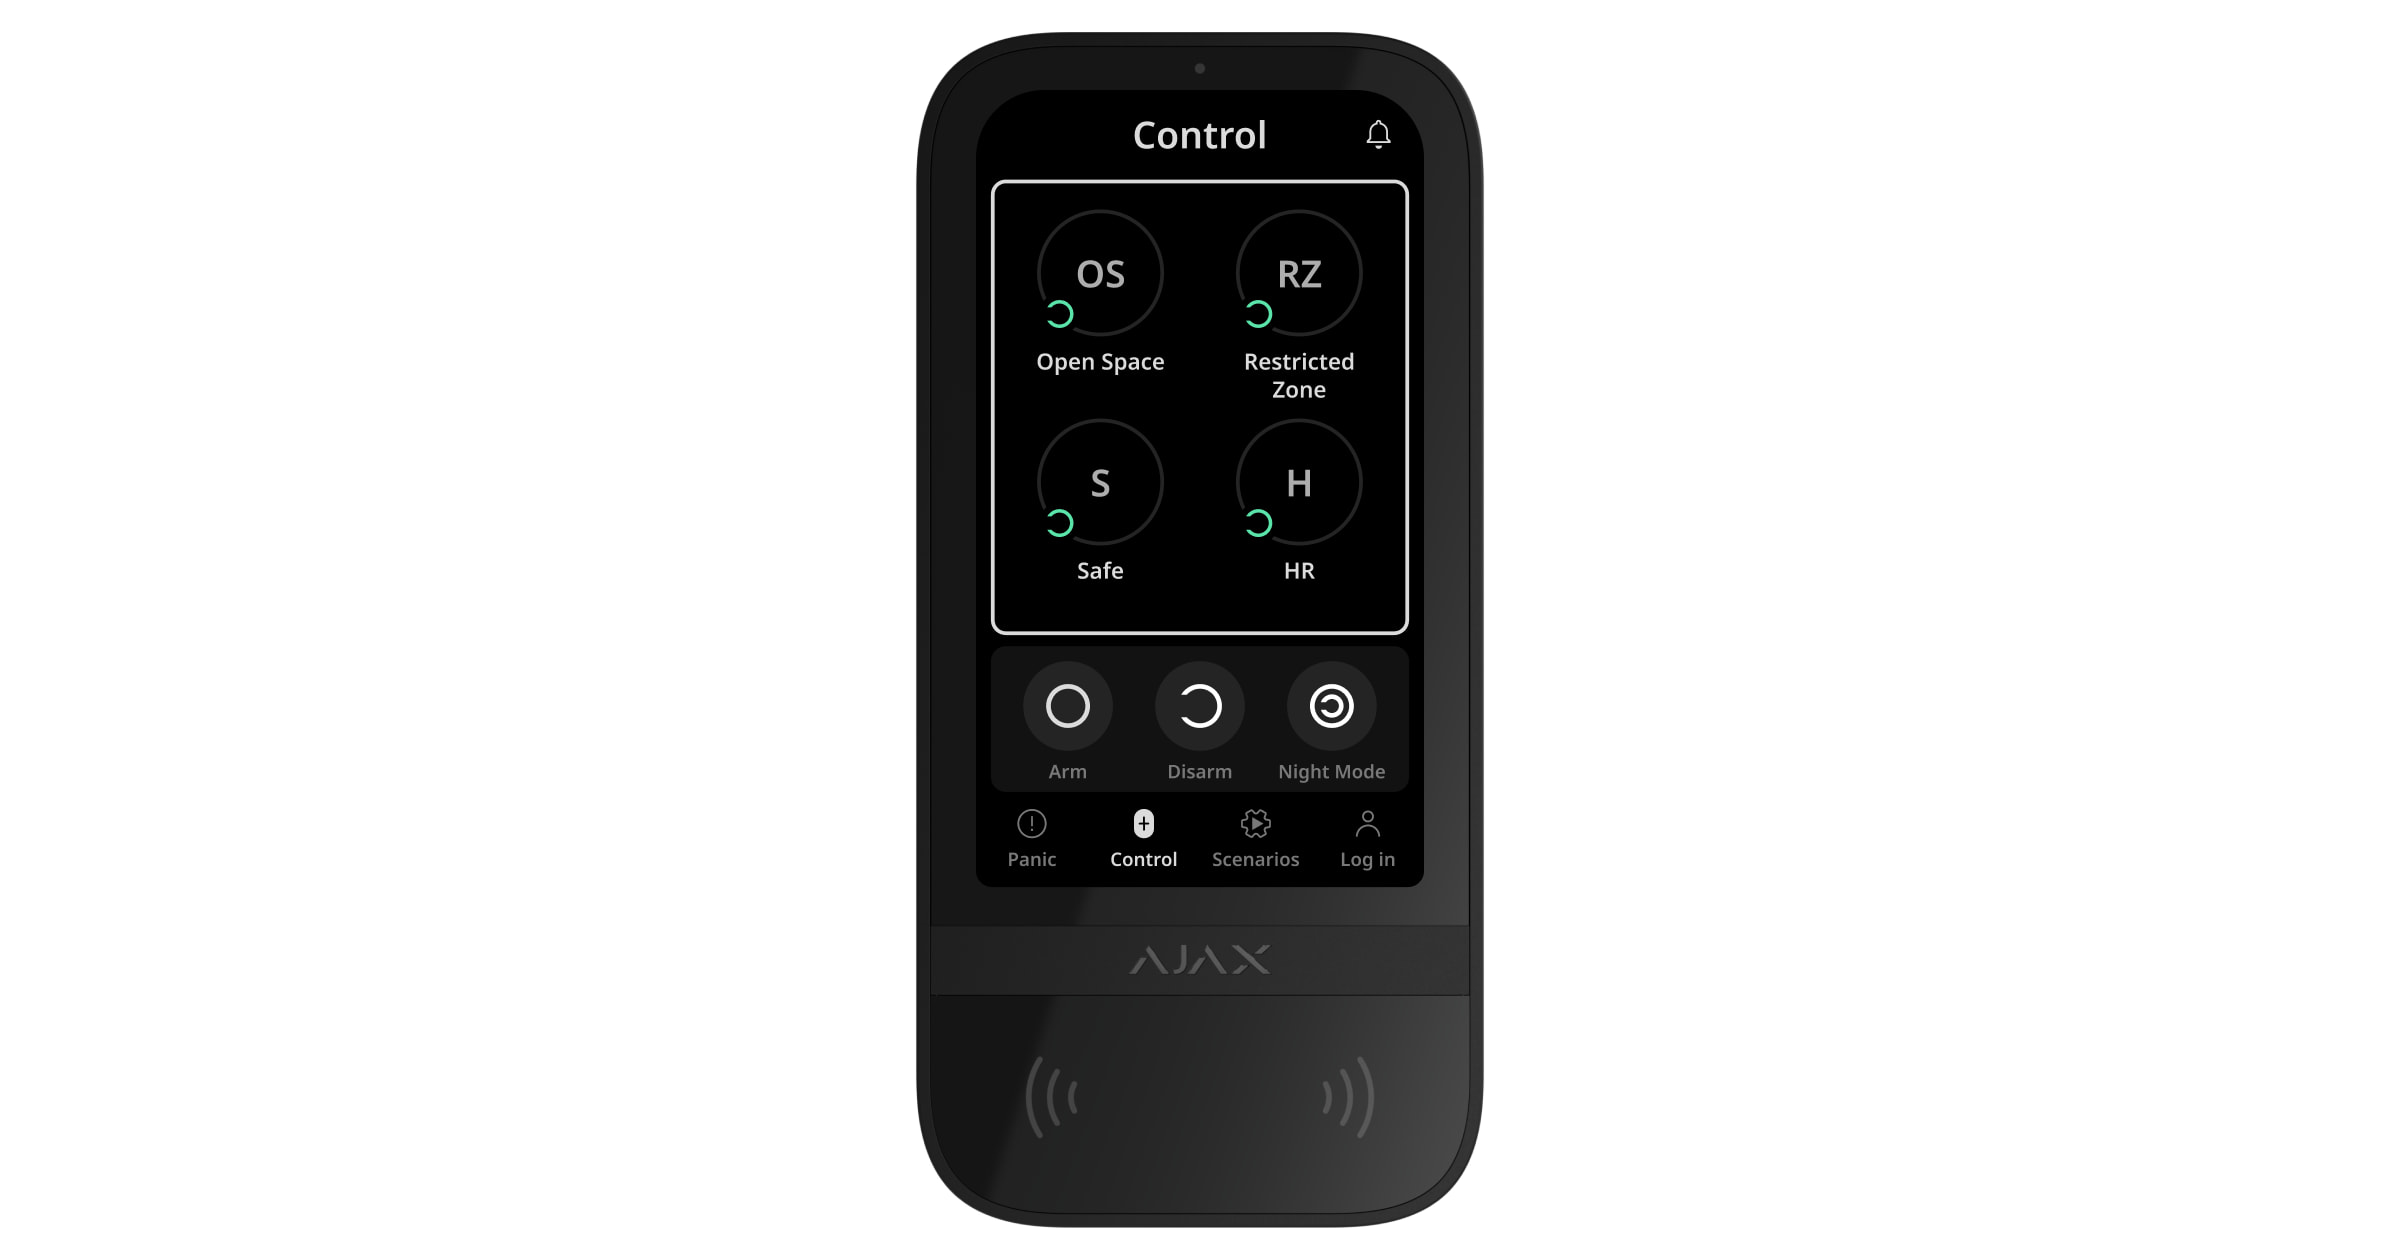
If a personal or access code, Tag/Pass, or smartphone is used, the name of the user who changed the security mode is displayed in the hub event feed and in the notifications list. If a general code is used, the name of the keypad from which the security mode was changed is displayed.
The step sequence to change the security mode with the keypad depends on whether user pre-authorization is enabled in the KeyPad TouchScreen settings.
If pre-authorization is enabled
- Activate the keypad by approaching it or holding your hand in front of the sensor. Perform pre-authorization.
- In the Control tab press the Arm / Disarm / Night Mode button.
- Activate the keypad by approaching it or holding your hand in front of the sensor. Perform pre-authorization.
- In the Control tab press the groups you want to arm or disarm.
Shared keypad groups will be available after authentication in the Control ![]() tab. If you press the Arm
tab. If you press the Arm ![]() / Disarm
/ Disarm ![]() / Night Mode
/ Night Mode ![]() button on the keypad display in this case, the security mode will change only for the shared keypad groups.
button on the keypad display in this case, the security mode will change only for the shared keypad groups.
Authenticate in the Log in ![]() tab to change the security mode of the groups available for the user.
tab to change the security mode of the groups available for the user.
To disarm the system with a duress code:
- Activate the keypad by approaching it or holding your hand in front of the sensor. Perform pre-authorization with an appropriate duress code.
- Press the Disarm button in the Control tab.
If pre-authorization is disabled
- Activate the keypad by approaching it or holding your hand in front of the sensor.
- In the Control tab press the Arm / Disarm / Night Mode button.
- Enter an appropriate code, present Tag/Pass or smartphone.
- Activate the keypad by approaching it or holding your hand in front of the sensor.
- In the Control tab press the groups you want to arm or disarm.
- Enter an appropriate code, present Tag/Pass or smartphone.
- To change the security mode for the groups available for the user, authenticate with a code, key fob/card, or smartphone in the Log in tab first. Press the groups you want to arm or disarm.
If you press the Arm ![]() / Disarm
/ Disarm ![]() / Night Mode
/ Night Mode ![]() button on the keypad display, the security mode will change for all displayed groups.
button on the keypad display, the security mode will change for all displayed groups.
To disarm the system with a duress code:
- Activate the keypad by approaching it or holding your hand in front of the sensor.
- Press the Disarm button in the Control tab.
- Enter an appropriate duress code.
Example of entering codes
| Code | Example | Note |
|
Keypad code Keypad duress code |
1234 → OK | Incorrectly entered numbers can be cleared with the |
|
User code User duress code |
2 → |
Enter the user ID first, press the Incorrectly entered numbers can be cleared with the |
|
Code of unregistered user Duress code of unregistered user |
1234 → OK | Incorrectly entered numbers can be cleared with the |
| RRU Code | 1234 → OK | Incorrectly entered numbers can be cleared with the |
Easy armed mode change
Easy armed mode change feature allows you to change the security mode to the opposite using Tag/Pass or smartphone, without confirmation with the Arm ![]() or Disarm
or Disarm ![]() buttons. Go to the keypad settings to enable the feature.
buttons. Go to the keypad settings to enable the feature.
To change the security mode to the opposite
- Activate the keypad by approaching it or holding your hand in front of the sensor. Perform pre-authorization if necessary.
- Present Tag/Pass or smartphone.
Two-stage arming
KeyPad TouchScreen can participate in two-stage arming but cannot be used as a second-stage device. The two-stage arming process using Tag, Pass or smartphone is similar to using a personal or general code on the keypad.
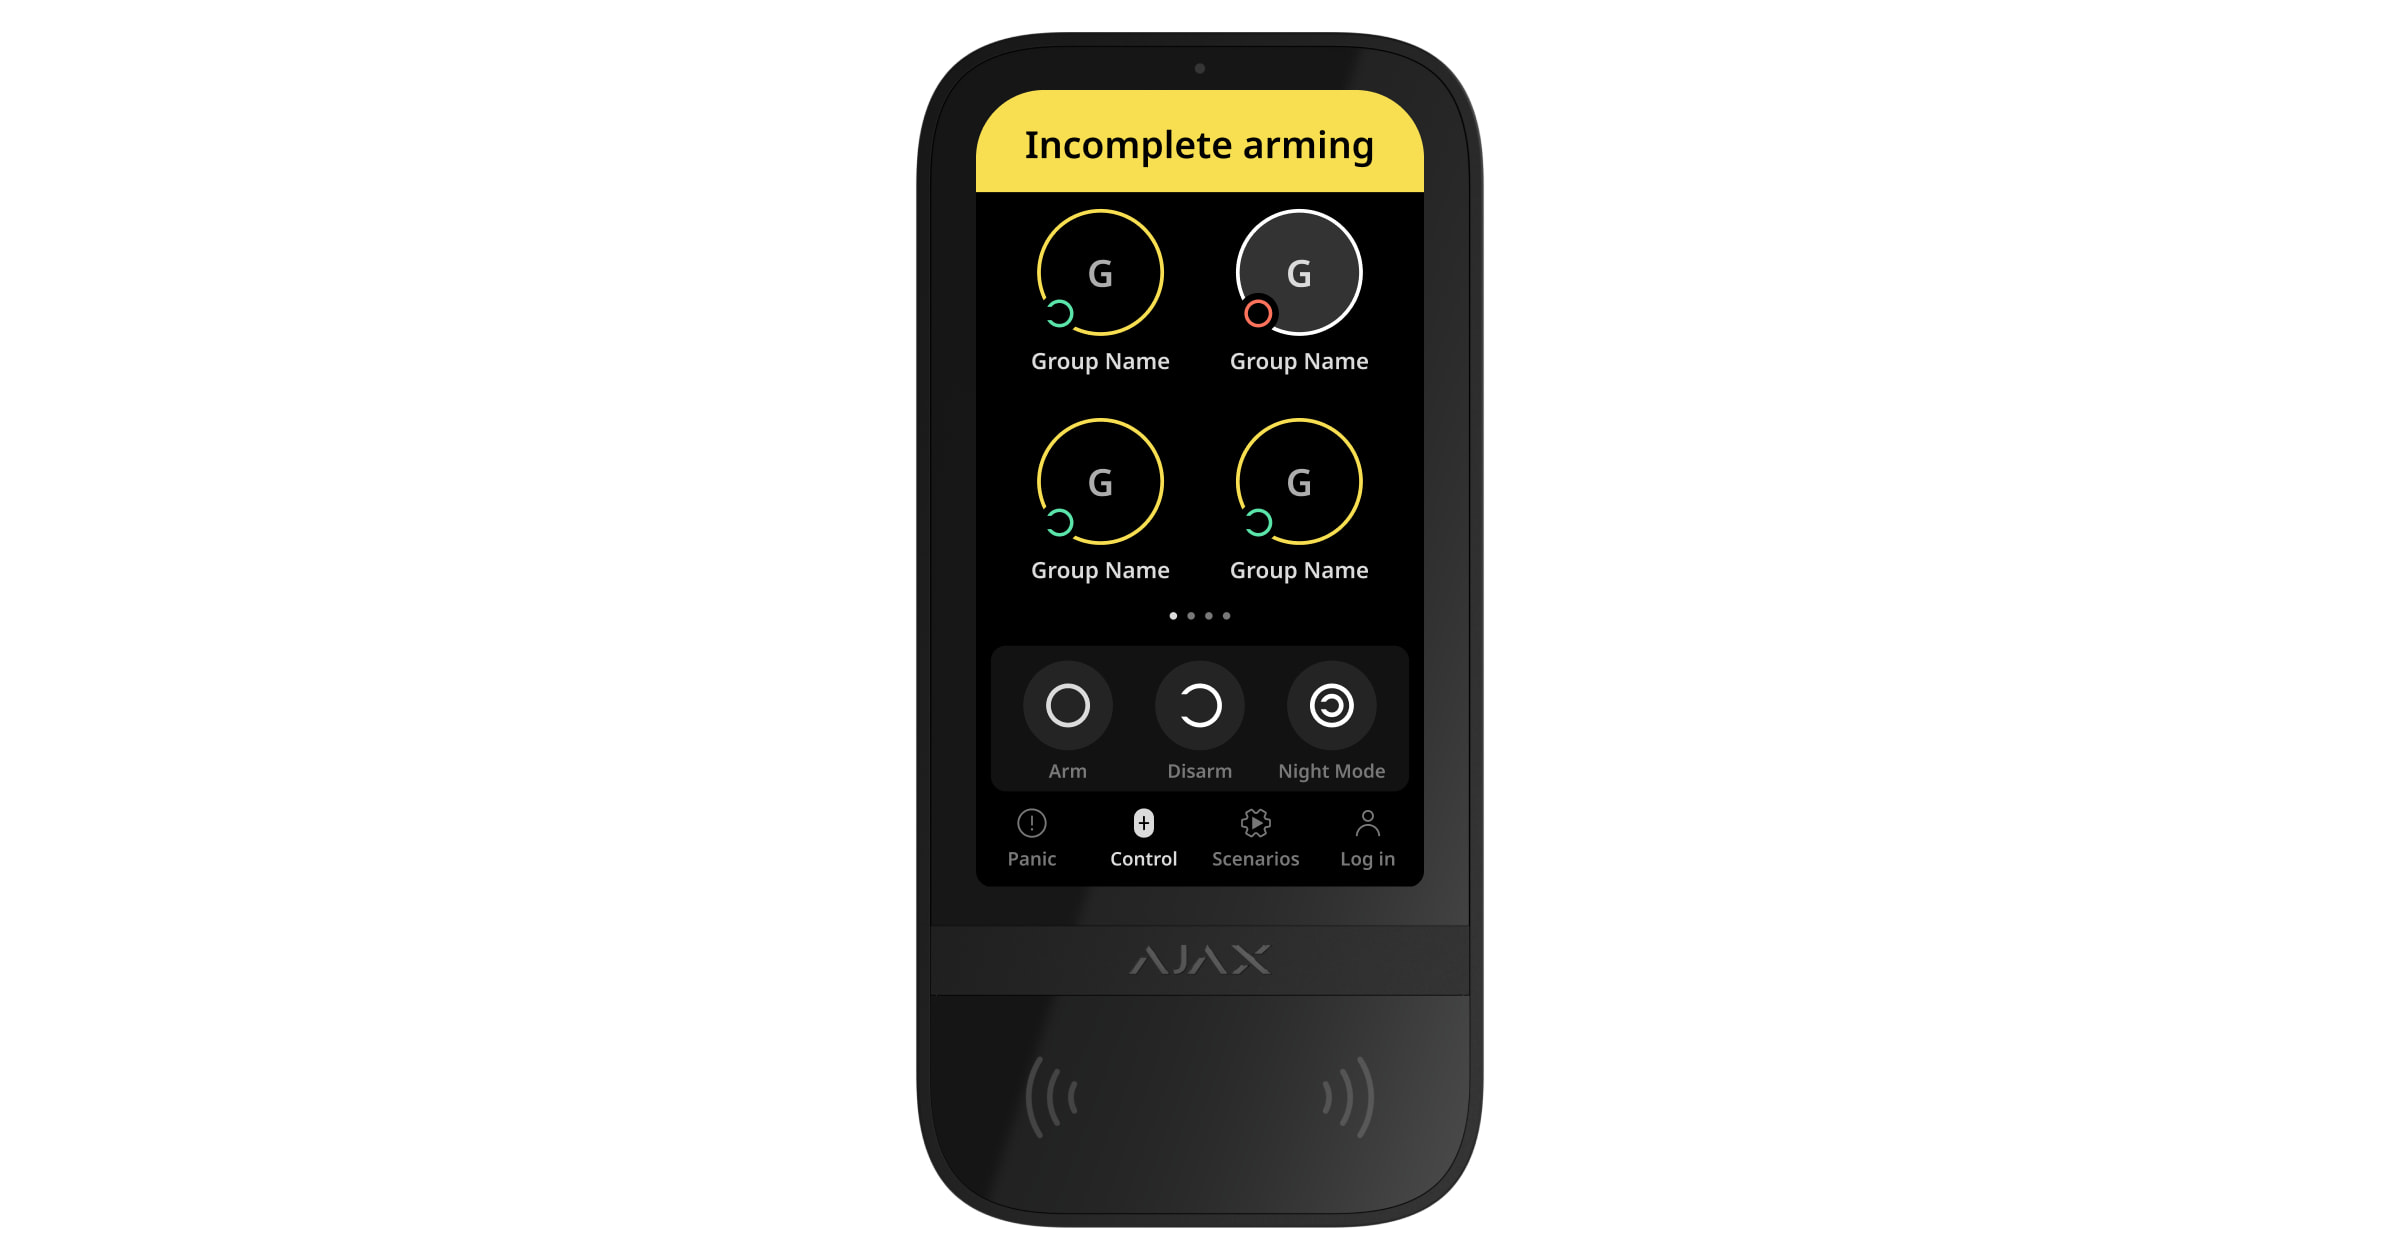
The system users can see whether the arming is started or incomplete on the keypad display. If Group Mode is activated, the color of the group buttons depends on the current state:
- Grey — disarmed, arming process not started.
- Green — arming process started.
- Yellow — arming is incomplete.
- White — armed.
Managing scenarios with the keypad
KeyPad TouchScreen allows users to create up to six scenarios of two types. The On preset action scenario type enables control of one or more automation devices and Ajax WaterStop Jeweller. The On switching the state scenario type allows users to switch the state of a single automation device or Ajax WaterStop Jeweller from the keypad’s Scenarios tab.
Starting with OS Malevich 2.38 after authorization on the keypad the system records which user initiated an automation scenario from the keypad. This information is displayed in the hub event feed.
- Open an Ajax app. Select the hub with at least one KeyPad TouchScreen and automation device. Add one if necessary.
- Go to the Devices tab.
- Select KeyPad TouchScreen from the list and go to the Settings menu.
- Go to the Automation Scenarios menu. Enable the Scenarios Management toggle.
- Open the Keypad Scenarios menu.
- Press Add Scenario.
- Select the On preset action scenario type.
- Select one or more automation devices. Press Next.
- Enter the scenario name in the Name field.
- Select the preferred device action during scenario execution.
- Press Save.
- Press Back to return to the Automation Scenarios menu.
- If necessary, activate the Pre-authorization toggle.
Created scenarios are displayed in the app: KeyPad TouchScreen → Settings ![]() → Automation Scenarios → Keypad Scenarios. You can turn them off, adjust settings, or delete them at any time.
→ Automation Scenarios → Keypad Scenarios. You can turn them off, adjust settings, or delete them at any time.
To remove a scenario:
- Go to the Settings of KeyPad TouchScreen.
- Open Automation Scenarios → Keypad Scenarios menu.
- Select the scenario you want to remove.
- Press Next.
- Press Delete Scenario.
The user can see and manage automation scenarios after authentication when the Pre-authorization feature is enabled. Go to the Scenarios ![]() tab, enter the code or present a personal access device to the keypad.
tab, enter the code or present a personal access device to the keypad.
To perform a scenario, press an appropriate button in the Scenarios ![]() tab.
tab.
The KeyPad TouchScreen display shows only activated scenarios in the keypad settings.
Indication
KeyPad TouchScreen informs users about alarms, entry/exit delays, current security mode, malfunctions, and other system states with:
- display;
- logo with an LED indicator;
- built-in buzzer.
KeyPad TouchScreen indication is shown on the display only when it is active. Icons that indicate some system or keypad states are displayed in the upper part of the Control ![]() tab. For example, they can indicate a fire alarm, system restoration after an alarm, and chime on opening. Information about the security mode will be updated even if it is changed by another device: key fob, another keypad, or in the app.
tab. For example, they can indicate a fire alarm, system restoration after an alarm, and chime on opening. Information about the security mode will be updated even if it is changed by another device: key fob, another keypad, or in the app.
| Event | Indication | Note |
| Alarm. | The built-in buzzer emits an acoustic signal. |
If Activate keypad buzzer if alarm in the system is detected toggle is enabled. The duration of the acoustic signal depends on the keypad settings. |
| An alarm was detected in the armed system. | The LED indicator flashes twice approximately every 3 seconds until the system is disarmed. |
To activate, enable the after-alarm indication in the hub settings. Also, specify KeyPad TouchScreen as a device for informing about other devices’ alarms. The indication turns on after the built-in buzzer has completed playing the alarm signal. |
| Switching on the device/Loading the updated system configuration to the keypad. | An appropriate notification is shown on the display while the data is loading. | |
| Switching off the device. | The LED indicator lights up for 1 second, then flashes three times. | |
| The system or the group is armed. | The built-in buzzer emits a short beep. | If notifications for Arming/Disarming are enabled. |
| The system or the group is switched to the Night Mode. | The built-in buzzer emits a short beep. | If notifications for Night Mode Activation/Deactivation are enabled. |
| The system is disarmed. |
The built-in buzzer emits two short beeps. The LED indicator’s light is constantly green if the external power is connected. |
If notifications for Arming/Disarming are enabled.
This type of LED indication is available for KeyPad TouchScreen Jeweller with firmware version 11.60.10.19 or later. |
| System in the armed mode. |
The LED indicator lights up red for a short time every 3 seconds if the external power is not connected. The LED indicator constantly lights up red if the external power is connected. |
If Armed Mode Indication is enabled. The indication turns on when the keypad switches to sleep mode (the display goes out). |
| An incorrect code was entered. |
An appropriate notification is shown on the display. The built-in buzzer emits a short beep (if adjusted). |
The beep loudness depends on the configured buttons’ volume. |
| Error when adding a card/key fob. |
An appropriate notification is shown on the display. The LED indicator lights up red once. The built-in buzzer emits a long beep. |
The beep loudness depends on the configured buttons’ volume. |
| Successfully added card/key fob. |
An appropriate notification is shown on the display. The built-in buzzer emits a short beep. |
The beep loudness depends on the configured buttons’ volume. |
| Low battery. | The LED indicator smoothly lights up and goes out when the tamper is triggered, an alarm is activated, or the system is armed or disarmed (if the indication is activated). | |
| Tamper triggering. | The LED indicator lights up red for 1 second. | |
| Jeweller/Wings Signal Strength Test. | The LED indicator lights up green during the test. | Turns on after launching an appropriate test in the keypad settings. |
| Firmware update. | The LED indicator periodically lights up green while the firmware is updating. | Turns on after launching the firmware update in the keypad States. |
| Muting interconnected fire alarm. |
An appropriate notification is shown on the display. The built-in buzzer emits an acoustic signal. |
|
| The keypad is deactivated. | An appropriate notification is shown on the display. | If Entirely option is selected for the Permanent or One-Time Deactivation keypad settings. |
| System restoration is required. | An appropriate screen to restore or send a request for the system restoration after the alarm appears on the display. |
The Restoration After Alarm feature has to be adjusted in the system. The screen appears when arming or switching the system to the Night Mode if an alarm or malfunction occurred in the system before. Admins or PROs with the rights to configure the system can restore the system. Other users can send a request for restoration. |
| Counting delays when entering/leaving (if Beep on delays is enabled) | The LED indicator and beep sounds turn on simultaneously if the Fast beep on delays feature is enabled. | LED indicator lights up red for Entry delays and green for Exit delays.
This type of indication is available for KeyPad TouchScreen Jeweller with firmware version 11.60.10.19 or later. |
Sound notifications of malfunctions
If any device is offline or the battery is low, KeyPad TouchScreen can notify system users with an audible sound. The keypad’s LED indicator will also flash. Malfunction notifications will be displayed in the events feed, SMS, or push notification.
To enable sound notifications of malfunctions, use Ajax PRO and PRO Desktop apps:
- Click Devices , choose hub and open its settings :
Click Service → Sounds and Alerts.
- Enable toggles: If battery of any device is low and If any device is offline.
- Click Back to save settings.
| Event | Indication | Note |
| If any device is offline. |
Two short sound signals, LED indicator flashes twice. Beep occurs once per minute until all devices in the system are online. |
Users can delay sound indication for 12 hours. |
| If KeyPad TouchScreen is offline. |
Two short sound signals, LED indicator flashes twice. Beep occurs once per minute until the keypad in the system is online. |
Sound indication delay is not possible. |
| If the battery of any device is low. |
Three short sound signals, LED indicator flashes three times. Beep occurs once per minute until the battery is restored or the device is removed. |
Users can delay sound indication for 4 hours. |
Sound notifications of malfunctions appear when the keypad indication is finished. If multiple malfunctions occur in the system, the keypad will first notify about the loss of connection between the device and the hub first.
Functionality testing
The Ajax system offers several types of tests to help select the correct installation place for the devices. Tests do not start immediately. However, the waiting time does not exceed the duration of one “hub-device” ping interval. Ping interval can be checked and configured at hub settings (Hub → Settings ![]() → Jeweller or Jeweller/Fibra).
→ Jeweller or Jeweller/Fibra).
To run a test, in the Ajax app:
- Select the required hub.
- Go to the Devices tab.
- Select KeyPad TouchScreen from the list.
- Go to Settings .
- Select a test:
- Run the test.
Device placement
The device is designed for indoor use only.
When choosing a location for the device, consider the parameters that affect its operation:
- Jeweller and Wings signal strength.
- Distance between the keypad and the hub or range extender.
- Presence of obstacles for radio signal passage: walls, interfloor ceilings, large objects located in the room.
Consider the recommendations for placement when developing a security system project for your facility. The security system must be designed and installed by specialists. A list of recommended partners is available here.
KeyPad TouchScreen is best placed indoors near the entrance. This allows disarming the system before the entry delays have expired and quickly arming the system when leaving the premises.
The recommended installation height is 1.3–1.5 meters above the floor. Install the keypad on a flat, vertical surface. This ensures KeyPad TouchScreen is securely attached to the surface and helps avoid false tamper alarms.
Signal strength
The Jeweller and Wings signal strength is determined by the number of undelivered or corrupted data packages over a certain period of time. The icon ![]() on the Devices
on the Devices ![]() tab indicates the signal strength:
tab indicates the signal strength:
- Three bars — excellent signal strength.
- Two bars — good signal strength.
- One bar — low signal strength, stable operation is not guaranteed.
- Crossed out icon — no signal.
Check the Jeweller and Wings signal strength before final installation. With a signal strength of one or zero bars, we do not guarantee stable operation of the device. Consider relocating the device as repositioning even by 20 cm can significantly improve the signal strength. If there is still poor or unstable signal after the relocation, use ReX 2 radio signal range extender. KeyPad TouchScreen is incompatible with ReX radio signal range extenders.
Do not install the keypad
- Outdoors. This can lead to keypad failure.
- In places where parts of clothing (for example, next to the hanger), power cables or Ethernet wire may obstruct the keypad. This can lead to false triggering of the keypad.
- Nearby any metal objects or mirrors causing attenuation and screening of the signal.
- Inside premises with temperature and humidity outside the permissible limits. This could damage the keypad.
- Closer than 1 meter from the hub or radio signal range extender. This can lead to a loss of communication with the keypad.
- In a place with a low signal level. This may result in the loss of the connection with the hub.
- Near the glass break detectors. The built-in buzzer sound may trigger an alarm.
- In places where the acoustic signal can be attenuated (inside furniture, behind thick curtains, etc.).
Installation
Before installing KeyPad TouchScreen, ensure that you have selected the optimal location that complies with the requirements of this manual.
To mount a keypad:
- Remove the SmartBracket mounting panel from the keypad. Unscrew the holding screw first and slide the panel down.
- Fix the SmartBracket panel using double-sided tape to the selected installation spot.

Double-sided tape can only be used for temporary installation. The device attached by the tape may come unstuck from the surface at any time. As long as the device is taped, the tamper will not be triggered when the device is detached from the surface.
SmartBracket has markings on the inner side for easy installation. The intersection of two lines marks the centre of the device (not the attachment panel). Orient them when installing the keypad.

- Place the keypad on SmartBracket. The device LED indicator will flash. It is a signal indicating that the enclosure of the keypad is closed.
If the LED indicator doesn’t light up during placing on SmartBracket, check the tamper status in the Ajax app, the integrity of the fastening, and the tightness of the keypad fixation on the panel.
- Run the Jeweller and Wings signal strength tests. The recommended signal strength is two or three bars. If the signal strength is low (a single bar), we do not guarantee stable operation of the device. Consider relocating the device, as repositioning even by 20 cm can significantly improve the signal strength. If there is still poor or unstable signal after the relocation, use ReX 2 radio signal range extender.
- Run Signal Attenuation Test. During the test, the signal strength can be reduced and increased to simulate different conditions at the installation location. If the installation spot is chosen correctly, the keypad will have a stable signal strength of 2–3 bars.
- If the tests are passed successfully, remove the keypad from SmartBracket.
- Fix the SmartBracket panel on the surface with bundled screws. Use all fixing points.
When using other fasteners, ensure they do not damage or deform the panel.
- Place the keypad on the SmartBracket mounting panel.
- Tighten the holding screw on the bottom of the keypad’s enclosure. The screw is needed for more reliable fastening and protection of the keypad from quick dismantling.

Connecting a third-party power supply unit
When connecting a third-party power supply unit and using KeyPad TouchScreen, follow the general electrical safety regulations for using electrical appliances, as well as the requirements of regulatory legal acts on electrical safety.
KeyPad TouchScreen is equipped with terminals for connecting a 10.5V–14 V⎓ power supply unit. Recommended electrical parameters for the power supply unit are: 12 V⎓ with a current of at least 0.5 A.
We recommend connecting an external power supply when you need to keep a display always active and to avoid rapid battery discharge, for example, when using the keypad in premises with low temperatures. An external power supply is also required for updating the keypad firmware.
When external power is connected, the pre-installed batteries serve as a backup power source. Do not remove them while connecting the power supply.
Before installing the device, make sure to check the wires for any damage to the insulation. Use only a grounded power source. Do not disassemble the device while it’s under voltage. Do not use the device with a damaged power cable.
To connect a third-party power supply unit:
- Remove the SmartBracket mounting panel. Carefully break out the perforated enclosure part to prepare the holes for the cable:

1 — to output the cable through the wall.
2 — to output the cable from the bottom. It is enough to break out one of the perforated parts. - De-energize external power supply cable.
- Connect the cable to the terminals by observing polarity (marked on the plastic).
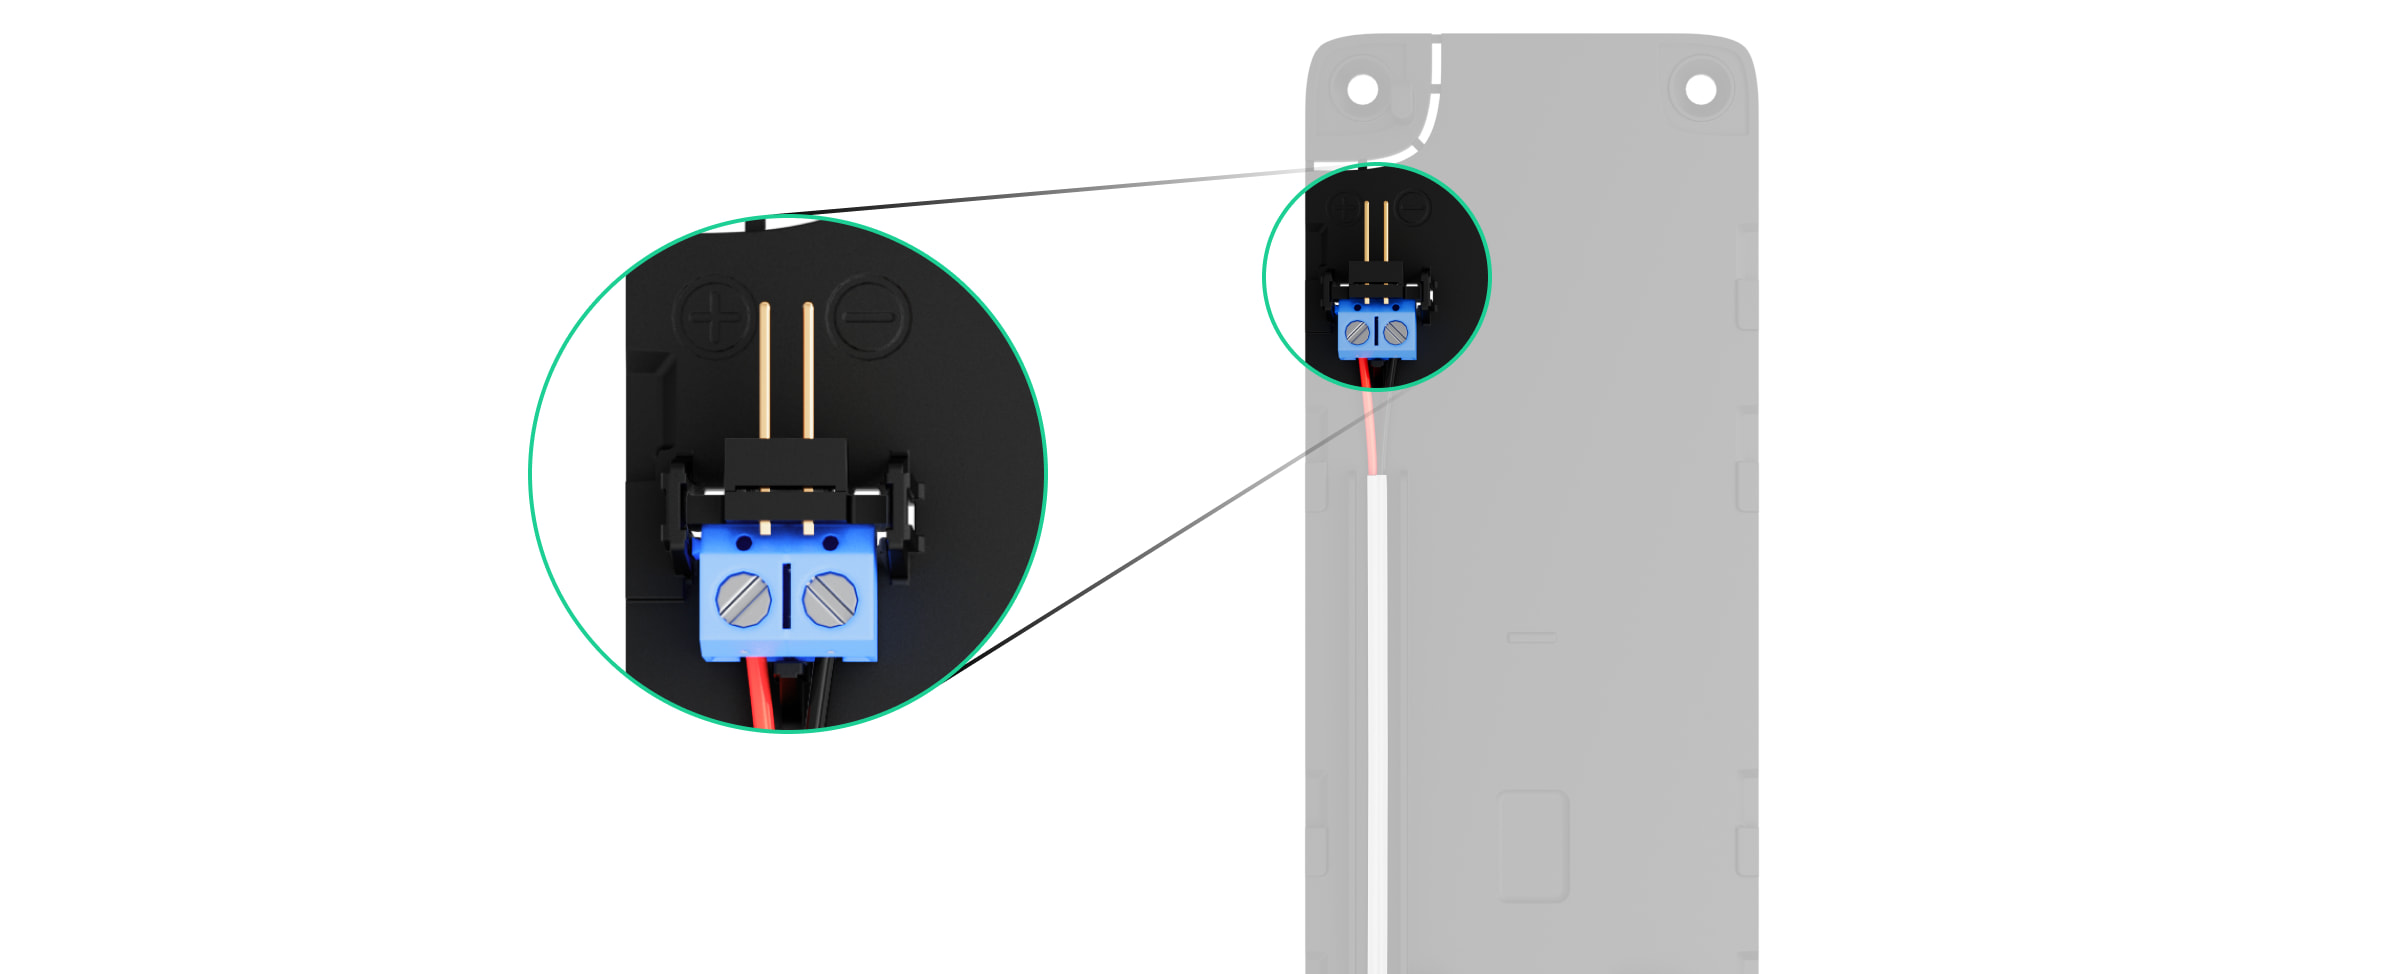
- Route the cable in the cable channel. An example of how to output the cable from the bottom of the keypad:

- Turn on the keypad and place it on the mounting panel.
- Check the status of batteries and external power in the Ajax app and the overall operation of the device.
For an INCERT-compliant system, do not connect the third-party power supply unit to KeyPad TouchScreen Jeweller.
Firmware update
The KeyPad TouchScreen firmware update can be installed when a new version is available. You can find out about it in the devices list in Ajax PRO: Tool for Engineers and PRO Desktop apps. If an update is available, the corresponding keypad will have an icon ![]() . An admin or a PRO with access to the system settings can run an update in the KeyPad TouchScreen states or settings. An update takes up to 1 or 2 hours (if the keypad operates via ReX 2).
. An admin or a PRO with access to the system settings can run an update in the KeyPad TouchScreen states or settings. An update takes up to 1 or 2 hours (if the keypad operates via ReX 2).
To update the firmware, connect an external power supply unit to KeyPad TouchScreen. Without an external power supply, an update won’t be started.
If KeyPad TouchScreen is not powered from an external power supply at the installation place, you can use a separate SmartBracket mounting panel for KeyPad TouchScreen. To do this, remove the keypad from the main mounting panel and install it on a reserve panel connected to an external power supply with a voltage of 10.5–14 V⎓ and a current of 0.5 A or more.
The mounting panel can be purchased separately from authorized Ajax Systems partners.
Maintenance
Regularly check the functioning of KeyPad TouchScreen. The optimal frequency of checks is once every three months. Clean the device enclosure of dust, cobwebs, and other contaminants as they emerge. Use soft, dry wipes suitable for equipment maintenance.
Do not use substances that contain alcohol, acetone, petrol, and other active solvents to clean the device. Gently wipe the touch screen.
The device runs for up to 1.5 years on the pre-installed batteries — a calculated value based on default settings and up to 4 daily interactions with the keypad.
The system will send an early warning when it’s time to replace the batteries. When changing the security mode, the LED will slowly light up and go out.
Technical specifications
Warranty
Warranty for the Limited Liability Company “Ajax Systems Manufacturing” products is valid for 2 years after the purchase.
If the device does not function correctly, please contact the Ajax Technical Support first. In most cases, technical difficulties can be resolved remotely.
Contact Technical Support:
Manufactured by “AS Manufacturing” LLC
