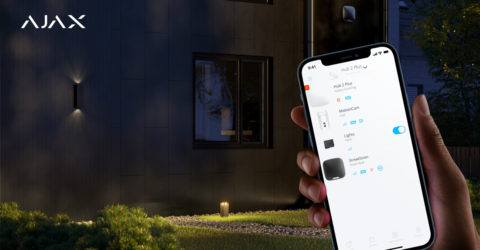
In the Control mode, the Button responds to long and short presses that control automation devices in the Ajax security system.
You can bind the action of an automation device (Relay, WallSwitch or Socket) in the Button settings — Scenarios menu.
On automating the routine tasks and controlling the home appliances
In the Control mode, the Button responds to long and short presses that control automation devices in the Ajax security system.
You can bind the action of an automation device (Relay, WallSwitch or Socket) in the Button settings — Scenarios menu.
To bind the action of an automation device (Relay, WallSwitch or Socket) to a long or short press of a Button:
The response of Relay, WallSwitch or Socket to arming/disarming is configured in the Scenarios menu.
To access the Scenarios menu:
Learn more: How to create and configure a scenario in the Ajax security system
Alarm type icons for the scenario setup:
— motion detection with MotionProtect, MotionProtect Plus, CombiProtect, MotionProtect Curtain, MotionProtect Outdoor, MotionCam, MotionCam Outdoor;
— motion detection with left side of DualCurtain Outdoor;
— motion detection with right side of DualCurtain Outdoor;
— door/window opening detection with DoorProtect, DoorProtect Plus;
— glass break detection with GlassProtect, CombiProtect;
— detection of a change in the tilt angle of DoorProtect Plus;
— shock detection with DoorProtect Plus;
— triggering of an external detector connected to Transmitter, DoorProtect, DoorProtect Plus or GlassProtect;
— alarm by shifting detected with the Transmitter accelerometer;
— wire breakage of the roller shutter detector connected to DoorProtect Plus;
— triggering of the roller shutter opening detector connected to DoorProtect Plus;
— pressing of Button, DoubleButton, SpaceControl, KeyPad Plus or KeyPad panic button;
To run the scenario by pressing the panic button, specify the device: Button, DoubleButton, SpaceControl, KeyPad Plus or KeyPad. Running a scenario with pressing the panic button in the app is not provided.
— threshold temperature rise detection (+59°C ± 2°C) with FireProtect, FireProtect Plus;
— temperature jump detection (of 30°C for 30 minutes) with FireProtect, FireProtect Plus;
— smoke detection with FireProtect, FireProtect Plus;
— detection of a dangerous concentration of carbon monoxide sensed by the FireProtect Plus detector;
— water sensed by contacts of LeaksProtect leak detector.
To delete or edit a scenario:
Learn more: How to create and configure a scenario in the Ajax security system
In pulse mode, Relay can close/open contacts for up to 15 seconds. In other cases, this function is not provided, since each scenario is a single action of the automation device. If one scenario enables the device, another scenario will be required for disabling, or you can disable it manually in the application.
Learn more: How to create and configure a scenario in the Ajax security system
The user can create a scenario for arming or disarming a specific group by schedule.
To create and configure arming/disarming scenario:
Learn more: How to create and configure a scenario in the Ajax security system
Scenarios are supported by automation devices: Relay, WallSwitch and Socket.
Yes, the scenario can be triggered by alarm of several detectors.
Learn more: How to create and configure a scenario in the Ajax security system
Ajax security system allows you to configure the reaction of Relay, WallSwitch and Socket in response to an alarm or change in security mode, Button click, as well as scheduled actions. The scenario in which the automation device will respond is configured remotely via Ajax apps.
Use scenarios to automate your security system and reduce the number of routine actions. For example, set up water shut-off by alarm of the LeaksProtect leak detector, scheduled heater activation, or automatic clothing the electric lock when the system is being armed.
Learn more: How to create and configure a scenario in the Ajax security system
Two types of scenarios can be bound to SpaceControl, KeyPad Plus or KeyPad:
If you choose scenario by alarm, an automation device (Relay, WallSwitch or Socket) will be triggered by pressing SpaceControl or KeyPad panic button.
Also, the automation device can respond to arming/disarming using SpaceControl or KeyPad. However, in this case, the device will also respond to automatic arming/disarming according to the schedule or using the app. In this type of scenario, the determining factor will be the system status, not the control device.
Learn more: How to create and configure a scenario in the Ajax security system
Button operates in two modes: as a panic button and as a control button. In the panic button mode, pressing the Button raises an alarm, which, in turn, can trigger a scenario. In the control button mode, the Button controls automation devices by long or short pressing, without raising an alarm.
To change the Button operation mode:
Learn more: How to create and configure a scenario in the Ajax security system
The maximum number of scenarios depends on the hub model: Hub supports up to 5 scenarios, Hub 2 — up to 32, Hub Plus and Hub 2 Plus — up to 64.
To create and configure arming/disarming scenario:
Learn more: How to create and configure a scenario in the Ajax security system
To create a scheduled scenario, select the device (Relay, WallSwitch or Socket) and go to the settings menu by clicking on the gear icon .
Go to the Scenarios menu and click Create scenario if you are creating a scenario for the first time, or Add Scenario if scenarios have already been created in the security system.
Learn more: How to create and configure a scenario in the Ajax security system
To create an alarm scenario, select a device (Relay, WallSwitch or Socket) and go to the settings menu by clicking on the gear icon .
Go to the Scenarios menu and click Create scenario if you are creating a scenario for the first time, or Add Scenario if scenarios have already been created in the security system.
Learn more: How to create and configure a scenario in the Ajax security system