
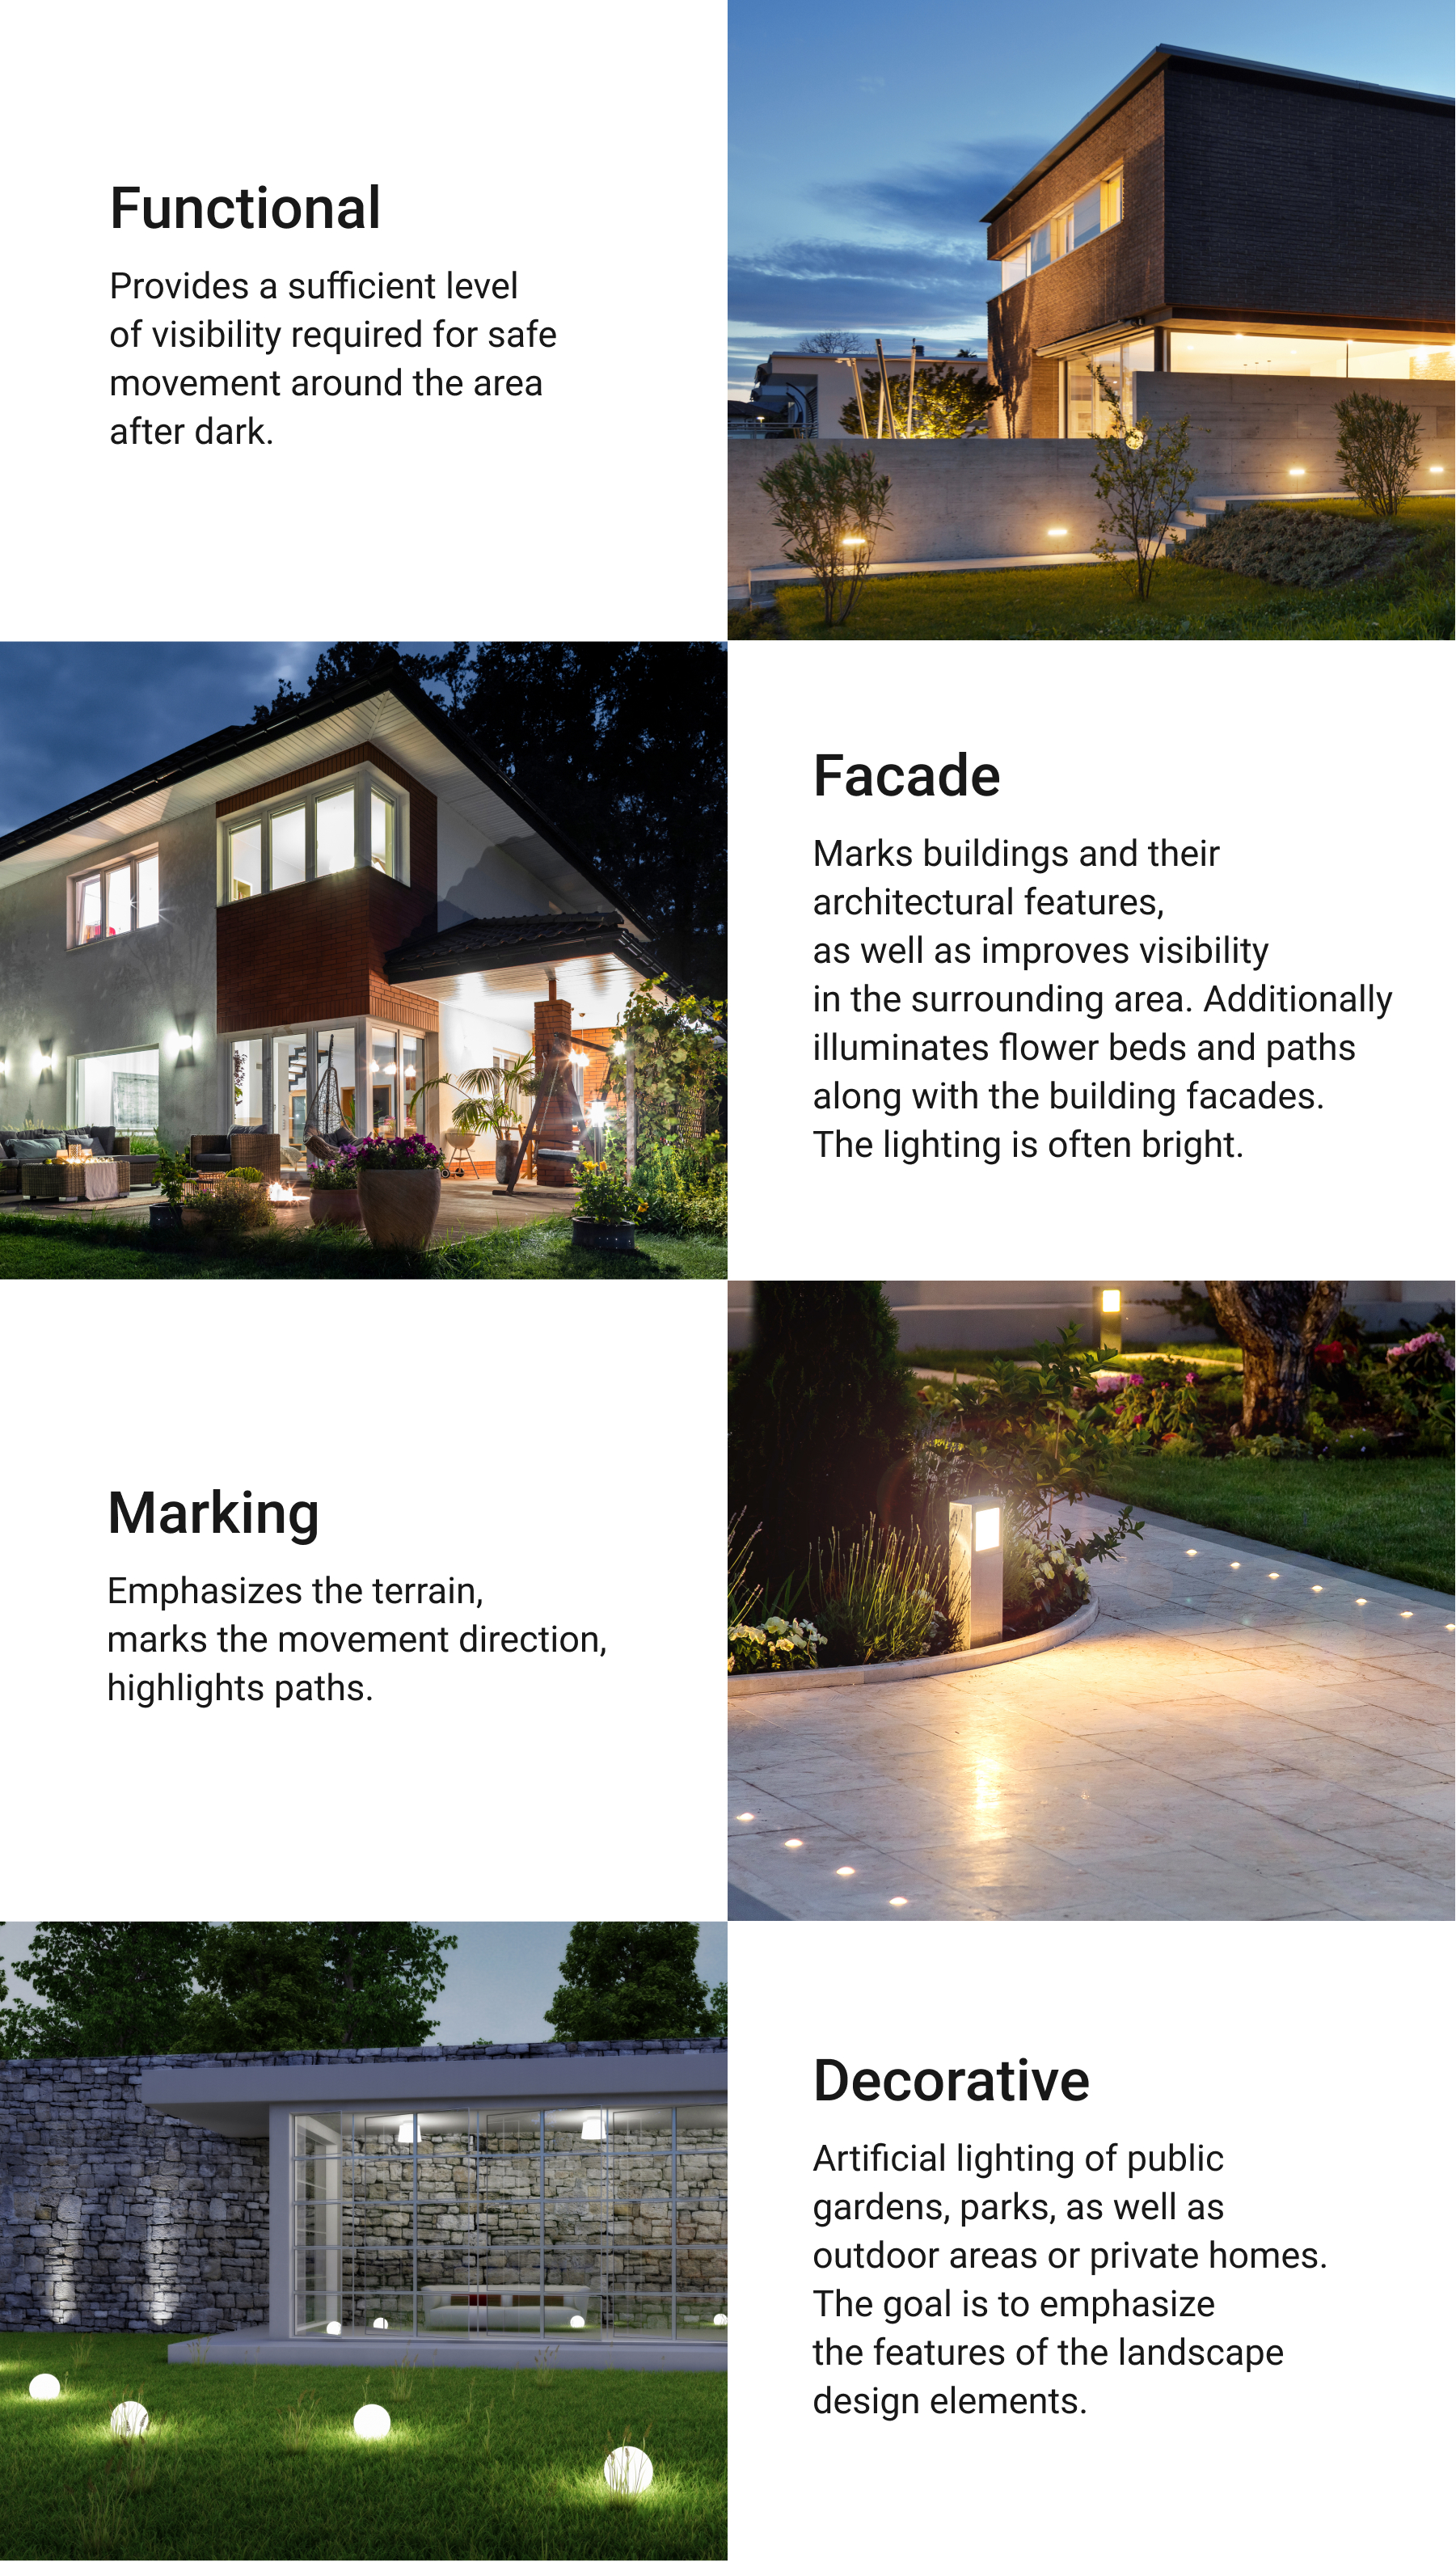
In addition to protection against burglary, fire, and flood, the Ajax system offers automation options. We already wrote about how to automatically control the water shut off. In this article we will tell you about the automation of outdoor lighting and the nuances of its connection and control — using apps, scenarios, and the wireless Button.
Why automate outdoor lighting
Automatic lighting control allows you to avoid wasting time on turning lights on and off manually and to save energy by turning lights off by schedule.
Lighting automation is most often used in private houses and summer cottages. But it can also be used in parking lots, business centres, and other facilities — both for security and to optimize routine processes.
By implementing automation with Ajax, you can:
- Set up a scenario to trigger the motion detector to instantly light an area when an intruder is detected on the property. This way you can not only scare the offender away, but also capture their features with integrated video surveillance cameras.

Sufficient light levels will provide better image quality when taking pictures.
- Set up a lighting schedule and use automation devices to turn lights on at night and off in the morning.
- Manage lighting remotely via the Ajax app even from the other side of the world.
- Control the lights with the wireless Button. The miniature buttons can be placed in “strategic locations” with the Holder mount or carried with you, for example on a keychain.
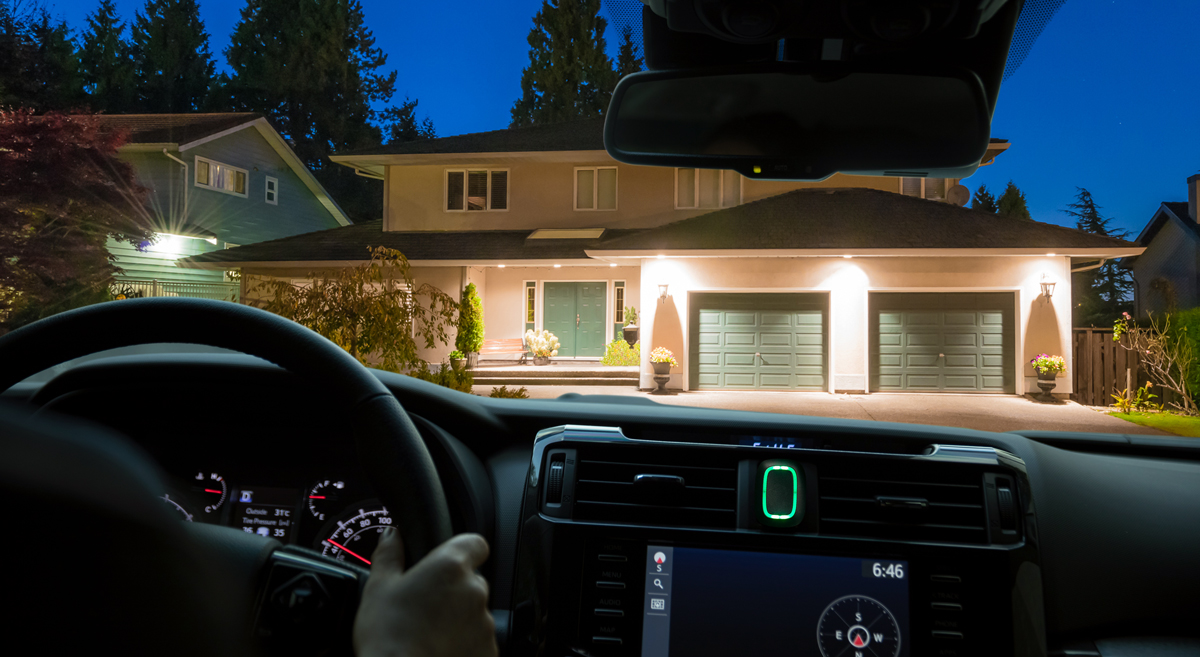
- Create the effect of presence at the site — turn the lighting on and off remotely in the Ajax app or by schedule.
What outdoor lighting can be automated with Ajax
The Ajax system allows you to control any outdoor lighting.
Outdoor lighting consists of three main components – lighting devices, electrical wiring, and the power control equipment. Ajax automation modules connect to the outdoor lighting energy controls, providing control via Ajax apps, automation scenarios, and the Button.
Depending on the task, Ajax automation devices can be connected to either one or a chain of lighting devices.
Types of lighting by supply voltage:
- 110/230 volts — controlled by WallSwitch. The same power supply is used.
- 12/24 volts — controlled by Relay. The same power supply is used.
- 24/36 volts — controlled by Relay. Different power sources are used.
Ajax automation devices allow you to control a single lighting device or a group of devices simultaneously. Limitation of the number of lighting equipment in one circuit is determined by the total load. This information is available in the Relay and WallSwitch user manuals.
To independently control multiple lighting devices, you will need the appropriate number of automation devices. They will need to be connected to each of the lights separately.
Make the lighting calculation — determine the exact number and power of all lights, the length and cross-section of the cable, as well as the power of circuit breakers and RCDs. This will help determine the number and type of automation devices to be connected.
All elements of lighting, including light bulbs, lamps, and switches, must be designed for outdoor use and be protected against moisture and dust. The degree of protection of the devices is indicated by IP. The classification can be found on Wikipedia.
Try to use copper wires: they are not as susceptible to mechanical damage. Be sure to ground all light devices.
Placement of the lights should not obstruct service and installation.
Safety

When installing and operating electric devices, follow the general electrical safety rules, as well as the requirements of electrical safety regulations.
Do not disassemble devices under voltage, and do not use devices with a damaged power cord.
Relay and WallSwitch must be installed and connected by a qualified technician. Do not connect the Relay to a power supply with a voltage of more than 36 V or to AC circuits. Also, do not connect the wall switch to a voltage beyond 184–253 V. This is a fire hazard and will damage the device.
During installation, do not allow moisture to penetrate the Relay or WallSwitch, or the cable connections. Consider the operating temperature range and operating humidity of the relay, and do not keep the devices outdoors.
Use distribution boxes to connect lighting devices. This eliminates the risk of fire, because the connection point of the wires is isolated. In addition, access to the wires in the distribution box will be much easier and more convenient.
Use proper connection of electrical conductors of lighting devices: welding, soldering, pressing, or screw and bolt clamps when connecting lighting devices. Never use twists.
Check each connected lighting circuit with a multimeter for breaks and short circuits. In addition, you can check the resistance and, consequently, the power consumption.
First, connect the entire circuit, check it, and only then connect the line to the circuit breaker in the distribution panel.
Once the connection is complete, make sure that all the lights work. If any lights do not work, disconnect the entire line, then disassemble and check the condition of the contacts and connections.
What is needed to automate outdoor lighting and what is its role
- Ajax app — managing, adding devices, and customizing.
- Hub (control panel) — coordinates operation of the system devices. If you need a lot of scenarios, look at some more advanced hub models.
- Relay (relay with dry contacts) — controls switching on/off of lights.
- WallSwitch (power relay) — controls the power supply.
- DIN Holder — a bracket to fix Relay and WallSwitch on a DIN rail inside a switchboard or junction box.
- Backup power (optional) — allows you to control lighting in case of the main power failure. The hub runs for up to 16 hours on the backup battery. Ajax devices run on batteries for 2 to 7 years.
Ajax automation devices feature compact size. They can be placed in a deep sub-socket, electrical device body, or electrical panel. A flexible relay antenna will provide communication stability at distances of up to 1,000 meters without obstacles.
The signal quality at the site can be approximated with a radio range calculator.
Proprietary secure radio protocol Jeweller guarantees smooth interaction between all Ajax security system devices and the hub. Using 5 radio signal range extenders, one Ajax system covers up to 35 km² and is ready to secure and automate hotel complexes, warehouses, estates, or factories.
How to connect Ajax to outdoor lighting
Connecting Ajax to a 110-230 V electrical line
WallSwitch and outdoor lighting can be connected to the same power source. Connect WallSwitch to the outdoor lighting power circuit according to the diagram below and configure the system.

- Connect the power supply source to the power terminals of WallSwitch.
- Connect the WallSwitch contact terminals to the outdoor lighting power inputs.
WallSwitch setup
In the Ajax app:
- Go to the Devices tab
 .
. - Select WallSwitch and go to its Settings
 .
. - Set the parameters:
- Relay operating mode: Bistable or pulse.
The pulse mode allows you to turn on the lights for a set time from 0.5 to 255 seconds. This can be useful, for example, when you need to turn on the road lighting only for the time the car is parked.
- Pulse duration (if the pulse mode is selected): 0.5 to 255 seconds.
- Contact state: normally closed or normally opened.
- Relay operating mode: Bistable or pulse.
- Click Back to save the settings.
Rename WallSwitch for more informative notifications. For example, call the device Outdoor Lighting.
Connecting Ajax to a 12/24 V electrical line
The Relay, coupling relay, and outdoor lighting can be powered from a single power source. Connect Relay to the outdoor lighting power circuit according to the diagram below and configure the system.
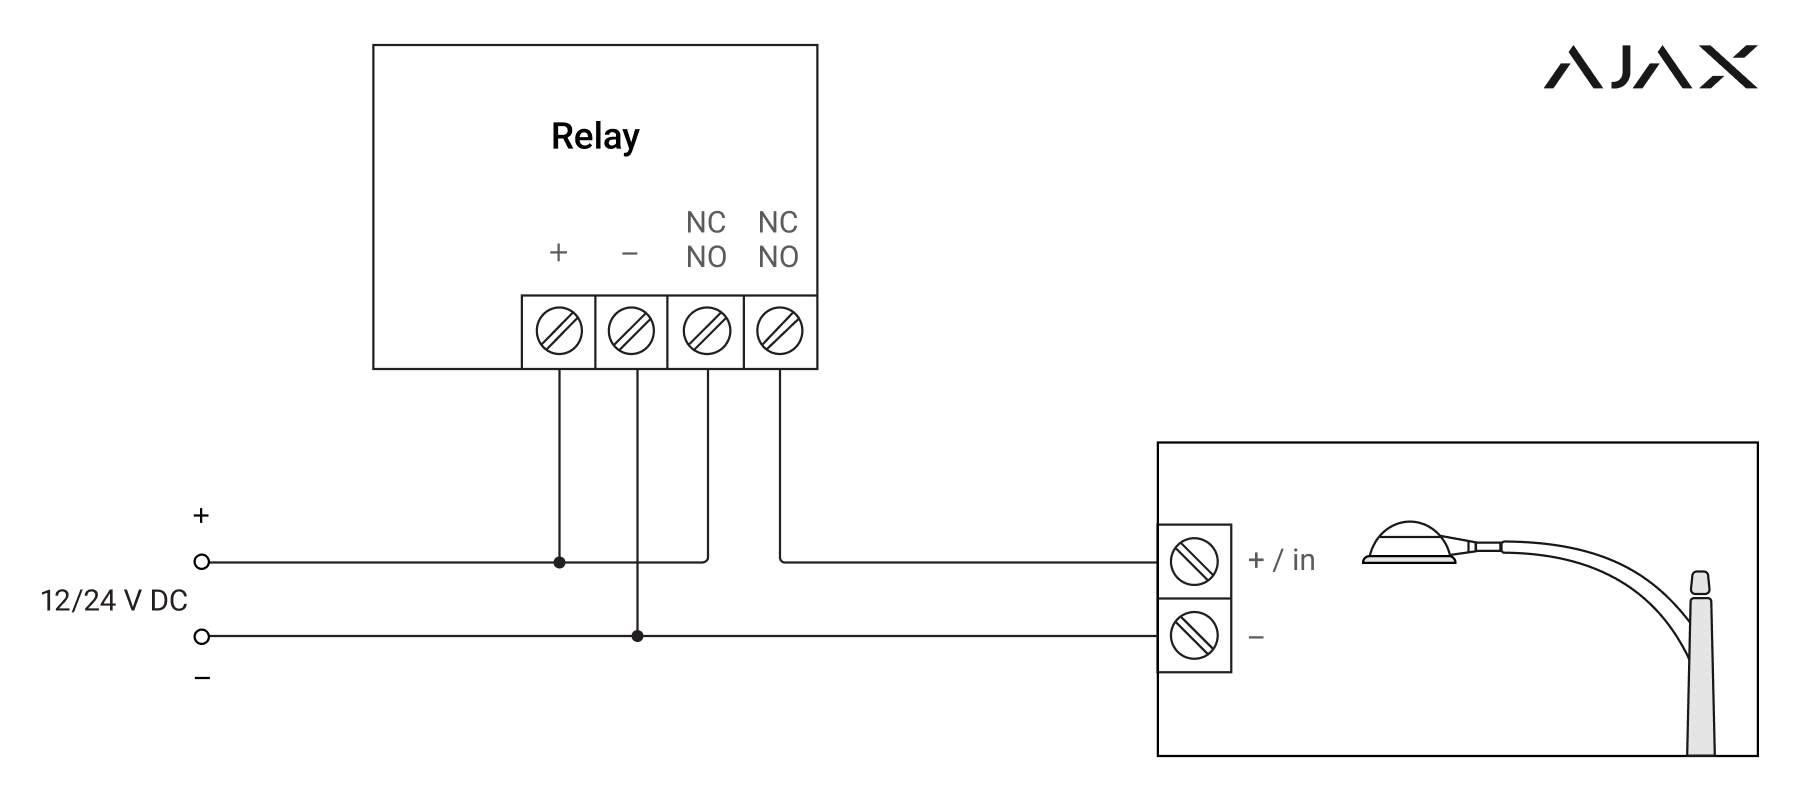
- Connect the power supply source to the power terminals of the Relay.
- Connect the “+” of the power supply to one of the relay contact terminals, and the “+” of the lighting device to the other terminal of the relay contacts.
- Connect the “–” contact of the lighting device to the “–” of the power supply.
Relay setting
In the Ajax app:
- Go to the Devices tab .
- Select Relay and go to its Settings .
- Set the parameters:
- Relay operating mode: Bistable or pulse.
The pulse mode allows you to turn on the lights for a set time from 0.5 to 255 seconds. This can be useful, for example, when you need to turn on the road lighting only for the time the car is parked.
- Pulse duration (if the pulse mode is selected): 0.5 to 255 seconds.
- Contact state: normally closed or normally opened.
- Relay operating mode: Bistable or pulse.
- Click Back to save the settings.
For more informative notifications, rename Relay. For example, call the device Outdoor Lighting.
Connecting Ajax to a 36 V electrical line
Relay is powered by a 12/24 V power supply. The outdoor lighting is powered by another 36 V power supply. Connect Relay to the outdoor lighting power circuit according to the diagram below and configure the system.
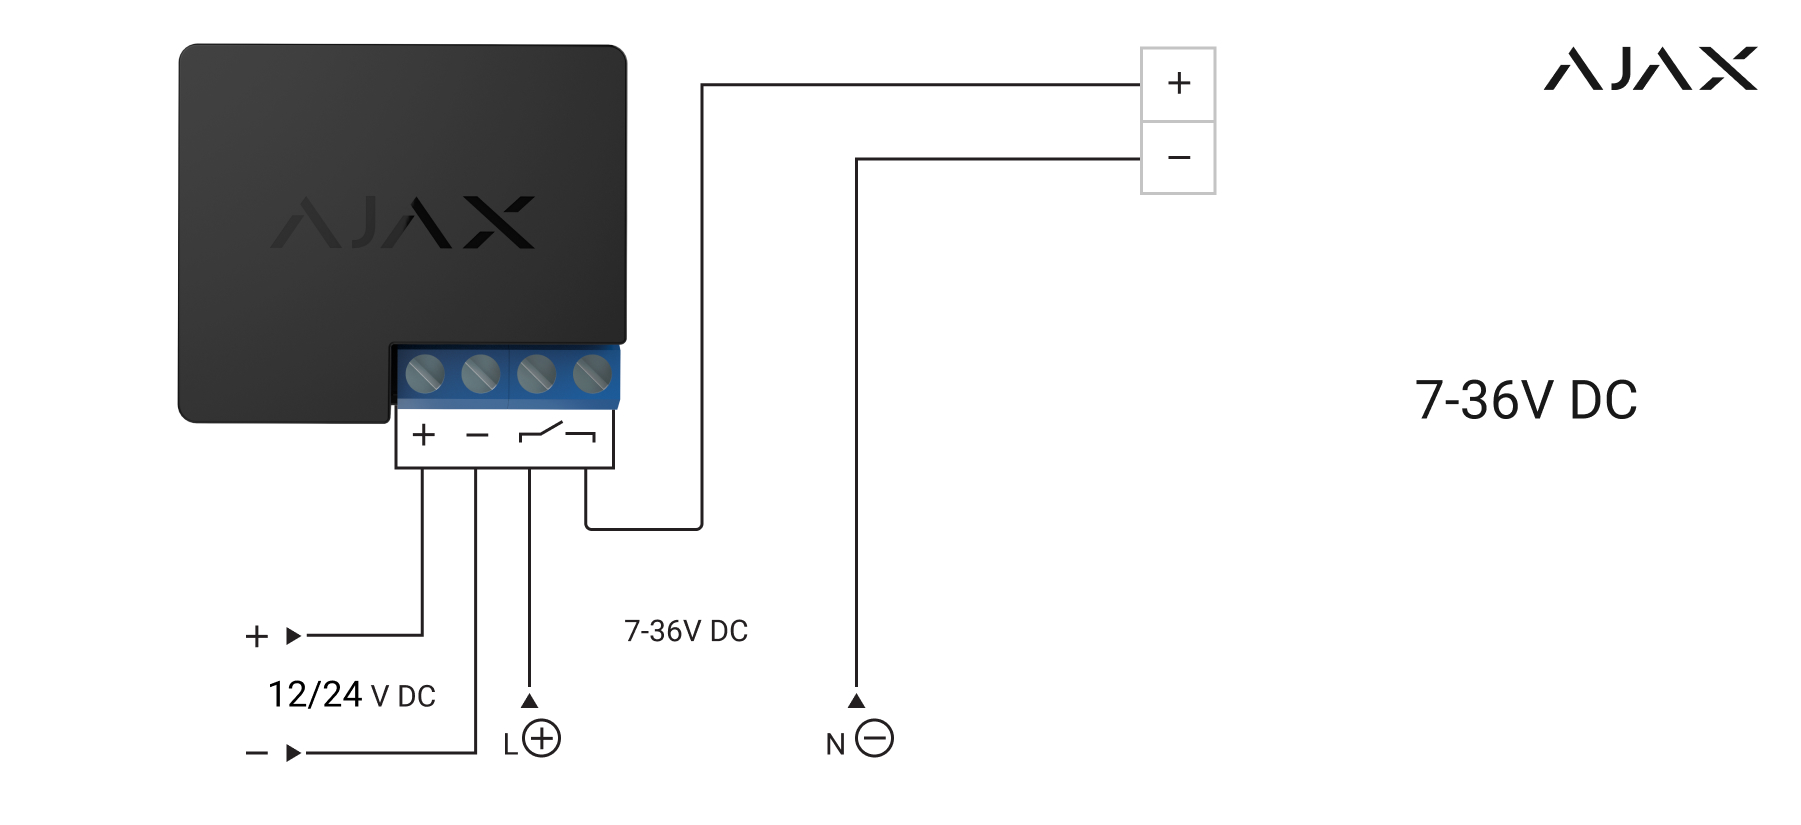
- Connect the 12/24 V power supply source to the power terminals of the Relay.
- Connect the “+” of the 36 V power supply to one of the terminals of the Relay contacts.
- Connect the second terminal of the Relay contacts to the “+” of the lighting device.
- Connect the “–” contact of the lighting device to the “–” of the 36 V power supply.
Relay setting
In the Ajax app:
- Go to the Devices tab .
- Select Relay and go to its Settings .
- Set the parameters:
- Relay operating mode: Bistable or pulse.
The pulse mode allows you to turn on the lights for a set time from 0.5 to 255 seconds. This can be useful, for example, when you need to turn on the road lighting only for the time the car is parked.
- Pulse duration (if the pulse mode is selected): 0.5 to 255 seconds.
- Contact state: normally closed or normally opened.
- Relay operating mode: Bistable or pulse.
- Click Back to save the settings.
For more informative notifications, rename Relay. For example, call the device Outdoor Lighting.
How to set up scenarios for outdoor lighting automation
Ajax scenarios allow you to turn the lights on and off when changing the security mode, enabling and disabling the Night mode, by alarm, and according to the schedule.
To create scenarios to control outdoor lighting, go to Ajax App → Devices ![]() → Relay or WallSwitch → Settings
→ Relay or WallSwitch → Settings ![]() → Scenarios.
→ Scenarios.
How to manage outdoor lighting with the Button
The hub with OS Malevich version 2.10 and later allows you to configure different actions for short and long pressing of the Button. For example, a short press can turn lights on, and a long one can turn them off.
To control outdoor lighting with the Button, configure the appropriate scenarios in the Ajax app:
- Devices .
- Button.
- Settings .
- Scenarios.
How to manage outdoor lighting with the Ajax app
WallSwitch control in the app
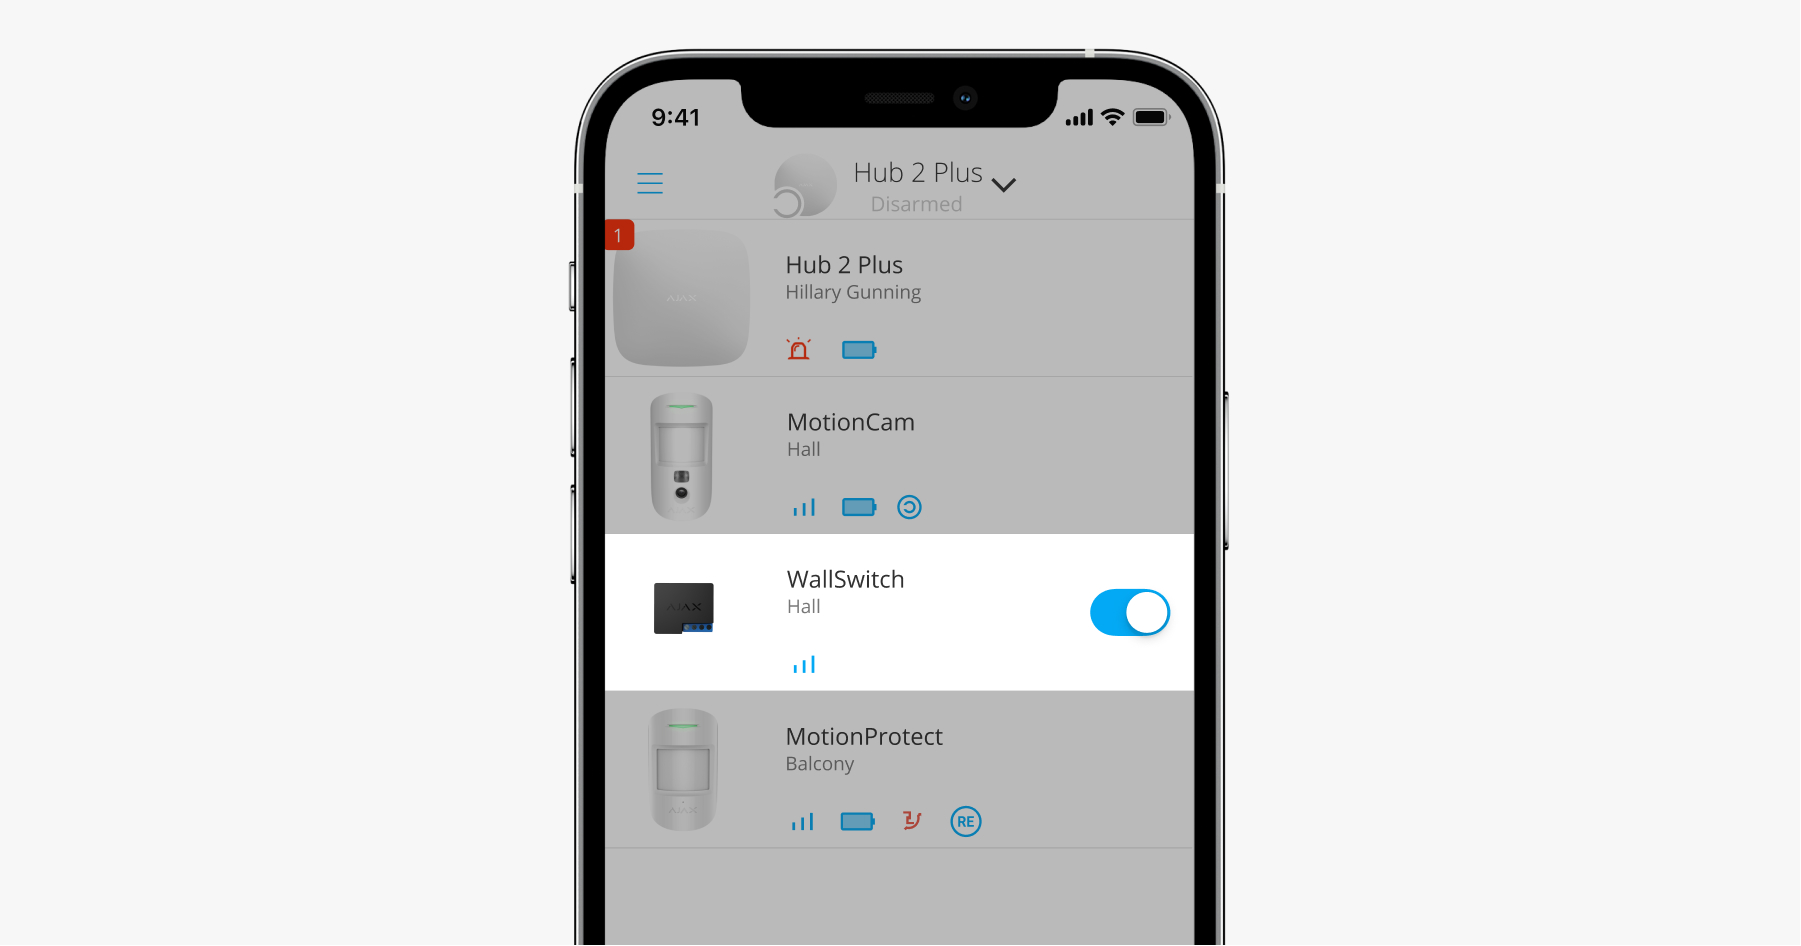
Press the toggle switch in the power relay field, and the state of the contacts will change to the opposite. When the contacts are closed, power is applied, and the outdoor lights turn on. When the contacts are open, the device power supply shuts down, and the outdoor lights turn off.
Relay control in the app
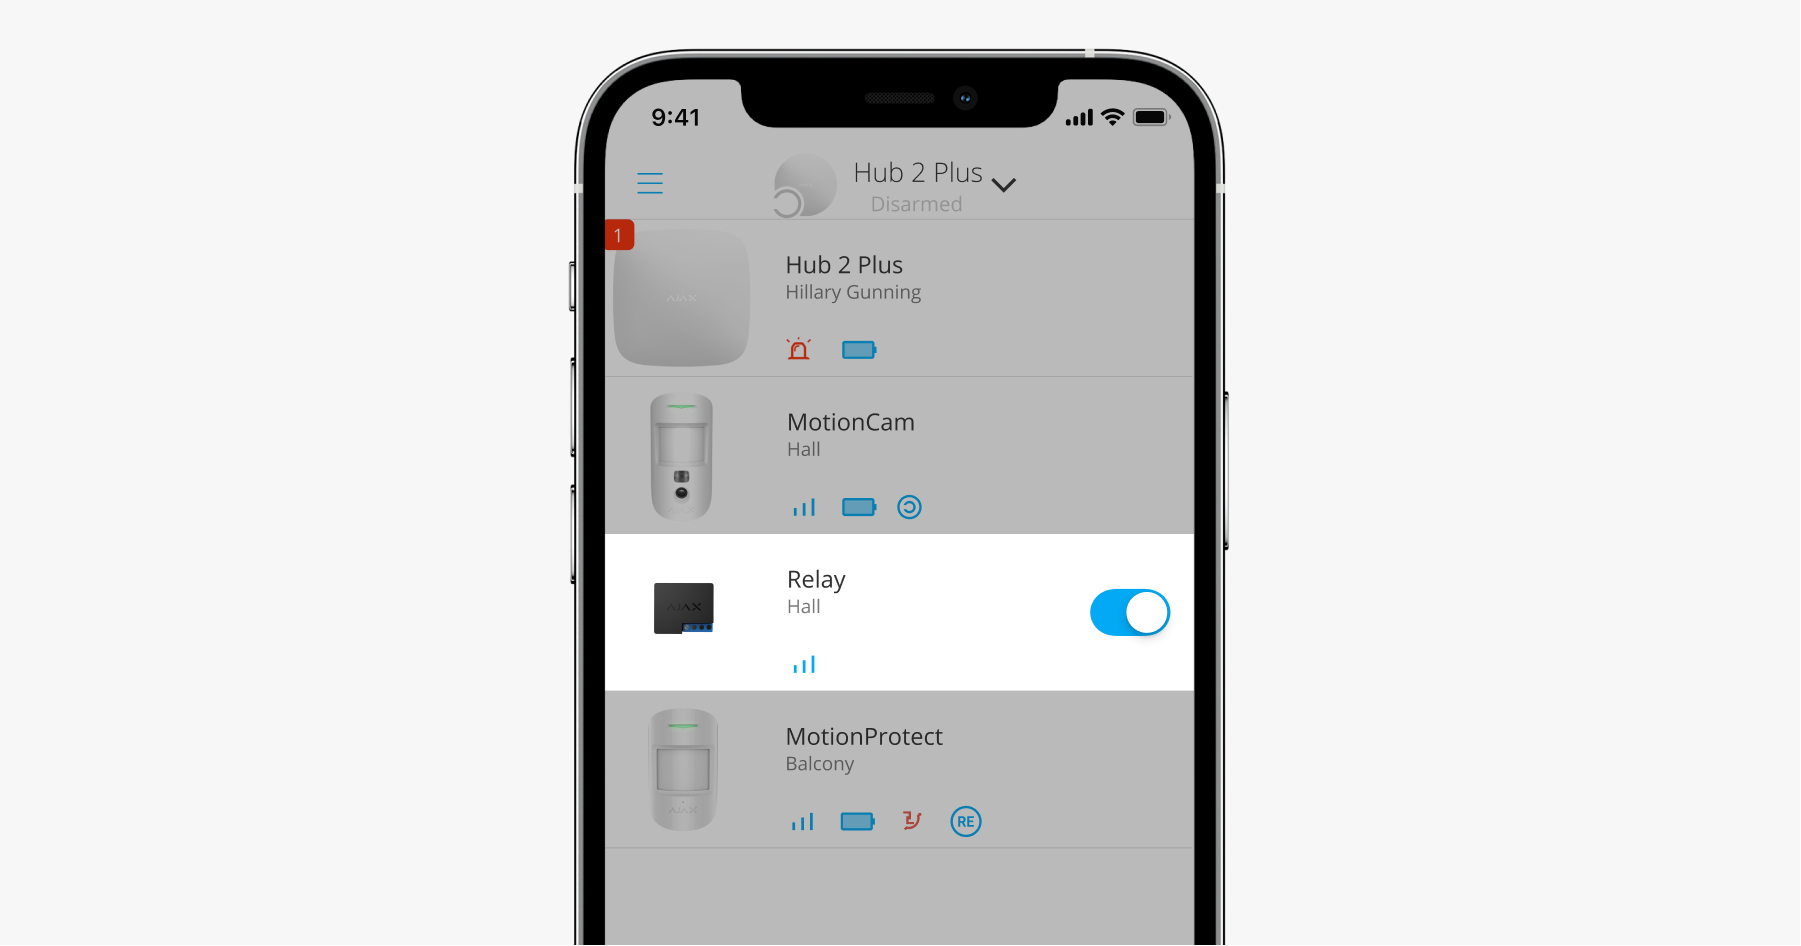
Press the toggle switch in the weak-current field, and the state of the contacts will change to the opposite. When the contacts are closed, power is applied, and the outdoor lights turn on. When the contacts are open, the device power supply shuts down, and the outdoor lights turn off.