The Ajax capabilities are not limited to protection against robbery, fire, and flood, as the system can automate routine actions, save time, and make life more comfortable.
We have already written how to control a gate or traffic barrier. This article describes connecting electric roller blinds and roller shutters to the Ajax system and the nuances of their control using apps, scenarios, or buttons and keypads.
Why are roller blinds and roller shutters needed, and what types are there
Roller blinds and roller shutters differ in purpose. Roller shutters perform protective functions and block access to the territory or premises. And roller blinds are used similarly to curtains — they protect from light and prying eyes.
Roller shutters can be used to protect windows, doors, and glass roofs. Roller shutter gates and grilles are also worth mentioning.

Decorative roller blinds are usually installed indoors. Their curtains can be insulated to reduce heat loss. They protect from sunlight and, to some extent, provide sound insulation.
Types of roller blinds and roller shutters by the control method
Roller blinds and roller shutters are opened/closed manually (mechanically) and/or by electric drive. Mechanical roller shutters can be automated using an electric drive.
Which roller blinds/roller shutters can be controlled with Ajax
Ajax can control any roller blinds/roller shutters equipped with an electric drive.
If the roller blinds/roller shutters are equipped with a controller (more expensive and rare models), you will need to connect wiring to its control terminals. In the absence of a controller, make a connection directly to the electric drive.
Connection to the drive
The Ajax system allows you to control roller blinds and roller shutters with an electric drive of any kind — with 110/230 V AC mains (most models) and low-current type (12/24 V DC).
Power electric drives, as a rule, are installed in protective roller shutters, and low-current ones are more often found in decorative roller blinds.
Information about the type of electric drive can be found in the equipment manual and/or on the roller blinds/roller shutters manufacturer’s website.
Connection to the controller
Some roller blinds/roller shutters models can be equipped with a control unit. It consists of a controller and control devices such as remote controls. The controller receives commands from control devices and activates the open-close mechanism.
To integrate with Ajax, the controller should have a control input for connecting wired buttons and relays. The controller can have a non-standard control input or special control and operation modes, which also should be taken into account during integration.
Before starting to connect the equipment, study the technical documentation for roller blinds/roller shutters.
What devices are used when connecting
Main devices:
- Roller blinds or roller shutters with an electric drive.
- Hub — coordinates the operation of system devices.
- Relays — controls the power supply for the equipment and gives the command to open or close roller blinds/roller shutters. Refer to the technical specifications of the relays to choose the right one for your application.
With the help of WallSwitch Jeweller or Superior MultiRelay Fibra, roller blinds or roller shutters can be de-energized upon command from the application or automatically when arming. This way, intruders will not be able to open the roller blinds or roller shutters, even if they have gained access to control buttons.
Additional devices:
- Integration modules — transmits to the system in real-time the status of roller blinds/roller shutters: open or closed.
- Buttons and keypads — allows sending a command for roller blinds/roller shutters opening or closing.
- Ajax opening detectors — detect break-in of roller blinds. Available for Superior DoorProtect Plus Jeweller, DoorProtect Plus Jeweller, Superior DoorProtect Plus Fibra and Superior DoorProtect G3 Fibra.
- Back-up batteries of appropriate capacity and output current — for opening or closing the curtain in case of power loss, as well as for back-up power supply of relays.
The hub can run up to 16 hours on a back-up battery, and the rest of the Ajax devices run 2 to 7 years on pre-installed batteries.
Security requirements
Connect roller blinds and roller shutters according to manufacturer’s instructions, observing the general electrical safety rules.
Do not disassemble energized devices. Do not use devices with a damaged power cord.
Relays must be installed and connected by a qualified technician. Do not connect relays to a power supply with voltages that exceed the supported range specified for the device. This is a fire hazard and will damage the device.
During installation, do not allow moisture to penetrate the relays or the cable connections. Consider the operating temperature range and humidity; do not keep the devices outdoors.
We recommend using roller shutters equipped with an emergency manual lifting system — in case of a prolonged power outage or fire.
How to connect roller blinds/roller shutters to Ajax to control opening-closing
The connection diagram and the type of relay depend on the type of roller blinds/roller shutters control system:
- Opening and closing are initiated by a 110/230 V power supply — power relay must be used.
- Opening and closing are initiated by a 12/24 V supply. A low—current relay must be used.
- Opening and closing are controlled by the controller — a low current relay must be used.
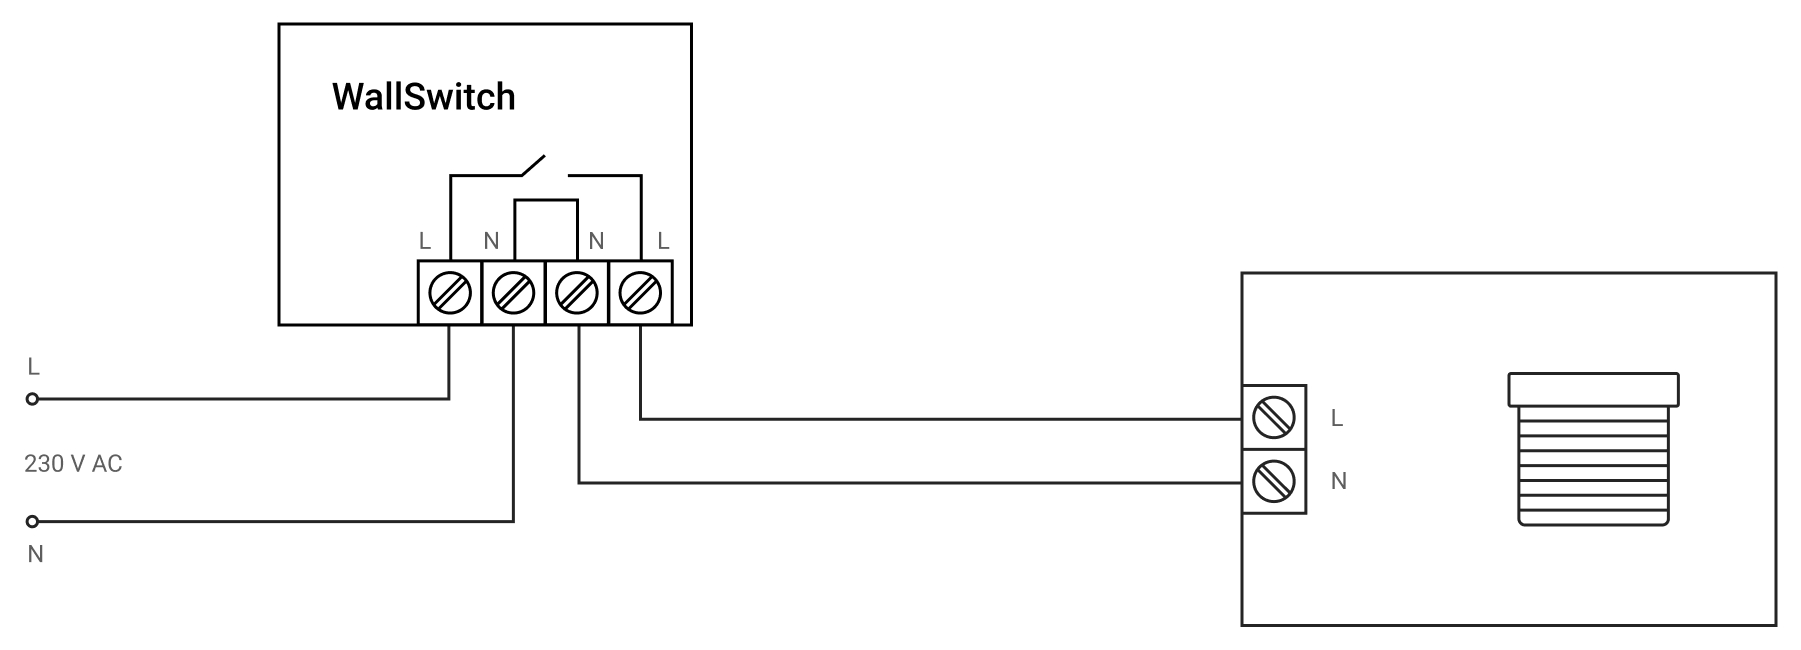
Connection to Ajax of roller blinds/roller shutters with 110/230 V power supply
According to the diagram below, connect the WallSwitch Jeweller power relay to the electric drive power supply circuit and set up the system.
WallSwitch Jeweller connection diagram
WallSwitch Jeweller and electric drive of roller blinds/roller shutters can be powered from the same power supply.
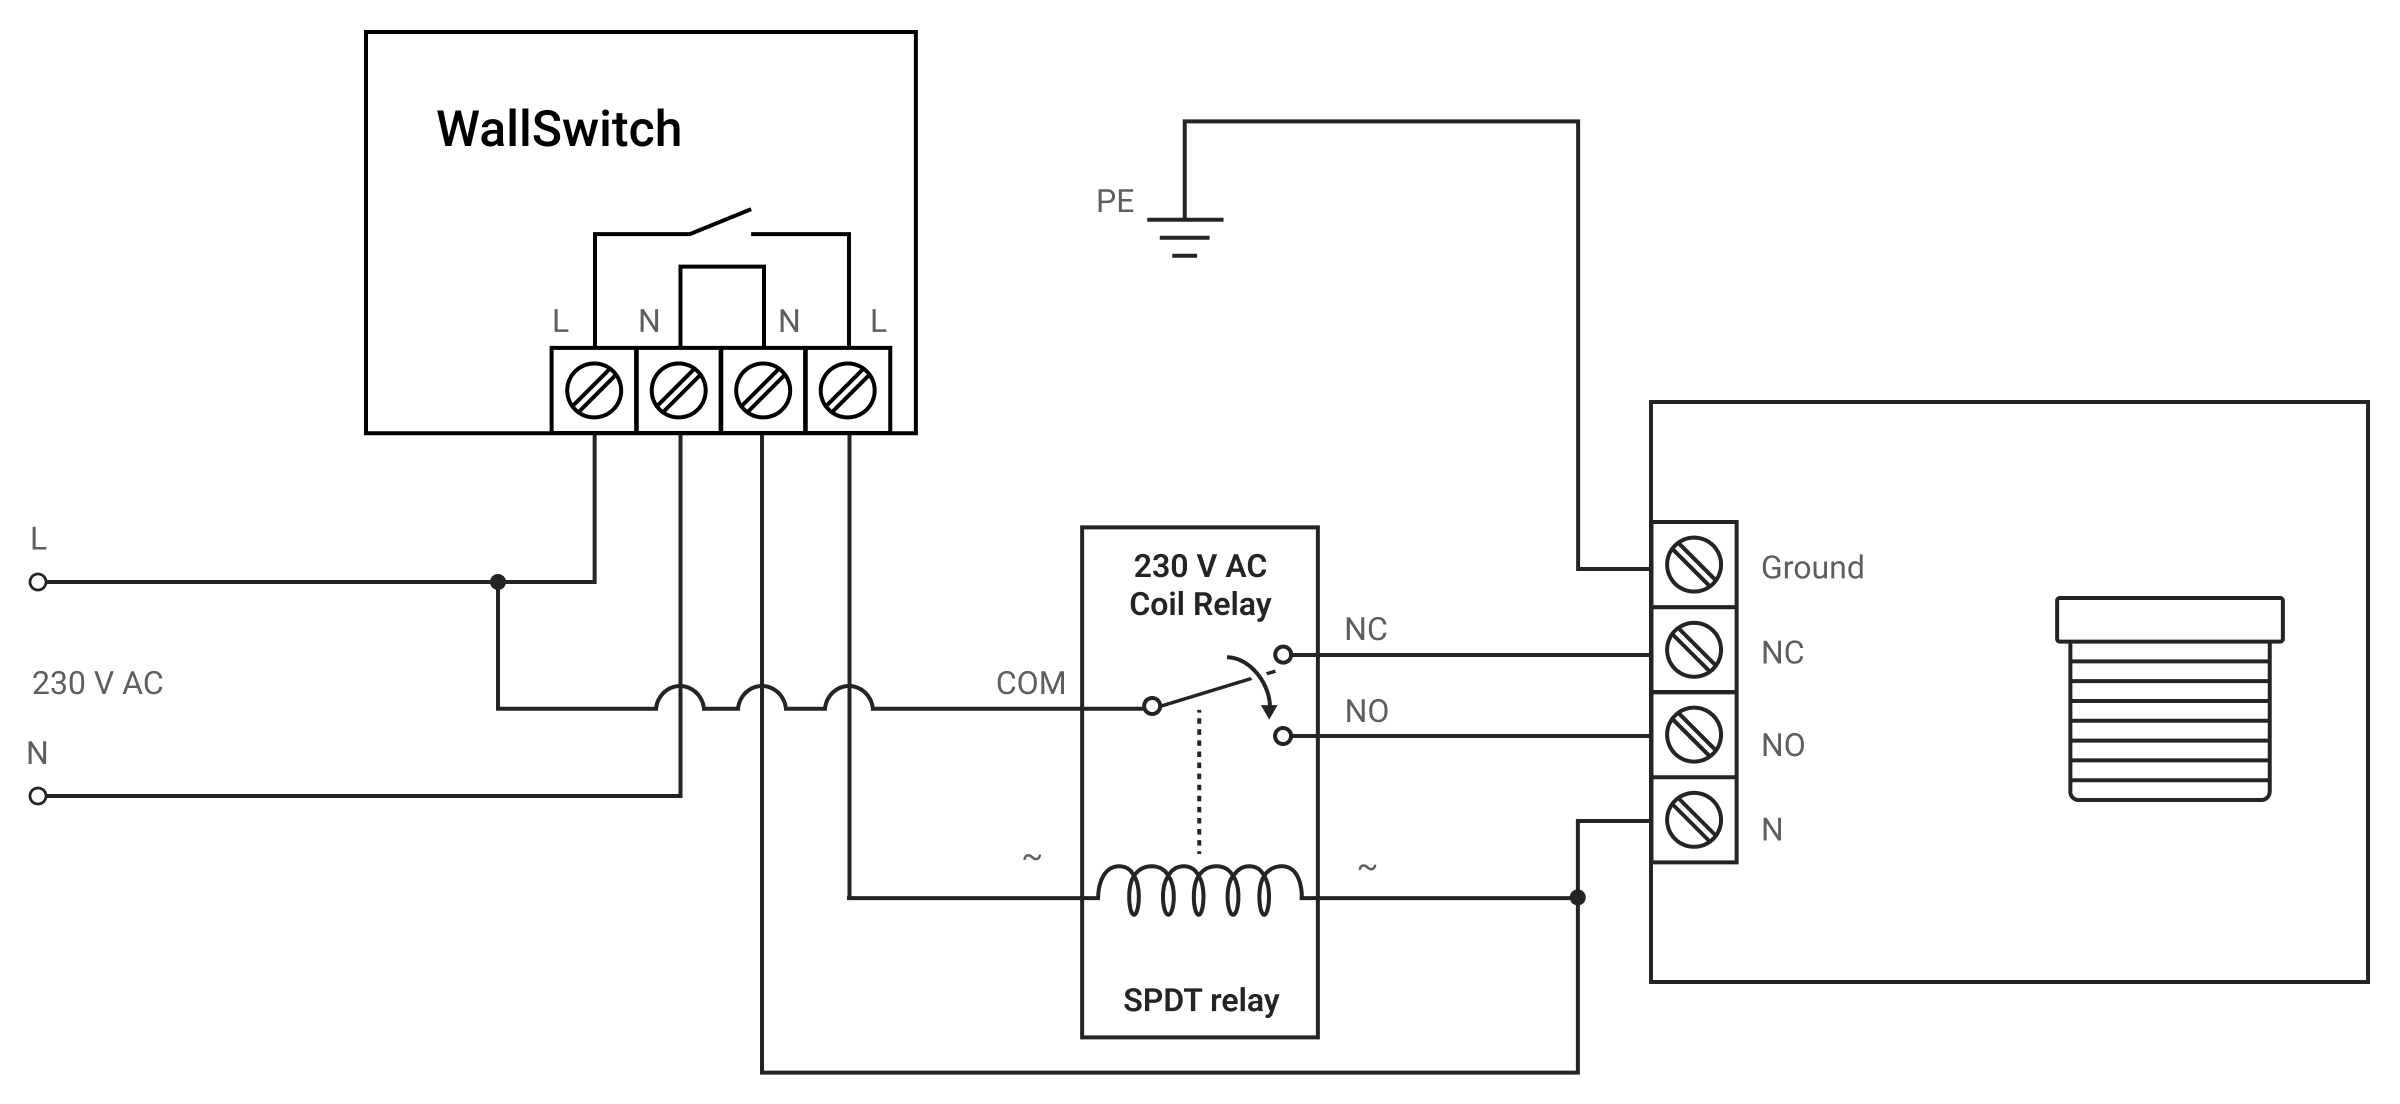
- Connect the power supply to the power terminals of WallSwitch Jeweller observing the polarity.
- Connect power from the coupling SPDT relay to WallSwitch Jeweller output terminals.
- Connect the common terminal (“COM“) of the coupling relay to the phase (“L“) of the power supply.
- Connect the NC terminal of the coupling relay to the opening input of the roller blind/roller shutter electric drive, and the NO terminal to the closing input.
- Connect the zero (“N“) of the roller blind/roller shutter electric drive to the zero (“N“) of the power supply.
- Ground the appropriate contact of the solenoid valve, if required by the manufacturer.
WallSwitch Jeweller setup
In the Ajax app:
- Go to the Devices
 tab.
tab. - Select WallSwitch Jeweller and go to its Settings
 .
. - Set the required parameters.
- Relay operating mode: bistable or pulse.
- Contact state: normally closed or normally opened.

The settings depend on the roller blind/roller shutter model. You will find connection recommendations in the technical documentation of the device.
- Click Back to save the settings.
For more informative notifications, rename WallSwitch Jeweller, for example, by naming the device Central Entrance.
Connection to Ajax of roller blinds/roller shutters with 12/24 V power supply
With Relay Jeweller
According to the diagram below, connect the low current Relay Jeweller to the electric drive power supply circuit and set up the system.
Relay Jeweller connection diagram
Relay Jeweller, coupling relay, and electric drive of roller blinds/roller shutters can be powered from the same power supply.
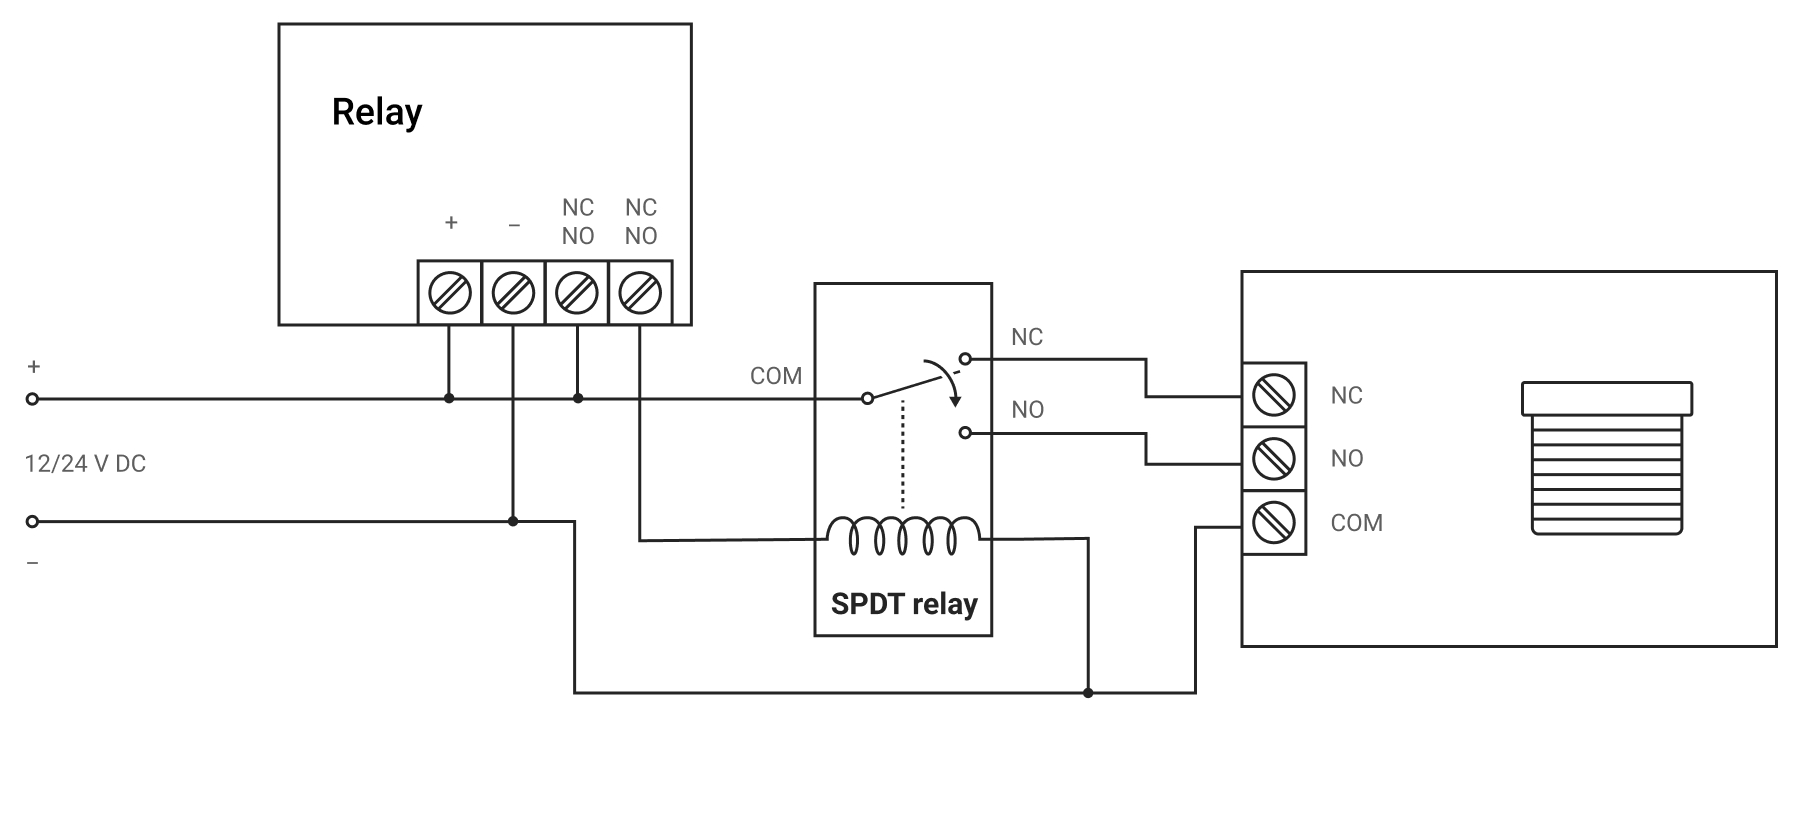
- Connect the power supply to the power terminals of Relay Jeweller.
- Connect the “+” of the power supply to one of the Relay output contact terminals, and the “+” of the coupling relay — to the other terminal of Relay Jeweller contacts.
- Connect the contact “–” of the roller blind/roller shutter electric drive (common contact) and “–” of the coupling relay to the “–” of the power supply.
- Connect the common terminal (“COM“) of the coupling relay to the “+” of the power supply.
- Connect the NC terminal of the coupling relay to the roller blind/roller shutter opening control input, and the NO terminal to the closing input.
Relay Jeweller setup
In the Ajax app:
- Go to the Devices tab.
- Select Relay Jeweller and go to its Settings .
- Set the required parameters.
- Relay operating mode: bistable or pulse.
- Pulse duration (if pulse mode is selected) is within 0.5 to 255 seconds. The duration should be greater than or equal to the closing-opening time of the roller blind or roller shutter.
- Contact state: normally closed or normally opened.
The settings depend on the roller blind/roller shutter model. You will find connection recommendations in the technical documentation of the device.
- Click Back to save the settings.
For more informative notifications, rename Relay Jeweller, for example, by naming the device Central Entrance.
With Superior MultiRelay Fibra
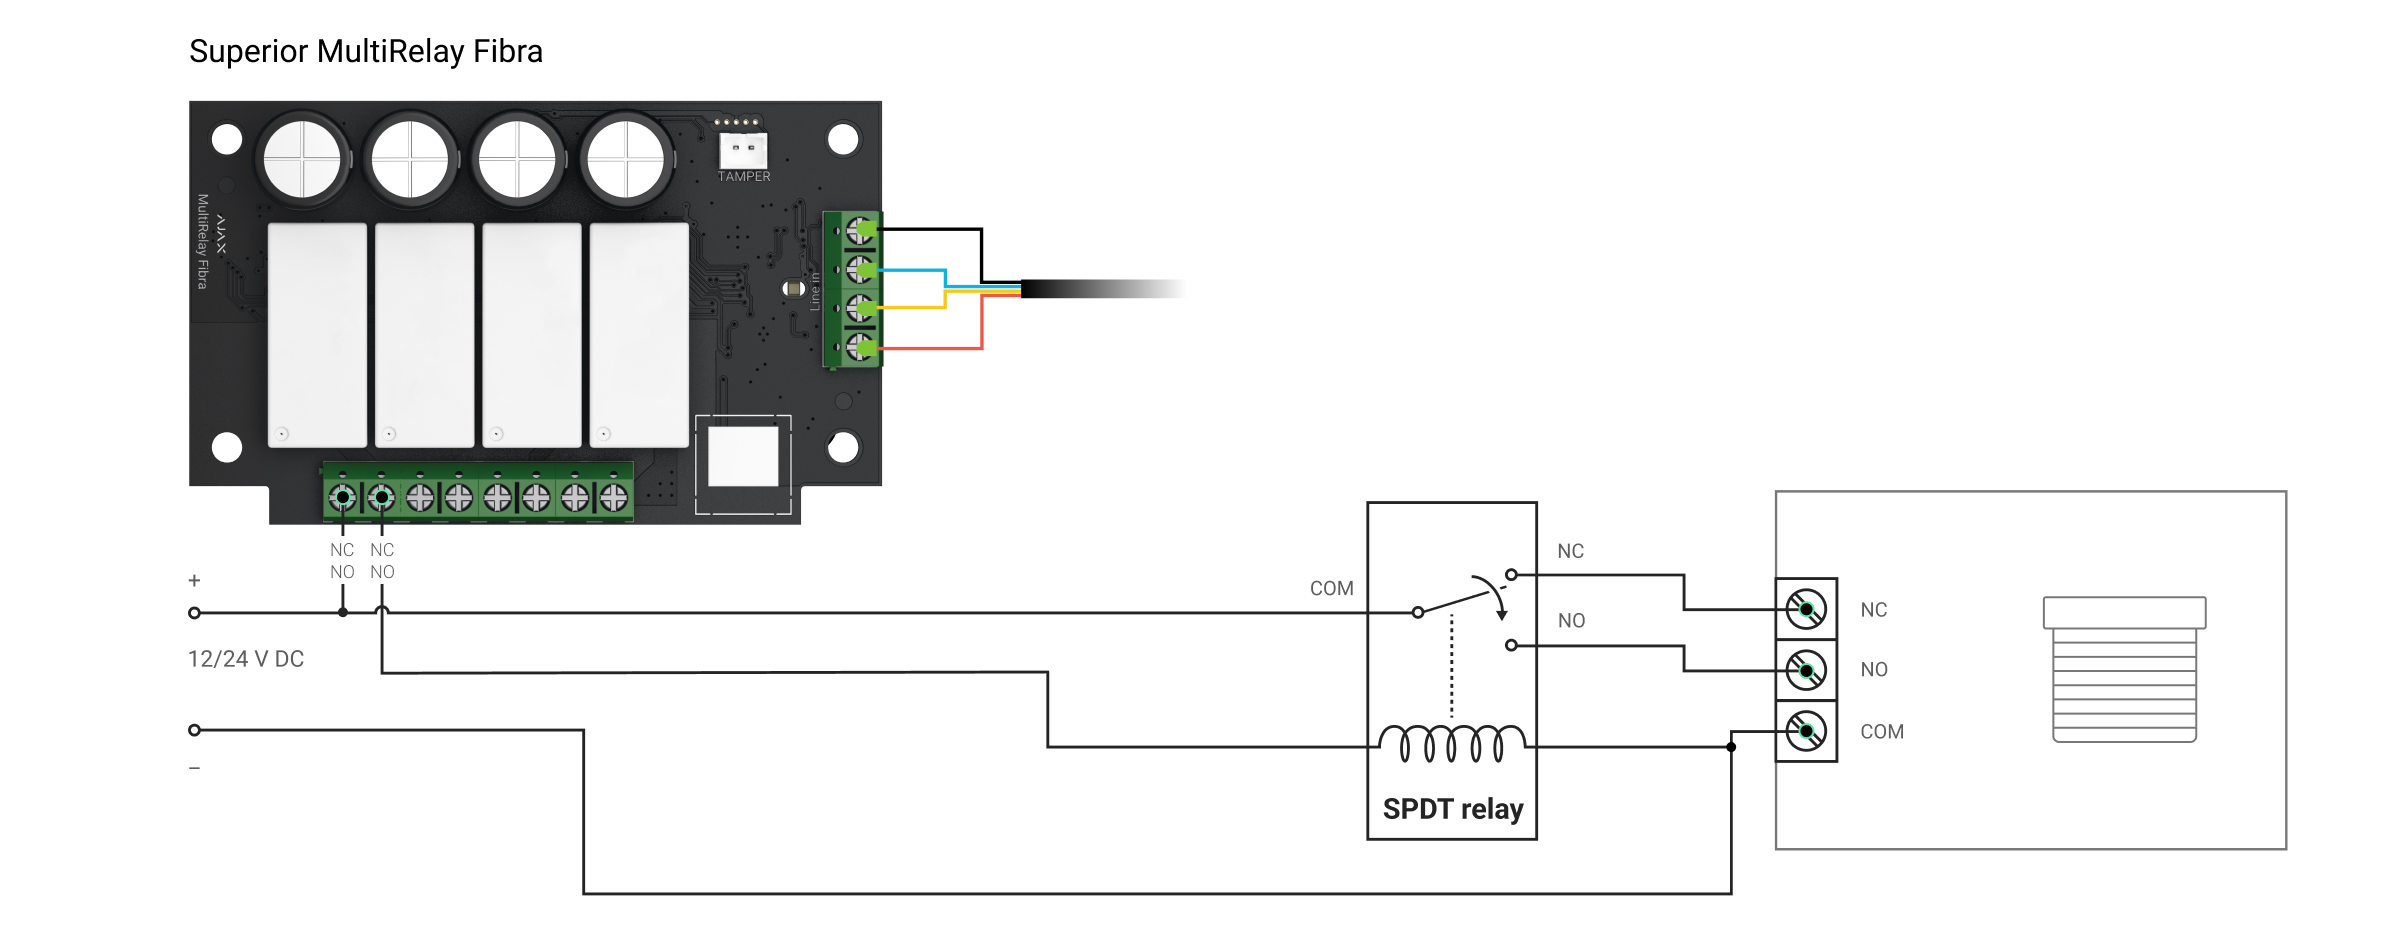
- Connect Superior MultiRelay Fibra to the hub via the Fibra line.
- Connect the relay output terminals to the control input.
If the relay is connected to a controller that opens the roller blinds/roller shutters on contacts opening, provide the relay with backup power. In the event of a power loss, the relay contacts change to an open state, which will open the roller blinds/roller shutters.
Superior MultiRelay Fibra setup
In the Ajax app:
- Go to the Devices tab.
- Select Superior MultiRelay Fibra and go to its Settings .
- Select the relay that is connected to the roller blinds/roller shutters controller.
- Set the required parameters.
The settings depend on the roller blind/roller shutter model. See wiring recommendations in the technical documentation of the device.
- Name: for more informative notifications, rename relay. For example, name the device “Entrance”.
- Active: should be enabled for the relay to function.
- Output mode: select Relay option.
- Notifications: allows setting up notifications for the relay.
- Contact state: normally closed or normally opened.
- Shutoff by timer: option for deactivating the controlled device after a set time.
- Operating time (if Shutoff by timer is enabled): from 1 second to 2 hours. The duration must be greater than or equal to the closing/opening time of the roller blinds/roller shutters.

An incorrectly selected Operating time can cause the roller blinds/roller shutters to close immediately after opening, or open/close incompletely.
- Click Back to save the settings.
With Superior MultiTransmitter IO (4X4) Fibra
- Connect Superior MultiTransmitter IO (4X4) Fibra to the hub via the Fibra line.
- Connect the relay output terminals to the control input.
If the relay is connected to a controller that opens the roller blinds/roller shutters on contacts opening, provide the relay with backup power. In the event of a power loss, the relay contacts change to an open state, which will open the roller blinds/roller shutters.
Superior MultiTransmitter IO (4X4) Fibra setup
In the Ajax app:
- Go to the Devices tab.
- Select Superior MultiTransmitter IO (4X4) Fibra and go to its Settings .
- Select the Relay output that is connected to the roller blinds/roller shutters controller.
- Set the required parameters.
The settings depend on the roller blind/roller shutter model. See wiring recommendations in the technical documentation of the device.
- Name: for more informative notifications, rename relay. For example, name the device “Entrance”.
- Active: should be enabled for the relay to function.
- Output mode: select Relay option.
- Notifications: allows setting up notifications for the relay.
- Contact state: normally closed or normally opened.
- Shutoff by timer: option for deactivating the controlled device after a set time.
- Operating time (if Shutoff by timer is enabled): from 1 second to 2 hours. The duration must be greater than or equal to the closing/opening time of the roller blinds/roller shutters.
An incorrectly selected Operating time can cause the roller blinds/roller shutters to close immediately after opening, or open/close incompletely.
- Click Back to save the settings.
Connection to Ajax of roller blinds/roller shutters with a controller
The controller of roller blinds/roller shutters can have one or more control inputs. The connection diagram depends on this.
One Relay Jeweller is enough if the input is combined and is responsible for both opening and closing roller blinds/roller shutters. If the inputs are separate (one responsible for opening and the other for closing), then two relays are required.
Connection of roller blinds/roller shutters with combined control input
Connect the low current Relay Jeweller to the controller according to the diagram below and set up the system.
Relay Jeweller connection diagram
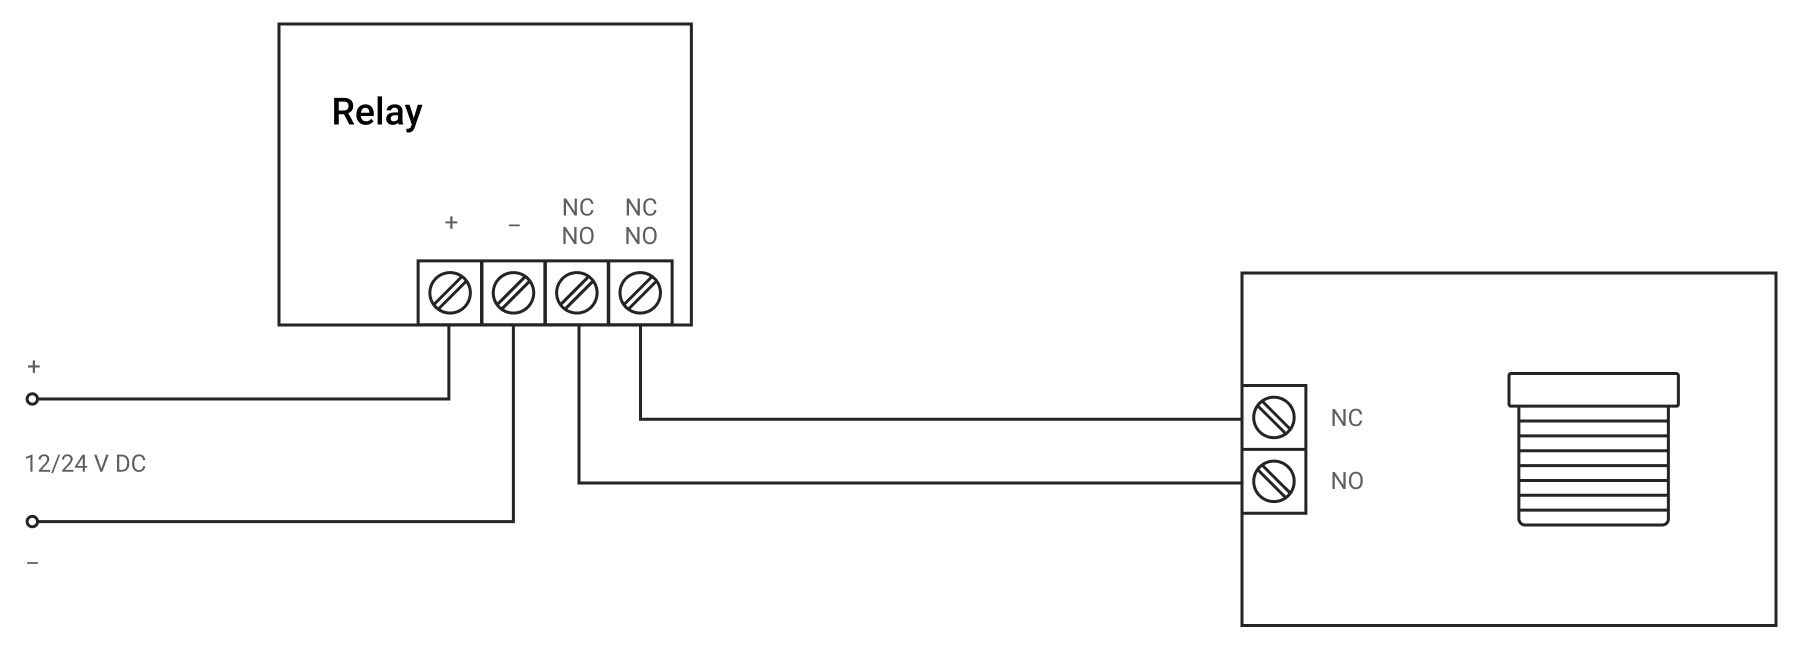
- Connect the power supply to the power terminals of the relay.
- Connect the relay contact terminals to the control input.
If the Relay Jewelelr is connected to a controller that opens the roller blinds/roller shutters when the contacts open, provide the Relay Jeweller with backup power. In the event of a power loss, the Relay Jeweller contacts open, which will lead to the opening of the roller blinds/roller shutters.
Relay Jeweller setup
In the Ajax app:
- Go to the Devices tab.
- Select Relay Jeweller and go to its Settings .
- Set the required parameters.
The settings depend on the model of your roller blinds/roller shutters. You will find connection recommendations in the technical documentation of the device.
- Relay operating mode: bistable or pulse.
- Pulse duration (if pulse mode is selected) is within 0.5 to 255 seconds. The duration should be greater than or equal to the closing-opening time of the roller blind or roller shutter.
An incorrectly selected pulse duration can lead to a failure of roller blinds or roller shutters to fully open or close.
- Contact state: normally closed or normally opened.
- Click Back to save the settings.
For more informative notifications, rename Relay, for example, by naming the device Central Entrance.
Roller blind/roller shutter connection with separate control inputs
Connect the low current relays to the controller according to the diagram below and set up the system. With this connection diagram, one Relay Jeweller controls the opening, and the other Relay Jeweller controls the closing.
Relay Jeweller connection diagram

- Connect the power supply to the power terminals of both relays.
- Connect the contact terminals of the first Relay Jeweller to the first control input.
- Connect the contact terminals of the second Relay Jeweller to the second control input.
Relay Jeweller setup
In the Ajax app:
- Go to the Devices tab.
- Select Relay Jeweller and go to its Settings .
- Set the required parameters.
The settings depend on the model of your roller blinds/roller shutters. You will find connection recommendations in the technical documentation of the device.
- Relay operating mode: bistable or pulse.
- Pulse duration (if pulse mode is selected) is within 0.5 to 255 seconds. The duration should be greater than or equal to the closing-opening time of the roller blind or roller shutter.
An incorrectly selected pulse duration can lead to a failure of roller blinds or roller shutters to fully open or close.
- Contact state: normally closed or normally opened.
- Click Back to save the settings.
- Repeat steps 1–4 for the second Relay.
For more informative notifications, rename Relay Jeweller, for example, by naming the device Central Entrance.
How to control the power supply for roller blinds/roller shutters using Ajax
Power supply control will work in parallel with the control of opening/closing for roller blinds/roller shutters. According to the diagram below, connect the WallSwitch Jeweller power relay to the controller power supply circuit and set up the system.
WallSwitch Jeweller connection diagram
- Connect the power supply to the WallSwitch Jeweller power terminals.
- Connect the relay contact terminals to the roller blind/roller shutter power supply inputs.
WallSwitch Jeweller setup
In the Ajax app:
- Go to the Devices tab.
- Select WallSwitch Jeweller and go to its Settings .
- Set the required parameters.
The settings depend on your roller blind/roller shutter model. You will find connection recommendations in the technical documentation of the device.
- Relay operating mode: bistable.
- Contact state: normally closed or normally opened.
- Click Back to save the settings.
For more informative notifications, rename WallSwitch Jeweller, for example, by naming the device Power supply of roller blinds.
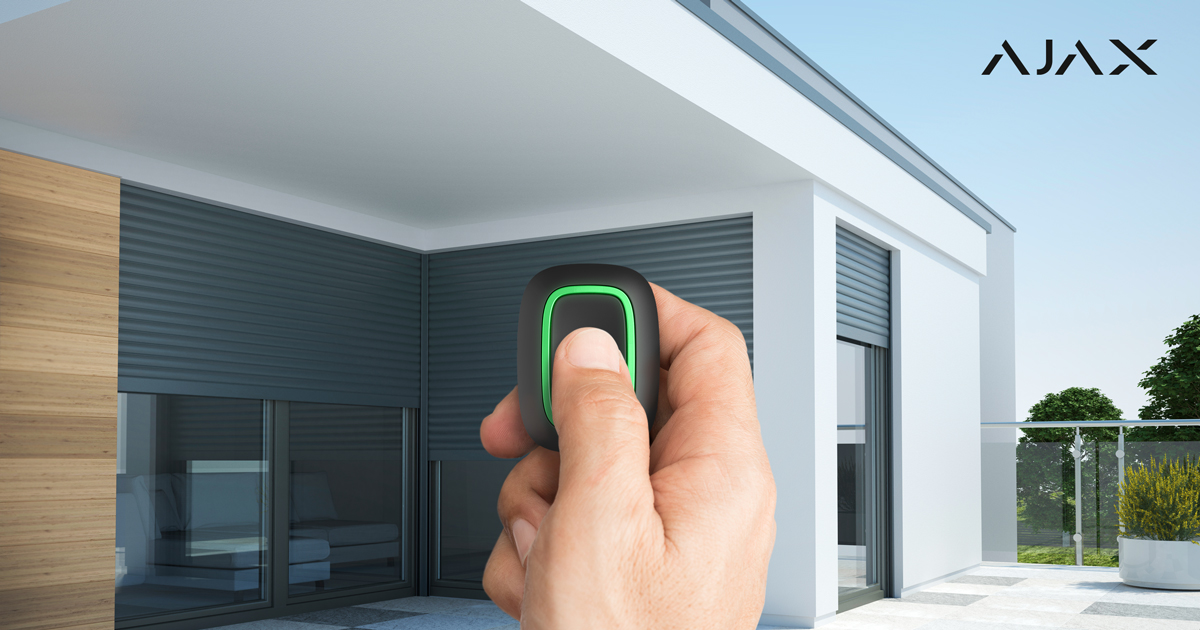
How to control roller blinds or roller shutters using Button Jeweller
The hub running on OS Malevich 2.10 and later allows configuring different actions for short and long pressing of Button Jeweller. For example, a short pressing can open or close roller blinds/roller shutters, and a long press can de-energize the device.
To control roller blinds/roller shutters using Button, configure the appropriate scenarios in the menu Ajax app → Devices → Button Jeweller → Settings → Scenarios.
How to see the status of roller blinds/roller shutters in an Ajax app: “closed”, “open”
To display the status of roller blinds/roller shutters (open or closed) in the Ajax apps, connect the integration module to the status output of the roller blind/roller shutter controller.
With Transmitter Jeweller
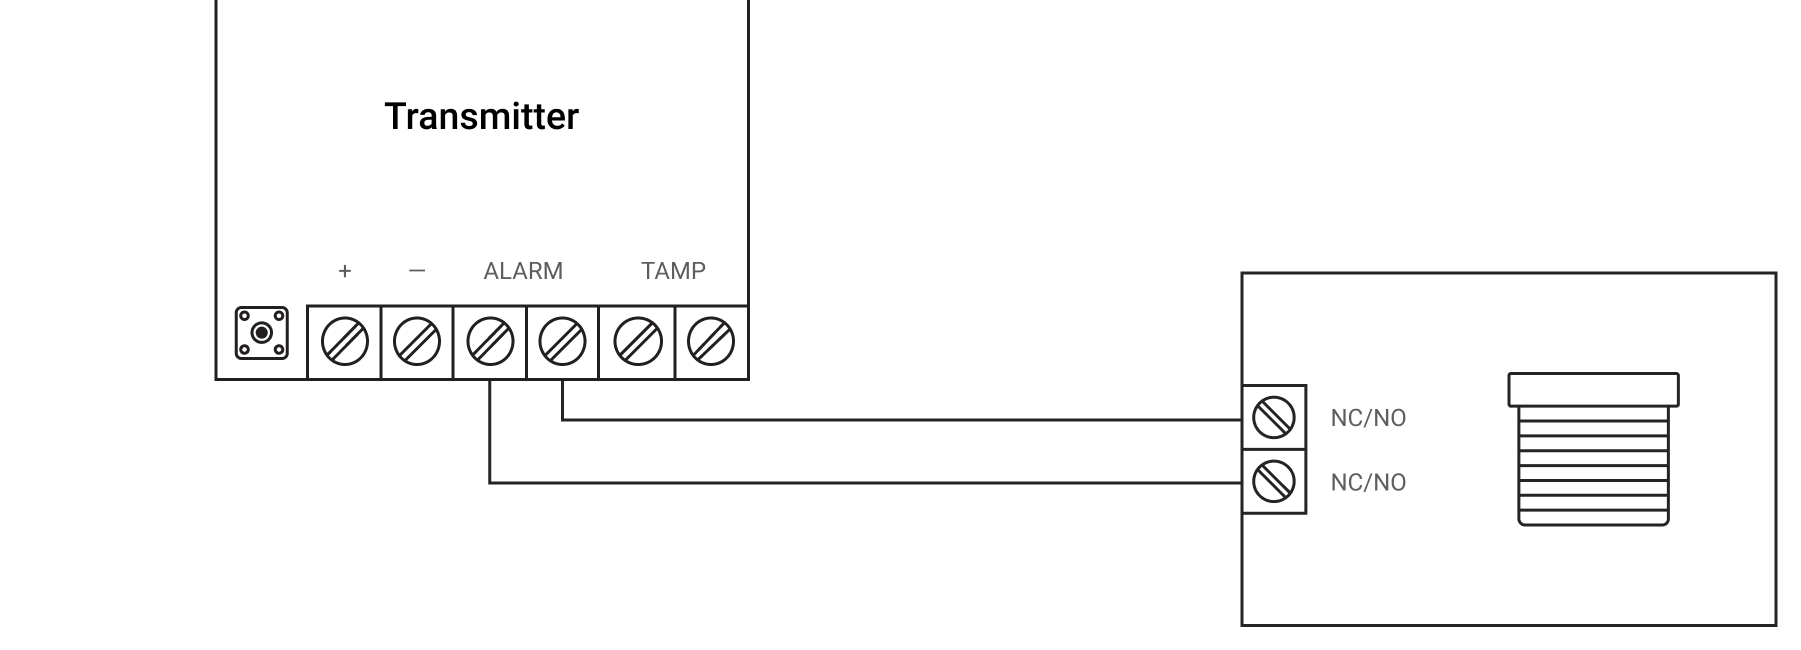
Connect the status output of the roller blind/roller shutter controller to the tamper or alarm terminals of Transmitter Jeweller. The operation algorithm of notifications depends on this.
Connection to tamper terminals of Transmitter Jeweller
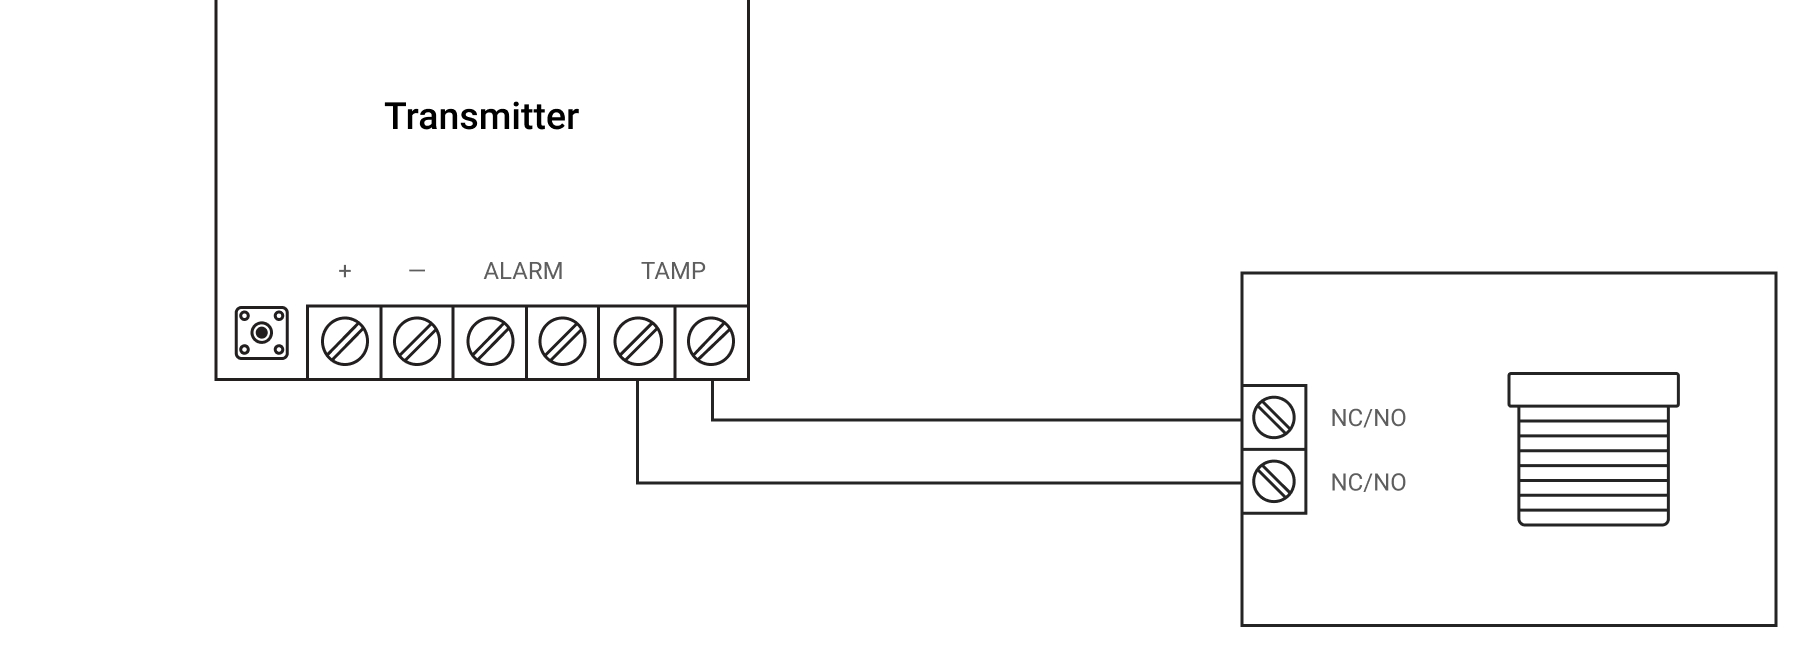
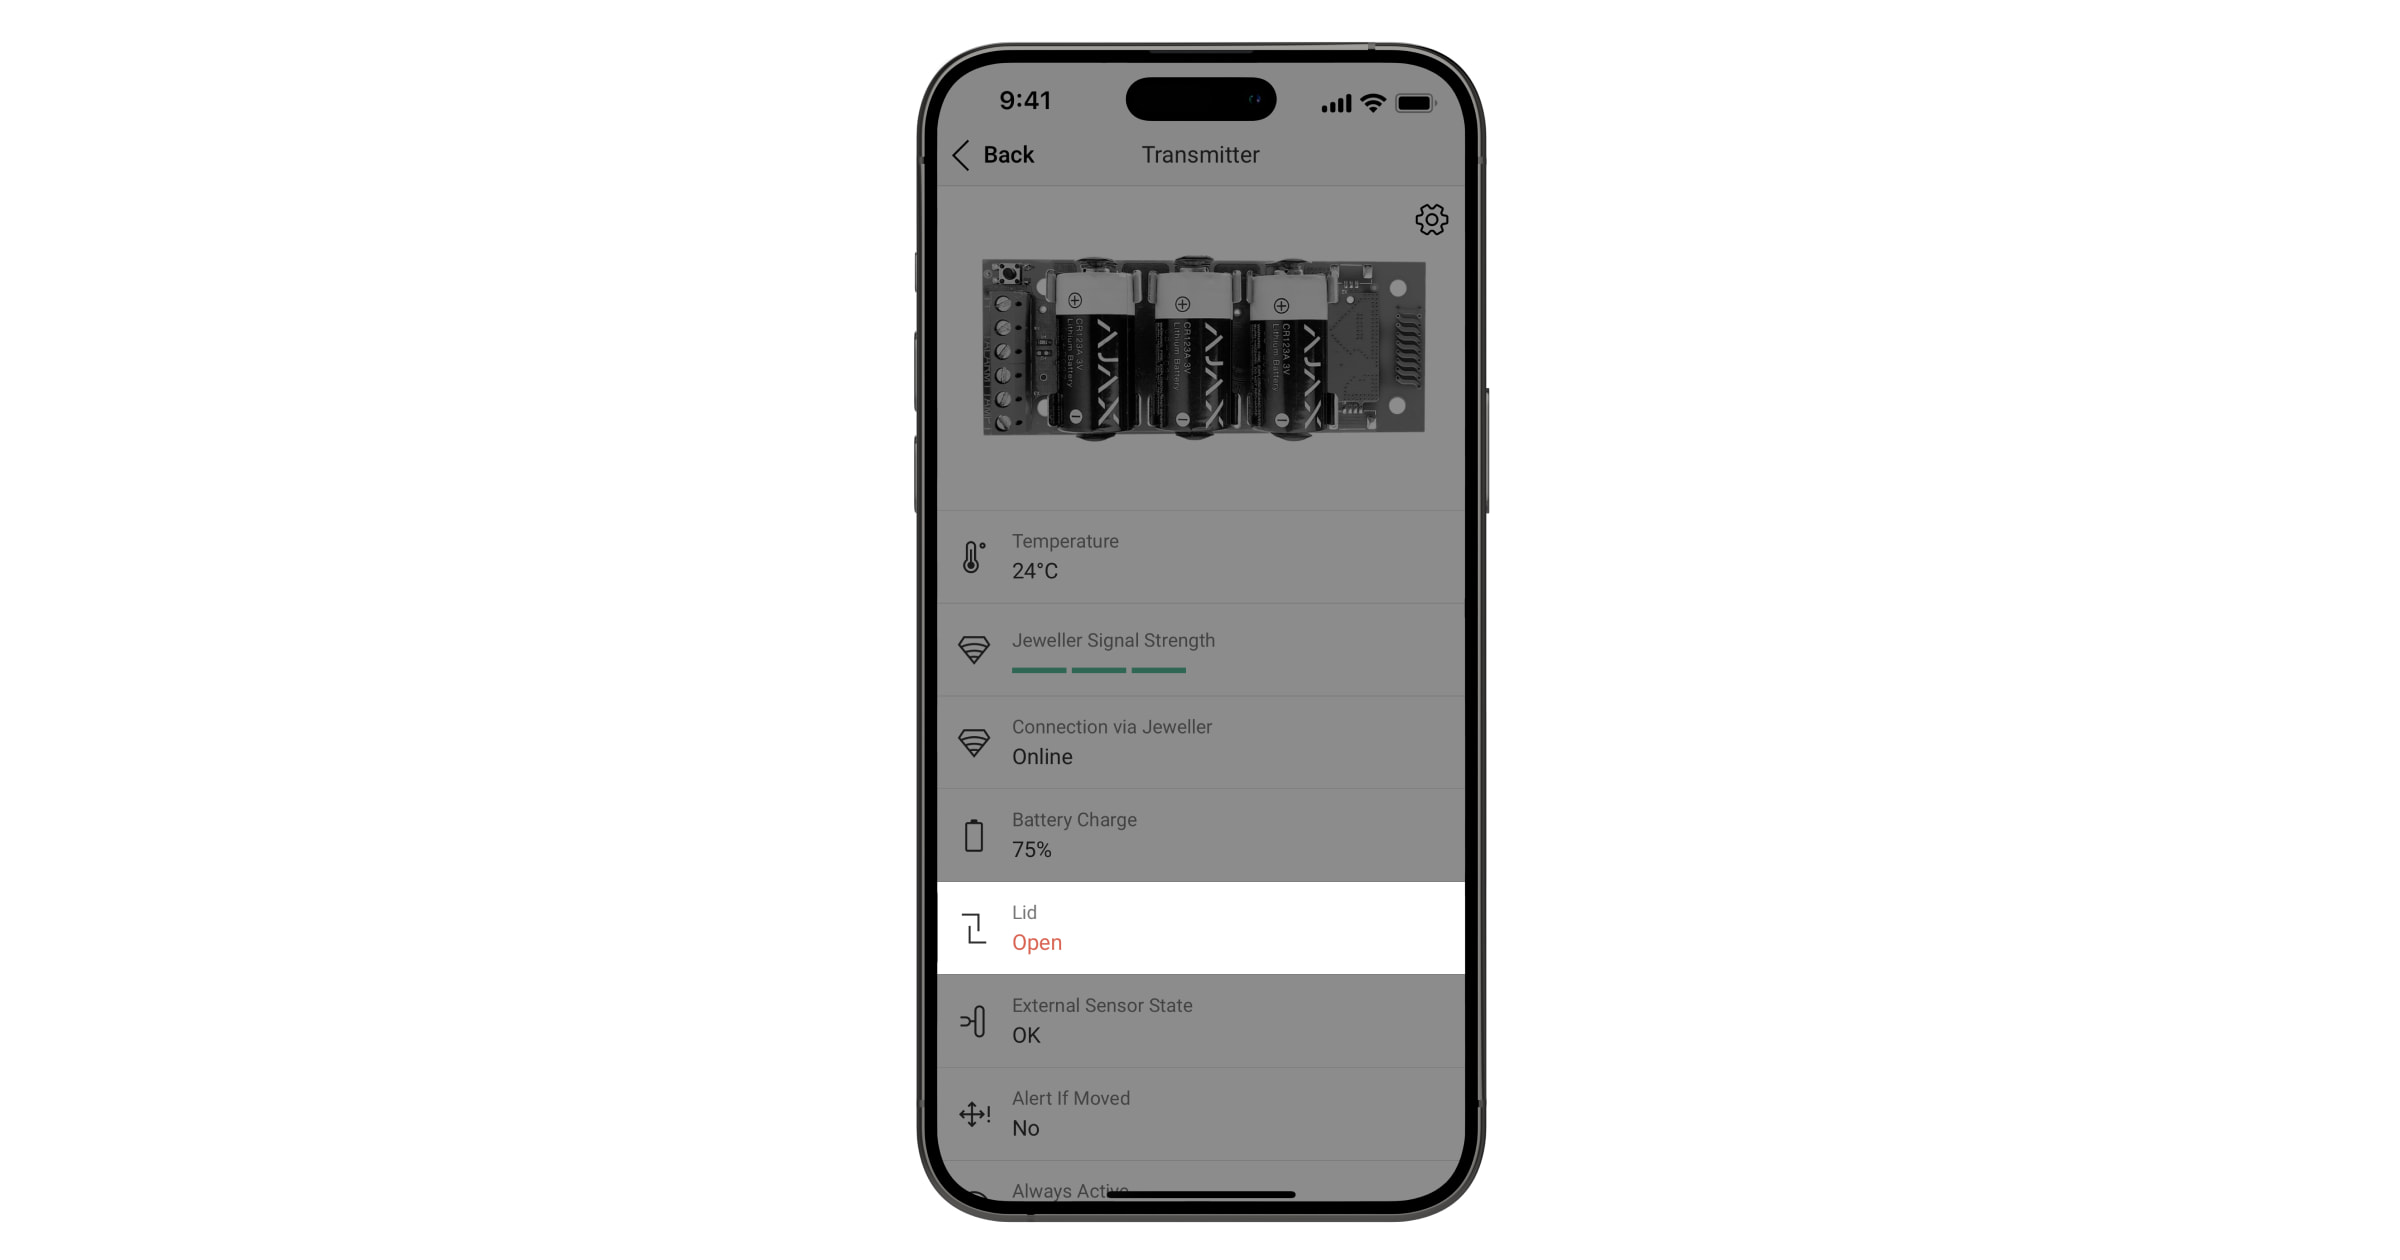
When connected via the tamper terminals of Transmitter Jeweller, the security system notifies about opening or closing regardless of the security mode.
The status of roller blinds/roller shutters is displayed in real-time in the Lid field in the Transmitter Jeweller statuses:
- Ajax app
- Devices tab.
- Transmitter Jeweller
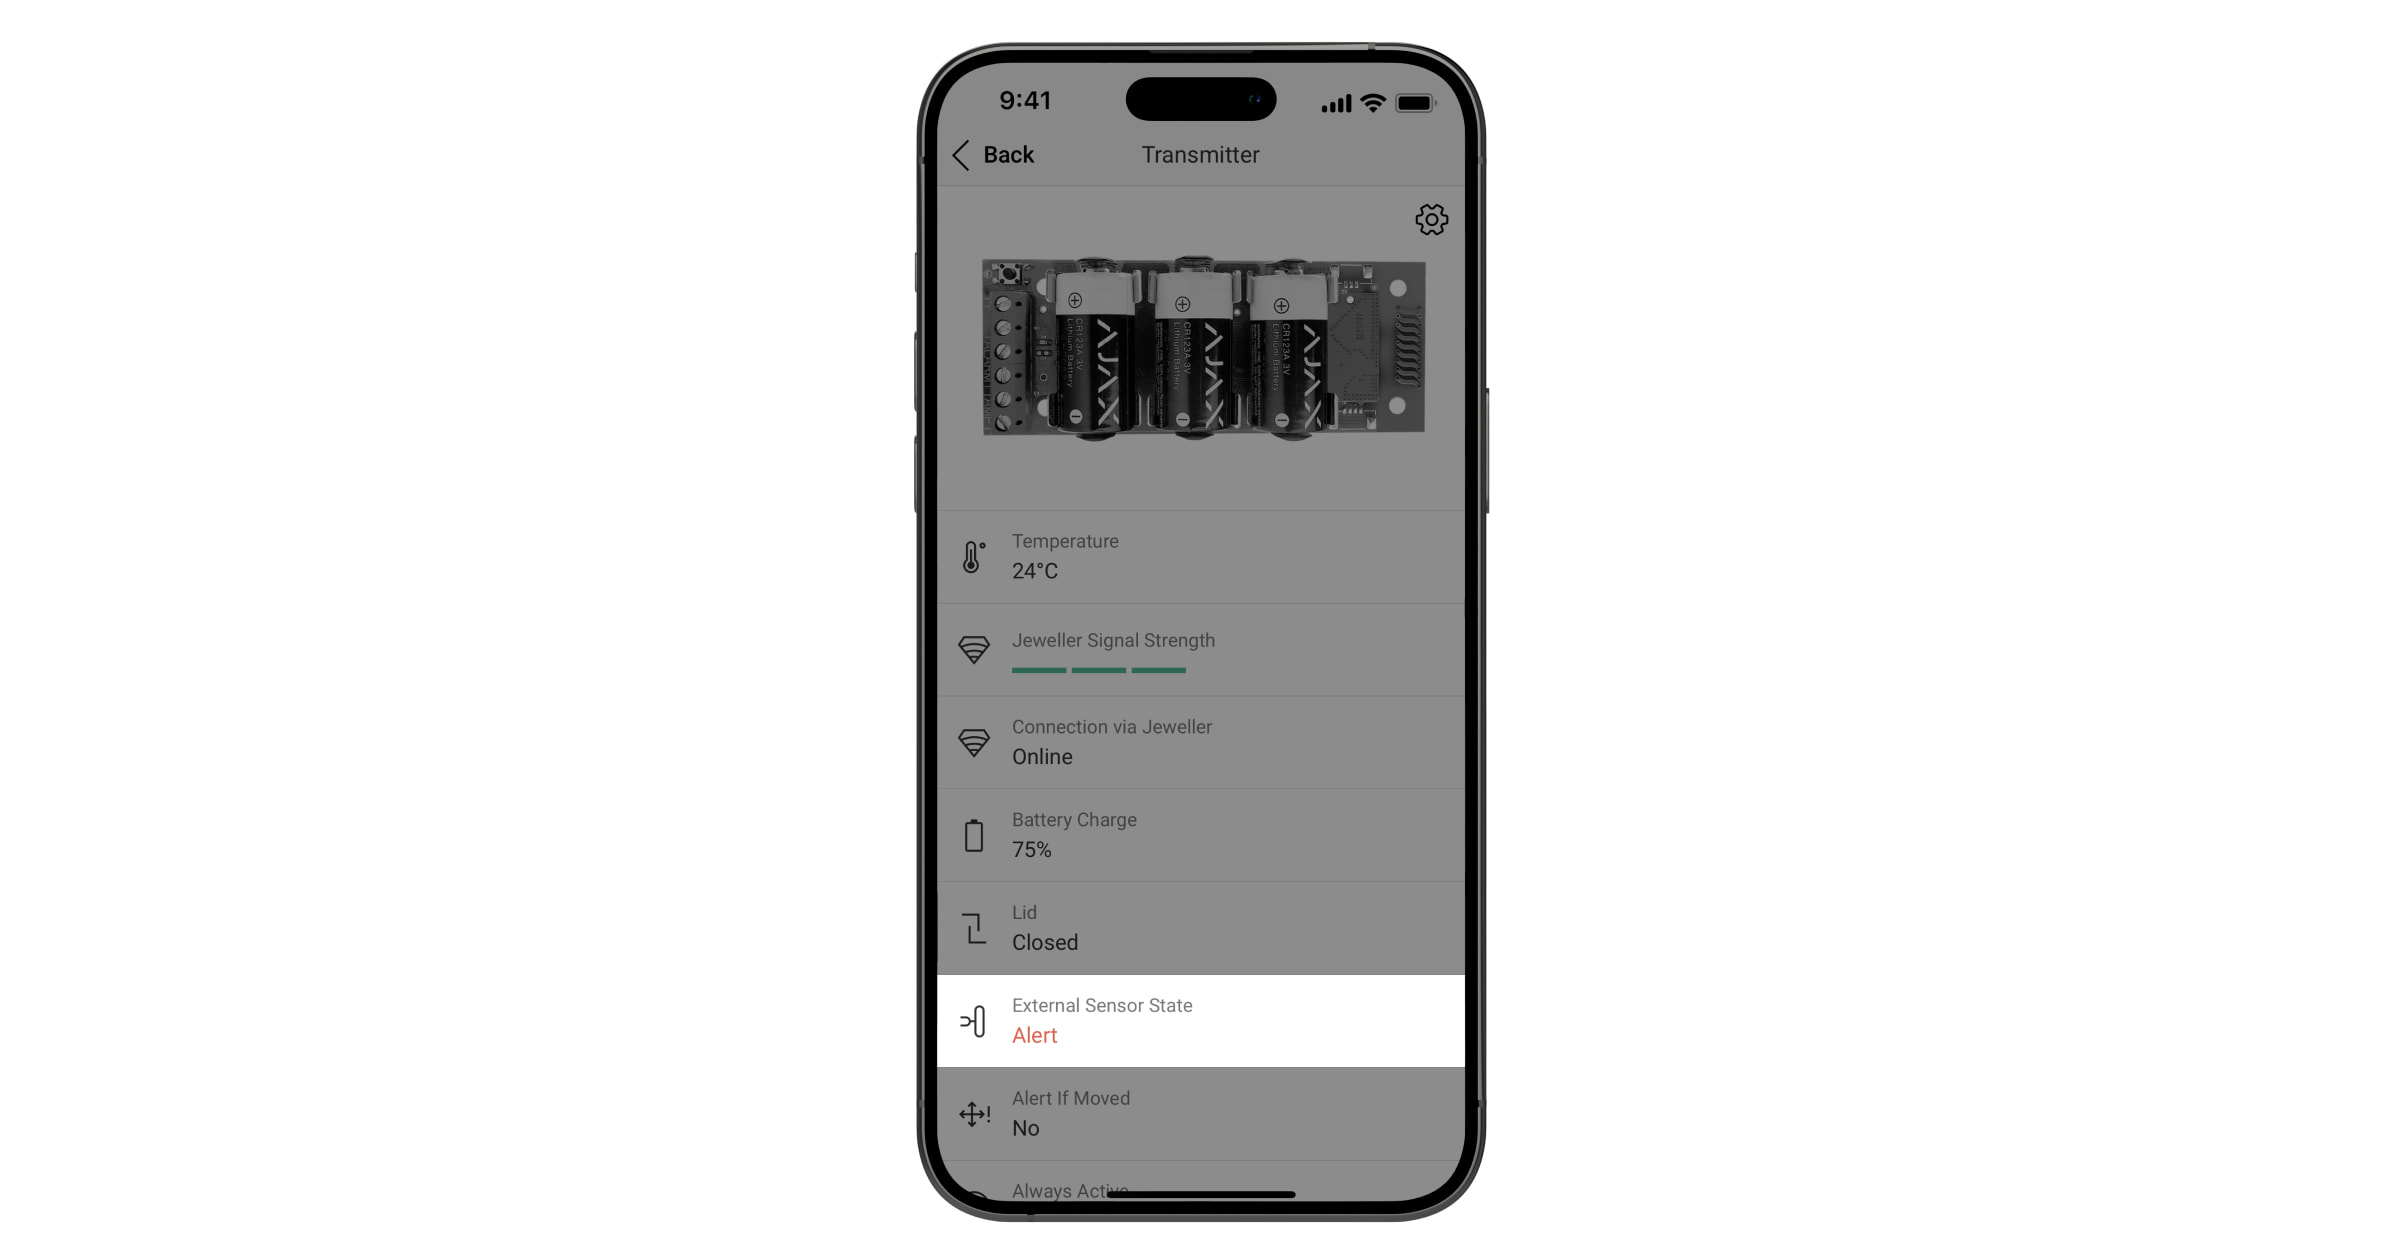
Connection to alarm terminals of Transmitter Jeweller
When connected via the Transmitter Jeweller alarm terminals, the system notifies about opening or closing only when the entire system or group to which the Transmitter Jeweller is added is armed. Exception: Transmitter Jeweller operates in the Always Active mode.
The status of the roller blind/roller shutter curtain is displayed in real-time in the Detector status field, in the Transmitter Jeweller statuses:
- Ajax app
- Devices tab.
- Transmitter Jeweller
With other integration modules
It is possible to receive state of roller blinds/roller shutters via Superior Transmitter Fibra, MultiTransmitter Jeweller, Superior MultiTransmitter Fibra, and Superior MultiTransmitter IO (4X4) Fibra.
Integration modules wiring diagram
Connect the status output of the roller blinds/roller shutters controller to an unoccupied zone of the integration module.
Integration modules setup
In the Ajax app:
- Go to the Devices tab.
- Select the integration module and go to its Devices .
- Press Add device, type in its Name and select Wire input zone with connected roller blinds/roller shutters; assign virtual room.
- Select added device and go to its Settings .
- Set the required parameters.
The settings depend on your roller blinds/roller shutters model. See wiring recommendations in the technical documentation of the device.
- Name: change it for more informative notifications.
- Room: select virtual room.
- Input type: without EOL, EOL, 2EOL, 3EOL, or roller shutter.
- Sensor mode: select Detect alarms.
- Type of event: select Custom.
- Default state: normally closed or normally opened.
- Operating mode: bistable or pulse.
- Always active: should be enabled.
- Pulse time: 20 ms, 100 ms, or 1 sec.
- Alert with siren If alarm detected: should be disabled.
- Chime settings: allows setting up an audible signal with connected to the hub siren to notify users on device opening.
- Operating mode: can be Instant alarm, Entry/Exit, Follower.
- Click Back to save the settings.
How to detect a break-in of roller blinds using Ajax
For break-in detection, you can use a third-party roller shutter motion detector by connecting it to Superior DoorProtect Plus Jeweller, DoorProtect Plus Jeweller, Superior DoorProtect Plus Fibra or Superior DoorProtect G3 Fibra using an external terminal. You can also use the integration module to detect break-in.
To connect a motion detector to the mentioned Ajax opening detectors, follow the instructions:
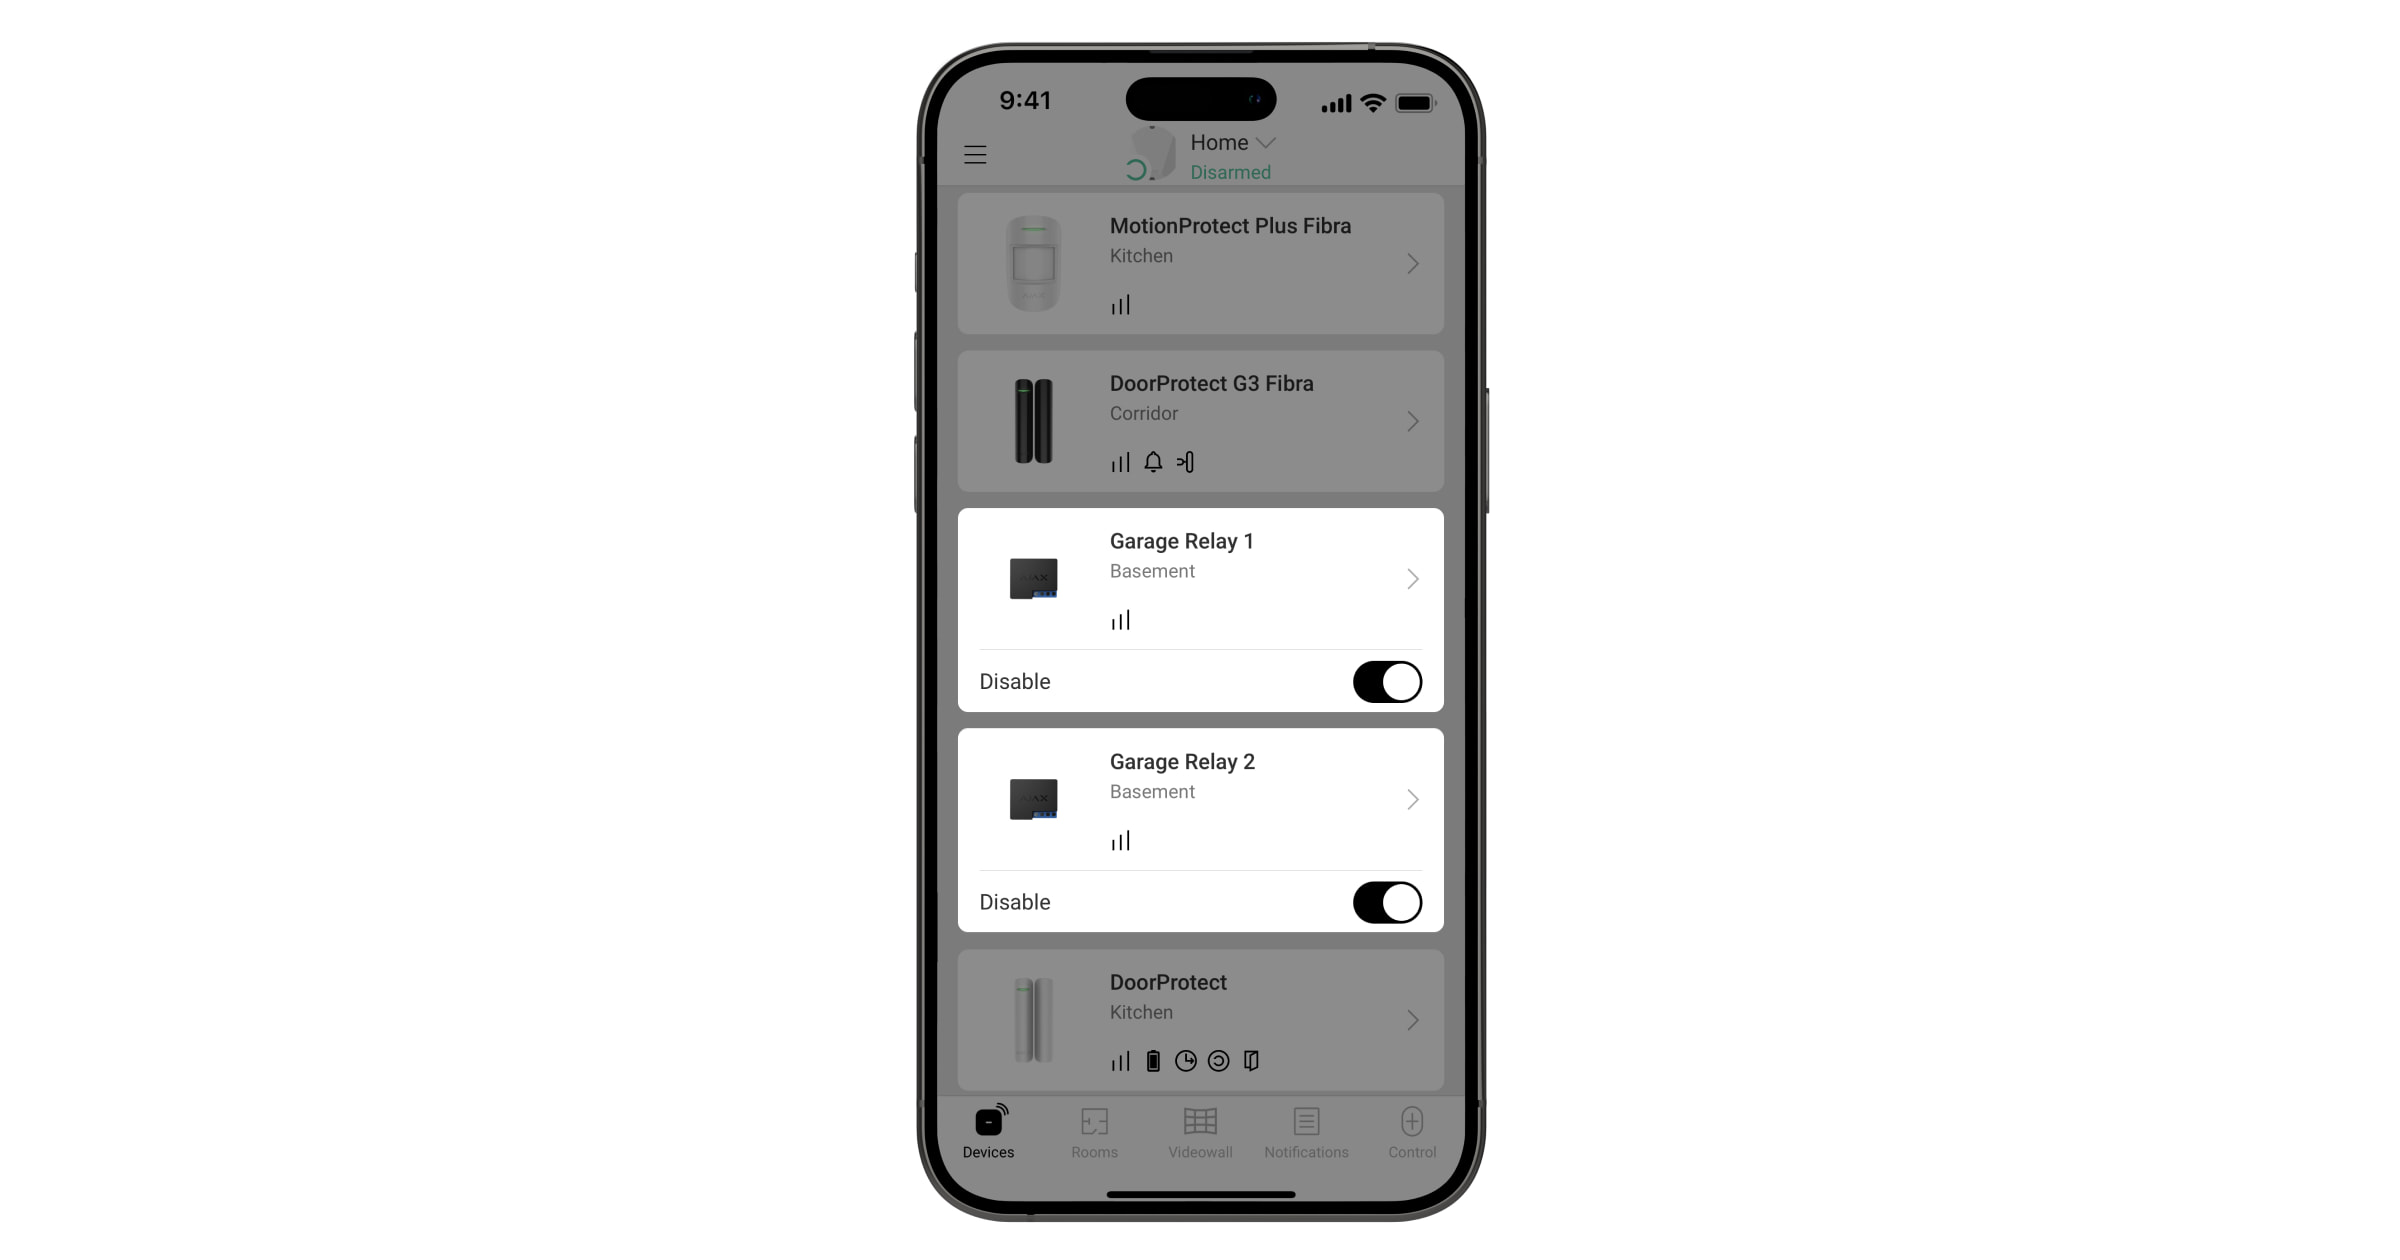
How to control roller blinds/roller shutters in an Ajax app
Click on the switch in the relay field in the Devices ![]() menu of the Ajax app — the state of the relay contacts will change to the opposite, and the roller blinds/roller shutters will open or close.
menu of the Ajax app — the state of the relay contacts will change to the opposite, and the roller blinds/roller shutters will open or close.
If you have connected to a controller with separate control inputs, to open the roller blinds/roller shutters, press the switch in the field of the corresponding low current relay. To close, use a similar switch in the field of the second low current relay.
How to control the power supply of roller blinds/roller shutters drive in the Ajax app
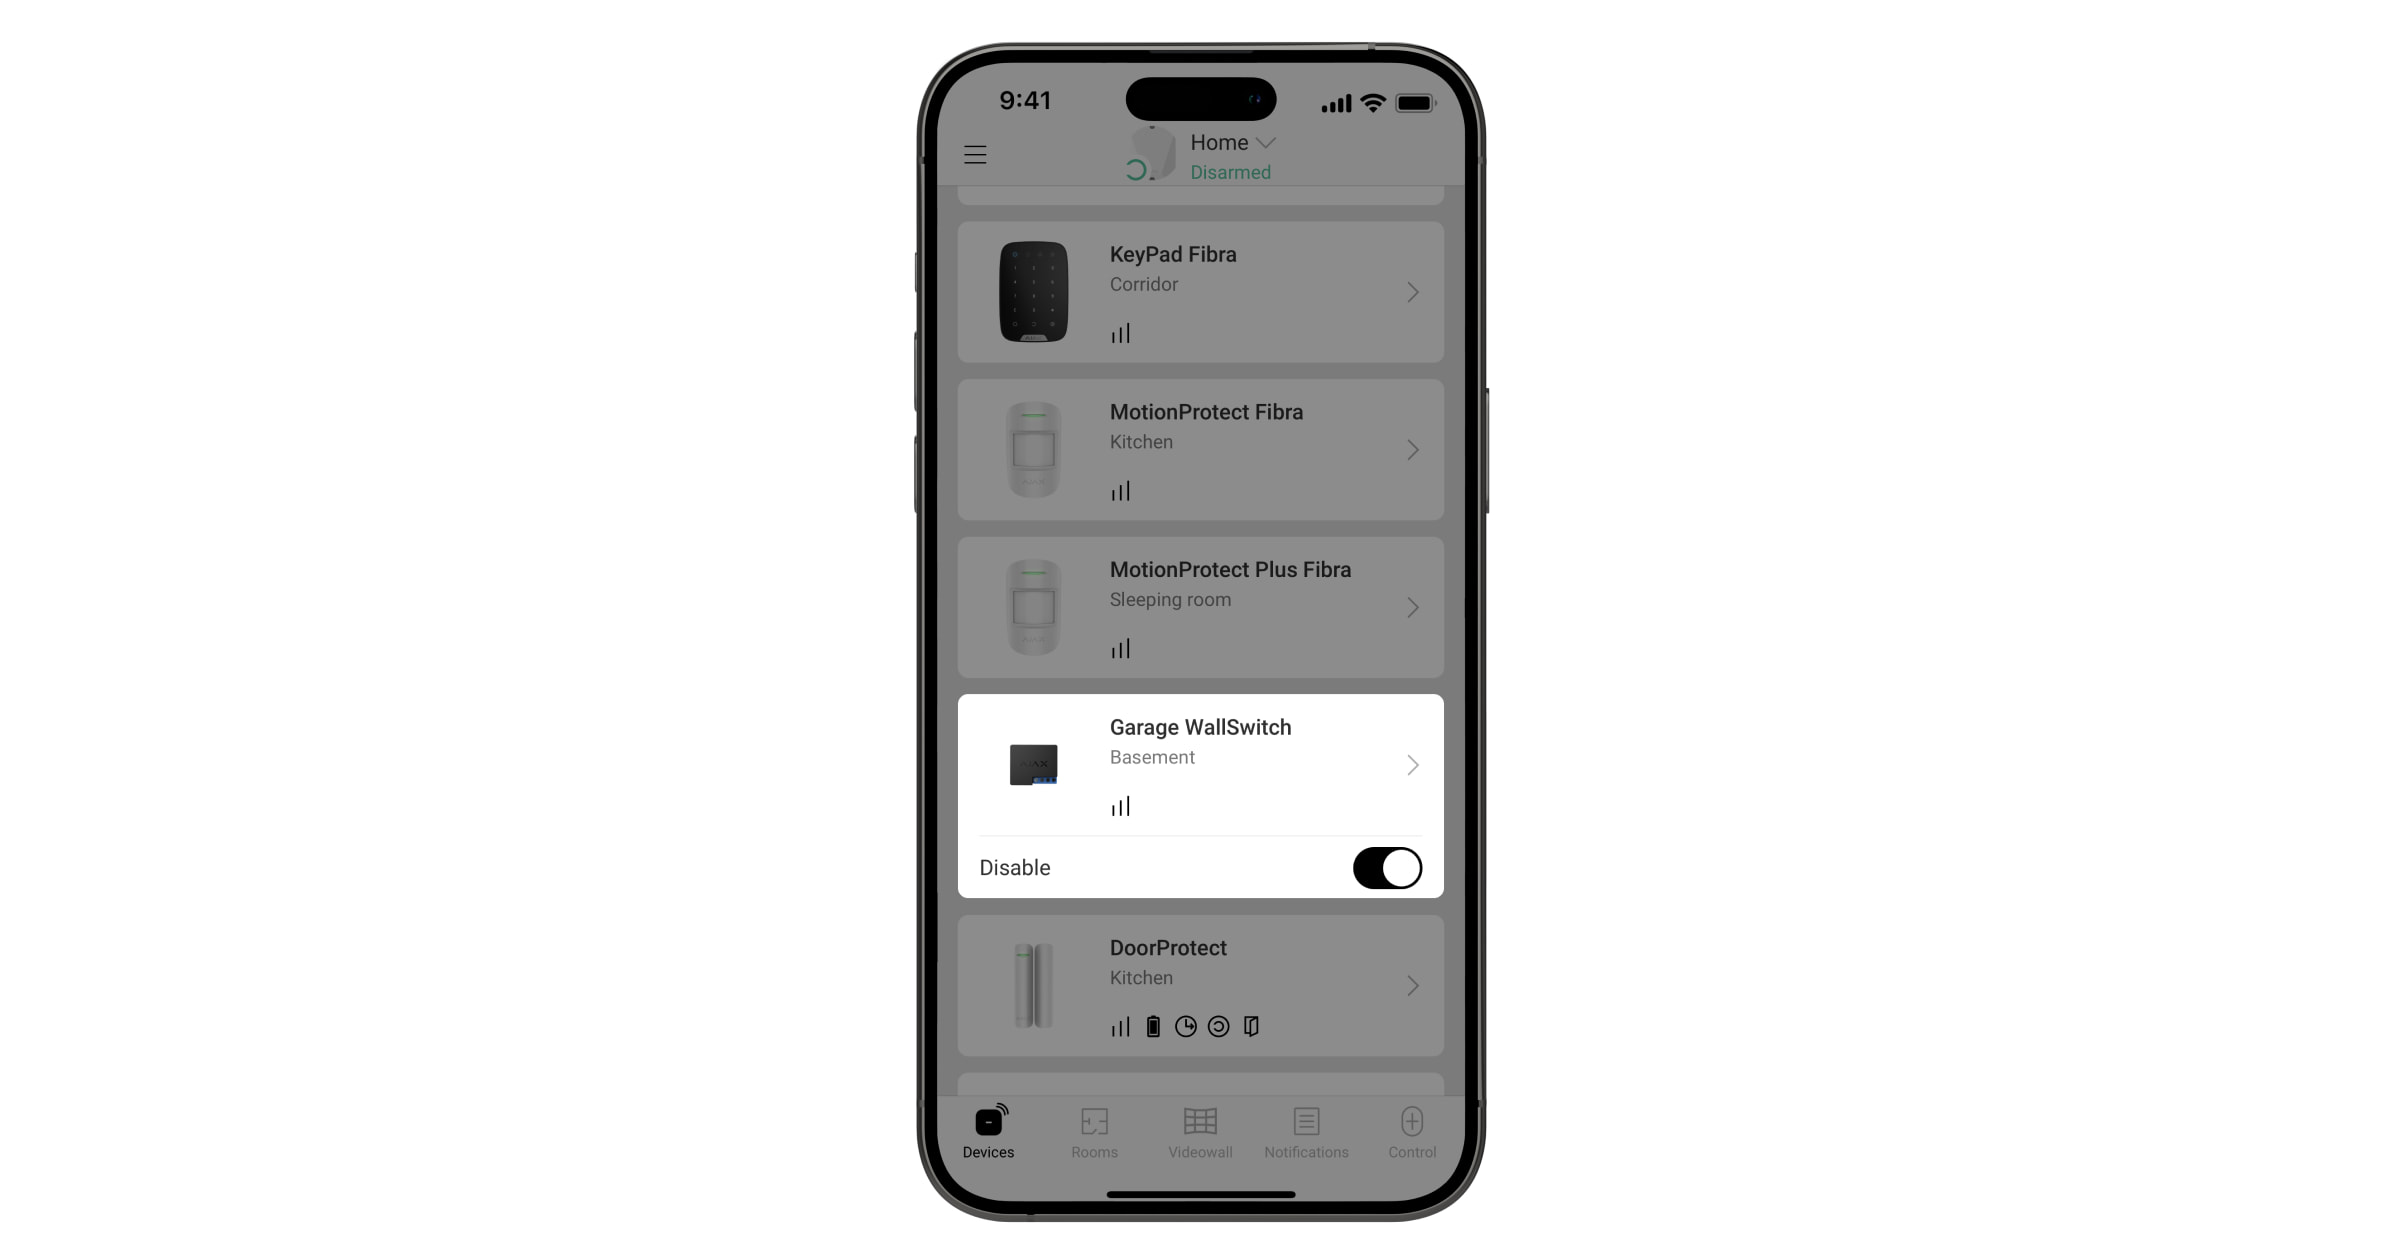
Press the switch in the power relay field — the state of the contacts will change to the opposite. When the contacts are closed, power is supplied to the device and the roller blinds/roller shutters can be controlled. When the contacts are open, the power supply to the device is interrupted, and the roller blinds/roller shutters are blocked.
How to program scenarios for opening, closing, and power supply control of roller blinds/roller shutters
Ajax scenarios allow you to open and close, as well as power and de-energize roller blinds/roller shutters when changing the security mode, turning on/off the Night Mode, on alarm or schedule.
Scenarios when changing the security mode can be used both for the entire Ajax system and using groups.
The Ajax security system provides the ability to control automation devices on schedule. You can set the activation time for relays.
It is possible to set a scenario upon the fire detector alarm. If the fire detector detects the smoke, excess limit temperature, or its rapid rise, the Ajax security system can open the roller shutters according to the scenario to facilitate evacuation.
To create scenarios for controlling roller blinds/roller shutters, go to the menu:
- Ajax app
- Devices tab
- Select the corresponding relay
- Settings
- Scenarios