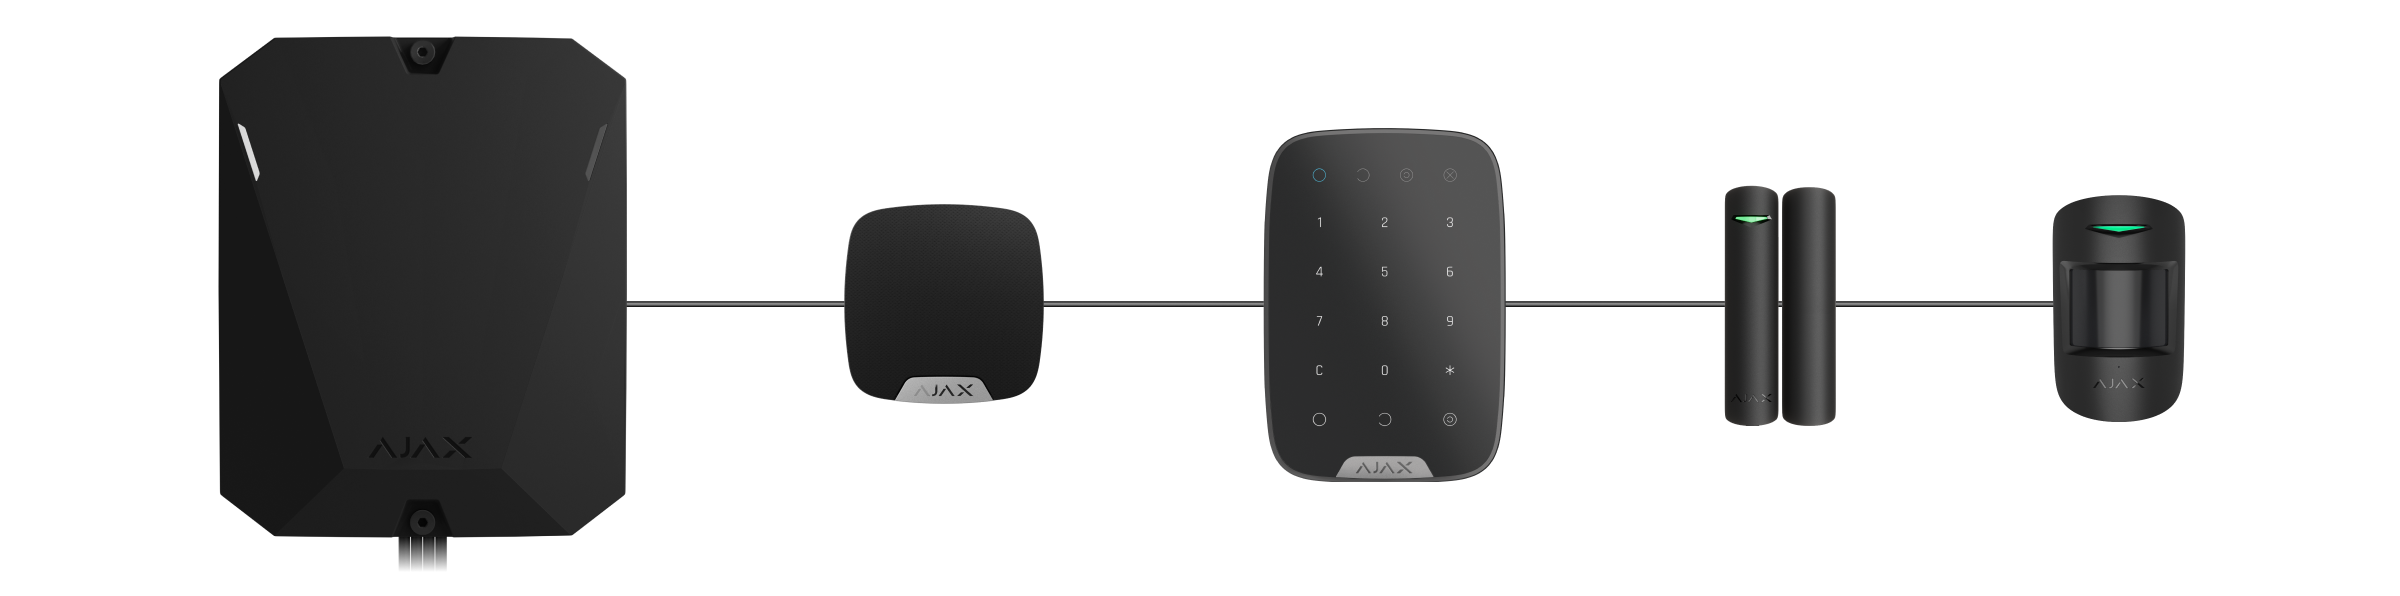
Hub Hybrid is a hybrid control panel of the Ajax security system. Compatible with wired and wireless Ajax devices. Controls the operation of connected devices, interacts with the user and the security company. Intended for indoor installation.
Hub Hybrid needs Internet access to connect to the Ajax Cloud service. Available communication channels: Ethernet and two SIM cards. The hub is available in two versions: with 2G and 2G/3G/4G (LTE) modem.
The Hub Hybrid board is sold in the casing, but you can install the board without casing into Case D (430) using Module Holder (type B). Case and holders are sold separately.
Installing the hub in Case D (430) does not meet the Grade (EN 50131) requirements. The compliant version will be available soon.
Functional elements
Casing elements
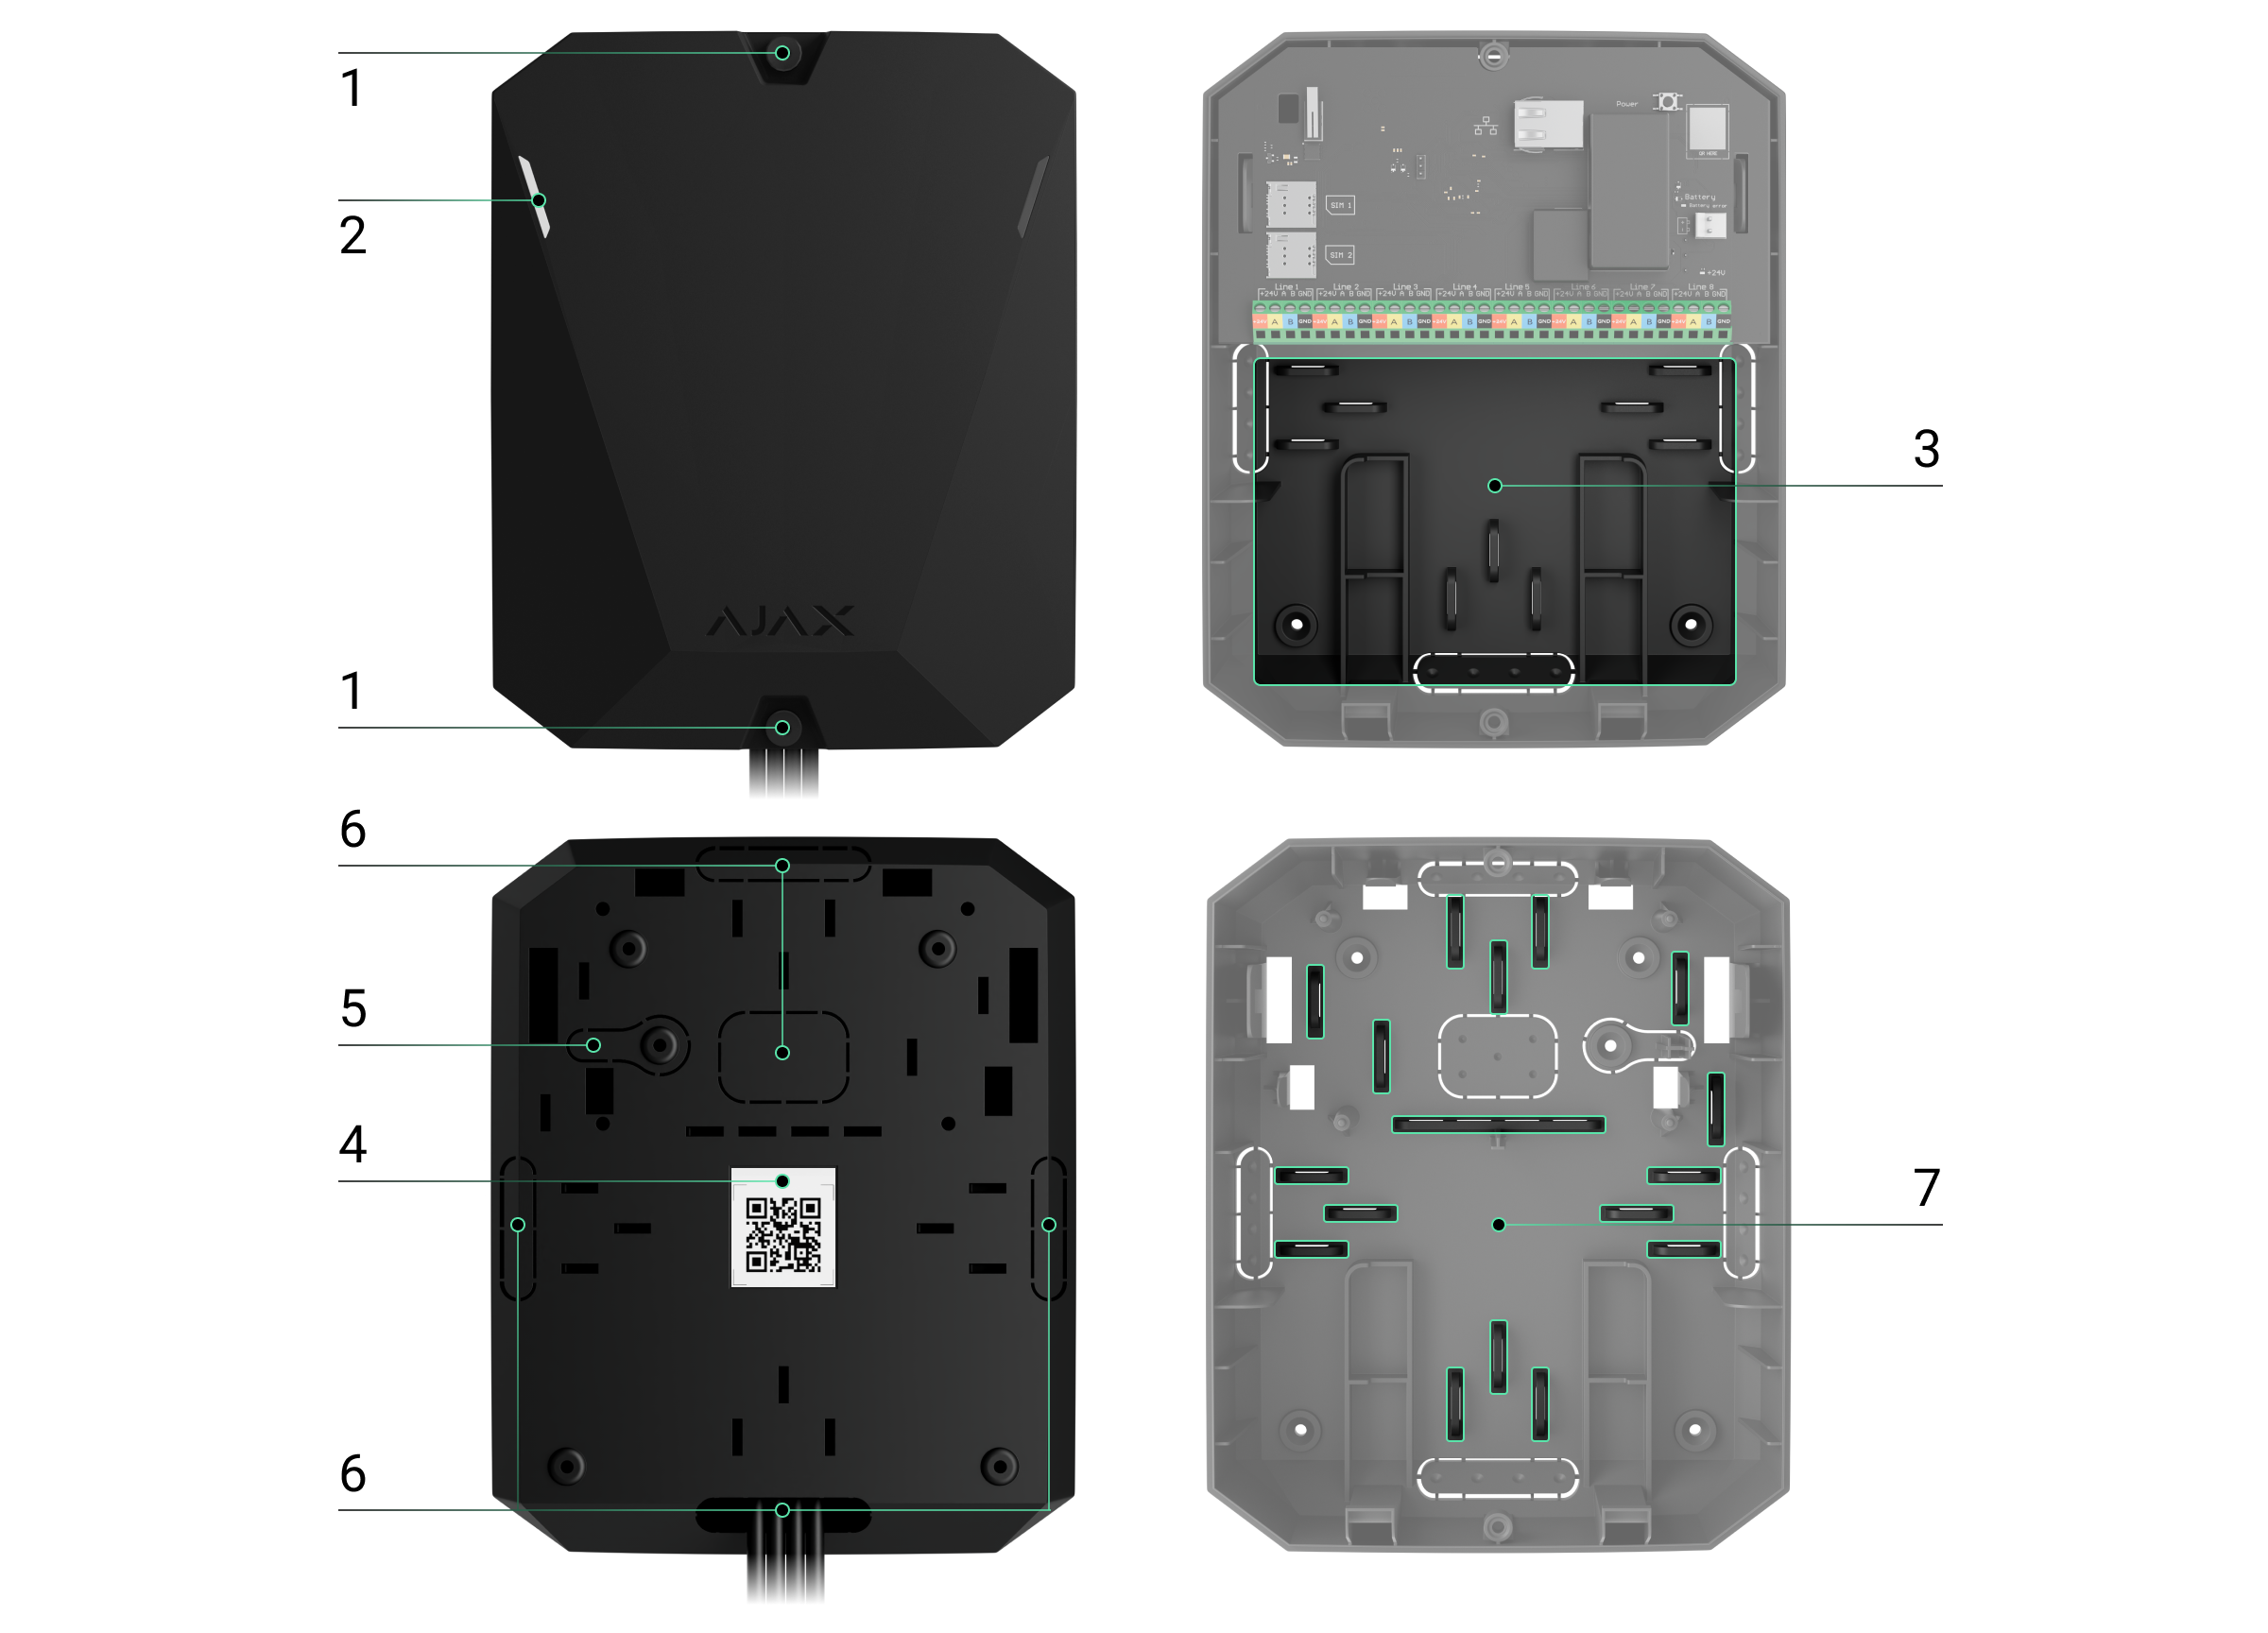
- Screws that secure the casing lid. Unscrew with a bundled hexagon key (Ø 4 mm).
- Light guides for the hub status indication (available in the new casing version; in the previous version, the LED indicator is located on the board).
- A part with holders for a backup battery.

Battery not included.
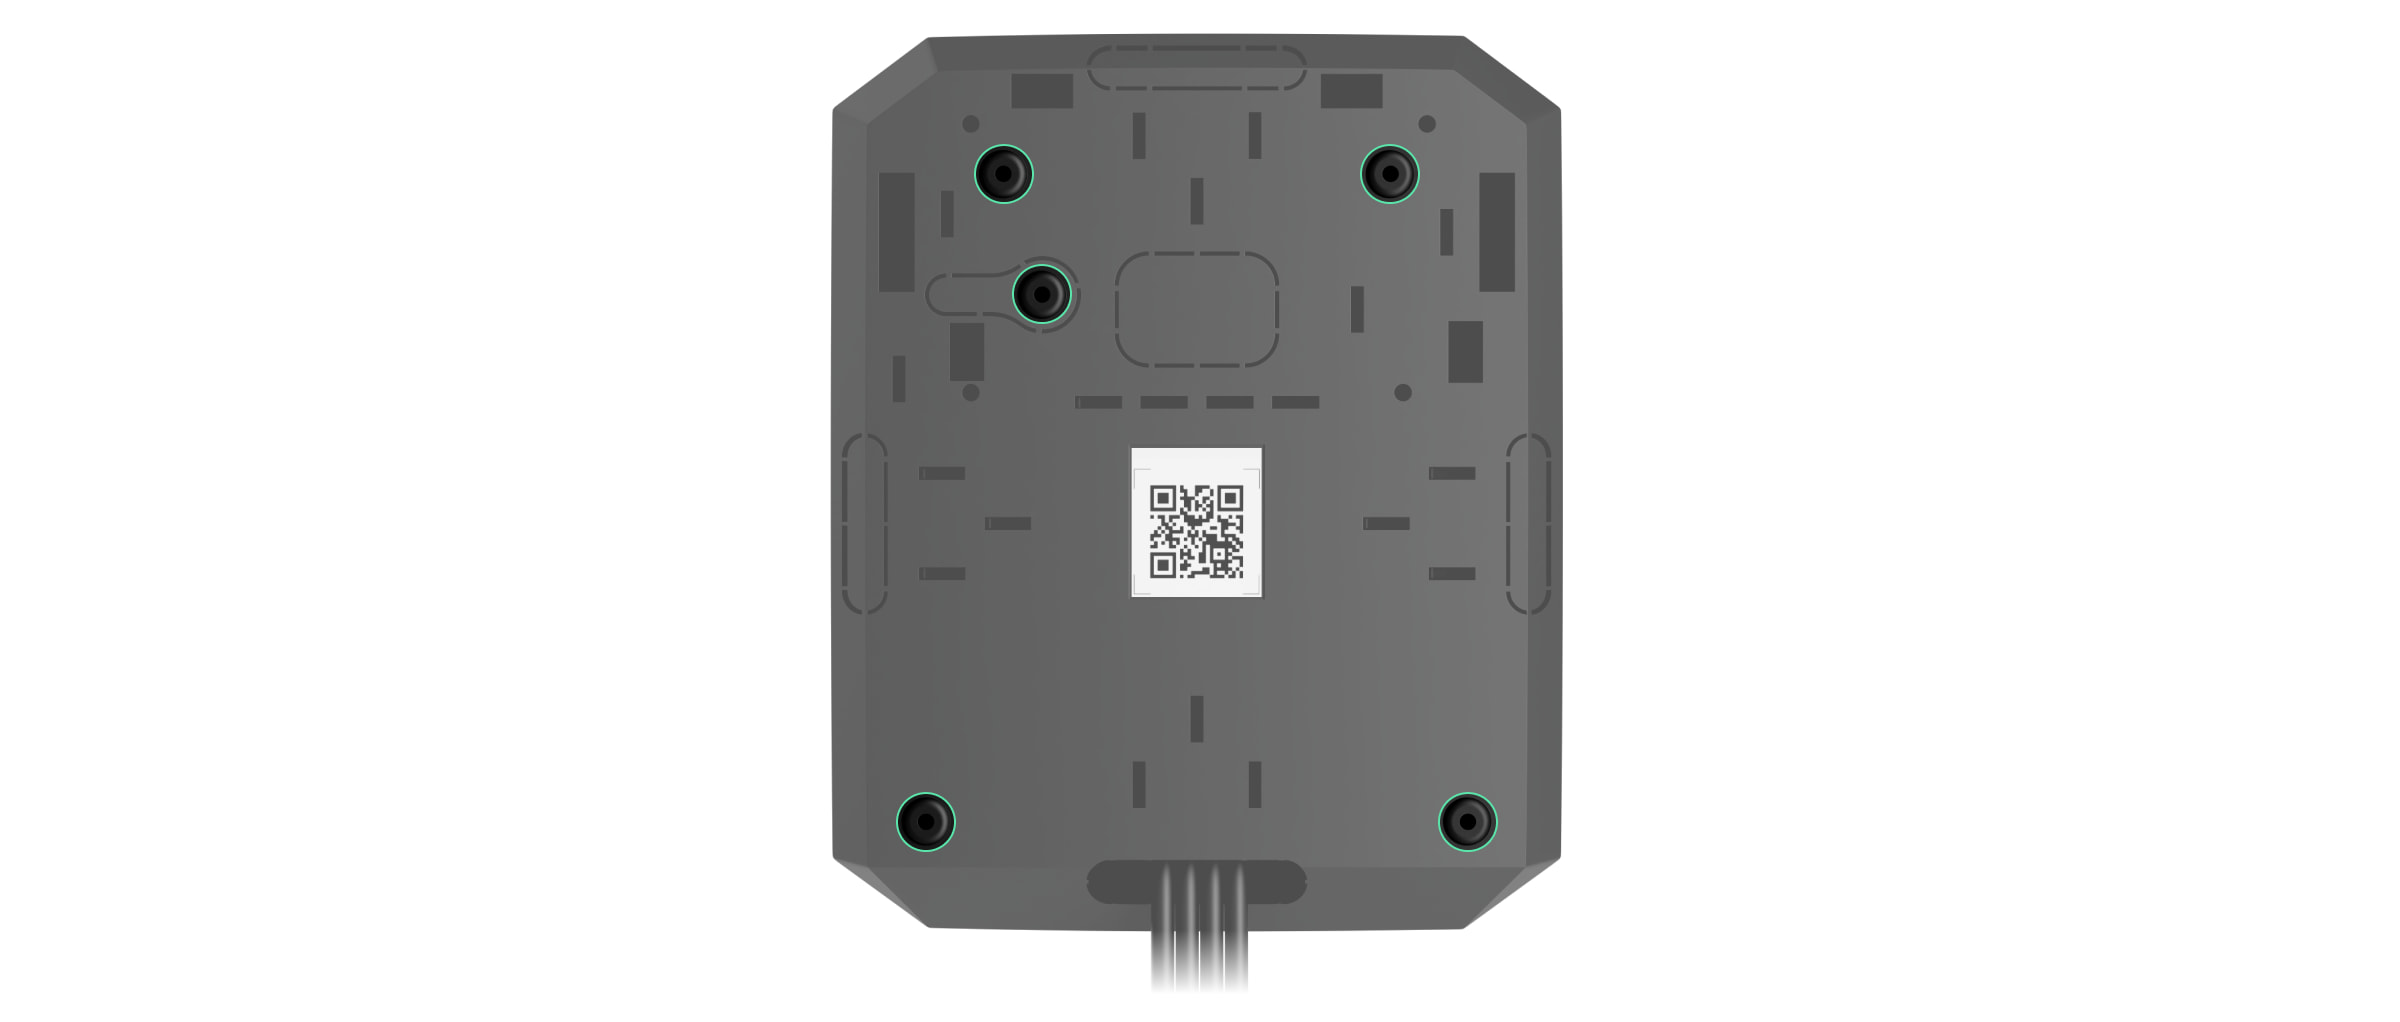
- QR code and ID (serial number) of the control panel.
- Perforated part of the casing. Necessary for tamper triggering in case of any attempt to detach the device from the surface. Do not break it off.
- Perforated parts of the casing for the output of wires of the connected detectors and devices.
- Cable fasteners.
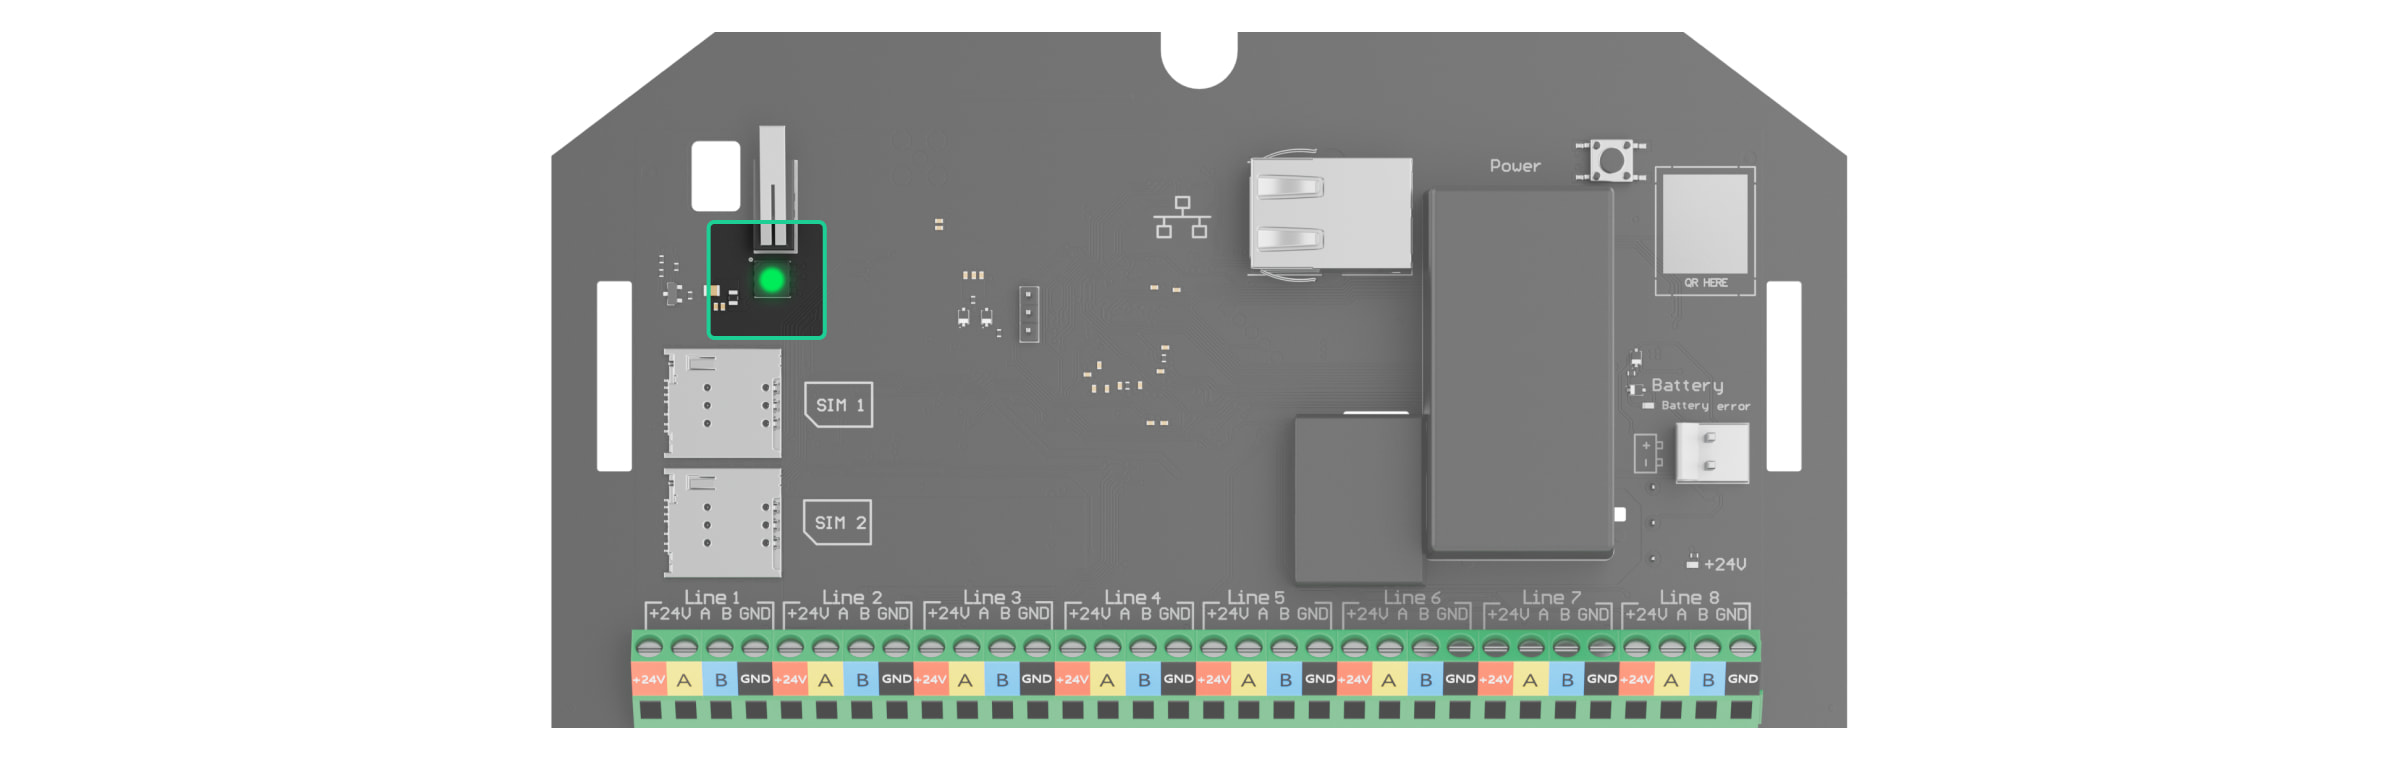
Board elements
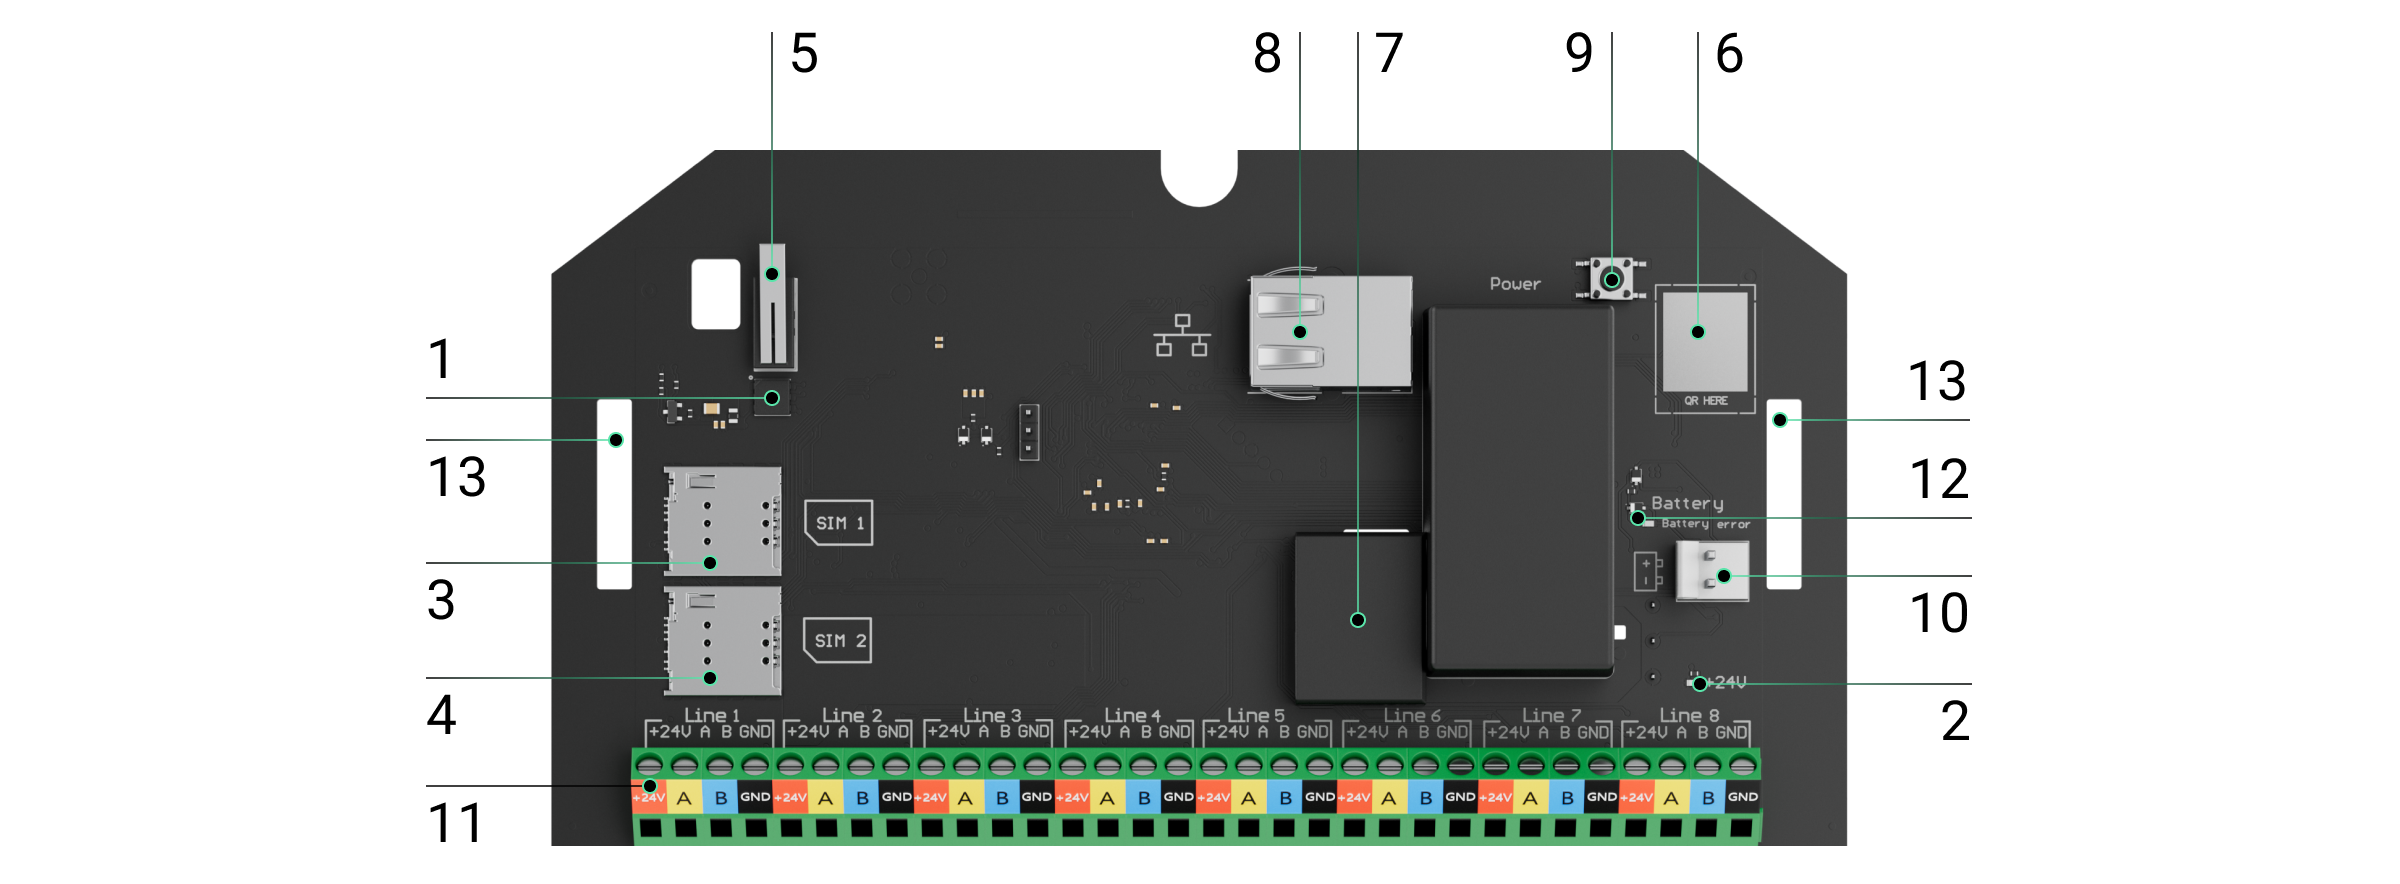
- LED status indicator of the hub and connected communication channels.
- LED status indicator of devices connected to the hub Fibra lines.
- Slot for micro SIM 1.
- Slot for micro SIM 2.
- Tamper button. Detects when the casing lid of Hub Hybrid (2G) / (4G) is removed.
- QR code and ID (serial number) of the device.
- Power cable connector.
- Ethernet cable connector.
- Power button.
- Terminals for connecting a 12 V backup battery.
- Fibra lines terminals for connecting wired devices.
- Battery error indicator. Lights up in case of polarity reversal when connecting the battery (when the battery “-” is connected to the terminal “+” and vice versa).
- Mounting holes to attach the Hub Hybrid board into Case D (430) using Module Holder (type B) or to the hub casing.
Fibra line terminals
Hub Hybrid (2G) / (4G) has 8 Fibra lines. Numbers from 1 to 8 are indicated on the control panel board.
Fibra line terminals:
- +24 V — power supply terminal of 24 V⎓.
- A — first signal terminal.
- B — second signal terminal.
- GND — power ground terminal.
Observe the polarity and the order of connecting the wires when installing Fibra devices.
Operating principle
Hub Hybrid is a hybrid control panel of the Ajax security system. It controls the operation of connected devices.
You can connect up to 100 wired and wireless Ajax devices to Hub Hybrid. Connected devices protect against intrusion, fire, and flooding, and also allow you to control electrical appliances according to scenarios or manually — in a mobile app or by pressing the panic button, LightSwitch, or keypad with touch screen.
To monitor the operation of all security system devices, the hub communicates with the connected devices using three encrypted protocols:
1. Jeweller is a radio protocol for transmitting events and alarms from Ajax wireless devices. The communication range is up to 2,000 m without obstacles: walls, doors, or inter-floor constructions.
2. Wings is a radio protocol for transmitting photos from MotionCam and MotionCam Outdoor detectors. The communication range is up to 1,700 m without obstacles: walls, doors, or inter-floor constructions.
3. Fibra is a wired protocol for transmitting events and alarms from Ajax wired devices. The communication range is up to 2,000 m when connected via twisted pair U/UTP cat.5.
If a detector is triggered, the system raises an alarm in less than a second, regardless of the communication protocol. In case of an alarm, the hub activates the sirens, starts the scenarios, and notifies the security company’s monitoring station and all users.
Sabotage protection
Hub Hybrid has 3 communication channels for connecting to the Ajax Cloud server: Ethernet and two SIM cards. This allows you to connect the device to three different communication providers at the same time. If one of the communication channels is unavailable, the hub will automatically switch to another one and inform the control station of the security company and system users.
When a jamming attempt is detected, the system switches to an idle radio frequency and sends notifications to the control station of the security company and to system users.
The hub regularly checks the quality of communication with all connected devices. If any device loses connection with the control panel, upon expiry of the time specified by the administrator, all system users (depending on the settings), as well as the monitoring station of the security company, will receive a notification about the incident.
No one can turn off the hub unnoticed, even when the facility is disarmed. If an intruder tries to open the hub casing, the tamper button will trigger immediately. The alarm notification will be sent to the security company and to system users.
When the Hub Hybrid board is installed in Case D (430), the app displays the hub lid is open. Installing the hub in Case D (430) does not meet the Grade (EN 50131) requirements. The compliant version will be available soon.
The hub rechecks Ajax Cloud connection at regular intervals. The ping period is specified in the hub settings. If a minimum ping period is set, the server may notify the users and the security company in as little as 60 seconds after the connection is lost.
The 7 A∙h backup battery can be connected to the hub, which can provide a system of 30 detectors with backup power for 60 hours.
Use 12 V⎓ batteries with a capacity of 4, 7, or 9 A∙h. There are special holders for batteries in the control panel casing and Case D (430).
You can use batteries of a different capacity, which suit the hub size and feature the full charging time of no more than 30 hours. The maximum battery charging current from the Hub Hybrid is 300 mA. The maximum dimensions of the battery to be installed in the Hub Hybrid casing are 151 × 65 × 94 mm, and the weight is 5 kg.
OS Malevich
Hub Hybrid is run by the real-time operating system OS Malevich. It is protected from viruses and cyber-attacks.
OS Malevich brings new features and functionality to the Ajax security system through over-the-air updates. The update does not require the involvement of an installation engineer or user.
The update takes up to 2 minutes with the security system disarmed and the external power supply and backup battery connected.
Indication
The hub LED has a list of indications showing the system state or events occurring. Hub Hybrid can light up red, white, purple, yellow, blue, or green, depending on the state.
In the previous casing version of Hub Hybrid and when the board is installed in Case D (430), the LED indicator is not visible when the casing lid is closed. The indicator is useful only during the hub’s connection and setup. In the new version, the casing of Hub Hybrid features light guides, allowing hub state to be viewed at any time.
Hub Hybrid states can also be monitored in the Ajax apps.
| Indication | Event | Note |
| Lights up white. | At least two communication channels are connected: Ethernet and one or two SIM cards. | When operating on a backup battery only, the indicator will blink every 10 seconds. |
| Lights up green. |
One communication channel is connected: Ethernet or one/two SIM cards. |
When operating on a backup battery only, the indicator will blink every 10 seconds. |
| Lights up red. | The hub has no connection to the Internet or the Ajax Cloud service. | When operating on a backup battery only, the indicator will blink every 10 seconds. |
|
The external power supply is disconnected (if there is a connected backup battery). |
Lights up continuously for 3 minutes, then blinks every 10 seconds. | The colour of the indication depends on the number of connected communication channels. |
If you see an indication while using the system that is not listed in this user manual, please contact the Ajax support service.
Access to indications
Hub Hybrid users can see the Alerts and Malfunctions indication after they:
- Arm/disarm the system using the Ajax keypad.
- Enter the correct user ID or personal code on the keypad and perform an action that has already been performed (for example, the system is disarmed and the disarm button is pressed on the keypad).
- Press the SpaceControl button to arm/disarm the system or activate Night Mode.
- Arm/disarm the system using Ajax apps.
All users can see the Changing hub’s state indication.
British Disco
The function can be enabled in the hub settings in the PRO app (Hub → Settings → Services → LED indication).
The indication is available for hubs with the firmware OS Malevich 2.14 and higher and in apps of such versions and higher:
- Ajax PRO: Tool for Engineers 2.22.2 for iOS.
- Ajax PRO: Tool for Engineers 2.25.2 for Android.
- Ajax PRO Desktop 3.5.2 for macOS.
- Ajax PRO Desktop 3.5.2 for Windows.
| Indication | Event | Note |
| Changing hub’s state | ||
| White LED flashes once per second. | Two-Stage Arming or Delay When Leaving. | One of the devices is performing Two-Stage Arming or Delay When Leaving. |
| Green LED flashes once per second. | Entry indication. | One of the devices is performing Delay When Entering. |
| White LED lights up for 2 seconds. | Arming is completed. | The hub (or one of the groups) is changing its state from Disarmed to Armed. |
| Green LED lights up for 2 seconds. | Disarming is completed. | The hub (or one of the groups) is changing its state from Armed to Disarmed. |
| Alerts and Malfunctions | ||
| Red and purple LED flashes in sequence for 5 seconds. | Confirmed hold-up alarm. |
There is an unrestored state after a confirmed hold-up alarm. The indication is displayed only if Restoration after confirmed hold-up alarm is enabled in the settings. |
| Red LED lights up for 5 seconds. | Hold-up alarm. |
There is an unrestored state after a hold-up alarm. The indication is not displayed if there is a confirmed hold-up alarm state. The indication is displayed only if Restoration after hold-up alarm is enabled in the settings. |
| Red LED flashes. | The number of flashes equals the Device No. of a hold-up device (DoubleButton), the first to generate the hold-up alarm. | There is an unrestored state after the confirmed or unconfirmed hold-up alarm:
or
|
| Yellow and purple LED flashes sequentially for 5 seconds. | Confirmed intrusion alarm. |
There is an unrestored state after the confirmed intrusion alarm. The indication is displayed only if Restoration after confirmed intrusion alarm is enabled in the settings. |
| Yellow LED lights up for 5 seconds. | Intrusion alarm. |
There is an unrestored state after the intrusion alarm. The indication is not displayed if there is a confirmed intrusion alarm condition. The indication is displayed only if Restoration after intrusion alarm is enabled in the settings. |
| Yellow LED flashes. | The number of flashes equals the Device No. that first generated the intrusion alarm. | There is an unrestored state after the confirmed or unconfirmed intrusion alarm:
or
|
| Red and blue LED flashes in sequence for 5 seconds. | Lid opening. |
There is an unrestored tamper state or an open lid on any of the devices, or the hub. The indication is displayed only if Restoration after Lid opening is turned on in the settings. |
| Yellow and blue LED flashes in sequence for 5 seconds. | Other malfunctions. |
There is an unrestored fault state or a malfunction of any device or the hub. The indication is displayed only if Restoration after faults is enabled in the settings. Currently, Restoration after faults is not available in Ajax apps. |
| Dark blue LED lights up for 5 seconds. | Permanent deactivation. | One of the devices is permanently deactivated or the lid state notifications are disabled. |
| Blue LED lights up for 5 seconds. | Automatic deactivation. | One of the devices is automatically deactivated by an opening timer or the number of detections. |
| Green and blue LED flashes in sequence. |
Alarm timer expiration. |
Displayed after the alarm timer expires (to confirm the alarm). |
When nothing is happening in the system (no alarm, malfunction, lid opening, etc.), the LED displays two hub states:
- Armed/partially armed or Night Mode enabled — the LED lights up white.
- Disarmed — the LED lights up green.
In hubs with firmware OS Malevich 2.15.2 and higher, the LED lights up green when set to Armed/partially armed or Night Mode.
Alert indication
If the system is disarmed and any of the indications from the table is present, the yellow LED flashes once per second.
If there are several states in the system, the indications are displayed one by one, in the same sequence as shown in the table.
Ajax account
To set up the system, install the PRO version of the app and create an account if you don’t have one. Don’t create a new account for each hub since one account can manage multiple security systems. Where necessary, you can configure separate access rights for each hub.
User settings, systems, and parameters of connected devices are stored in the hub. Changing the hub administrator, adding or removing users does not reset the settings of devices connected to the hub.
Hub Hybrid can only be added and configured in Ajax PRO apps.
Connecting the hub to Ajax Cloud
Hub Hybrid needs Internet access to connect to the Ajax Cloud server. Connection is needed for the operation of Ajax apps, remote setup and management of the system, and for sending push notifications to users.
Hub Hybrid is connected to the Internet via Ethernet and two SIM cards. Connect all communication channels to achieve greater reliability and availability of the system.
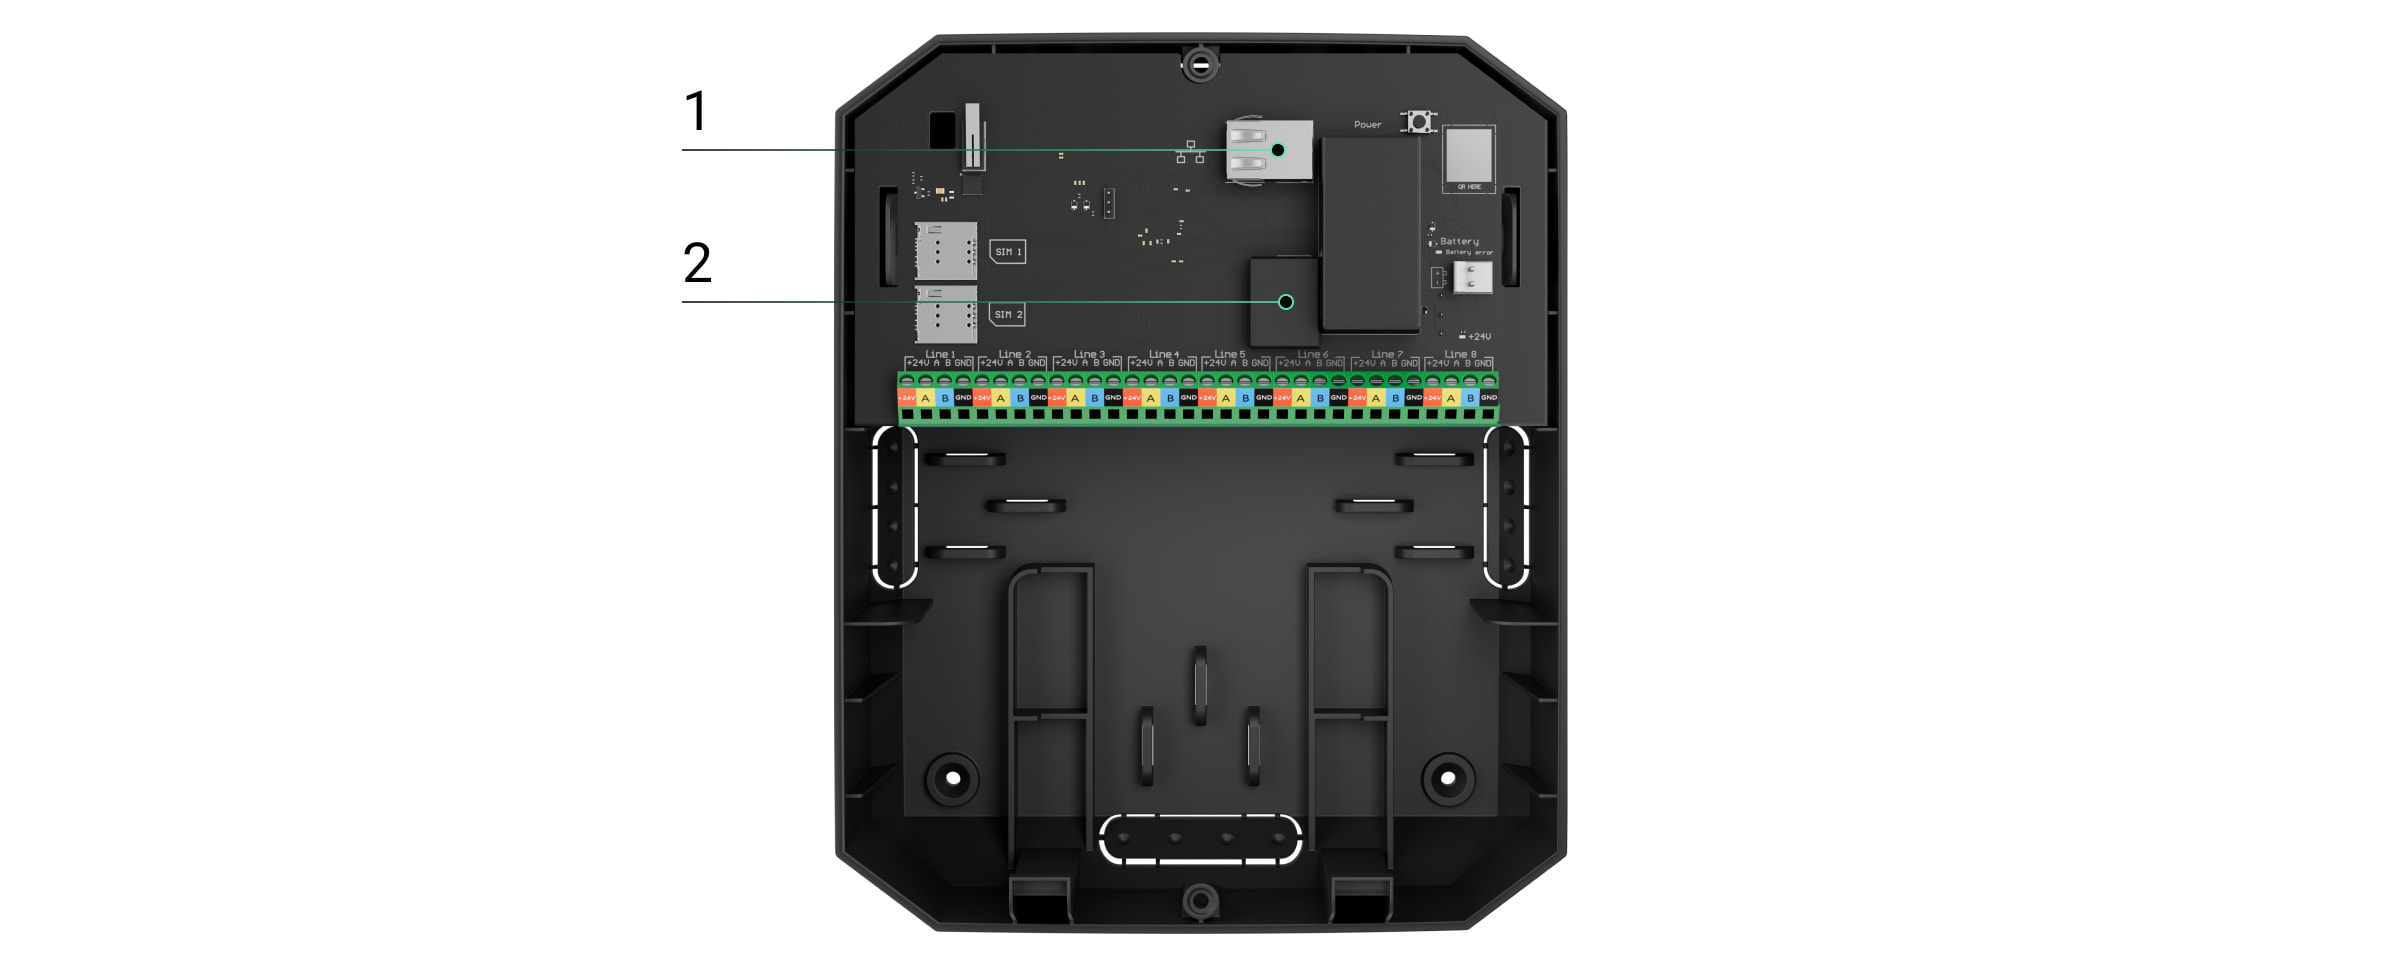
To connect the hub to Ajax Cloud:
- Unscrew the screws securing the casing, if installed. Unscrew with a Ø 4 mm hexagon key. This hexagon key is included in the control panel set.
- Remove the casing lid of the hub.
- Install the Hub Hybrid board into Case D (430) using Module Holder (type B) if necessary.
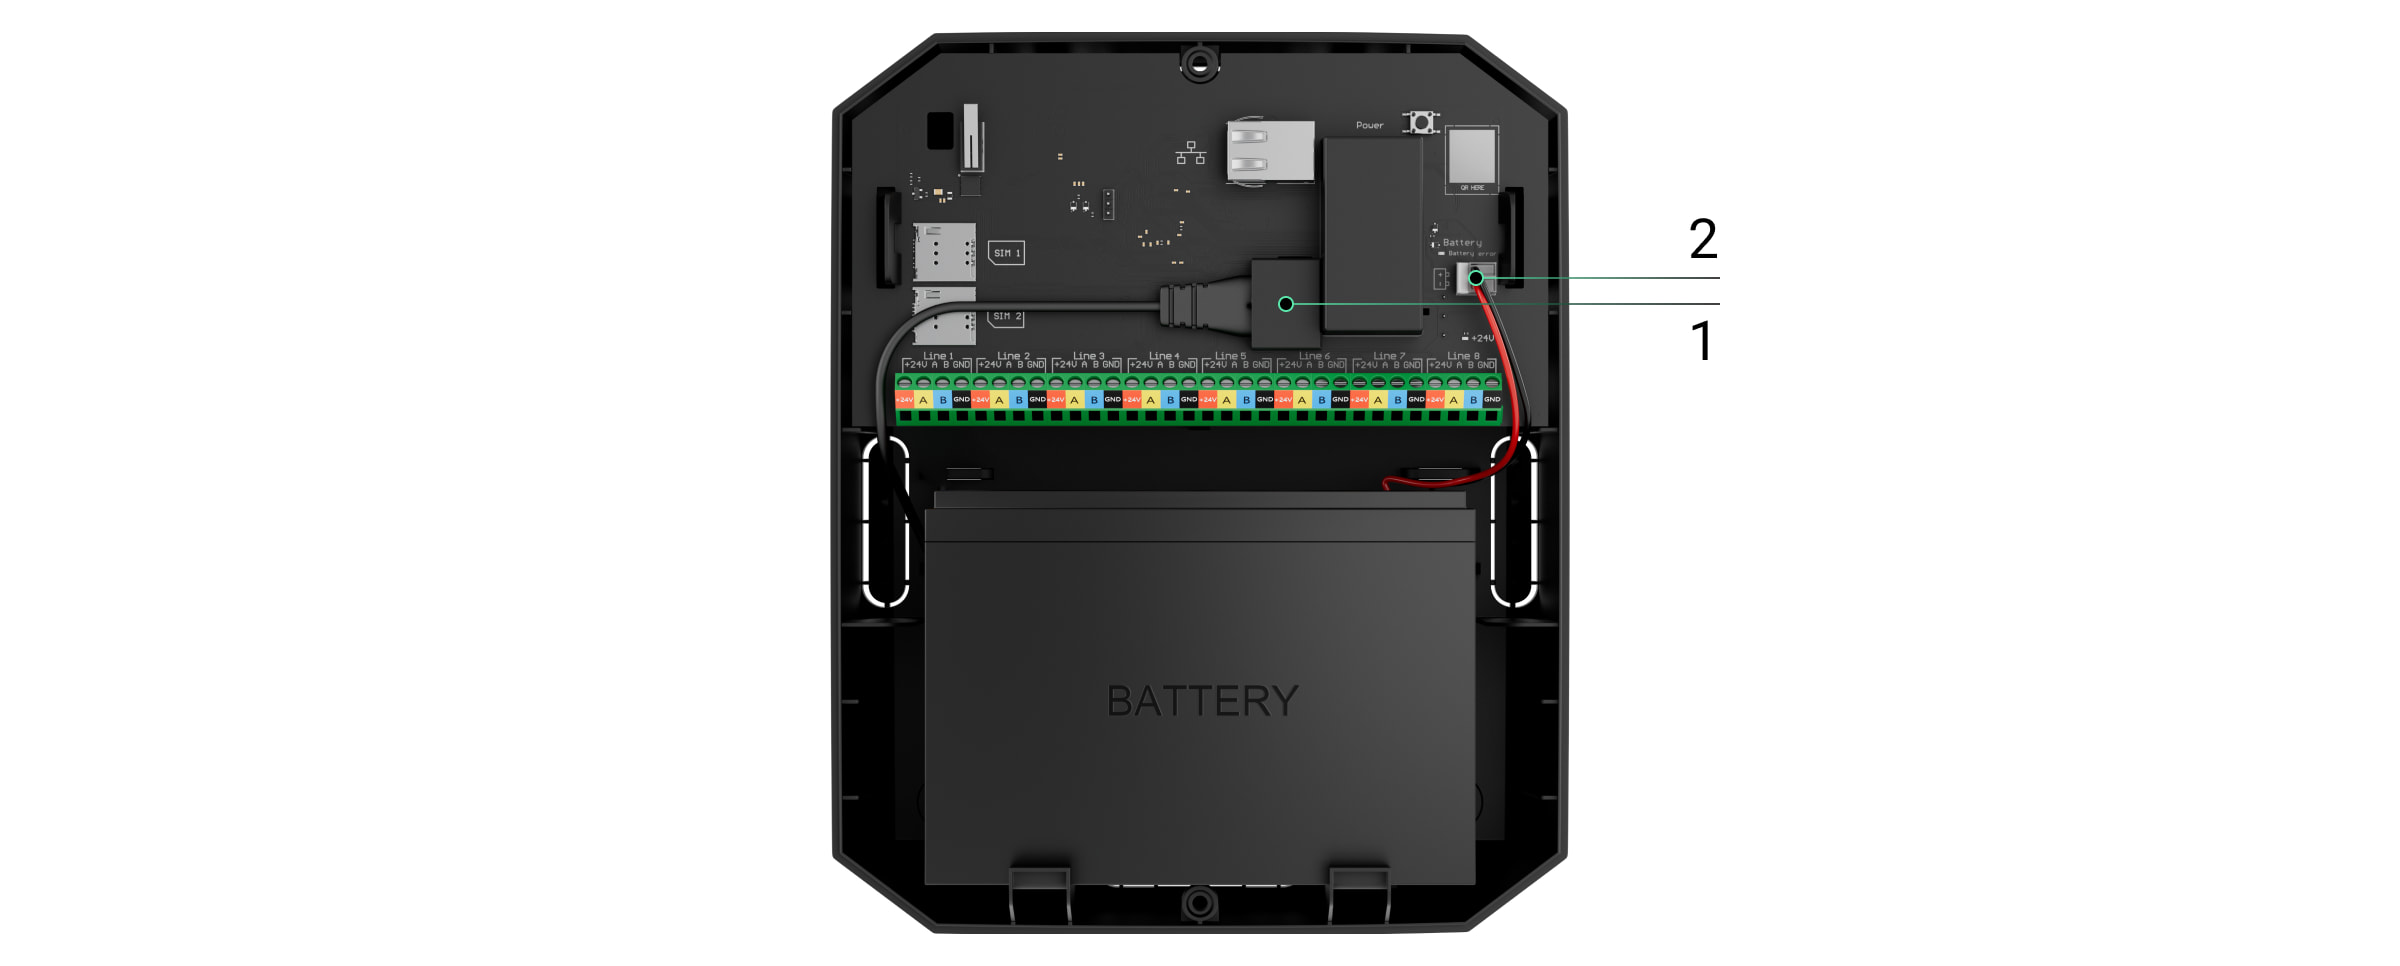
- Connect the power and Ethernet cables to the appropriate connectors:
1 — Ethernet cable connector.
2 — power cable connector.To comply with the INCERT requirements, use the Screw terminal block Adapter to connect the external power supply. Read more.
- Install SIM cards:
1 — first micro-SIM slot.
2 — second micro-SIM slot. - Connect a 12 V⎓ backup battery with a capacity of 4, 7, or 9 A∙h. The hub casing and Case D (430) are designed for use with this type of battery.
- Hold down the power button of the hub. As soon as the hub is on, the Fibra line LEDs on the hub board will light up.
- Wait until the control panel is connected to the Internet. The green or white colour of the LED indicates that the hub is ready for operation.


If Ethernet connection fails
If the Ethernet connection is not established, disable proxy and MAC address filtration and activate DHCP in the router settings. The hub will automatically receive an IP address. After that, you can assign a static IP address to the hub in the Ajax app.
If SIM connection fails
To connect to the cellular network, you need to install a micro-SIM card with a PIN code request disabled and a sufficient amount of funds on the account to pay for services as per the operator’s tariff. To disable the PIN code request, insert the SIM card into the phone.
If the hub fails to connect to the cellular network, use Ethernet to configure the network parameters: roaming, APN access point, user name, and password. To find out these parameters, contact the support service of your mobile operator.
Adding a hub to the PRO version of the app
Hub Hybrid can only be added and configured in Ajax PRO apps.
After adding a hub to your account, you become the administrator of the device. Administrators can invite other users to the system and determine their rights. You can connect up to 50 users to Hub Hybrid.
Each PRO account connected to the hub, as well as the security company profile is considered a user of the system.
Changing or removing the administrator from the list of hub users does not reset the settings of the system or connected devices.
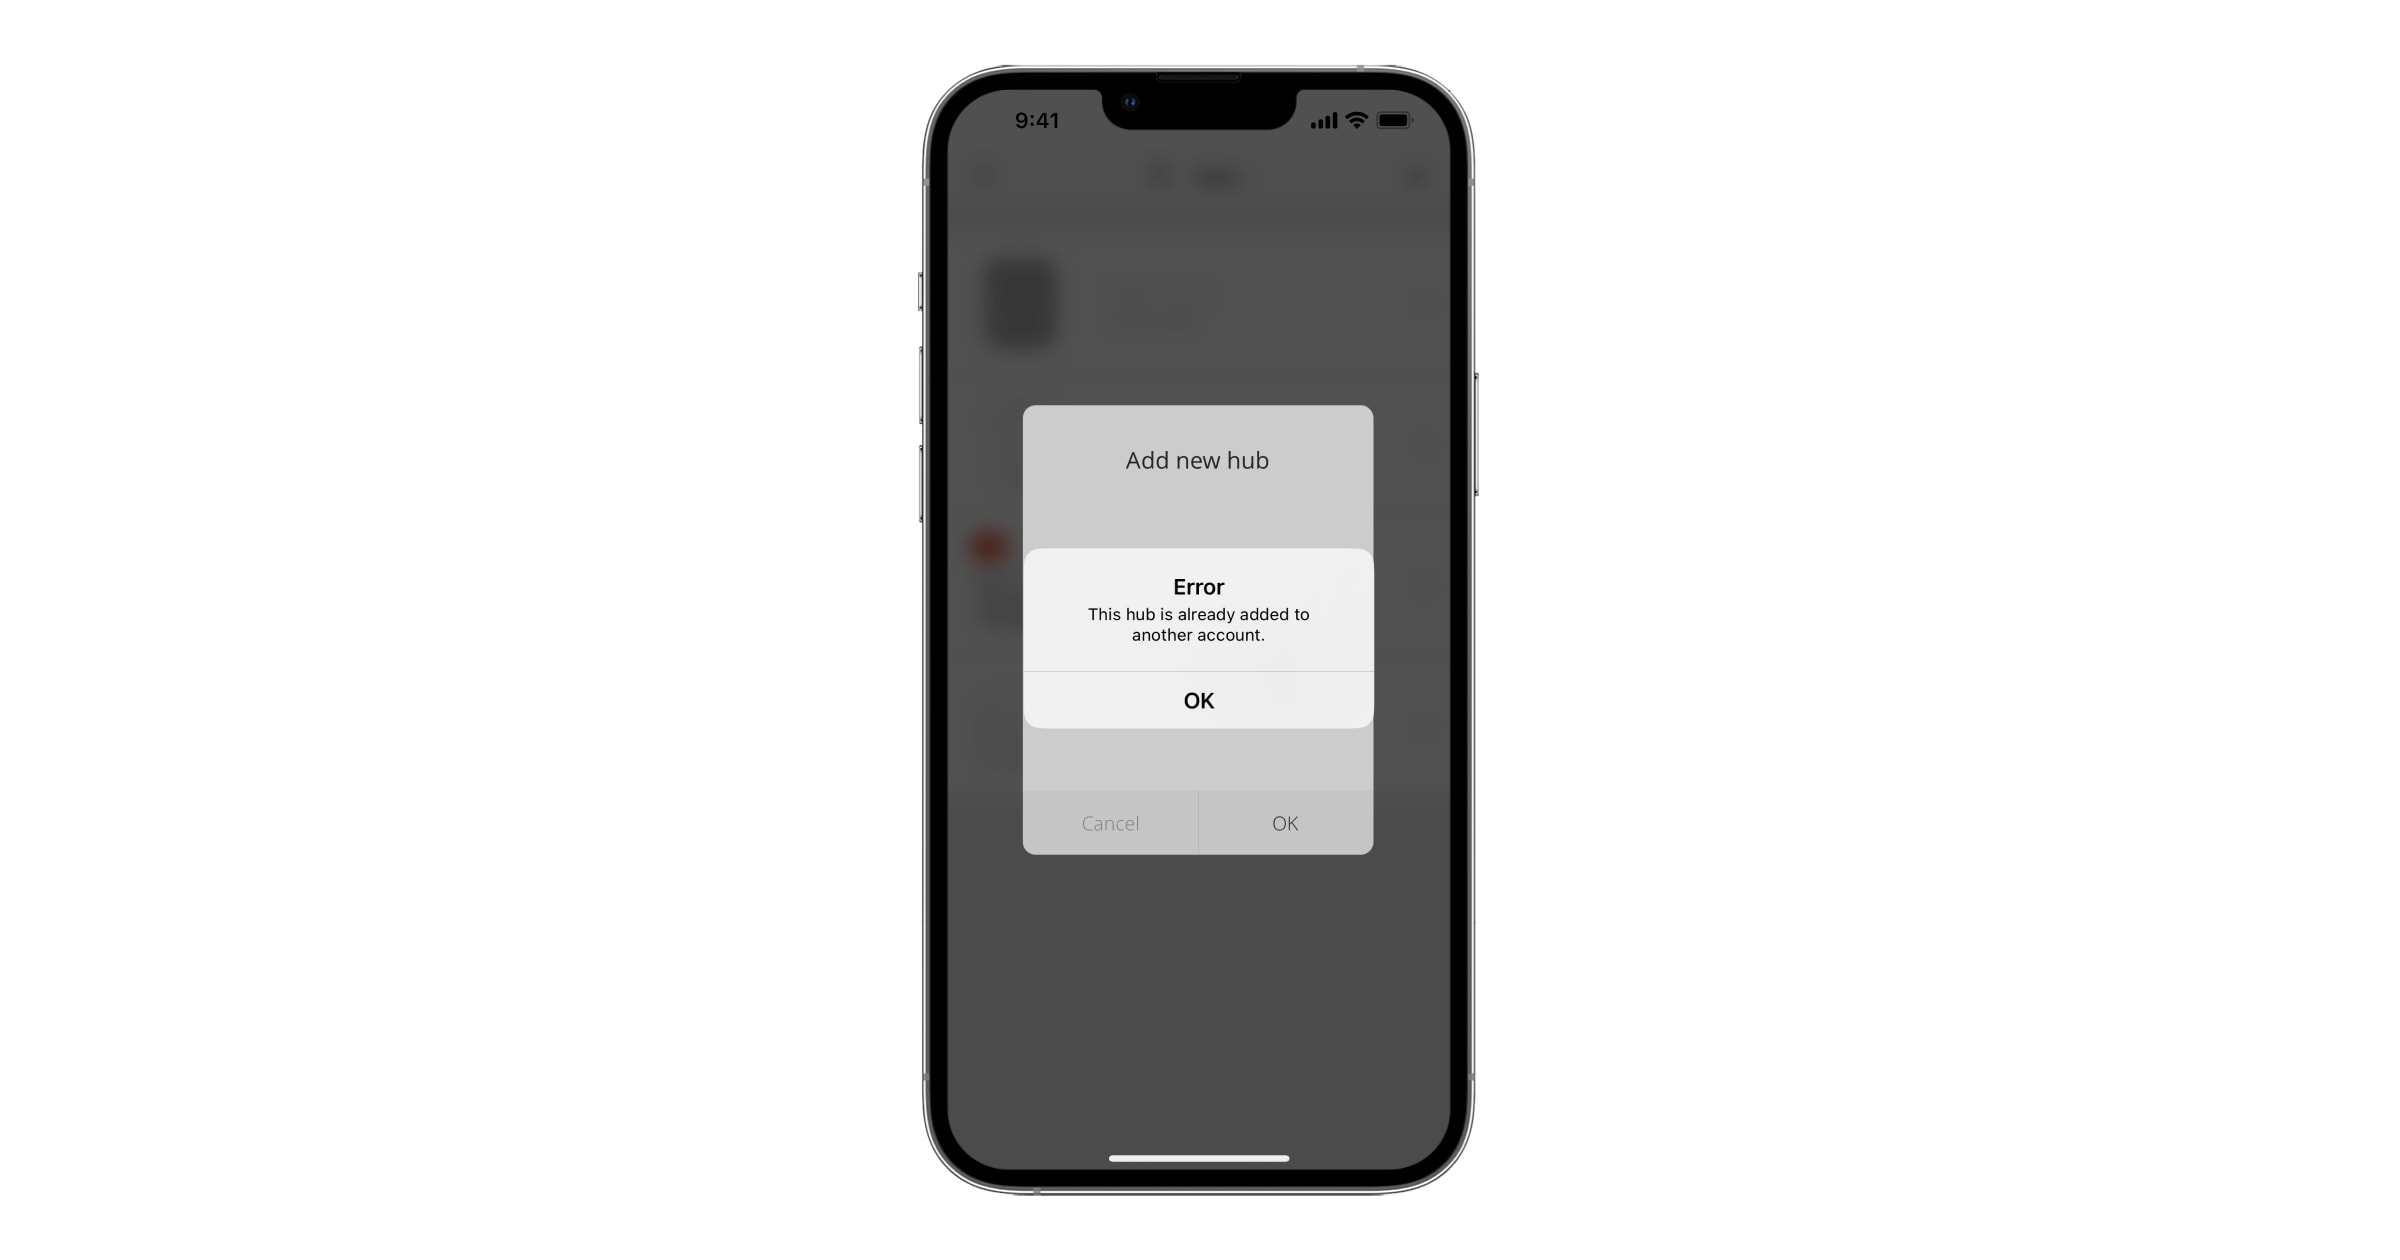
If there are already users on the hub, the hub admin, PRO with full rights, or the installation company maintaining the selected hub can add your account. You will receive a notification that the hub is already added to another account. Contact with Technical Support to determine who has admin rights on the hub.
To add a hub to the PRO version of the app:
- Connect external power, backup battery, Ethernet, and/or SIM cards to the hub.
- Turn on the hub and wait until the connection status LED indicator lights up green or white.
- Open the PRO version of the app. Allow the app to access the requested features. This will allow you to fully use the capabilities of the Ajax apps and not to miss notifications about alarms or events.
- Ensure you have a space. Create the space if you don’t have one.
The space functionality is available for apps of such versions and higher:
- Ajax Security System 3.0 for iOS;
- Ajax Security System 3.0 for Android;
- Ajax PRO: Tool for Engineers 2.0 for iOS;
- Ajax PRO: Tool for Engineers 2.0 for Android;
- Ajax PRO Desktop 4.0 for macOS;
- Ajax PRO Desktop 4.0 for Windows.
- Click Add Hub.
- Choose a suitable method: manually or using a step-by-step guidance. If you are setting the system up for the first time, use step-by-step guidance.
If you have selected manual adding.
- Assign the hub name.
- Scan the hub QR code or enter the ID manually.
- Wait until the hub is added. After binding, the hub will be displayed in the Devices menu of the PRO version of the app.
If you chose a step-by-step guidance.
Follow the instructions in the app. Upon completion, the hub and connected devices will be displayed in the Devices ![]() menu of the PRO version of the app.
menu of the PRO version of the app.
Fault counter
If a hub fault is detected (e.g., no external power supply is available), a fault’s counter is displayed on the device icon in the Ajax app.
All faults can be viewed in the hub states. Fields with faults will be highlighted in red.
Hub icons
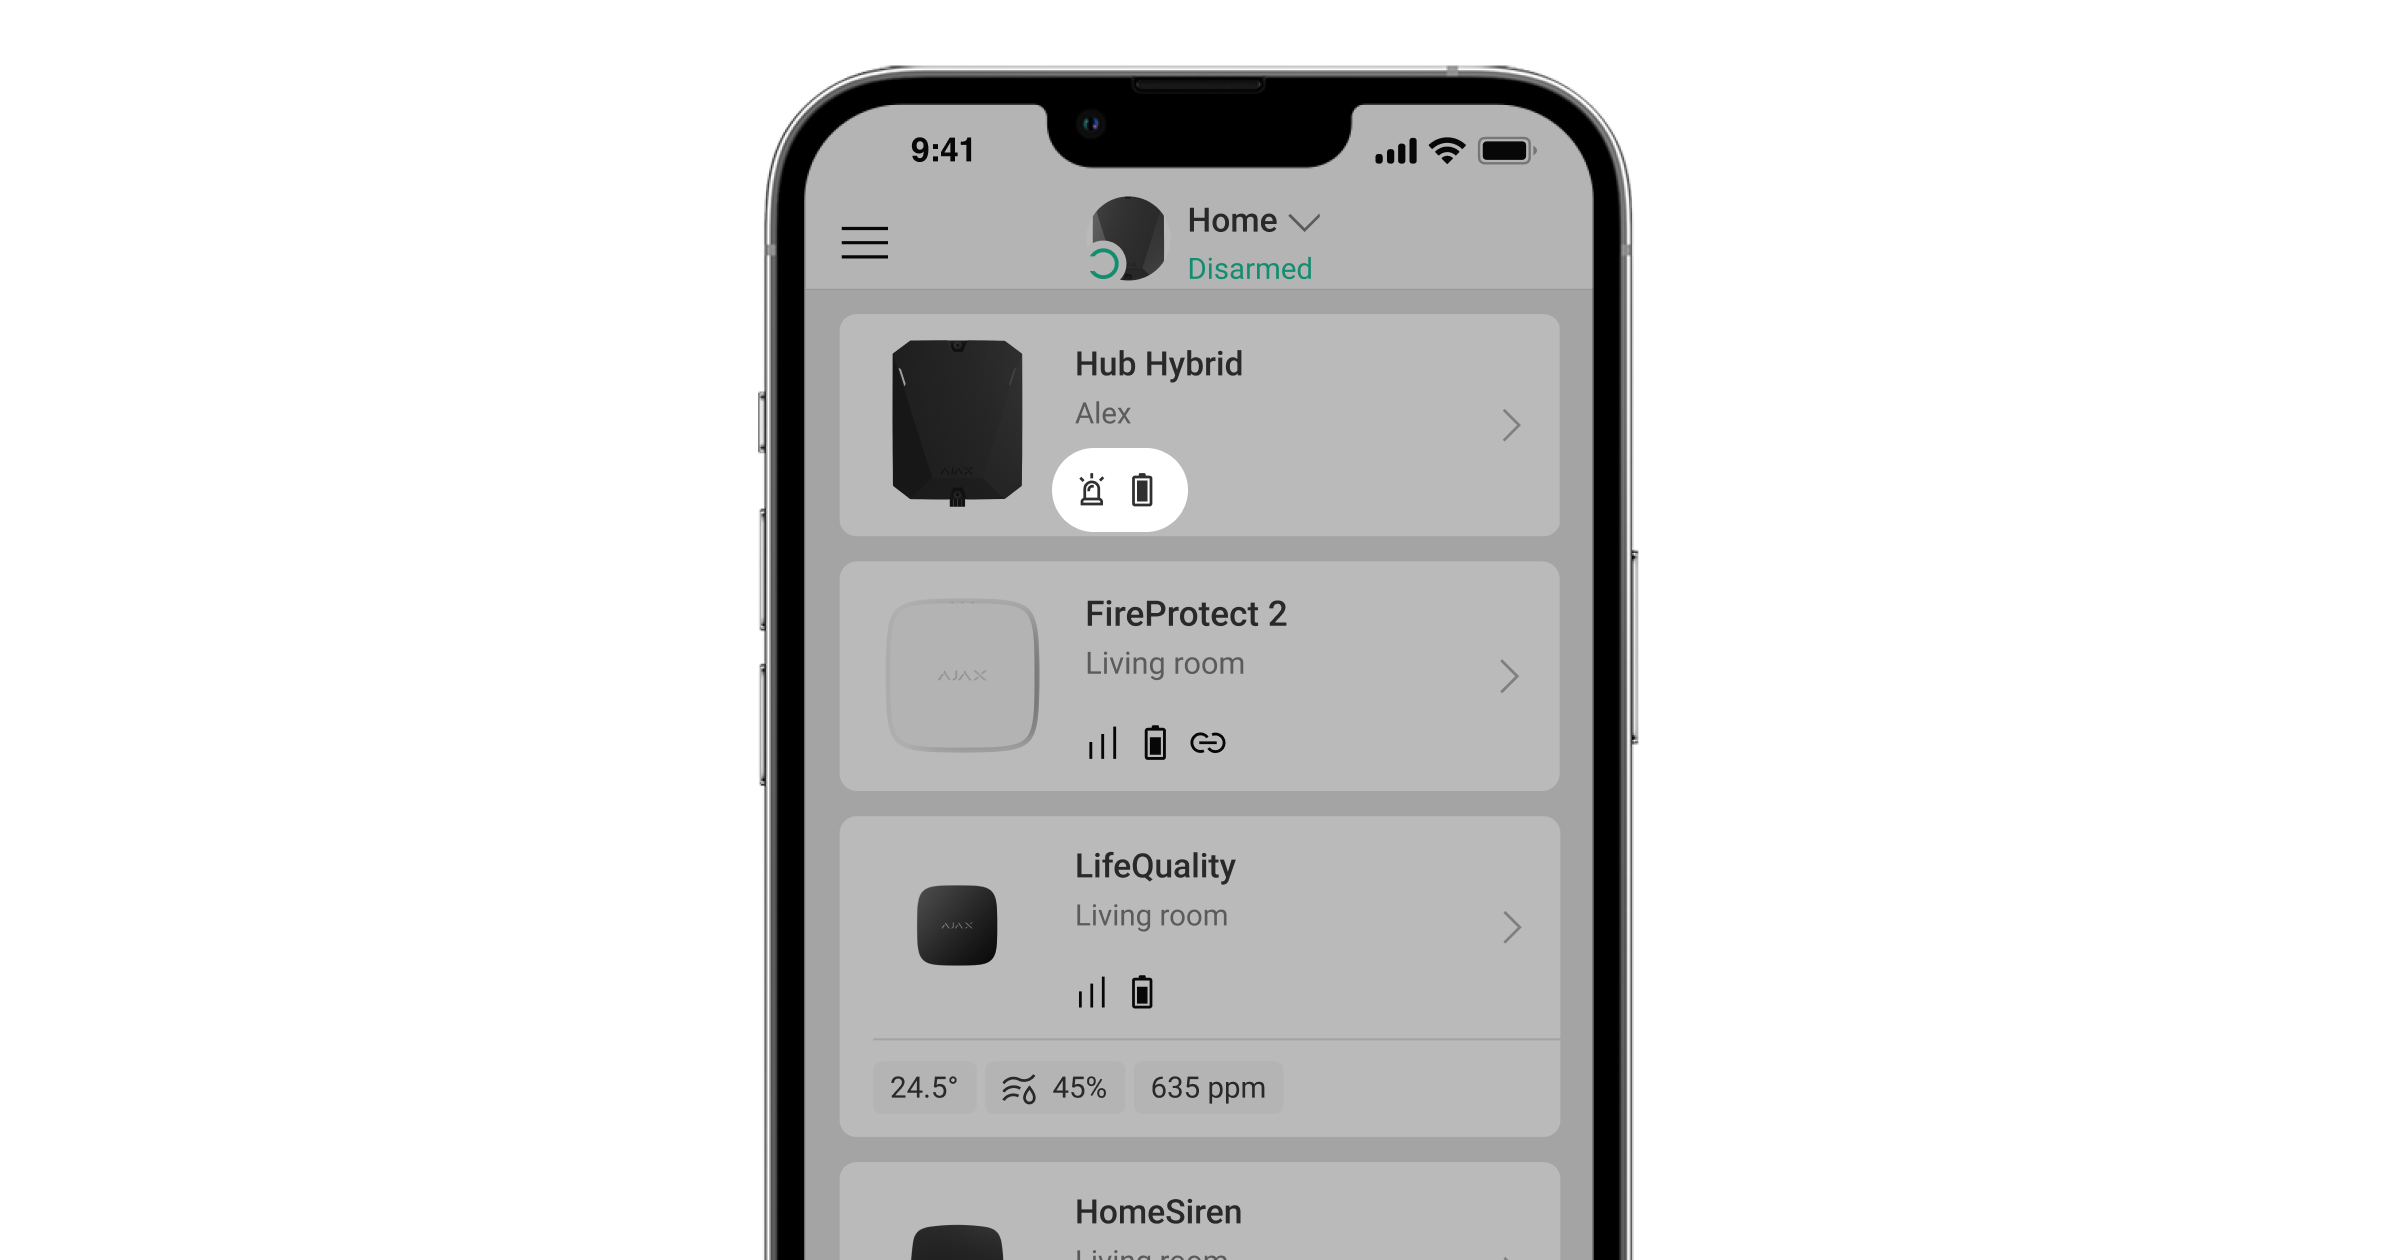
Icons display some of the Hub Hybrid statuses. You can view them in the Ajax app, in the Devices ![]() tab.
tab.
| Icon | Meaning |
| Hub operates in the 2G network. | |
|
Hub operates in the 3G network. Available for Hub Hybrid (4G) only. |
|
|
The hub operates in the 4G (LTE) network. Available for Hub Hybrid (4G) only. |
|
| No SIM cards. Insert at least one SIM card. | |
| The SIM card is faulty or has a PIN code set up. Check SIM card operation in the phone and disable the PIN code request. | |
| Hub Hybrid battery charge level. Displayed in 1% increments. | |
| Hub Hybrid malfunction detected. Open hub states for details. | |
|
The hub is directly connected to the monitoring station of the security company. The icon is not displayed if direct connection is not available or not configured. |
|
|
The hub is not directly connected to the central monitoring station of the security company. The icon is not displayed if direct connection is not available or not configured. |
Hub states
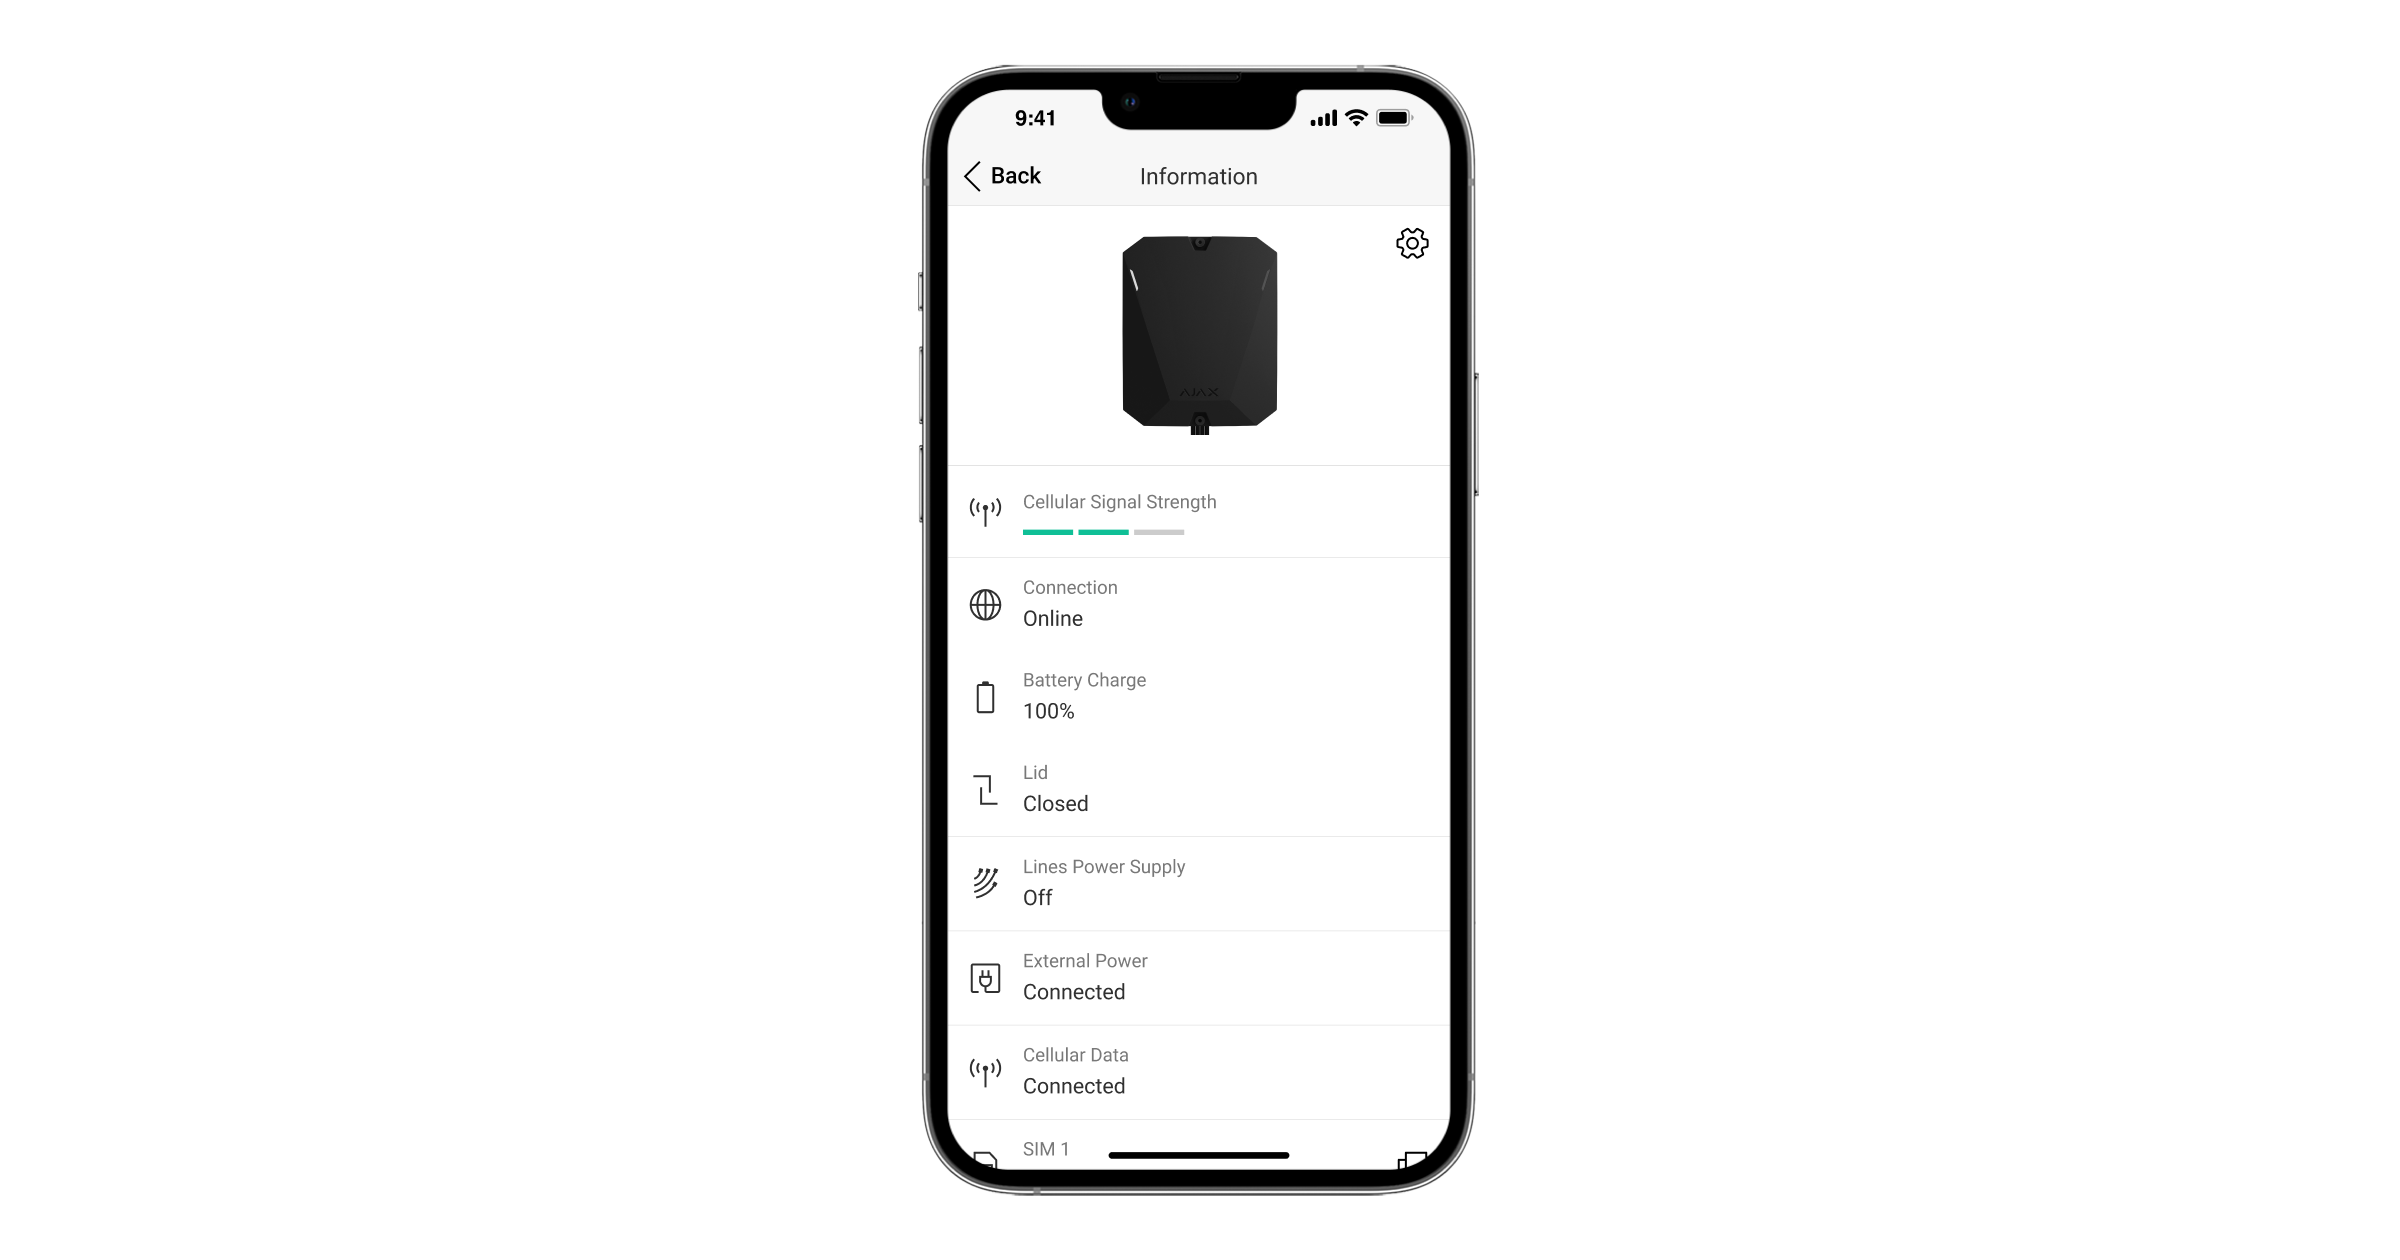
States can be found in the Ajax app:
- Go to the Devices tab.
- Select Hub Hybrid from the list.
| Parameter | Meaning |
| Malfunction |
Click the The field appears only if a malfunction is detected. |
| Cellular Signal Strength |
The signal strength of the active SIM mobile network. Install the hub in places where the cellular communication level reaches 2-3 bars. If the hub is installed in a place with weak or unstable signal strength, it will not be able to call or send an SMS about an event or alarm. |
| Connection | The status of connection between the hub and Ajax Cloud:
If Hub Hybrid is not connected to the server, the icons of the hub and all connected devices become semi-transparent in the list of devices. |
| Battery Charge |
Hub backup battery charge level. Displayed in 1% increments. At a charge level of 20% and below, the hub will report low battery charge. |
| Lid | The status of tampers that respond to demounting or opening of the control panel casing:
|
| Lines Power Supply | Power supply status on the hub Fibra lines:
|
| External Power | External power supply connection status:
|
| Average Noise (dBm) |
Average noise in the radio channel. Measured in the place where the hub is installed. The first two values show the level at Jeweller frequencies, and the third — at Wings frequencies. The acceptable value is –80 dBm or lower. For example, –95 dBm is considered acceptable and –70 dBm is invalid. |
| Cellular Data | Mobile Internet connection status of the hub:
If the cellular signal strength reaches 1–3 bars, and the hub has enough funds and/or has bonus SMS/calls, it will be able to call and send SMS, even if this field displays the Not connected status. |
| Active | Displays active SIM card:
|
| SIM 1 |
The number of the SIM card installed in the first slot. To copy the number, click on it. If the phone number is displayed as an Unknown number, the operator has not written it to the memory of the SIM card. |
| SIM 2 |
The number of the SIM card installed in the second slot. To copy the number, click on it. If the phone number is displayed as an Unknown number, the operator has not written it to the memory of the SIM card. |
| Ethernet | Internet connection status of the hub via Ethernet:
|
| Monitoring Station | The status of direct connection of the hub to the central monitoring station of the security company:
If this field is displayed, the security company uses direct connection to receive events and security system alarms. |
| Hub model |
Hub model name: Hub Hybrid (2G) or Hub Hybrid (4G). |
| Hardware version | Hub Hybrid hardware version. Not updated. |
| Firmware |
Hub Hybrid firmware version. Updates remotely. |
| Device ID |
Identifier (first 8 digits of the serial number) of the Hub Hybrid. The identifier is located on the device box and on the board under the QR code. |
| IMEI | A unique 15-digit serial number for identifying the hub’s modem on a GSM network. It is shown only when a SIM card is installed in the hub. |
Selecting the installation site
Fix Hub Hybrid casing on a vertical surface using bundled fasteners. All the necessary holes for fastening in the casing have already been made.
Hub vertical fixation is needed for the tamper to respond if someone tries to detach a device.. Learn the battery documentation before installing — some batteries can be mounted only vertically (with terminals upward). Another installation position could cause fast battery degradation.
It is advisable to choose an installation site where the hub is hidden from prying eyes — for example, in the pantry. This will help reduce the likelihood of sabotage or security system jamming. Note that the device is intended for indoor installation only.
Choose a site where the hub can be connected via all possible communication channels: Ethernet and two SIM cards. The cellular signal strength at the installation site should be stable and should reach 2-3 bars. We do not guarantee correct operation of the device with a low cellular signal strength.
When choosing an installation site, take into account the distance between the hub and wireless devices and the presence of obstacles between them hindering the radio signal passage: walls, intermediate floors, or large-size objects located in the room.
To roughly calculate the signal strength at the place of installation of wireless devices, use our radio communication range calculator. Use Fibra power supply calculator to calculate the wired connection range.
Run the Jeweller, Wings, and Fibra signal strength tests. The stable signal strength of 2-3 bars with all connected devices should be provided at the chosen installation site. With a signal strength of 1 or 0 bars, we do not guarantee stable operation of the security system.
If the system has devices with signal strength of 1 or 0 bars, consider relocating the hub or device. If this is not possible or the device still has low or unstable signal strength after being moved, use range extenders.
Installation of the control panel
During installation and operation of the Ajax security system, adhere to the rules and requirements of regulatory legal acts on electrical safety. Do not disassemble the device while it is energized or use it with a damaged power cable.
Before installation, make sure that you have selected the optimal location for the device and that it complies with the requirements of this manual.
To install Hub Hybrid using the hub casing:
- Prepare the cable outputs in advance by carefully breaking out the perforated parts of the Hub Hybrid casing.
- Secure the casing on the vertical surface at the selected installation location with the bundled screws using all fixation points. One of them is in the perforated part above the tamper — it is required for tamper triggering in case of any attempt to detach the hub casing.
- Place the Hub Hybrid board into the casing on the holders.
- Connect the 12 V⎓ backup battery. Do not connect third-party power supplies. This could result in a failure of the control panel.
Use a 12 V⎓ battery with a capacity of 4, 7, or 9 A∙h. The maximum dimensions of the battery to be installed in the casing are 151 × 65 × 94 mm, and the weight is 5 kg. Special holders are provided for this battery configuration in the hub casing. You can use batteries of a different capacity if they are suitable in size and the charging time does not exceed 30 hours. The maximum battery charging current from the Hub Hybrid is 300 mA.
- Turn on the hub.
- Install the lid on the hub casing and fix it with the bundled screws.
- Check the status of the hub casing in the PRO version of the app. If the app shows tamper alarm, check tightness of the Hub Hybrid casing.


Do not install the hub
Outdoors. This could result in a failure of the control panel.
Near the metal objects and mirrors. They can cause attenuation or shielding of the radio signal. This could result in the loss of connection between the hub and wireless Ajax devices.
In places with high levels of radio interference. This could result in the loss of connection between the hub and wireless Ajax devices or false notifications about security system jamming.
With another hub board in Case D (430).
Less than 1 meter away from the router and power cables. This could result in the loss of connection between the hub and wireless devices.
Less than 1 meter away from Jeweller devices. This could result in the loss of connection between the hub and these devices.
In places where the hub will have a signal strength of 1 or 0 bars with connected devices. This could result in the loss of connection between the hub and these devices.
Inside premises with temperature and humidity beyond the permissible limits. This could result in a failure of the control panel.
In places with no cellular signal or 1 bar signal strength. We do not guarantee correct operation of the device with a low cellular signal strength.
Preparing to connect devices
Create at least one virtual room before adding devices to the system. Rooms are needed to group devices and to increase the information content of notifications. Names of devices and rooms are displayed in the text of events and alarms of the Ajax security system.
Creating a virtual room
To create a room in the Ajax app:
- Go to the Rooms tab.
- Click Add Room.
- Assign a name to it and, if necessary, attach (or make) a photo — it will be easier to find the room in the list.
- Click Save.
- Repeat steps 2-4 to add as many rooms as needed.
To delete a room, change its avatar or name, go to room Settings by clicking on the gear icon ![]() .
.
Connection of wireless devices
The hub is incompatible with other hubs, uartBridge, and ocBridge Plus.
To add a device to the hub, in the PRO version of the app:
- Open the room and select Add device.
- Name the device, scan or manually enter its QR code, select a group if the group mode is enabled.
- Click Add – the countdown for adding a device will begin.
- Follow the instructions in the app to connect the device.
- Repeat steps 1-4 to add any required devices.
To pair (bind) a device to the hub, the device should be located within the hub’s radio communication range — at the same secured premises.
Wired devices connection
The hub is incompatible with other hubs, uartBridge, and ocBridge Plus.
Fibra wired communication technology allows creating segments up to 2,000 meters long. Up to 8 segments in a single system under Hub Hybrid control.
Hub Hybrid features 8 lines compatible with all Fibra devices, regardless of the type. Security detectors, keypads, and sirens are connected to the same line and ensure the safety of a specific area of the facility.
Design and preparation
For the system to work correctly, it is important to properly design the project and install all devices correctly. Failure to follow the basic installation rules and recommendations of the user manual may result in incorrect operation or loss of connection between the hub and installed devices.
When designing the layout scheme of the devices, consider the wiring diagram of the power cables laid on the site. Signal cables of Fibra devices must be laid at a distance of at least 50 cm from the power cables when lying parallel, and, if they intersect, it must be at a 90° angle.
In total, you can connect up to 100 Ajax devices to Hub Hybrid. The ratio of wired to wireless devices within the system is of no importance. For example, you can connect 50 wired and 50 wireless devices or 99 wired and 1 wireless device.
For facilities that are under construction or renovation, cables of wired devices are laid after the main wiring of the facility. Use protective tubes to route cables of wired devices to organize and secure the wires; ties, clips, and staples can be used to secure them.
Prevent external damage to the cables whenever possible. When laying wires externally (without mounting them inside the walls), use an electric channel raceway. Raceways should be no more than half-filled with cables. Do not allow cables to sag. The raceway should be hidden from view if possible — for example, behind furniture.
We recommend laying cables inside walls, floors, and/or ceilings. This will provide greater security: the wires will not be visible, it will be impossible to accidentally damage them, and it will be impossible for an intruder to access them.
When selecting a cable, consider the length of the connection lines and the number of devices to be connected; these parameters affect the signal strength. We recommend using shielded copper cables with a high-quality insulation layer. Check the cables for bends and physical damage before installation.
When installing, observe the bend radius that the manufacturer specifies in the cable specs. Otherwise, you risk damaging or breaking the conductor. The bend radius is specified by the manufacturer in the cable specifications.
Signal strength and cable length
The Fibra signal level is determined by the number of undelivered or corrupted data packages over a certain period. The signal strength is displayed by the icon ![]() in the Devices
in the Devices ![]() tab:
tab:
- Three bars — excellent signal strength.
- Two bars — good signal strength.
- One bar — low signal strength, stable operation is not guaranteed.
- Crossed out icon — no signal.
The signal strength is influenced by the following factors: the number of devices connected to one line, the length and type of cable, and the proper connection of the wires to device terminals.
The maximum cable length depends on the cable type, material, and method of connecting the devices. When connected via the Beam connection (Radial wiring) (hub – devices – terminating resistor) using the U/UTP cat.5 (4×2×0.51) twisted pair, the wired connection length can reach up to 2,000 meters. The minimum cable length for connecting wired devices is 1 meter.
When connected via the Ring connection method (hub – devices – hub), the maximum cable length is 500 meters in case of using a twisted pair.
Ring topology is available with OS Malevich 2.16 and higher.
Installation and connection
Before installing the detectors and devices, make sure that you have selected the optimal location and that it meets the conditions of the user manual. Wires must be hidden from view and located in a place that is difficult for intruders to access to reduce the likelihood of sabotage. Ideally, the wires should be set into the walls, floor, and/or ceiling. Before the final installation, test the Fibra signal strength.
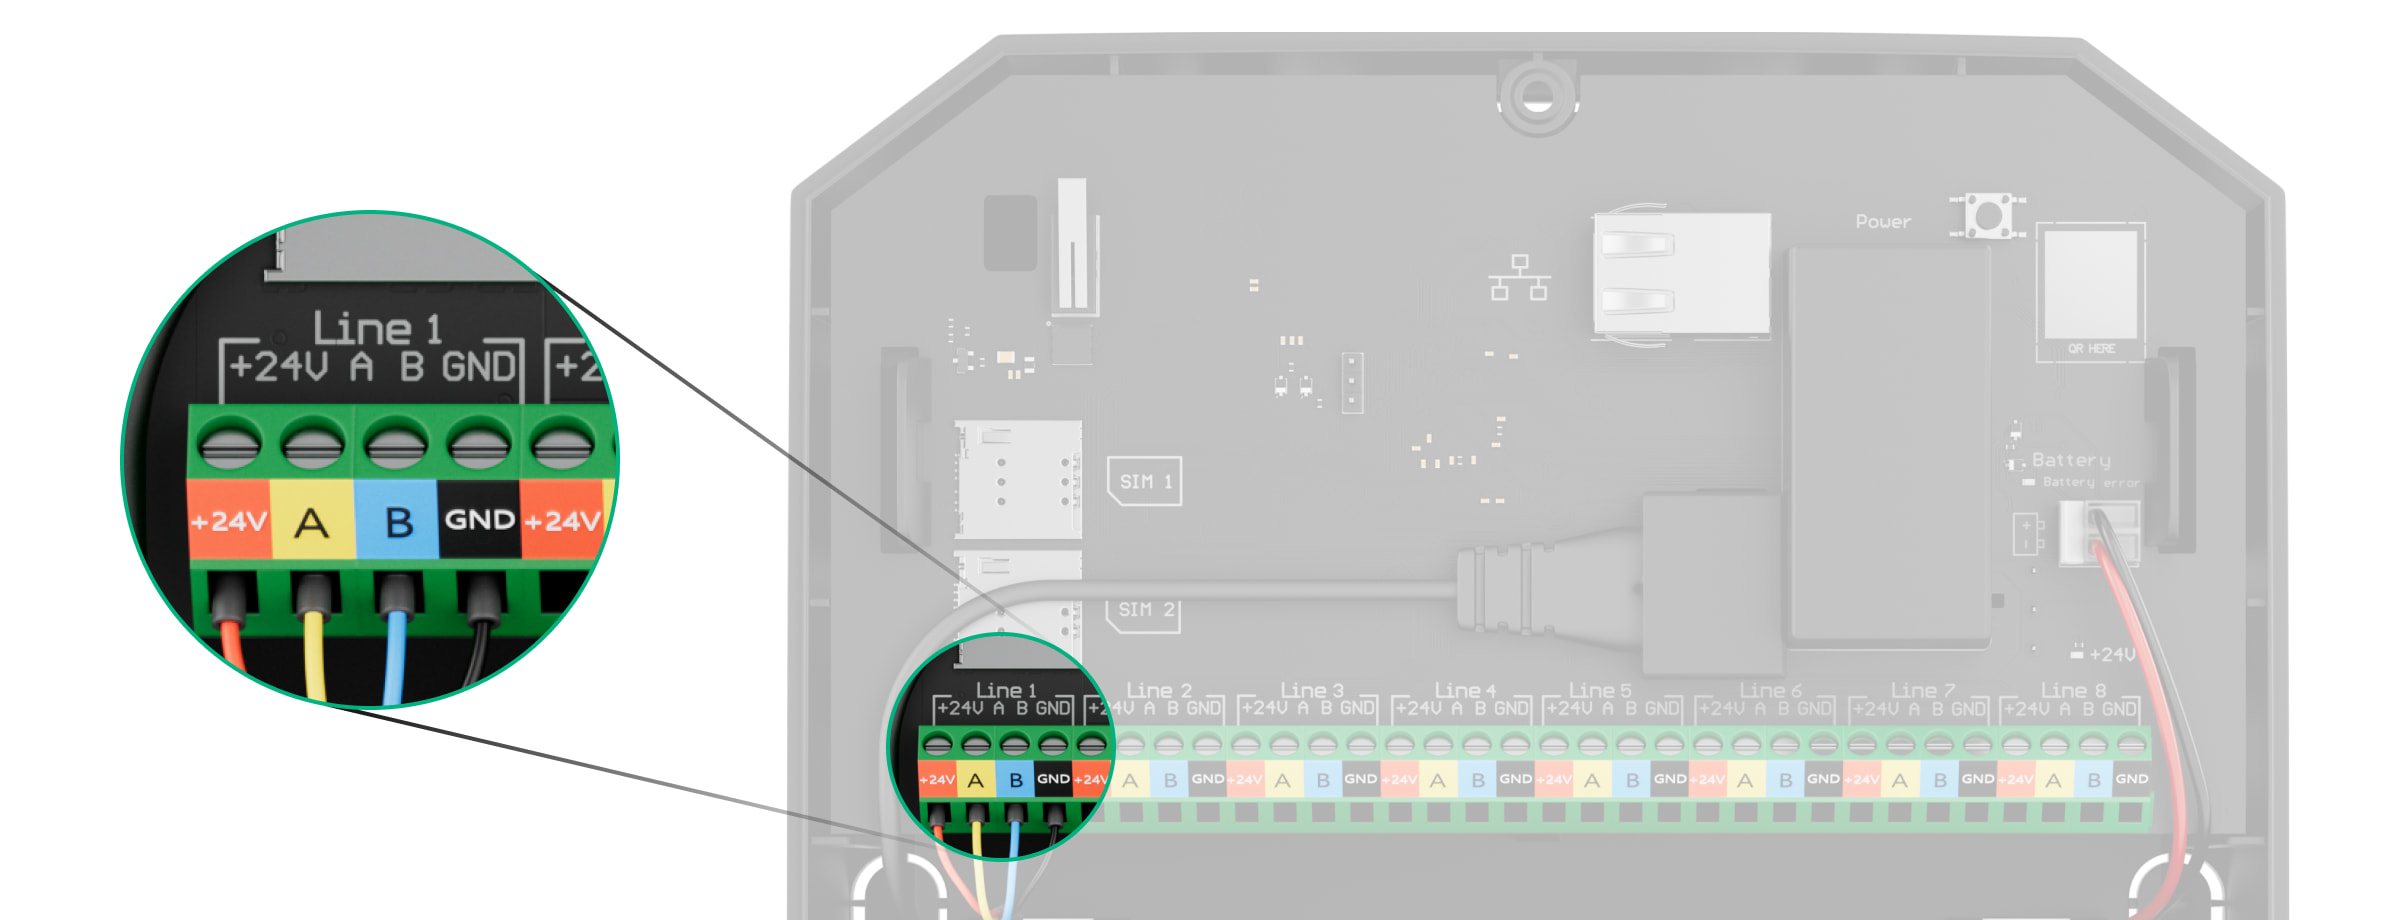
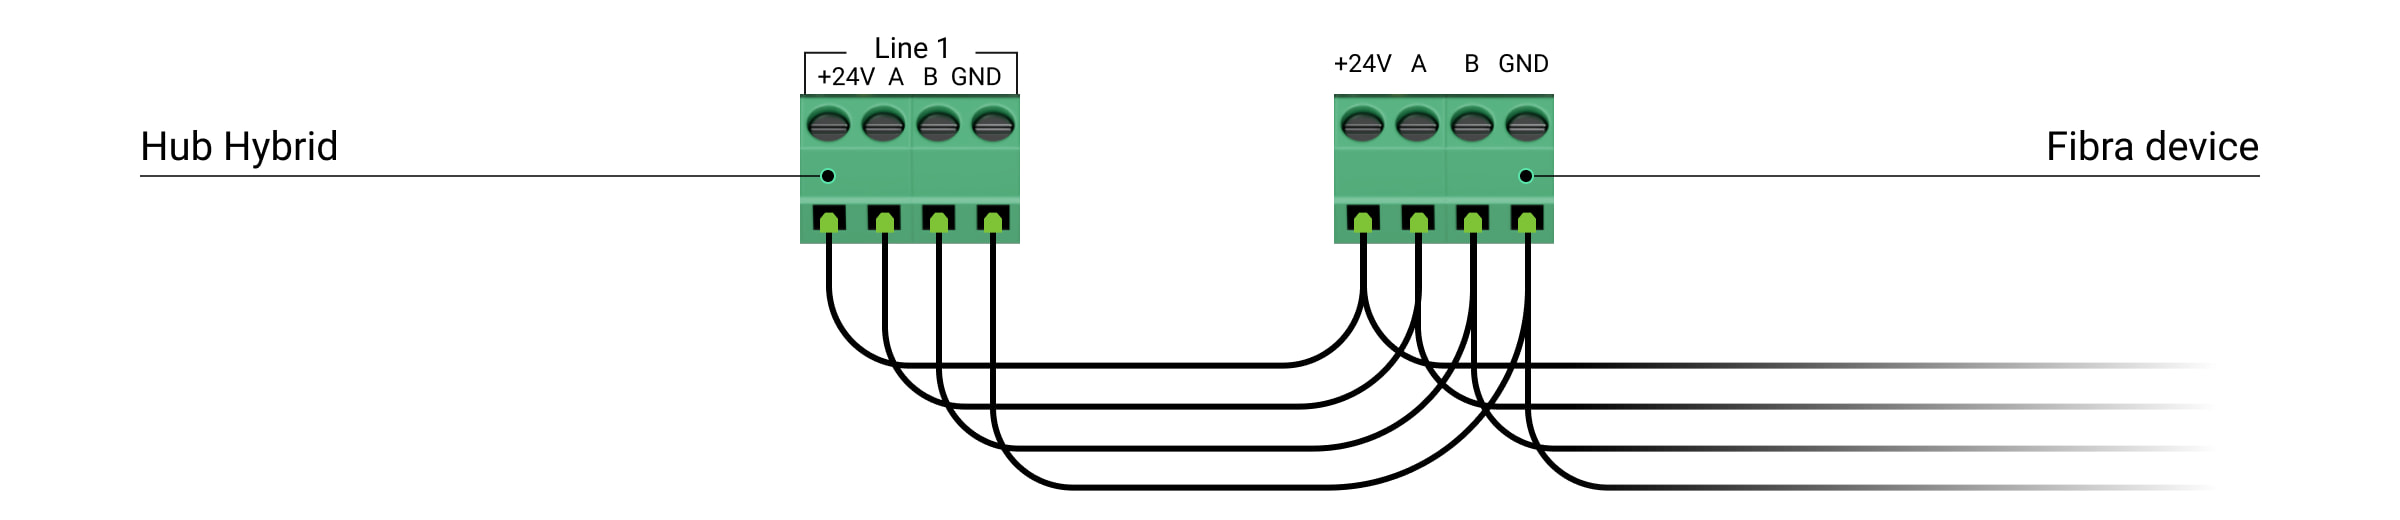
Connect the devices to the hub using a four-wire cable. Two wires provide power to the device (+24 V and GND), and the other (A and B) are used for data exchange between connected devices and the hub. When connecting, be sure to observe the polarity and connection order of the wires.
Devices are connected to the hub using two connection topologies: Ring and Beam (Radial wiring). The devices are connected to the same Fibra line one by one, as shown on the figure.
We recommend distributing wired devices evenly across all the hub’s Fibra lines to increase reliability.
We recommend connecting wired devices via the Ring connection method. If the line is broken, the devices will still be connected to Hub Hybrid via the Beam (Radial wiring) connection and will continue transmitting events and alarms to the hub. Notification about the line open fault will be sent to users and the security company.
When connecting via the Ring connection method, connect two lines per one segment and reduce the maximum length of the wired connection to 500 meters (when connected via the Beam (Radial wiring) connection method — to 2,000 meters).
| Beam (Radial wiring) | Ring |
|
|
Ring topology is available with OS Malevich 2.16 and higher.
When connecting devices, do not twist the wires together; solder them. The ends of the wires that will be inserted into the siren terminals should be tinned to increase the reliability of the connection.
Follow the polarity and connection order of the wires. Securely fasten the wires to the terminals. If the device body provides fasteners for cables, secure the cable with ties.
To connect a detector or device:
- De-energize and turn off the hub. Disconnect the backup battery.
1 — External power supply
2 — Backup battery - Run the four-wire cables into the hub. Connect the wires to Hub Hybrid line terminals:
+24V — power supply terminal of 24 V⎓.
А, B — signal terminals.
GND — ground. - Connect the other end of the four-wire cable to the terminals of the first device in the line, observing the polarity and the order of wiring. Securely fasten the cable to the terminals of the device.
- If other devices are connected to the segment, prepare and wire the cable for the next device into the terminals.
+24V — power supply terminal of 24 V⎓.
А, B — signal terminals.
GND — ground. - Connect other devices to the line, if necessary.
- Install a 120 ohm terminating resistor for the last device in the line using the Beam (Radial) topology. A terminating resistor is installed between terminals A and B of the last device in the line.
With the Ring topology, a terminating resistor is not needed. In this case, connect the last device in the line to the next Fibra line of the hub.
The nominal value of terminating resistors is 120 Ω. Termination resistors are included in the complete set of Hub Hybrid.
Ring topology is available with OS Malevich 2.16 and higher.
- Connect power to the hub and turn it on.
- Add devices to the system manually or using line scanning.
- Run the Fibra Signal Strength Test for each connected device. The recommended signal strength is two or three bars. Otherwise, check the connection and integrity of the wires or relocate the system devices.

Adding wired devices
There are two ways to add wired devices: manually and using line scanning. It is useful to add a few devices manually — for example, when replacing a faulty detector with a new one. Automatic line scanning is useful when adding numerous devices.
To add a wired device manually:
- Open the PRO version of the app.
- Select the object to which you want to add the device.
- Go to the Devices tab and click Add Device.
- Name the device, scan, or type in the QR code (available on the device body and the packaging), select a room and a group (if the group mode is enabled).
- Click Add.
To add devices using line scanning:
- Open the PRO version of the app.
- Select the object to which you want to add the devices.
- Go to the Devices tab.
- Click Add Device.
- Click Add All Fibra Devices.
- The hub will start the line scan process.
After line scanning, the PRO app will display a list of wired devices connected to the hub. The devices in the list are sorted by lines to which they are physically connected.
By default, the device designation includes its name and ID. To pair a device to the hub, edit its name, assign it to a room and a group if the group mode is activated.
Scanning is also available in the Lines menu (Hub → Settings → Lines → Add All Fibra Devices).
For the installation engineer to name the device correctly or assign a room and a group to it, we have provided two methods for device identification: by LED indication and by alarm.
Method 1: Identify device by blinking
After line scanning, the PRO app will display a list of wired devices connected to the hub.
Click on any device in this list. After clicking, the LED indicator of the device will start blinking. After identifying the device, bind it to the hub.
To pair a device to a hub:
- Click on the device in the list.
- Assign a name to the device.
- Specify a room and a group if the group mode is turned on.
- Click Save.
- The paired device will disappear from the list of devices available to be added.
Method 2: Add devices by alerts
Select the toggle Prioritize triggered devices.
Trigger an alarm. For example, walk in front of a motion detector, press any button on the keypad, or trigger a siren tamper.
Once triggered, the detector will move to the top of the list in the Recently triggered devices category. The device will stay in this category for 5 seconds, and then move back to the line category. After identifying the device, bind it to the hub.
To pair a device to a hub:
- Click on the device in the list.
- Assign a name to the device.
- Specify a room and a group if the group mode is enabled.
- Click Save.
- The paired device will disappear from the list of devices available to be added.
Updating the statuses of wired devices depends on the ping period (adjusts in the Jeweller/Fibra settings).
If the hub already has the maximum number of devices added (for Hub Hybrid, the default is 100), you will get an error notification when you add one.
Connected Ajax devices work with one hub only. Once added to a new hub, these devices are not removed from the list of devices of the old hub. This must be done through the Ajax PRO app.
Hub Hybrid settings
The control panel settings can be changed in Ajax PRO apps. In order to change the settings:
- Log in to the PRO version of the app.
- Select an object from the list.
- Go to the Devices menu.
- Select a hub.
- Go to its Settings by clicking on the gear icon .
- Select a settings category and make changes. After making changes, click Back to save the new settings.
Setting up the header image of the Ajax security system. Displayed in the object selection menu to facilitate identification.
To change or set up an avatar, click on the camera icon.
The hub name is displayed in the SMS and push notification text. The name can contain up to 12 Cyrillic characters or up to 24 Latin characters.
To change it, click on the pencil icon ![]() and enter the new hub name.
and enter the new hub name.
In this category of settings, you can invite and delete users, edit their rights, and define how the security system notifies users about events and alarms.
To change the settings for a specific user, click on their username in the list of active users.
User Settings
User Role — selecting the level of access to the system management and configuring: Admin or User.
Privacy Settings Management — when enabled, the user can control other users’ access to surveillance cameras, DVRs, detectors with photo verification and with support for Photo on Demand and Photo by Scenario functions.
Permissions — this setting allows you selectively grant access to manage:
- System security modes.
- Pressing the panic button in the Ajax app.
- Automation devices.
- Chime feature.
Privacy
The category is available for those users who have the right to manage privacy settings. The settings apply to detectors with photo verification that support the Photo on Demand and Photo by Scenario functions and to the surveillance cameras, and DVRs integrated into the system. In this category of settings, you can activate these functions and manage other users’ access to detectors and photos.
General Privacy Settings
Allow Photos on Demand — the setting determines if it is allowed to take on-demand photos using the detectors connected to the hub.
Permissions
Users — setting up access levels to detectors with photo verification, surveillance cameras and DVRs for system users.
Installers — setting up access levels to detectors with photo verification, surveillance cameras and DVRs for professional installers.
Alarm Scenarios
Allow Photos by Scenario — the setting determines if the detectors with photo verification are allowed to take photos in case of the Ajax fire detector alarm.
Alarm Scenarios Conditions — the setting for the already created scenarios; determines the photo shooting conditions in case of the Ajax fire detectors alarm.
Settings for wired Internet connection.
- Ethernet — enables and disables the hub Ethernet module.
- DHCP / Static — selection of a method for the hub to obtain an IP address. If DHCP is selected, the hub automatically obtains an IP address and other network settings. Static allows you to manually set up the IP address and other network settings for the hub.
- IP Address — hub IP address.
- Subnet mask — mask of the subnet in which the hub operates.
- Gateway — gateway used by the hub.
- DNS — DNS of the hub.
Settings of the mobile network and installed SIM cards. In the main menu, you can edit the settings that relate to both SIM cards, and in the sub-menu — the private parameters of SIM cards.
Main menu settings
Cellular Data — disables and enables the hub cellular module.
Roaming — if this option is active, the SIM cards can work in roaming.
Ignore Network Registration Error — if this option is active, the hub ignores errors when trying to connect to the network via a SIM card. Activate this option if the SIM card cannot connect to the network.
Disable communication check with the operator — if this option is active, the hub ignores operator communication errors. Activate this option if the SIM card cannot connect to the network.
SIM 1 — displays the number of the SIM card installed. If the phone number is displayed as an Unknown Number, the operator has not written it to the memory of the SIM card. Clicking on the field opens the settings of this SIM card.
SIM 2 — displays the number of the SIM card installed. If the phone number is displayed as an Unknown Number, the operator has not written it to the memory of the SIM card. Clicking on the field opens the settings of this SIM card.
SIM card sub-menu settings
APN, Username, and Password — settings for connecting to the Internet via a SIM card. To find out the settings of your cellular operator, contact your provider’s support service. APN settings are applied only after successful connection with new parameters. If the connection attempt fails, the hub continues to work with the previous APN settings.
Mobile data usage. The menu contains information about mobile traffic used by the Ajax security system, allowing you to reset statistics and check the balance of the SIM card.
The data is calculated on the hub and may differ from the operator’s statistics. This is because each operator calculates incoming and outgoing traffic individually.
Incoming — the amount of data received by the hub. Displayed in KB or MB.
Outgoing — the amount of data sent by the hub. Displayed in KB or MB.
Reset statistics — resets statistics on incoming and outgoing traffic.
USSD code. Enter the code that is used to check the balance in this field. For example, *111#. To send a request, after entering the code, click Check Balance. The request result will be displayed under the balance check button.
Setting up reminders about arming/disarming by user coordinates.
Setting up keypad passwords for people who are not registered in the system.
With the OS Malevich 2.13.1 update, we have also added the ability to create a password for people who are not connected to the hub. This is convenient, for example, to provide a cleaning company with access to security management. Knowing the access code, you just need to enter it on the Ajax keypad to arm or disarm the system.
To set up an access code for an unregistered person in the system
- Press Add code.
- Set up Username and Access Code.
- Press Add.
If you want to set up a duress code, change an access code, settings for access to groups, Night mode, code ID, temporarily disable or delete this code, select it in the list and make changes.
The created access codes are valid for all keypads connected to the hub. Hub Hybrid supports up to 50 access codes.
The access code should contain from 4 to 6 digits. Numbers from 0 to 9 can be applied to every digit.
Hub Hybrid supports more than 1,000,000 variations of PIN codes.
This setting is only available in PRO Ajax apps
Set the requirements for the length of passcodes that are used for users’ authorization and access to the system. You can select Flexible (4 to 6 symbols) option or define the fixed code length: 4 symbols, 5 symbols, or 6 symbols.
Note: when you set the fixed code length, the system resets all access codes configured before.
Group mode configuration. Groups are used for two purposes:
- To control the security of individual rooms or groups of detectors. For example, to keep the office under armed mode while the cleaning company employees are working in the kitchen.
- To delimit user access to the security mode control. For example, so that the marketing department employees do not have access to the lawyers’ office.
Scheduled arming/disarming settings. The security schedule can be used for individual groups and for the entire object, as well as for the Night mode.
Starts the Detection Zone Test for connected detectors. The test allows you to check the operation of devices and their alarm detection zone.
Setting the polling period between the hub and connected devices. The settings indicate how often the hub communicates with devices and how fast a connection loss is detected.
Detector Ping Interval, sec — the frequency of polling of connected devices by the hub, set in the range from 12 to 300 seconds. The default value is 36 seconds. Configured for both: wired and wireless devices.
Number of missed pings to determine connection failure — counter of undelivered packets. The default value is 8 packets (configured separately for wireless and wired devices).
Do not decrease the default values of the ping interval and ping period unless it is necessary.
The time before sending a message regarding the loss of connection between the hub and the device are calculated using the following formula:
Detector Ping Interval × Number of missed pings to determine connection failure.
The shorter the ping period, the faster the hub will know about the events of the connected devices, and the devices will receive hub commands. Information about alarms and sabotage is transmitted instantly, regardless of the ping interval. Decreasing the ping period will affect the battery life of wireless devices.
The ping interval limits the maximum number of connected devices:
| Interval | Connection limit |
| 12 s | 39 devices |
| 24 s | 79 devices |
| 36 seconds (default) | 100 devices |
Regardless of the ping period settings, up to 10 sirens can be connected to Hub Hybrid.
A group of settings for wired connected Fibra devices.
Lines Power Supply — Hub Hybrid lines power management. When enabled, power is supplied to connected Fibra devices. Power is on by default.
Lines power test — runs the Hub Hybrid lines power test. It simulates the maximum possible energy consumption: detectors generate alarms, keypads are activated, sirens are turned on.
If the system passes the test, all wired devices will have enough power in all situations.
During the lines power test, connected wired sirens are activated.
Add All Fibra Devices — runs a Fibra lines scan. The function shows all wired devices connected to the hub, in order to quickly set names, groups, and rooms.
Group of hub service settings. These are divided into 2 groups: general settings and advanced settings.
General settings
Time Zone
Selecting the time zone in which the hub operates. Used for scheduled scenarios. Be sure to set the correct time zone before creating scenarios.
LED Brightness
Brightness adjustment of the hub LED indicator. Set in the range of 1 to 10. The default value is 10.
Firmware update
The menu contains the hub firmware update settings.
- Firmware auto-update configures automatic OS Malevich updates (enabled by default):
- If enabled, the firmware is automatically updated when a new version is available. The system should be disarmed, and external power should be connected to the hub.
- If disabled, the system does not update automatically. If a new firmware version is available, the app will offer to update the OS Malevich.
- Check for new version allows manually checking and installing firmware updates when available or assigned to the hub. This option is available only when the Firmware auto-update setting is enabled.
Hub System Logging
This setting allows you to select the transmission channel for the hub logs or disable their recording:
- Ethernet — system logs are transmitted over the wired Internet.
- Disable — logging is disabled.
Logs are files containing information about system operation. Do not disable the logs as this information may be helpful in case of errors in the operation of the system. Logs are transmitted via Ethernet only.
Advanced settings
PD 6662 Setting Wizard
Opens a step-by-step guide on how to set up your system to comply with the British security standard PD 6662:2017.
Server Connection
Communication settings between the hub and the Ajax Cloud server:
- Hub-Server Polling Interval, sec. Frequency of sending pings from the hub to Ajax Cloud server. It is set in the range of 10 to 300 s. The recommended default value is 60 s.
- Delay of Server Connection Failure Alarm, sec. The delay is necessary to reduce the risk of false notification of a lost connection with the Ajax Cloud server. Activated after 3 unsuccessful hub–server polls. The delay is set in the range of 30 to 600 s. The recommended default value is 300 s.
The time before sending a message regarding the loss of communication between the hub and the Ajax Cloud server is calculated using the following formula:
(Ping interval × 3) + Time filter.
With the default settings, Ajax Cloud registers the hub loss in 8 minutes:
(60 s * 3) + 300 s = 8 min.
- Receive events of server connection loss without alarm. Ajax’s apps can notify about the hub-server connection loss in two ways: with a standard push notification signal or with a siren sound (enabled by default). When the option is active, the notification comes with a standard push notification signal.
- Notify of connection loss over channels. The Ajax security system can notify both the users and the security company about the loss of connection between the hub and the Ajax Cloud server even via one of the communication channels.In the menu, you can select the communication channels via which the system will notify about the loss of connection (Ethernet and/or cellular), as well as the transmission delay of such notifications.
- Loss Notification Delay, min — time of the delay before sending the notification about the loss of connection via one of the communication channels. Set in the range from 3 to 30 minutes.The time of sending a notification about the loss of connection via one of the communication channels is calculated using the following formula:
(Ping interval × 3) + Time filter + Notification delay.
Sounds and Alerts
The menu contains three groups of settings: siren activation parameters, siren after-alarm indication, and beep with keypad activation parameters.
Siren activation parameters
If lid of hub or any detector is open. If enabled, the hub activates the connected sirens if the body of the hub, detector, or any other Ajax device is open.
If in-app panic button is pressed. If enabled, the hub activates the connected sirens if the panic button was pressed in the Ajax app.
Disable the siren response to SpaceControl panic button pressing in the key fob settings in the Ajax app (Devices ![]() → SpaceControl → Settings
→ SpaceControl → Settings ![]() ).
).
Setting the siren after-alarm indication
This setting is only available in PRO version of the app
The siren can inform about alarms in the armed system by means of LED indication. Thanks to this feature, users and passing patrols of security companies can see that the system was triggered.
Beep with keypad activation parameters
This setting is only available in PRO Ajax apps
The keyboards connected to the hub will emit an audible sound to inform of malfunctions. To activate the sound notifications enable toggles: If any device is offline and If the battery of any device is low.
Sound notifications of malfunctions settings are available for all hubs with firmware version OS Malevich 2.15 or higher.
Sound notifications of malfunctions are supported by Ajax keypads with the following firmware versions or higher:
- 5.57.1.1 for KeyPad Jeweller;
- 5.57.5.0 for KeyPad Plus Jeweller;
- 6.57.11.12 for KeyPad Fibra.
Battery Power Saver
This setting is available only in Ajax PRO apps.
The Save hub backup battery charge setting allows for extending the backup battery life when an external power supply is unavailable. When this setting is enabled, the hub switches to standby mode once it loses the external power supply.
To save the backup battery charge, the hub disables its connection channels (cellular network, Ethernet, Wi-Fi) when it switches to standby mode. Therefore, the hub in standby mode is not connected to Ajax Cloud and CMS until any system event occurs. In Ajax apps, the hub and devices added to it will be greyed out and unavailable for configuration or control; the hub will be in the Saving Mode state, and devices added to it will be Offline.
The standby mode doesn’t affect the system operation. Any detector triggering activates the hub for a specified time to transmit the event to users and CMS. During standby mode, the hub LED flashes red every 30 seconds, and the LED brightness is decreased to the minimum.
If the hub is in standby mode, switching arming modes is possible only by using a keypad or a key fob. Switching system arming modes and configuring the hub in standby mode via Ajax apps are not provided.
Enable Save hub backup battery charge to configure the hub operation time:
| Setting | Meaning |
| Period of activity after event triggered | The time the hub remains connected to Ajax Cloud after any system event occurs is set to 10 minutes by default. However, you can adjust this time from 5 minutes to 1 hour. |
| Server Polling Interval | The time between connections of the hub in standby mode to the server is set to 6 hours by default. However, you can adjust this time from 1 hour to 24 hours. |
The Battery Power Saver feature allows for extending the backup battery life up to 200 hours for Hub Hybrid (2G) and Hub Hybrid (4G) when using a 12 V⎓ backup battery with a capacity of 7 Ah. This duration depends on system configuration and the number of devices added to the hub.
The Battery Power Saver feature is available for hubs with OS Malevich 2.19 or higher.
When the Battery Power Saver feature is enabled, your system does not comply with EN 50131 Grade 2, 3.
Note: if your system includes at least one range extender added to the hub via Ethernet, the hub will not switch to standby mode. This is necessary to keep the connection with devices added via the range extender.
Fire Detectors Settings
Configuring the Interconnected Fire Detectors Alarm. The function activates the built-in sirens of all Ajax fire detectors if at least one of them triggers.
System Integrity Check
This parameter is responsible for checking the status of security detectors and devices before arming the system. System integrity check is disabled by default.
When the Hub Hybrid board is installed in Case D (430), the app displays the hub lid is open. If you use the System integrity check function, disable the Lid state toggle. Installing the hub in Case D (430) does not meet the Grade (EN 50131) requirements. The compliant version will be available soon.
Alarm Confirmation
This setting is only available in PRO version of the app
This is a special event that the hub sends to the CMS and system users if several devices specified by the administrator have triggered within a specified period of time.
By responding to confirmed alarms, the security company and the police reduce the number of visits on false alarms.
Restoration After Alarm
This setting is only available in PRO version of the app
The feature does not allow arming the system if an alarm has been registered previously. To arm the system, an authorized user or PRO should restore it. The types of alarms that require system restoration are defined when configuring the function.
The function eliminates situations when the user arms the system with detectors that generate false alarms.
Arming/Disarming Process
This setting is only available in PRO Ajax apps
The first Compliance with Standard option allows selecting a specific standard to set the security system according to existing requirements. Once you select the required standard, the menu will show the appropriate arming/disarming settings below. The following standards are available:
- EN 50131 — European standard for intrusion and hold-up alarm systems, which also describes the security grades concept.
- PD 6662 — British standard for intrusion and hold-up alarm systems, aimed to reduce the number of unconfirmed alarms and ensure police reaction only to real threats.
- ANSI/SIA CP-01-2019 — American standard for security systems that regulates features and requirements to reduce false alarms caused by users or equipment.
EN 50131
Once EN 50131 is selected, the following setting allows you to enable Two-Stage Arming and set Alarm Transmission Delay for the security system disarming process.
PD 6662
Once PD 6662 is selected, the menu shows the number of arming/disarming settings that allow configuring the system to comply with standard requirements.
Use the corresponding step-by-step guide in the Ajax PRO app for a quick and convenient system setup according to PD 6662. Go to Hub → Settings ![]() → Service → PD 6662 Setting Wizard and follow the app prompts.
→ Service → PD 6662 Setting Wizard and follow the app prompts.
ANSI/SIA CP-01-2019
Once ANSI/SIA CP-01-2019 is selected, you can configure Exit Time Restart and Unvacated Premises for the arming settings. For the disarming settings, you can select what devices should make an annunciation on Alarm Cancellation or Alarm Abort and adjust the Alarm Abort Window timeout.
Also, this standard requires enabling a number of features for the system, such as Delay When Entering/Leaving, cross zoning*, Devices Auto Deactivation, and system testing. These features are configured in the hub and certain device settings.
* The cross zoning functionality will be available in the next OS Malevich updates.
Devices Auto Deactivation
This setting is only available in PRO version of the app
The function allows you to ignore alarms and/or other device events without removing them from the system. Events of disabled devices will not be sent to the CMS and security system users.
There are two types of Devices Auto Deactivation: by the timer and by the number of alarms. It is also possible to manually deactivate a specific device.
Settings for direct connection to the security company’s central monitoring station. Parameters are set by security company engineers. Keep in mind that events and alarms can be sent to the central monitoring station of the security company even without these settings.
Settings
- Protocol — the choice of the protocol used by the hub to send alarms to the central monitoring station of the security company via a direct connection. Available protocols: Ajax Translator (Contact-ID) and SIA.
- Connect on demand. Enable this option if you need to connect to the CMS only when transmitting an event. If the option is disabled, the connection is maintained continuously. The option is available only for the SIA protocol.
- Object number — the number of an object in the monitoring station (hub).
Primary IP address
- IP address and Port are settings of the primary IP address and port of the security company server to which events and alarms are sent.
Secondary IP address
- IP address and Port are settings of the secondary IP address and port of the security company server to which events and alarms are sent.
The hub switches between the primary and secondary IP addresses only if connection with the central monitoring station is lost.
Alarm sending channels
In this menu, channels for sending alarms and events to the central monitoring station of the security company are selected. Hub Hybrid can send alarms and events to the central monitoring station via Ethernet and mobile internet. We recommend that you use all communication channels at once — this will increase the transmission reliability and secure against failures on the telecom operators’ side.
- Ethernet — enables event and alarm transmission via Ethernet.
- Cellular — enables event and alarm transmission via the mobile internet.
- Monitoring Station Ping Interval — sets the period for sending test messages: from 1 minute to 24 hours.
Encryption — event transmission encryption settings in the SIA protocol. AES 128-bit encryption is used.
- Encryption — if enabled, events and alarms transmitted to the central monitoring station in SIA format are encrypted.
- Encryption key — encryption key of transmitted events and alarms. Must match the value on the CMS.
Panic button coordinates
- Send coordinates — if enabled, the pressing of a panic button in the app sends the coordinates of the device on which the app is installed and the panic button is pressed, to the central monitoring station of the security company.
Alarm Restore on ARC. The setting allows you to select when the alarm recovery event will be sent to the CMS of the security company: immediately (upon detector recovery) or when disarming.
Settings for PRO users — installers and representatives of security companies connected to the security system.
The settings allow you to determine who has access to the system, what rights are granted to users, and how the security system notifies them of events and alarms.
List of security companies in your area. The area is determined by the GPS data or the regional settings of your smartphone.
When pressed, opens the Hub Hybrid user manual in the Ajax app.
Menu for automatically transferring devices and settings from another hub. Note that you are in the settings of the hub on which you want to import data.
Removes your account from the hub. All settings, paired detectors, and devices, as well as invited users, are saved in the hub’s memory.
Hub settings reset
Resetting the hub to the factory settings:
- Turn on the hub if it is off.
- Remove all users and installers from the hub.
- Hold the power button for 30 s — the LED indicator on the hub board will start blinking red.
- Remove the hub from your account.
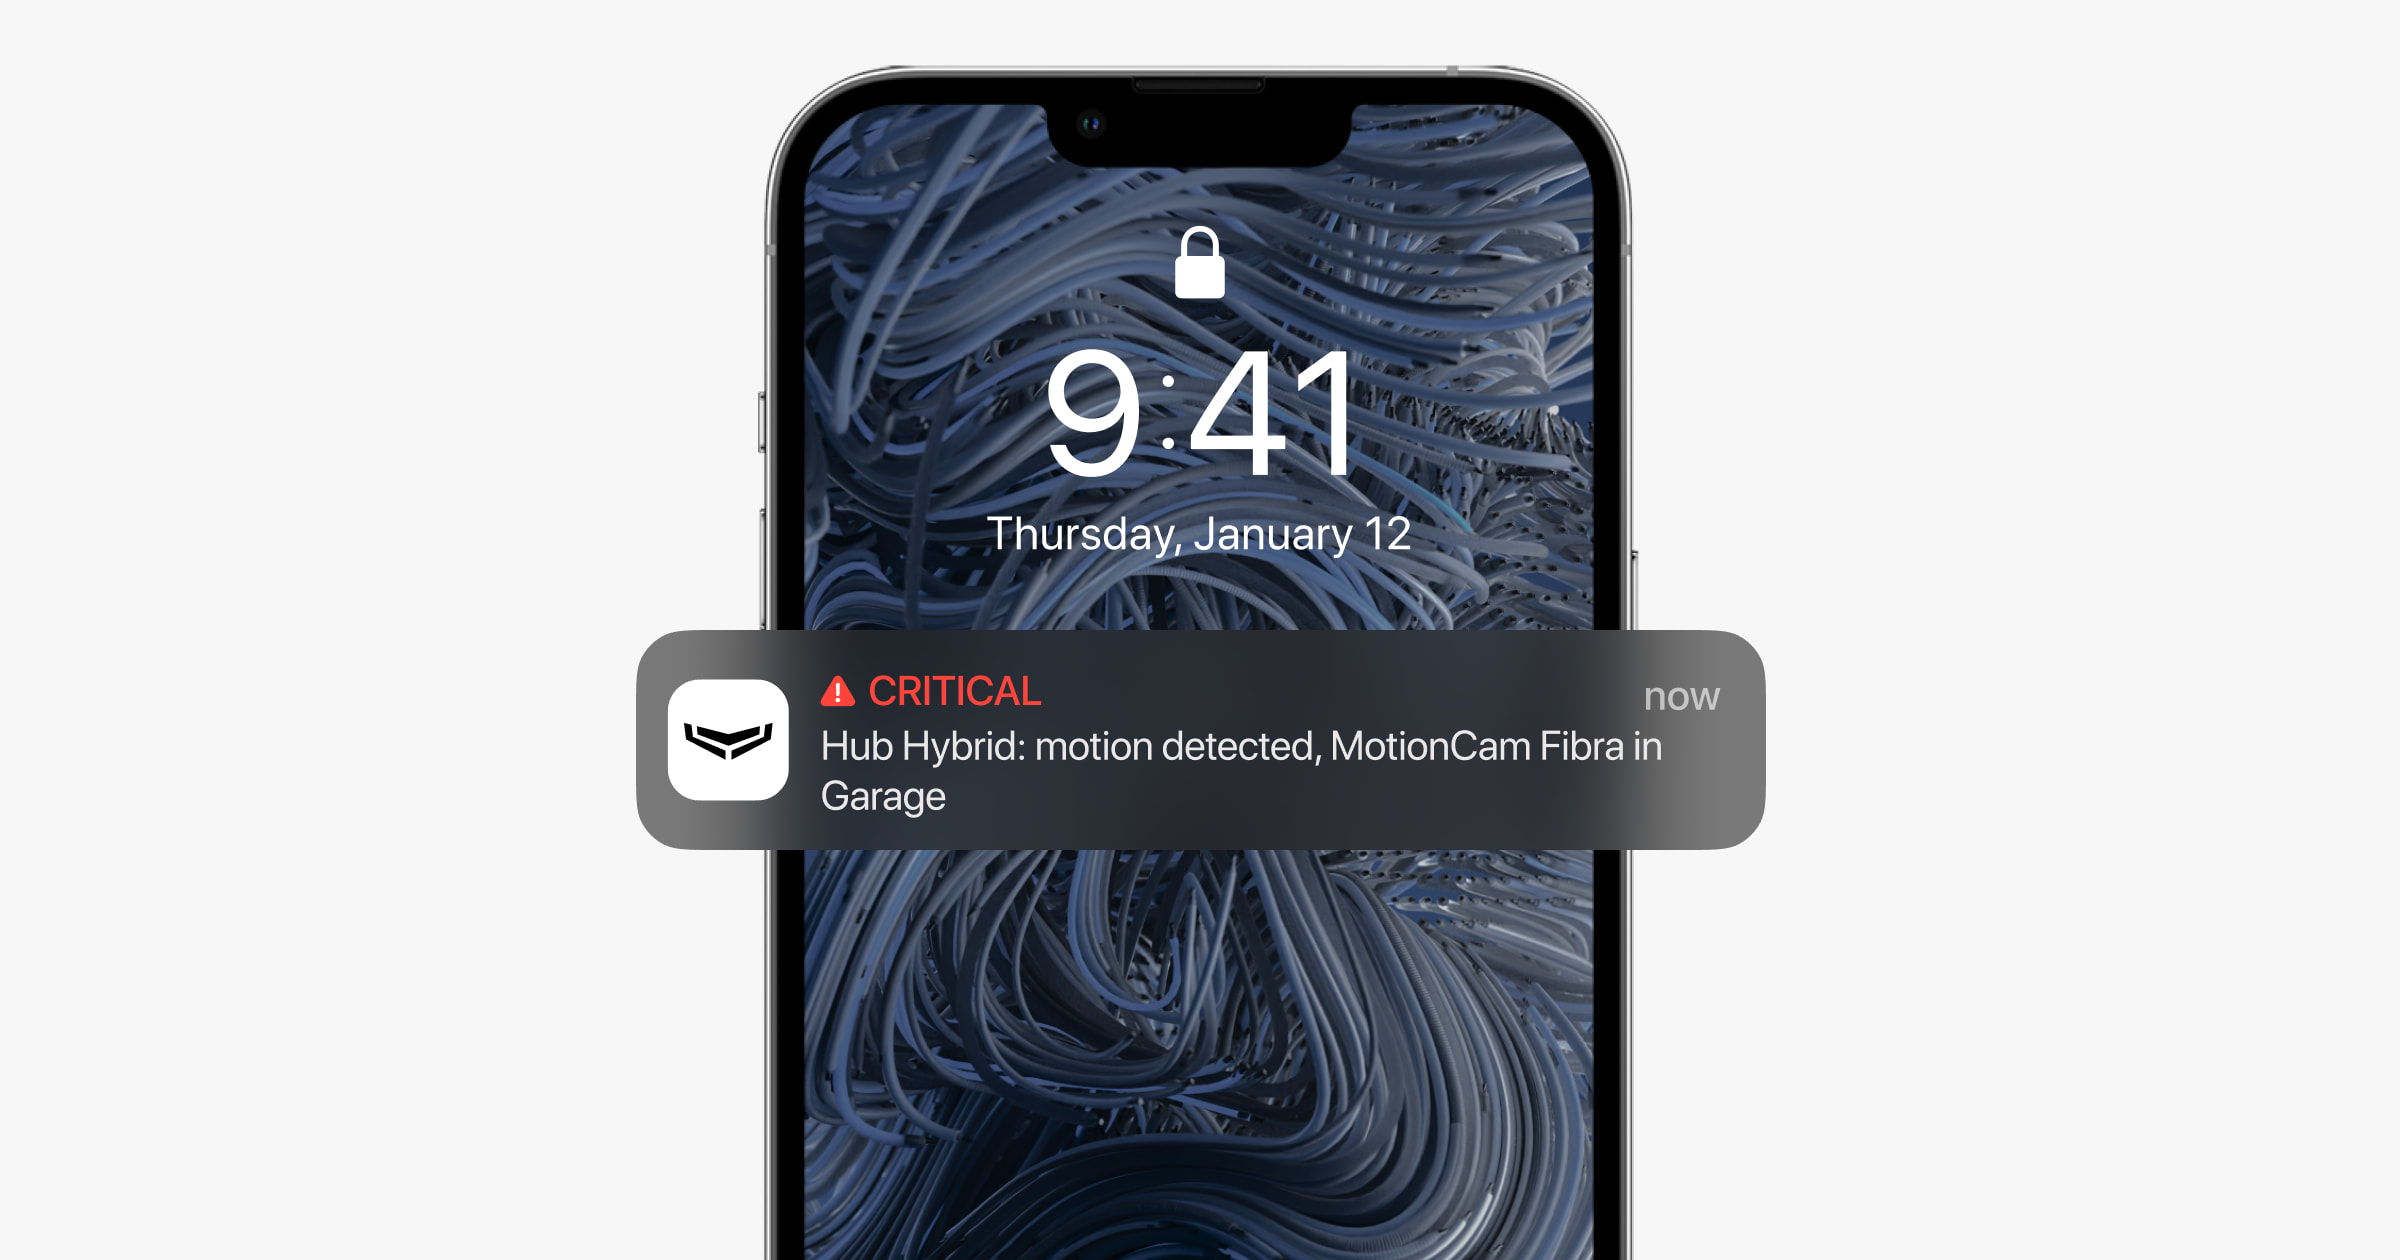
Events and alarms notifications
The Ajax security system informs users about alarms and events using push notifications, SMS, and phone calls.
Hub Hybrid does not support calls and SMS transmission using VoLTE (Voice over LTE) technology. Before buying a SIM card, please make sure that it only supports the GSM standard.
| Causes of notifications | What are they used for | Types of notifications |
| Alarms | System alarm:
Loss of connection between the hub and the Ajax Cloud server |
|
| Malfunctions |
|
|
| Security Mode Change |
|
|
| System Events |
|
|
| Non-security Alerts | The changing of the air quality parameters:
The non-security alerts settings are available with firmware version OS Malevich 2.15 or higher and in apps of the following versions or higher:
|
|
| Automation Devices |
The settings of the automation devices notifications are available with firmware version OS Malevich 2.15 or higher and in apps of the following versions or higher:
|
|
The hub does not notify users and the security company about the triggering of the opening detectors in the Disarmed mode when the Chime function is enabled and configured. Only the sirens connected to the system notify about the opening.
Connecting to the monitoring station of security company
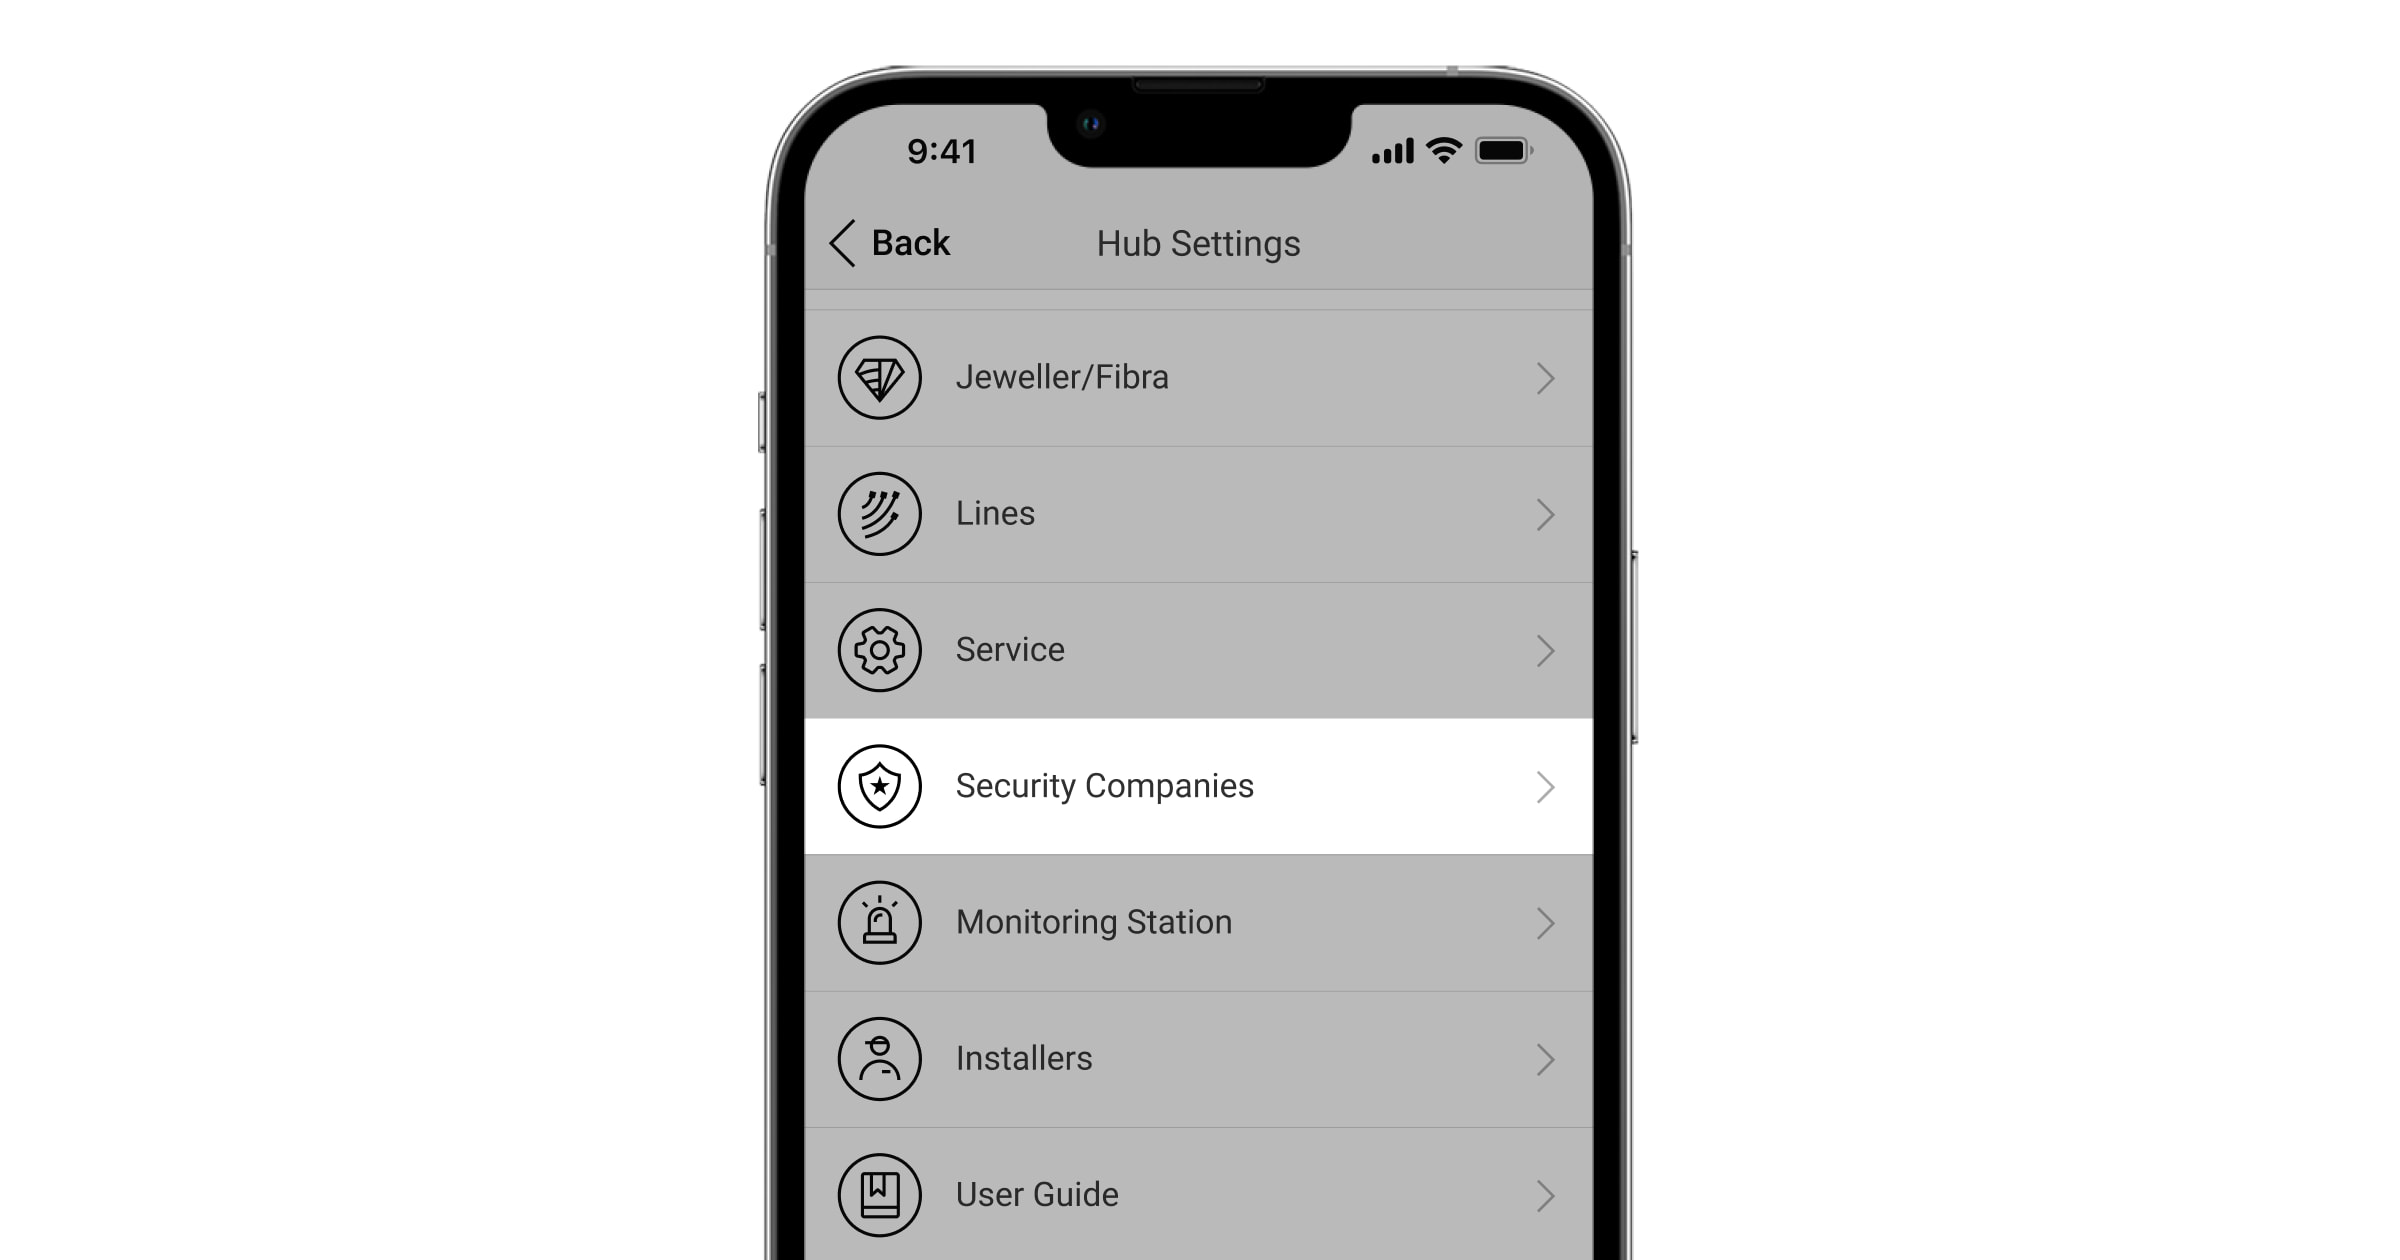
The list of companies that receive system notifications to the monitoring station can be found in the Security companies menu in the Ajax app:
Devices ![]() → Hub → Settings
→ Hub → Settings ![]() → Security companies.
→ Security companies.
Select a security company and click Send Monitoring Request. After that, the security company will contact you to discuss the connection terms. You can also contact the company representatives yourself to agree on the connection. The phone number, email address, and website of the security company are available in the Ajax app.
You can also connect the hub to the CMS by e-mail of the security company. To do this, in the Security companies menu, click on the letter icon, enter your e-mail, and click Continue. Confirm your choice of company and click Send Request.
Additional features
Video surveillance
Third-party cameras can be connected to the security system: thanks to the RTSP protocol support, integration with IP cameras and Dahua, Hikvision, Safire, EZVIZ, and Uniview DVRs is implemented.
You can connect up to 25 video surveillance devices to the system.
Scenarios
Hub Hybrid allows creating 32 scenarios and minimizing the human factor impact on safety. The hub can manage the security of the entire facility or group according to a schedule; activate the smoke machine if intruders enter the room; de-energize the room and turn on emergency lighting in case of fire; shut off water in the event of a leak; control lighting devices, electric locks, roller shutters, and garage doors — when changing the security mode by pressing a button or by a detector alarm.
Scenarios can be used to reduce the number of routine actions and increase productivity. Ajax automation devices respond to changes in temperature and air quality. For example, configure the heating to turn on at low temperatures, control the supply system, humidifier, and air conditioner to maintain a comfortable climate.
Photo verification
Hub Hybrid supports both MotionCam and MotionCam Outdoor wireless motion detectors. When triggered, the detectors take a series of shots you can use to evaluate the unfolding of the events at the facility over time. This relieves users of unnecessary anxiety and prevents security companies from sending unnecessary patrol dispatches.
The detector activates the camera when armed and detects movement. Only users with access to the events feed, as well as authorized employees of the security company can see visual alarm verifications provided that the security system is connected to the monitoring station.
If Photo on Demand function is activated, the detectors can take a photo upon the command of a system user or PRO user with the appropriate rights. The taking of a photo is always registered in the hub’s events feed.
The shots are protected by encryption at every stage of transmission. They are stored on the Ajax Cloud server and are not processed or analysed.
Maintenance
Check the functioning of Hub Hybrid and connected devices on a regular basis. The optimal frequency of checks is once every three months. Clean the hub casing from dust, cobwebs, and other contaminants as they emerge. Use a soft, dry cloth that is suitable for equipment care.
Do not use substances that contain alcohol, acetone, petrol, and other active solvents to clean the device.
Technical specifications
Complete set
- Hub Hybrid (2G) or Hub Hybrid (4G).
- Power cable.
- Screw terminal block Adapter (Only for INCERT compliance).
- Ethernet cable.
- Casing.
- Eight 120 Ω terminating resistors.
- Installation kit.
- Quick start guide.
Warranty
Warranty for the Limited Liability Company “Ajax Systems Manufacturing” products is valid for 2 years after the purchase.
If the device does not function correctly, please contact the Ajax Technical Support first. In most cases, technical issues can be resolved remotely.
Contact Technical Support:
Manufactured by “AS Manufacturing” LLC

