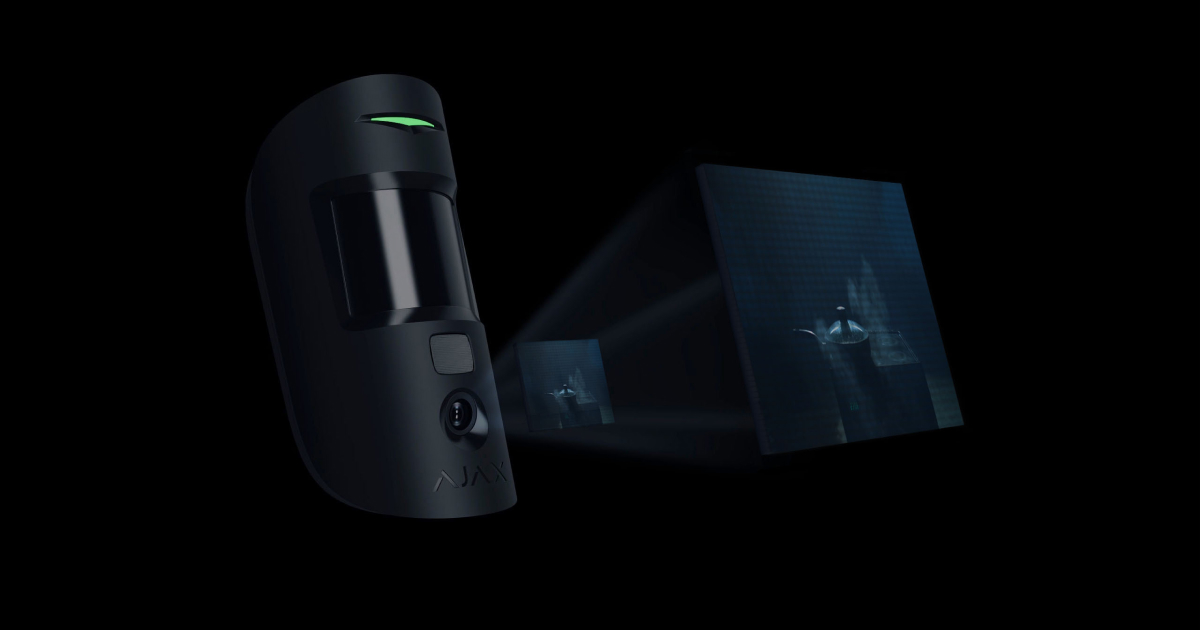
The Photo by Scenario feature allows you to create scenarios for all MotionCam (PhOD) detectors. In these scenarios, detectors take pictures when other Ajax devices trigger or by schedule. With this feature, you can, for example, check the cause of the fire alarm and regularly monitor the situation at the protected facility.
The ability to take photos by scenario is available in Ajax systems with OS Malevich 2.13 update, while the Photo by Schedule feature is available with OS Malevich 2.19 update.
MotionCam (PhOD) detectors also support the Photo on Demand feature.
Devices supporting Photo by Scenario
Detectors:
- MotionCam (PhOD) Jeweller.
- MotionCam Outdoor (PhOD) Jeweller.
- MotionCam S (PhOD) Jeweller.
- MotionCam (PhOD) Fibra.
Other detectors do not support the Photo by Scenario feature.
Hubs:
App versions supporting Photo by Scenario
The latest versions of Ajax apps can automatically take photos by alarm from other devices or at a specified time.
- Ajax Security System 2.33 and higher (for iOS).
- Ajax Security System 2.35 and higher (for Android).
- Ajax PRO: Tool for Engineers 1.27 and higher (for iOS).
- Ajax PRO: Tool for Engineers 1.26 (for Android).
- Ajax PRO Desktop version 3.16 and higher (for macOS).
- Ajax PRO Desktop version 3.16 and higher (for Windows).
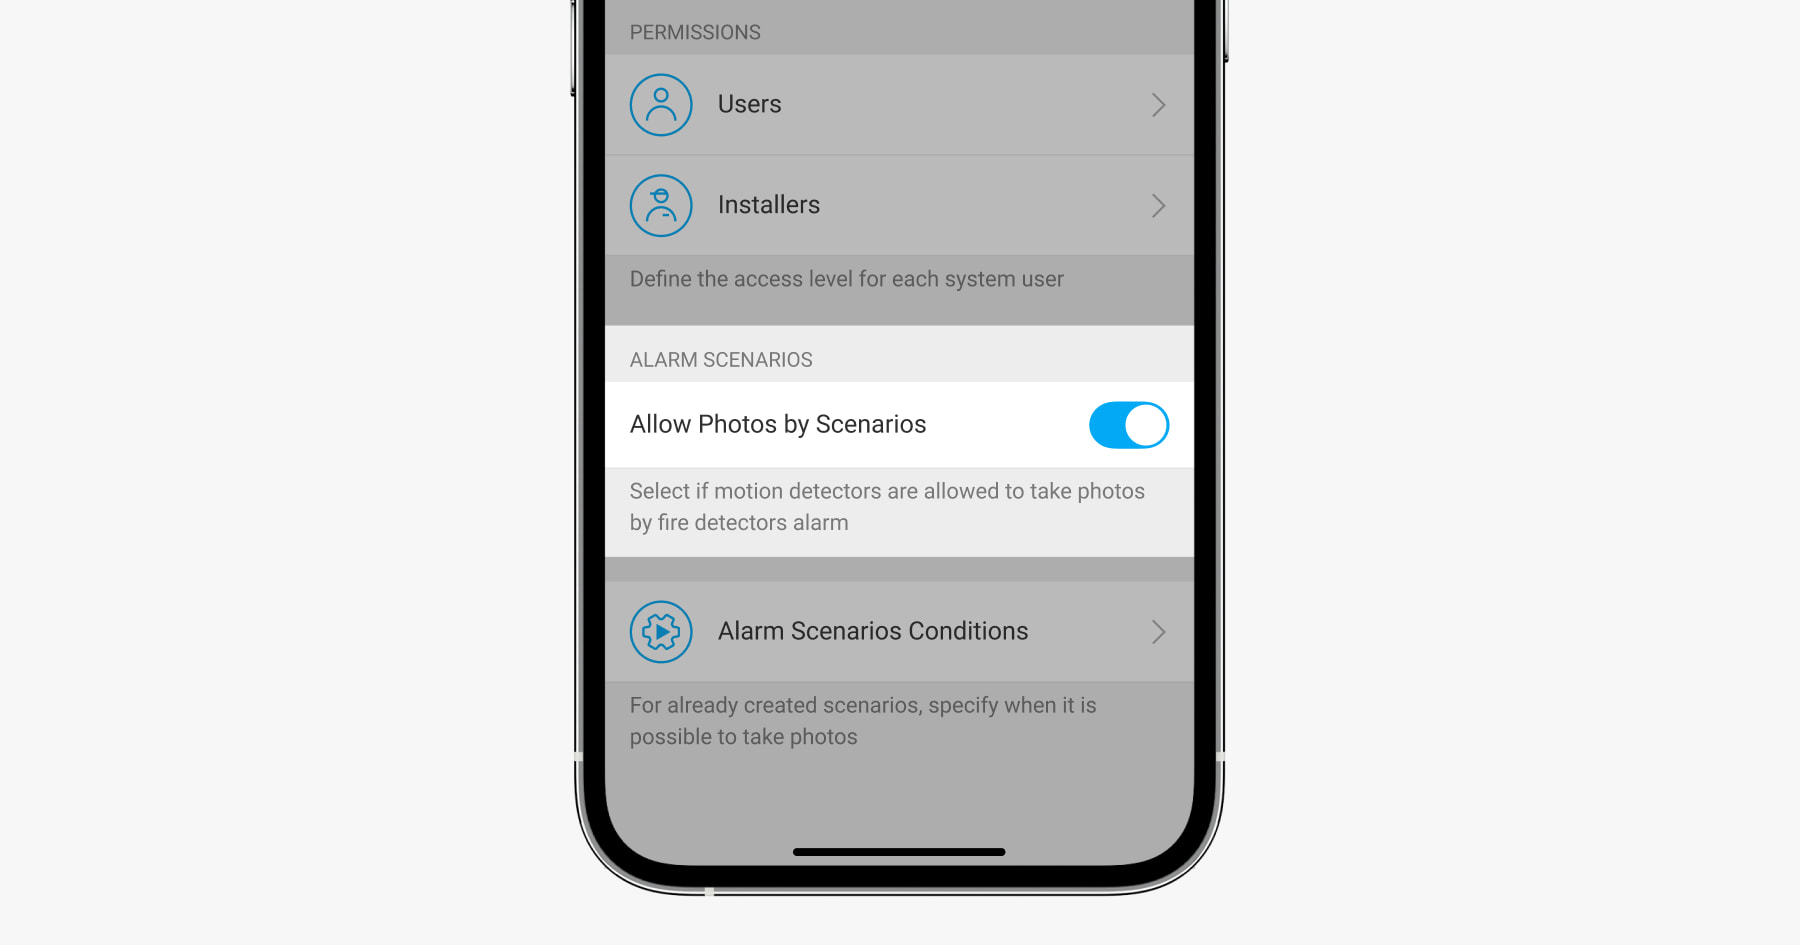
Privacy settings
OS Malevich 2.13 adds a new user right: managing privacy settings (hub settings, Privacy menu).
Two types of system users can manage privacy settings:
- Users with administrator rights (by default).
- Users without administrator rights, if they were granted such a right.
By default, the Photo by Scenario feature is disabled for all detectors. An admin or a user with access to privacy settings can enable this feature. A PRO cannot manage privacy settings but can grant the right to any user of the system.
Access to photos by scenario
Photos by scenario are available to all users of the system with access to the events feed. The event of a photo in case of the Ajax devices alarm is sent to the security company monitoring station via SIA (DC-09) and other proprietary protocols. The event code is 730.
The photos taken by scenario are available to the CMS engineers if the CMS software supports photo verification. Photos by scenario are also available in the PRO Desktop app.
Photos by scenario will not be sent to the CMS if only a direct connection with the monitoring station of the security company is used.
How to enable Photo by Scenario
An admin or a user with access to privacy settings can enable the Photo by Scenario feature.
To do this, in the Ajax app:
- Select the space if you have several of them.
- Go to the Control
 tab.
tab. - Click on the gear icon to go to the space settings.
- Select the Privacy menu and enable the Allow photos by scenarios option.
- Click Back to save the settings.
How to set up scenarios
Any user or PRO with system configuration rights can create and configure scenarios.
Taking photos by alarm from Ajax devices
- In the Ajax app, select the space if you have several of them.
- Go to the Devices tab and select a detector with photo verification.
- Go to the detector’s Settings by clicking on the gear icon .
- Select the Scenarios menu from the list.
- Click Add scenario.
- Select By alarm menu.
- Select Ajax devices and types of alarms for which detectors will take photos.
- Click Next.
- Specify:
- Name of the scenario.
- The number of devices that start the scenario (the parameter is available if there are two or more Ajax fire detectors in the system).
– Any — the scenario will run if at least one device triggers.
– All selected — the scenario will run if all the selected devices trigger. - Triggering time for all devices (the parameter is available if in the Devices triggering the scenario block, All selected option is specified).
To start the scenario, all selected devices should alarm within the specified time. If the devices don’t raise an alarm within a specified time, the timer will reset, and the scenario will not run.
- When the detector can take photos: always or when it is in the armed mode. The option is only available to the users with the right to control privacy settings. By default, the detector takes photos by scenario only in the armed mode.
- Click Save. The scenario will appear in the list of device scenarios.
Taking photos by schedule
- In the Ajax app, select the space if you have several of them.
- Go to the Devices tab and select a detector with photo verification.
- Go to the detector’s Settings by clicking on the gear icon .
- Select the Scenarios menu from the list.
- Click Add scenario.
- Select By schedule menu.
- Specify:
- Name of the scenario.
- Time when the detector takes photos.
- Days of the week when the detector takes photos.
- Whether the detector takes photos always or only when armed.
- Click Save.
The scenario will not be executed if the Allow photos by scenarios option is disabled in the Privacy menu (space settings).
To delete or edit a scenario, click on it in the list. You can also disable the scenario: its settings will be saved, but it will not start if the device triggers. To do this, use a toggle next to the scenario name.
Permanently deactivated PhOD detectors cannot take photos by scenario, and permanently disabled devices do not trigger the scenario for taking photos.
How to set the resolution and number of images when taking photos by scenario
The user or PRO with system configuration rights can set the resolution, as well as the number of photos.
To do this, in the Ajax app:
- Select the space if you have several of them.
- Go to the Devices tab and select the required detector with photo verification.
- Click on the gear icon to go to the detector Settings.
- Determine the number of photos in case of an alarm (the specified number of photos will be taken by the detector in case of motion alarms).
- Define the photo resolution. The specified resolution will also be used in case of motion alarms and scheduled photos.
- Click Back to apply the settings.
- Repeat steps 2–6 for other detectors for which you want to adjust the resolution and number of photos.
Delivery speed for photos by scenario
Photo delivery time from MotionCam Outdoor (PhOD) Jeweller detectors
| Resolution | Delivery time |
| 320 × 176 (default) | Up to 9 seconds |
| 640 × 352 | Up to 20 seconds |
Photo delivery time from MotionCam S (PhOD) Jeweller and MotionCam (PhOD) Jeweller detectors
| Resolution | Delivery time |
| 160 × 120 | Up to 7 seconds |
| 320 × 240 (default) | Up to 9 seconds |
| 640 × 480 | Up to 20 seconds |
Photo delivery time from MotionCam (PhOD) Fibra detectors
| Resolution | Delivery time |
| 160 × 120 | Up to 7 seconds |
| 320 × 240 (default) | Up to 12 seconds |
| 640 × 480 | Up to 21 seconds |
The tables show the delivery time of one image at a signal strength of 2–3 bars between the detector and the hub. The hub is connected to the Internet via Ethernet, Wi-Fi, or 4G (LTE). The delivery time when the detector is connected via a range extender is available at the link.
How to view photos by scenario
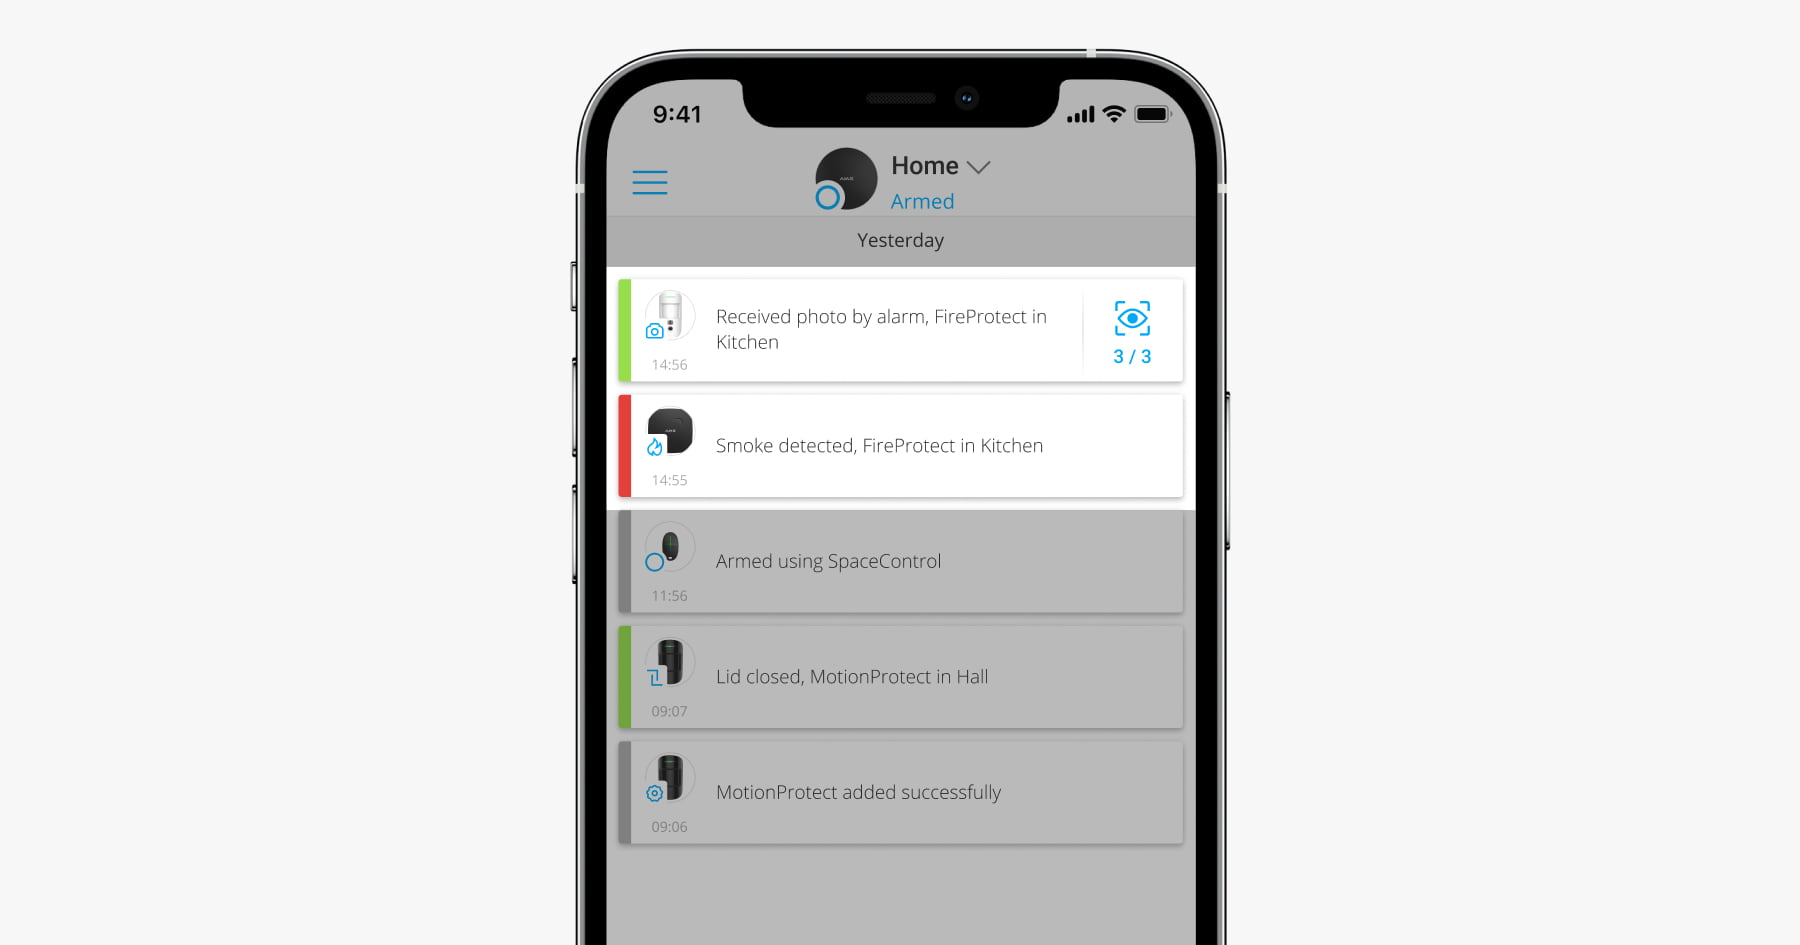
Photos by scenario are taken and automatically sent to Ajax apps. Pictures are taken within 3 seconds after an alarm is detected or at a scheduled time.
System users who have push notifications about the events enabled will receive photo notifications.
Photos by scenario are available to all users of the system with access to the events feed. As soon as the picture is available for viewing, a corresponding notification will appear in the events feed. An eye icon ![]() with a delivered images counter is displayed opposite the notification. To view the photos, click the notification.
with a delivered images counter is displayed opposite the notification. To view the photos, click the notification.
Additional features and useful links
Detectors with (PhOD) in the name can also take photos on demand.
The product line of the Ajax security system also includes detectors with photo verification, which cannot take photos on demand or by scenario.
You can learn more about the features of photo verification in the Ajax security system by this link
Ajax cameras and NVRs can be connected to the Ajax system. Fast integration with Dahua, Hikvision, Safire, Uniview, and EZVIZ cameras and DVRs is also supported.
