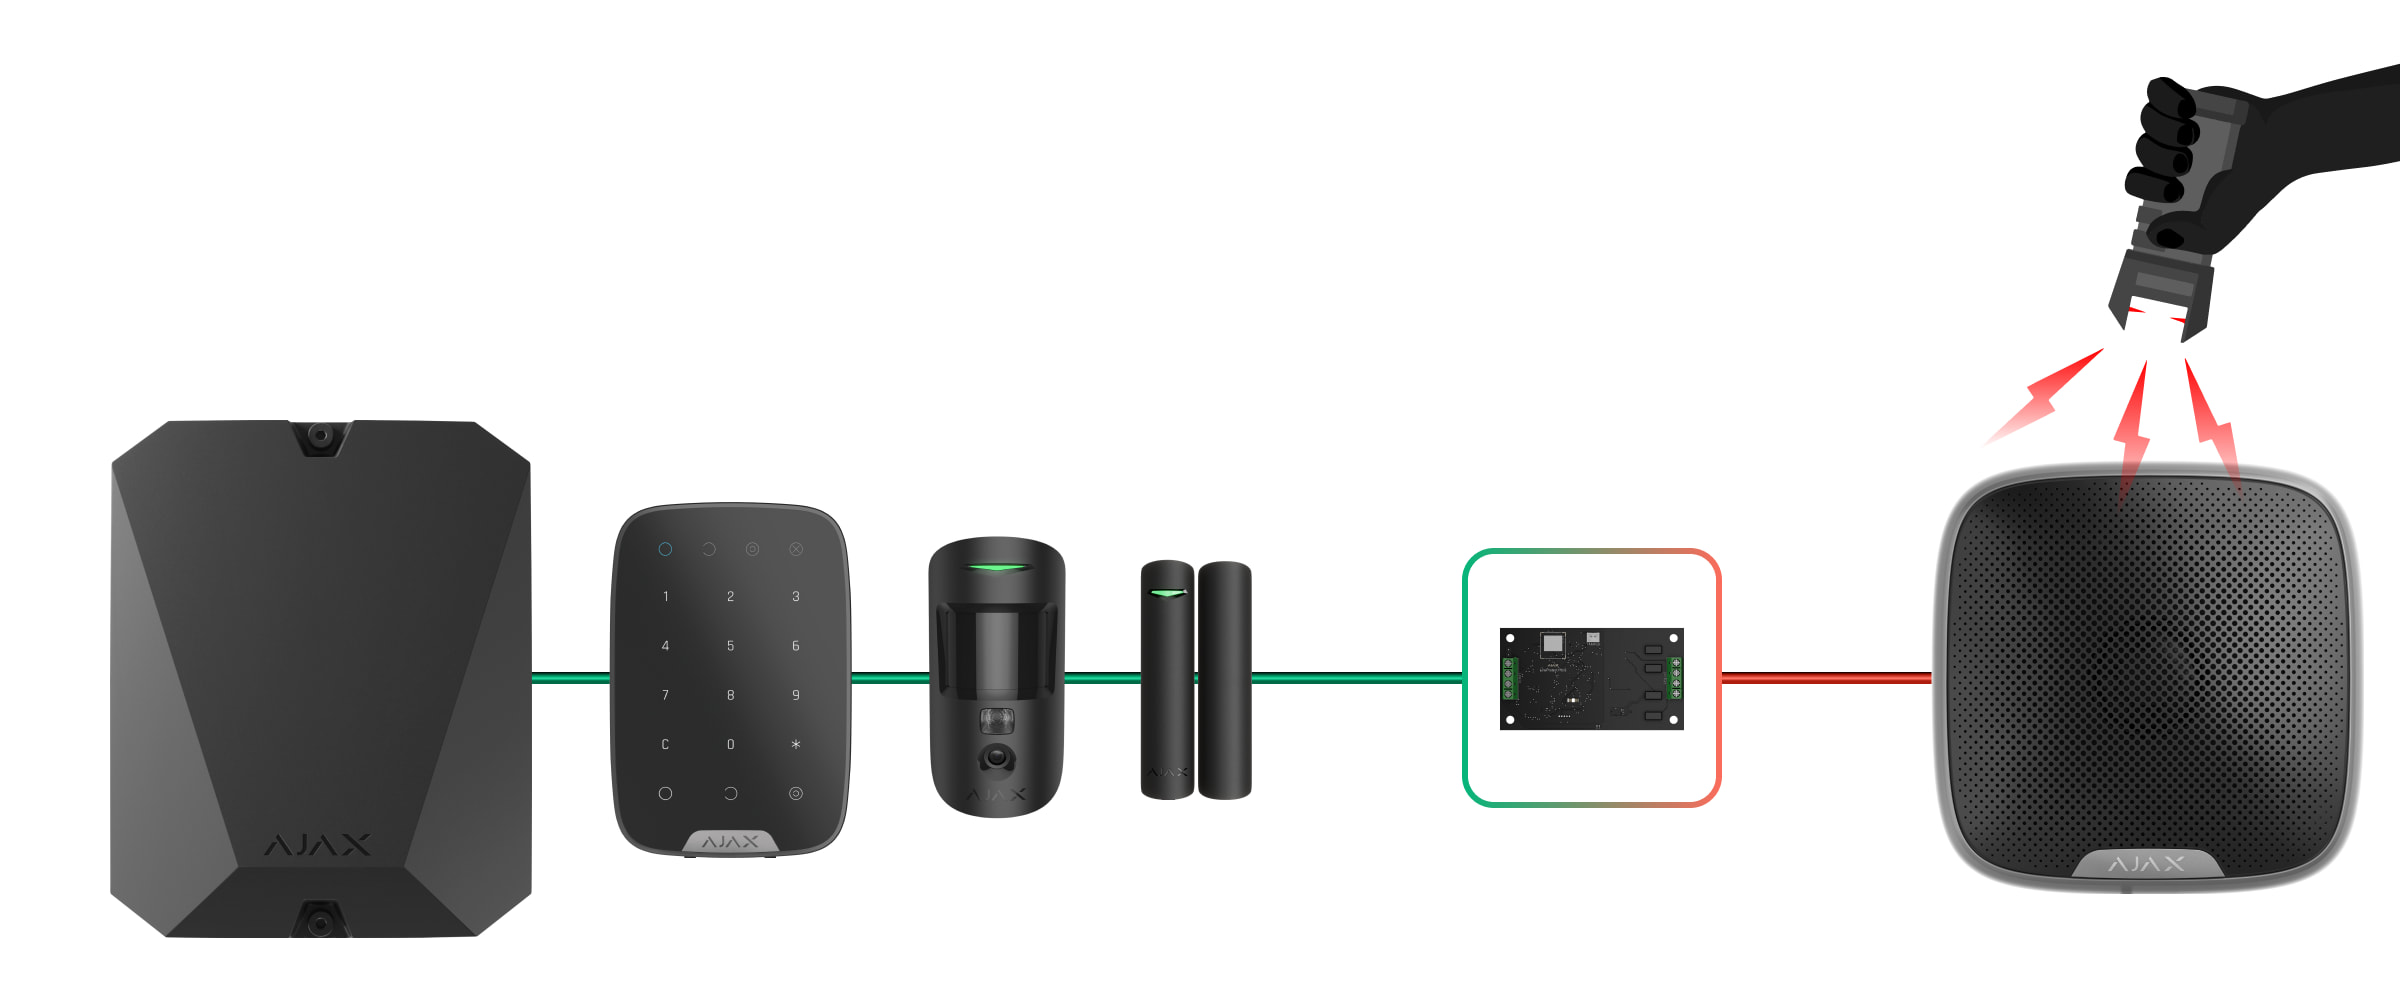
LineProtect Fibra is a module designed to protect devices on the Fibra line from short circuit and sabotage: 110/230 V~ voltage supply to the line, hit with the stun gun.
The module works in an Ajax system and exchanges data with the hub using the secure Fibra wired communication protocol.
The device is compatible with Hub Hybrid (2G) and Hub Hybrid (4G). Connection to other hubs, radio signal range extenders, ocBridge Plus, and uartBridge is not provided.
LineProtect is a part of the Fibra product line of wired devices. Only accredited Ajax Systems partners can buy, install, and administer Fibra products.
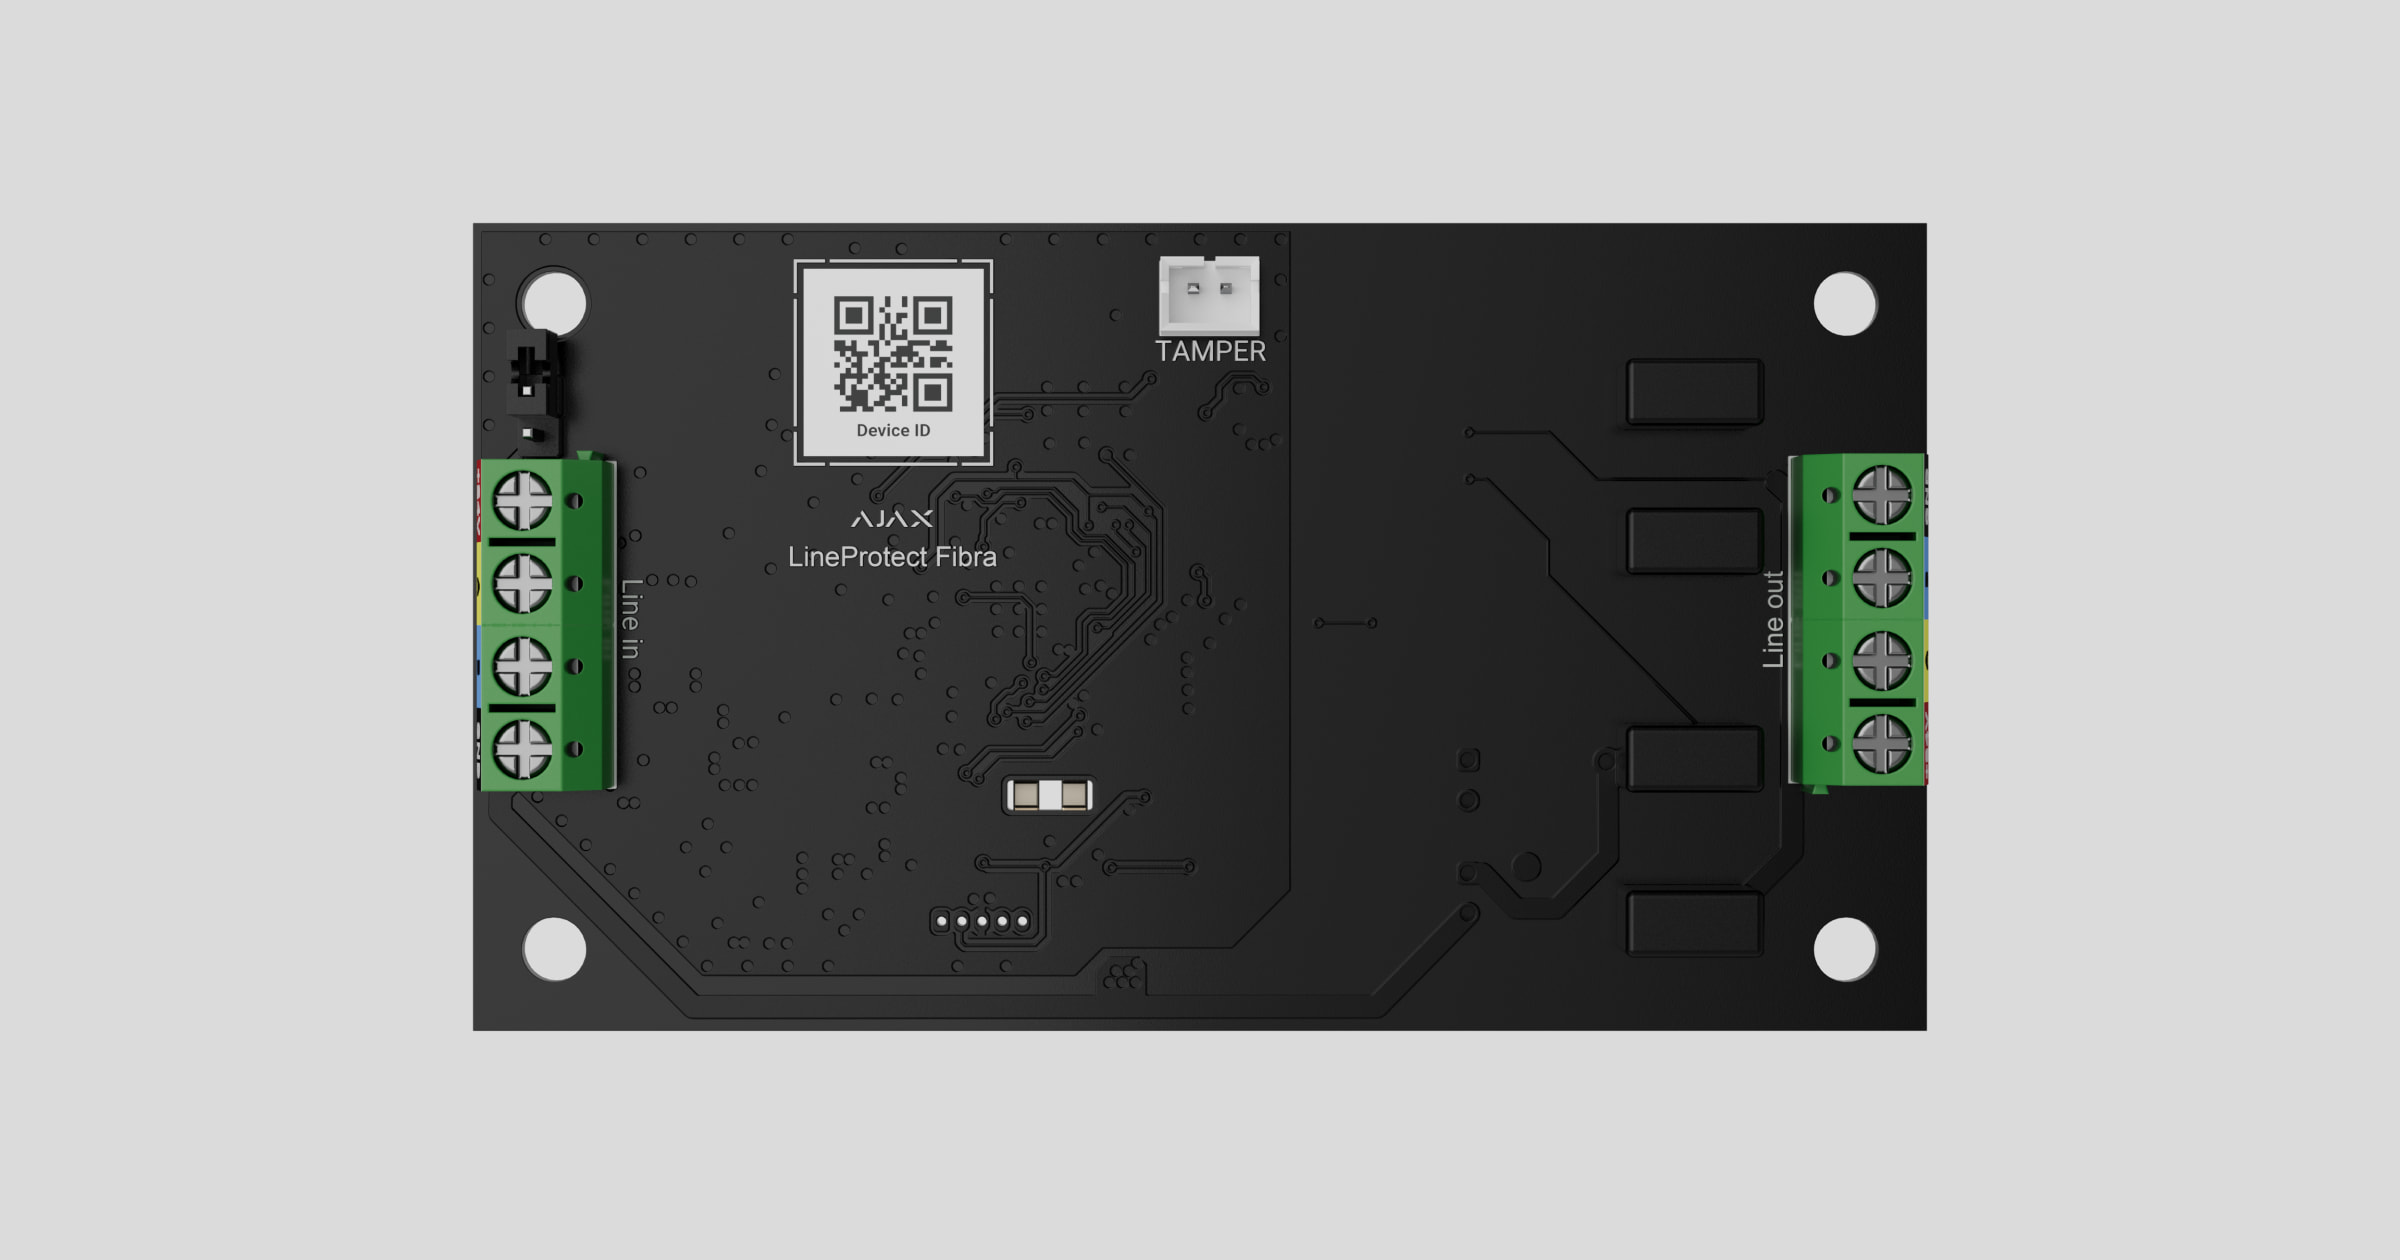
Functional elements
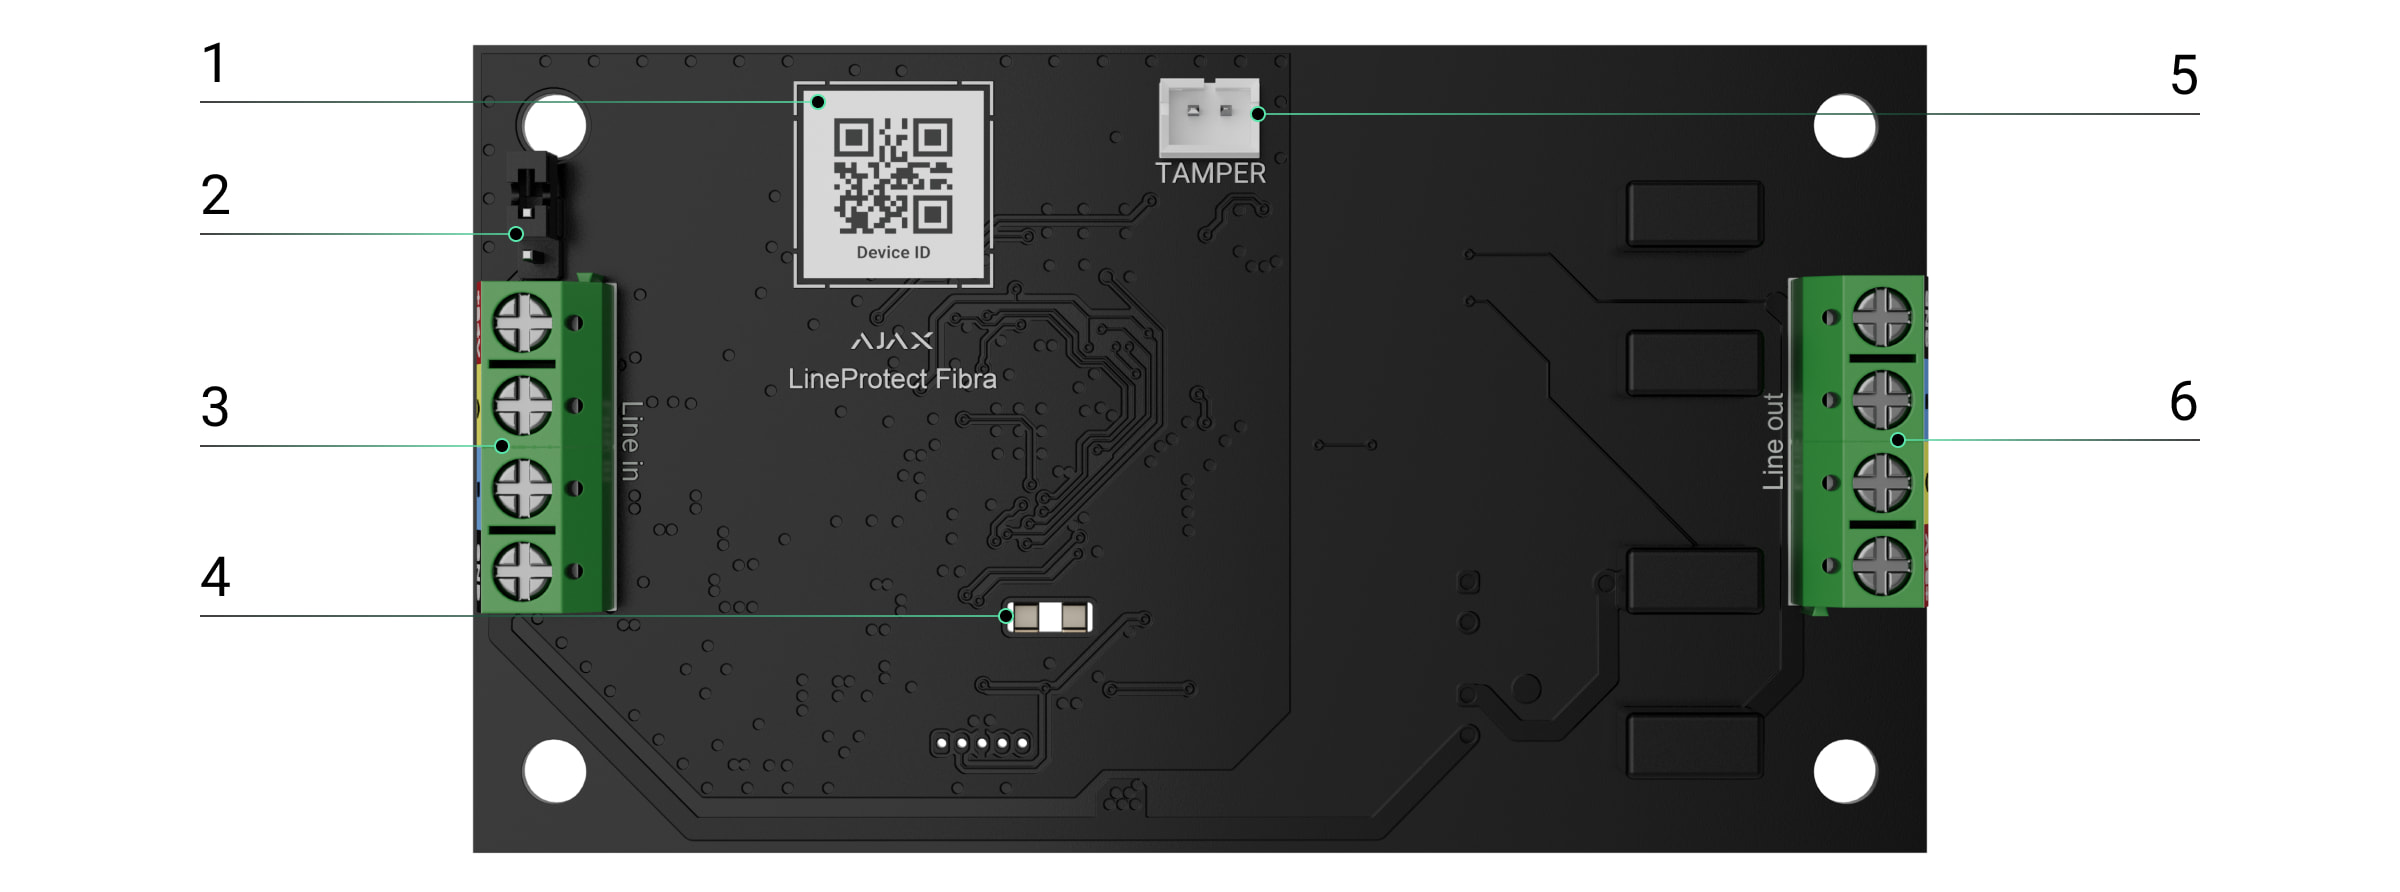
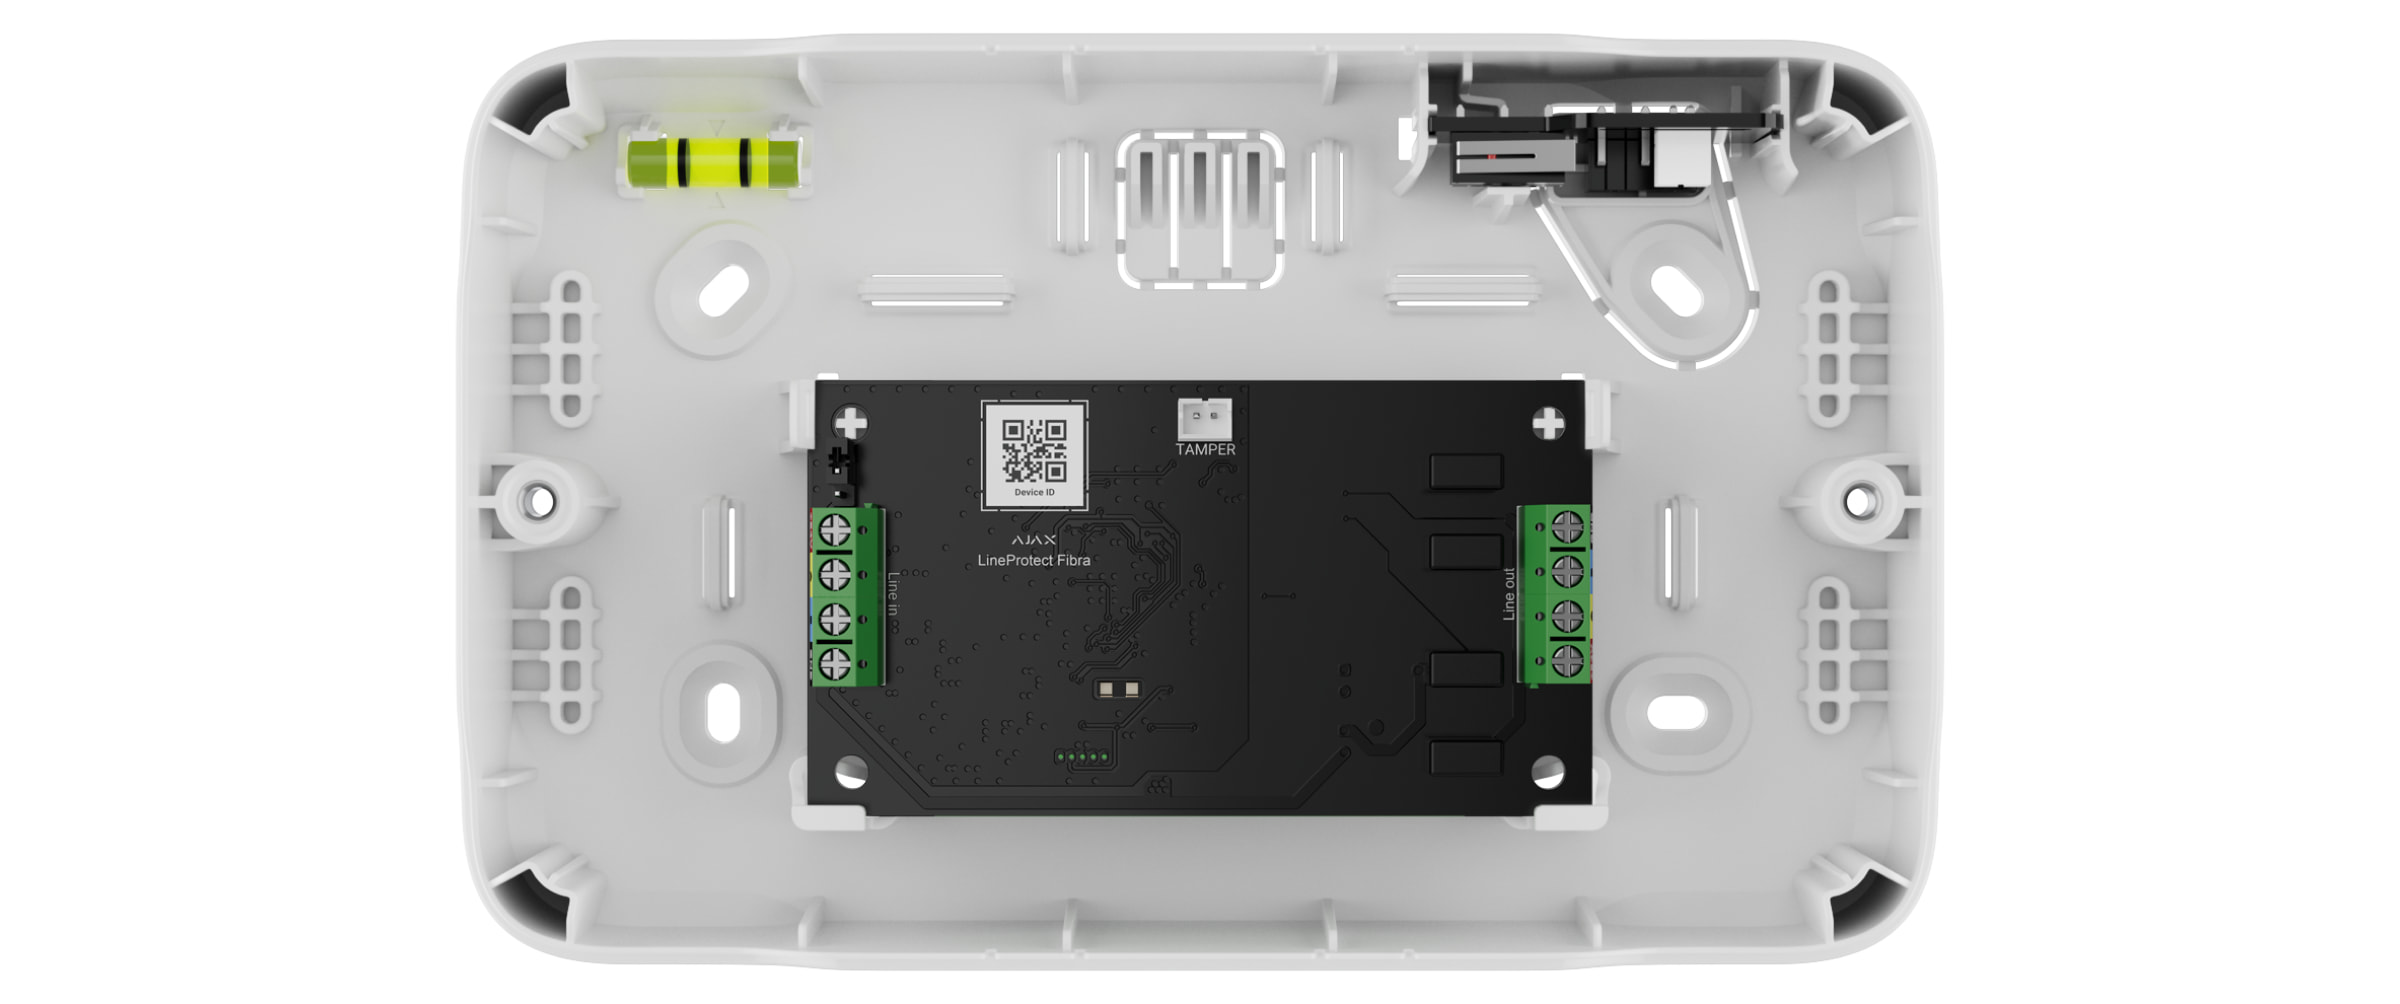
- QR code with the device ID. It is used to pair this device with an Ajax system.
- Terminating resistor jumper. It is installed on two contacts if LineProtect is the last device on the Fibra line. Otherwise, the jumper is either installed on one contact or not installed.
- LineProtect input terminals.
- LED indicators.
- Connector to fasten the tamper board to the module. The tamper board is in Case that is sold separately.
- Output terminals for connecting wired devices.
Operating principle
LineProtect is a module designed to protect devices connected to the input line on the Fibra line in an Ajax system. It connects to any point of the Fibra line.
The module protects devices installed on the Fibra line between LineProtect and the hub, as well as the hub itself. LineProtect does not protect devices between the module and the end of the line.
You need to connect one input and one output Fibra line to LineProtect. Use LineSplit Fibra to divide the line. Do not install LineProtect on the Fibra line created in a Ring topology.
Do not connect LineProtect modules one after another. You can connect one LineProtect to one Fibra line.
The module protects the hub and Fibra devices from the following threats:
- 110/230 V~ voltage supply.
- Short circuit on the line.
- Hit with the stun gun.
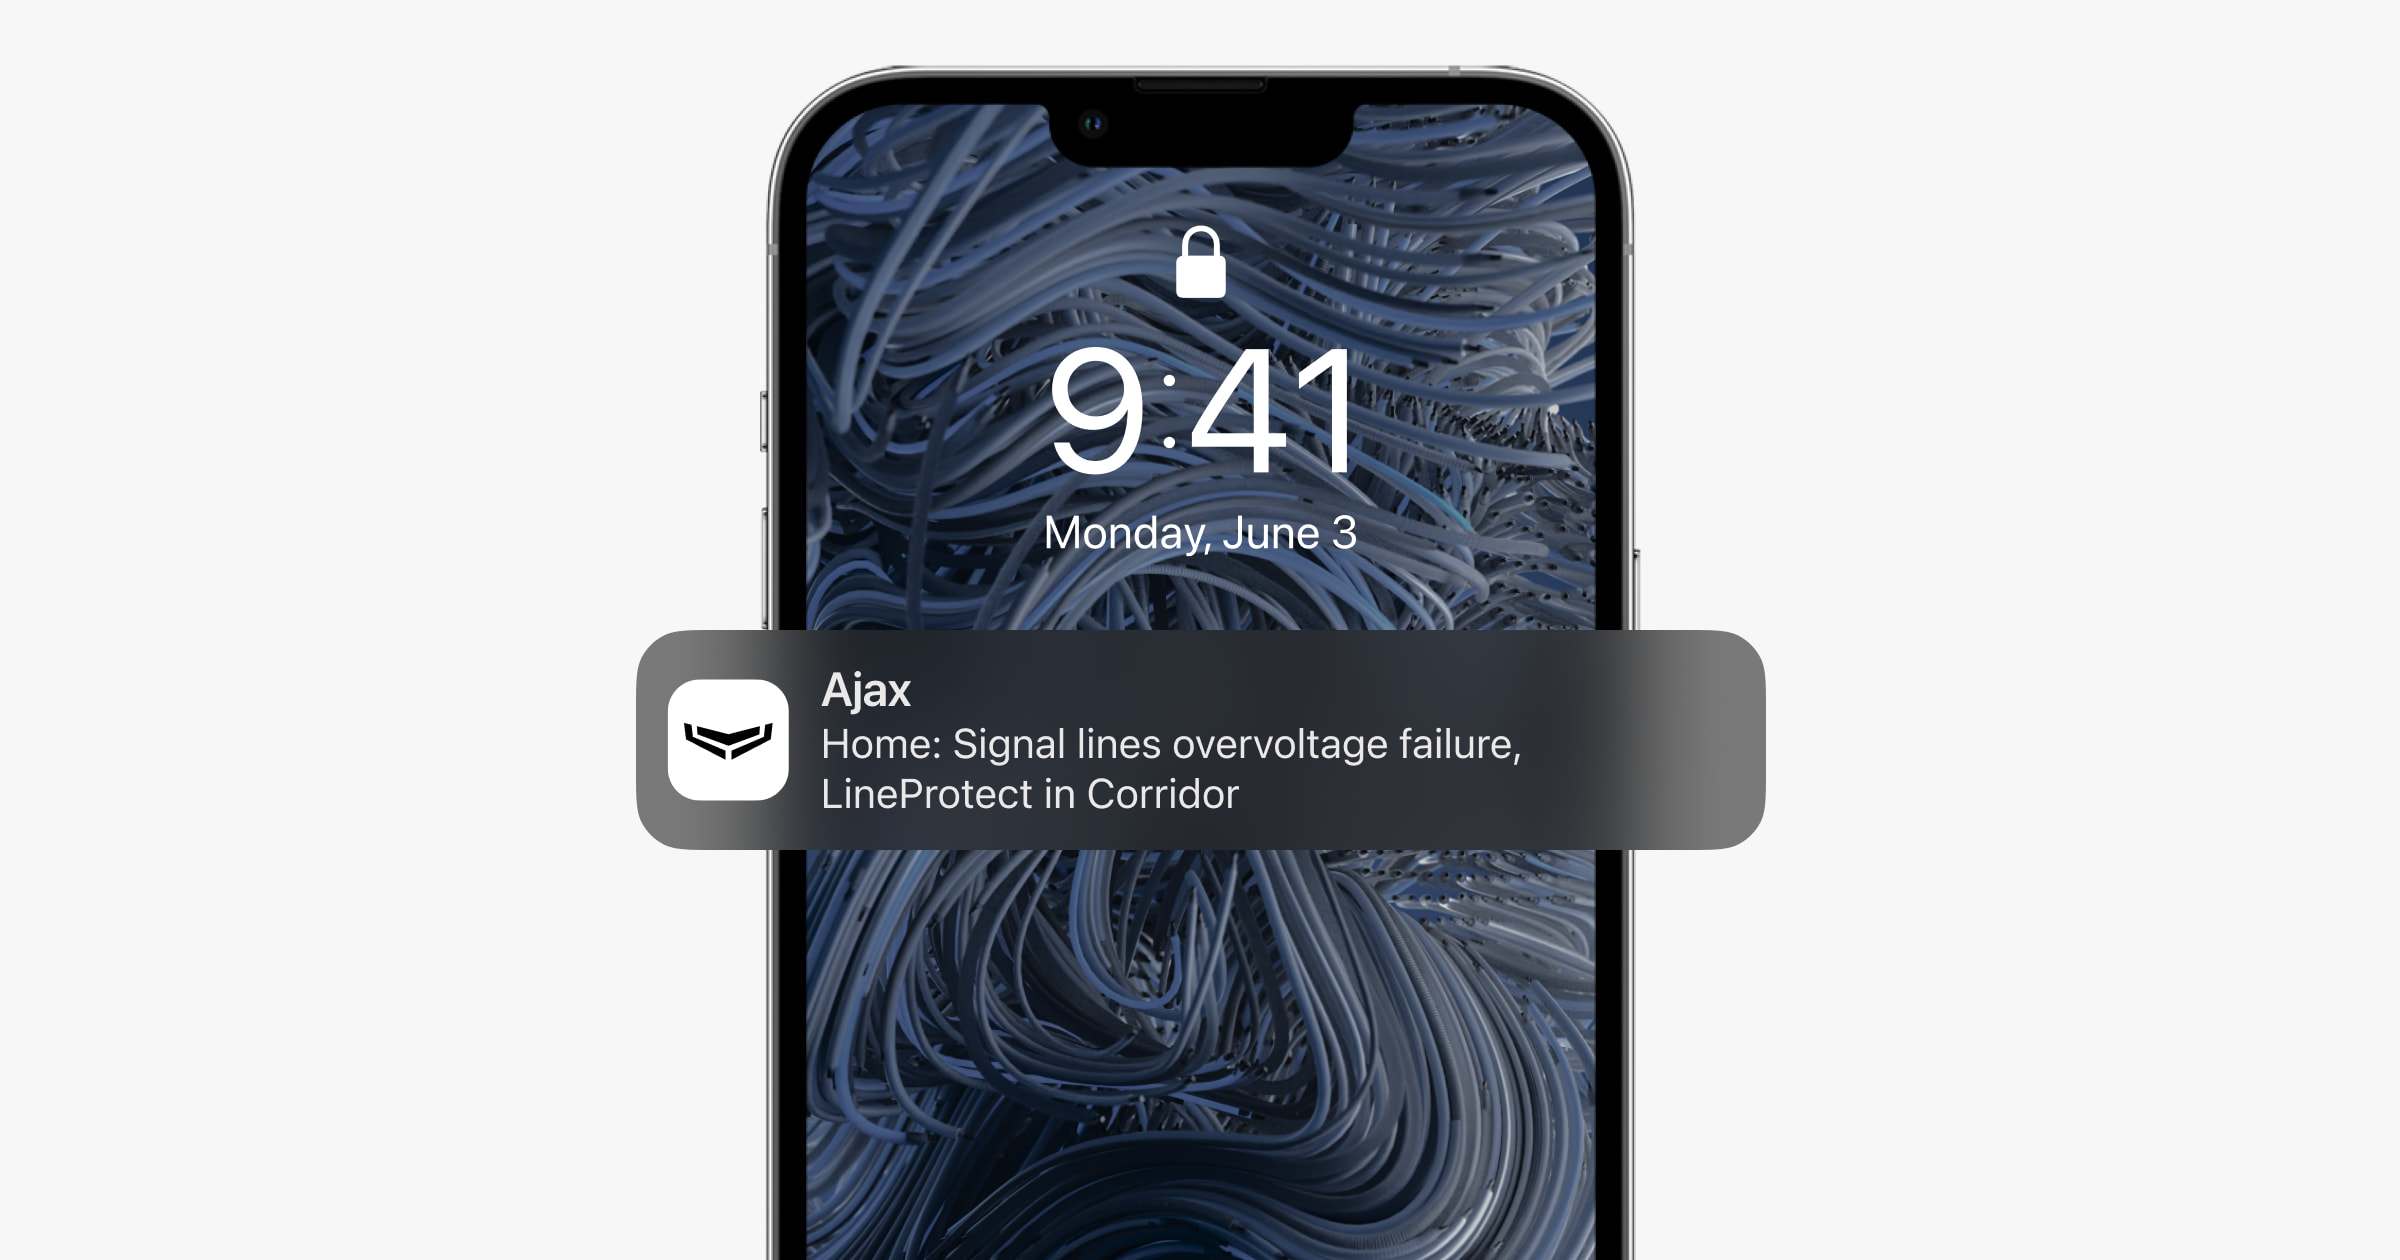
- Overvoltage on the Fibra signal lines.
LineProtect distinguishes the intervention type, and the system sends the corresponding notification to the Ajax apps.
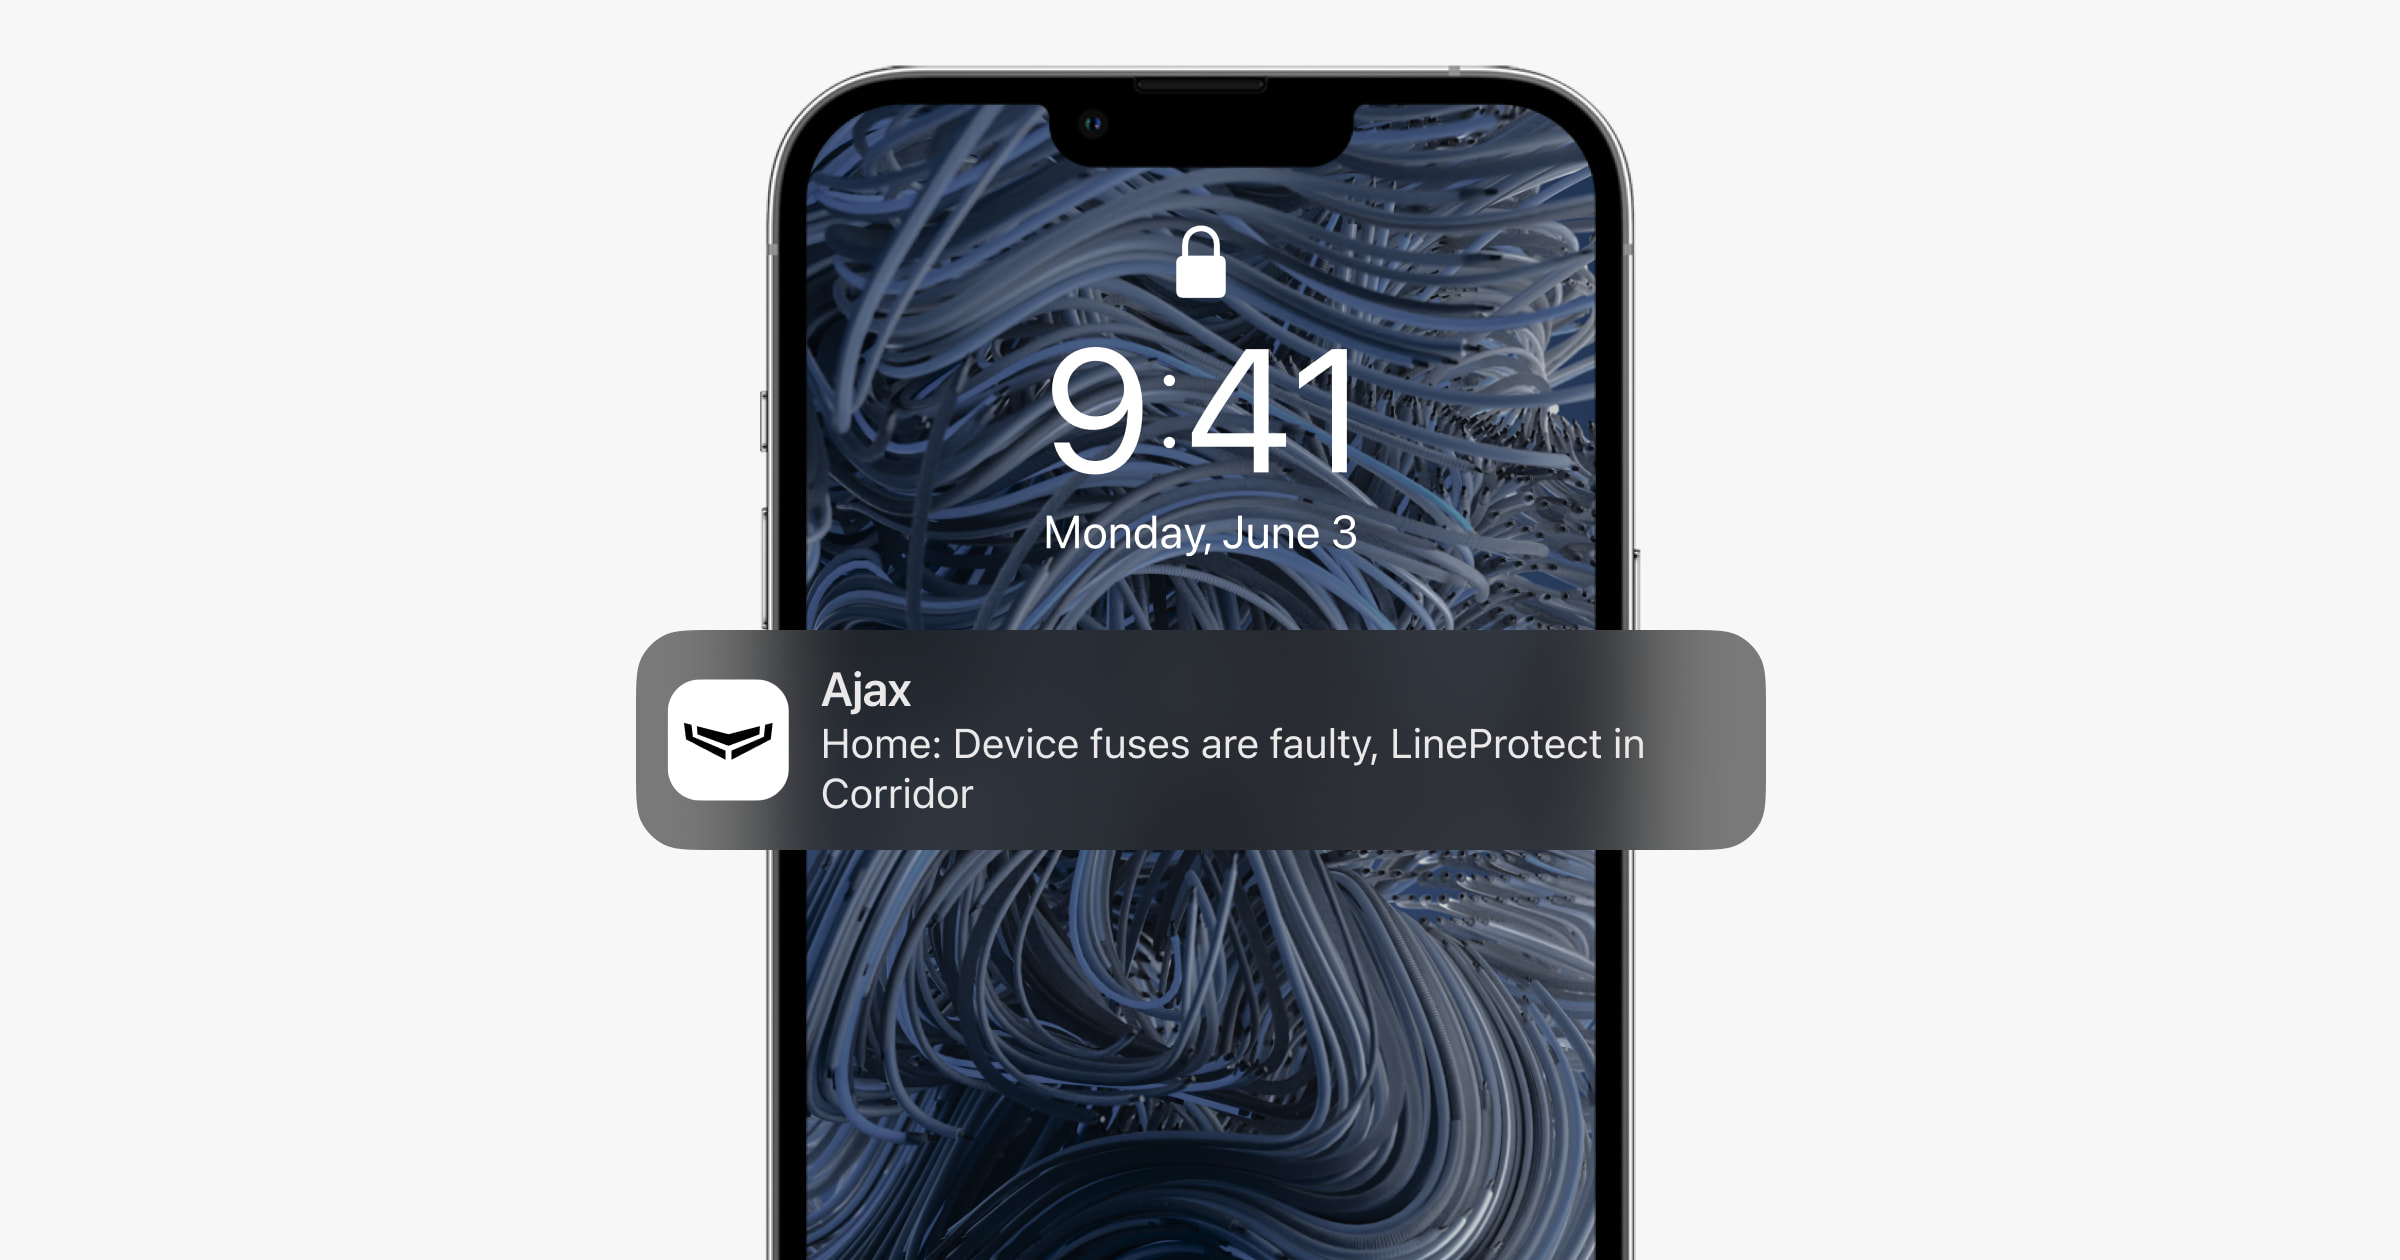
Fuses are triggered if an abnormal voltage is supplied on the Fibra line. In this case, LineProtect can fail, so it needs to be replaced. The users and the security company will receive the corresponding notification.
Fibra data transfer protocol
The module uses Fibra technology to transmit alarms and events. It is a wired data transfer protocol for fast and reliable two-way communication between the hub and connected devices.
Sending events to the monitoring station
The Ajax system transmits alarms to the PRO Desktop monitoring app, as well as to the central monitoring station (CMS) using SurGard (Contact ID), SIA (DC-09), ADEMCO 685, and other protocols.
LineProtect can transmit the following events:
- Tamper alarm and turning off the alarm.
- Low supply voltage and voltage return to normal values.
- Loss and restoration of communication between LineProtect and the hub.
- Permanent deactivation and activation of the device.
- One-time deactivation and activation of the device.
- Short circuit on the Fibra line and power supply restoration.
- Overvoltage on the Fibra signal lines and voltage return to normal values.
- Faulty fuse.
When an alarm is received, the CMS operator knows exactly what happened and where to send the rapid response team. The Ajax devices are addressable, meaning that PRO Desktop app and CMS receive events, device type, assigned name, and location (room, group). The list of transmitted parameters may differ depending on the CMS type and the selected communication protocol.
You can find the device ID, loop (zone) number, and line number in the device States.
Selecting the installation site
LineProtect is installed in front of potentially vulnerable devices. An intruder can directly electrocute a street siren or a keypad in a public space.
The module protects devices installed between LineProtect and the hub, as well as the hub itself. However, the module does not protect devices that have been directly subjected to high voltage.
When choosing a spot to install LineProtect, consider the parameters that affect the operation of the device:
- Fibra signal strength.
- The length of the cable for connecting LineProtect.
- The length of the cable for connecting wired devices to LineProtect.
Follow these recommendations when designing the Ajax system project for an object. Only professionals should design and install the security system. The list of authorized Ajax partners is available here.
Installing into Case
We recommend installing LineProtect into Case. The casing is sold separately and available in multiple versions. Installing a single module, several modules, or several other devices into Case is possible.
Case has mounts for the modules, wire channels, and a tamper that connects to the board of LineProtect.
LineProtect cannot be installed
- Outdoors. It can damage the module.
- Inside premises where temperature and humidity values do not correspond to the operating parameters. It can damage the module.
- In places with low or unstable Fibra signal strength.
Fibra signal strength
Fibra signal strength is the ratio of undelivered or corrupted data packages to those expected over a specific time. The icon ![]() in the Devices
in the Devices ![]() tab in Ajax apps indicates the signal strength:
tab in Ajax apps indicates the signal strength:
- Three bars — excellent signal strength.
- Two bars — good signal strength.
- One bar — low signal strength; stable operation is not guaranteed.
- Crossed out icon — no signal; stable operation is not guaranteed.
Lines Power Test
The test simulates the maximum energy consumption of devices connected to the hub. If the system passes the test successfully, all its devices have enough power in any situation.
During the test, LineProtect calibrates its output to the appropriate voltage. After calibration, the device becomes more sensitive to detecting sabotage, including short circuit. If you change the system configuration, you need to repeat the lines power test to recalibrate the device according to the new network characteristics.
After the test, the app displays a notification with the status of each line:
- Test passed.
- Test passed with malfunctions.
- Test failed.
Designing the system project
It is crucial to properly design the system project to install and configure the devices correctly. The project must consider the number and types of devices at the object, their exact location and installation height, the length of wired Fibra lines, the cable type, and other parameters. Read the article to learn tips for designing the Fibra system project.
LineProtect can be connected at any point of the Fibra line. The output line of the device can have a length of up to 2,000 meters when connected using the U/UTP cat.5 twisted pair cable. Different types of devices can be connected to the output Fibra line. For example, you can use opening detectors, motion detectors, sirens, and keypads. The number of wired devices in the system is limited by the output current of the hub and its specifications. You can connect up to 100 devices to Hub Hybrid.
To provide additional power to the line, install LineSupply Fibra.
Ajax systems support Beam and Ring topologies. However, do not install LineProtect on the Fibra line created in a Ring topology.
Cable length and type
Recommended cable types:
- U/UTP cat.5, 4 × 2 × 0.51, copper conductor.
- Signal cable 4 × 0.22, copper conductor.
The wired connection range may vary if you use a different cable type. No other types of cables have been tested.
Verification using a calculator
To ensure that the project is designed correctly and the system will work in practice, we have developed a Fibra power supply calculator. It helps to check the communication quality and cable length for wired Fibra devices when designing the system project.
Preparing for installation
Cable arrangement
When preparing to lay cables, check the electrical and fire safety regulations in your region. Strictly follow these standards and regulations. Tips for cable arrangement are available in the article.
Cable routing
We recommend you carefully read the Selecting the installation site section before installation. Do not deviate from the system project. Violating the basic LineProtect installation rules and the recommendations of this manual may lead to incorrect operation and loss of connection with the device. Tips for cable routing are available in the article.
Preparing cables for connection
Remove the insulating layer and strip the cable with a special insulation stripper. The ends of the wires inserted into the device terminals must be tinned or crimped with a sleeve. It ensures a reliable connection and protects the conductor from oxidation. Tips for preparing the cables are available in the article.
Installation and connection
Connecting LineProtect Fibra to the hub
- Prepare cable holes in advance by carefully breaking out the perforated parts of Case.
- Secure Case with the bundled screws using at least two fixing points. Fix Case at a point with a perforated area so its tamper responds to disassembly attempts.
- Turn off the power of lines in the Ajax PRO app:
- Hub → Settings
 → Lines → Lines Power Supply.
- Hub → Settings
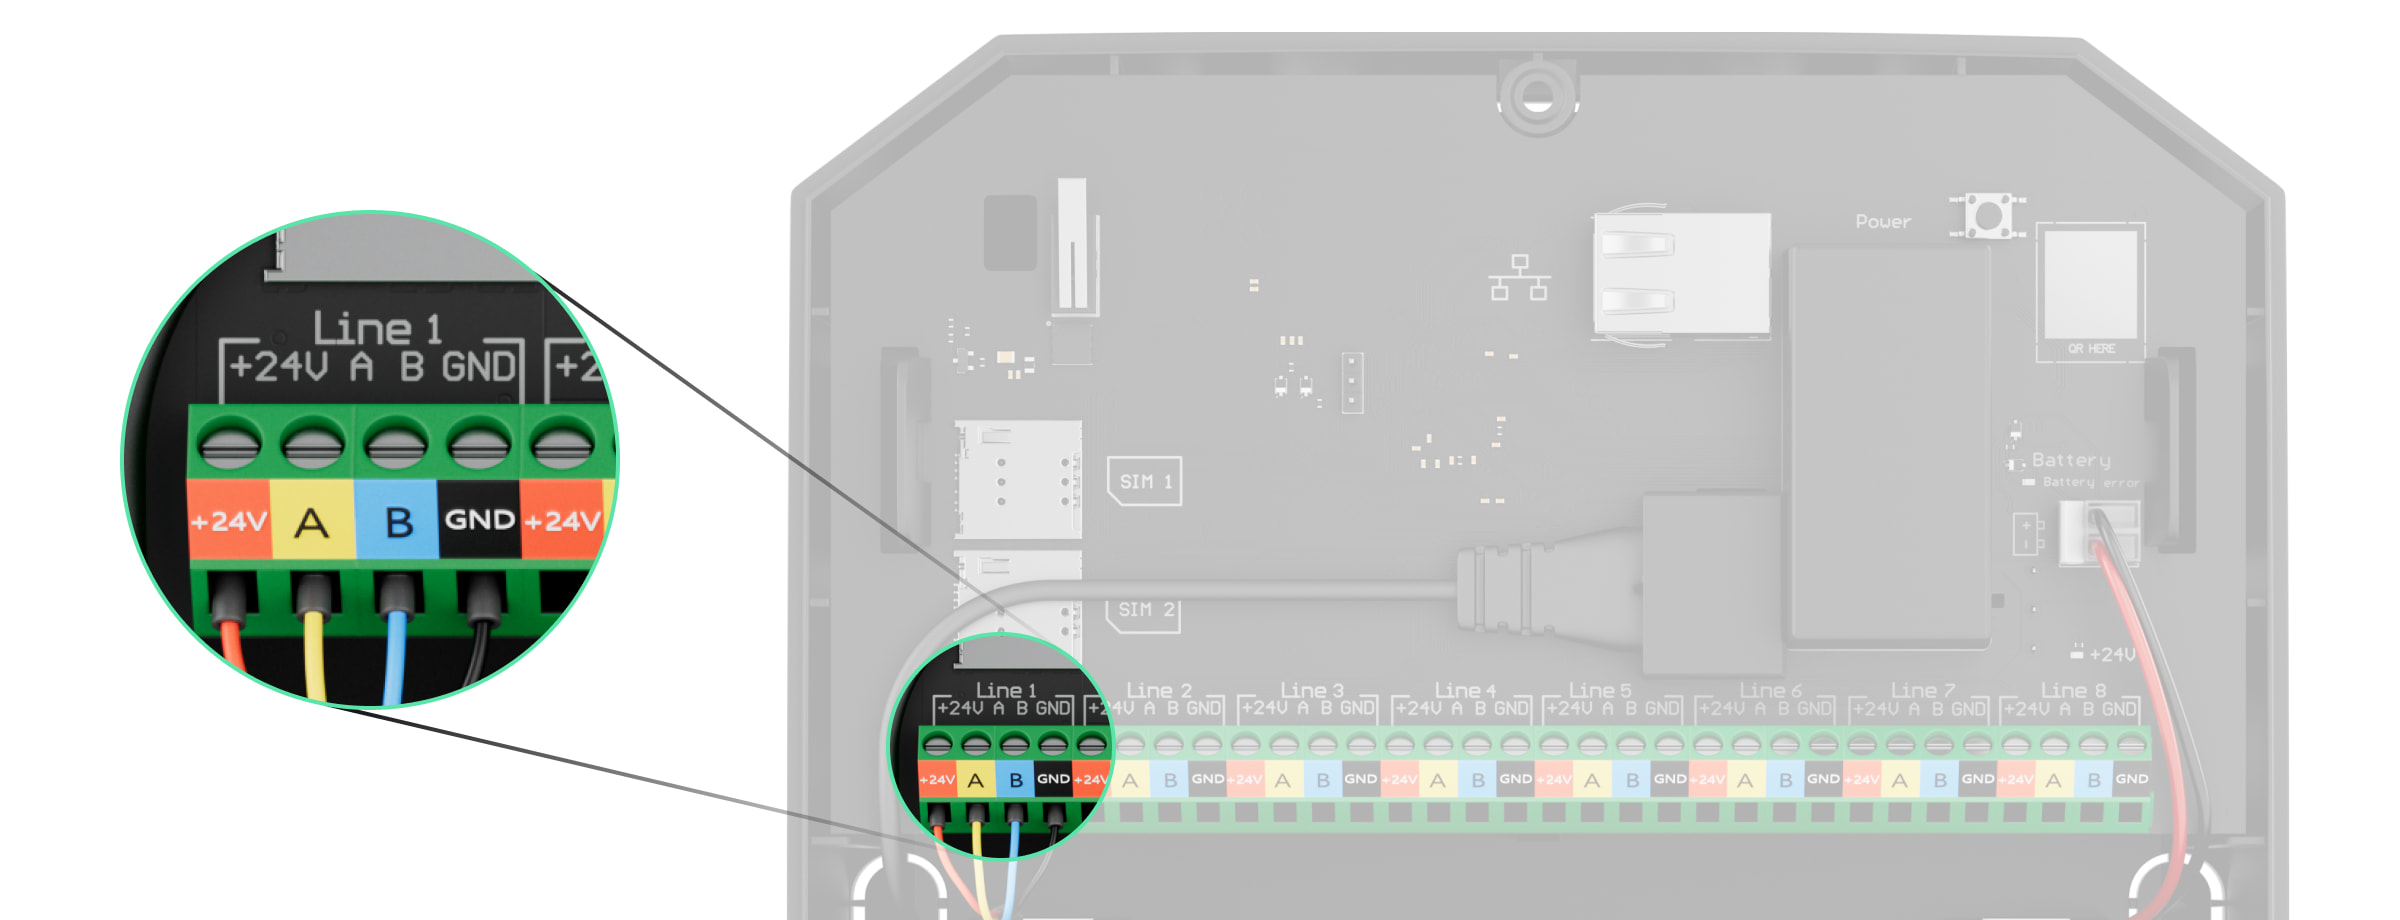
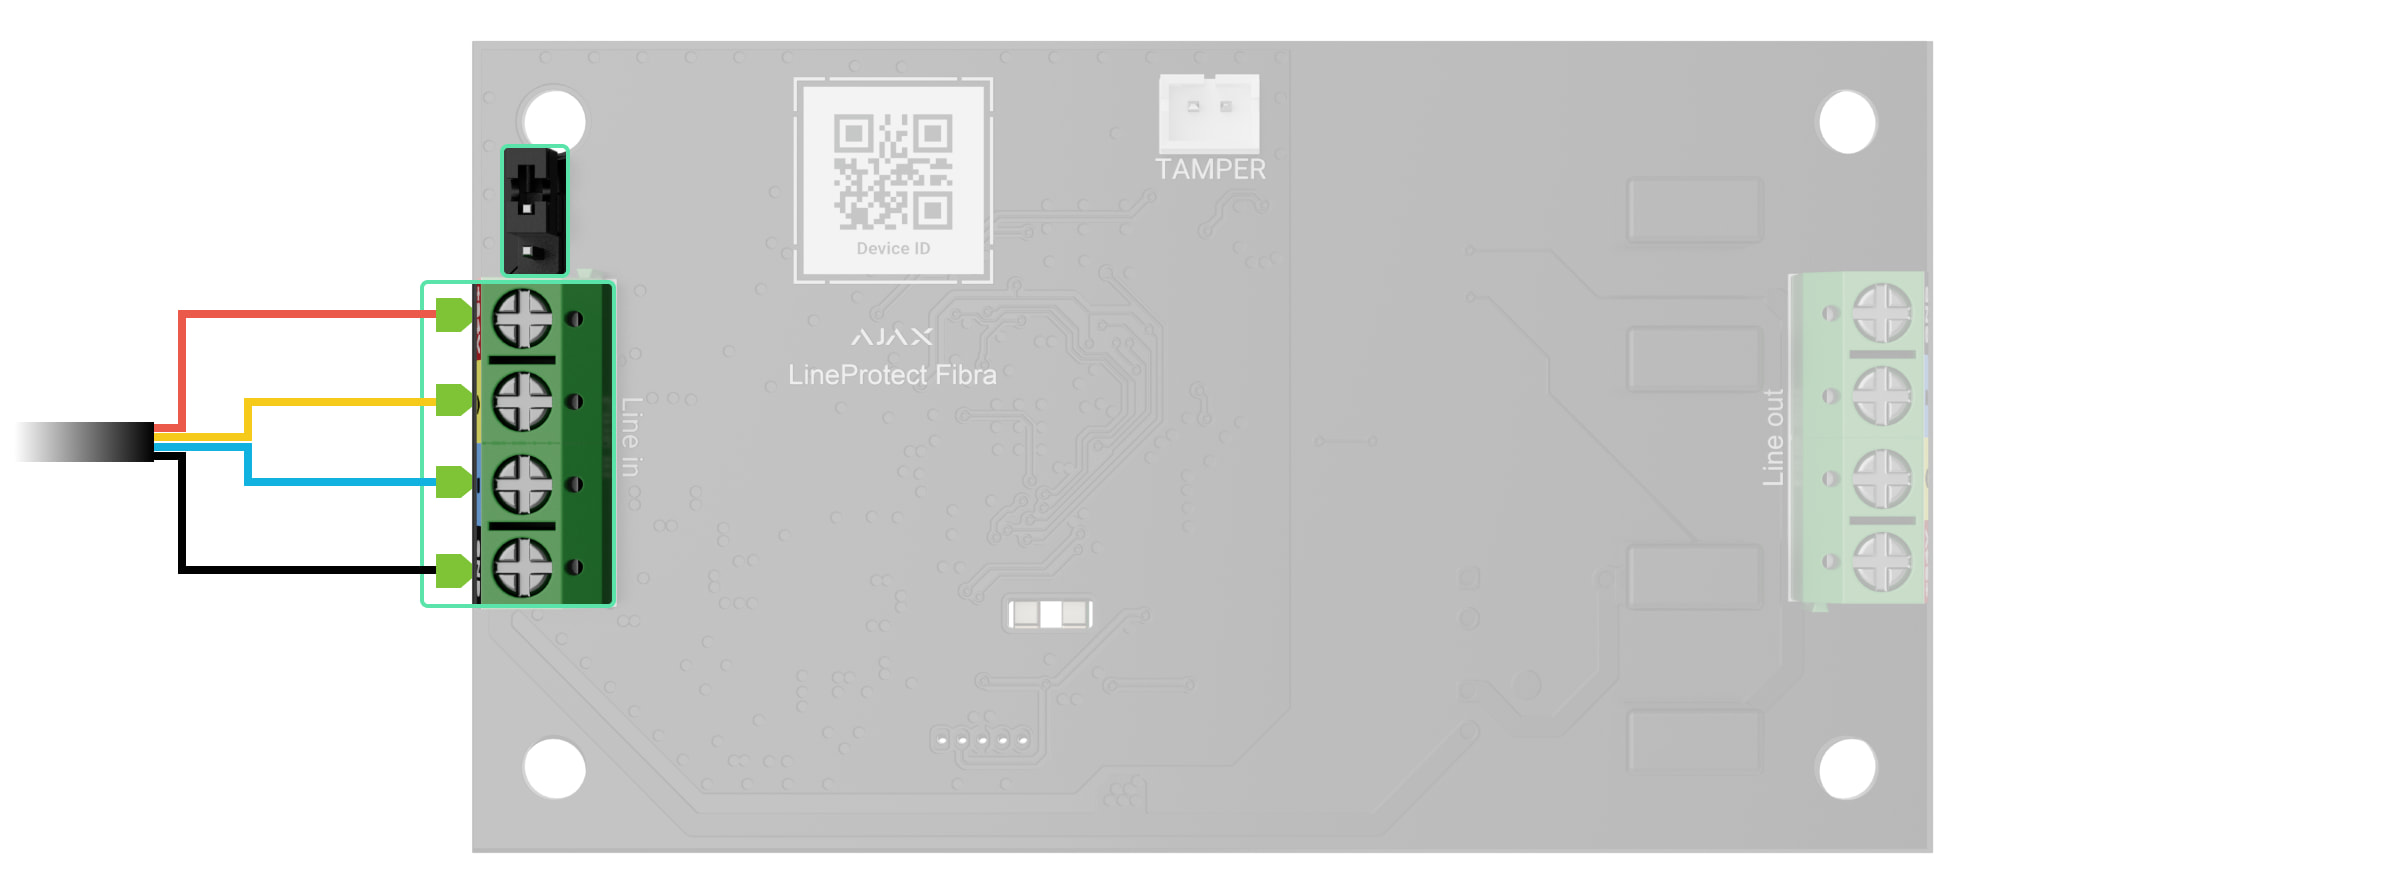
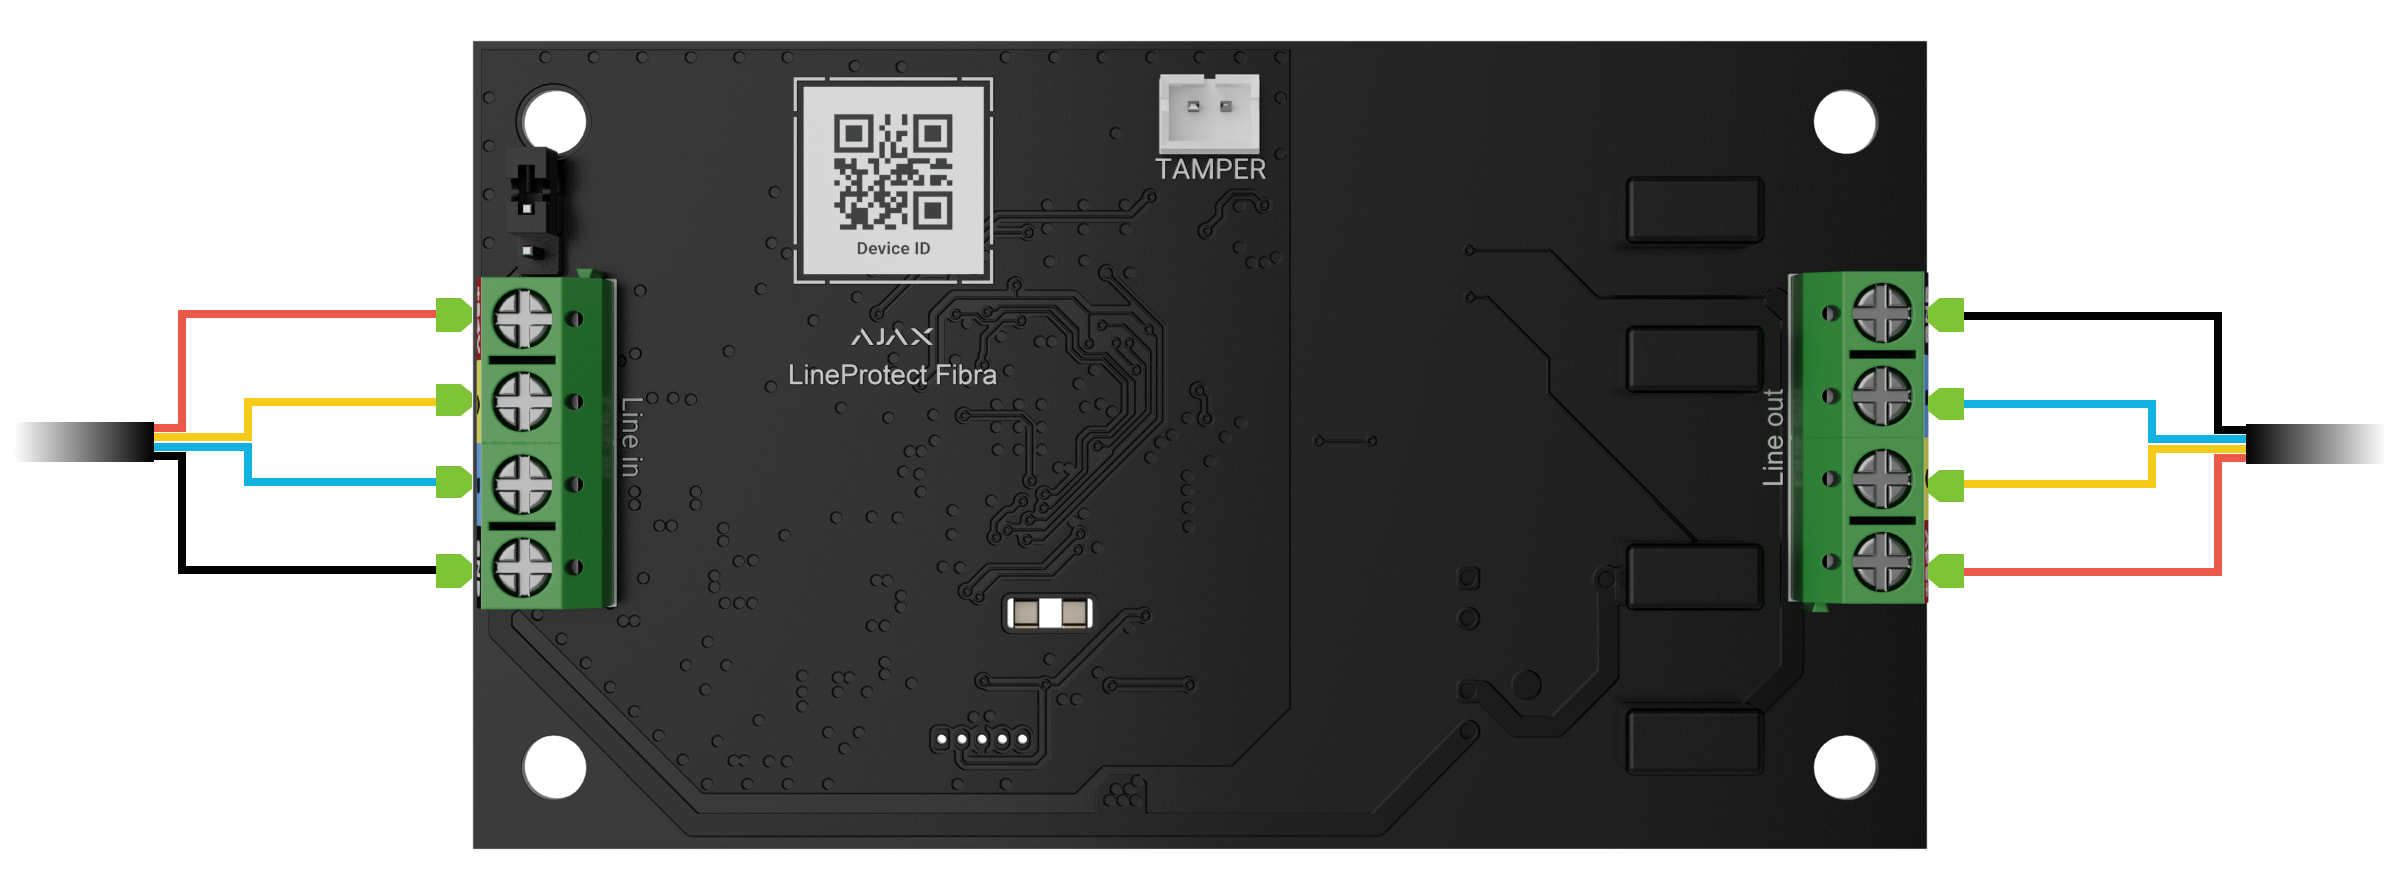
- Route the cable to connect LineProtect to the hub casing. Connect the wires to the required hub line.
+24V — 24 V⎓ power terminal.
A, B — signal terminals.
GND — ground. - Connect the wires to the LineProtect input terminals according to the diagram below. Follow the polarity and connection order of the wires. Securely fasten the cable to the terminals.
- If LineProtect is the last one on the line, install a terminating resistor jumper on the two contacts. Otherwise, the terminating resistor jumper should remain installed on one contact or not be installed.
- If LineProtect is not the last one on the line, connect the device’s wires to the LineProtect output terminals according to the diagram below. Follow the polarity and connection order of the wires. Securely fasten the cable to the terminals.
- Secure the module in Case using holes in the board. Secure the cable with ties.
- Connect the Case tamper to the appropriate module connector.
- Place the lid on the casing and fasten it with the bundled screws.
- Turn on the power supply of lines in the Ajax PRO app:
- Hub → Settings → Lines → Lines Power Supply.
- Hub → Settings
- Add LineProtect to the hub.
- Run the functionality testing.
Adding to the system
LineProtect Fibra is compatible only with Hub Hybrid (2G) and Hub Hybrid (4G). Only verified partners can add and configure Fibra devices in in Ajax PRO apps.
Before adding a device
- Install the Ajax PRO app. Sign in to the PRO account.
- Add a hub compatible with LineProtect to your app. Adjust the settings and create at least one virtual room.
- Ensure the hub is on and has Internet access via Ethernet and/or mobile network. You can do this in the Ajax app.
- Check the hub status in the Ajax app. Make sure the hub is disarmed and does not start updates.
- Make sure LineProtect is physically connected to the hub.
How to add LineProtect Fibra
Two ways to add devices are available in the Ajax PRO app: automatically and manually.
- Open the Ajax PRO app. Select the hub to which you want to add LineProtect Fibra.
- Go to the Devices tab and click Add Device.
- Select Add All Fibra Devices. The hub will scan the Fibra lines. After scanning, all devices connected to the hub that still need to be added to the system will be shown.
- Select the device from the list. After pressing, the LED indicator will flash to identify this device.
- Set the device name, and specify the room and security group if Group Mode is enabled. Press Save.
If the connection fails, check the wired connection’s correctness and try again. If the maximum number of devices (100 for Hub Hybrid) has already been added to the hub, you will receive an error notification while adding.
LineProtect only works with one hub. The module stops exchanging data with the previous hub when pairing with a new one. When LineProtect is added to a new hub, it remains in the list of devices on the previous hub. You can remove it manually.
Functionality testing
Available for LineProtect:
- Fibra Signal Strength Test — to determine the strength and stability of the signal at the device installation site.
- Lines Power Test — to determine if there is enough power for all devices connected to the hub and calibrate the protection threshold.
Icons
The icons show some statuses of the device. You can check them in the Ajax apps:
- Select a hub in the Ajax app.
- Go to the Devices tab.
- Find LineProtect in the list.
| Icon | Meaning |
|
Fibra Signal Strength — displays the signal strength between the hub and the module. Recommended values: 2–3 bars. |
|
|
LineProtect is permanently deactivated. |
|
|
In LineProtect, events of tamper triggering are permanently disabled. |
|
| LineProtect is deactivated for one arming cycle. | |
| In LineProtect, events of tamper triggering are disabled for one arming cycle. |
States
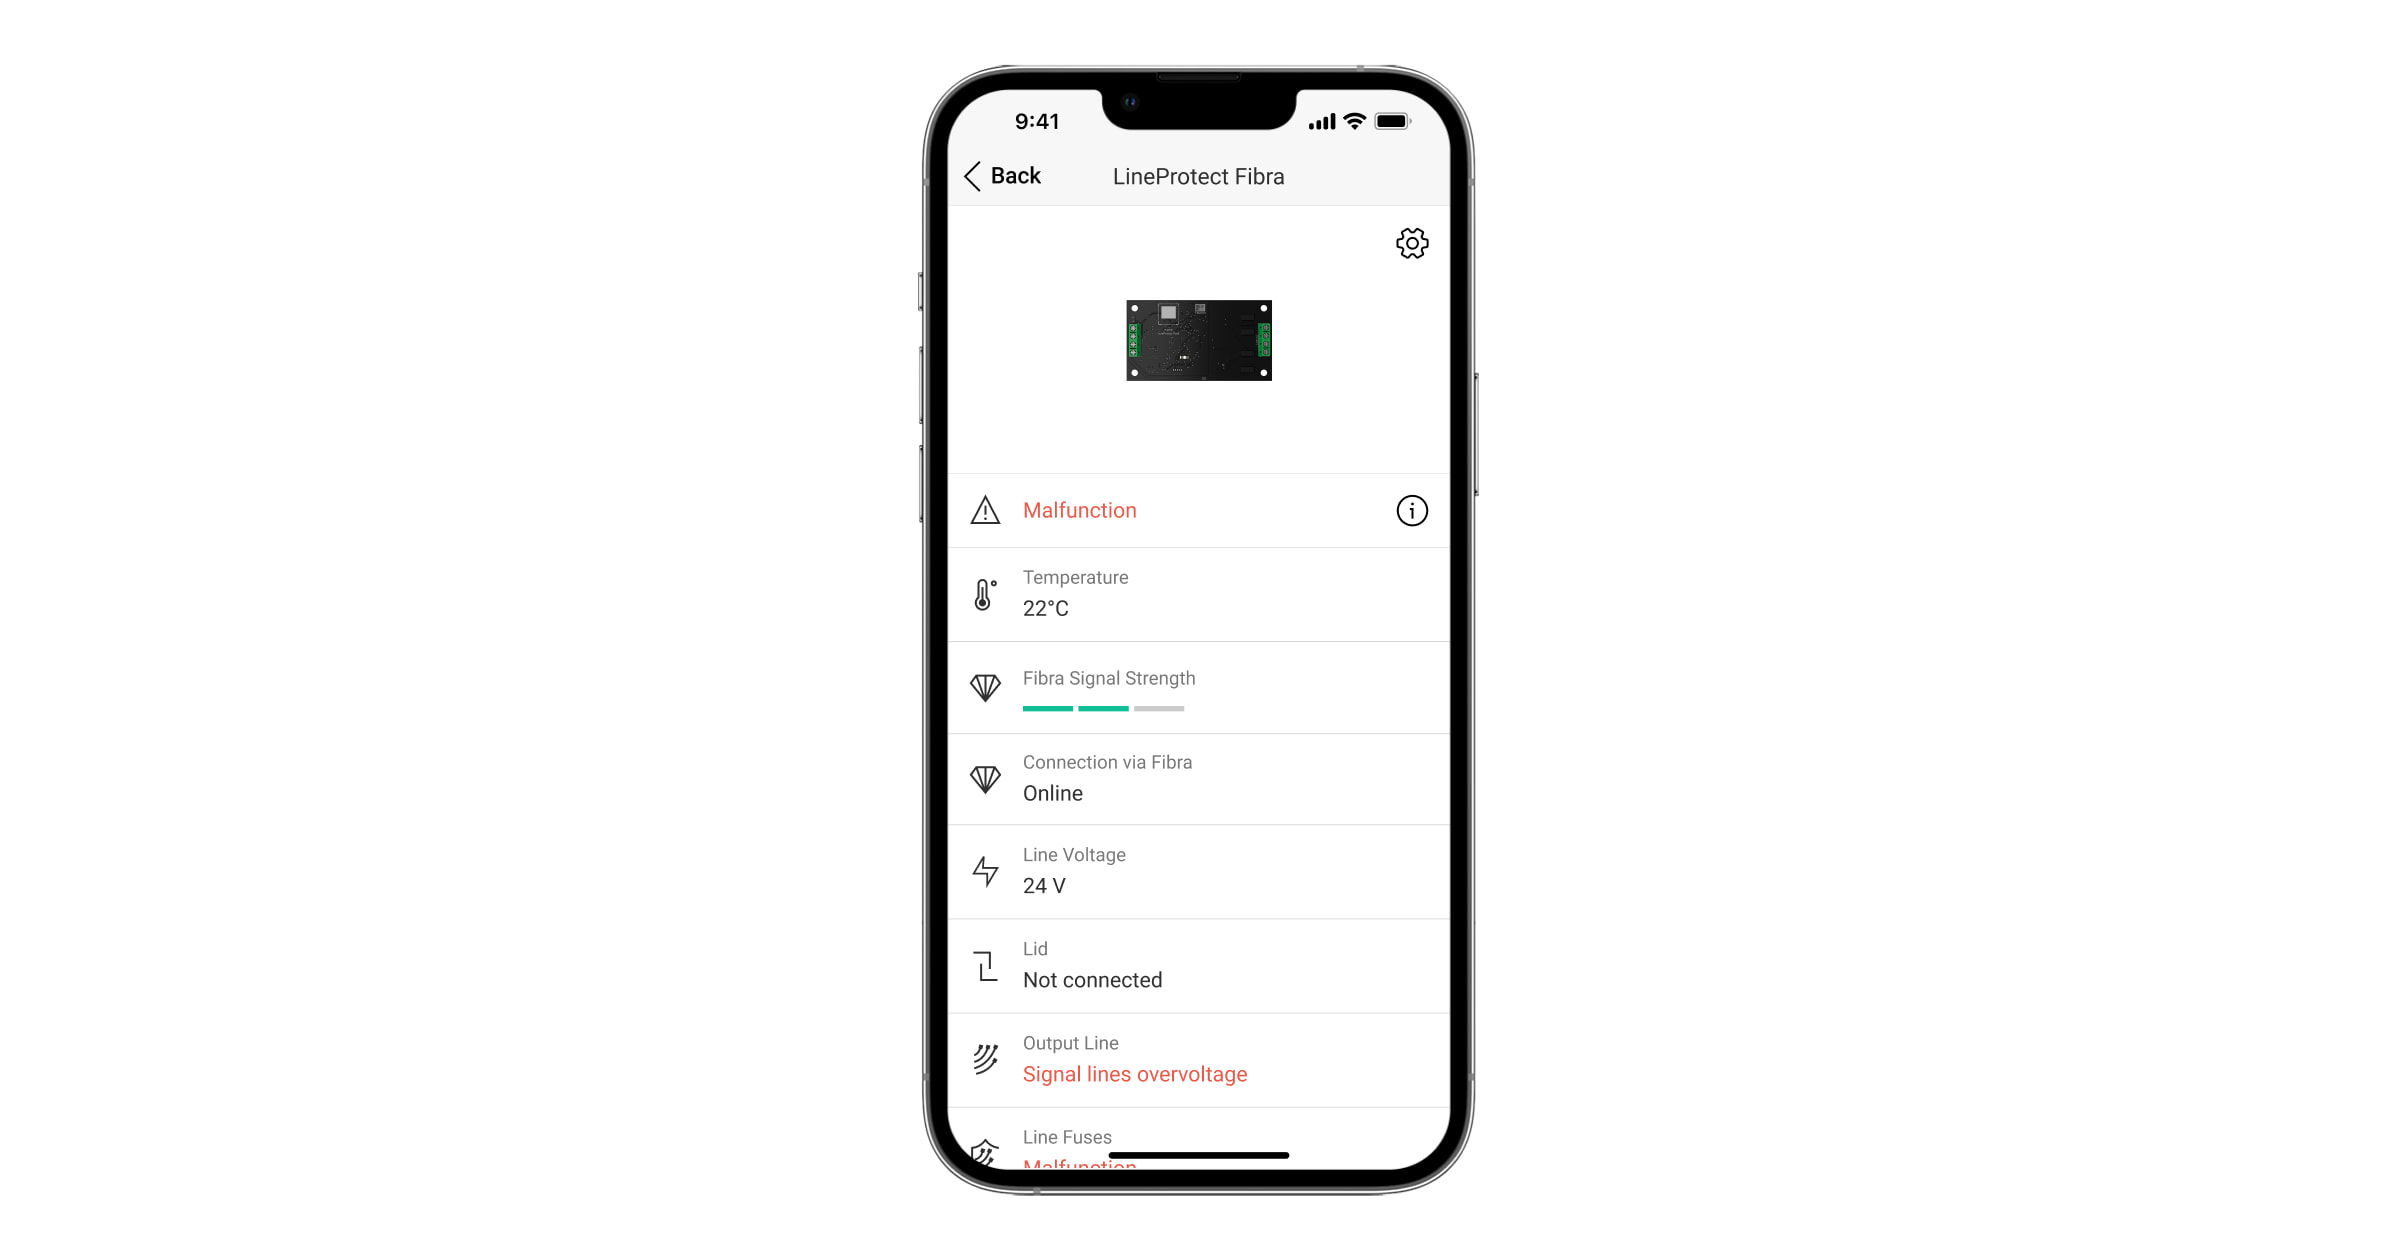
The states display information about the device and its operating parameters. You can check the LineProtect states in the Ajax apps:
- Select a hub in the Ajax app.
- Go to the Devices tab.
- Select LineProtect from the list of devices.
| Parameter | Meaning |
| Temperature |
Module temperature. The acceptable error between the value in the app and the temperature at the installation site: 2 °C. The value is updated as soon as the module detects a temperature change of at least 1 °C. You can create a scenario by temperature to control automation devices. |
| Fibra Signal Strength |
Signal strength between the hub and LineProtect Fibra. Recommended values: 2–3 bars. Fibra is a protocol for transmitting events and alarms. |
| Connection via Fibra | The status of connection between the hub and the module:
|
| Line Voltage | The voltage value on the Fibra line to which the module is connected. |
| Lid | The tamper status that responds to the detachment of the device from the surface or violation of the device’s casing integrity:
|
| Output Lines | Shows the output line status:
|
| Line Fuses | The status is shown after line fuses triggering:
|
| Permanent Deactivation | Shows the status of the device permanent deactivation function:
|
| One-Time Deactivation | Shows the status of the device deactivation for one arming cycle function:
|
| Firmware | LineProtect firmware version. |
| Device ID | LineProtect ID/Serial Number. Also available on the device board and its packaging. |
| Device No. | LineProtect loop (zone) number. |
| Line No. | The Fibra line number of the hub to which LineProtect is connected. |
Settings
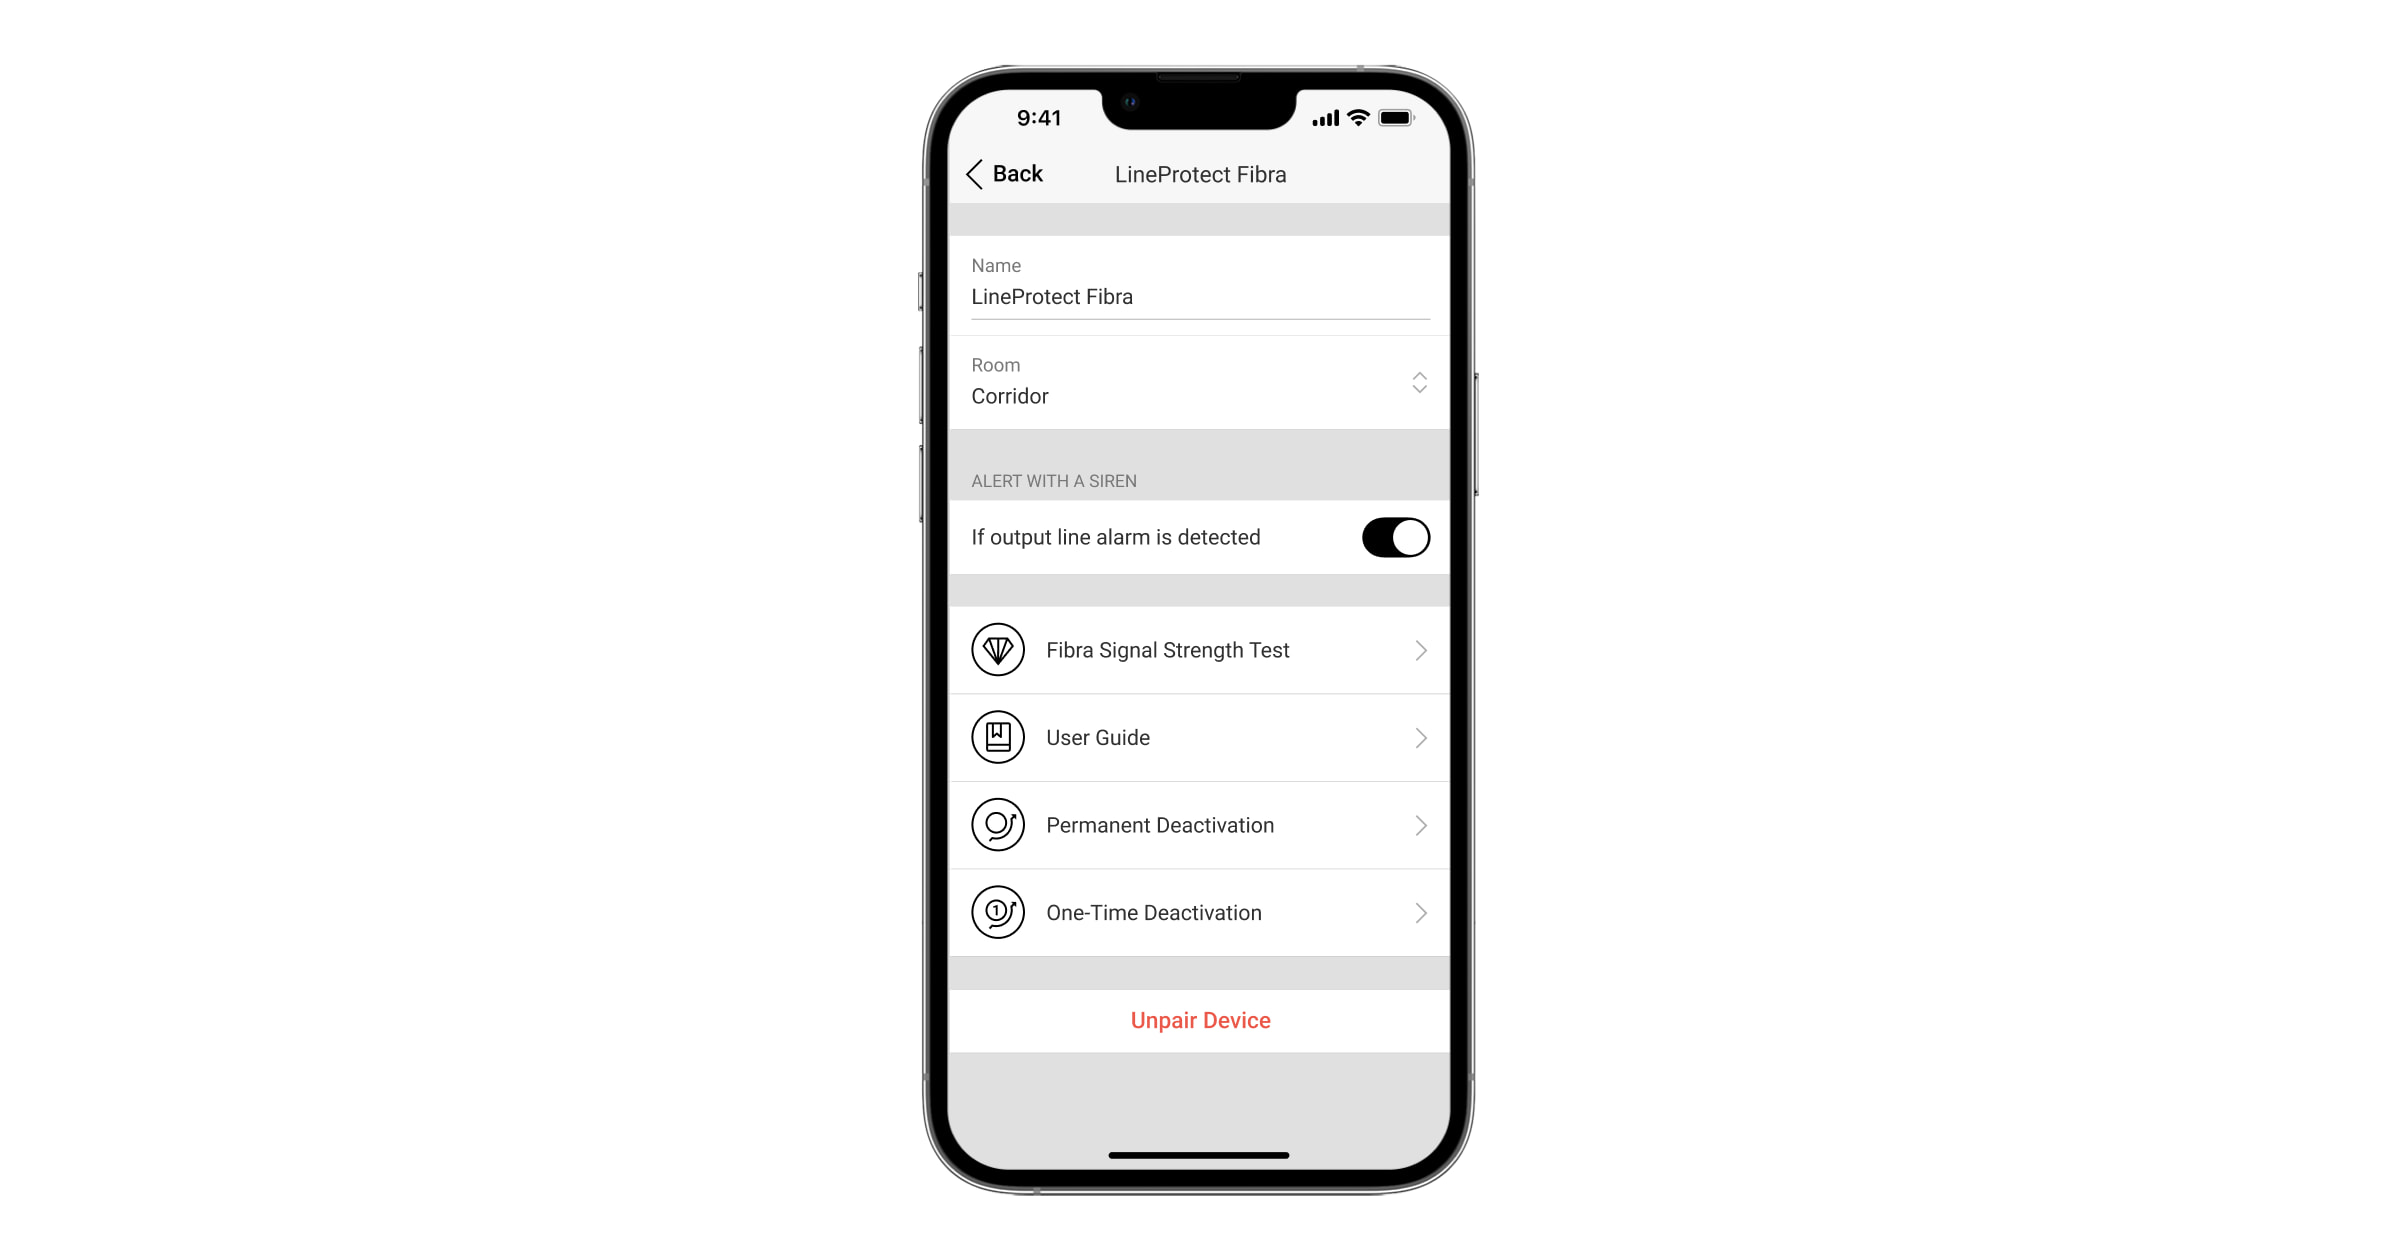
To change module settings in an Ajax app:
- Go to the Devices tab.
- Select LineProtect from the list.
- Go to Settings by clicking on the gear icon .
- Set the required parameters.
- Click Back to save the new settings.
| Settings | Meaning |
| Name |
Name of the module. Displayed in the list of hub devices, text of SMS and notifications in the events feed. To change the name of the module, click on the text field. The name can contain up to 12 Cyrillic characters or up to 24 Latin characters. |
| Room |
Selection of the LineProtect virtual room. The room name is displayed in SMS and notifications in the events feed. |
| Alert with a siren if output line alarm is detected | When the toggle is enabled, the siren activates when the output line alarm is detected. |
| Fibra Signal Strength Test |
Puts the module into the Fibra Signal Strength Test mode. The test allows you to check the signal strength between the hub and LineProtect via the wired Fibra data transfer protocol to select the optimal installation site. |
| User Guide | Opens LineProtect User Manual in an Ajax app. |
| Permanent Deactivation |
Allows the user to disable the device without removing it from the system. Three options are available:
|
| One-Time Deactivation |
Allows the user to disable the device for one arming cycle without removing it from the system. Three options are available:
|
| Unpair Device | Unpairs LineProtect from the hub and deletes its settings. |
Indication
| Event | Indication | Note |
| Adding a module |
When added automatically — the green LED flashes quickly when LineProtect is selected from the list. When you click Add device, the green LED flashes once. When added manually — the green LED flashes once. |
|
| Removing the module | The green LED flashes six times. | |
| Tamper triggering | The green LED flashes once. | |
| Lines Power Test | The green and red LEDs are glowing continuously during the test. | |
| Low voltage on the output line | The green LED lights up smoothly and goes out smoothly. | Voltage of 7 V⎓ or less is considered low. |
| Short circuit on the line | The red LED flashes 4 times per second for 12 seconds. | After 12 seconds, LineProtect attempts to restore power to the output lines. If the fault has not been cleared, the module repeats turning off. The actions are repeated until the correct state of the line is restored. |
| Overvoltage on the line | The red LED flashes 4 times per second for 12 seconds. | After 12 seconds, LineProtect attempts to restore power to the output lines. If the fault has not been cleared, the module repeats turning off. The actions are repeated until the correct state of the line is restored. |
| Faulty fuses | The red LED flashes 4 times per second for 12 seconds. | After 12 seconds, LineProtect attempts to restore power to the output lines. If the fault has not been cleared, the module repeats turning off. The actions are repeated until the correct state of the line is restored. |
Maintenance
The device does not require maintenance.
Warranty
Warranty for Limited Liability Company “Ajax Systems Manufacturing” products are valid for 2 years after purchase. Faulty fuse is not a warranty case.
Please contact Ajax Technical Support first if the device does not function correctly. In most cases, technical issues can be resolved remotely.
Contact Technical Support:

