DoorProtect is a wireless door and window opening detector designed for indoor use. It is capable of detecting more than 2 million* openings. DoorProtect has a socket for connecting an external detector**. The calculated battery life of the detector is up to 7 years from a built-in battery.
The functional element of DoorProtect is a sealed contact reed relay. It consists of ferromagnetic contacts placed in a bulb that form a continuous circuit under the effect of a constant magnet.
DoorProtect operates within the Ajax system, connecting via the protected Jeweller radio protocol. Communication range is up to 1,200 m in the line of sight. Using the uartBridge*** or ocBridge Plus*** integration modules, DoorProtect can be used as part of third party security systems***.
Only Hub 2 Plus Jeweller and Hub 2 (4G) Jeweller are certified according to UL/ULC standards.
The detector is set up via Ajax apps for iOS, Android, macOS and Windows. The app notifies user of all events through push notifications, SMS and calls (if activated).
The Ajax system is self-sustaining, but the user can connect it to the central monitoring station of a private security company.
* 6,000 openings are evaluated by UL.
** Must be UL certified.
*** Not evaluated by UL.
Functional elements
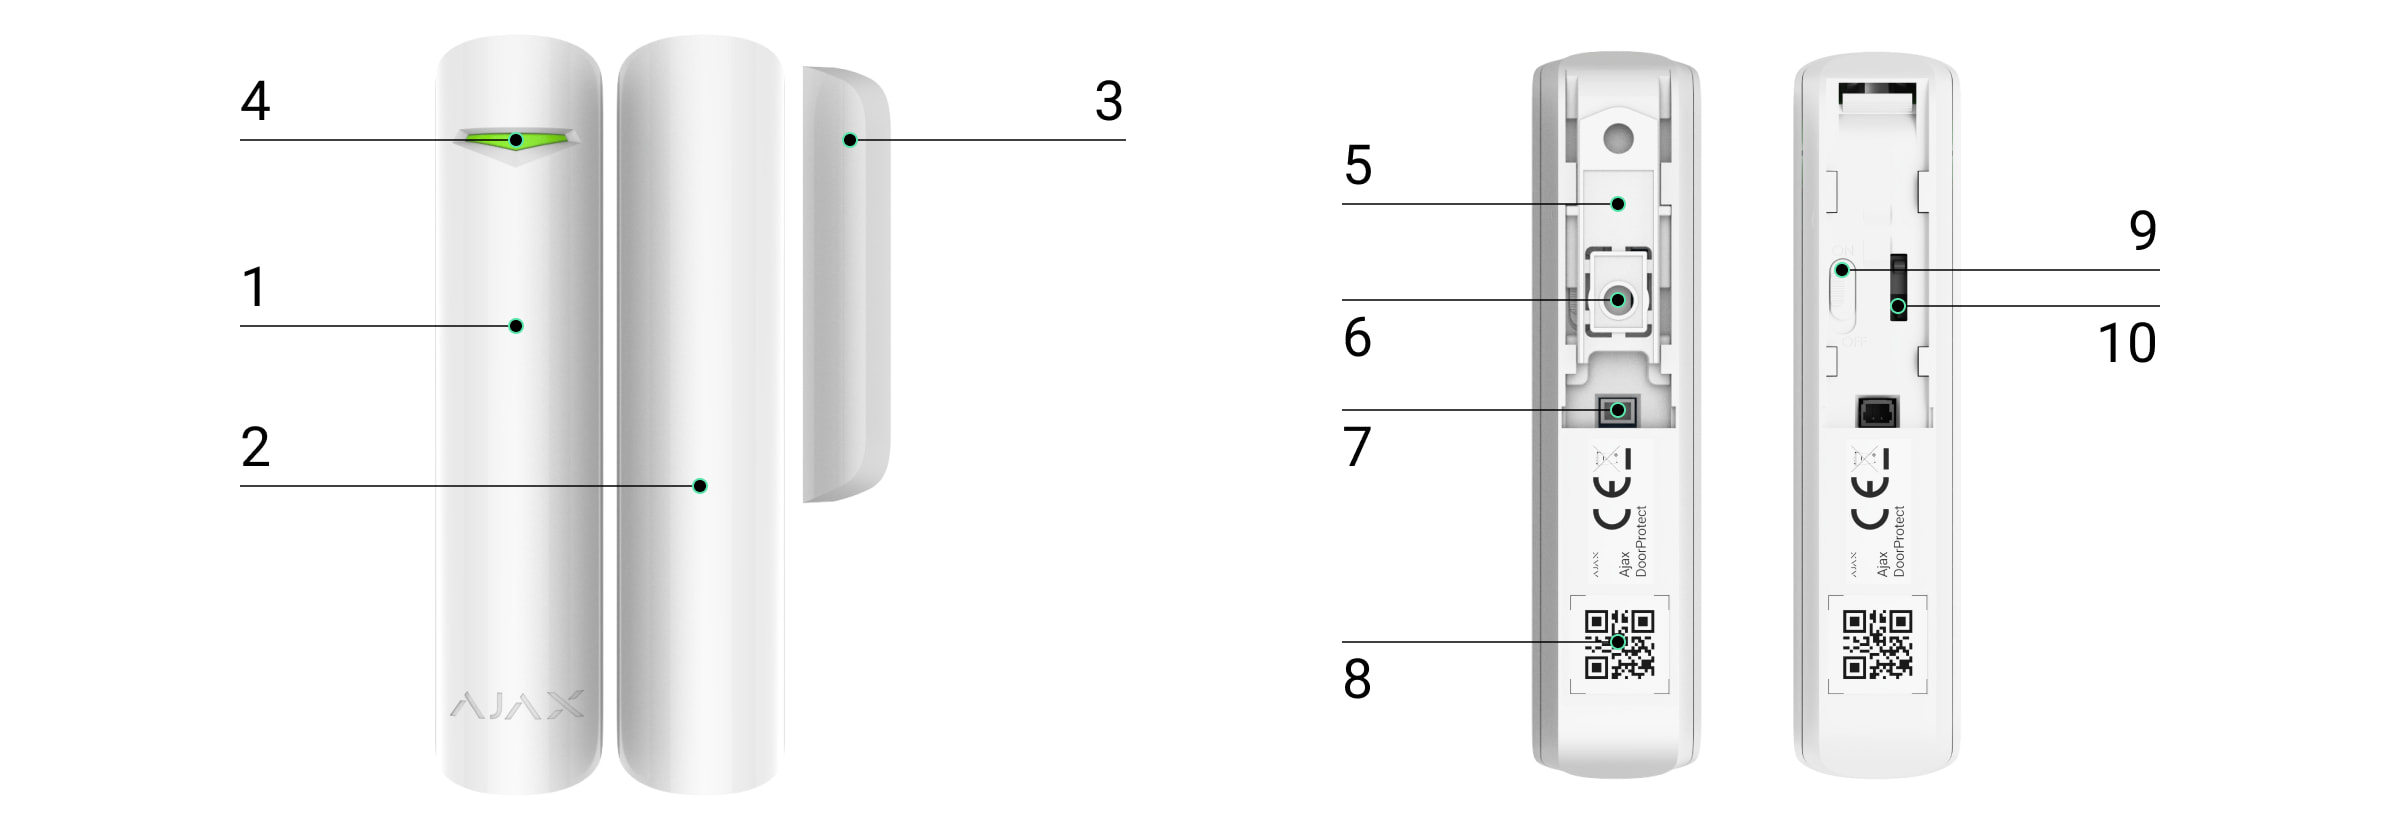
- DoorProtect opening detector.
- Big magnet. It operates at a distance of up to 2 cm from the detector and should be placed to the right of the detector.
- Small magnet. It operates at a distance of up to 1 cm from the detector and should be placed to the right of the detector.
- LED indicator
- SmartBracket mountin panel. To remove it, slide the panel down.
- Perforated part of the mounting panel. It is required for the tamper triggering in case of any attempt to dismantle the detector. Don’t break it out.
- Socket for connecting a third-party wired detector with an NC contact type
- QR code with the device ID to add the detector to an Ajax system.
- Device on/off button.
- Tamper button. Triggered when there is an attempt to tear the detector off the surface or remove it from the mounting panel.
Operating principle
DoorProtect consists of two parts: the detector with a sealed contact reed relay, and the constant magnet. Attach the detector to the door frame, while the magnet can be attached to the moving wing or sliding part of the door. If the sealed contact reed relay is within the coverage area of the magnetic field, it closes the circuit, which means that the detector is closed. The opening of the door pushes out the magnet from the sealed contact reed relay and opening the circuit. In such a way, the detector recognizes the opening.
Attach the magnet to the RIGHT of the detector.
A small magnet works at a distance of 1 cm, and the big one — up to 2 cm.
After actuation, DoorProtect immediately transmits the alarm signal to the hub, activating the sirens and notifying the user and security company.
Pairing the Detector
Before starting pairing
- Following the hub instruction recommendations, install the Ajax app on your smartphone. Create an account, add the hub to the app, and create at least one room.

Only Hub 2 Plus Jeweller and Hub 2 (4G) Jeweller are certified according to UL/ULC standards.
- Switch on the hub and check the internet connection (via Ethernet cable and/or GSM network).
- Make sure that the hub is disarmed and does not update by checking its status in the app.
Only users with administrator rights can add the device to the hub.
How to pair the detector with the hub
- Select the Add Device option in the Ajax app.
- Name the device, scan/write manually the QR Code (located on the body and packaging), and select the location room.

- Select Add — the countdown will begin.
- Switch on the device.

For detection and pairing to occur, the detector should be located within the coverage area of the wireless network of the hub (at the same facility).
The request for connection to the hub is transmitted for a short period of time at the moment of switching on the device.
If pairing with the hub failed, switch off the detector for 5 seconds and retry it.
If the detector has paired with the hub, it will appear in the list of devices in the Ajax app. The update of the detectors statuses in the list depends on the detector ping interval set in the hub settings. The default value is 36 seconds.
States
The states screen contains information about the device and its current parameters. Find the DoorProtect states in the Ajax app:
- Go to the Devices
 tab.
tab. - Select DoorProtect from the list.
| Parameter | Value |
| Data import | Displays the error when transferring data to the new hub:
|
| Temperature |
Temperature of the detector. It is measured on the processor and changes gradually. Acceptable error between the value in the app and the room temperature — 2°C. The value is updated as soon as the detector identifies a temperature change of at least 2°C. You can configure a scenario by temperature to control automation devices |
| Jeweller Signal Strength |
Signal strength between the hub/range extender and the opening detector. We recommend installing the detector in places where the signal strength is 2–3 bars |
| Connection via Jeweller | Connection status between the hub/range extender and the detector:
|
| Transmitter power |
Displays the selected power of the transmitter. The parameter appears when the Max or Attenuation option is selected in the Signal attenuation test menu. |
| ReX range extender name |
Radio signal range extender connection status. Displayed when the detector works via radio signal range extender |
| Battery Charge |
Battery level of the device. Displayed as a percentage |
| Lid | The tamper state, which reacts to detachment or damaging of the detector body |
| Opening sensor | Status of the detector’s opening sensor:
|
| External Contact | The status of the external detector connected to DoorProtect |
| Always Active |
If the option is active, the detector is always in armed mode and notifies about alarms |
| Chime |
When enabled, a siren notifies about opening detectors triggering in the Disarmed system mode |
| Permanent Deactivation | Shows the status of the device permanent deactivation function:
|
| Alarm Reaction | |
| Operating Mode | Shows how the detector reacts to alarms:
|
| Delay When Entering, sec |
Entry delay (alarm activation delay) is the time you have to disarm the security system after entering the room |
| Delay When Leaving, sec |
Delay time when exiting. Delay when exiting (alarm activation delay) is the time you have to exit the room after arming the security system |
| Night Mode Delay When Entering, sec |
The time of Delay When Entering in the Night mode. Delay when entering (alarm activation delay) is the time you have to disarm the security system after entering the premises. |
| Night Mode Delay When Leaving, sec |
The time of Delay When Leaving in the Night mode. Delay when leaving (alarm activation delay) is the time you have to exit the premises after the security system is armed. |
| Firmware | The detector firmware version |
| Device ID | The device identifier |
| Device No. | Number of the device loop (zone) |
Settings
To change the detector settings in the Ajax app:
- Select the hub if you have several of them or if you are using the PRO app.
- Go to the Devices tab.
- Select DoorProtect from the list.
- Go to Settings by clicking on the
 .
. - Set the required parameters.
- Click Back to save the new settings.
| Setting | Value |
| Name |
Detector name that can be changed. The name is displayed in the text of SMS and notifications in the event feed. The name can contain up to 12 Cyrillic characters or up to 24 Latin characters |
| Room | Selecting the virtual room to which DoorProtect is assigned. The name of the room is displayed in the text of SMS and notifications in the event feed |
| Alarm LED indication |
Allows you to disable the flashing of the LED indicator during an alarm. Available for devices with firmware version 5.55.0.0 or higher How to find the firmware version or the ID of the detector or device? |
| Opening sensor | If active, DoorProtect opening sensor reacts to opening/closing |
| External Contact | If active, DoorProtect registers external detector alarms |
| Always Active |
If the option is active, the detector is always in armed mode and notifies about alarms |
| Alert with a siren if opening detected | If active, sirens added to the system are activated when the opening detected |
| Alert with a siren if an external contact is open | If active, sirens added to the system are activated during an external detector alarm |
| Chime Settings |
Opens the settings of Chime. |
| Alarm Reaction | |
| Operating Mode | Specify how this device will react to alarms:
|
| Delay When Entering, sec |
Selecting delay time when entering. Delay when entering (alarm activation delay) is the time you have to disarm the security system after entering the room |
| Delay When Leaving, sec |
Selecting the delay time when exiting. Delay when exiting (alarm activation delay) is the time you have to exit the room after arming the security system |
| Arm in Night Mode | If active, the detector will switch to the armed mode when using the Night mode |
| Night Mode Delay When Entering, sec |
The time of Delay When Entering in the Night mode. Delay when entering (alarm activation delay) is the time you have to disarm the security system after entering the premises. |
| Night Mode Delay When Leaving, sec |
The time of Delay When Leaving in the Night mode. Delay when leaving (alarm activation delay) is the time you have to exit the premises after the security system is armed. |
| Jeweller Signal Strength Test |
Switches the detector to the Jeweller signal strength test mode. The test allows you to check the signal strength between the hub and DoorProtect and determine the optimal installation site |
| Detection Zone Test |
Switches the detector to the detection area test |
| Signal Attenuation Test |
Switches the detector to the signal fade test mode (available in detectors with firmware version 3.50 and later) |
| User Guide | Opens DoorProtect User Guide in the Ajax app |
| Permanent Deactivation |
Allows the user to disconnect the device without removing it from the system. Three options are available:
Learn more about permanent deactivation of devices The system can also automatically deactivate devices when the set number of alarms is exceeded or when the recovery timer expires. |
| Unpair Device | Disconnects the detector from the hub and deletes its settings |
How to set Chime
Chime is a sound signal that indicates the triggering of the opening detectors when the system is disarmed. The feature is used, for example, in stores, to notify employees that someone has entered the building.
Notifications are configured in two stages: setting up opening detectors and setting up sirens.
Detectors settings
- Go to the Devices menu.
- Select the DoorProtect detector.
- Go to its settings by clicking the gear icon in the upper right corner.
- Go to the Chime Settings menu.
- Select the events to be notified by the siren:
- If a door or a window is open.
- If an external contact is open (available if the External Contact option is enabled).
- Select the chime sound (siren tone): 1 to 4 short beeps. Once selected, the Ajax app will play the sound.
- Click Back to save the settings.
- Set up the required siren.
Indication
| Event | Indication | Note |
| Switching on the detector | Lights up green for about one second | |
|
Detector connecting to the hub, ocBridge Plus* and uartBridge* |
Lights up for a few seconds | |
| Alarm / tamper activation | Lights up green for about one second | Alarm is sent once in 5 seconds |
| Battery needs replacing | During the alarm, it slowly lights up green and slowly goes out | Replacement of the detector battery is described in the Battery Replacement manual |
* Not evaluated by UL.
Functionality Testing
The Ajax system allows conducting tests for checking the functionality of connected devices.
The tests do not start immediately but within 36 seconds by default. The starting time depends on the ping interval (the paragraph on “Jeweller” settings in hub settings).
Installing the Detector
Selecting the location
Location of DoorProtect is determined by its remoteness from the hub and presence of any obstacles between the devices hindering the radio signal transmission: walls, inserted floors, large objects located within the room.
The device developed only for indoor use.
Check the Jeweller signal strength at the installation point. With a signal level of one or zero divisions, we do not guarantee the stable operation of the security system. Move the device: even displacing it through 20 centimeters can significantly improve the signal strength. If the detector still has a low or unstable signal level after moving, use a radio signal range extender.
The detector is located either inside or outside of the door case.
When installing the detector in the perpendicular planes (e.g. inside a door frame), use the small magnet. The distance between the magnet and detector should not exceed 1 cm.
When positioning the parts of DoorProtect in the same plane, use the big magnet. Its actuation threshold — 2 cm.
Attach the magnet to the moving part of the door (window) to the right of the detector. The side to which the magnet should be attached is marked with an arrow on the detector’s body. If necessary, the detector may be positioned horizontally.
Detector installation
Before installing the detector, make sure that you have chosen the optimal installation spot and that it complies with the terms of this manual.
In order to install the detector:
-
- Remove the SmartBracket mounting panel from the detector by sliding it down.

- Temporarily fix the detector mounting panel to the selected installation spot using double-sided tape.

Double-sided tape is needed to secure the device only during testing upon installation. Do not use double-sided tape as a permanent fixation—the detector or magnet may unstick and drop. Dropping may cause false alarms or damage the device. And if someone tries to tear the device off the surface, the tamper alarm will not trigger while the detector is secured with tape.
- Fix the detector on the mounting plate. Once the detector is fixed on the SmartBracket panel, the device LED indicator will flash. It is a signal indicating that the tamper on the detector is closed.
If the LED indicator is not activated during installing the detector on SmartBracket, check the tamper status in the Ajax app, the integrity of the fastening, and the tightness of the detector fixation on the panel.
- Fix the magnet on the surface:
- If a large magnet is used: remove the SmartBracket mounting panel from the magnet and fix the panel on the surface with double-sided tape. Install the magnet on the panel.

- If a small magnet is used: fix the magnet on the surface with double-sided tape.
- If a large magnet is used: remove the SmartBracket mounting panel from the magnet and fix the panel on the surface with double-sided tape. Install the magnet on the panel.
- Run Jeweller Signal Strength Test. The recommended signal strength is 2 or 3 bars. One bar or lower does not guarantee stable operation of the security system. In this case, try moving the device: a difference of even 20 cm can greatly improve signal quality. Use the radio signal range extender if the detector has low or unstable signal strength after changing the installation spot.
- Run Detection Zone Test. To check the detector operation, open and close the window or door where the device is installed several times. If the detector doesn’t respond in 5 out of 5 cases during the test, try to change the installation spot or method. The magnet may be too far from the detector.
- Run Signal Attenuation Test. During the test, the signal strength is artificially reduced and increased to simulate different conditions at the installation location. If the installation spot is chosen correctly, the detector will have a stable signal strength of 2-3 bars.
- If the tests are passed successfully, secure the detector and magnet with bundled screws.
- To mount the detector: remove it from the SmartBracket mounting panel. Then fix the SmartBracket panel with bundled screws. Install the detector on the panel.

- To mount a large magnet: remove it from the SmartBracket mounting panel. Then fix the SmartBracket panel with bundled screws. Install the magnet on the panel.

- To mount a small magnet: remove the front panel using a plectrum or plastic card. Fix the part with magnets on the surface; use the bundled screws for this. Then install the front panel on its place.


- To mount the detector: remove it from the SmartBracket mounting panel. Then fix the SmartBracket panel with bundled screws. Install the detector on the panel.
If uses screwdrivers, set the speed to the minimum so as not to damage the SmartBracket mounting panel during installation. When using other fasteners, make sure they do not damage or deform the panel. To make it easier for you to mount the detector or magnet, you can pre-drill the screw holes while the mount is still secured with double-sided tape.
Do not install the detector:
- outside the premises (outdoors);
- nearby any metal objects or mirrors causing attenuation or interference of the signal;
- inside any premises with the temperature and humidity beyond the permissible limits;
- closer than 1 m to the hub.
Connecting a Third-Party Wired Detector*
A wired detector with the NC contact type can be connected to DoorProtect using the outside-mounted terminal clamp.

We recommend to install a wired detector at a distance not exceeding 1 meter (using signal cable 4 × 0.22, copper conductor) — increasing the wire length will increase the risk of its damage and reduce the quality of communication between the detectors.
To lead out the wire from the detector body, break out the plug:

If the external detector is actuated, you will receive a notification.
* Must be UL certified.
- Remove the SmartBracket mounting panel from the detector by sliding it down.
Detector Maintenance and Battery Replacement
Check the operational capability of the DoorProtect detector on a regular basis.
Clean the detector body from dust, spider web and other contaminations as they appear. Use soft dry napkin suitable for equipment maintenance.
Do not use any substances containing alcohol, acetone, gasoline and other active solvents for cleaning the detector.
The battery lifetime depends on battery quality, actuation frequency of the detector and ping interval of the detectors by the hub.
If the door opens 10 times a day and the ping interval is 60 seconds, then the calculated battery life of the detector will be up to 7 years from a built-in battery. Setting the ping interval of 12 seconds, you will reduce the battery life to 2 years.
How long Ajax devices operate on batteries, and what affects this
If the detector battery is discharged, you will receive a notification, and the LED will smoothly light up and go out, if the detector or tamper is actuated.
Technical specifications
Warranty
Warranty for the Limited Liability Company “Ajax Systems Manufacturing” products is valid for 2 years after the purchase and does not apply to the pre-installed battery.
If the device does not work correctly, you should first contact the support service — in half of the cases, technical issues can be solved remotely!
Contact Technical Support:
