
Ajax PRO Desktop is the app for monitoring and administering Ajax systems. Allows you to configure and test devices, manage user access, and monitor and process events and alarms of an unlimited number of Ajax systems.
PRO Desktop can be used in parallel with the PRO mobile app. Installation and service companies can use the app to set up and connect security systems, while security and monitoring companies can use it to organize a Central Monitoring Station (CMS).
Ajax PRO apps types and their capabilities
There are two types of Ajax PRO apps: desktop and mobile.
The PC PRO app is PRO Desktop. This app is available for Windows and macOS. In the PC app, you can create companies, manage their settings, add employees, and manage their rights. PRO Desktop is essential for monitoring and remote configuring of Ajax systems.
The mobile PRO app is Ajax PRO: Tool for Engineers. It is available for smartphones with iOS and Android. The app is convenient for installers. It allows them to create spaces, connect standalone devices (e.g., Ajax cameras, NVRs, or Yale smart locks) and hubs, and manage the settings of available systems from the personal PRO or company account.
| PRO Desktop (PC app) |
Ajax PRO: Tool for Engineers (mobile app) |
|
| Connect devices and set up the system | + | + |
| Connect the space to the company | + | + |
|
Create a company |
+ | — |
| Edit company information | + | — |
|
Add employees |
+ | — |
|
Change employee rights |
+ | — |
|
Events and alarms monitoring |
+ | — |
General information
One company connected to the space is one user, regardless of how many employees (PRO accounts) are assigned to this company. Any number of companies can be connected to the space within the user limit. You can add up to 200 users to the space without hubs. The limit (maximum number of users) in the space with hubs depends on the hub model.
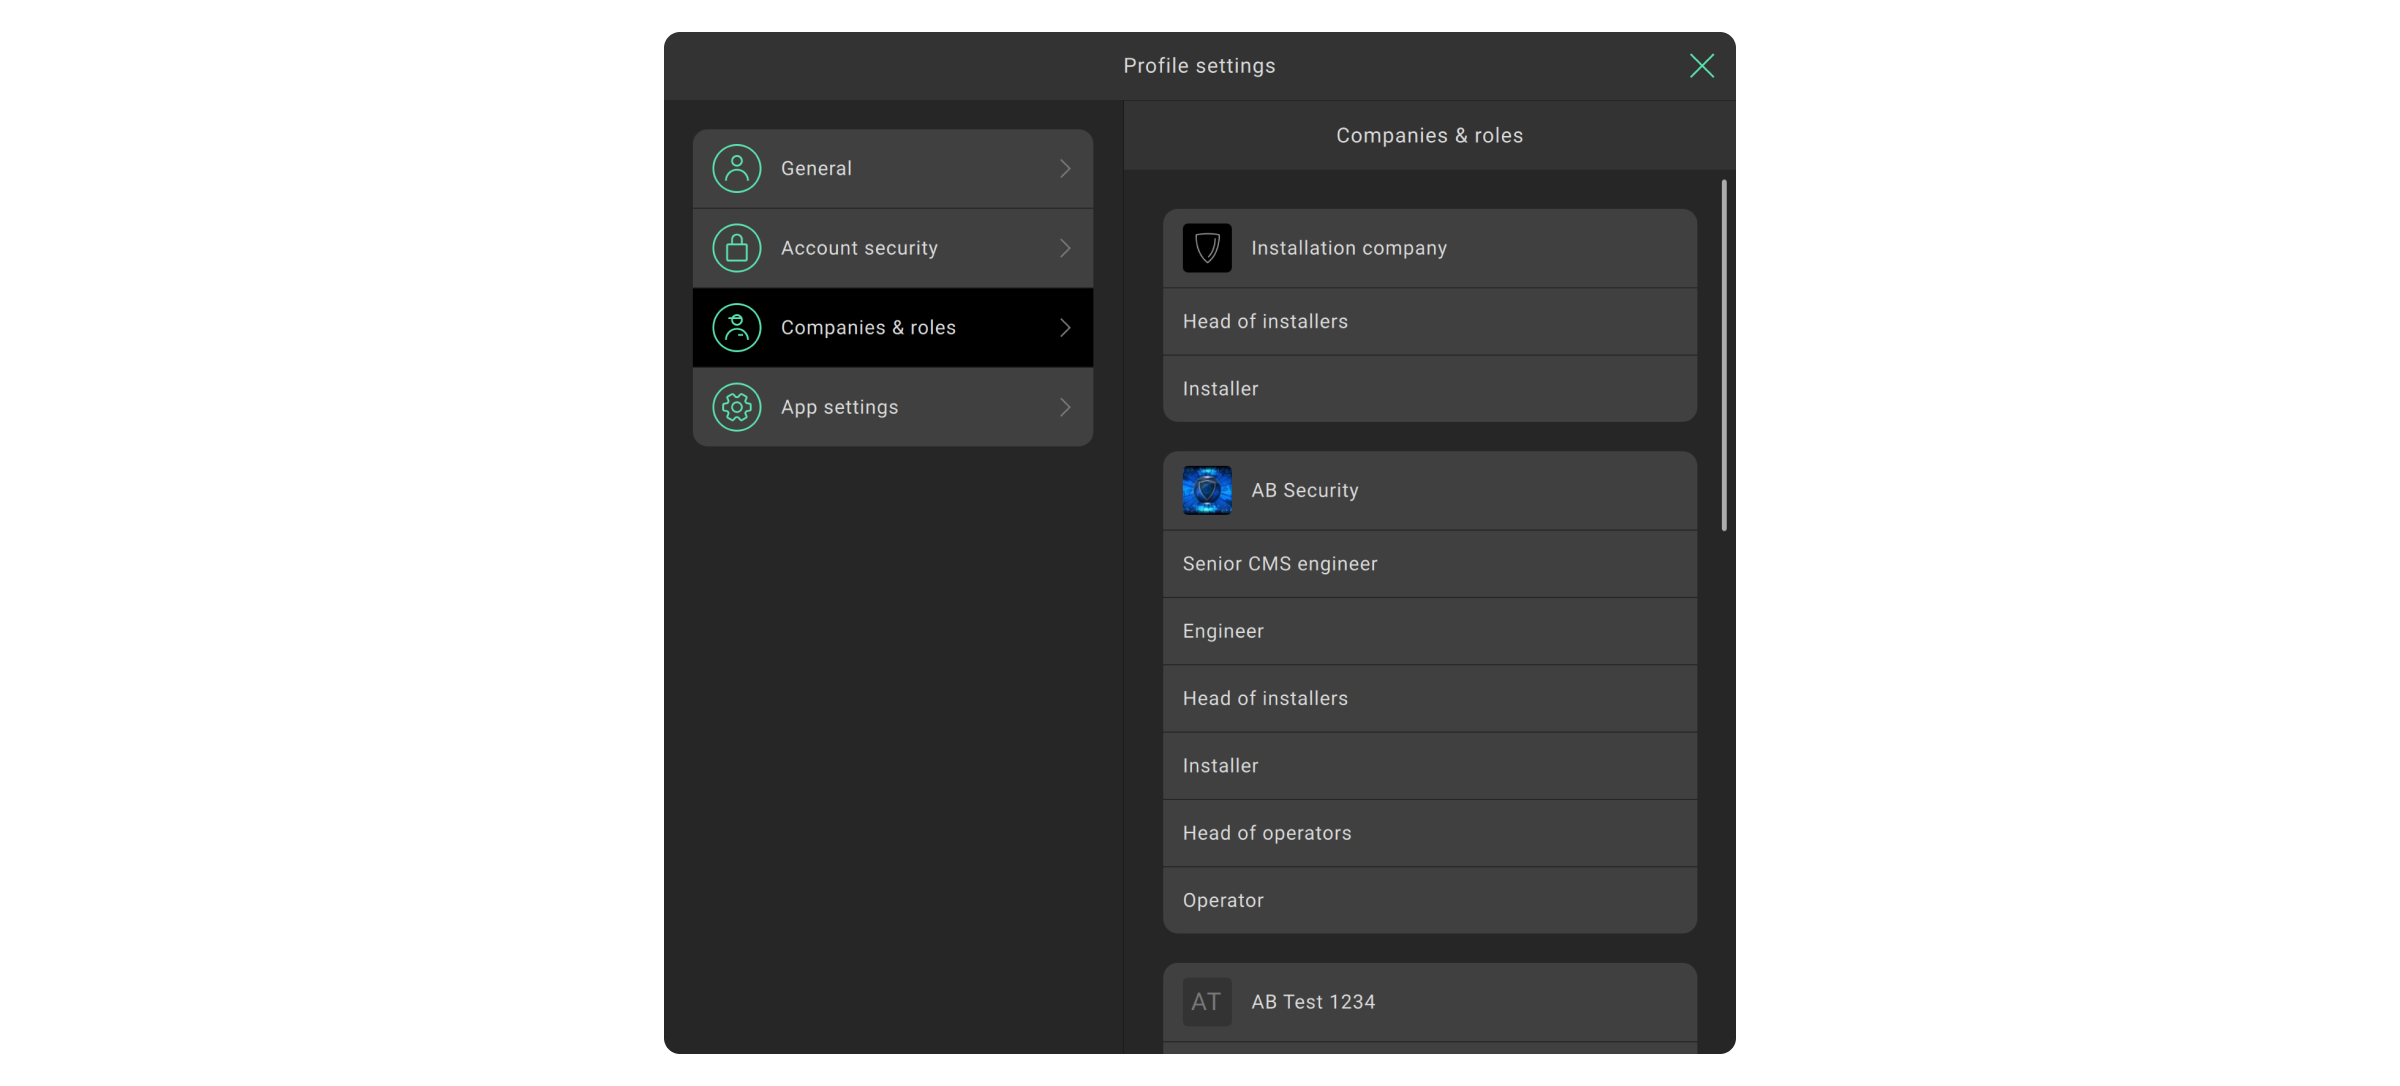
PRO accounts can be connected to an unlimited number of companies. PRO accounts can have different roles in different companies. For example, the role of Installer in one company, and the role of Head of installers in another one.
When you log in again after closing the app, you should use the login and password from the PRO account. If two-factor authentication is enabled for a PRO account, it will need to be passed during logging in.
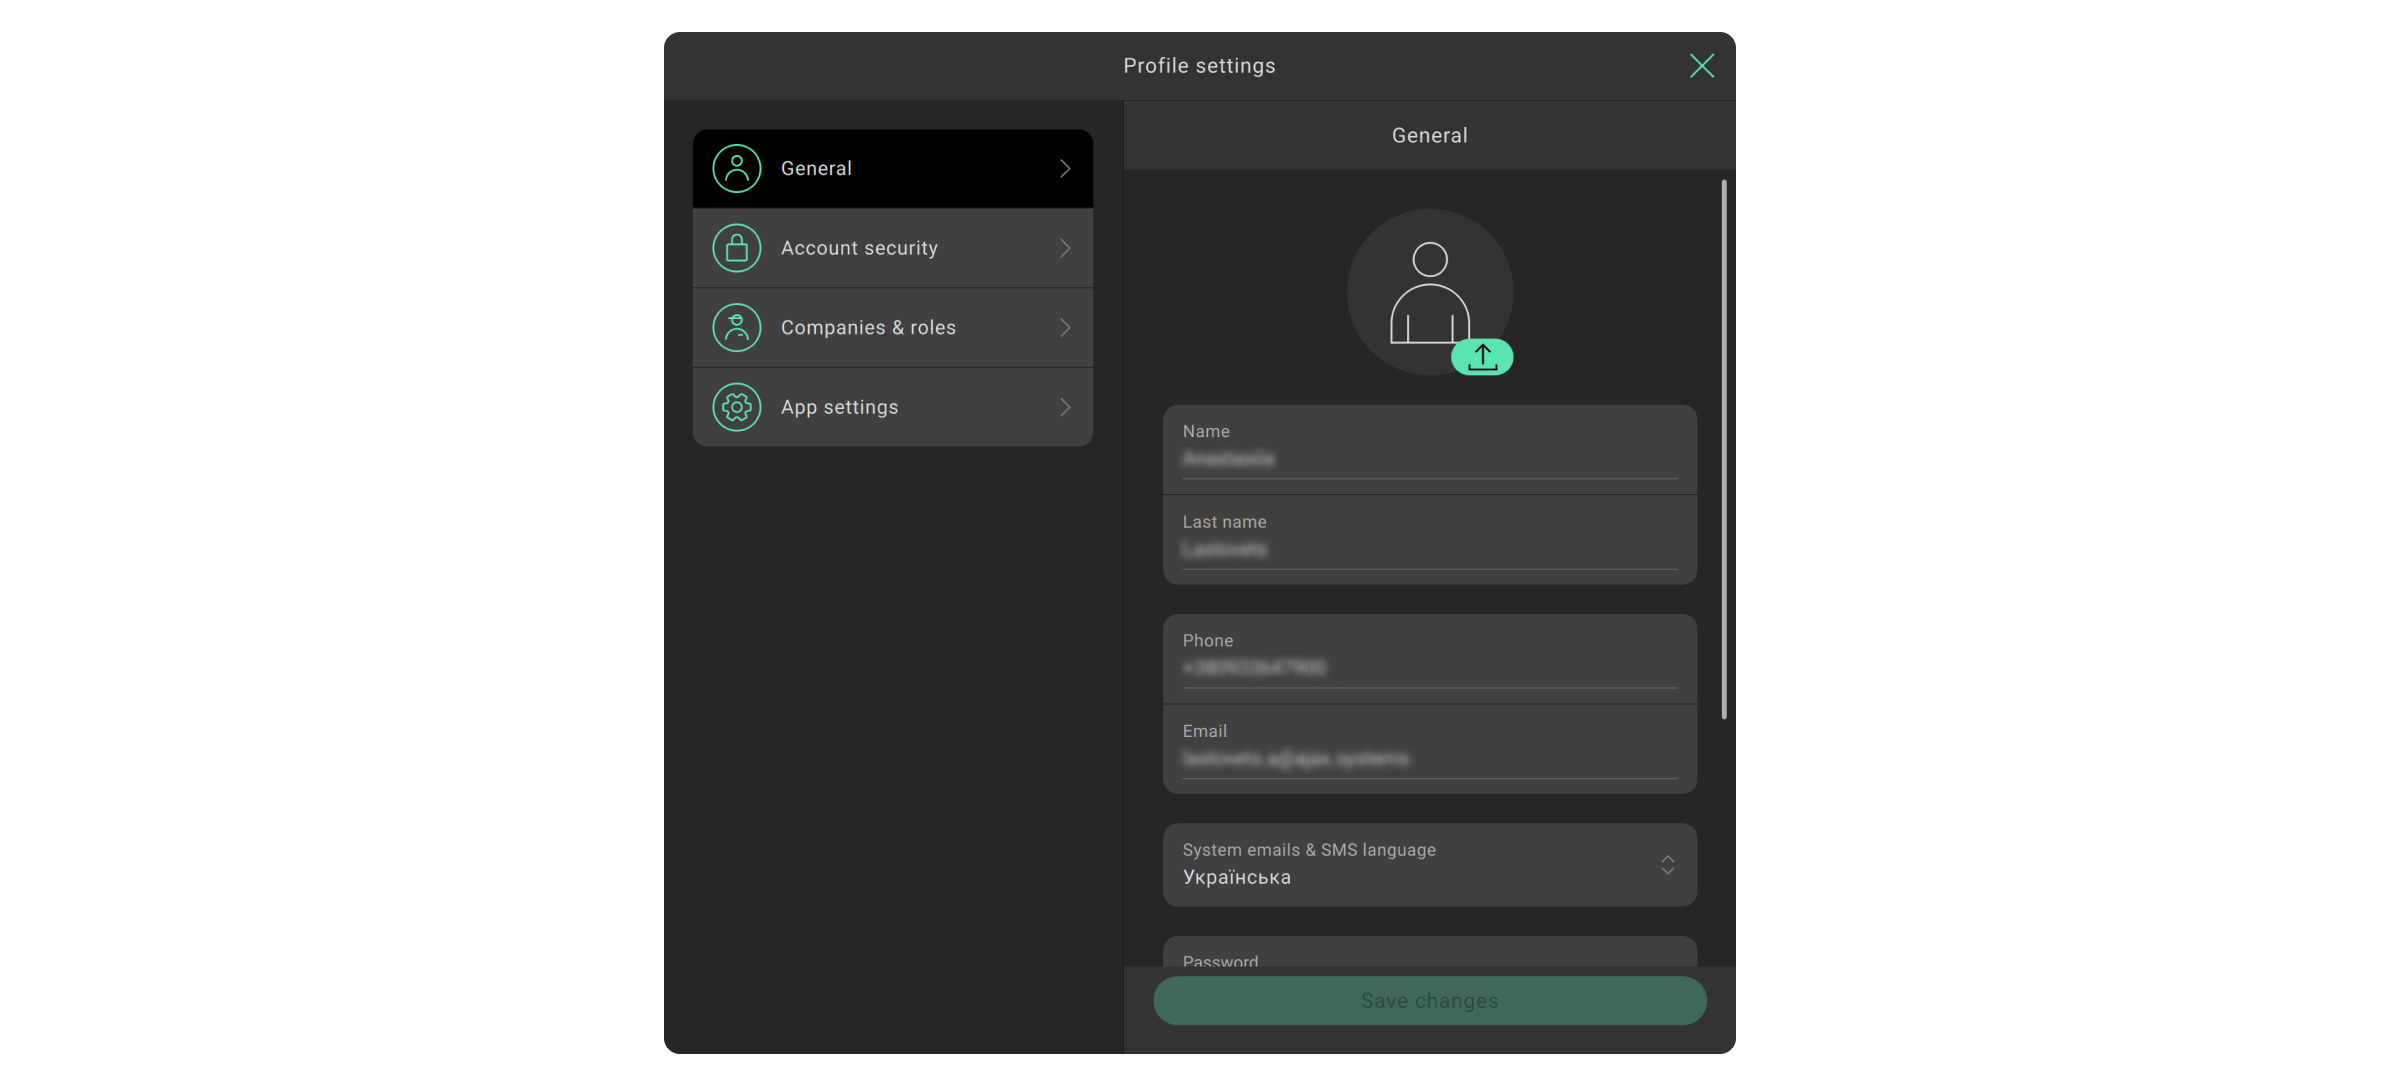
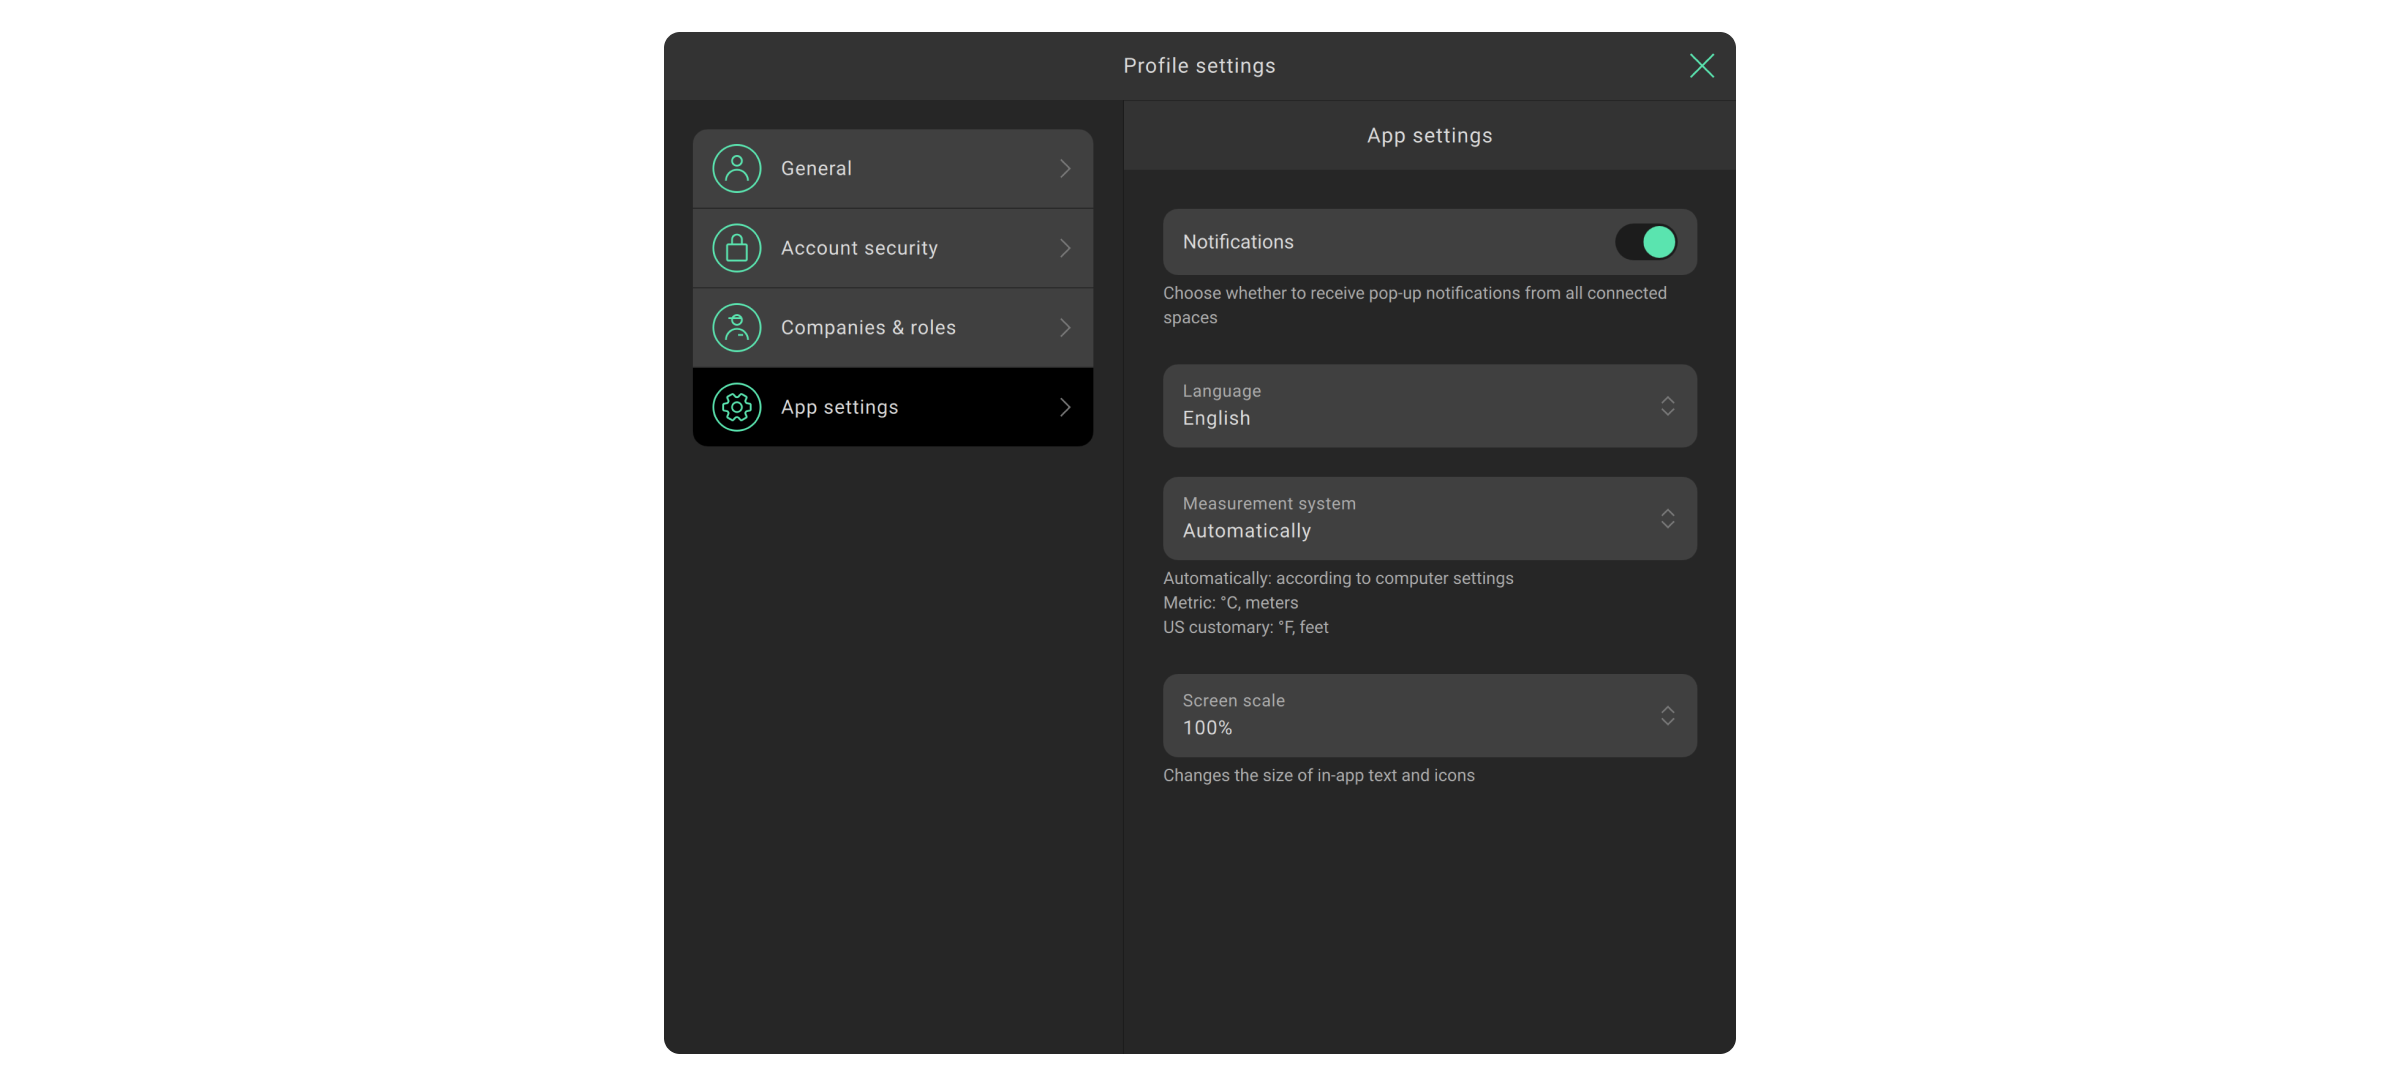

To report a bug, change PRO Desktop settings, view information about the PRO account, log out or change its settings — click on the menu with the company logo or the PRO account icon.
Installing PRO Desktop app
- Download the app installation file.
- Open the downloaded file.
- Install PRO Desktop.
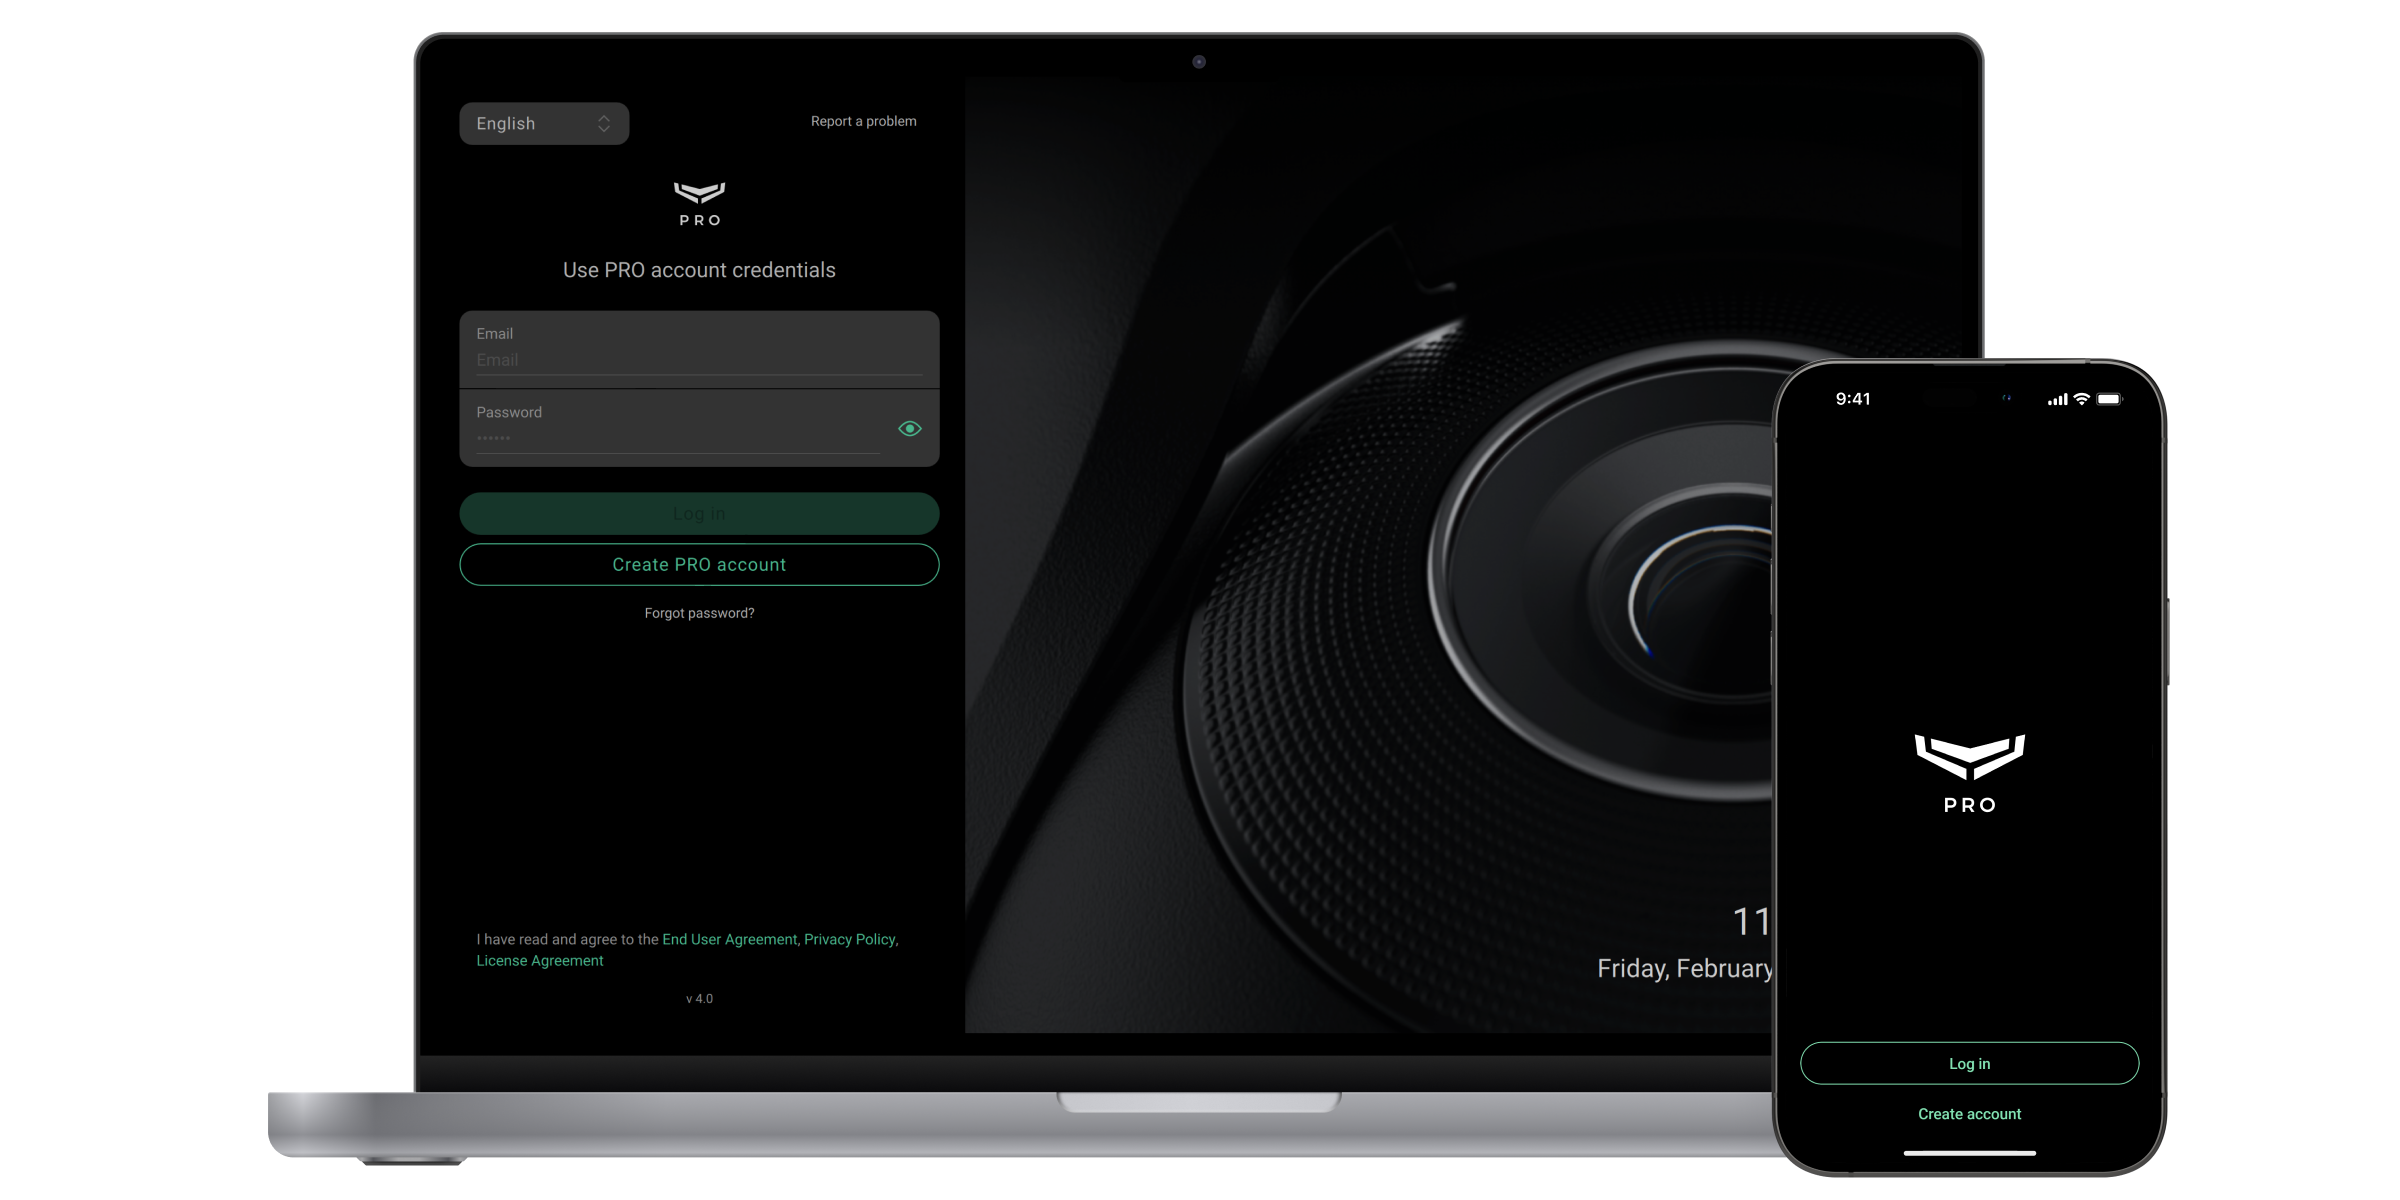
Creating the PRO account and logging into the app
To log in to PRO Desktop, you need the PRO account. The account should be registered in any of these two apps: PRO Desktop or Ajax PRO: Tool for Engineers. You can’t log in to the PRO app with a username and password from the Ajax Security System app for end users. PRO account is different from the account created in the end-user app.
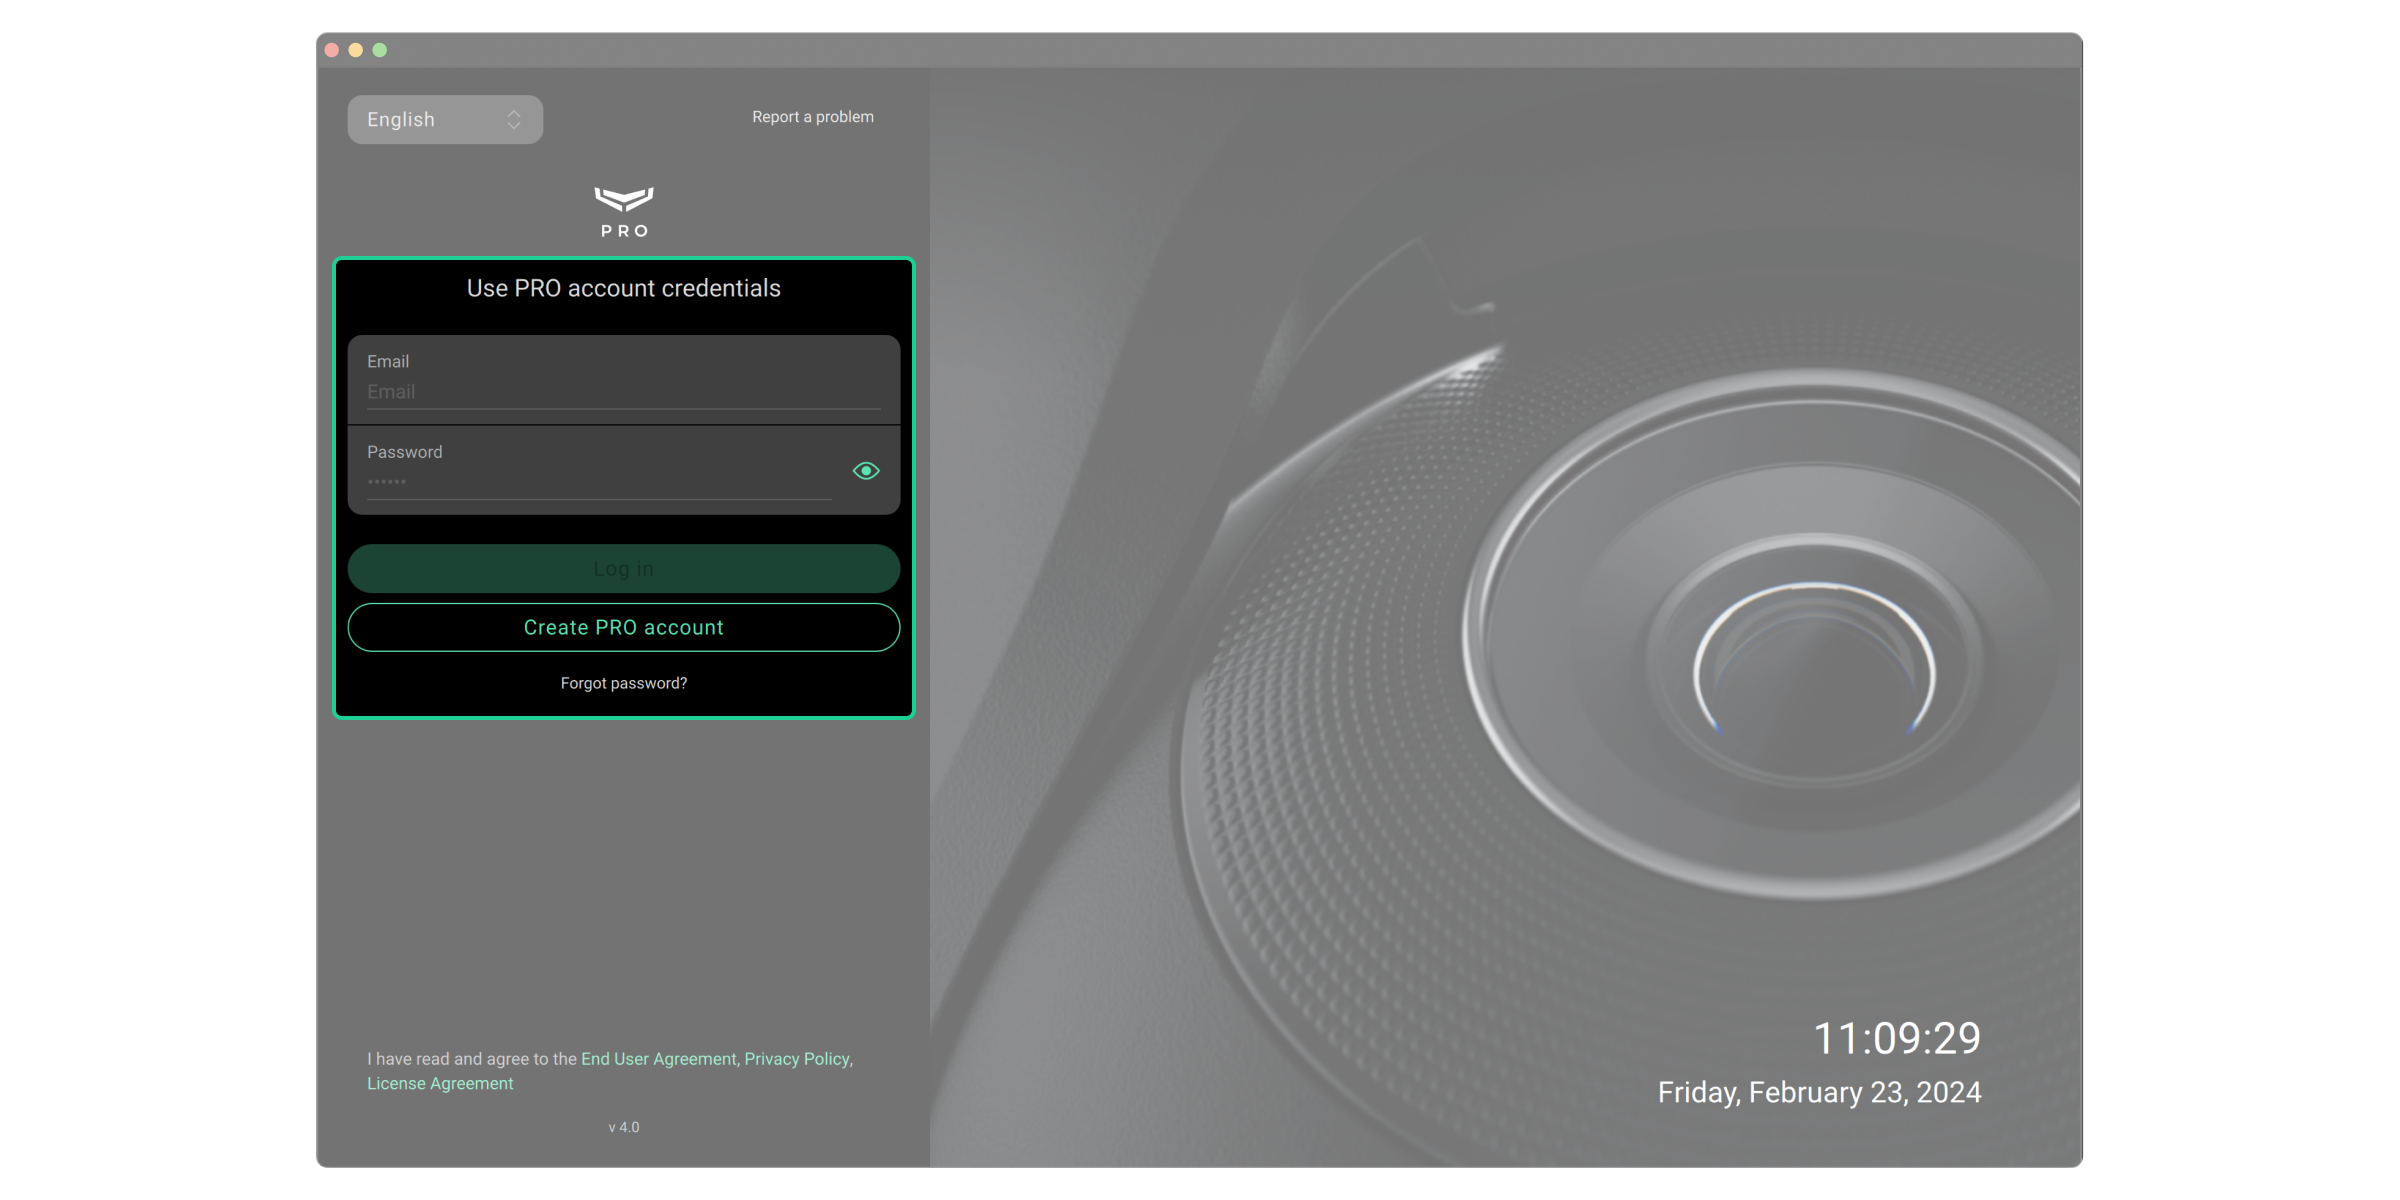
If you have a PRO account: fill in the Email and Password fields, and then click Login.
If you don’t have a PRO account: click Create PRO account in PRO Desktop or Ajax PRO: Tool for Engineers and follow the instructions in the app. When creating a PRO account, you can use the same email and phone number as in the account of the Ajax Security System app. These will be different accounts.
Account types
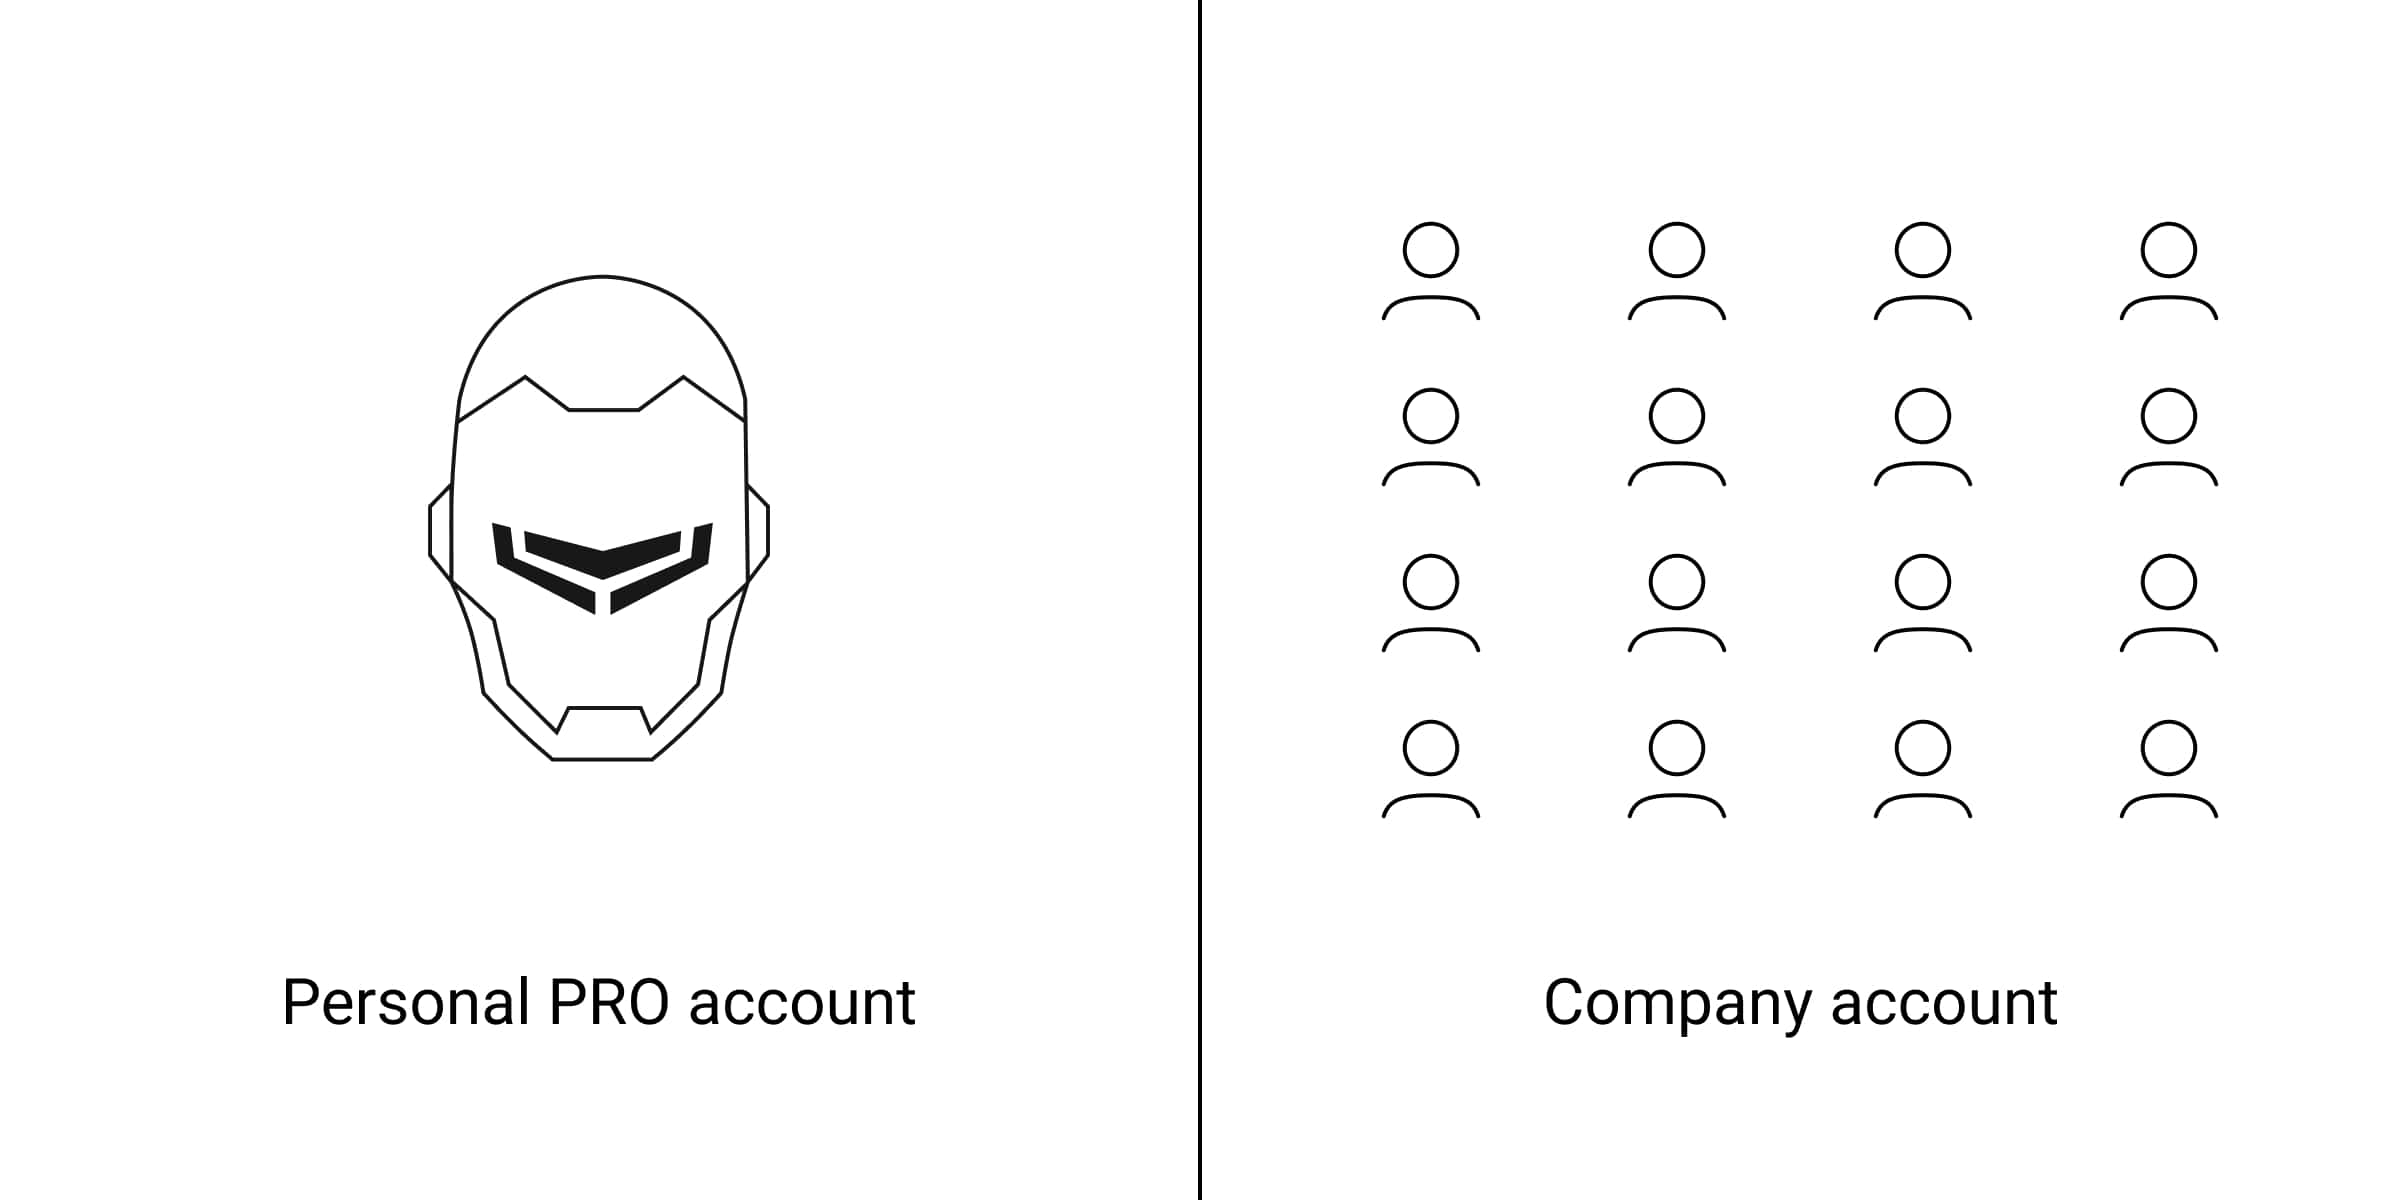
Two types of accounts are available in Ajax PRO apps: a personal PRO account and a company account.
A personal PRO account is needed to connect to companies, as well as to set up and manage connected Ajax systems.
Company accounts are required for running the security business: monitoring alarms and events, maintenance, configuring, and installing Ajax systems.
Switching between a personal PRO account and a company account
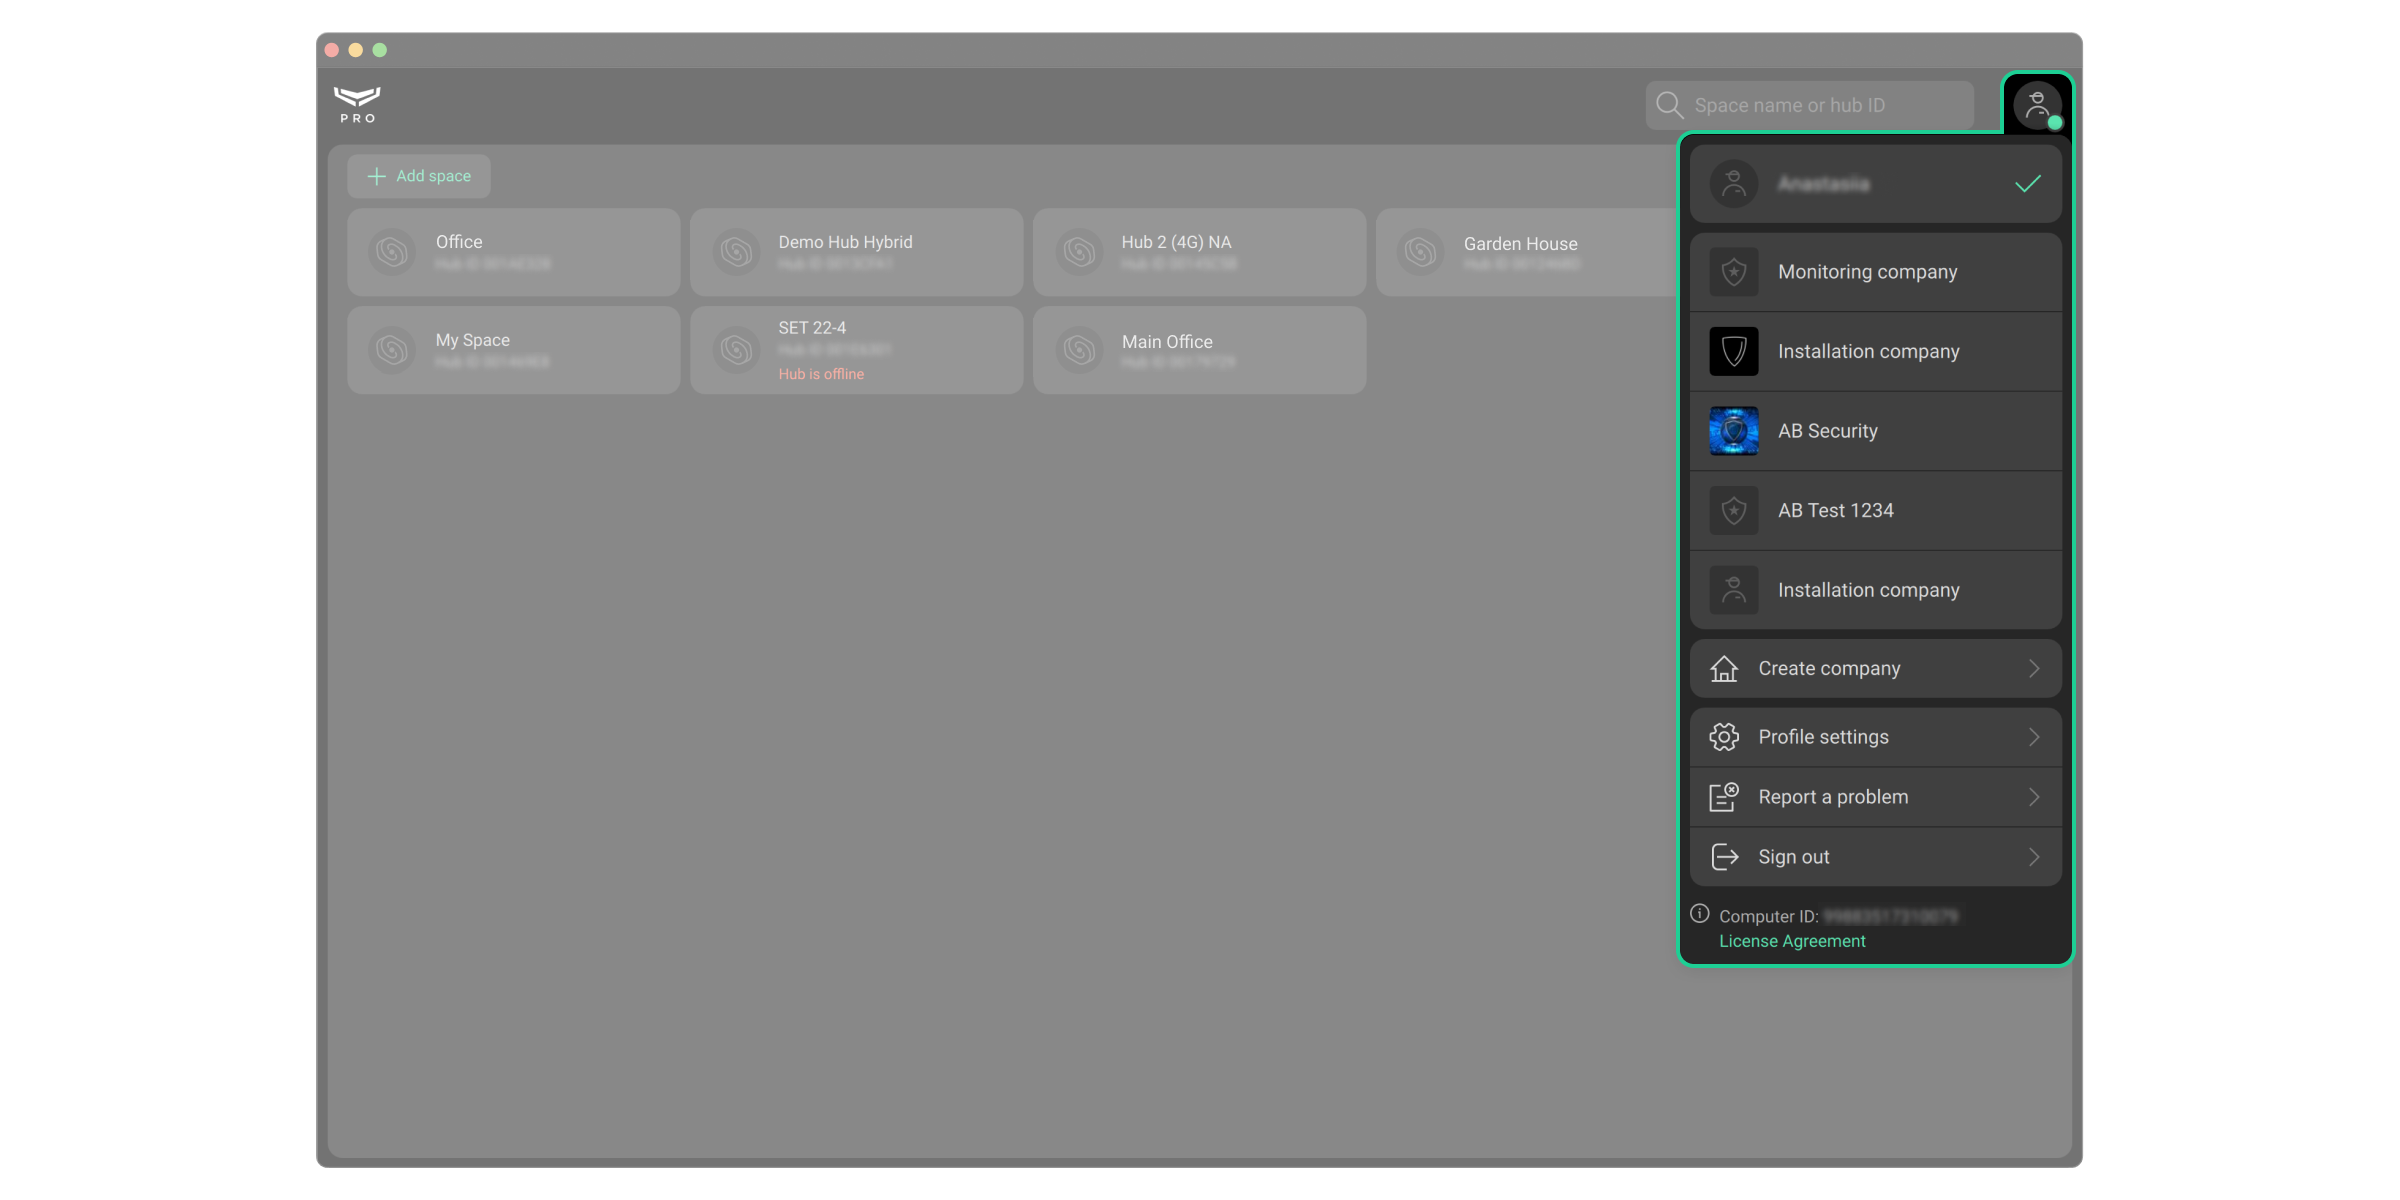
When you enter the app, it automatically opens the company with which the PRO account worked last time. To go to a personal PRO account or an account of another company:
- Click on the menu with the security company logo or initials.
- Select a personal PRO account or a company account.
Account security
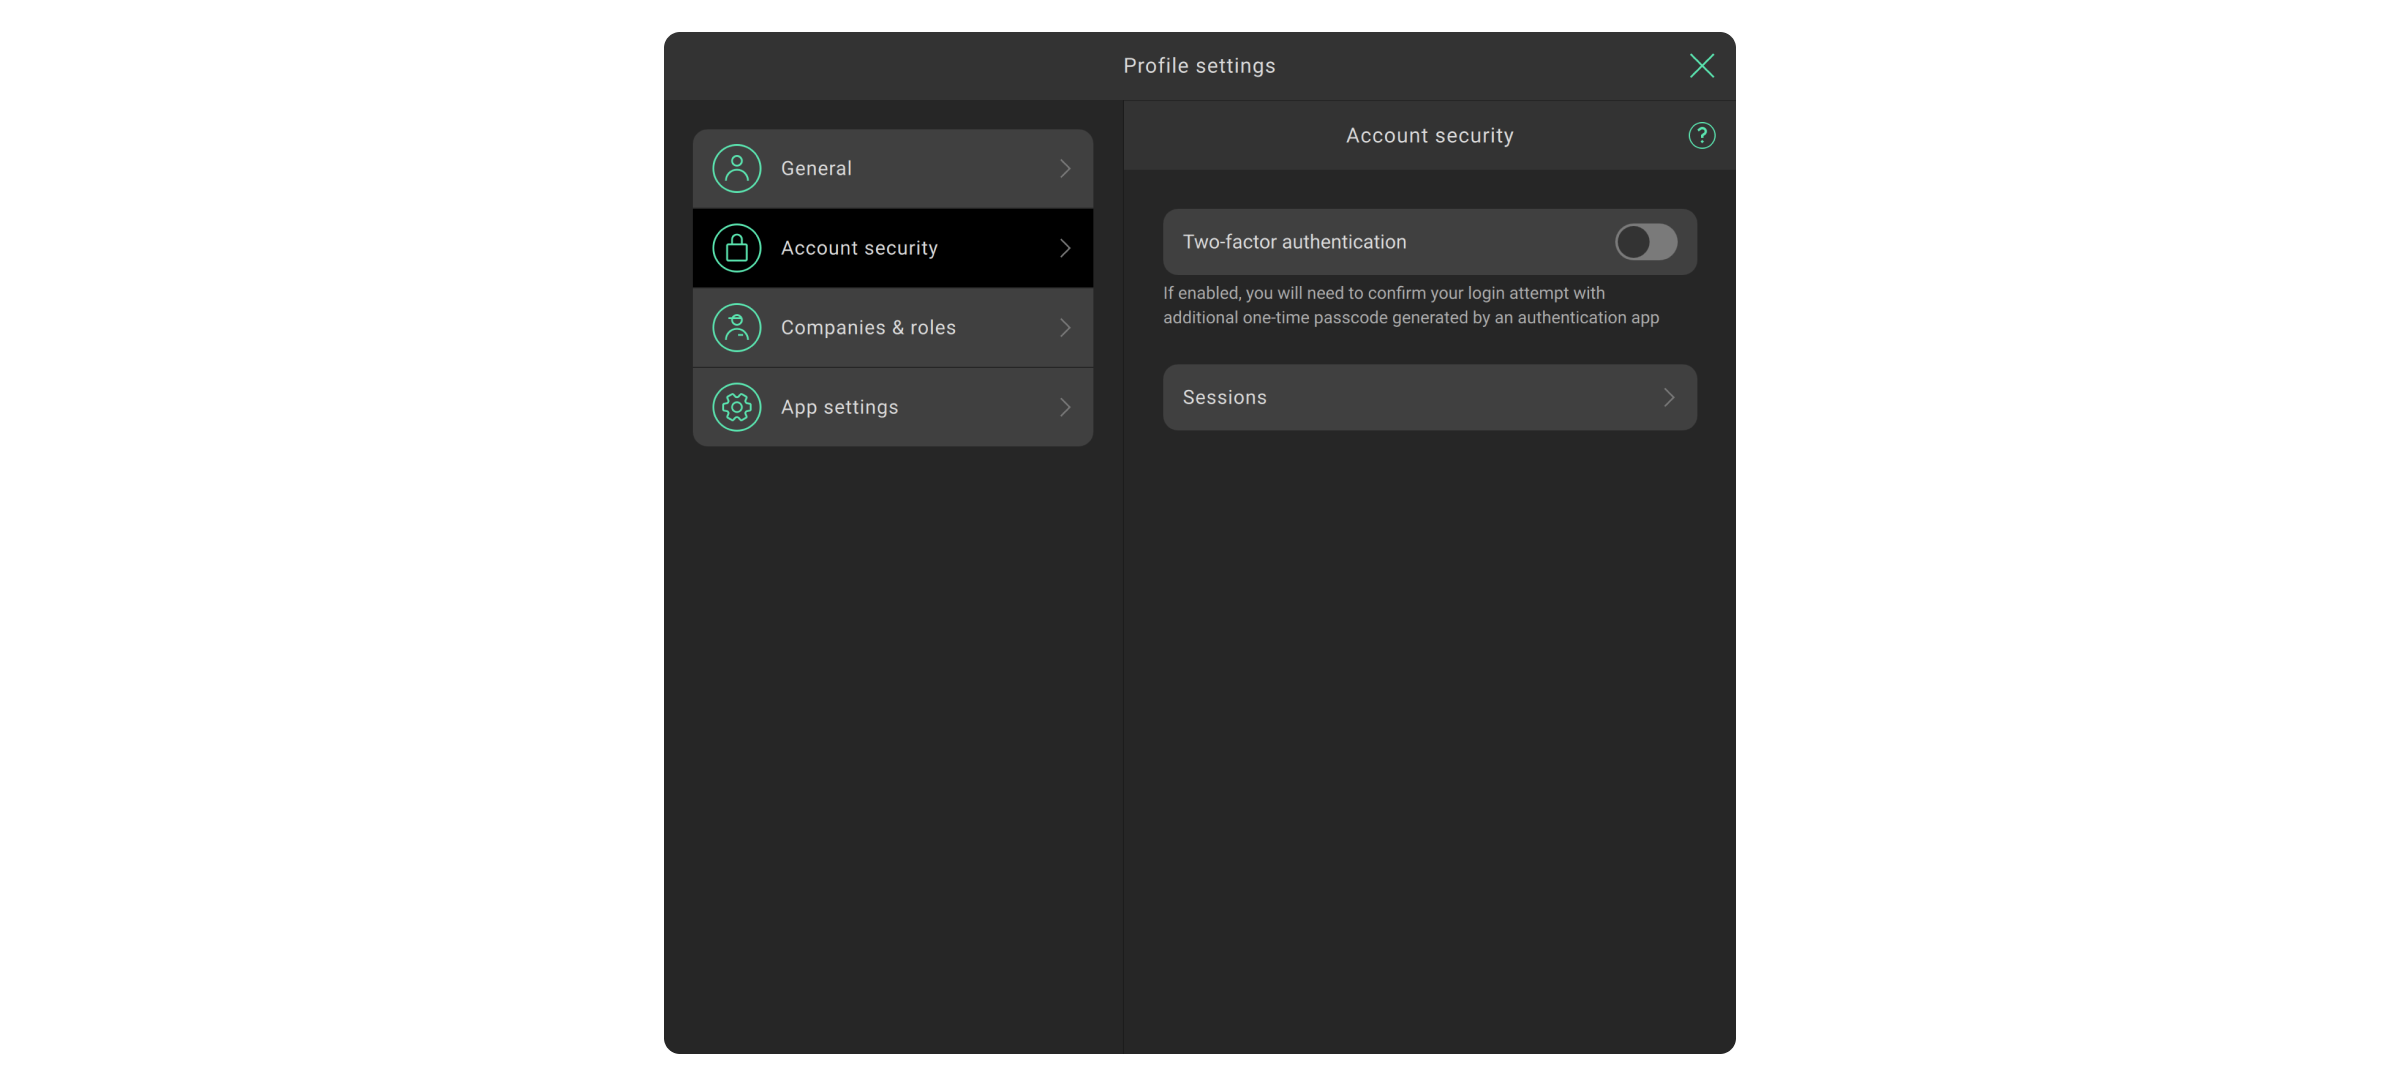
To protect the PRO account from hacking set up two-factor authentication and track sessions on other devices. Use both security tools to reduce the chances of unauthorized access to your PRO account.
Change your password and enable two-factor authentication when rogue account sessions are detected.
How to enable the two-factor authentication

- Click on the avatar (icon) of the PRO account.
- Go to the Profile Settings menu.
- Select the Account Security tab.
- Enable the Two-factor authentication option.
- Connect the authenticator following the instructions on the screen. For example, the Google Authenticator app.
How to terminate an account session
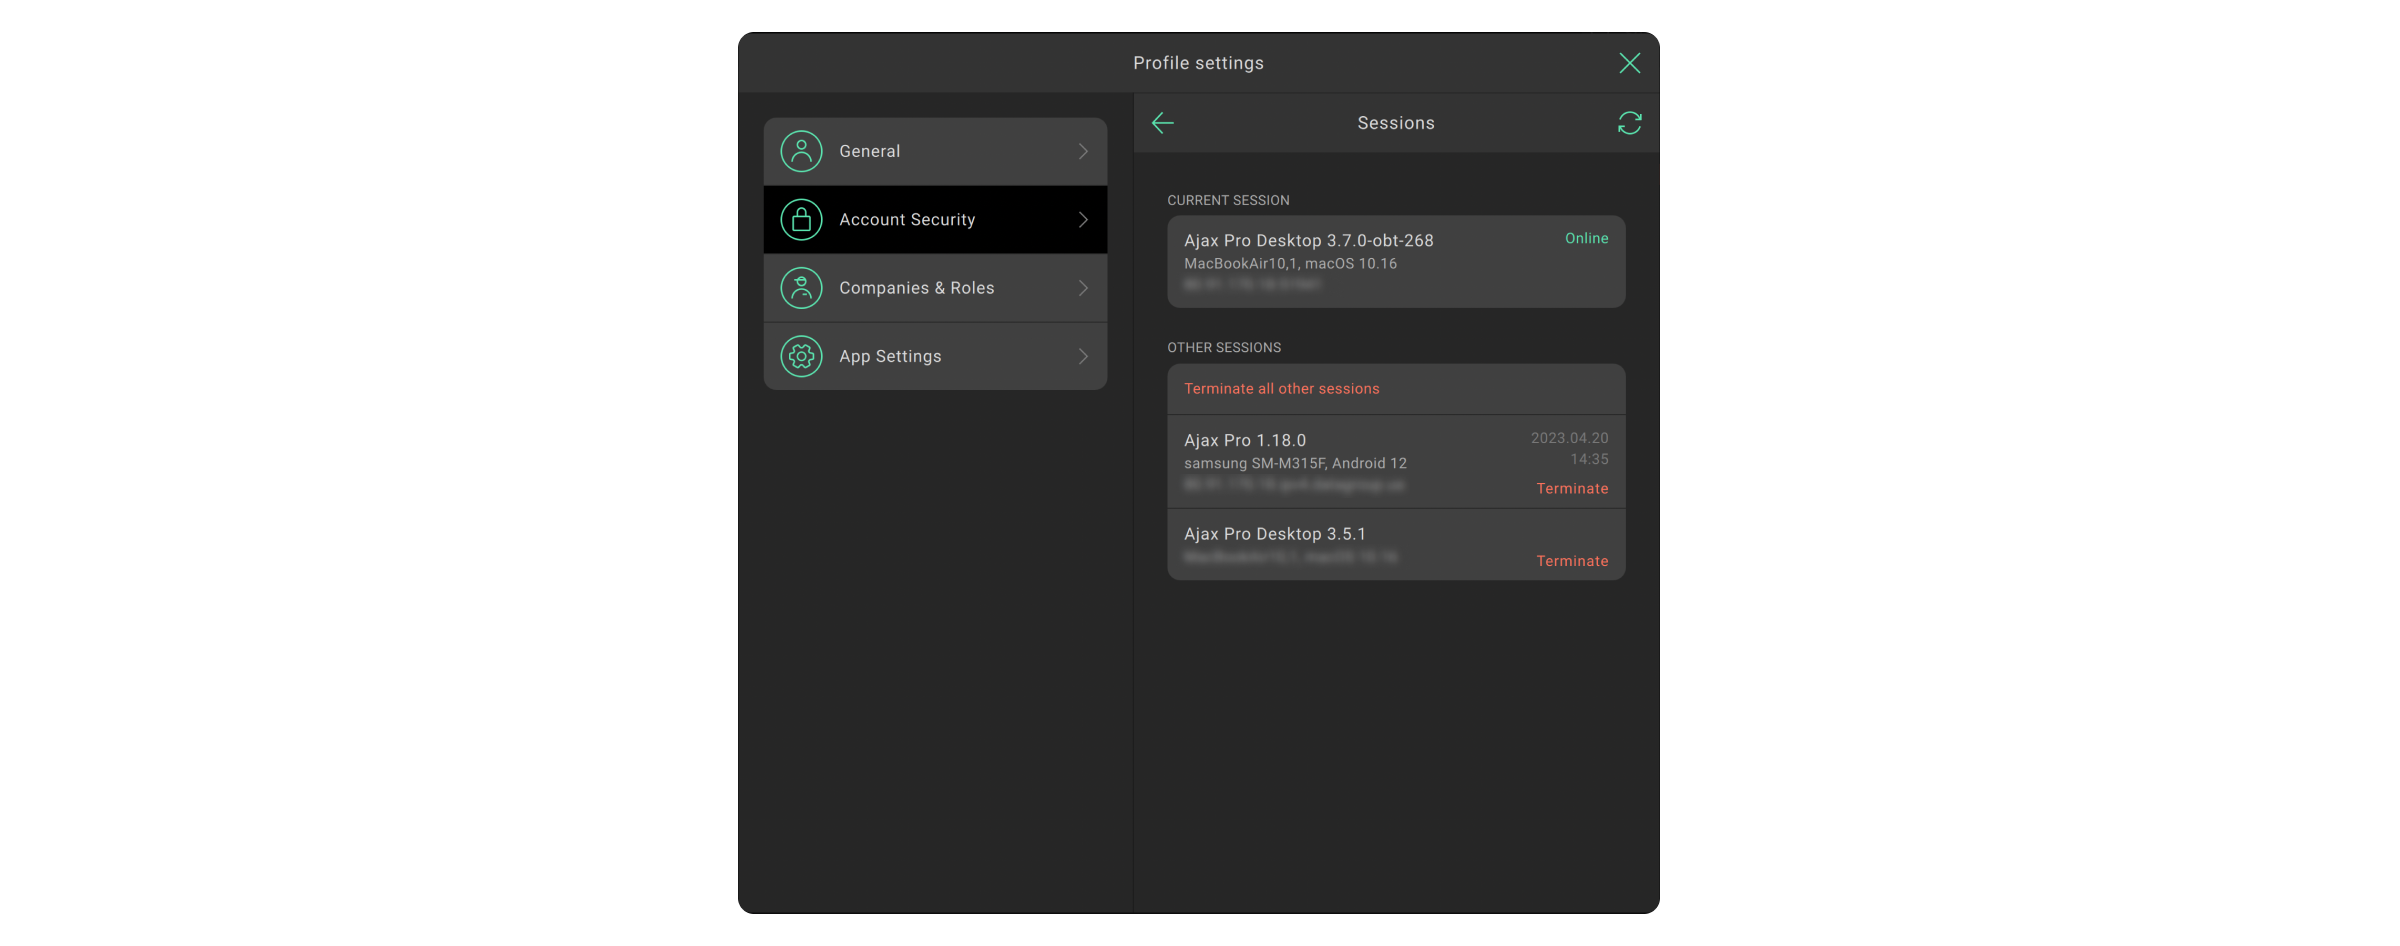
- Click on the avatar (icon) of the account.
- Go to the Profile Settings menu.
- Select the Account Security tab.
- Click on Sessions.
The session of the device from which you entered the app is called the Current session. Other sessions of devices from which the PRO account is logged in are available below. You can end a session by clicking Terminate, or Terminate all other sessions except the current one.
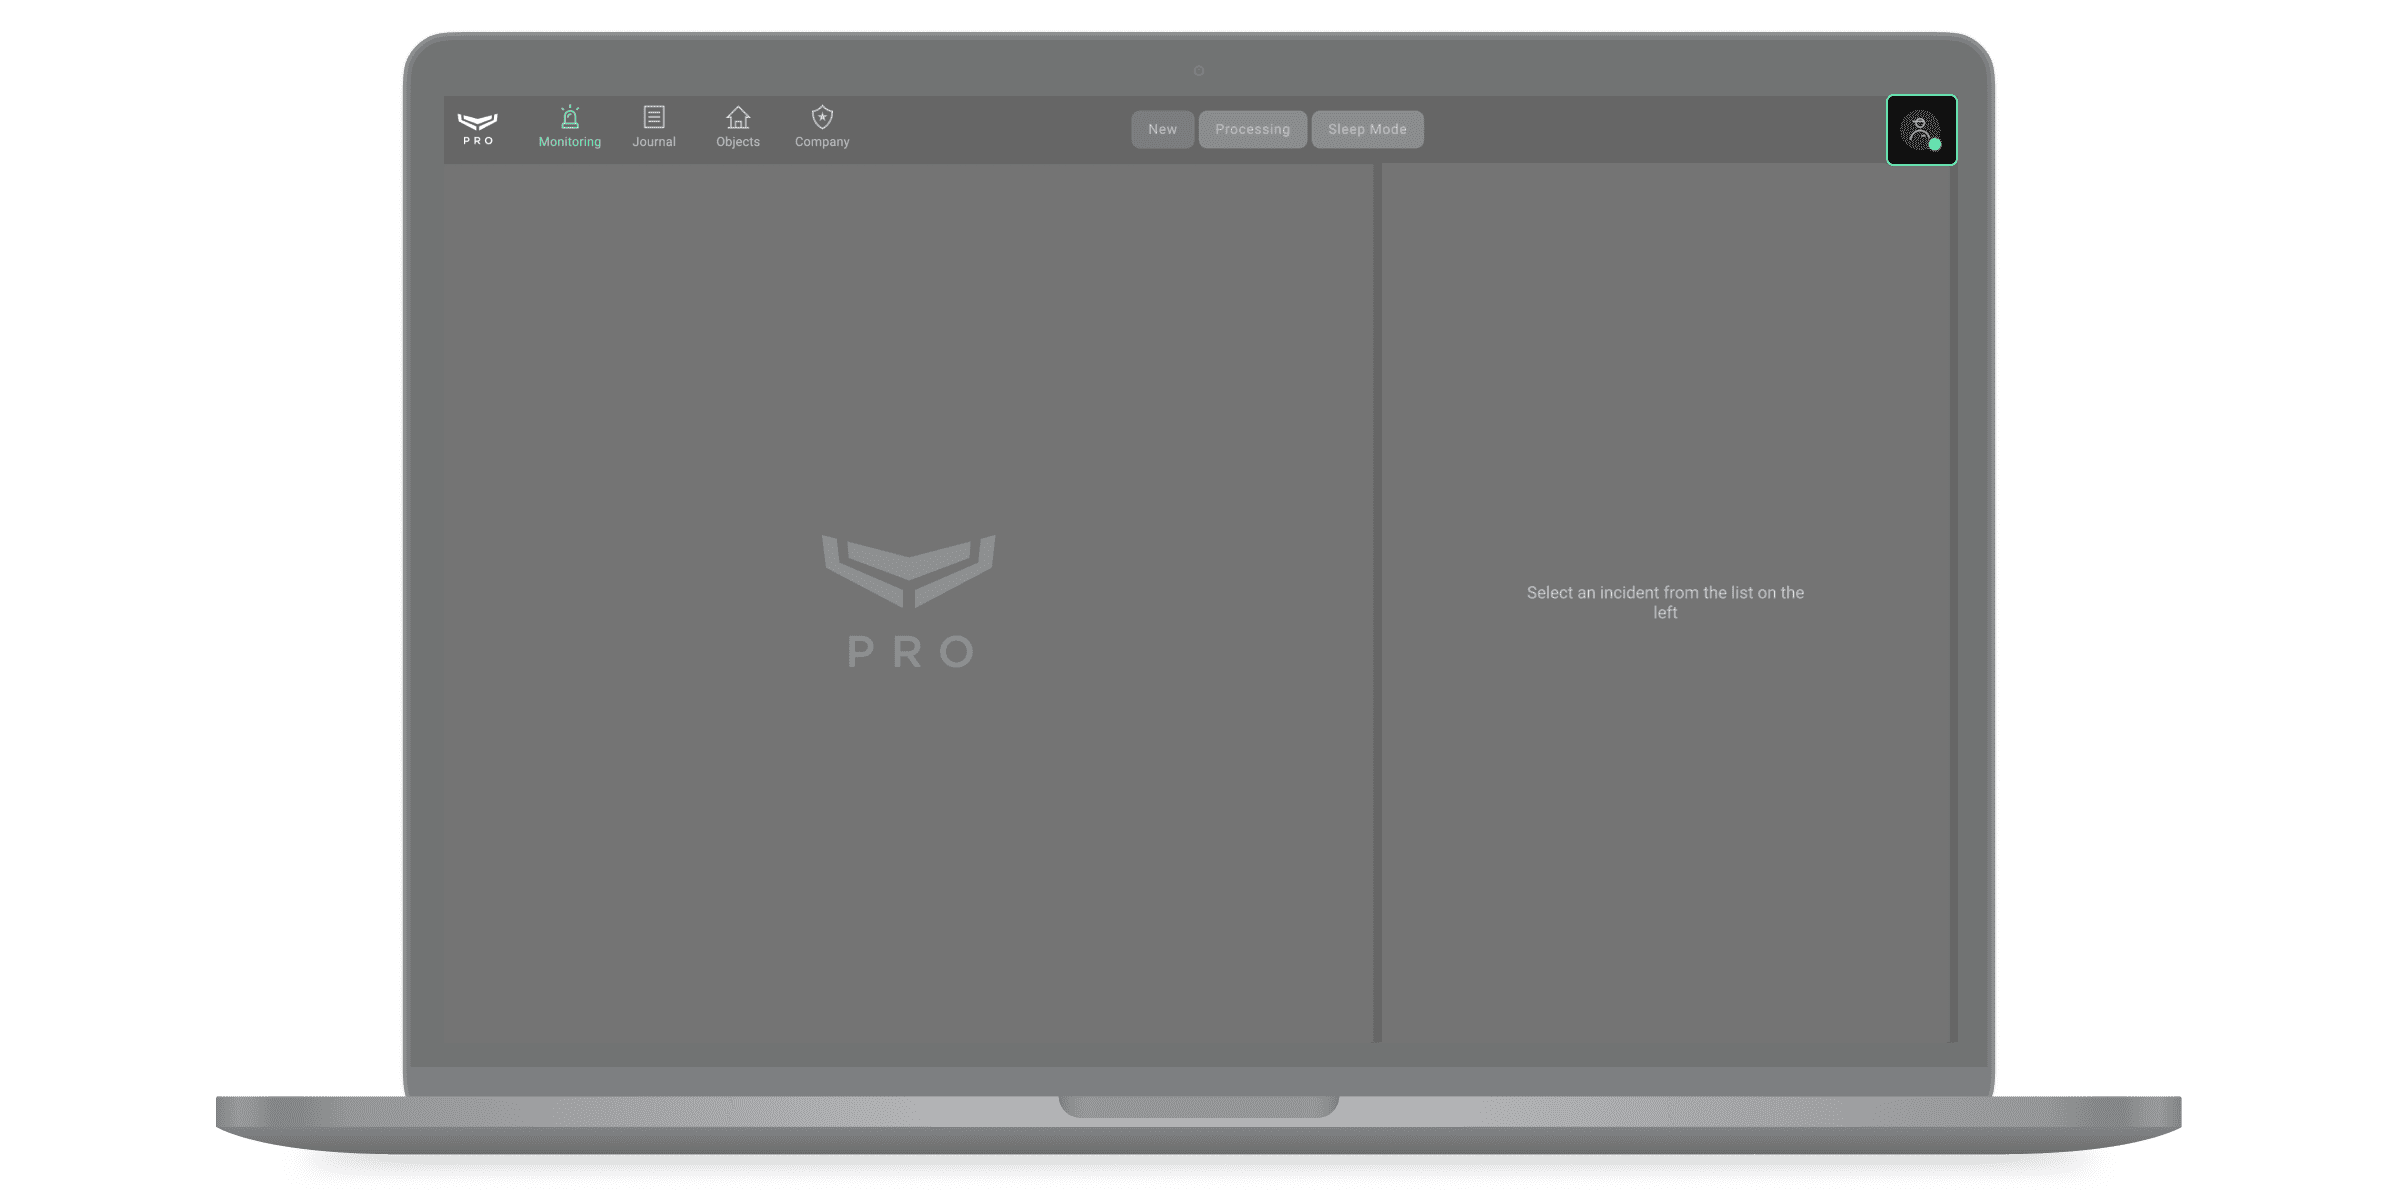
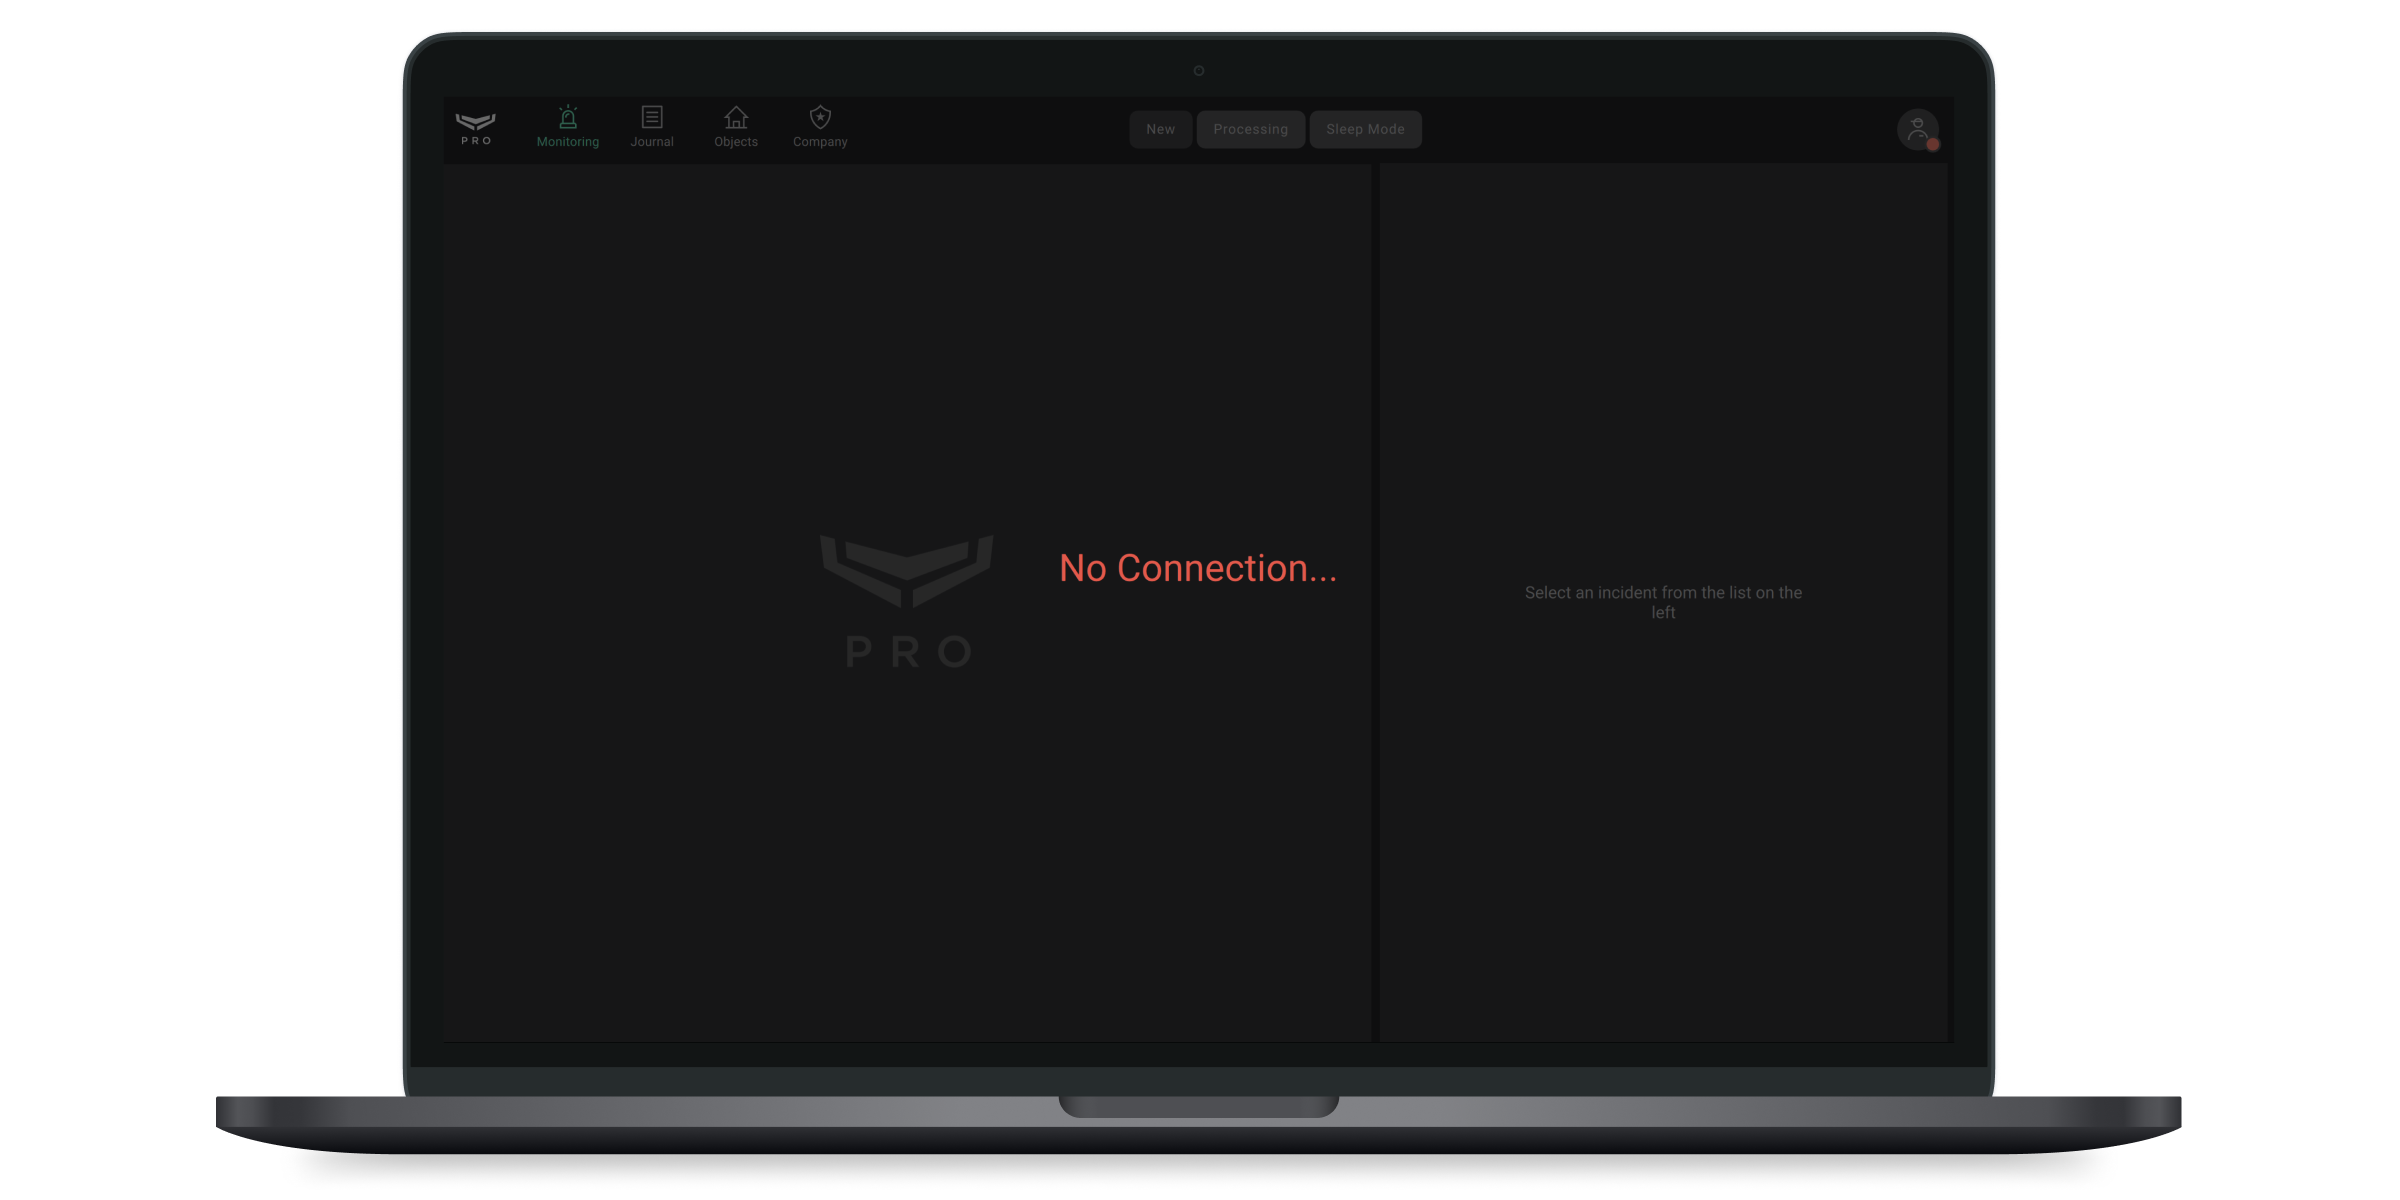
State of connection to the Ajax cloud
The indicator in the upper right corner of the PRO Desktop screen shows the connection status with the Ajax Cloud server. If the Internet connection is active, the indicator lights green. If there is no connection, it is red, and the message No Connection is displayed on the screen.
| Connection to Ajax Cloud is active | No connection to Ajax cloud |
 |
 |
Working with a personal PRO account
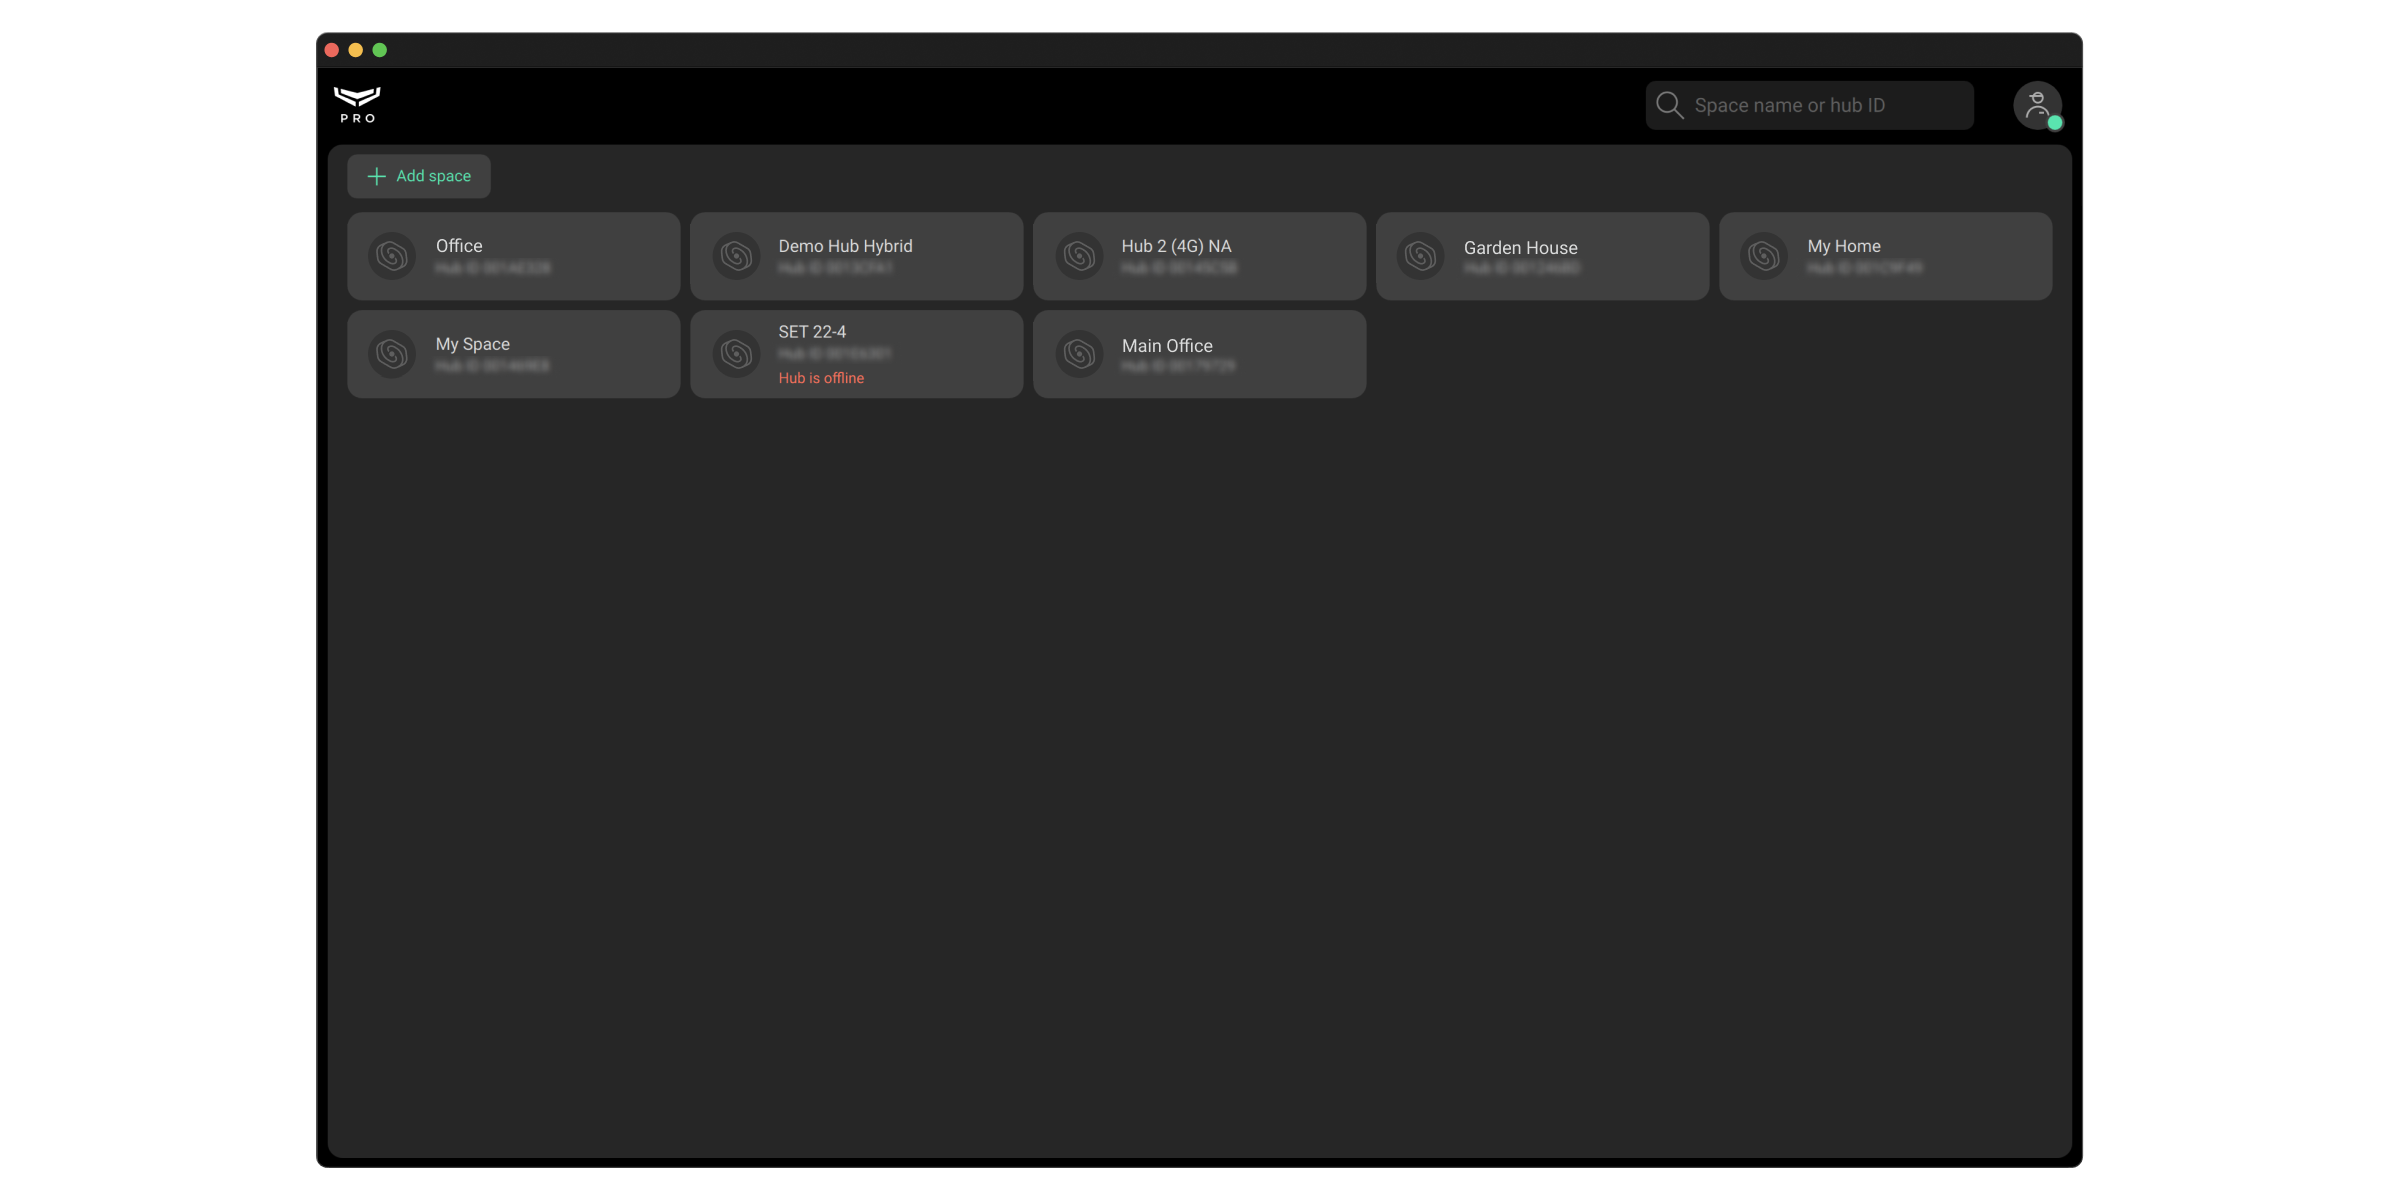
When you log in, a list of spaces linked to the PRO account opens. The faults counter (red icon with a number) shows the total number of faults for a specific security system. Information about the number of faults and the hub in case it is offline (if there is a hub in the space) updates automatically.
Space is a virtual entity where various autonomous devices are gathered on the same physical object. You can add a hub with detectors, only NVR with cameras, Yale smart locks to the space or combine all these elements in one system.
The space functionality is available for hubs with firmware version starting from OS Malevich 2.6 and apps of such versions and higher:
- Ajax Security System 3.0 for iOS;
- Ajax Security System 3.0 for Android;
- Ajax PRO: Tool for Engineers 2.0 for iOS;
- Ajax PRO: Tool for Engineers 2.0 for Android;
- PRO Desktop 4.0 for macOS;
- PRO Desktop 4.0 for Windows.

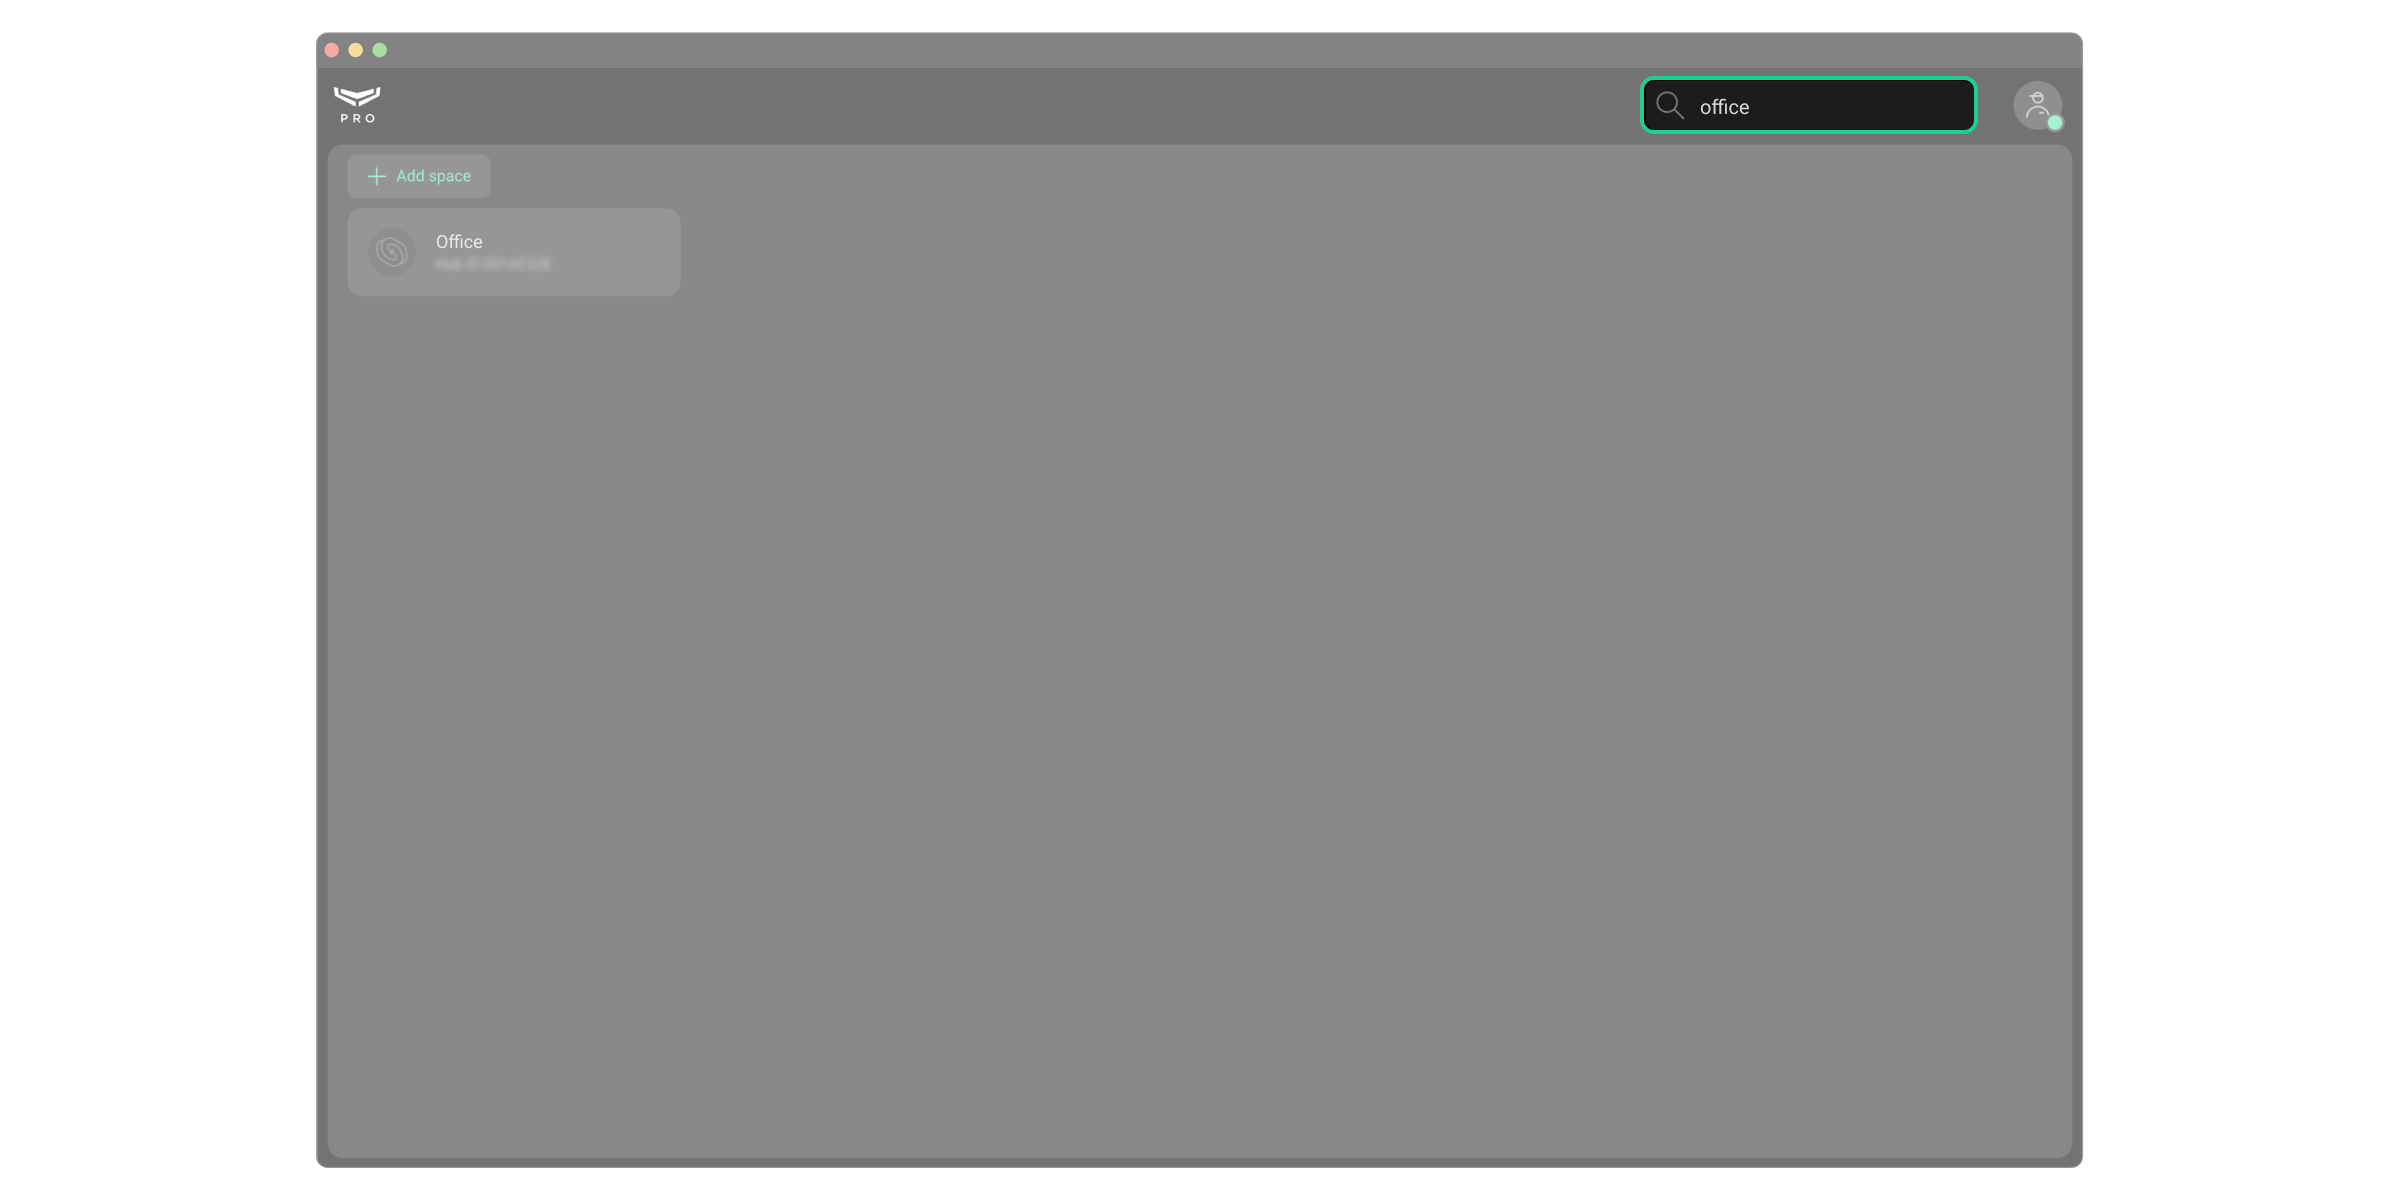
Finding the space. You can find the space by typing its name or hub ID (if a hub is added to the space) in the search field. Spaces are displayed as you type a text.
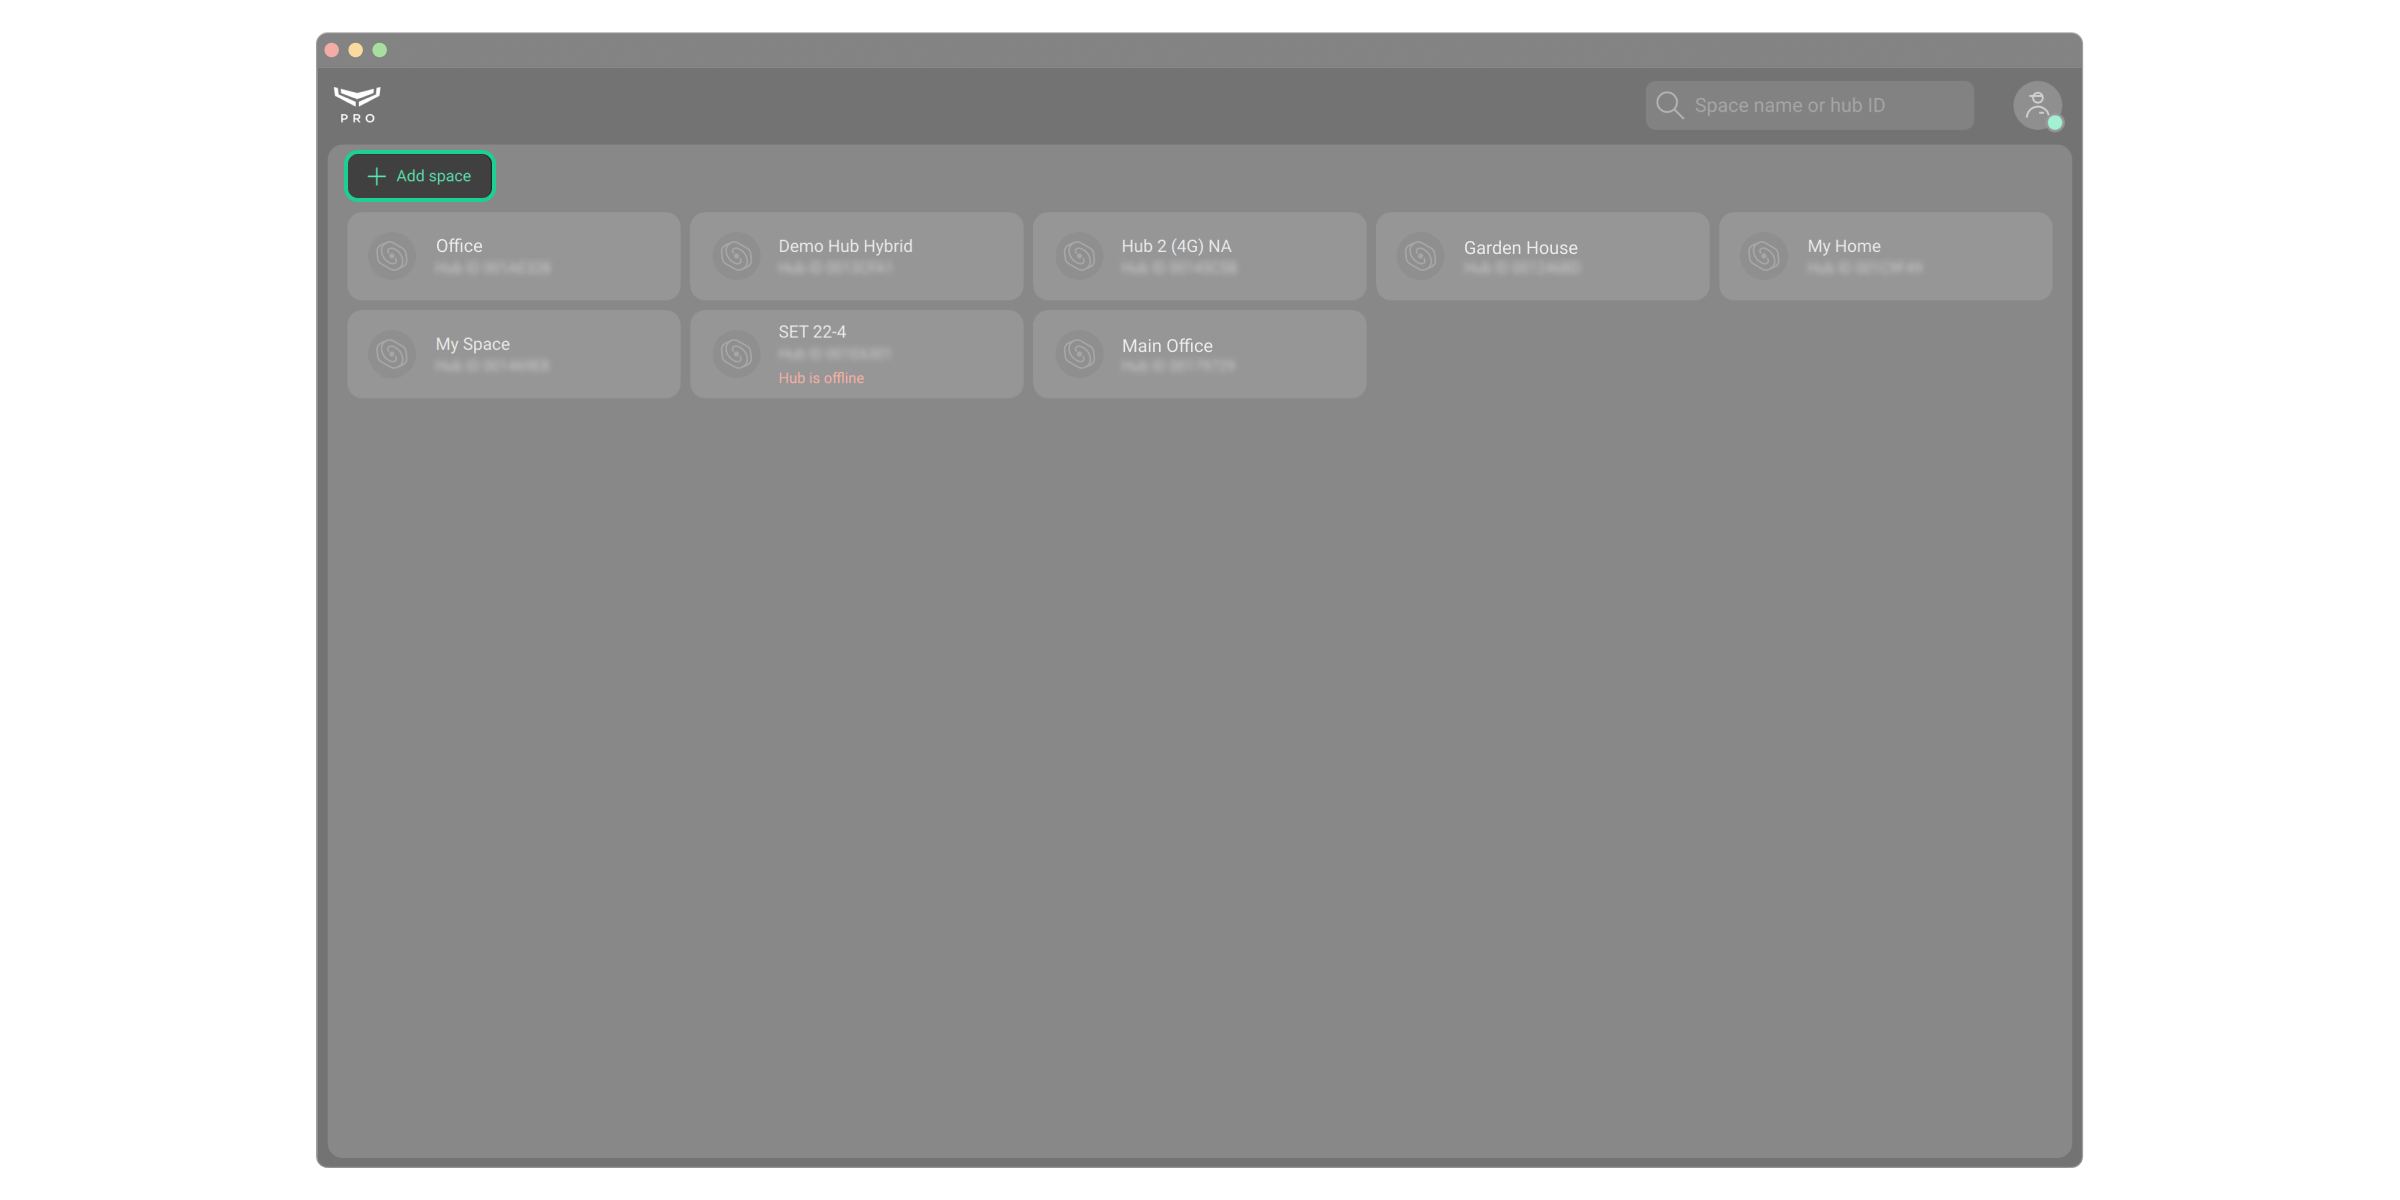

The Add Space button allows you to link a new space to a PRO account.
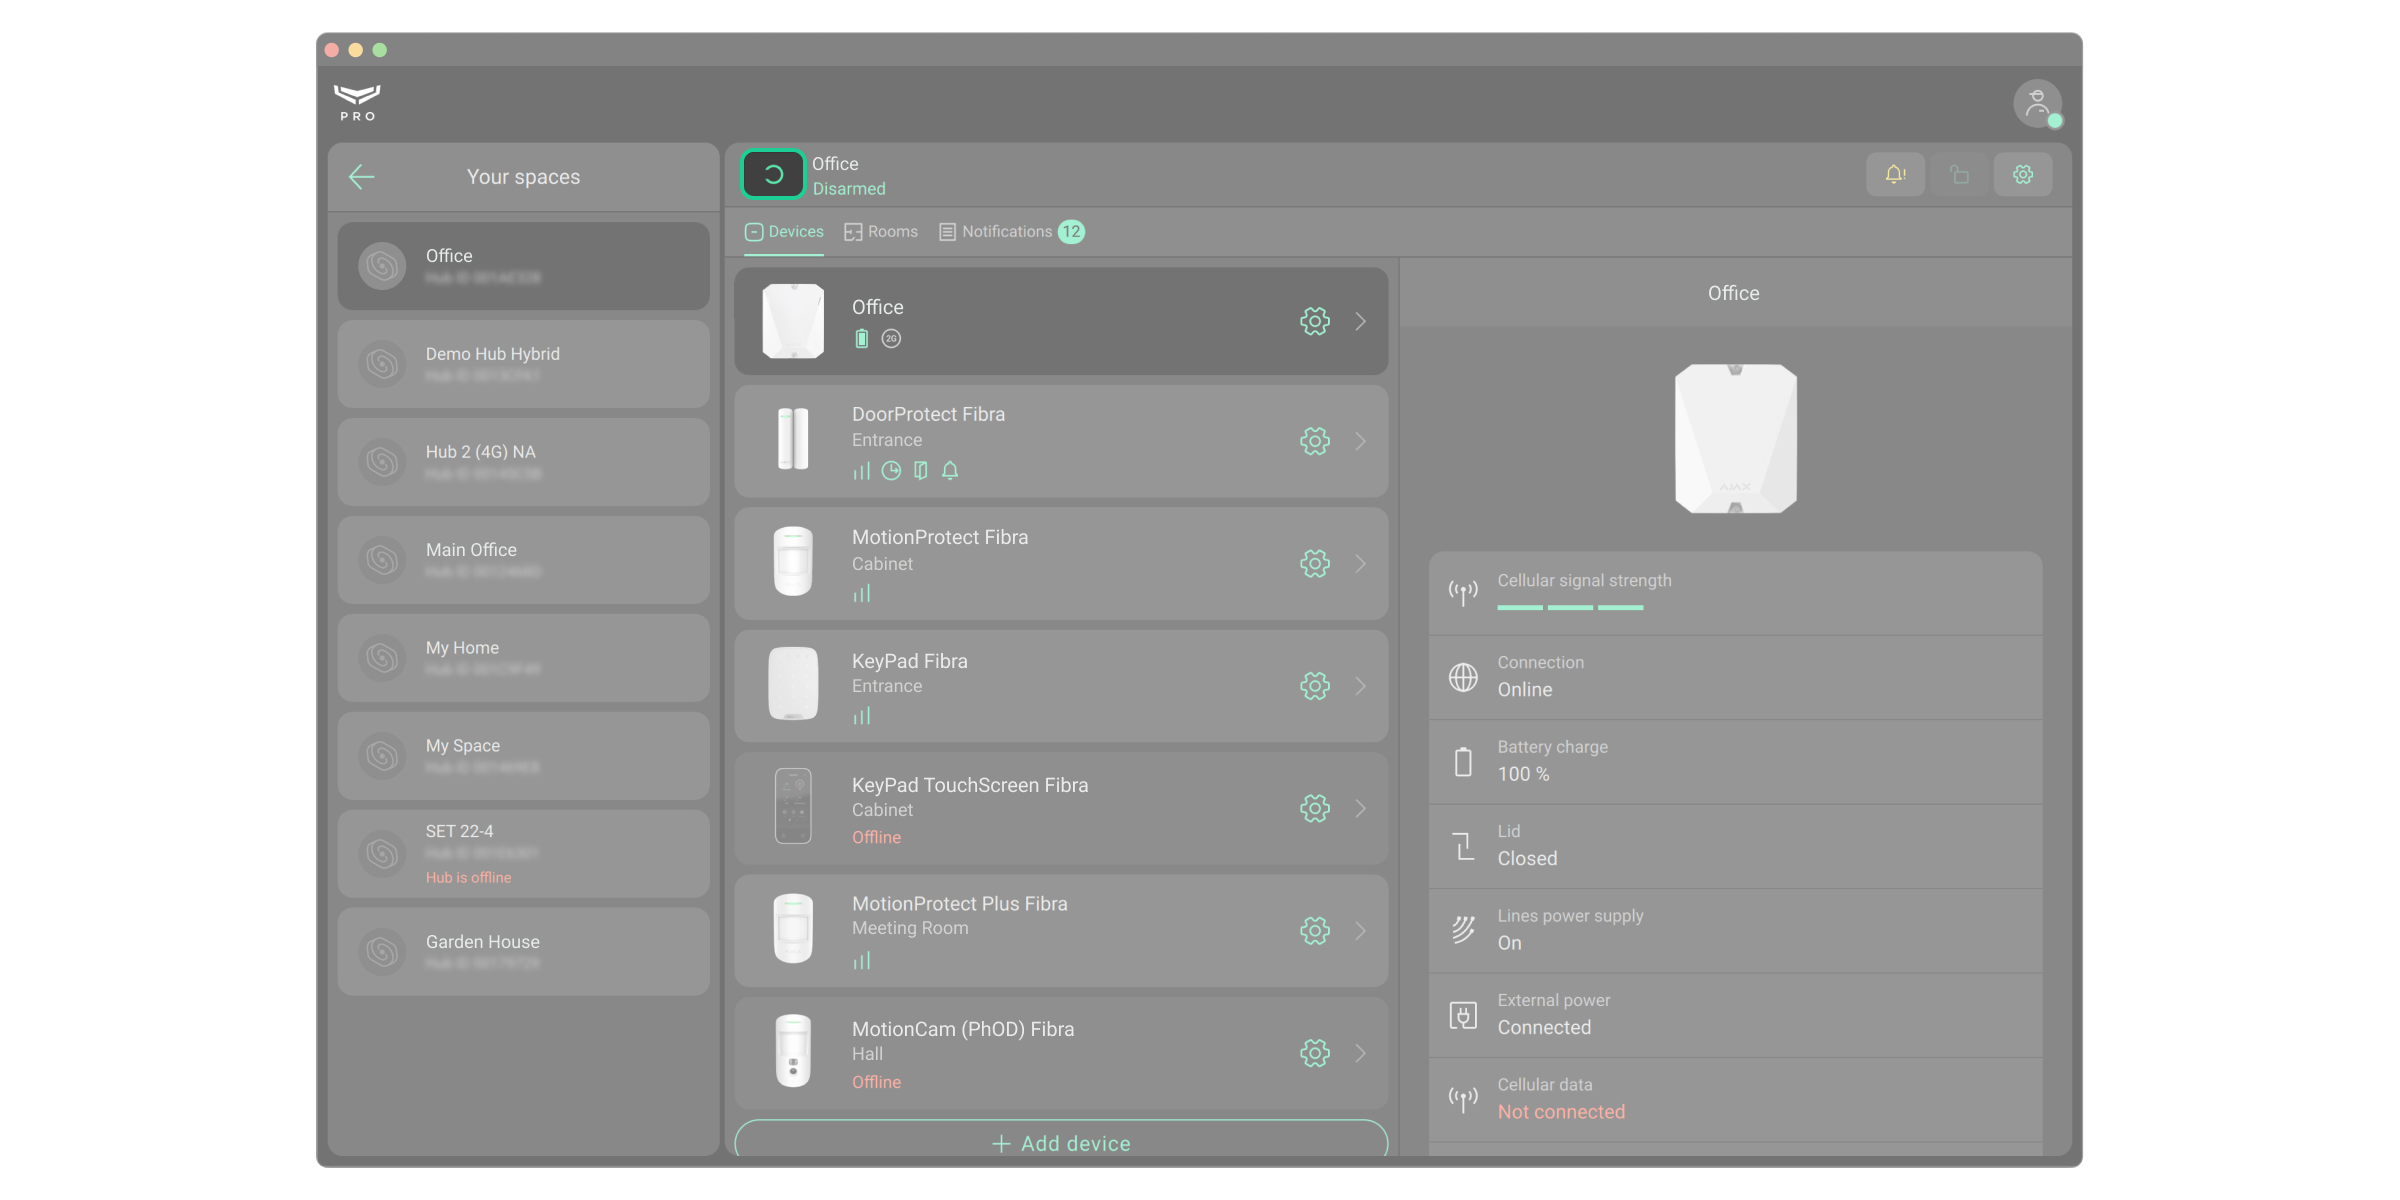
Security system menu
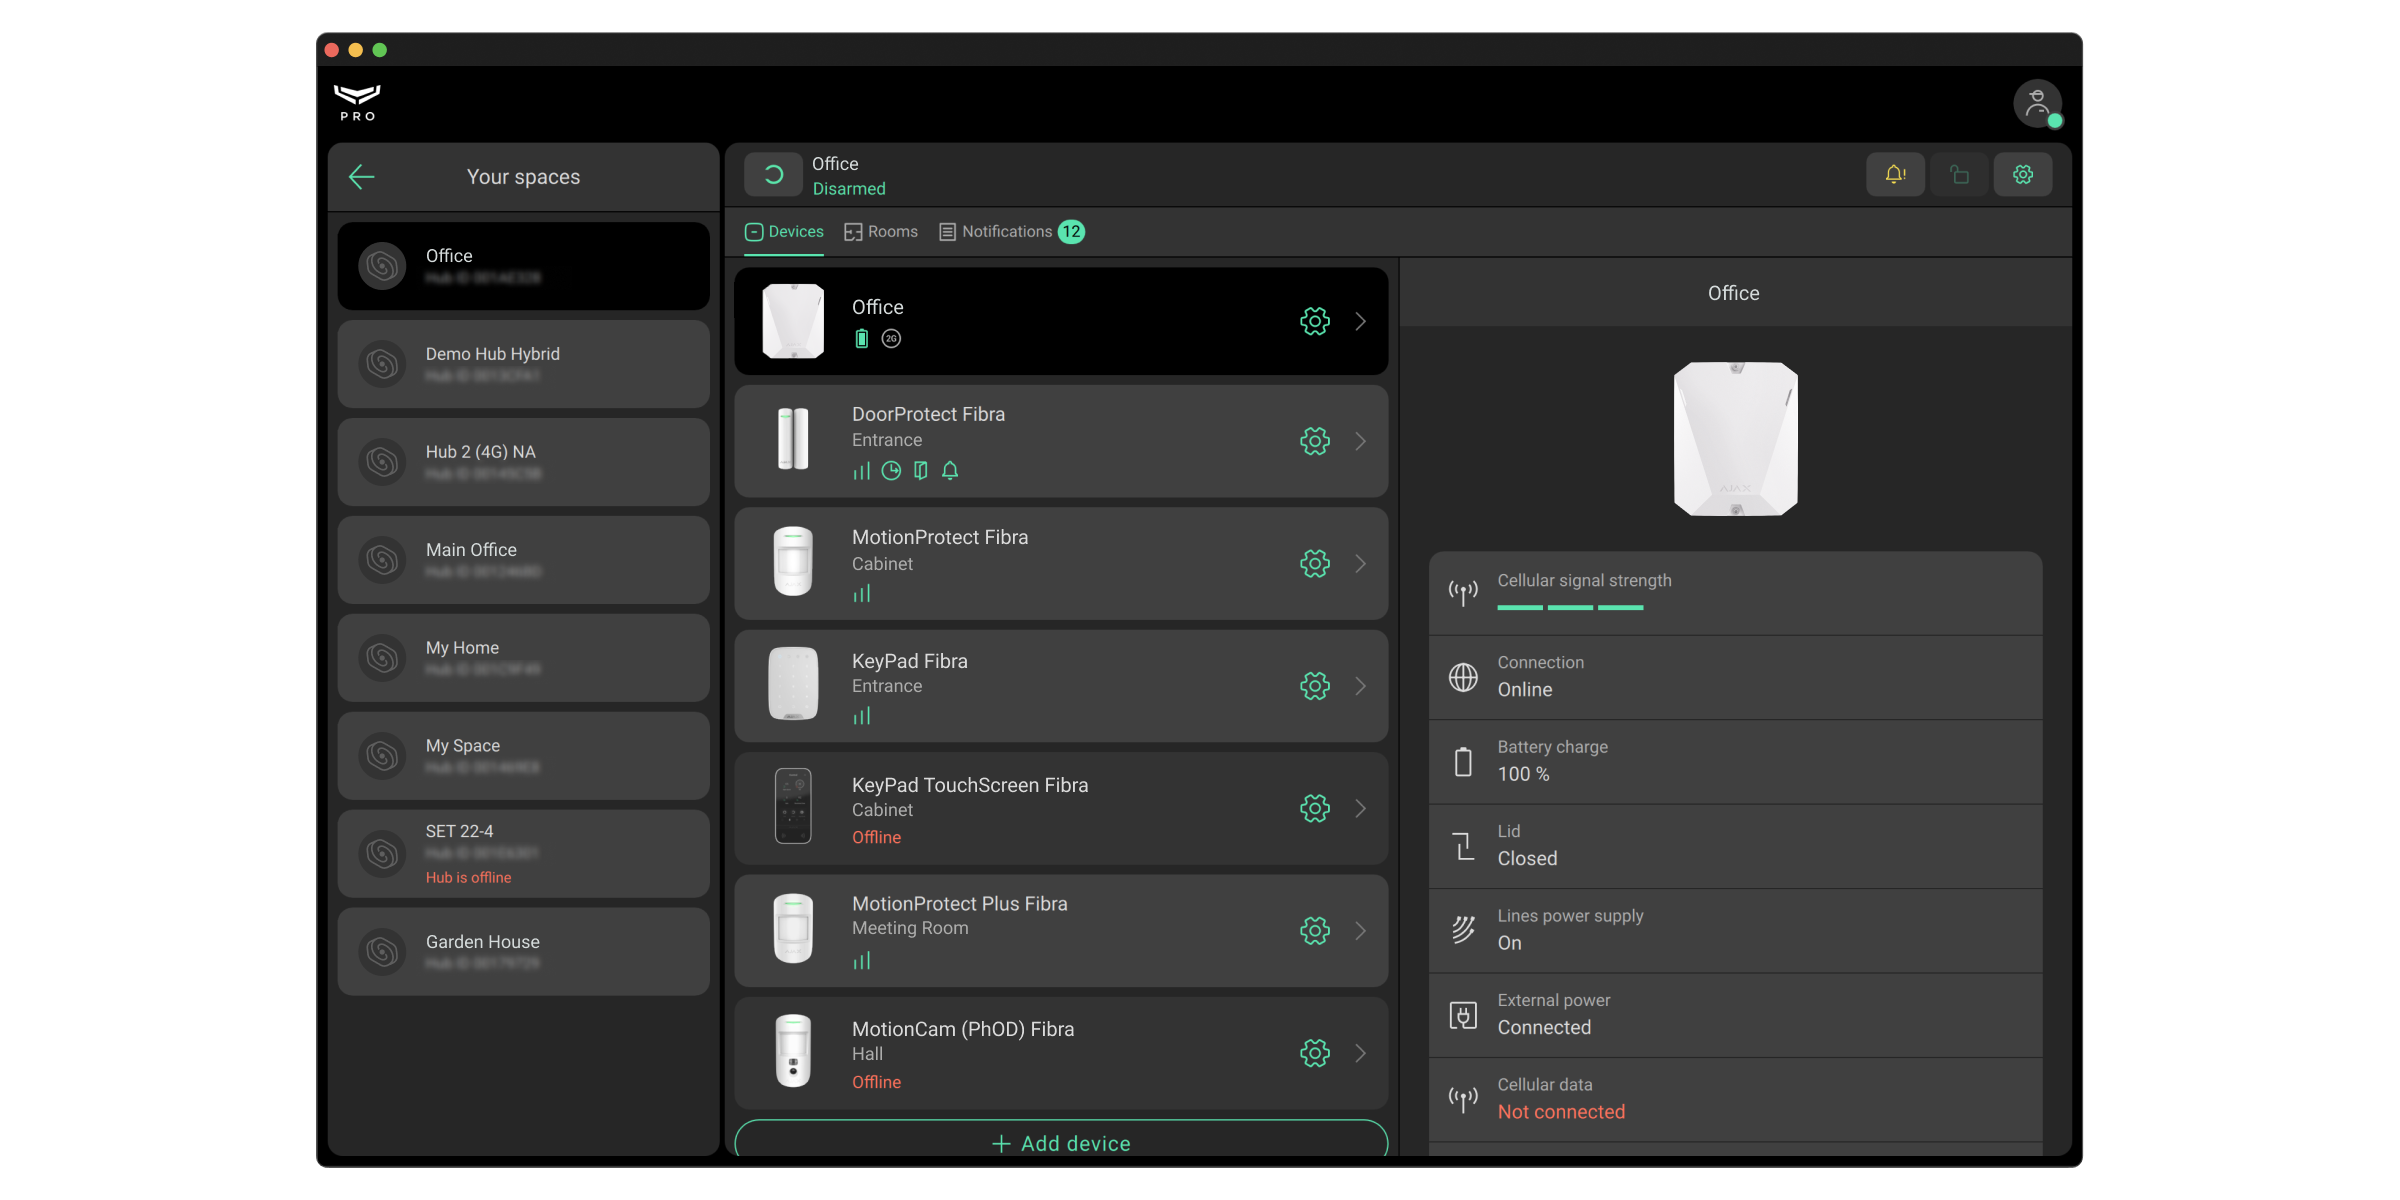
The menu contains rooms, devices, a notifications feed, and object security control buttons. The Your Spaces button returns to the list of linked spaces.
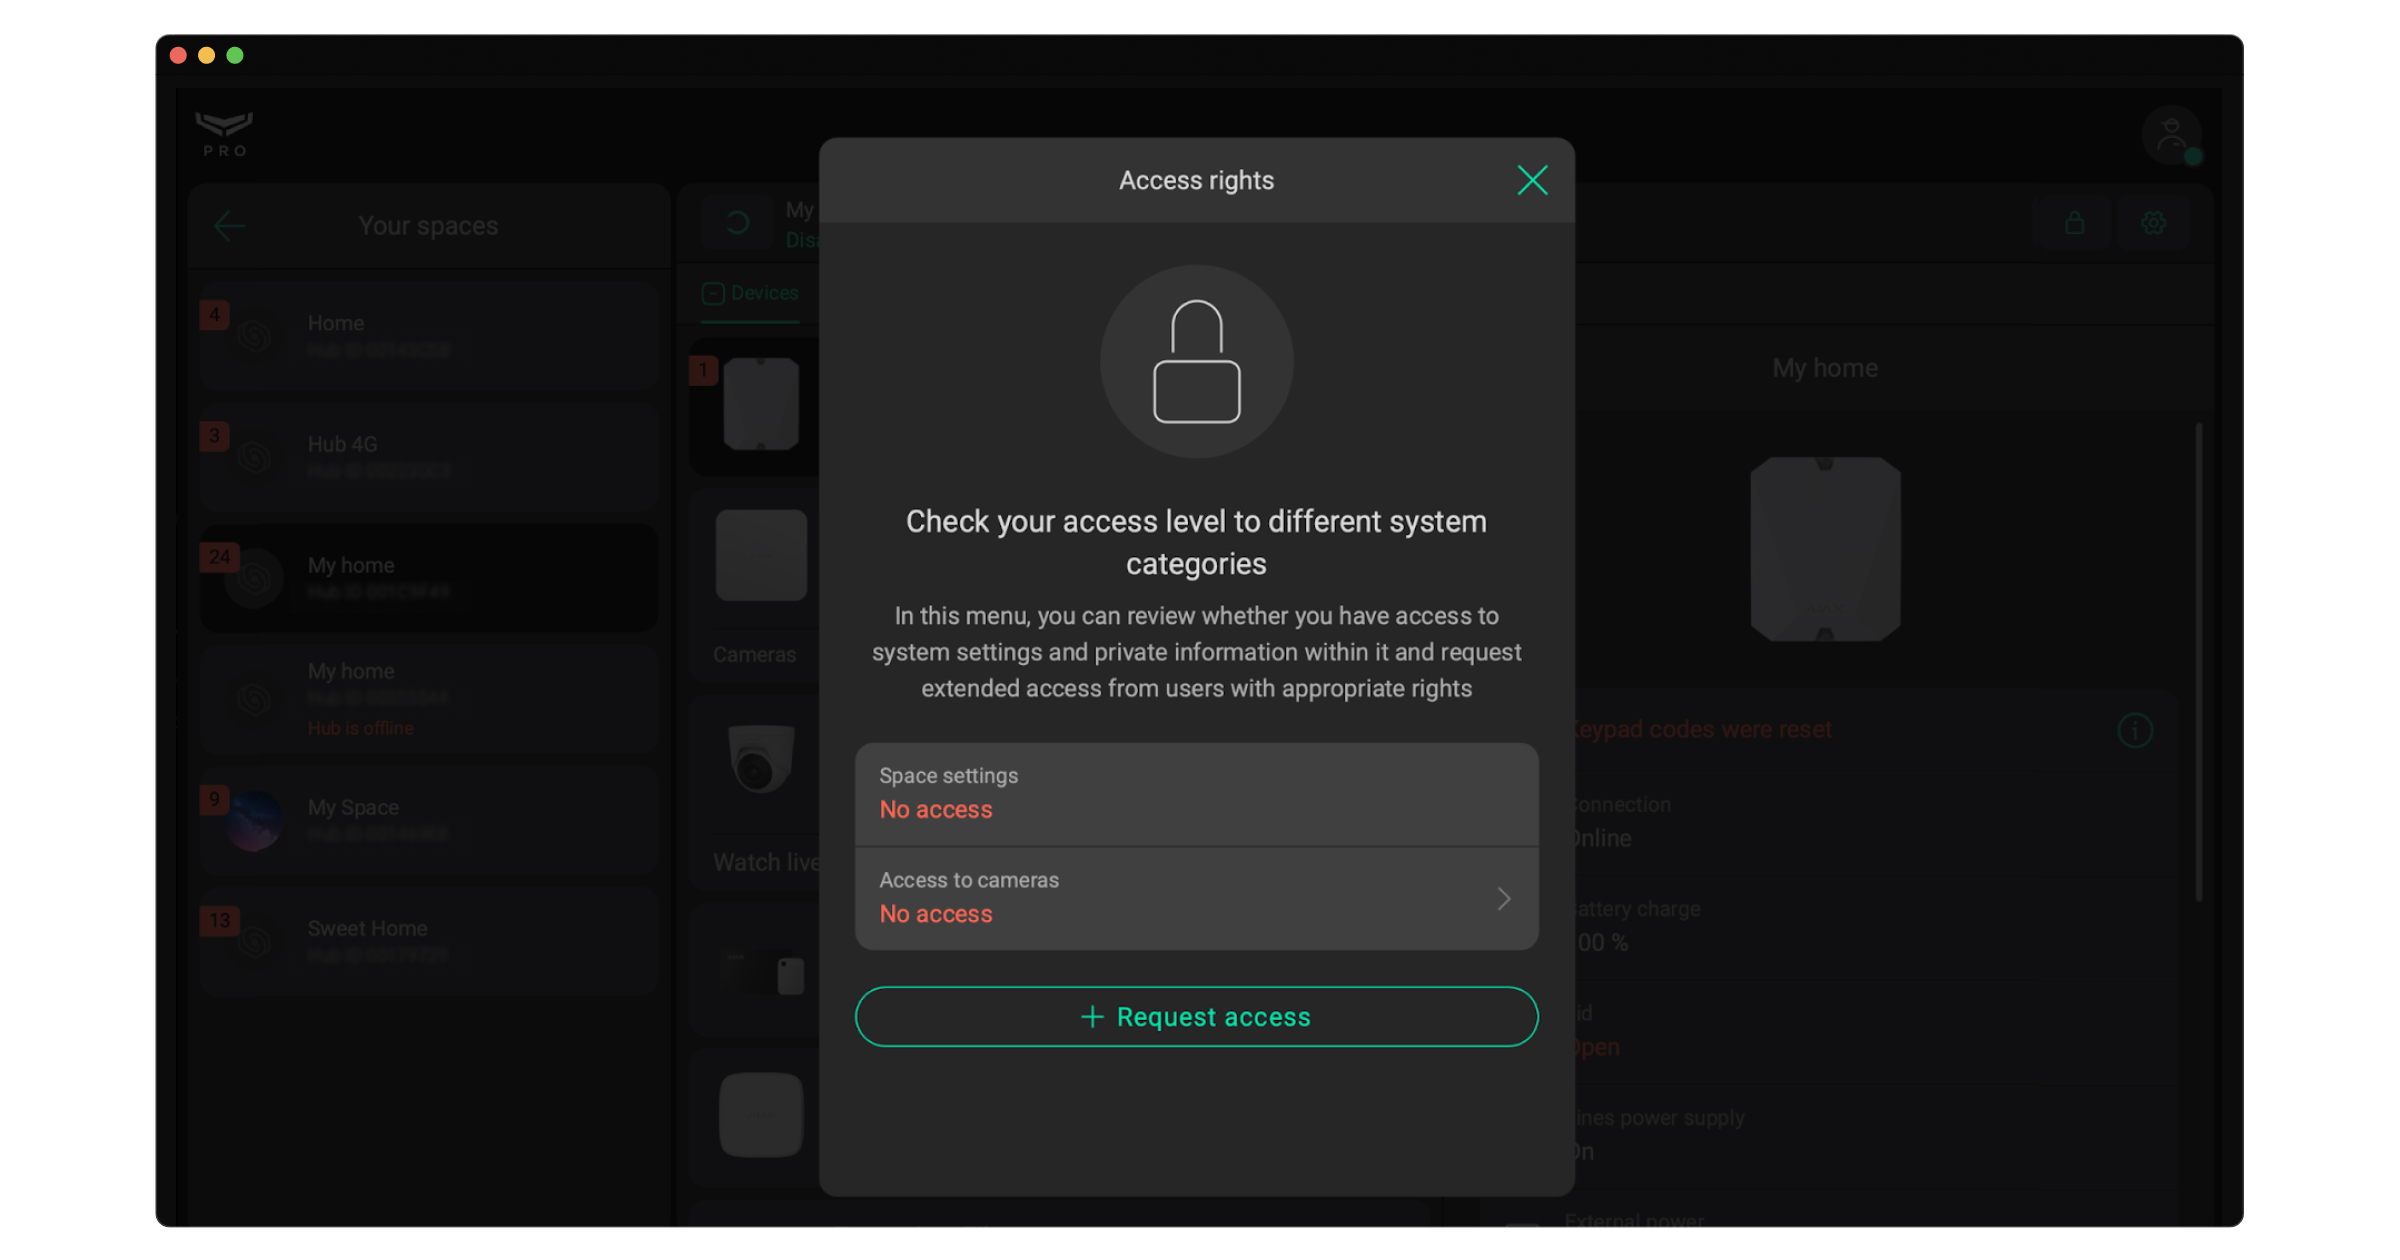
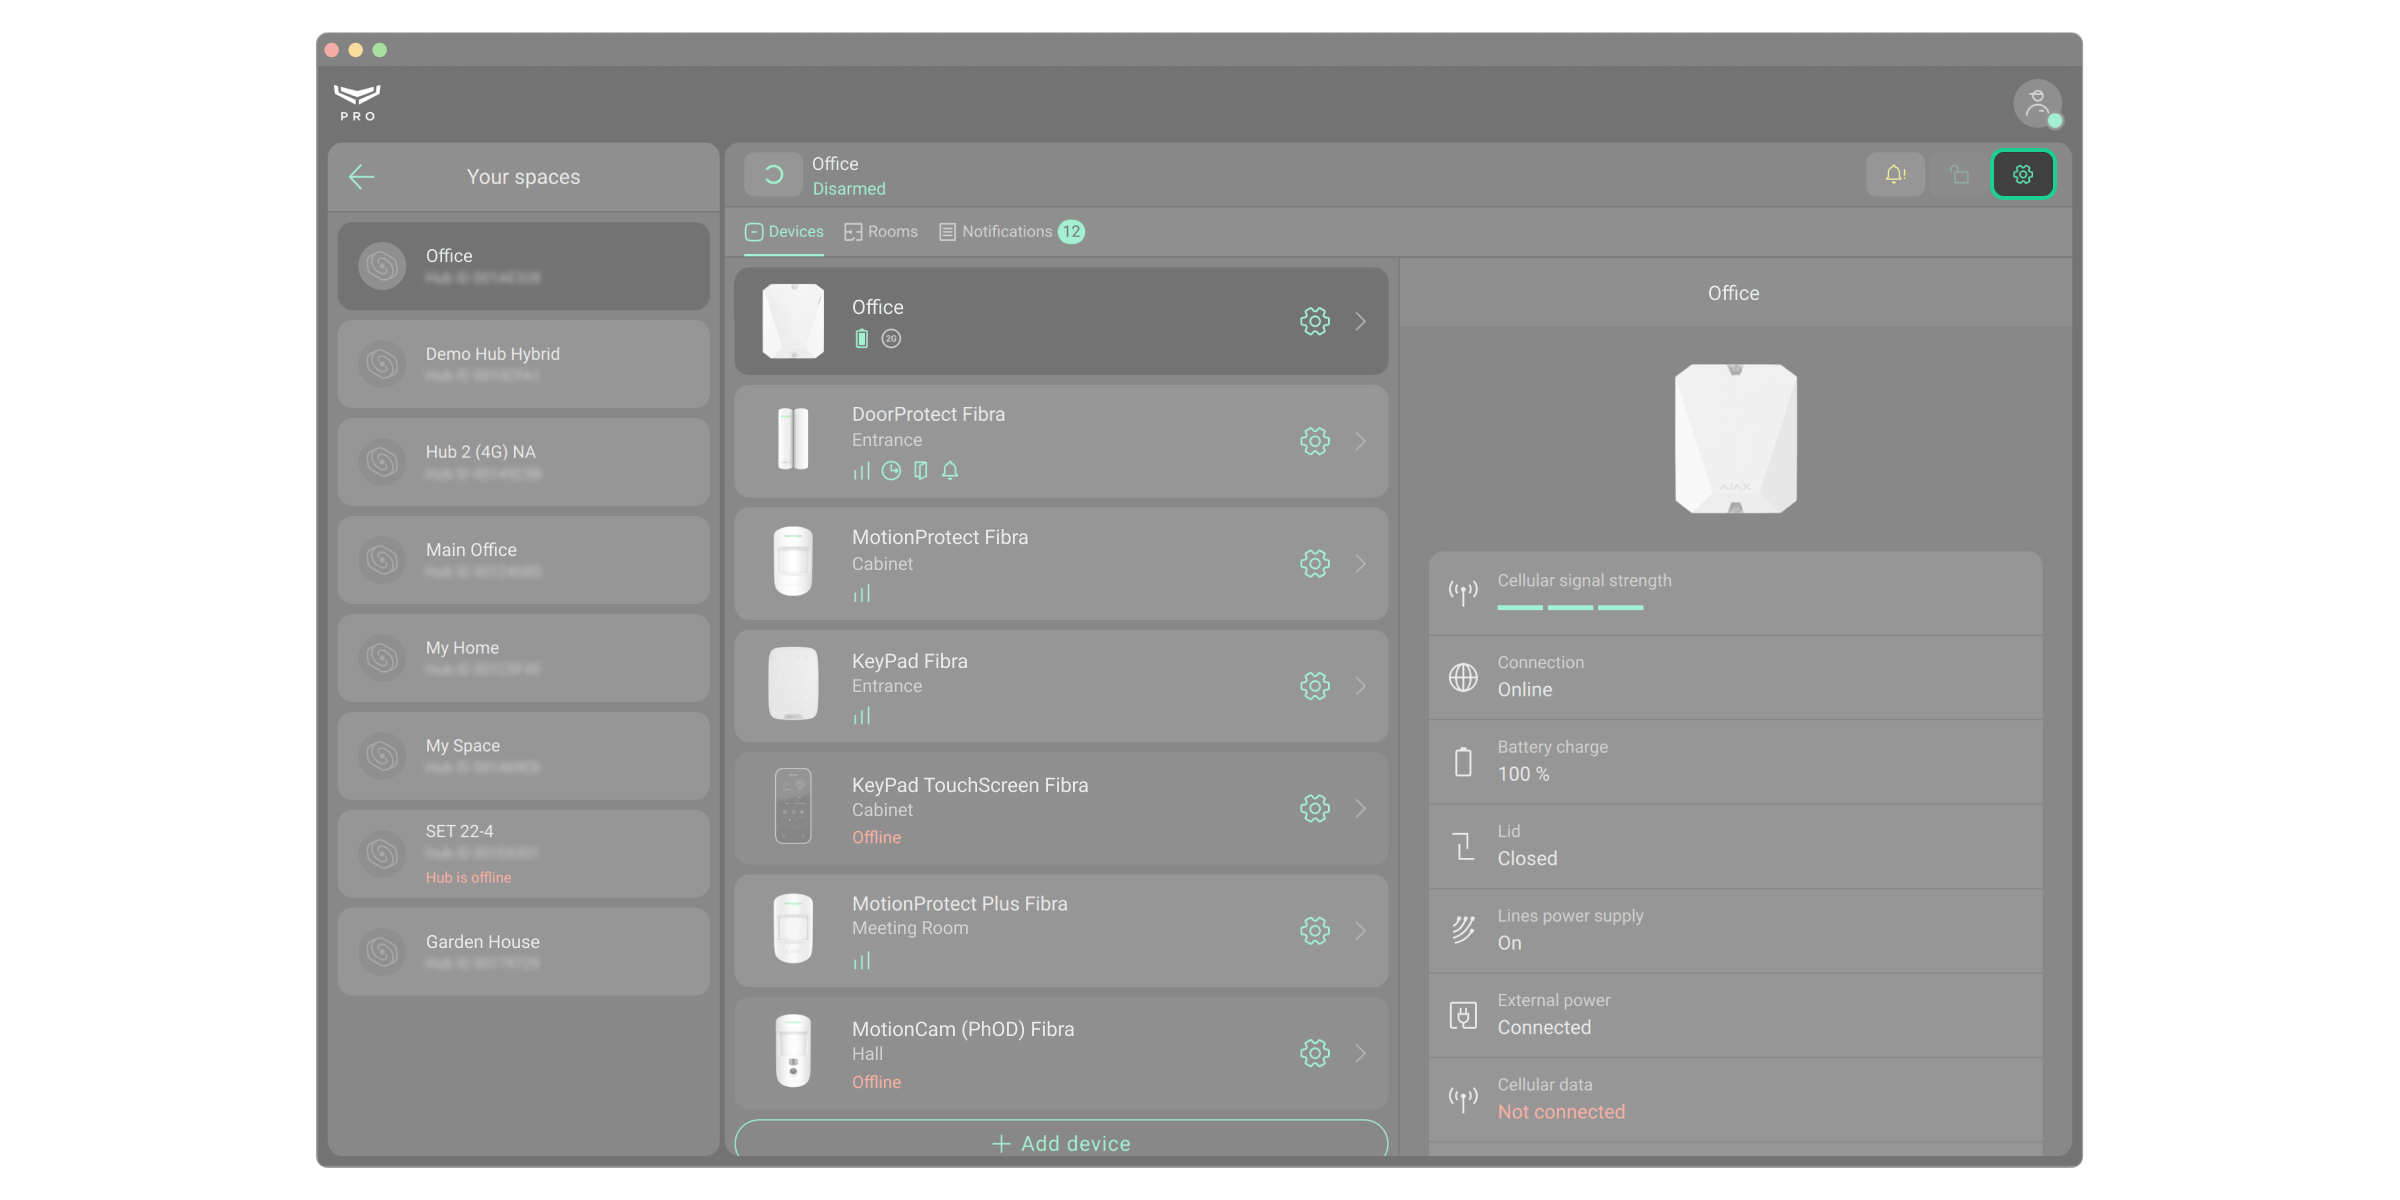
The PRO account can have temporary or permanent access to system settings and view video from cameras. To check the level of access to different components of the system, tap ![]() or
or ![]() , in the upper right corner. The field indicated in the screenshot shows the time during which the PRO account has access to the space settings and number of cameras to which access is provided. Click on the field and select the required option to request temporary or permanent access. The request can be confirmed by the space admin.
, in the upper right corner. The field indicated in the screenshot shows the time during which the PRO account has access to the space settings and number of cameras to which access is provided. Click on the field and select the required option to request temporary or permanent access. The request can be confirmed by the space admin.

A PRO account can manage the object security modes if such a right has been granted to it by the space admin. The field indicated in the screenshot displays the security status of a specific Ajax system. By clicking on the field, you can change the security mode or press the Panic button, if the PRO account is entitled to do so.
Setting up the security system
Change hub or device settings
- Select the space from the list and go to its Settings
 .
. - Make changes.
Changing the hub or device settings
- Go to the Devices menu.
- Select the device from the list.
- Go to its Settings .
- Make changes.
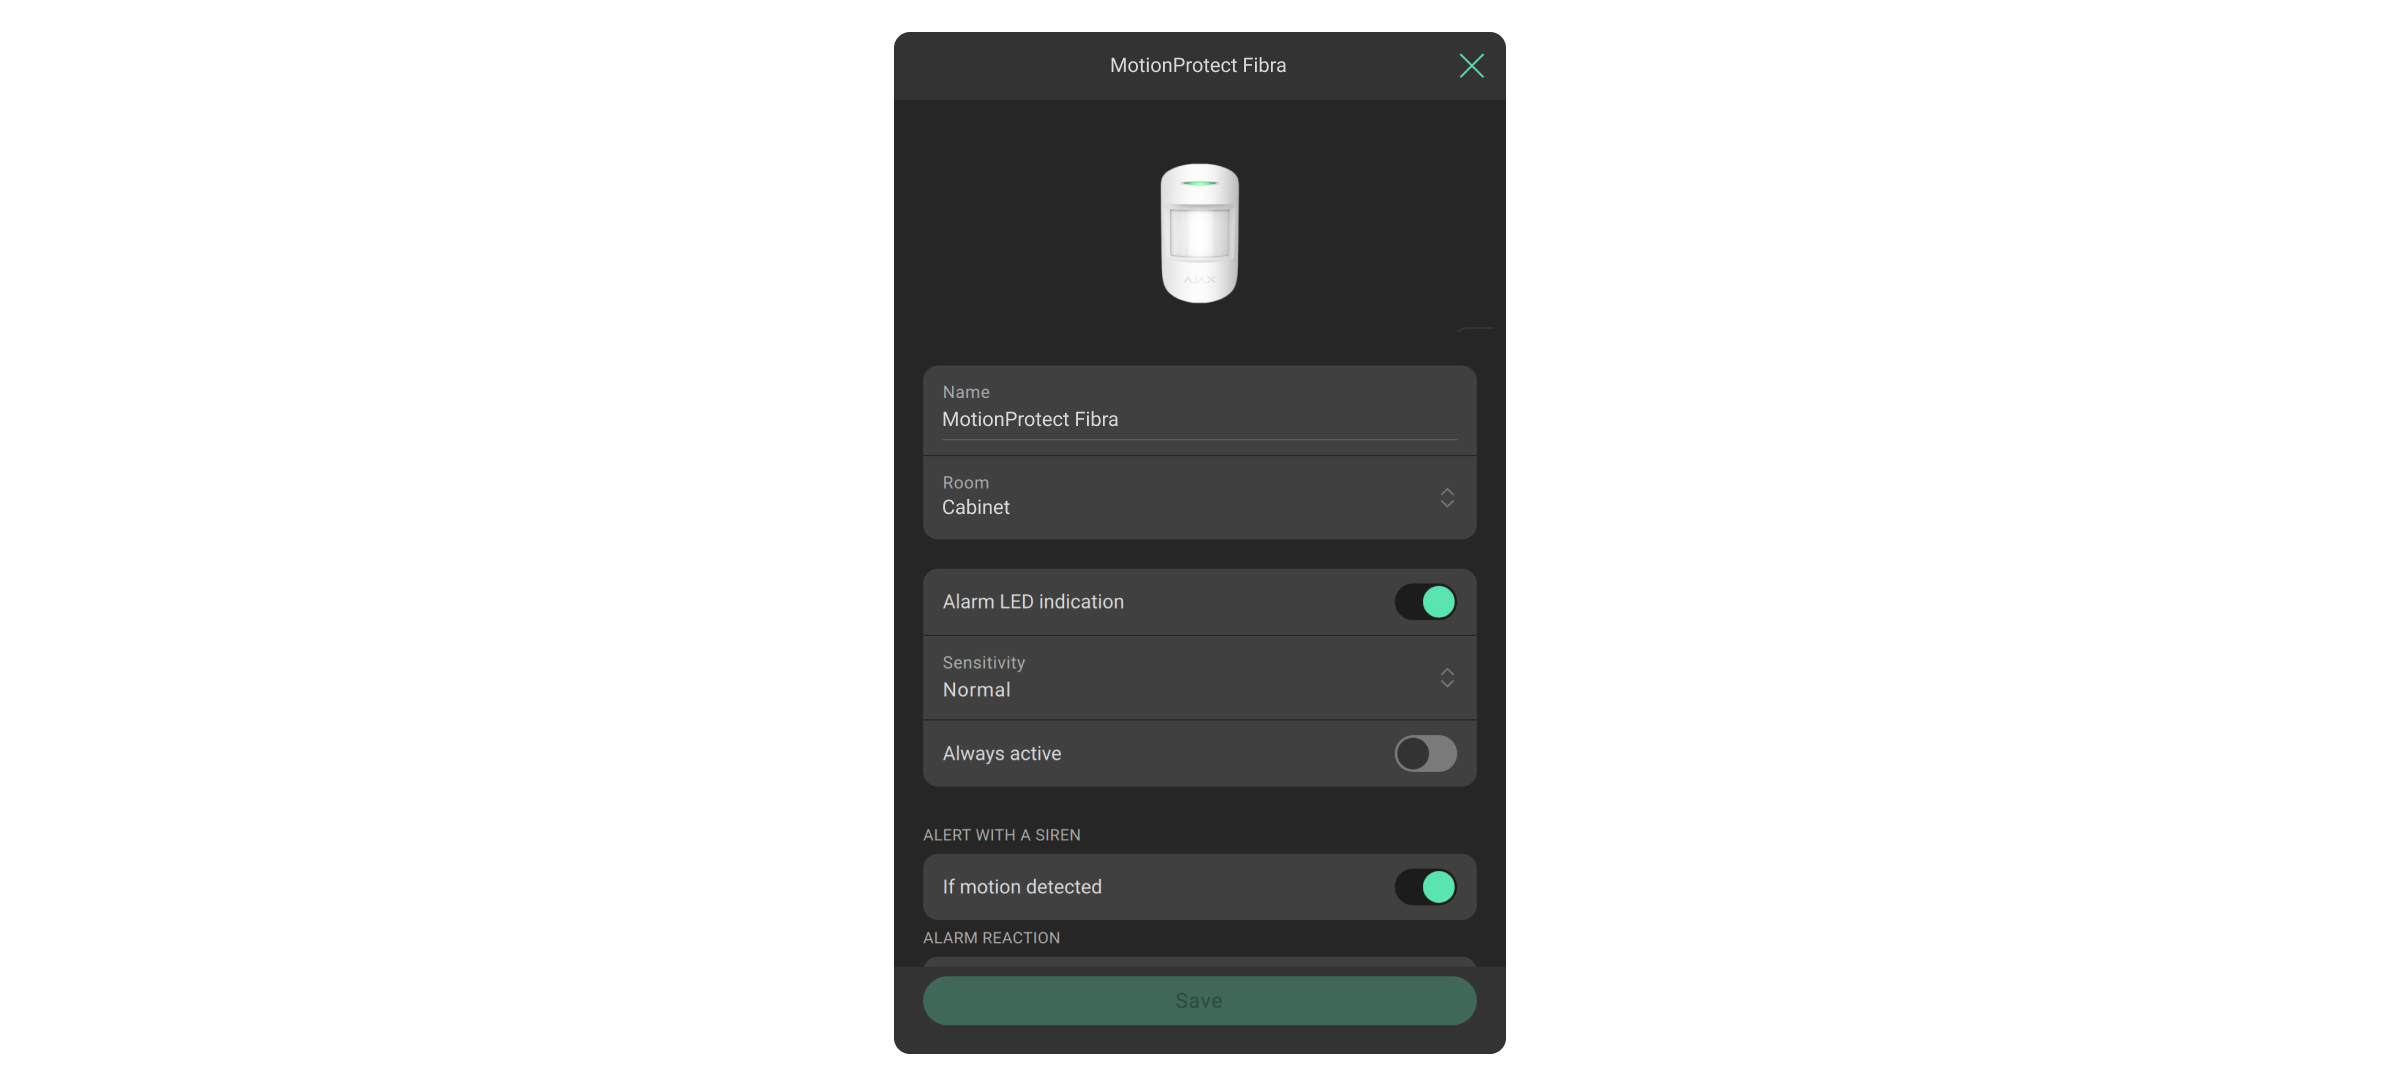
All device settings are described in the user manual of this device.
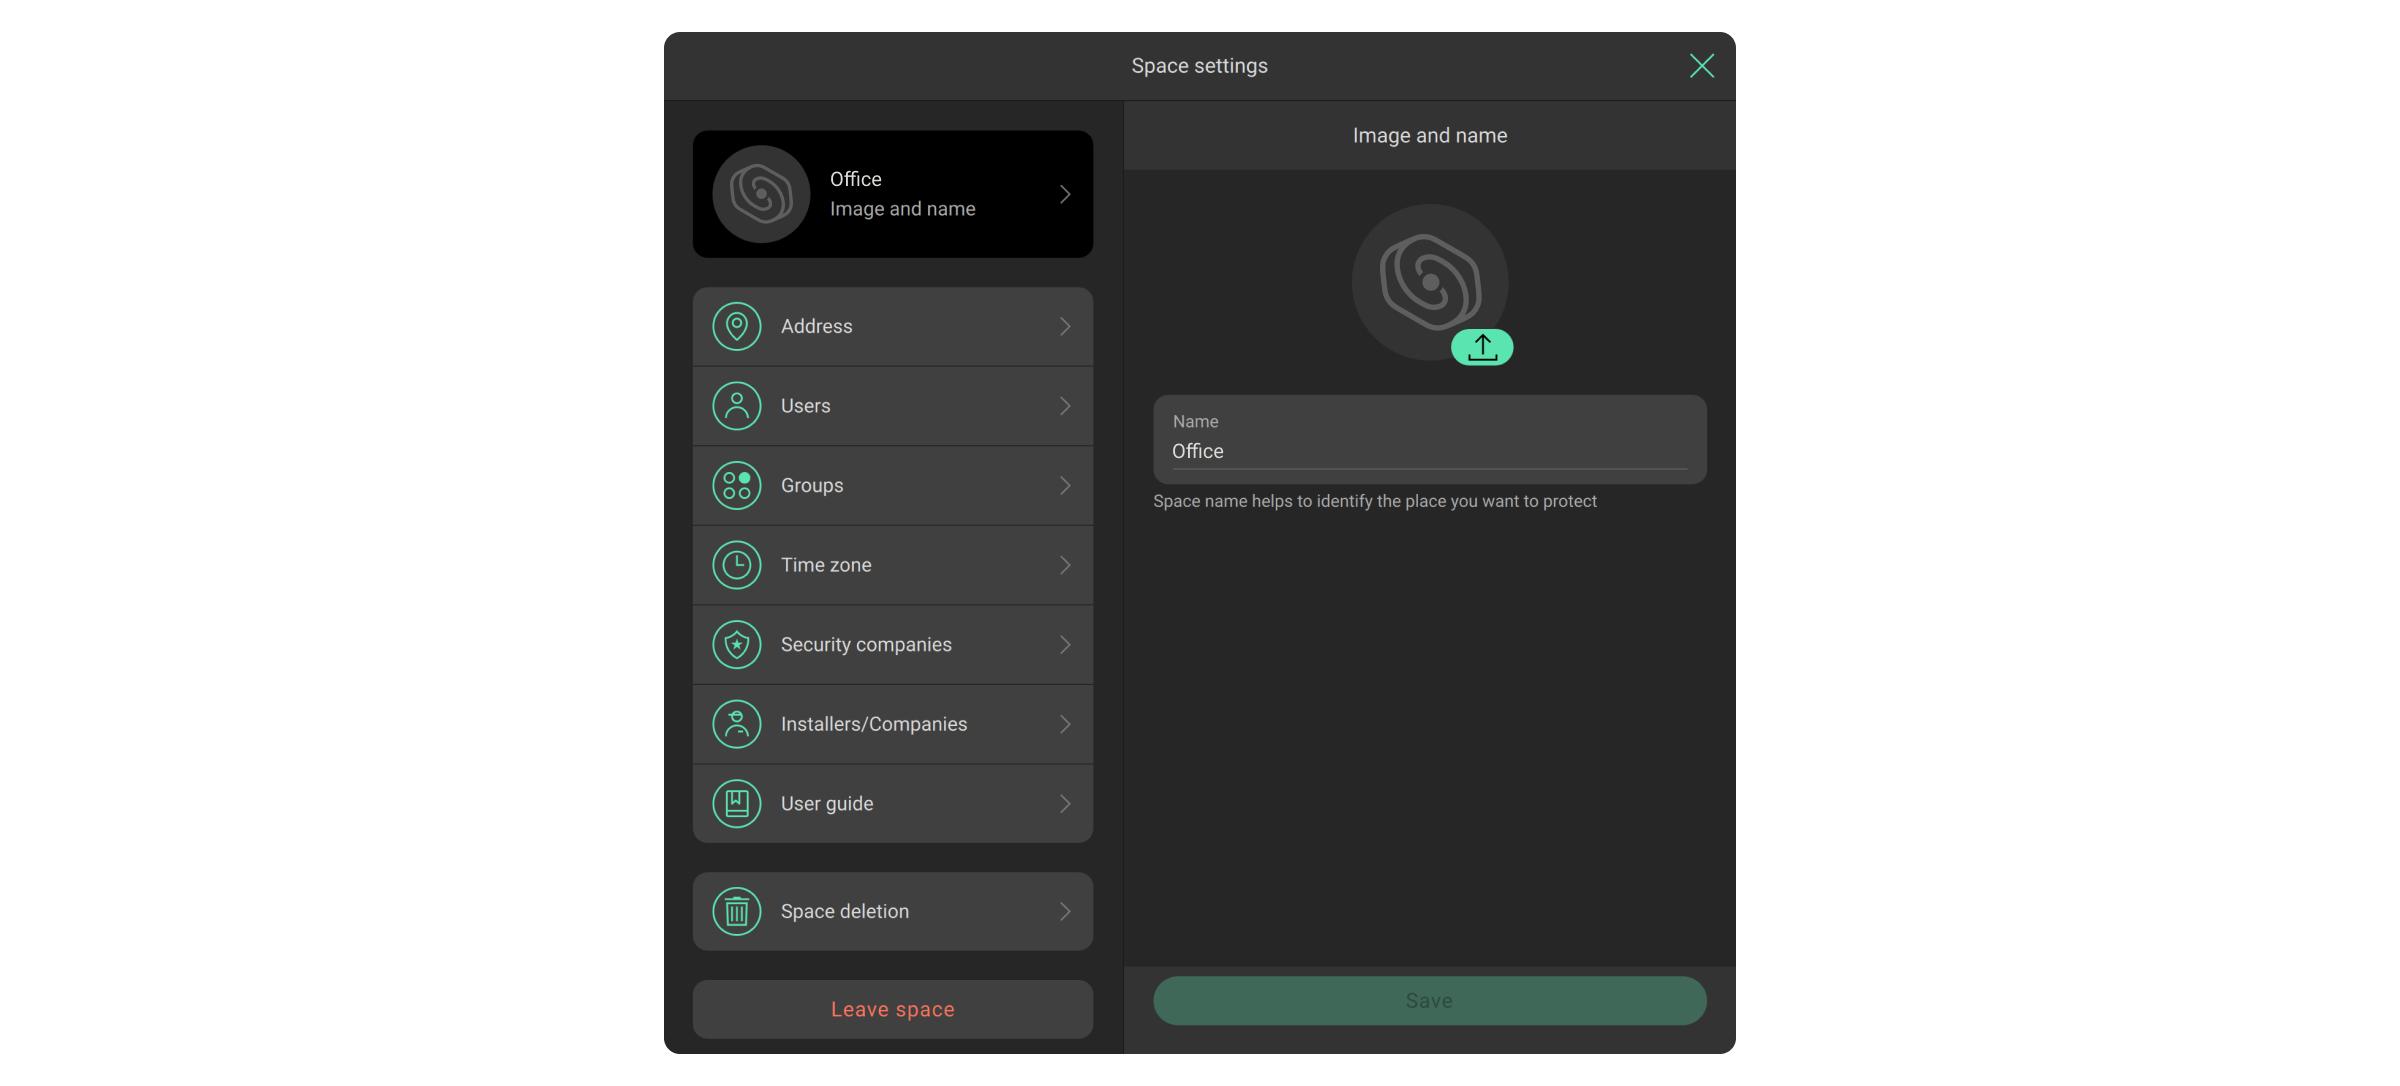
User management
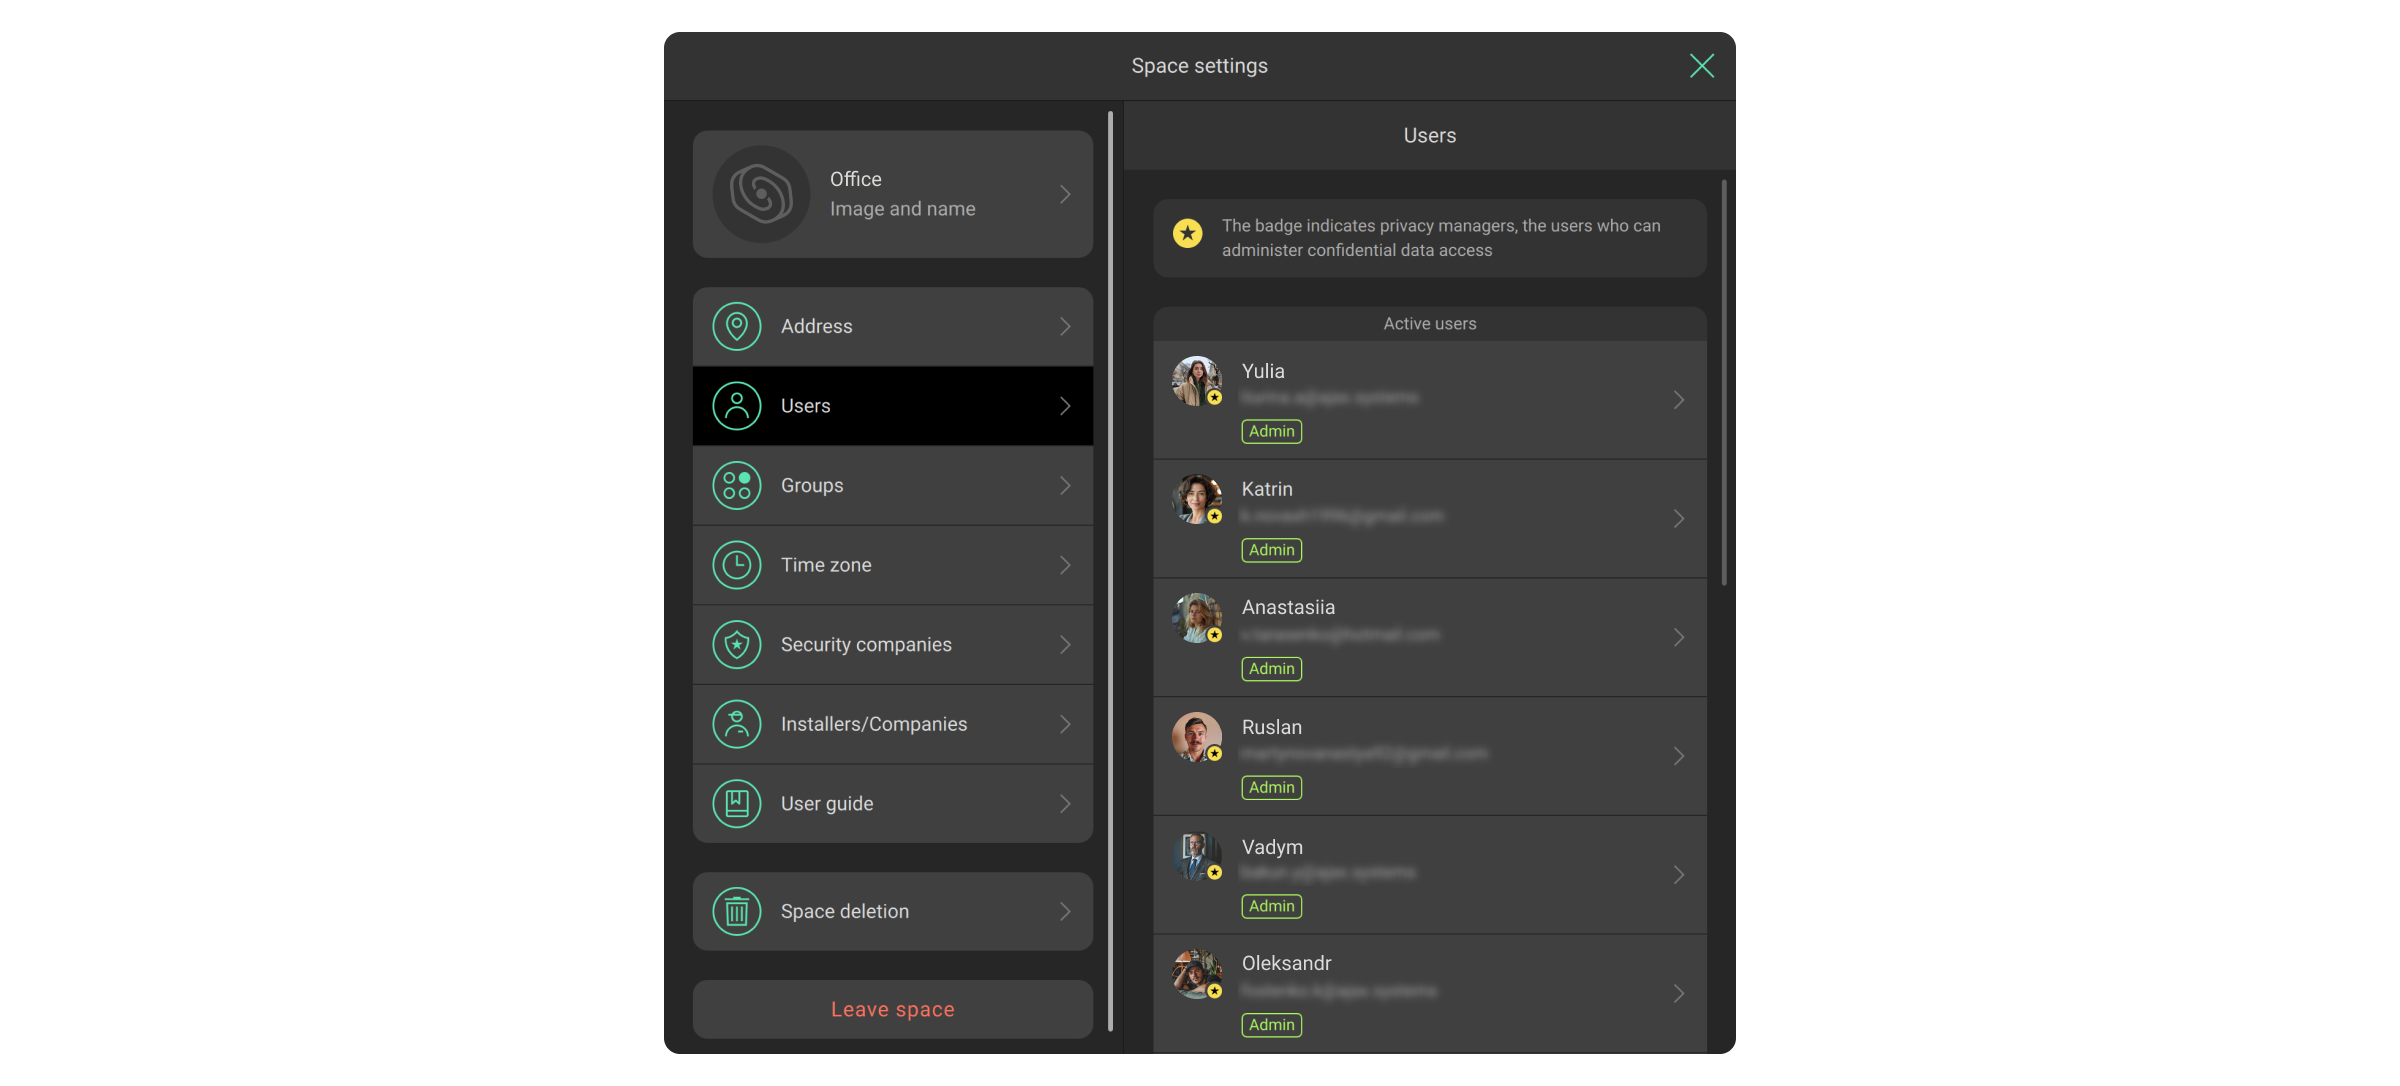
- Go to the space Settings .
- Select the Users menu.
- Make changes: add users, change their permissions, or delete them.
PRO account management

- Go to the space Settings .
- Select the Installers/Companies menu.
- Make changes: add a PRO account, change its rights, or delete it.
Working with a company account
A company account combines all security objects, employee accounts, and teams of rapid response units (RRU) in one interface.
Company service types
PRO Desktop is an integrated tool for security, installation and service business. The app has a set of functions for both Alarm monitoring and Installation and maintenance.
The set of functions is selected independently. The app also allows you to select both types of services at once: Alarm monitoring and Installation and maintenance. This is provided for companies that simultaneously install security systems and respond to their alarms and events.
The owner specifies the types of services when registering the company and can change them at any time. The interface and functions of the app adapt to the selected type of service.
Creating a company

The PRO account that created the company becomes the Company owner. Such a PRO account has access to all PRO Desktop modules, can add and remove employees, as well as change information about the company. One PRO account can create an unlimited number of companies.
The role of the Company owner can be assigned to one PRO account only. Only the Company owner or an authorized employee should create the company. Deleting the company or changing the Company owner is not provided.
To create a company:
- Open PRO Desktop.
- Sign in to a PRO account.
- Go to a personal PRO account if a company account is open.
- Go to the Company module.
- Click Create company.
- Enter the company name and the country of service.
- Specify the type of service the company provides: alarm monitoring, installation and maintenance, or both.
- Fill in company information and follow the app’s instructions.
In the registration form, enter an available and working email address. A validation code will be sent to the owner’s email to complete the company creation. This code should be entered at the last step of registration. After validation, the company is created automatically. You don’t need to wait for additional confirmation.
Employees
You can add employees or change the roles of already connected PRO accounts in the Employees menu (Company module → Employees menu). You can only add an employee who already has a PRO account. An account can be registered in any of these two apps: PRO Desktop or Ajax PRO: Tool for Engineers.
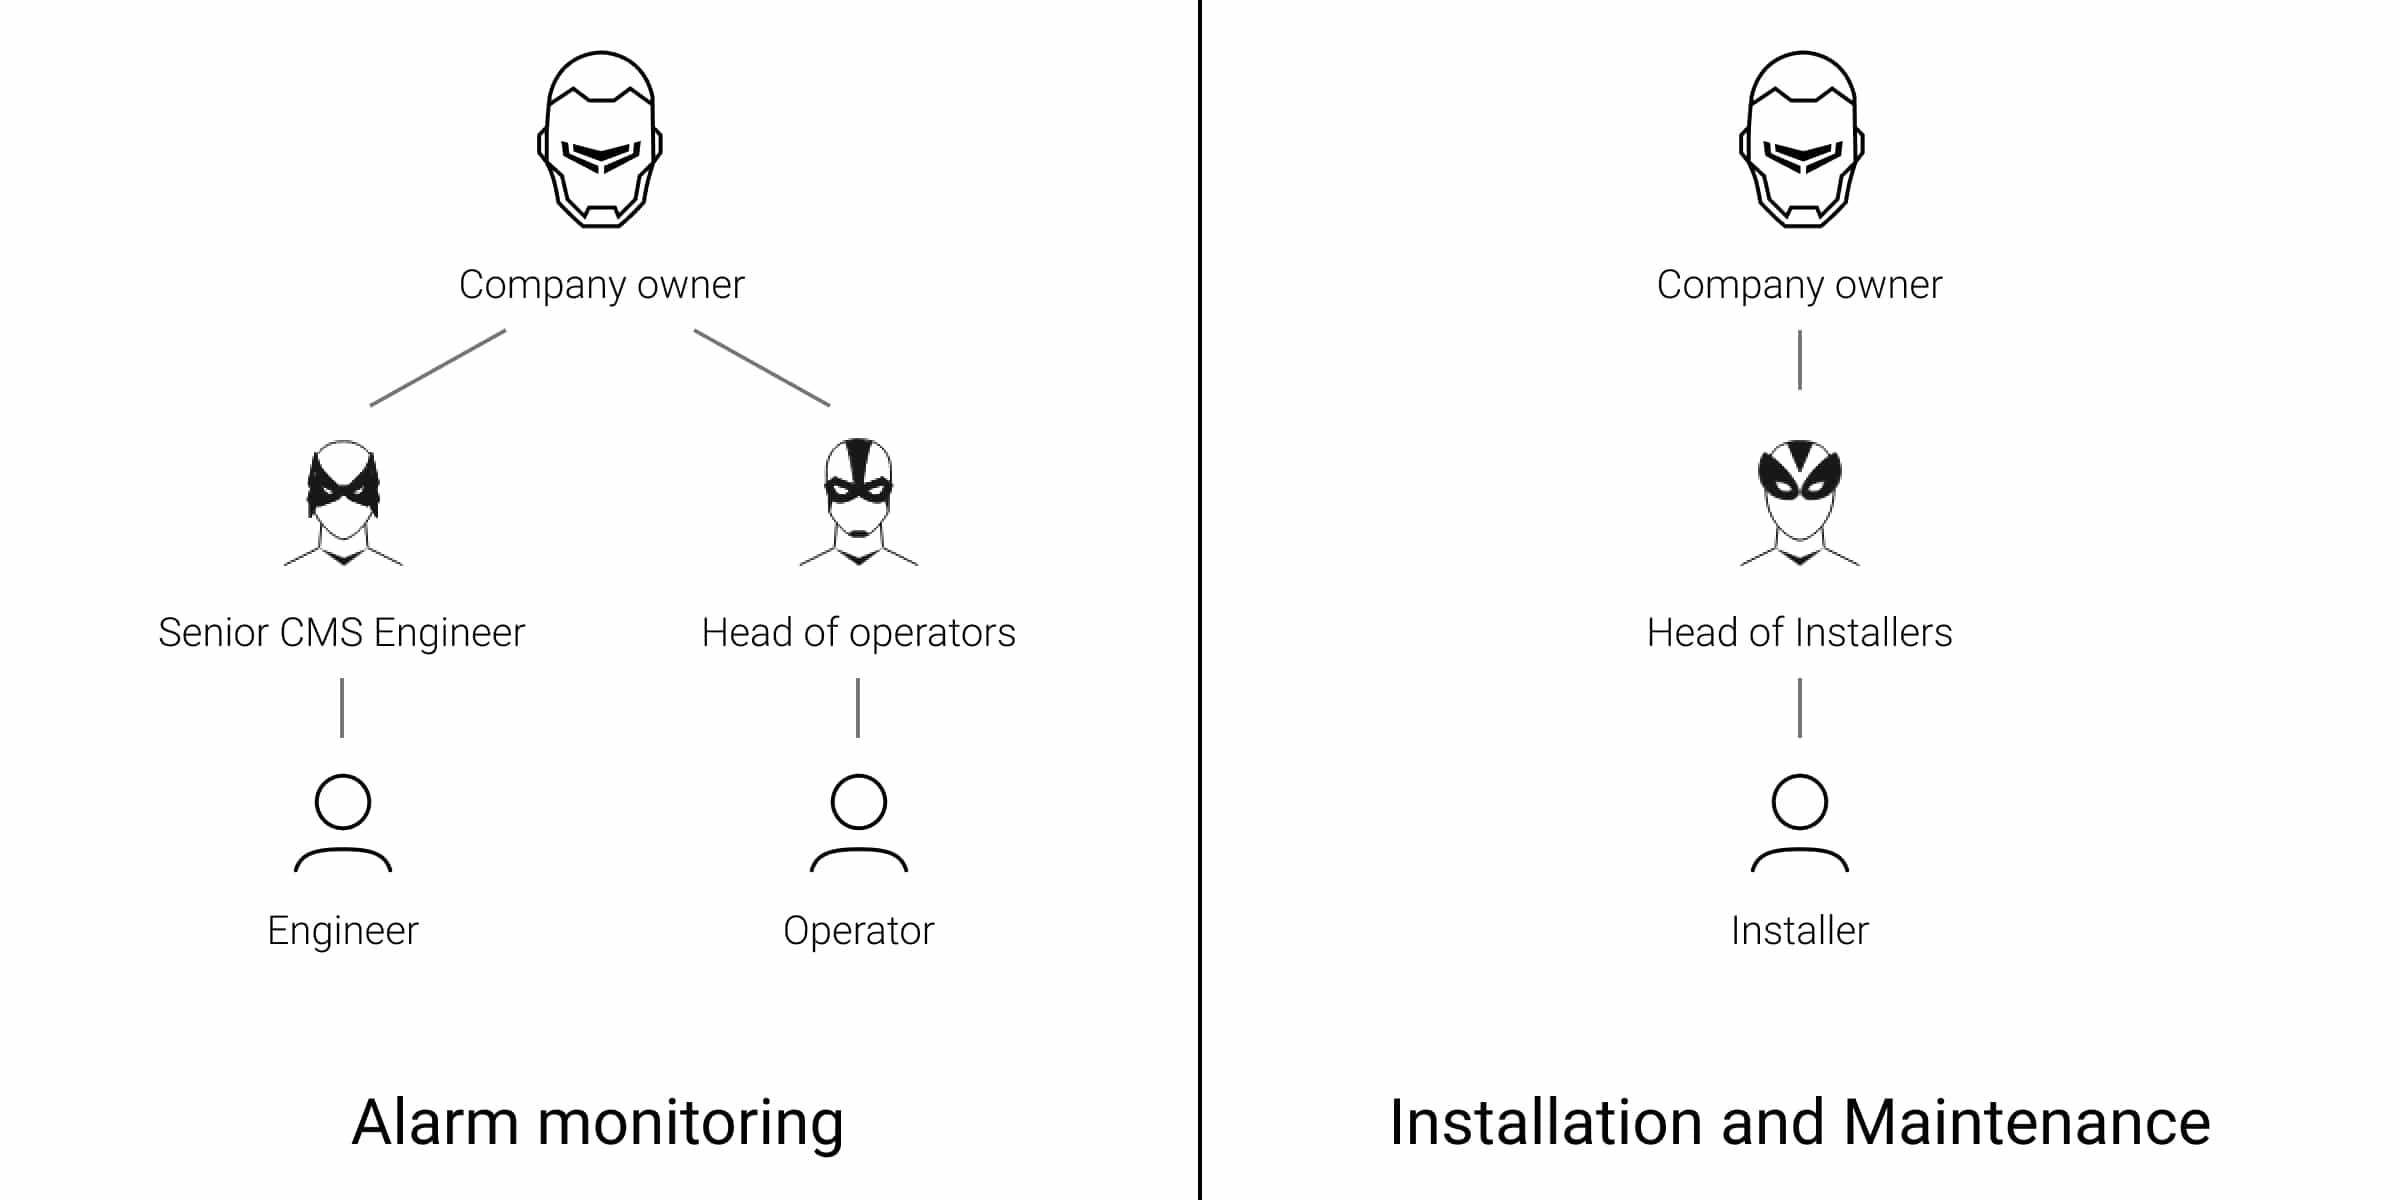
Employee Roles
If the Alarm monitoring service type is selected:
- Company owner
- Senior CMS Engineer
- Engineer
- Head of operators
- Operator
If the Installation and Maintenance service type is selected:
- Company owner
- Head of Installers
- Installer
If both service types are selected: All employee roles are available.
Employee rights and access
Adding, editing, and deactivating employees
To add an employee, they should have a PRO account registered.
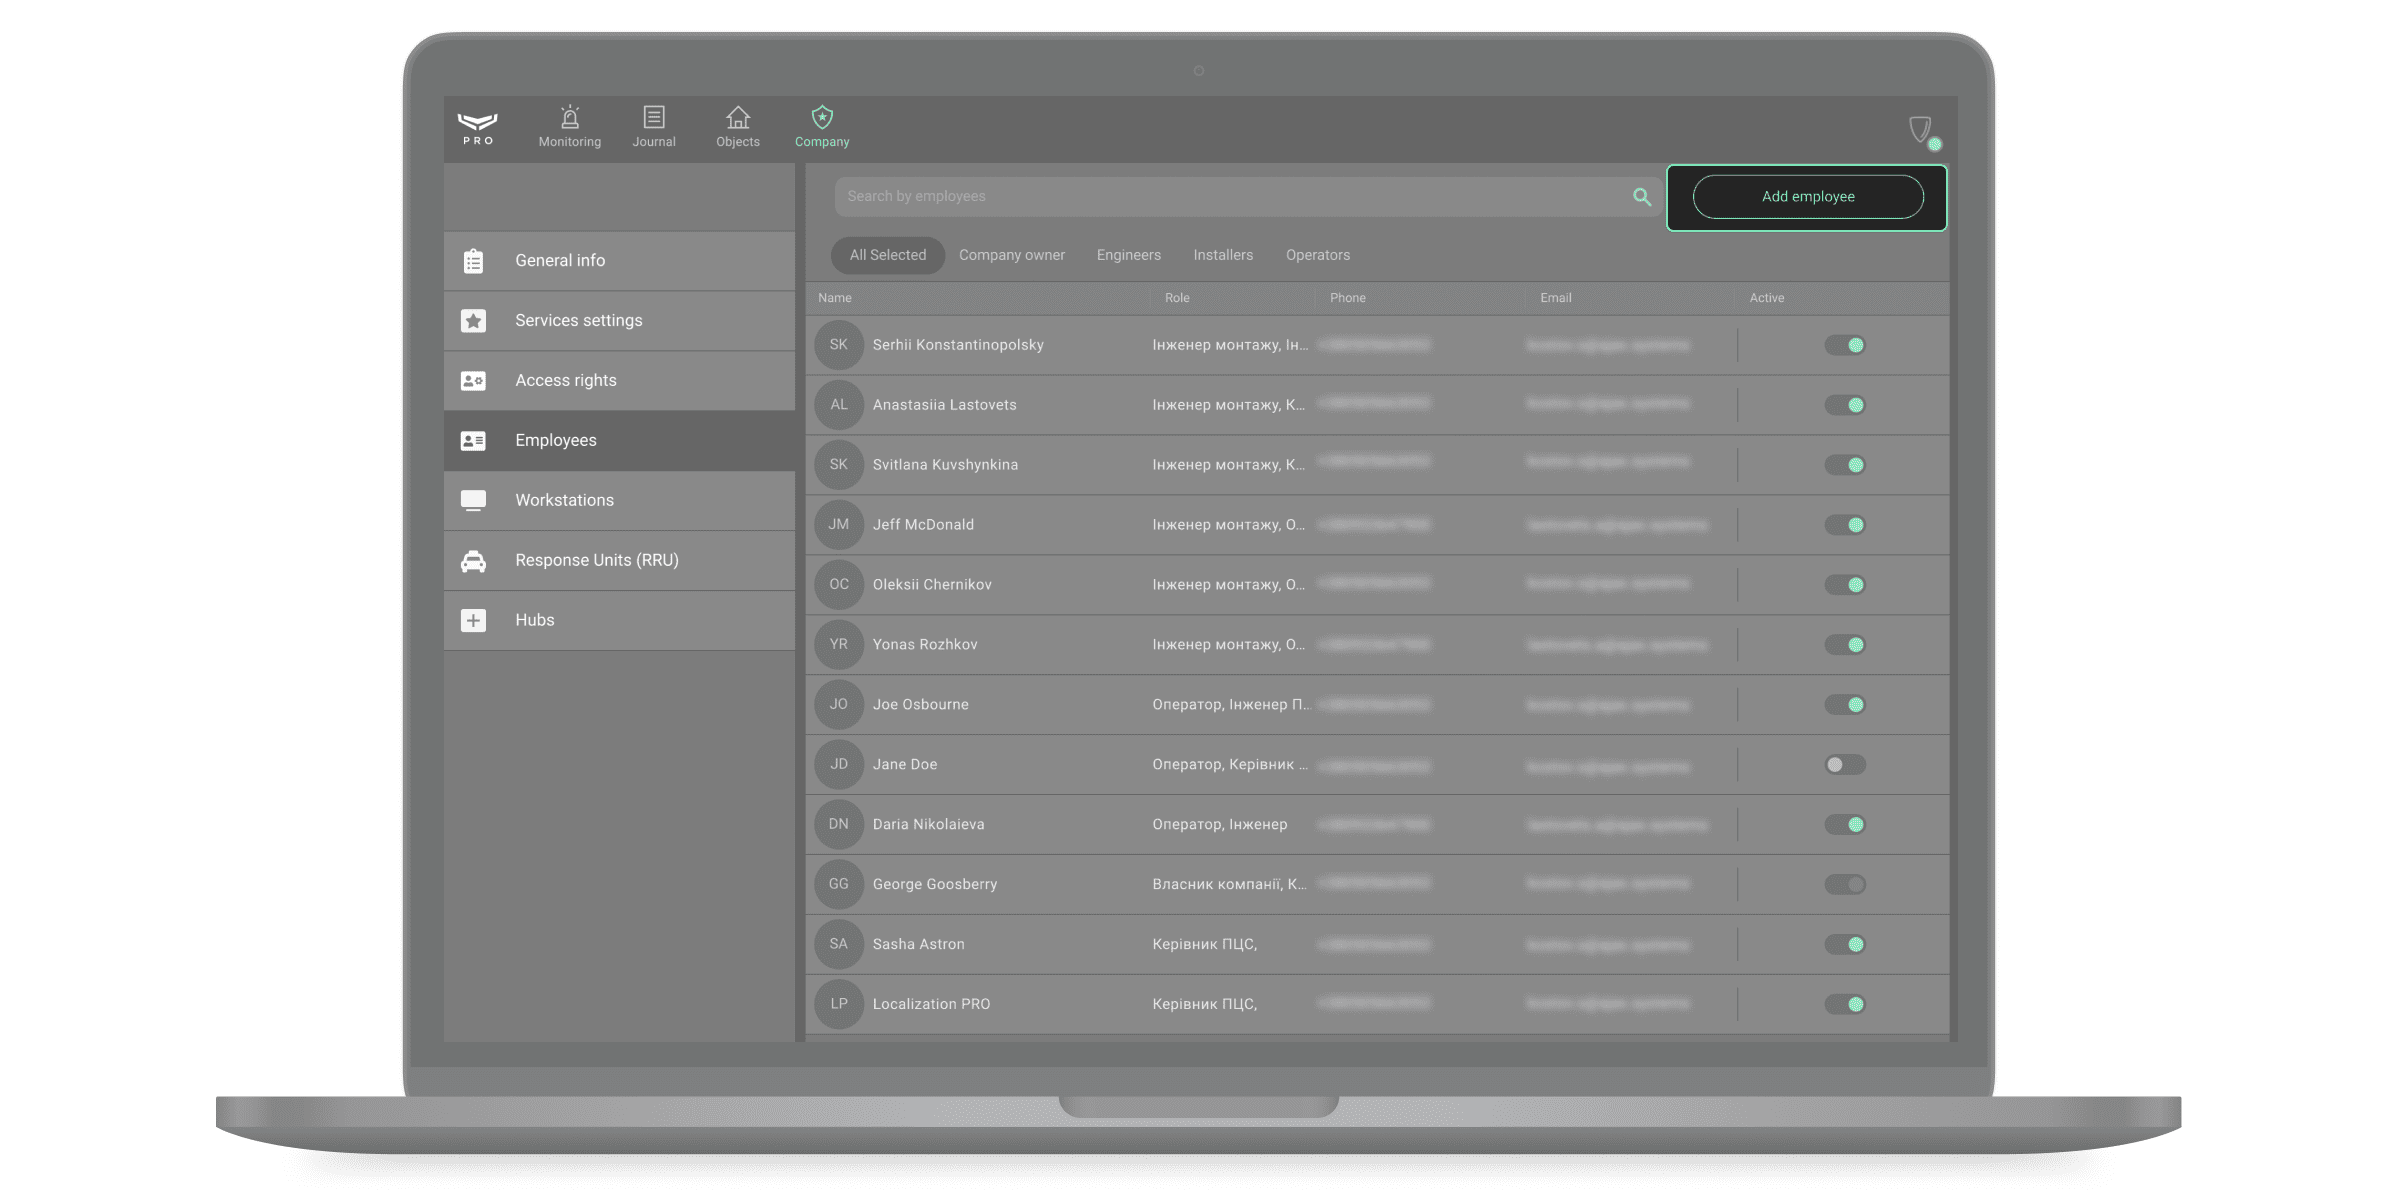
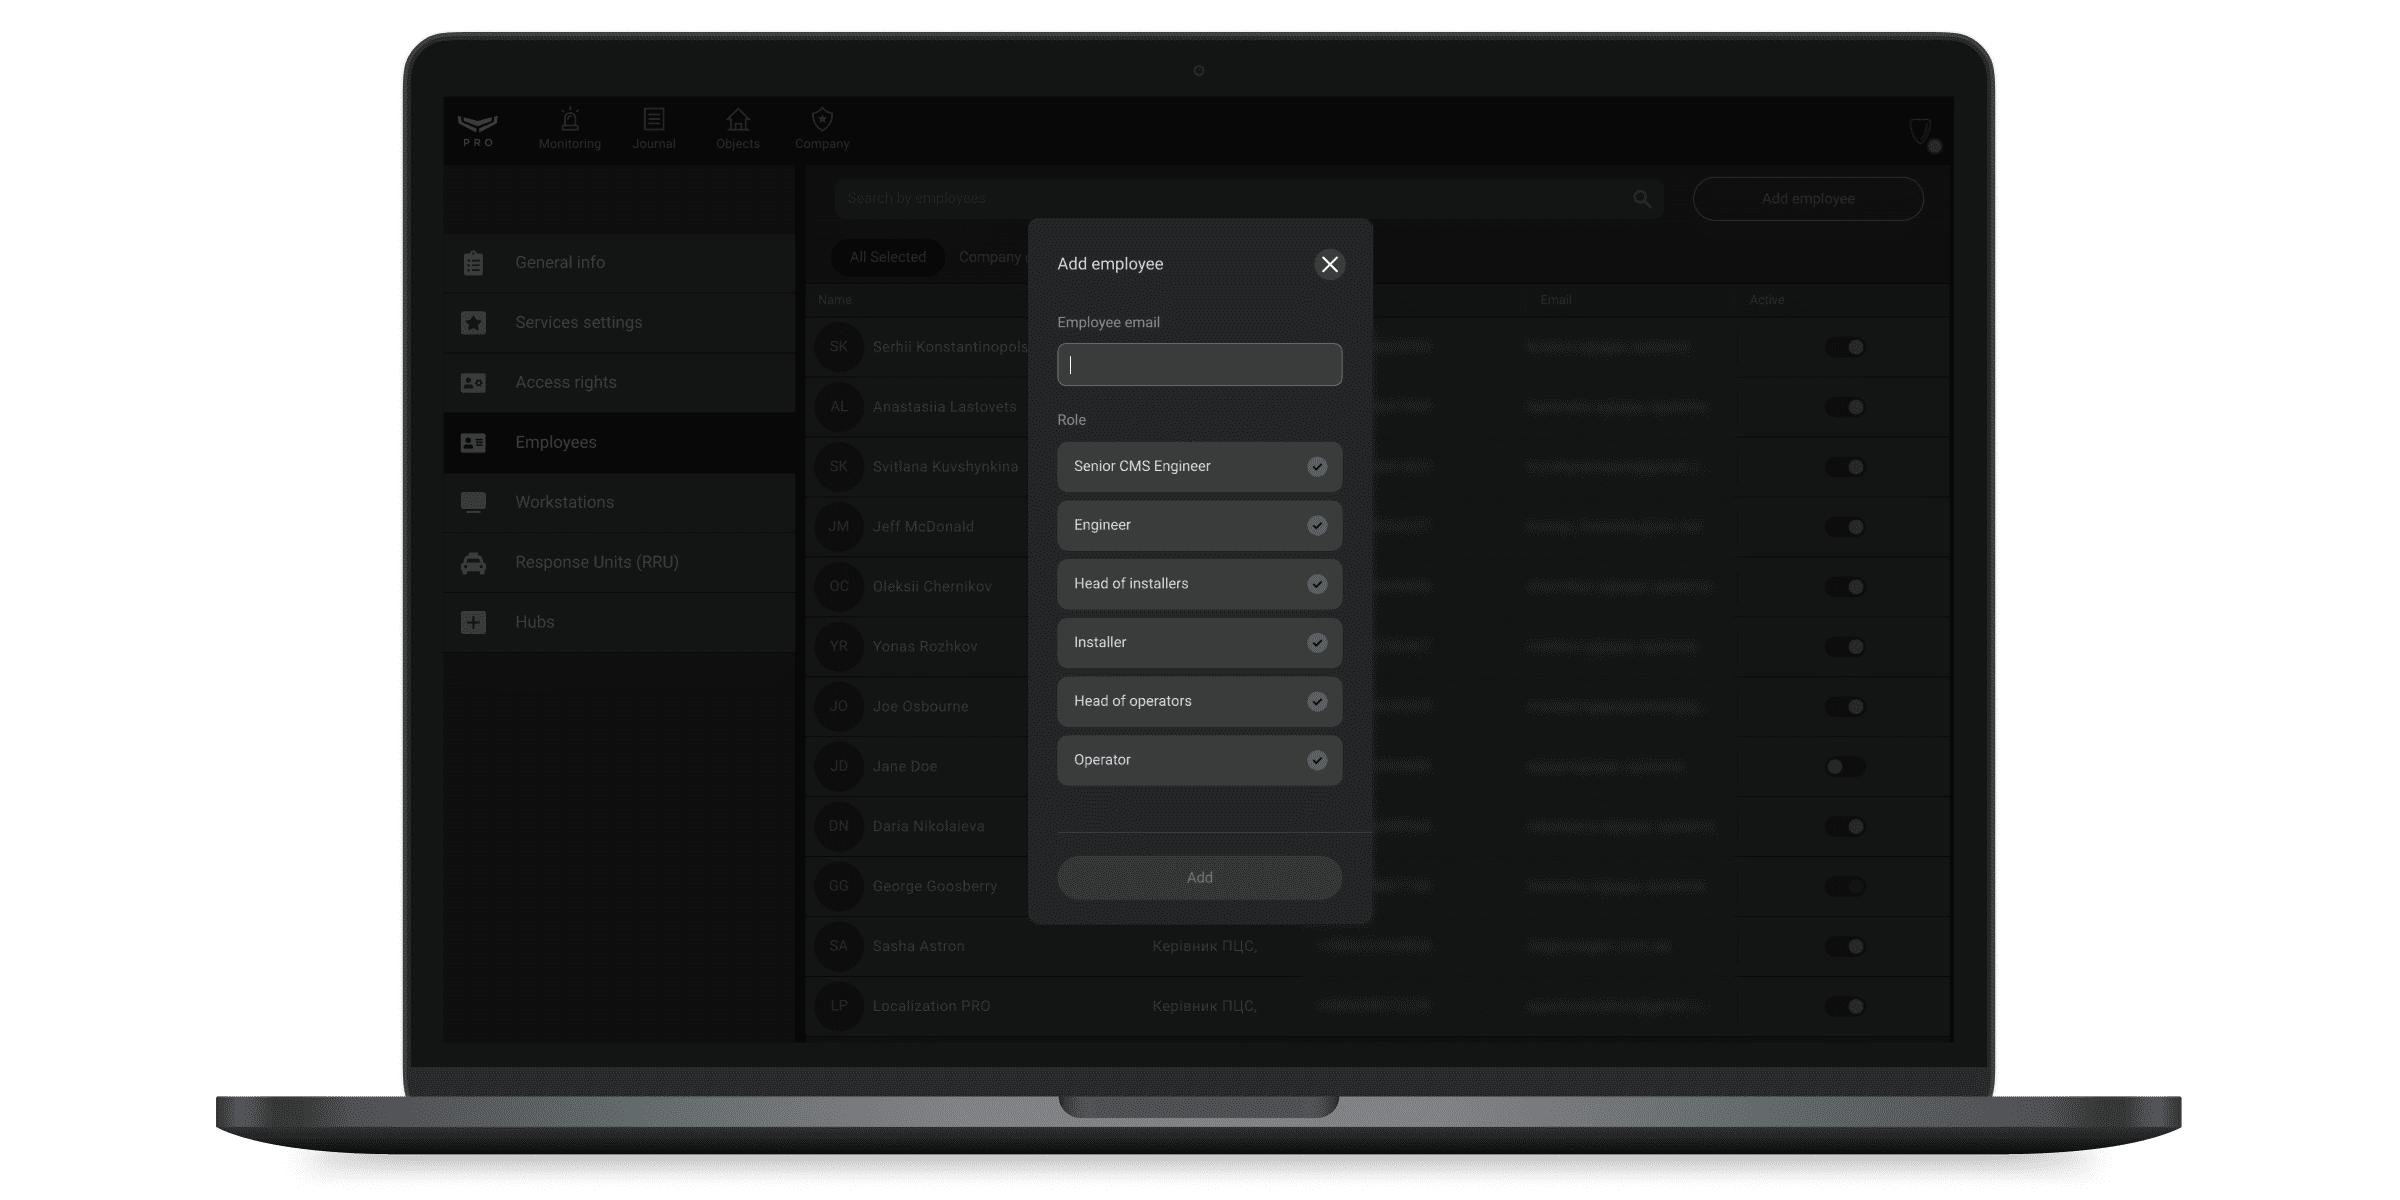
To add an employee, in PRO Desktop:
- Go to the Company module.
- Go to the Employees menu.
- Click Add employee.
- Enter the email address the employee’s PRO account is registered with.
- Define the role of the employee.
- Click Add.
After adding, the owner of the PRO account will receive a notification email. The employee adding will be recorded in the PRO Desktop event journal.
To edit the data or delete an employee’s PRO account, select it in the list. A window with details and the Edit and Delete profile buttons will appear on the right.
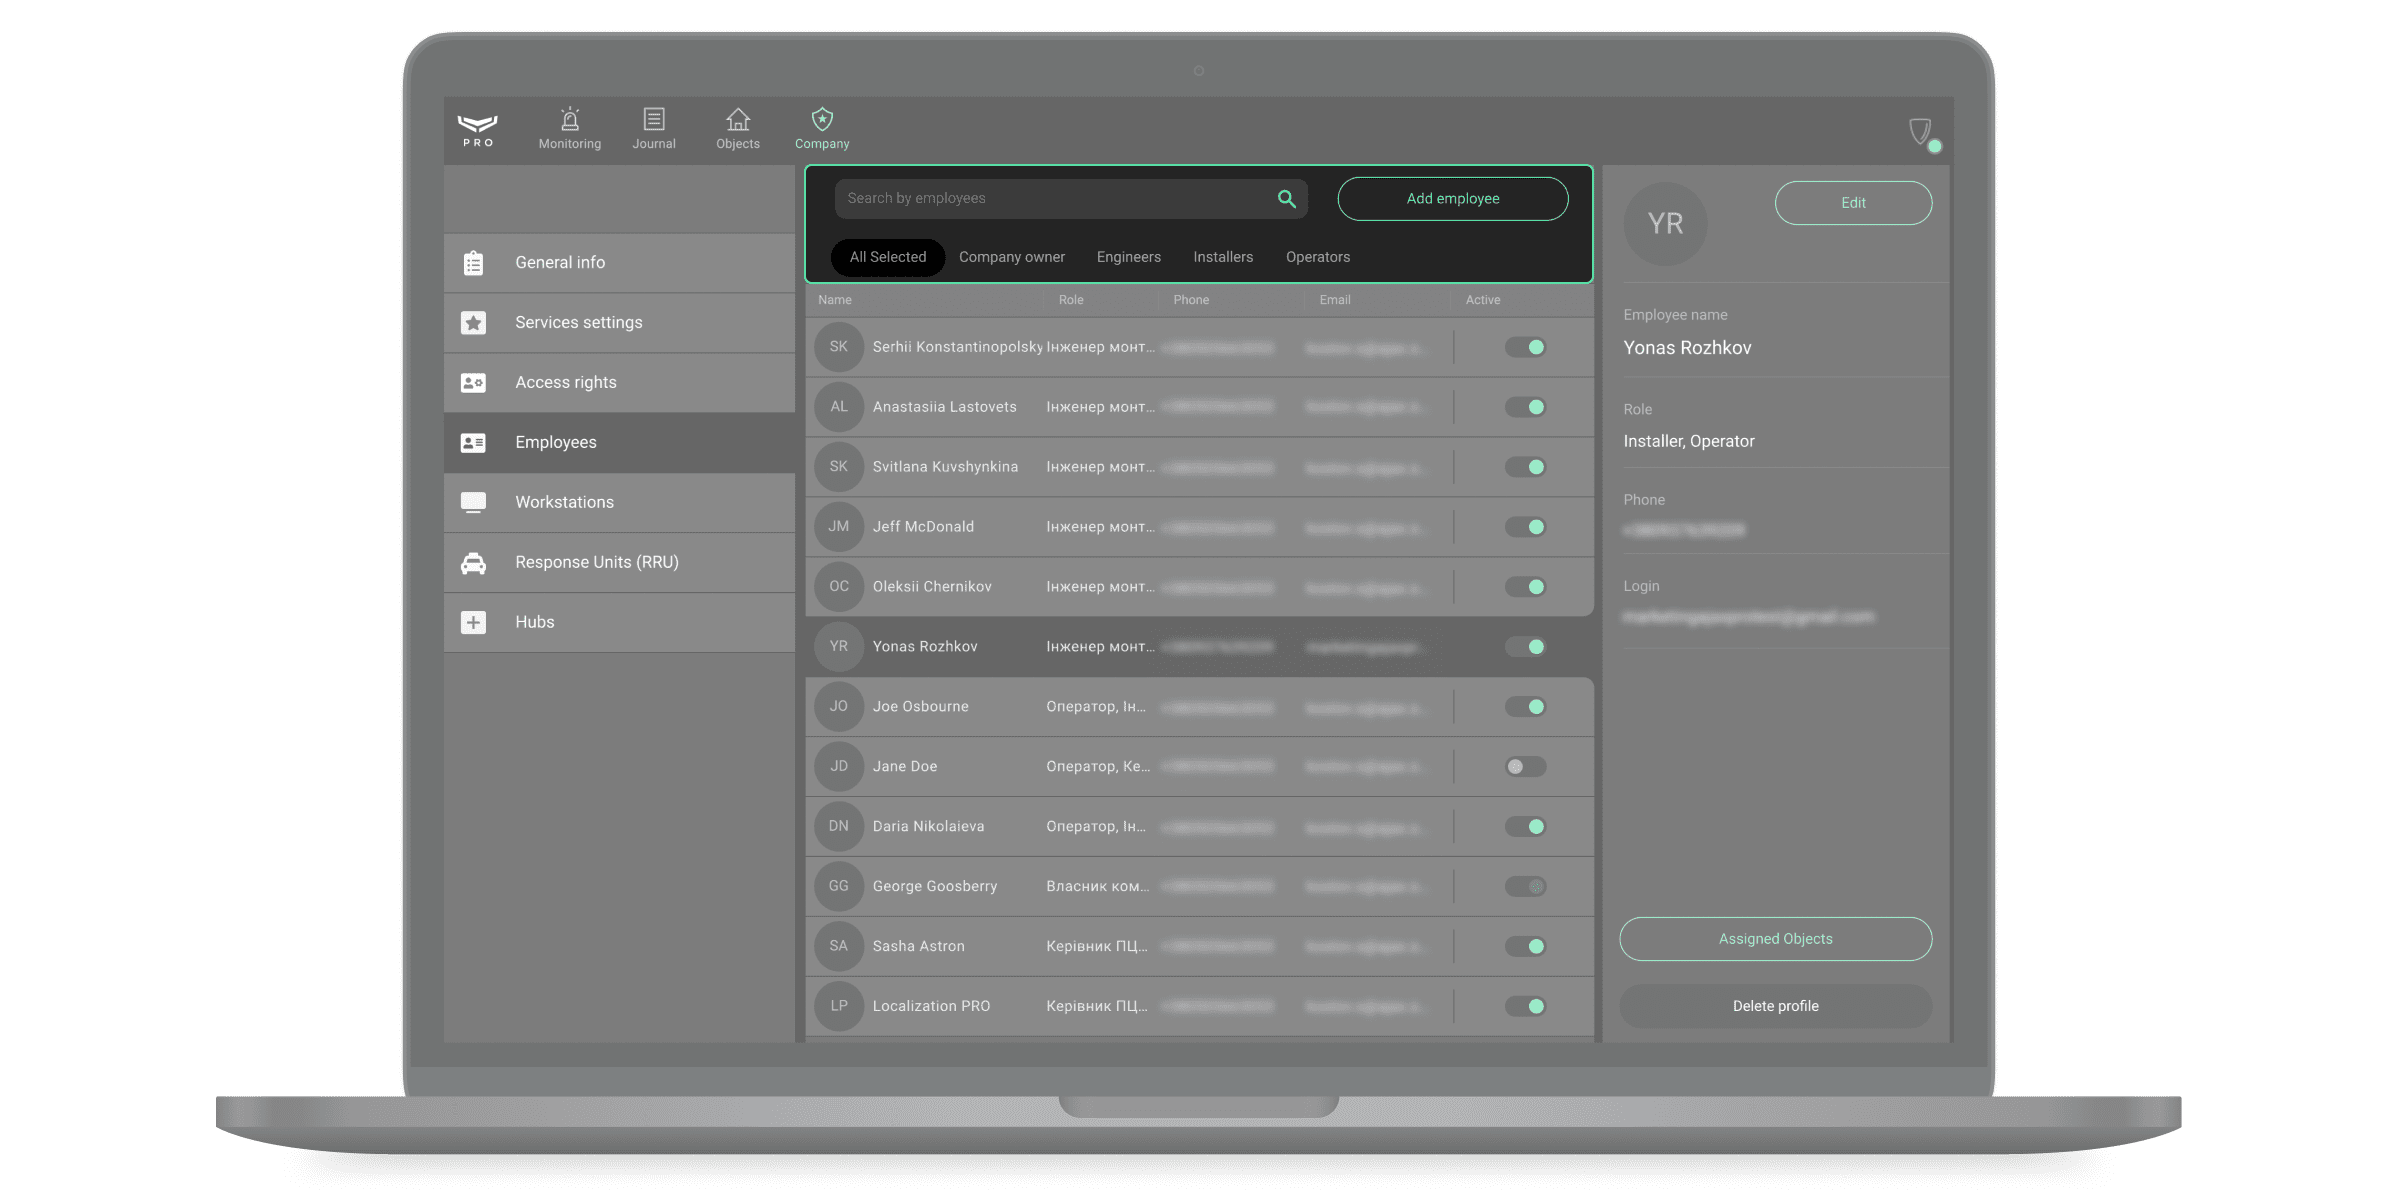
To find an employee, use sorting or search by name, phone, and email.
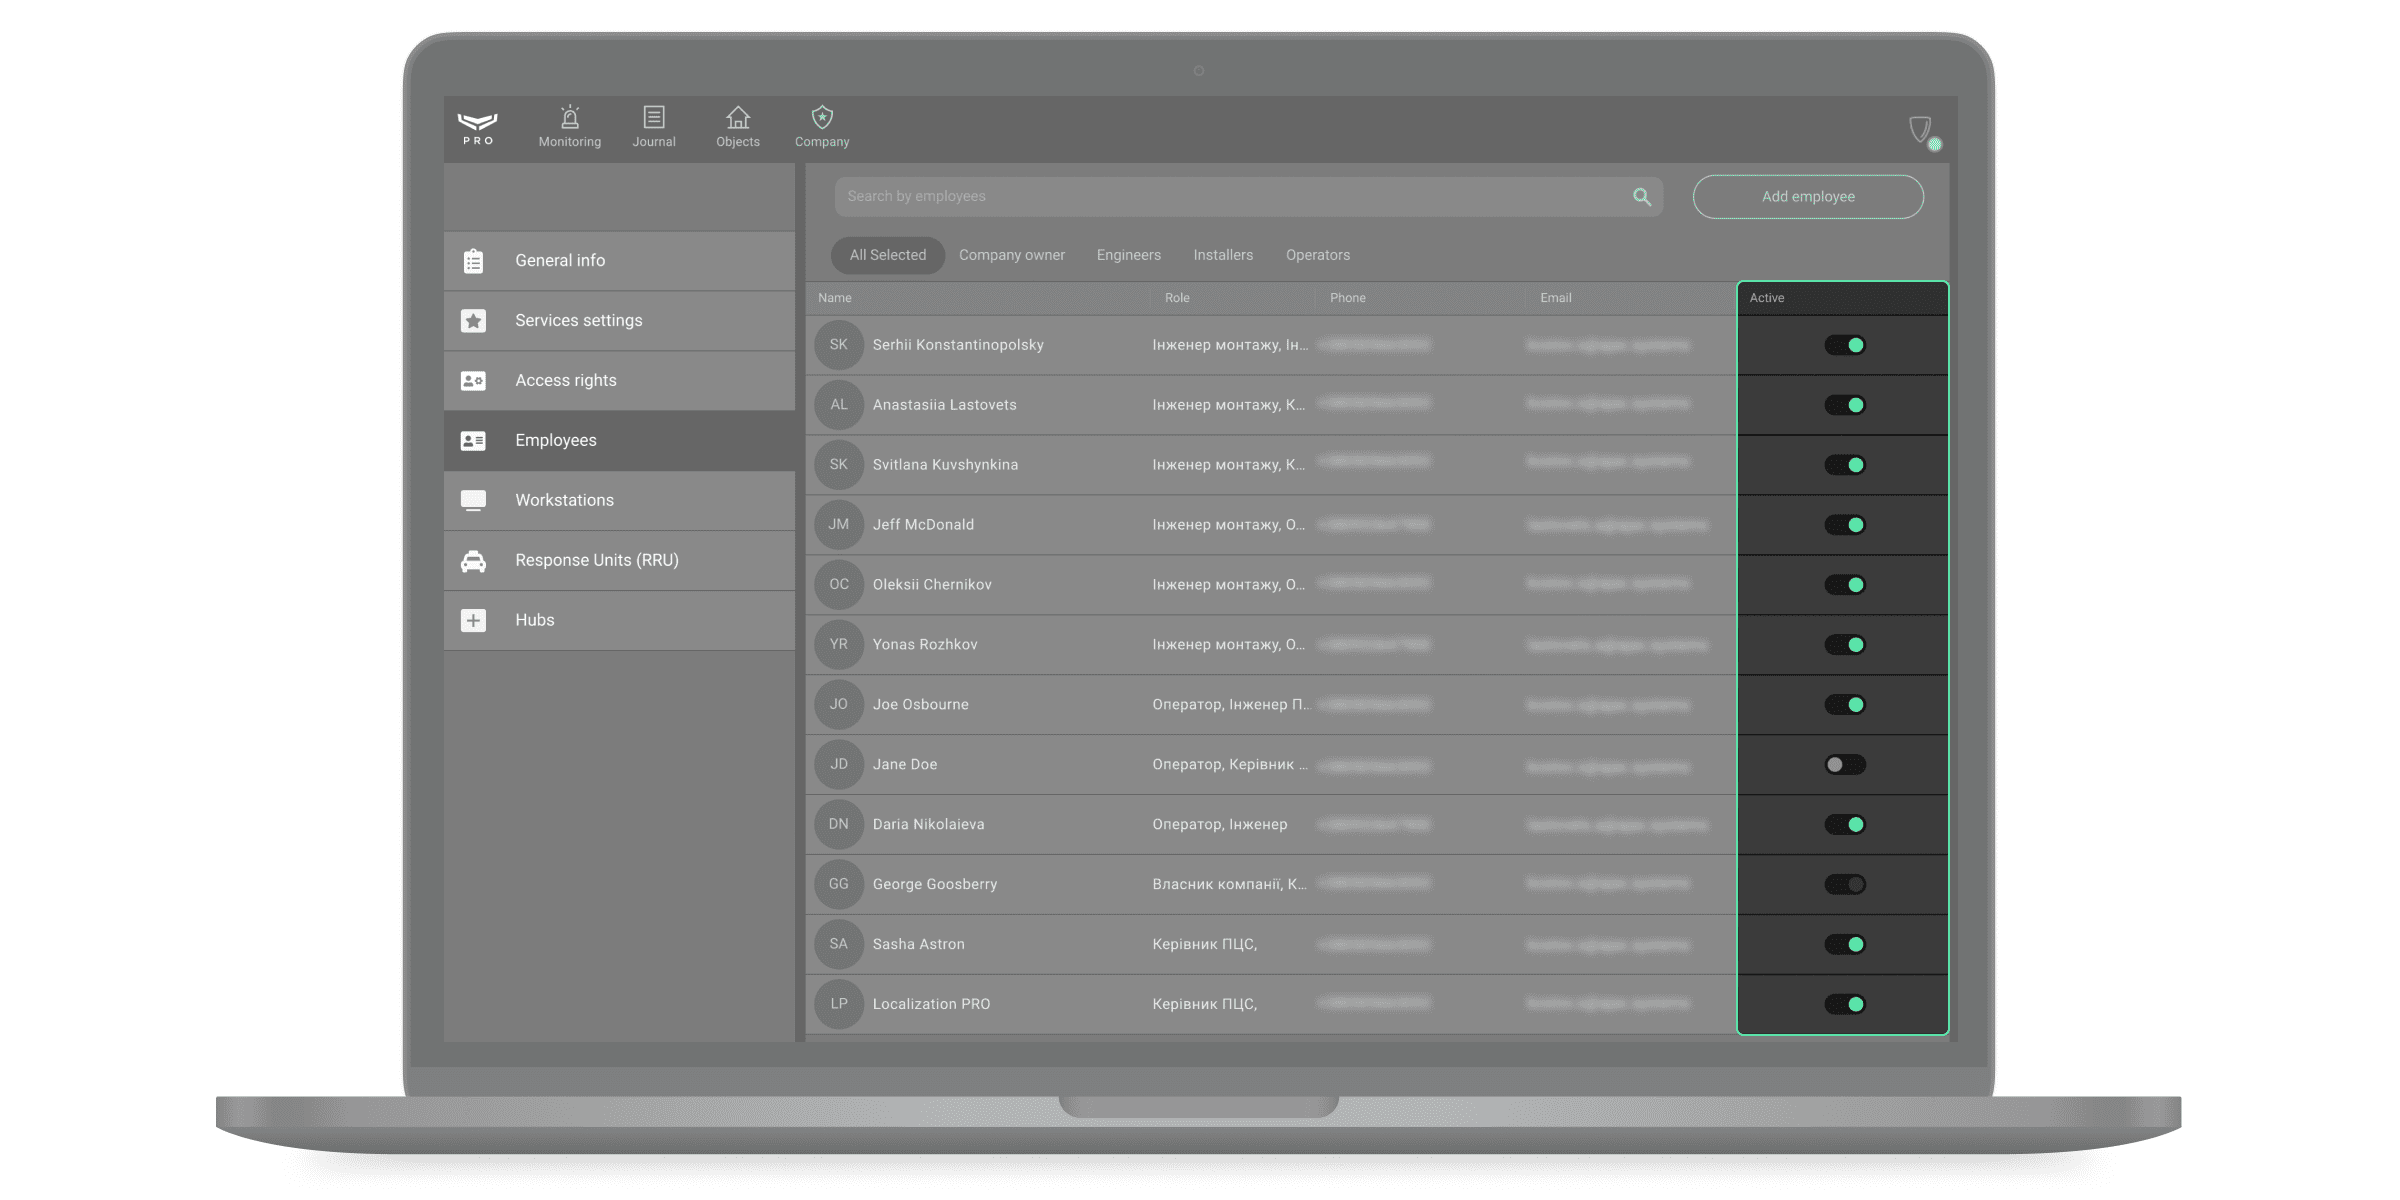
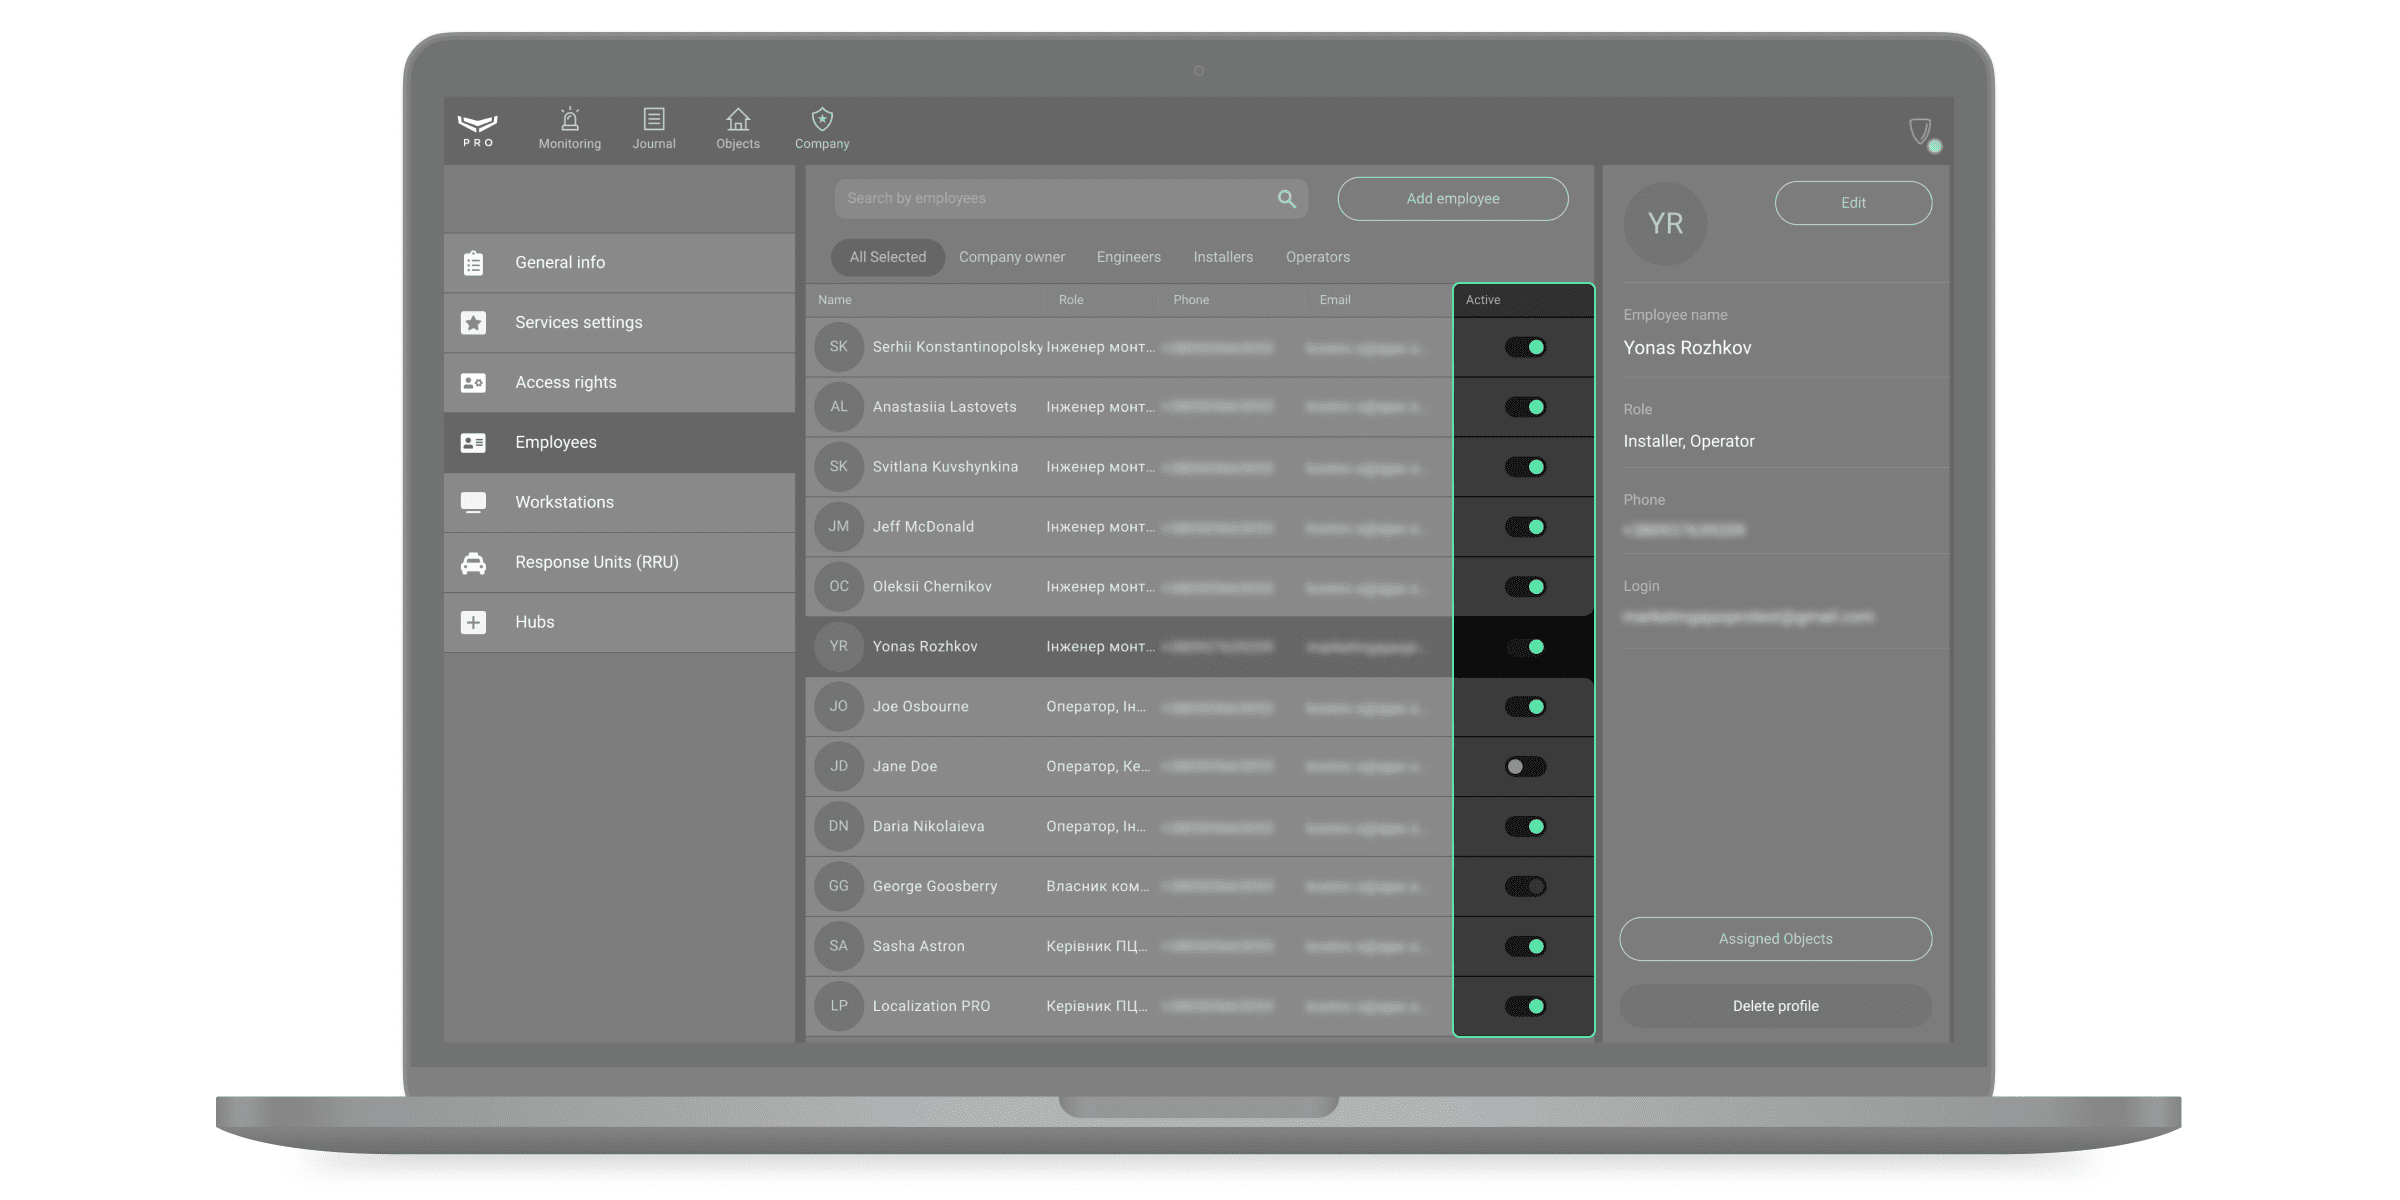
PRO Desktop allows you to temporarily deactivate an employee’s PRO account without deleting it from the system — in case of holiday or sick leave. To do this, turn the toggle against the employee’s name to an inactive position. A temporarily deactivated employee does not have access to company modules in PRO Desktop.
Privacy settings
Taking and viewing on-demand photos are available for a company profile in PRO Desktop app if the company has been granted the appropriate access rights. To assign access to a certain type of company employee, Owner or Senior CMS Engineer changes the status of the View photos by alarm and in alarm scenarios option in the company’s access rights settings.
An admin can configure the security company’s access to on-demand photos and livestream from shared cameras. The feature allows users to confirm an alarm at the protected object. The user sets the conditions under which the company’s employees can take a photo on demand: at any time, when shared devices are armed, or only within a certain time after the alarm. By request, the administrator can set up temporary access to the video stream for the installer. This allows users to configure an Ajax system without compromising their privacy. The installer can send a request for temporary access to the video using the PRO Desktop and Ajax PRO: Tool for Engineers apps.
PRO Desktop modules, menus, and capabilities
The app allows you to:
- Manage employee PRO accounts — Company module, Employees menu, RRU menu.
- Administer an unlimited number of Ajax systems — the Objects module.
- Maintain a customer database of the object — the Objects module and Hubs menu in the Company module.
- Receive, distribute among operators and process Ajax security system alarms — Monitoring module.
- Assign workstations to operators — Company module, Workstations menu.
- Generate hub availability report or CMS operators availability report — Journal module.
- Coordinate the work of Response Units (RRU) — Monitoring module.
- Maintain a journal of events and alarms of security systems — the Journal module.
- Activate an Ajax SIM service — the Services module.
Company
Access to the module: Company owner, Engineer, Senior CMS Engineer, Head of operators, Operator, Installer, Head of installers.
The Company module contains menus and settings for the following tasks:
- General Info — to view information about the company. Only the company owner can edit.
- Services settings — to select the type of company services, the media files storing period, the level of access to objects and hubs, and other settings.
- Cloud signaling monitoring — to manage receivers that are intermediaries between CMS and a cloud server (available only for Senior CMS Engineer and CMS Engineer).
- Access rights — to grant permission to take and view photos on demand, to create maintenance reports for serviced objects.
- Employees — to manage employee accounts.
- Workstations — for accounting of computers (PCs) operators use for work. Helps to calculate the CMS availability and track the login of operators to the PRO account from third-party devices.
- Response Units (RRU) — to administer Rapid Response Teams.
- Hubs — to manage company hubs. The menu contains objects in Translator (if connected), requests for monitoring, and requests for removal from monitoring.
- Settings templates — to create and edit templates to quickly apply several settings at once.
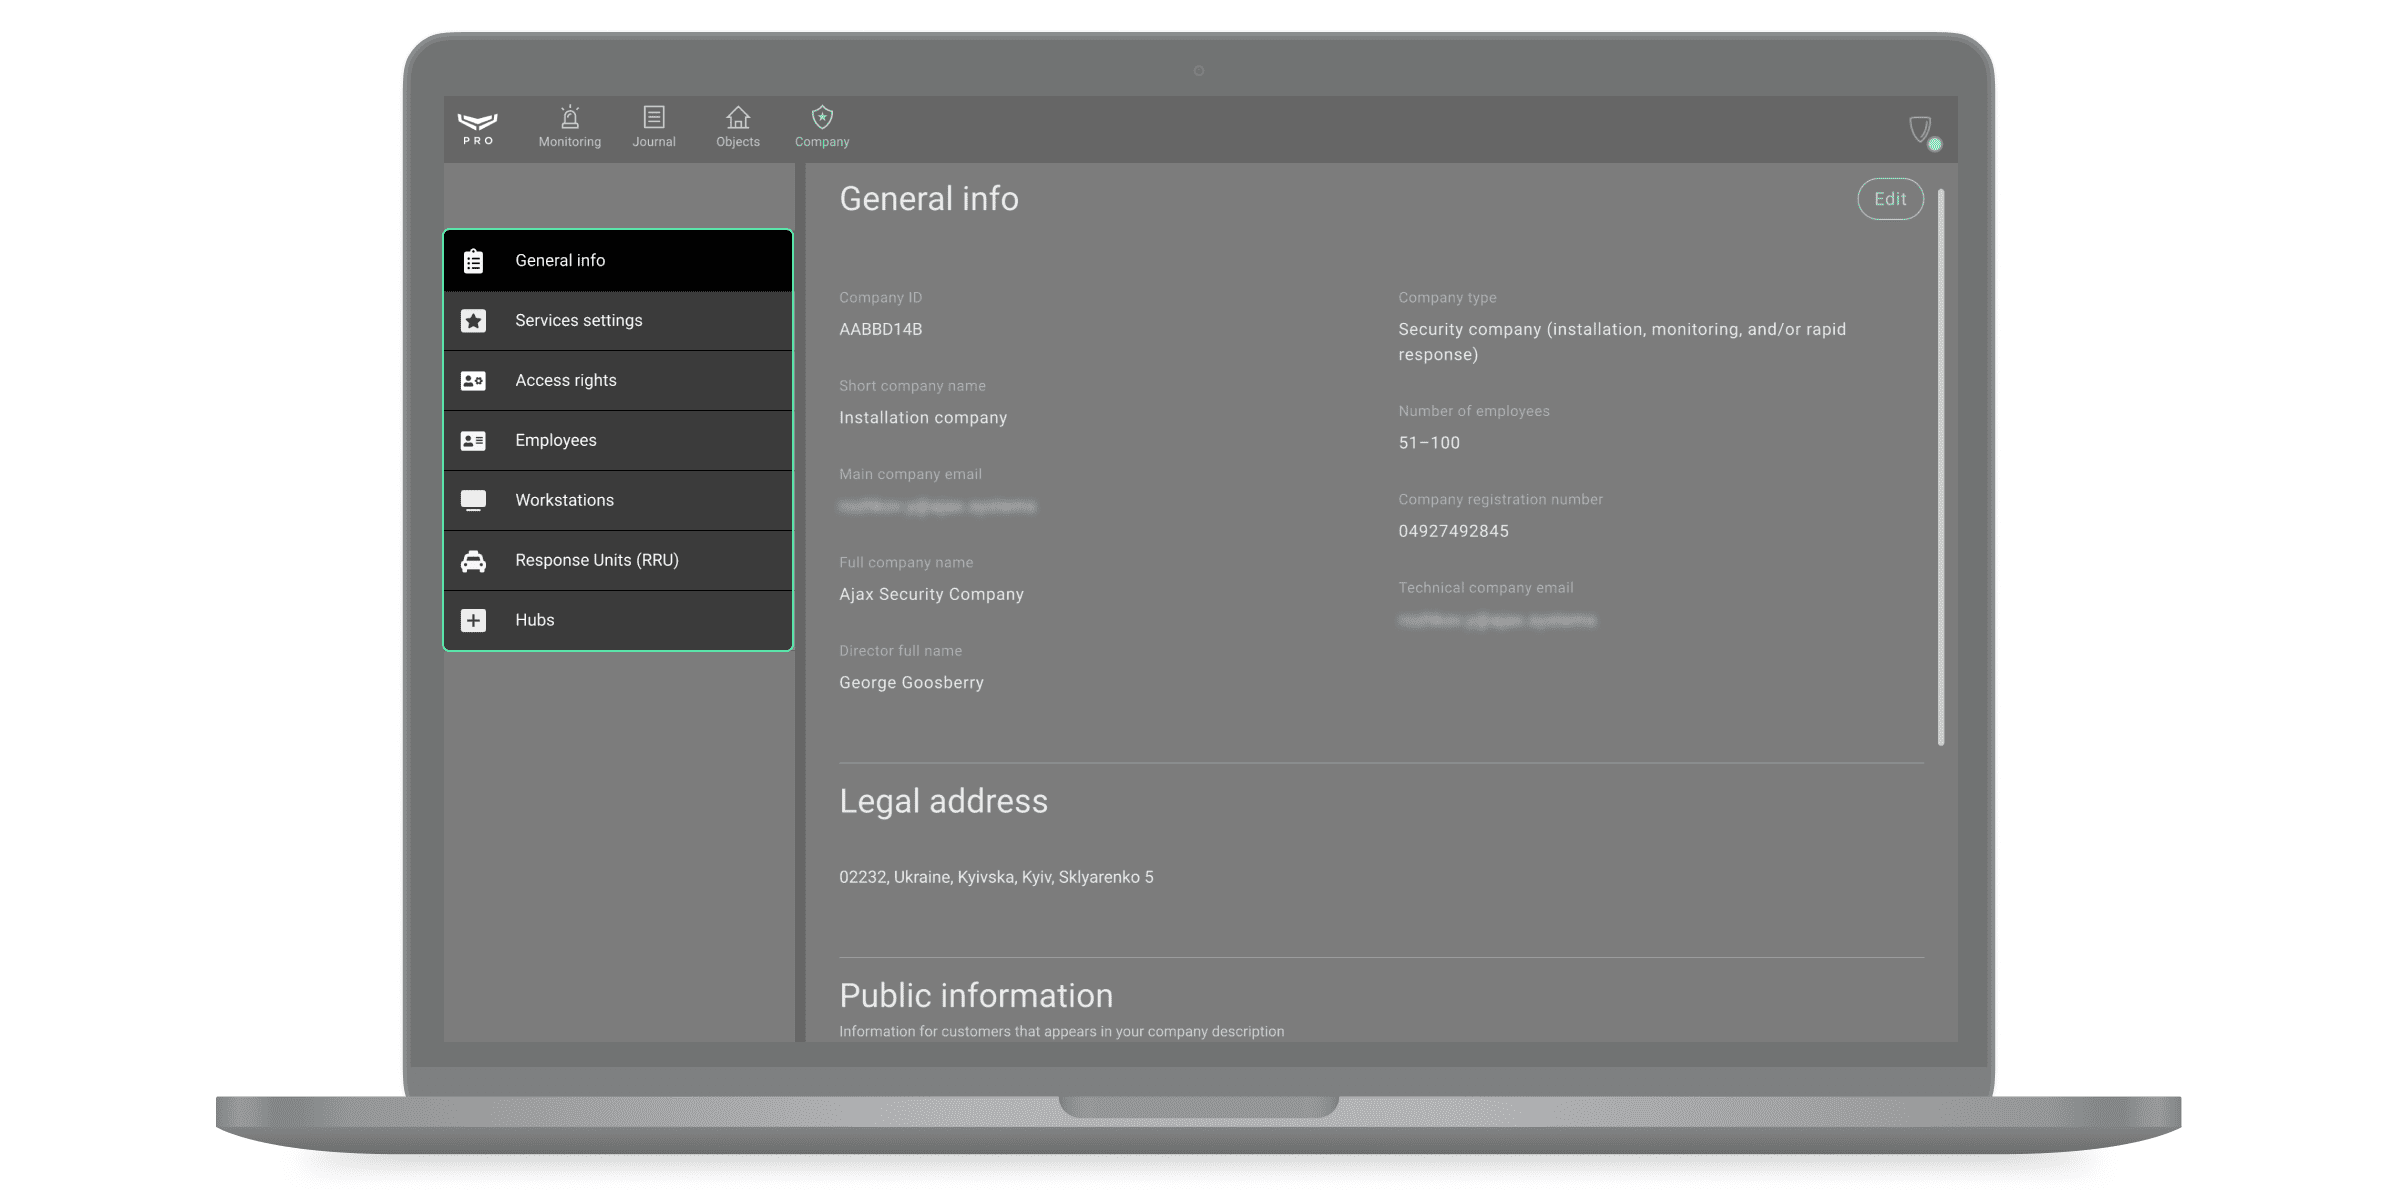
General info
The menu contains information about the company. The owner can change company details. The app allows you to change all data about the company, except for the name and company owner. To change the company name, contact Ajax technical support service. To apply all changes, click the Save changes button or cancel them with the Cancel button.
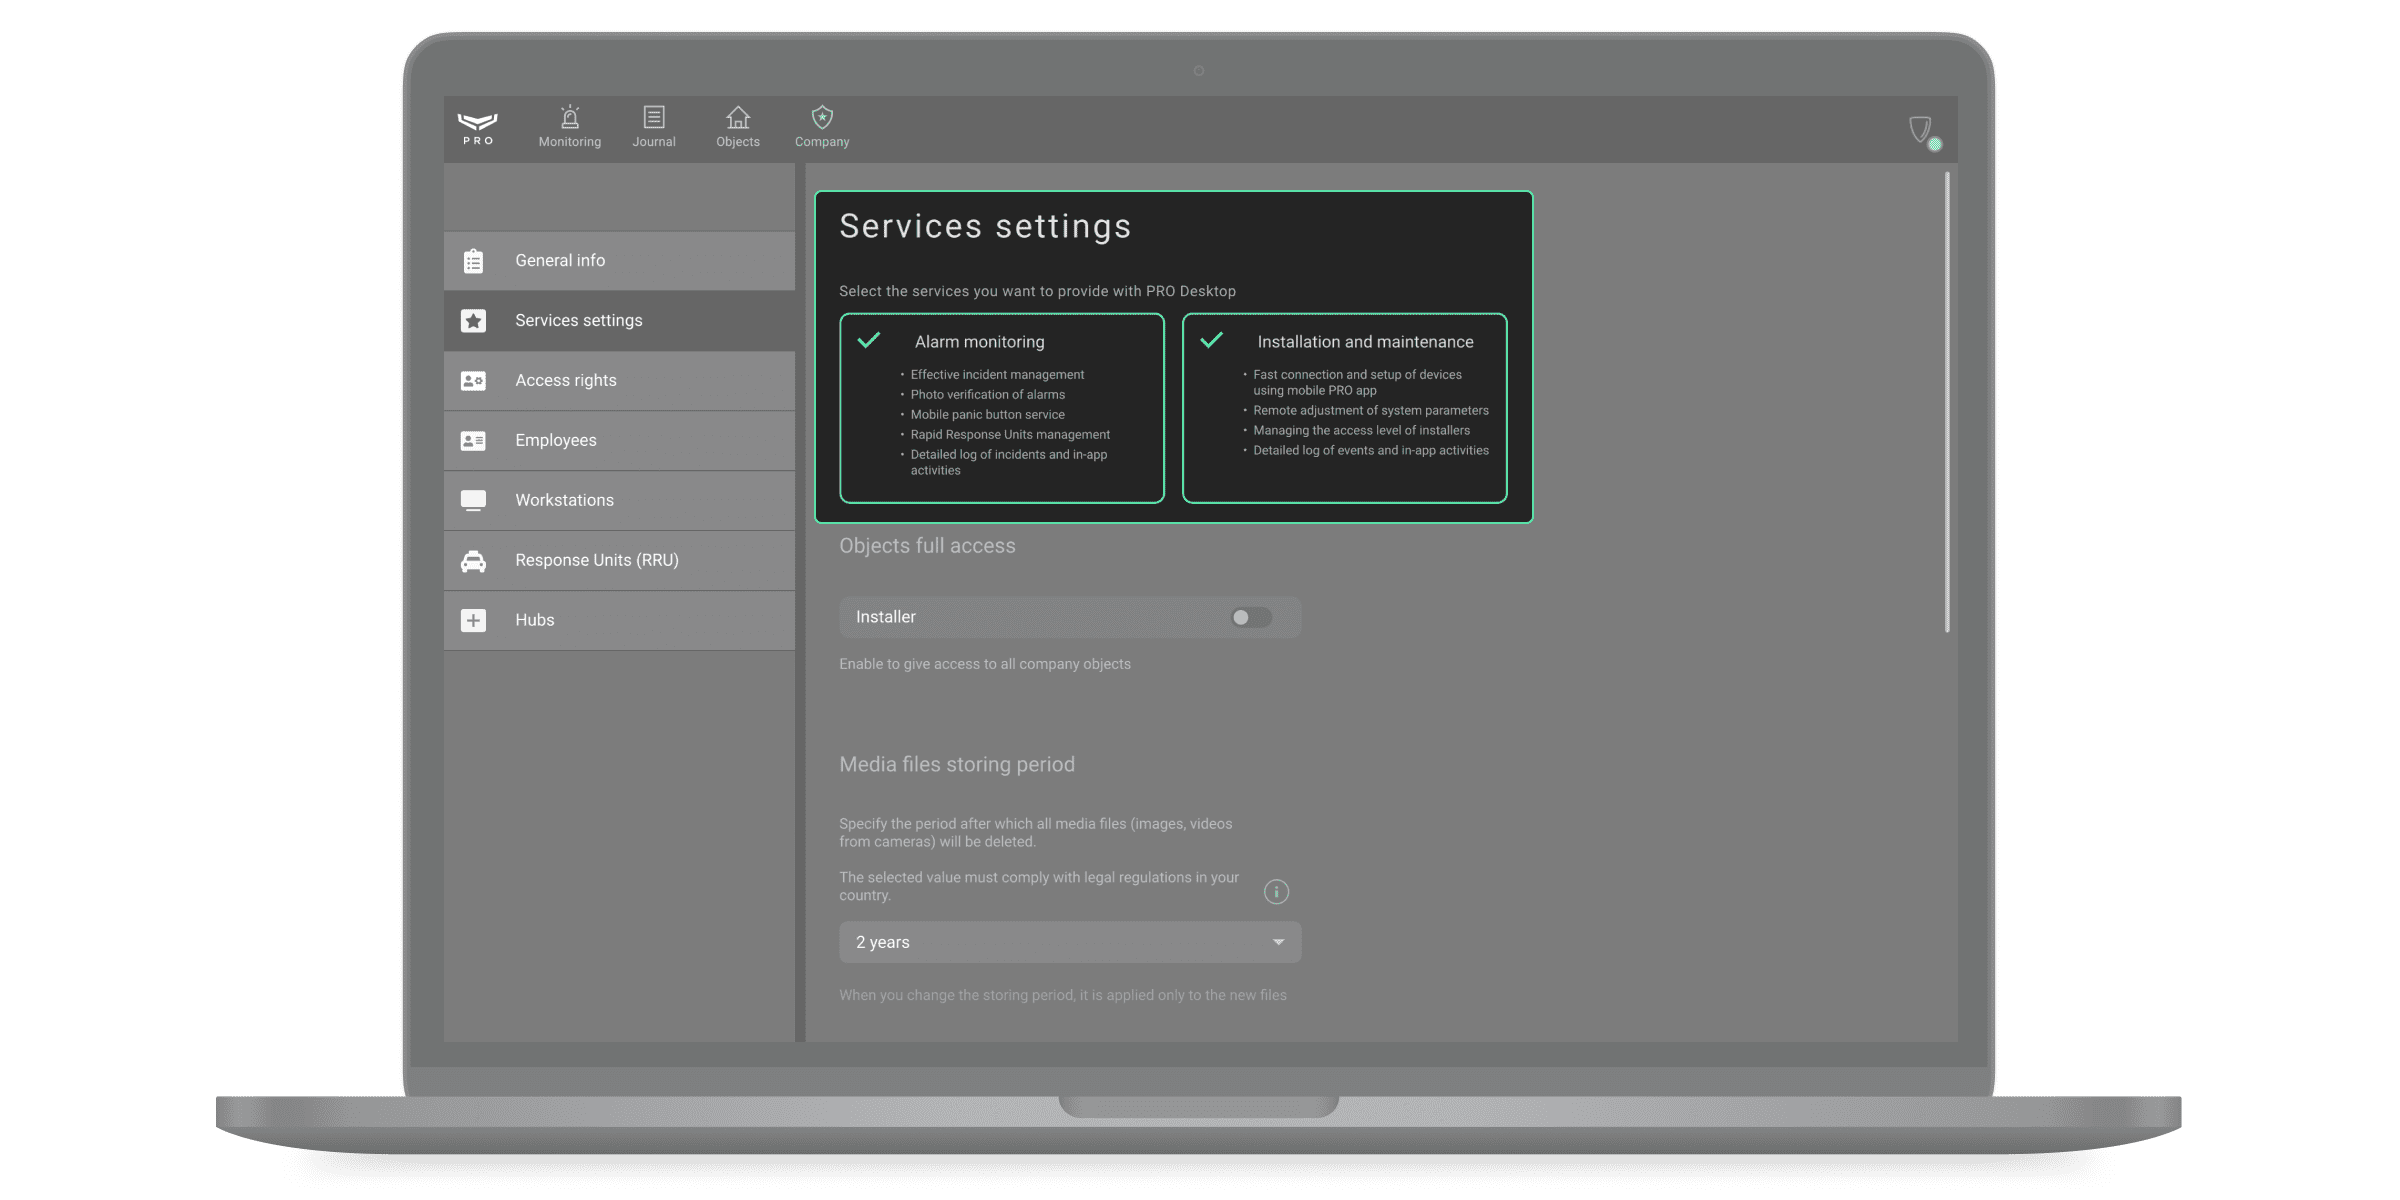
Services settings

In the menu, you can set the type of services provided by the company and manage other system settings (access to objects, media files storing period, maintenance reports). The owner of the company chooses the type of company services when registering in the app and can change the type of services at any time.
Employee access to objects
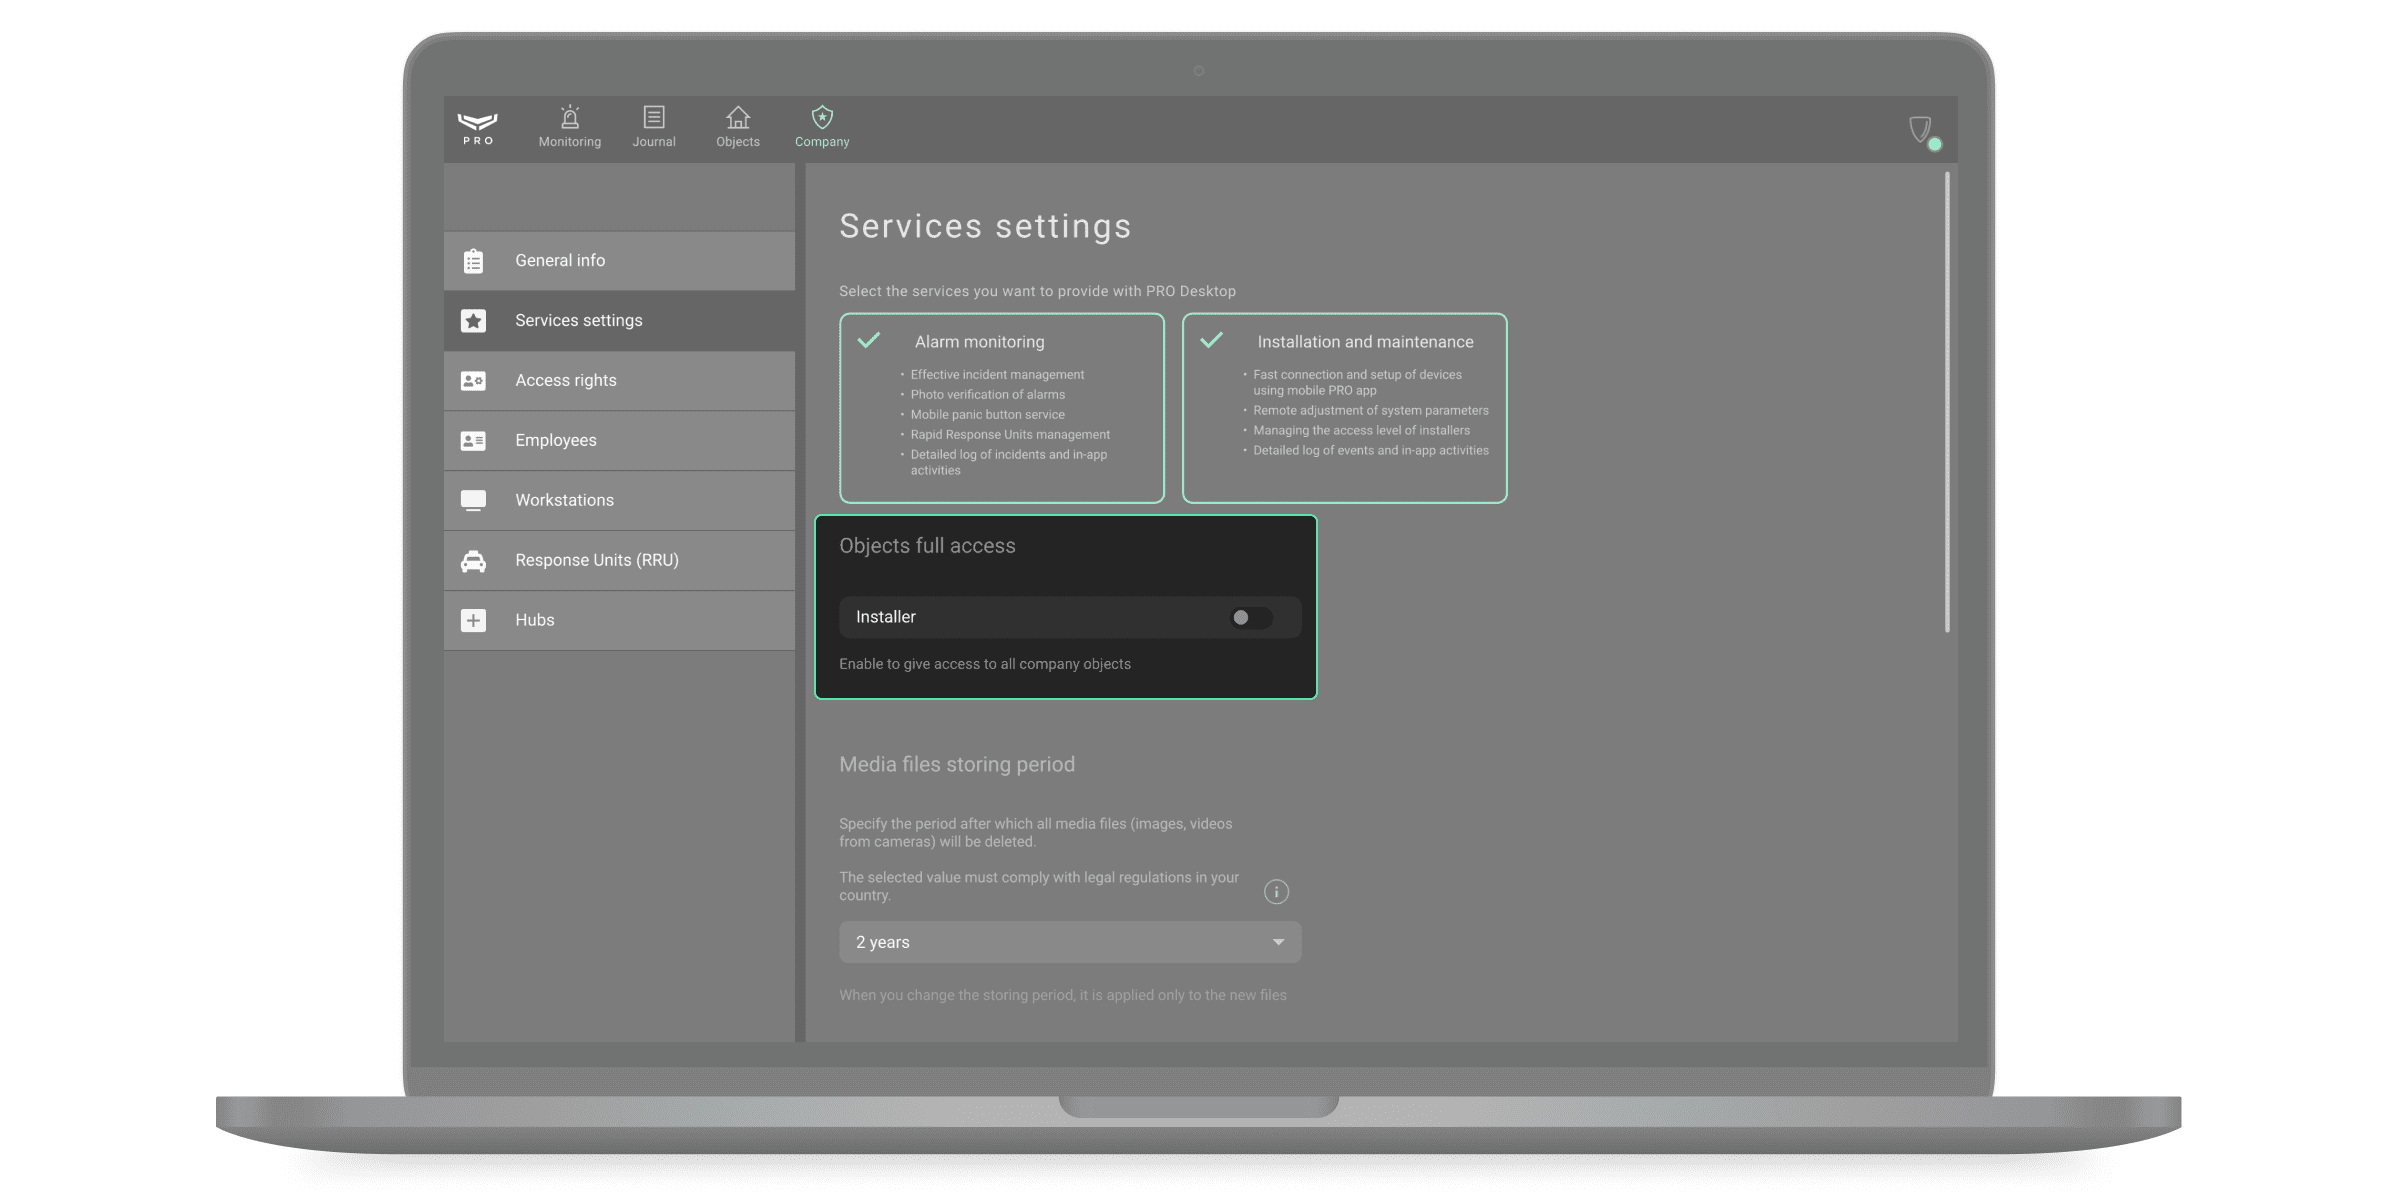
By default, an employee with the Installer role has access to those objects that are assigned to them by the Head of installers. For the installer to be able to configure all objects connected to the company, the Objects full access option should be enabled.
To do this, in PRO Desktop:
- Go to the Company module.
- Open the Services settings menu.
- In the Objects full access field, enable the option for Installer.
Now the installer and the company have the same rights to configure all objects. The rights can be following:
- Permanent access to system settings.
- Temporary access: you can configure the system for a specified time, from 1 to 8 hours.
- No access to system settings.
Require account number for monitoring requests
This setting is available only for monitoring companies and is disabled by default. If enabled, your company will receive monitoring requests only if the account number for the object is specified when sending a request. Only a PRO or a company employee can send the monitoring request to your company from the Ajax PRO app if this setting is enabled.
Media files storing period
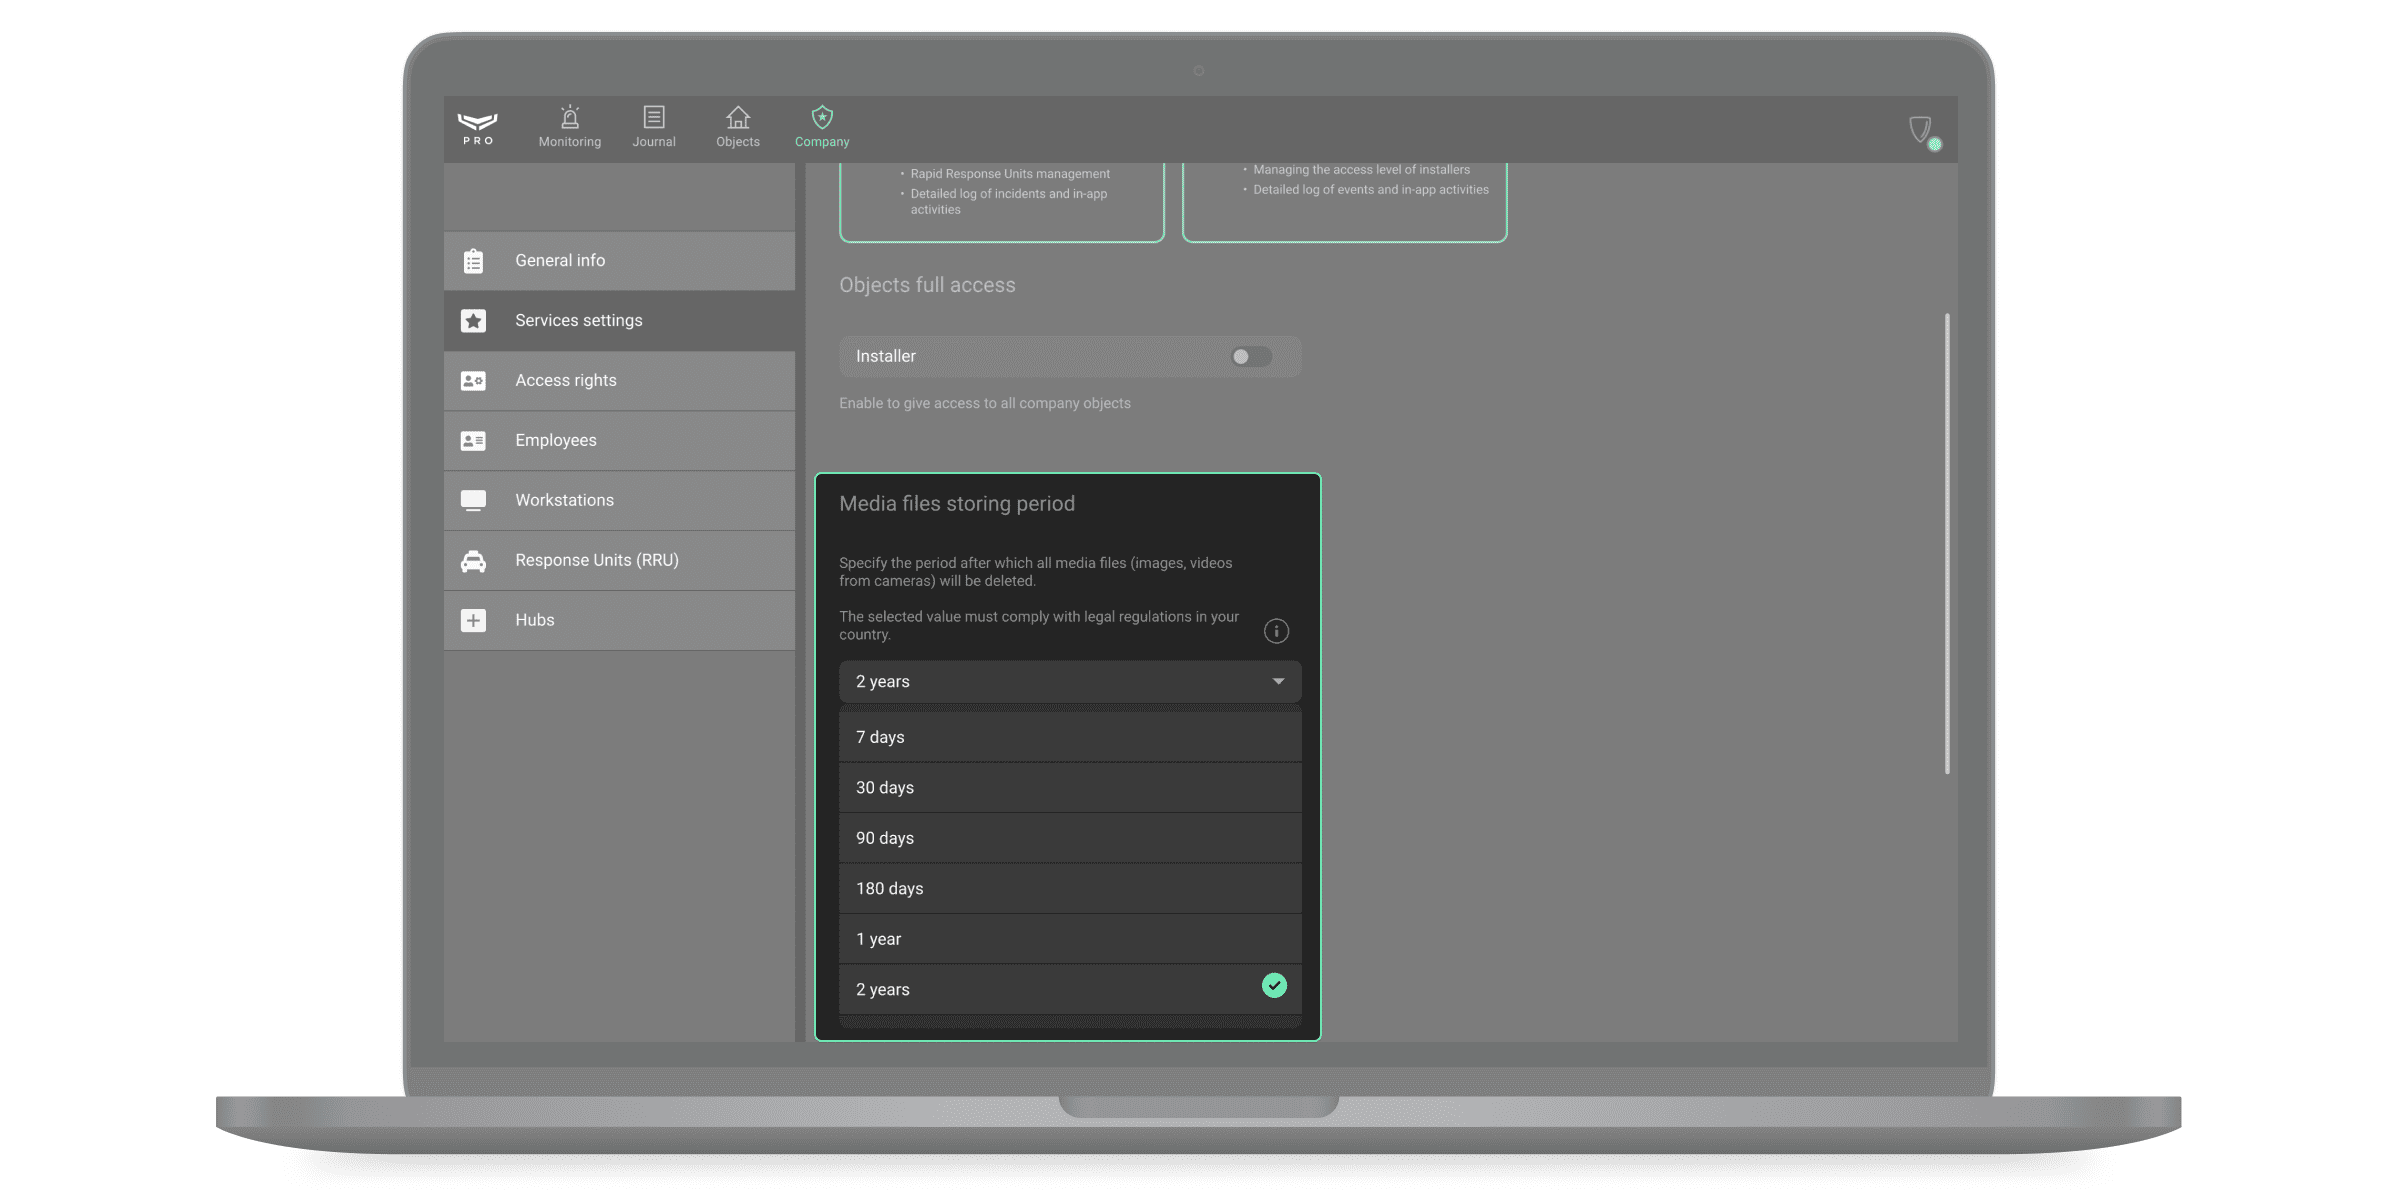
You can set the period after which all media files (images, videos from cameras) will be deleted. The new media files storing period only applies to files created after changes.
Available storing period for media files:
- 7 days.
- 30 days.
- 90 days.
- 180 days.
- 1 year.
- 2 years.
The selected media files storing period must comply with the laws of your region.
Company-locked hubs
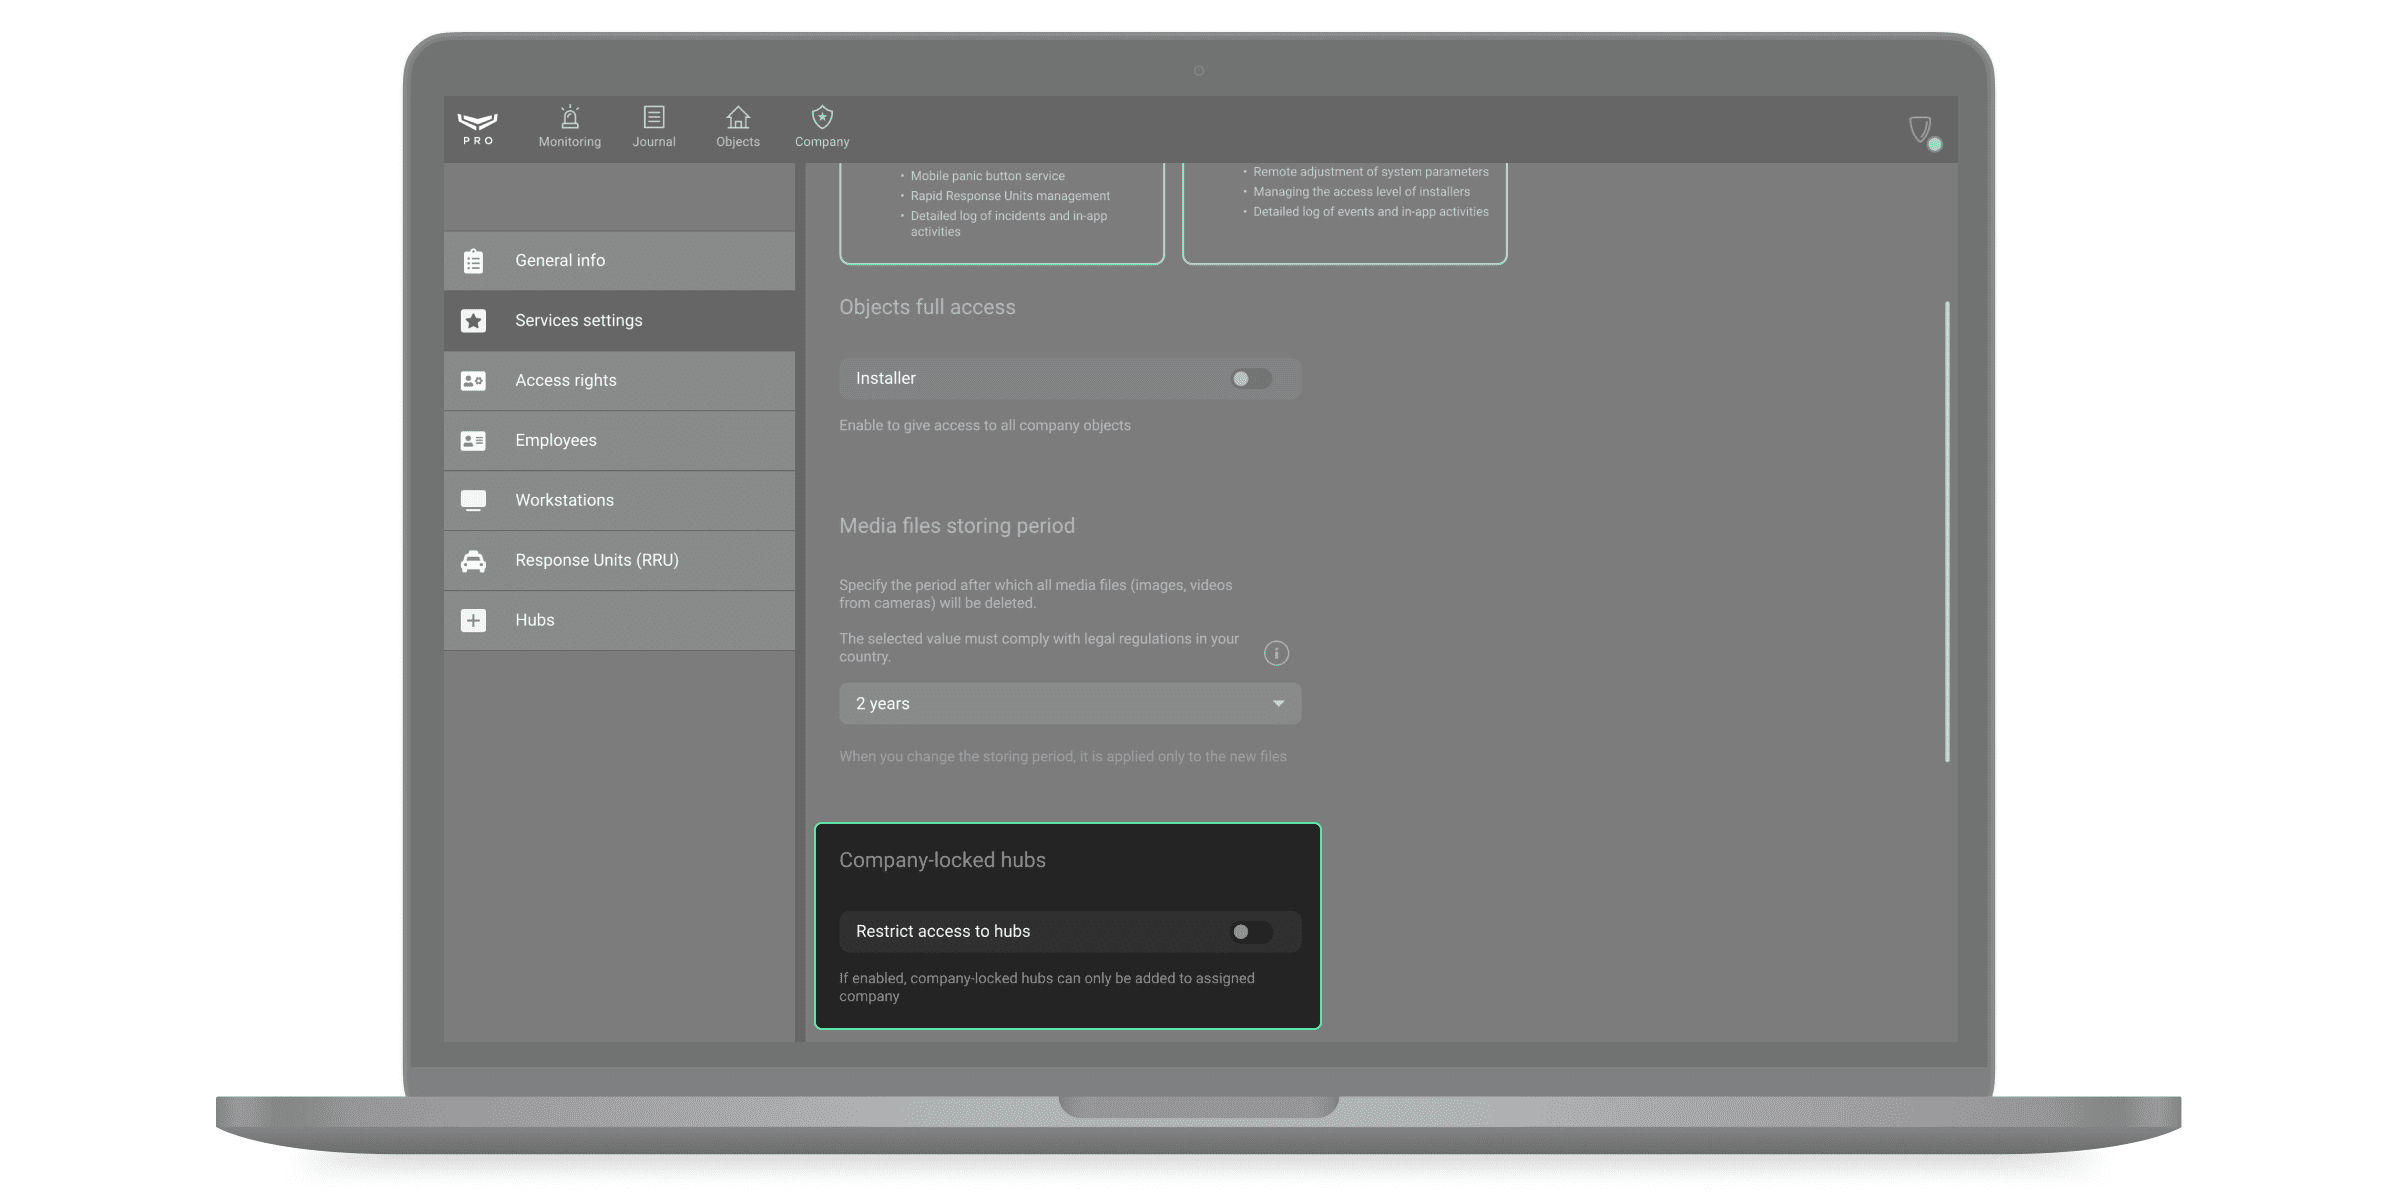
The Restrict access to hubs option is disabled by default. When enabled, company-locked hubs can only be added to that company’s account. Adding to accounts of other companies is not possible Contact Ajax technical support service or your Ajax manager to learn more about this feature.
Objects Maintenance
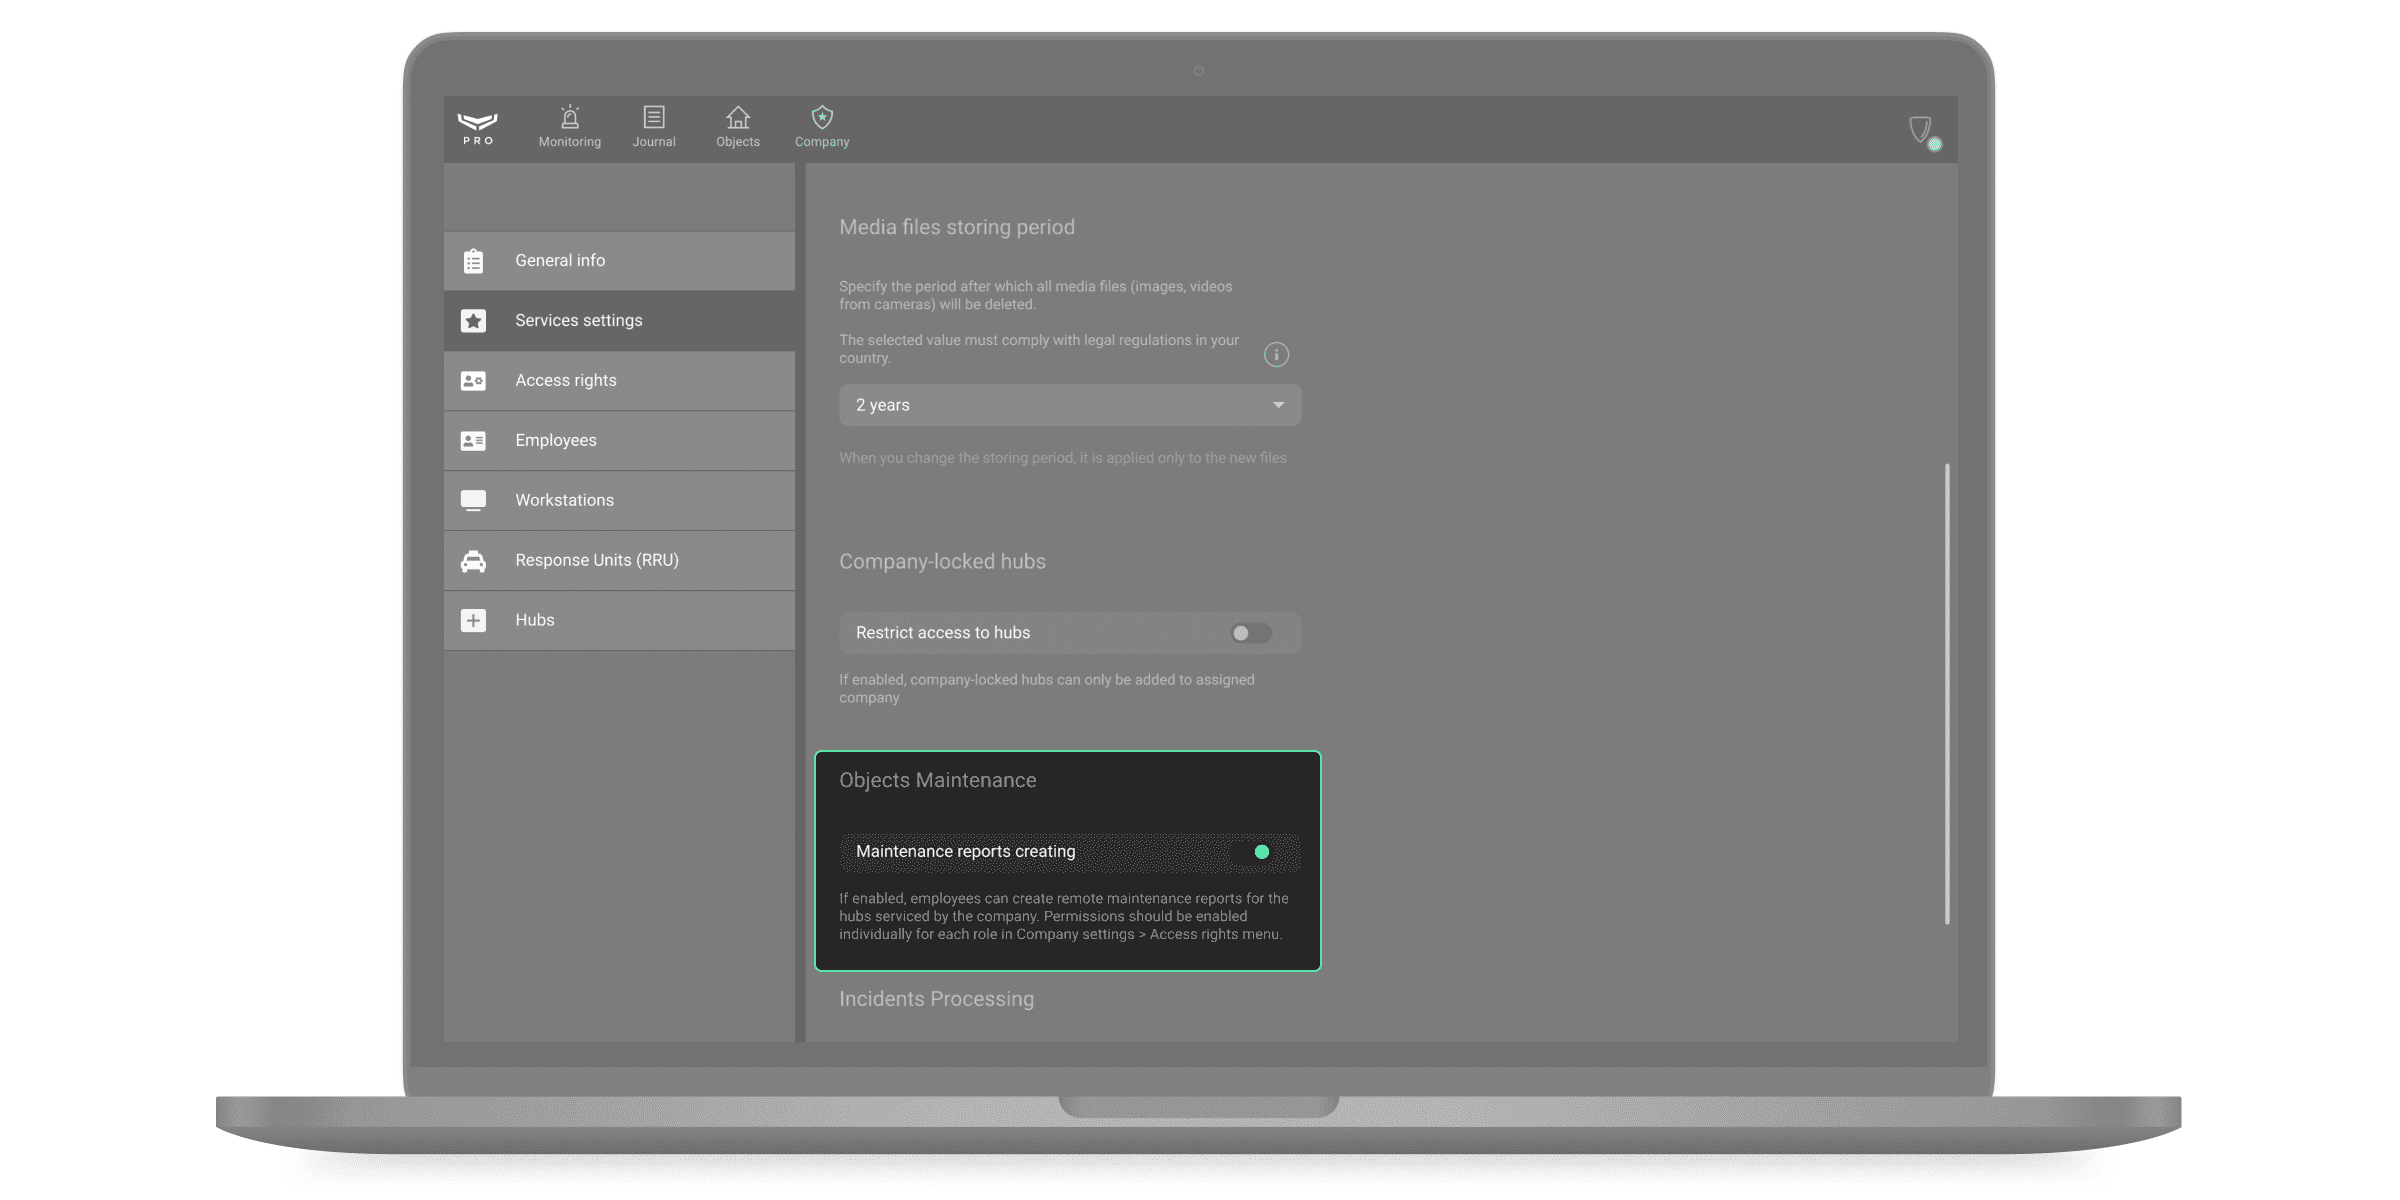
If the Maintenance reports option is enabled, company employees can generate reports on the technical health of security and fire detectors used in the system. Such reports can be generated and downloaded only by those roles which received the appropriate right from the company owner. The right is assigned in the Access rights menu.
By default, the maintenance reports option is turned off. An employee with the Installer role can’t generate technical health reports for those objects to which they have no access.
Incidents Processing
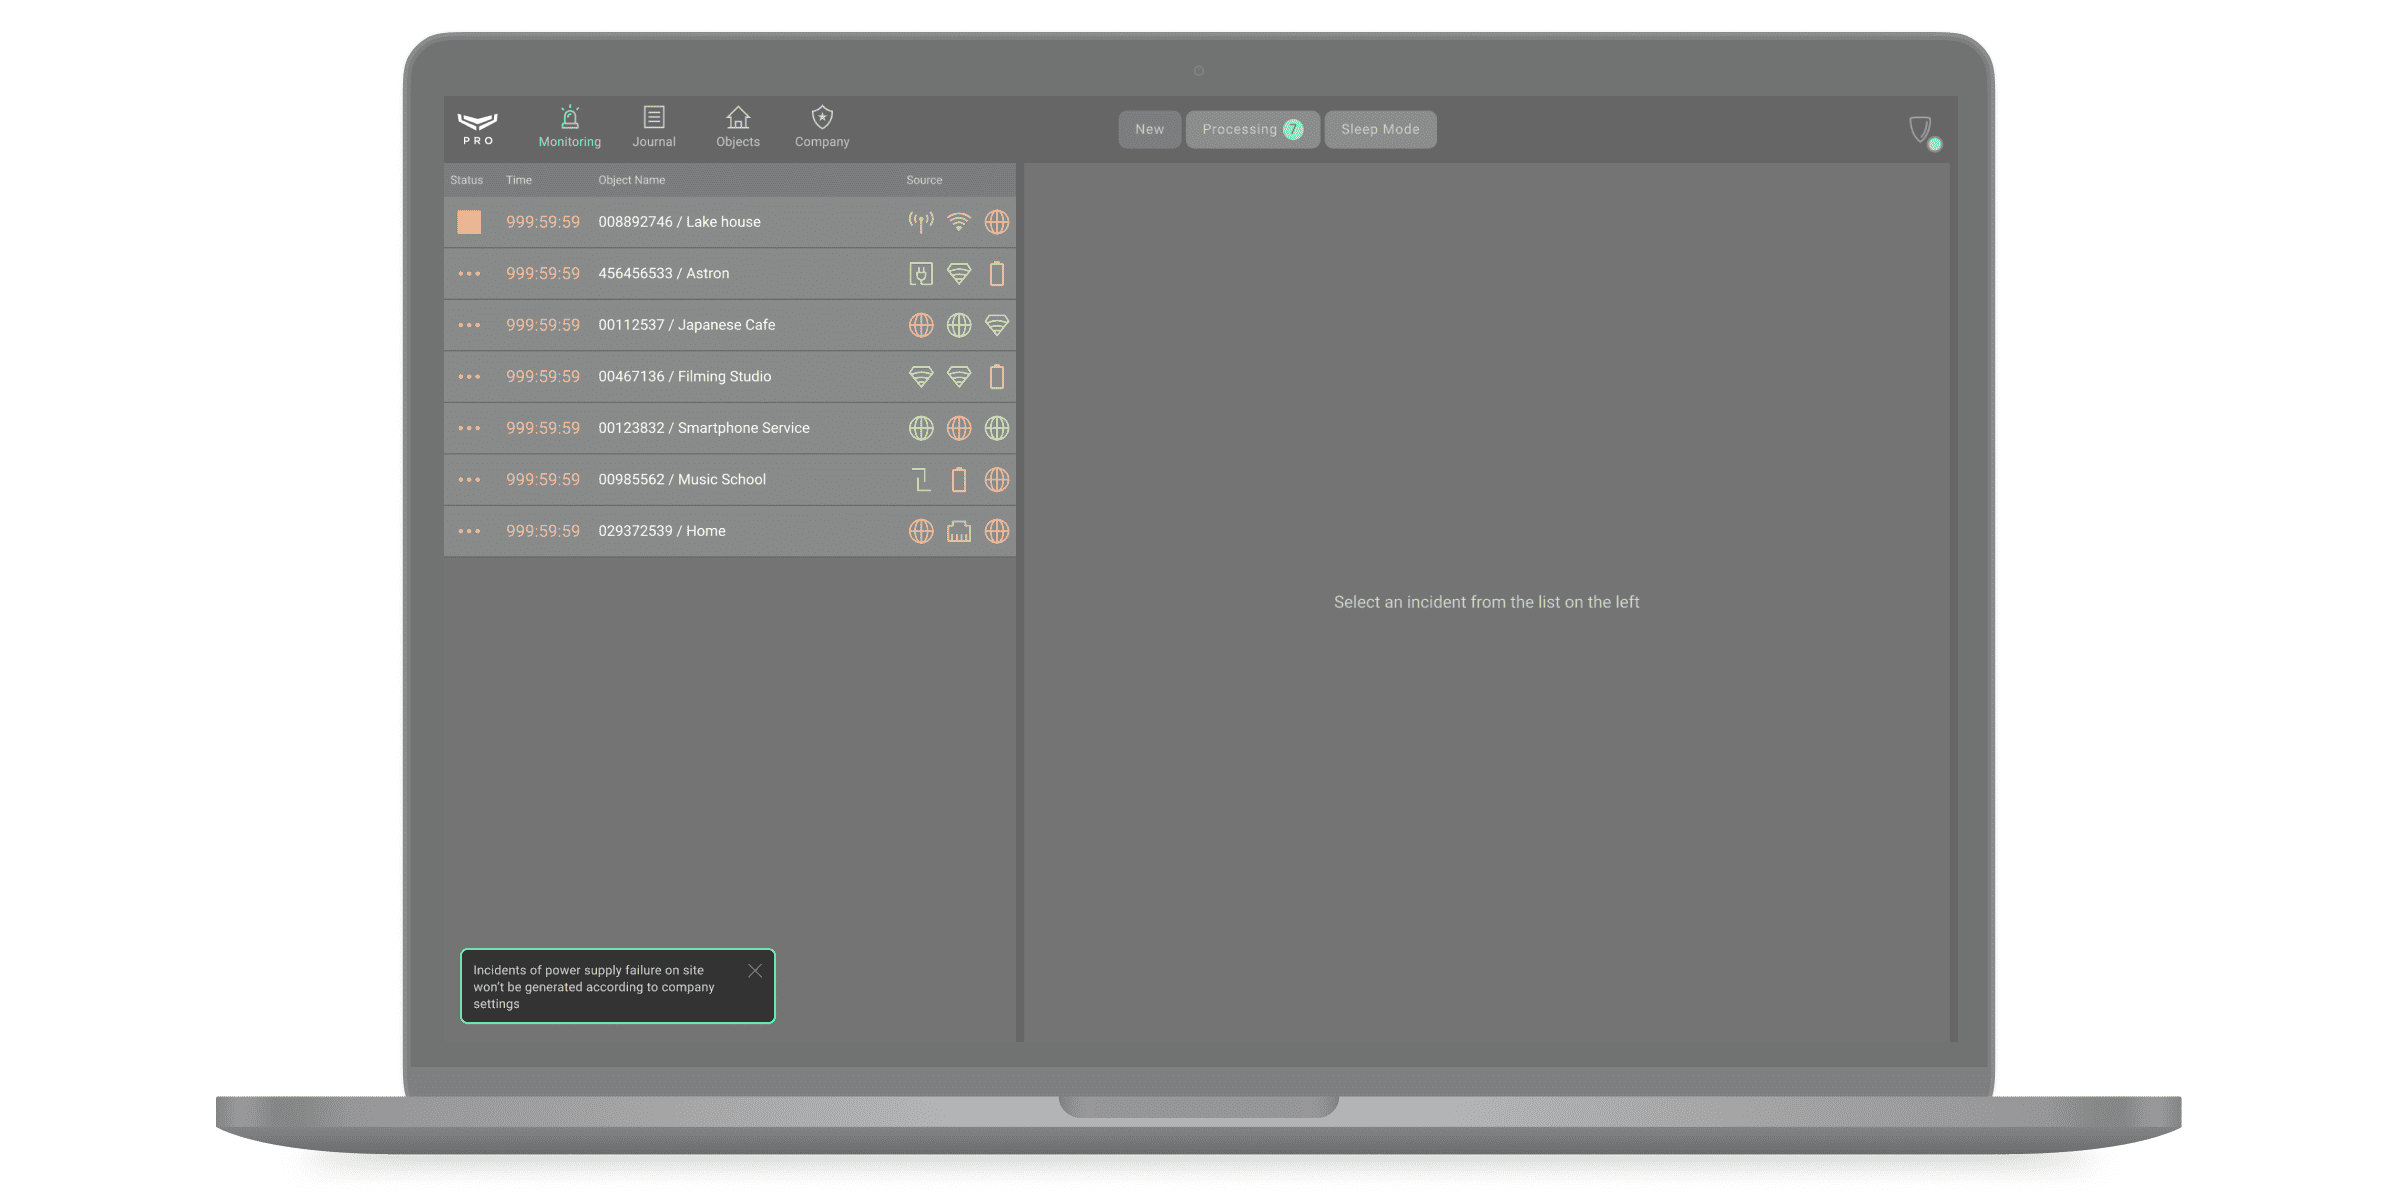
The Receive notifications at power outage on the objects option is enabled by default. When the option is disabled, the system will not generate incidents of external power loss for the hub, range extender, or integration module installed at the object.

After disabling this option, the following message will be displayed in the Monitoring module: “Incidents of power supply failure on site won’t be generated according to company settings”.
Cloud signaling monitoring

Cloud Signaling is a service that enables communication between Ajax system and third-party monitoring software. It serves as a link between a hub and monitoring stations, converting notifications received from the hub into an event protocol compatible with the Central Monitoring Station’s (CMS) software.
Cloud Signaling can deliver events to the CMS directly from Ajax Cloud. This service is beneficial for alarm monitoring companies and companies involved in both security systems installations and alarms and events response. By using PRO Desktop, they can configure and connect security systems. Additionally, security and monitoring companies can use the app to organize a CMS.
Access rights

In the Access rights menu, the company owner, senior CMS engineer, and head of installers can adjust the access rights for employee roles. If the manager assigns access to a certain type of employee, then all employees with this role will have the corresponding right.
The following rights can be enabled or disabled in this menu:
| Company owner | Senior CMS engineer | Head of installers | |
| Taking and viewing photos on demand and photos by on-schedule scenarios | + | + | – |
| Viewing photos by alarm and in alarm scenarios | + | + | – |
| Inviting an installer/company or security company | + | – | + |
| Assigning an admin role to an existing user | + | – | + |
| Granting an admin access to system settings | + | – | + |
| Arming and disarming objects | + | + | + |
| Watching livestreams of the third-party video cameras | + | + | – |
| Watching livestreams of Ajax cameras with and without sound | + | + | – |
| Viewing Ajax camera archive | + | + | – |
| Using pan-tilt-zoom (PTZ) feature | + | + | – |
| Making and receiving calls using voice module | + | + | – |
| Locking and unlocking smart locks | + | – | – |
| Creating maintenance reports for serviced objects | + | – | – |
| Exporting records from journal and object data | + | – | – |
If the manager has granted the right to create maintenance reports for a specific role, all employees with this role can create reports, download them, and access the archive of these reports.
Workstations
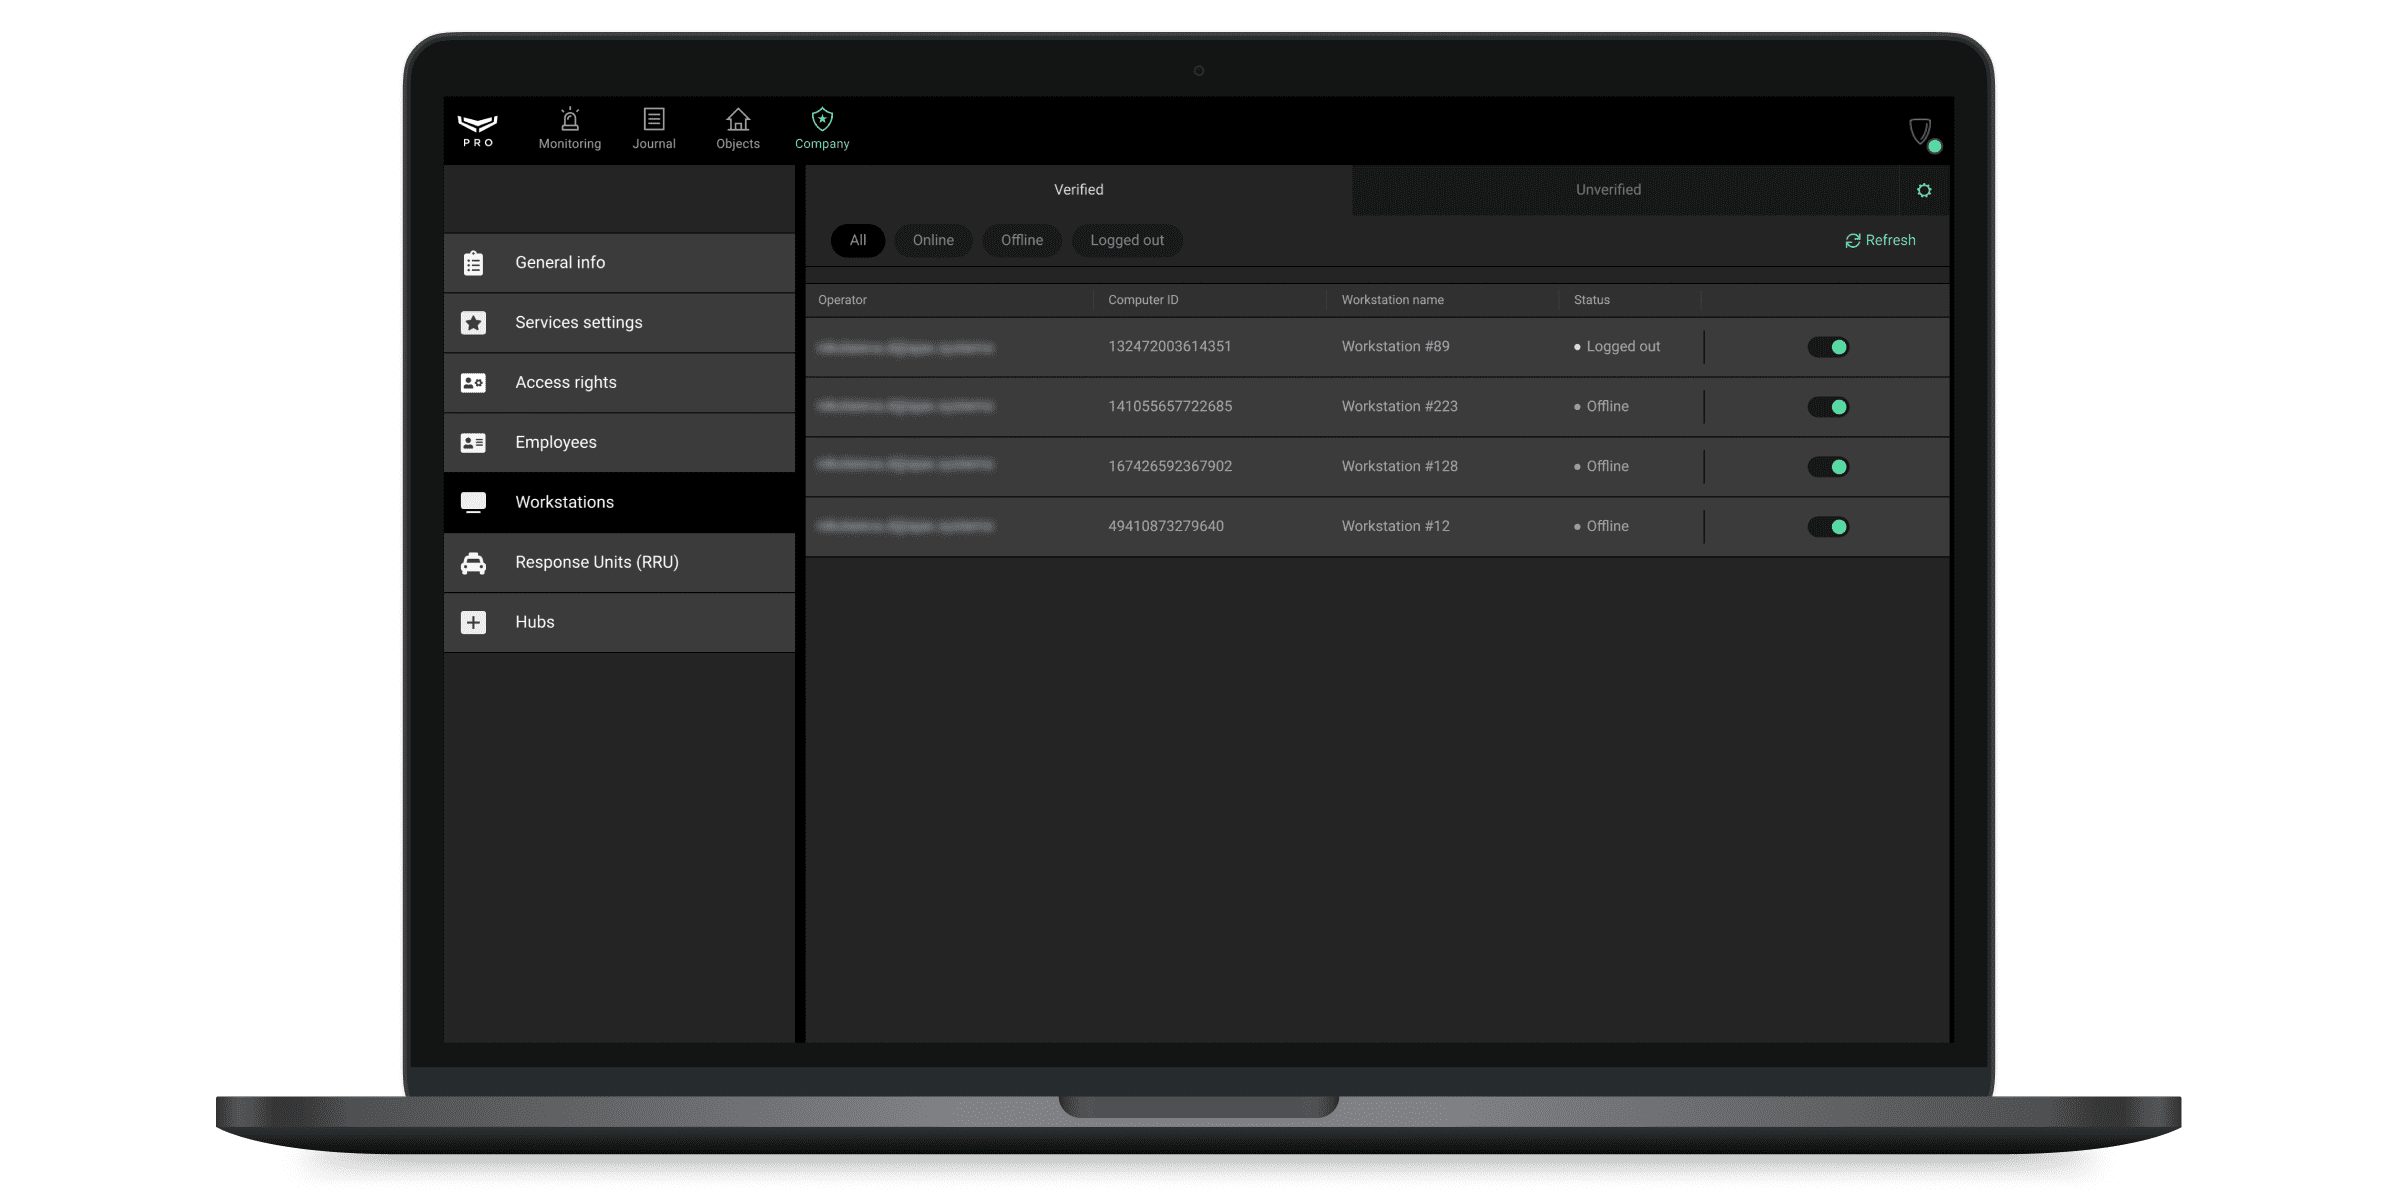
In the Workstations menu, you can assign a unique identifier to each computer (computer ID) and link an employee account to it. This information is used to generate a report on CMS availability.
To assign a workstation to an operator, you need to confirm their login to the account. You can do this by clicking “+” in the line with the operator’s email in the Unverified tab. When you click on the line, the extended information about the account and the Verify button open on the right.
When verifying the workstation, you should assign a name to it for the convenience of displaying it in the event journal. The computer ID is assigned automatically.
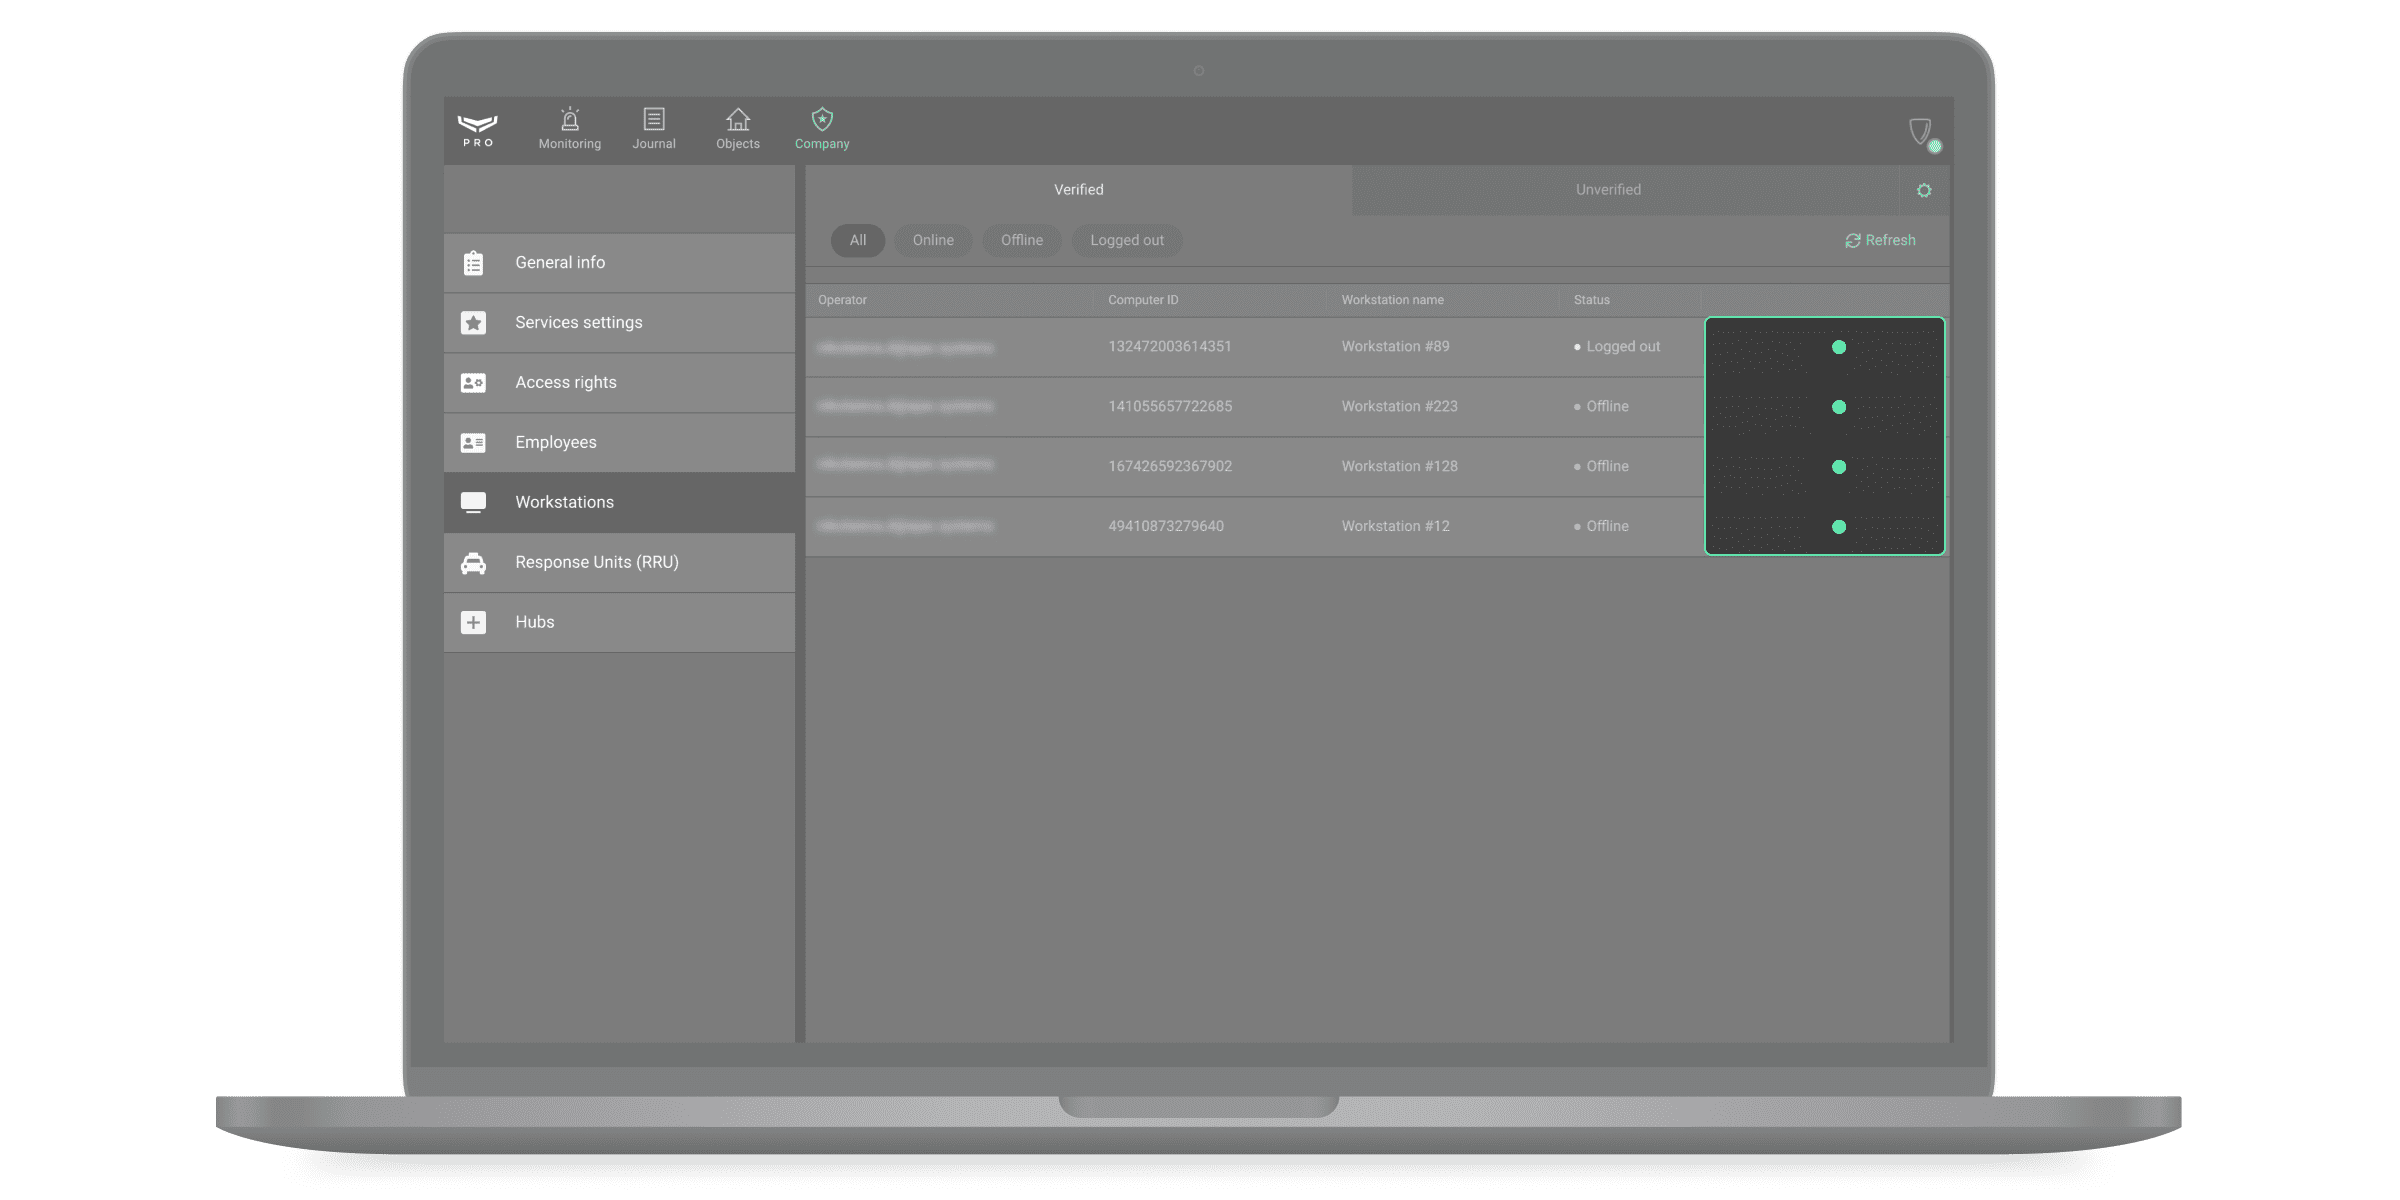
After confirming the workstation, the operator account displays in the Verified tab along with the data about the computer. A workstation can be temporarily deactivated or deleted by selecting an account in the list and clicking Delete from verified.
Filters are provided for convenience in navigation through the list of workstations.
In the Workstations menu, you can configure the types of events that generate incidents. PRO Desktop notifies about incidents in the Monitoring tab. To select events that generate incidents, click on the gear icon in the Unverified tab.

In the opened window, select the types of events:
- The operator is offline — the operator computer has no Internet connection.
- Login from an unverified computer — login to the account from a PC that has not been verified by the head of operators.
How to manage response units in the RRU menu
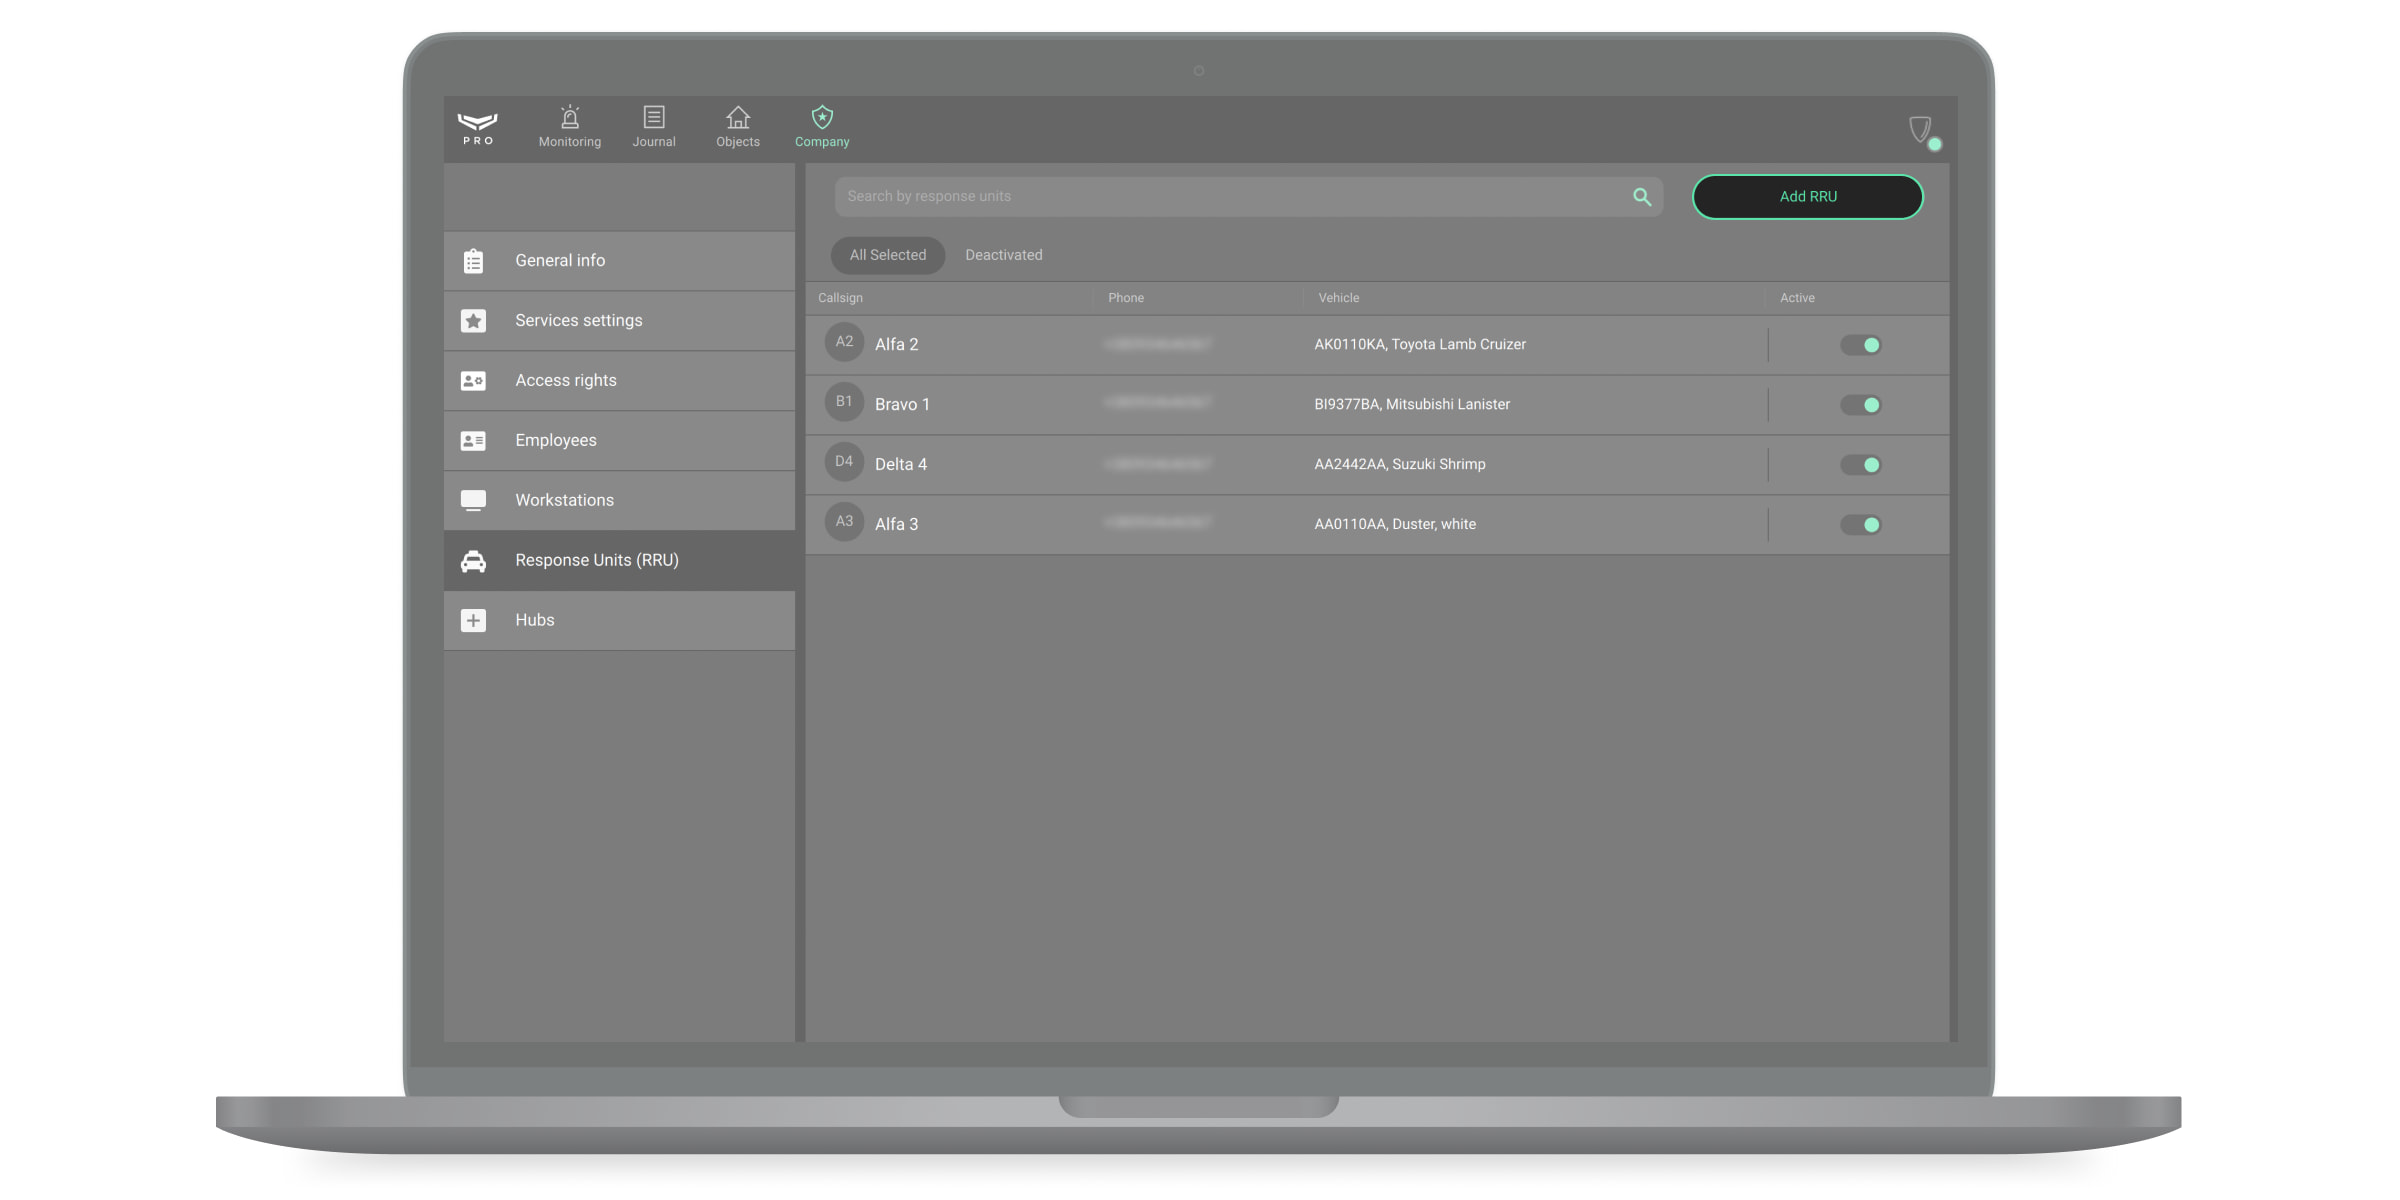
To add a new response unit, click the Add RRU button in the Response Units (RRU) menu.
A window will open with a form in which you need to specify the unit details. This information will be displayed in the Monitoring module when processing an alarm, as well as in the Objects module when the RRU is linked to an object. You can add 2 phone numbers to one unit. Required fields are marked with an asterisk.
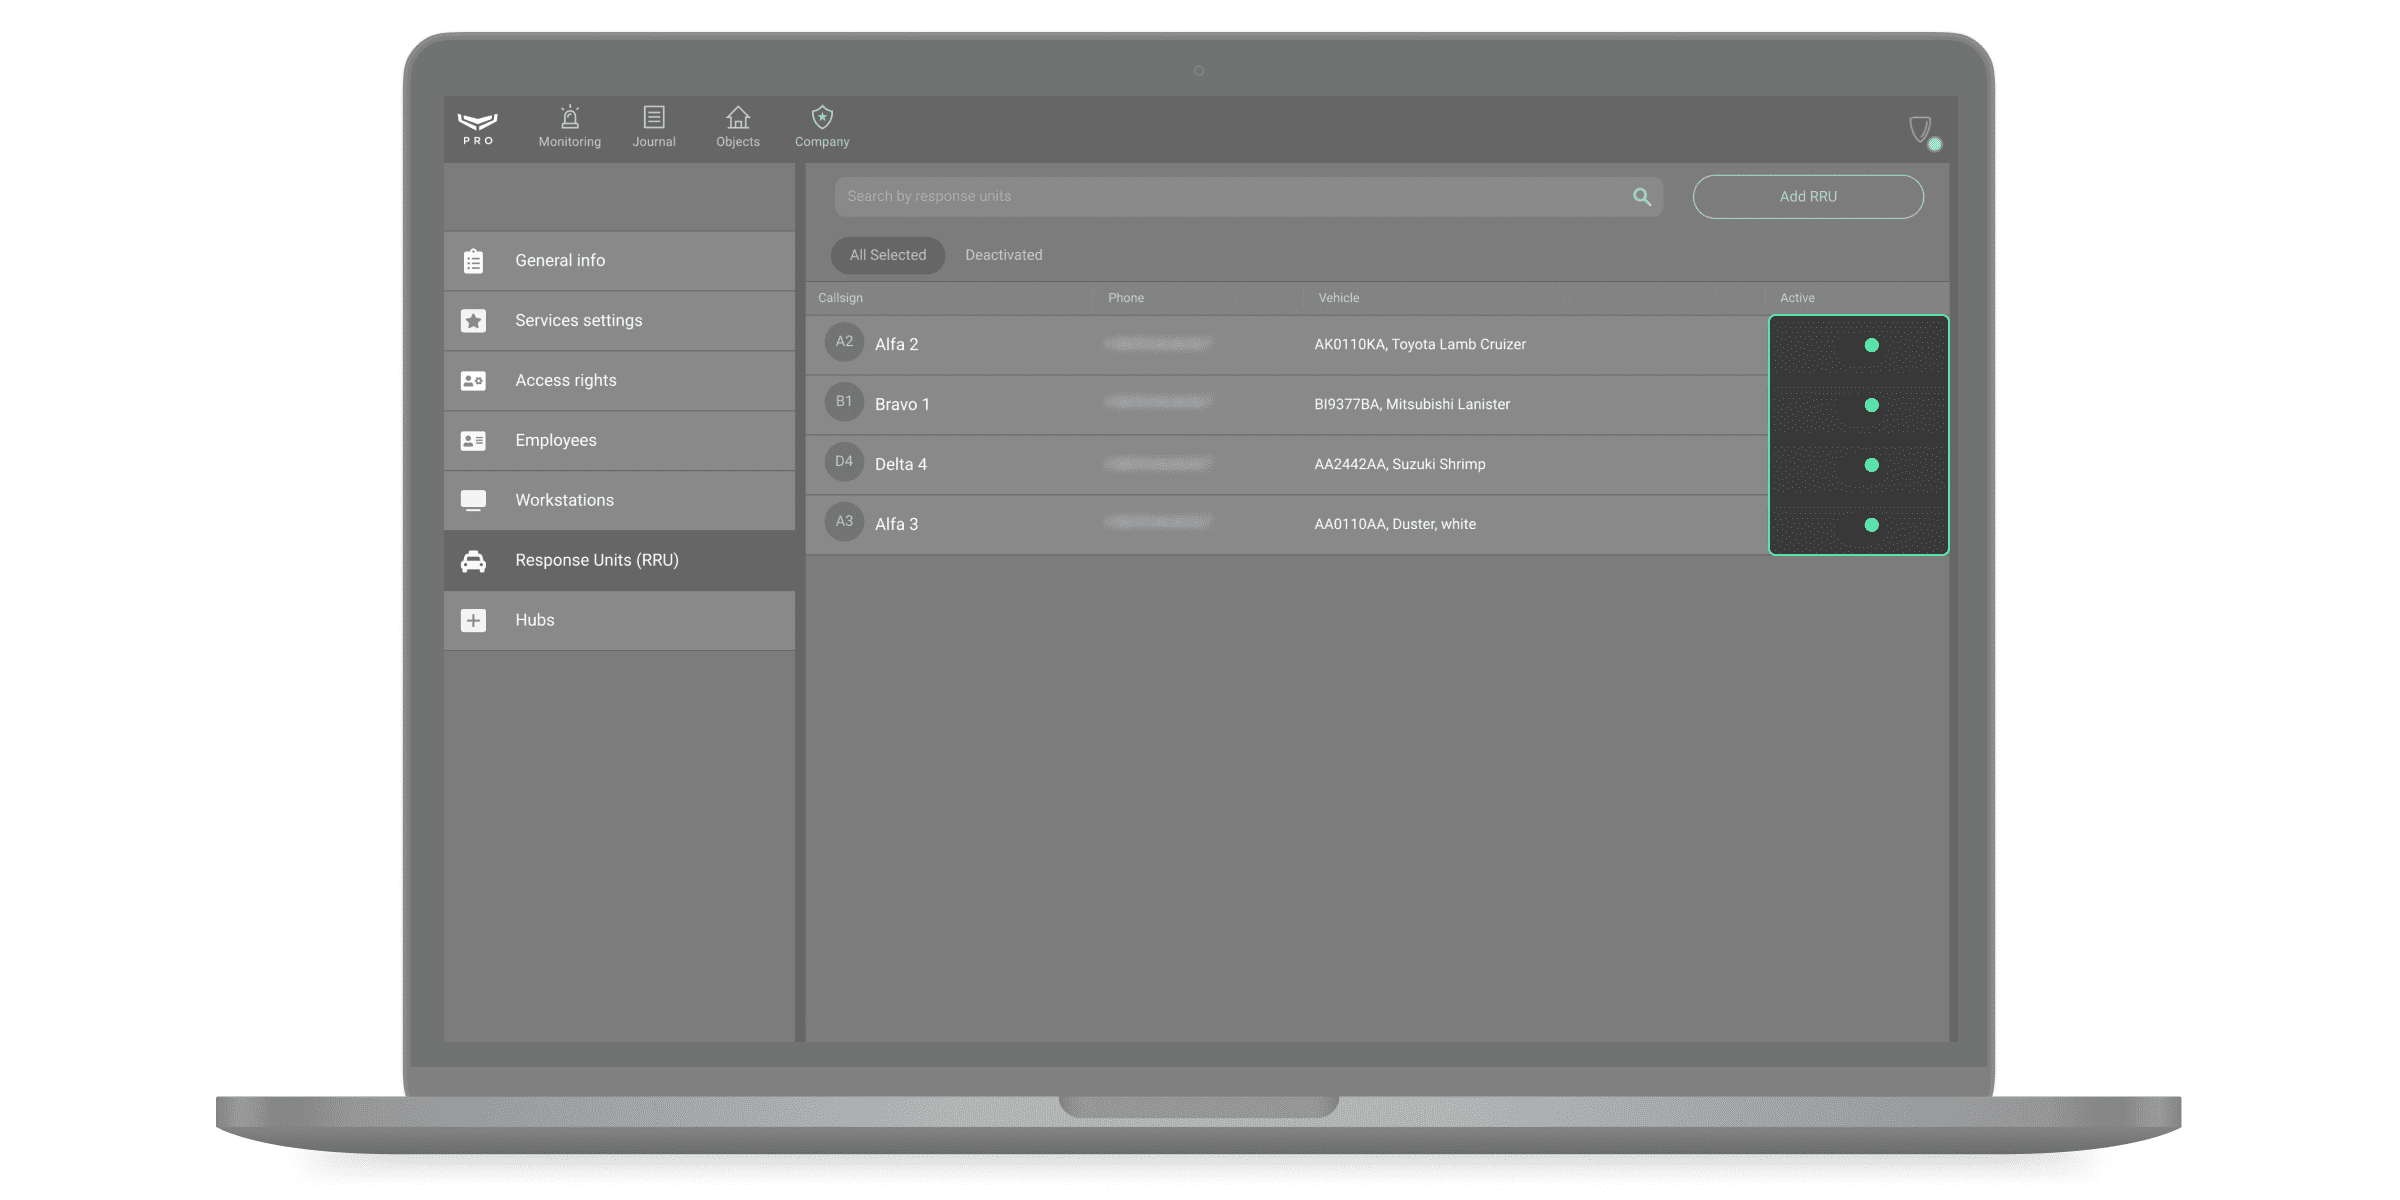
It is possible to deactivate the RRU temporarily without removing it from the system. To do this, switch the toggle in the line with the certain unit. Left position — the unit is inactive, right position — it is active.
You can configure RRU codes that activate only after the alarm and are valid for a specified period for each facility. With this code, the rapid response team can change the security mode using any Ajax keypad at the facility.
Hubs
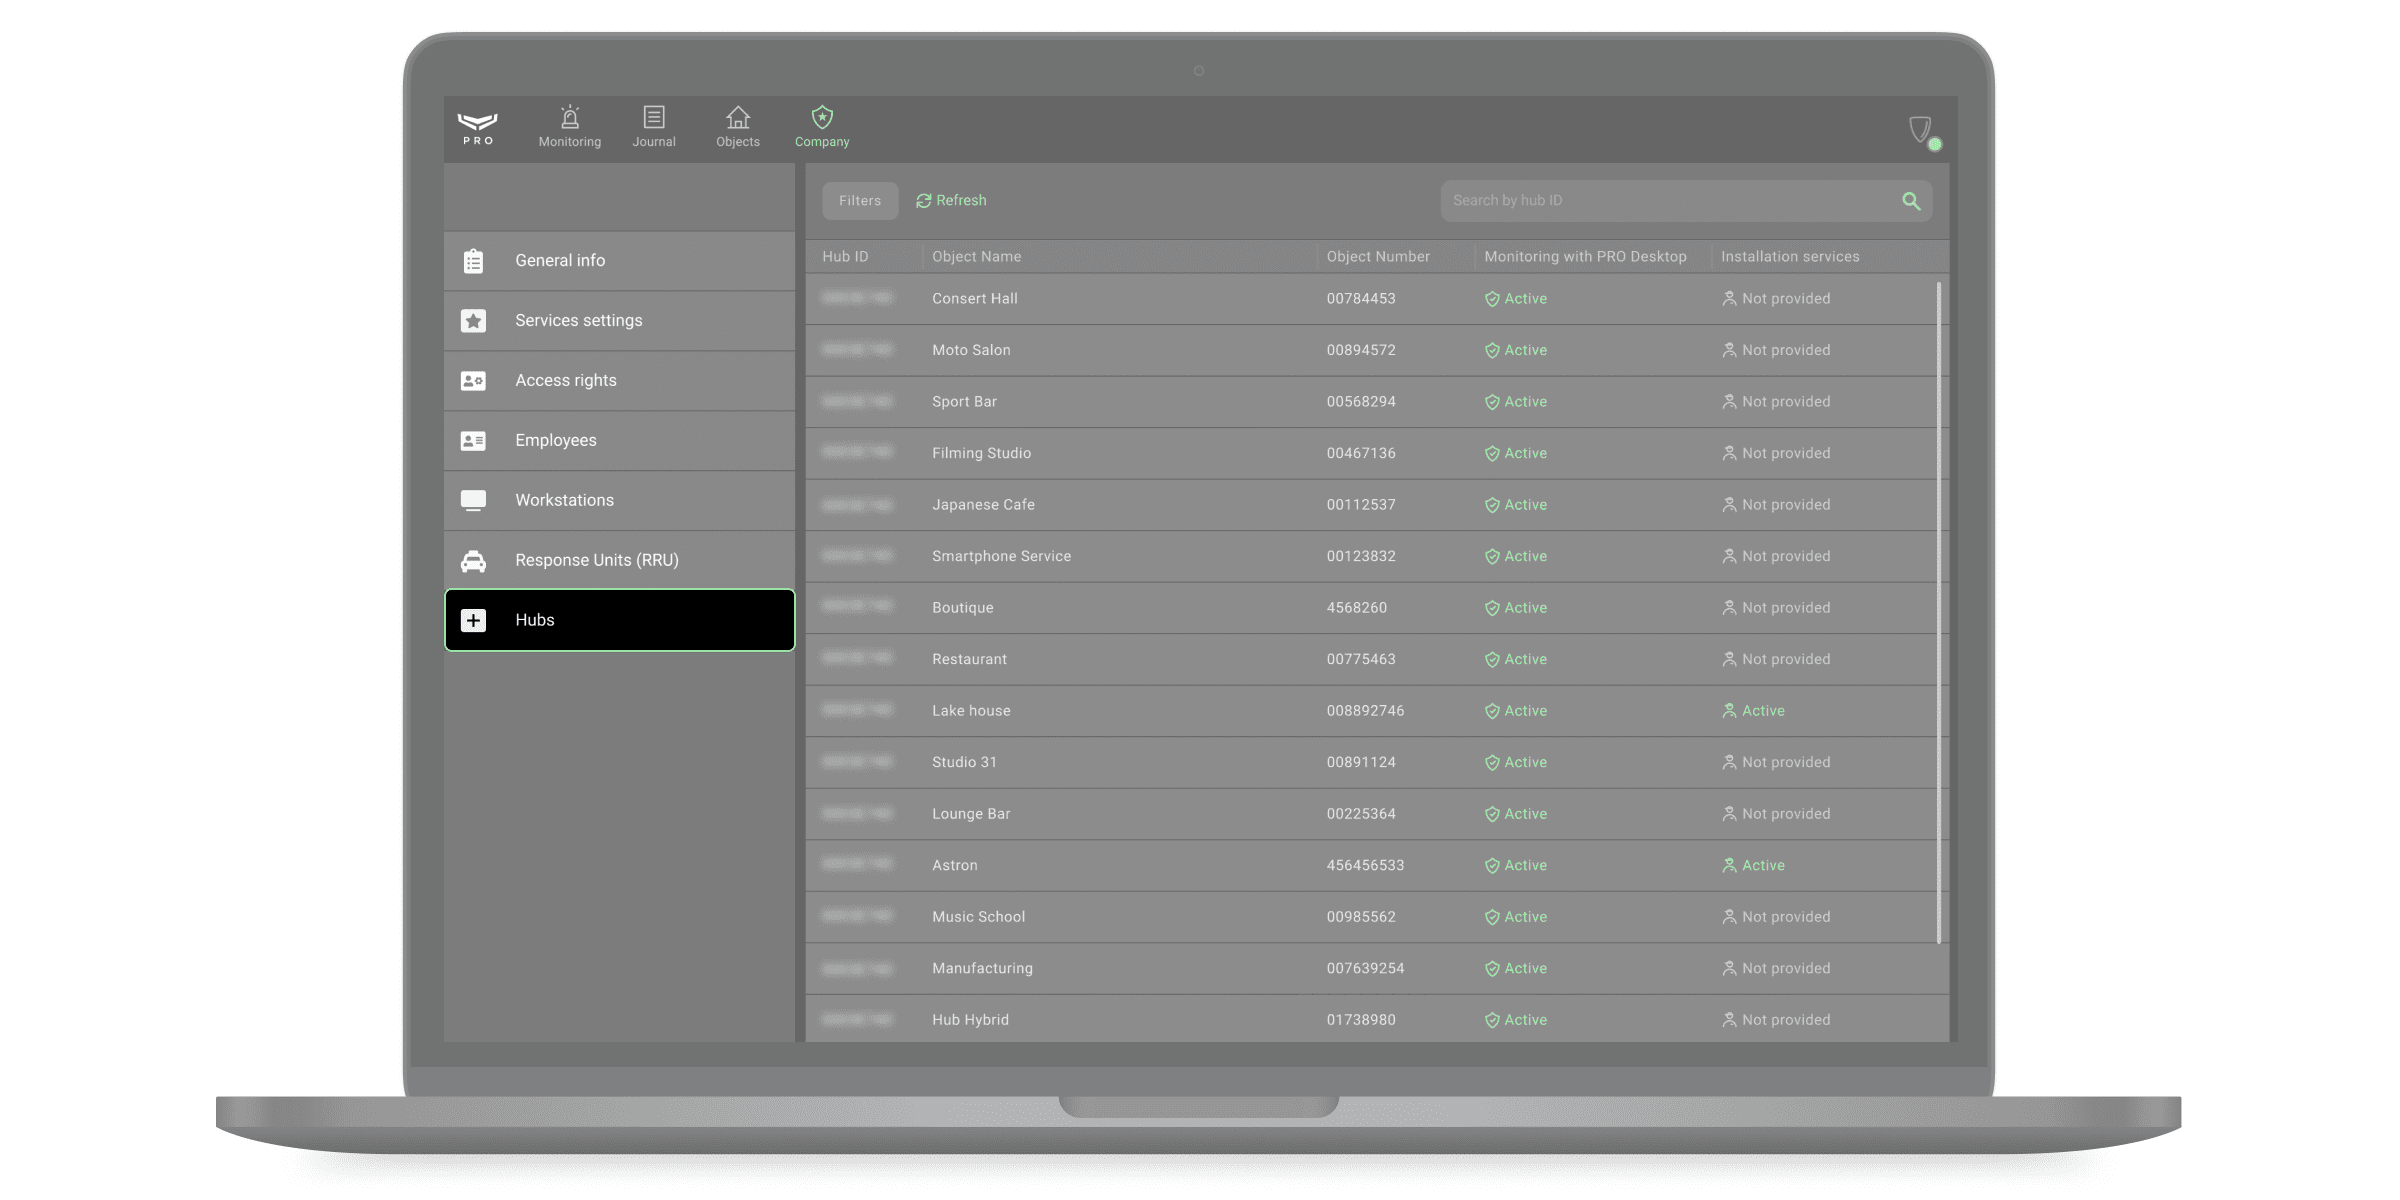
The Hubs menu is designed to administer hubs linked to a company. Here you can receive requests for monitoring/removal from monitoring, adding/deleting objects, as well as transferring objects from Translator to PRO Desktop (if the Translator account is linked to a company account). Hubs are displayed in the menu as a list, where the hub identifier, object statuses, number, and name of the object in PRO Desktop are indicated.
The hub status is also displayed in this window. Monitoring with PRO Desktop is designed for monitoring services, and Installation services is for installing and configuring the Ajax systems.
| Monitoring with PRO Desktop | Meaning |
| Active | Object accepted for monitoring. |
| Pending deletion | The object has been removed from monitoring and is in the Withdrawn from monitoring menu of the Objects module. |
| No monitoring | Monitoring request was not sent. |
| Installation services | Meaning |
| Active | A request for installation services has been sent. |
| Not provided | Installation and maintenance services are not provided. Installers and Heads of Installers do not have access to system settings. |
When the hub is selected, a details window opens, with buttons for creating/deleting an object, going to the object card, and deleting the hub from the company account. The deletion from an account means that the object will be deleted both in PRO Desktop and in Translator (if the account in Translator is linked to an account in PRO Desktop).
Settings templates
An Ajax system allows PRO to create templates to quickly apply several settings at once. With the Ajax PRO Desktop 4.17 firmware version and higher, you can create the telephony settings template. It allows to configure an Ajax hub to communicate with a central monitoring station (CMS) via SIP protocol.
PRO can create no more than 5 templates.
PRO can apply created template in the hub settings.
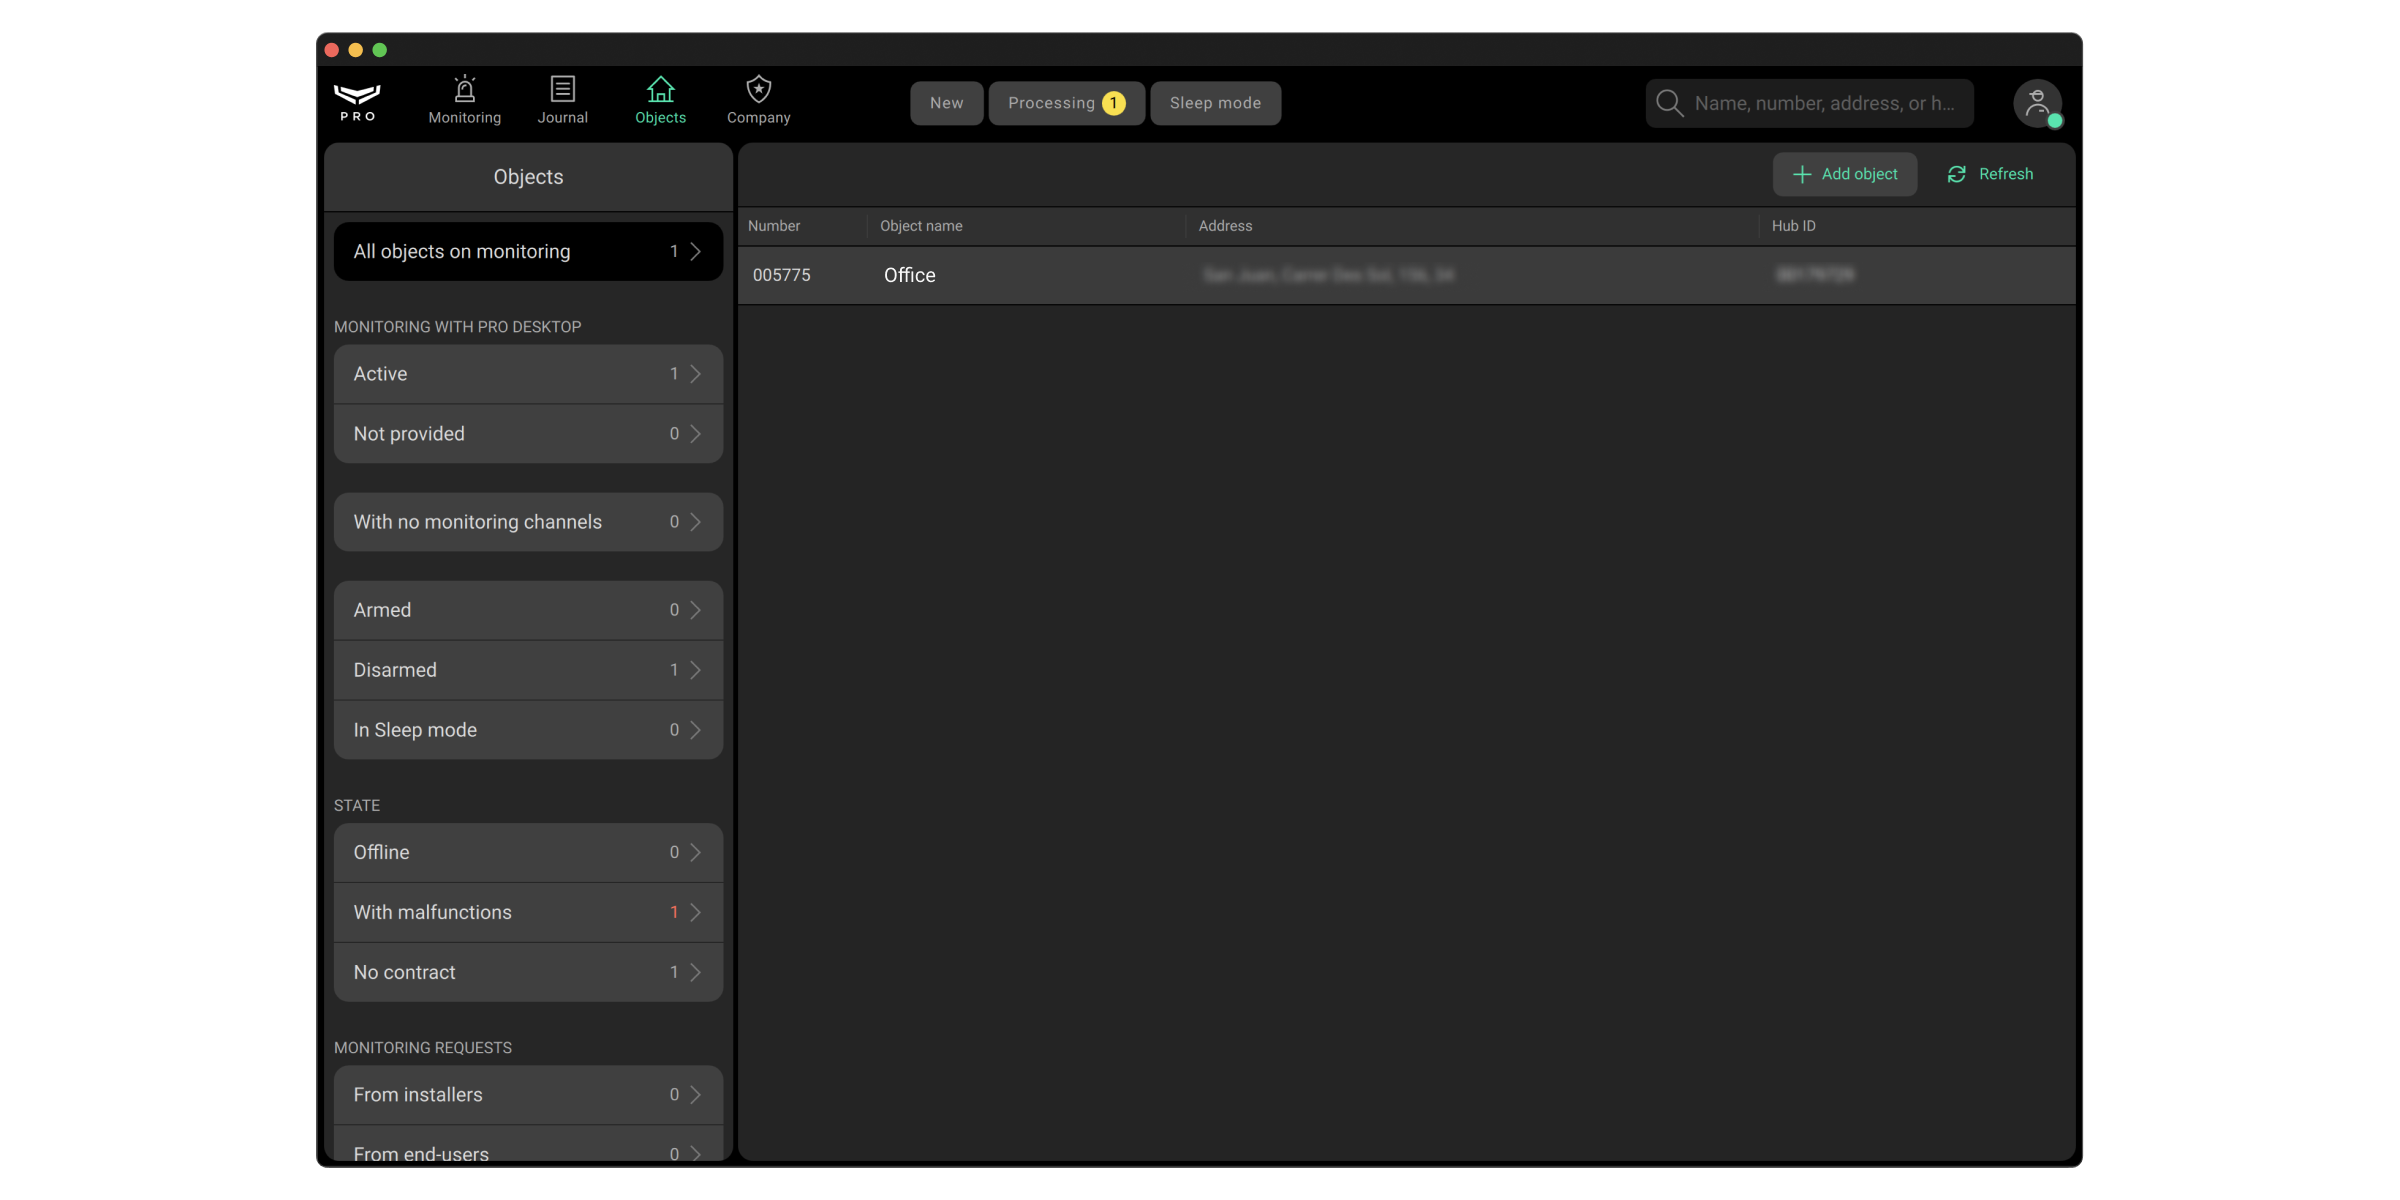
Objects
Roles of employees with access to the module: Engineer, Senior CMS Engineer, Head of operators, Operator, Installer, Head of installers.
The Objects module is designed to administer objects in PRO Desktop. To go to the module, select Objects in the list of modules in the upper left corner of the screen.
An object in PRO Desktop is the space. All devices connected to the space are automatically linked to the object and displayed in the Equipment tab.
The module screen consists of two parts: a list of objects and a sorting menu. The list of objects contains their numbers in PRO Desktop, names, addresses, as well as hub identifiers (IDs). The following items are available in the sorting menu:
- Cloud signaling monitoring:
- <Receiver name> — the list of all objects that are monitored via <Receiver name>.
- No monitoring — the list of all objects that are not monitored via receivers.
- Monitoring with PRO Desktop:
- Active — the list of all objects within PRO Desktop, except for objects in the Withdrawn from monitoring menu.
- Not provided — the list of all objects that are not monitored within PRO Desktop.
- With no monitoring channels — the list of objects that are not monitored, either within PRO Desktop or Cloud Signaling.
- Armed — the list of objects with the currently armed security system.
- Disarmed — the list of all objects with the currently disarmed security system.
- In Sleep Mode — the list of objects with muted alarm notifications.
- Offline — the list of objects where the hub is offline.
- With malfunctions — the list of objects where the security system reports a malfunction: low battery indicator, failed attempts to arm the detector, etc.
- No contract — the list of objects with empty information about the contract with the company. Contract information can be added at any time.
- Installation services provided — objects that are under maintenance of Installers and Heads of installers.
- Monitoring requests (from installers) — objects from which a request was submitted to connect to the CMS via Ajax PRO apps.
- Monitoring requests (from end-users) — objects from which a request was submitted to connect to the CMS via the Ajax Security System app for end-users.
- Monitoring cancellation requests — a list of objects from which a request was submitted to disconnect from the CMS via any Ajax app.
Only an admin or a PRO account with the right to configure the system can cancel a request for monitoring cancellation. You can do this in any Ajax app: Control tab → space Settings
→ Security companies. - Withdrawn from monitoring — deleted objects. Objects are automatically deleted from the bin after 7 days.
In the Objects module, the following buttons are also available:
- Add object — allows you to link an object to a company using the QR code (ID) of the hub or to create an empty object.
The way of adding an object via the hub ID depends on the employee role and type of a company: monitoring, installation, or security (installation & monitoring). Only an employee of the installation or security company in the Installer or Head of installers role can create an empty object.
- Maintenance reports — opens the menu of maintenance reports.
- Update — updates the list of hubs linked to the company.
Adding an object
There are several ways to add a new object to PRO Desktop:
- Using the hub ID (its QR code).
- Creating an empty object and adding standalone devices to it.
- Accepting a monitoring request from the Ajax app.
- Transferring the object from Translator to PRO Desktop.
After connecting the hub, specify the necessary information in the object card. In Ajax apps, this will make easier navigation and object searching.
When adding an object via the hub ID or a monitoring request, an employee of the companies that use Cloud signaling monitoring, can select one or more monitoring channels. This option becomes available with the Ajax PRO Desktop 4.0 firmware version and higher.
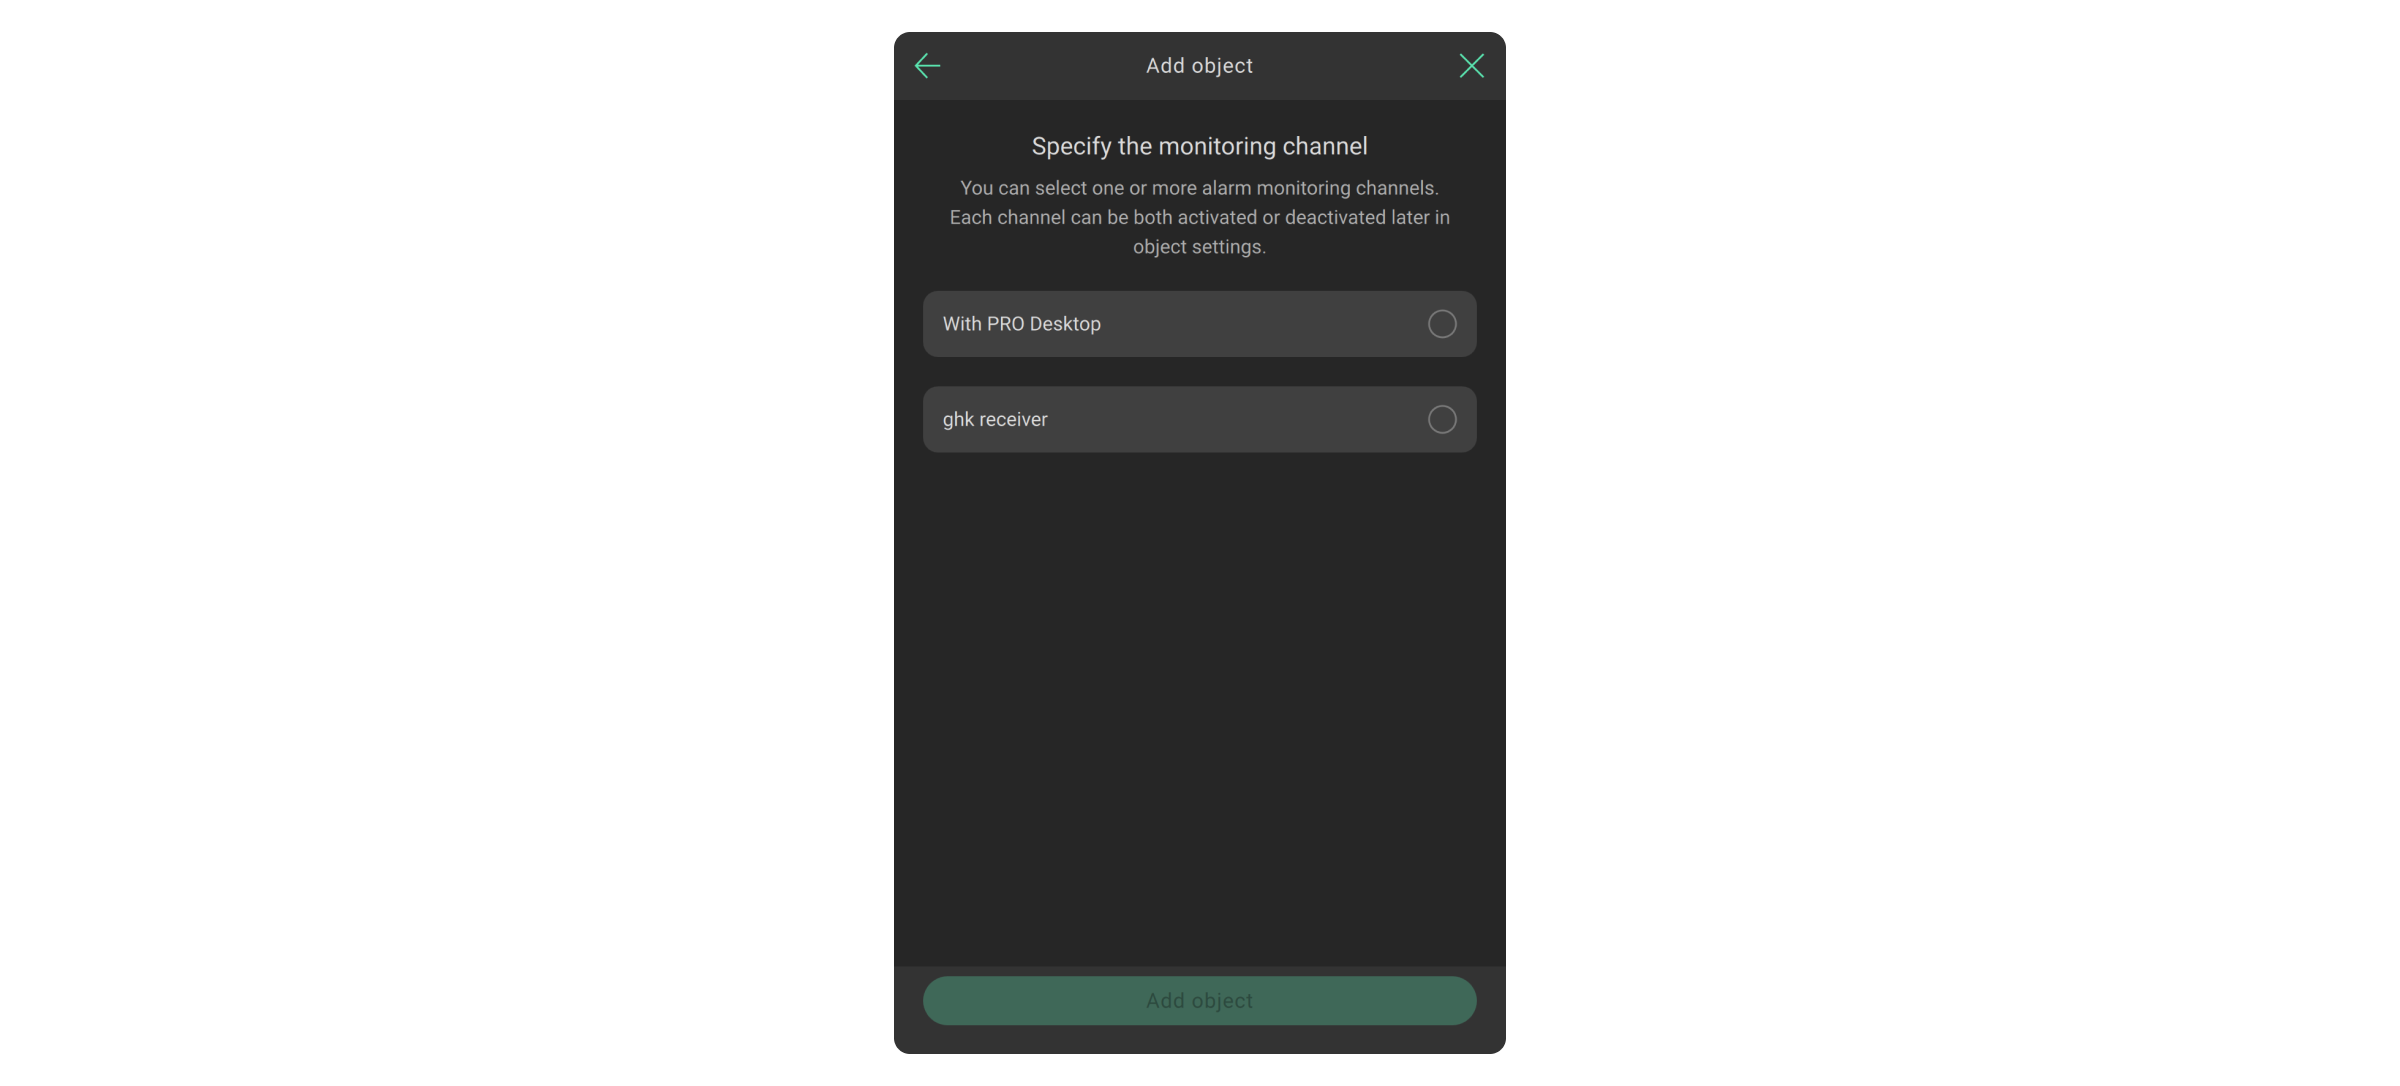
Adding via ID
When adding an object, a card is created with all the information necessary for alarm processing: address, contacts, room layouts, road maps, responsible people, comments, etc. You can add an object from a company account only but not from a personal PRO account. After adding the object, the company has permanent access to its settings.
It’s possible to add an object via the hub ID (QR code) if the following conditions are met:
- The hub is online.
- The space has no admins or PRO.
- The hub is not added to another installation company account and it is not locked by another monitoring company.
To add an object via the hub ID, an employee has to be in the role of:
- CMS Engineer or Senior CMS Engineer — for the monitoring or security company.
- Installer or Head of installers — for the installation or security company.
To add an object, in PRO Desktop:
- Open the Objects module.
- Click the Add object button.
- Specify the number and name of the object, as well as the 20-digit hub ID (located under the QR code on the hub or packaging, the format is xxxxxxxxxxxxxxxxxxxx).
The Number and Hub ID fields are optional for the Installer or Head of installers of the security and installation company. While they are mandatory for the CMS Engineer or Senior CMS Engineer employee of the monitoring company.
- Click Add Object.

Creating an empty object
Only the Installer or Head of installers of the security and installation company can create an empty object.
To create an empty object, in PRO Desktop:
- Open the Objects module.
- Click the Add object button.
- Specify the name of the object.
- Click Add Object.

Adding an object via a monitoring request
The request to add is sent via Ajax apps by the hub admin or a PRO account with access to the object’s settings. The list of requests for monitoring and monitoring cancellation is displayed in the corresponding tabs of the Objects module, as well as in the Hubs menu of the Company module.
The adding method depends on the type of services provided:
- To access alarm monitoring, the end-user or PRO with rights to configure the system should send a request for monitoring.
- To access installation and maintenance, the employee should request access to the system settings.
- For both types of access, you should send both requests.
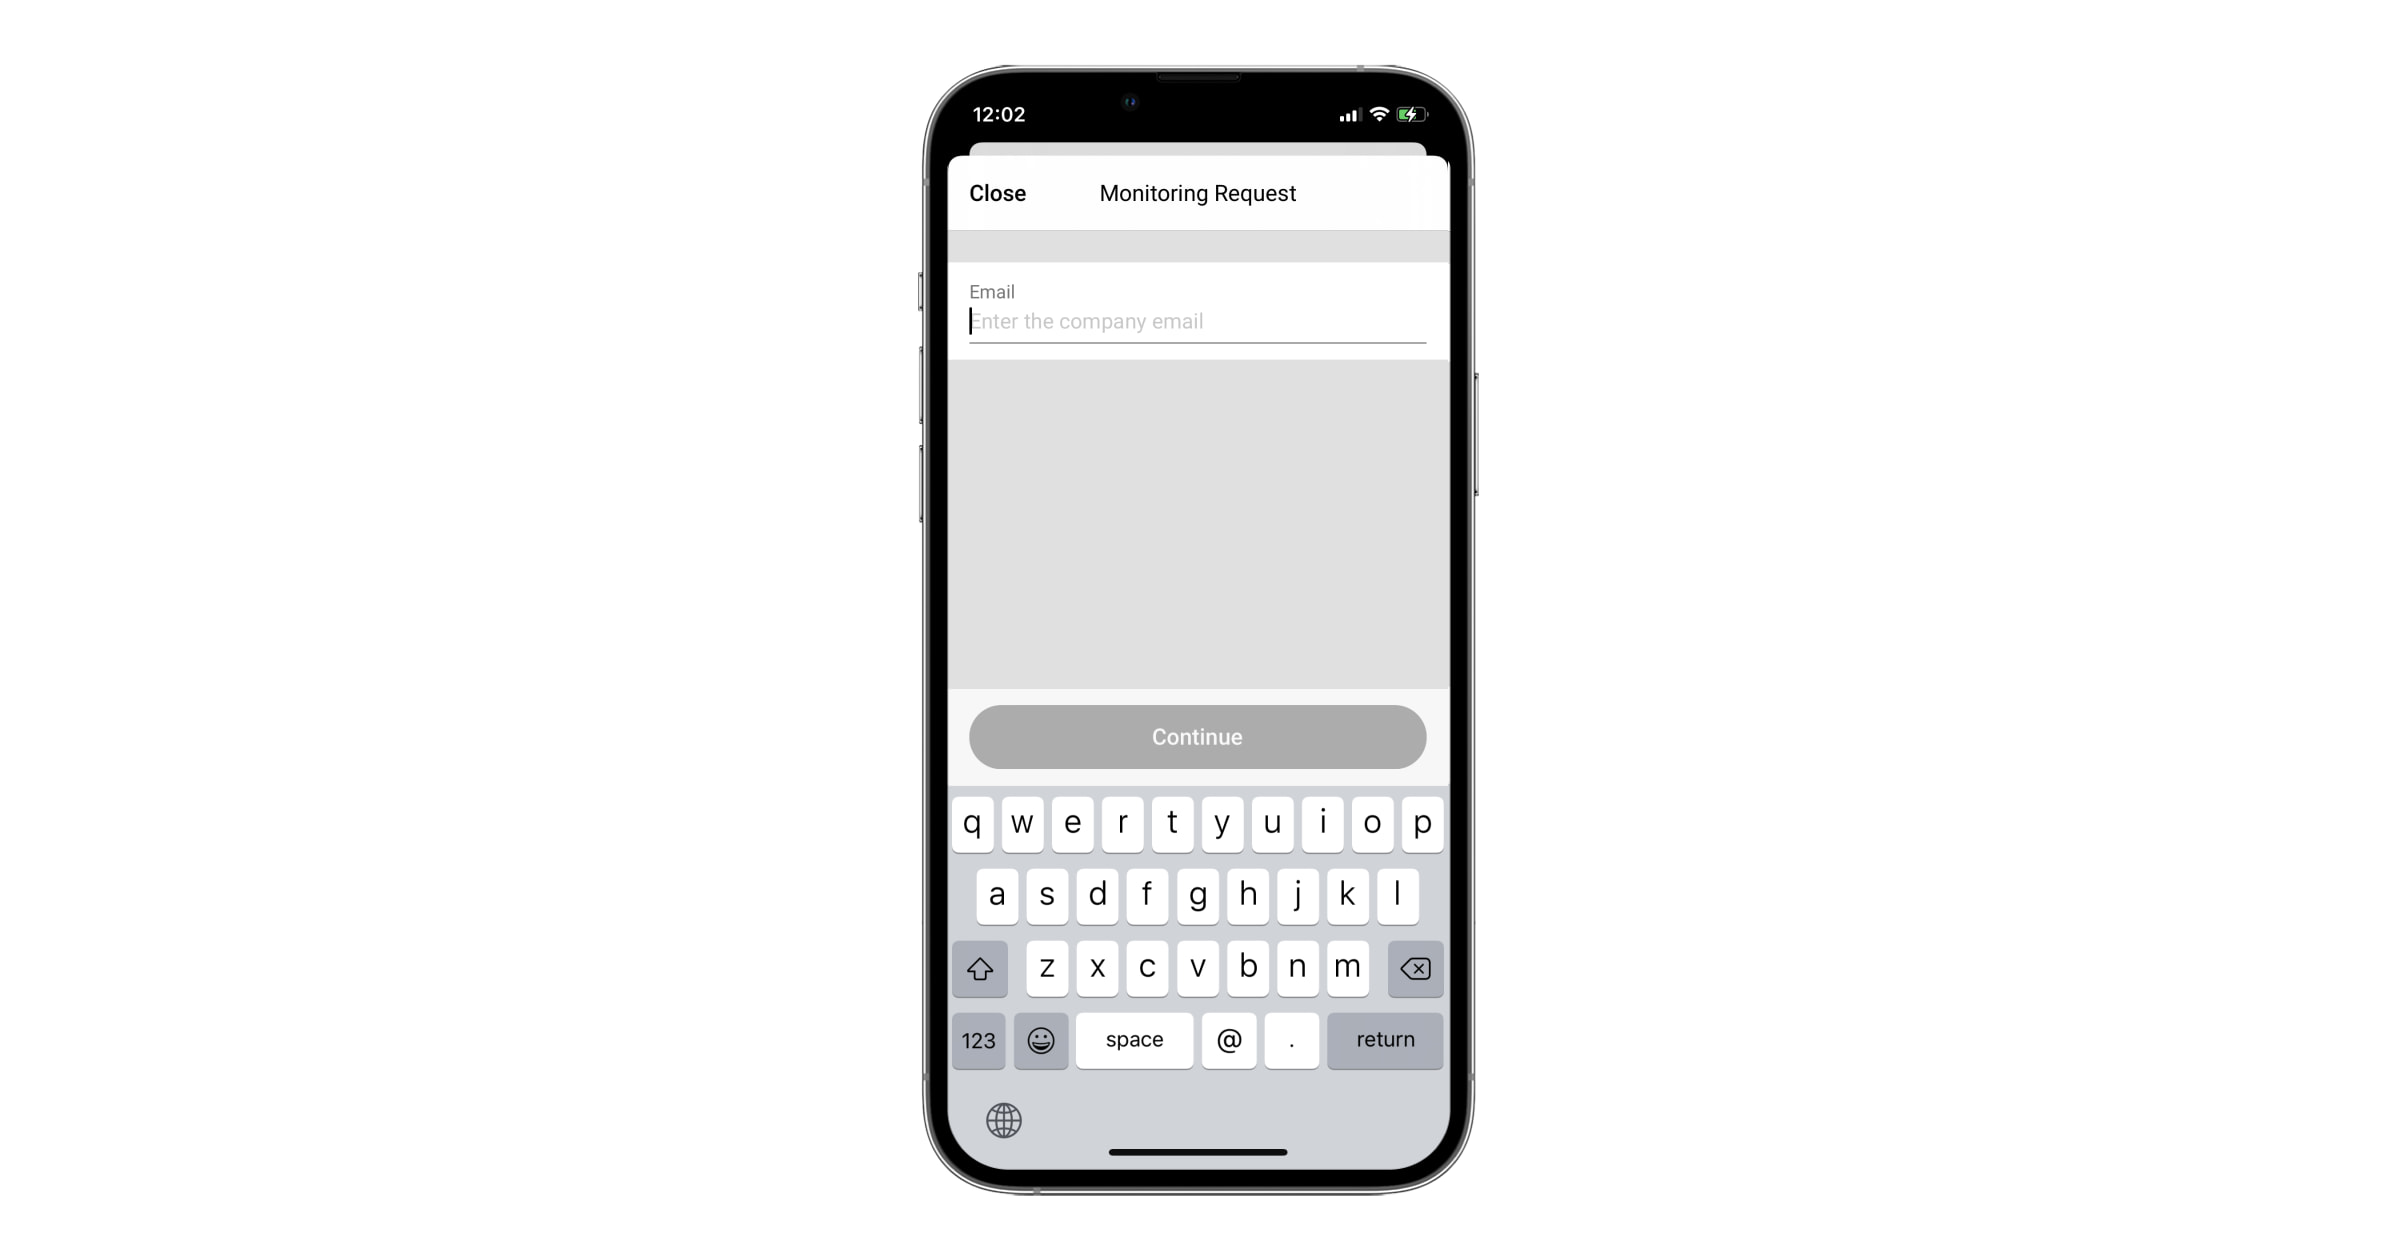
To send a request for alarm monitoring, in the Ajax app:
- Select the space if you have more than one or if you use the Ajax PRO app.
- Go to the Control tab and open the space settings.
- Open the Security companies menu.
- Select a company and click Apply.
A monitoring request can also be sent if you know the company’s email address. To do this, click on the Invite by email button in the Security companies menu, enter the company’s email address, and click Continue. Select a company from the list and confirm sending the request.
To accept a monitoring request, in PRO Desktop:
- In the Objects module, go to the Monitoring requests (from end-users) and/or Monitoring requests (from installers).
- Select the hub.
- Click Accept request. An object card will be automatically created for the hub to fill in the information.
- Enter the number, name of the object and click Save. A new object will appear in PRO Desktop.
To send a request for access to installation and maintenance in the Ajax app:
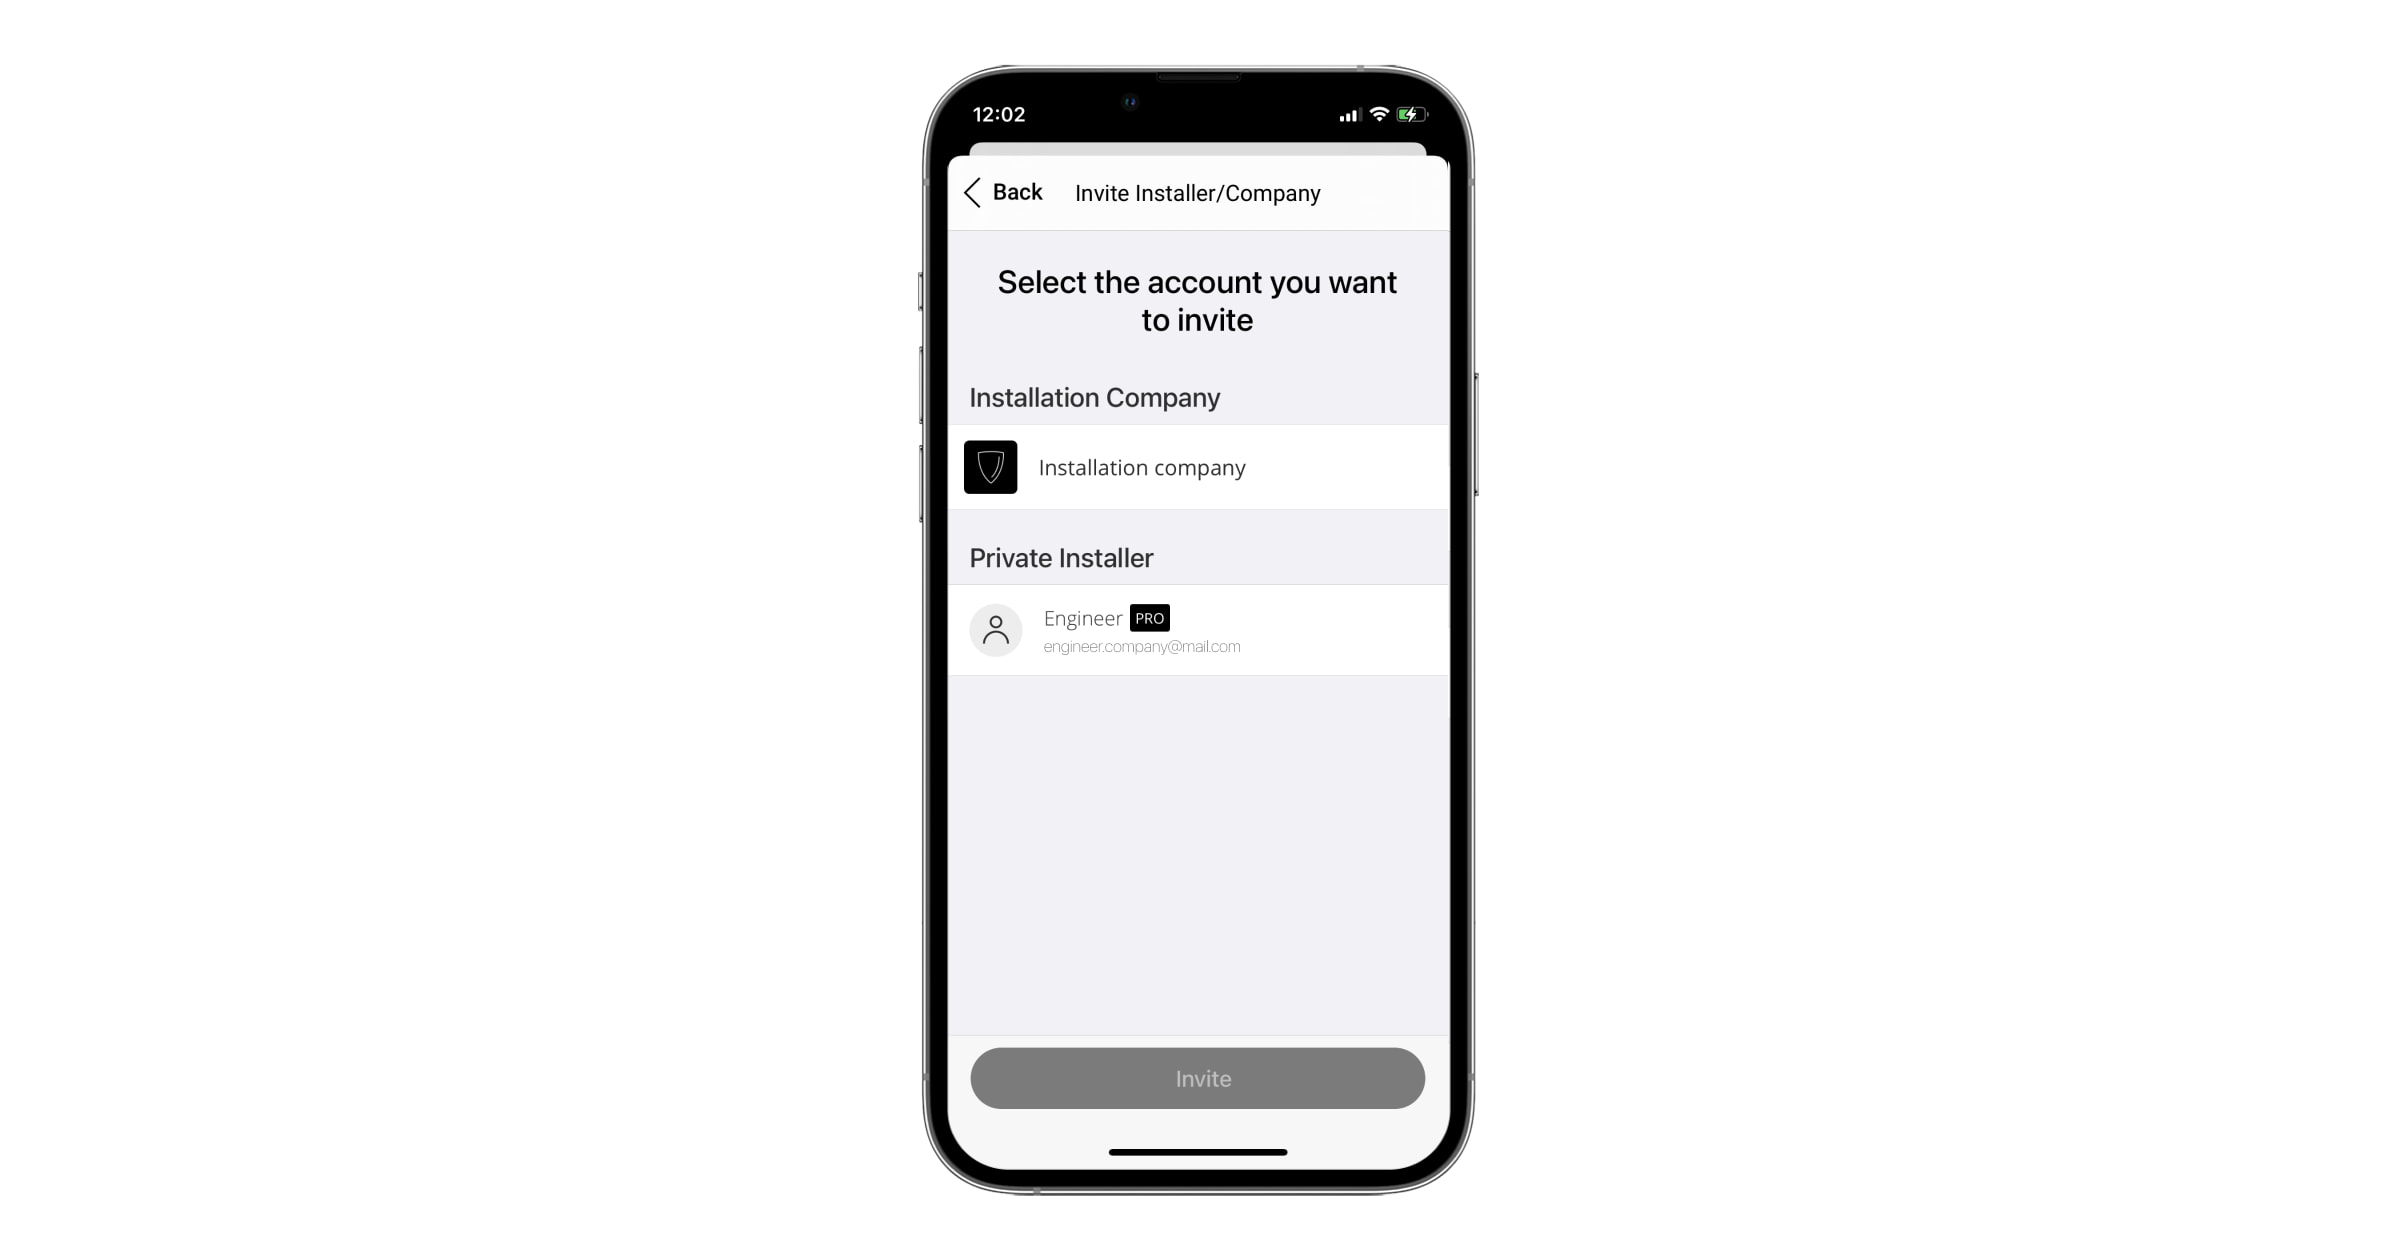
- Select the space if you have more than one or if you use the Ajax PRO app.
- Go to the Control tab and open the space settings.
- Open the Installers/Companies menu.
- Click the Invite button.
- Enter the email address of the company specified in the General info menu.
- Select a company and confirm the sending of a request.
You do not need to accept a request for the installation company services in PRO Desktop. After adding, the company has 8 hours to change the space settings, add devices and invite users. On the expiry of this access time, the company can no longer change the object’s settings.
If necessary, the Installer or Head of installers can request temporary or permanent access, which should be confirmed by the space admin or a PRO account with rights to configure the system.
PRO receives permanent rights to configure the system if there is no single space admin.
Transferring objects from Translator
To transfer objects from Translator, contact Ajax technical support service.
Configuring an object
The Installer or the Head of installers can set up the object via mobile or desktop app. Both apps provide the same options for Installers.
By default, the Installer has the same rights for setting as his company. The Installer does not have access to the space settings (if access to all objects is disabled) until the Head of installers grants him such a right. Once access is granted, Installers can begin setting up the object.
There are two ways to grant access to the installer:
| The first way | The second way |
|
|
Prolongation of access time to the space settings
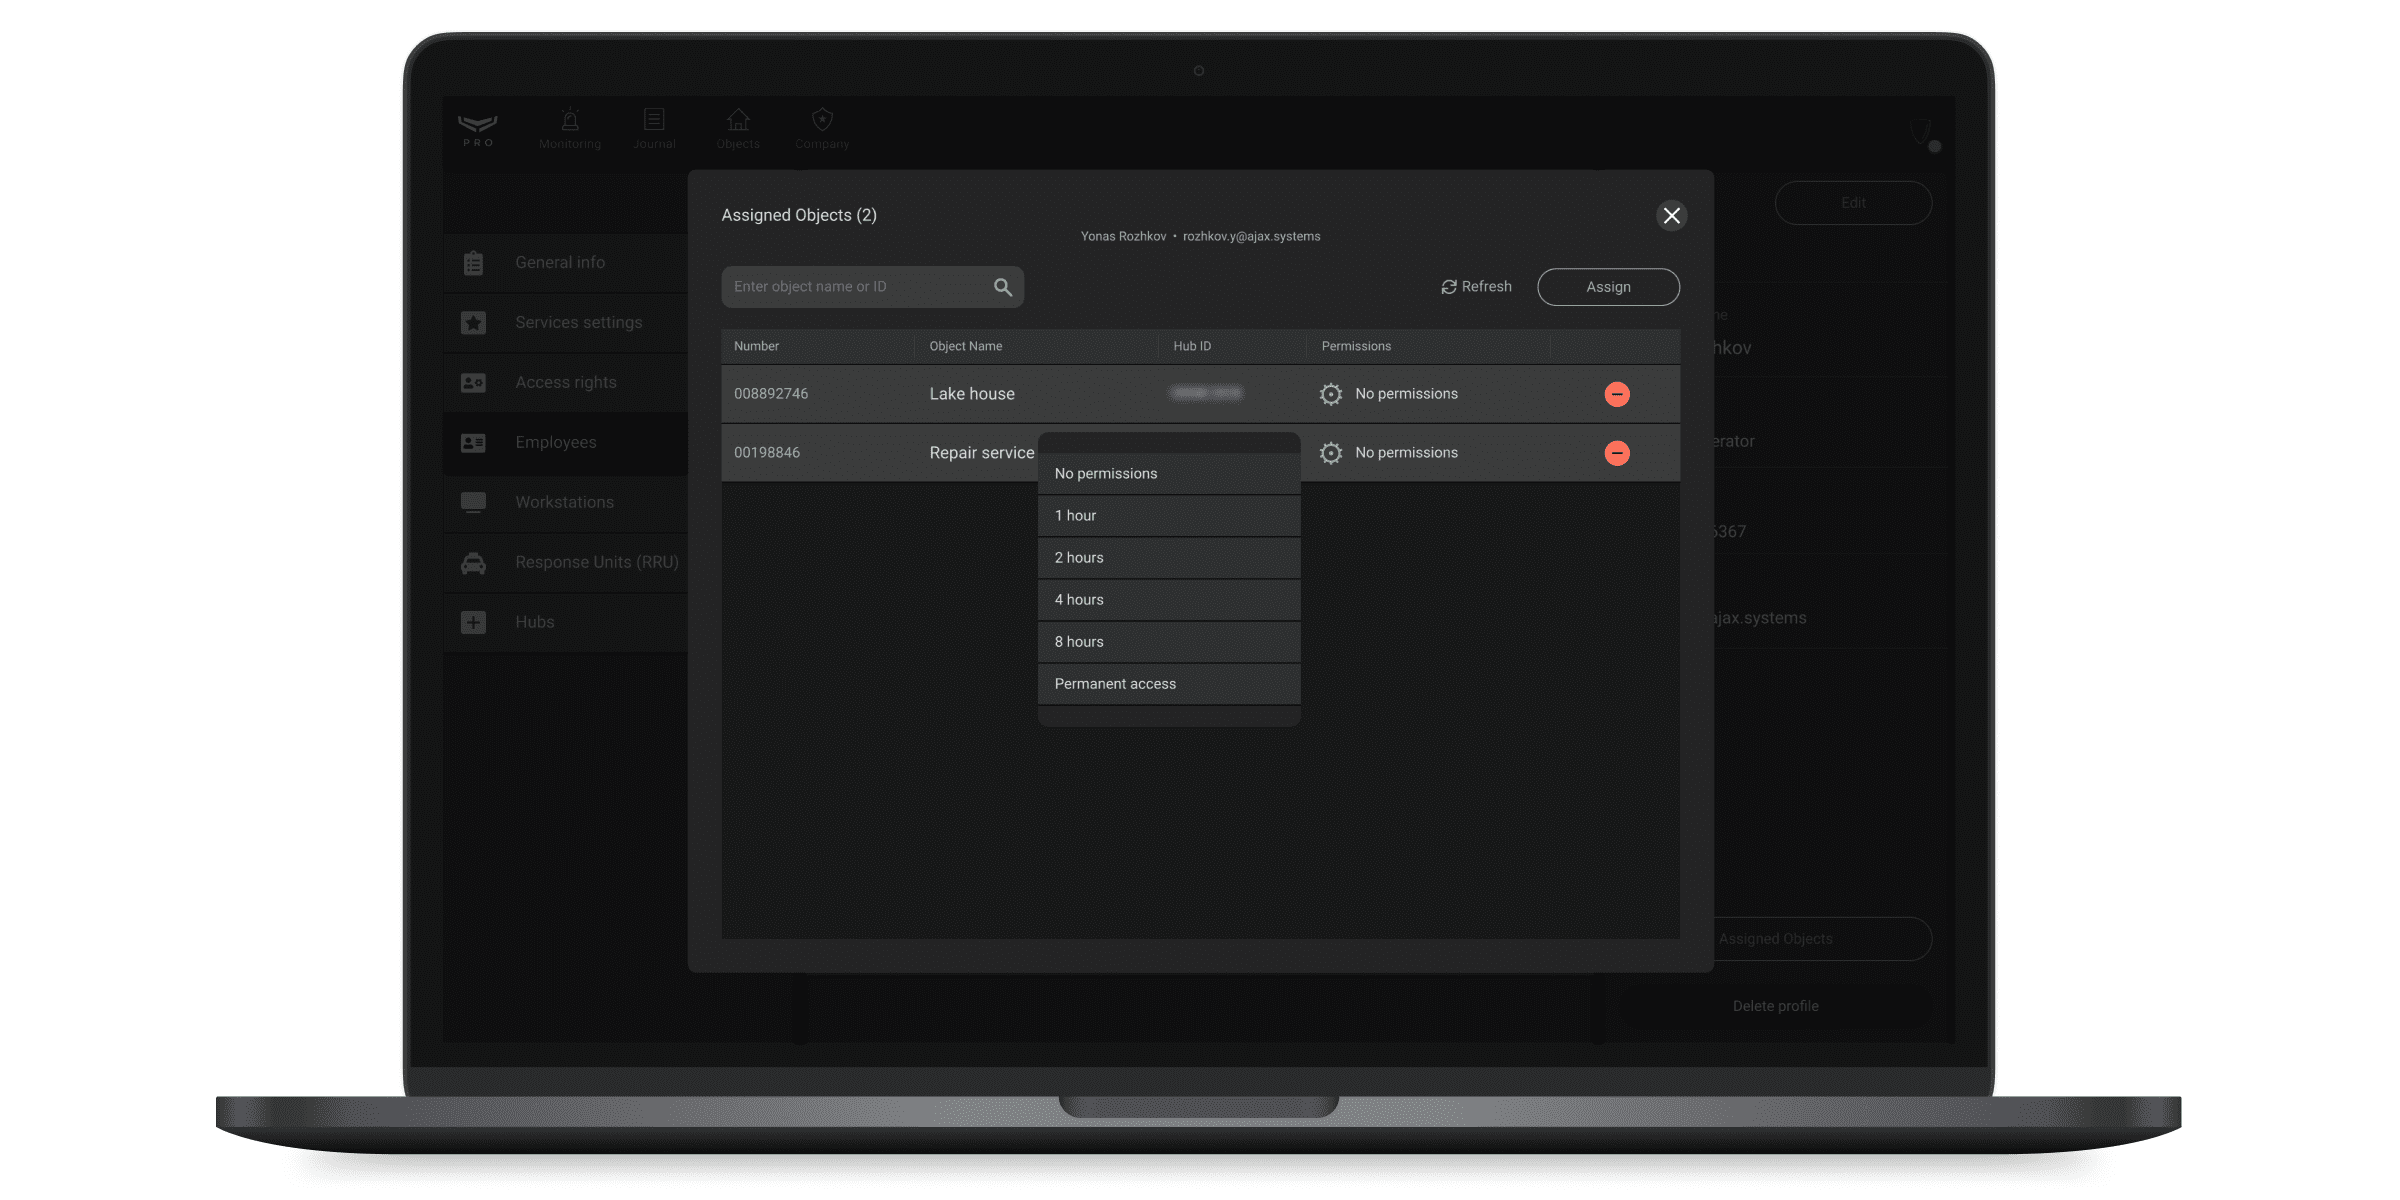
The field indicated in the screenshot shows the time during which the Installer has access to the system settings. By clicking on the field, you can request permanent or temporary access (for 1, 2, 4 or 8 hours).
If there is not enough time to set up, the Installer can send a request to extend the time to access the settings. All Heads of installers of this company or the space admin will receive such a request.
If the company has sufficient rights, any Head of installers can grant this right to the Installer. Such a request can only be confirmed in the PRO Desktop app.
If the rights are not enough, for example, the company has rights to configure within 4 hours, and the Installer needs 8 hours, the Head of installers can request access rights from the space admin. When approved, access will be granted to the company and this particular Installer.
The system allows the head of installers to auto-approve requests of installers to object settings or video devices. To enable the auto-approve:
- Go to the Company module.
- Open the Services settings menu.
- Enable the toggle Auto-confirmation of system access requests by Head of installers.
If the company doesn’t have enough access rights, installers’ requests will be automatically redirected to the space admin.
Set up company rights
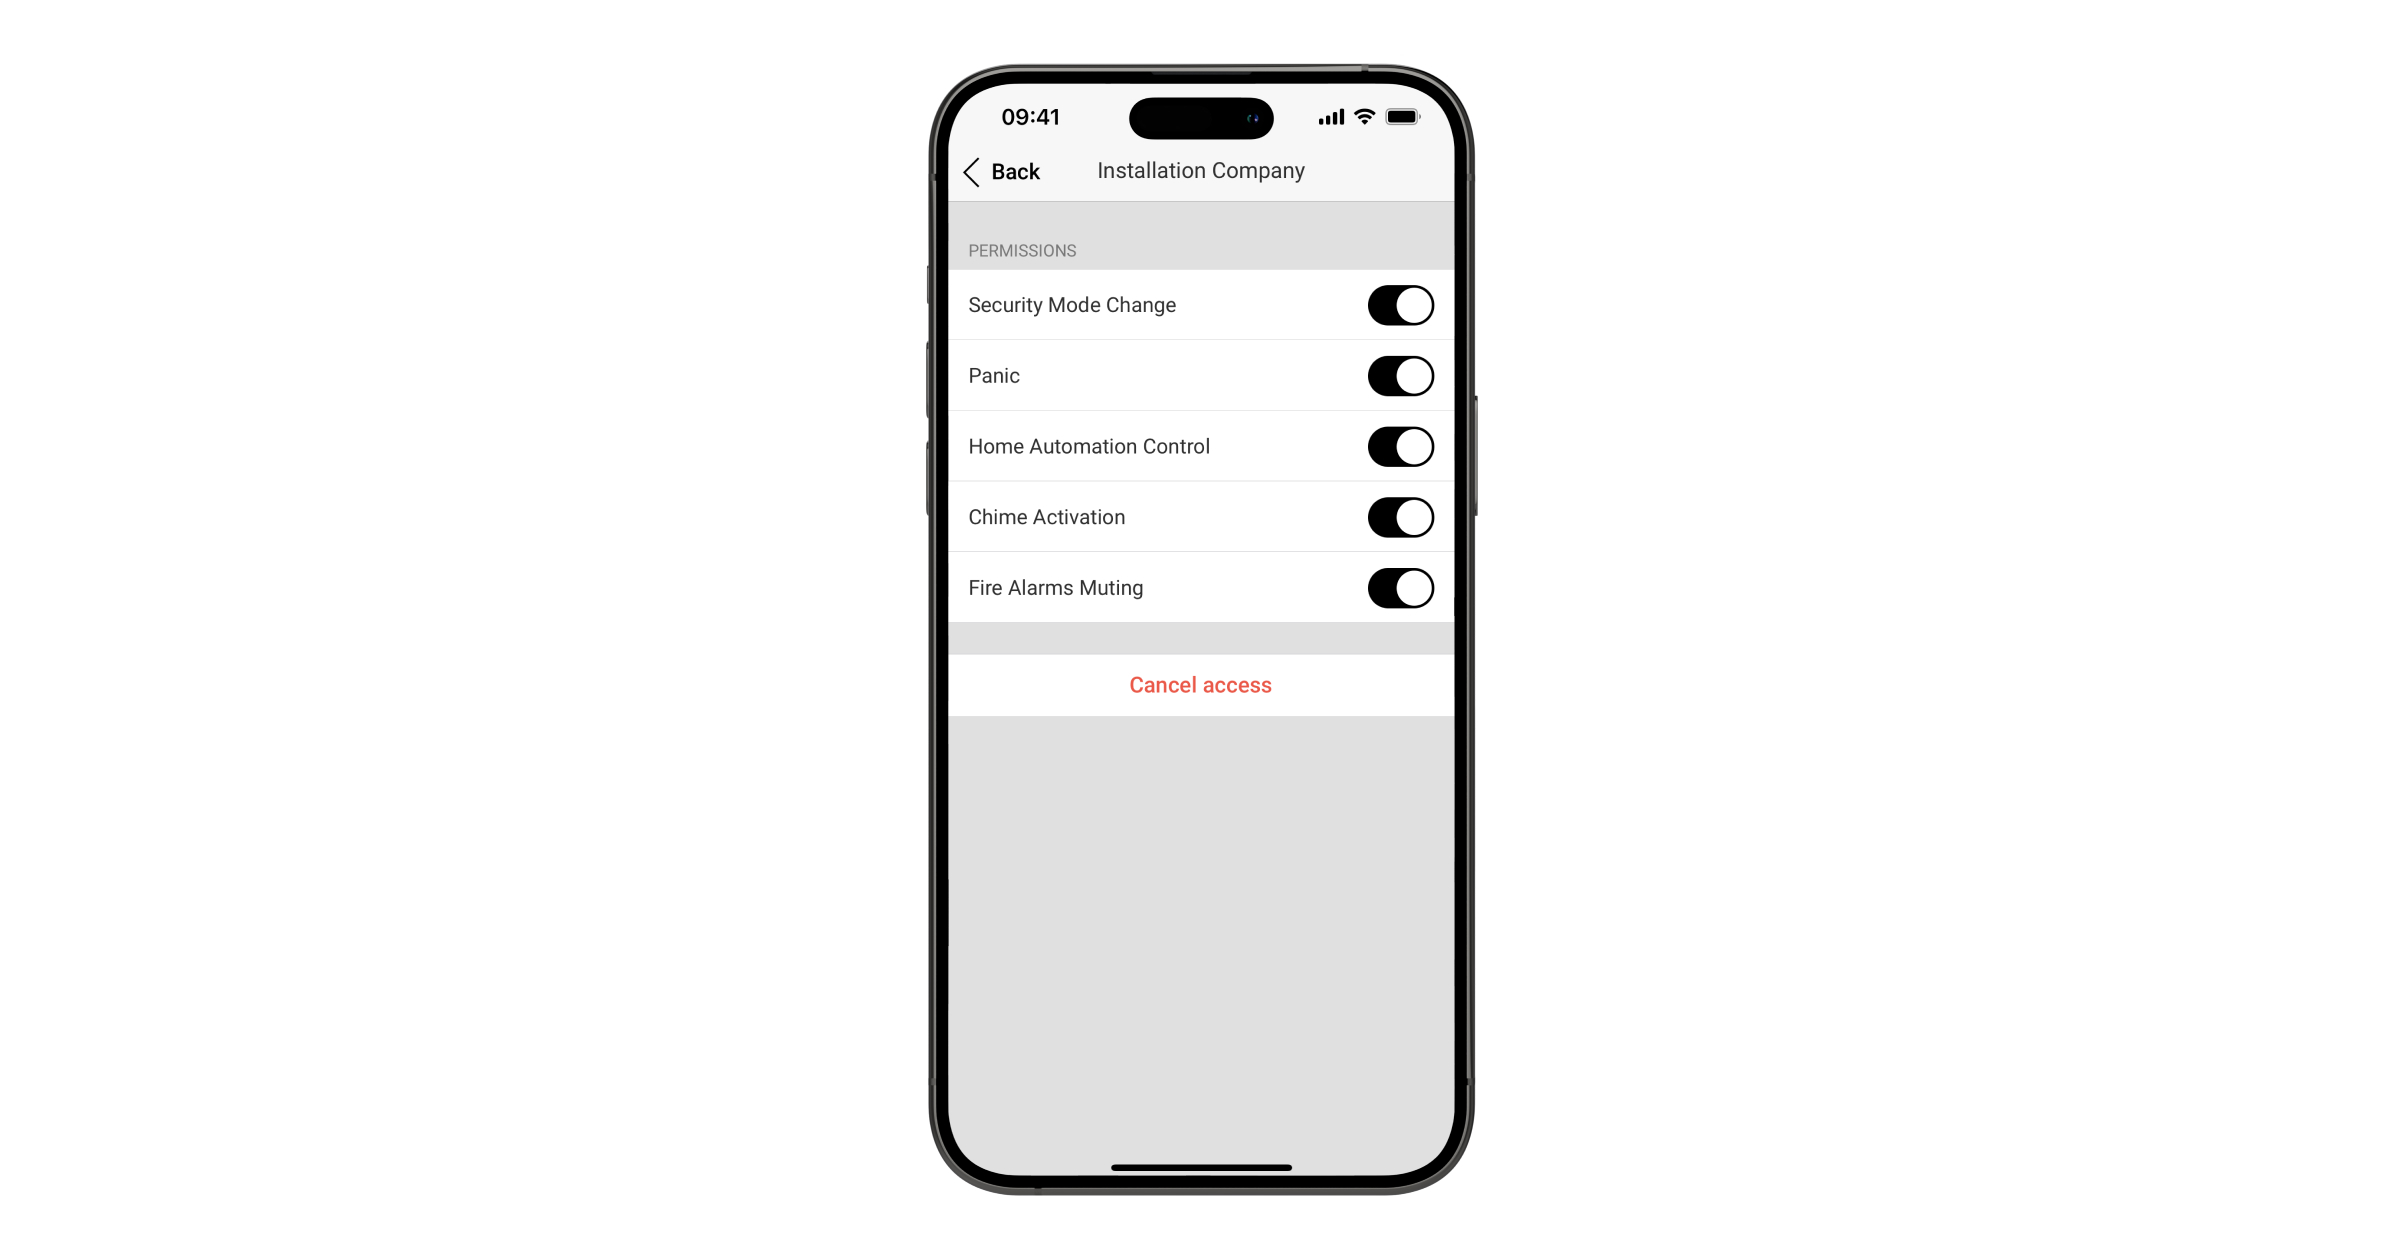
The space admin or PRO account with the right to configure the system can assign company access rights. These settings apply to all employees of the company. To assign access rights to a company, in the Ajax app:
- Select an object if you have several of them or use the Ajax PRO app.
- Go to the space Settings menu from the Control tab.
- Open the Installers/Companies menu.
- Select a company. Go to its settings. These settings allow you to grant or disable the right to:
- Change security modes.
- Activate panic button in Ajax apps.
- Control automation devices.
- Enable Chimes.
- Mute fire alarms.
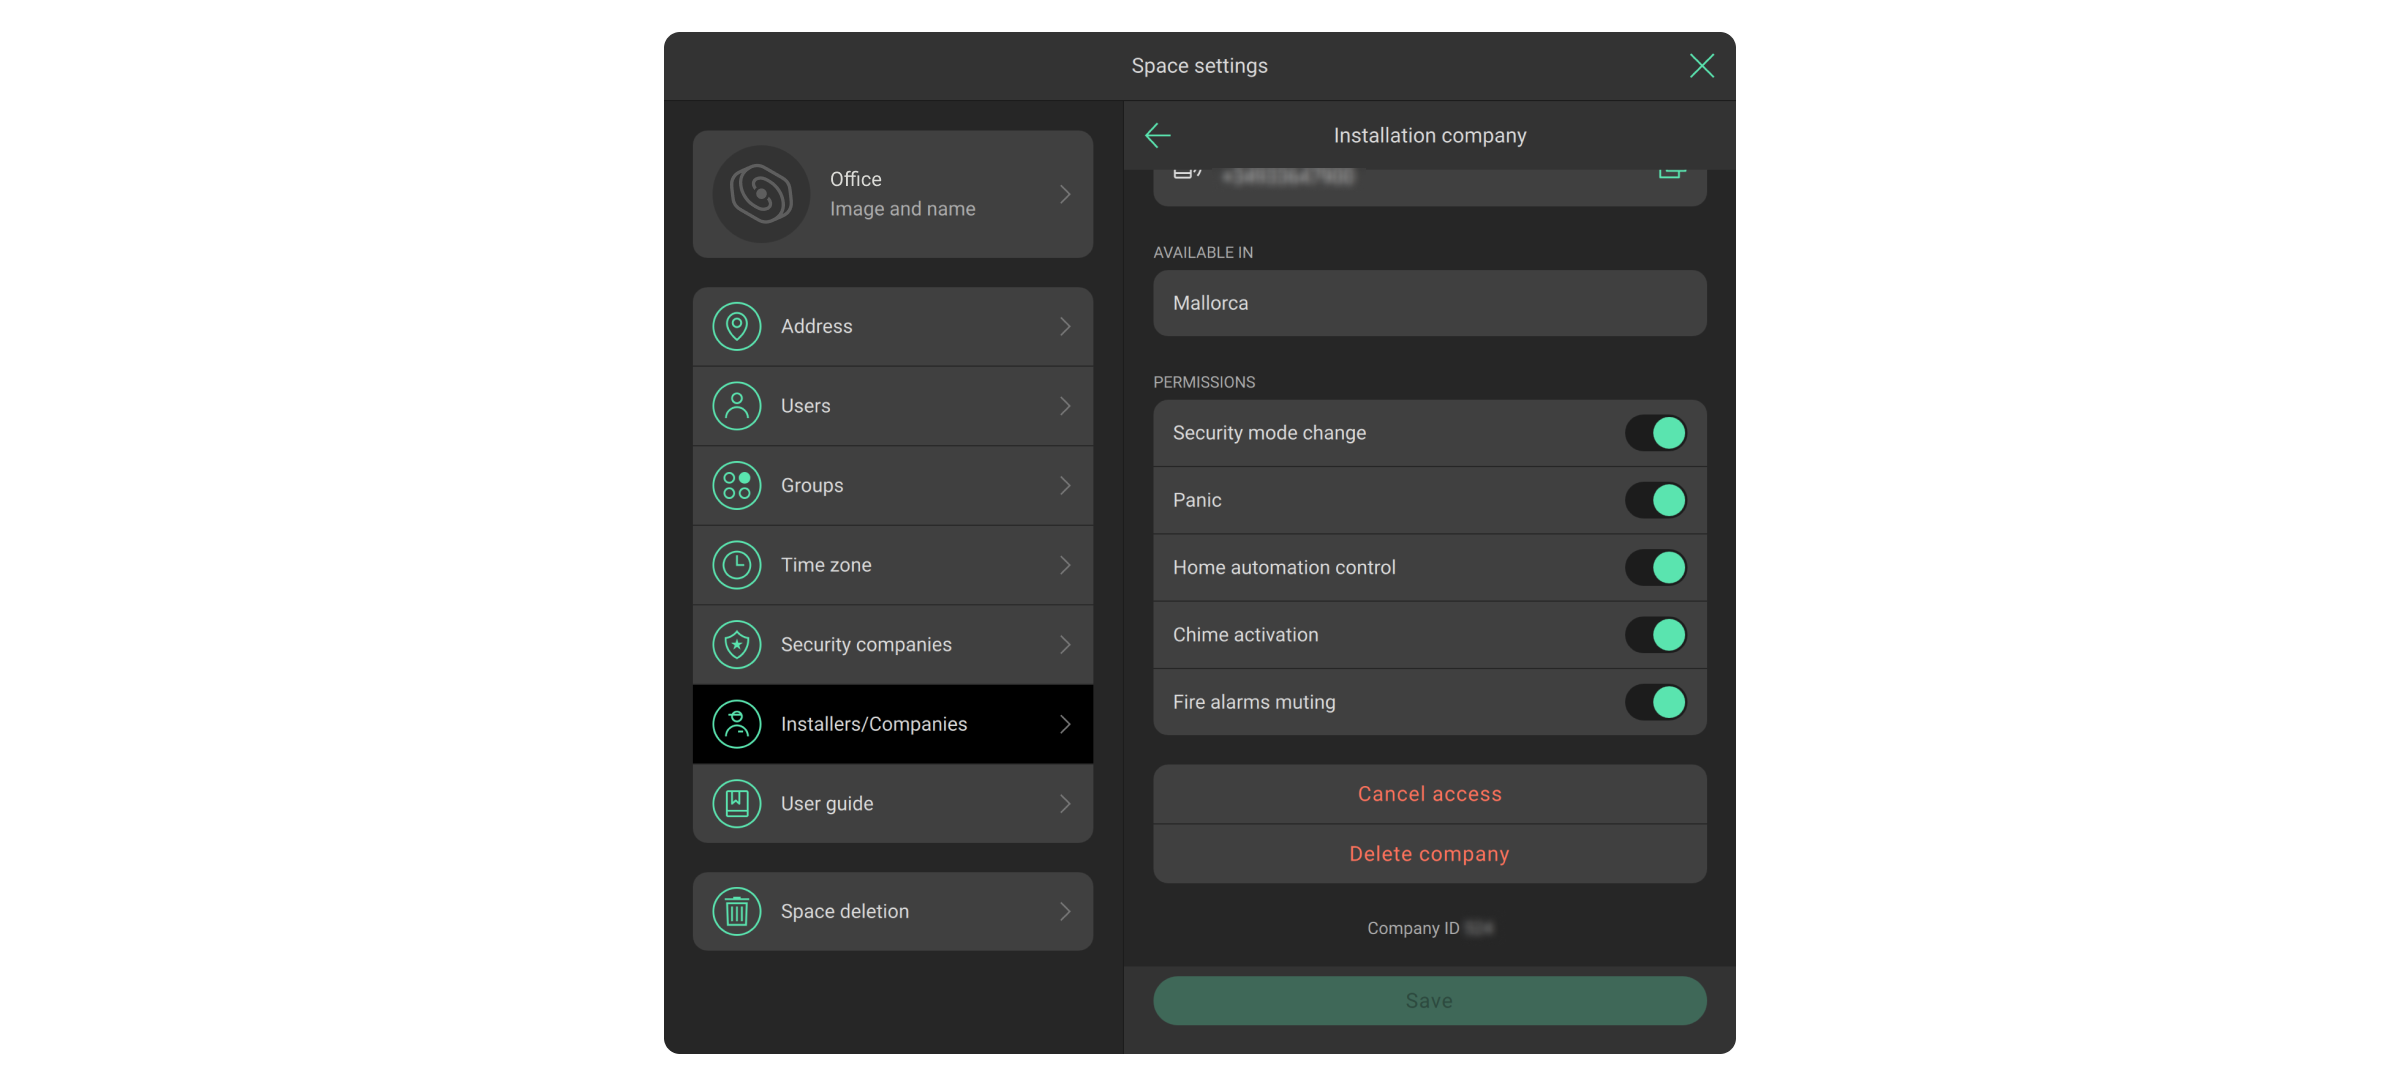
The list of the company access rights settings depends on the devices added to the space.
The space admin or PRO account with the right to configure the system can also remove the company from the space or cancel its access.
Object Card
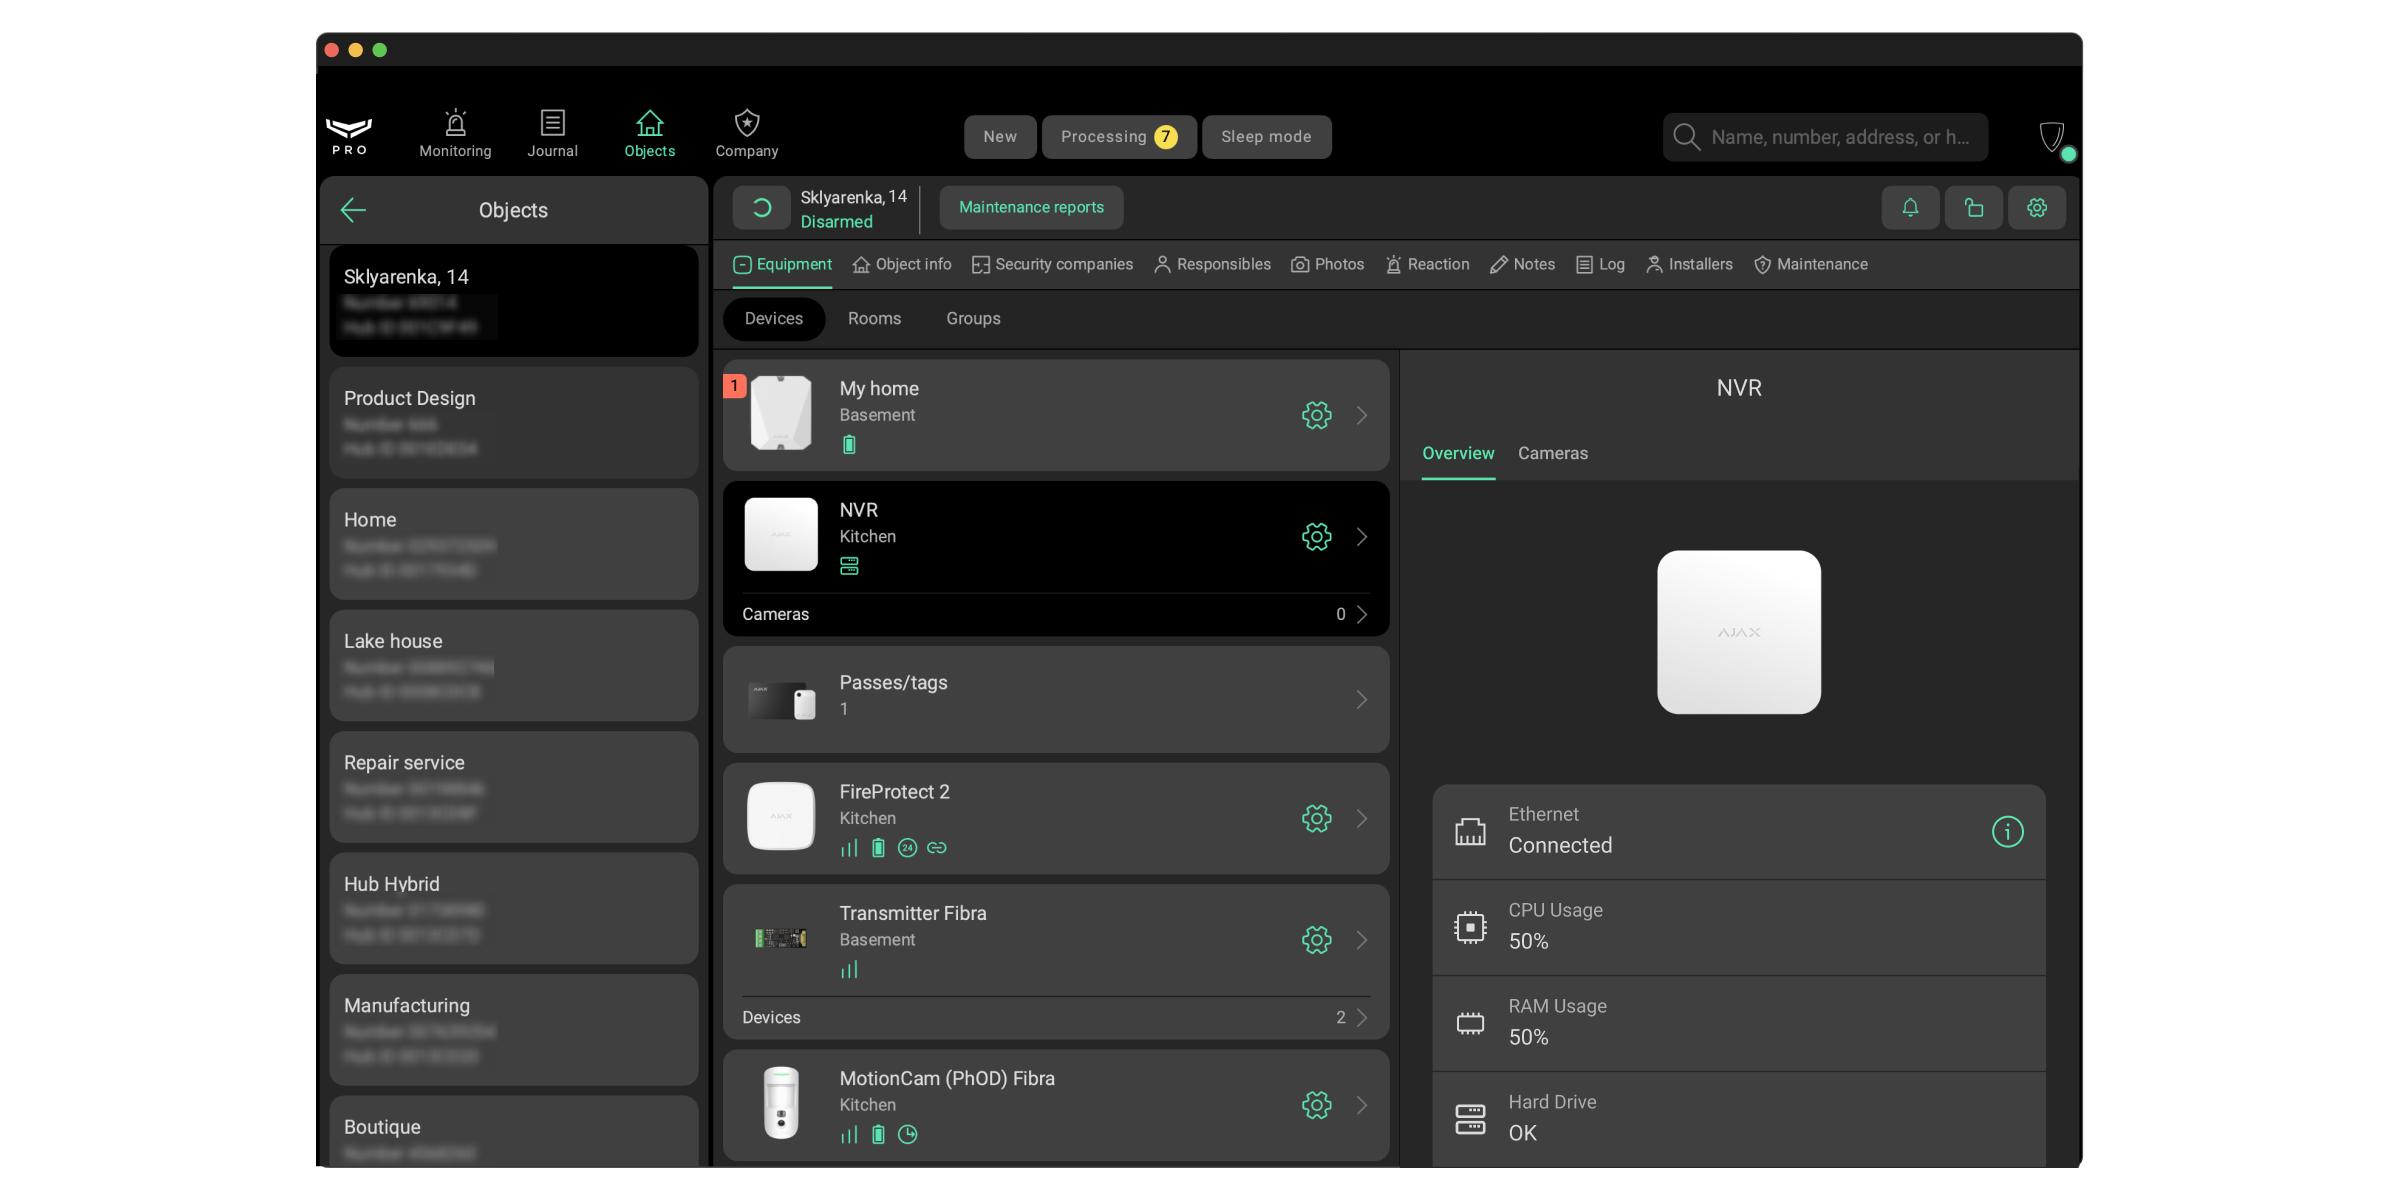
Data about the object can be supplemented and edited. The data is divided into tabs:
- Equipment — a list of devices, virtual rooms, and security groups of an object. When a device is selected, the status screen opens, showing battery charge, connection status, tamper status, and other data about the operation.
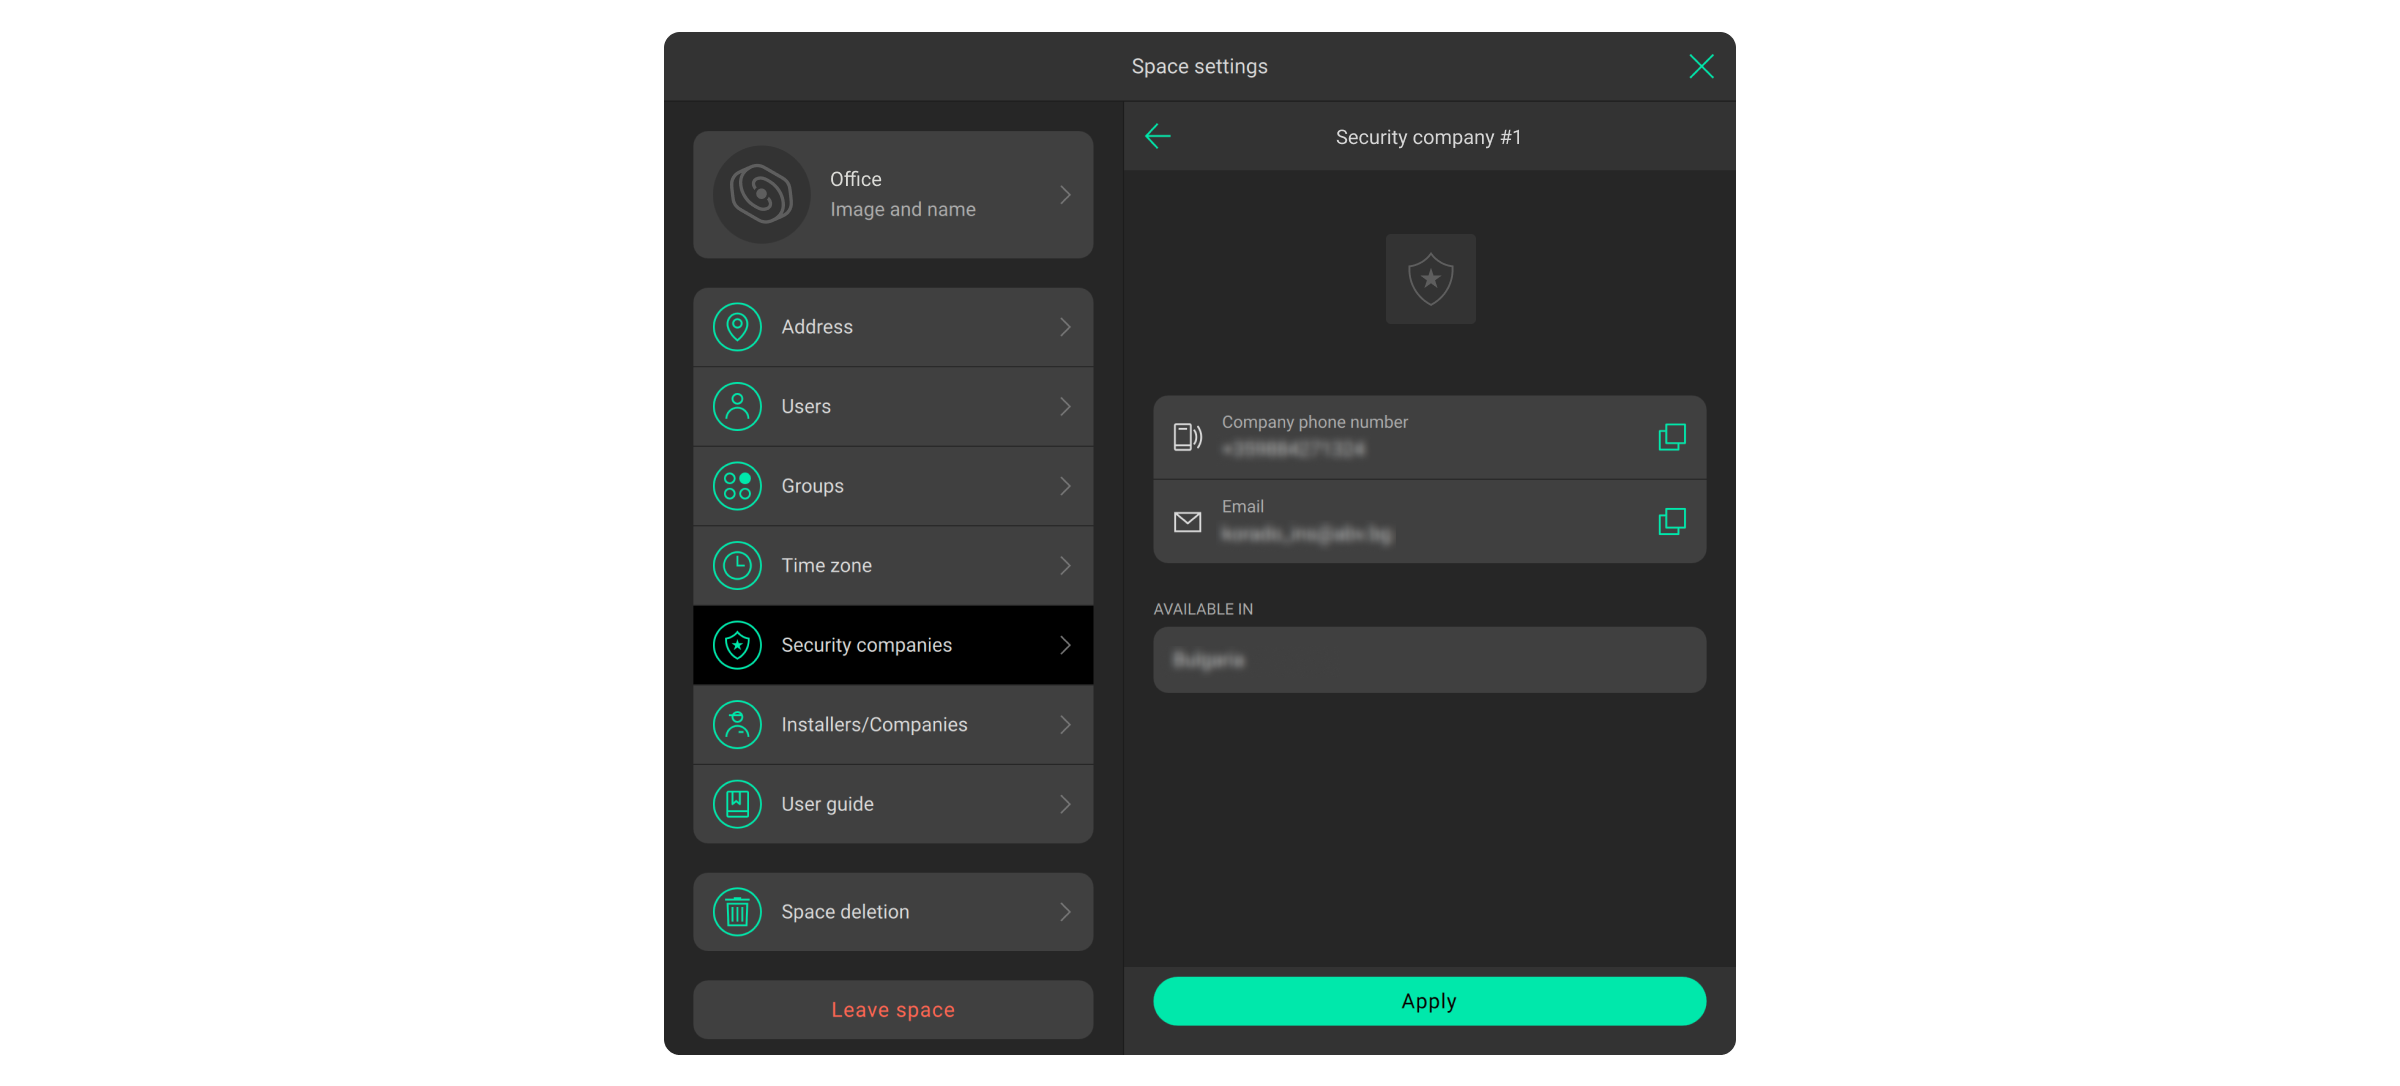
- Security Companies — names, phone numbers, and a status of the security companies.
- Responsibles — names and phone numbers of people with whom the operator can contact in case of an alarm at the object.
- Object Photos — a photo of the object, a map of approaches to the object, room layouts of the object, and road maps for directions to the object.
- Reaction — information about the main and reserve RRU’s assigned to the object. To manage units in this menu, you should first create them in the Company module, the Response Units (RRU) menu.
- Object Notes — technical information about the object: dates and detailed information on the installation work, connecting to the monitoring station, data of the Installer assigned to the object.
- Log — event journal of an object.
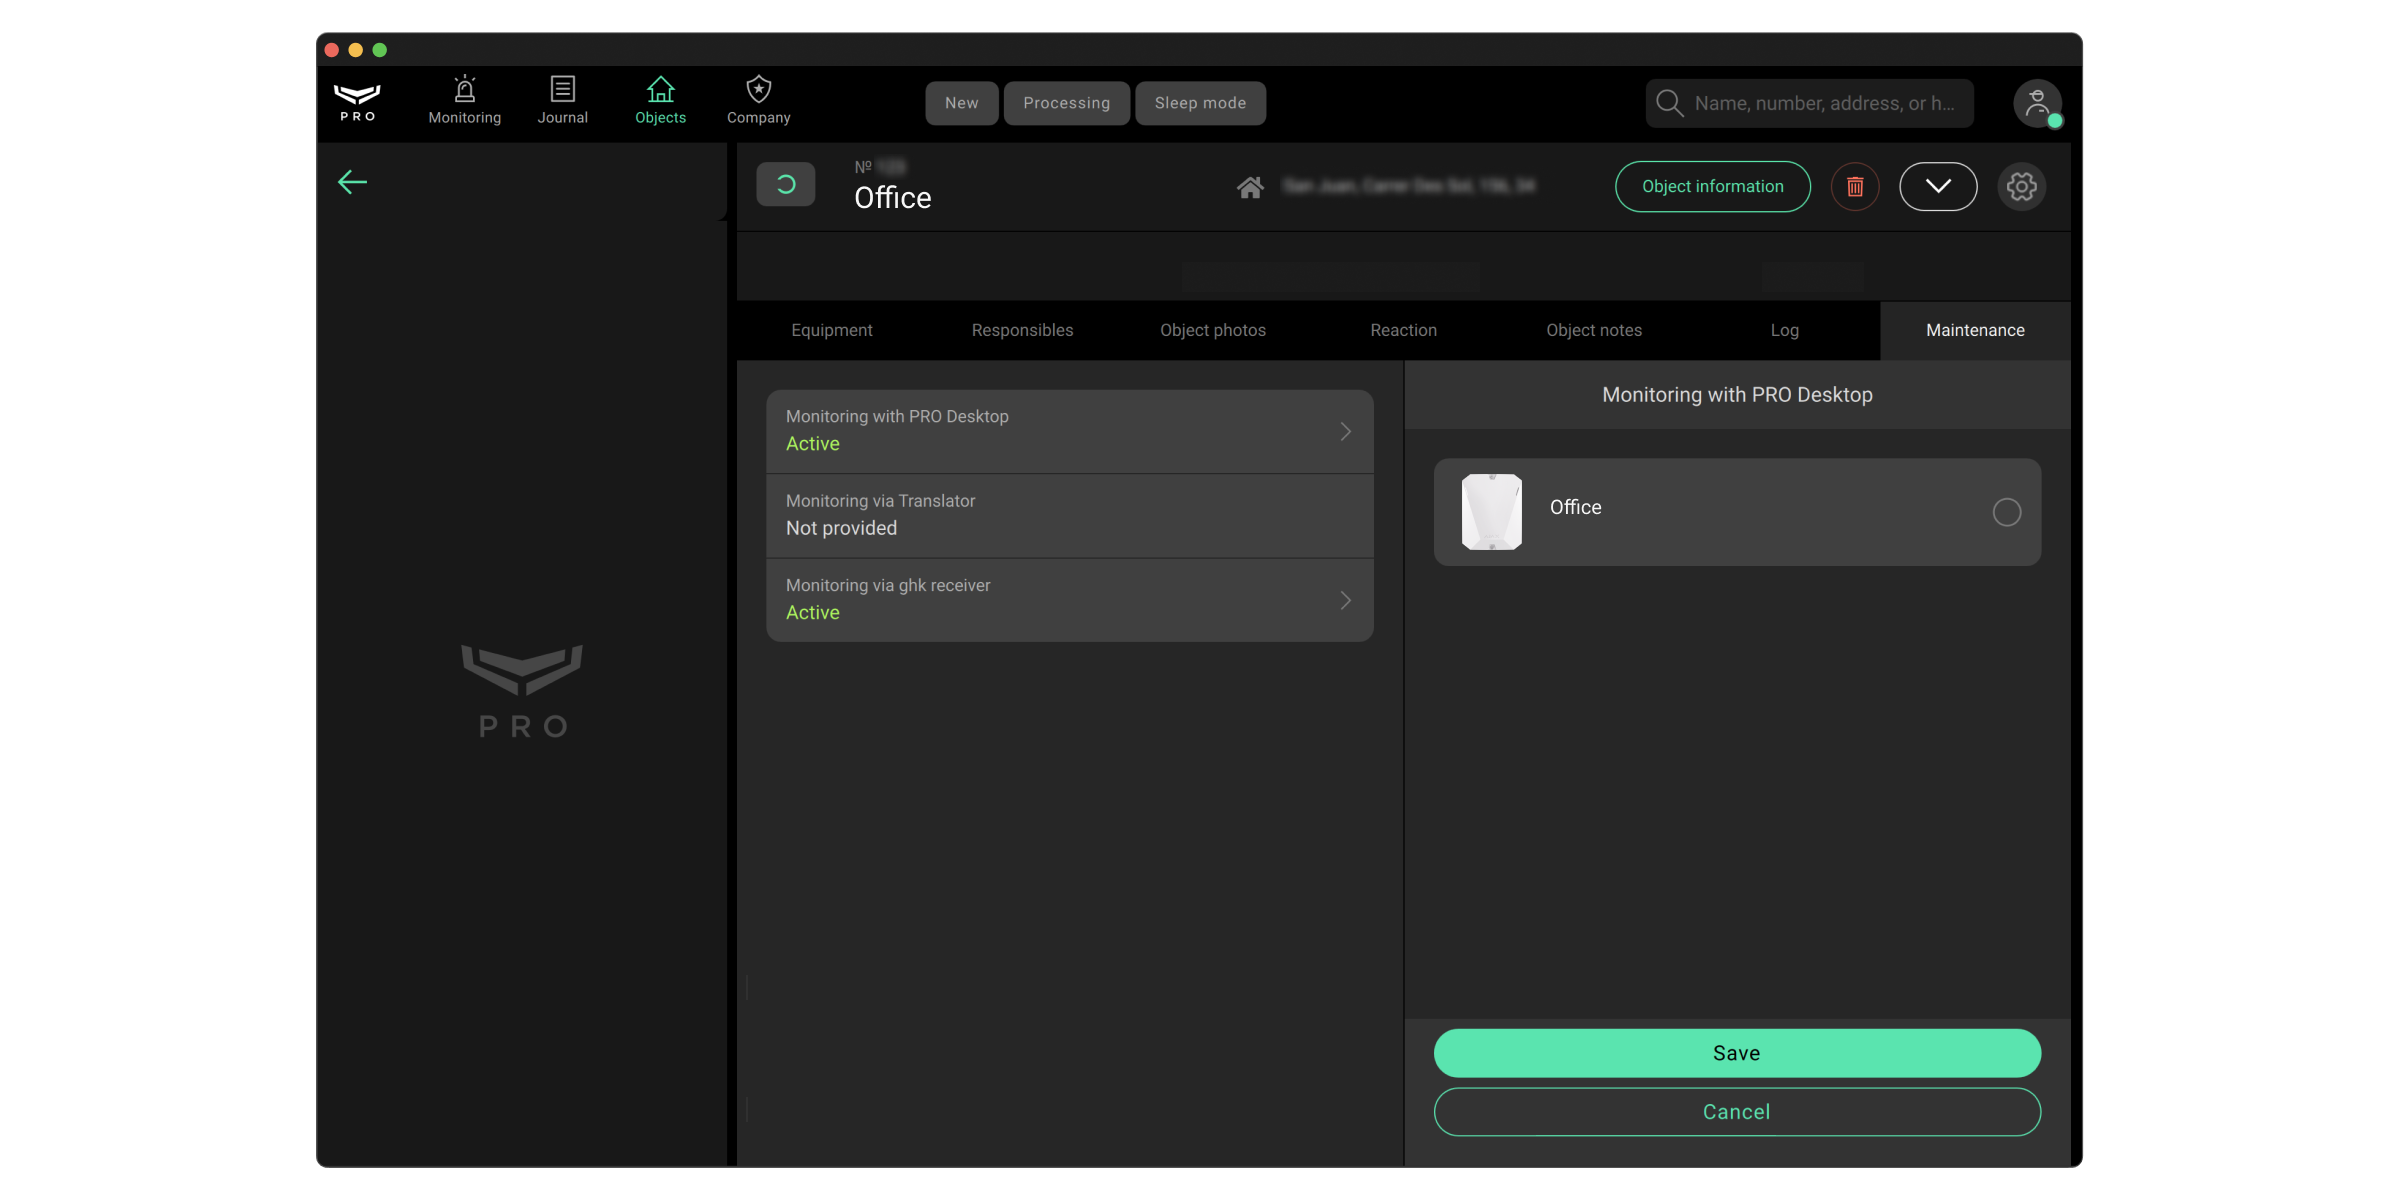
- Maintenance — information about monitoring with PRO Desktop, Cloud Signaling, via Translator, and installation services (available only for the Senior CMS Engineer, the CMS Engineer, the Head of operators and the Operator).
With the Ajax PRO Desktop 4.0 firmware version and higher, it’s available to activate/deactivate the Monitoring with PRO Desktop channel for any monitoring company. - Installers — information about assigned installers to the object: employee name, email, permissions.
In addition to the access time to the object settings, the tab Equipment displays the Maintenance reports button. The button is available only for those employee roles for which the company owner has assigned such a right.
Keep in mind that employees with an Installer role can create reports if they have access to the settings of this hub.
By clicking on the button, you can generate a new report or download a previously created report from the archive. When trying to create a new report, the Maintenance reports tab opens.
Editing a card and deleting an object
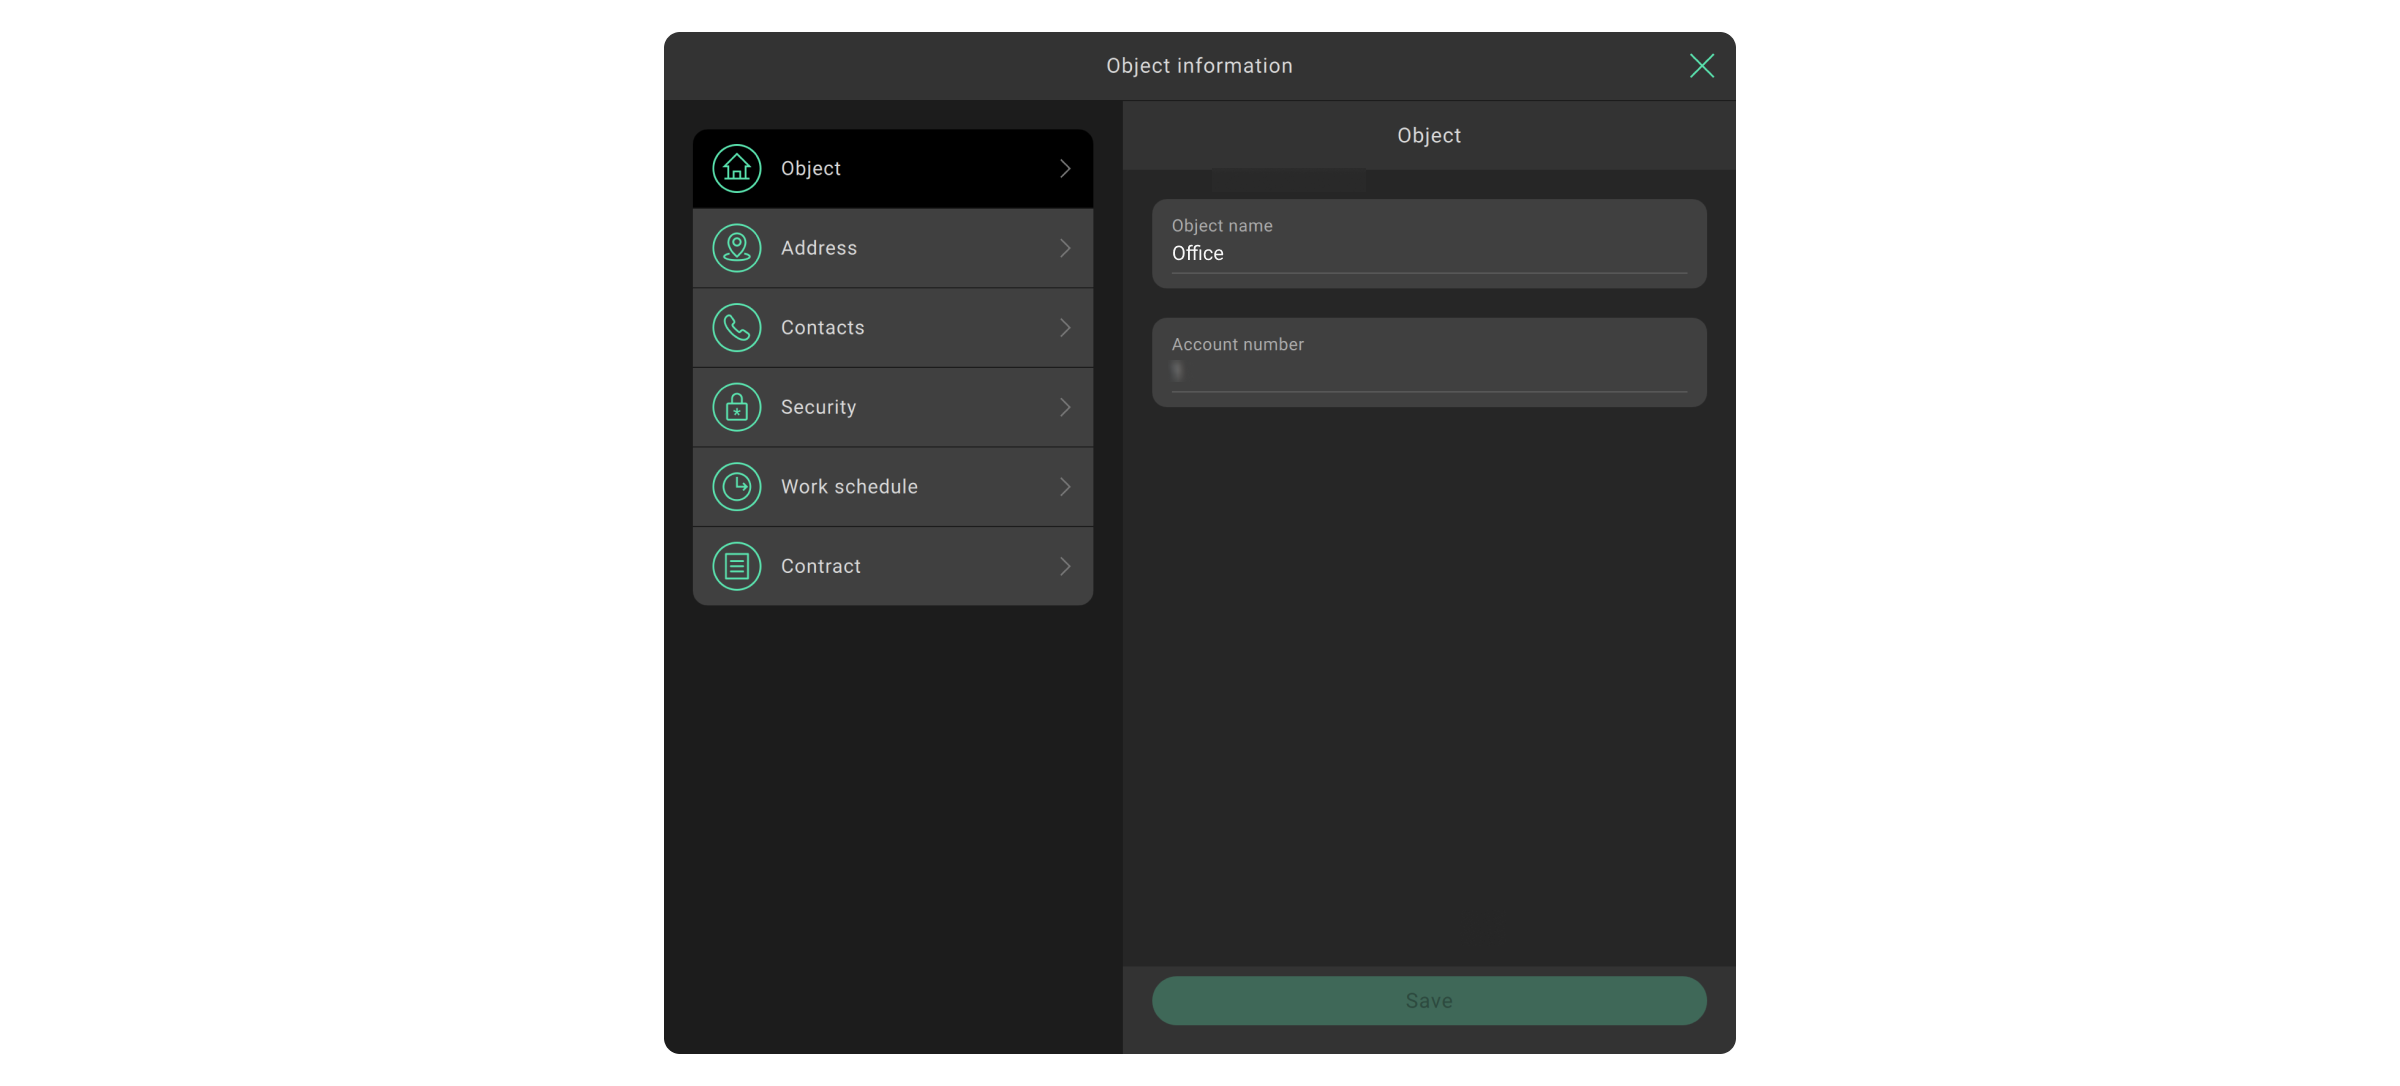
The menu to control security modes, the object number, its name and address, buttons to edit and delete, and a button that opens contacts and details of the object operation are located above the informational tabs.
Click Object information to change the title or account number of the object, specify its location, contact details, a password for alarm cancellation, add a work schedule, set the alarm when disarming at non-working hours, or specify the contract details. This information is displayed in the Monitoring module during alarm processing. Required fields are marked with an asterisk. After entering or editing the data, click Save.
To delete an object, click on the red icon of the trash can or the icon with three dots if the company performs both functions: alarm monitoring, installation and maintenance. There will be a menu with two options: Stop monitoring or Stop maintenance. Their functions are different. For example, if the object remains under monitoring and the service is stopped, the operators will receive alarms and events of this system, but the Installer will not be able to change the equipment settings at the facility.
When monitoring is stopped, the object is moved to the Withdrawn from monitoring menu and automatically deleted after 7 days. During this time, the object can be returned to the list of active ones by going to the Withdrawn from monitoring menu in the Objects module and clicking Restore objects. You can stop the monitoring only for those objects that do not have open incidents.
To delete objects without waiting 7 days, select the object from the Withdrawn from monitoring menu and click the red bin icon. Confirm the action by clicking Delete now.
When the maintenance services are stopped, the object is permanently removed. This means that Installers and Head of installers will no longer be able to maintain this object. To restore the object, the company needs to be reconnected through the hub settings.
If the company is the last space user, the space will continue to exist after the maintenance services are stopped.
Maintenance reports
Maintenance reports allow you to generate PDF files that contain information about security and fire detectors connected to the hub, and their states. Reports allow you to regularly monitor the status of all monitored objects.
Maintenance reports can be generated only for the objects with hubs.
One report is generated for one object. The language of the report downloaded matches the language selected in the PRO Desktop app as a language for SMS messages.
The company owner can enable or disable the maintenance reports option at any time.
The maintenance reports menu contains three tabs:
- Objects — contains a list of objects for which you can generate maintenance reports. In this menu, you can also generate these reports.
- Upload CSV — menu for uploading the list of hubs for generating a maintenance report.
- Archive — contains previously created maintenance reports.
Objects tab
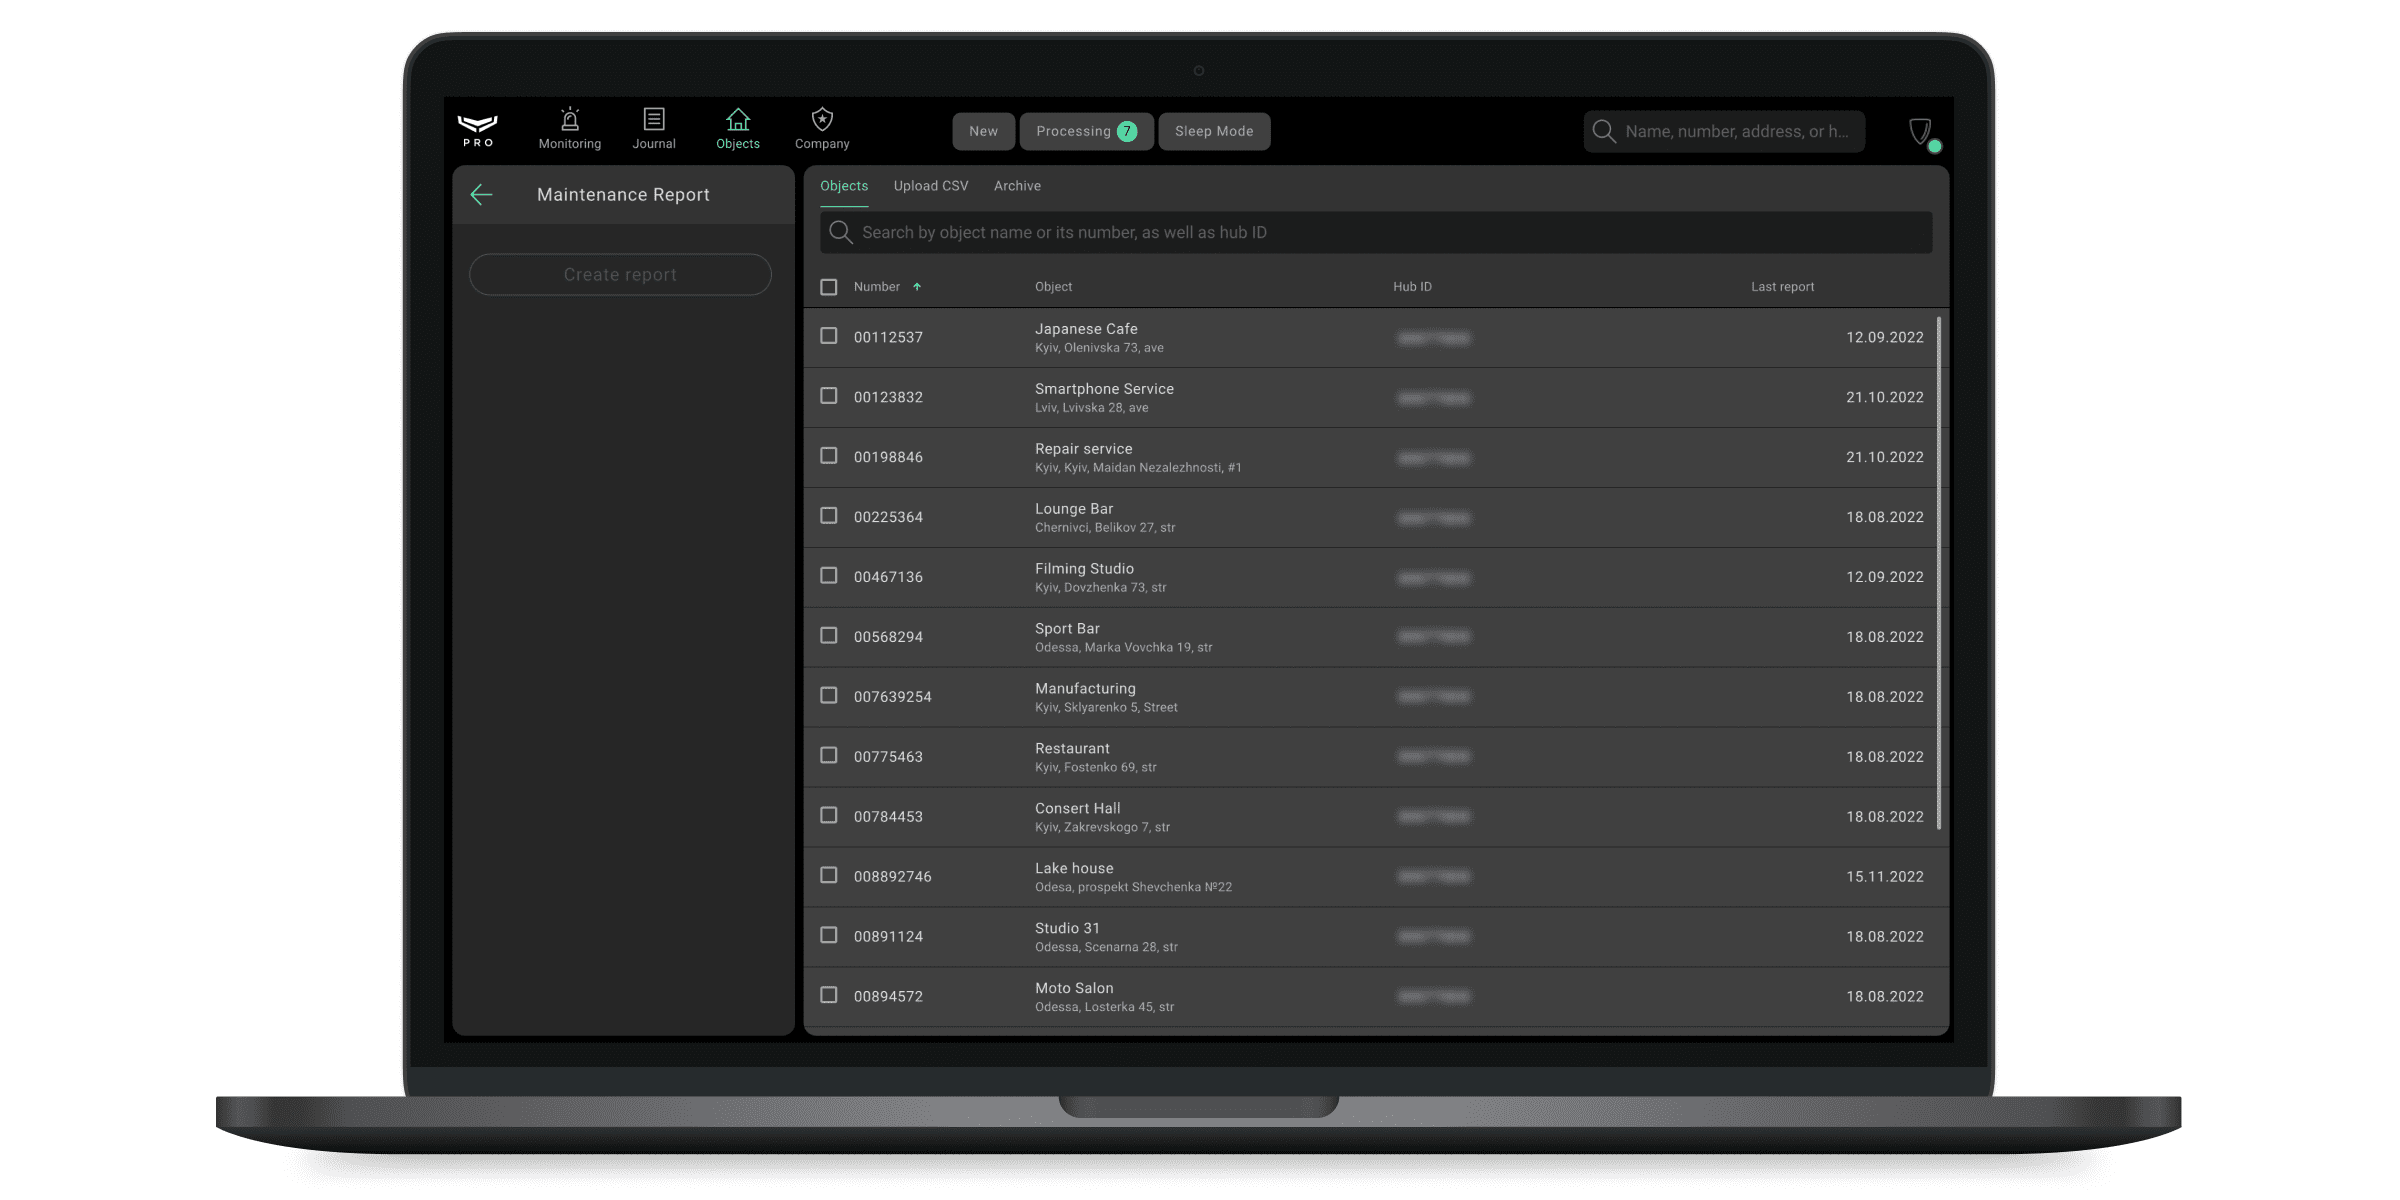
All objects for which you can generate maintenance reports are shown in this menu. Objects can be sorted:
- By object number.
- By name or address of the object.
- By hub ID (identifier).
- By date of generation of the last report.
To generate a report, in the Objects menu:
- Select the required objects. For ease of navigation, we have provided search by name of the object, its number and address, as well as by the hub ID. If you want to hide extra objects, enable the option Hide unselected.
- Press Create report.
- Confirm report generation by selecting Create.
- Wait until the report is generated.
- Go to the Archive tab. Select the required reports.
- Press Download selected.
- Select a folder and save the files.

To automatically download selected reports to your PC after creation, enable the option Automatically download when created.
Search on the Objects tab
Any employee of the company can search through company objects (except for company owner if that is the only role they have). You can search for all objects or for a selected category from the Objects menu, except for categories that don’t have objects or in the section Monitoring requests. The search displays up to 12 results, and if the desired result is not among them, you need to refine your request.
To use the search:
- Click the Search button.
- Select a search criterion:
- Default – by object name, number, address, or hub ID (hub ID must be entered in uppercase).
- Hub name – by the name of the device specified for the hub.
- Responsible person – by phone number or first and last name (the search by responsible person displays all persons of the object).
- Video device ID – by the ID of a camera, NVR, or other Ajax video device.
- Contract data – by the contract ID or contract owner.
- Enter at least 2 characters in the search field.
- After the search is complete, you can go to the found object by clicking on one of the search results.
Exporting data to CSV
The permission to export data to a CSV file can be granted only by the company owner on the Access rights tab using the Export object data option. The file language corresponds to the language of the application only for Security state column, other fields are always displayed in English. Unspecified values are displayed as “–”.
To export data on all objects in a category, you need to:
- Select a category from the Objects menu.
- Press the Export data button.
- Select the fields you want to export:
- Hub ID (mandatory field)
- Account number (mandatory field)
- Object name
- Security state
- Response units (RRU)
- Address
- Press the Export data button.
- Press Download button.
- Select the folder where the CSV file will be saved.
- After successful uploading, a message will appear on the screen.
Upload CSV tab
Drag the CSV file or upload it from your computer to generate a report for the required list of objects. CSV file should contain hub IDs (identifiers) or object numbers. If you upload a file in the wrong format, the app will return an error.
After uploading the file, reports on the necessary objects will be generated and available in the Archive tab.
You can download an example of CSV in the required file format in the Upload CSV tab.
Archive tab
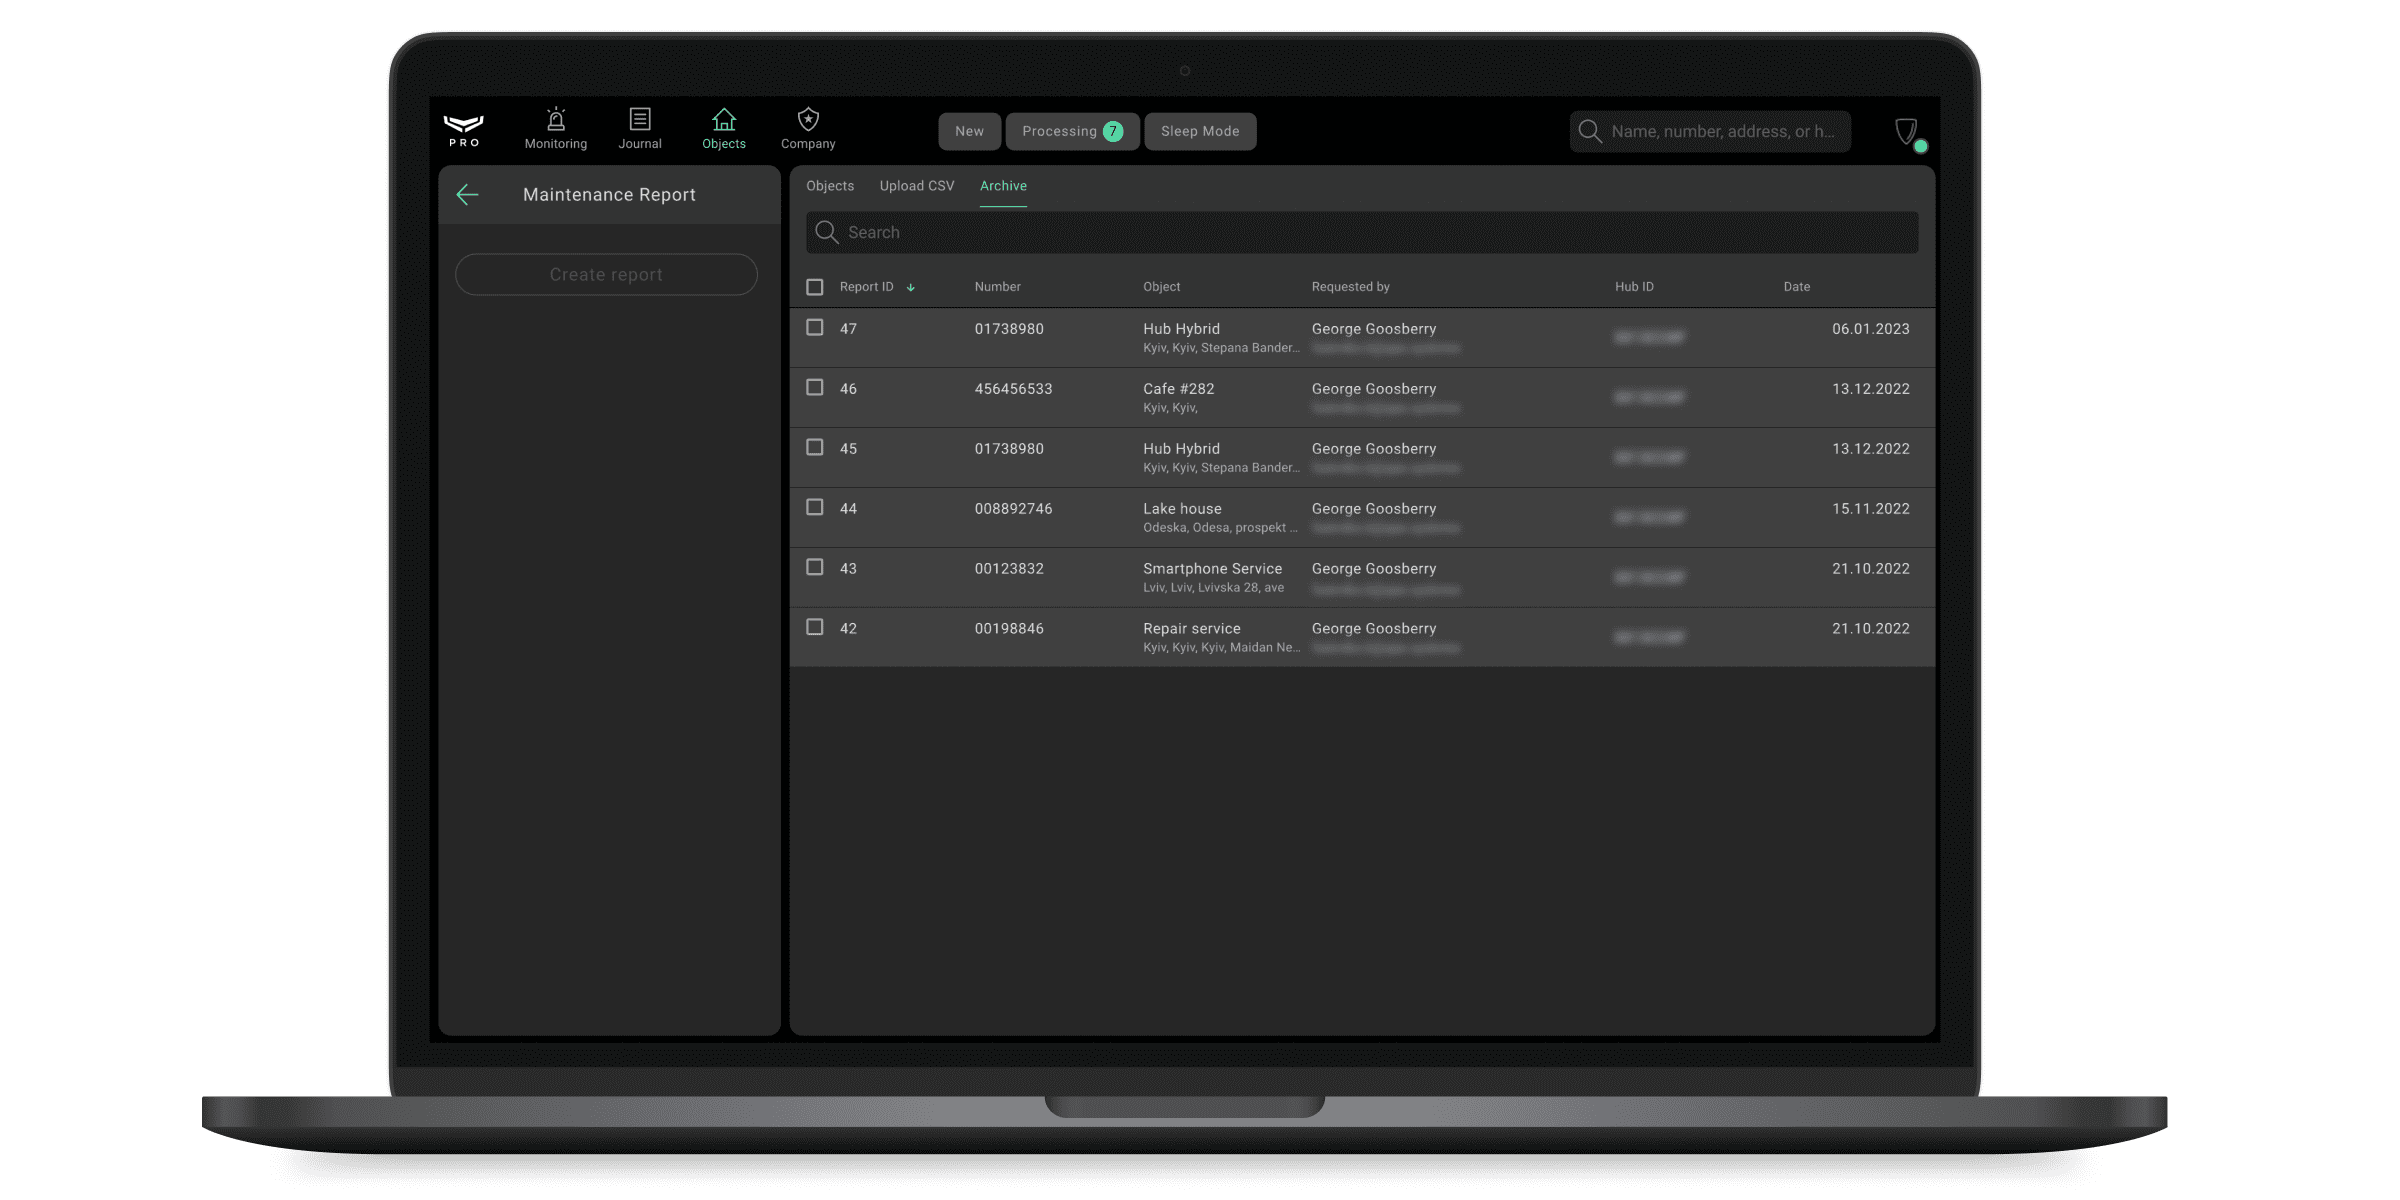
The maintenance reports generated are located in this tab. The tab shows only the last 5 reports for each object. Older reports are deleted.
Objects can be sorted:
- By report number (the higher the number, the newer the report).
- By object number.
- By name or address of the object (one of the two options can be selected by clicking on the column name).
- By name or e-mail address of the company employee who generated the report (one of the two options can be selected by clicking on the column name).
- By hub ID (identifier).
For ease of navigation, we have provided search by name of the object, its number and address, as well as by the hub ID.
To download a report:
- Go to the Archive tab.
- Select the required reports.
- Press Download selected.
- Select a folder and save the files.
After selecting an object in the Archive tab, you can also generate a new report for this object if necessary.
PDF file of the report
PDF file of the report contains all the necessary information about the object and the states of all devices of the security system. At the beginning of each file, in addition to general data, a short summary of the check is also available: if the engineer should visit the object or not. A recommendation to visit the object appears if at least one device in the system has a malfunction.
The file name has the following format: AA_XXXXXXXX_YYYYYYY_MM
- AA — the result of the check.
- p — the test passed, and the report does not contain a malfunction.
- pw — the test passed, but the report contains some malfunctions. It is recommended that an engineer visit the object to check. For example, if one of the detectors has a low hub signal strength or this detector is temporarily disabled.
- f — the test failed. It is recommended that an engineer visit the object to check. For example, one of the detectors has lost connection with the hub.
- XXXXXXXX — the date when the report was created in the DDMMYYYY. For example, 27032022.
- YYYYYYY — the assigned object number. If there is no number, the hub ID is used.
- MM — report number.
Monitoring
Module access: Company owner, Senior CMS Engineer, Head of operators, Operator.
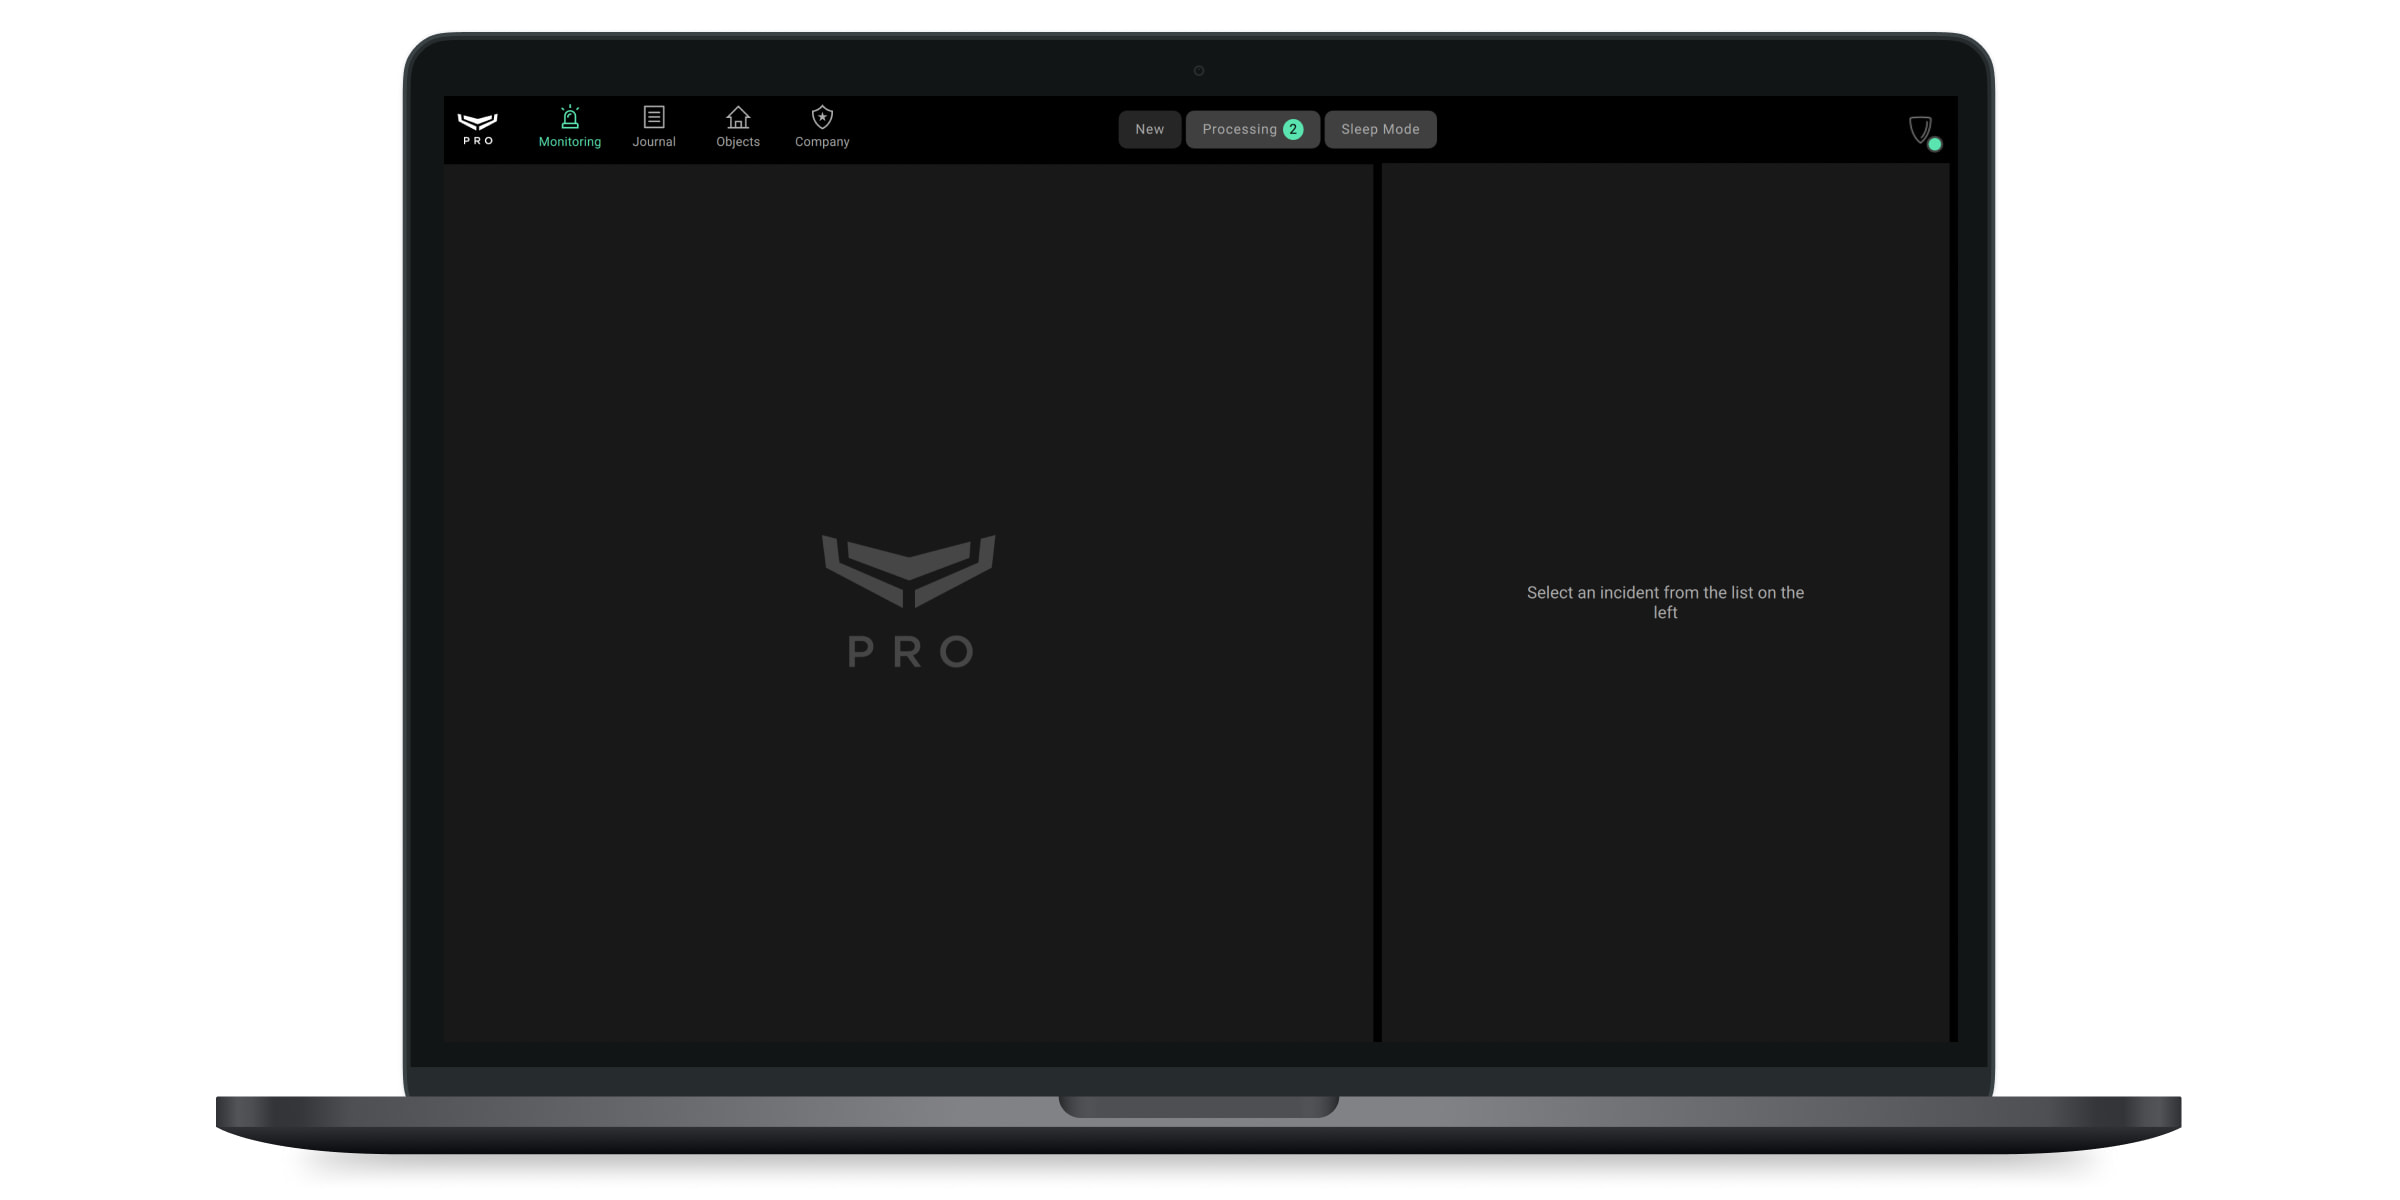
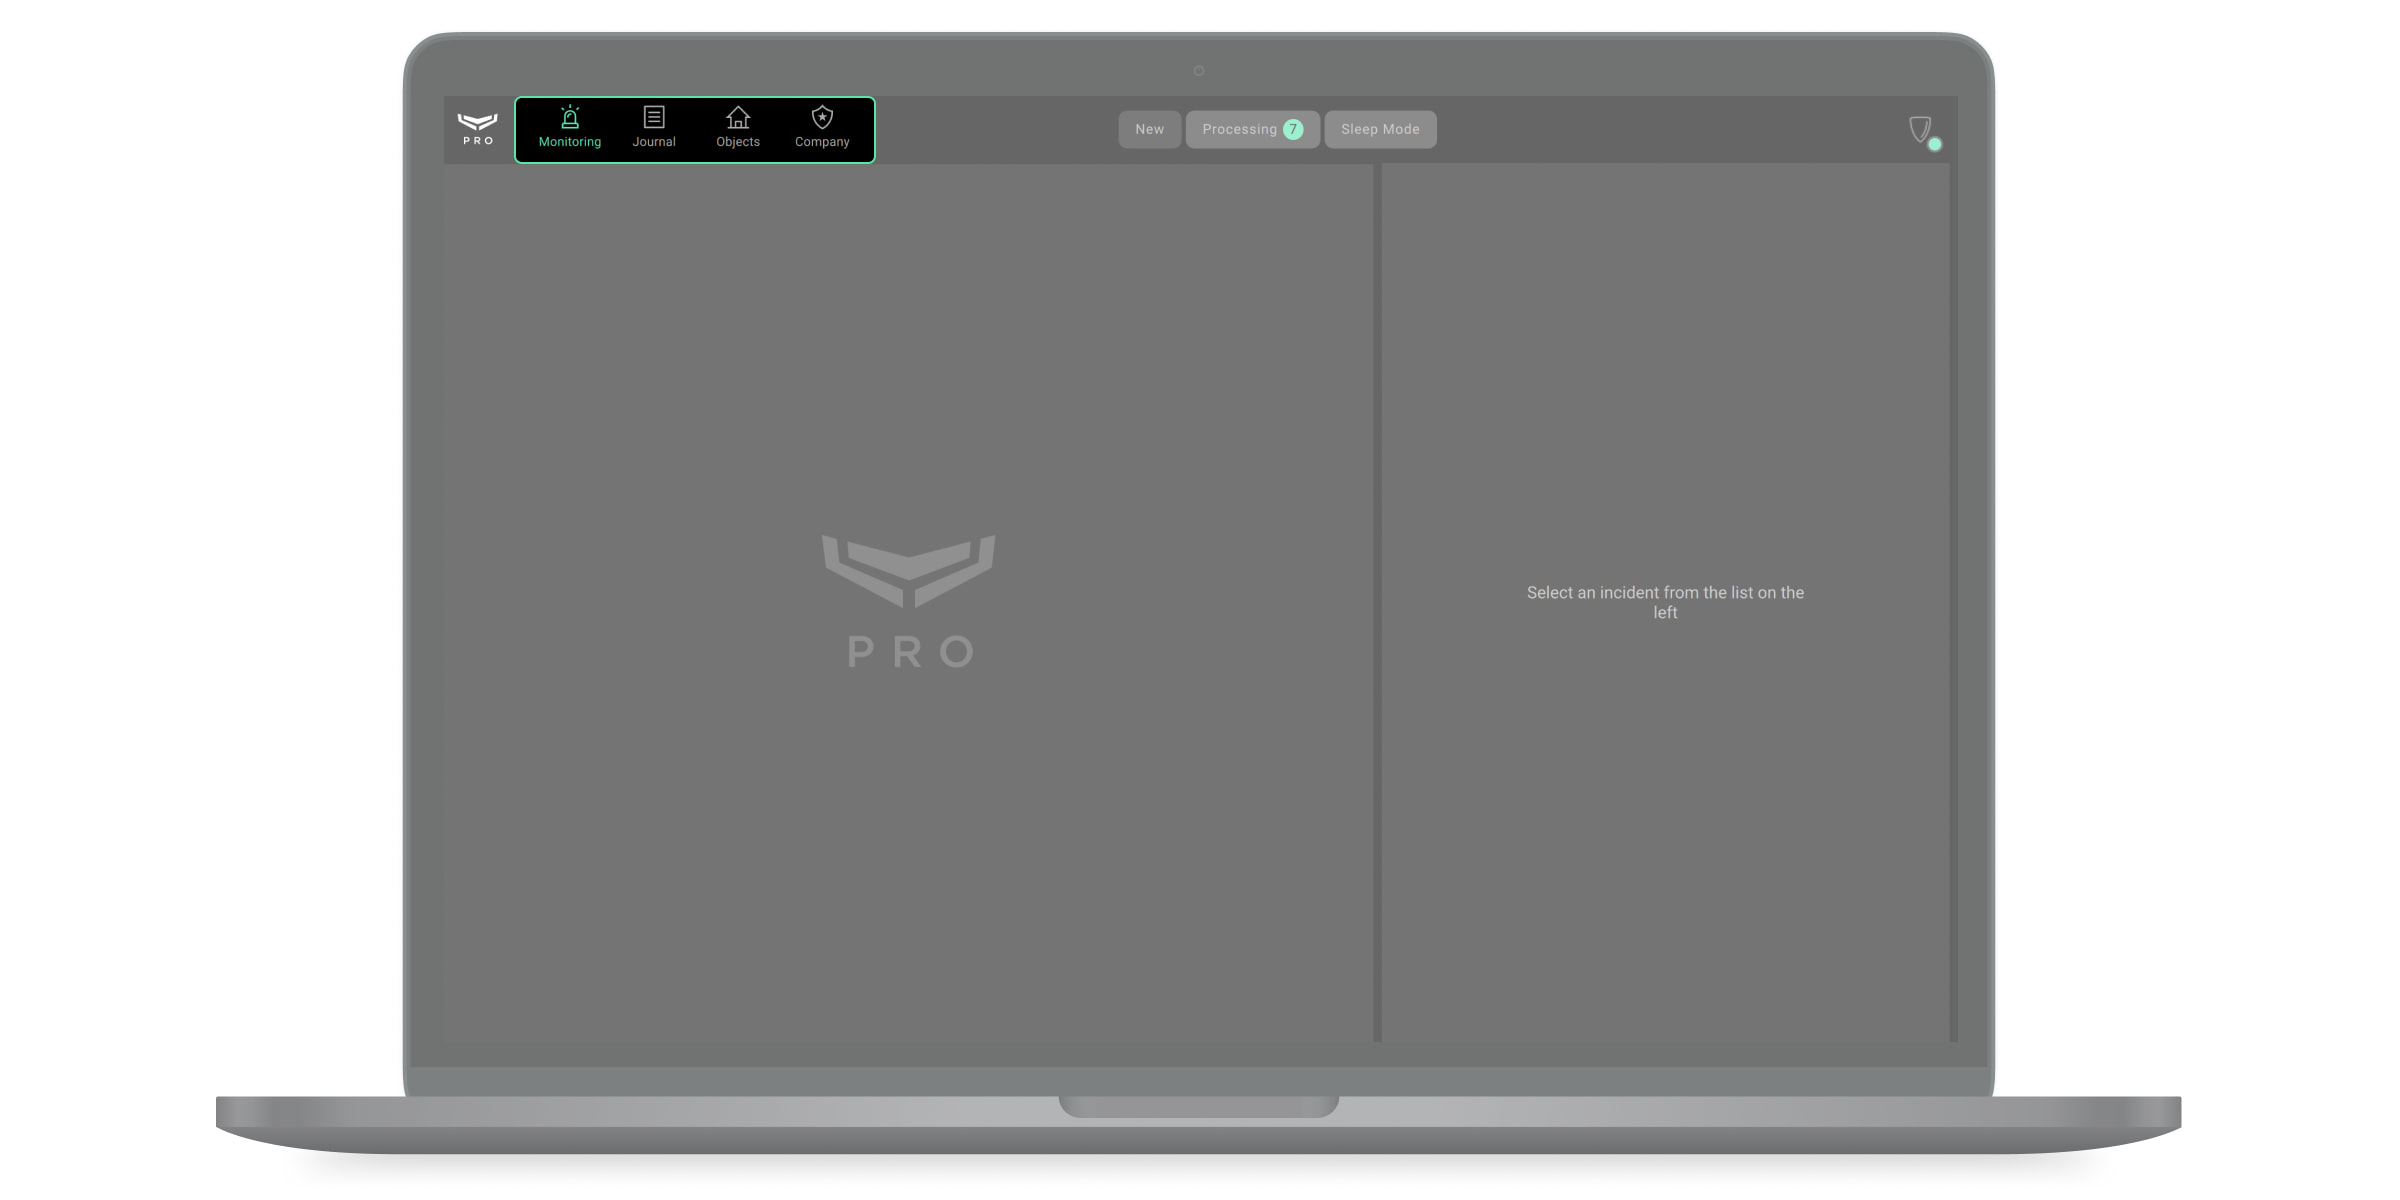
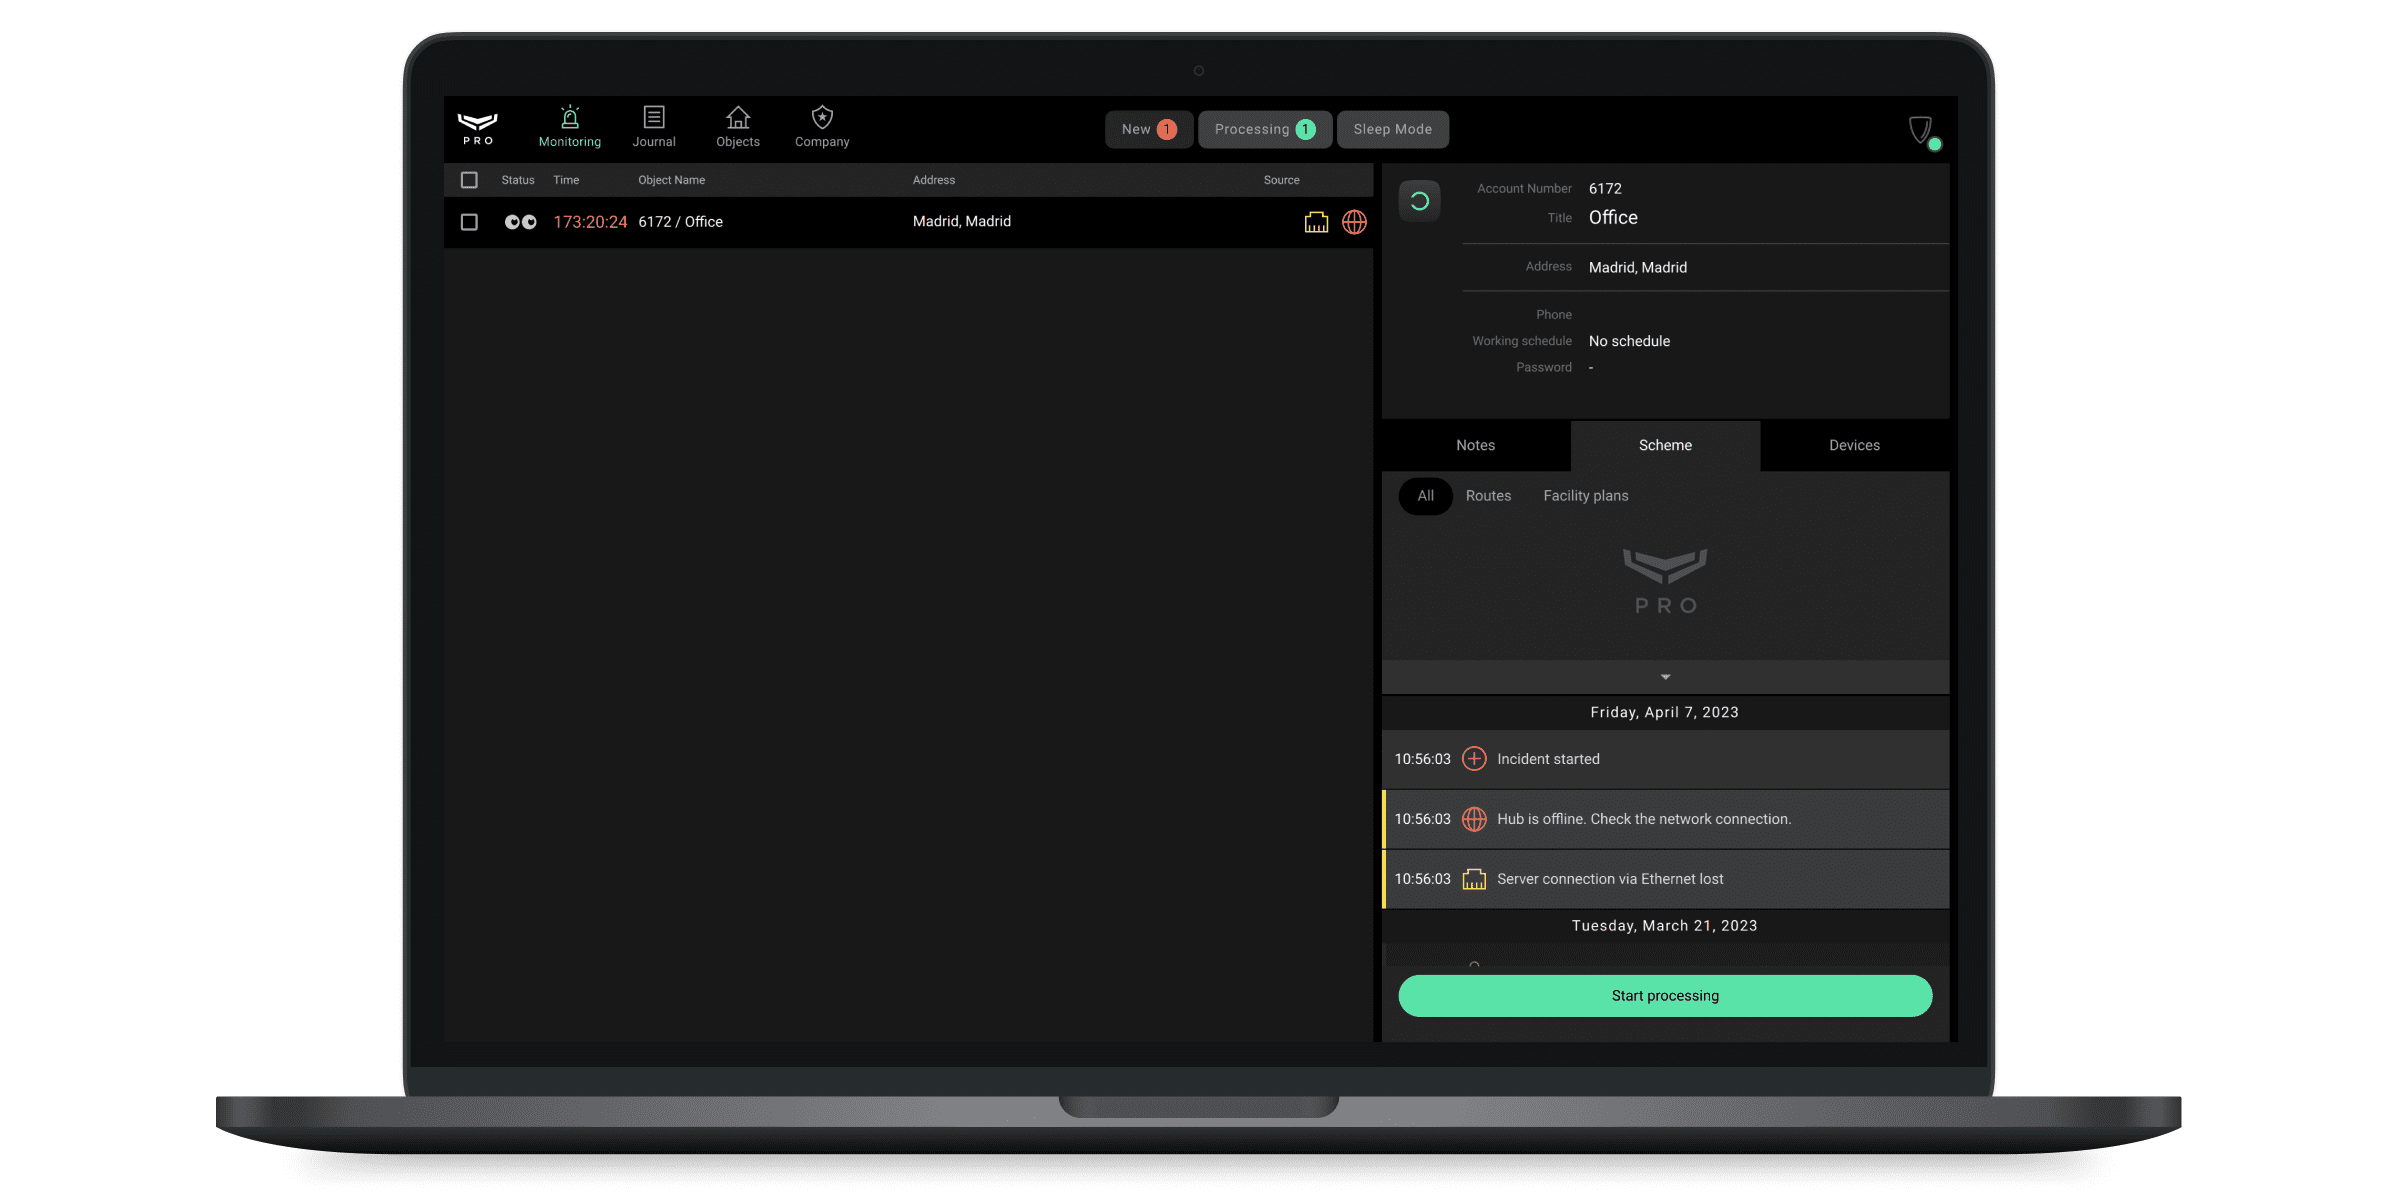
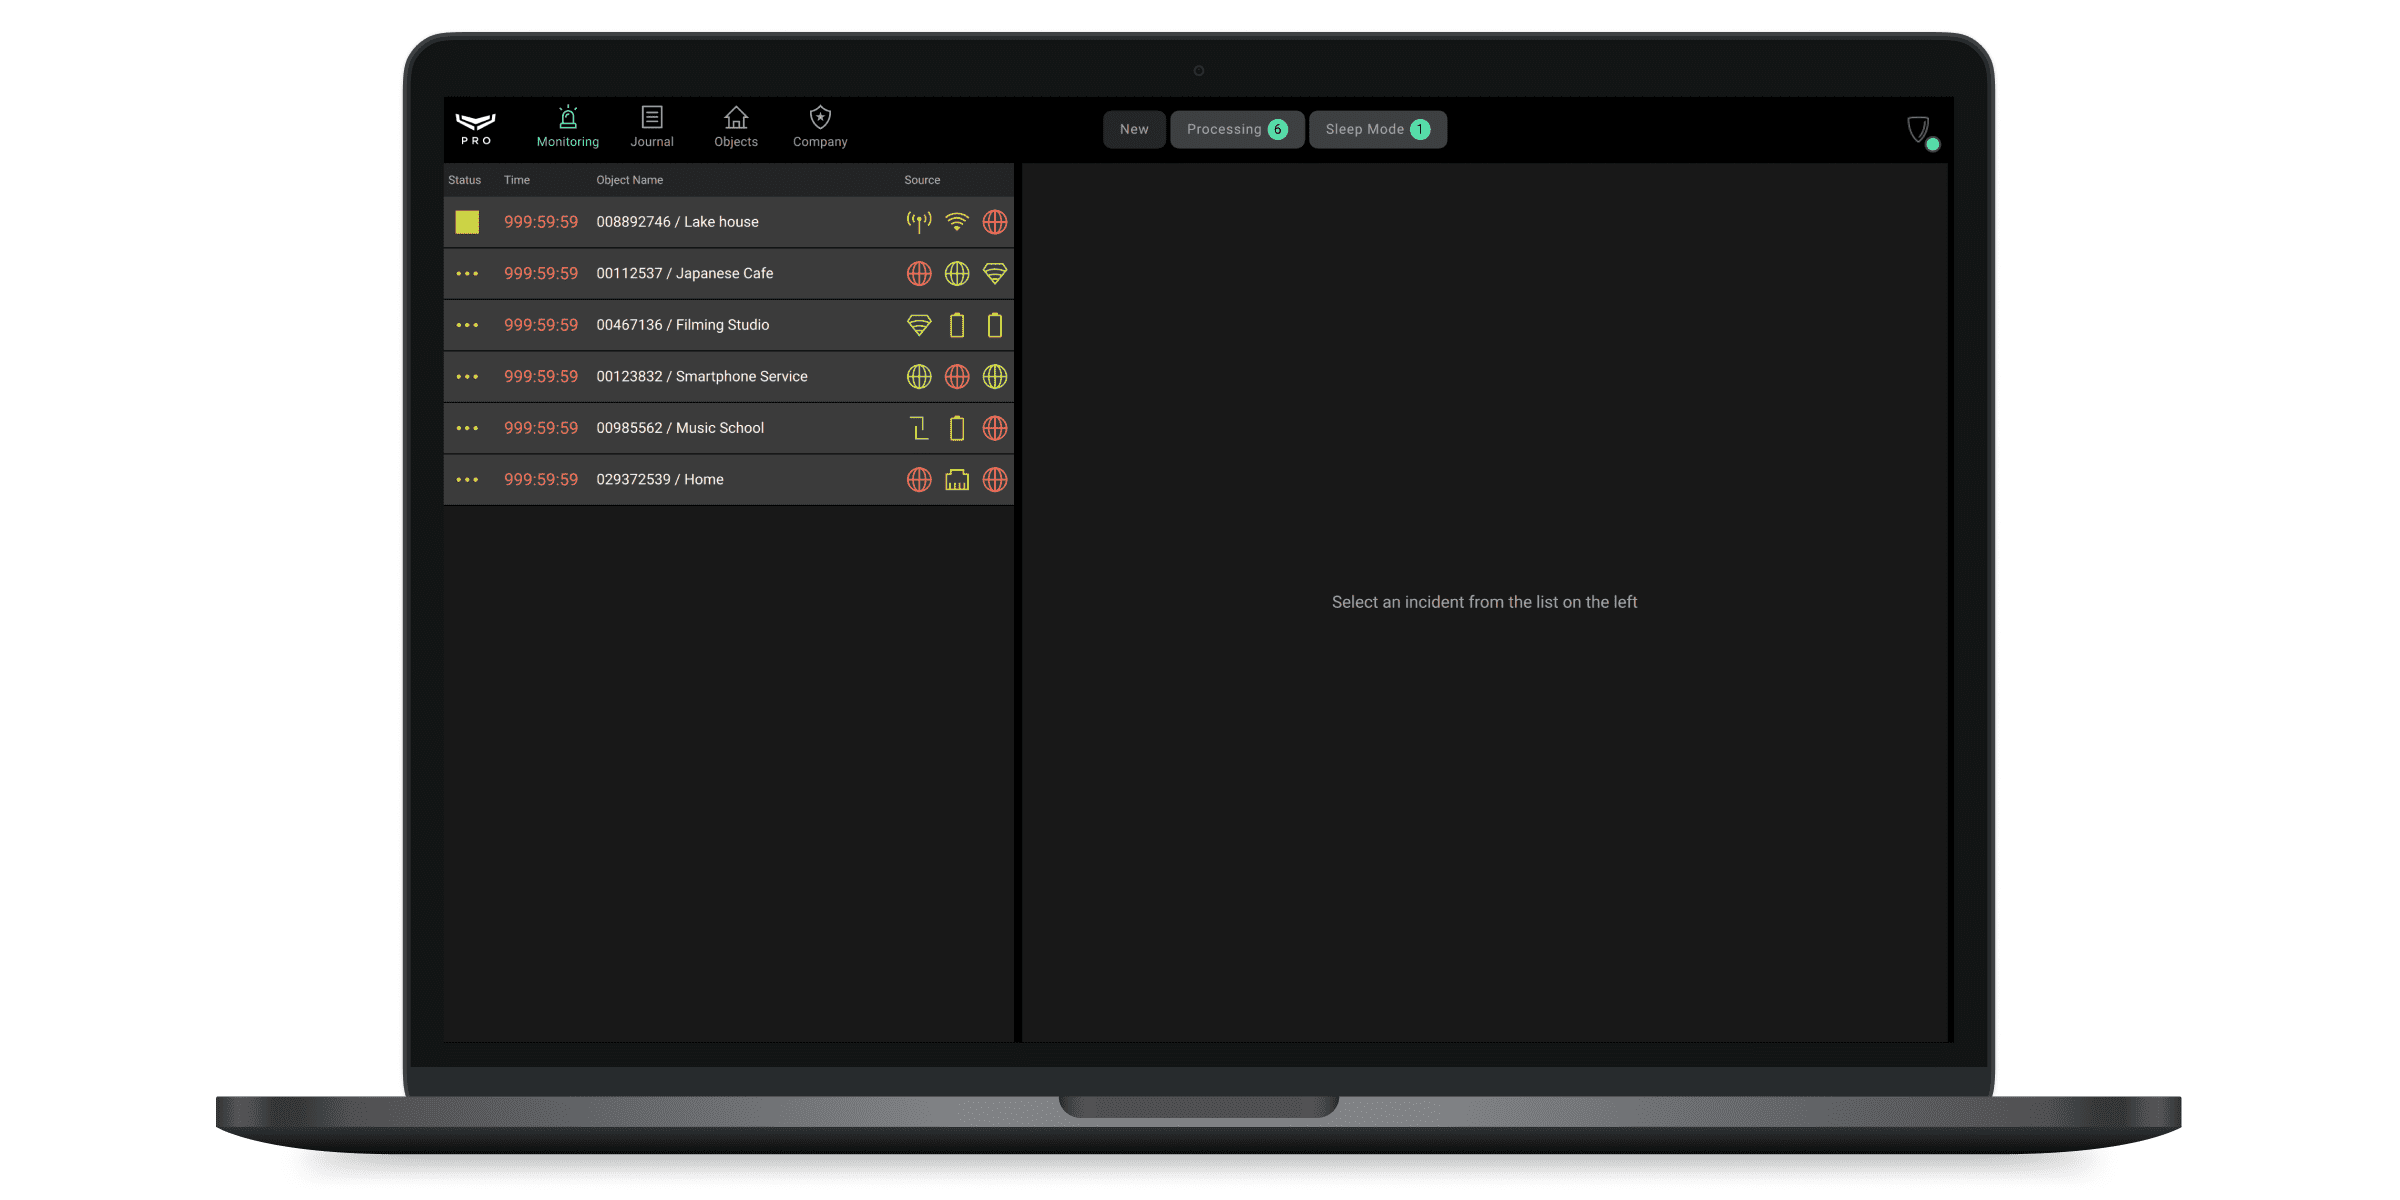
The Monitoring module allows you to process events and alarms of Ajax systems, as well as notifications about the operators work. New, Processing, and Sleep Mode tabs are located at the top of the PRO Desktop screen.
New alarm notifications are displayed in the New tab and are accompanied by the sound of a siren until the incident will be considered. An incident is not considered closed until it is closed by the operator. One notification can include multiple alarms or events of the security system. The latter three are displayed as icons in the notification line, in the Source column.

An incident is created after the following Ajax security events:
- Detector alarms.
- Tamper triggering of any device in the system.
- Sirens accelerometer triggering.
- Jamming detection.
- Loss of connection with any device in the system.
- Loss of connection between the hub and the Ajax Cloud server via one or all communication channels.
The system notifies the user of events that occur after the hub loses connection with the server. Notifications in the events feed include the date and time when the events occurred. If there is more than one event, they are grouped together in a drop-down list. The number of events stored in the hub buffer can be set in the hub settings.Learn more
- Loss of the central unit, range extender, vhfBridge or integration modules external power supply.
Notification of power outage at the object can be disabled in the Services settings menu in the Company module.
- Any other malfunction of the system devices.
| Meaning of system alarms and events icons | ||
| Event icon | Description | Recovery icon |
| Malfunctions | ||
 |
<Device name> is offline. Connection via Jeweller channel lost. |
 |
 |
Server connection via Ethernet lost |
 |
 |
Server connection via cellular lost |
 |
 |
Server connection via Wi-Fi lost |
 |
 |
Hub is offline. Check the network connection. |
 |
 |
External power failure |
 |
 |
Battery low |
 |
| Alarms | ||
 |
Leakage detected |
 |
 |
Lid is open |
 |
 |
Motion detected | |
 |
Detector view blocked |
 |
 |
Glass break detected | |
  |
Opening detected |
  |
 |
Shock detected |
|
 |
Tilt detected | |
 |
Alarm detected, roller shutter |
 |
 |
Your company employee <Name> pressed the panic button | |
  |
Device was moved | |
 |
Fire alarm | |
  |
Carbon monoxide (CO) detected |
 |
  |
Smoke detected |
 |
 |
Alarm is temporarily muted |
|
  |
Temperature above the threshold value |
 |
 |
Gas leak detected |
 |
 |
Auxiliary alarm |
 |
The notification line displays the name, address, object number, as well as the status and time elapsed since the alarm was received, during which the operator is viewing the incident. Which operator and when started viewing the incident is recorded in the Journal module. The journal also records all other actions of operators to process the incident: from consideration to closing the incident.
| Icons for operator incident viewing status | |
 |
Incident started |
 |
Your company employee <Name> started viewing the incident |
 |
Your company employee <Name> started processing the incident |
 |
Your company employee <Name> closed the incident |
Operator incidents
Separately, the list shows incidents of loss of connection with the operator and operator logins to the PRO account from an unverified computer. These types of incidents are generated according to the operators’ workstations, which are confirmed in the Company module, processed as security alarms, indicating the cause of the incident, and recorded in the journal.
Notification Operator is offline – an incident type that contains information about the loss of connection with the computer that is confirmed as the operator’s workstation in the Company module.
Notification Login from an unverified computer – an incident type that contains information about the user and the computer from which the login was made.
Incident processing
Incident processing algorithm
- Sending an Ajax security alarm by the hub.
- Automatic creation of an Incident in the Monitoring module.
- Review of the Incident by the CMS operator or the head of operators.
- Processing the Incident by the CMS operator or the head of operators.
- Checking the cause of the alarm: communication with contact persons, checking pictures from detectors with photo verification.
- If the alarm is real or it is impossible to determine the cause of the alarm: Sending the RRU. After finding out the causes of the alarm, end the incident processing, indicating the cause of the alarm.
- If the alarm is false: Set the cause of the alarm as “False alarm” or “No incident” and end the incident processing.
Information on incident processing screens
Clicking on the notification opens:
- Incident details —alarm time, triggered device, room, photo verification (if detectors with photo verification triggered).
- Object info — address, contacts, schemes of premises, etc.
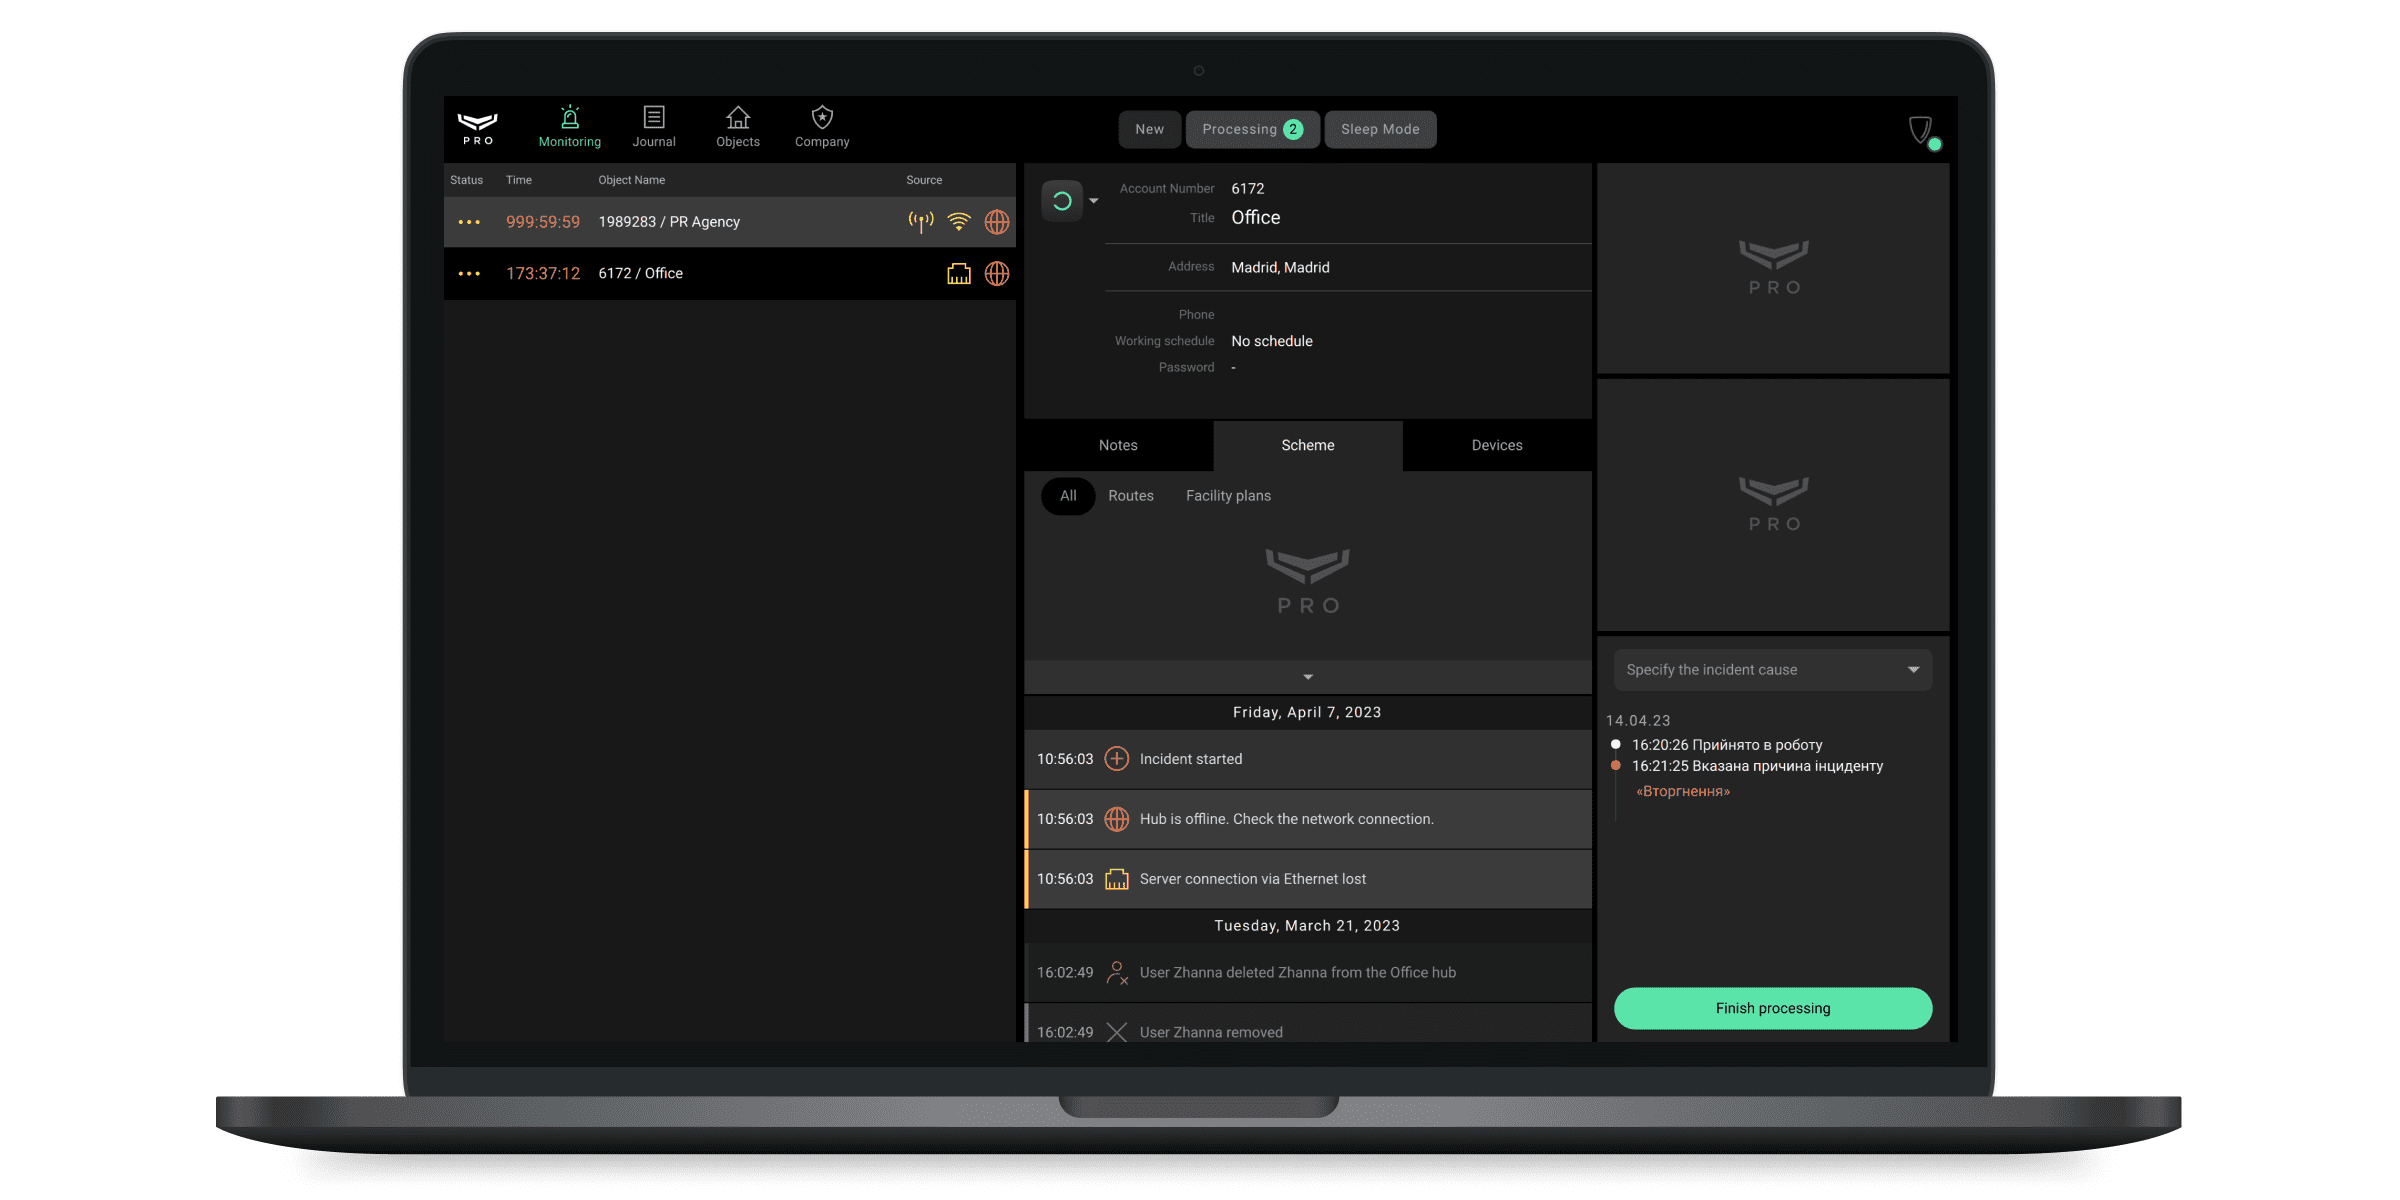
The operator starts processing the alarm by clicking the Start processing, and the incident goes to the Processing tab. The operator has limited access to the tab: they see only those incidents that are being processed. The Head of operators has full access to see all incidents that are being processed by the operators and can close multiple incidents at once.
In the centre of the Processing tab, information about the object, a list of alarms, a menu for controlling security modes, as well as notes, a list of devices, road maps, and room layouts are displayed.
If motion detectors with photo verification are installed at the object, the operator can view a series of photos taken by the detector to check the cause of the alarm. Photos are displayed in the MotionCam tab in chronological order, starting with the latest.
The operator can contact one of the responsible people indicated in the object card — when processing an alarm, their names, and phone numbers are displayed on the app screen. PRO Desktop does not support calls from the app. But the operator can copy the phone number of the responsible person and call them using third-party software. For example, using an app for IP telephony.
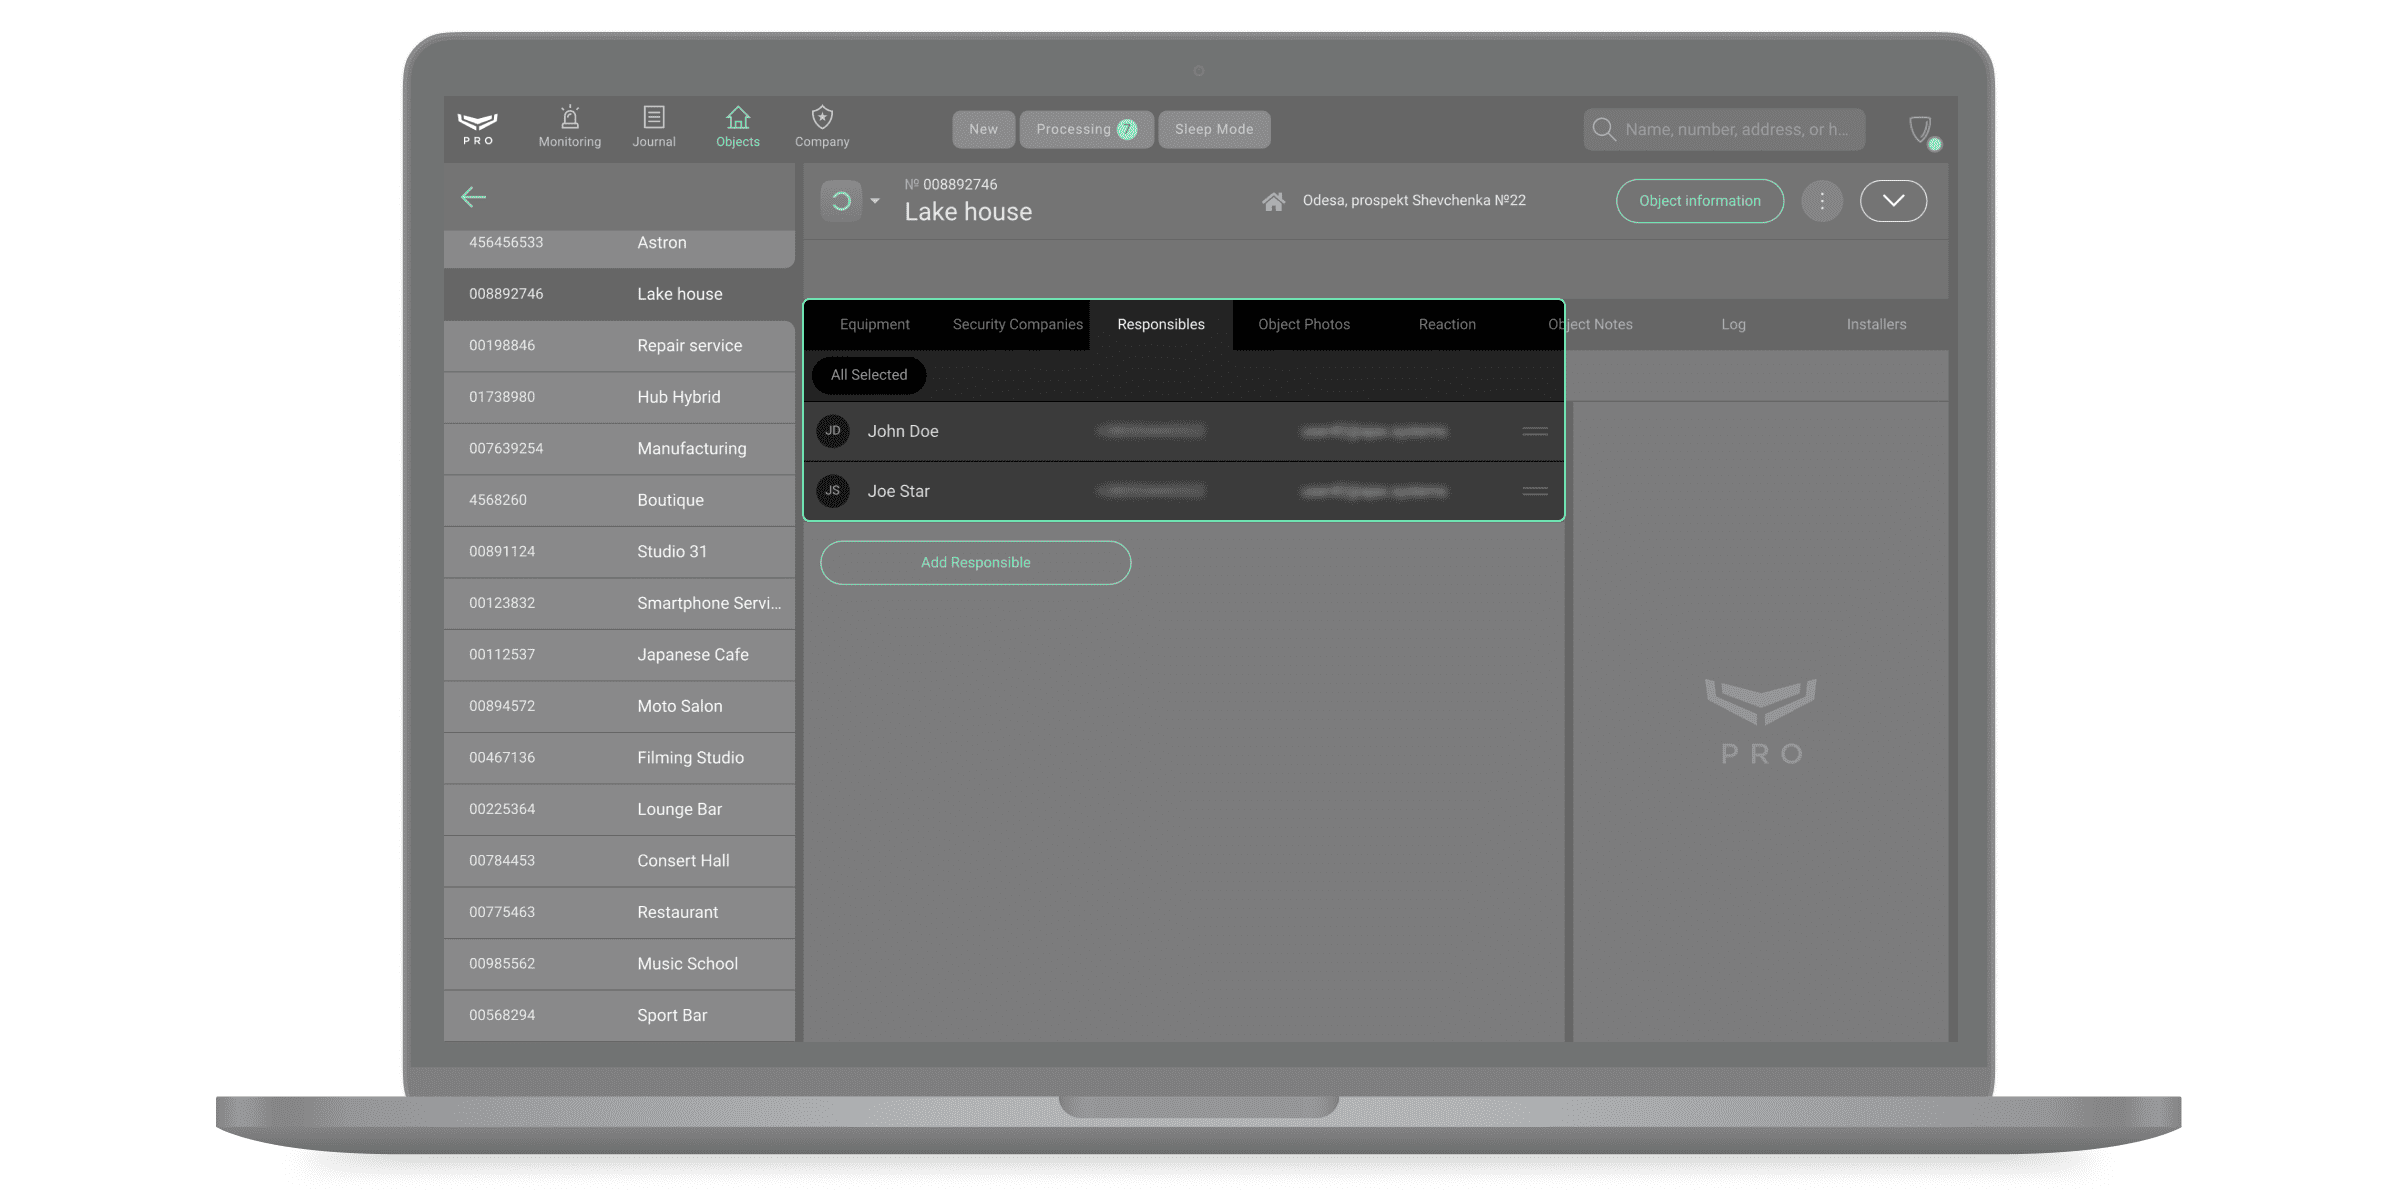
Responsible people are assigned when creating an object in PRO Desktop. This may be, for example, the owner of the flat or the head of the security service at the production site.
Based on the results of the connection, the operator puts a mark Accepted — if it was possible to contact and the responsible person accepted the information. If there is no connection with the responsible person, the operator puts the mark Not responding. You can switch between responsible people using the arrows. They appear if all responsible people cannot be displayed at the current size of the app window.
The rapid response teams assigned to the object are displayed under the responsible people. When communicating with the RRU, the operator checks if the unit has been Dispatched, Arrived, or is Unavailable. You can switch between assigned groups using the arrows. They appear if all RRUs cannot be displayed at the current app window size.
RRUs are assigned when an object is created in PRO Desktop.
The incident processing log is displayed in the lower right corner of the screen. For each record in the log, the operator can leave a comment by clicking on the record. At the top of the processing journal, you can select the cause of the alarm from the drop-down list and complete the processing. If necessary, you can comment on the cause of the alarm. For example, to describe in more detail the cause of a false alarm at an object.
When processing an incident related to the operator’s workstation, you can specify the reason from the drop-down list, and, if necessary, accompany it with a comment. When processing an incident about an operator logging in from an unverified computer, the workstation can be verified in the same window. To do this, click the ”+” button next to the operator details.
After the incident is processed, it closes and goes to the Journal, where the log of its processing is saved. You cannot return to incident processing.
Sleep Mode
An employee who has access to the monitoring module can switch an object into Sleep Mode if installation work is being carried out at the object or false alarms are coming from it. Objects with alarms and events that are temporarily ignored are on the Sleep Mode tab. You can switch the object to Sleep Mode using the menu for managing security modes.
When transferring an object to Sleep Mode, the operator specifies the time after which the object will return to normal operation. You can select 1, 5, 15, or 30 minutes, or manually enter the time from 1 to 300 minutes.
While the object is put into Sleep Mode, PRO Desktop ignores its alarms and events — they are not displayed in the New tab but are recorded in the Journal module. At the end of the set time, the object returns to normal operation.
To remove an object from Sleep Mode before the end of the set period:
- Open the security mode controlling menu.
- Disable Sleep Mode.
Journal
Access to the module: Company owner, Engineer, Senior CMS Engineer, Head of operators, Operator, Head of installers.
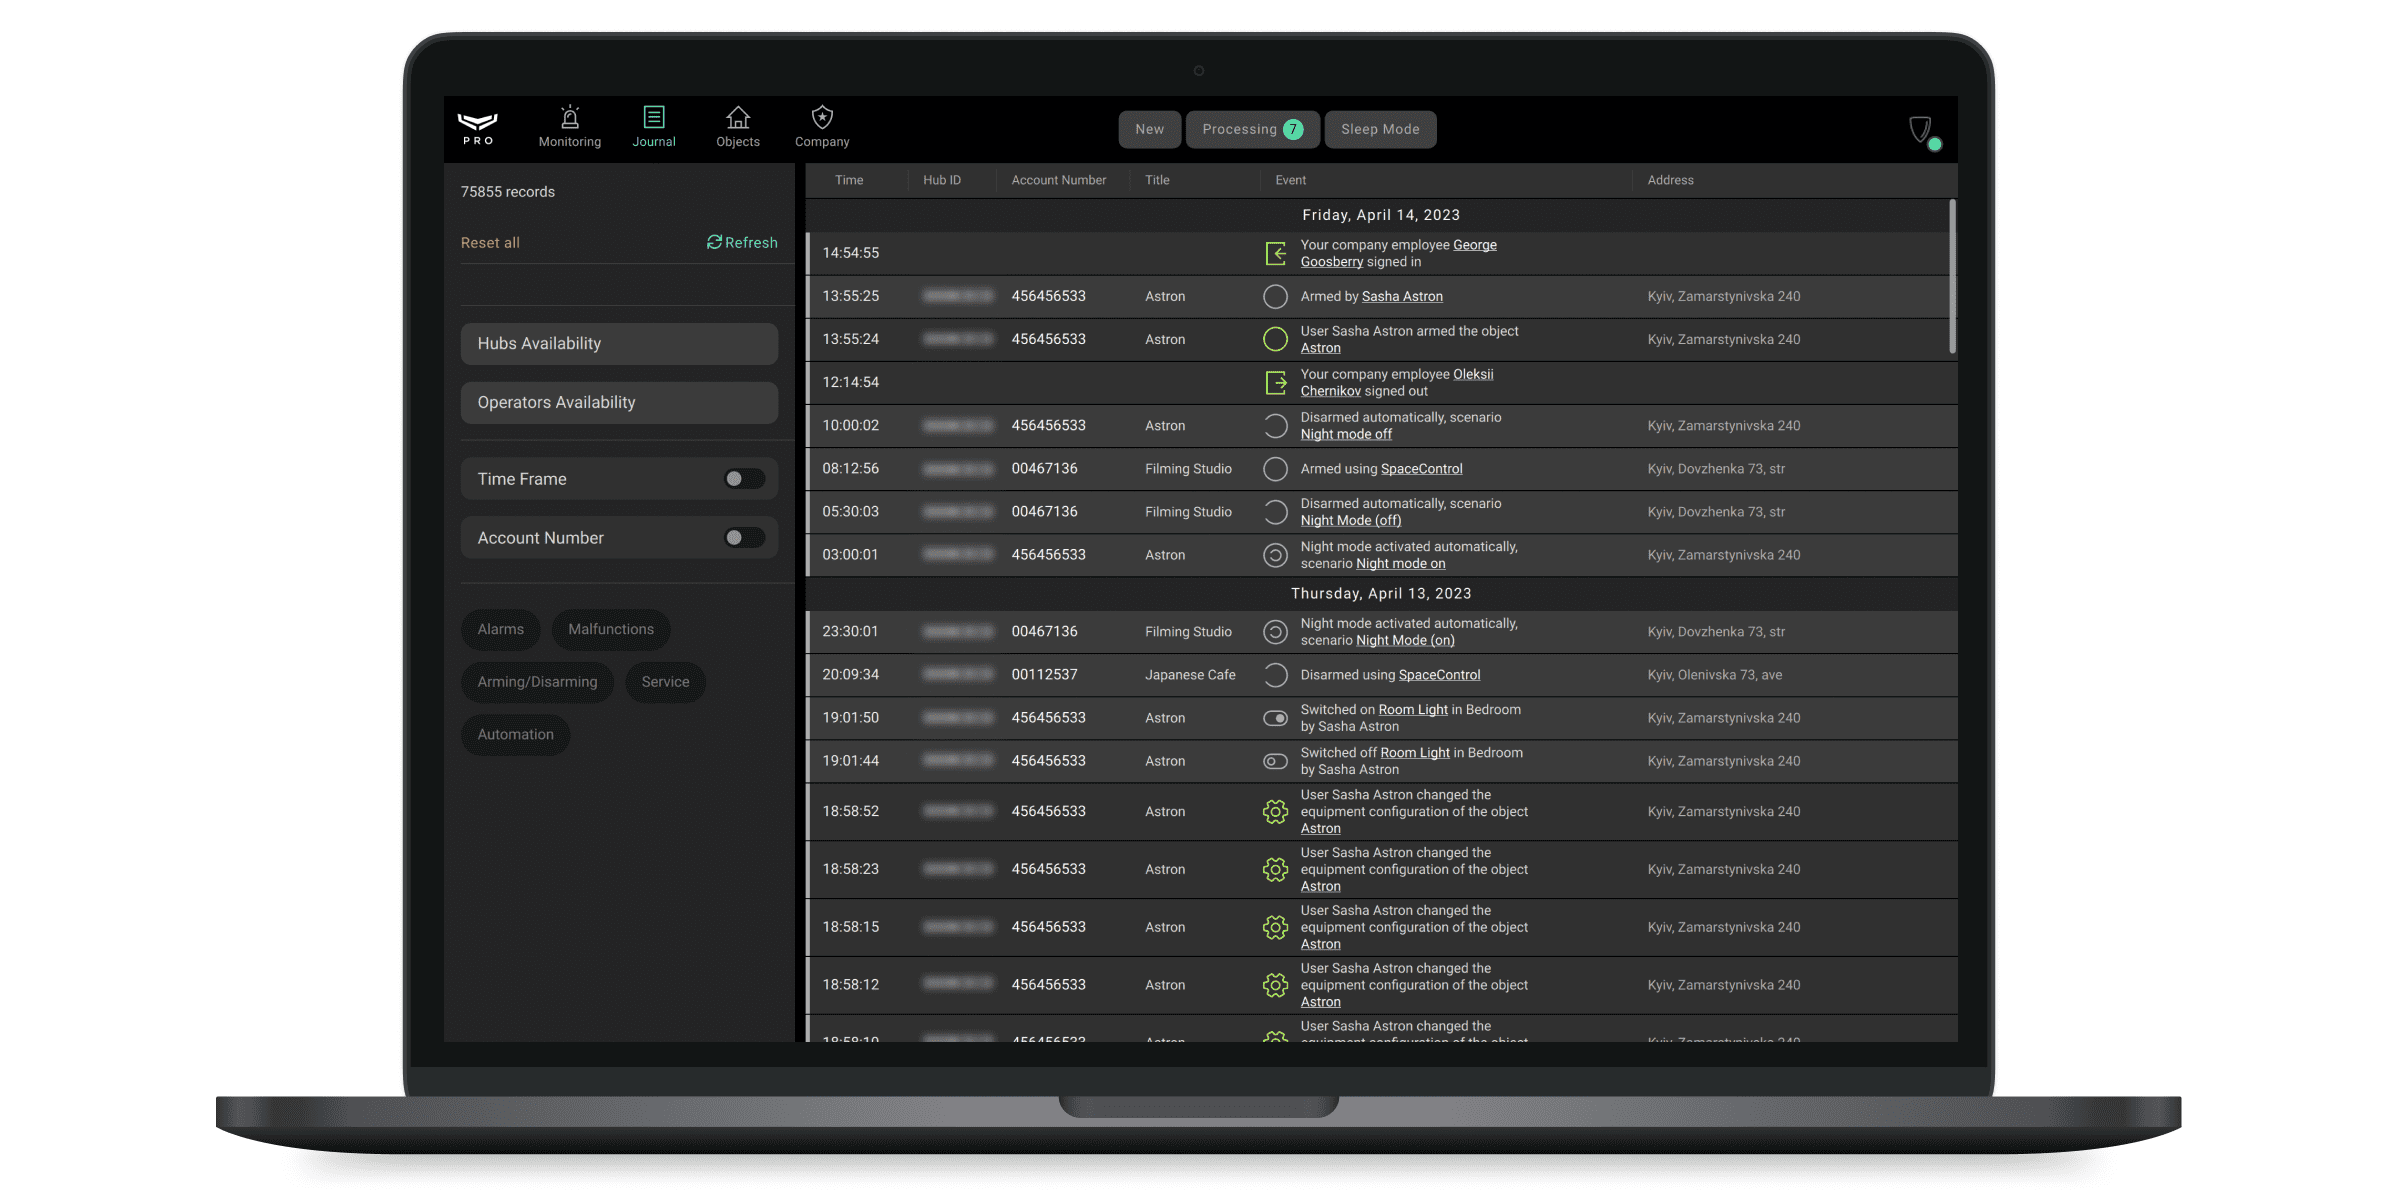
PRO Desktop maintains a journal of alarms and events of all company objects, and also allows you to generate reports on the availability of hubs and CMS operators. The journal also contains information about the download of video fragments from the archive. Which allows you to monitor who downloaded which fragment, and when. To go to it, select the Journal in the list of app modules.
Object notifications are displayed in chronological order. To set the time interval for notifications, their type, or object number, use the filters. Above the filters, a counter of filtered records is displayed, as well as buttons for resetting filters and refreshing the journal.
To filter notifications by device or user, click on them in the list of notifications. By clicking on the number of the object in the column, you can filter the notifications of this object. Notifications can also be filtered by clicking on the event icon — you will get a list of all events of the same type.


To open the incident processing log, click on the clock icon on the incident ending record.
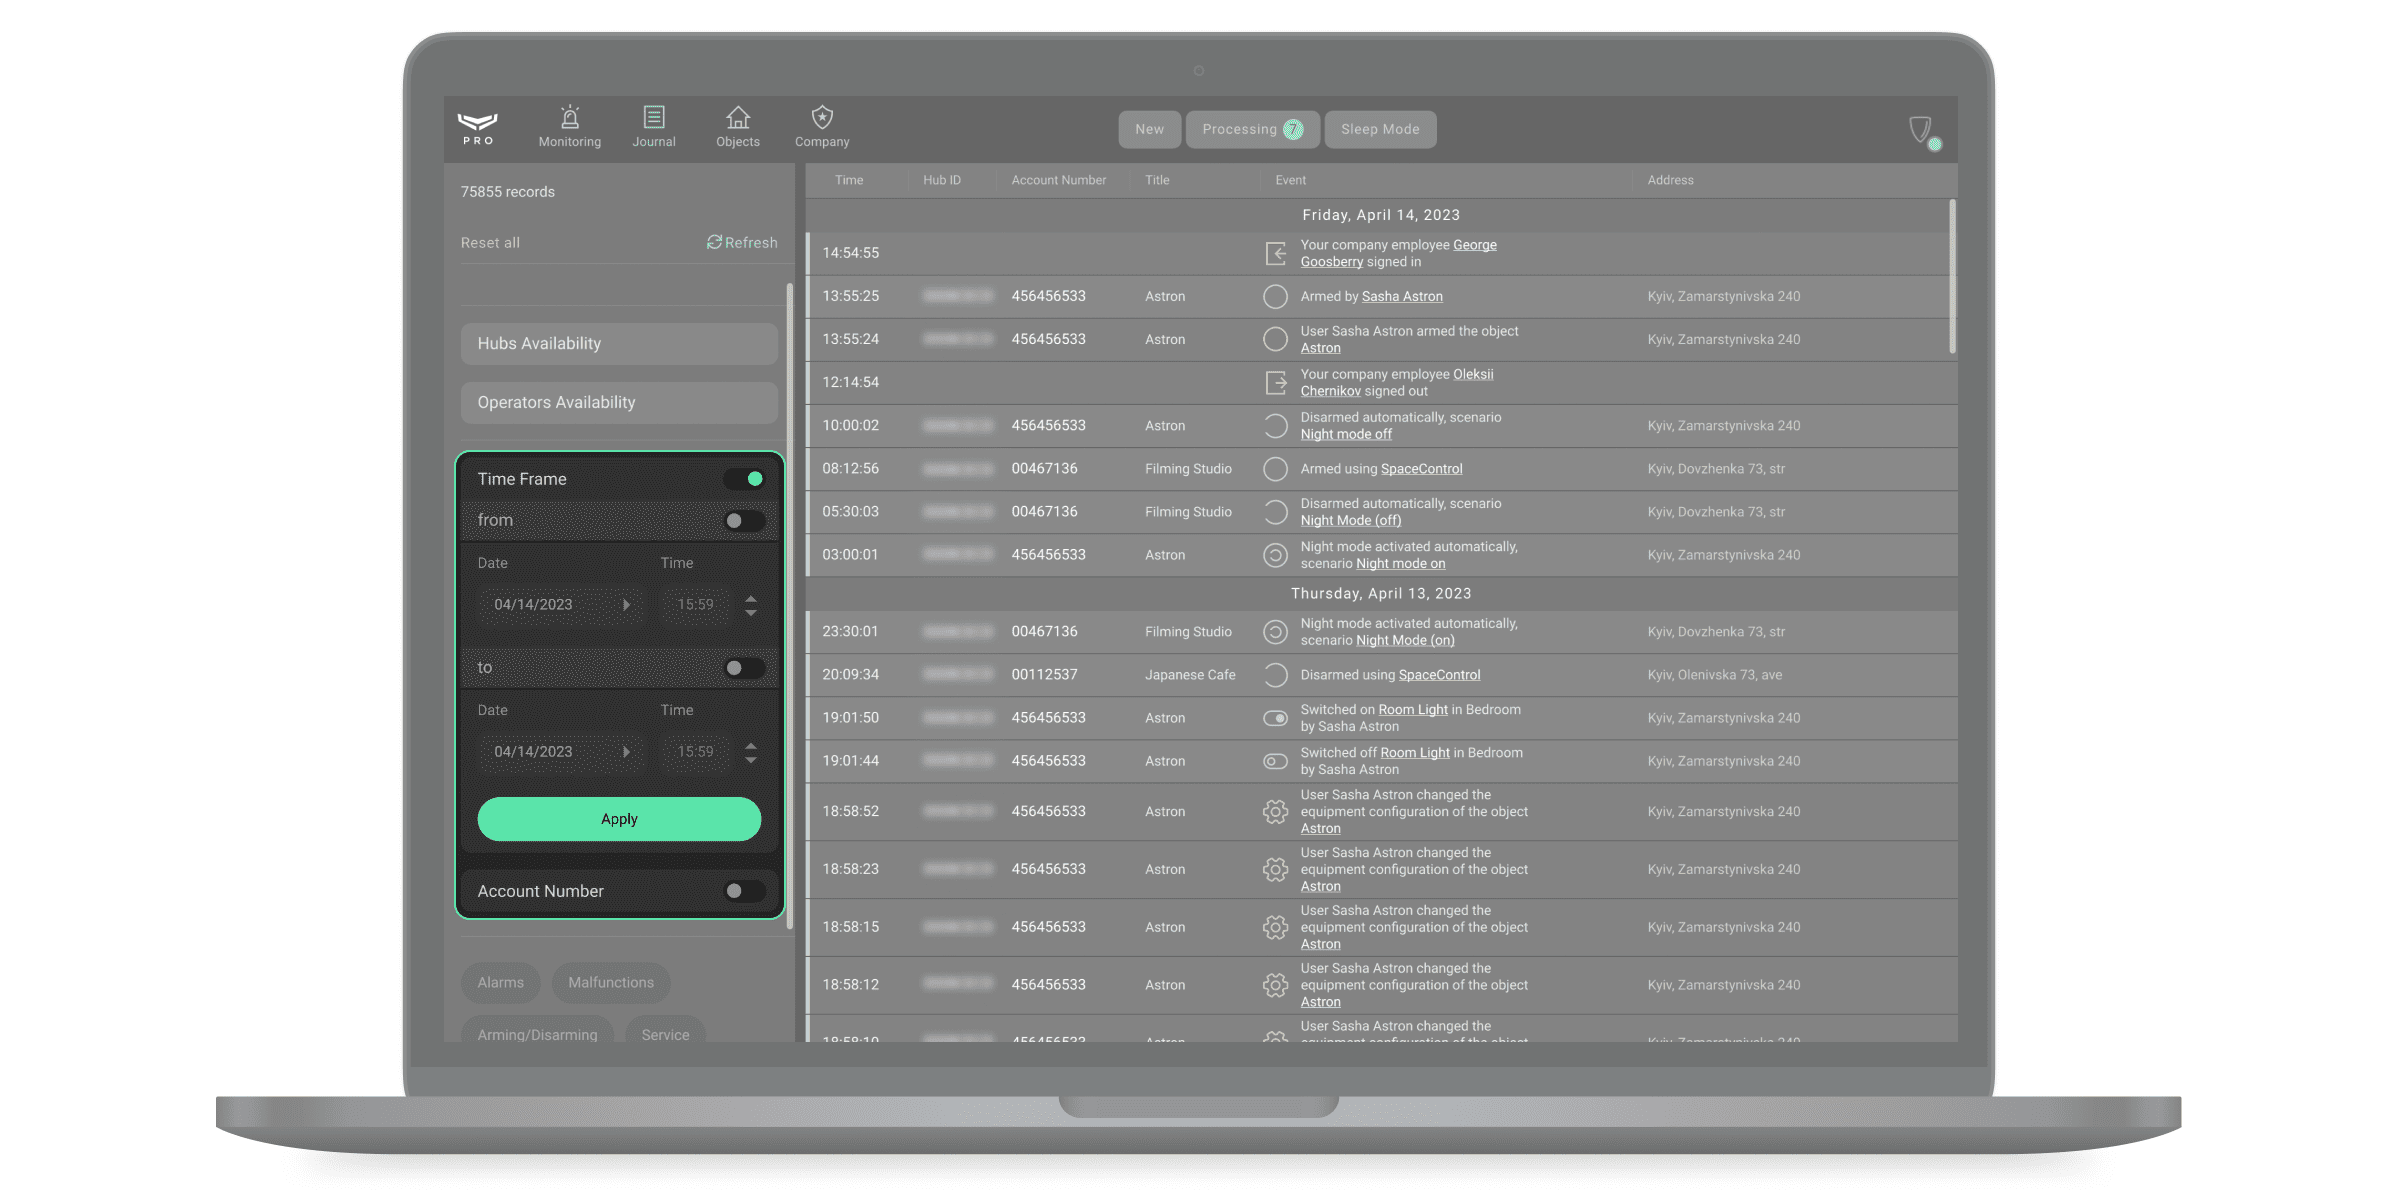
Availability reports
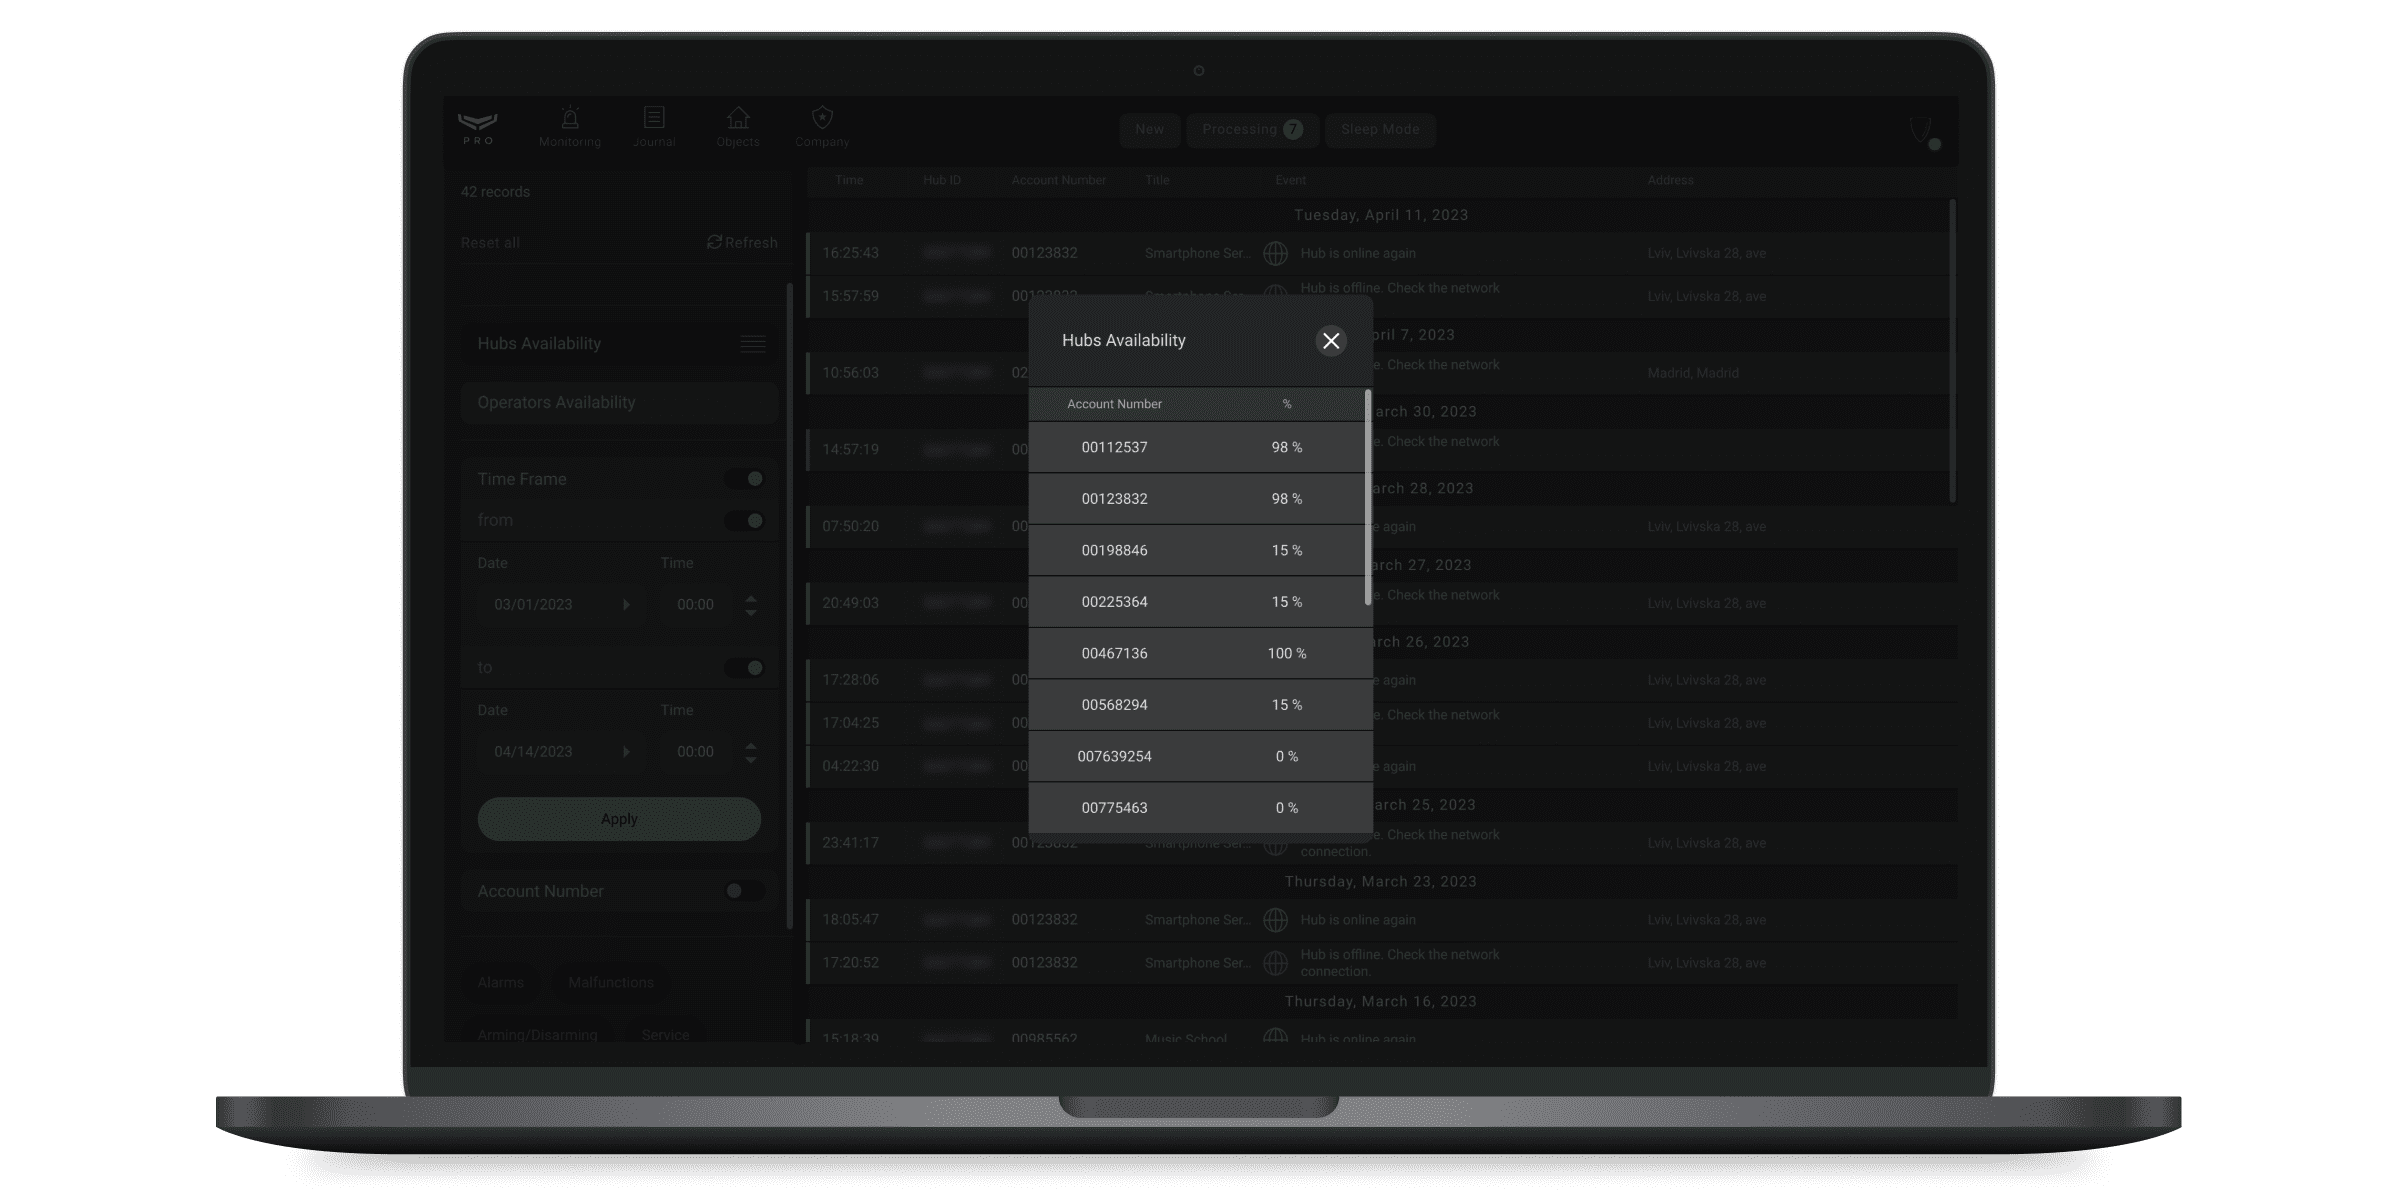
PRO Desktop can generate reports showing the connection time with security systems (Hubs availability). You can also generate a report on the Operators availability. To generate reports on hub availability, select the Hubs availability filter. By default, the report has information of the last 7 days. If necessary, the period can be changed in the Time frame filter, and you can also set the object number.

The availability report will be generated for the selected objects if the filter by object number is active. If the filter by object number is inactive, the report will be generated for all hubs of the company. After setting parameters, click the report generation button next to the filter name — the report will open in a new window.
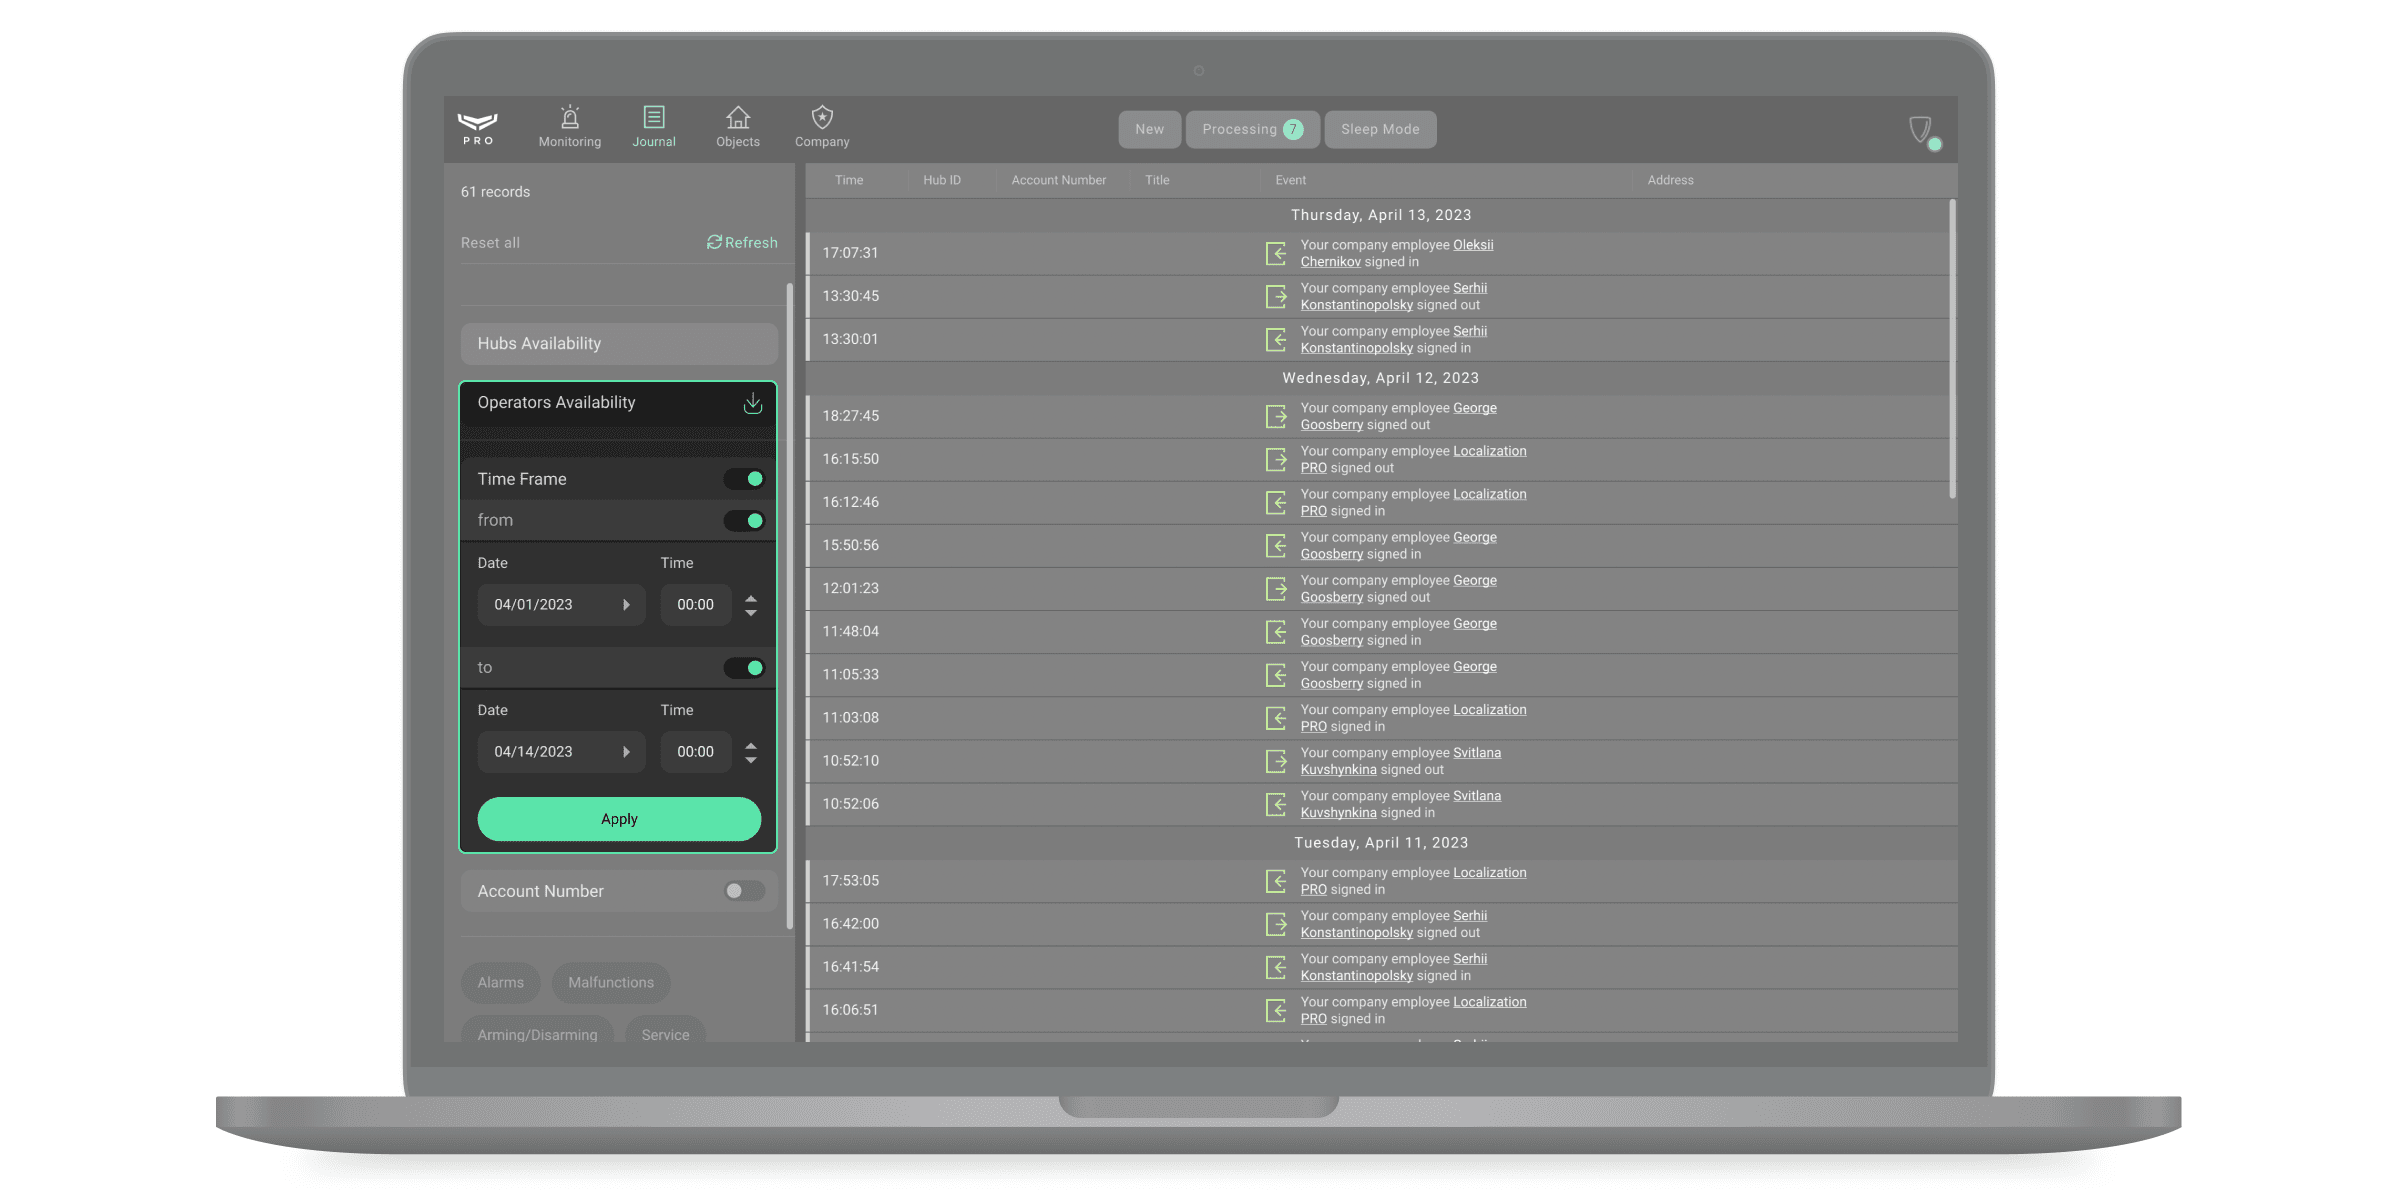
To generate the operators availability report, only the workstations of operators verified in the Company module are considered. To generate a report, click the Operators availability filter.
A list of events will be displayed on the right:
- Your company employee signed in — login to the operator account is registered.
- Your company employee signed out — logout of the operator account is registered.
- Your company employee added new receiver for cloud signaling monitoring.
- Your company employee changed settings for receiver.
- Your company employee deleted receiver.
- Connection with your company employee lost — loss of Internet connection with the operator’s computer.
- Connection with your company employee restored — restoring the Internet connection with the operator’s computer.
- Receiver lost connection via primary/secondary address.
- Restored receiver connection via primary/secondary address.
- Monitoring is paused: no operators online — there is no available operator.
- Monitoring is resumed — at least one operator is available.
- Your company employee started monitoring object via receiver.
- Your company employee updated account number of object for receiver.
- Your company employee stopped monitoring object via receiver.
Set and apply the range to filter events by time. To generate a report based on the specified parameters, click the report generation button next to the filter name.
Exporting the alarm and event journal
Ajax PRO Desktop provides the ability to export the alarm and event journal. The option allows you to get a document in CSV format that can contain up to 1,000 events.
System requirements
| Minimum | Recommended | |
| Operating system | 64-bit or 32-bit Microsoft® Windows® 7/8/10/11 | 64-bit Microsoft® Windows® 10/11 |
| Processor | Intel® Core™ i3 4130 or equivalent | Intel® Core™ i5 7400 or equivalent |
| Random access memory | 8 GB | 16 GB |
| Video card | Graphics driver that provides OpenGL 2.1 and higher | Graphics driver that provides OpenGL 2.1 and higher |
| Storage | 2 GB of free space | 8 GB of free space |
| Screen resolution | 1600×900 | 1920×1080 |
| Minimum | Recommended | |
| Operating system | macOS® 10.15 (Catalina) | macOS® 11.6 (Big Sur) and later |
| Processor | Intel® Core™ i5 5th generation or equivalent | Intel® Core™ i5 10th generation/ Apple M1 chip or equivalent |
| Random access memory | 8 GB | 16 GB |
| Storage | 2 GB of free space | 8 GB of free space |
| Screen resolution | 1440×900 | 2560×1600 |

