ReX Jeweller is a range extender of communication signals that expands the radio communication range of Ajax devices fitted with a hub up to 2 times. Developed only for indoor use. It has a built-in tamper resistance and is equipped with a battery that provides up to 24 hours is evaluated by UL of operation without external power.
The extender is compatible only with the Ajax hubs! Connection to uartBridge* and ocBridge Plus* is not provided.
The device is configured via the mobile application for iOS and Android smartphones. Push-notifications, SMS messages and calls (if enabled) notify ReX Jeweller user about all events.
Only Hub 2 Plus Jeweller and Hub 2 (4G) Jeweller are certified according to UL/ULC standards.
The Ajax system can be used for independent monitoring of the site and can be connected to the Central Monitoring Station of the security company.
* Not evaluated by UL.
Functional elements
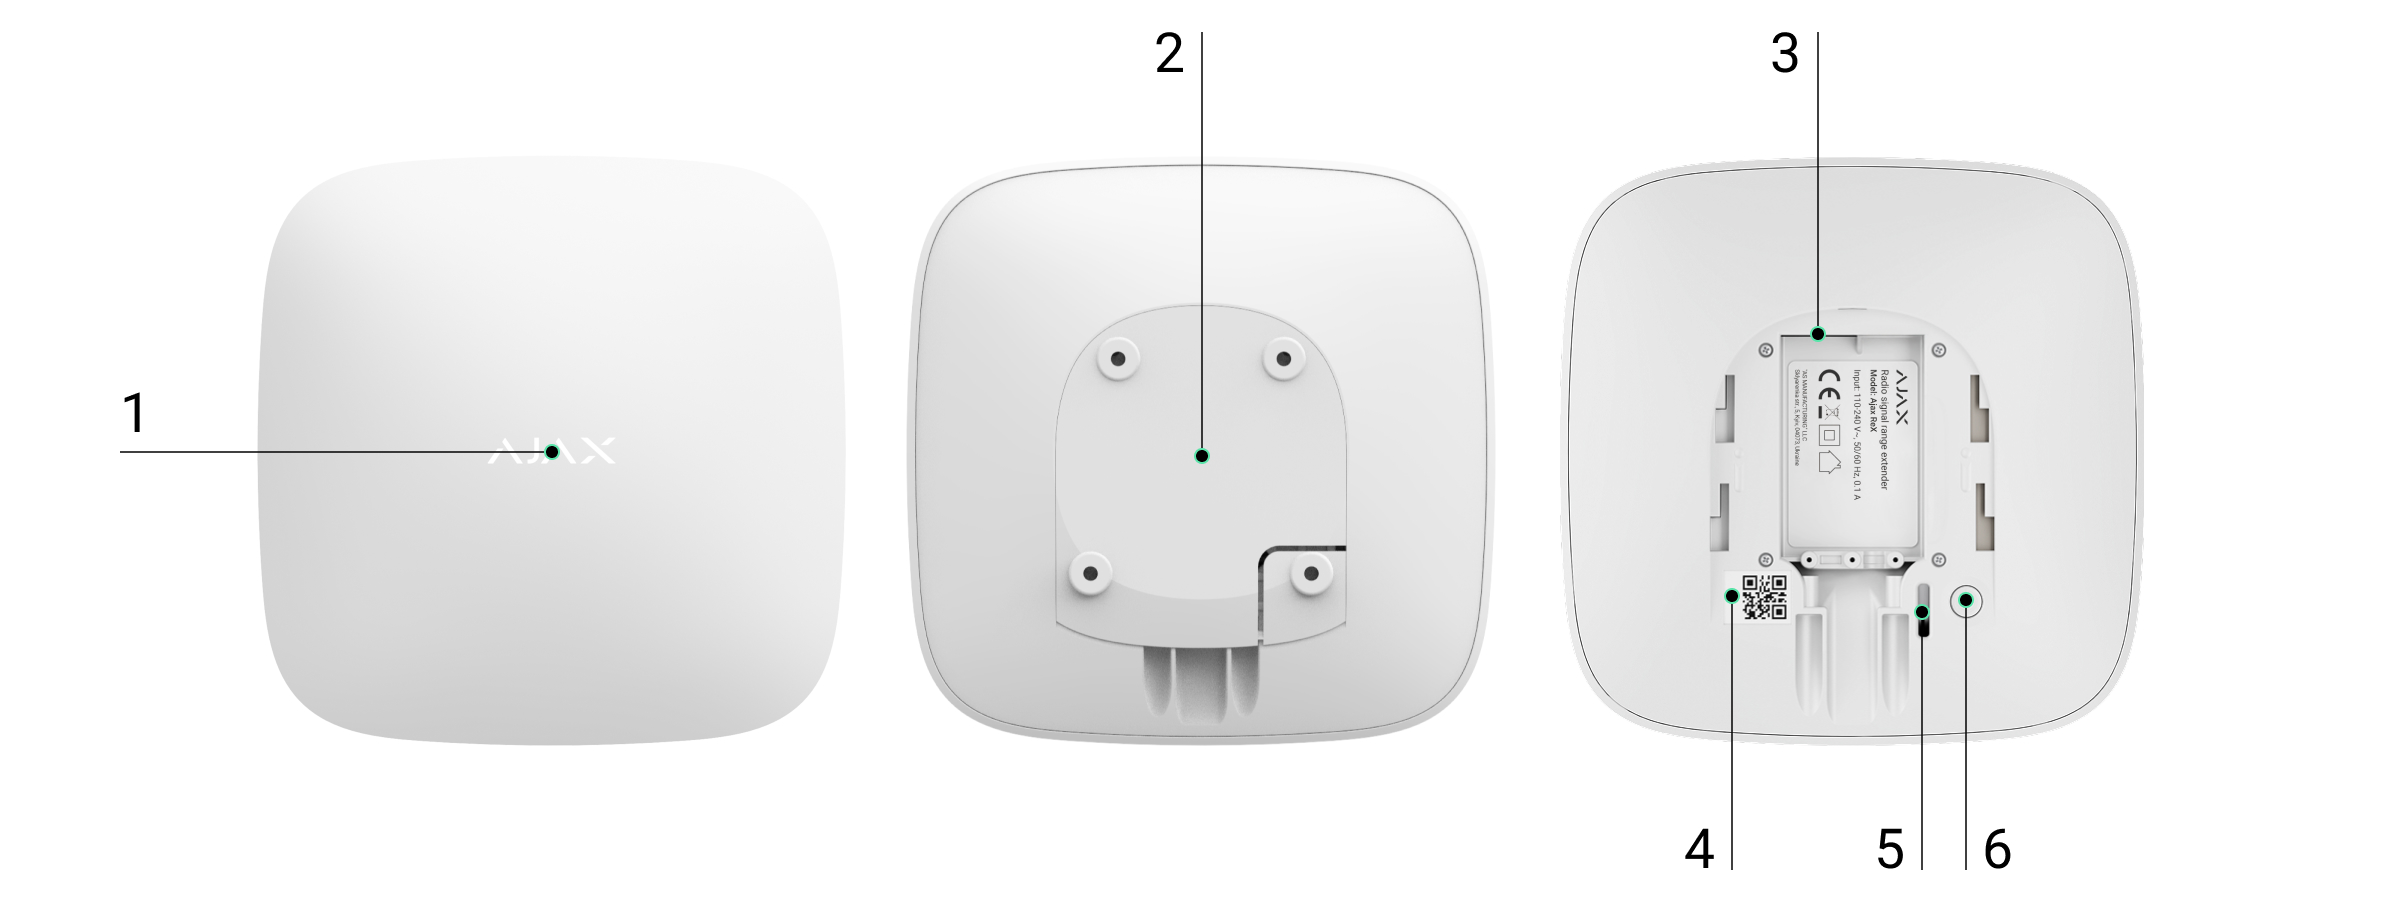
- Logo with light indicator
- SmartBracket attachment panel (perforated section is necessary to trigger the tamper during an attempt to lift the fixed ReX Jeweller from the surface)
- Power connector
- QR-code
- Tamper button
- Power button
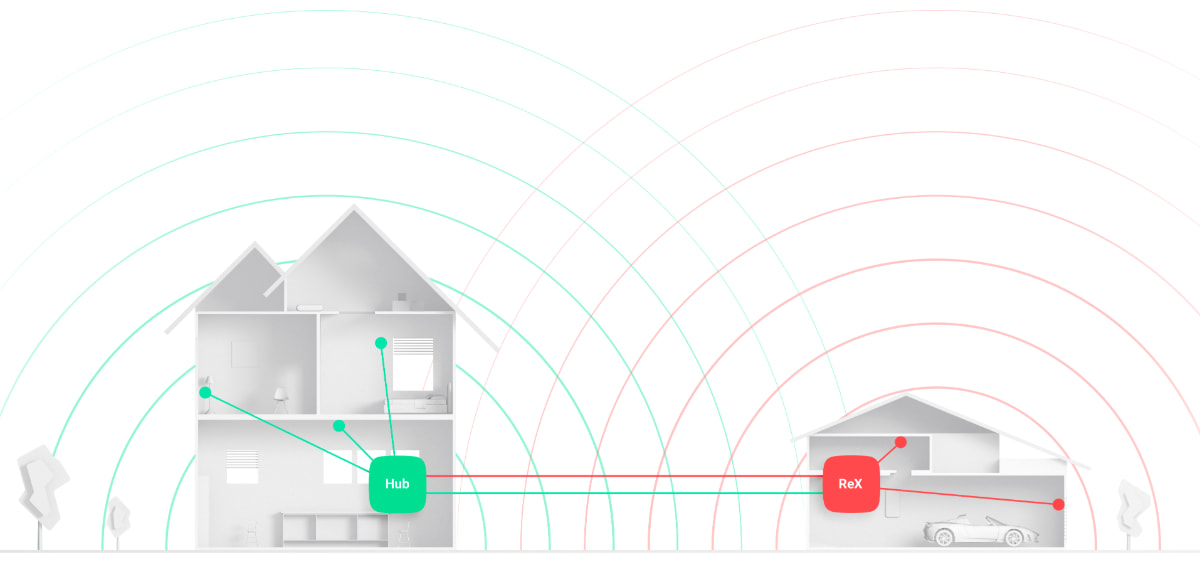
Principle of operation
ReX Jeweller expands the radio communication range of the security system allowing installation of Ajax devices at a greater distance away from the hub.
The communication range between ReX Jeweller and the device is limited by the radio signal range of the device (indicated in the device specifications on the website and in the User Manual).
ReX receives hub signals and transmits them to the devices connected to ReX Jeweller, and transmits signals from the devices to the hub. The hub polls the extender every 12~300 seconds (by default: 36 seconds) while the alarms are communicated within 0.3 seconds.
The number of connected ReX Jeweller
Depending on the hub model, the following number of range extenders can be connected to the hub:
| Hub (2G) Jeweller | 1 ReX Jeweller |
| Hub (4G) Jeweller | 1 ReX Jeweller |
| Hub Plus Jeweller | up to 5 ReX Jeweller |
| Hub 2 (2G) Jeweller | up to 5 ReX Jeweller |
| Hub 2 (4G)* Jeweller | up to 5 ReX Jeweller |
| Hub 2 Plus* Jeweller | up to 5 ReX Jeweller |
| Hub BP Jeweller / Hub BP Jeweller (without casing) | up to 5 ReX Jeweller |
| Superior Hub G3 Jeweller | up to 5 ReX Jeweller |
| Superior Hub Hybrid (2G) / Superior Hub Hybrid (4G) / Superior Hub Hybrid (4G) (without casing) | up to 5 ReX Jeweller |
| Superior Hub Hybrid 2 / Superior Hub Hybrid 2 (without casing) | up to 5 ReX Jeweller |
Connecting multiple ReX Jeweller to the hub is supported by devices with OS Malevich 2.8 and later. At the same time, ReX Jeweller can only be connected directly to the hub and connecting one range extender to another is not supported.
ReX Jeweller does not increase the number of devices connected to the hub!
* Certified according to UL/ULC standards.
Connection of ReX Jeweller to the hub
The hub and the device operating at different radio frequencies are incompatible. The radio-frequency range of the device may vary by region. We recommend purchasing and using Ajax devices in the same region. You can check the range of operating radio frequencies with the technical support service.
Before adding a device
- Install the Ajax app or Ajax PRO.
- Log in to an account or create a new one.
- Select a space or create a new one.

The space functionality is available for apps of such versions or later:
- Ajax Security System 3.0 for iOS;
- Ajax Security System 3.0 for Android;
- Ajax PRO: Tool for Engineers 2.0 for iOS;
- Ajax PRO: Tool for Engineers 2.0 for Android;
- Ajax PRO Desktop 4.0 for macOS;
- Ajax PRO Desktop 4.0 for Windows.
- Add at least one virtual room.
- Add a compatible hub to the space. Ensure the hub is switched on and has internet access via Ethernet, Wi-Fi, and/or mobile network.
Only Hub 2 Plus Jeweller and Hub 2 (4G) Jeweller are certified according to UL/ULC standards.
- Ensure the space is disarmed, and the hub is not starting an update by checking statuses in the Ajax app.
Only users with administrator rights can add a device to the hub.
Connecting ReX Jeweller to the hub
- Click Add Device in the Ajax application.
- Name the extender, scan or manually enter the QR-code (located on the lid and package), and select the room where the device is located.

- Click Add — the countdown begins.
- Turn on ReX Jeweller by pressing the power button for 3 seconds — shortly after connecting to the hub the logo will change its color from red to white within 30 seconds after ReX Jeweller is switched on.

In order for detection and interfacing to occur, ReX Jeweller must be located within radio communication range of the hub (on the same guarded facility).
The request to connect to the hub is transmitted only when the device is enabled. If the connection to the hub fails, turn off the extender by pressing the power button for 3 seconds and retry the connection procedure after 5 seconds.
The extender connected to the hub will appear in the list of hub devices in the application. The updating of device statuses in the list depends on the polling time set in the hub settings; the default value is 36 seconds.
Choosing devices for operation via ReX Jeweller
In order to assign a device to the extender
- Go to the ReX Jeweller settings (Devices → ReX Jeweller → Settings
 ).
). - Press Pair with device.
- Choose the devices that should operate via the extender. You can search by model name, device name, or ID, or filter by room or group.
- Go back to the ReX Jeweller settings menu.
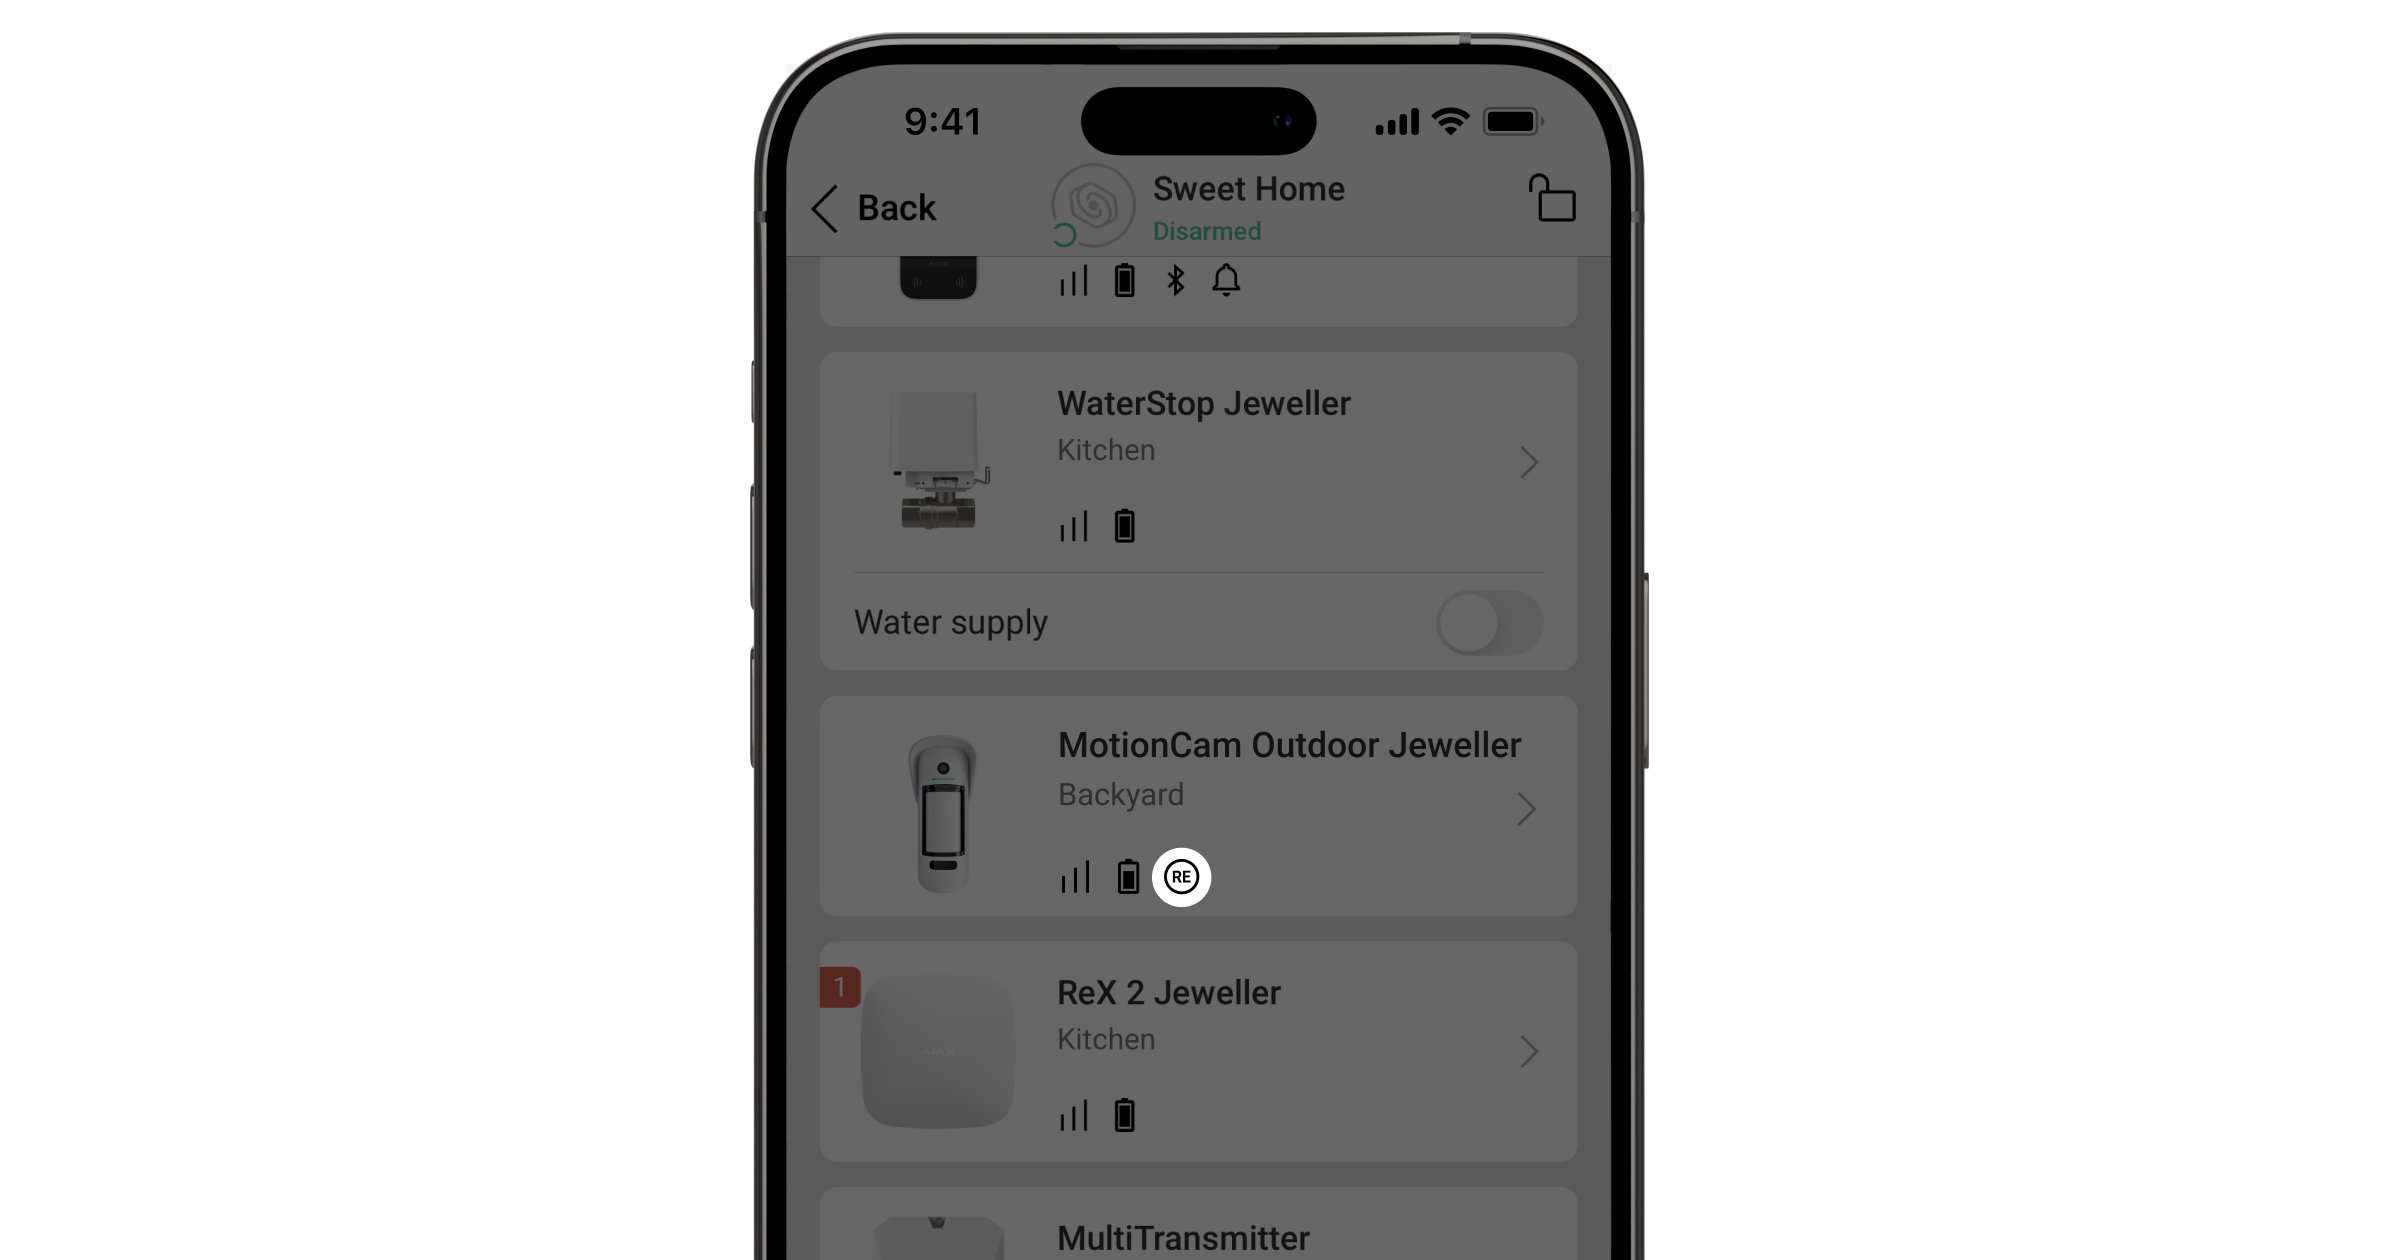
Once the connection is established, the selected devices will be marked with the ![]() icon in the mobile application.
icon in the mobile application.
ReX Jeweller does not support pairing with MotionCam motion detector with visual alarm verification since the latter uses additional Wings radio protocol.
A device can only be paired with one ReX Jeweller. When a device is assigned to a range extender it is automatically disconnected from another connected range extender.
In order to assign a device to the hub
- Go to the ReX Jeweller settings (Devices → ReX Jeweller → Settings ).
- Press Pair with device.
- Uncheck the devices that need to be connected to the hub directly.
- Go back to the ReX Jeweller settings menu.
ReX Jeweller states
- Devices

- ReX Jeweller
| Parameter | Value |
| Data import | Displays the error when transferring data to the new hub:
|
| Some functions do not work |
The field is displayed if the firmware versions of the hub and ReX Jeweller range extender do not match. ReX Jeweller updates within half an hour if the system is disarmed. To update the firmware, it is important to have a stable:
|
| Jeweller Signal Strength | Signal strength between the hub and ReX Jeweller |
| Connection | Connection status between the hub and the extender |
| Transmitter power |
Displays the selected power of the transmitter. The parameter appears when the Max or Attenuation option is selected in the Signal attenuation test menu. |
| Battery Charge |
Battery level of the device. Displayed as a percentage |
| Lid | Tamper mode that reacts to an attempt to detach or violate the integrity of the extender body |
| External power | Availability of external power |
| Radio transmitter power | The field is displayed if the Attenuation Test is enabled.
|
| Permanent Deactivation | Shows the status of the device: active, completely disabled by the user, or only notifications about triggering of the device tamper button are disabled |
| Firmware | ReX Jeweller firmware version |
| Device ID | Identifier of the device |
ReX Jeweller settings
- Devices
- ReX Jeweller
- Settings
| Item | Value |
| Name | Device name, can be edited |
| Room | Selection of a virtual room that the device is assigned to |
| Charging mode |
This setting is only available in Ajax PRO apps. Available for ReX Jeweller operating with hubs with OS Malevich 2.24 or higher. This setting defines how fast the device’s built-in battery charges from an external source. Two options are available:
|
| LED Brightness | Adjusts the brightness of the logo light |
| Pair with device | Assignment of devices for the extender |
| Jeweller Signal Strength Test | Signal strength test between the extender and the hub |
| Signal Attenuation Test |
Switches the device to the signal attenuation test mode. During the test, the power of the radio transmitter is reduced or increased to simulate a change in the situation at the object and check the stability of communication between the detector and the hub (or the radio signal range extender). |
| Permanent Deactivation |
Allows the user to disconnect the device without removing it from the system. Three options are available:
Learn more about permanent deactivation of devices Note that the system will ignore only the disabled device. Devices connected via ReX Jeweller will continue operating normally |
| User Guide | Opening ReX Jeweller User Manual |
| Unpair device | Disconnecting the extender from the hub and deleting its settings |
Malfunctions
ReX Jeweller can notify about malfunctions, if any. Malfunctions field is available in Device States. Clicking on ![]() opens the list of all malfunctions. The field is displayed if a malfunction is detected.
opens the list of all malfunctions. The field is displayed if a malfunction is detected.
| Malfunction | Description | Solution |
| Some functions do not work. | The field is displayed if the firmware versions of the hub and ReX Jeweller range extender do not match. | Make sure that automatic updates are enabled in the hub settings. ReX Jeweller updates within half an hour if the system is disarmed and a new firmware version is available on the server. |
Indication
The ReX Jeweller LED indicator may light red or white depending on the state of the device.
| Event | State of logo with LED indicator |
| Device is connected to the hub | Constantly lights white |
| Device lost connection with the hub | Constantly lights red |
| No external power | Blinks every 10 seconds |
Functionality testing
The functionality testing of the associated to ReX Jeweller devices will be added to the next updates of OS Malevich.
The Ajax system allows conducting tests for checking the functionality of connected devices.
The tests do not start straight away but within a period of 36 seconds when using the standard settings. The test time start depends on the settings of the detector scanning period (the paragraph on “Jeweller” in hub settings).
You can test the Jeweller signal strength between the range extender and the hub, as well as between the range extender and the device connected to it.
To check the Jeweller signal strength between the range extender and the hub, go to the ReX Jeweller settings and select Jeweller Signal Strength Test.
To check the Jeweller signal strength between the range extender and device, go to the settings of the device connected to ReX Jeweller, and select Jeweller Signal Strength Test.
Device installation
Selection of the installation site
The location of ReX Jeweller determines its distance from the hub, the devices connected to the extender, and the presence of obstacles preventing the passage of the radio signal: walls, interfloor bridgings, and large objects located in the facility.
The device developed only for indoor use.
Check the signal strength at the installation site!
If the signal strength reaches just one bar on the indicator, the stable operation of the security system can not be guaranteed. Take whatever action is necessary to improve the quality of the signal! At the very least, move ReX Jeweller or hub — relocation even by 20 cm can significantly improve the reception quality.
Installation procedure
Before installing ReX Jeweller, be sure to choose the best location that meets the requirements of this guide! It is desirable for the extender to be hidden from direct view.
During mounting and operating, follow the general electrical safety rules when using electrical appliances as well as the requirements of electrical safety laws and regulations.
Device mounting
- Fix the SmartBracket attachment panel with the bundled screws. If you choose to use other fasteners, make sure that they do not damage or deform the panel.

It is not recommended to use double-sided adhesive tape for installation. This can result in ReX Jeweller falling that can lead to malfunctioning of the device.
- Slide ReX Jeweller onto the attachment panel. After installation, check the tamper status in the Ajax application and then the panel tightness.
- In order to ensure higher reliability, fix ReX Jeweller to the SmartBracket panel with the bundled screws.

Do not flip the range extender when attaching vertically (for instance, on a wall). When properly fixed, the Ajax logo can be read horizontally.
You will receive a notification if an attempt to detach the extender from the surface or remove it from the attachment panel is detected.
It is strictly forbidden to disassemble the device connected to the power supply! Do not use the device with a damaged power cable. Do not disassemble or modify ReX Jeweller or its individual parts — this may interfere with the normal operation of the device or lead to its failure.
Don’t place ReX Jeweller:
- Outside the room (outdoors).
- Near metal objects and mirrors that cause attenuation or screening of radio signals.
- In rooms characterized by humidity and temperature levels beyond the permissible limits.
- Close to radio interference sources: less than 1 meter from the router and power cables.
Maintenance of the device
Check the functionality of the Ajax system regularly.
Clean the body from dust, cobwebs, and other contaminants as they emerge. Use soft dry napkin suitable for equipment maintenance.
Do not use substances that contain alcohol, acetone, gasoline or other active solvents to clean the extender.
Technical specifications
Warranty
Warranty for the Limited Liability Company “Ajax Systems Manufacturing” products is valid for 2 years after the purchase and does not apply to the pre-installed accumulator.
If the device does not work correctly, contact the support service first — technical issues can be resolved remotely in half of the cases!
Contact Technical Support:
