An Ajax system controlled by the hub with OS Malevich 2.21 or higher can be configured following the requirements of ANSI/SIA CP-01-2019 (hereinafter referred to as SIA CP-01). This standard introduces measures to improve security systems’ reliability and prevent false alarms.
The SIA CP-01 complied features are configured only in PRO apps of such versions or higher:
- Ajax PRO Desktop 4.2 for macOS;
- Ajax PRO Desktop 4.2 for Windows;
- Ajax PRO: Tool for Engineers 2.2 for iOS;
- Ajax PRO: Tool for Engineers 2.2 for Android.
Follow these instructions to configure the system correctly.
Hub settings
To set up the SIA CP-01 compliant system, you need to enable the SIA CP-01 mode in the hub settings.
- Hub Plus Jeweller
- Hub 2 (2G) Jeweller
- Hub 2 (4G) Jeweller (certified according to SIA CP-01)
- Hub 2 Plus Jeweller (certified according to SIA CP-01)
- Superior Hub Hybrid (2G)
- Superior Hub Hybrid (4G)
- In the Ajax PRO app, select the required space and go to:
- Hub → Settings
 → Service → Arming/Disarming Process
- Hub → Settings
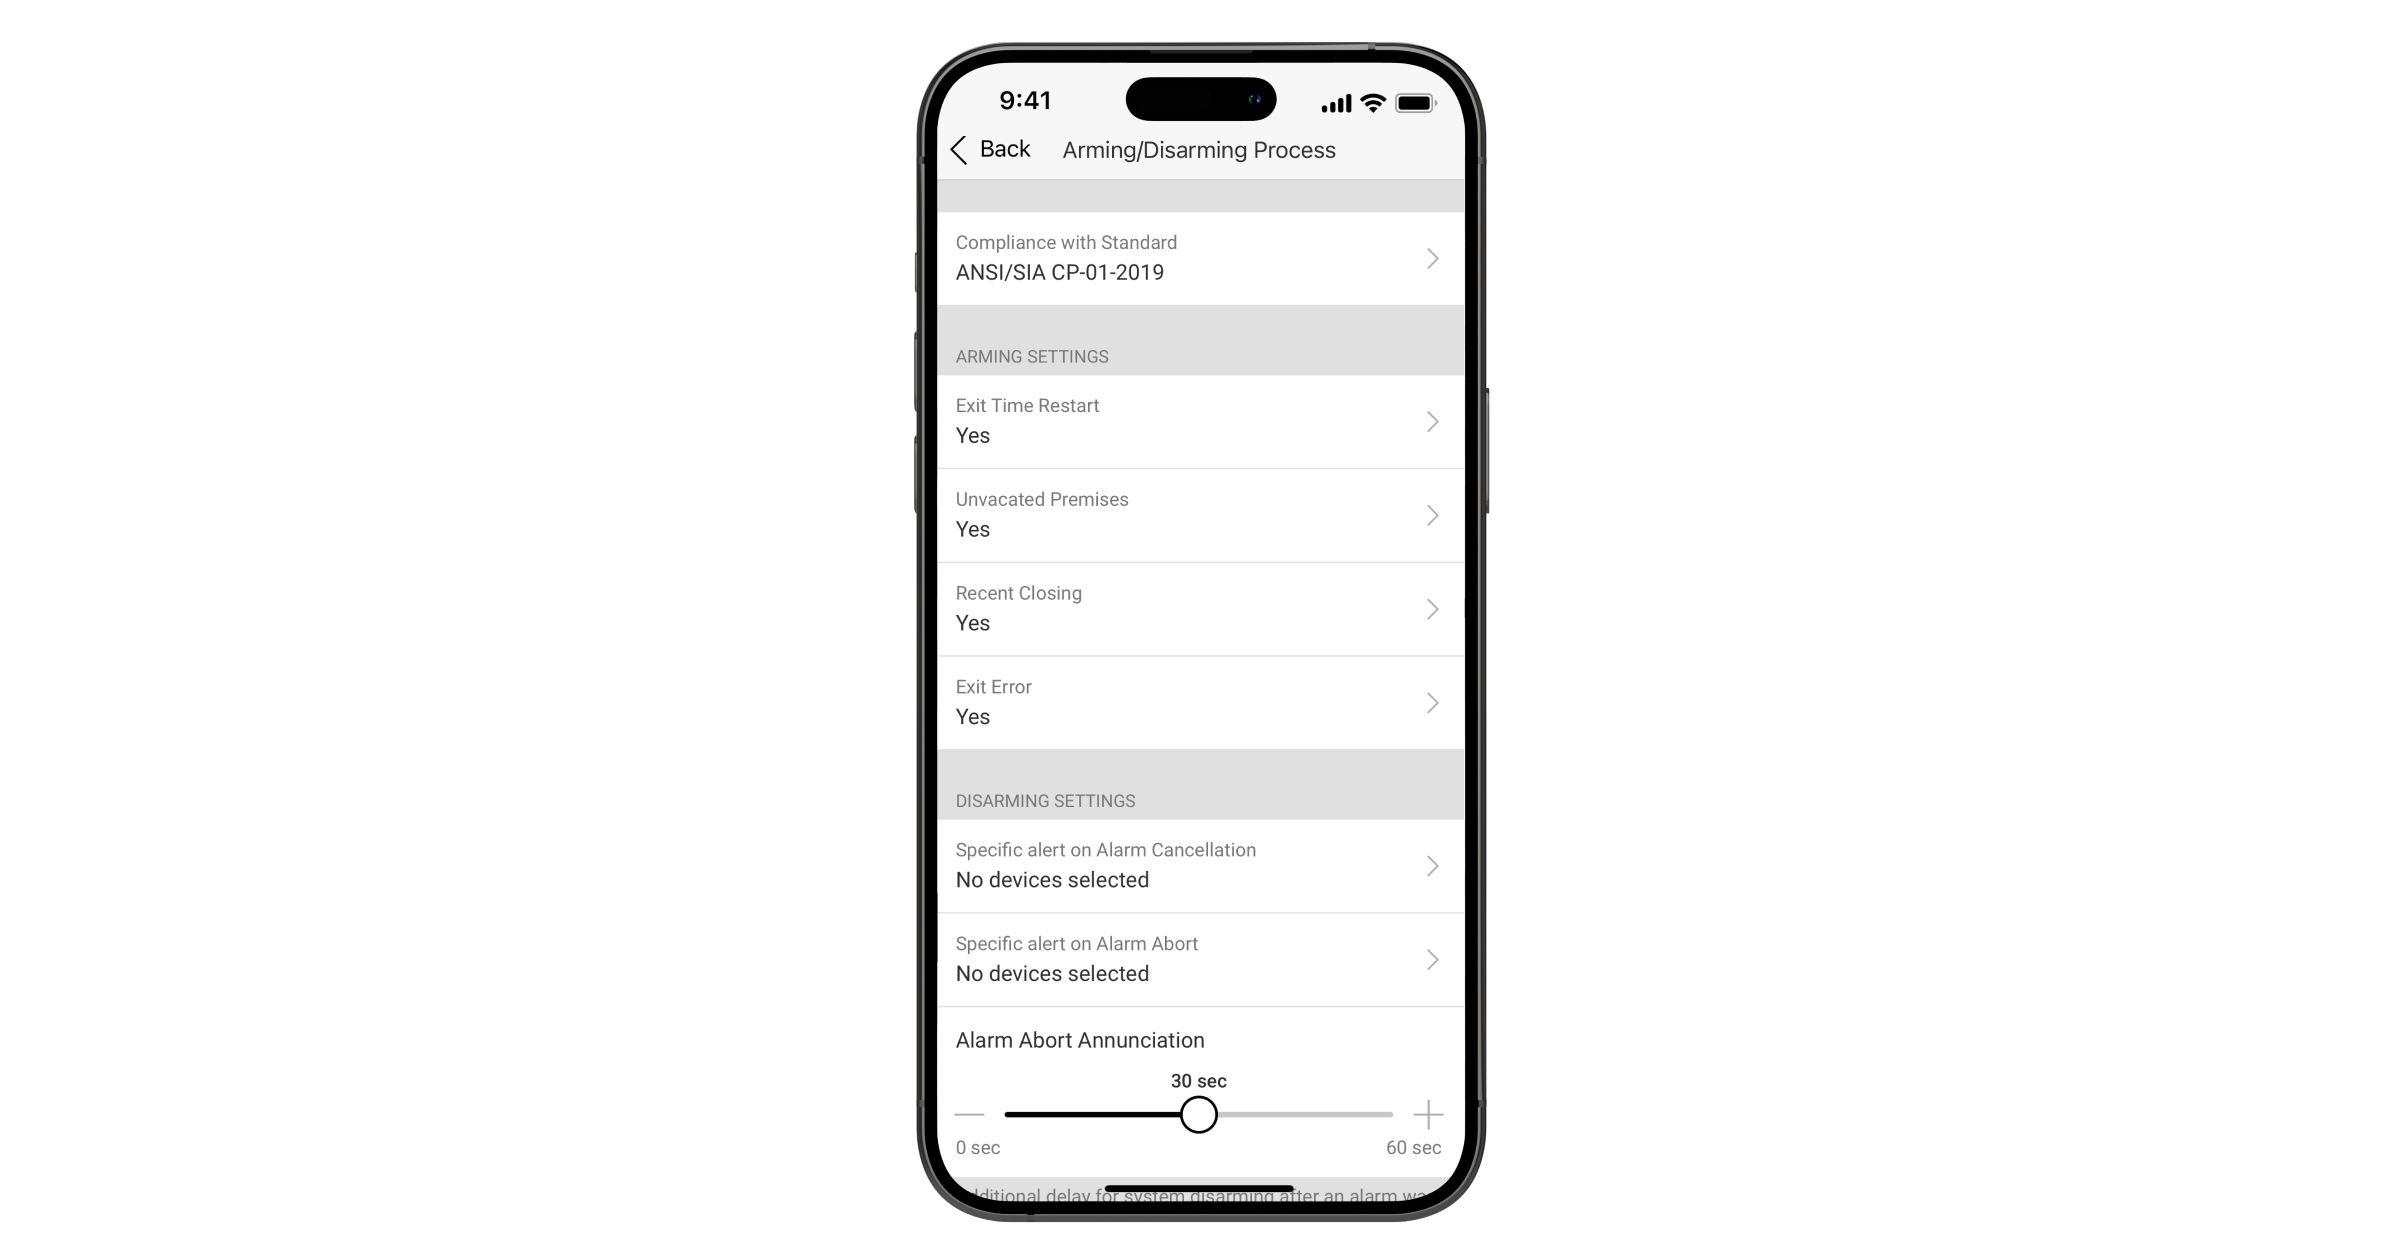
- Go to the Compliance with Standard setting.
- Select ANSI/SIA CP-01-2019.
- Click Save to enable the SIA CP-01 mode.
Once the SIA CP-01 mode is enabled, you can configure the SIA CP-01 related settings, such as Exit Time Restart and Unvacated Premises. Also, it is possible to select what devices should make an annunciation on Alarm Cancellation or Alarm Abort and adjust the Alarm Abort Window timeout. Refer to the following sections to set up and configure the mentioned settings.
Exit Time Restart
The Exit Time Restart feature is intended to start Delay When Leaving again if the user opens the exit door twice before the exit time expires. This feature reduces the number of false alarms during an exit procedure when the user arms the system, leaves the premises, and returns to the premises.
The Exit Time Restart feature is enabled by default; however, you can adjust it if necessary.
Unvacated Premises
The Unvacated Premises feature checks whether the exit door was open during the exit delay. If not, the system automatically switches to Night Mode after Delay When Leaving expires. This feature reduces the number of false alarms if the user arms the system and does not leave the premises.
The Unvacated Premises feature is enabled by default; however, you can adjust it if necessary.
Entry/Exit devices
To comply with SIA CP-01, the Delay When Entering/Leaving time ranges should be set up for all Entry/Exit devices.
Delay When Leaving
SIA CP-01 requires setting up the Delay When Leaving time within a range from 45 to 255 seconds. Once the SIA CP-01 mode is enabled, the system will set 60 seconds for Delay When Leaving by default for all Entry/Exit devices.
You can adjust the Delay When Leaving setting if necessary.
Delay When Entering
SIA CP-01 requires setting up the Delay When Entering time within a range from 30 to 255 seconds. Once the SIA CP-01 mode is enabled, the system will set 30 seconds for Delay When Entering by default for all Entry/Exit devices.
You can adjust the Delay When Entering setting if necessary.
Progress annunciation
To comply with SIA CP-01, various progress annunciation beeps by sirens should be possible to set up for Entry/Exit Delays. There is the usual beep on delay, the fast beep on delay expiration, and the ability to mute beep while you are entering a passcode on the keypad.
Progress annunciation features are available for the following sirens:
- Superior HomeSiren Jeweller and HomeSiren Jeweller with firmware versions from 5.60.4 to 6.0.0.0 and from 6.56.3.37 or higher.
- StreetSiren Jeweller, Superior StreetSiren DoubleDeck Jeweller, and StreetSiren DoubleDeck Jeweller with firmware versions from 5.60.5 to 6.0.0.0 and from 6.56.1.57 or higher.
The Superior HomeSiren Jeweller and Superior StreetSiren DoubleDeck Jeweller sirens are not certified according to SIA CP-01.
Beep on Delays
An Ajax system allows you to configure beep on Entry/Exit Delays announced by Ajax sirens. This feature is configured in the sirens’ settings:
- Superior HomeSiren Jeweller
- HomeSiren Jeweller
- StreetSiren Jeweller
- Superior StreetSiren DoubleDeck Jeweller
- StreetSiren DoubleDeck Jeweller
Fast beep on Entry/Exit Delay expiration
The Fast beep on Entry/Exit Delay expiration feature is intended to notify the user that the Delay When Entering/Leaving time is running out. There are 4 options to choose from when the fast beep should start:
- Never
- Last 5 seconds
- Last 10 seconds (SIA CP-01 recommended)
- Last 15 seconds
Mute the device when code on keypad is being entered
The Mute the device when code on keypad is being entered feature mutes the annunciation beeps once the user starts entering a passcode on the keypad. This feature allows users to focus on the system disarming.
You can enable the Mute the device when code on keypad is being entered feature in the siren settings.
Keypad settings
An Ajax system provides two functions that decrease the number of actions while disarming the system. These functions provide keypad auto waking and allow disarming the system by entering a passcode without pressing any additional keys.
KeyPad Plus Jeweller with firmware version 5.60.7 or higher is compatible with the SIA CP-01 requirements.
Easy Armed Mode Change
The Disarm without disarming button feature allows disarming the system without pressing the ![]() Disarm button on the keypad after entering a passcode or using an access device.
Disarm button on the keypad after entering a passcode or using an access device.
A fixed passcode length should be set for the system in the hub settings using the Ajax PRO app.
To set up Easy Armed Mode Change in the Ajax PRO app:
- Select the required space.
- Go to the Devices
 tab.
tab. - Select the required keypad and go to:
- Settings → Easy Armed Mode Change
- Settings
- Select the Disarm without disarming button option.
- Click Back to apply the changes.
Auto-wake on Delay when Entering
The Auto-wake on Delay when Entering feature allows automatically activating KeyPad Plus Jeweller when Delay When Entering is set up.
The combination of the Easy Armed Mode Change and Auto-wake on Delay when Entering features allow users to disarm the system by a smooth single-step procedure without experiencing false alarms. Just open an entry door and enter a passcode or use an access device without additional actions. The system will be disarmed after entering the valid passcode.
Manual alarms
DoubleButton Jeweller, Superior Button Jeweller, Button Jeweller, Ajax SpaceControl Jeweller could be used to generate manual alarms.
DoubleButton Jeweller has two separate physical buttons that should be pressed simultaneously to generate a hold-up alarm.
Superior Button Jeweller, Button Jeweller, and Ajax SpaceControl Jeweller have the Accidental Press Protection option:
To make Superior Button Jeweller, Button Jeweller, and Ajax SpaceControl compliant with SIA CP-01 to generate panic alarms, select the Double press option for Accidental Press Protection in the device settings in the Ajax app:
- Go to the Devices tab.
- Select the required button or Ajax SpaceControl and go to:
- Settings → Accidental Press Protection
- Settings
- Select the Double press option.
- Click Back to apply the changes.
System acknowledgment
All remote devices, such as DoubleButton Jeweller, Superior Button Jeweller, Button Jeweller, and Ajax SpaceControl Jeweller, as well as Ajax mobile apps, show the system acknowledgment on all actions made on the remote device.
- Ajax apps show clear and understandable statuses on each action (e.g., arming/disarming).
- Ajax SpaceControl and buttons:
- blink green once if the command is delivered to the hub;
- blink green a second time if the acknowledgment from the hub is positive;
- blink red if the acknowledgment from the hub is negative.
Alarm Abort Window
The Alarm Abort Window feature is intended to reduce the number of false alarms during the entry procedure.
If the user didn’t disarm the system during Delay When Entering or a non-entry device was triggered, the system will initiate a local alarm and start the Alarm Abort Window timer.
If the user disarms the system until the Alarm Abort Window time expires, alarms will not be sent to apps and the CMS. The system will announce via sirens that the alarm was aborted by a long beep after a disarming audio indication.
During the Alarm Abort Window time, the user can disarm the system using Easy Armed Mode Change.
If the user doesn’t disarm the system until the Alarm Abort Window time expires, alarms will be sent to apps and the CMS.
To adjust the Alarm Abort Window time in the Ajax PRO app:
- Select the required space and go to:
- Hub → Settings → Service → Arming/Disarming Process
- Hub → Settings
- Adjust the Alarm Abort Window time.
- Click Back to apply the changes.
The combination of the Delay When Entering and Alarm Abort Window time ranges should not exceed 1 minute according to the SIA CP-01 requirements.
Disarming
If the user disarms the system after the Alarm Abort Window time expiration, the system will show which device was triggered and when in the app’s notification log.
If the user disarms the system within 5 minutes after the Alarm Abort Window time expiration, the system will send the Alarm Cancellation to the CMS. Also, the system will announce via sirens that the alarm was cancelled by two long beeps after a disarming audio indication.
Duress code
An Ajax system has a feature that allows simulating system disarming with the duress code. In this case, a user won’t be given away by the Ajax app and sirens installed at the facility, and the security company and other security system users will be warned about the incident.
The duress code is not set up by default. To create the duress code in the Ajax app:
- Go to the Devices tab.
- Select the required keypad and go to:
- Settings → Duress Code
- Settings
- Create a duress code.
- Click Done to save the changes.
Cross zoning
An Ajax system has a feature that allows verifying alarms by the system itself using cross zoning. To verify the alarm, the system should detect multiple triggerings from a particular device or devices used in a cross zone within the intrusion confirmation time.
If a device involved in intrusion alarm confirmation is triggered when the system is armed, the system starts the Intrusion confirmation timer and reacts according to the configured Reaction to single alarm setting. If the required number of triggerings occurs in the same cross zone until the Intrusion confirmation timer expires, the system transmits a confirmation event to apps and the CMS.
Devices Auto Deactivation
To comply with SIA CP-01, the Devices Auto Deactivation option should be enabled. The number of alarms to deactivate should be 2 by default. The number can be adjusted from 0 to 6 according to standard requirements. Values more than 6 do not comply with SIA CP-01.
System testing
An Ajax system provides various tests to check the operability of different types of devices. You can perform Detection Zone, Jeweller Signal Strength, or siren Volume Level tests.
At the same time, an Ajax system continuously tests the connectivity with all detectors, Ajax Cloud, and CMSs.
System Integrity Check
System Integrity Check is a parameter responsible for checking the status of all security detectors and devices before arming.
To comply with SIA CP-01, the System Integrity Check option should be enabled.
When setting up, you can choose the hub states to be included in the integrity check:
- Battery charge level
- Power supply availability
- Lid state
- Noise level
- Server connection status
- Central monitoring station connection
When the System Integrity Check option is enabled, the statuses of other security devices (tampers, battery level, states of bistable detectors) are checked regardless of the selected hub states.
Minimum system configuration
- Control panel: Hub 2 Plus Jeweller (9NA), Hub 2 (4G) Jeweller (9NA).
- Progress annunciation device: StreetSiren Jeweller (9NA), StreetSiren DoubleDeck Jeweller (9NA), HomeSiren Jeweller (9NA).
- Off-premise transmission: via the control panel.
- Local alarm siren model: StreetSiren Jeweller (9NA), StreetSiren DoubleDeck Jeweller (9NA), HomeSiren Jeweller (9NA).
- Smoke detector: compatible, UL-certified.
- Arming device: KeyPad Plus Jeweller (9NA), Ajax SpaceControl Jeweller (9NA).
Consult your installer to determine if Alarm Abort Window is configured for your system. The Alarm Abort Window feature prevents reporting to the CMS if the control panel is disarmed within 30–45 seconds after an intrusion alarm is triggered. Note that fire-type alarms are normally reported without a delay.
Quick reference requirements
| Feature | Requirement | Requirement range | Recommended programming |
| Delay When Leaving | Required (programmable) option | For full or auto arming: 45–255 seconds |
60 seconds |
| Progress annunciation | Allowed option | Individual annunciator may be disabled | All annunciators enabled |
| Exit Time Restart | Required option | For re-entry during exit time | Enabled |
| Unvacated Premises | Required option (except for remote arming) | If no exit after full arming | Enabled |
| Delay When Entering | Required (programmable) option | 30 seconds — 4 minutes* | At least 30 seconds* |
| Alarm Abort Window | Required option | May be disabled — by zone or zone type | Enabled |
| Disarming (Alarm Abort Window) | Required (programmable) option | Up to 60 seconds* | At least 15 seconds* |
| Alarm Abort | Required option | Annunciate that no alarm was transmitted | Enabled |
| Alarm Cancellation | Required option | Annunciate that a Cancel was transmitted | Enabled |
| Duress Code | Allowed option | No automatic derivative of another user code No duplicates with other user codes |
Disabled |
| Cross zoning | Required option | Programming needed | Enabled, and two (or more) zones are programmed |
| Devices Auto Deactivation | Required (programmable) option | For all non-fire zones, shut down at 1 to 6 alarm triggerings | Two alarm triggerings |
| System testing | Required option | Cannot be enabled when the system is armed | Could be started/finished by the installer |
* The combination of the Delay When Entering and Alarm Abort Window time ranges should not exceed 1 minute.