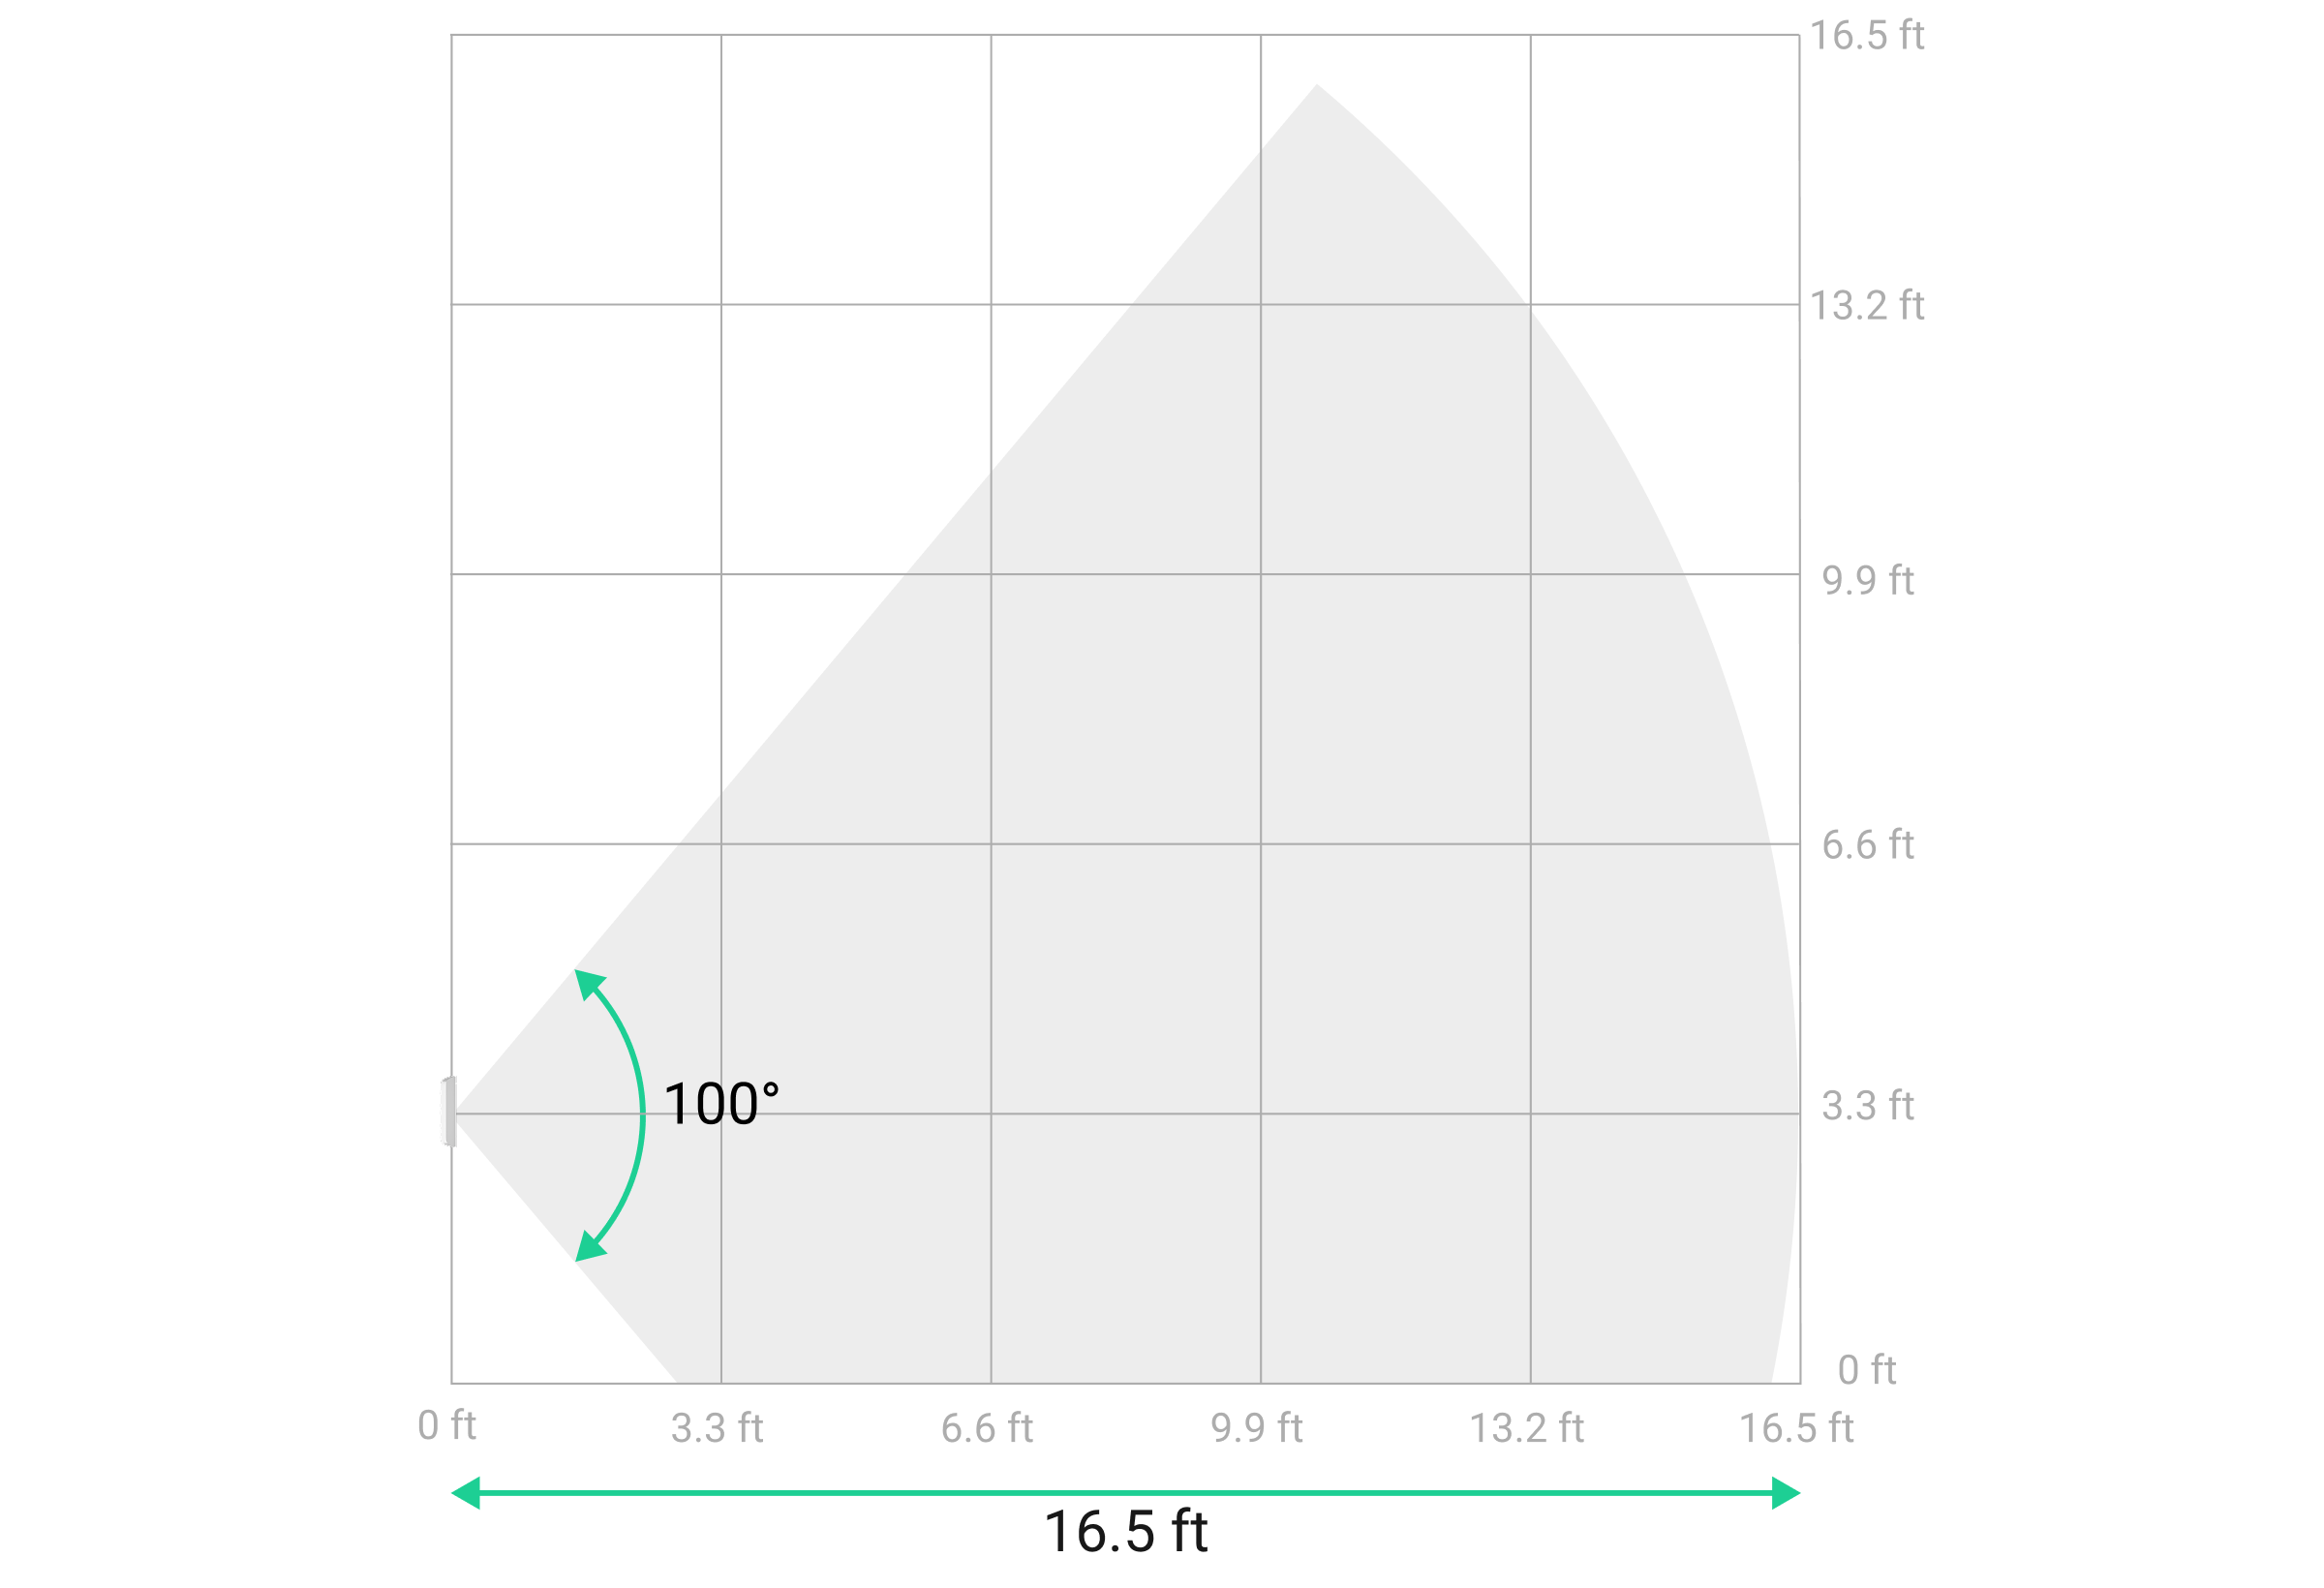
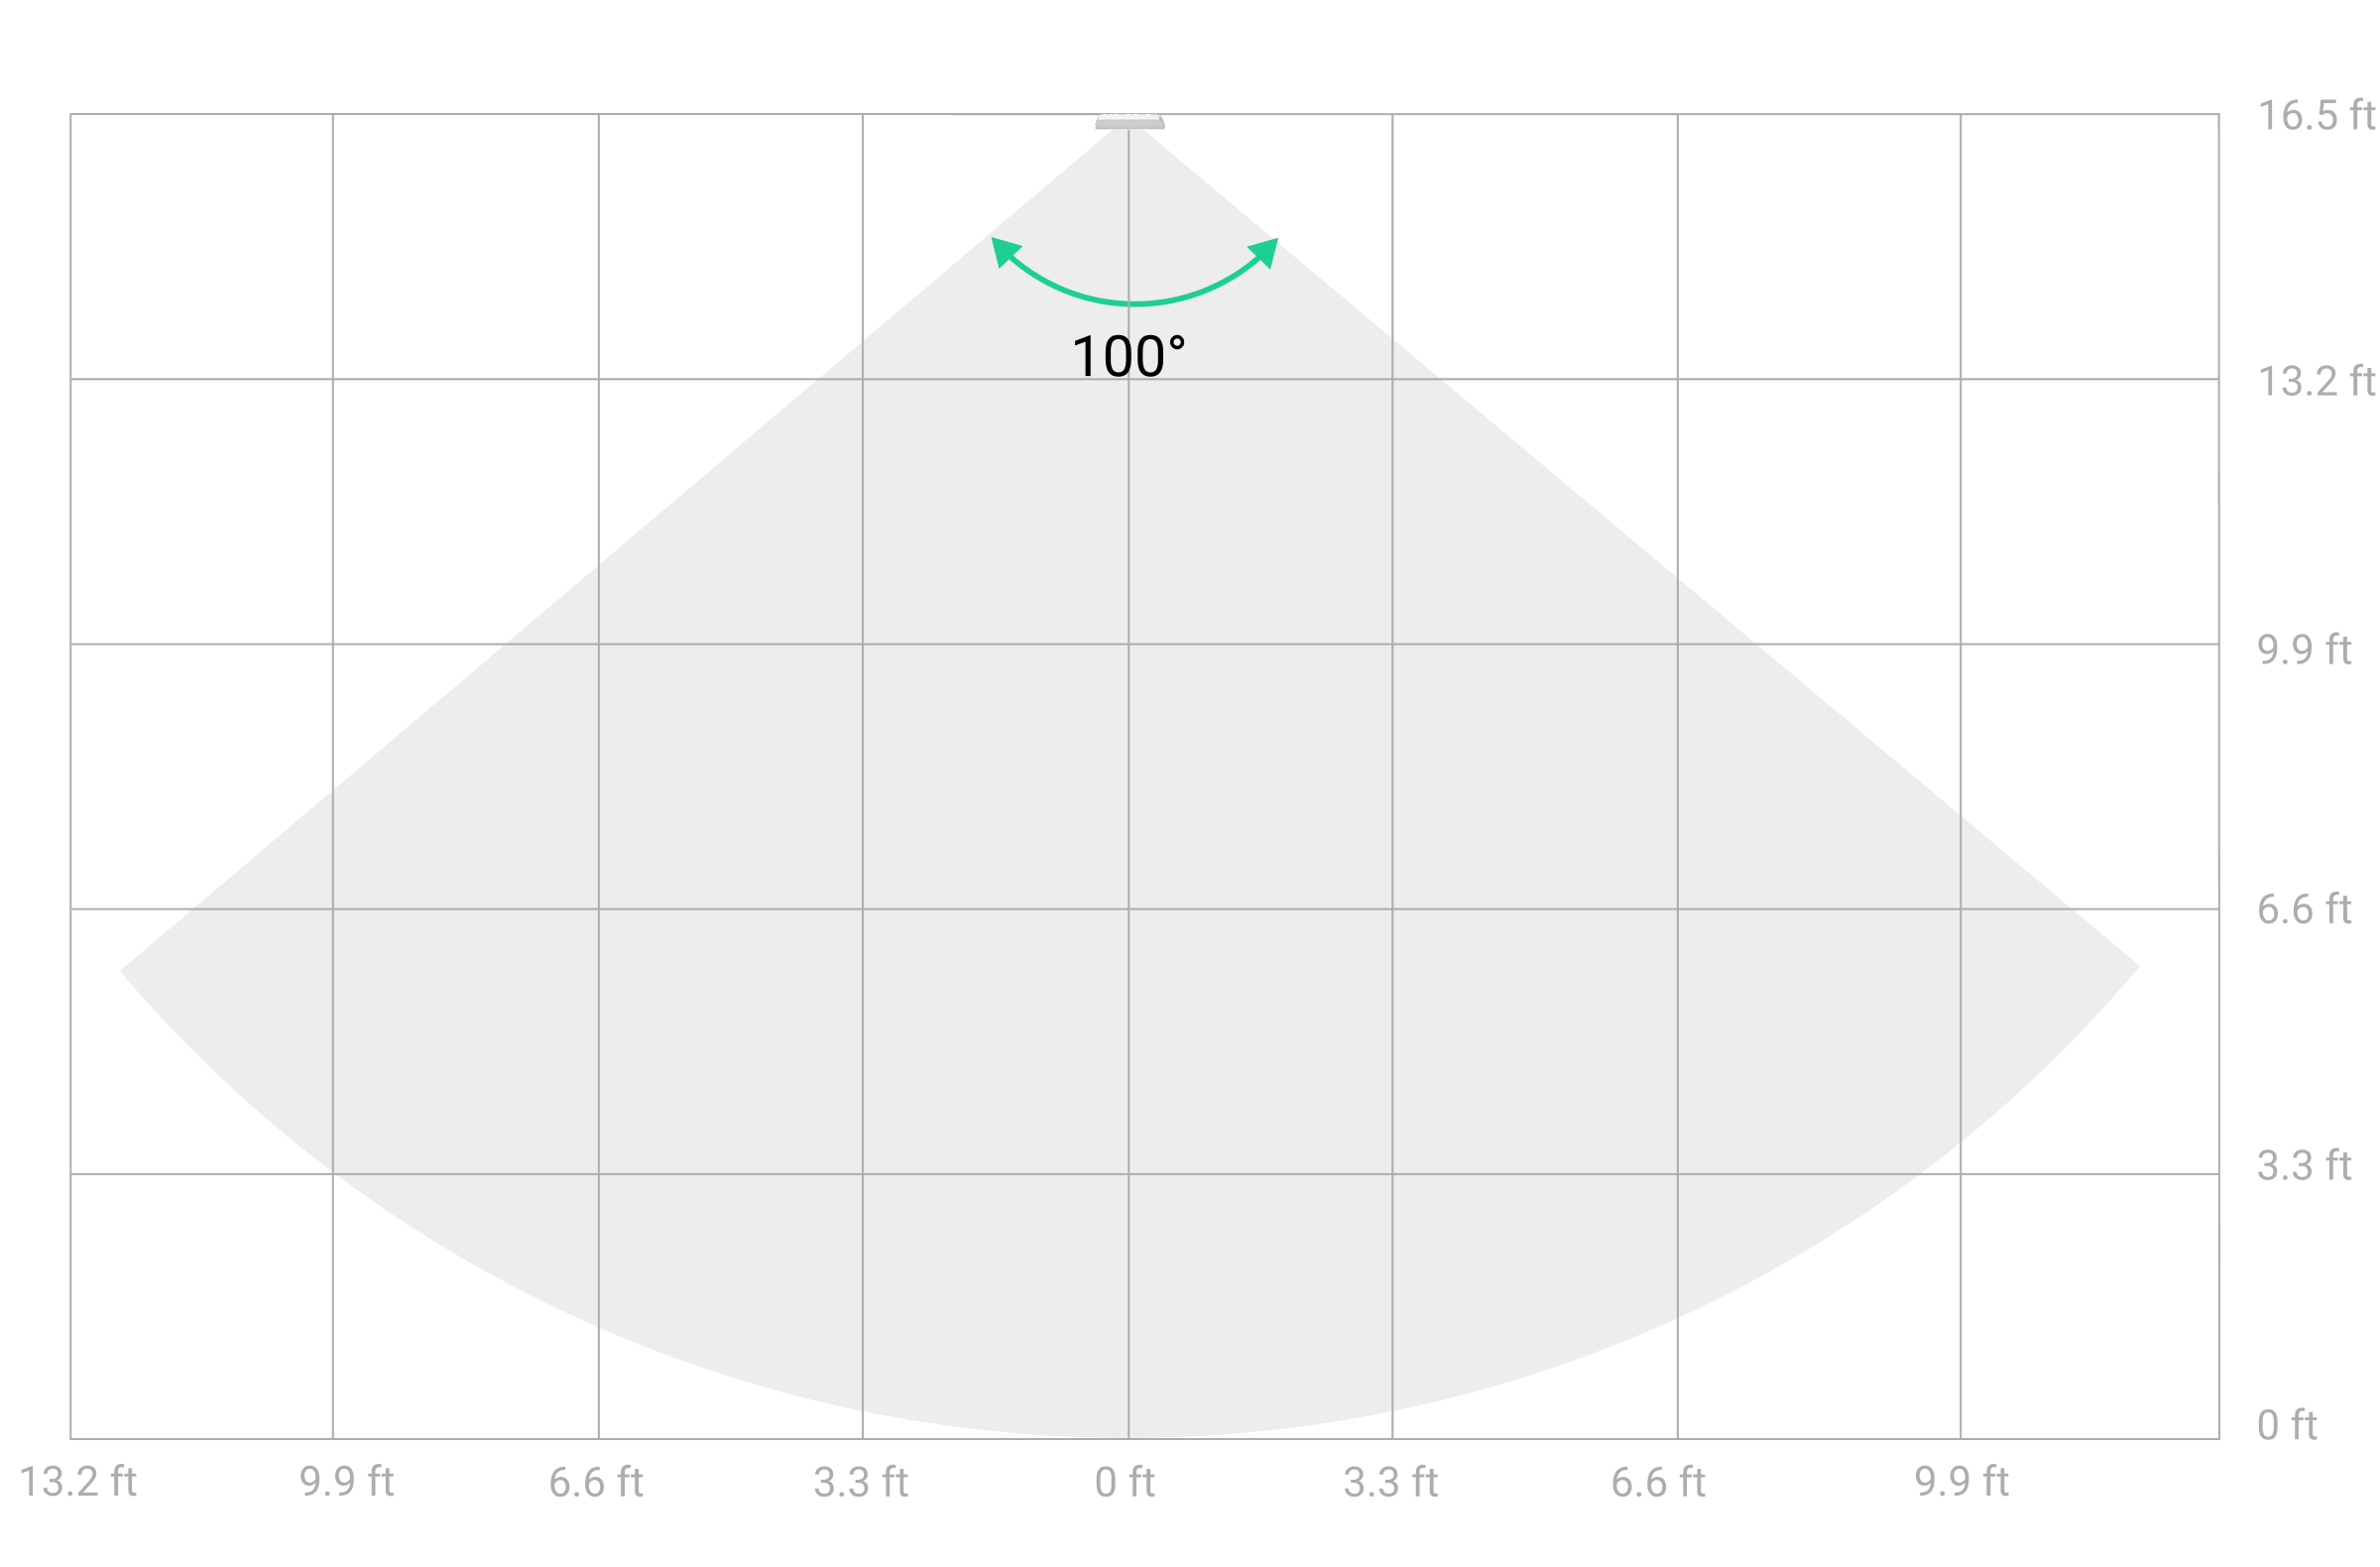
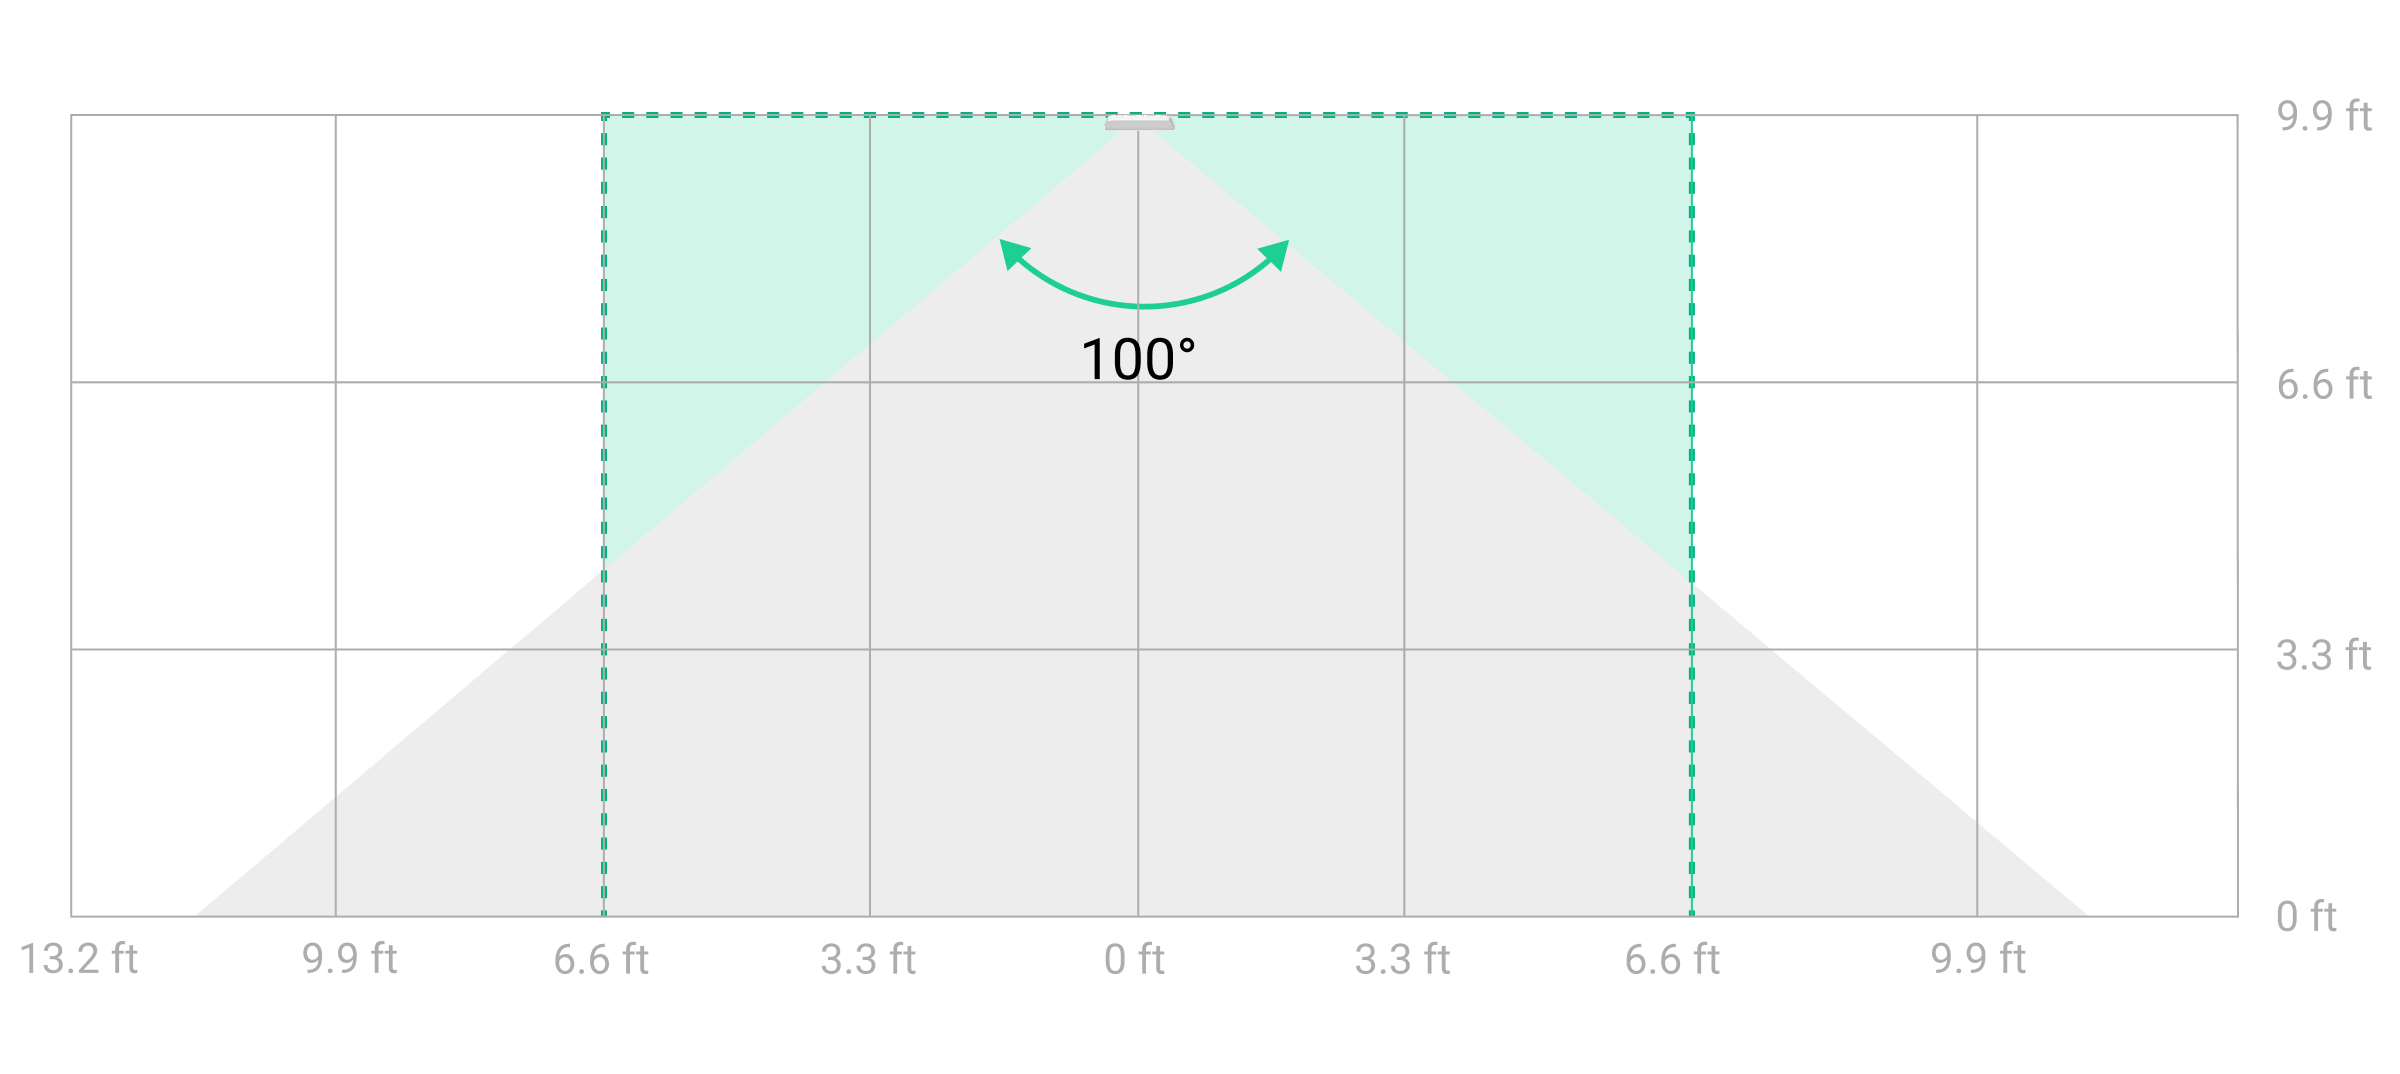
Curtain Outdoor Mini Jeweller is a wireless curtain-type motion detector with dual motion detection technology and an anti-masking system. The device is designed for outdoor and indoor use. It features a narrow horizontal detection angle of 15° and a wide vertical detection angle of 100°. This allows the detector to cover windows, doors, narrow pathways, and other entry points along the perimeter. The device detects motion at a distance of up to 16.4 ft.
Curtain Outdoor Mini Jeweller communicates with the hub using two secure protocols. The detector uses Jeweller to transmit alarms and events and Wings to update the firmware. The communication range in an open space is up to 5,550 ft. Pre-installed batteries ensure up to 3 years of autonomous operation.
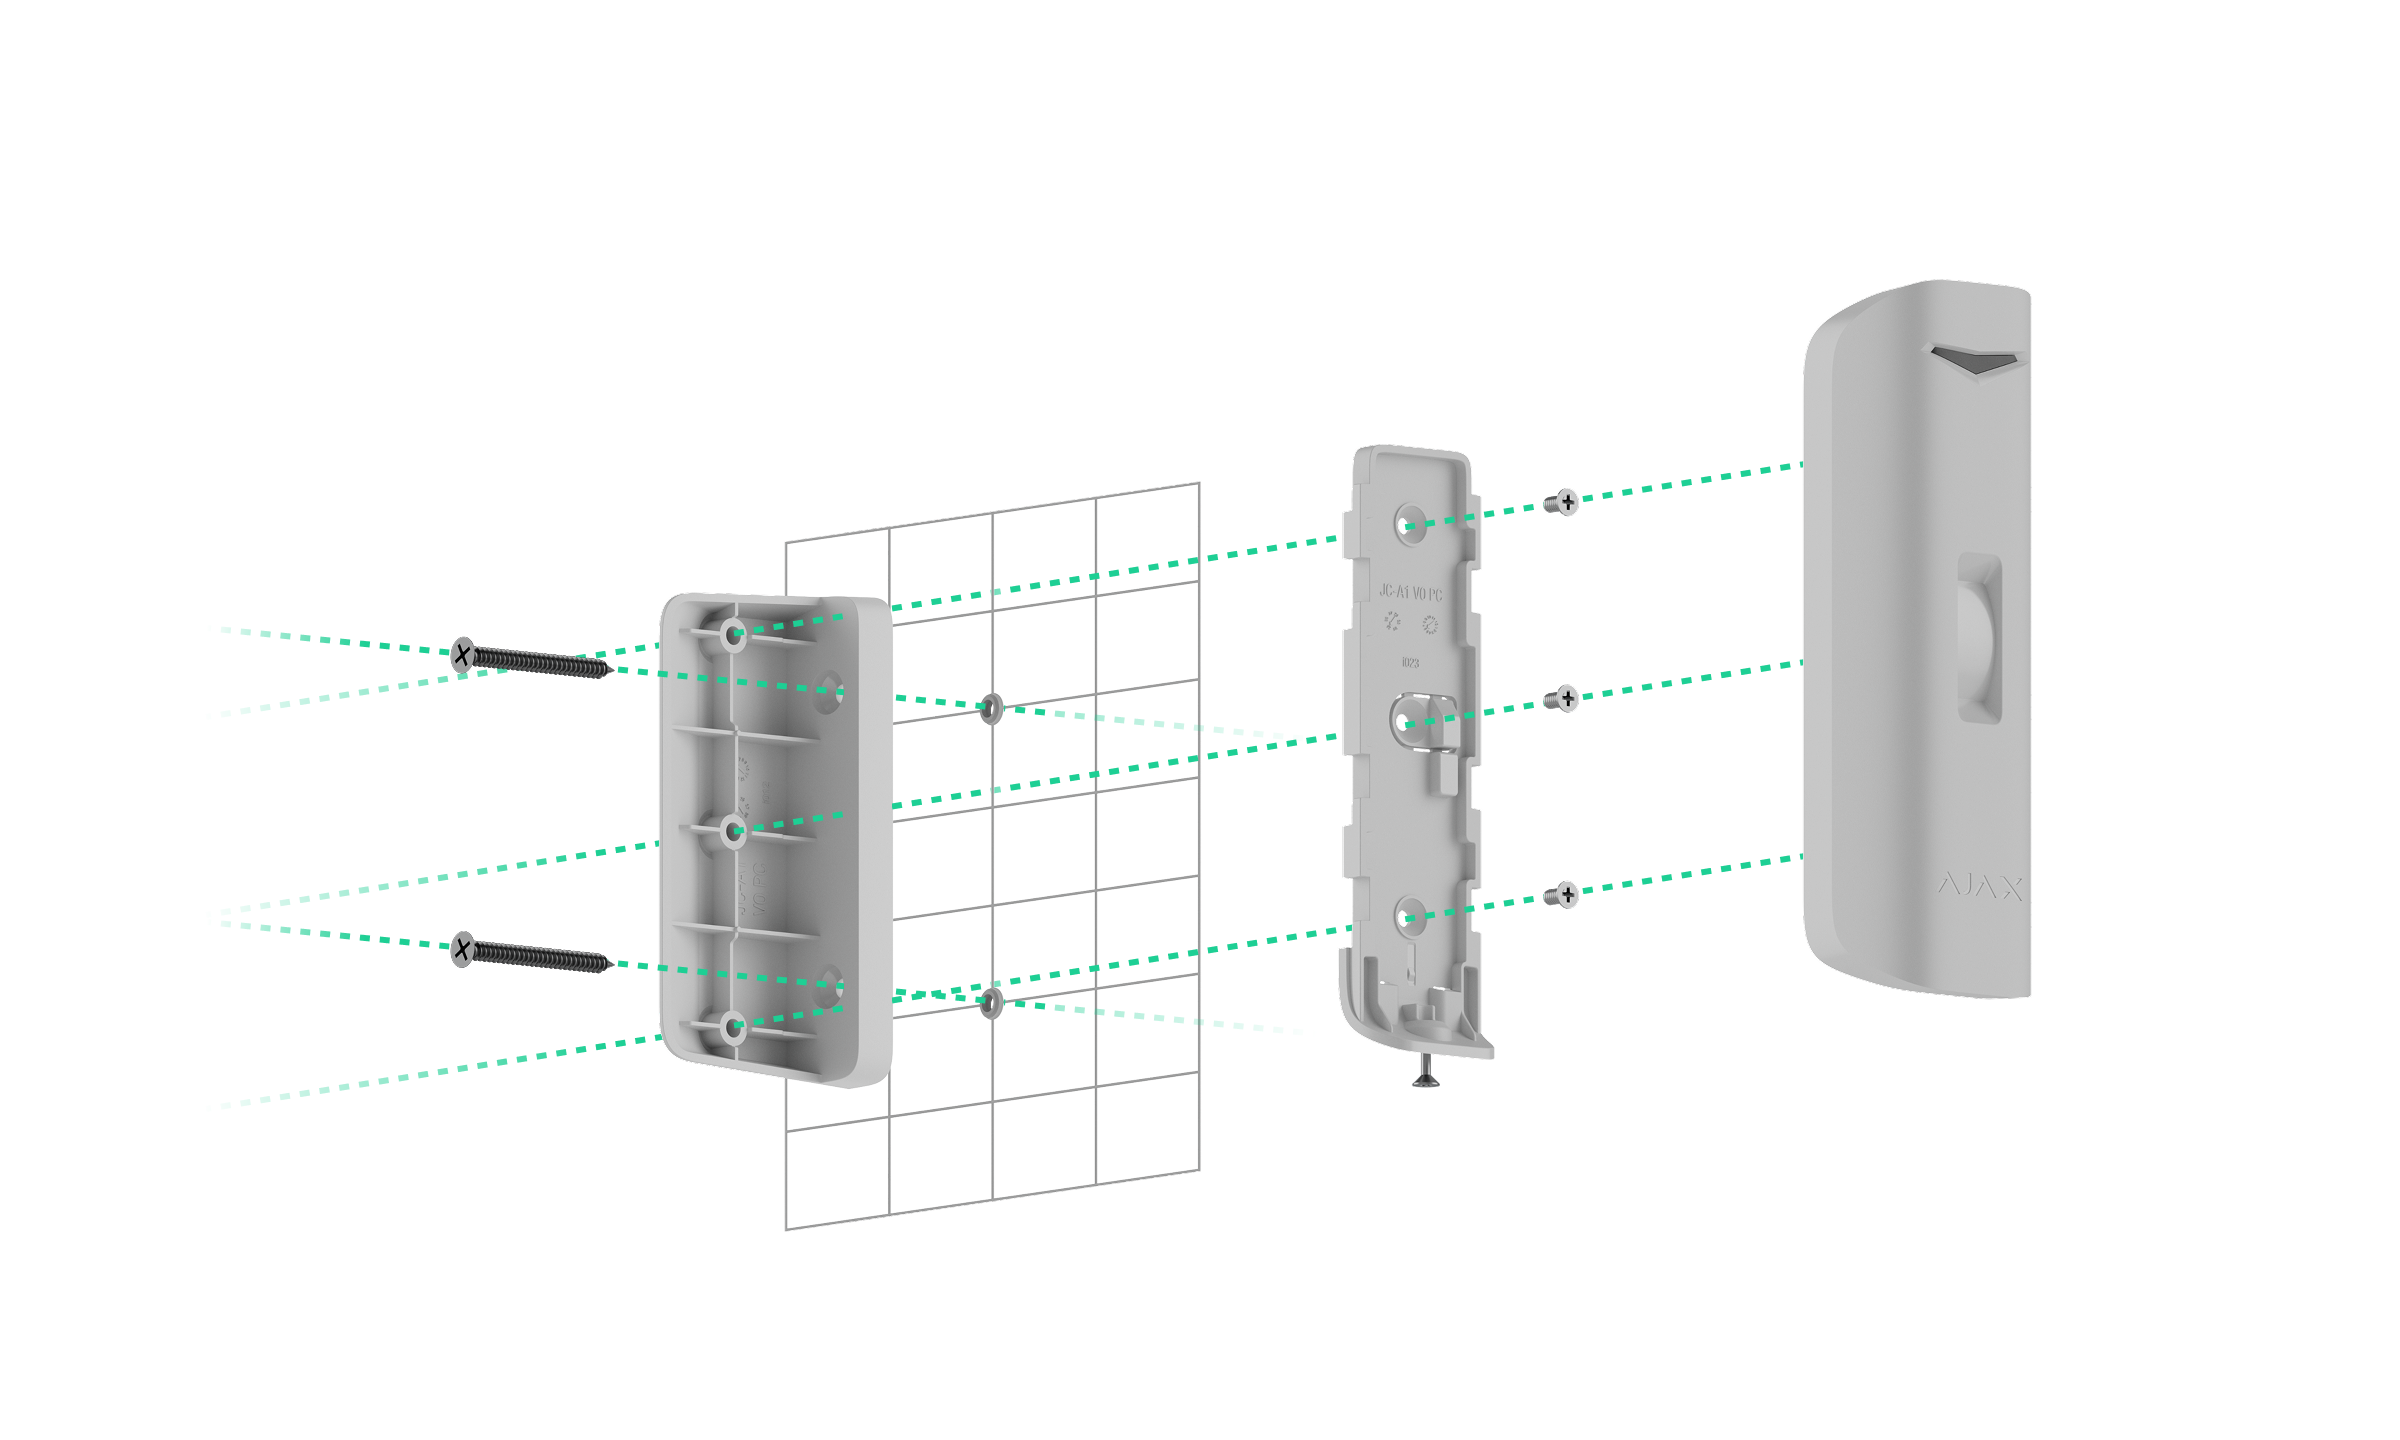
Functional elements
Detector
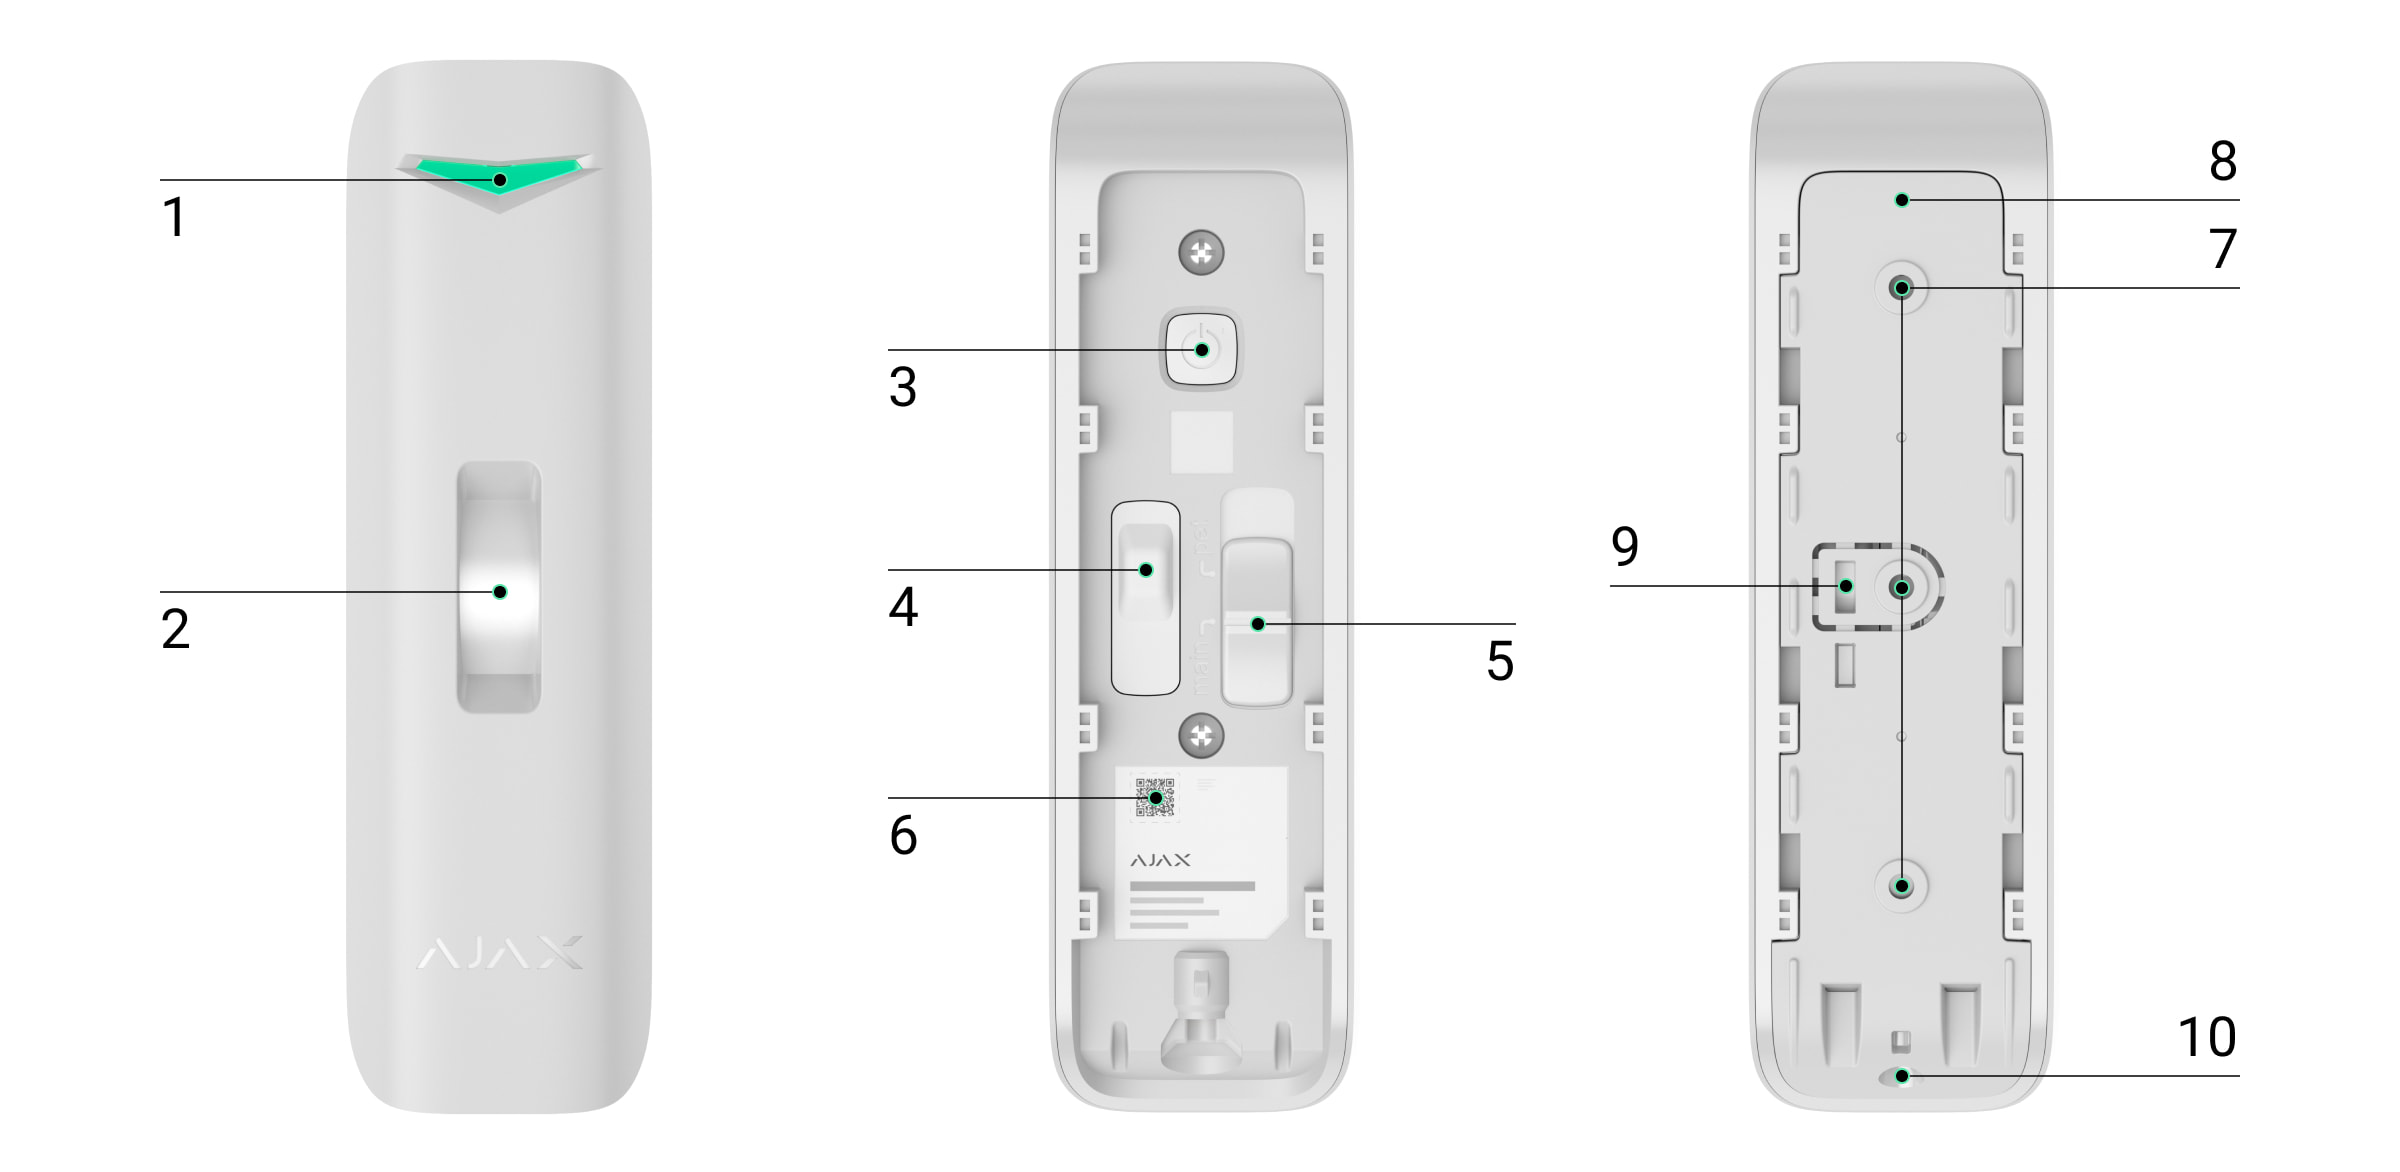
- LED indicator.
- Lens with a masking sensor.
- Power button.
- Tamper button. It triggers in case of an attempt to detach the detector from the surface or remove it from the mounting panel.
- Slider for selecting the Main or Pet mode.
- QR code with the device ID. It is used to add the detector to the hub.
- Fixing points for attaching the SmartBracket mounting panel to the surface or angle mount.
- SmartBracket mounting panel. To remove the panel, slide it down.
- Perforated part of the mounting panel. Triggers a tamper in case of any attempt to detach the detector from the surface. Do not break it off.
- Holding screw for securing the detector on SmartBracket.
Angle mount
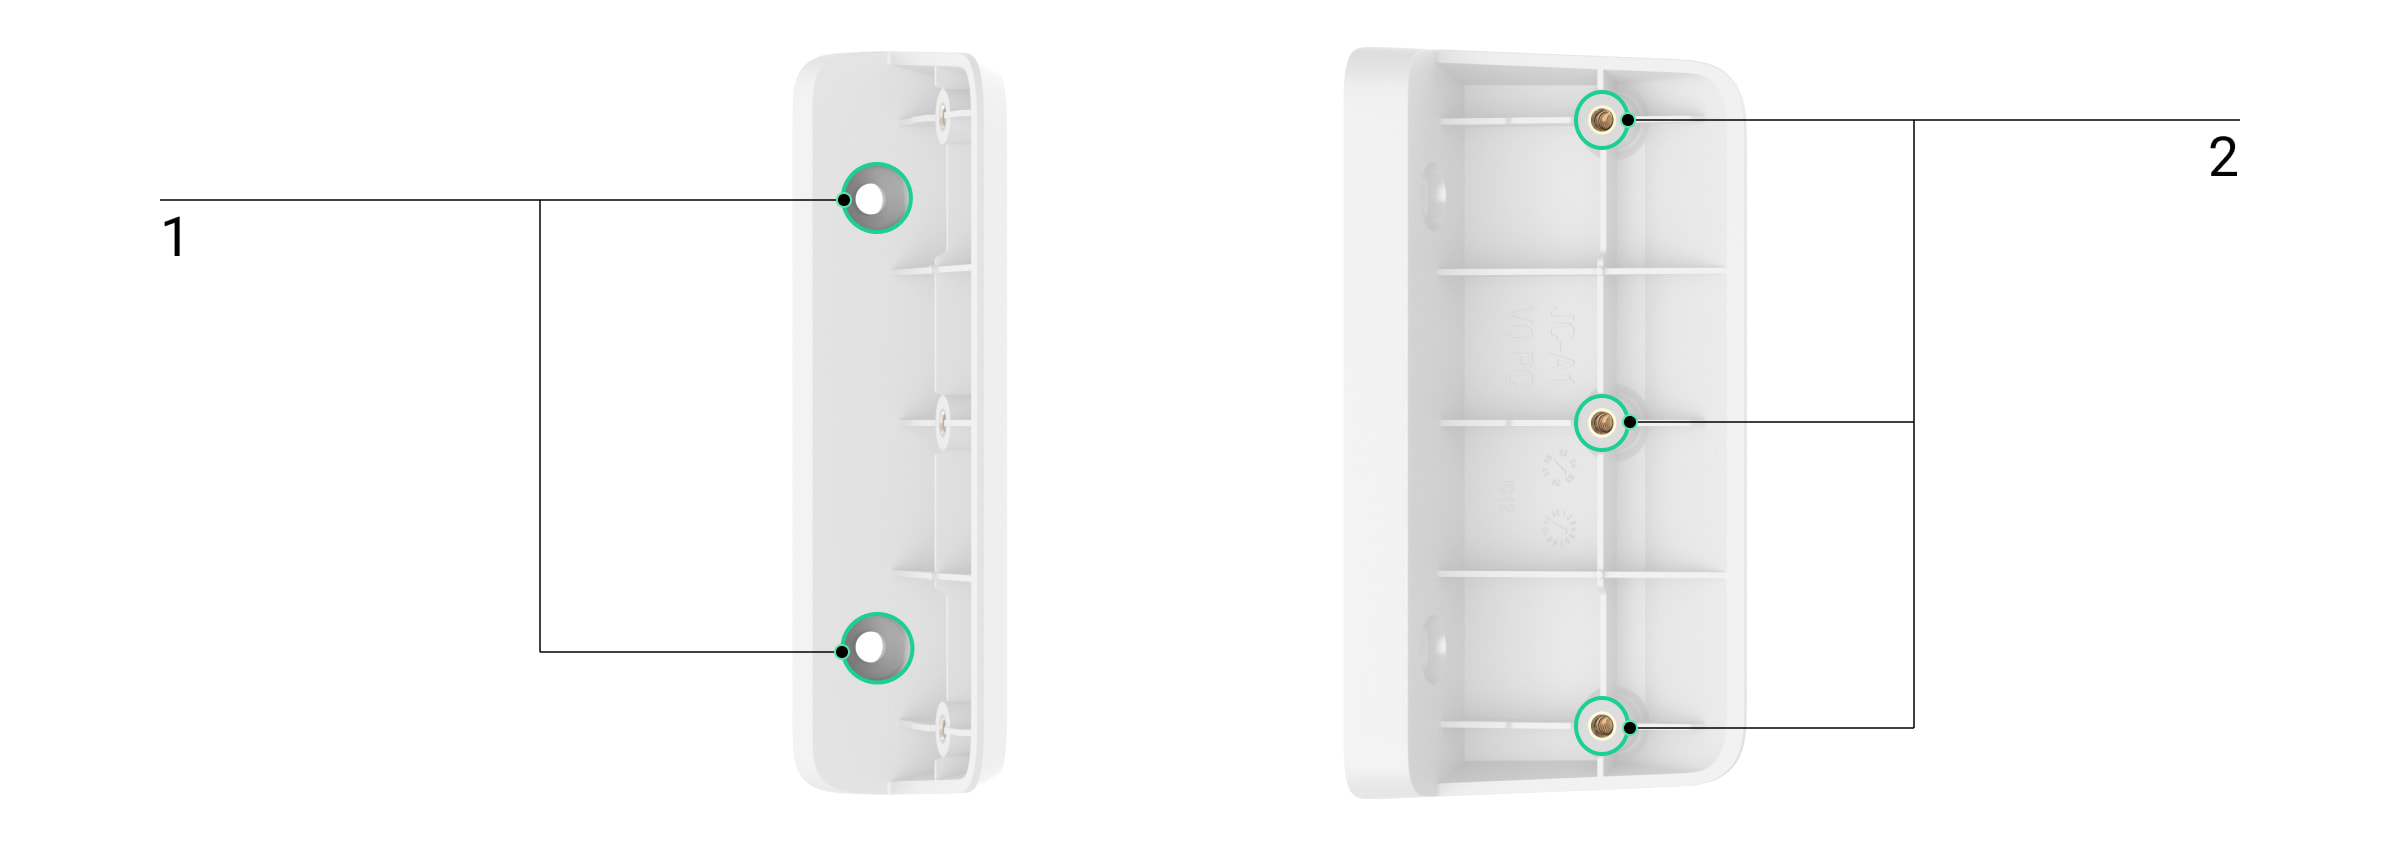
- Fixing points for attaching the angle mount to the surface.
- Fixing points for attaching the SmartBracket mounting panel to the angle mount.
Compatible hubs and range extenders
The device requires a compatible Ajax hub with OS Malevich 2.34 or later to operate.
Operating principle
A PIR sensor of Curtain Outdoor Mini Jeweller registers intrusion upon detecting moving objects with a temperature different from the ambient temperature.
When the device detects motion, it additionally performs a radio frequency (RF) scan with a built-in K-band microwave sensor. It helps to eliminate false alarms caused by thermal interference: air flows, fans, air conditioners, etc.
In case of an alarm, a detector instantly sends it to the hub. Therefore, the hub activates the sirens connected to the system, runs the scenarios, and notifies users and the security company. All Curtain Outdoor Mini Jeweller alarms and events are recorded in the event feed of Ajax apps.
Users and the monitoring company know exactly where motion is detected. The notifications contain the name of a space (the name of a guarded facility), the device name, and the virtual room to which the detector is assigned.
The detector doesn’t switch to the armed mode instantly. The switching time depends on two factors: the exit delay (specified in the detector settings) and the hub–detector polling interval (Jeweller or Jeweller/Fibra settings; the default value is 36 s). In the first case, the delay is set by an admin or a PRO user with admin rights. In the second case, the delay occurs because it takes one polling interval for the hub to notify the detector about switching to the armed mode.
Protection against false alarms
Curtain Outdoor Mini Jeweller uses the SmartDetect algorithm to protect against false alarms. This algorithm allows the detector to analyze the thermal diagram read by the sensor: the intensity of infrared radiation, the size of the heat spot, the time spent in the detection area, and other parameters.
After this stage, an additional RF scan of the facility is run using the built-in K-band microwave sensor. Depending on the result, the alarm is activated or not.
Pet immunity
When properly installed and configured, Curtain Outdoor Mini Jeweller will not respond to pets up to 28″ in height. We recommend installing the detector at a height of 3.3 ft, adjusting the slider on the detector enclosure to the Pet position.
Follow our recommendations to install and configure the detector.
Temperature compensation
Due to temperature compensation, the detector responds to movements, even if the indoor or outdoor temperature is close to the human body temperature. Read more about temperature compensation in the article.
Anti-masking system
Masking is an attempt to block the view of the detector. Curtain Outdoor Mini Jeweller detects an obstacle in front of the lens at a distance of up to 2″. The maximum distance depends on the obstacle material.
The system notifies users and the security company’s monitoring station about masking. The maximum masking detection time is 180 s (depending on the obstacle type and the distance).
If the Anti-masking feature is enabled, it is always active and works regardless of the security mode.
Jeweller and Wings data transfer protocols
Jeweller and Wings are wireless data transfer protocols that provide fast and reliable two-way communication between the hub and devices. The detector uses Jeweller to transmit alarms and events and Wings to update the firmware.
Sending events to the monitoring station
The Ajax system can transmit alarms to the Ajax PRO Desktop monitoring app, as well as to the central monitoring station (CMS), in formats of SurGard (Contact ID), SIA (DC-09), ADEMCO 685, and other protocols.
Curtain Outdoor Mini Jeweller can transmit the following events:
- Motion alarm.
- Masking.
- Alert if moved.
- Tamper alarm/recovery.
- Loss/restoration of connection with the hub.
- Permanent deactivation/activation of the device.
- One-time deactivation/activation of the device.
When an alarm is received, the operator at the security company’s monitoring station knows what happened and precisely where to dispatch a rapid response unit. The addressability of Ajax devices allows sending events to Ajax PRO Desktop or the CMS, including the device’s type and name, security group, and virtual room. Note that the list of transmitted parameters may vary depending on the CMS type and the selected communication protocol for the monitoring station.
Protection against faster battery discharging
To prevent rapid battery discharge, Curtain Outdoor Mini Jeweller has the Notify on risk of fast battery discharge setting. Once the system detects that the device is installed incorrectly, system users will receive notifications in Ajax apps, and similar information will be displayed in the device states.
The device sensors can be triggered by different objects or obstacles, which the device filters out as unconfirmed alarms. Also, the device requires more power to process each triggering. As a result, when the number of such triggerings gets too high, the system will notify about increased power consumption and the risk of fast battery discharge.
Enable the Notify on risk of fast battery discharge feature in the device settings to save the battery charge.
Consider changing the device placement if you receive a notification about incorrect installation.
Adding to the system
Before adding a device
- Install the Ajax app.
- Log in to your account or create a new one.
- Select a space or create a new one.
- Add at least one virtual room.
- Add a compatible hub to the space. Ensure the hub is switched on and has internet access via Ethernet, Wi-Fi, and/or mobile network.
- Ensure the space is disarmed, and the hub is not starting an update by checking statuses in the Ajax app.
Only a PRO or a space admin with the rights to configure the system can add a device to the hub.
Adding to the hub
- Open the Ajax app. Select a space where you want to add the detector.
- Go to the Devices
 tab and click Add Device.
 - Name the device, scan, or type in the QR code (placed on the detector and the package box), and select a room and a group (if Group mode is enabled).
- Click Add — the countdown will begin.
- Switch on the device by holding the power button for 3 seconds.
Once added to the hub, the detector will appear in the list of hub devices in the Ajax app. The device status update frequency in the list depends on the Jeweller or Jeweller/Fibra settings, with the default value of 36 s.
If the connection fails, try again in 5 seconds. If the maximum number of devices is added to the hub, you will be notified when trying to add a new one.
Curtain Outdoor Mini Jeweller works with only one hub. Once the device is connected to a new hub, it stops sending events to the old one. Adding the detector to a new hub does not automatically remove it from the device list of the old hub. This must be done using the Ajax app.
Malfunctions
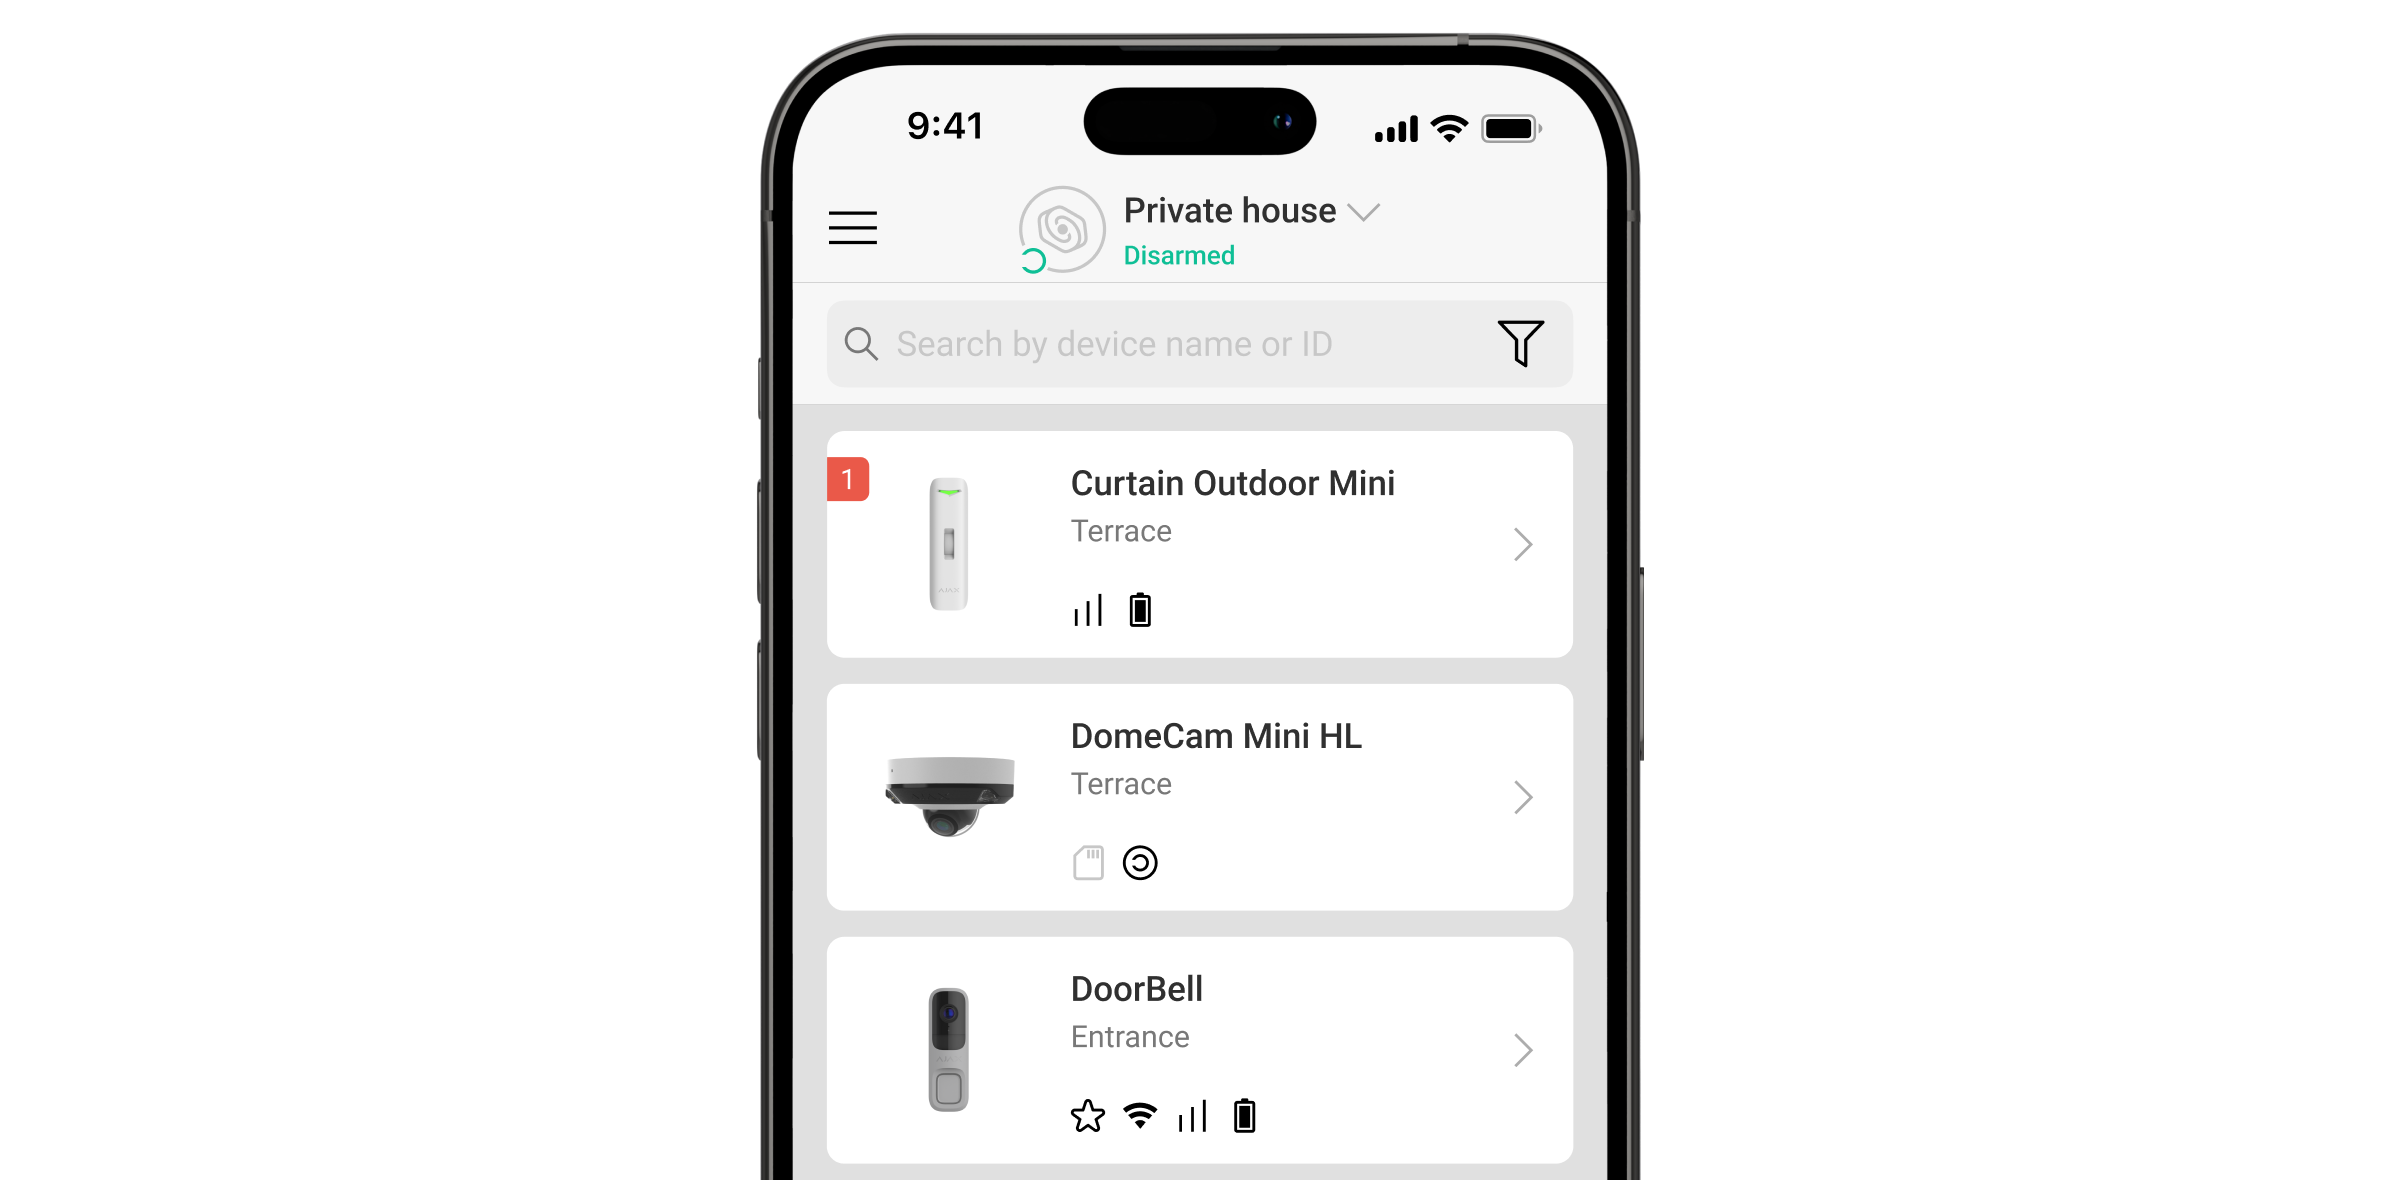
When the device detects a malfunction (for example, there is no connection via the Jeweller protocol), a malfunction counter is displayed in the Ajax app in the upper left corner of the device icon.
All malfunctions can be seen in the device states. Fields with malfunctions will be highlighted in red.
Malfunction is displayed if:
- The device temperature is outside acceptable limits.
- The device lid is open (tamper is triggered).
- No connection with the hub or radio signal range extender via Jeweller.
- No connection with the hub or radio signal range extender via Wings.
- The calibration of the masking sensor failed.
- The accelerometer of the device is faulty.
- The detector battery is low.
Icons
The icons in the app display some Curtain Outdoor Mini Jeweller states. To access them:
| Icon | Meaning |
|
Jeweller signal strength displays the signal strength between the hub and the device. The recommended value is 2–3 bars. |
|
|
Battery charge state of the detector. |
|
| The detector has detected motion. The icon is displayed when the device is armed. | |
| The icon is displayed when you select the Max or Attenuation in the Signal attenuation test menu. | |
| A firmware update is available. Go to the detector states or settings to find the description and launch an update. | |
| The detector operates through the radio signal range extender. | |
|
Delay when entering and/or leaving is enabled. |
|
|
The detector operates in Night Mode. |
|
|
The detector operates in the Always Active mode. |
|
|
The detector is permanently deactivated. |
|
|
Tamper alarm notifications are permanently deactivated. |
|
|
The detector is deactivated until the system is disarmed for the first time. |
|
|
Tamper alarm notifications are deactivated until the system is disarmed for the first time. |
|
| The device has lost connection with the hub, or the hub has lost connection with the Ajax Cloud server. | |
|
The device has not been transferred to the new hub. |
States
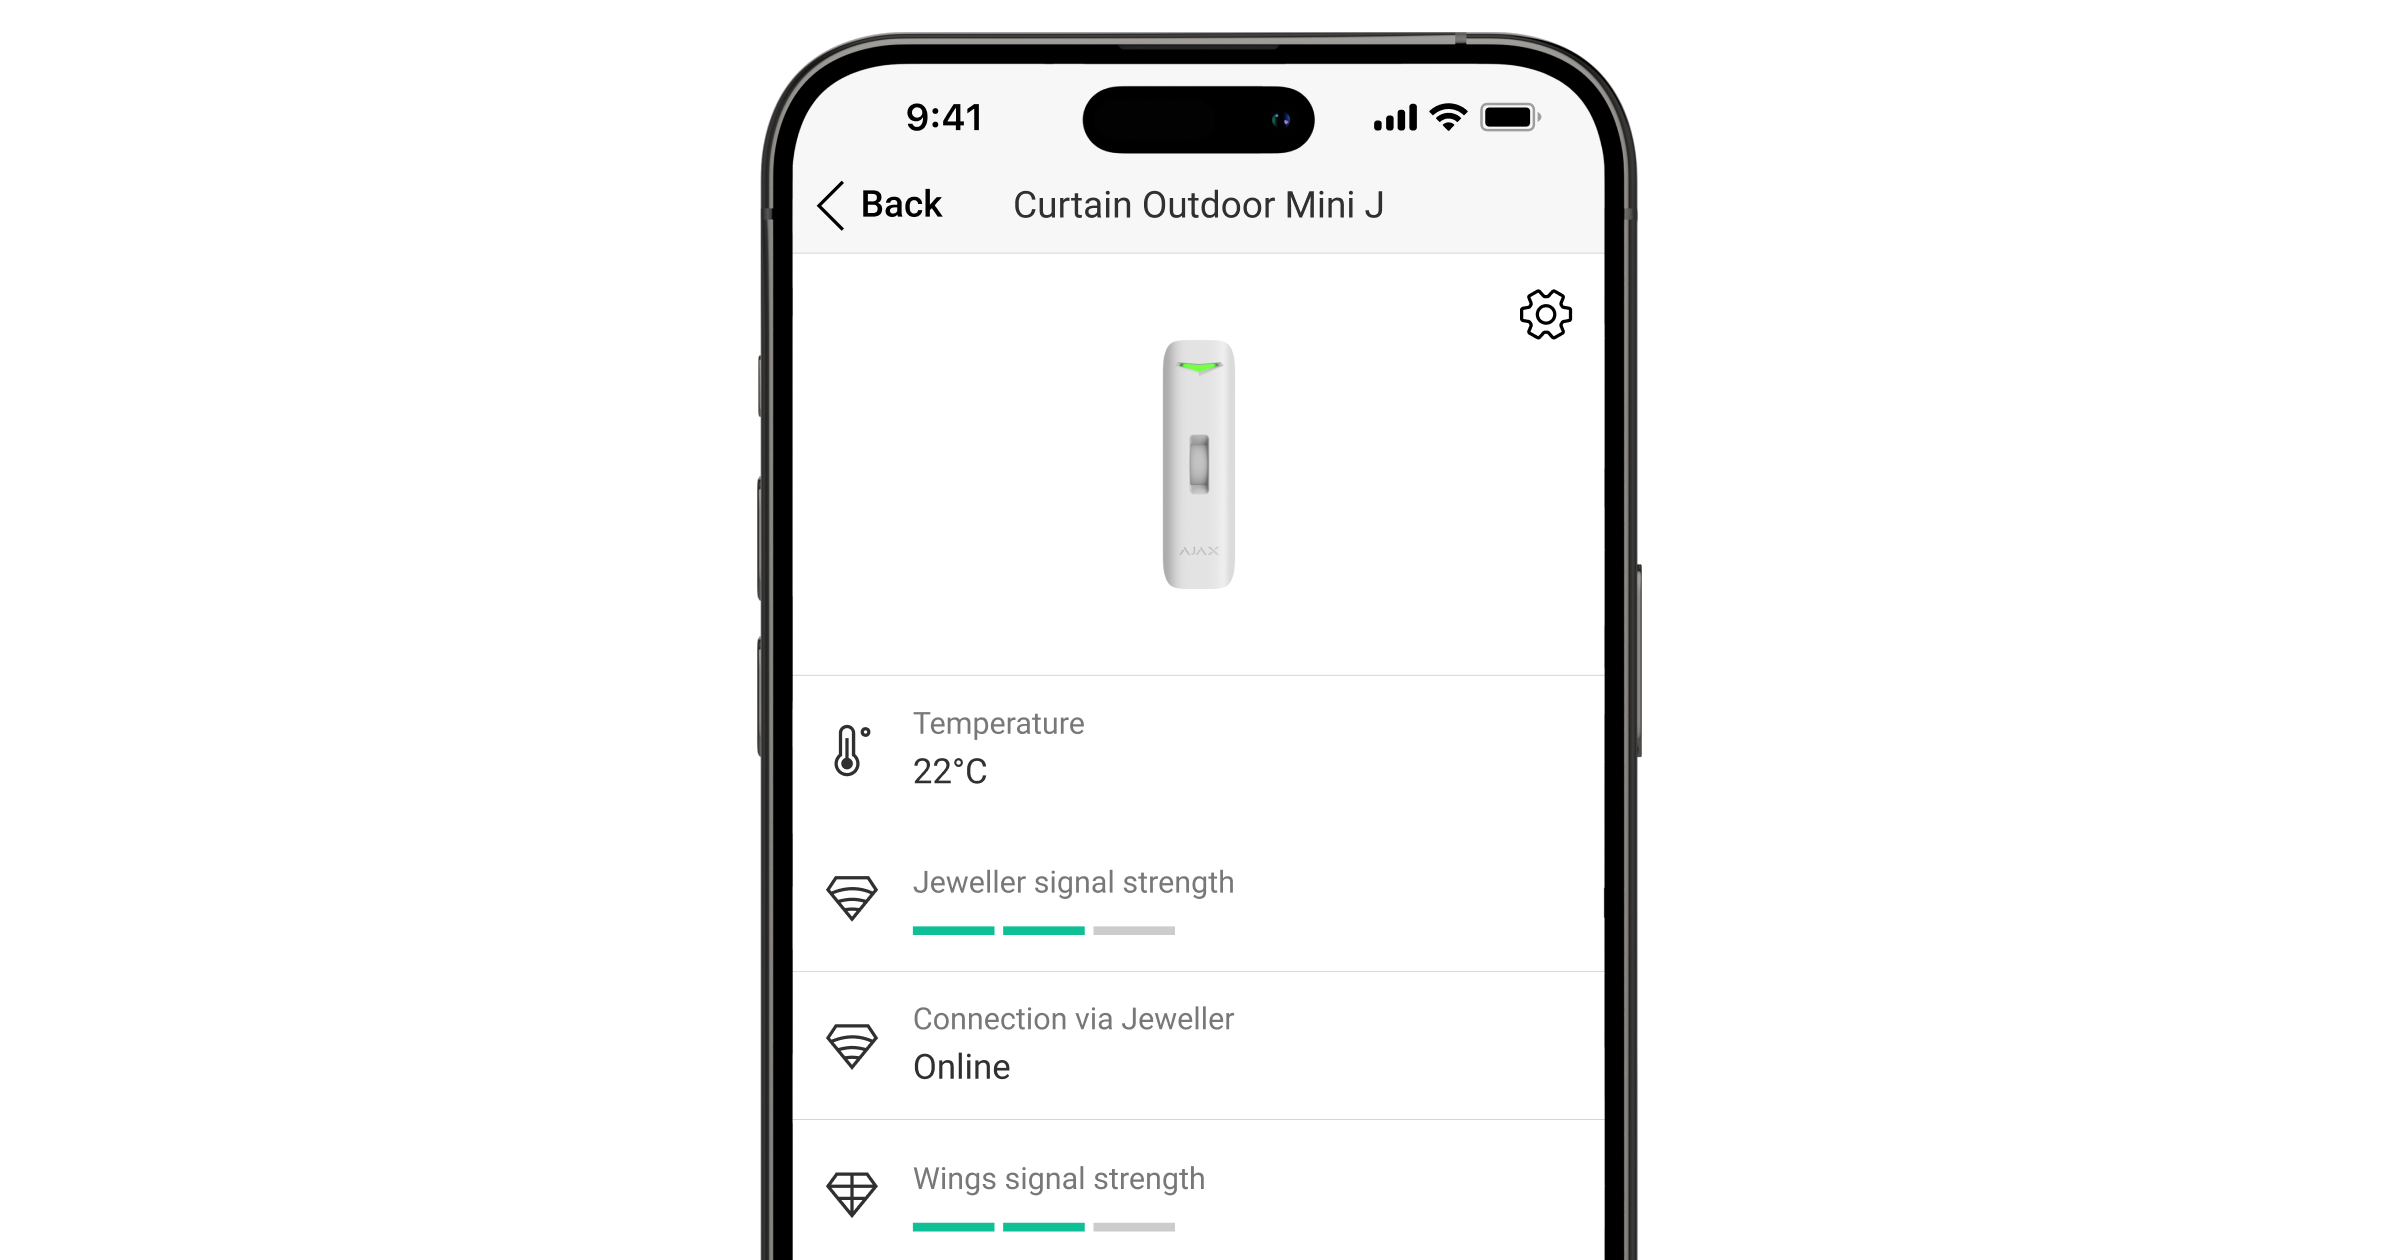
The states include information about the device and its operating settings. You can find the states of Curtain Outdoor Mini Jeweller in the Ajax app:
- Go to the Devices tab.
- Select Curtain Outdoor Mini Jeweller from the list.
| Parameter | Meaning |
| Data import | Displays the error when transferring data to the new hub:
|
| Malfunction |
Clicking on The field is displayed if a malfunction is detected. |
| New firmware version available |
Clicking on The field is displayed if a new firmware version is available. |
| Temperature |
Detector temperature. Measured on the processor and changes gradually. Acceptable error between the value in the app and the temperature at the facility: 4 °F. The value is updated as soon as the detector identifies a temperature change of at least 4 °F. You can create a scenario by temperature to control automation devices. Curtain Outdoor Mini Jeweller is an outdoor detector, and its temperature is not considered when calculating the average temperature in the room to which the detector is assigned. |
| Jeweller signal strength |
Jeweller signal strength between the detector and the hub (or the radio signal range extender). The recommended value is 2–3 bars. Jeweller is a protocol for transmitting Curtain Outdoor Mini Jeweller events and alarms. |
| Connection via Jeweller | Connection status on the Jeweller channel between the detector and the hub (or the range extender):
|
| Wings signal strength |
Wings signal strength between the device and the hub (or the range extender). The recommended value is 2–3 bars. Wings is a protocol for updating the Curtain Outdoor Mini Jeweller firmware. |
| Connection via Wings | Connection status on the Wings channel between the hub (or the range extender) and the detector:
|
| Transmitter power |
Displays the selected power of the transmitter. The parameter appears when the Max or Attenuation option is selected in the Signal attenuation test menu. |
| <Range extender name> | Status of device connection to the radio signal range extender.
The field is displayed if the detector operates via the radio signal range extender. |
| Battery charge | The battery charge level of the device. Two states are available:
When the batteries need to be replaced, Ajax apps and the security company will receive appropriate notifications. |
| Lid | The status of the detector tamper that responds to detachment or opening of the device enclosure:
|
| Sensitivity | Sensitivity level of the motion detector:
Select the sensitivity depending on the results of the detection zone test. |
| Anti-masking | Detector masking state:
|
| Detection mode | Displays the selected detection mode:
Configured on the device enclosure. |
| Always active |
When this option is enabled, the detector is constantly armed, detects motion, and raises alarms. |
| Alert if moved | Displayed only if Alert if moved is enabled:
|
| Permanent deactivation | Shows the status of the device’s permanent deactivation setting:
|
| One-time deactivation | Shows the status of the device’s one-time deactivation setting:
|
| Alarm reaction | |
| Operating mode | Shows how the detector reacts to alarms:
|
| Delay when entering |
Delay when entering (alarm activation delay) is the time the user has to disarm the security system after entering the premises. |
| Delay when leaving |
Delay when leaving (arming delay) is the time the user has to leave the premises after arming. |
| Arm in Night Mode |
When this option is enabled, the detector will enter the armed mode when the system is set to Night mode. |
| Night mode delay when entering |
Entry delay time in Night mode. Delay when entering (alarm activation delay) in Night mode is the time the user has to disable Night mode after entering the premises. |
| Night mode delay when leaving |
Exit delay time in Night mode. Delay when leaving (arming delay) in Night mode is the time the user has to leave the premises after activating Night mode. |
| Firmware |
Detector firmware version. The firmware version is updated over the air. |
| Device ID | Device ID. |
| Device No. | Device loop (zone) number. |
Settings
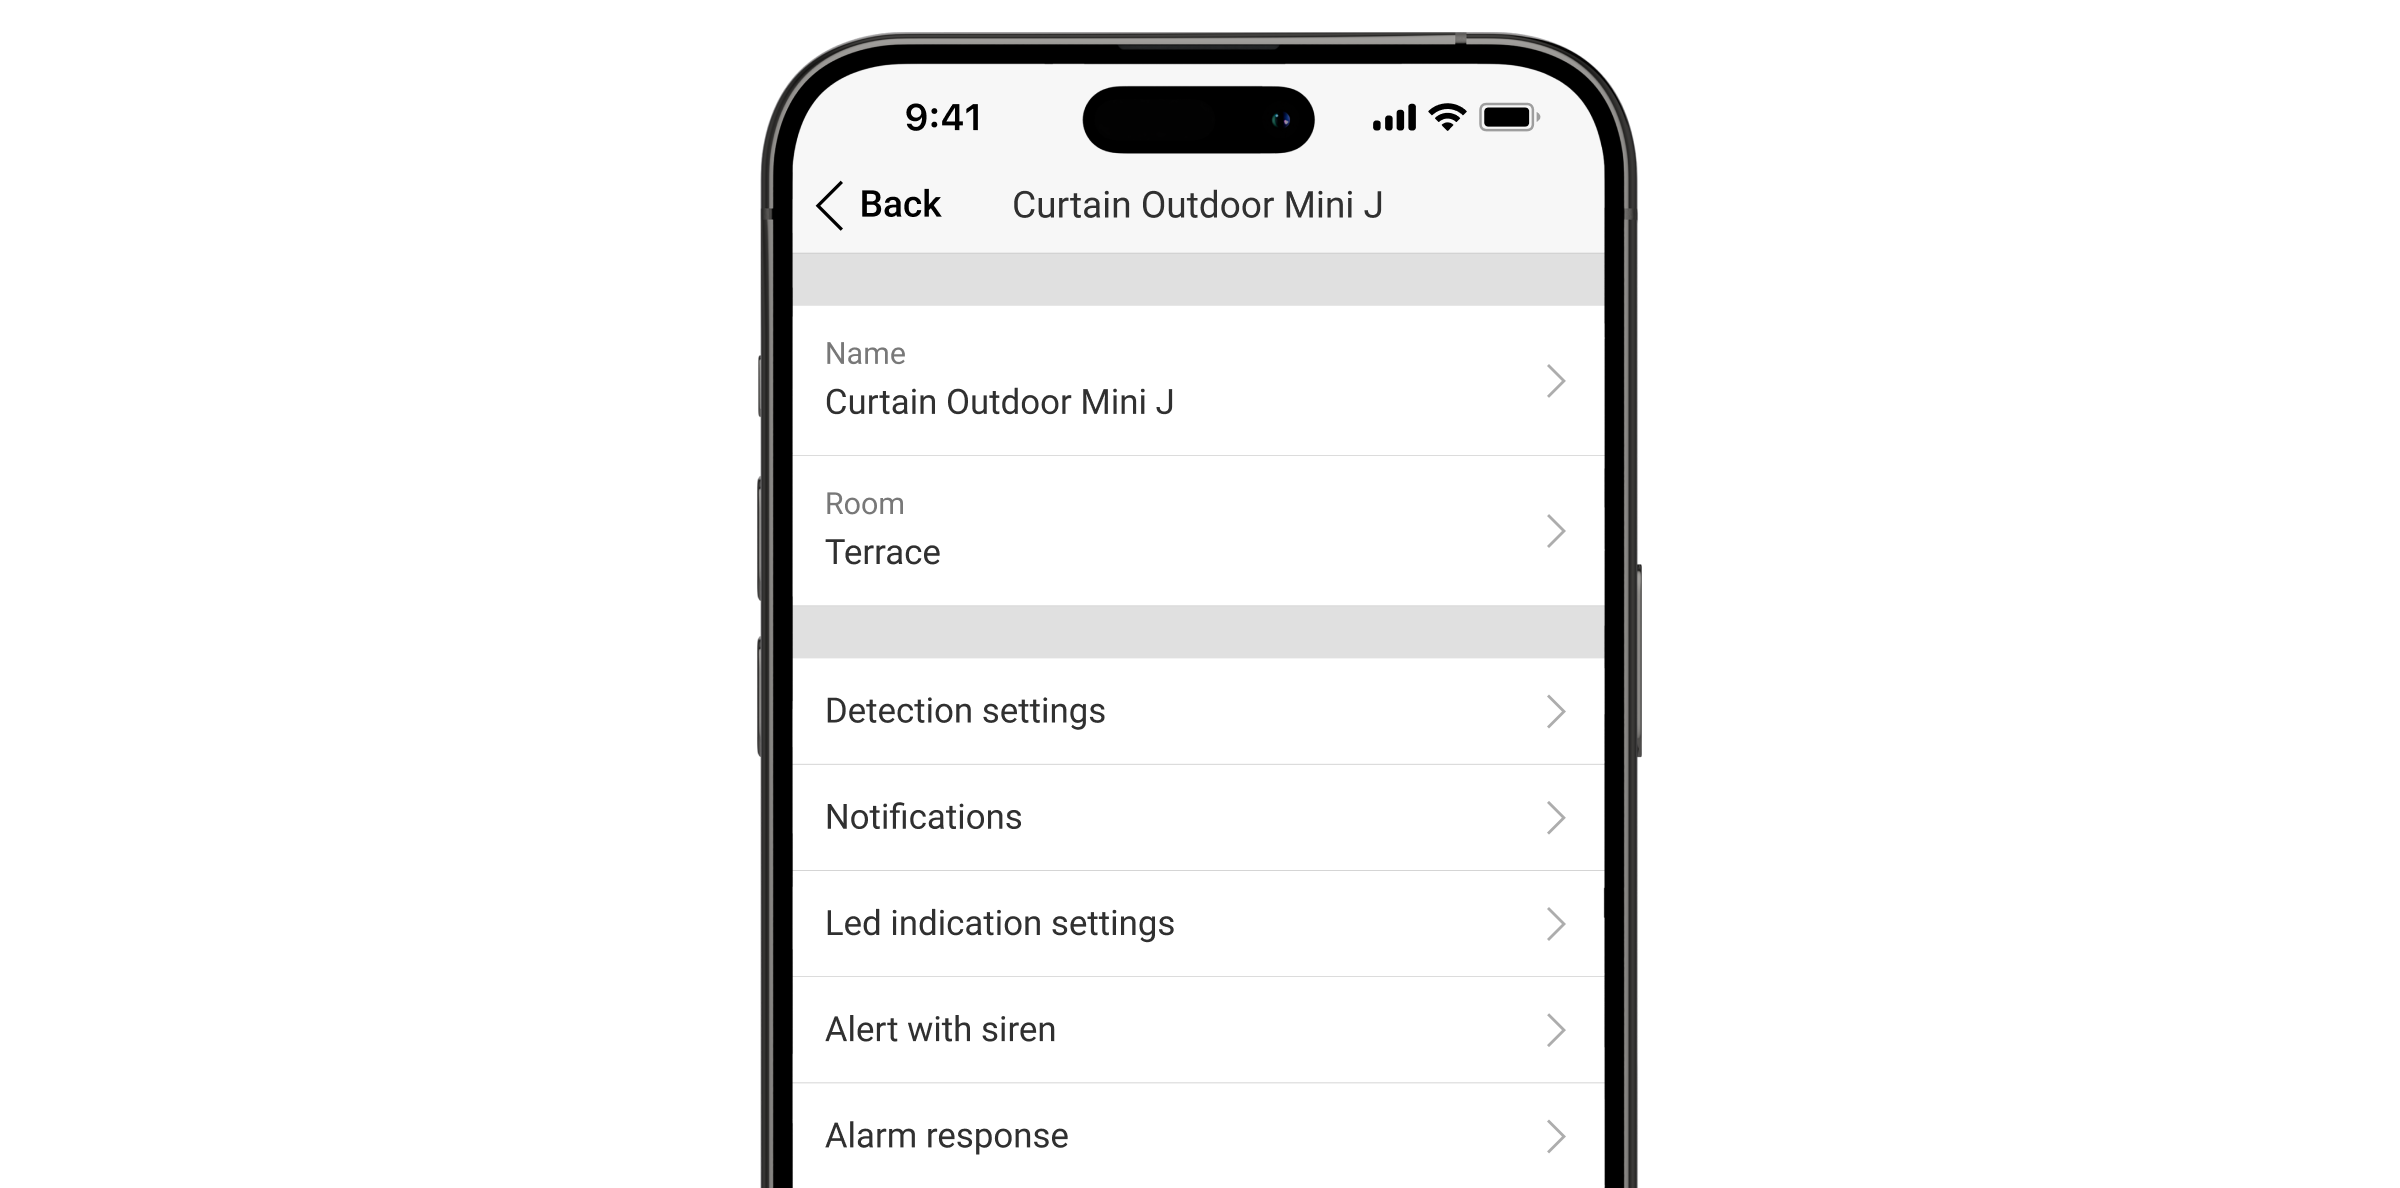
To change the settings in the Ajax app:
- Select a space.
- Go to the Devices tab.
- Select Curtain Outdoor Mini Jeweller from the list.
- Go to Settings by clicking on the
 icon.
icon. - Set the required parameters.
- Click Back to save the settings.
| Settings | Meaning |
| Name |
Detector name. Displayed in the list of hub devices, text of SMS and notifications in the events feed. To change the detector name, click on the text field. The name can contain up to 12 Cyrillic characters or up to 24 Latin characters. |
| Room |
Selecting the virtual room to which Curtain Outdoor Mini Jeweller is assigned. The room name is displayed in the text of SMS and notifications in the events feed. |
| Sensitivity | Sensitivity level of the motion detector. The choice depends on the type of the object, the presence of probable sources of false alarms, and the specifics of the protected area:
|
| Alarm LED indication | When disabled, the LED indicator doesn’t notify about alarms and tamper triggering. |
| Always active |
When enabled, the detector is always in the armed mode and detects motion. |
| Anti-masking |
When enabled, Curtain Outdoor Mini Jeweller detects masking. Curtain Outdoor Mini Jeweller detects an obstacle in front of the lens at a distance of up to 2″ (depending on the obstacle material). |
| Alert if moved | When enabled, the system raises the alarm if the device is moved or detached from the mounting panel. |
| Accelerometer sensitivity | The sensitivity level of the detector’s accelerometer. The selection depends on the type of the object, the presence of probable sources of false alarms, and the specifics of the protected area:
|
| Notify on risk of fast battery discharge | When this option is enabled, the user is notified when incorrect installation affects the device’s battery life because the detector is often triggered without an actual intrusion. |
| Alert with a siren | |
| If motion detected | When this option is enabled, sirens connected to the system are activated when motion is detected by Curtain Outdoor Mini Jeweller. |
| If masking detected |
When this option is enabled, sirens connected to the system are activated when Curtain Outdoor Mini Jeweller detects masking. The field is displayed and active if the Anti-masking option is enabled. |
| If device was moved |
When this option is enabled, the built-in accelerometer alerts about sabotage. Sirens added to the system are activated when Curtain Outdoor Mini Jeweller is moved. The field is displayed and active if Alert if moved is enabled. |
| Alarm reaction | |
| Operating mode | Specify how this device will react to alarms:
|
| Delay when entering |
Selecting delay time when entering: 5 to 120 s. Delay when entering (alarm activation delay) is the time the user has to disarm the security system after entering the premises. |
| Delay when leaving |
Selecting delay time when leaving: 5 to 120 s. Delay when leaving (arming delay) is the time the user has to leave the premises after arming. |
| Arm in Night mode |
When enabled, the detector switches to the armed mode when the system is set to Night mode. |
| Night mode delay when entering |
Entry delay time in Night mode. Delay when entering (alarm activation delay) in Night mode is the time the user has to disable Night mode after entering the premises. |
| Night mode delay when leaving |
Exit delay time in Night mode. Delay when leaving (arming delay) in Night mode is the time the user has to leave the premises after activating Night mode. |
| Firmware update | Switches the detector to the firmware update mode if a new version is available. |
| Jeweller signal strength test |
Switches the detector to the Jeweller signal strength test mode. The recommended value is 2–3 bars. |
| Wings signal strength test |
Switches the detector to the Wings signal strength test mode. The recommended value is 2–3 bars. |
| Detection zone test |
Switches the detector to the detection zone test mode. |
| Signal attenuation test |
Switches the device to the signal attenuation test mode. |
| User guide | Opens the Curtain Outdoor Mini Jeweller user manual in the Ajax app. |
| Permanent deactivation |
Allows the user to deactivate the device without removing it from the system. Three options are available:
|
| One-time deactivation |
Allows the user to disable device events until the system is disarmed for the first time. Three options are available:
|
| Delete device | Unpairs the detector, disconnects it from the hub, and deletes its settings. |
Indication
Indication upon pressing the power button
| Indication | Event |
| Lights up green for about 0.5 s. | Turning the detector on. |
| Lights up green for about 0.5 s, flashes green 6 times, and flashes red 3 times but faster. | Turning on the detector that has not been added to the hub. |
| Lights up red for about 1 s, then flashes 3 times. | Turning the detector off. |
Activated detector indication
| Indication | Event |
| Lights up green for about 0.5 s. | Tamper/accelerometer alarm or activation. |
| In case of an alarm, it slowly lights up green and slowly goes out. | Batteries need to be replaced. |
| Flashes green continuously. | The detector’s battery is completely discharged. |
| Flashes green 6 times during 2 s, then after 0.5 s flashes red 3 times. | Deleting the detector from the hub. |
| Flashes green every 0.5 s. | Calibrating the masking sensor. The indication lasts during the calibration. |
| Lights up green continuously and goes out when motion is detected. |
Detection zone test. |
| Lights up red continuously and goes out when masking is detected. | The masking sensor test. |
| Lights up red for about 0.5 s every 3 s. |
Hardware error. The detector needs to be repaired; please contact our Technical Support. |
| Lights up red for about 0.5 s every 12 s. |
Failed calibration of the masking sensor. Retry the calibration: remove the detector from the mounting panel and reinstall it. The calibration will start automatically. If the indication repeats, contact our Technical Support. |
| Lights up green twice and goes out every 3 s. | Downloading the updated firmware version of the detector. |
| Flashes green 2 times every second. | Updating the detector firmware. The indication lasts during the firmware update. |
Functionality testing
The Ajax system offers several types of tests to help choose the correct installation place for the devices. Testing does not start immediately. However, the waiting time does not exceed the duration of one hub–device polling interval. The polling interval can be checked and configured in hub settings (Hub → Settings ![]() → Jeweller or Jeweller/Fibra).
→ Jeweller or Jeweller/Fibra).
To run the test in the Ajax app:
- Select a space.
- Go to the Devices tab.
- Select Curtain Outdoor Mini Jeweller from the list.
- Go to Settings .
- Select a test:
- Run the test.
Device placement
Curtain Outdoor Mini Jeweller is suitable for protecting windows, doors, narrow pathways, and other perimeter openings. It allows you to secure the perimeter, leaving space for free movement inside. The detector can be installed both outdoors and indoors.
Curtain Outdoor Mini Jeweller can protect:
- Front doors.
- Windows.
- Gates.
- Fences.
- Arches and other places where you need to protect the perimeter or passage.
The detector should be placed at a height of 3.3 ft on a side surface or up to 16.4 ft on the ceiling, depending on the protected area size. For the Pet immunity feature to work properly, the detector should be installed at a height of 3.3 ft on a side surface.
If you install the detector at a height other than the recommended one, ensure there are no false alarms caused by pets, the device detects people’s motion, and the detection zone meets your needs.
If the surface is not flat, the installation height is calculated from the highest point of the area to be protected.
The detector should be installed on a flat, stable surface, for example, on the wall of a house or a solid fence. Installing the detector on a shaky (unstable) surface will result in false alarms. The detector enclosure must be placed perpendicular or parallel to the ground level, and the intended path of the intruder must be perpendicular or parallel to the axis of the detector’s lens.
When installing the device on a window with a mosquito net, place the detector as far as possible from the mosquito net, using the full depth of the window recess.
In practice, increasing the distance from the mosquito net by at least 2″ significantly reduces the risk of false alarms. If false alarms continue to occur, reduce the detector’s sensitivity level.
When choosing where to place Curtain Outdoor Mini Jeweller, consider the parameters that affect its operation:
- Motion detection zone.
- Jeweller and Wings signal strength.
- Distance between the detector and the hub or range extender.
- Presence of obstacles between devices that may affect the radio signal, such as walls, inter-floor ceilings, or large objects located on the premises.
- Presence of bushes, trees, air conditioners, glass, and other structures that may block the detector’s view.
- Presence of water reservoirs or pools in the detection area. They may cause false alarms.
Consider the recommendations for detector placement when developing a security system project for the facility. The security system must be designed and installed by specialists. The list of recommended Ajax partners is available here.
Signal strength
The signal strength is determined by the number of undelivered or corrupted data packages over a certain period of time. The ![]() icon in the Devices
icon in the Devices ![]() tab in Ajax apps indicates the signal strength:
tab in Ajax apps indicates the signal strength:
- three bars — excellent signal strength;
- two bars — good signal strength;
- one bar — low signal strength, stable operation is not guaranteed;
- crossed out icon — no signal.
Check the Jeweller and Wings signal strength before final installation. With a signal strength of one or zero bars, we do not guarantee the device will operate stably. Consider relocating the device, as adjusting its position even by 8″ can significantly improve the signal strength. If the signal remains poor or unstable after relocation, consider using a radio signal range extender.
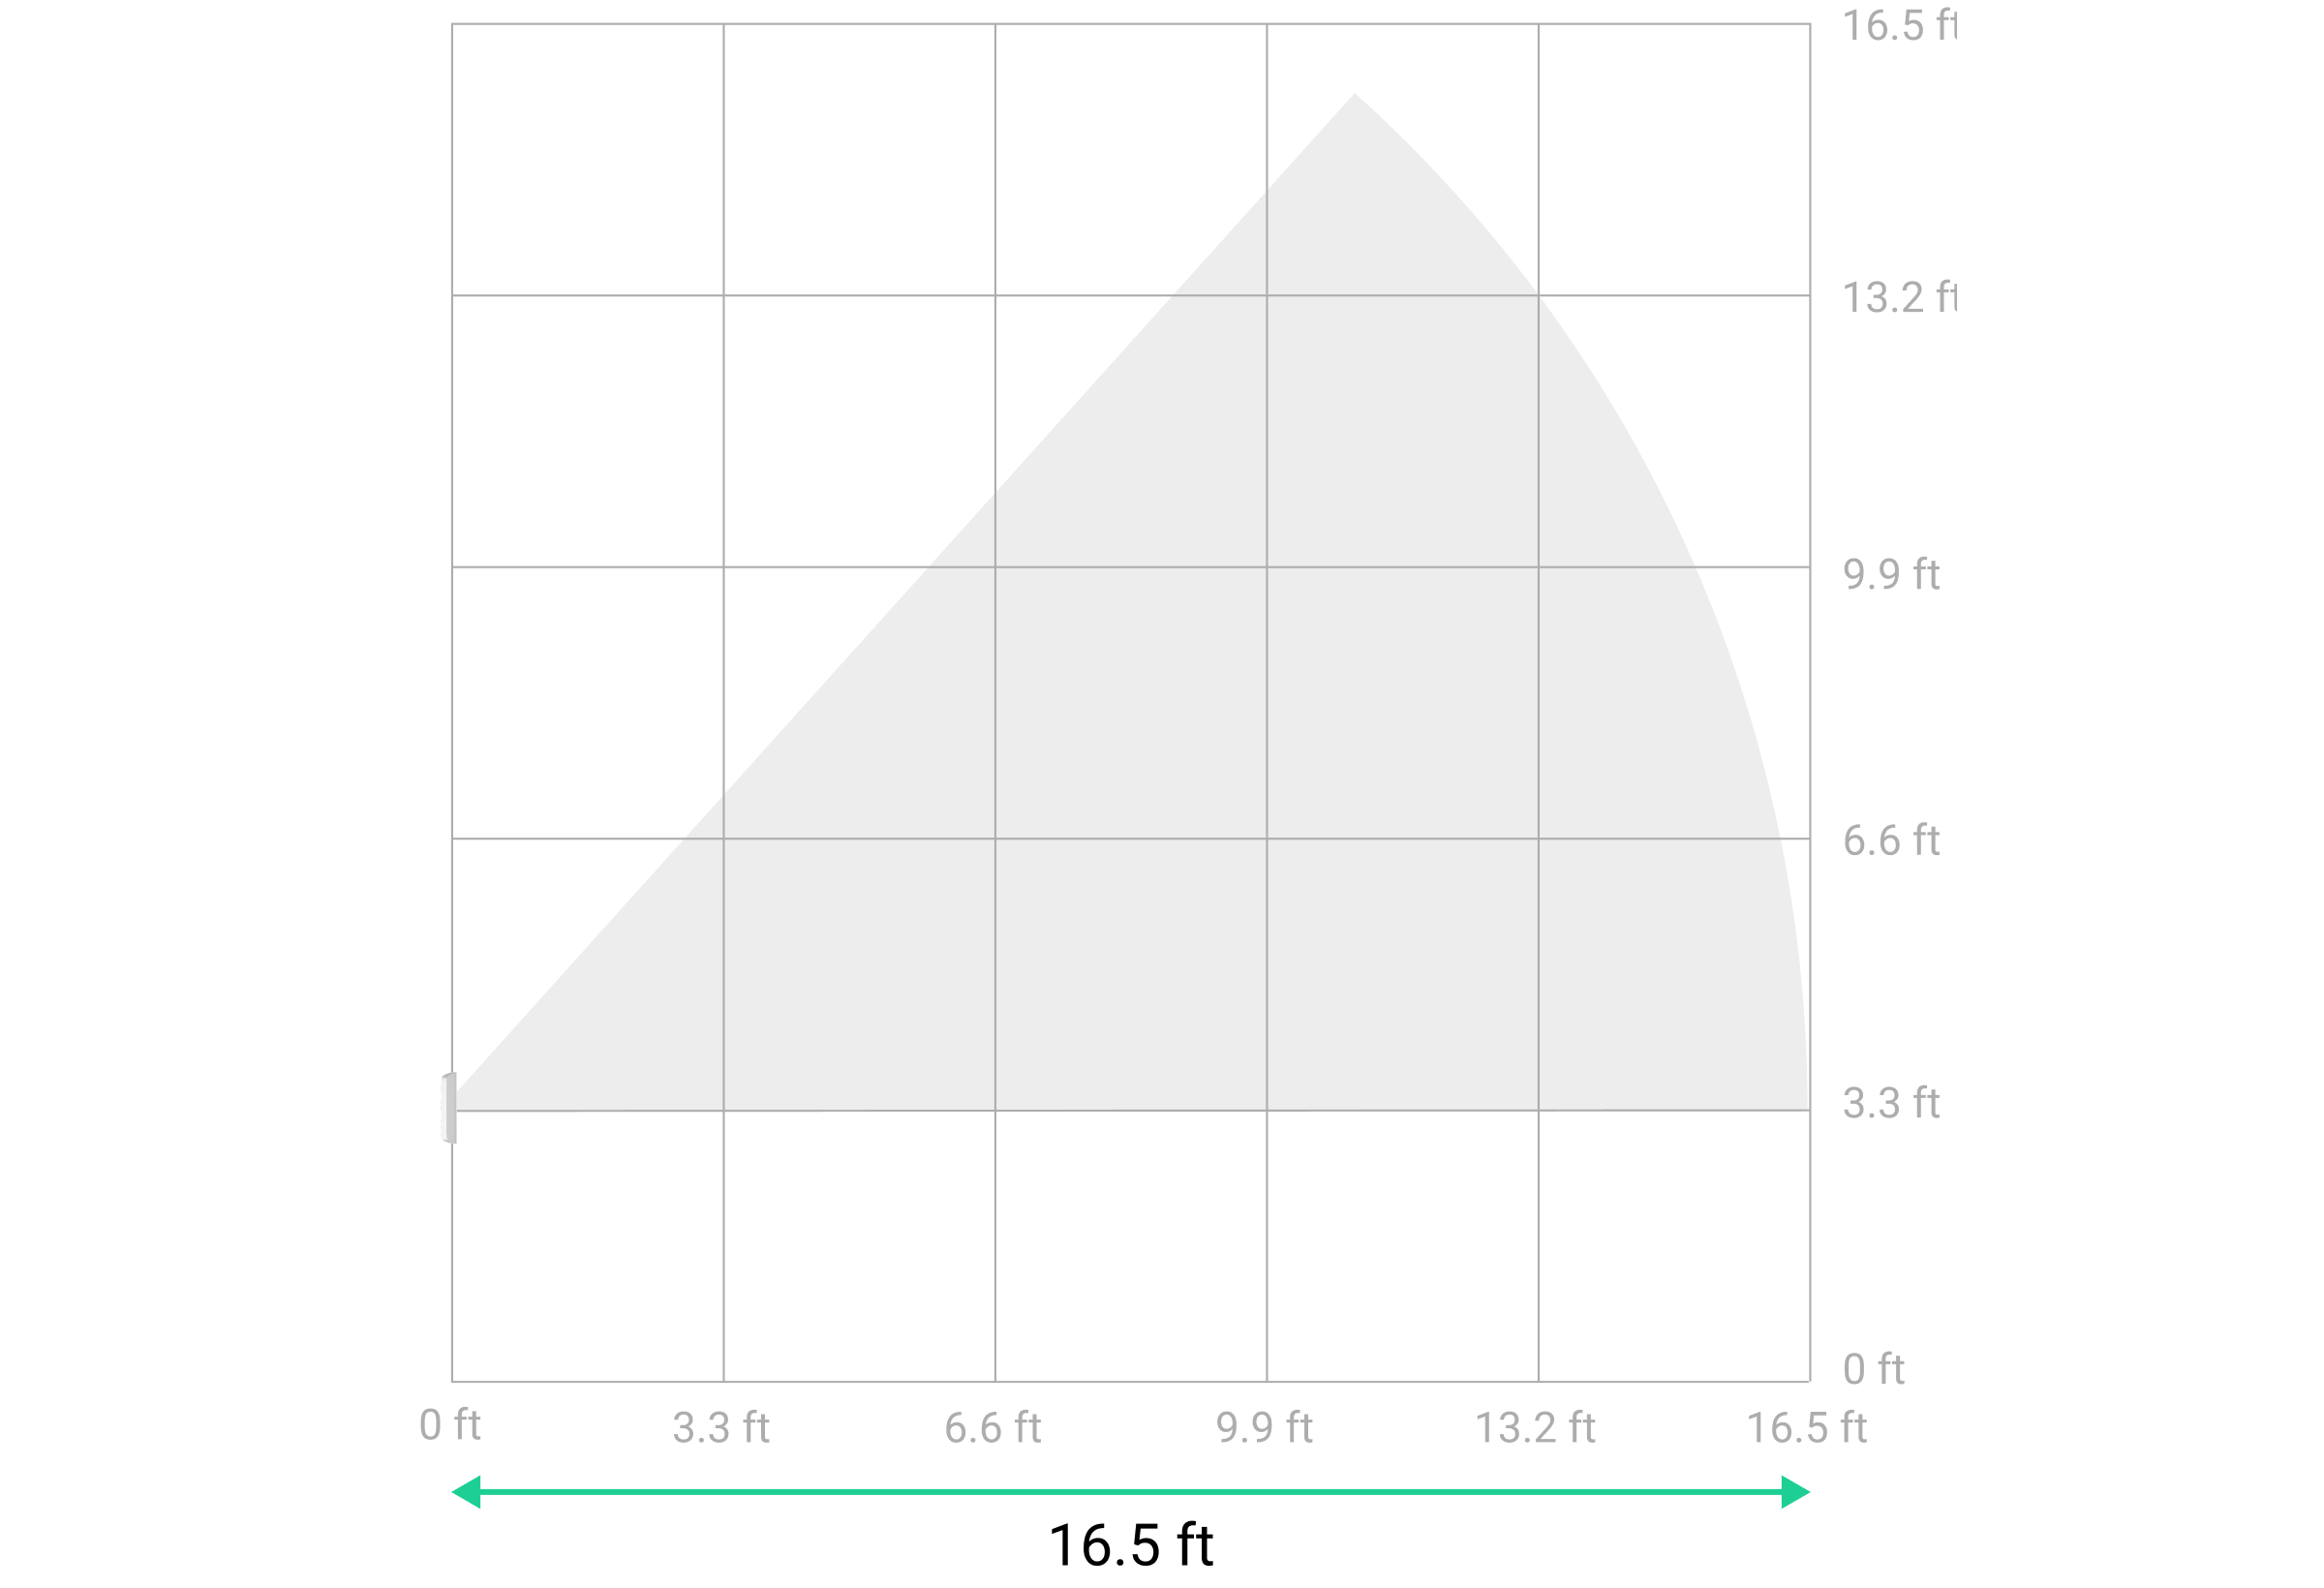
Detection zone
When choosing where to place the detector, perform the detection zone test to accurately determine the sector in which the device detects motion.
When choosing the installation site, consider the detector’s horizontal viewing angle and the width of the detection zone. Incorrect placement of the detector may cause false alarms.
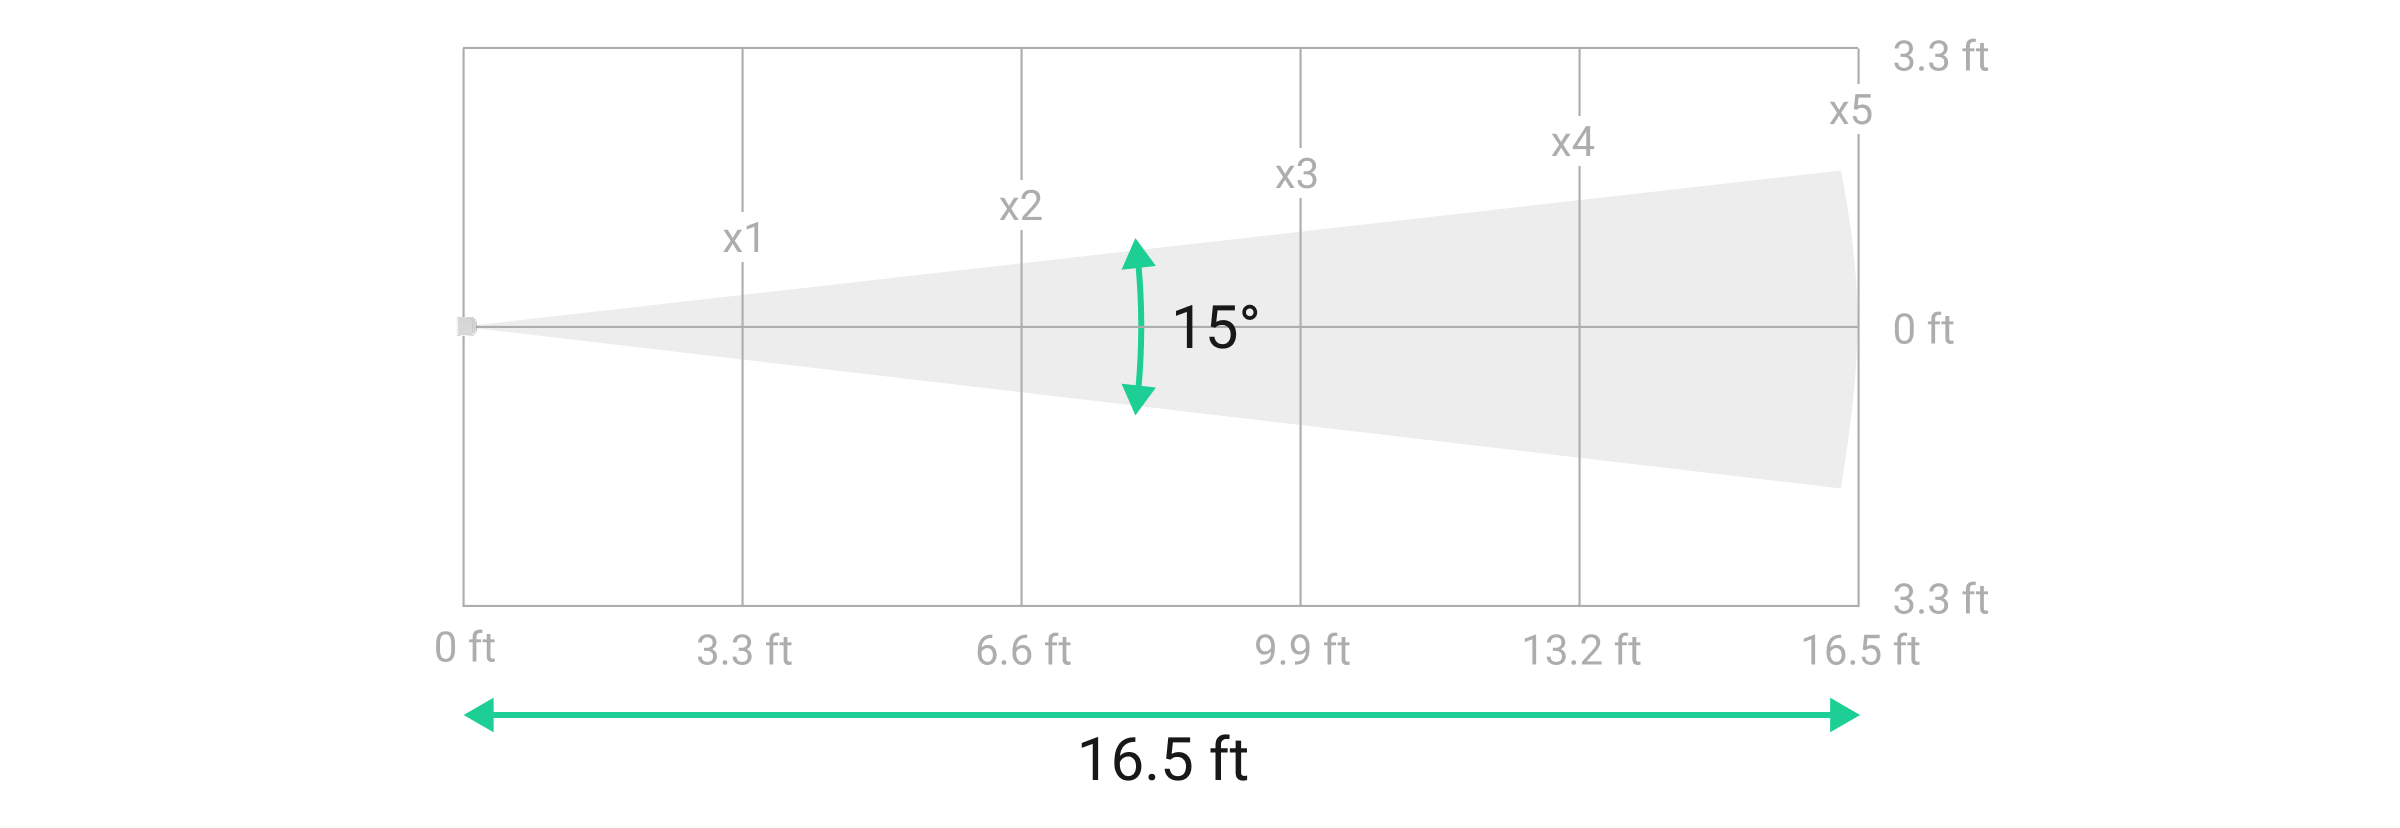
| x | 3.3 | 6.6 | 9.9 | 13.2 | 16.5 |
| xx/2, ft | 0.43 | 0.86 | 1.30 | 1.73 | 2.17 |
| xx, ft | 0.86 | 1.72 | 2.60 | 3.46 | 4.34 |
Do not install the detector
- Near any metal objects or mirrors that can cause signal attenuation and screening.
- Opposite trees or bushes in the detection zone of a PIR sensor of the detector.
- In front of furniture, glass, or other constructions that may block the detector’s view.
- In places where electrical panels, air conditioning units, downspout pipes, or other constructions are located in the device’s detection zone.
- In front of water reservoirs or pools if they are located in the detection zone of the detector.
- In places with low or unstable Jeweller and/or Wings signal strength.
- Closer than 3.3 ft to the hub or radio signal range extender.
Installation
Before installing Curtain Outdoor Mini Jeweller, ensure that you have chosen the optimal location that complies with the requirements of this manual.
There are two options for installing Curtain Outdoor Mini Jeweller:
- On the SmartBracket mounting panel. SmartBracket allows you to install the detector on a vertical or horizontal surface.
- On the angle mount. It allows you to install the detector parallel to the guarded facility’s wall. The detector can be installed on the angle mount with the SmartBracket mounting panel.
Before installation, set the required detection mode on its enclosure.
To install the detector:
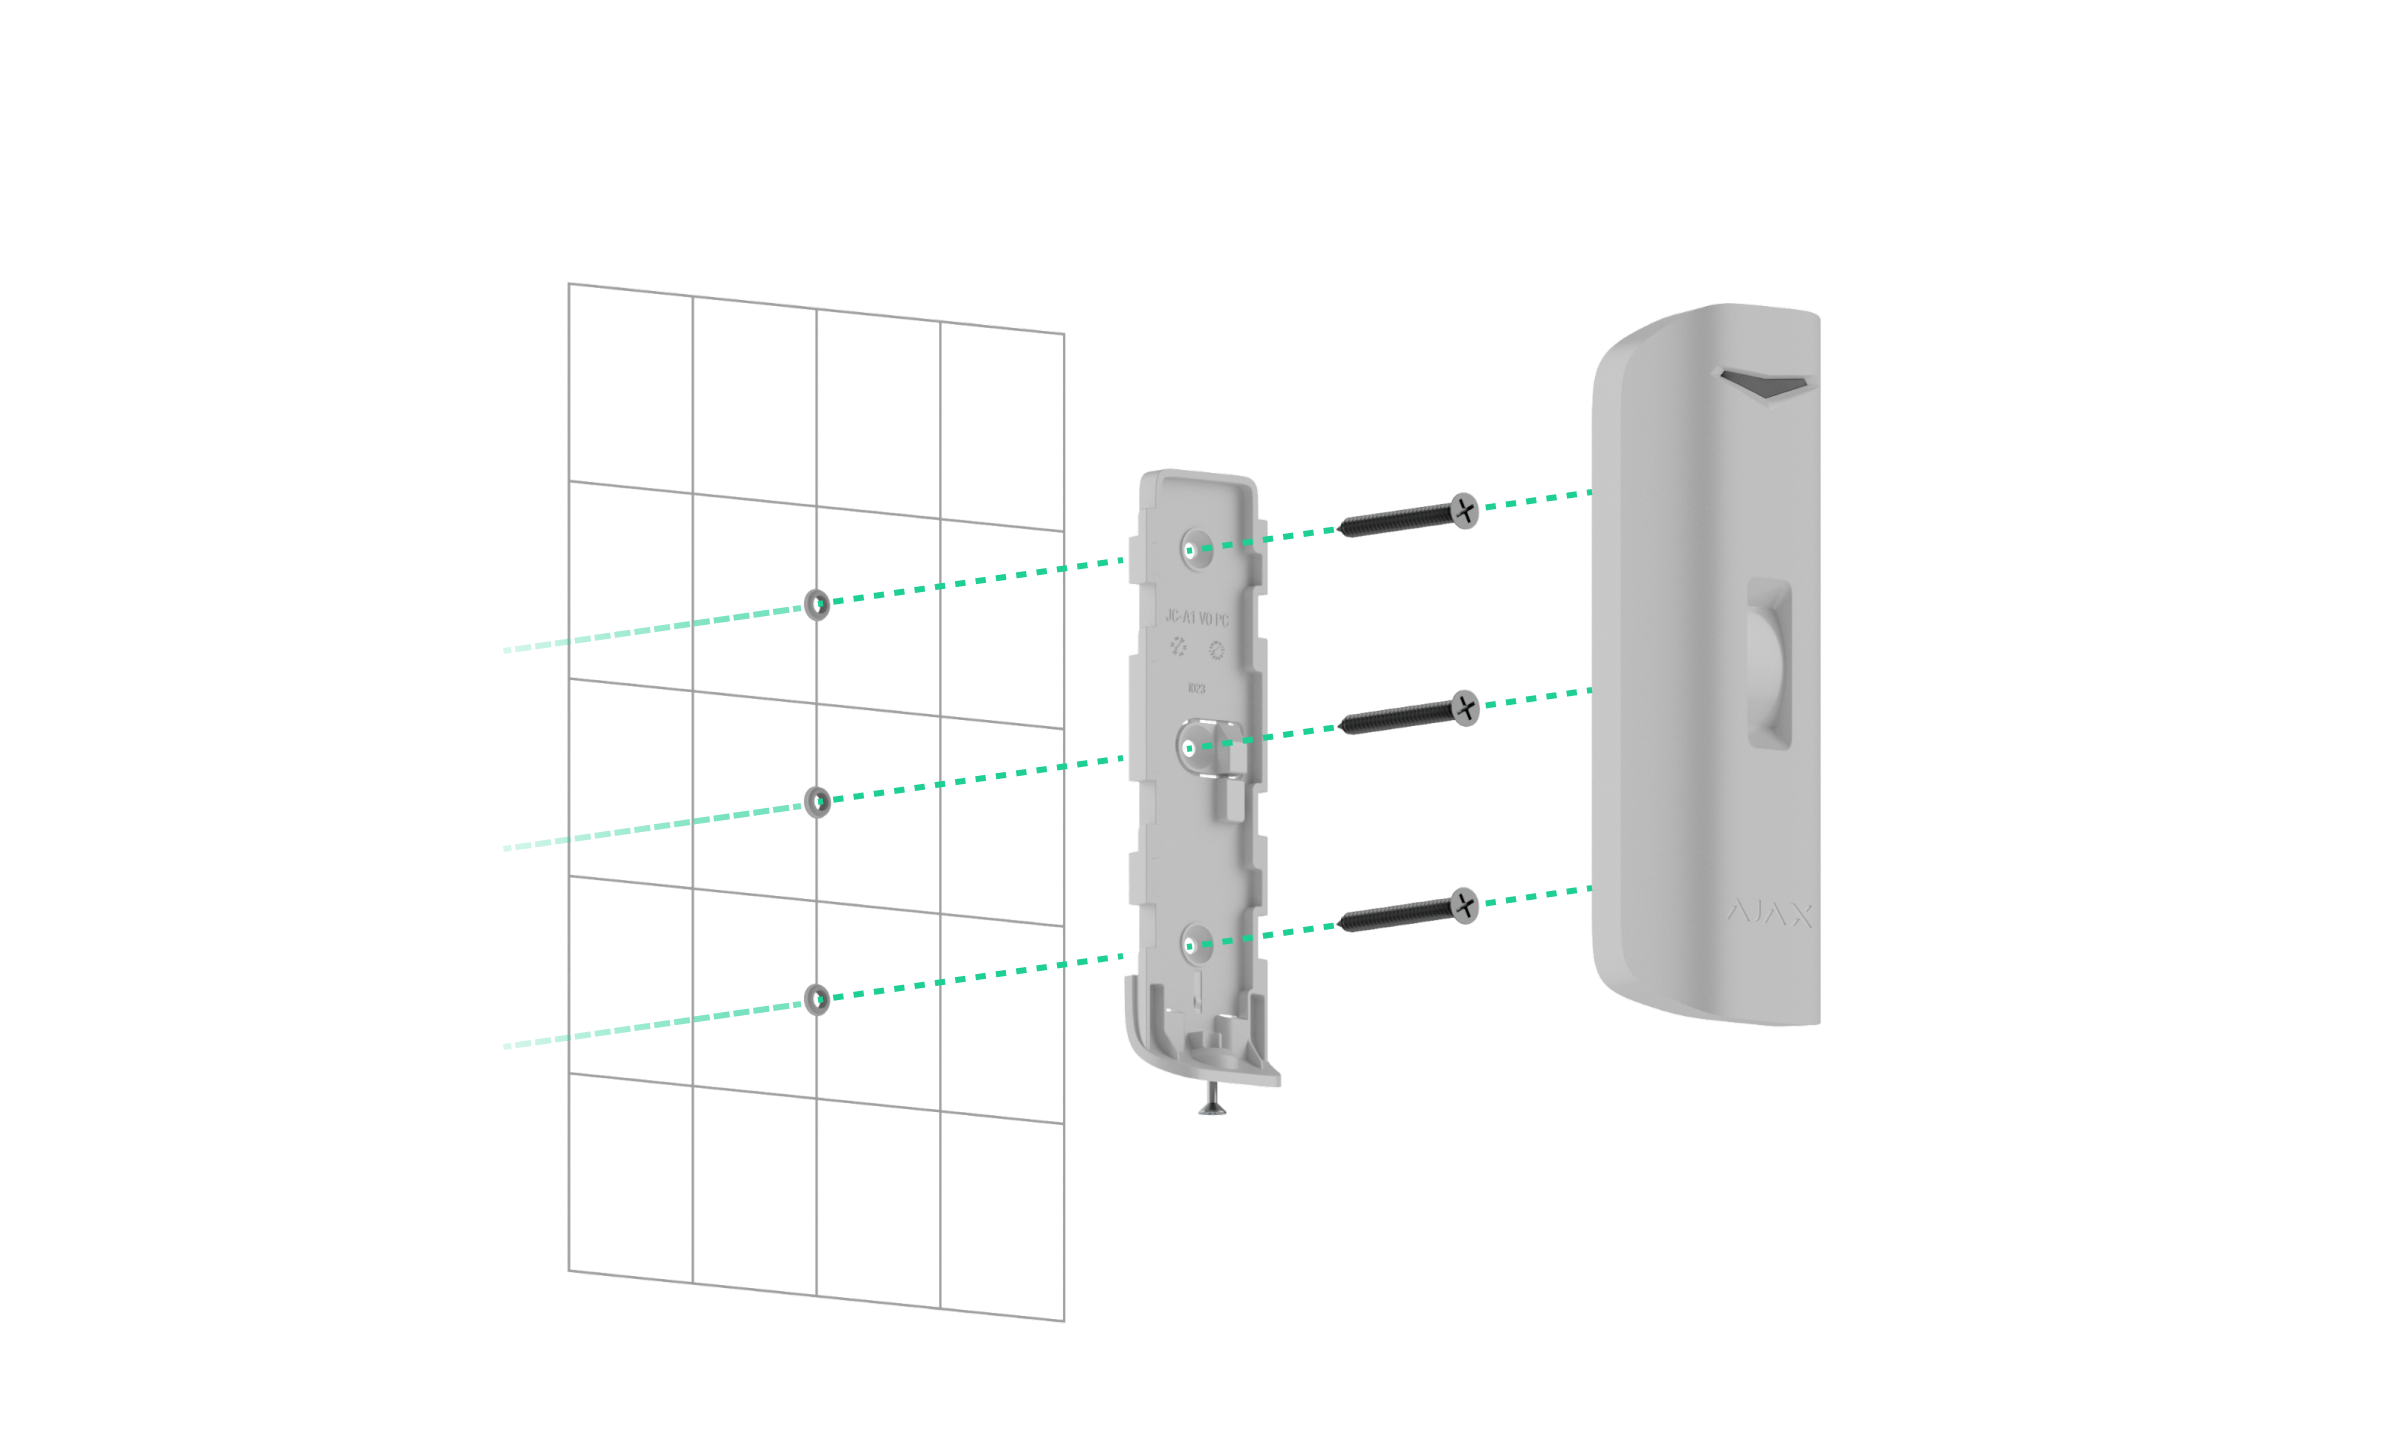
- Remove the SmartBracket mounting panel from the detector. Unscrew the holding screw first and slide the panel down.
- Fix the SmartBracket panel using double-sided adhesive tape or other temporary fasteners. The mounting panel can be installed on a vertical or horizontal surface or in a corner of the premises using the mount angle.
The recommended installation height up to 16.4 ft on the ceiling or 3.3 ft on a side surface, depending on the protected area size.

Double-sided adhesive tape can only be used for temporary installation. The device attached by the tape may come unstuck from the surface at any time. As long as the device is taped, the tamper will not be triggered when the device is detached from the surface,
- Set the Detection mode slider on the device enclosure to the required position.
- Place the detector on the SmartBracket mounting panel and run the Jeweller signal strength test and Wings signal strength test. The recommended signal strength is two or three bars. With a signal strength of one or zero bars, we do not guarantee the device will operate stably. Consider relocating the device, as repositioning even by 8″ can significantly improve the signal strength. If the signal remains poor or unstable after relocation, consider using a radio signal range extender.
- Perform the detection zone test. To check the motion detector, walk around the premises while observing the LED indicator and determine the detection zone of the detector. The maximum range of motion detection is 16.4 ft. If the detector does not respond to movement during the test in 5 cases out of 5, relocate the device.
- Remove the detector from the SmartBracket mounting panel.
- Use bundled screws to attach SmartBracket / the angle mount to the surface.
- If the detector is installed directly on the mounting panel, attach the device to it. When installing the detector to the angle mount, first attach the SmartBracket mounting panel to the mount using bundled screws. Then, install the detector on the mounting panel.
- Leave the device’s detection zone (horizontal angle is 15°) and ensure there is no movement within the detector’s zone of view. This is necessary for the correct calibration of the masking sensor. During calibration, the detector’s LED indicator will flash green every 0.5 sec. Calibration takes up to 2 minutes.

Calibration starts automatically after installing the detector on the mounting panel.
- Tighten the holding screw on the bottom of the detector enclosure. The screw is needed for more reliable fastening and protection of the detector from quick dismantling.
If the LED indicator is not activated after installing the detector on SmartBracket, check the tamper status in the Ajax app, the integrity of the fastening, and the tightness of the detector fixation on the panel. You will receive a notification if the detector is detached from the surface or removed from the mounting panel.
Maintenance
Regularly check the functioning of the detector. The optimal frequency of checks is once every three months. Clean the detector enclosure of dust, cobwebs, and other contaminants as they emerge. Use soft, dry wipes suitable for equipment maintenance.
Do not use substances that contain alcohol, acetone, gasoline, and other active solvents to clean the device.
Pre-installed batteries provide up to 3 years of the detector’s autonomous operation. When the battery is low, the system will send a corresponding notification to Ajax apps. In case of an alarm, the LED indicator will smoothly light up and go out.
Technical specifications
Warranty
The warranty for the products of the Limited Liability Company “Ajax Systems Manufacturing” is valid for 2 years after purchase.
If the device does not operate properly, we recommend contacting the support service first, as most technical issues can be resolved remotely.
Contact Technical Support:
Manufactured by ”AS Manufacturing” LLC
