
Superior HomeSiren Jeweller is a wireless siren for indoor installation. The device notifies of events and alarms with an LED indicator and sound volume up to 105 dB. Supports connection of an additional wired LED. Can operate for up to 5 years with a pre-installed battery.
Superior HomeSiren Jeweller communicates with a hub via the Jeweller secure radio protocol to transmit alarms and events. The communication range in an open space is up to 2,000 meters.
This product line is developed for projects. Only accredited Ajax Systems partners can sell install and administer Superior products.
Superior and Baseline product lines are mutually compatible. This opens up numerous possibilities for building systems of any configuration.
Functional elements
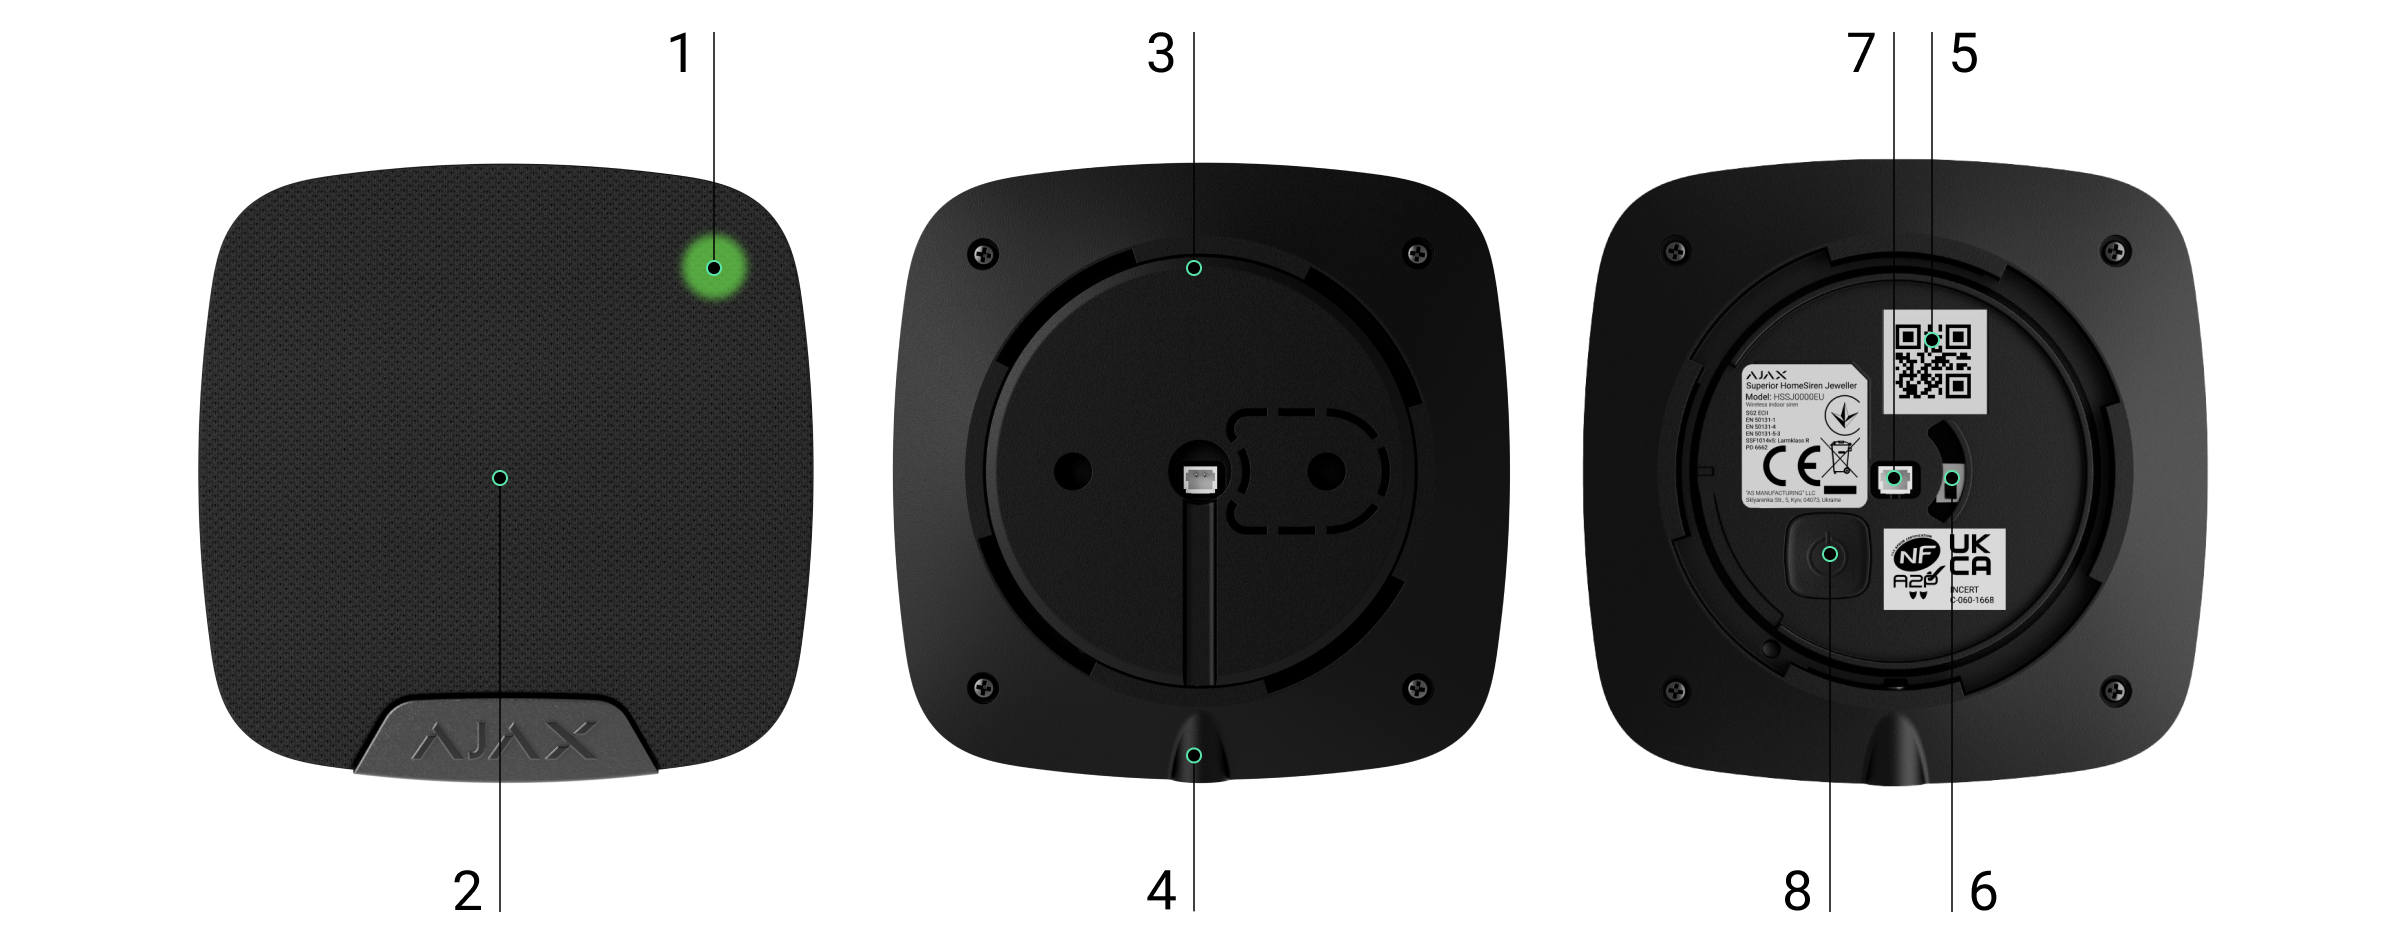
- LED indicator.
- Siren buzzer covered with a fabric.
- SmartBracket attachment panel. Do not break it off. The perforated part is needed for a tamper triggering in case of any attempt to detach the siren from the surface.
- The hole to attach the SmartBracket mounting panel with a holding screw.
- QR code. It is used to pair the siren with an Ajax hub.
- Tamper button. Triggers in case of an attempt to detach the siren from the surface or remove it from the mounting panel.
- Socket to connect an external light indicator.
- Power button.
Compatible hubs and range extenders
An Ajax hub with the firmware OS Malevich 2.16 and higher is required for the siren to operate.
| Hubs | Radio signal range extenders |
Operating Principle
The device is equipped with a loud buzzer – the sound of the siren can be heard from afar. If installed correctly, it would be hard for the intruder to dismount and deactivate the actuated siren. The siren has an autonomous power supply and a robust enclosure with a holding screw to secure the device. The power button is blocked when the system is armed.
The siren performs four tasks:
- Informs about an alarm. The siren responds to tamper and security system alarms. It is loud enough to scare away intruders and attract the neighbors’ attention.
- Indicates the security status. The siren uses LED indication to notify that the object is armed, and reports about Delays When Entering/Leaving with sound. These functions can be helpful when managing the security system using key fobs and keypads: the siren reminds you to disarm the system when you enter the object.
- Chime. Sirens with a special sound inform about the triggering of the opening detectors when the system is disarmed. The feature is used, for example, in stores, to notify employees that someone has entered the building.
- Notifies of triggering until the system is disarmed. The siren’s LED and external LED (if connected) flashes after the sound signal. Thanks to this option, users and passing patrols of security companies can see that the system was triggered.
Jeweller data transfer protocol
Jeweller is a two-way wireless data transfer protocol that provides fast and reliable communication between hub and devices. The siren uses Jeweller to transmit alarms and events.
Sending events to the monitoring station
An Ajax system can transmit alarms to the PRO Desktop monitoring app as well as the central monitoring station (CMS) in the formats of SurGard (Contact ID), SIA (DC-09), ADEMCO 685, and other protocols.
Superior HomeSiren Jeweller can transmit the following events:
- Tamper alarm. Tamper recovery.
- Loss of connection with the hub (or radio signal range extender). Restoration of connection.
- Permanent deactivation/activation of the siren.
- One-time deactivation/activation of the siren.
When an alarm is received, the operator of the security company monitoring station knows what happened and precisely where to send a rapid response team. The addressability of Ajax devices allows sending events to PRO Desktop or the CMS the type of the device, its name, security group, and virtual room. Note that the list of transmitted parameters may differ depending on the kind of CMS and the protocol selected for communication with the monitoring station.
The ID and the number of the device can be found in its states in the Ajax app.
Adding to the system
Superior HomeSiren Jeweller is incompatible with Hub and third-party security control panels.
To connect Superior HomeSiren Jeweller to the hub, the siren must be located at the same secured facility as the system (within the range of the hub radio network). For the siren to work via the ReX or the ReX 2 radio signal range extender, you must first add the siren to the hub, then connect it to ReX or ReX 2 in the settings of the range extender.
The hub and the device operating at different radio frequencies are incompatible. The radio-frequency range of the device may vary by region. We recommend purchasing and using Ajax devices in the same region. You can check the range of operating radio frequencies with the technical support service.
Up to 10 sirens or keypads with a built-in siren may be connected to the Ajax hub.
Before adding a device
- Install an Ajax PRO app.
- Log in to a PRO account or create a new one.
- Select a space or create a new one.

The space functionality is available for apps of such versions or later:
- Ajax Security System 3.0 for iOS;
- Ajax Security System 3.0 for Android;
- Ajax PRO: Tool for Engineers 2.0 for iOS;
- Ajax PRO: Tool for Engineers 2.0 for Android;
- Ajax PRO Desktop 4.0 for macOS;
- Ajax PRO Desktop 4.0 for Windows.
- Add at least one virtual room.
- Add a compatible hub to the space. Ensure the hub is switched on and has internet access via Ethernet, Wi-Fi, and/or mobile network.
- Ensure the space is disarmed, and the hub is not starting an update by checking statuses in the Ajax app.
This product line is developed for projects. Only accredited Ajax Systems partners can install, and administer Superior products.
Connecting to the hub
- Open the Ajax PRO app. Select the hub where you want to add the siren.
- Go to the Devices tab and click Add Device.
- Name the device, scan, or type in the QR code (placed on the siren and the package box), and select a room and a group (if Group Mode is enabled).
- Press Add.
- Switch on the siren by holding the power button for 3 seconds.


If the connection fails, turn the siren off and try again in 5 seconds. Note that if the maximum number of devices has already been added to the hub (depending on the hub model), you will be notified when you try to add a new one.
The siren connected to the hub will appear in the list of hub devices in the Ajax app. Updating the statuses of devices in the list depends on the Jeweller or Jeweller/Fibra settings; the default value is 36 seconds.
Superior HomeSiren Jeweller works with one hub. When connected to a new hub, the siren stops sending events to the old one. When added to a new hub, the siren is not removed from the device list of the old hub. This must be done through the Ajax app.
Malfunctions
When a malfunction is detected, the Ajax app displays a malfunction counter on the device icon. All malfunctions are shown in the siren states. Fields with malfunctions will be highlighted in red.
A malfunction is displayed if:
- The siren temperature is outside acceptable limits.
- The siren enclosure is open (tamper is triggered).
- No connection with the hub or radio signal range extender via Jeweller.
- The siren battery is low.
Icons
The icons display some siren states. To access them:
- Sign in to the Ajax app.
- Select the hub.
- Go to the Devices tab.
| Icon | Meaning |
|
Jeweller signal strength. Displays the signal strength between the hub and the siren. The recommended value is 2–3 bars. |
|
|
The siren has a malfunction. The list of malfunctions is available in the siren states. |
|
|
The siren battery charge level. |
|
| Displayed when the siren is operating via a radio signal range extender. | |
|
The device is in the signal attenuation test mode. |
|
|
Siren is permanently deactivated. |
|
|
Siren has tamper alarms permanently deactivated. |
|
|
Siren is deactivated until the first event of disarming the system. |
|
|
Siren has tamper alarms deactivated until the first event of disarming the system. |
|
| The device has lost connection with the hub or the hub has lost connection with the Ajax Cloud server. | |
|
The device has not been transferred to the new hub. |
States
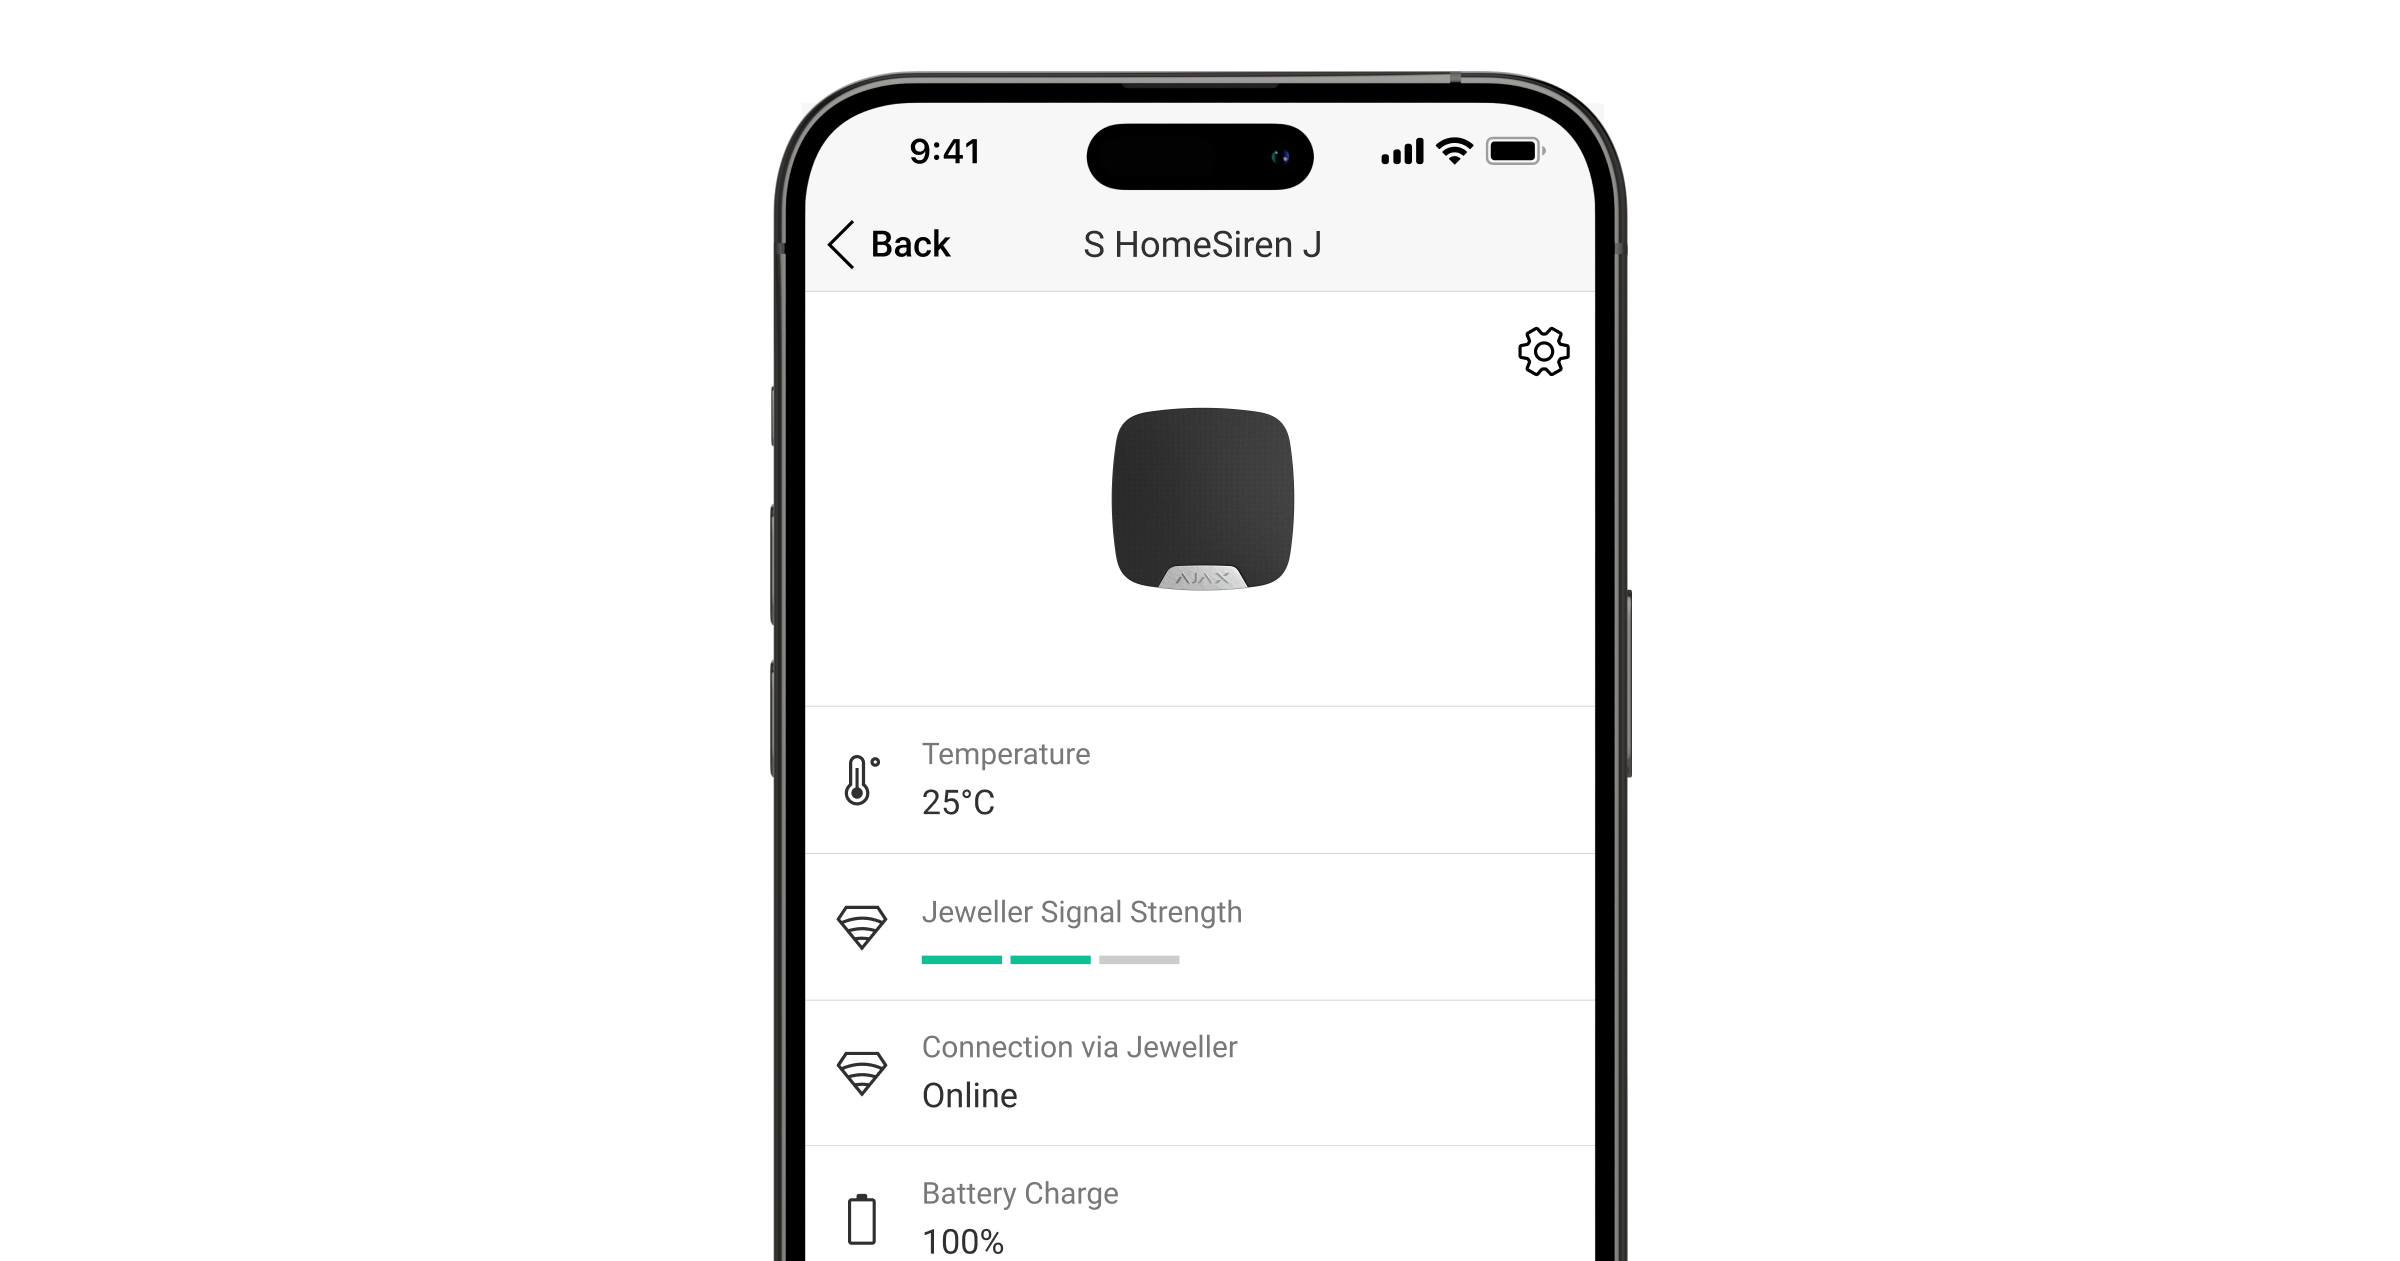
The states include information about the device and its operating parameters. The states of Superior HomeSiren Jeweller can be found in Ajax apps:
- Go to the Devices tab.
- Select Superior HomeSiren Jeweller from the list.
| Parameter | Value |
| Data import | Displays the error when transferring data to the new hub:
|
| Malfunction |
Clicking on The field is displayed if a malfunction is detected. |
| Temperature |
The acceptable error between the value in the app and the temperature at the installation site: 2°C. The value is updated as soon as the module detects a temperature change of at least 1°C. You can create a scenario by temperature to control automation devices. |
| Jeweller Signal Strength |
Signal strength between the siren and the hub (or the range extender) via the Jeweller channel. The recommended value is 2–3 bars. Jeweller is a protocol for transmitting Superior HomeSiren Jeweller events and alarms. |
| Connection via Jeweller | Connection status on the Jeweller channel between the siren and the hub (or the range extender):
|
| Transmitter power |
Displays the selected power of the transmitter. The parameter appears when the Max or Attenuation option is selected in the Signal attenuation test menu. |
| ReX range extender name |
Radio signal range extender connection status. Displayed when the siren works via radio signal range extender. |
| Battery Charge |
Battery level of the device. Displayed as a percentage. |
| Lid | The status of the siren tamper that responds to detachment or opening of the device enclosure:
|
| Alarm Volume | Volume level in case of alarm:
The volume level is measured 1 m away from the siren. |
| Alarm Duration | Duration of sound signal in case of alarm: from 3 seconds to 3 minutes. |
| LED indication | LED indication of the siren settings:
|
| Beeps Settings | |
| Arming/Disarming | When enabled, the siren notifies about arming and disarming by flashing the LED and a short beep. |
| Night Mode Activation/Deactivation | When enabled, the siren notifies you when the Night Mode is switched on/off by flashing the LED and making a short beep. |
| Entry Delays | When enabled, the siren beeps about delays when entering. |
| Exit Delays | When enabled, the siren beeps about delays when leaving. |
| Entry Delays in Night Mode | When enabled, the siren beeps about delays when entering in Night Mode. |
| Exit Delays in Night Mode | When enabled, the siren beeps about delays when leaving in Night Mode. |
| Chime on opening |
When enabled, a siren notifies about opening detectors triggering in the Disarmed system mode. |
| Beep Volume | Displayed if the notifications about arming/disarming, entry/exit delay, and opening are activated. Shows the siren volume level for notifications. |
| Permanent Deactivation | Shows the status of the siren permanent deactivation setting:
|
| One-Time Deactivation | Shows the status of the siren one-time deactivation setting:
|
| Firmware | Siren firmware version. |
| ID | Siren ID. Also available on the QR code on the device enclosure and its package box. |
| Device No. | Number of the device loop (zone). |
Settings
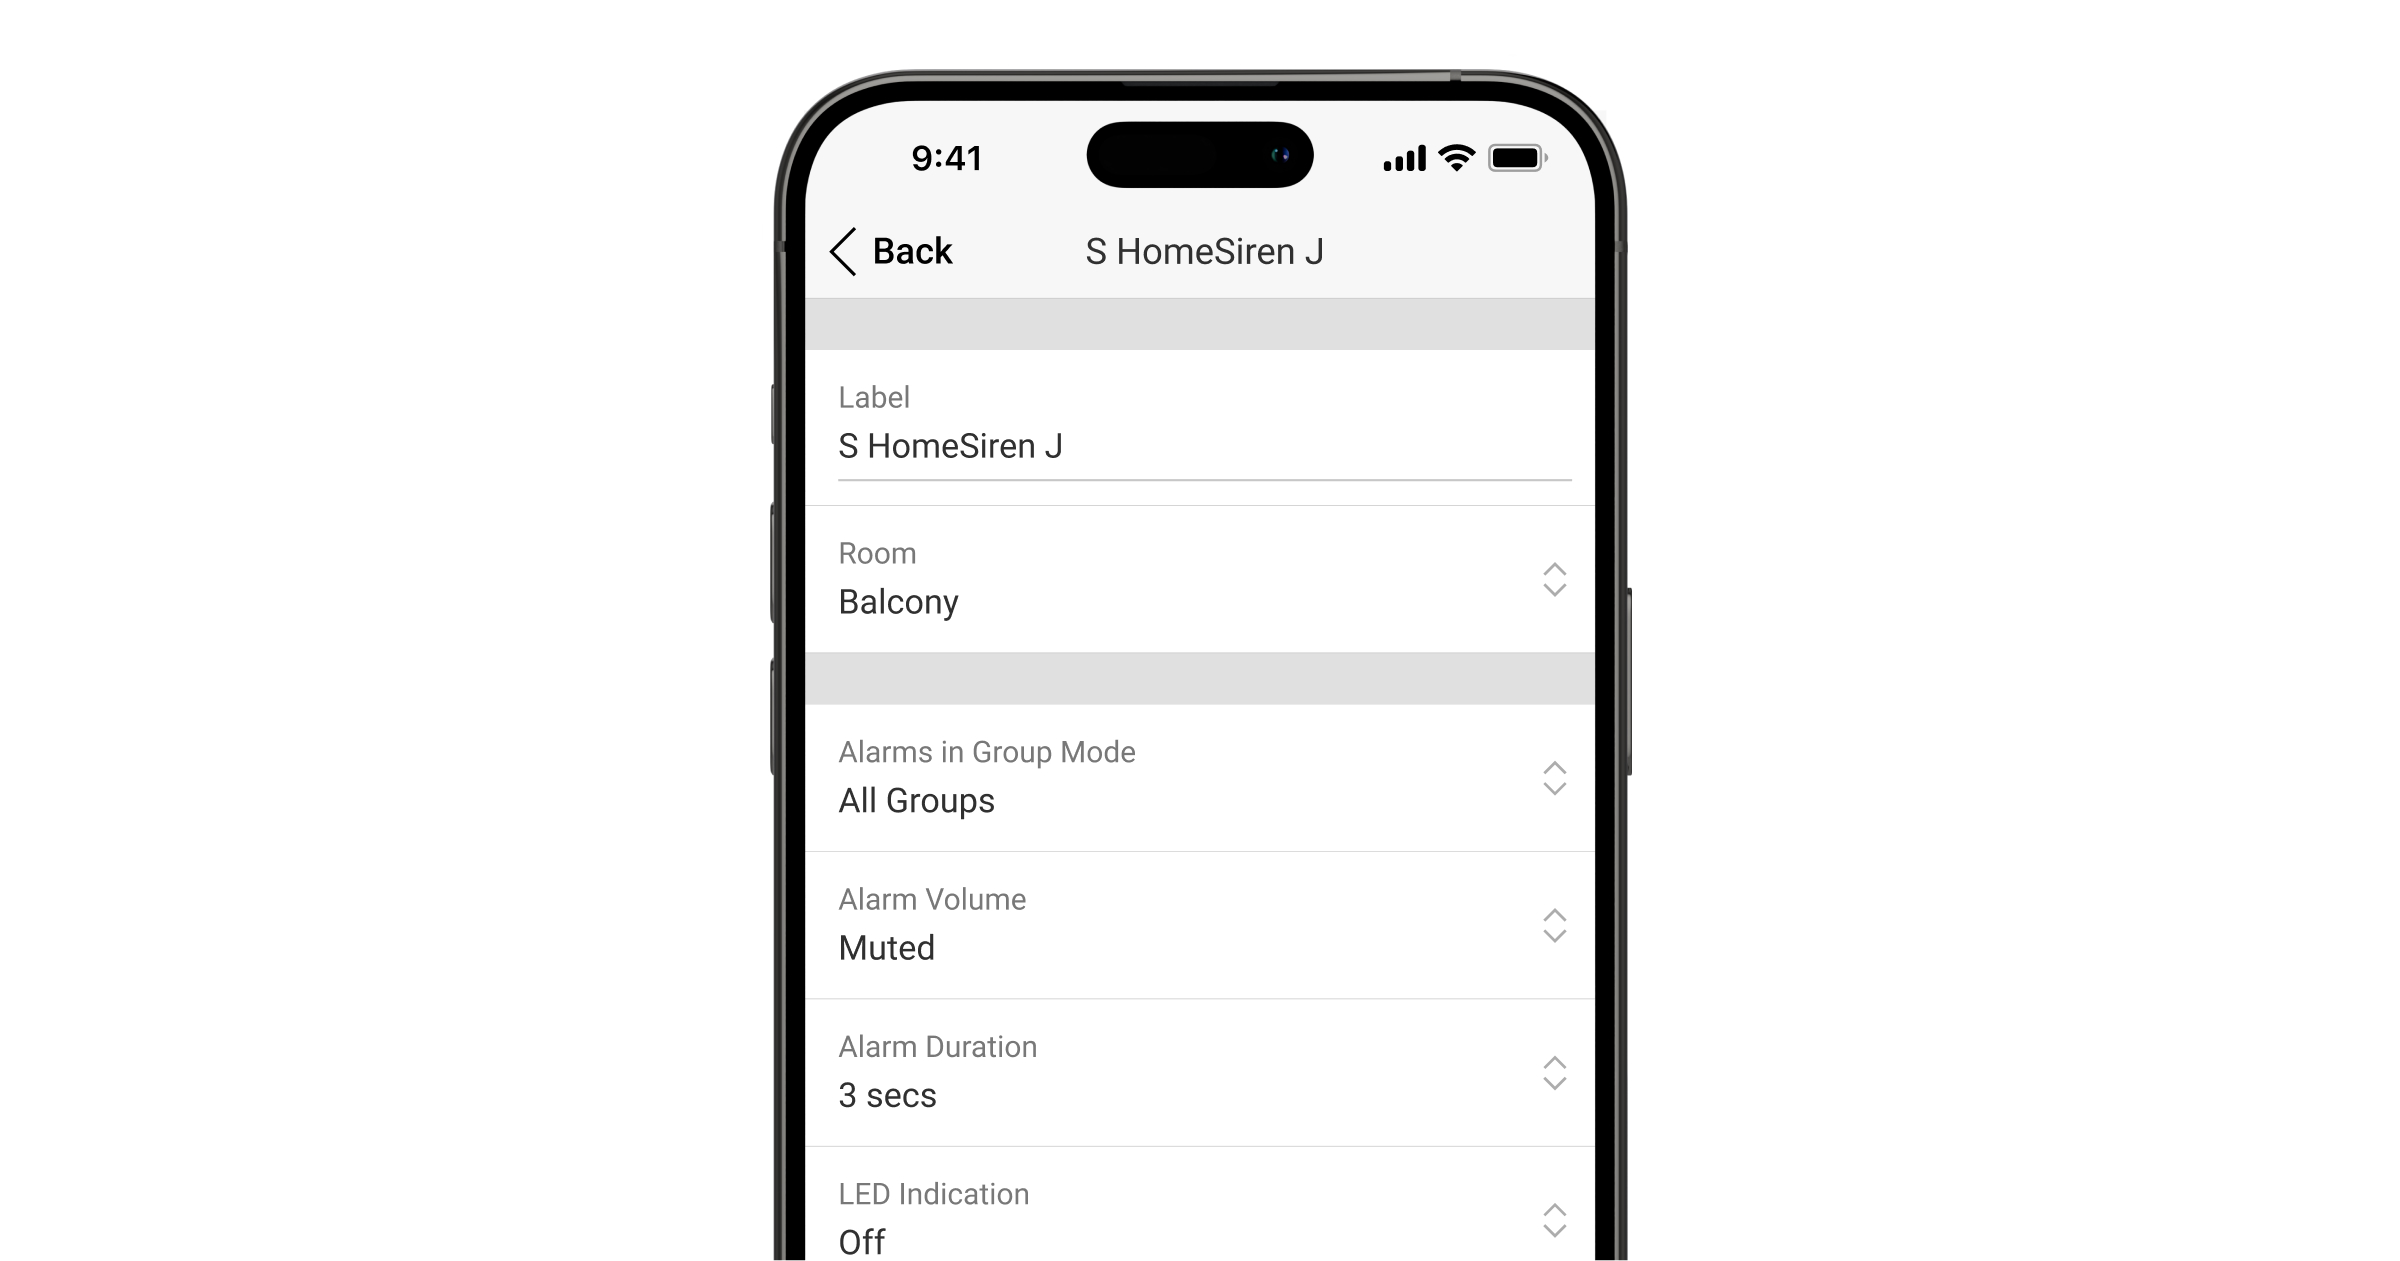
To change the Superior HomeSiren Jeweller settings in the Ajax app:
- Go to the Devices tab.
- Select Superior HomeSiren Jeweller from the list.
- Go to Settings by clicking on the gear icon .
- Set the required parameters.
- Click Back to save the new settings.
| Setting | Value |
| Name |
Name of the siren. Displayed in the list of hub devices, text of SMS and notifications in the events feed. To change the name of the device, click on the text field. The name can contain up to 12 Cyrillic characters or up to 24 Latin characters. |
| Room |
Selecting the virtual room to which Superior HomeSiren Jeweller is assigned. The room name is displayed in the text of SMS and notifications in the events feed. |
| Audible alarm | Selecting when to enable audible alarm:
|
| Alarms in Group Mode | Selecting the group to which the siren is assigned. You can select one or all groups:
Regardless of the selected group, the siren will respond to activation and alarms of the Night Mode. The option is displayed if group mode is enabled on the hub. |
| Alarm Volume | Volume level in case of alarm:
The volume level is measured 1 m away from the siren. |
| Alarm Duration |
Duration of a sound signal in case of alarm: from 3 seconds to 3 minutes. Set in 3 second intervals. |
| LED indication | LED indication of the siren settings:
|
| Beeps Settings |
Opens the siren beeps settings. A detailed description of the settings is available below. |
| Jeweller Signal Strength Test |
Switches the siren to the Jeweller signal strength test mode. |
| Volume Test |
Switches the siren to the volume test mode. |
| Signal Attenuation Test |
Switches the device to the signal attenuation test mode. |
| User Guide | Opens the Superior HomeSiren Jeweller user manual in the Ajax app. |
| Permanent Deactivation |
Allows the user to disable the siren without removing it from the system. Three options are available:
|
| One-Time Deactivation |
Allows the user to disable events of the siren until the first event of disarming the system. Three options are available:
|
| Unpair Device | Unpairs the siren, disconnects it from the hub, and deletes its settings. |
Beep settings
| Event | Meaning |
| Beep on armed mode change | |
| Arming/Disarming | When enabled, the siren notifies you when the system is armed and disarmed by lighting of the LED and by a short beep. |
| Night Mode Activation/Deactivation | When enabled, the siren notifies you when the Night Mode is switched on/off by lighting of the LED and by a short beep. |
| Mute the device when code on keypad is being entered |
Available for Superior HomeSiren Jeweller with firmware versions from 5.60.4.0 to 6.0.0.0 and from 6.56.3.37 or higher, operating with hubs with OS Malevich 2.19 or higher. Mutes the annunciation beeps once the user starts to enter a passcode on the keypad. This feature allows users to focus on the system disarming. |
| Beep on delays | |
| Entry Delays |
When enabled, the siren beeps to signal about a delay when entering. |
| Exit Delays |
When enabled, the siren beeps to signal about a delay when leaving. |
| Entry Delays in Night Mode |
When enabled, the siren beeps to signal about a delay when entering in the Night Mode. |
| Exit Delays in Night Mode |
When enabled, the siren beeps to signal about a delay when leaving in the Night Mode. |
| Fast beep on delays | |
| Fast beep on Entry delay expiration |
Available for Superior HomeSiren Jeweller with firmware versions from 5.60.4.0 to 6.0.0.0 and from 6.56.3.37 or higher, operating with hubs with OS Malevich 2.19 or higher. Notifies the user that the Delay When Entering time is running out. There are 4 options to choose from when the fast beep should start:
|
| Fast beep on Exit delay expiration |
Available for Superior HomeSiren Jeweller with firmware versions from 5.60.4.0 to 6.0.0.0 and from 6.56.3.37 or higher, operating with hubs with OS Malevich 2.19 or higher. Notifies the user that the Delay When Leaving time is running out. There are 4 options to choose from when the fast beep should start:
|
| Beep when disarmed | |
| Chime on opening |
When this option is enabled, the siren informs you with a short beep that the opening detectors are triggered in the Disarmed system mode. |
| Beep volume | Selecting the siren volume level for notifications about arming/disarming, entry/exit delay, and opening:
The volume level is measured 1 m away from the siren. |
Setting the siren response to device alarms
In Ajax apps, you can separately configure the siren’s reaction to the alarms of each detector in the system. The function is useful if you do not need to activate the siren in case of the alarm of a specific device. For example, to LeaksProtect water leak detector triggering.
To set the siren response to a device alarm:
- Open the Ajax app.
- Go to the Devices tab.
- Select the device for which you want to configure the siren response from the list.
- Go to the device Settings by clicking on the gear icon .
- Find the Alert with a siren option and select the toggles which will activate it. Enable or disable the function.
- Repeat steps 3-5 for the rest of the system devices.
By default, the siren response is enabled for alarms of all devices in the system.
Setting the tamper alarm response
In Ajax apps, you can configure the siren’s response to enclosure alarms of each system device. When the function is activated, the siren will emit a sound signal when triggering the tamper button or the accelerometer of the device.
To set the siren response to a tamper alarm:
- Open the Ajax app.
- Go to the Devices tab.
- Select the hub and go to its Settings .
- Select the Service menu.
- Go to the section Sounds and Alerts.
- Enable the If lid of hub or any detector is open toggle.
- Click Back to save the new settings.
Tamper button reacts to opening and closing of the enclosure, regardless of the armed mode of the device or system, the accelerometer reacts to an attempt to displace or dismantle the device.
Setting the response to pressing the panic button in the Ajax apps
You can configure the siren response to alarm when the panic button is pressed in the Ajax apps. To do this, follow these steps:
- Open the Ajax app.
- Go to the Devices tab.
- Select the hub and go to its Settings .
- Select the Service menu.
- Go to the section Sounds and Alerts.
- Enable the If in-app panic button is pressed toggle.
Setting the siren after-alarm indication
The siren can inform about triggering in the armed system by means of LED indication.
The option functions as follows:
- The system registers the alarm.
- The siren activates an alarm signal. The duration and volume of the signal depend on the device settings.
- The siren LED and external LED (if connected) flashes twice (once every 3 seconds) until the system is disarmed.
Thanks to this feature, system users and security companies patrols can understand that the alarm has occurred.
The siren after-alarm indication does not work for always active detectors, if the detector was triggered when the system was disarmed.
To enable the siren after-alarm indication, in Ajax PRO app:
- Go to siren settings:
- Hub → Settings → Service → LED Indication.
- Hub → Settings
- Specify which events the sirens will inform about by double blinking of the LED indicator before the system is disarmed:
- Confirmed intrusion/hold-up alarm.
- Single intrusion/hold-up alarm.
- Lid opening.
- Select the required sirens in the Devices menu. Click Back to save the parameters.
- Click Back. All values will be applied.
Setting specific alerts on Alarm Cancellation and Alarm Abort
Selecting devices to alert on Alarm Cancellation and Alarm Abort is only available in Ajax PRO apps. Settings are available for hubs with firmware version OS Malevich 2.19 or higher.
You can select which devices should beep if the alarm is cancelled and which should beep if the alarm is aborted in the hub settings in PRO apps. The Alarm Cancellation Annunciation and Alarm Abort Annunciation features are required for systems that should comply with ANSI/SIA CP-01-2019 standard*.
To select the devices to annunciate on alarm cancellation and alarm abort in the Ajax PRO app:
- Select the required hub and go to:
- Settings → Service → Arming/Disarming Process
- Settings
- Ensure that ANSI/SIA CP-01-2019 is selected for the Compliance with Standard setting.
- Select the devices for Specific alert on Alarm Cancellation and Specific alert on Alarm Abort options.
- Click Back to apply the settings.
Features are available for Superior HomeSiren Jeweller with firmware versions from 5.60.4.0 to 6.0.0.0 and from 6.56.3.37 or higher
* Superior HomeSiren Jeweller is not certified according to ANSI/SIA CP-01-2019.
How to set Chime
If Chime on opening is enabled and the system is disarmed, the sirens notify you with a short beep if the opening detectors are triggered. The feature is used, for example, in stores, to notify employees that someone has entered the building.
Notifications are configured in two stages: setting up sirens and setting up opening detectors. This article provides more information about Chime and how to set up the siren and detector.
Indication

| Event | Indication | Note |
| Alarm | Emits an acoustic signal and all LED signaling ceases. | The duration and volume of the sound signal depend on the siren settings. |
|
An alarm was detected in the armed system (if after-alarm indication is enabled) |
The siren LED and external LED (if connected) blinks twice approximately every 3 seconds until the system is disarmed. | The indication turns on after the siren has completely played the alarm signal. |
| Switching on the device | LED lights up once. | |
| Switching off the device | LED lights up for 1 second, then blink three times. | |
| Registration failed | LED lights up and goes out, then the siren switches off. | |
| The system is armed | Flashes once with a LED and emits a short beep. |
If Beep on Armed Mode Change and LED Indication are enabled. The volume of the sound signal depends on the Beep Volume settings. |
| Security system is disarmed | Flashes twice with a LED and emits two short beeps. |
If Beep on Armed Mode Change and LED Indication are enabled. The volume of the sound signal depends on the Beep Volume settings. |
| Siren in the armed mode | LED lights up for a short time every 3 seconds. | If LED Indication is configured in Armed mode. |
| Battery low | LED smoothly lights up and goes out when the system is armed or disarmed (if the indication is activated), the tamper is actuated or alarm is given. |
Functionality testing
The Ajax system offers several types of tests to help select the correct installation place for the devices. Tests do not start immediately. However, the waiting time does not exceed the duration of one “hub—device” polling interval. Polling interval can be checked and configured at hub settings (Hub → Settings ![]() → Jeweller or Jeweller/Fibra).
→ Jeweller or Jeweller/Fibra).
To run a test, in the Ajax app:
- Select the required hub.
- Go to the Devices tab.
- Select Superior HomeSiren Jeweller from the list.
- Go to Settings .
- Select a test:
- Run the test.
Device placement
The device is designed for indoor use only.
When choosing where to place Superior HomeSiren Jeweller, consider the parameters that affect its operation:
- Jeweller signal strength.
- Distance between the siren and the hub or range extender.
- Presence of obstacles for radio signal and sound transmission: walls, interfloor ceilings, large objects located in the room.
Consider the recommendations for placement when developing a project for the security system of the facility. The security system must be designed and installed by specialists. A list of recommended partners is available here.
Recommended installation height — 2.5 meters and more. This will complicate the access to the device for intruders in case of intrusion.
Signal strength
The Jeweller signal strength is determined by the number of undelivered or corrupted data packages over a certain period of time. The icon ![]() on the Devices
on the Devices ![]() tab indicates the signal strength:
tab indicates the signal strength:
- Three bars — excellent signal strength.
- Two bars — good signal strength.
- One bar — low signal strength, stable operation is not guaranteed.
- Crossed out icon — no signal.
Check the Jeweller signal strength before final installation. With a signal strength of one or zero bars, we do not guarantee stable operation of the device. Consider to relocate the device as repositioning even by 20 cm can significantly improve the signal strength. If there is still poor or unstable signal after the relocation, use a radio signal range extender.
Do not install the siren
- Outdoors. This can lead to siren failure.
- In places where the acoustic signal can be attenuated (inside furniture, behind thick curtains, etc.).
- Nearby any metal objects or mirrors causing attenuation and screening of the signal.
- Inside premises with temperature and humidity outside the permissible limits. This could damage the siren.
- Closer than 1 meter from the hub or radio signal range extender. This can lead to a loss of communication with the siren.
- In a place with a low signal level. This may result in the loss of the connection with the hub.
Installation
Before installing Superior HomeSiren Jeweller, ensure that you have selected the optimal location that complies with the requirements of this manual.
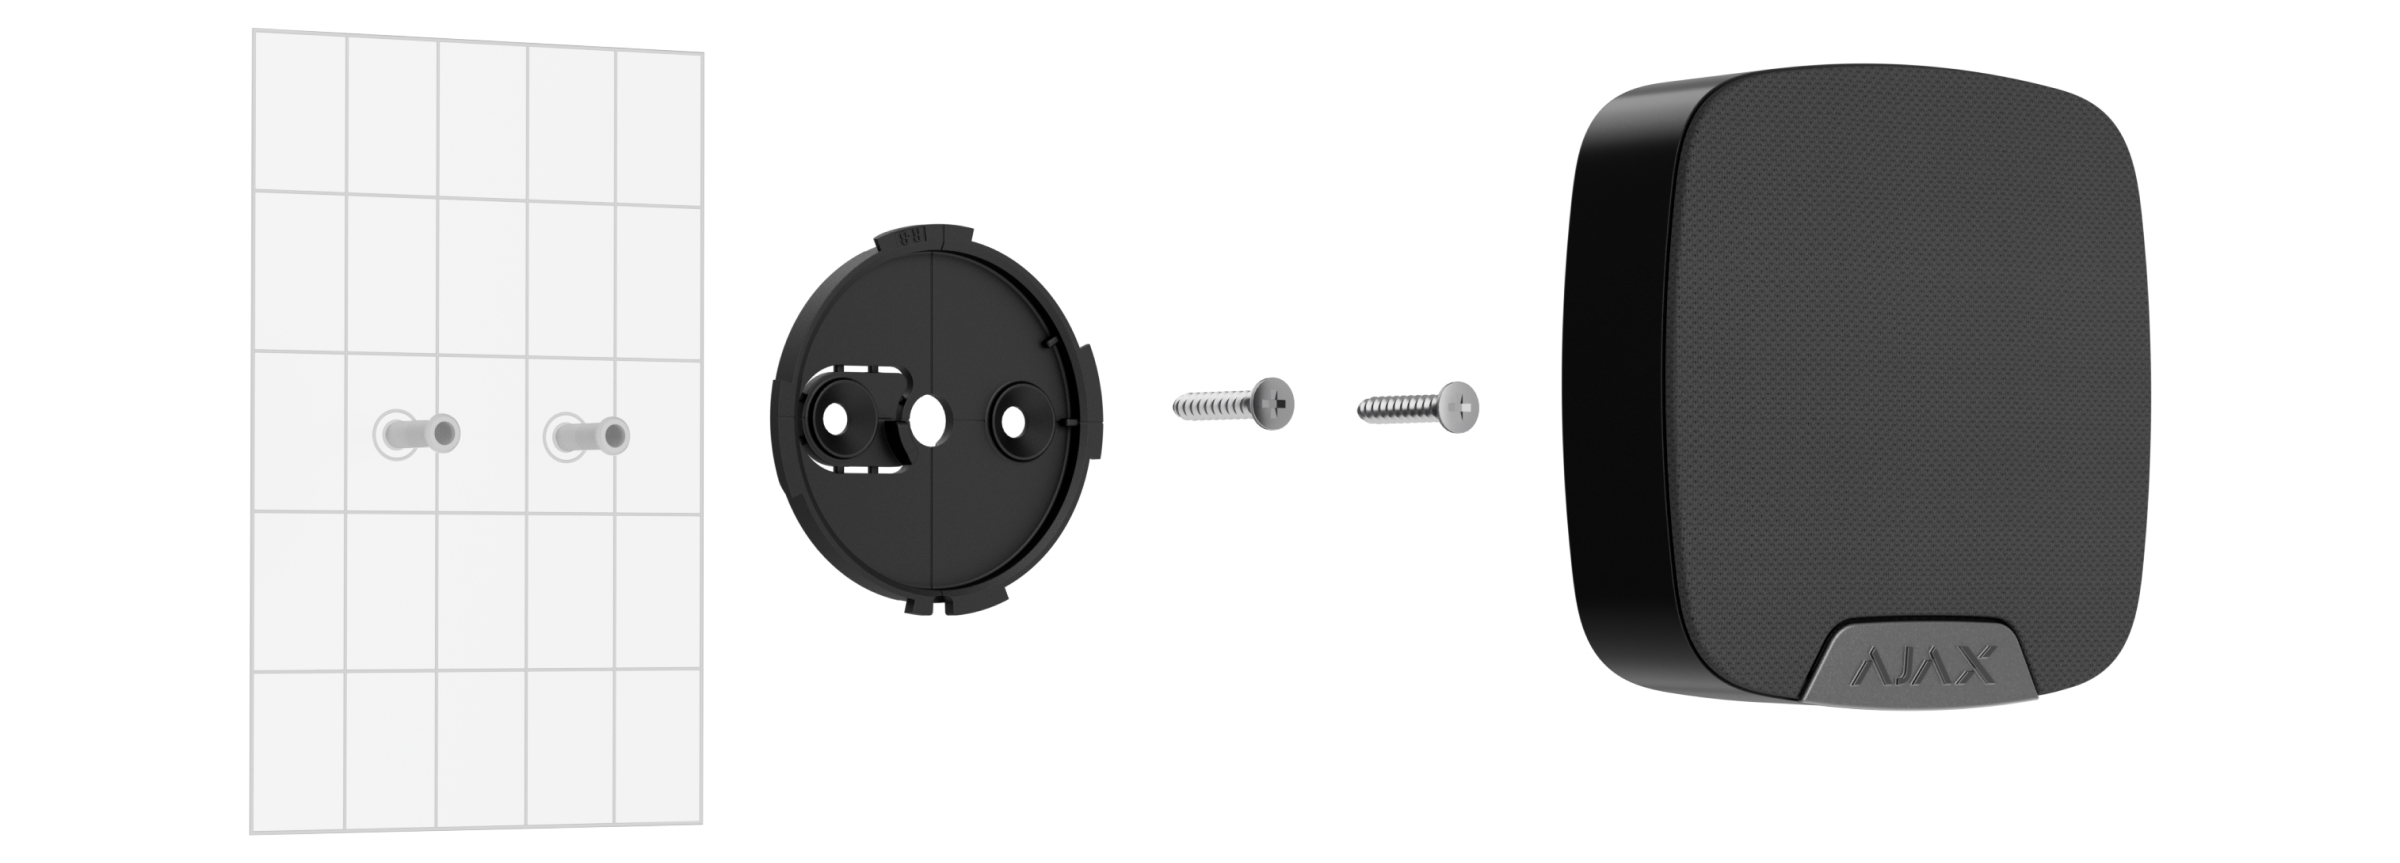
To mount a siren:
- Remove the SmartBracket mounting panel from the siren by turning it counterclockwise. Unscrew the holding screw first.
- Fix the SmartBracket panel using double-sided tape to the selected installation spot.
Double-sided tape can only be used for temporary installation. The device attached by the tape may come unstuck from the surface at any time. As long as the device is taped, the tamper will not be triggered when the device is detached from the surface.
- Place the siren on SmartBracket and turn it clockwise. The device LED indicator will flash. It is a signal indicating that the tamper on the siren is closed.
If the LED indicator doesn’t light up during placing the siren on SmartBracket, check the tamper status in the Ajax app, the integrity of the fastening, and the tightness of the siren fixation on the panel.
- Run the Jeweller signal strength test. The recommended signal strength is two or three bars. If the signal strength is low (a single bar), we do not guarantee stable operation of the device. Consider relocating the device as repositioning even by 20 cm can significantly improve the signal strength. If there is still poor or unstable signal after the relocation, use a radio signal range extender.
- Run the Volume Test.
- Run Signal Attenuation Test. During the test, the signal strength is artificially reduced and increased to simulate different conditions at the installation location. If the installation spot is chosen correctly, the siren will have a stable signal strength of 2–3 bars.
- If the tests are passed successfully, remove the siren from SmartBracket.
- Fix the SmartBracket panel on the surface using bundled screws.
When using other fasteners, ensure they do not damage or deform the panel. To make mounting easier, you can pre-drill the screw holes while the mount is still secured with double-sided tape.
- Place the siren on the SmartBracket mounting panel.
- Tighten the holding screw on the bottom of the siren’s enclosure. The screw is needed for more reliable fastening and protection of the siren from quick dismantling.

External LED connection
An external LED can be connected to Superior HomeSiren Jeweller. It works in parallel with the built-in LED of the device and fully replicates its signals.
For connection, use the socket on the rear side of the siren body and observe the polarity during the connection. Black terminal wire — “+” contact.
Output power supply: 3 V⎓, 10 mA.
Maintenance
Check the functioning of the siren regularly. The optimal frequency of checks is once every three months. Clean the device enclosure of dust, cobwebs, and other contaminants as they emerge. Use a soft dry wipes suitable for equipment care.
Do not use substances that contain alcohol, acetone, petrol, and other active solvents to clean the siren.
The batteries installed in the siren ensure up to 5 years of autonomous operation (with the inquiry frequency by the hub of 1 minute) or at least 6 hours of the buzzer sound.
If the battery is discharged, the security system will send an early warning about replacing the batteries. When the armed mode is activated, the LED will slowly light up green and go out.
Technical specifications
Warranty
Warranty for the Limited Liability Company “Ajax Systems Manufacturing” products is valid for 2 years after the purchase.
If the device does not function correctly, please contact the Ajax Technical Support first. In most cases, technical difficulties can be resolved remotely.
Contact Technical Support:
Manufactured by “AS Manufacturing” LLC
