Beta versions of Ajax PRO apps support three types of companies:
- Service (installation) companies — add devices, manage hub settings, and invite users to manage security system modes.
- Monitoring companies — monitor events and alarms of Ajax security systems.
- Mix companies — combine the capabilities of service and monitoring companies.
The capabilities of monitoring companies are described in the PRO Desktop user manual. Monitoring companies are available in release versions of Ajax apps. Therefore, we will not dwell on them.
In this article, we will talk about new opportunities available for service and mix companies. Such companies are only available in beta versions of Ajax apps.
Differences of Ajax PRO apps
In PRO apps for PC, you can create companies, manage their settings, add employees, and manage their rights. You can also monitor and remotely configure Ajax security systems with PRO apps for PC.
PRO apps for smartphones are convenient for installation engineers, as they allow you to connect hubs to a company and manage the settings of available systems.
| PRO Desktop | PRO app for smartphones | |
| Installation and configuration of Ajax security systems | + | + |
| Assigning hubs to a company | + | + |
| Creation of companies | + | — |
| Editing information about companies | + | — |
| Adding employees | + | — |
| Changing employee rights | + | — |
| Alarm and events monitoring | + | — |
Information for beta testers
For the correct operation of new functionality, install beta versions of Ajax apps. You need to install beta versions of apps for both smartphones and PC. Please do not use the beta apps side simultaneously with release versions.
Your feedback is very important. Please report any bugs, errors, inconveniences, or anything else that will help to improve your experience with Ajax security systems. You can do this through the Report a problem menu in Ajax apps.
How to report a problem in an Ajax iOS app
How to report a problem in an Ajax Android app
How to report a problem in an Ajax app for Windows or macOS
General information
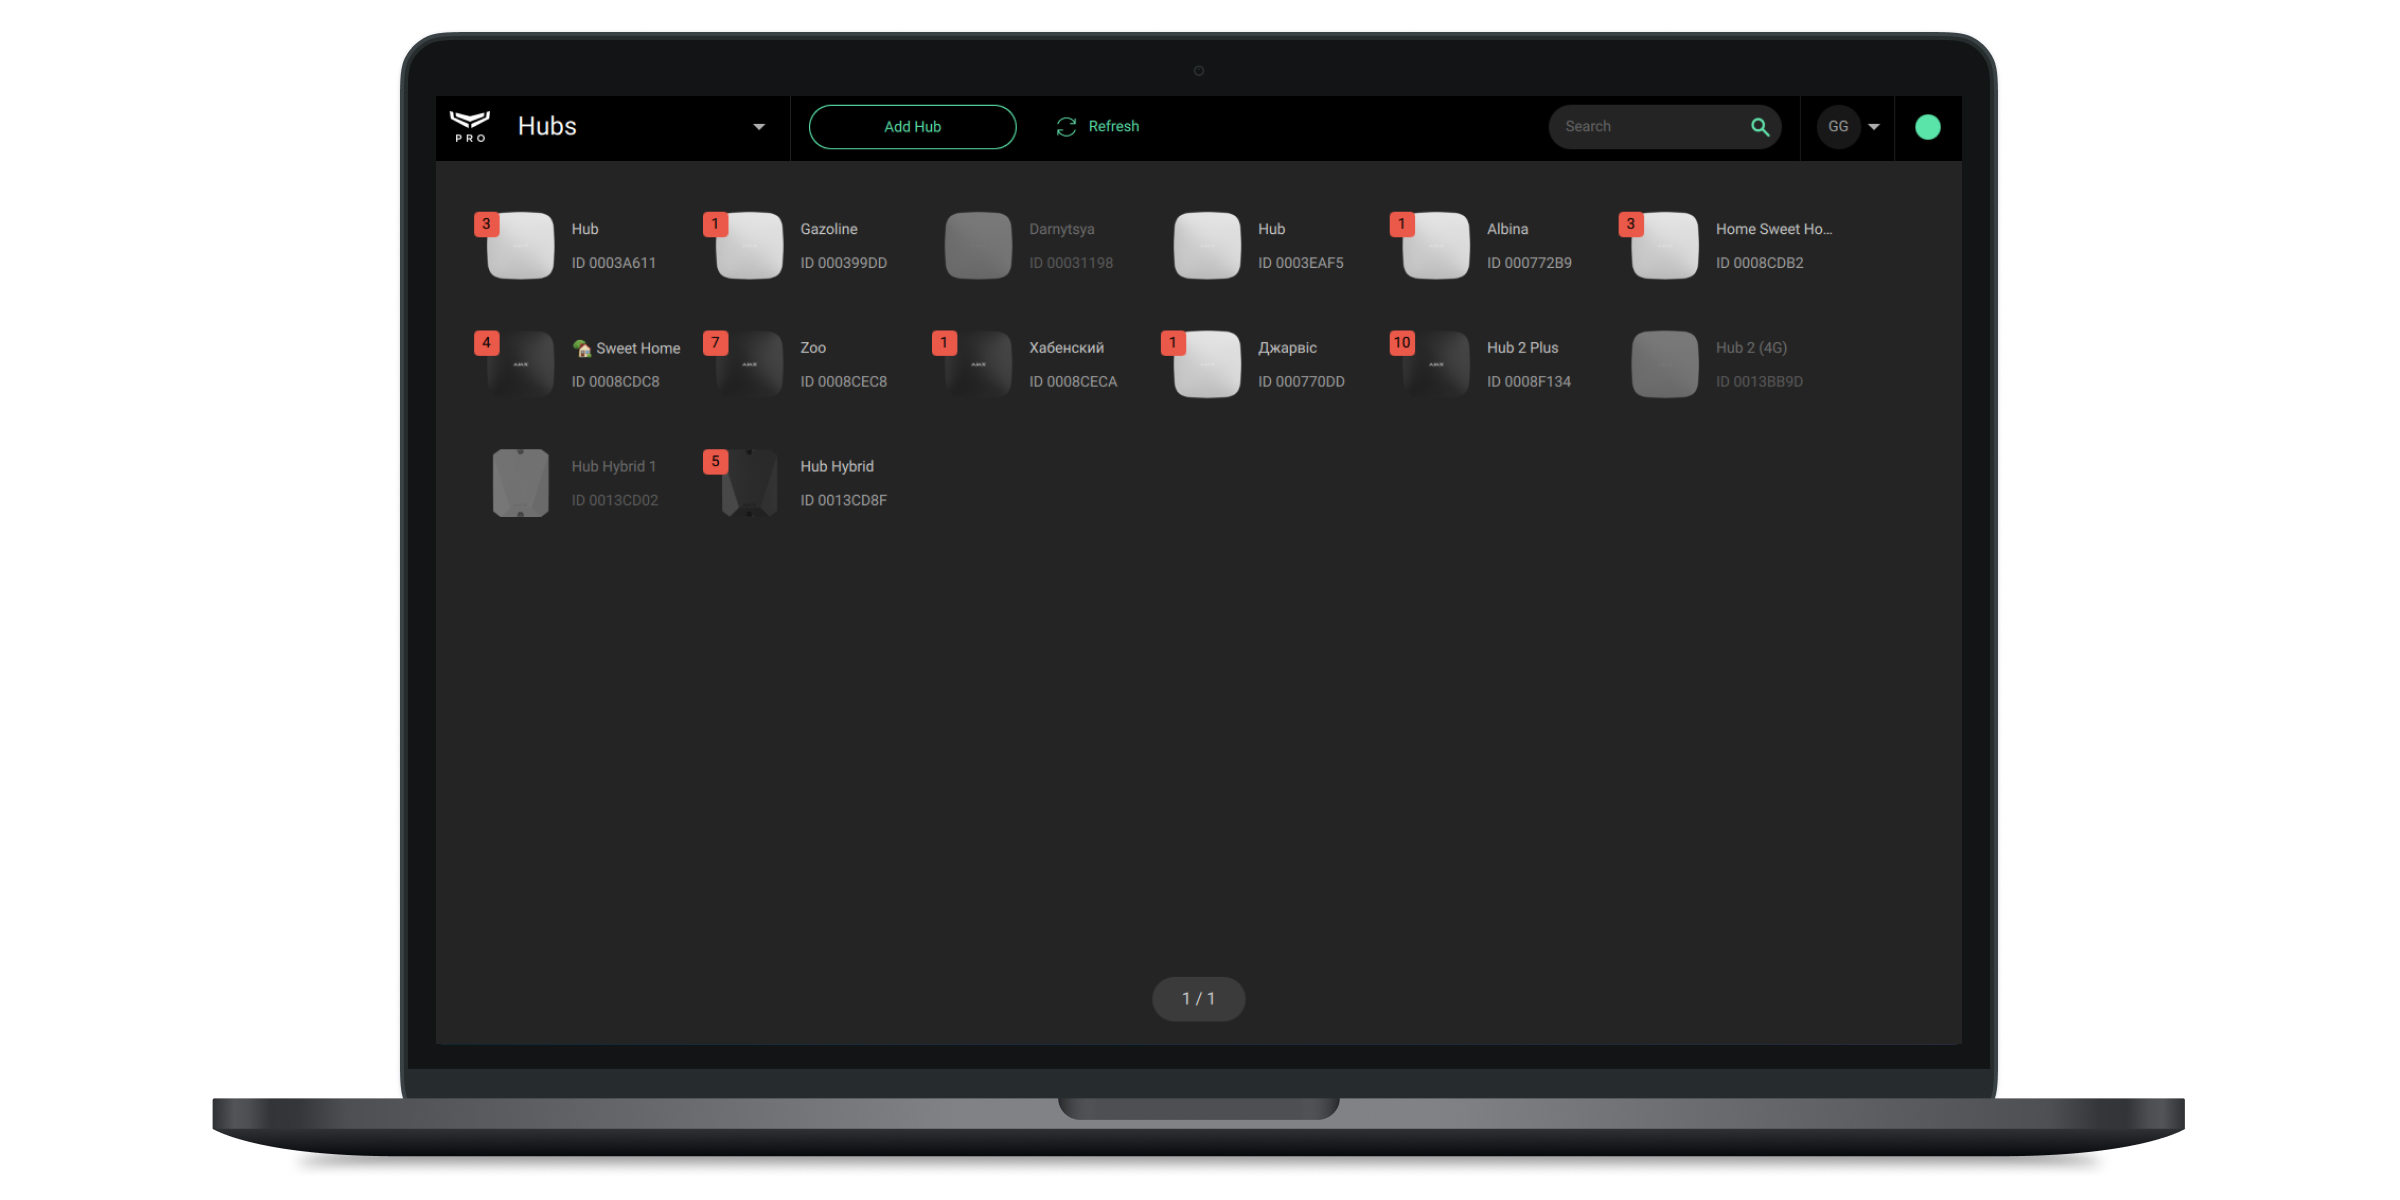
Regardless of its type, each company assigned to the hub is considered a single user. It does not matter how many employees are assigned to this company.
Any number of companies can be assigned to the hub within the user limit. The maximum number of hub users depends on the control panel model.
You can assign the hub to a monitoring company through the Security companies menu. A user with administrator rights or a PRO with rights on system configuration can do this.
Installers and heads of installers can use both mobile and PC apps to configure and set up Ajax security systems.
Installers and heads of installers can be assigned to an unlimited number of companies. A PRO account can have different roles in different companies.
Creation of PRO account and login into the app
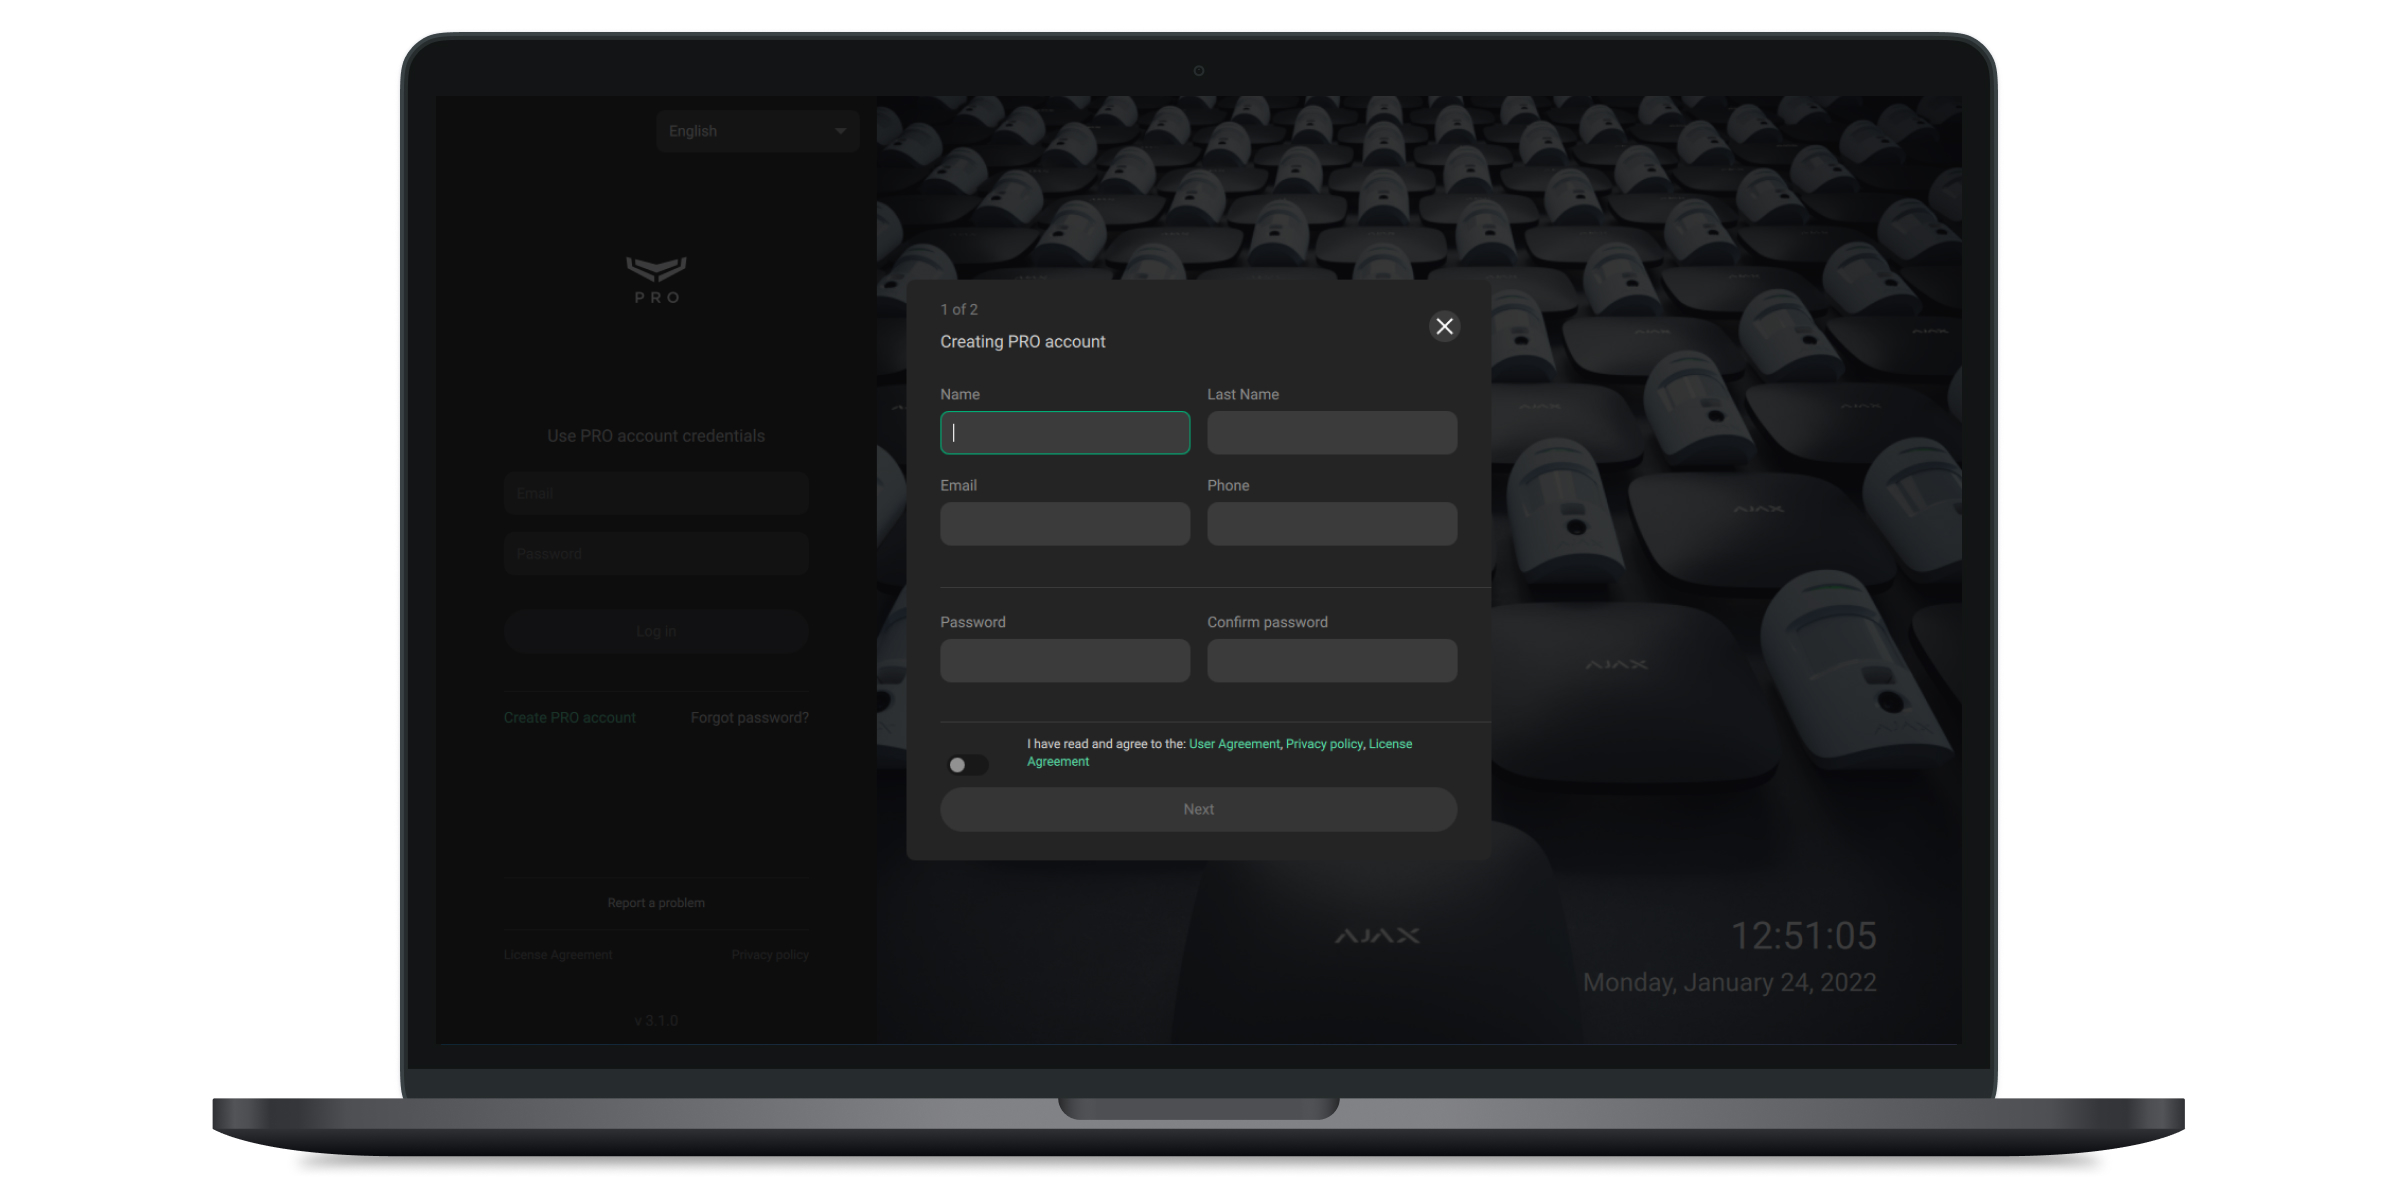
A PRO account is required to log into PRO Desktop. A PRO account is different from an account created in the Ajax Security System app. Therefore, you will not log into the PRO app with the user name and password from the regular app.
If you already have a PRO account registered in the app for smartphone or PC app, fill in the E-mail and Password fields on the left side of the screen and click Login.
If you have not used the PRO app before, click Create a PRO account and follow the instructions in the app.
When creating a PRO account, you can use the same e-mail and phone number as your Ajax Security System account. Please, note in this case, it will be different accounts.
Creation of company
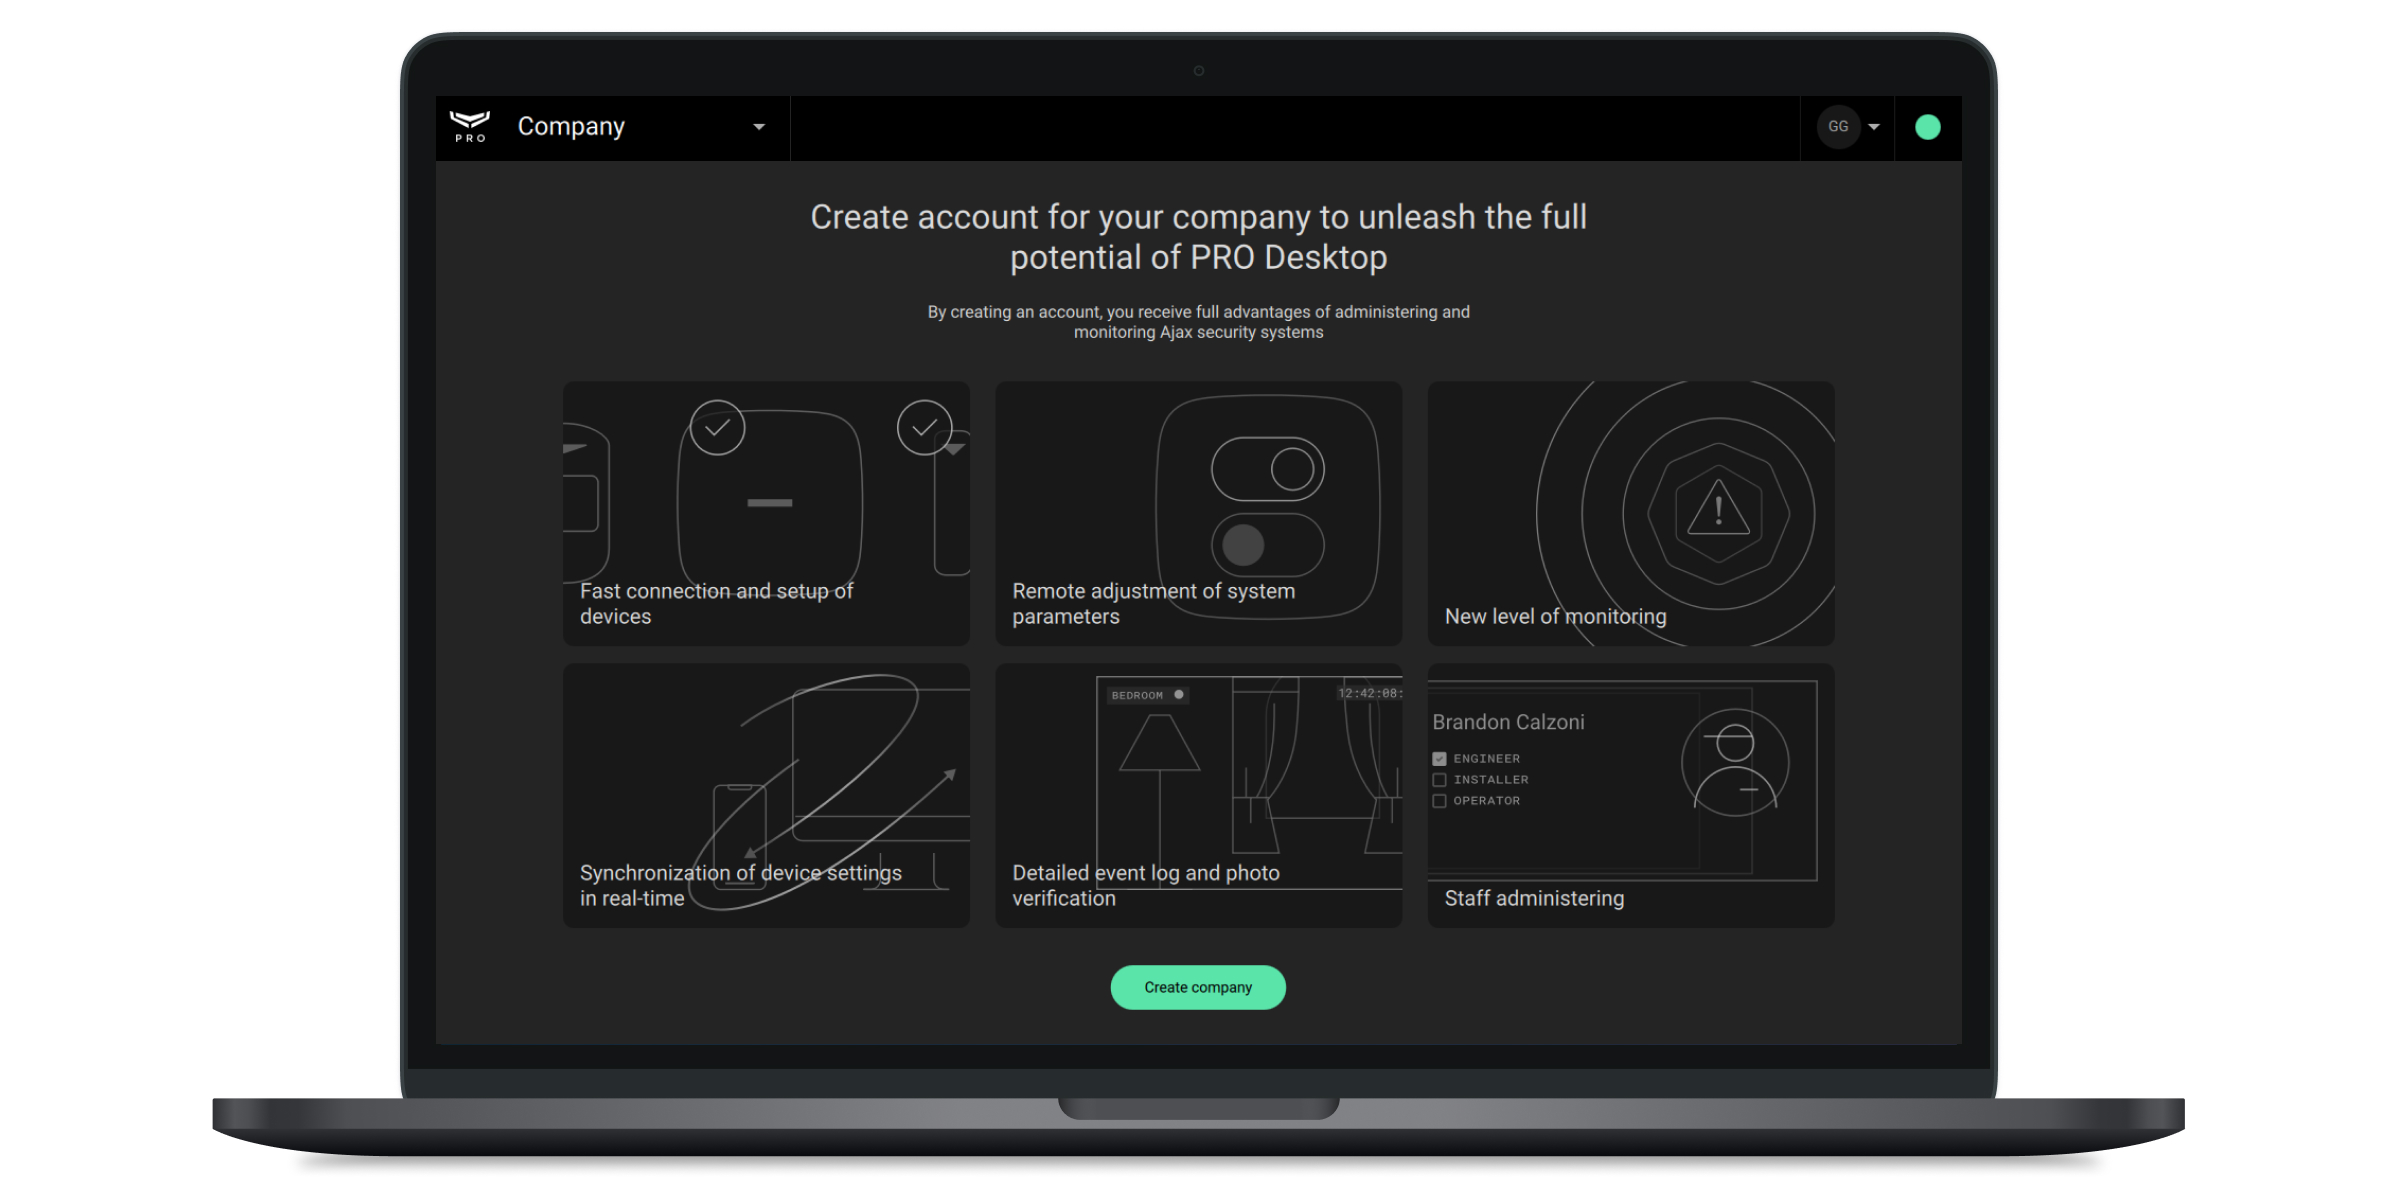
The PRO account that created the company receives the company owner’s role. Such an account has access to all modules of PRO apps, can invite, delete employees, change their rights, and change company data.
Without a personal PRO account, you cannot create a company. The company owner role can only be assigned to one account. The possibility of deleting a company or changing its owner is not provided.
You can create a service or mix company only in the beta version of the PRO Desktop app.
To create a company:
- Open the PRO Desktop app.
- Sign in to a PRO account with your username and password.
- If you are logged in with a company account, go to a personal PRO account. To do this, click on the avatar in the upper right corner and select Personal account.
- Go to the Company module.
- Click Register a company.
- Specify the type of services that the company provides: monitoring, installation and maintenance, or both categories.
Monitoring 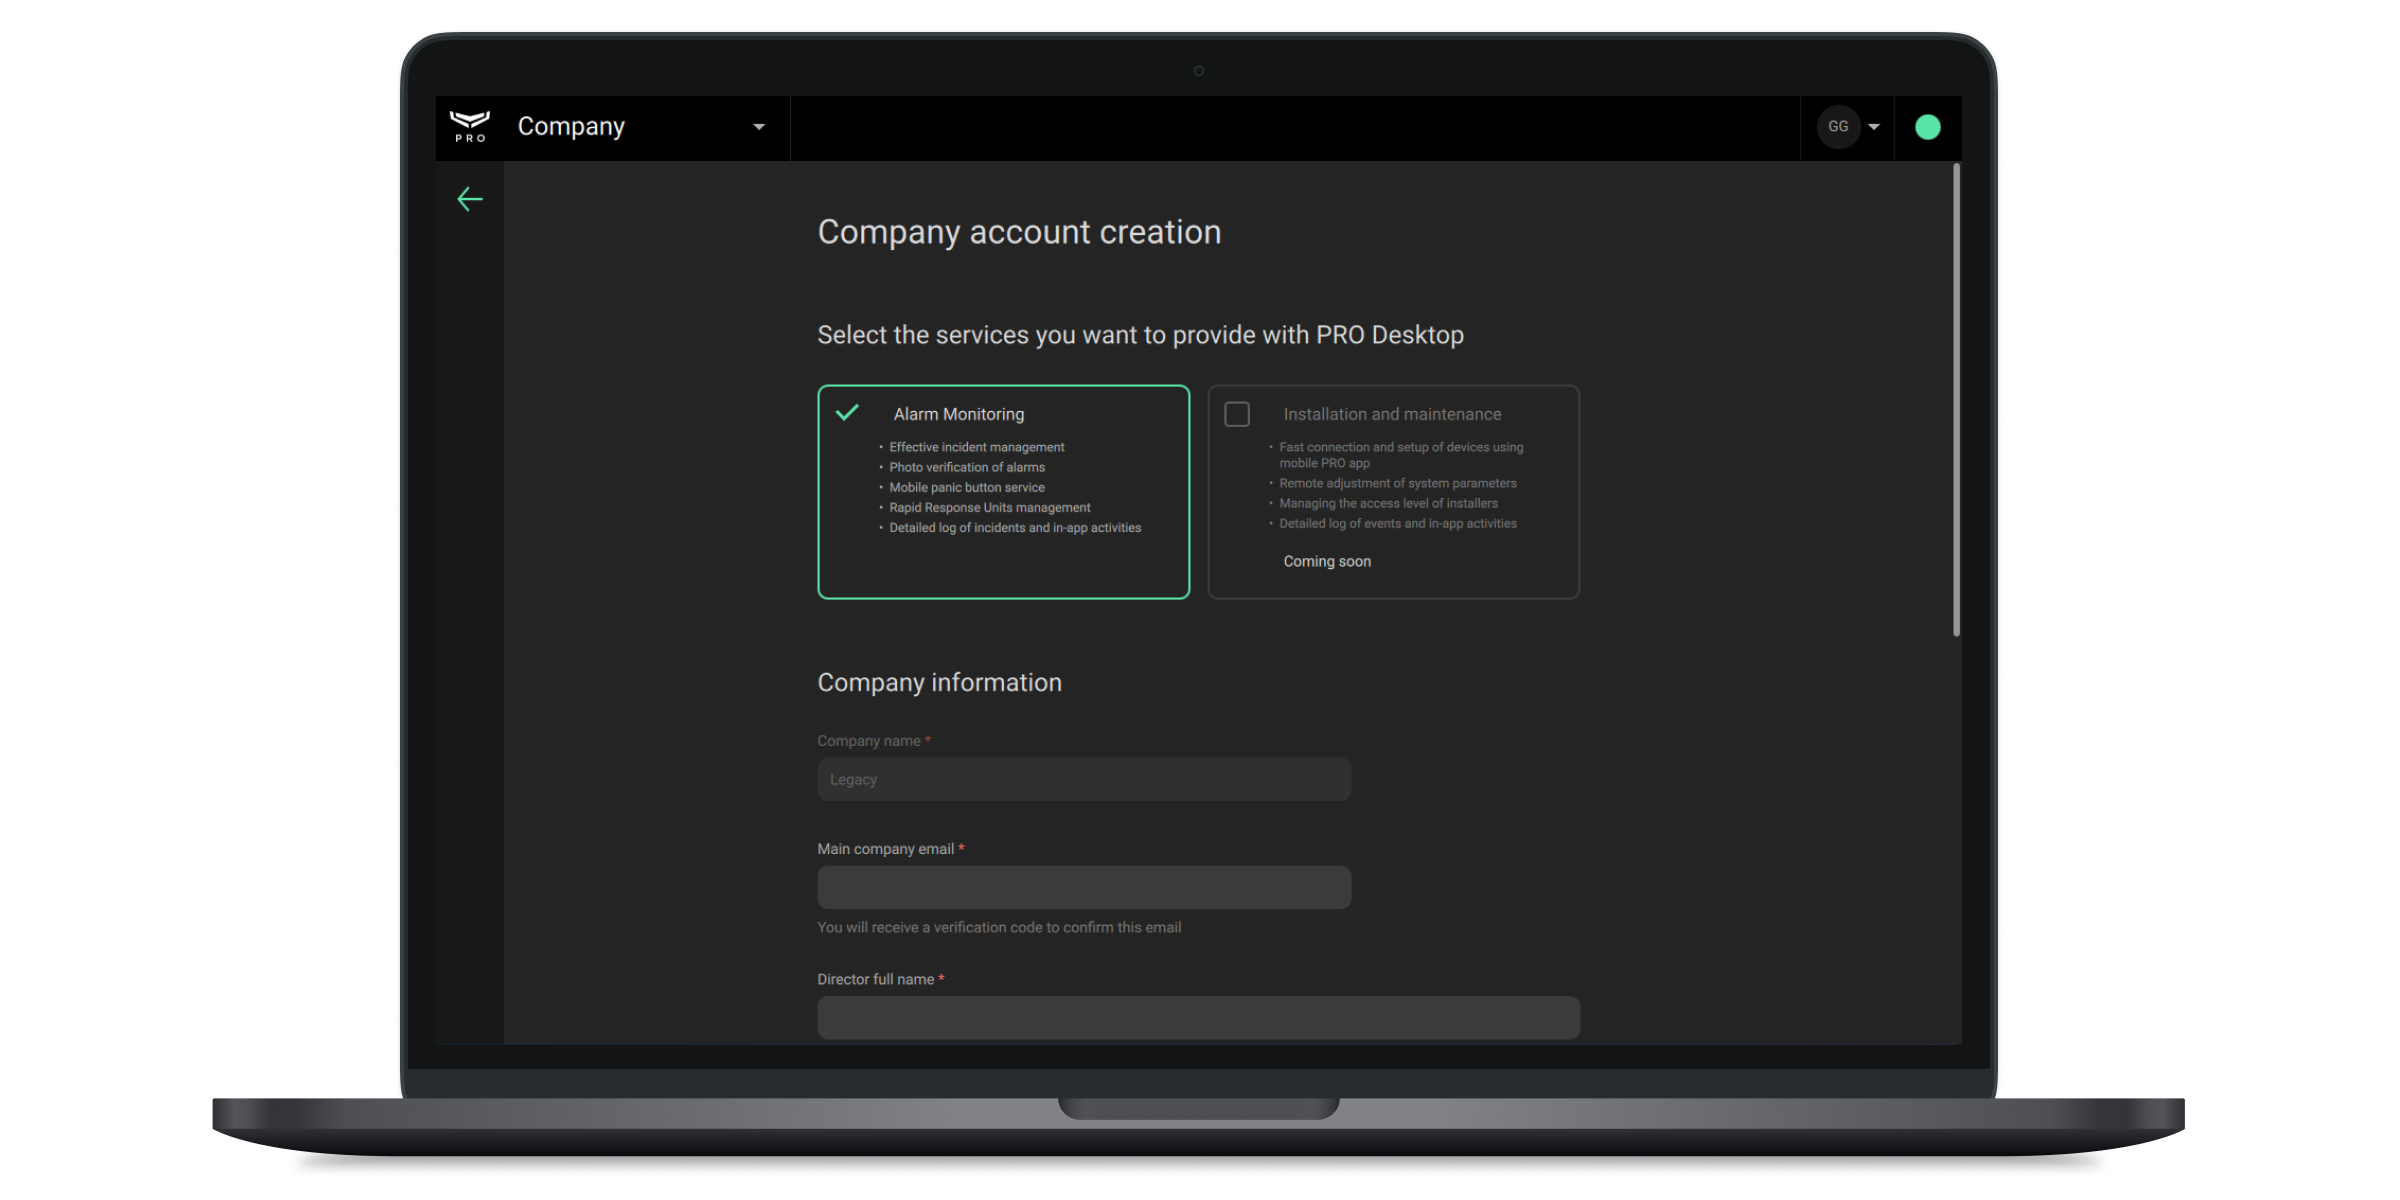
Both categories 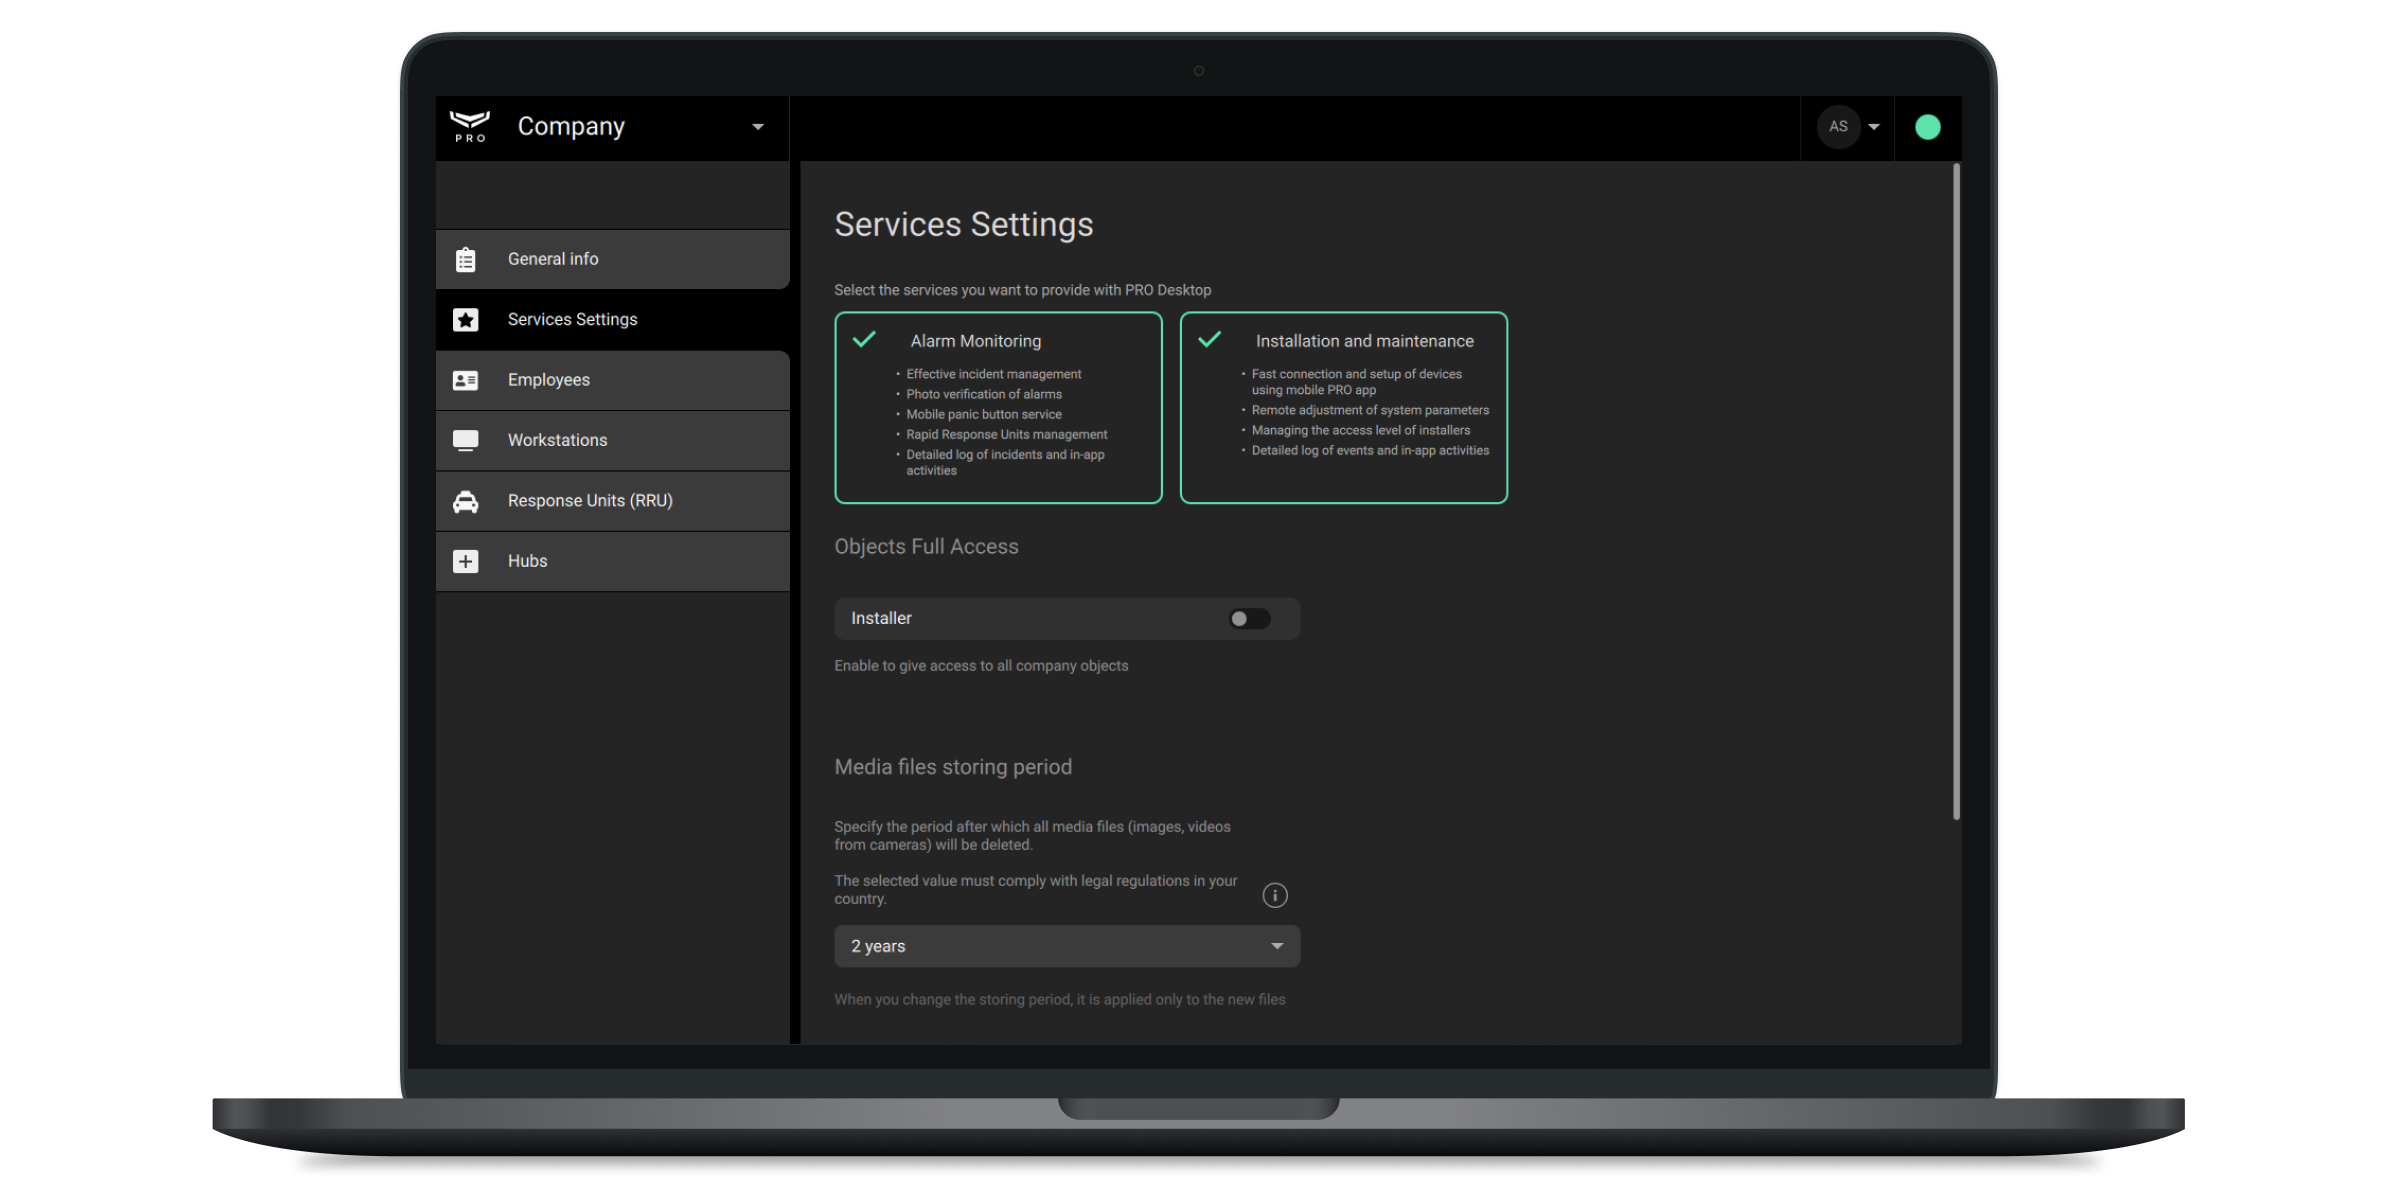

Monitoring companies are available in release versions of Ajax apps. For beta testing, we recommend registering service or mix companies.
- Fill in your company information and follow the app’s instructions.
To confirm the company’s creation, we will send a validation code to the company owner e-mail. You will need to enter this code at the last stage of registration. Therefore, in the company creation form, indicate an available and working e-mail address. After validation, the company is created automatically.
After registering a service company, its owner automatically receives the head of installers role. When registering a mixed company, the owner has the head of installers and the head of operators roles.
Switching between a personal and company account
How to switch accounts in PRO Desktop
When you log in to the app, the company or personal account that worked last time is automatically opened.
To switch to a personal or another company account:
- Open the PRO Desktop app.
- Sign in to a PRO account with your username and password.
- Click on the avatar in the upper right corner of the screen and select a personal account or an account of the required company.
How to switch accounts in smartphone app
To switch to a personal or another company account:
- Open the PRO app.
- Sign in to a PRO account with your username and password.
- Click on the username or company name at the top of the screen.
- Select a personal account or an account of the required company.
Company employees
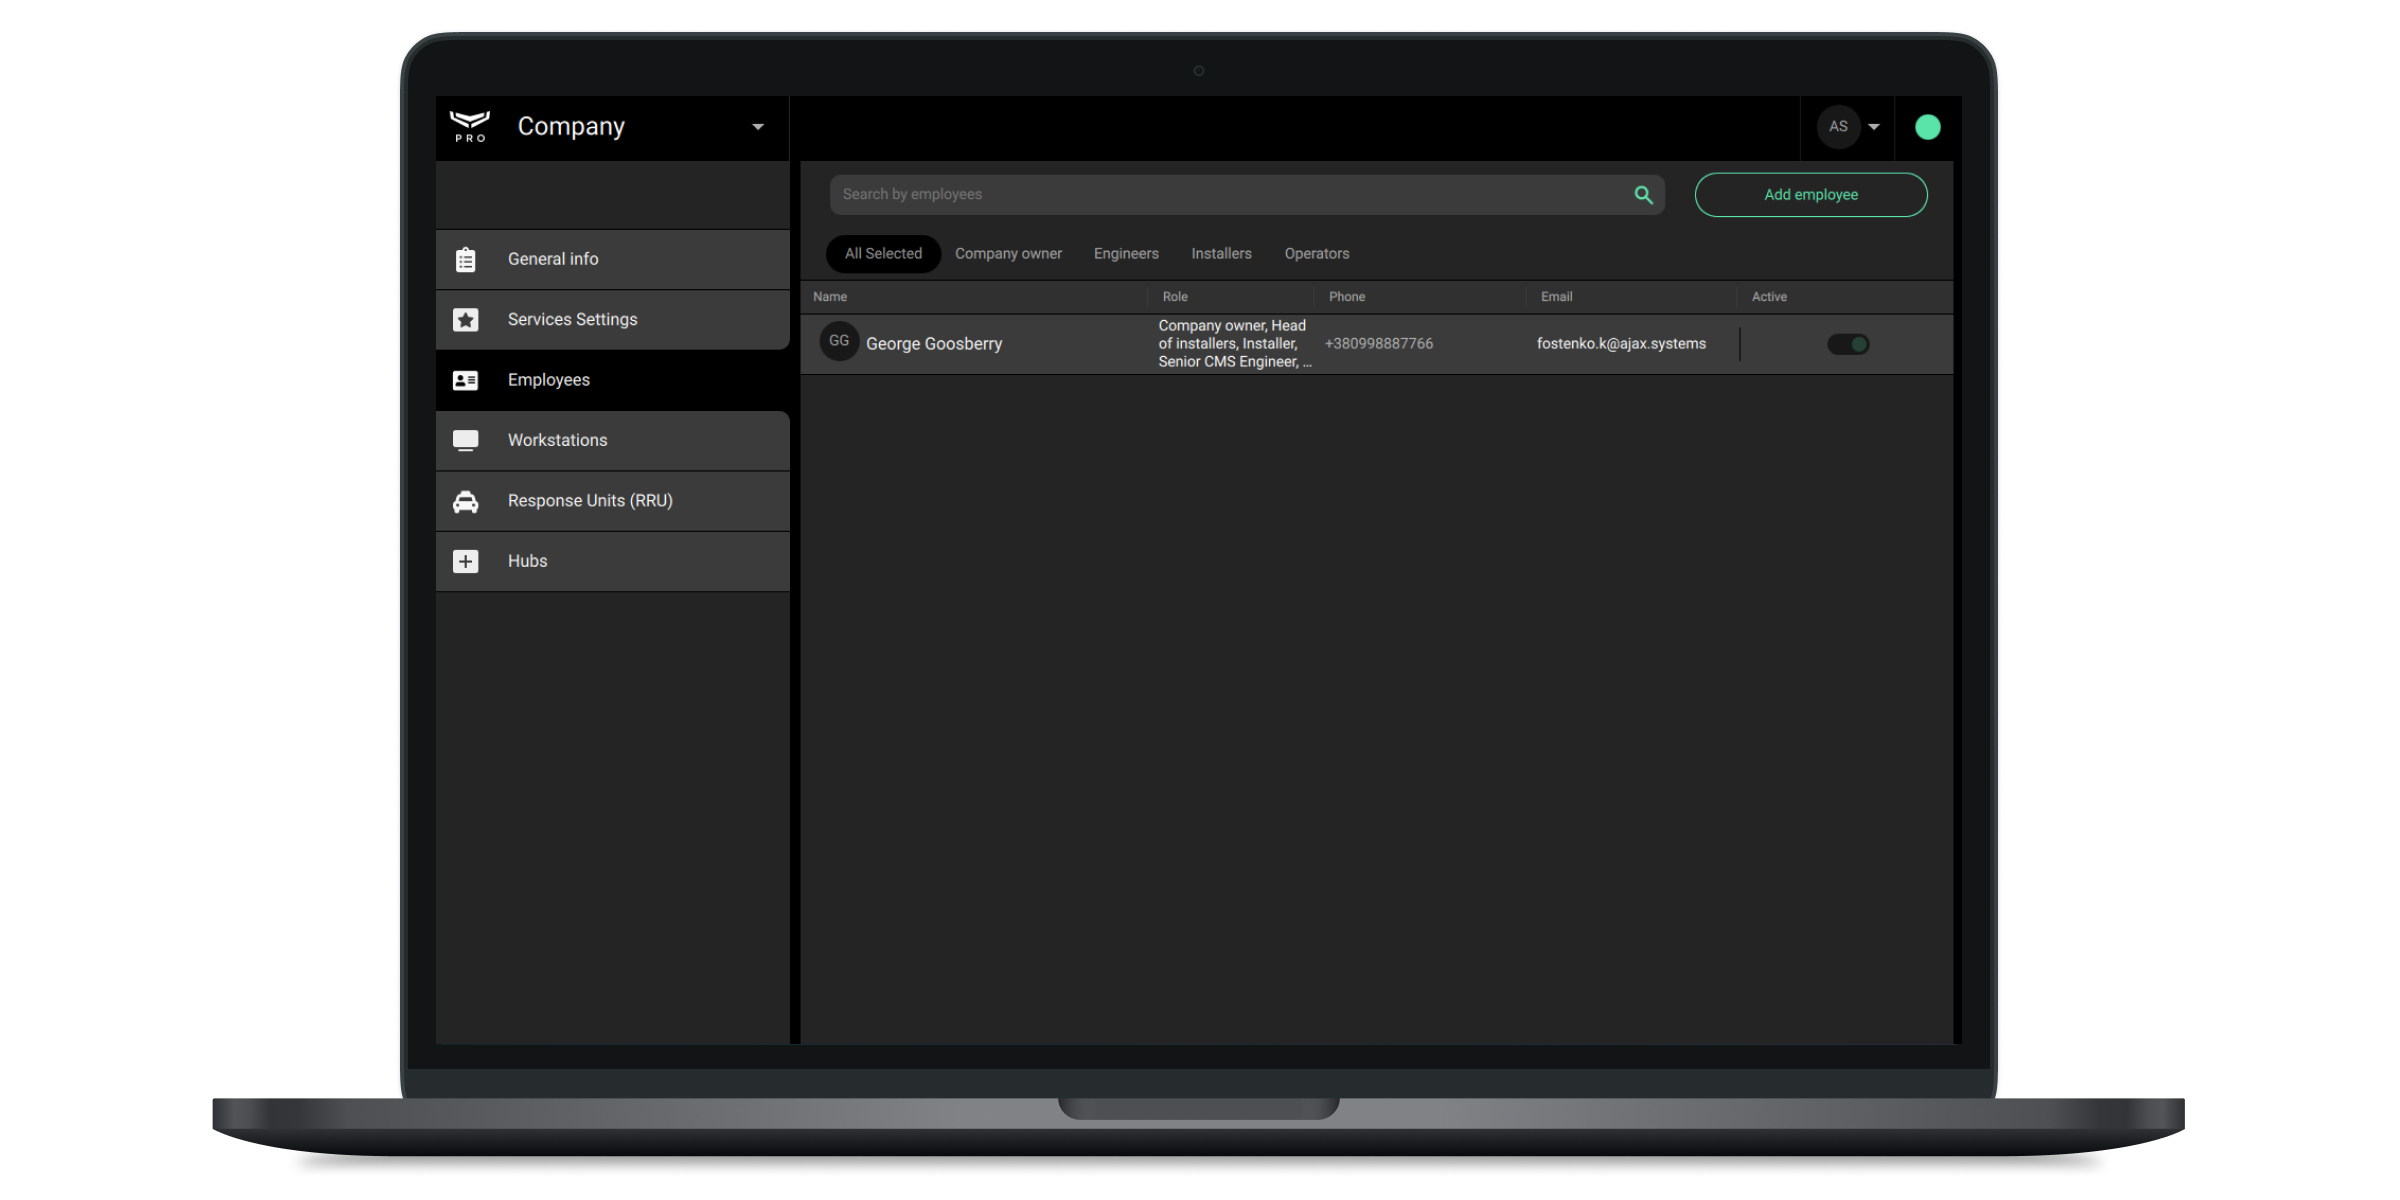
The new company has only the company owner. You can add new employees or change the role of existing ones in the Employees menu (Company module → Employees menu).
You can only add an employee who already has a PRO account. It does not matter whether this account is registered in the app for smartphones or PC.
Employee types
Each employee added to PRO Desktop has a set of access rights according to his role. In total, there are 7 roles:
- Company owner.
- Senior CMS engineer.
- Engineer.
- Head of operators.
- Operator.
- Head of installers.
- Installer.
The number of available roles depends on the type of company: service, monitoring, or mixed company.
A description of the capabilities of all roles, except for the installer and head of installers, is available in the PRO Desktop user manual. In this article, we will talk only about the possibilities of new roles: the installer and the head of installers.
Employee rights
| Company owner | Senior CMS engineers | Engineers | Heads of operators | Operators | Heads of installers | Installers | |
| Edit the company owner profile info | + | ||||||
| Add, delete or edit Senior CMS engineers | + | + | |||||
| Add, delete or edit Engineers | + | + | |||||
| Add, delete or edit Heads of operators | + | + | + | ||||
| Add, delete or edit Operators | + | + | + | + | |||
| Add, delete or edit Heads of installers | + | + | |||||
| Add, delete or edit Installers | + | + | + | ||||
| View incidents | + |
+ (only incidents of this operator) |
|||||
| Process incidents | + | + | |||||
| Manage Sleep Mode | + | + | + |
+ (if incidents of this hub is not in process) |
|||
|
Adjust operators events (Operator is offline or logins from an unverified computer) |
+ | ||||||
| Arm security system and activate Night Mode | + | + | + | + |
+ (if service or mixed company have such rights) |
+ (if this installer has appropriate rights) |
|
| Disarm security system and deactivate Night Mode |
+ (if service or mixed company have such rights) |
+ (if this installer has appropriate rights) |
|||||
|
Configure security system (e.g., adjust hub settings) |
+ (if service or mixed company have such rights) |
+ (if this installer has appropriate rights) |
|||||
| Add or edit Rapid response units | + | + | + | ||||
| Deactivate Rapid response units | + | + | |||||
| Edit objects info | + | + |
+ (while hub is not on the monitoring) |
+ (while hub is not on the monitoring) |
|||
| Delete objects maintained by monitoring and mixed companies | + | + | |||||
| Delete objects maintained by service companies | + | + | |||||
| Edit company info | + | ||||||
| Have access to all objects activation/deactivation | + | + | + | ||||
| Manage media files storing period | + | ||||||
| Manage company installers access to hubs | + | ||||||
| Approve monitoring requests | + | + | |||||
| Have access to hubs availability statistic | + | + | + | + | |||
| Have access to operators availability statistic | + | + | + | ||||
|
Send system restoration requests |
+ | + | + | + | |||
|
Approve system restoration requests |
+ | + |
Rights of the head of installers role
The head of installers has the same rights for the system configuration as his company. All heads of installers of one company have the same rights. Therefore, if the company has the right to configure the system, all heads of installers will have such a right.
One company can have an unlimited number of employees with the head of installers. Any head of installers can grant access to the Ajax security system settings to ordinary installers if this does not exceed the access level of the company.
For example, if a company has access to system settings for 4 hours, then the head of installers can grant the installer the right to configure for 2 hours. Still, he cannot provide access for 8 hours without additional confirmation from the administrator of this hub. We talk about additional confirmation in the section Extending the access of a company or installer to the hub settings.
Rights of the installer role
The installer has access to the Ajax security system settings if the head of installers has granted him such a right. He can change system settings, invite users, and add new devices. One company can have an unlimited number of employees with the installer role.
Types of employee access to objects settings
By default, all installers of service and mixed companies have access to all objects assigned to this company. Access settings for each hub depend on the access level of the company.
The company can:
- Do not have access to system settings.
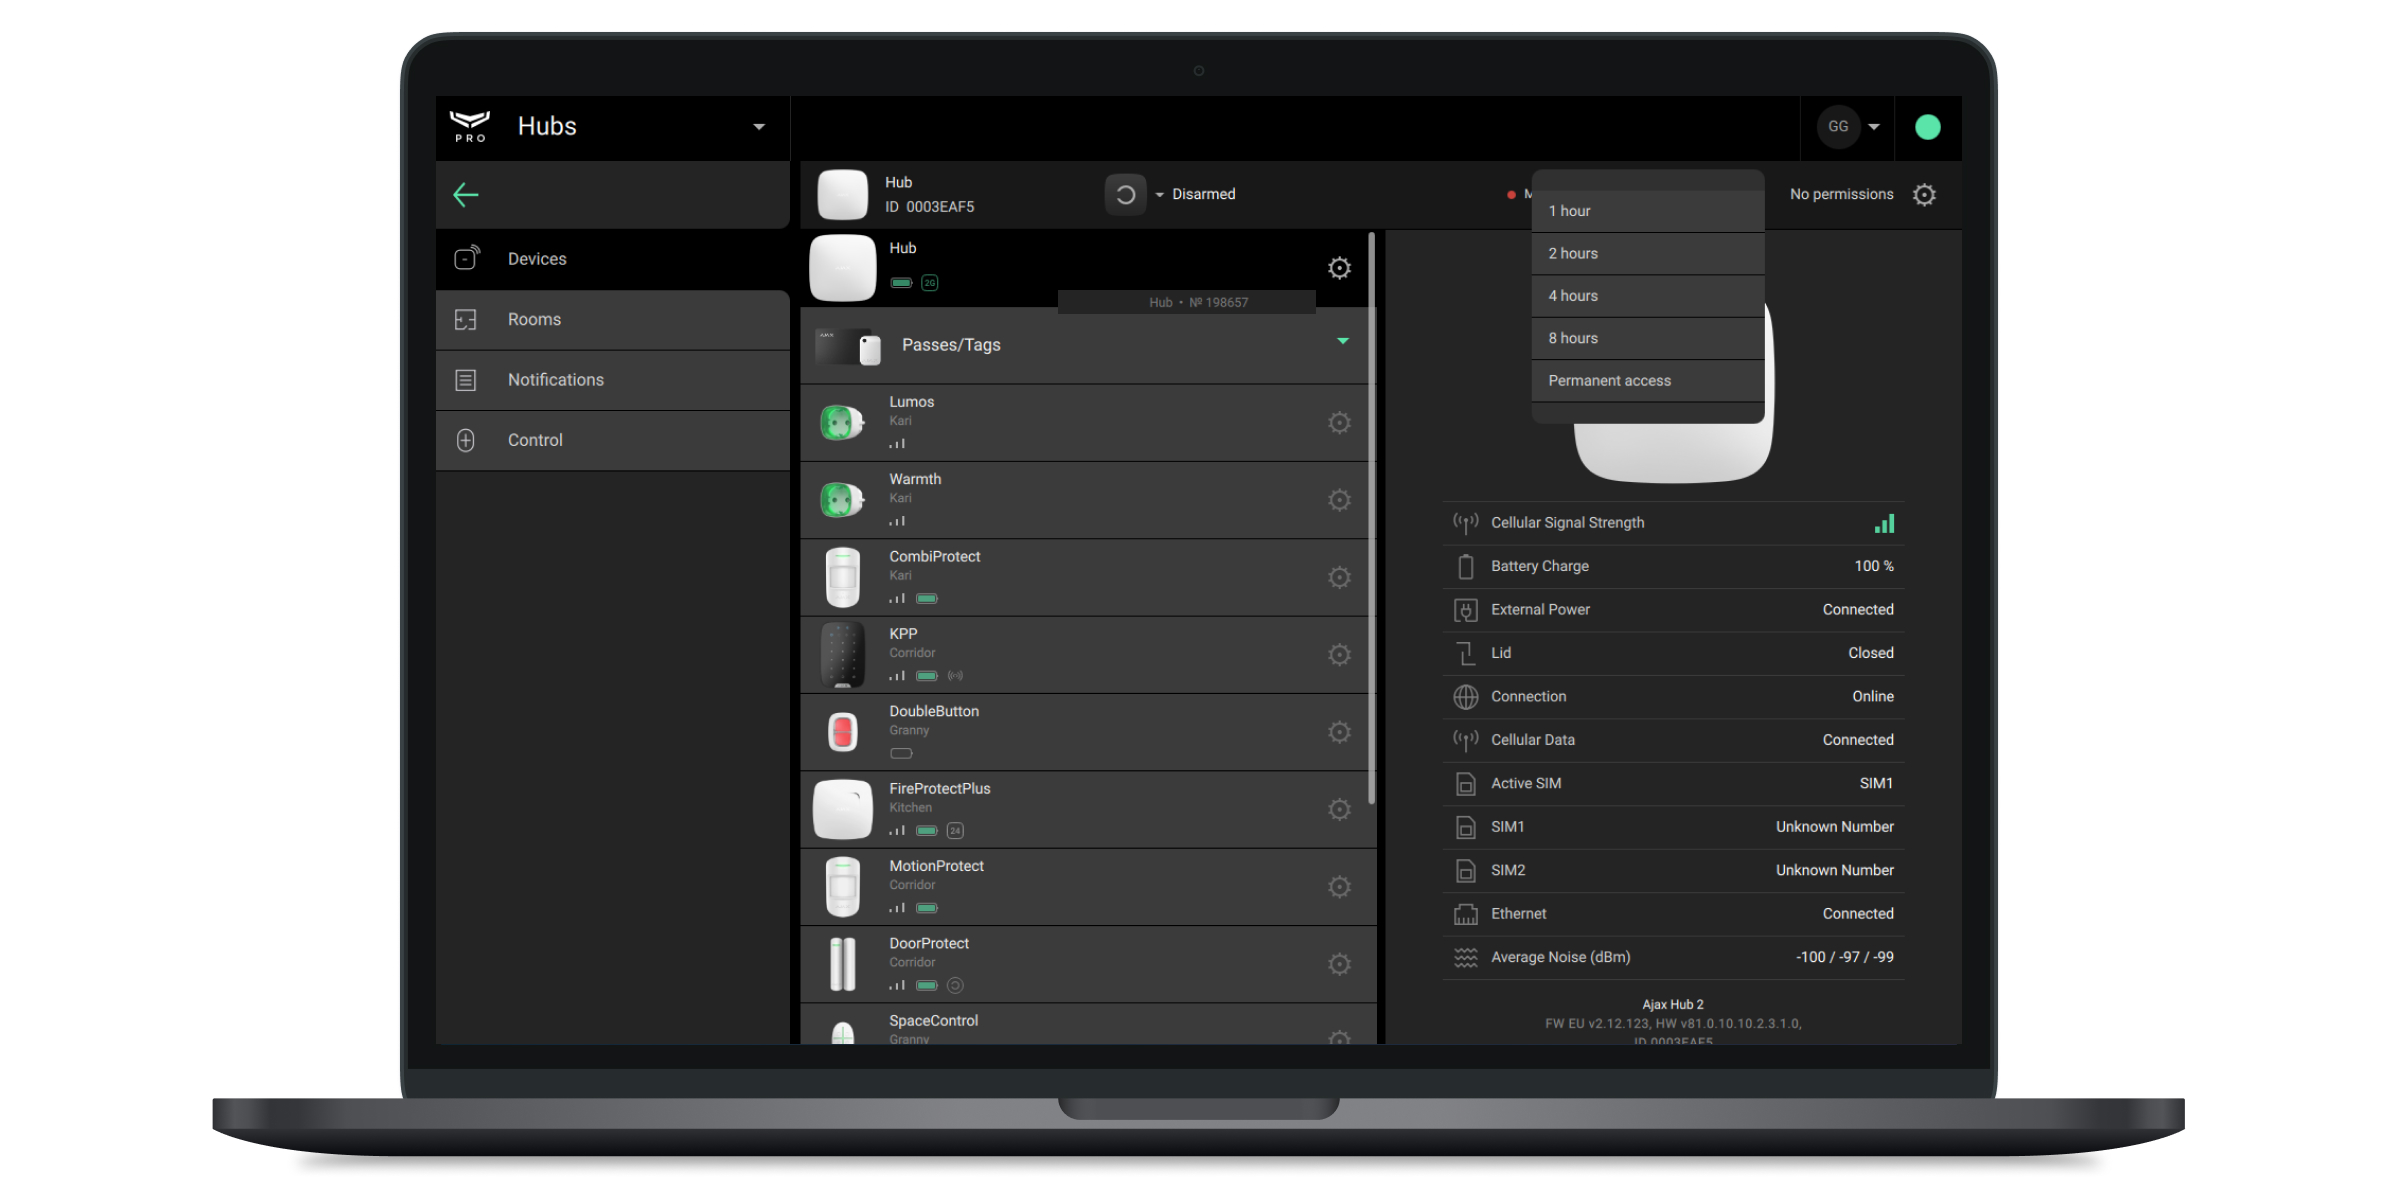
- Have access to the settings for a period of 1 to 8 hours.
- Have permanent access to system settings.
So that an employee with the rights of the head of installers can determine the rights for configuring objects for other installers independently, disable the Access to all objects option (it is enabled by default).
To do this:
- Go to the Company module.
- Open the Service Settings menu.
- In the Access to all objects field, disable the option for Installers.
Now only the head of installers can grant the rights to configure systems assigned to the company to installers.
Adding employees
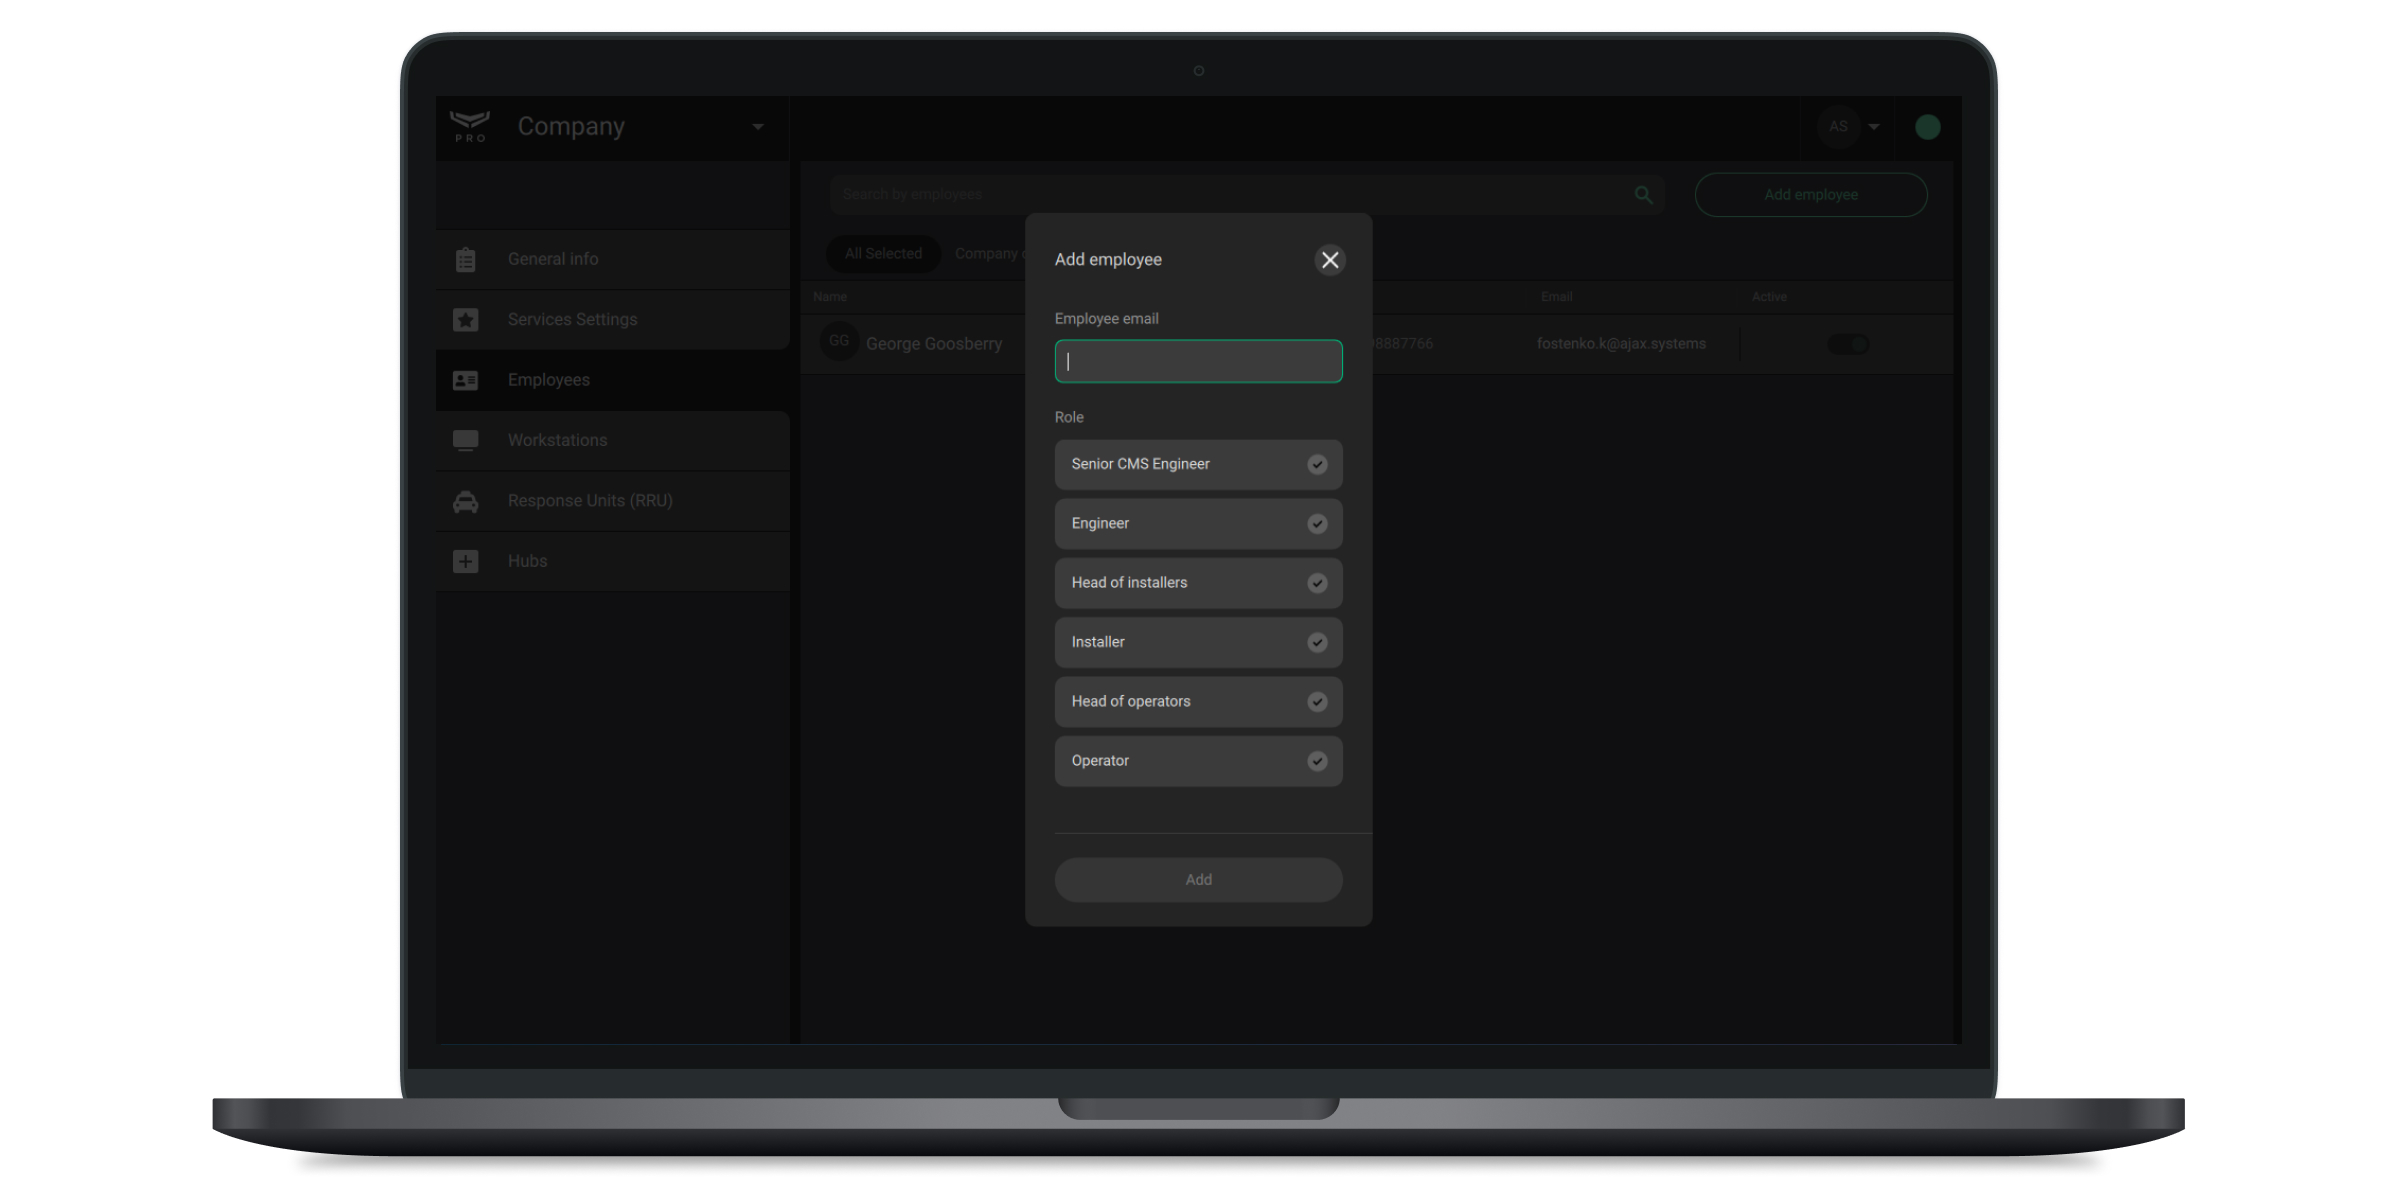
- Go to the Objects module.
- Go to the Company menu.
- Go to the Employees menu.
- Click Add employee.
- Specify the PRO account e-mail to which the employee account is registered.
- Define the role of the employee.
- Click Add.
Afterwards, the specified PRO account will be assigned to the company. The owner of the PRO account will receive a notification about this to his e-mail address. This event will also be recorded in the PRO Desktop event log.
Adding and configuring objects
There are two ways to assign an object to a service or mixed company: by the hub ID (its QR code) or by invitation from the hub administrator.
After assigning the hub, specify all the necessary information in the object card. This makes more straightforward navigation and searching objects in Ajax apps.
Add by the ID
You can add an object using an identifier under several conditions:
- The hub is online.
- There are no administrators or PRO accounts on it.
- The hub is not assigned to the account of another company.
An installer or head of installers can assign such a hub. You need to add such a hub from a company account but not from a personal PRO account. After assigning, the company has permanent access to the hub’s settings.
To add a hub using PRO Desktop, click the Add Object button in the Objects module. In the form that opens, specify the name of the object, as well as the 20-digit hub ID (placed under the QR code, format xxxxx-xxxxx-xxxxx-xxxxx).
To add a hub using the mobile app, click the “+” button on the app’s main screen. In the form that opens, specify the object’s name and scan the hub’s QR code (it contains the hub ID). If it is not possible, you can manually enter the 20-digit hub ID. It is placed under the QR code in the xxxxx-xxxxx-xxxxx-xxxxx format.
Adding an object through the administrator request
The request is sent through the Ajax app by a hub user with administrator rights. To do this in an Ajax app:
- Open the necessary object if you have several of them.
- Select the hub in the list of devices.
- Go to its Settings.
- Open the Installers/Companies menu.
- Click the Add button.
- Enter the main company’s e-mail indicated during registration.
- Select a company.
After adding, the company has 8 hours to change the hub settings, add devices and invite users. After this access time expires, the company can no longer change the object’s settings.
If necessary, the installer or head of installers can request temporary or permanent access, which a hub user with administrator rights should confirm.
Configuring an object
The installer or the head of the installers can configure the object. The object can be configured using apps for smartphones and PC. Both apps provide the same options for installation engineers.
By default, the head of installers has the same rights as his company. The installer does not have access to the hub settings (if access to all objects is disabled) until the head of the installers grants him such a right. After gaining access, installers can start to configure the object.
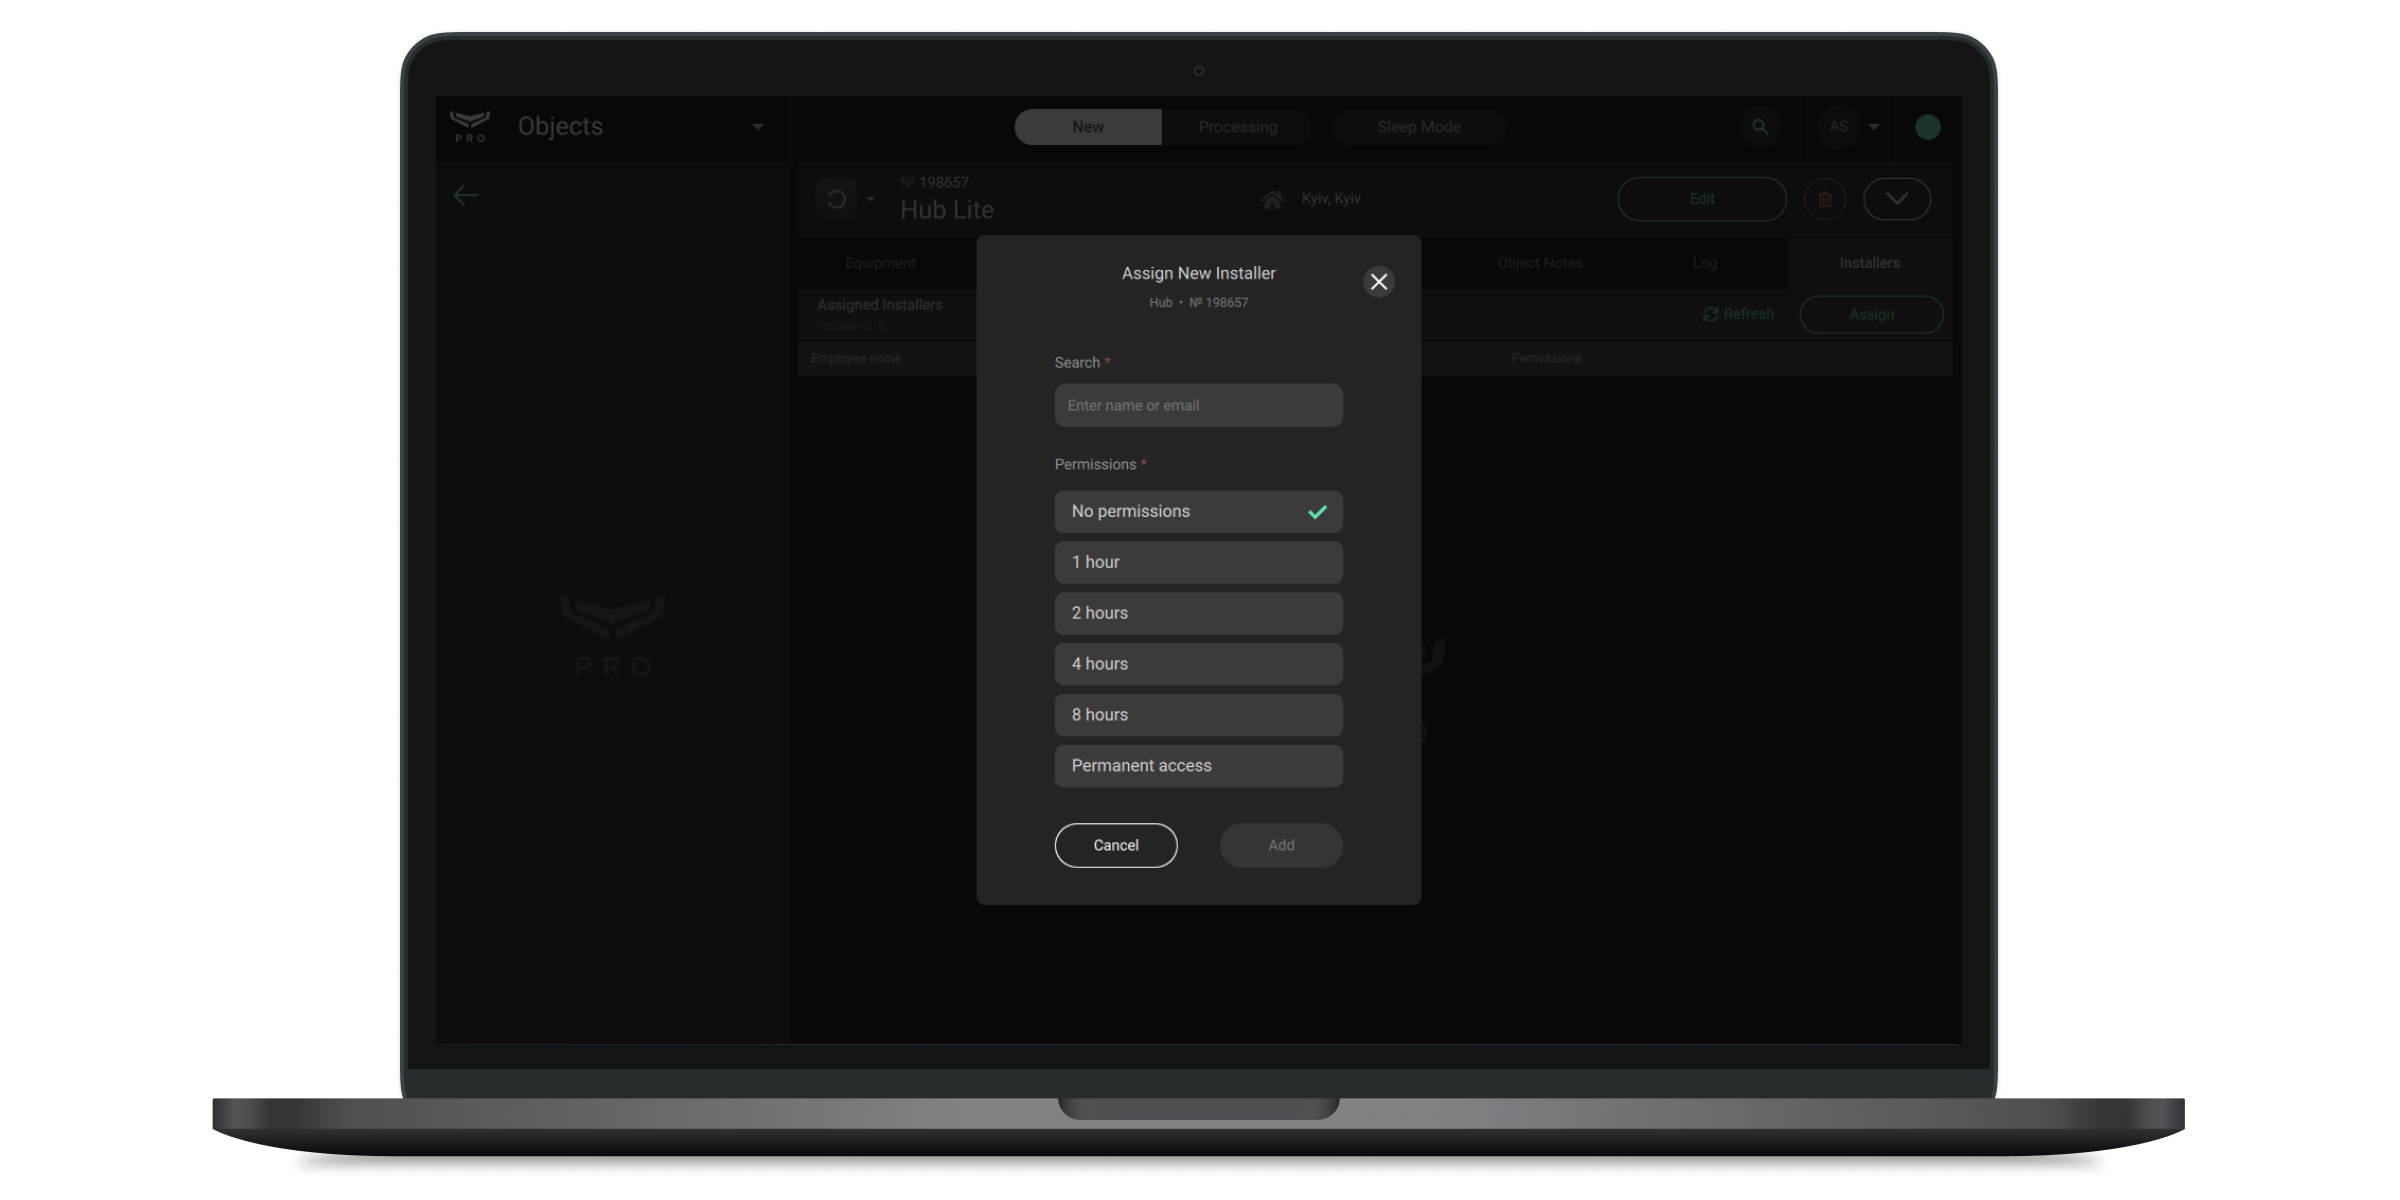
Granting access to the installer is possible in two methods.
Method 1:
- Open the object list in PRO Desktop.
- Select the required object.
- Go to the Installers menu.
- Click Assign.
- Enter the e-mail address of the installer’s PRO account or select it from the list.
- Define its access rights. Please note that the installer’s access rights cannot exceed the company’s rights.
- Click Add.
Method 2:
- Open the object list in PRO Desktop.
- Go to the Company module and select the Employees category.
- Select the required employee.
- Go to the Assigned objects menu and click Assign.
- Enter the name/ID of the object or select it from the list.
- Define the access rights of this installer. Please note that the installer’s access rights cannot exceed the company’s rights.
- Click Add.
Prolongation of access of a company or installer to the hub settings
If there is not enough time for settings, the installer can request to increase the access time. Such a request will receive all heads of the company’s installers.
If the company has sufficient rights, any head of installers can grant this right to a regular installer. Please note that you can confirm such a request only in the PRO Desktop app.
If the rights are not enough, for example, the company has rights to configure within 4 hours, but the installer needs 8 hours, the head of the installers can request access from the hub administrator. In this case, confirmation is required from a user with administrator rights in the Ajax app.
After confirmation, access will be automatically granted to the company and the respective installer.
Configuring the company rights
A user with administrator rights or a PRO with rights for system configuring can set the company’s access rights. These settings will be valid for all employees of the company.
To do this in an Ajax app:
- Open the necessary object if you have several of them or use the Ajax PRO app.
- Select the hub in the list of devices.
- Go to its Settings.
- Open the Installers/Companies menu.
- Select a company and go to its settings. They allow you to grant or disable the right to:
- Change of security mode
- Panic button activation in Ajax apps
- Viewing cameras
- Controlling the relays and smart plugs
- Enabling chimes
A user with administrator rights or PRO with the right to configure the system can also remove a company from the hub or disable its access.
Disabling access prohibits the company from changing the settings but leaves access to the events feed, device list, rooms, and control screen. The total deleting disconnects the hub from the company and all from its employees.