SpeakerPhone Jeweller is a wireless voice module for two-way voice communication between a security company and a person physically present at the site where an Ajax system and SpeakerPhone are installed. The device allows the operator of the central monitoring station (CMS) to contact the site immediately after an alarm to analyze the situation and rapidly respond to an emergency.
SpeakerPhone Jeweller communicates with a hub over three secure radio protocols. The device uses Jeweller to transmit alarms and events, Wings to update firmware, and VoRF to stream audio. The communication range in an open space is up to 5,550 ft.
SpeakerPhone Jeweller is a device oriented on central monitoring stations. For the device to work correctly, it is necessary not only to configure the voice module but also the telephony on the Ajax hub. Besides, the monitoring company must set up SIP-telephony on its part.
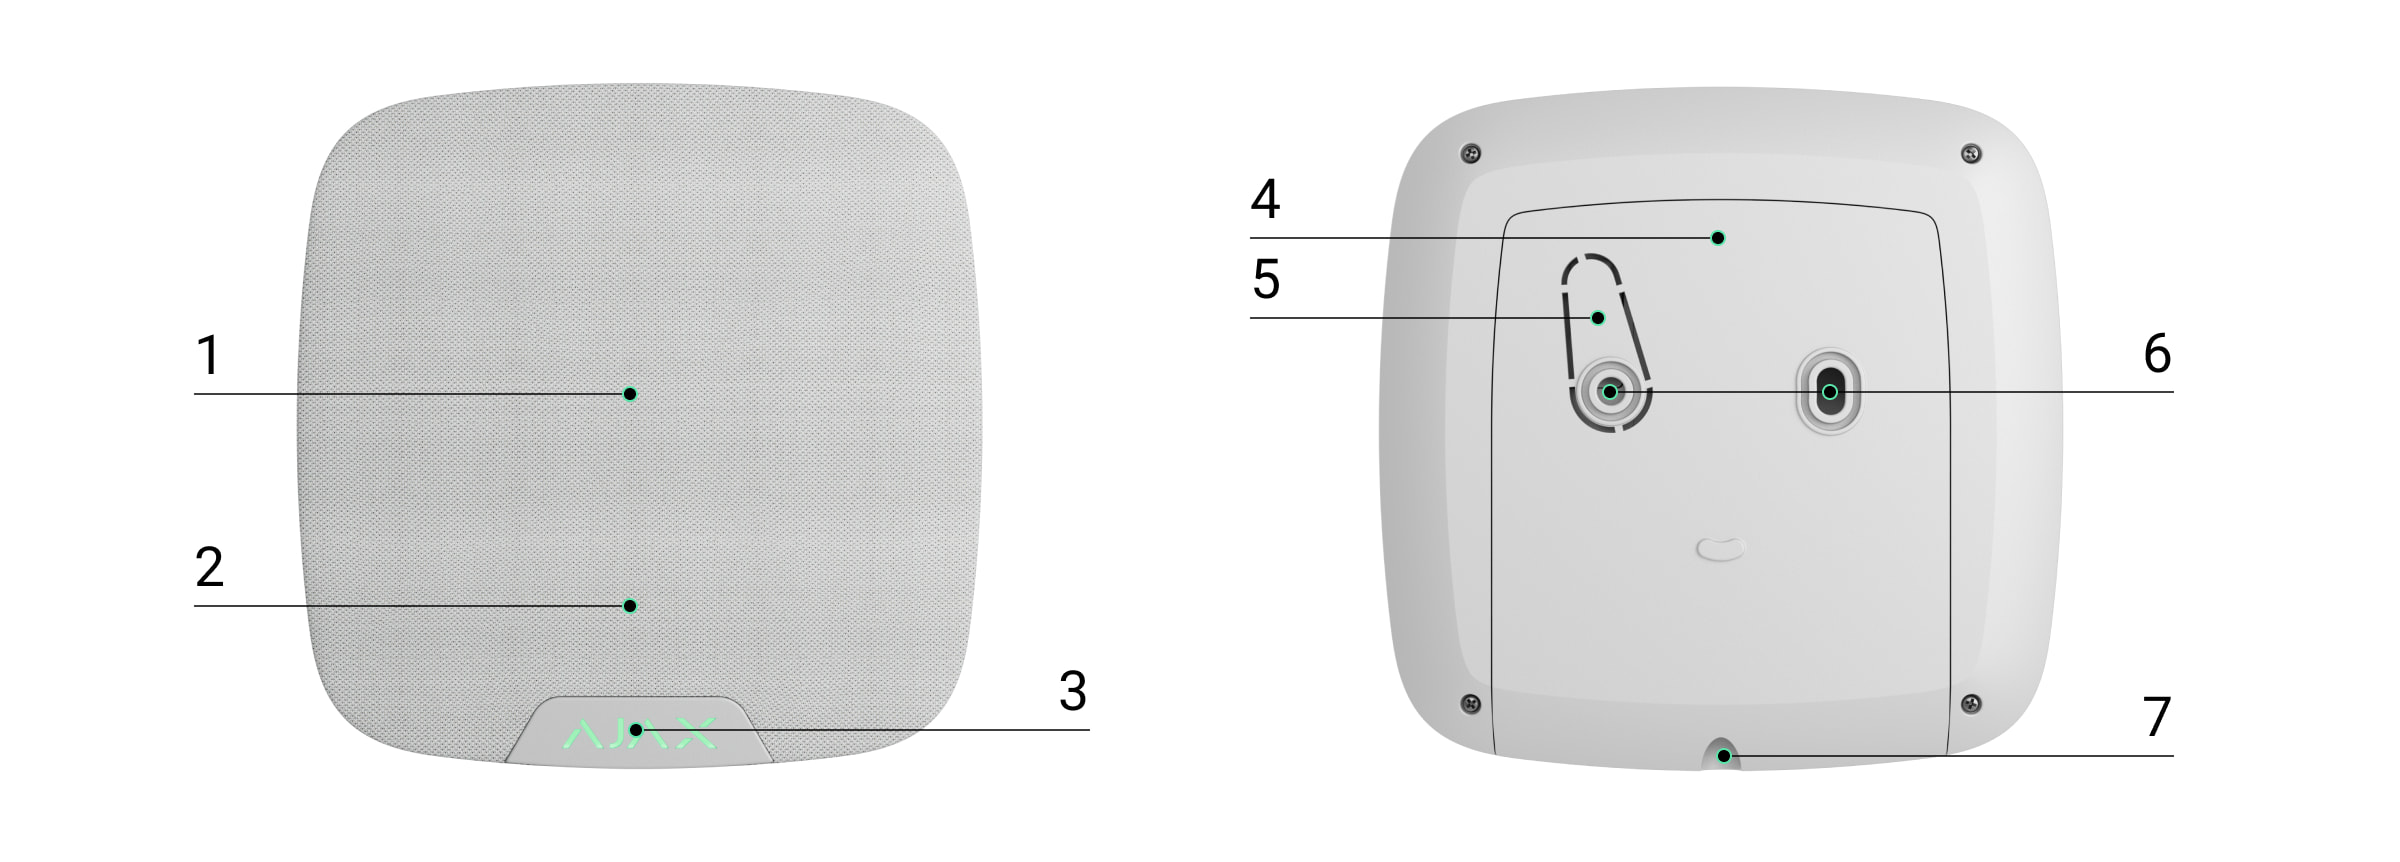
Functional elements
- Built-in speaker.
- Omnidirectional microphone.
- Ajax logo with an LED indicator.
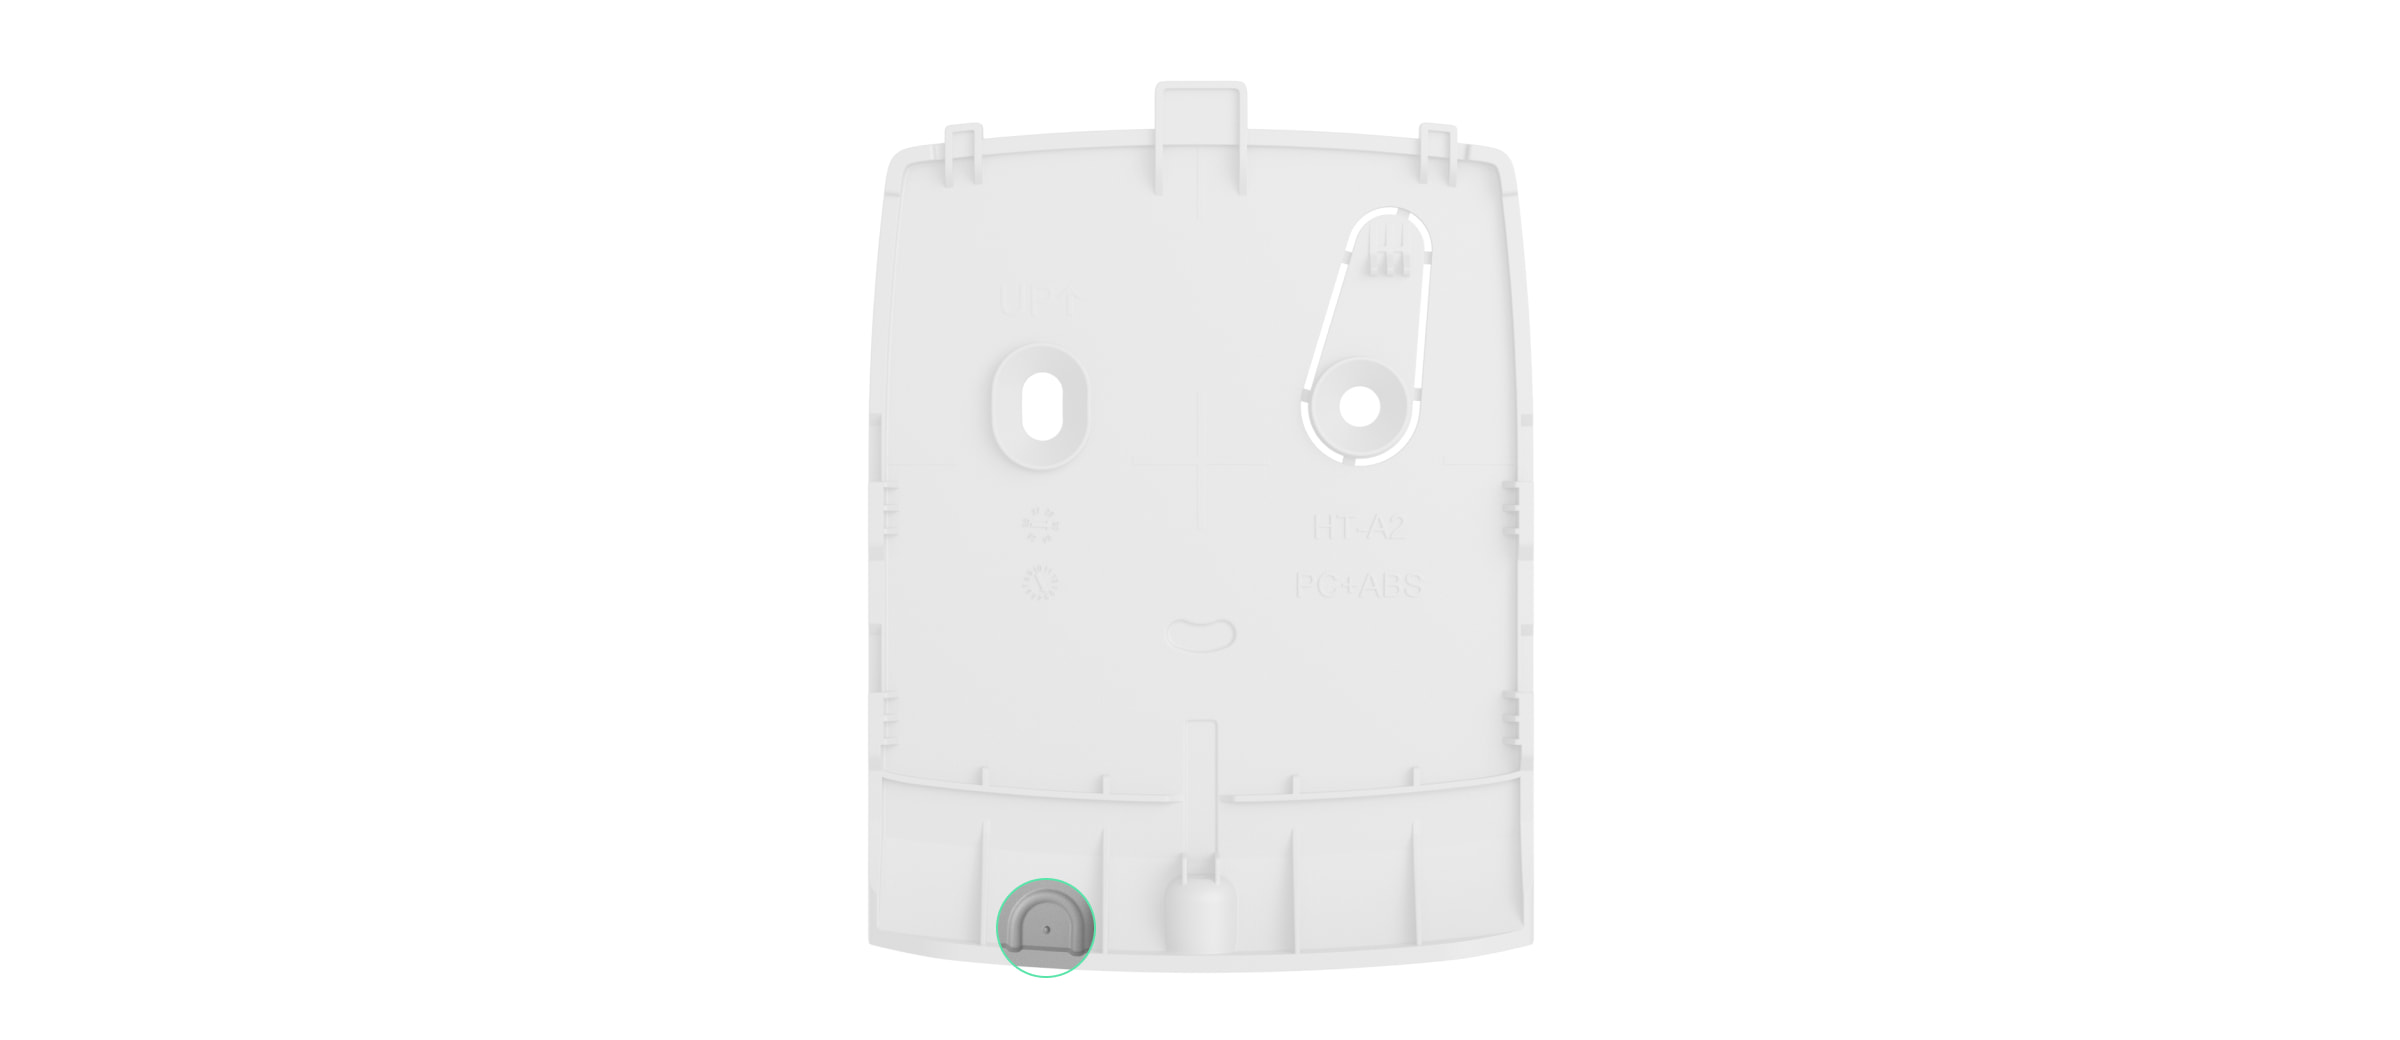
- The SmartBracket mounting panel. To remove the panel, loosen the holding screw on the bottom of the device enclosure and slide the panel down.
- Perforated part of the mounting panel to trigger a tamper in case of any attempt to detach the device from the surface. Do not break it off.
- Fixing points to attach SmartBracket to the surface.
- The hole to attach the SmartBracket mounting panel with a holding screw.
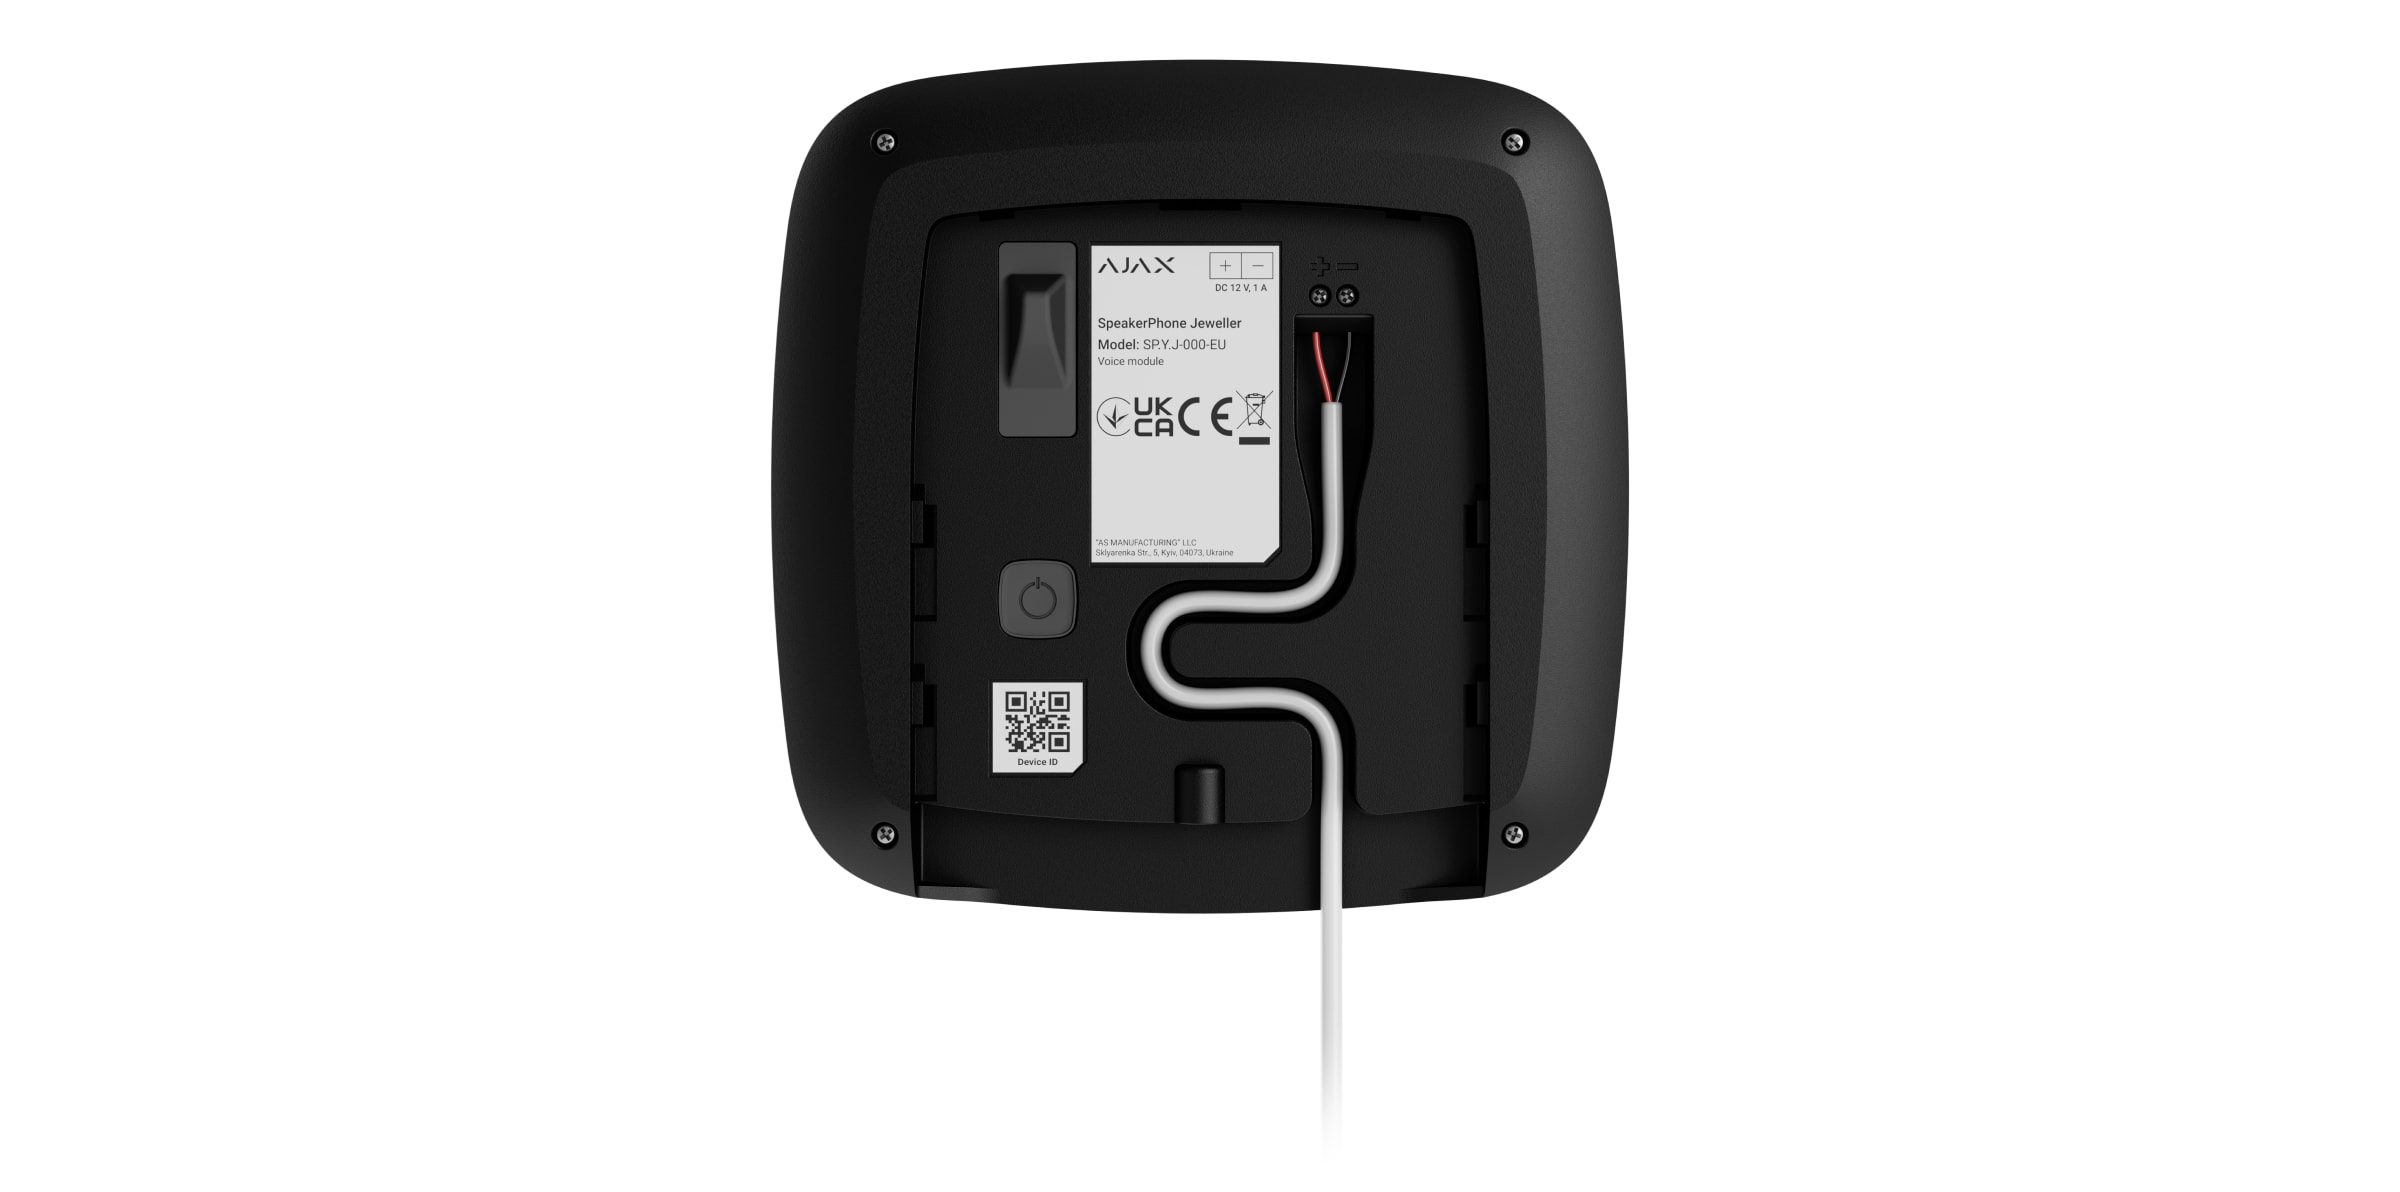
- Tamper button. Triggers in case of an attempt to detach the device from the surface or remove it from the mounting panel.
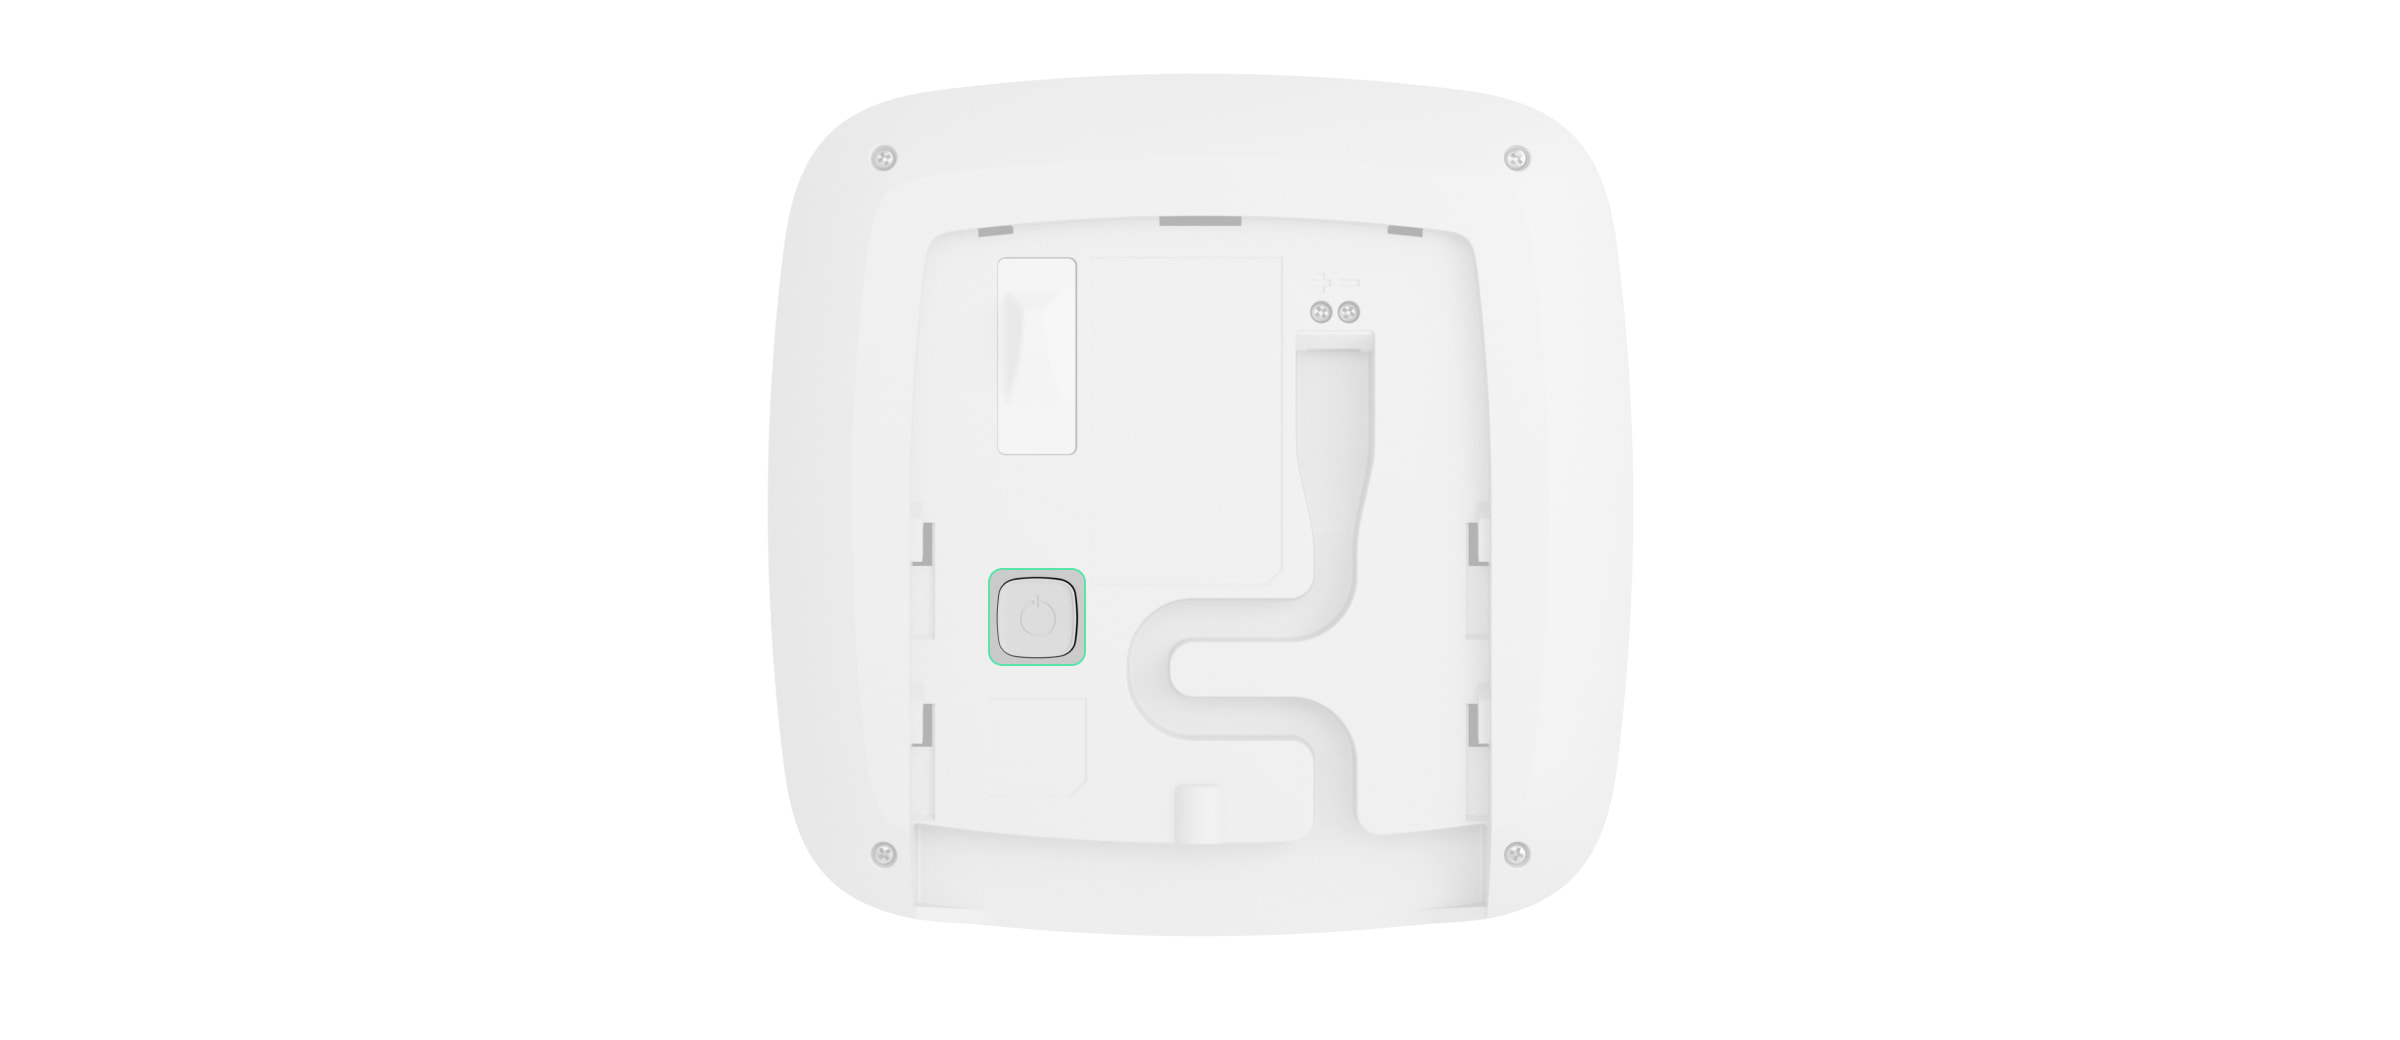
- Power button.
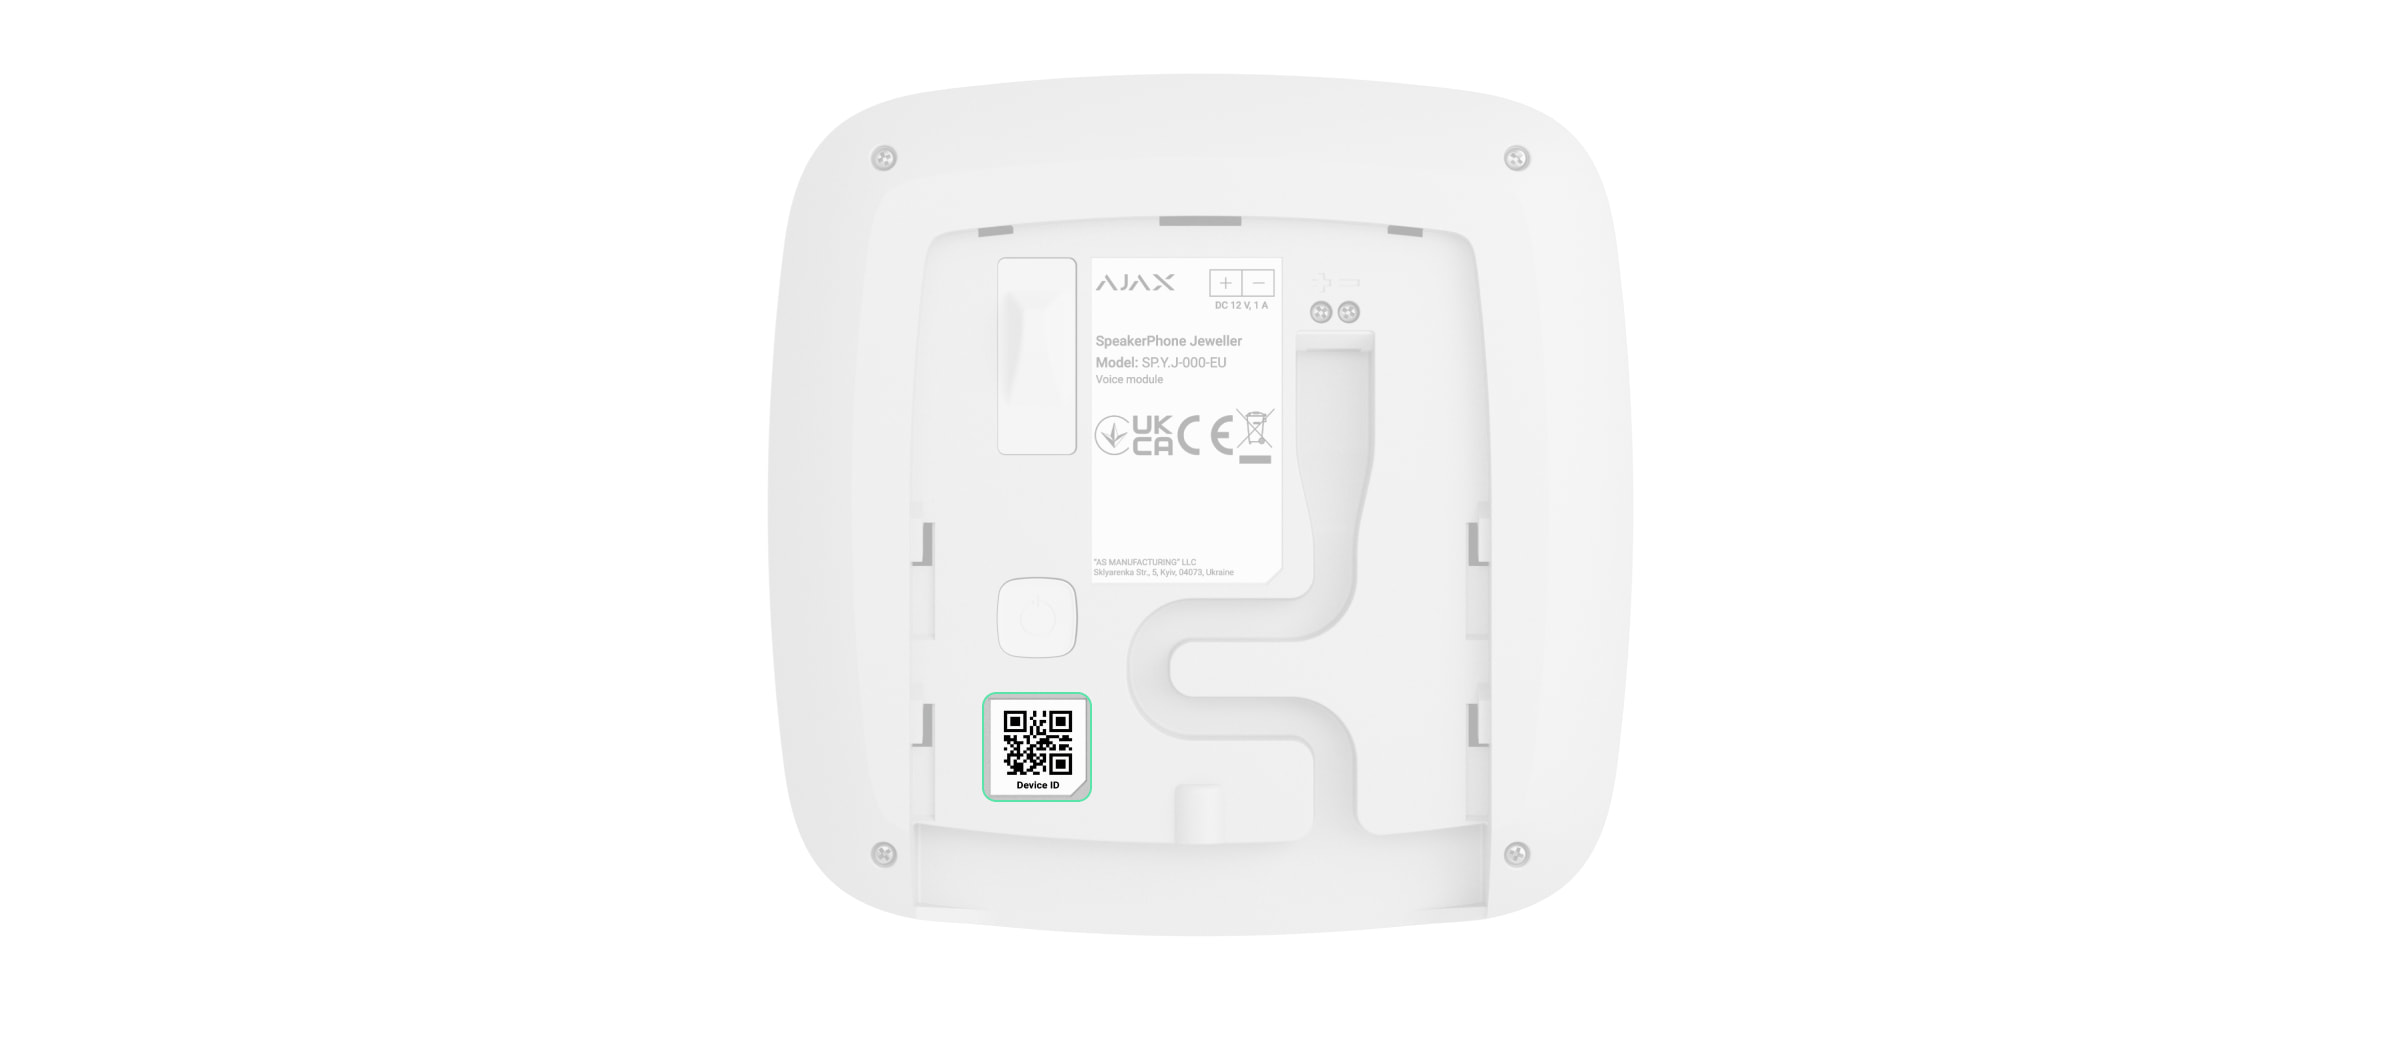
- QR code with the device ID to add the device to the Ajax system.
- Terminals to connect an external power supply unit (not included).
- Cable channel to route the cable from the third-party power supply unit.
Operating principle
SpeakerPhone Jeweller features a built-in speaker with a volume of up to 103 dB and an omnidirectional microphone. The device has a special voice processor powered by AI for sound optimization. You can customize the default state of this feature and switch it during a call.
In the event of an alarm after the CMS calls the hub, the person on the premises will not need to push any buttons to establish a connection between the operator and SpeakerPhone.
The device performs three tasks:
- Alarm verification. In case of an alarm, the operator establishes a connection, listens to the situation on the site, and asks for a confirmation code. If the code is right, the alarm turns off. If the code is wrong, or it is a duress code, the operator sends the rapid response unit (RRU).
- Deterring of intruders. When an intruder tries to break in or is already inside the premises, the operator informs the intruder that the security company is aware and guards or police are on the way.
- Help request. If the user triggers an auxiliary alarm (e.g., by pressing Button Jeweller or the button in the Ajax app), the operator establishes a connection, asks about the condition of a person, and calls for help.
The voice module also supports pre-alarm and post-alarm audio recording. Depending on the configuration, the device can record short audio fragments before or after the alarm is triggered and send them to the CMS.
The system with the Ajax hub with OS Malevich 2.27 and later versions supports adding up to 10 SpeakerPhone Jeweller devices. Depending on the system configuration, the CMS operator can choose the voice module for communication and switch between them, adjust the volume, listen to the situation at the site, and broadcast to all devices.
The CMS operator can select and connect to the voice module, adjust the volume, and broadcast to all devices only when using a third-party SIP server. In Ajax PRO Desktop, all mentioned features will be available in future releases.
Each voice module can be assigned to a specific group or all groups (if group mode is enabled), allowing an operator to connect to the voice module assigned to a group where an alarm was registered.
The device has an autonomous power supply and a robust enclosure with a holding screw to secure the device. The power button is blocked when the system is in armed mode.
The CMS operator can not connect to the voice modules added to the hub, which has switched to Saving mode (the Battery power saver feature should be enabled and configured in the hub settings).
In such cases, the CMS operator can connect and communicate via voice modules only during the hub Activity period when the hub stays connected to Ajax Cloud. The ongoing call can not prolong the hub activity period; therefore, the call will end automatically once the hub switches to Saving mode.
Jeweller and Wings data transfer protocols
Jeweller and Wings are two-way wireless data transfer protocols that provide fast and reliable communication between the hub and devices. SpeakerPhone uses Jeweller to transmit alarms and events and Wings to update firmware.
VoRF data transfer protocol
VoRF is an Ajax proprietary audio streaming protocol that uses time division duplexing (TDD). This technology makes communication possible in both directions (the conversation starts automatically, and there is no need to push any buttons like on a walkie-talkie) on the same frequency channel, using different time slots.
The VoRF protocol uses a part of the spectrum with a width of 2 MHz, namely the “K” band (863 MHz to 865 MHz).
Sending events to the monitoring station
The Ajax system can transmit alarms to both the Ajax PRO Desktop monitoring app and the CMS in the formats of SurGard (Contact ID), SIA (DC-09), ADEMCO 685, and other protocols.
The system with SpeakerPhone Jeweller can transmit the following events:
- Call / end call.
- Tamper alarm/recovery.
- Loss/restoration of connection with the hub.
- Permanent deactivation/activation of the device.
- One-time deactivation/activation of the device.
For the device to work correctly, it is necessary to configure the telephony on the Ajax hub. Besides, the monitoring company must set up SIP-telephony on its part.
When an alarm is received, the operator of the security company monitoring station knows what happened and precisely where to send the RRU. The addressability of Ajax devices allows sending not only events to Ajax PRO Desktop or the CMS, but also the type of the device, its name, security group, and virtual room. Note that the list of transmitted parameters may differ depending on the kind of CMS and the protocol selected for communication with the monitoring station.
The ID and the number of the device can be found in its states in the Ajax app.
Adding to the system
SpeakerPhone Jeweller is incompatible with Ajax radio range extenders and third-party security control panels.
To connect SpeakerPhone Jeweller to the hub, you need to place the device at the same secured facility as the system.
The hub and the device must operate at the same radio frequency; otherwise, they are incompatible. The radio-frequency range of the device might vary based on the region. We recommend purchasing and using Ajax devices in the same region. You can verify the range of operating radio frequencies with the technical support service.
You can add up to 10 SpeakerPhone Jeweller devices to the Ajax hub with OS Malevich 2.27 and later versions. If the Ajax hub has an earlier OS Malevich version, you may add only one SpeakerPhone Jeweller.
Before adding a device
- Install the Ajax app.
- Log in to a PRO account or create a new one.
- Select a space or create a new one.
- Add at least one virtual room.
- Add a compatible hub to the space. Ensure the hub is switched on and has internet access via Ethernet, Wi-Fi, and/or mobile network.
- Ensure the space is disarmed, and the hub is not starting an update by checking statuses in the Ajax app.
Only a PRO or a space admin with the rights to configure the system can add a device to the hub.
Connecting to the hub
- Open the Ajax app. Select the hub where you want to add the device.
- Go to the Devices
tab. Click Add device.
- Name the device, scan or type the QR code (placed on the device and the package box), and select a room and a group (if Group mode is enabled).
- Press Add.
- Switch on the device by holding the power button for 2 seconds.
If the connection fails, turn off the device and try again in 5 seconds. Note that if the maximum number of devices has already been added to the hub (depending on the hub model), you will be notified when you try to add a new one.
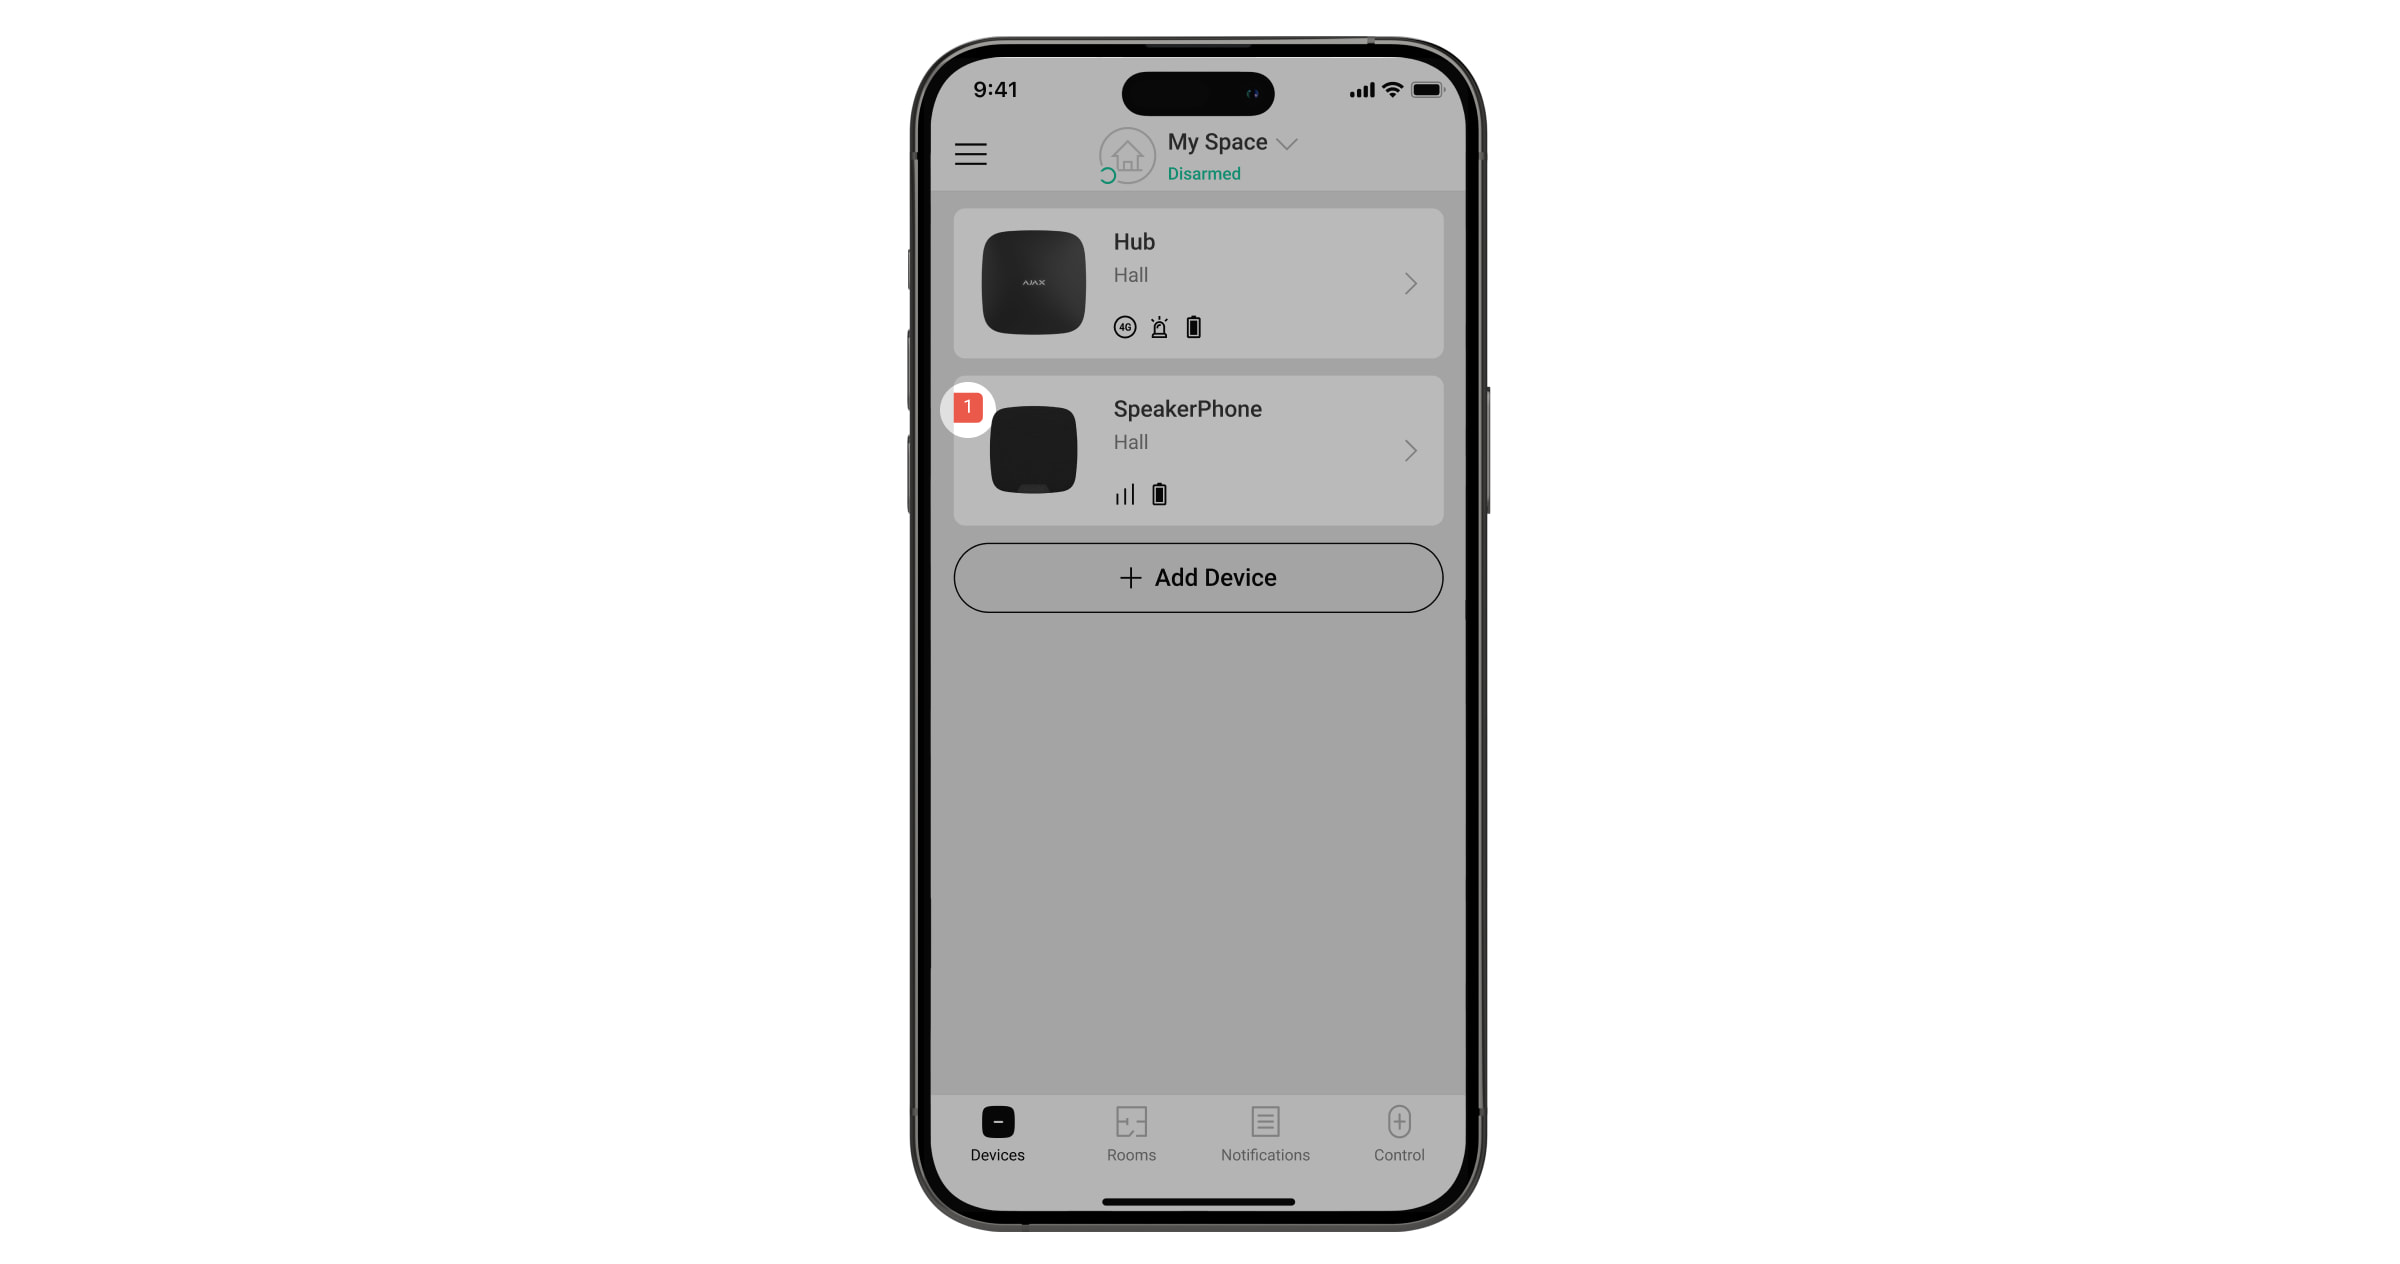
Once connected to the hub, the device will appear in the list of hub devices in the Ajax app. The update frequency for device statuses in the list depends on the Jeweller settings, with the default value of 36 seconds.
SpeakerPhone Jeweller works with only one hub. When connected to a new hub, it stops sending events to the old one. Adding the device to a new hub does not automatically remove it from the device list of the old hub. This must be done through the Ajax app.
Malfunctions
When a malfunction is detected, the Ajax app displays a malfunction counter on the device icon. All malfunctions are shown in the device states. Fields with malfunctions will be highlighted in red.
A malfunction is displayed if:
- the device enclosure is open (tamper is triggered);
- there is no connection with the hub via Jeweller;
- there is no connection with the hub via Wings;
- there is no connection with the hub via VoRF;
- the device’s battery is low;
- the device’s temperature is outside acceptable limits;
- there is a hardware malfunction.
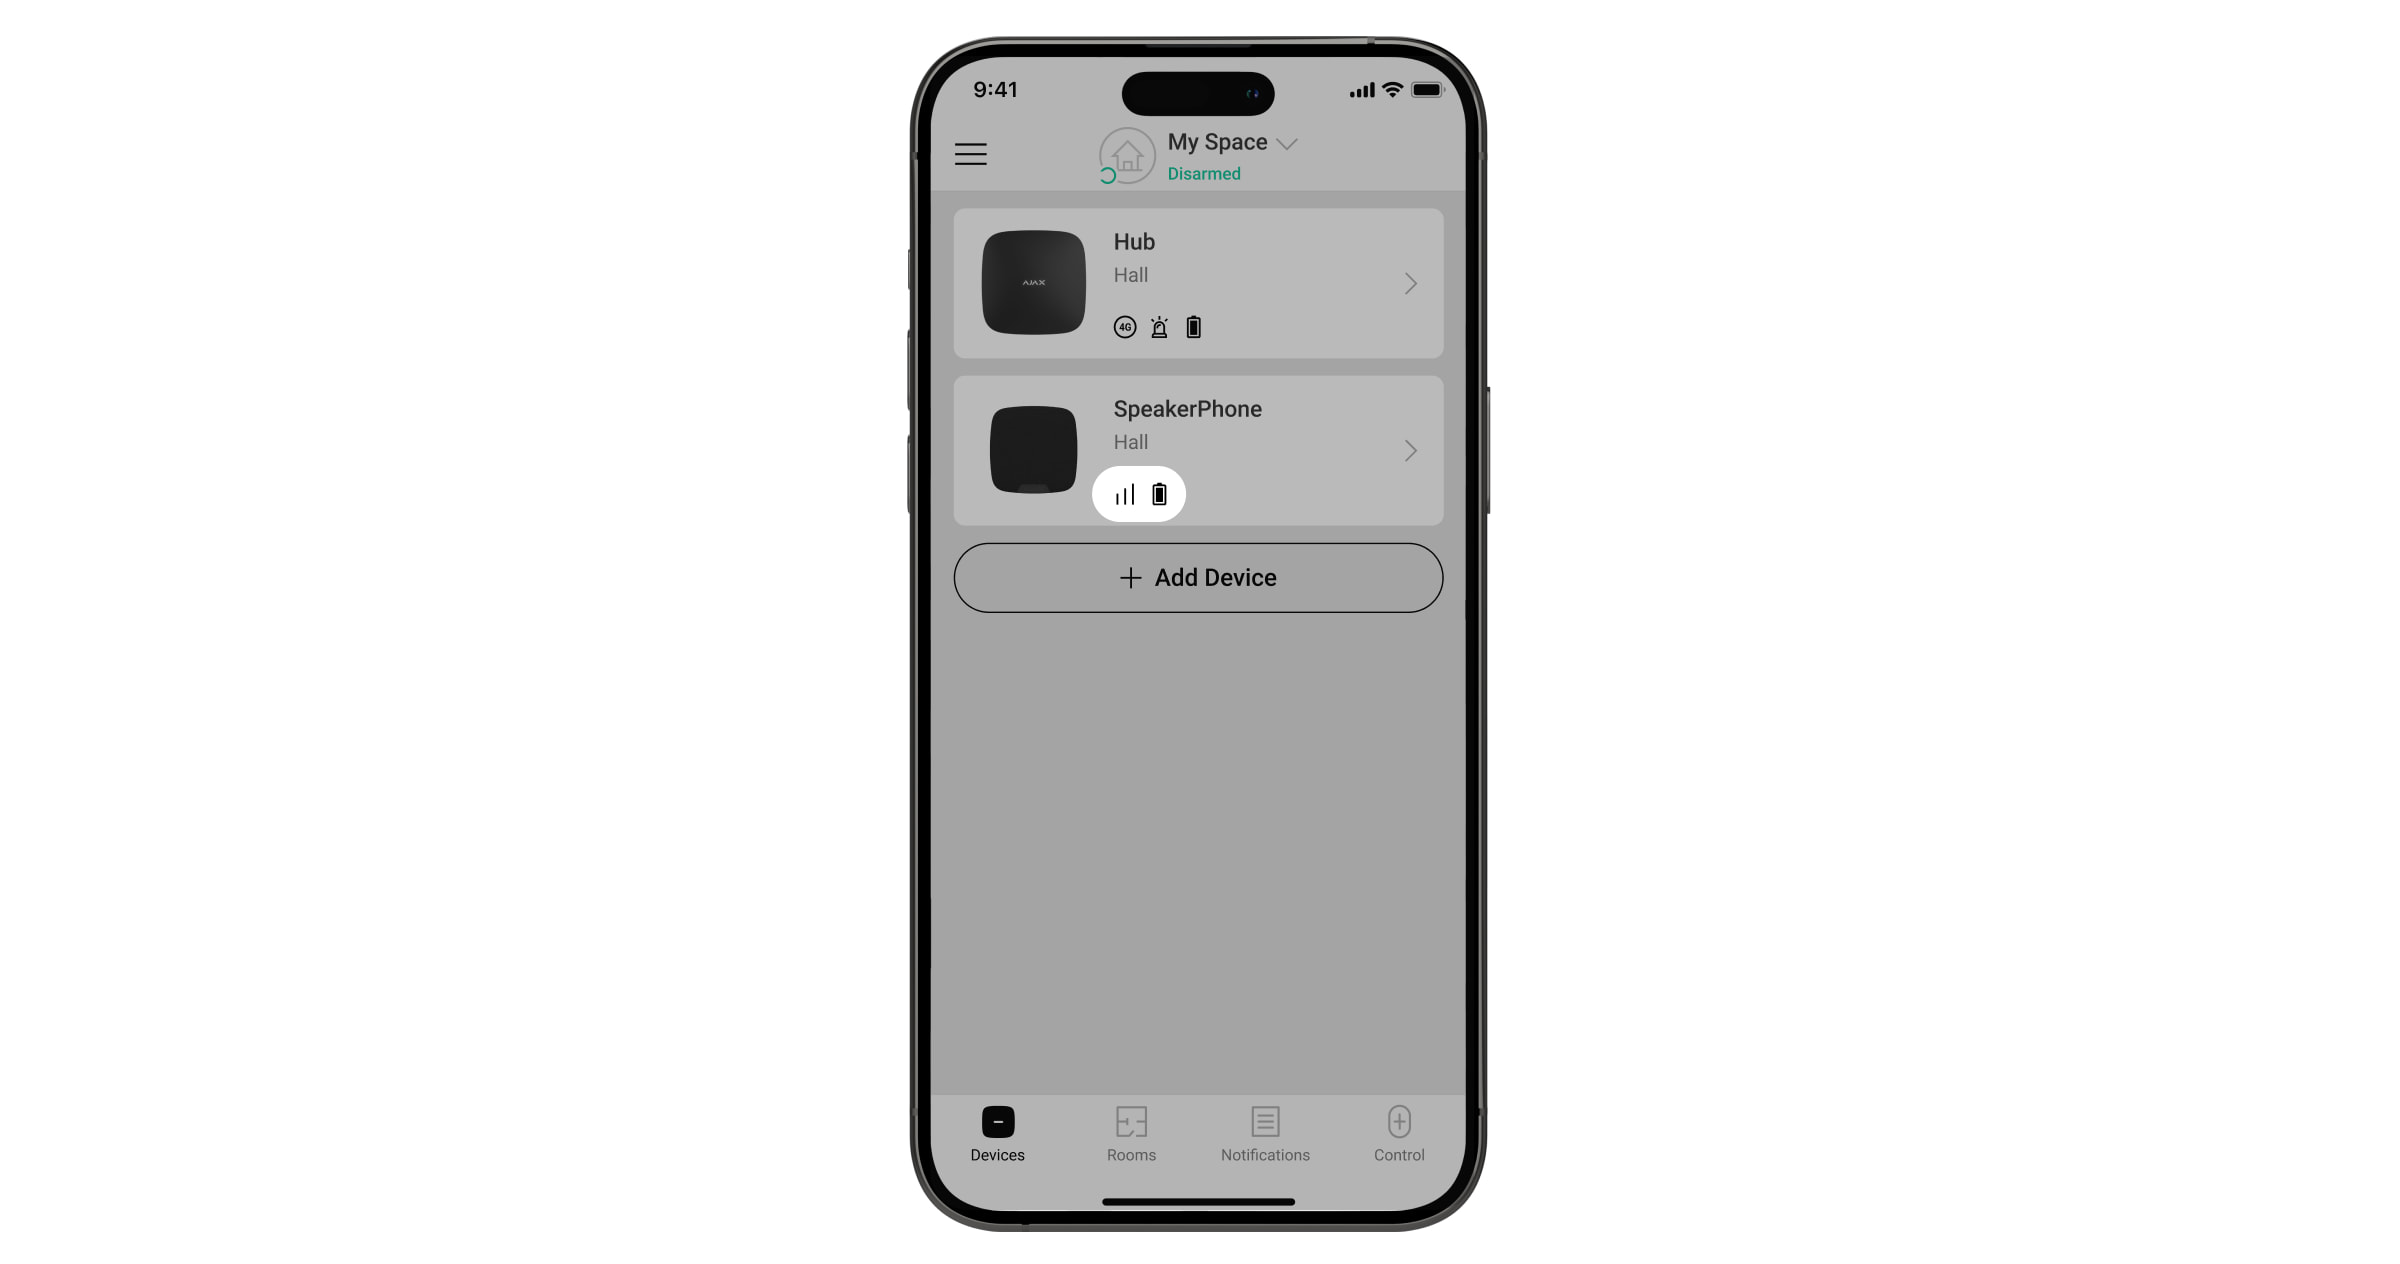
Icons
The icons display some device states. To access them:
- Sign in to the Ajax app.
- Select the space.
- Go to the Devices
tab.
| Icon | Meaning |
|
Jeweller signal strength. Displays the signal strength between the hub and the device. The recommended value is 2–3 bars. |
|
|
The device has a malfunction. The list of malfunctions is available in the device states. |
|
|
The device battery charge level. |
|
|
A firmware update is available. Go to the device states or settings to find the description and launch an update. |
|
|
The device is in the signal attenuation test mode. |
|
|
Device is permanently deactivated. |
|
|
Device has tamper alarms permanently deactivated. |
|
|
Device is deactivated until the first event of disarming the system. |
|
|
Device has tamper alarms deactivated until the first event of disarming the system. |
|
| The device has lost connection with the hub or the hub has lost connection with the Ajax Cloud server. | |
|
The device has not been transferred to the new hub. |
States
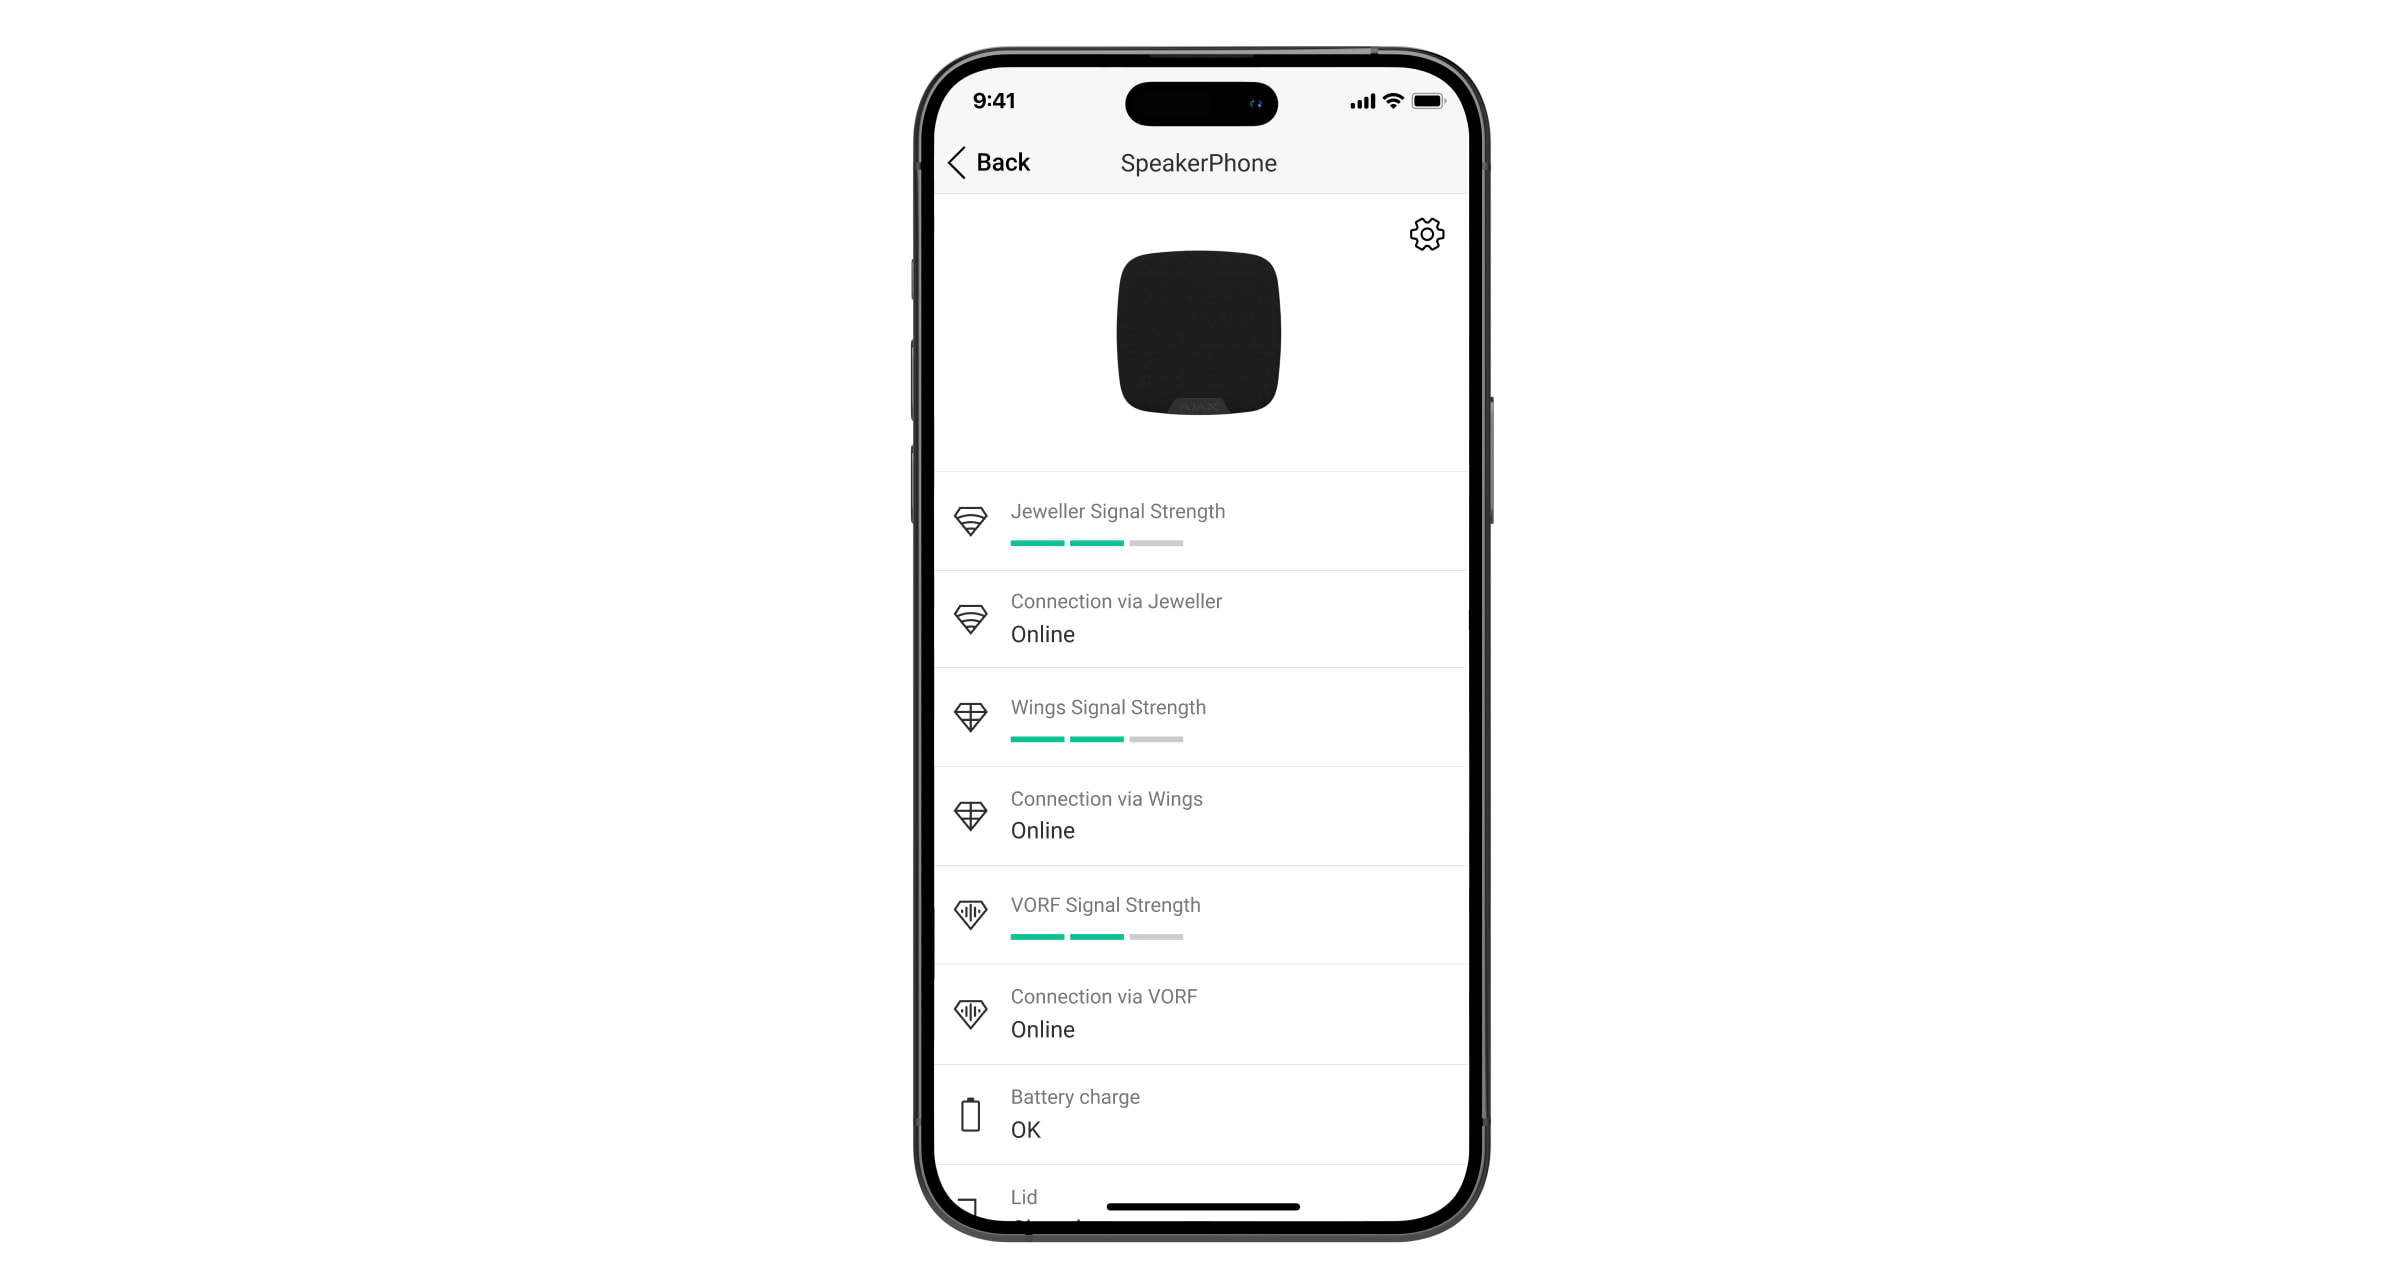
The states provide information about the device and its operating parameters. The states of SpeakerPhone Jeweller can be found in Ajax apps:
- Go to the Devices
tab.
- Select SpeakerPhone from the list.
| Parameter | Value |
| Data import | Displays the error when transferring data to the new hub:
|
| Malfunction |
Clicking on The field is displayed if a malfunction is detected. |
| New firmware version available |
Clicking on The field is displayed if a new firmware version is available. |
| Jeweller signal strength |
Signal strength between the hub and the device on the Jeweller channel. The recommended value is 2–3 bars. Jeweller is a protocol for transmitting SpeakerPhone events and alarms. |
| Connection via Jeweller | Connection status on the Jeweller channel between the device and the hub:
|
| Wings signal strength |
Signal strength between the hub and the device on the Wings channel. The recommended value is 2–3 bars. Wings is a protocol for updating firmware. |
| Connection via Wings | Connection status on the Wings channel between the hub and the device:
|
| VoRF signal strength |
Signal strength between the hub and the device on the VoRF channel. The recommended value is 2–3 bars. VoRF is a protocol for audio streaming. |
| Connection via VoRF | Connection status on the VoRF channel between the hub and the device:
|
| Transmitter power |
Displays the selected power of the transmitter. The parameter appears when the Max or Attenuation option is selected in the Signal attenuation test menu. |
| Battery charge | The battery charge level of the device:
When the batteries are low, the Ajax apps and the security company will receive appropriate notifications. |
| Lid | The status of the device tamper that responds to detachment or opening of the device enclosure:
|
| External power | Device external power supply connection status:
|
| Speaker volume | Volume level of the speaker:
|
| LED indication during call | Shows the status of the device LED indication:
|
| Permanent deactivation | Shows the status of the device permanent deactivation setting:
|
| One-time deactivation | Shows the status of the device one-time deactivation setting:
|
| Firmware | Device firmware version. |
| ID | Device ID. Also available on the QR code on the device enclosure and its package box. |
| Device No. | Number of the device loop (zone). |
Settings
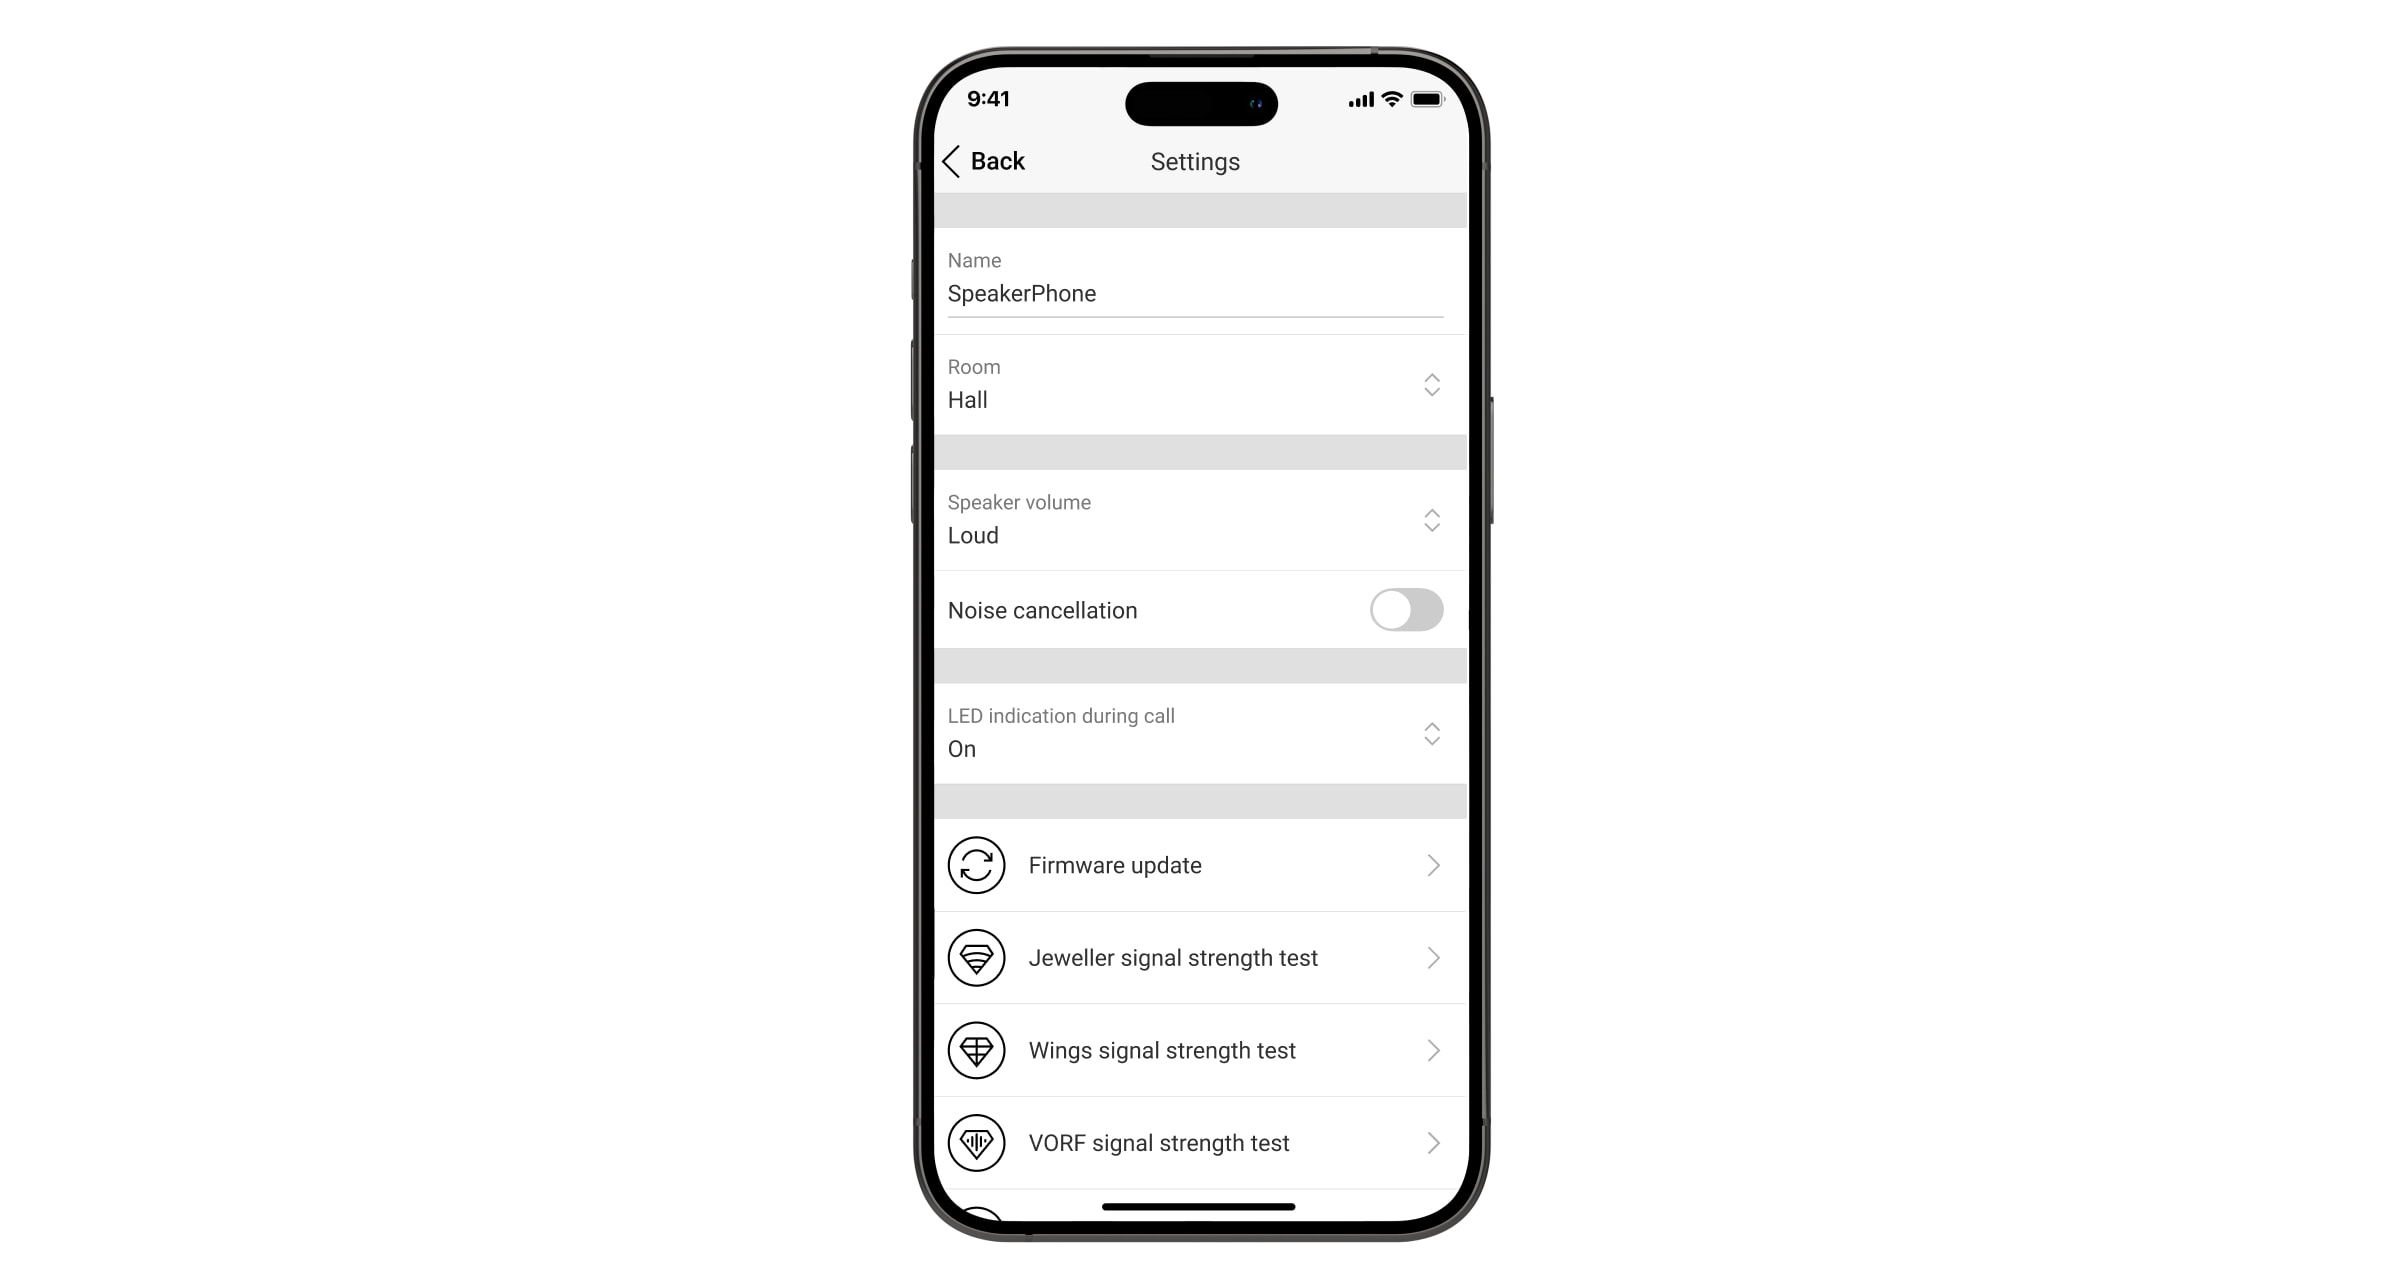
To change the SpeakerPhone settings in the Ajax app:
- Go to the Devices
tab.
- Select SpeakerPhone from the list.
- Go to Settings by clicking on the gear icon
.
- Set the required parameters.
- Click Back to save the new settings.
| Setting | Value |
| Name |
Name of the device. Displayed in the list of hub devices, text of SMS and notifications in the events feed. To change the name of the device, click on the text field. The name can contain up to 12 Cyrillic characters or up to 24 Latin characters. |
| Room |
Selecting the virtual room to which SpeakerPhone is assigned. The room name is displayed in the text of SMS and notifications in the events feed. |
| Call in Group mode | Selecting the group to which the device is assigned. You can select all groups or one group:
The option is available when group mode is enabled in space settings. |
| Speaker volume | Selecting the volume level of the speaker:
|
| Noise cancellation |
When the option is enabled, the system uses the suppression of extraneous noise. You can customize the default state of this feature and switch it during a call. |
| LED indication during call | Selecting the LED indication of the device:
|
| Alarm audio recording | Selecting the condition under which the voice module records audio and sends it to the CMS:
You can also select the duration of the audio recorded before or after the alarm is triggered. The available options are Don’t record or 1 to 10 seconds. |
| Firmware update |
Switches the device to the firmware updating mode. |
| Jeweller signal strength test |
Switches the device to the Jeweller signal strength test mode. |
| Wings signal strength test |
Switches the device to the Wings signal strength test mode. |
| VoRF signal strength test | Switches the device to the VoRF signal strength test mode. |
| Volume test |
Switches the device to the volume test mode. |
| Signal attenuation test |
Switches the device to the signal attenuation test mode. |
| Monitoring | When enabled, all device event notifications are sent to the monitoring station. |
| User manual | Opens the SpeakerPhone user manual in the Ajax app. |
| Permanent deactivation |
Allows the user to disable the device without removing it from the system. Three options are available:
|
| One-time deactivation |
Allows the user to disable events of the device until the first event of disarming the system. Three options are available:
|
| Delete device | Unpairs the device, disconnects it from the hub, and deletes its settings. |
Indication
| Event | Indication | Note |
| Switching on the device. | The LED indicator lights up green once. | |
| Switching off the device. | The LED indicator blinks red three times. | |
| A call is ongoing. | The LED indicator lights up green during a call. | |
| Low battery. | The LED indicator smoothly lights up red. | If external power is connected to SpeakerPhone, the low battery indication is not shown. |
| Tamper triggering. | The LED indicator blinks red. | |
| Jeweller/Wings/VoRF signal strength test. | The LED indicator blinks up green during the test. If there is no connection via Jeweller/Wings/VoRF, it blinks up red. | Turns on after launching an appropriate test in the device settings. |
| Volume test. | The LED indicator lights up green during the test. | Turns on after launching an appropriate test in the device settings. |
| Firmware update. | The LED indicator periodically lights up green while the firmware is updating. | Turns on after launching the firmware update in the device states. |
Functionality testing
The Ajax system offers several types of tests to help select the correct installation place for the devices. Tests do not start immediately. However, the waiting time does not exceed the duration of one “hub—device” polling interval. The polling interval can be checked and configured at hub settings (Hub → Settings → Jeweller).
To run a test, in the Ajax app:
- Select the required space.
- Go to the Devices
tab.
- Select SpeakerPhone from the list.
- Go to Settings
.
- Select a test:
- Jeweller signal strength test.
- Wings signal strength test.
- VoRF signal strength test.
- Volume test.
- Signal attenuation test.
- Run the test.
Device placement
The device is designed for indoor use only.
When choosing where to place SpeakerPhone Jeweller, consider the parameters that affect its operation:
- Jeweller signal strength.
- Wings signal strength test.
- VoRF signal strength test.
- Distance between the device and the hub.
- Presence of obstacles for radio signal and sound transmission: walls, interfloor ceilings, large objects located in the room.
Consider the recommendations for placement when developing a project for the security system of the facility. The security system must be designed and installed by specialists. A list of recommended partners is available here.
Recommended installation height — 5.2 ft.
Signal strength
The Jeweller, Wings, and VoRF signal strengths are determined by the number of undelivered or corrupted data packages over a certain period of time. The icon in the Devices
tab in Ajax apps indicates the signal strength:
- Three bars — excellent signal strength.
- Two bars — good signal strength.
- One bar — low signal strength, stable operation is not guaranteed.
- Crossed out icon — no signal.
Check the Jeweller, Wings, and VoRF signal strength before final installation. With a signal strength of one or zero bars, we do not guarantee stable operation of the device. Consider to relocate the device as repositioning even by 20 cm can significantly improve the signal strength. If there is still poor or unstable signal after the relocation, change the location.
Do not install the device
- Outdoors. This can lead to device failure.
- In places where the acoustic signal can be attenuated (inside furniture, behind thick curtains, etc.).
- NNear any metal objects or mirrors that cause attenuation and screening of the signal.
- Inside premises with temperature and humidity outside the permissible limits. This could damage the device.
- Closer than 3.3 feet from the hub. This can lead to a loss of communication with the device.
- In a place with a low signal level. This may result in the loss of the connection with the hub.
Installation
Before installing SpeakerPhone Jeweller, ensure that you have selected the optimal location that complies with the requirements of this manual.
To mount a device:
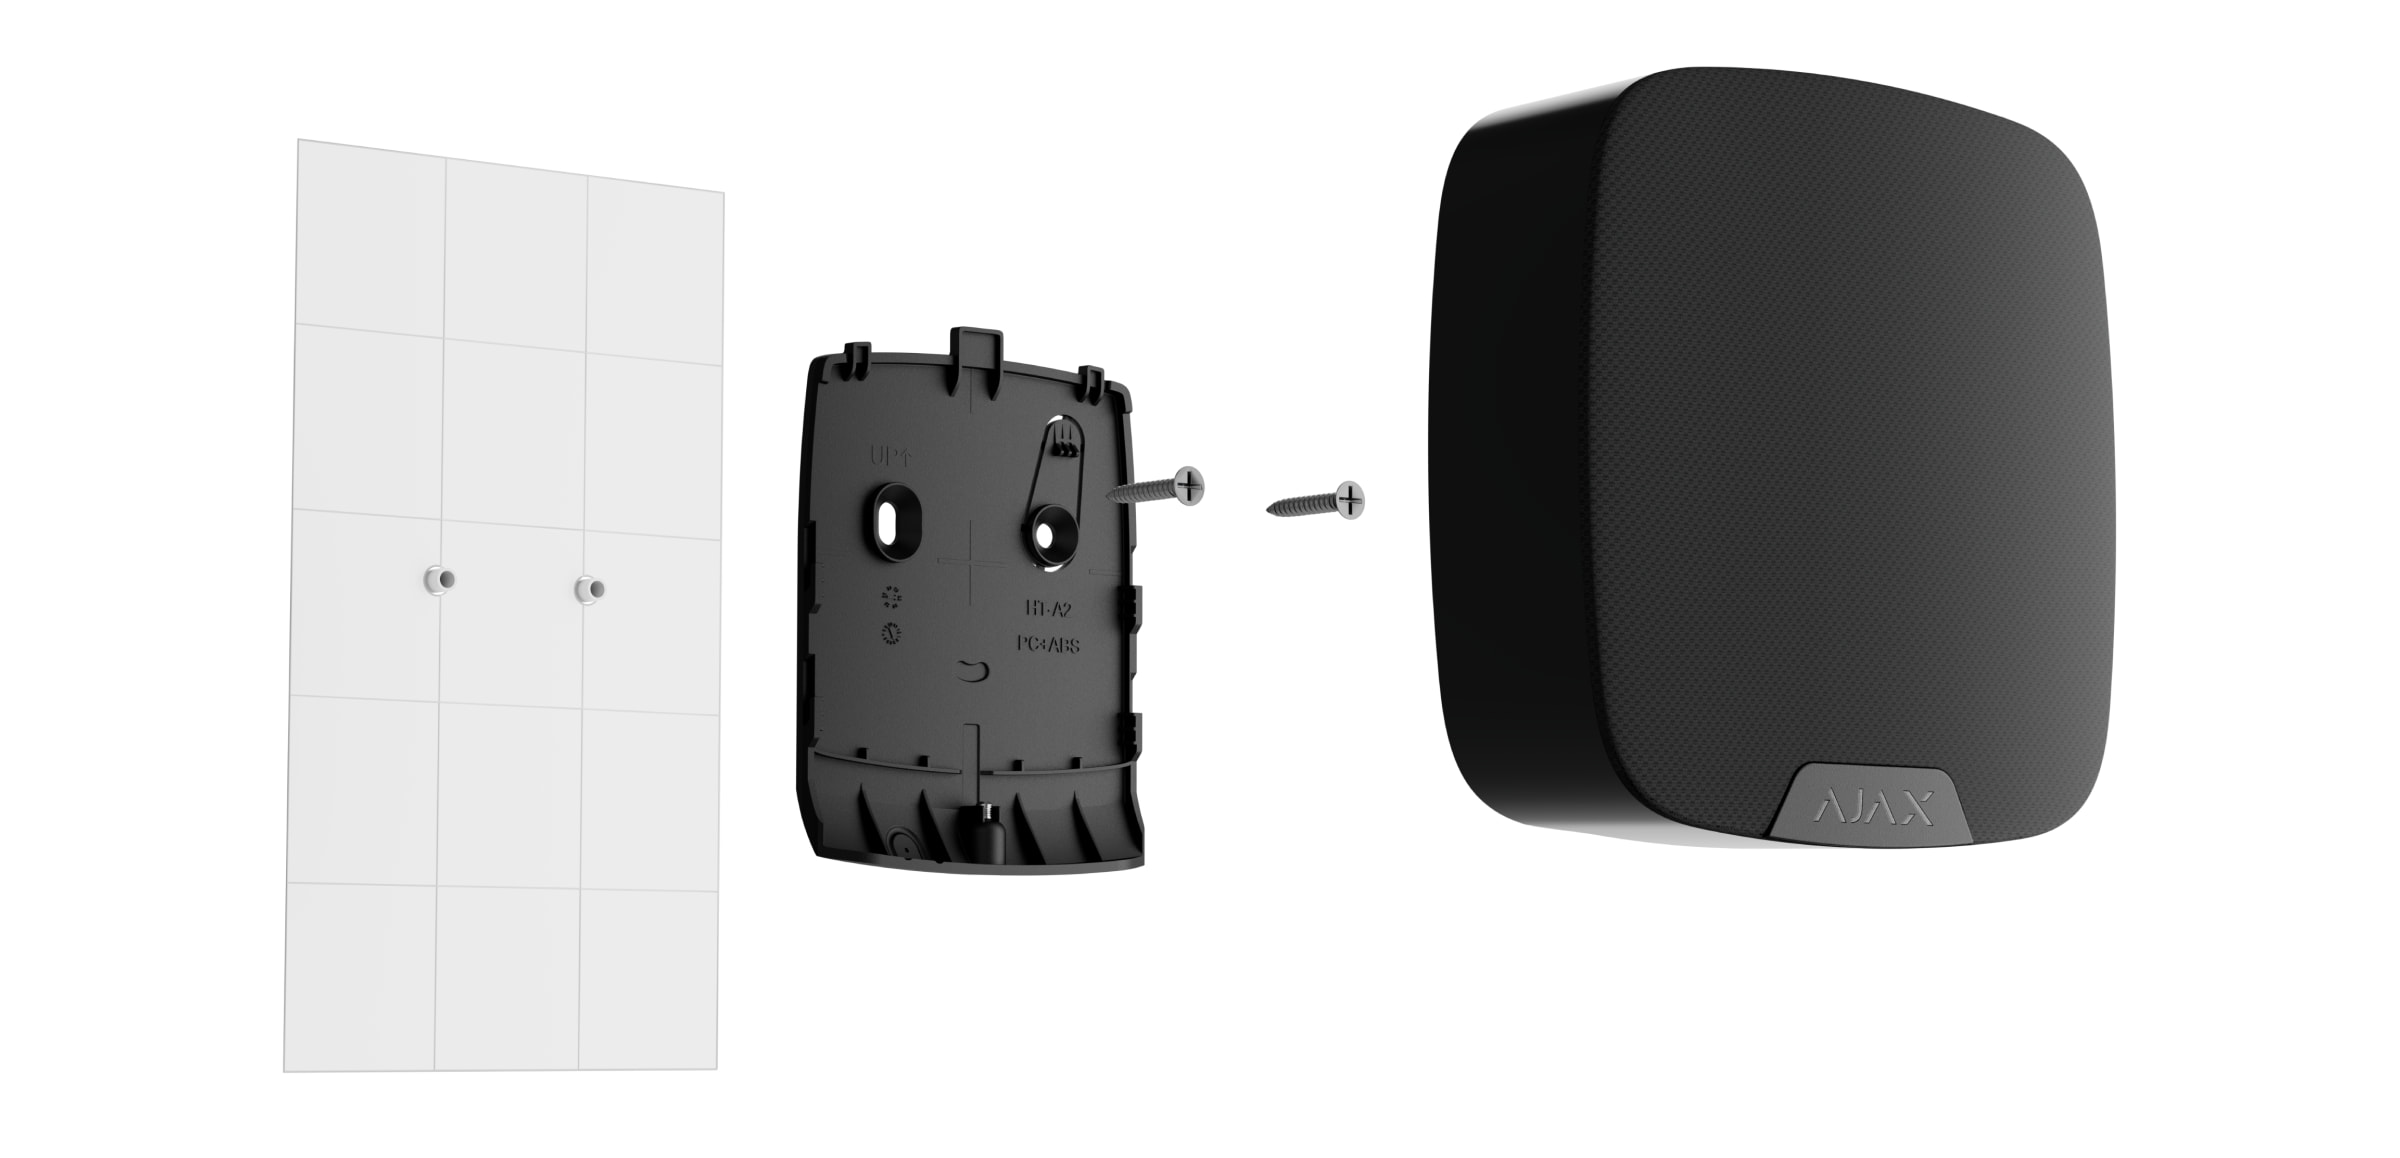
- Remove the SmartBracket mounting panel from the device. Unscrew the holding screw first and slide the panel down.
- Fix the SmartBracket panel using double-sided tape to the selected installation spot.
Double-sided tape can only be used for temporary installation. The device attached by the tape may come unstuck from the surface at any time. As long as the device is taped, the tamper will not be triggered when the device is detached from the surface.
- Place the device on SmartBracket. The device LED indicator will flash. It is a signal indicating that the enclosure of the device is closed.
If the LED indicator doesn’t light up during placing the device on SmartBracket, check the tamper status in the Ajax app, the integrity of the fastening, and the tightness of the device fixation on the panel.
- Run the functionality testing.
- If the tests are passed successfully, remove the device from SmartBracket.
- Fix the SmartBracket panel on the surface using bundled screws.
When using other fasteners, ensure they do not damage or deform the panel.
- Place the device on the SmartBracket mounting panel.
- Tighten the holding screw on the bottom of the device’s enclosure. The screw is needed for more reliable fastening and protection of the device from quick dismantling.
Connecting a third-party power supply unit
When connecting a third-party power supply unit and using SpeakerPhone Jeweller, follow the general electrical safety regulations for using electrical appliances, as well as the requirements of regulatory legal acts on electrical safety.
SpeakerPhone Jeweller is equipped with terminals for connecting a 12 V⎓ power supply unit. Recommended electrical parameters for the power supply unit are: 12 V⎓ with a current of 1 A.
When external power is connected, the pre-installed batteries serve as a backup power source. Do not remove them while connecting the power supply.
Before installing the device, make sure to check the wires for any damage to the insulation. Use only a grounded power source. Do not disassemble the device while it’s under voltage. Do not use the device with a damaged power cable.
To connect a third-party power supply unit:
- Remove the SmartBracket mounting panel. Carefully drill the appropriate enclosure part to prepare the hole for the cable:
- De-energize the external power supply cable.
- Connect the cable to the terminals by observing polarity (marked on the plastic).
The cable length should not exceed 32 ft using cable 2 × 0.35, copper conductor.
- Route the cable in the cable channel. An example of how to output the cable:
- Turn on the device and place it on the mounting panel. Tighten the holding screw on the bottom of the device’s enclosure.
- Check the status of batteries and external power in the Ajax app and the overall operation of the device.
Firmware update
The SpeakerPhone Jeweller firmware update can be installed when a new version is available. You can find out about it in the devices list in Ajax PRO: Tool for Engineers and Ajax PRO Desktop apps. If an update is available, the corresponding device will have an icon . An admin or a PRO with access to the system settings can run an update in the SpeakerPhone Jeweller states or settings. An update takes up to 15 minutes.
To update the SpeakerPhone firmware, you must connect the hub to Ajax Cloud via Ethernet or Wi-Fi.
Maintenance
Check the functioning of the device regularly. The optimal frequency of checks is once every three months. Clean the device enclosure of dust, cobwebs, and other contaminants as they emerge. Use a soft dry wipes suitable for equipment care.
Do not use substances that contain alcohol, acetone, petrol, and other active solvents to clean the device.
The batteries installed in the device ensure up to 3 years of autonomous operation in standby mode or up to 12 hours in conversation mode.
If the battery is discharged, the security system will send an early warning about replacing the batteries.
Technical specifications
Warranty
Warranty for the Limited Liability Company “Ajax Systems Manufacturing” products is valid for 2 years after the purchase.
If the device does not function correctly, please contact the Ajax Technical Support first. In most cases, technical difficulties can be resolved remotely.
Contact Technical Support:
Manufactured by “AS Manufacturing” LLC

