
Outlet [type F] Jeweller is a smart wall outlet with power consumption monitoring. Compliant with the European plug type F, it features a grounding terminal and protective shutters. These shutters shield against dust and splashes, and also protect children from electric shock by preventing them from inserting objects like screwdrivers, scissors, or pins into the outlet. The outlet has three types of protection: voltage, current, and temperature.
The smart outlet controls the power supply of electrical appliances connected to it, with a load capacity of up to 3 kW. It can be operated using the Ajax app, through automation scenarios, via the outlet’s touch button, or by pressing Button or smart switch LightSwitch.
Wall outlets can be used solo or combined with LightSwitch switches, as these devices have the same frame design.
Use the online Ajax switches and outlets configurator to assemble your custom set. Combine devices into a frame, pick the color, and download your configuration as PDF.
Outlet [type F] communicates with the hub using the secure Jeweller protocol to transmit events. The communication range is up to 1,100 meters in an open space.
The device is compatible only with Ajax radio signal range extenders and hubs. Connection to uartBridge and ocBridge Plus is not supported.
A smart outlet for a type E plug is also available — Outlet [type E] Jeweller.
Design
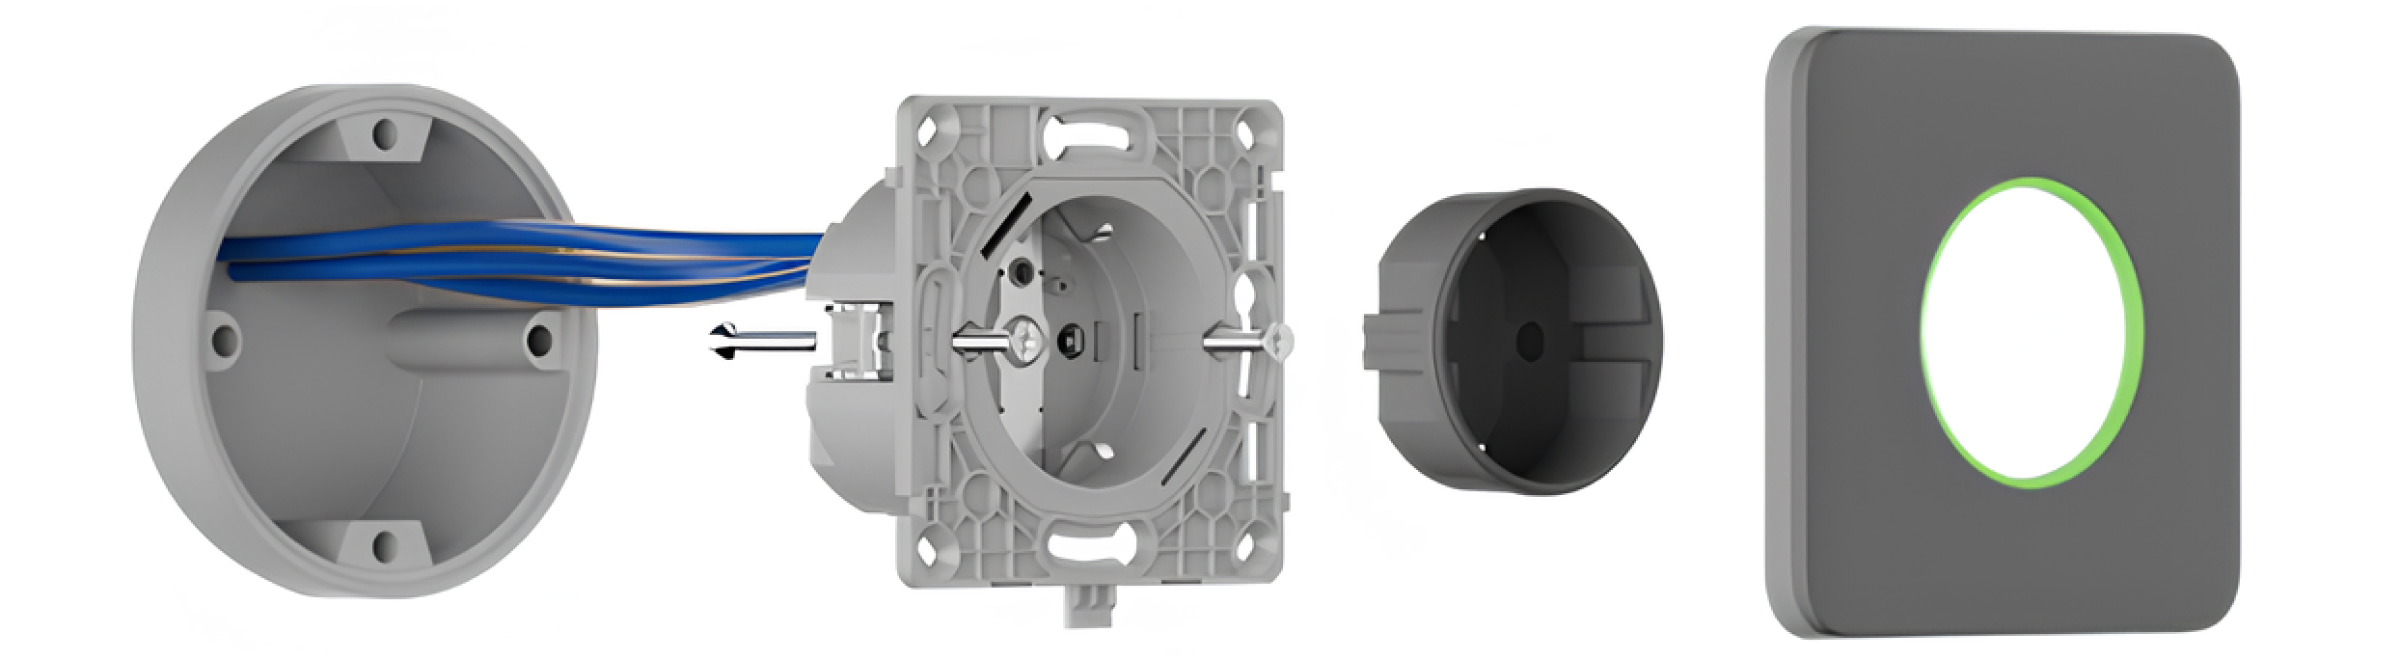
Outlet [type F] Jeweller is a prefabricated device that consists of the following components:
- Relay OutletCore (smart) [type F] Jeweller;
- Cover options: SoloCover (smart) [type F] / SideCover (smart) [type F] / СenterCover (smart) [type F];
- Frame options: Frame (2 seats) / Frame (3 seats) / Frame (4 seats) / Frame (5 seats). These frames are used when installing multiple smart outlets and/or LightSwitch devices in a row.
All components are sold separately and can be installed by attaching them to each other.
Choose the appropriate cover for Outlet [type F] based on your installation plan:
- as a separate device — SoloCover (smart) [type F];
- to the right or left of other Outlets or LightSwitches — SideCover (smart) [type F];
- between devices — CenterCover (smart) [type F].
Each cover comprises two parts: the front panel and the receptacle cap. For side-by-side installation of two or more outlets, you will also need Frame.
Use the online Ajax switches and outlets configurator to assemble your custom set. Combine devices into a frame, pick the color, and download your configuration as PDF.
Colors
The product line includes 8 colors of touch-sensitive panels: White, Fog, Grey, Graphite, Ivory, Oyster, Olive, and Black.
The RAL colors below are as close as an approximation of the actual color. However, they may slightly differ, so please only use them as a guide to the color choice.
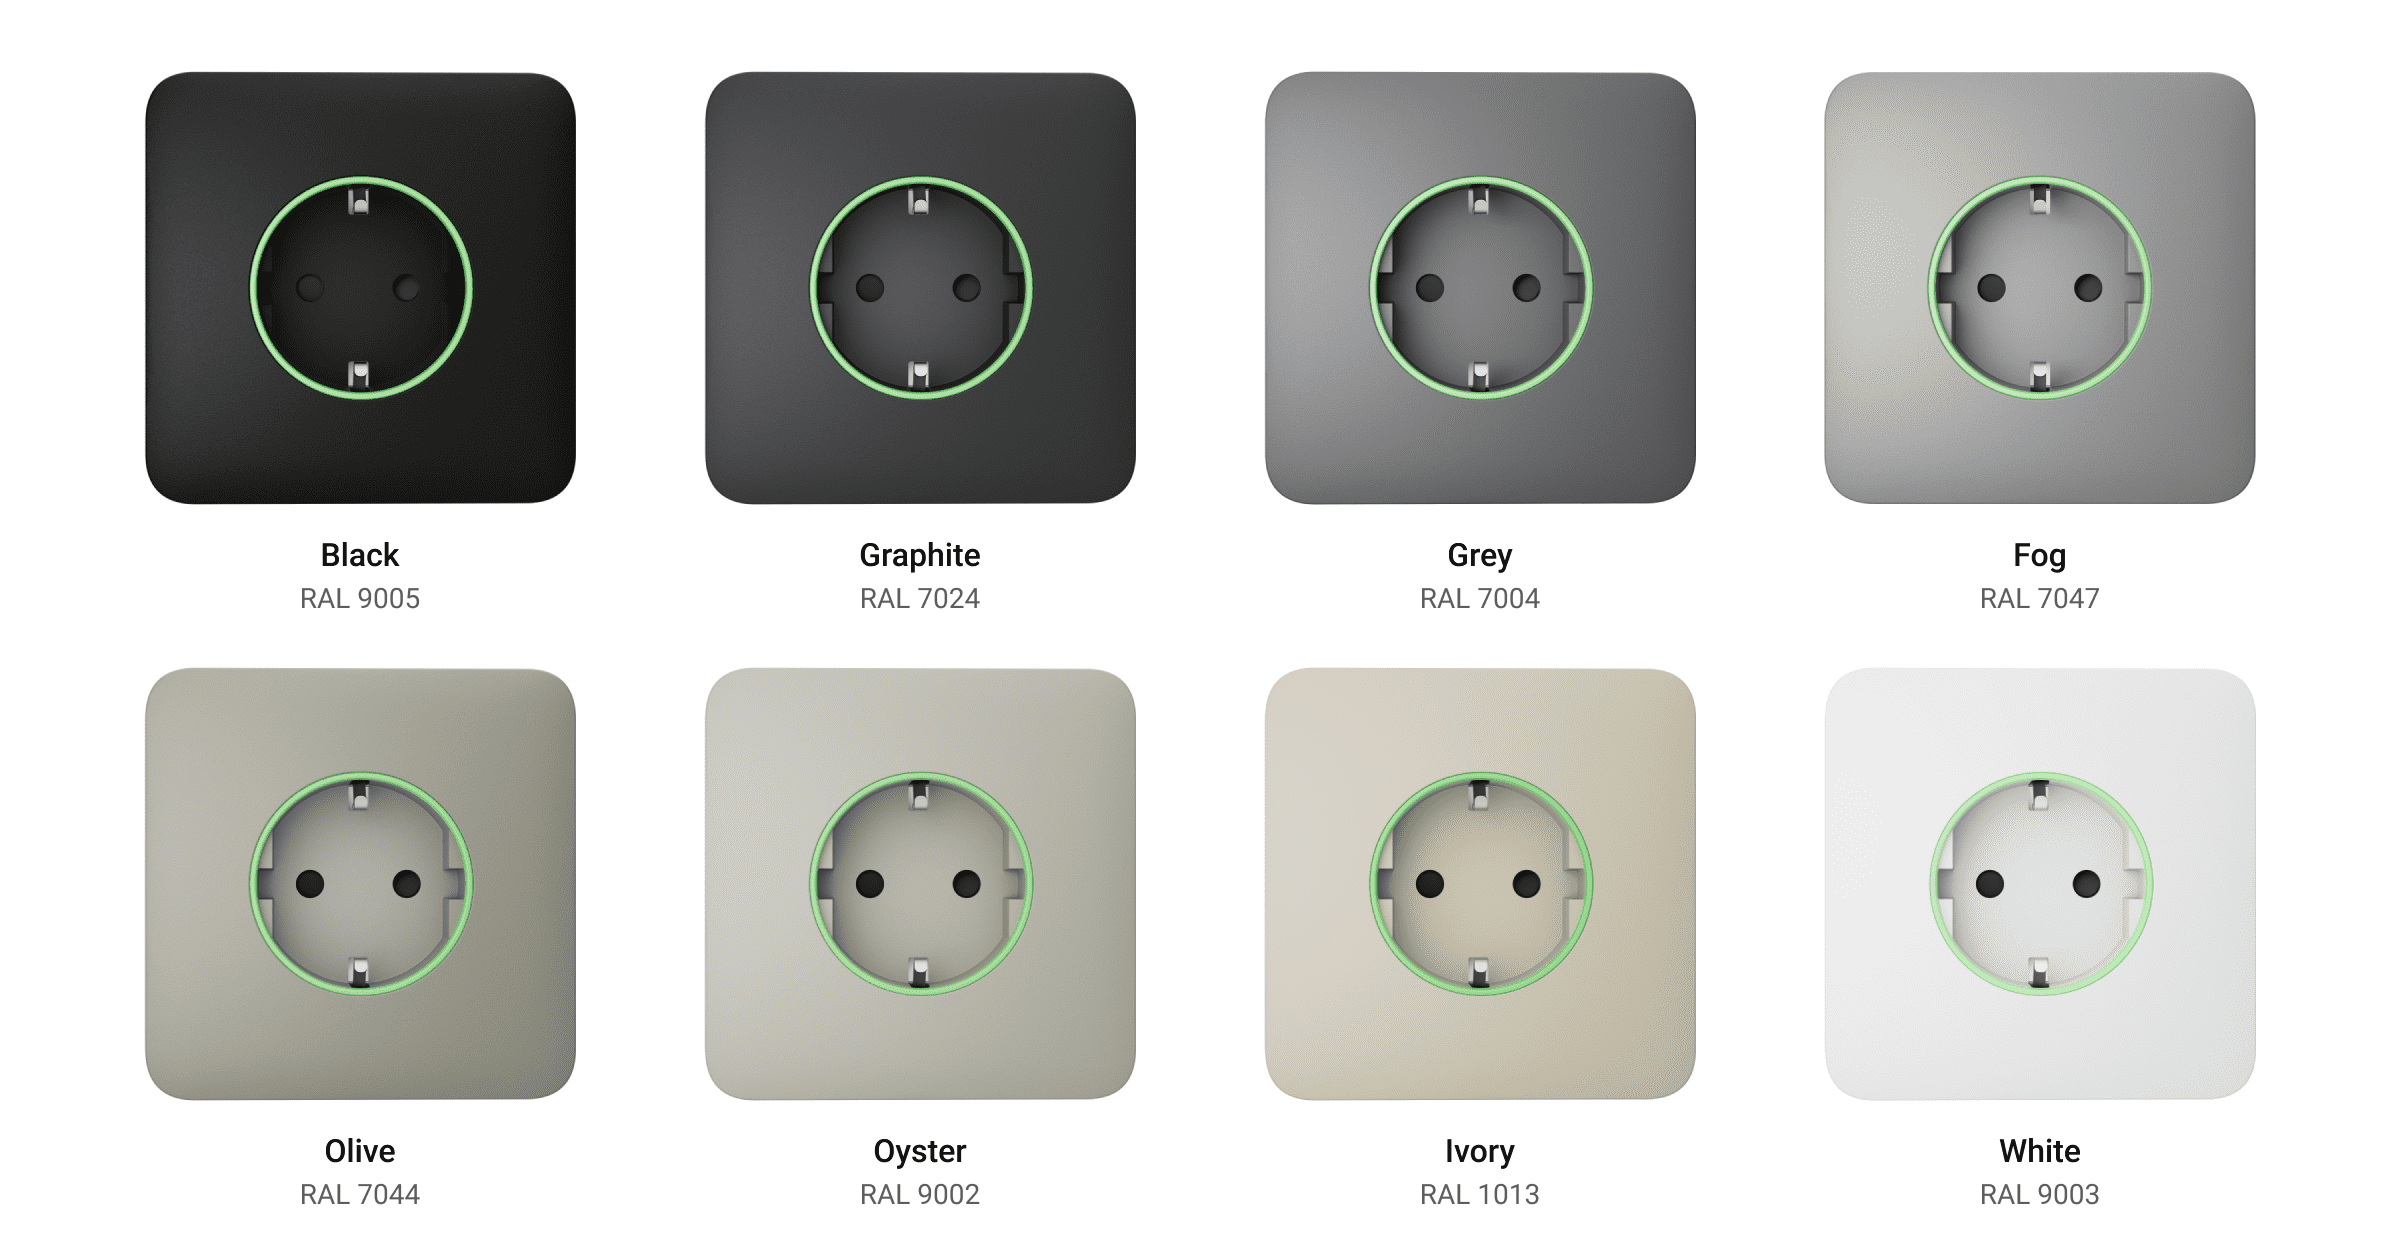
In the outlet settings in the Ajax apps, you can select the color for Outlet [type F]. Note that the selected color in the app does not necessarily have to match the actual color of the installed cover.
An admin or a PRO with the rights to configure the system can change the cover color at any time. This can be useful, for example, if the user has replaced the cover or wants to differentiate outlets in the app by color.
Functional elements
Relay
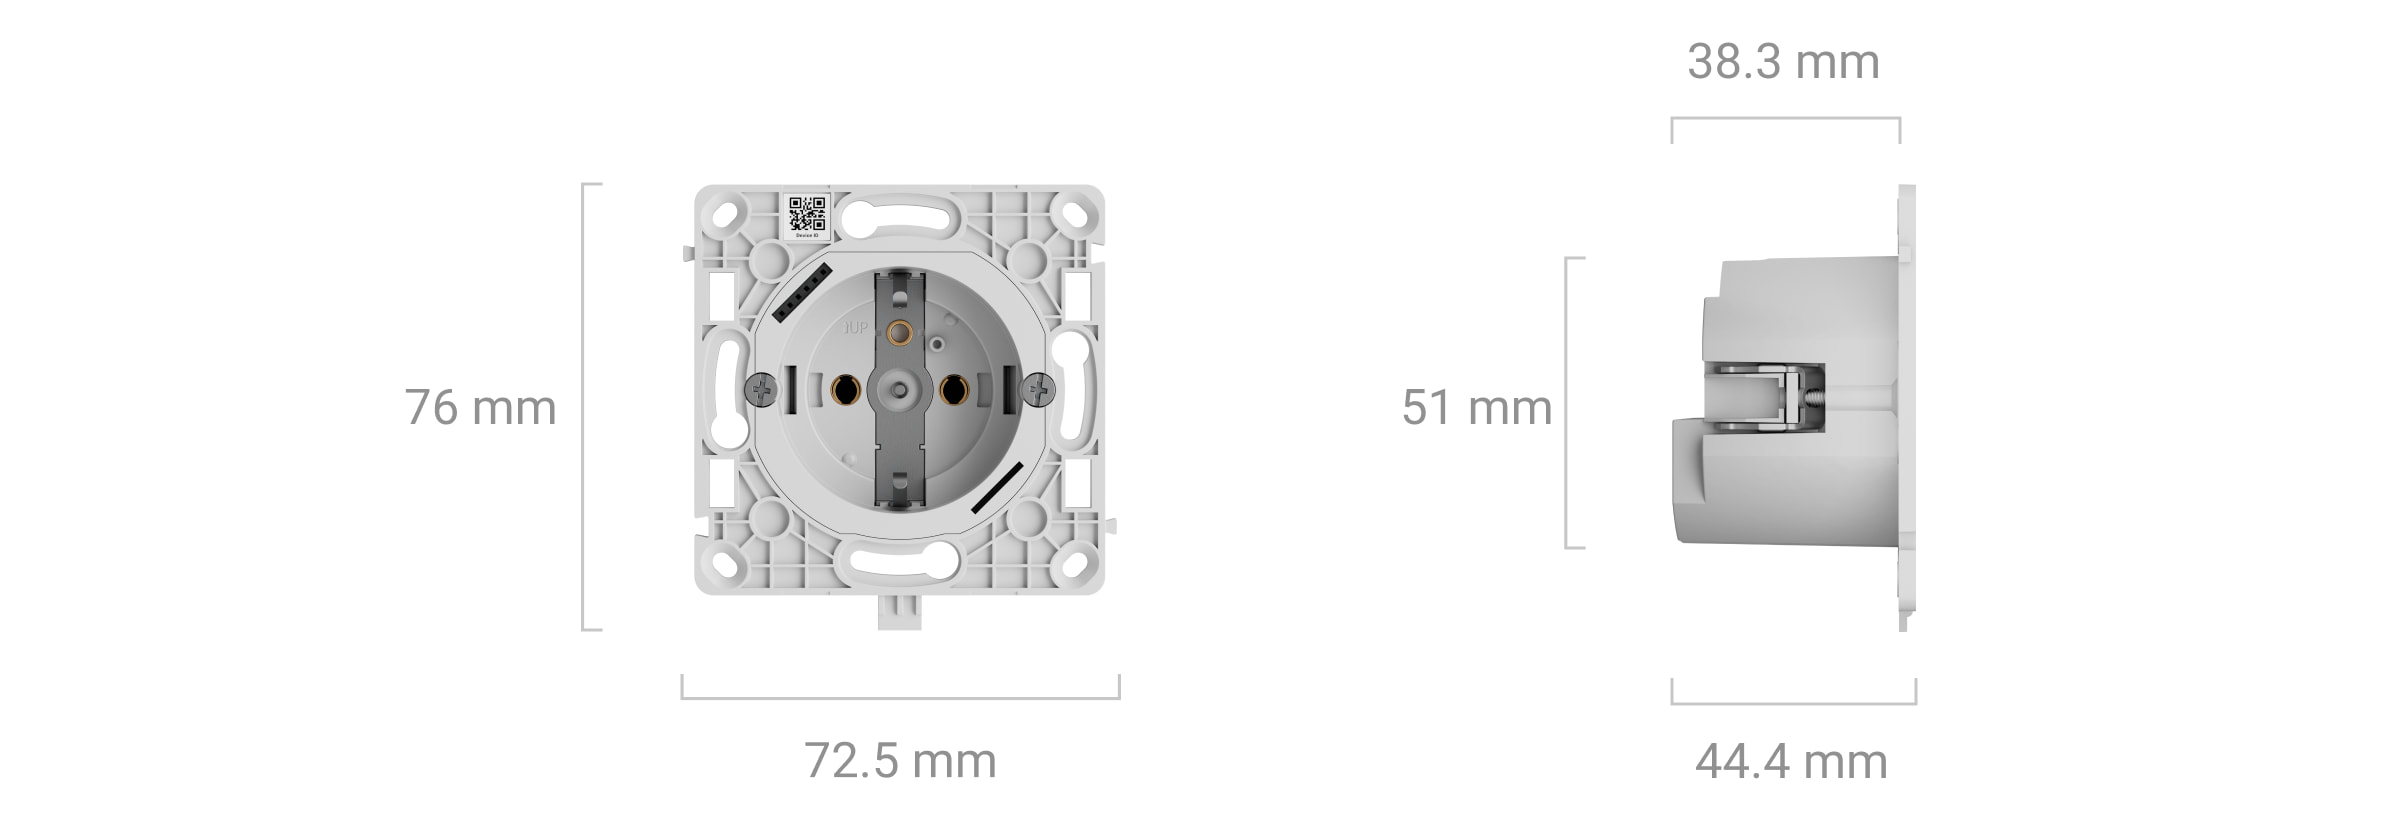
OutletCore (smart) [type F] Jeweller
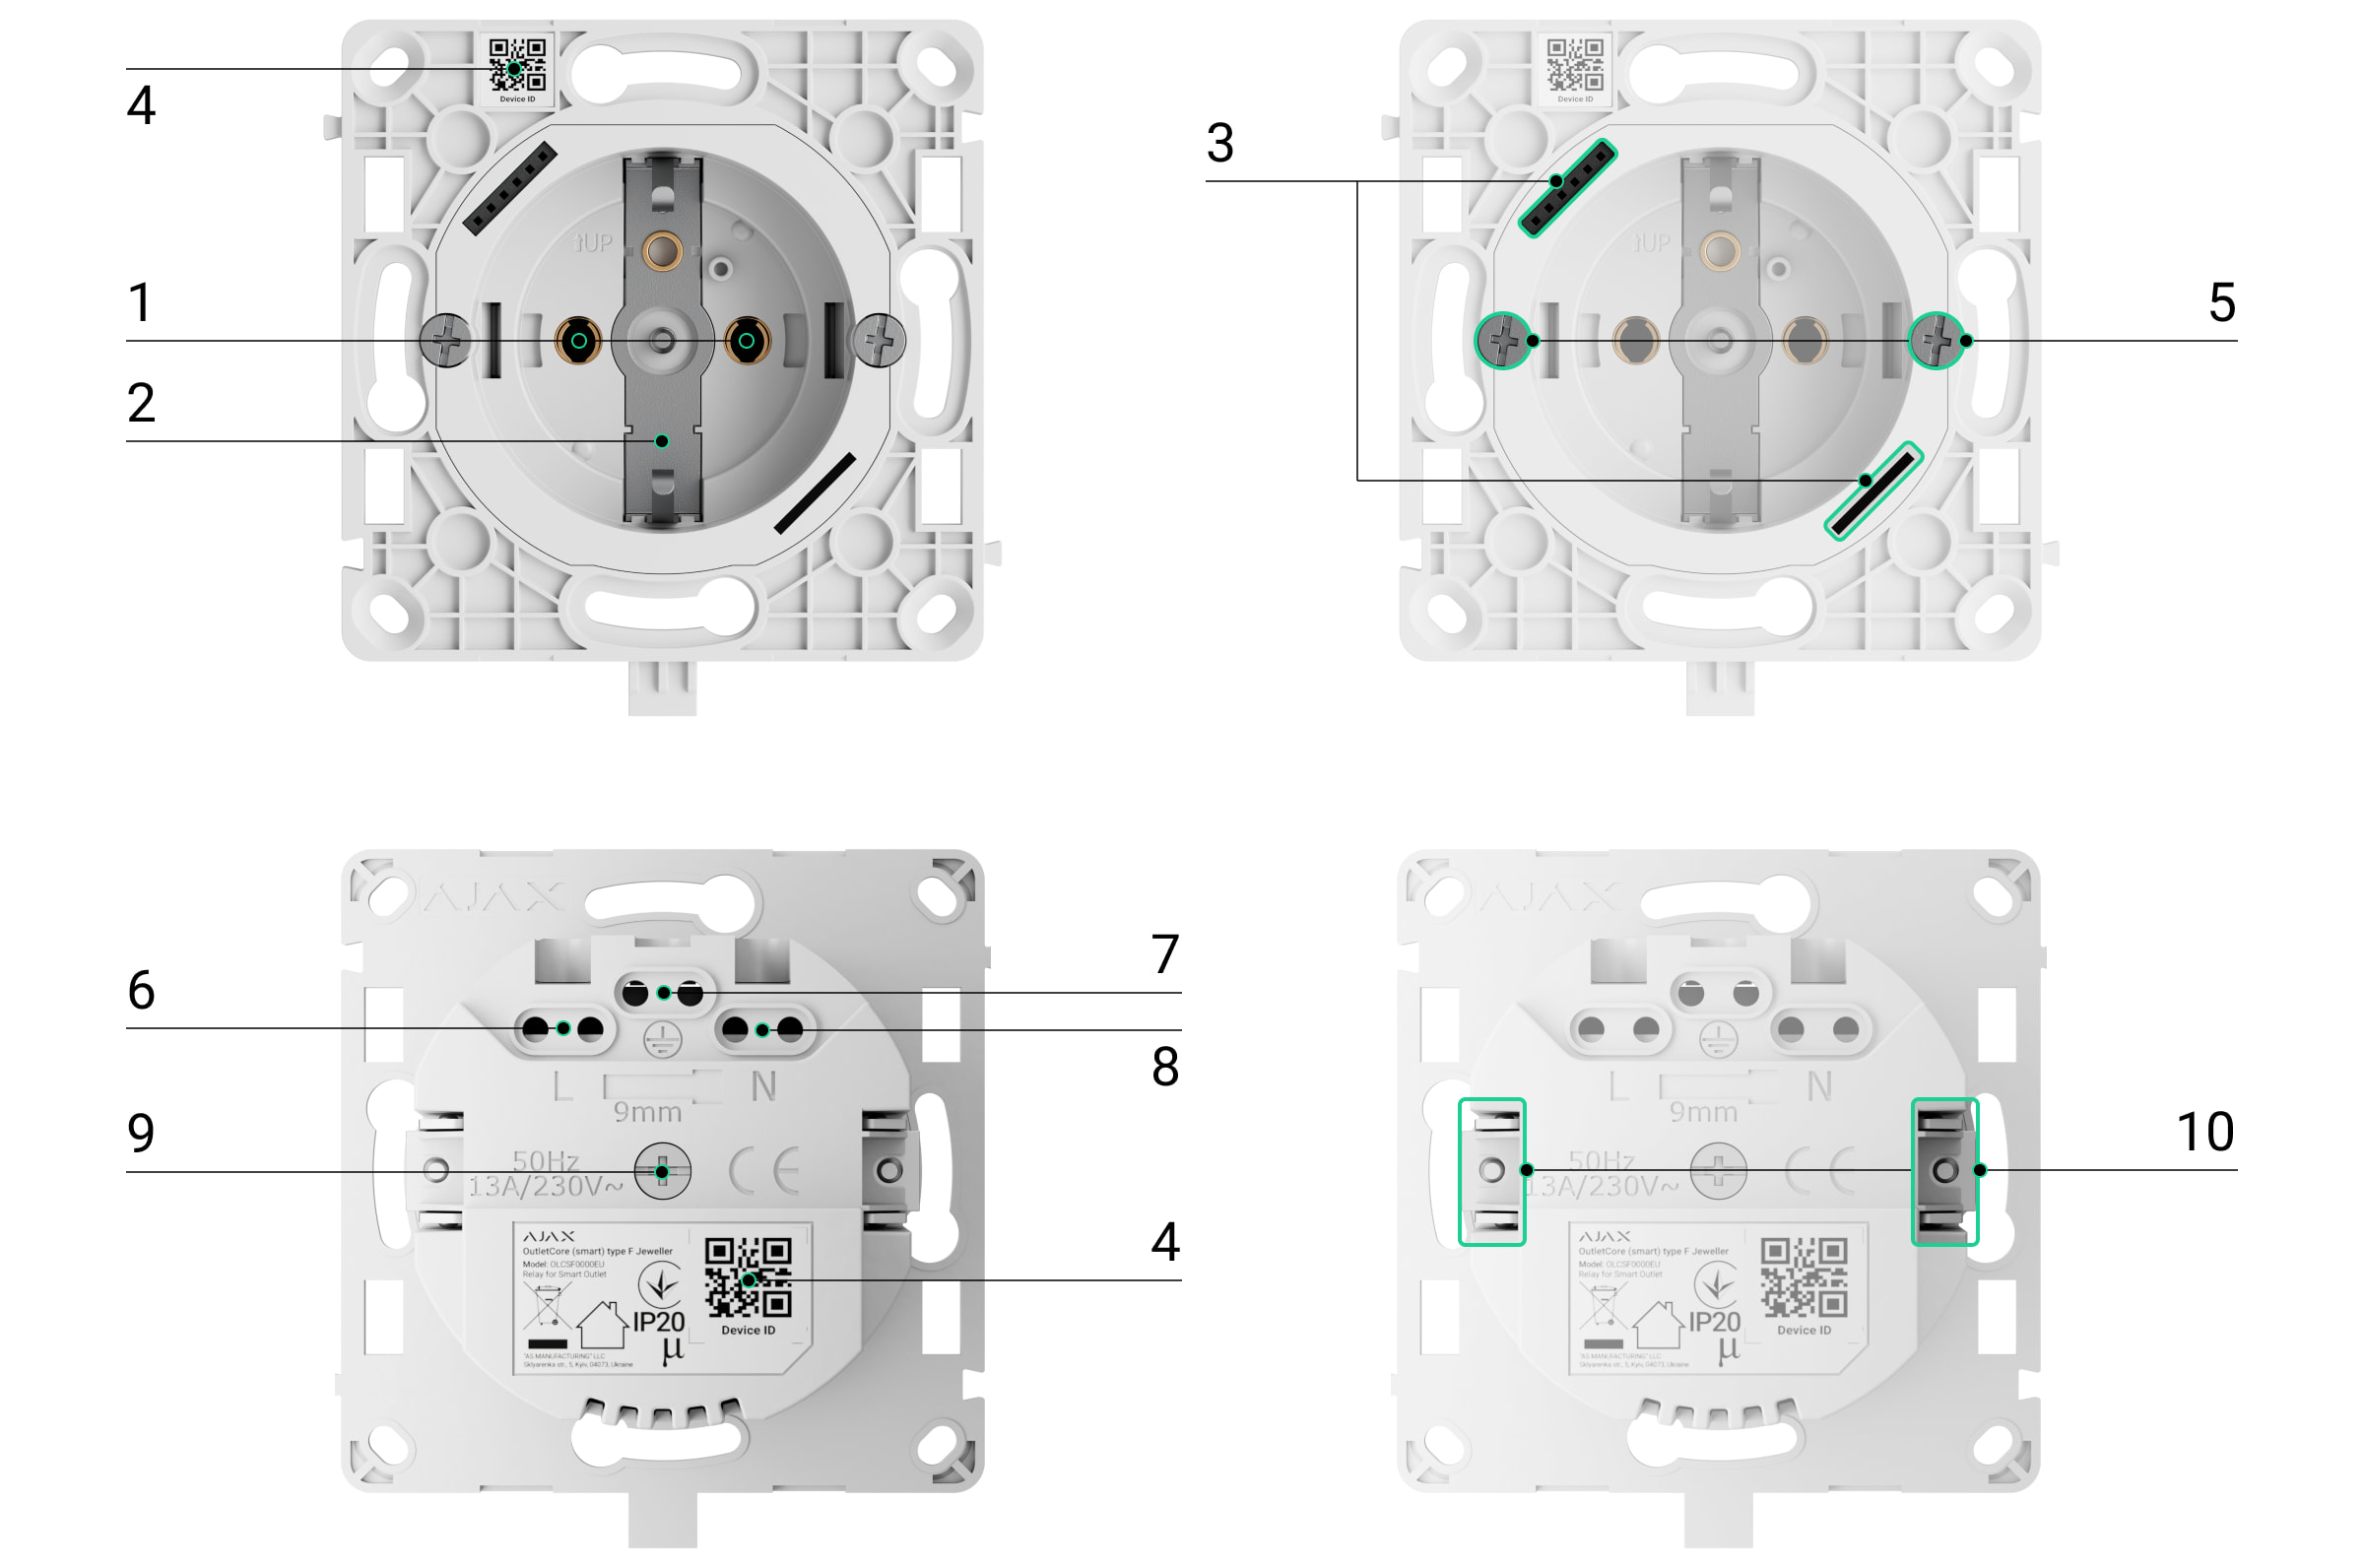
- Outlet (type F).
- Grounding terminal.
- A connector for connecting the LED indication, night backlight, and touch button, which are built into the front panel of the cover.
- QR code with the device ID for adding the outlet to the Ajax system.
- Screws for fixing mounting claws.
- Terminal for connecting the power supply phase (L).
- Terminal for connecting the ground.
- Terminal for connecting the power supply neutral (N).
- The hole for securing the receptacle cap with a bundled screw.
- Mounting claws to secure the outlet in the mounting box.
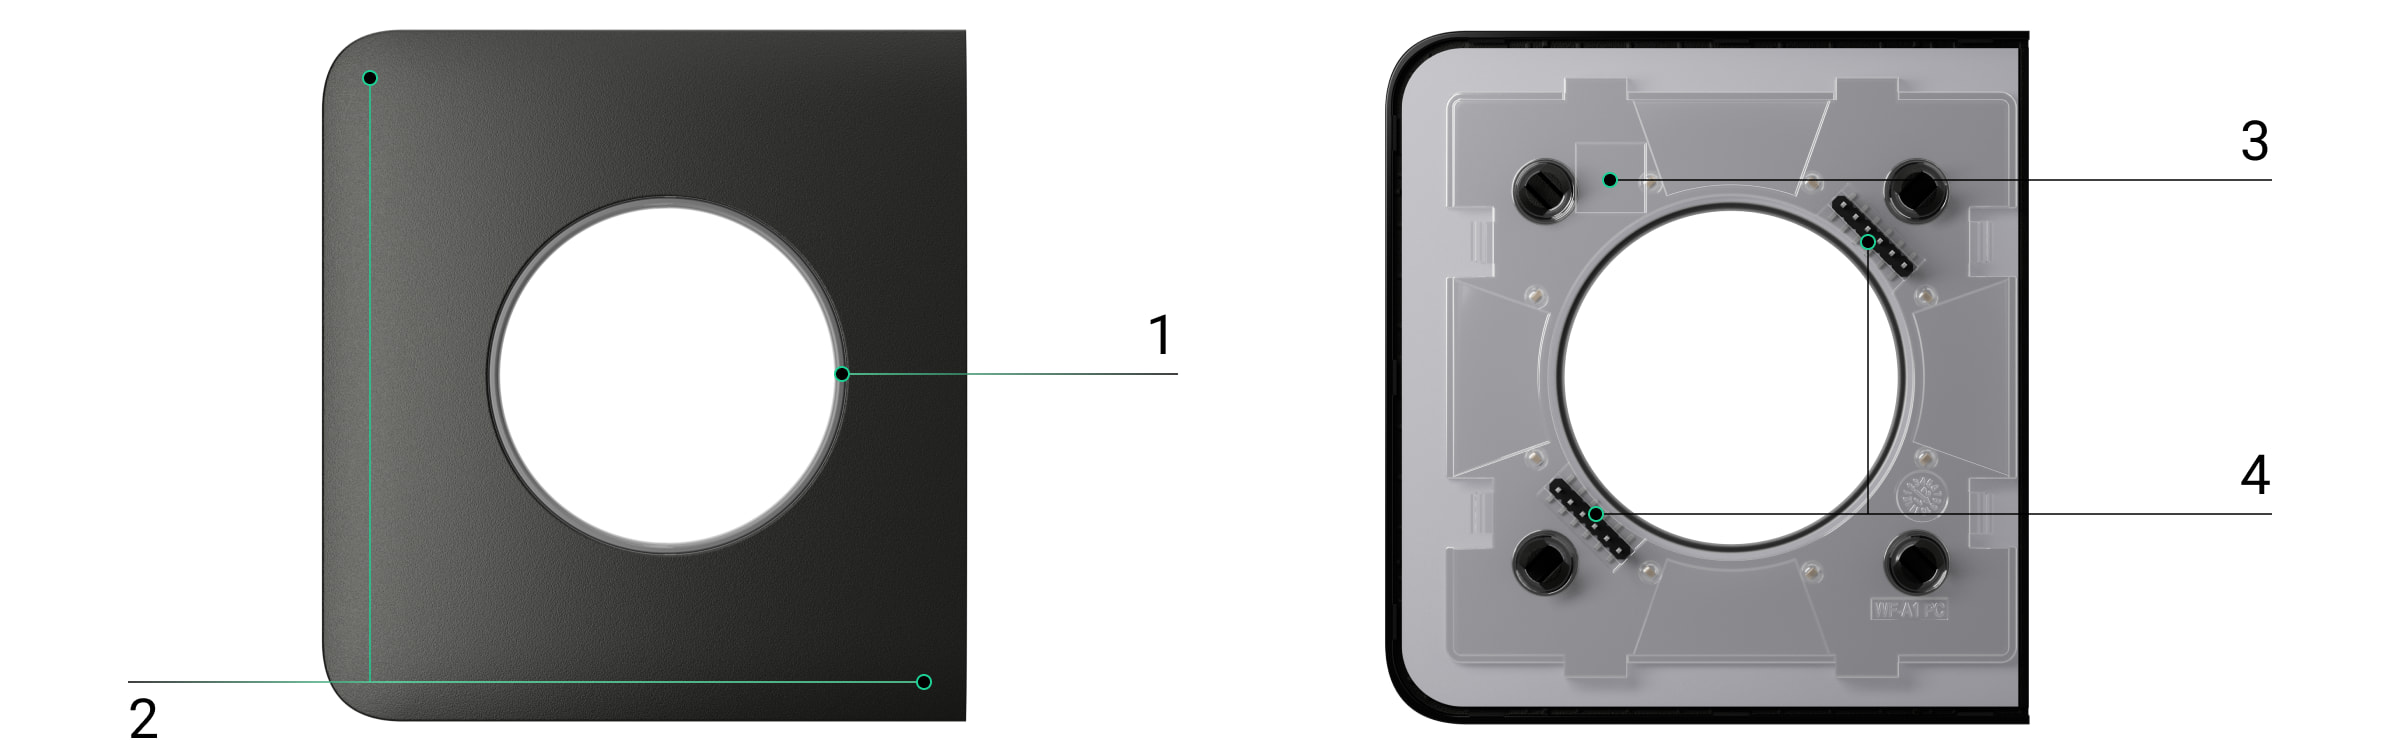
Covers
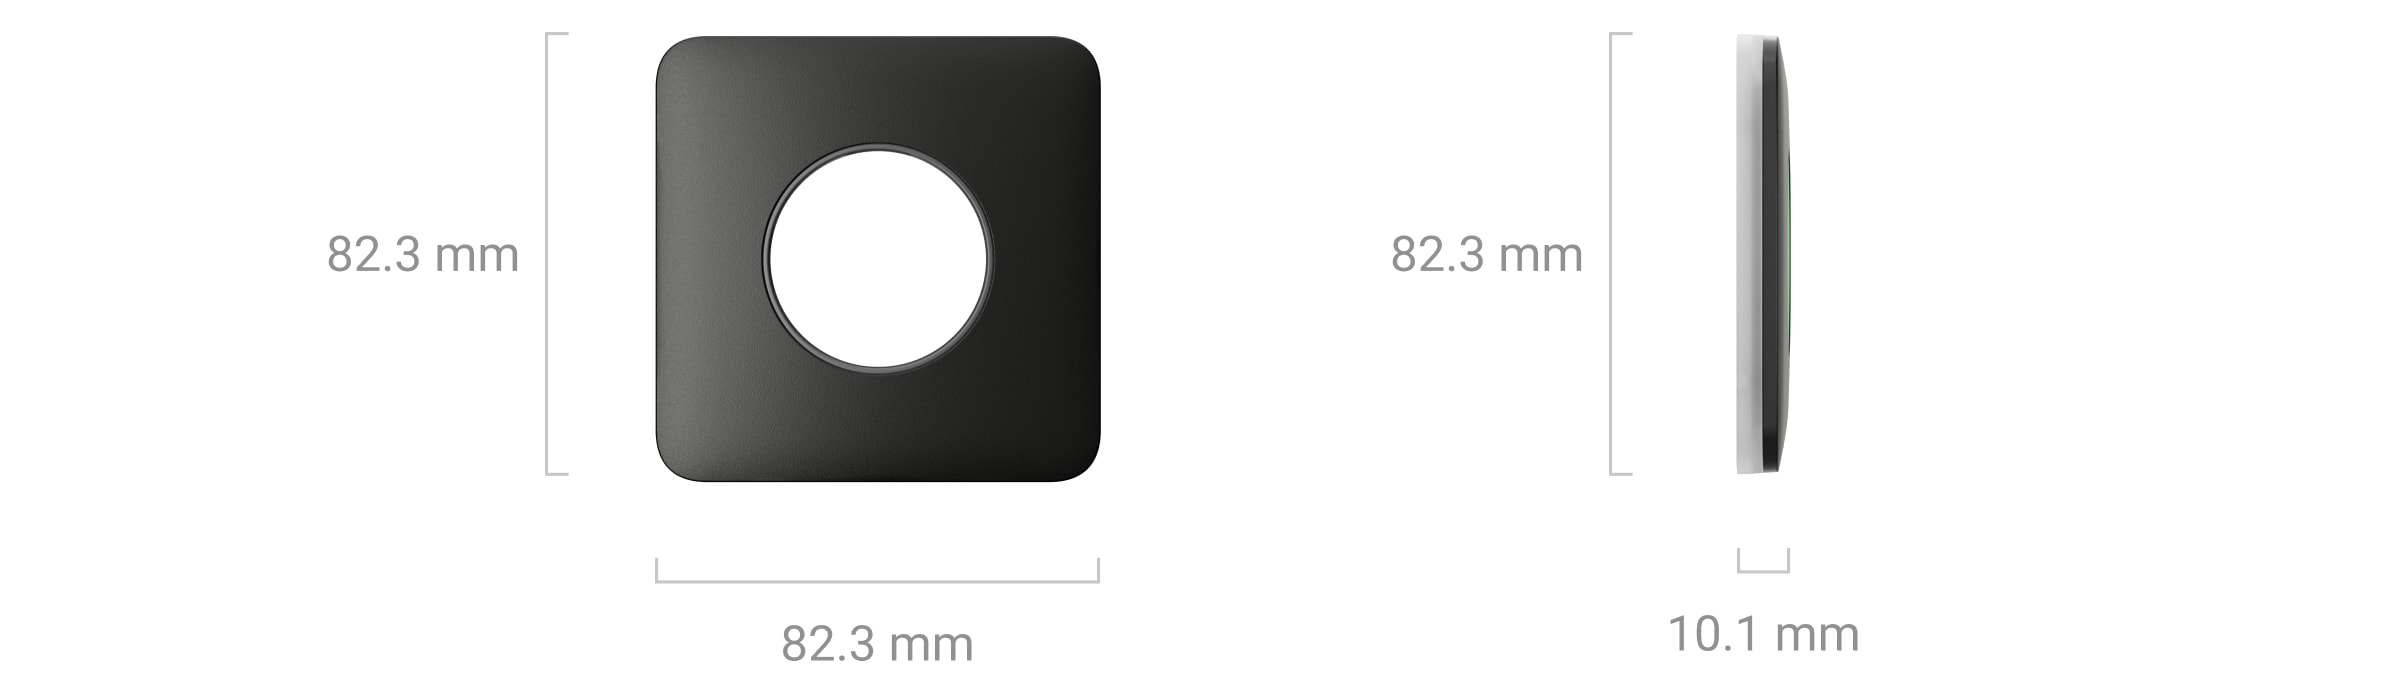
Front panel
- LED ring to indicate the Outlet [type F] state and the current load level with different colors.
- Touch button. The button, located in the upper left corner of the front panel, will be active if the socket is installed correctly relative to the UP key marked on the relay and receptacle cap, indicating the top of the socket enclosure.
- Night backlight of the panel. It can be enabled in the outlet settings in the app.
- Contacts to facilitate the connection of the LED indication, night backlight, and touch button to the OutletCore (smart) [type F] Jeweller relay.
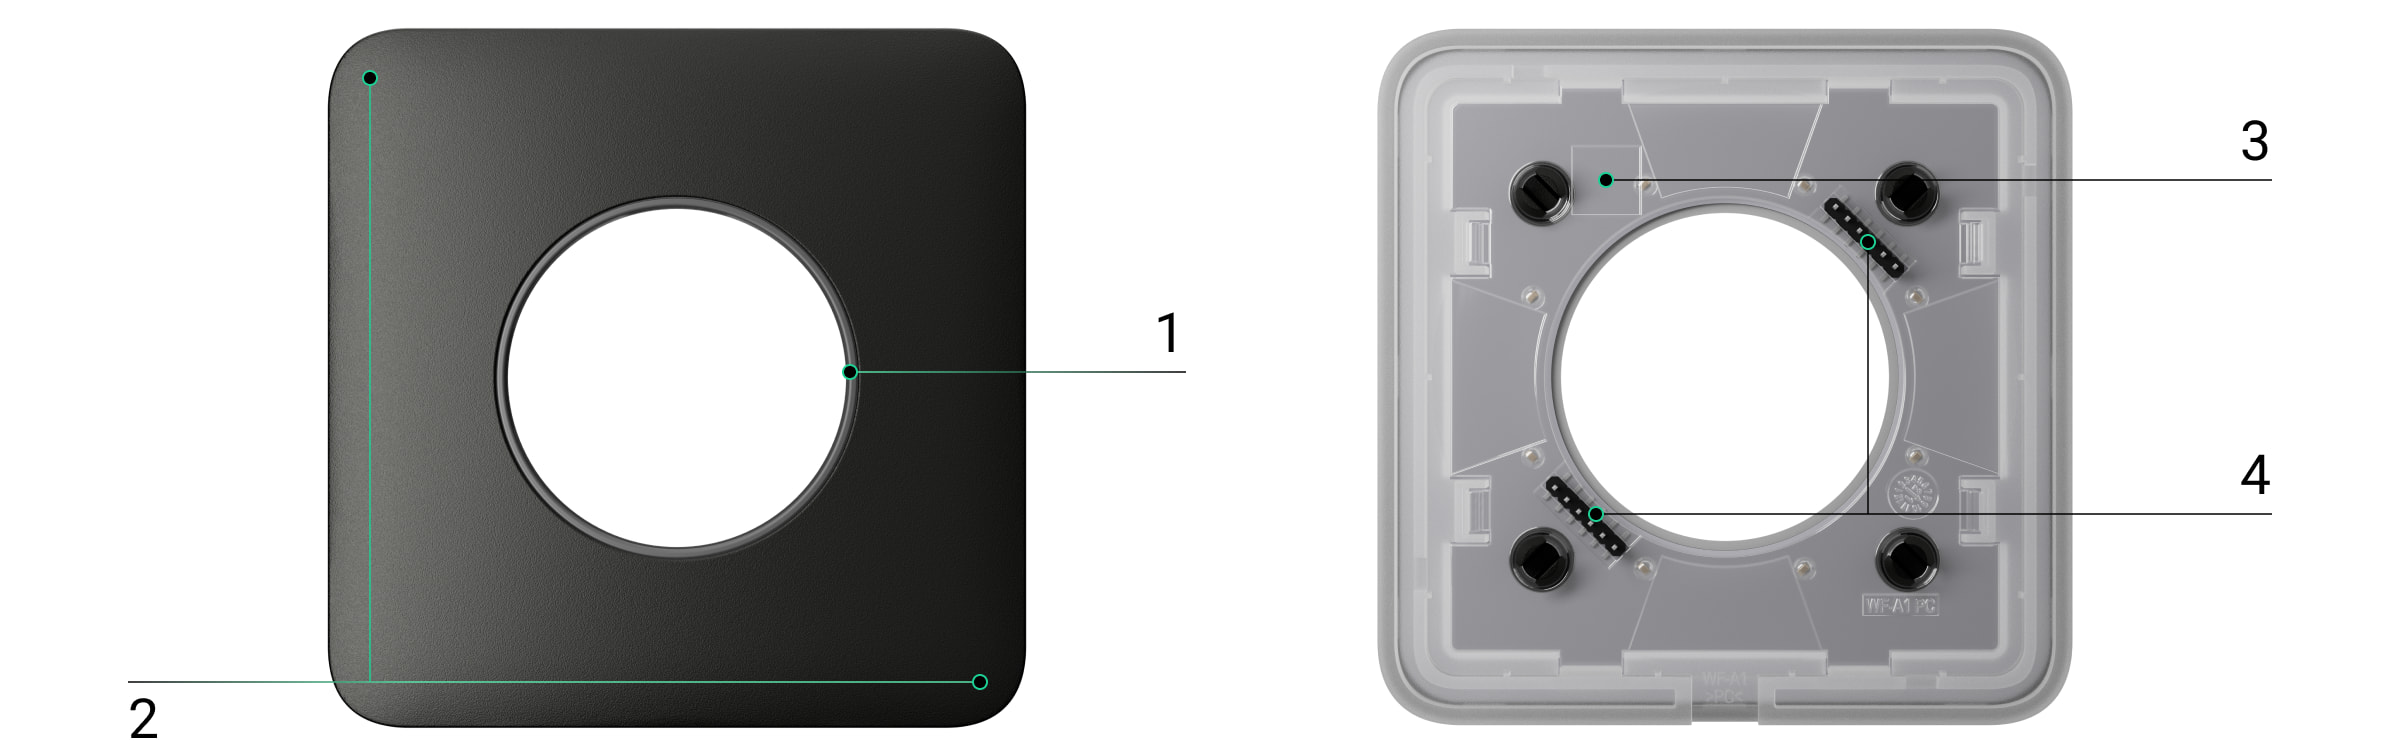
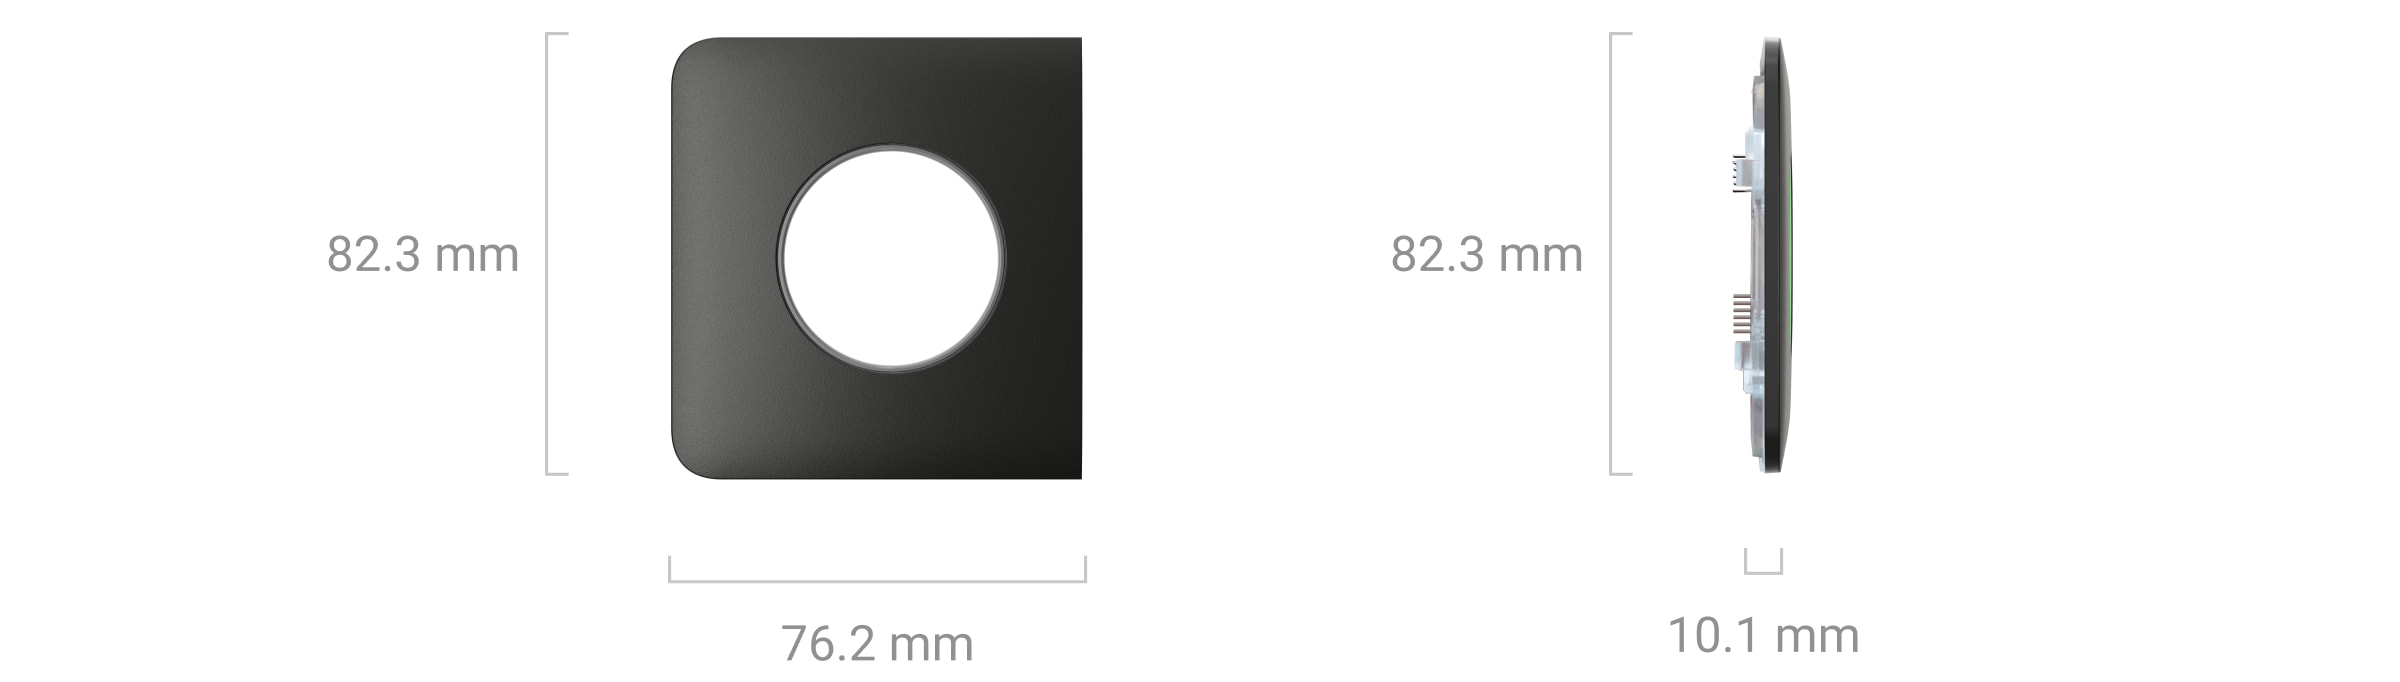
Receptacle cap
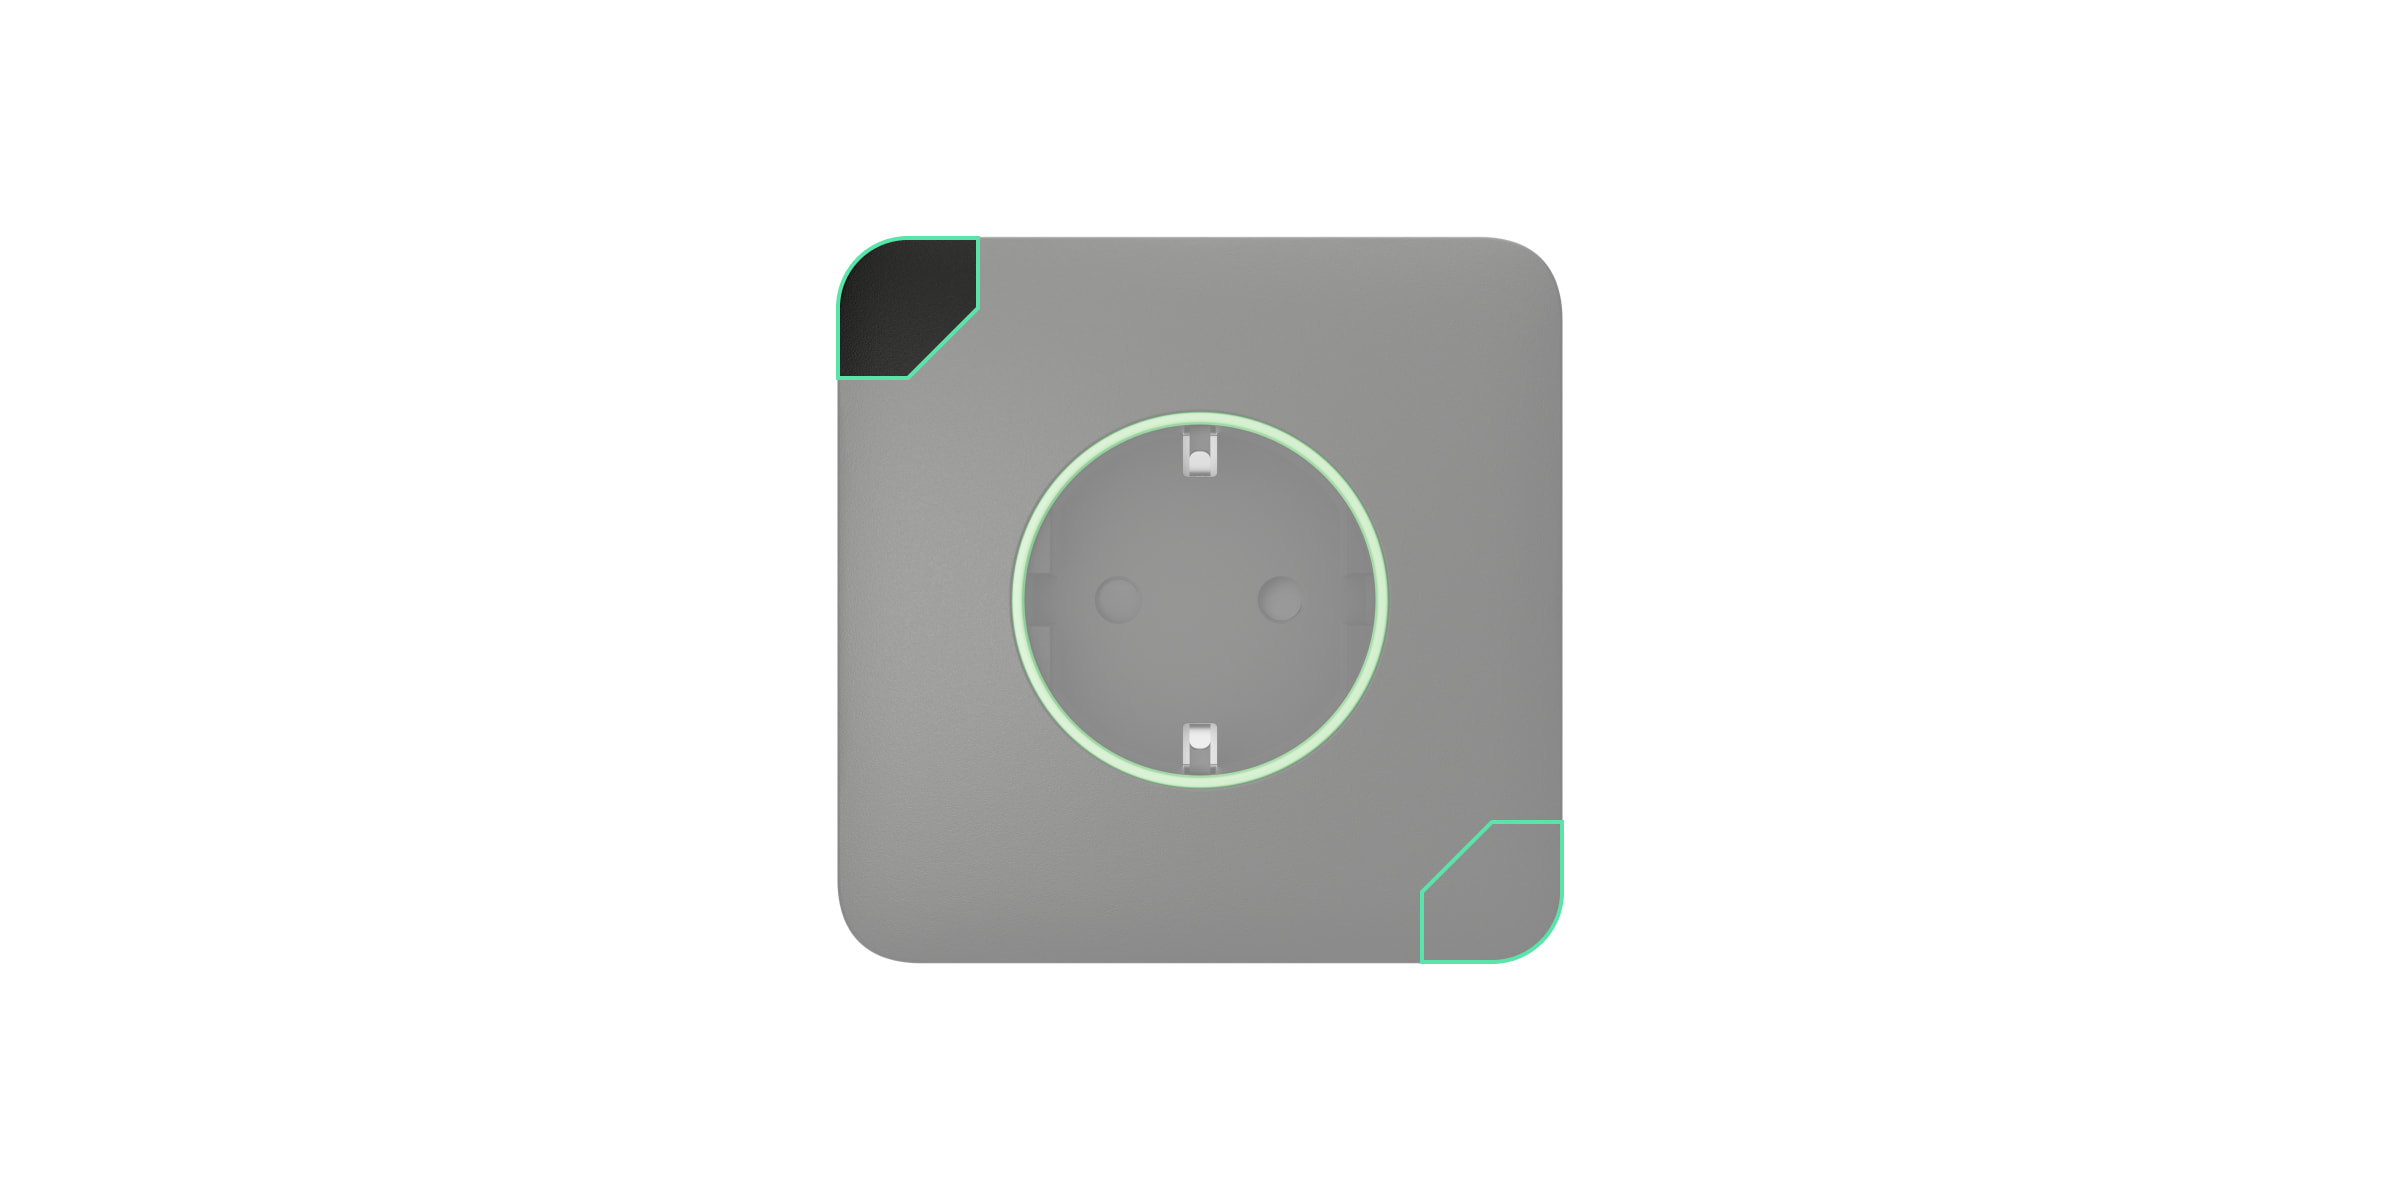
- Protective shutters.
- The hole for securing with a bundled screw to the relay OutletCore (smart) [type F] Jeweller. The complete set of SoloCover (smart) [type F] includes the necessary screw.
- UP key for installing the cover properly in the relay. The corresponding key is found on the OutletCore (smart) [type F] Jeweller, marking the top of the outlet enclosure.
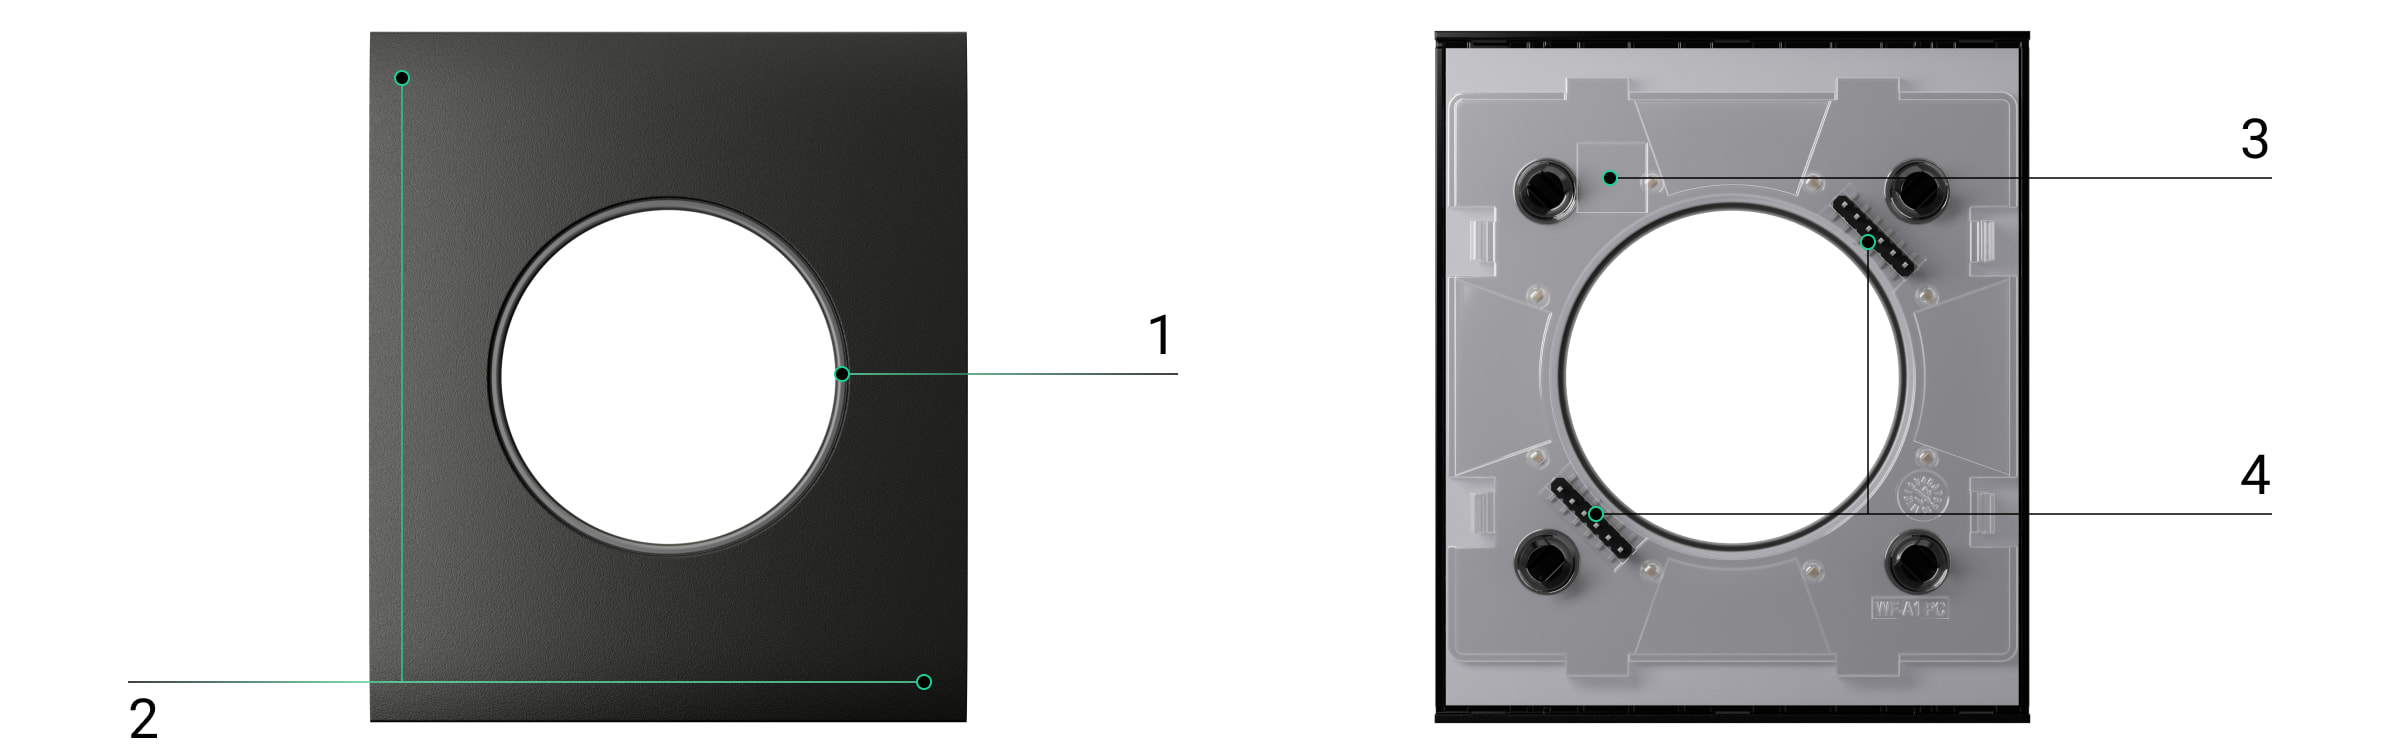
Front panel
- LED ring to indicate the Outlet [type F] state and the current load level with different colors.
- Touch button. The button, located in the upper left corner of the front panel, will be active if the socket is installed correctly relative to the UP key marked on the relay and receptacle cap, indicating the top of the socket enclosure.
- Night backlight of the panel. It can be enabled in the outlet settings in the app.
- Contacts to facilitate the connection of the LED indication, night backlight, and touch button to the OutletCore (smart) [type F] Jeweller relay.
Receptacle cap
- Protective shutters.
- The hole for securing with a bundled screw to the relay OutletCore (smart) [type F] Jeweller.
- UP key for installing the cover properly in the relay. The corresponding key is found on the OutletCore (smart) [type F] Jeweller, marking the top of the outlet enclosure.
Front panel
- LED ring to indicate the Outlet [type F] state and the current load level with different colors.
- Touch button. The button, located in the upper left corner of the front panel, will be active if the socket is installed correctly relative to the UP key marked on the relay and receptacle cap, indicating the top of the socket enclosure.
- Night backlight of the panel. It can be enabled in the outlet settings in the app.
- Contacts to facilitate the connecting of the LED indication, night backlight, and touch button to the OutletCore (smart) [type F] Jeweller relay.
Receptacle cap
- Protective shutters.
- The hole for securing with a bundled screw to the relay OutletCore (smart) [type F] Jeweller.
- UP key for installing the cover properly in the relay. The corresponding key is found on the OutletCore (smart) [type F] Jeweller housing.
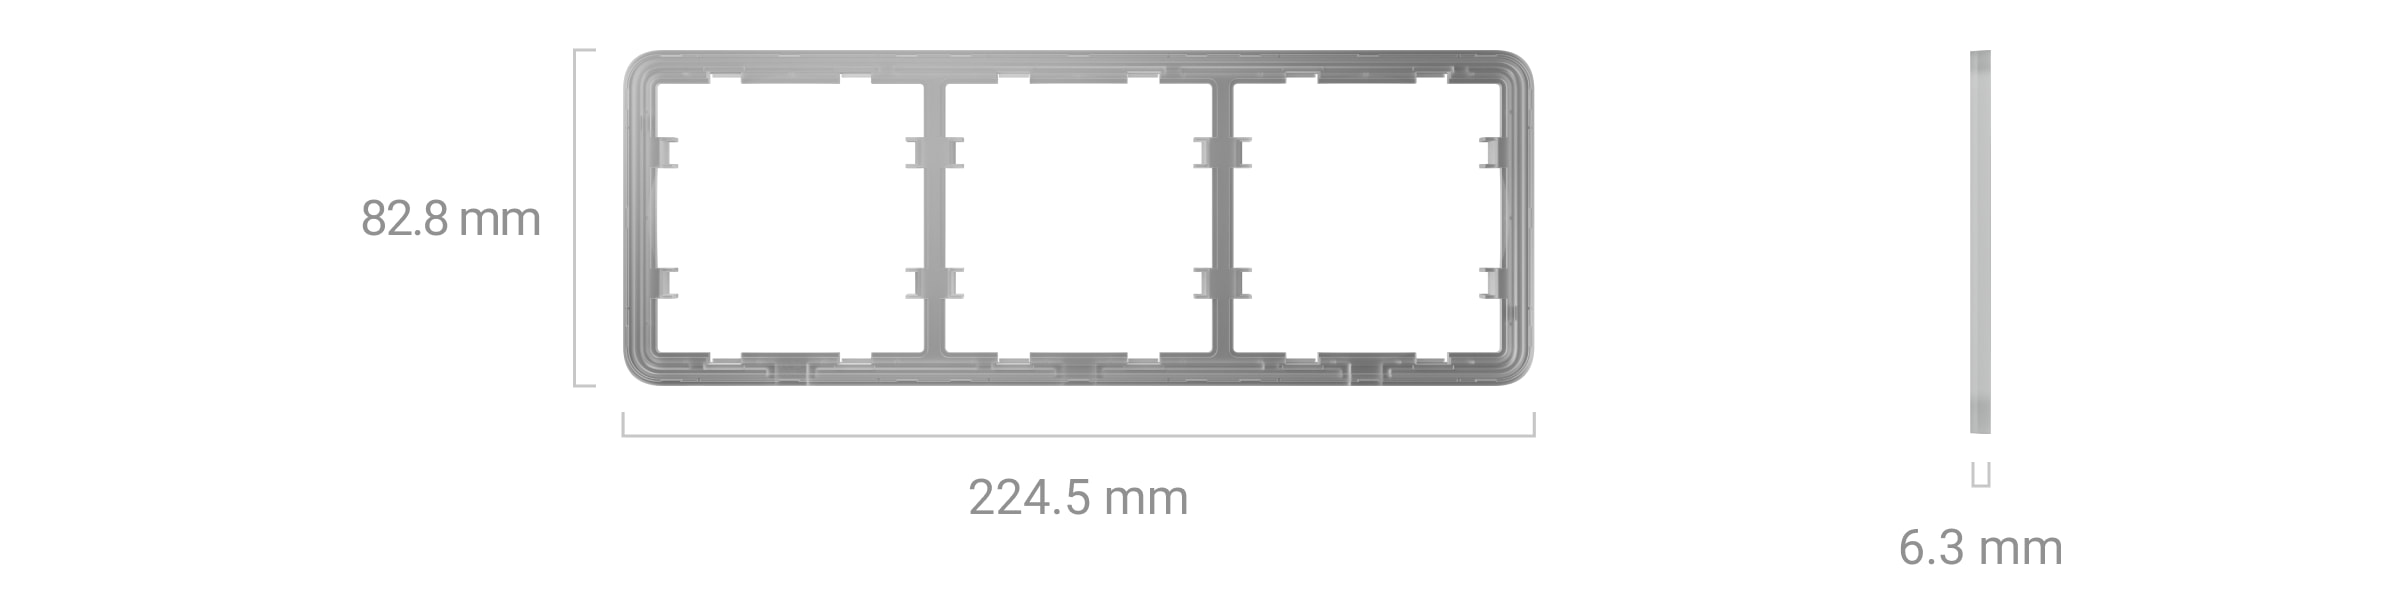
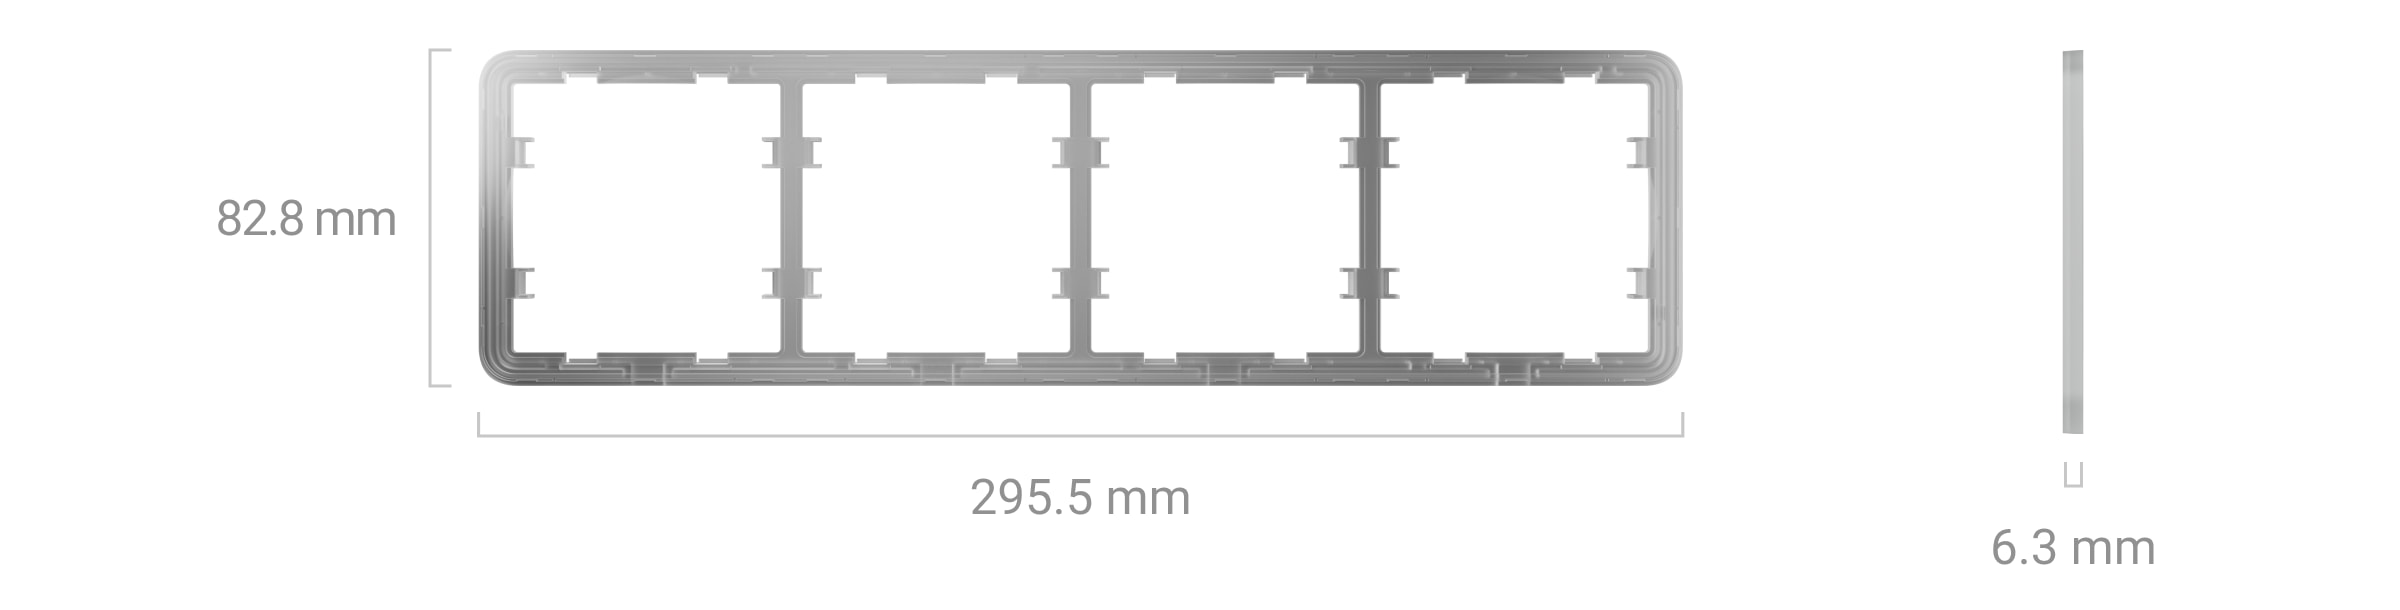
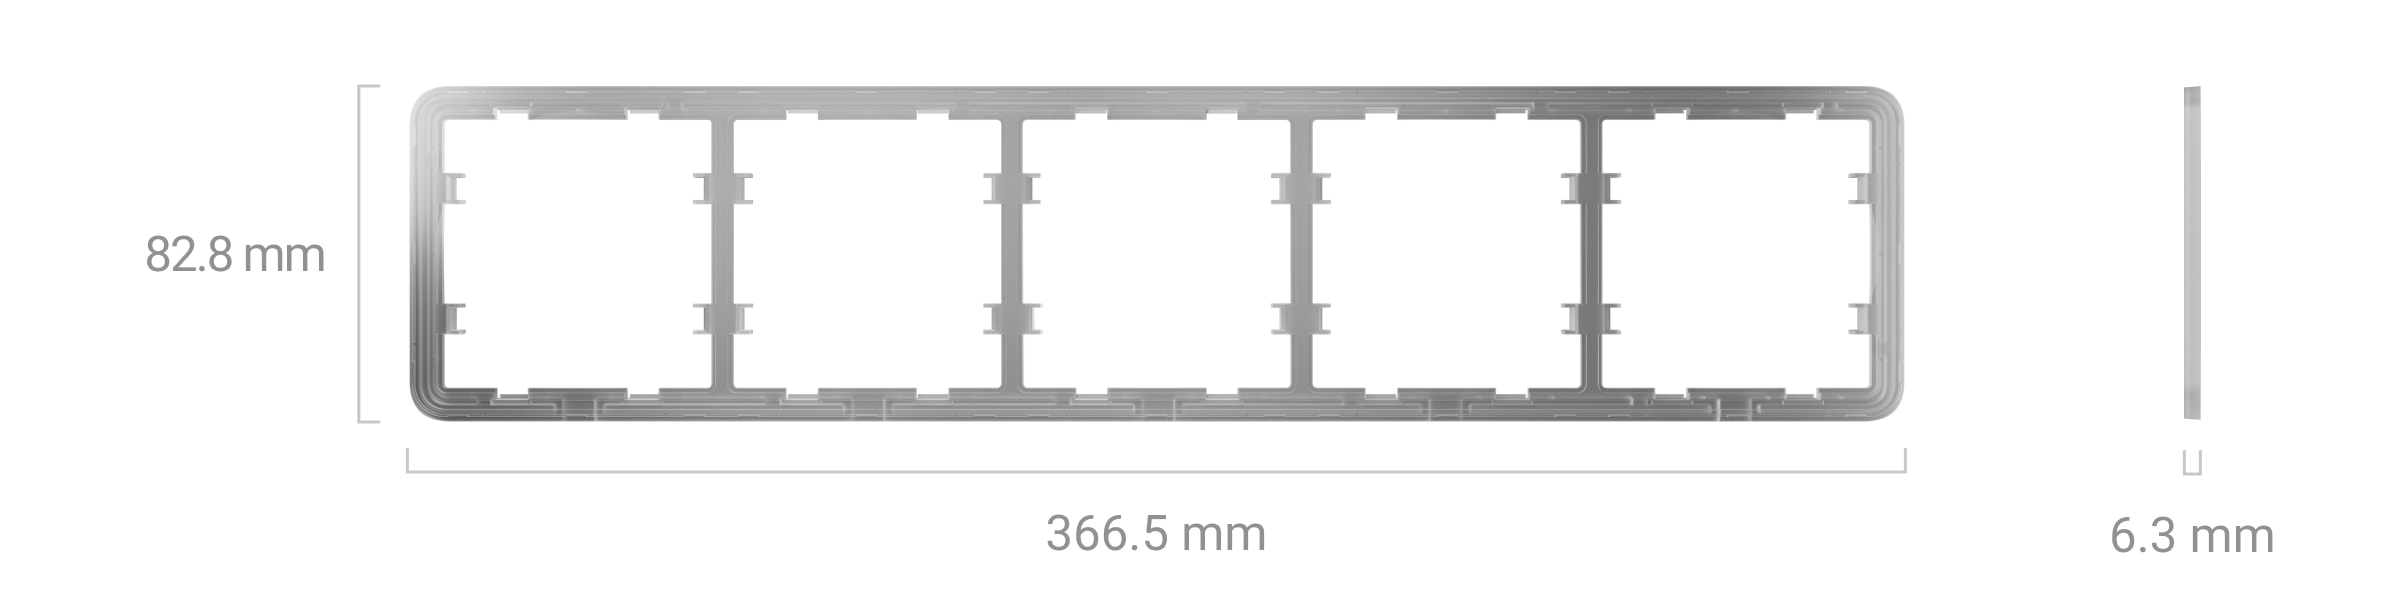
Frames

- Frame for two outlets or switches.
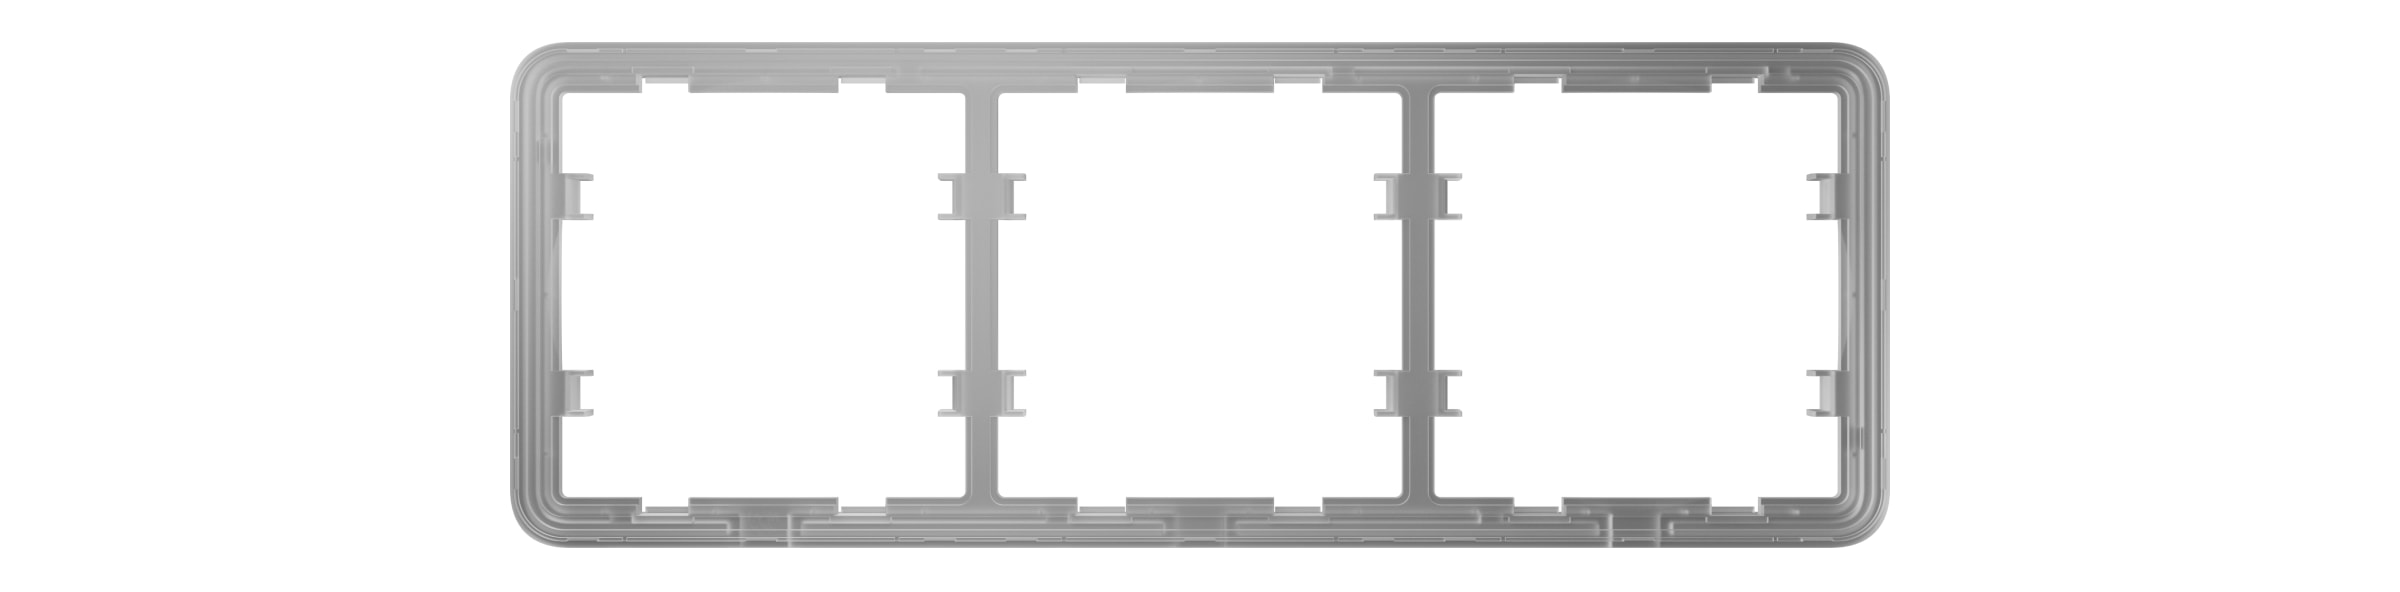
- Frame for three outlets or switches.
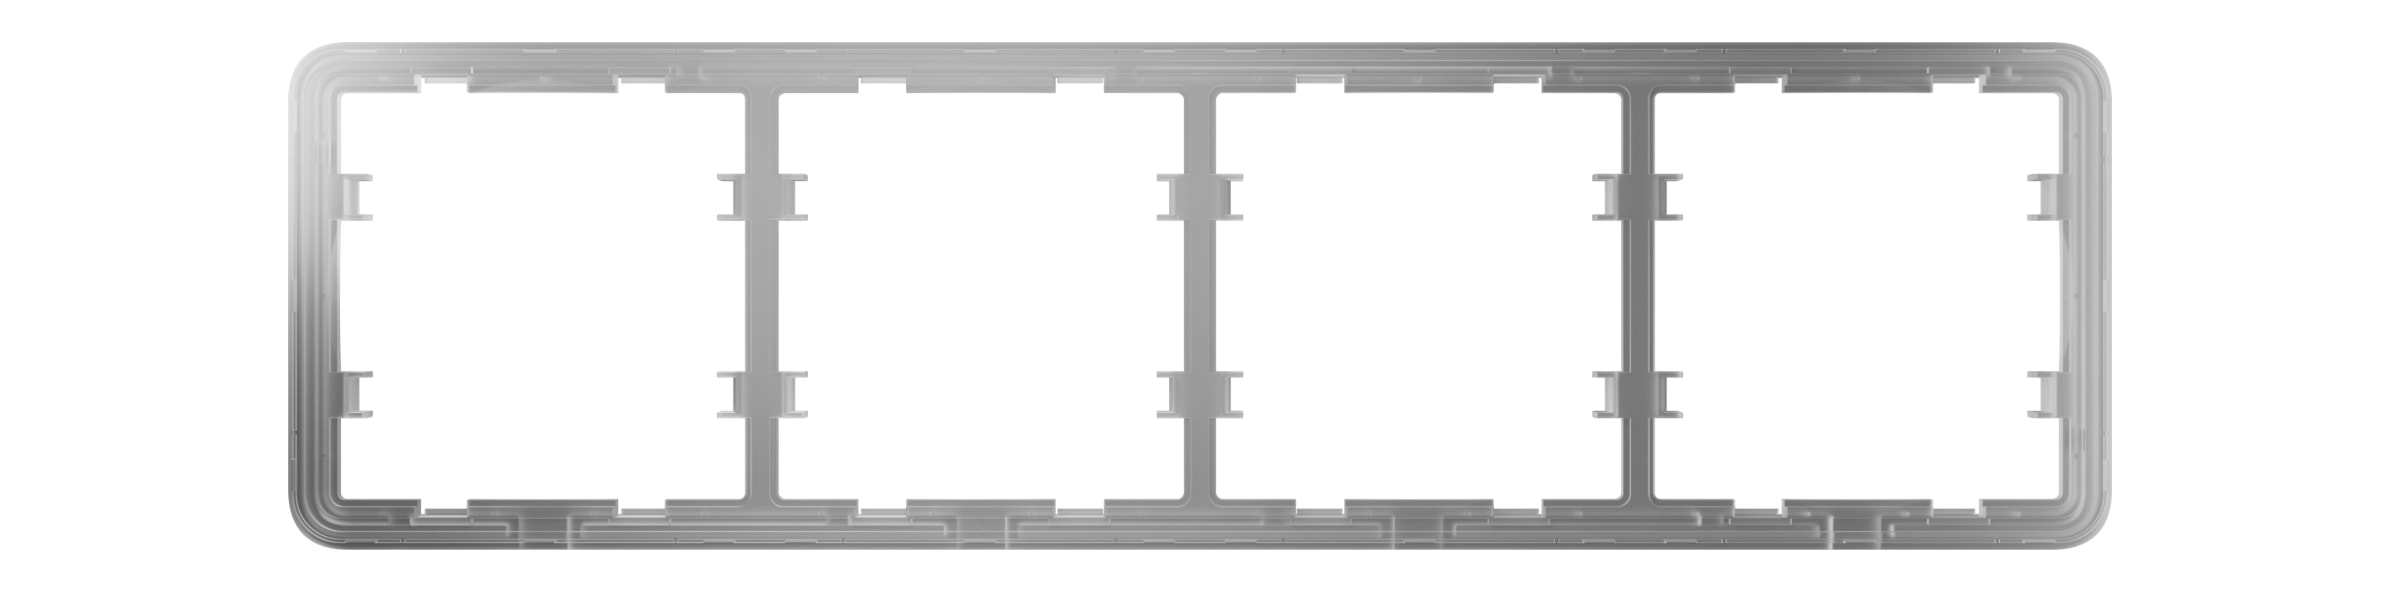
- Frame for four outlets or switches.
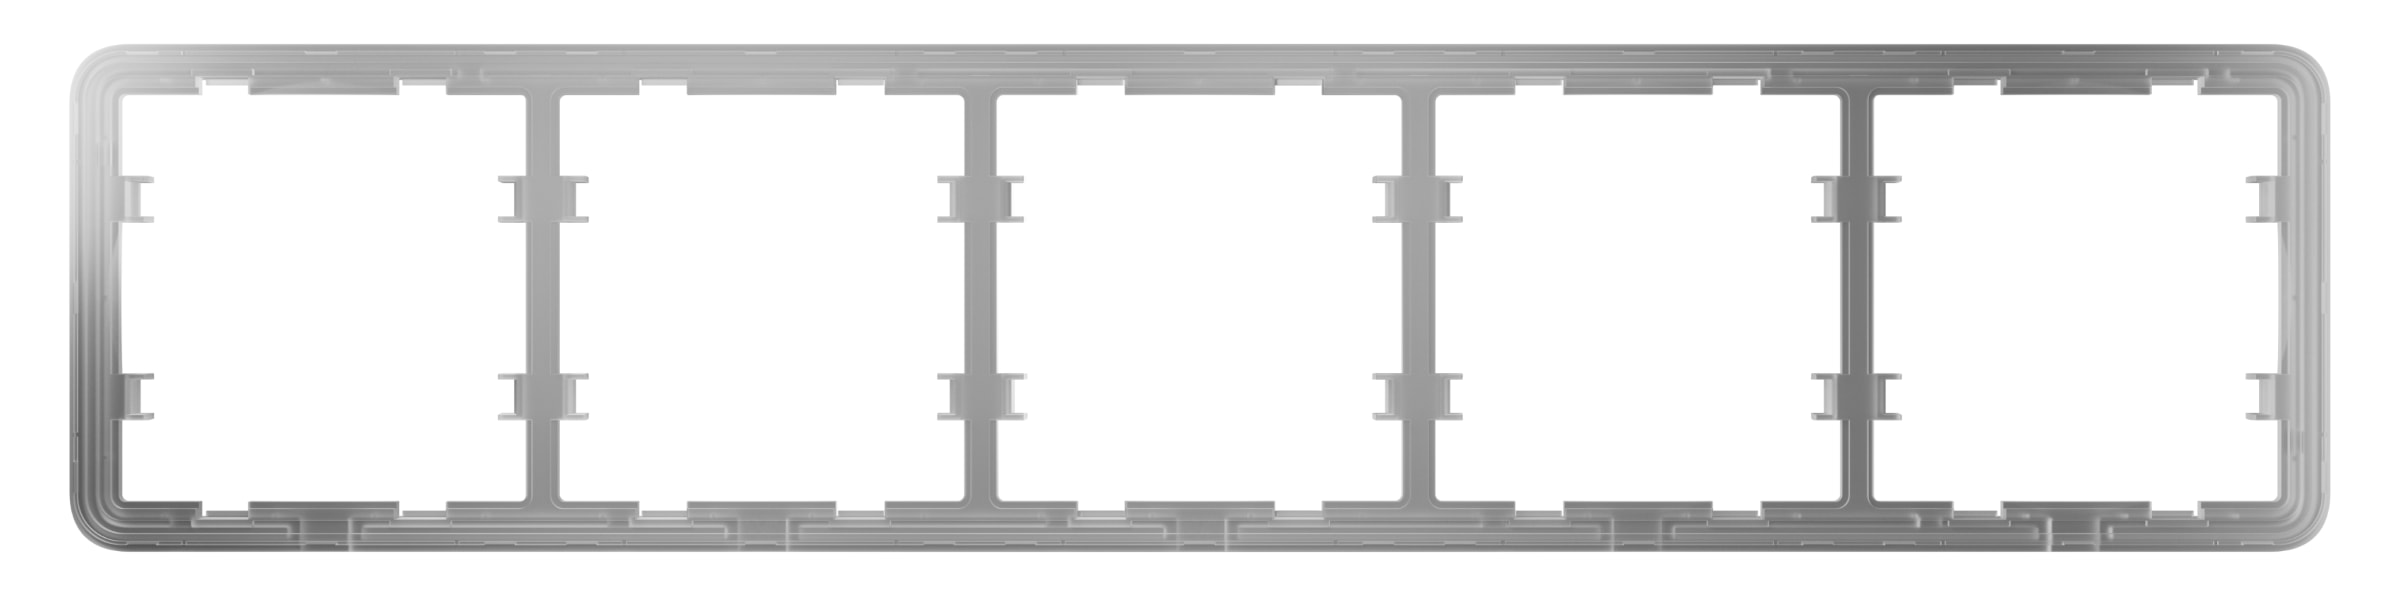
- Frame for five outlets or switches.
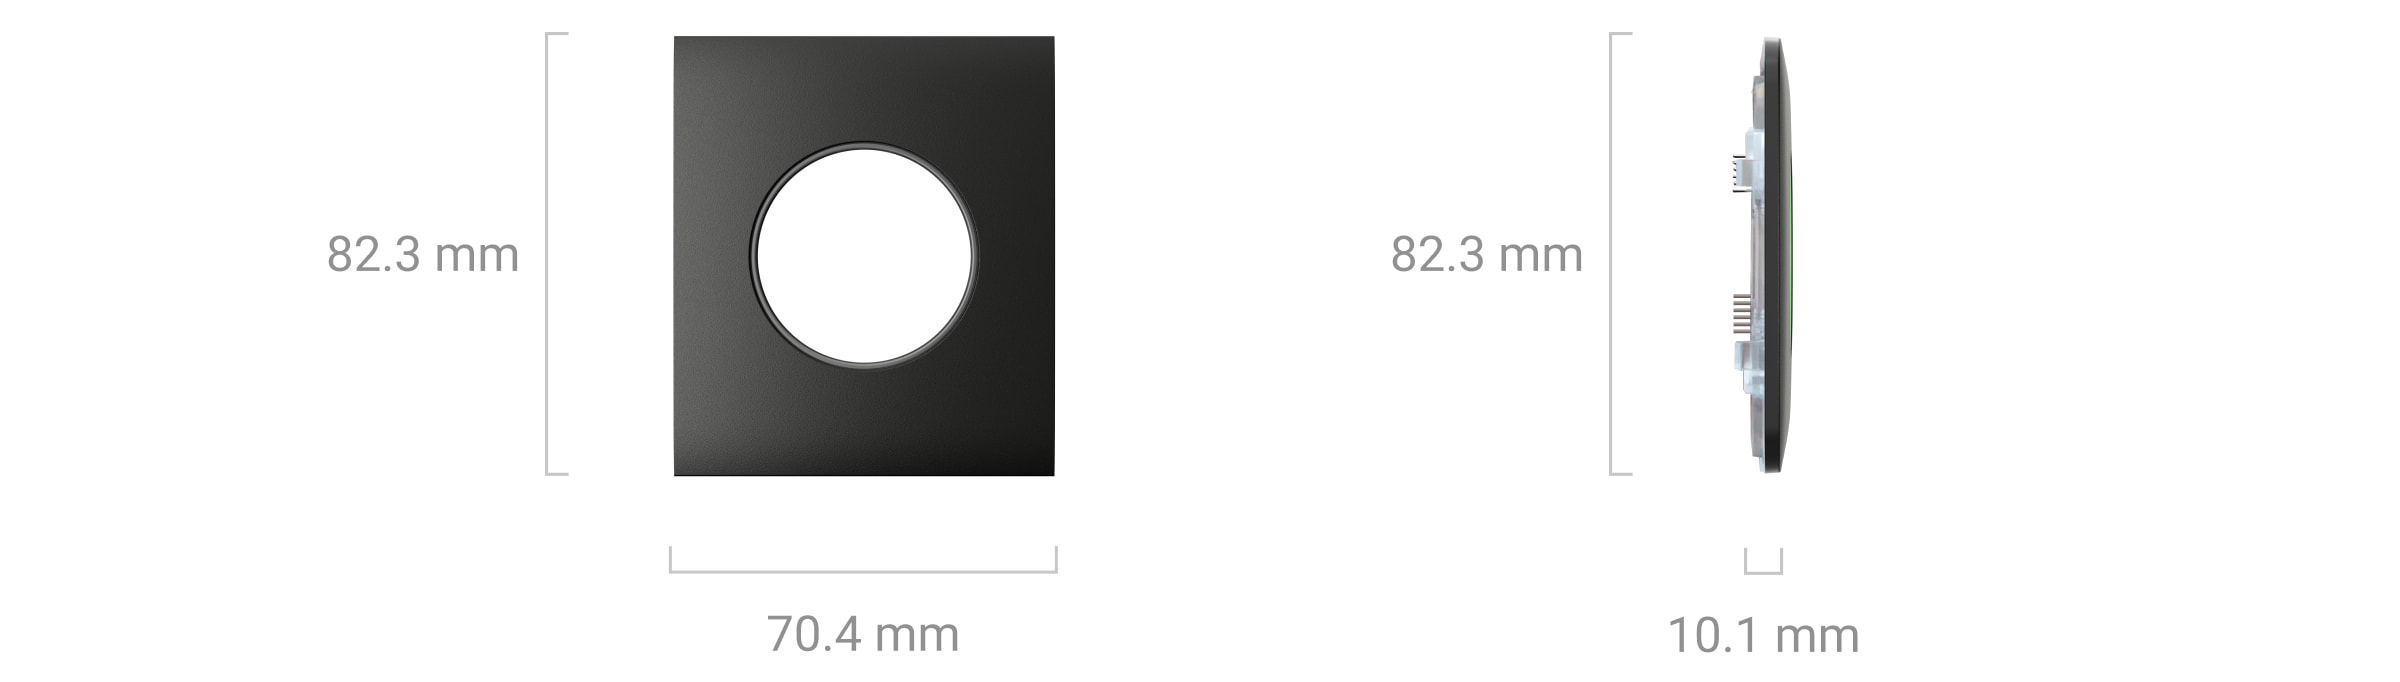
Dimensions
Relay
OutletCore (smart) [type F] Jeweller
We recommend a mounting box with a minimum depth of 50 mm. Please take into account the dimensions of the relay when selecting a location for installation.
Covers
Front panel
Receptacle cap

Front panel
Receptacle cap
Front panel
Receptacle cap
Frames

Compatible hubs and range extenders
A compatible Ajax hub with the firmware OS Malevich 2.16 and higher is required for the smart outlet to operate.
Operating principle
Outlet [type F] is a smart outlet of the Ajax system. It controls the power supply to connected devices using scenarios, via the Ajax app, by pressing the touch button on the outlet’s body, or with Button or LightSwitch.
Outlet [type F] monitors the current, voltage, power, and power consumption of connected electrical appliances. This data, along with other operational parameters, can be accessed in the States section of the Ajax apps. The device status updates approximately every second if Outlet [type F] alters the contact state due to a scenario or after being switched off/on using a touch button or app command. In other cases, the update frequency depends on the Jeweller or Jeweller/Fibra settings, with the default value of 36 seconds.
Outlet [type F] frame features an LED backlight. If needed, an admin or a PRO with the rights to configure the system can disable the backlight in the socket settings in the Ajax apps.
The maximum long-term load of the plug is 3 kW (if current protection is set at 13 A). If an inductive or capacitive load is connected, the maximum switching current drops to 8 A.
Remote control
Automation scenarios
Scenarios help to automate security and minimize routine actions. For example, you can schedule the lights, TV, and audio system to turn on at specific times. That way, the house won’t seem empty and deter potential intruders.
Outlet [type F] supports the following scenario types:
- Alarm reactions. For example, switching on the light if DoorProtect triggers an alarm.
- Security mode change reactions. For example, turning off the iron when the system is armed.
- Scheduled actions. For example, activating the heater at 7:00 PM and turning it off at 9:00 PM.
- By pressing Button. For example, illuminating the night light by pressing Button.
- By temperature. For example,activating the air conditioner if the room temperature exceeds 25 °C.
- By humidity level. For example, initiating the humidifier if the humidity in the room drops below 40%.
- By CO2 concentration. For example, engaging the ventilation system when the carbon dioxide concentration increases.
- By pressing LightSwitch. For example, shutting off all electrical appliances when the light is turned off.
Scenarios by humidity and CO2 concentration are available when LifeQuality is added to the system.
If the device is offline, it will not execute the scenario as it misses the scenario trigger (e.g., during a power outage or when the connection between the hub and device is lost).
Use case: The automated action is scheduled for 10 a.m., so it must start at 10 a.m. The electrical power goes out at 9:55 a.m. and is restored ten minutes later. The automation scenario won’t start at 10 a.m. and will not start immediately after the power is back on. This scheduled action is missed.
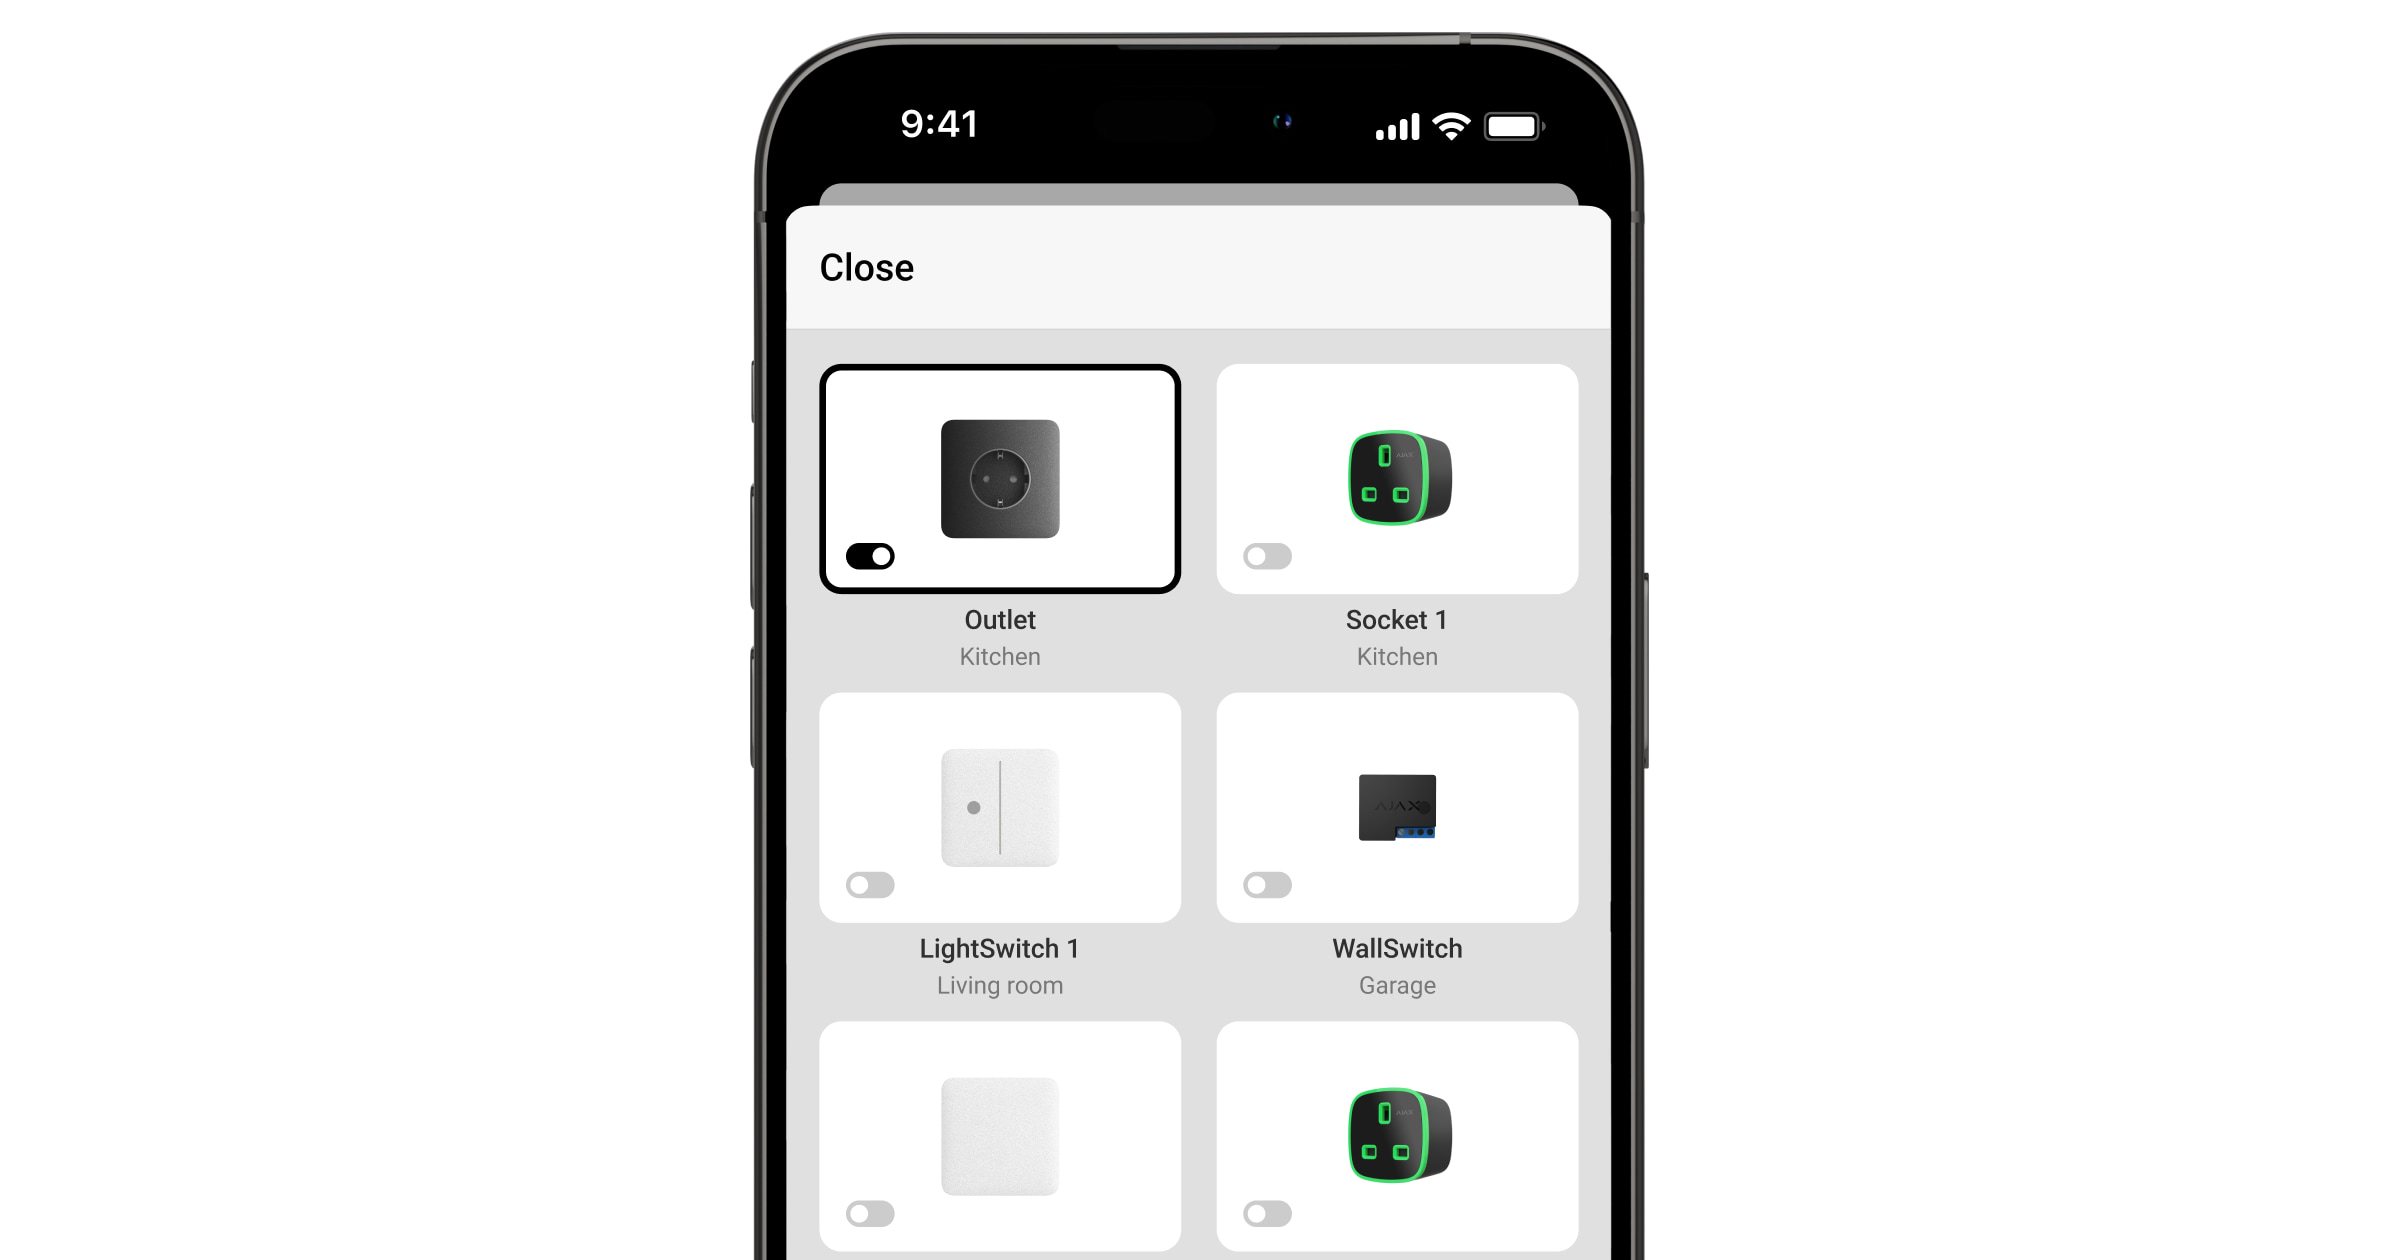
Control via the app
In Ajax apps, you can easily switch connected electrical appliances on or off via Outlet [type F]. Simply click the toggle in the Outlet [type F] field found in the Devices ![]() tab. This action reverses the current state of the outlet contacts, allowing you to remotely control the power supply to various devices, such as heaters or humidifiers beforehand.
tab. This action reverses the current state of the outlet contacts, allowing you to remotely control the power supply to various devices, such as heaters or humidifiers beforehand.
Additionally, you can manage the outlet from the Control ![]() tab. Simply swipe up to view a list of all devices connected to the hub. Use the toggle in the Outlet [type F] field to turn the connected devices on or off.
tab. Simply swipe up to view a list of all devices connected to the hub. Use the toggle in the Outlet [type F] field to turn the connected devices on or off.
Manual control
The front panel of Outlet [type F] has two touch buttons for easy cover installation. After installation, only the button located in the upper left corner of the front cover panel will be active. This touch button allows control of the power supply to connected appliances without the use of the app, scenarios, or Button. It also eliminates the need to unplug appliances from the outlet. The outlet’s response to the touch button depends on its operating mode.
If the Shutoff by Timer function is deactivated, Outlet [type F] operates in bistable mode. When you press the button, the outlet turns on or off the power to the connected devices.
If the Shutoff by Timer function is activated, Outlet [type F] supplies power for the time specified in the settings after being turned on with the touch button. Pressing the touch button again will interrupt the command, and the outlet will stop supplying power.
You can activate the touch button in the socket settings in the Ajax apps. The option is disabled by default.
Operation modes
Outlet [type F] can operate in bistable mode or automatically turn off the power after the expired time. By default, the outlet operates in bistable mode, where it switches on or off as you control the power supply.
When you activate the Shutoff by Timer function, the power can be enabled for a specified period: from 10 seconds to 2 hours. This mode is particularly useful, for example, when you need to turn on the lighting in the corridor for 5 minutes upon disarming the security system.
An admin or a PRO, granted the rights to configure the system, can activate the Shutoff by Timer function and set the operating time within the socket settings in Ajax apps.
Types of electrical protection of the outlet

Outlet [type F] offers three independent types of protection: voltage, current, and temperature.
Voltage protection: activates if the outlet voltage falls outside the range of 184–253 V~. This feature protects connected appliances from voltage surges.
Current protection: activates if the load current exceeds the limits set in the Ajax app. This feature protects both connected appliances and the smart plug from overcurrent. The limit can be adjusted within the range of 1 to 16 A, in increments of 1 A, in Outlet [type F] settings. The default value is 13 A.
For regular loads, we recommend setting the current value to up to 13 A. Values between 13 and 16 A should only be used for short-term loads.
Temperature protection: engages when the relay elements’ temperature reaches 95 °C, preventing the smart plug from overheating.
If either the voltage or temperature protection is triggered, Outlet [type F] ceases power supply and automatically resumes once the voltage or temperature normalizes. Note that the power supply does not automatically restore when the current protection is triggered. It can be reset by the command in the Ajax app or by pressing the touch button.
Energy consumption monitoring
Outlet [type F] consistently monitors the power consumption parameters of connected devices, including:
- voltage;
- load current;
- power consumption;
- electric energy consumed.
All the data is displayed in the device states. The data updates approximately every second if the outlet alters the contact state according to a scenario or following a toggle off/on by a touch button or a command in the app. In other cases, the update frequency depends on the Jeweller or Jeweller/Fibra settings, with the default value of 36 seconds. The power consumption values are displayed in increments of 1 W.
To reset the power consumption values in the outlet settings, follow these steps:
- In the Ajax app, go to the Devices
 tab.
tab. - Select Outlet [type F] from the list.
- Go to Settings by clicking on the
 icon.
icon. - Click Reset Energy Consumption Meter.
- Click Reset in the pop-up window.
After deleting the data, the date of the last reset will be displayed in the States of the outlet.
Jeweller data transfer protocol
This is a two-way wireless data transfer protocol that provides fast and reliable communication between the hub and connected devices. The smart outlet uses Jeweller to transmit alarms and events.
Sending events to the monitoring station
The Ajax system can transmit alarms to both PRO Desktop monitoring app and the central monitoring station (CMS) in the formats of SurGard (Contact ID), SIA (DC-09), ADEMCO 685, and other protocols.
Outlet [type F] can transmit the following events:
- Loss/restoration of connection between the device and the hub (or radio signal range extender).
- Permanent deactivation/activation of the outlet.
When an alarm is received, the operator at the security company’s CMS knows what happened and precisely where to dispatch a rapid response team. The addressability of Ajax devices allows sending events to PRO Desktop or the CMS, including the device type, its name, security group, and virtual room. Note that the list of transmitted parameters may vary depending on the CMS type and the selected communication protocol for it.
The ID and number of the device can be found in its states in the Ajax app.
Adding to the system
Outlet [type F] is incompatible with Hub and third-party security control panels.
To connect Outlet [type F] to the hub, the outlet must be located at the same secured facility as the system (within the hub’s radio network range). When using the ReX or ReX 2 radio signal range extender, first add the outlet to the hub, then connect it to ReX or ReX 2 in the range extender settings.
The hub and the device operating at different radio frequencies are incompatible. The radio-frequency range of the device may vary by region. We recommend purchasing and using Ajax devices in the same region. You can verify the range of operating radio frequencies with the technical support service.
Before adding a device
- Install the Ajax app.
- Log in to your account or create a new one.
- Select a space or create a new one.

The space functionality is available for apps of such versions or later:
- Ajax Security System 3.0 for iOS;
- Ajax Security System 3.0 for Android;
- Ajax PRO: Tool for Engineers 2.0 for iOS;
- Ajax PRO: Tool for Engineers 2.0 for Android;
- Ajax PRO Desktop 4.0 for macOS;
- Ajax PRO Desktop 4.0 for Windows.
- Add at least one virtual room.
- Add a compatible hub to the space. Ensure the hub is switched on and has internet access via Ethernet, Wi-Fi, and/or mobile network.
- Ensure the space is disarmed, and the hub is not starting an update by checking statuses in the Ajax app.
Only a PRO or a space admin with the rights to configure the system can add a device to the hub.
Connecting to the hub
- Install Outlet [type F] and power it.
- Open the Ajax app and select the hub where you want to add the device.
- Go to the Devices tab and click Add device.
- Name the device, scan or manually input the QR code found on the rear and front panel of OutletCore (smart) [type F] Jeweller, as well as on the device packaging. The device ID is located below the QR code.
- Select a room and a group (if Group Mode is enabled).
- Click Add.
If the connection fails, try again in 5 seconds. If the hub has reached its maximum number of devices (depending on the hub model), you will be notified when you try to add a new one.
Once connected to the hub, the outlet will appear in the list of hub devices in the Ajax app. The device status update frequency in the list depends on the Jeweller or Jeweller/Fibra settings, with the default value of 36 seconds.
Outlet [type F] works with only one hub. When connected to a new hub, the device stops sending events to the old one. To add an outlet to a new hub:
- scan or manually input the QR code;
- wait for the device registration timer to start counting down and press the touch button on the front panel of the outlet for 3 seconds.
Adding the outlet to a new hub does not automatically remove it from the device list of the old hub. This must be done through the Ajax app.
Malfunctions
When Outlet [type F] malfunction is detected, the Ajax app displays a malfunction counter on the device icon. All malfunctions are indicated in the outlet’s states. Fields with malfunctions will be highlighted in red.
A malfunction is displayed if:
- current protection was activated;
- temperature protection was activated;
- voltage protection was activated;
- there is no connection with the hub or radio signal range extender.
Icons
The icons in the app display some outlet states. To access them:
- Sign in to the Ajax app.
- Select a hub.
- Go to the Devices tab.
| Icon | Value |
| Jeweller Signal Strength displays the signal strength between the hub and the outlet. | |
| Malfunction detected. | |
| Device is connected via a radio signal range extender. | |
| Current protection was activated. | |
| Voltage protection was activated. | |
| Temperature protection was activated. | |
|
Device is permanently deactivated. |
|
|
Device is deactivated until the first disarming of the system. |
|
| The device has lost connection with the hub or the hub has lost connection with the Ajax Cloud server. | |
|
The device has not been transferred to the new hub. |
States
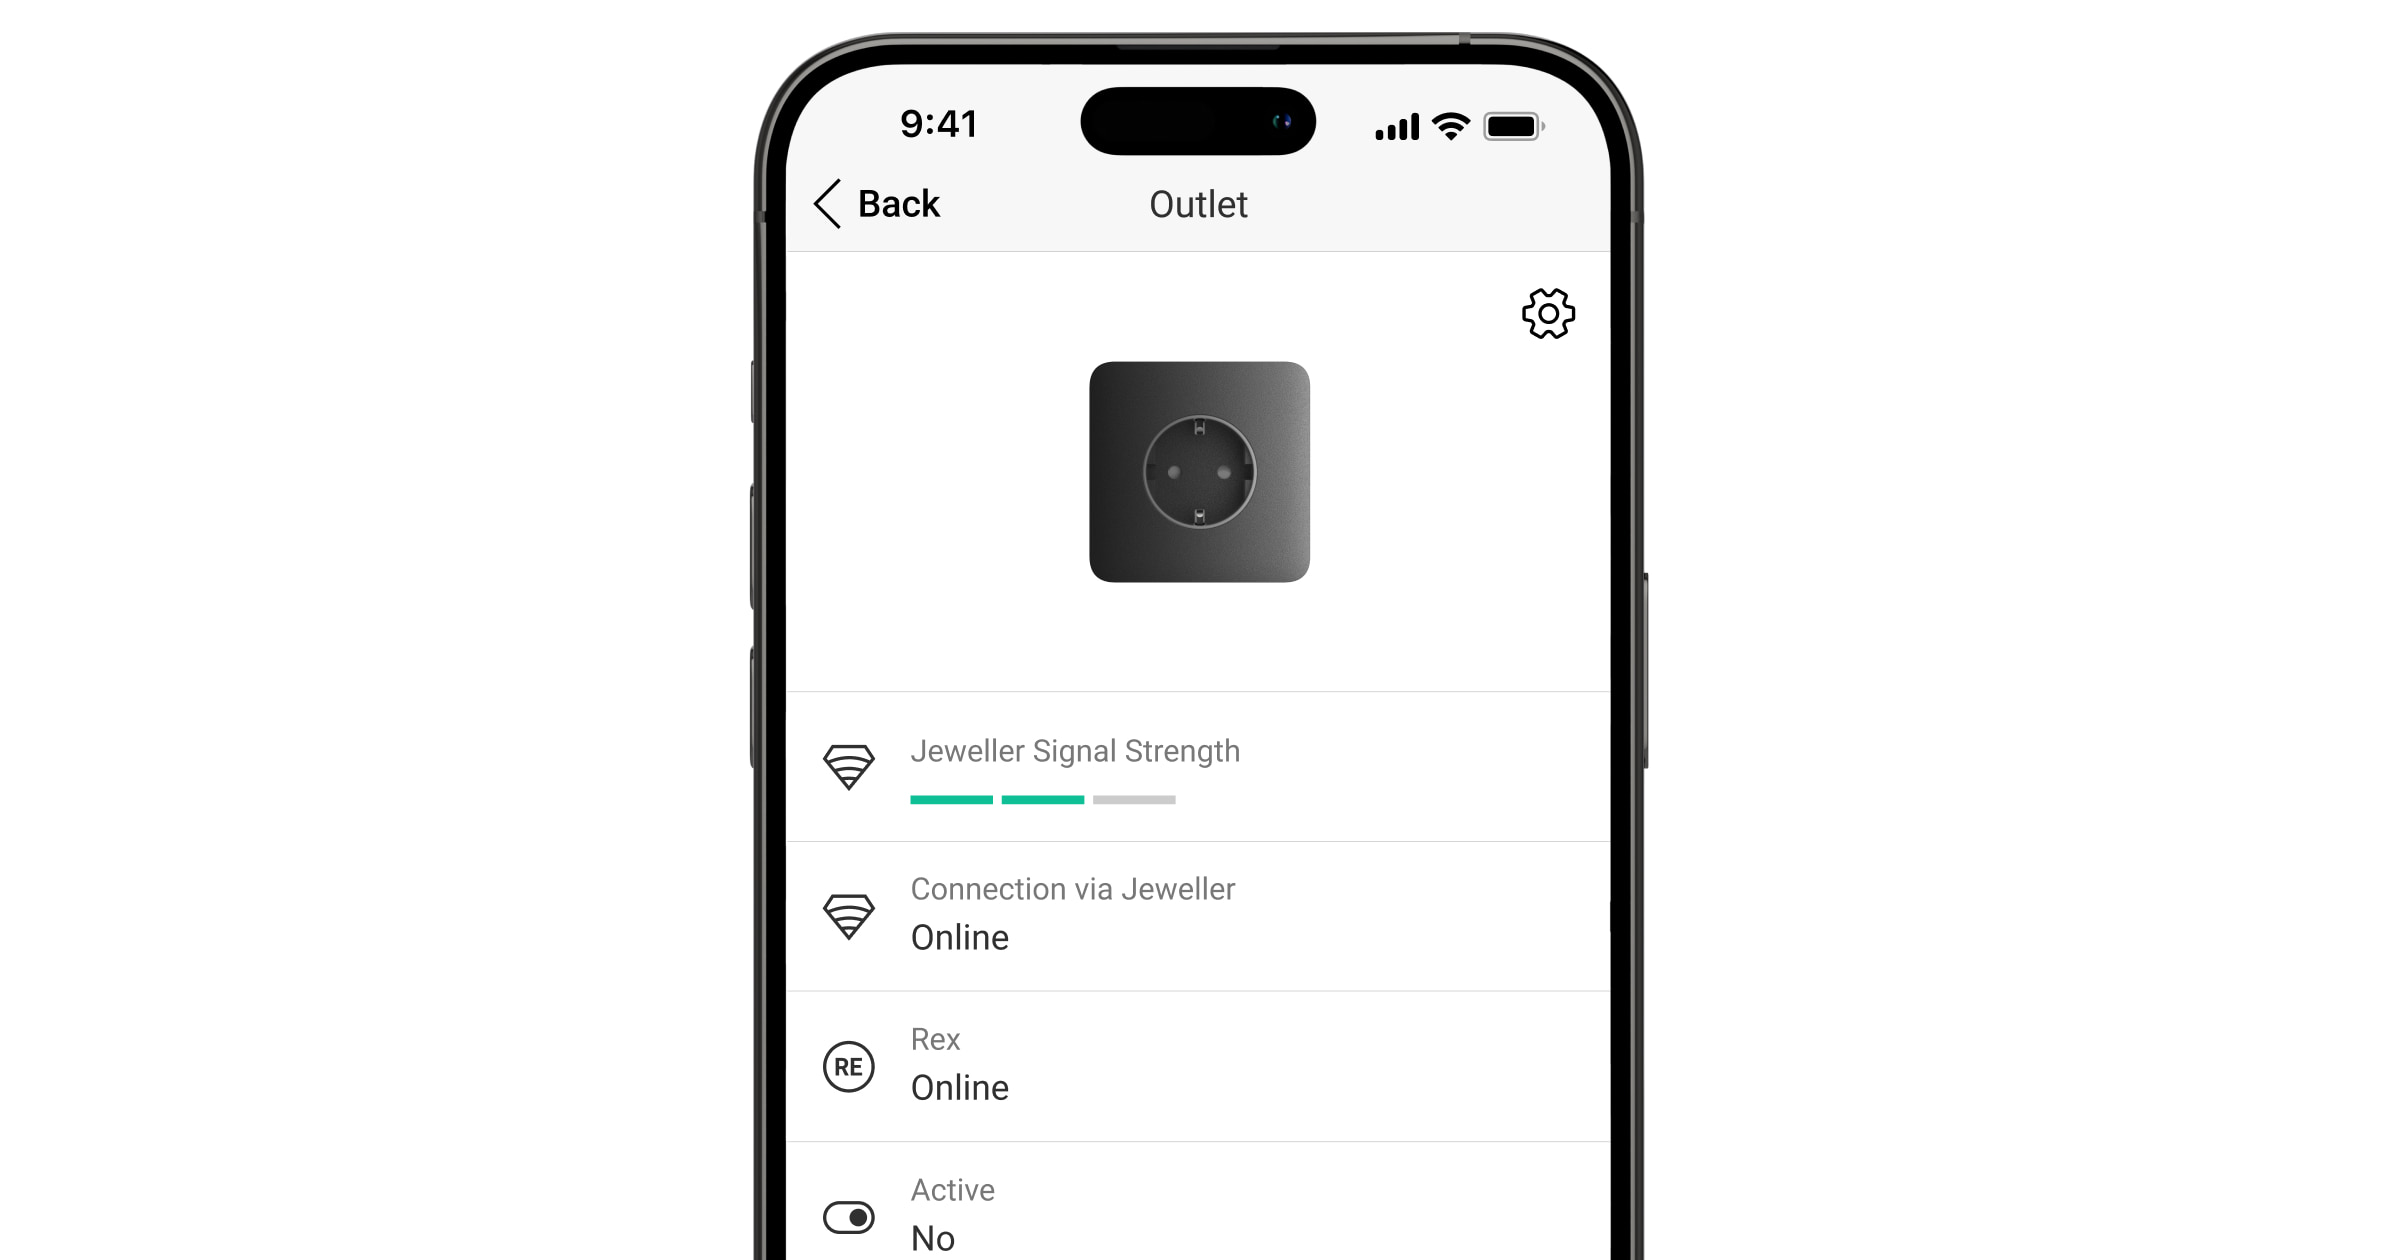
The states include information about the device and its operating parameters. You can find the states of Outlet [type F] in the Ajax app:
- Go to the Devices tab.
- Select Outlet [type F] from the list.
| Parameter | Value |
| Data import | Displays the error when transferring data to the new hub:
|
| Malfunction |
Clicking the The field is displayed only if a malfunction is detected. |
| Jeweller Signal Strength |
Jeweller signal strength between the device and the hub or the radio signal range extender. The recommended value is 2–3 bars. Jeweller is a protocol for transmitting Outlet [type F] events and alarms. |
| Connection via Jeweller | Connection status on the Jeweller channel between the device and the hub (or the range extender):
|
| ReX | Connection status between the device and the range extender:
The field is displayed if the plug operates via a radio signal range extender. |
| Active | Plug state:
|
| Current |
The value of current commuted by Outlet [type F]. Data update frequency is approximately 1 second if the outlet has changed the contact state according to a scenario or after being switched off/on by a touch button or a command in the app. In other cases, the update frequency depends on the Jeweller or Jeweller/Fibra settings, with the default value of 36 seconds. The current value is displayed in increments of 10 mA. |
| Voltage |
The voltage value commuted by Outlet [type F]. Data update frequency is approximately 1 second if the outlet has changed the contact state according to a scenario or after being switched off/on by a touch button or a command in the app. In other cases, the update frequency depends on the Jeweller or Jeweller/Fibra settings, with the default value of 36 seconds. The value is displayed in increments of 1 V~. |
| Current Protection Threshold |
The current limit for current protection adjusted in the settings. Once the current exceeds the selected limit, the outlet turns off automatically. |
| Voltage Protection | Voltage protection state:
The relay will automatically continue to operate when voltage returns to normal. |
| Control Device with Touch Button | Configuration state of the ability to control the outlet with the touch button. |
| Power |
The power consumption of an appliance connected to the plug. Data update frequency is approximately 1 second if the outlet has changed the contact state according to a scenario or after being switched off/on by a touch button or a command in the app. In other cases, the update frequency depends on the Jeweller or Jeweller/Fibra settings, with the default value of 36 seconds. The value is displayed in increments of 1 W. |
| Electric Energy Consumed |
The energy consumed by a device connected to the outlet. Data update frequency is approximately 1 second if the outlet has changed the contact state according to a scenario or after being switched off/on by a touch button or a command in the app. In other cases, the update frequency depends on the Jeweller or Jeweller/Fibra settings, with the default value of 36 seconds. The value is displayed in kWh, in increments of 1 Wh. You can reset the counter in the outlet Settings. In case of a power loss, the app displays the last saved value. |
| Last Consumption Reset |
The date of the last reset of the energy consumption meter. It is displayed if the meter data has been reset. |
| Permanent Deactivation | Displays the status of the device’s permanent deactivation setting:
|
| One-Time Deactivation | Displays the status of the device’s one-time deactivation setting:
|
| Firmware | Device firmware version. |
| Device ID | Outlet ID. Also available on the QR code on the device enclosure and its package box. |
| Device No. | Number of the device loop (zone). |
Settings
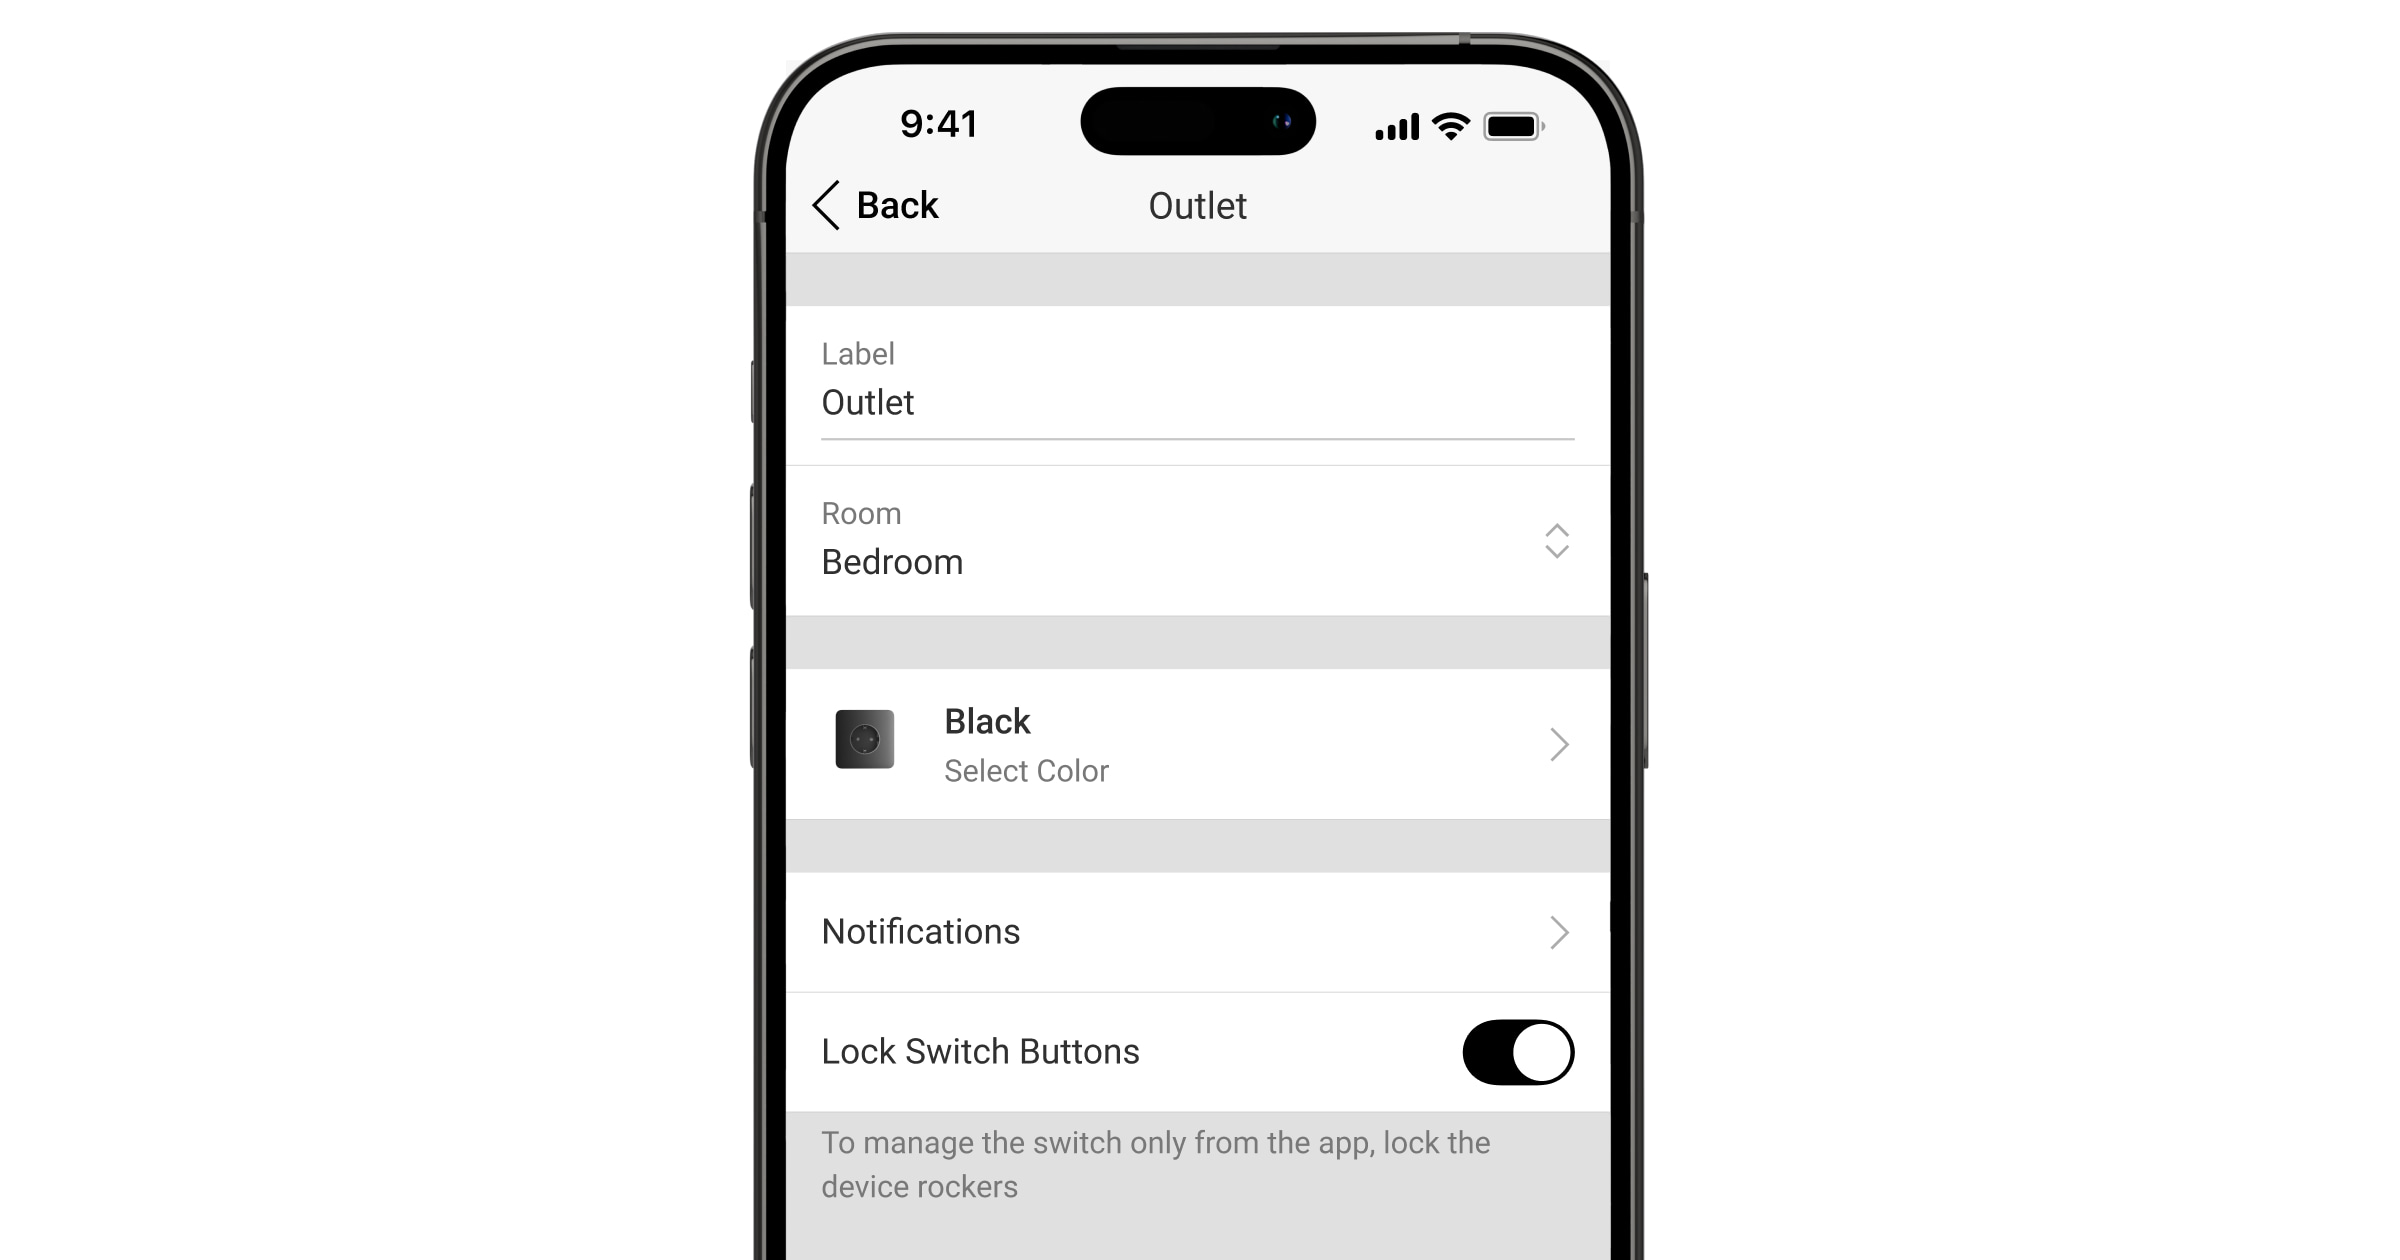
To change the Outlet [type F] settings, in the Ajax app:
- Go to the Devices tab.
- Select Outlet [type F] from the list.
- Go to Settings by clicking on the icon.
- Set the required parameters.
- Click Back to save the new settings.
| Settings | Value |
| Name |
Name of the outlet. Displayed in the list of hub devices, SMS text, and notifications in the events feed. To change the name of the device, click on the text field. The name can contain up to 12 Cyrillic characters or up to 24 Latin characters. |
| Room |
Selecting the virtual room to which Outlet [type F] is assigned. The room name is displayed in SMS text and notifications in the events feed. |
| Color | Selecting a color for the outlet icon in the app. The following 8 colors are available:
The list of colors corresponds to the colors of the covers. |
| Notifications | Selecting the outlet in-app notifications:
|
| Control Device with Touch Button | When enabled, you can switch the outlet’s state with a touch button on its front panel. This option is disabled by default. |
| Current Protection Threshold |
Selecting the maximum current commuted by Outlet [type F]. The current limit can be set from 1 to 16 A, in increments of 1 A. The default value is 13 A. The recommended value for a constant load is up to 13 A. For short-term loads, the recommended value is from 13 to 16 A. If the set value is exceeded, the current protection activates, and the outlet stops supplying power to the electrical appliance connected to it. You can restore the power supply manually in the Ajax app or by pressing the outlet’s touch button. |
| Voltage protection | When enabled, the power of the appliance connected to the outlet will be cut off if voltage exceeds 184–253 V~. |
| Backlight | Setting the backlight of the outlet frame: enabled or disabled. |
| Indication | Settings for the outlet’s LED indication:
|
| LED Brightness |
Adjusting the brightness of the smart outlet’s LED indication: from 0 to 100 (0 — minimal brightness, 100 — very bright). The brightness level is 50% by default. Available if the Always or When enabled option is selected in the Indication settings. |
| Shutoff by Timer | When enabled, the device plugged into the smart outlet turns off once the selected time expires. |
| Operating time |
Selecting the time for which the device plugged into the outlet will be powered: from 10 seconds to 2 hours. Available if the Shutoff by Timer toggle is enabled. |
| Reset Energy Consumption Meter | Menu to reset energy consumption data. |
| Scenarios |
Opens the menu for creating and configuring automation scenarios. Use scenarios to automate security. For example, to switch on lighting in the facility when an opening detector is triggered. |
| Jeweller Signal Strength Test |
Switches the device to the Jeweller signal strength test mode. |
| User Manual | Opens the Outlet [type F] user manual in the Ajax app. |
| Permanent Deactivation |
Allows the user to deactivate the device without removing it from the system. Two options are available:
After deactivation, Outlet [type F] retains the state it had at the time of disconnection: active or inactive. |
| One-Time Deactivation |
Allows the user to disable events of the device until the first disarm. Two options are available:
After deactivation, Outlet [type F] retains the state it had at the time of disconnection: active or inactive. |
| Unpair Device | Unpairs the device, disconnects it from the hub, and deletes its settings. |
Indication
Outlet [type F] informs about its state and the power consumption of connected devices through LED indication. The exact power consumption value can be viewed in the socket States in the Ajax app.
| Load level | Indication |
| No power supply | No light |
| Outlet [type F] is off | Lights up blue |
| Outlet [type F] is on, load from 0 to 549 W is connected | Lights up green |
| From 550 to 1,249 W | Lights up yellow |
| From 1,250 to 1,999 W | Lights up orange |
| From 2,000 to 2,839 W | Lights up red |
| From 2,840 to 3,679 W | Lights up dark red |
| 3,680 W and above | Lights up purple |
| Activates one or more types of protection (e.g., current and/or voltage) | Slowly lights up red and goes out |
Functionality testing
The Ajax system offers several types of tests to assist in selecting the optimal installation location for the devices. These tests do not start immediately; however, the waiting time does not exceed the duration of one “hub—device” polling interval. You can check and configure the polling interval in the hub settings (Hub → Settings ![]() → Jeweller or Jeweller/Fibra).
→ Jeweller or Jeweller/Fibra).
To run a test, in the Ajax app:
- Select the required hub.
- Go to the Devices tab.
- Select Outlet [type F] from the list.
- Go to the Settings .
- Select and run the Jeweller Signal Strength Test.
Device placement
The device should be connected to the power neutral, phase, and ground cables. The recommended depth of the mounting box is 50 mm. Note that the device is designed for indoor use only.
When choosing a location for the device, consider the parameters that affect its operation:
- Jeweller signal strength;
- the distance between the outlet and the hub or range extender;
- the presence of barriers that might hinder radio signal transmission between devices, such as walls, interfloor ceilings, or large objects located in the premises.
Consider the placement recommendations when designing the security system project for your object. The security system should be designed and installed by professionals. A list of recommended partners is available here.
Signal strength
The Jeweller signal strength is determined by the number of undelivered or corrupted data packages over a certain period of time. The icon ![]() on the Devices
on the Devices ![]() tab indicates the signal strength:
tab indicates the signal strength:
- three bars — excellent signal strength;
- two bars — good signal strength;
- one bar — low signal strength, stable operation is not guaranteed;
- crossed out icon — no signal.
Check the Jeweller signal strength before the final installation. With a signal strength of one or zero bars, we do not guarantee stable operation of the device. Consider relocating the device, as adjusting its position even by 20 cm can significantly improve the signal strength. If the signal remains poor or unstable after relocation, consider using ReX or ReX 2 radio signal range extender.
Do not install Outlet [type F]
- Outdoors, as it can lead to outlet failure.
- Nearby any metal objects or mirrors, which can cause signal attenuation and screening.
- Inside premises with temperature and humidity levels outside the permissible limits, as this can damage the device.
- Closer than 1 meter to the hub or radio signal range extender, to prevent a communication loss with the outlet.
- In areas with low signal levels, as this may result in connection loss with the hub.
Installation
Before installing Outlet [type F], make sure that you have selected the optimal location that complies with the requirements of this manual. When installing and operating the device, follow the general electrical safety rules for using electrical appliances, as well as the requirements of electrical safety regulations.
Only a qualified electrician or installer should install Outlet [type F]. Avoid energizing the power to the smart outlet until the cover has been securely installed.
To mount Outlet [type F]:
- De-energize the power cable to which Outlet [type F] will be connected.
- Prepare the mounting boxes and remove any pre-installed outlets, if present. Disconnect the wires, ensuring about 9 mm of bare wire is exposed.
- Install the receptacle cap. For proper alignment, match the UP key on the receptacle cap with that on the relay’s front panel. Secure the receptacle cap using the bundled screw on the relay’s rear part.
- Connect the cables to OutletCore (smart) [type F] Jeweller relay as per the following wiring diagrams:
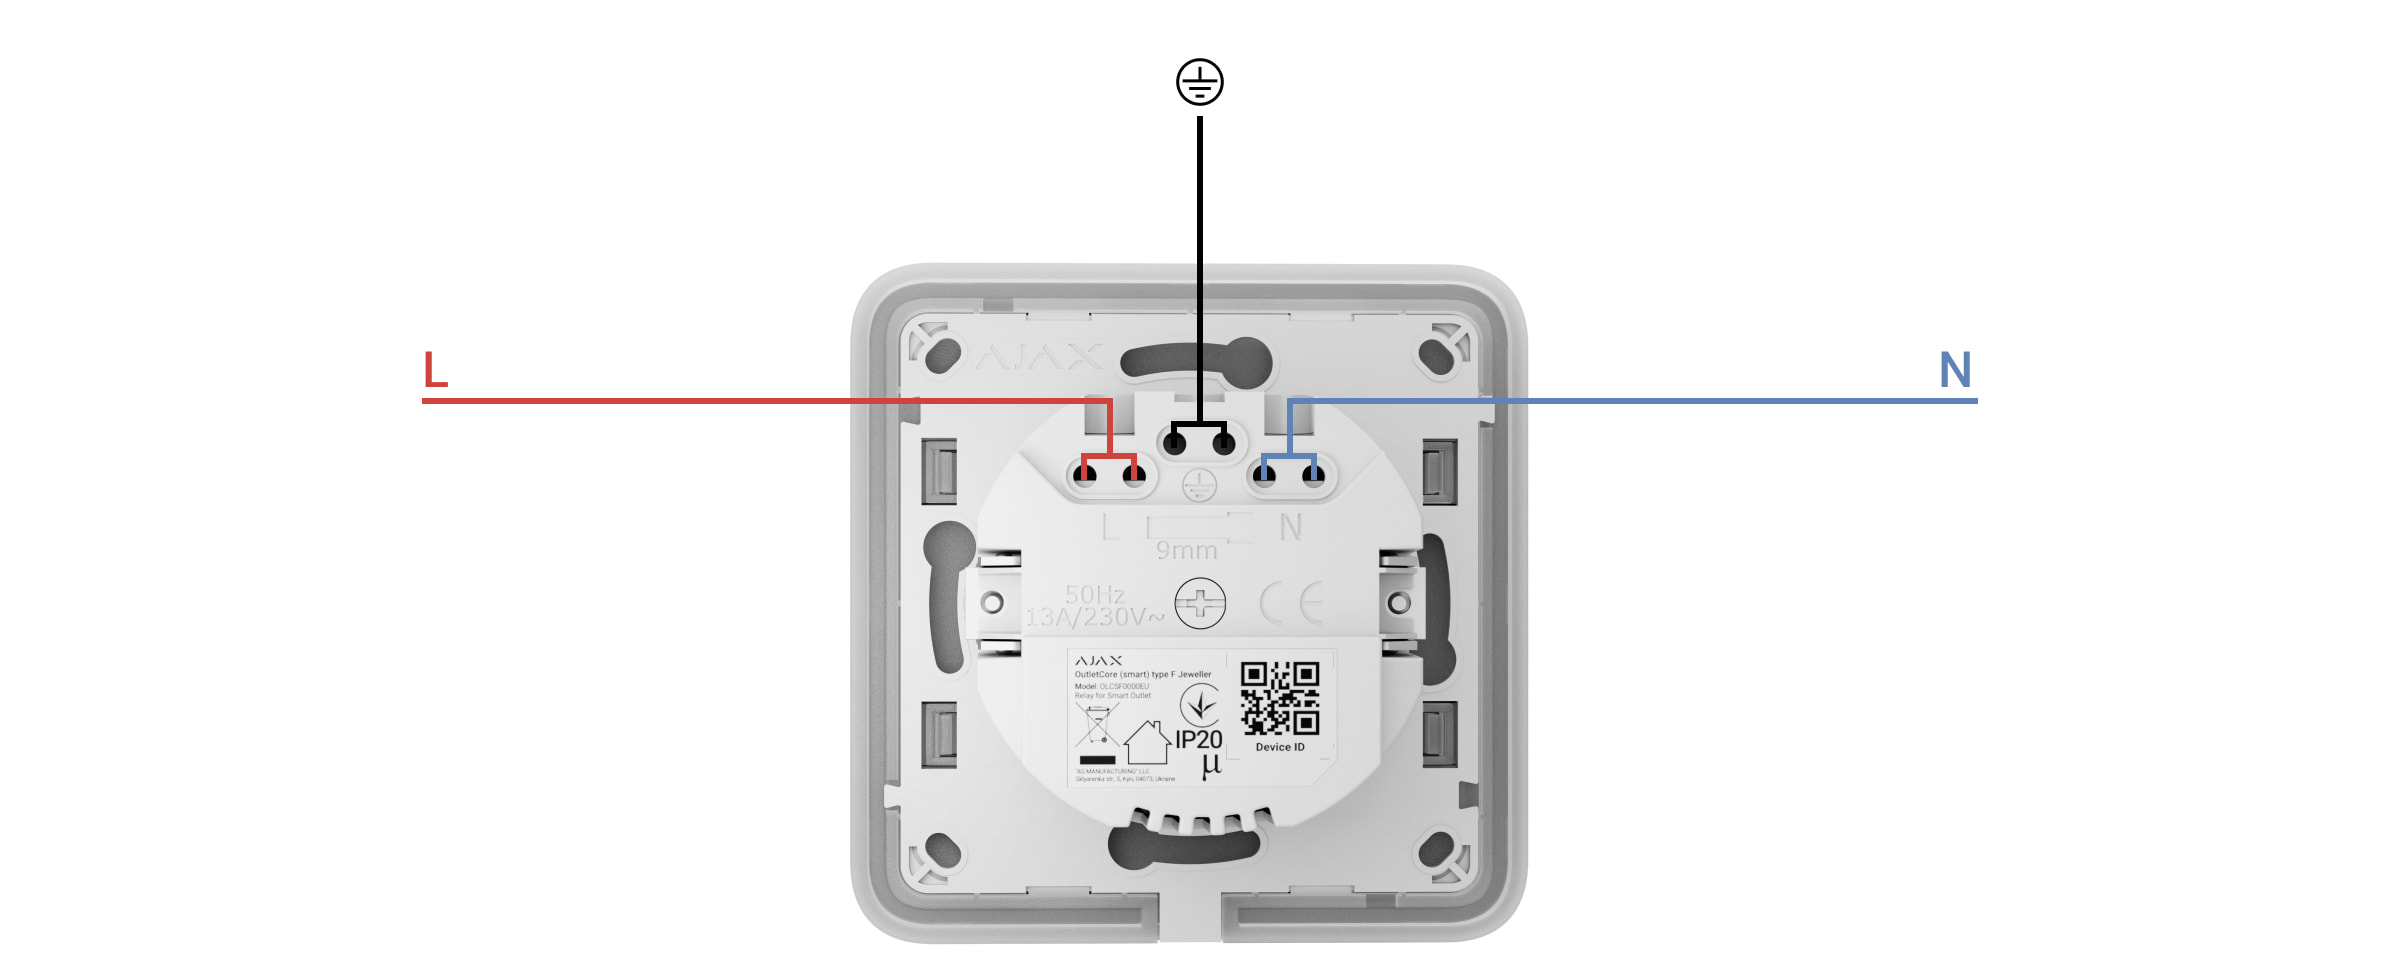
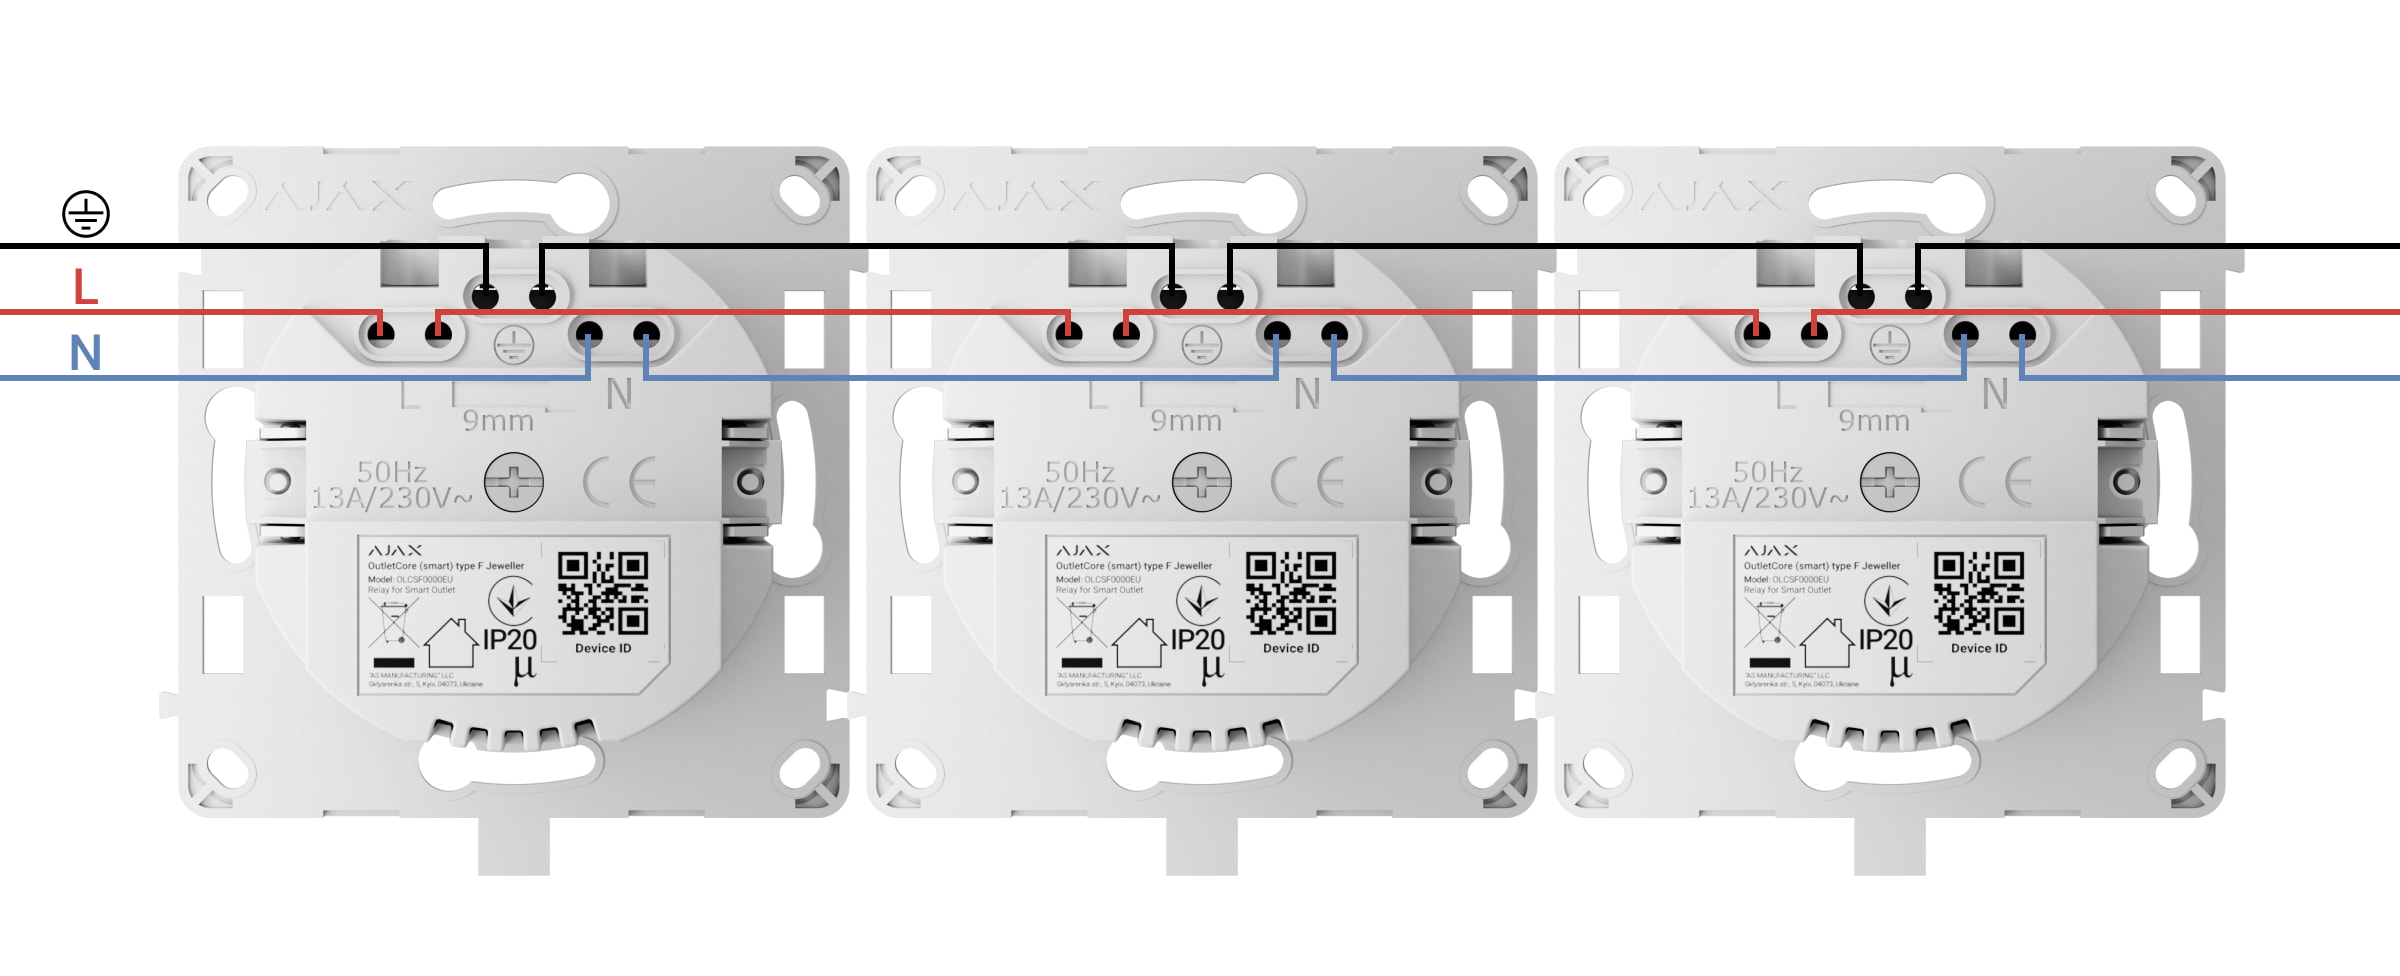
Wiring diagram for one outlet Wiring diagram for multiple outlets - Connect the power supply phase to terminal L.
- Connect the power supply neutral to terminal N.
- Connect the grounding cable to the designated terminal
 .
.
- Install the OutletCore relay in the mounting box and carefully insert cables. Tighten the screws to secure the mounting claws. Fasten the outlet relay using the bundled screws.
- Install the remaining OutletCore relays, if necessary.
- If installing multiple outlets or LightSwitch switches, mount the frame with the appropriate number of seats.
- Install the necessary front panels.
- Switch on power.
- Add outlets to the hub using the Ajax app.
Outlet [type F] will turn on within 3 seconds after power is applied. You will hear the relay click, and the device indication will illuminate (with front panels installed), indicating that the device is switched on.
Maintenance
Regularly check the functioning of the device. Clean the device’s enclosure to remove dust, cobwebs, and other contaminants as they emerge. Use a soft, dry cloth suitable for cleaning electronic equipment. Avoid using substances that contain alcohol, acetone, petrol, and other active solvents when cleaning the device.
Technical specifications
Complete set
Outlet [type F] Jeweller is a prefabricated smart outlet. All parts are purchased separately.
Use the online Ajax switches and outlets configurator to assemble your custom set. Combine devices into a frame, pick the color, and download your configuration as PDF.
Warranty
Warranty for the Limited Liability Company “Ajax Systems Manufacturing” products is valid for 2 years after the date of purchase.
If you encounter any issues with the device’s functionality, we recommend contacting Ajax Technical Support first. In most cases, technical issues can be resolved remotely.
Contact Technical Support:
