Ajax Desktop is a desktop app that allows you to control and configure your Ajax system from a computer.
Overview
With the Ajax Desktop app, you can perform all the actions with the spaces and manage your Ajax account and profile.
In general, Ajax Desktop is the same app as Ajax Security System but is designed to run on a computer. The Ajax Desktop app’s user interface and tools are designed for comfortable desktop use. Also, there are some differences between the desktop and mobile apps, which are described in this section.
You can log in to Ajax Desktop using the same Ajax account you use in the Ajax Security System mobile app.
Ajax Desktop can be used in parallel with the mobile app.
PRO user accounts cannot be used to log in to Ajax Desktop.
PRO accounts are used in Ajax PRO: Tool for Engineers and PRO Desktop apps only.
Differences from the mobile app
Ajax Desktop provides almost the same functionality as the Ajax Security System mobile app, except for some features not designed for desktop use.
On the other hand, Ajax Desktop provides additional features that are much more common for use on a wide computer screen.
Additional features available in Ajax Desktop only:
- Extended functionality and customization of the video wall for video surveillance management and monitoring.
- A page with all the spaces where you can search by space name or hub ID.
Features not available in Ajax Desktop:
- Scanning a device ID QR code with a camera while adding the device.
- Setting up devices using Bluetooth.
- Features that require geolocation (e.g., the Geofence feature, transmitting coordinates by clicking the in-app panic button, etc.).
- A dedicated tab or window with all automation devices.
- Adding a profile photo when creating a new account. The photo can be added via profile settings after the account is created.
- Displaying the space security states on the page with all spaces and in the list of spaces in the sidebar.
- Processing requests from PRO users to access video devices.
- Setting up the Smart lock access options in the space settings.
Terms of service
Links to the documents that regulate the use of the Ajax Desktop app are the following:
The documents are also linked on the welcome page and in the profile menu in the Ajax Desktop app.
Setting up the app
Ajax Desktop is a desktop app designed to be installed and run only on a computer.
System requirements
Computers with the following operating systems support the Ajax Desktop app:
- Windows 10 (64-bit) or later
- macOS Catalina (version 10.15) or later
The computer must be connected to the internet, as the Ajax Desktop app requires a connection to Ajax Cloud.
Downloading and installing
You can download the Ajax Desktop app installation file on this page.
When the installation file is downloaded, install it on your computer according to the standard software installation flow.
Updating to new versions
When the Ajax Desktop app runs, it checks if a new version is available for download and installation.
If a new version is available, the app displays a pop-up window offering to install the new app version.
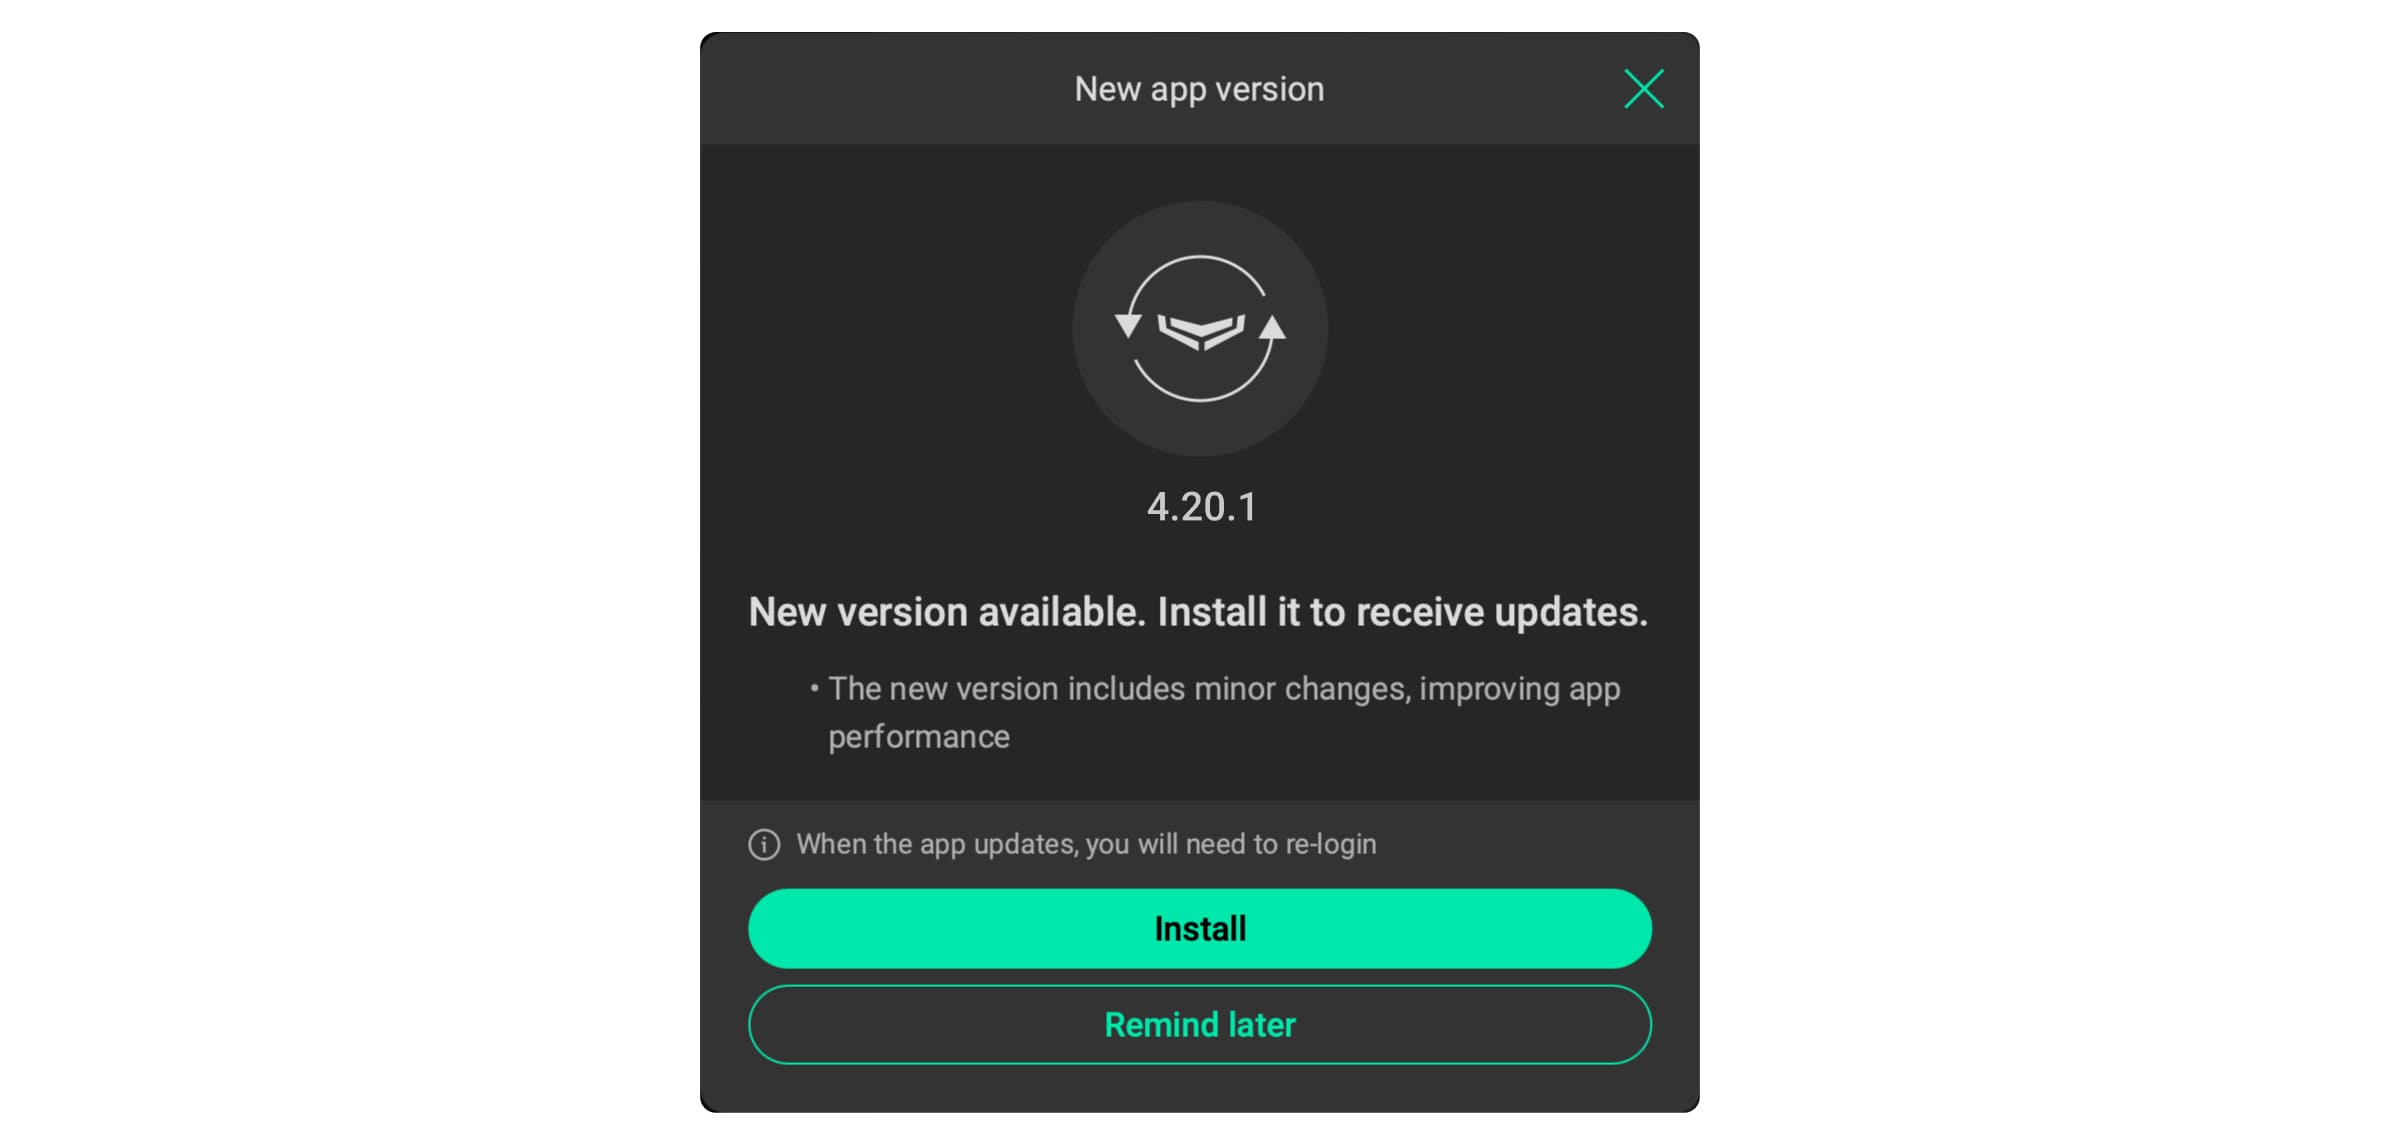
To update the app, click Install to start the installation or click Remind later to postpone the update.
Installing a new version will restart the app and log you out of your account.
The current app version is displayed in the title bar of the Ajax Desktop window and at the bottom of the login sidebar on the welcome page.
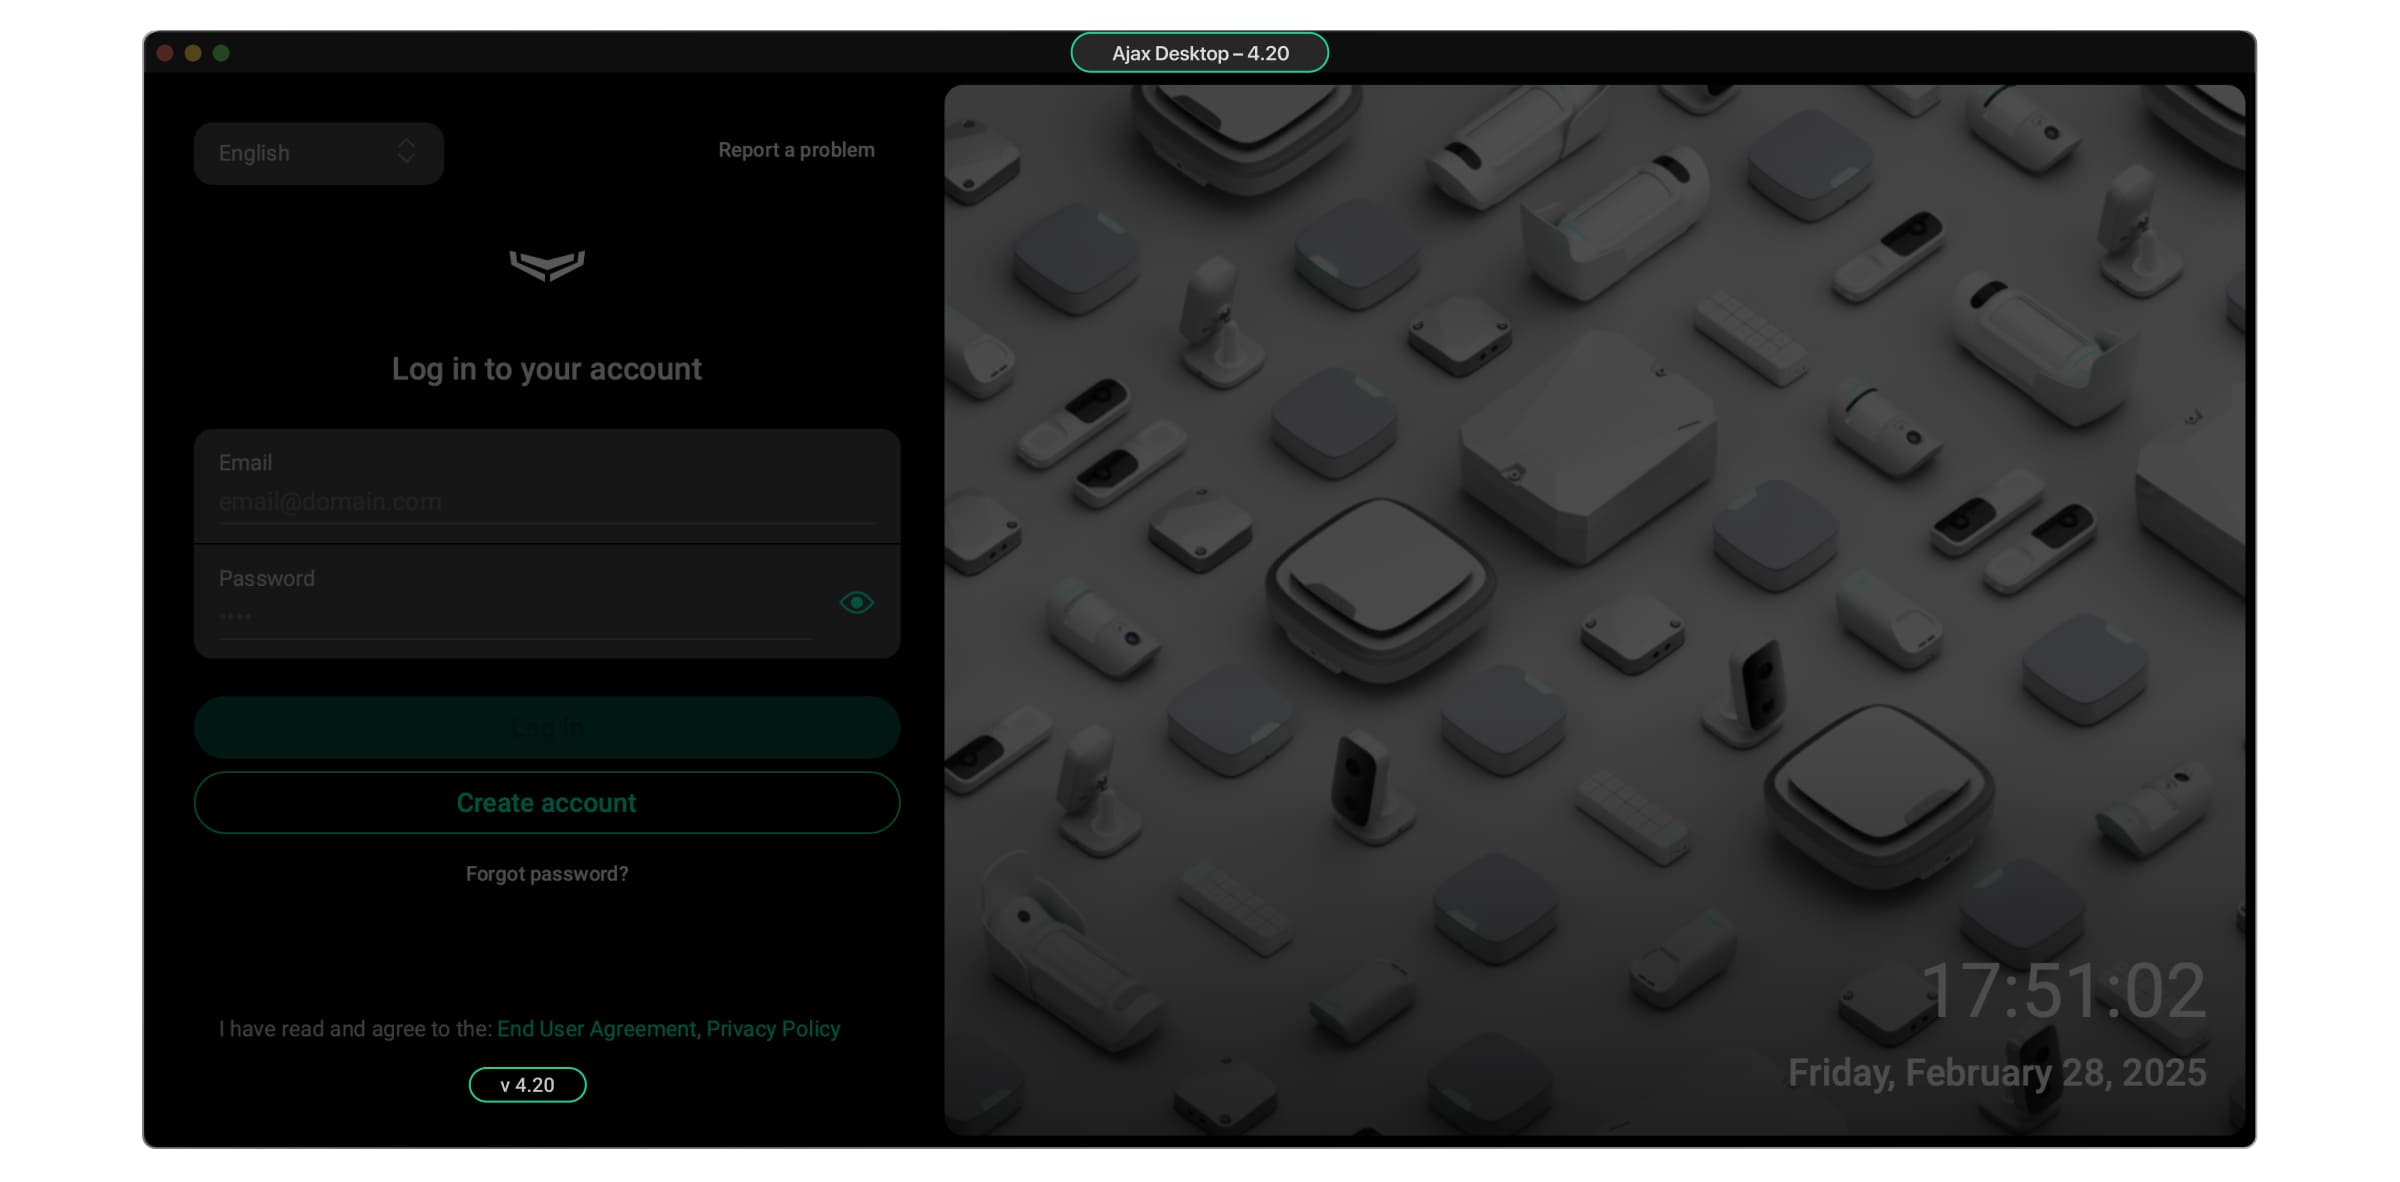
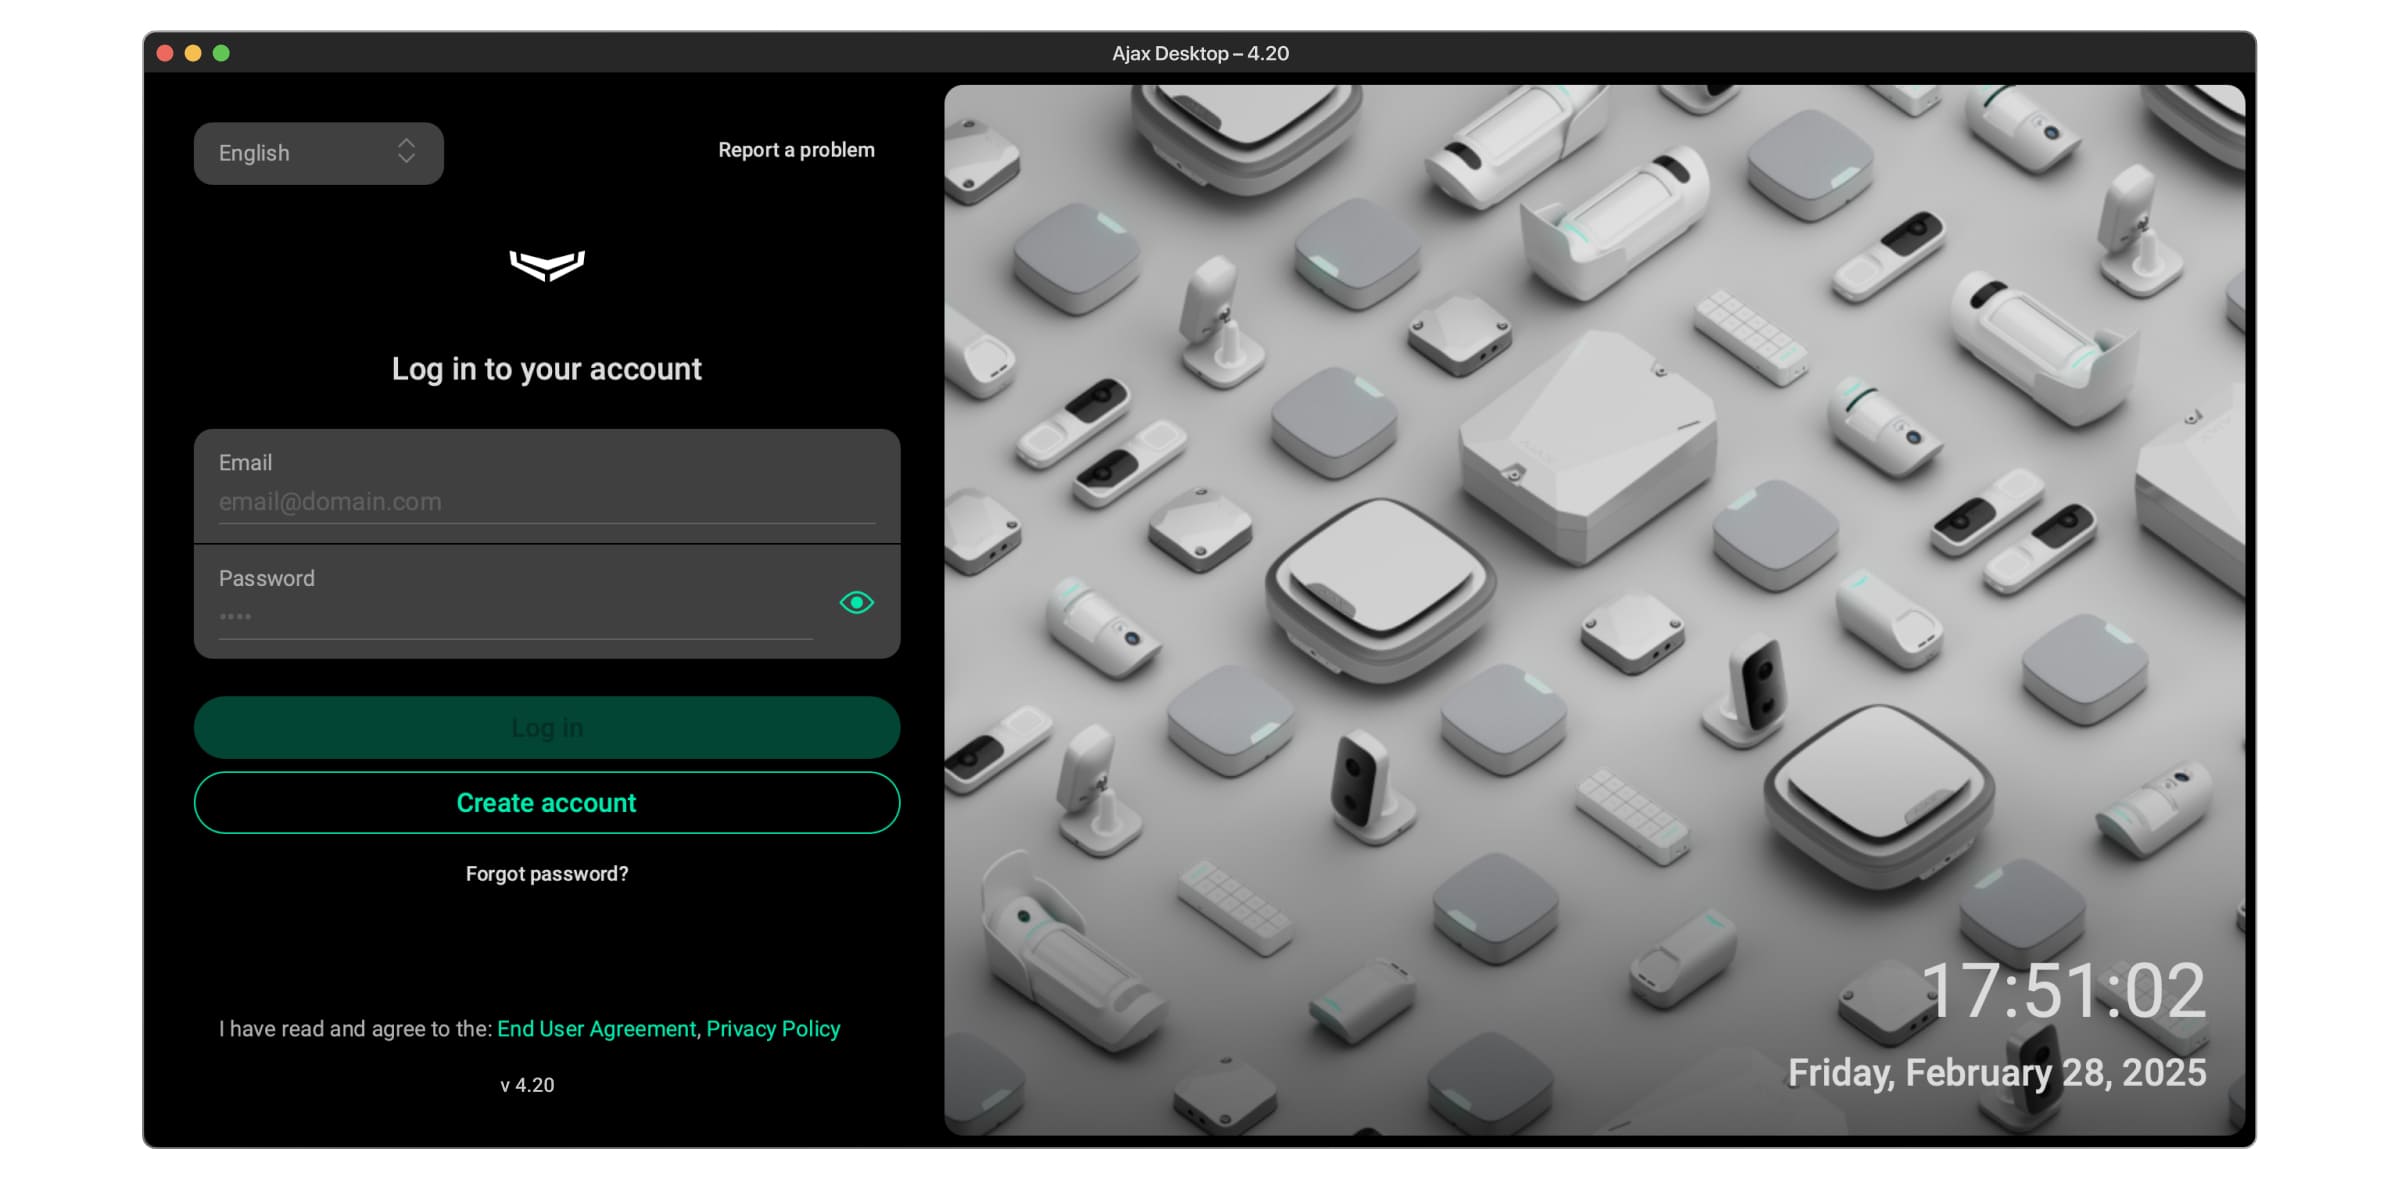
Welcome page
When you open the Ajax Desktop app, it starts with a welcome page. On the welcome page, you can log in to your account, create a new Ajax account, or restore access if you have forgotten the password.
Additionally, on the welcome page, you can change the app language and report a problem using the tools at the top of the login sidebar. At the bottom of the login sidebar, you can also check the terms of service and the current app version.
The Ajax Desktop app works with Ajax accounts used for the Ajax Security System app. You can log in to your account in Ajax Desktop with the same credentials you use for the mobile app. If you do not have an Ajax account, you can create one.
The Ajax Desktop app does not work with Ajax PRO accounts.
Logging in
To log in to your account, in the Ajax Desktop app:
- Enter your account email address or check the prefilled credentials in the Email field.
- Enter your account password in the Password field.
- Click Log in to log in to your account.
- If two-factor authentication is activated in your account, enter a temporary code from an authenticator app and click Next to verify your login.
The app remembers the email address you used to log in last time and prefills the Email field with it the next time you log in, so you do not need to enter it every time.
Logging out of your account is described in this section.
Also, the system automatically logs you out of your account when you exit the app.
Creating an account
You can create an account only on the welcome page. If you are logged in to your account in Ajax Desktop, you need to log out of your current account to create a new one.
To create an Ajax account, in the Ajax Desktop app:
- Select Create account.
- Fill in the following fields:
- Enter your name in the Name field.
- Enter your email address in the Email field.
- Select a telephone country code from the dropdown list and enter your phone number in the Phone field.
- Enter your password in the Password and Password confirmation fields. The password must contain at least six symbols, including uppercase and lowercase letters, digits, and special characters.
- Select that you have read and agree to all terms of service.
- Click Next to continue.
- In the corresponding fields, enter security codes that the system sends via SMS and email.
- Click Continue to finish creating an account.
Resetting a password
If you have forgotten your account password, you can reset it and restore access to your account on the welcome page.
To reset the account password, in the Ajax Desktop app:
- Select the Forgot password? option.
- Enter the email address or phone number to which your account is linked and click Next to continue.
- In the corresponding fields, enter security codes that the system sends via SMS and email.
- Enter your new password in the New password and New password confirmation fields. The password should contain at least six symbols, including uppercase and lowercase letters, digits, and special characters.
- Click Save to finish resetting the password.
You can also change the password to your account in the Edit account settings at any time.
Using Ajax Desktop
Ajax Desktop allows you to perform all the actions in your system. Once you have logged in to your account in the Ajax Desktop app, you can navigate spaces, control, configure, and create new spaces, use the video wall widget for video monitoring, configure your profile, and more.
Note that only users with admin rights have full access to system configuration. The list of available actions for other users depends on their permissions.
To use the Ajax Desktop app, you need an Ajax account. If you do not have one, create an Ajax account on the welcome page.
Selecting and creating a space
Once you log in to your account, Ajax Desktop will show you the page with the list of your spaces, if any exist.
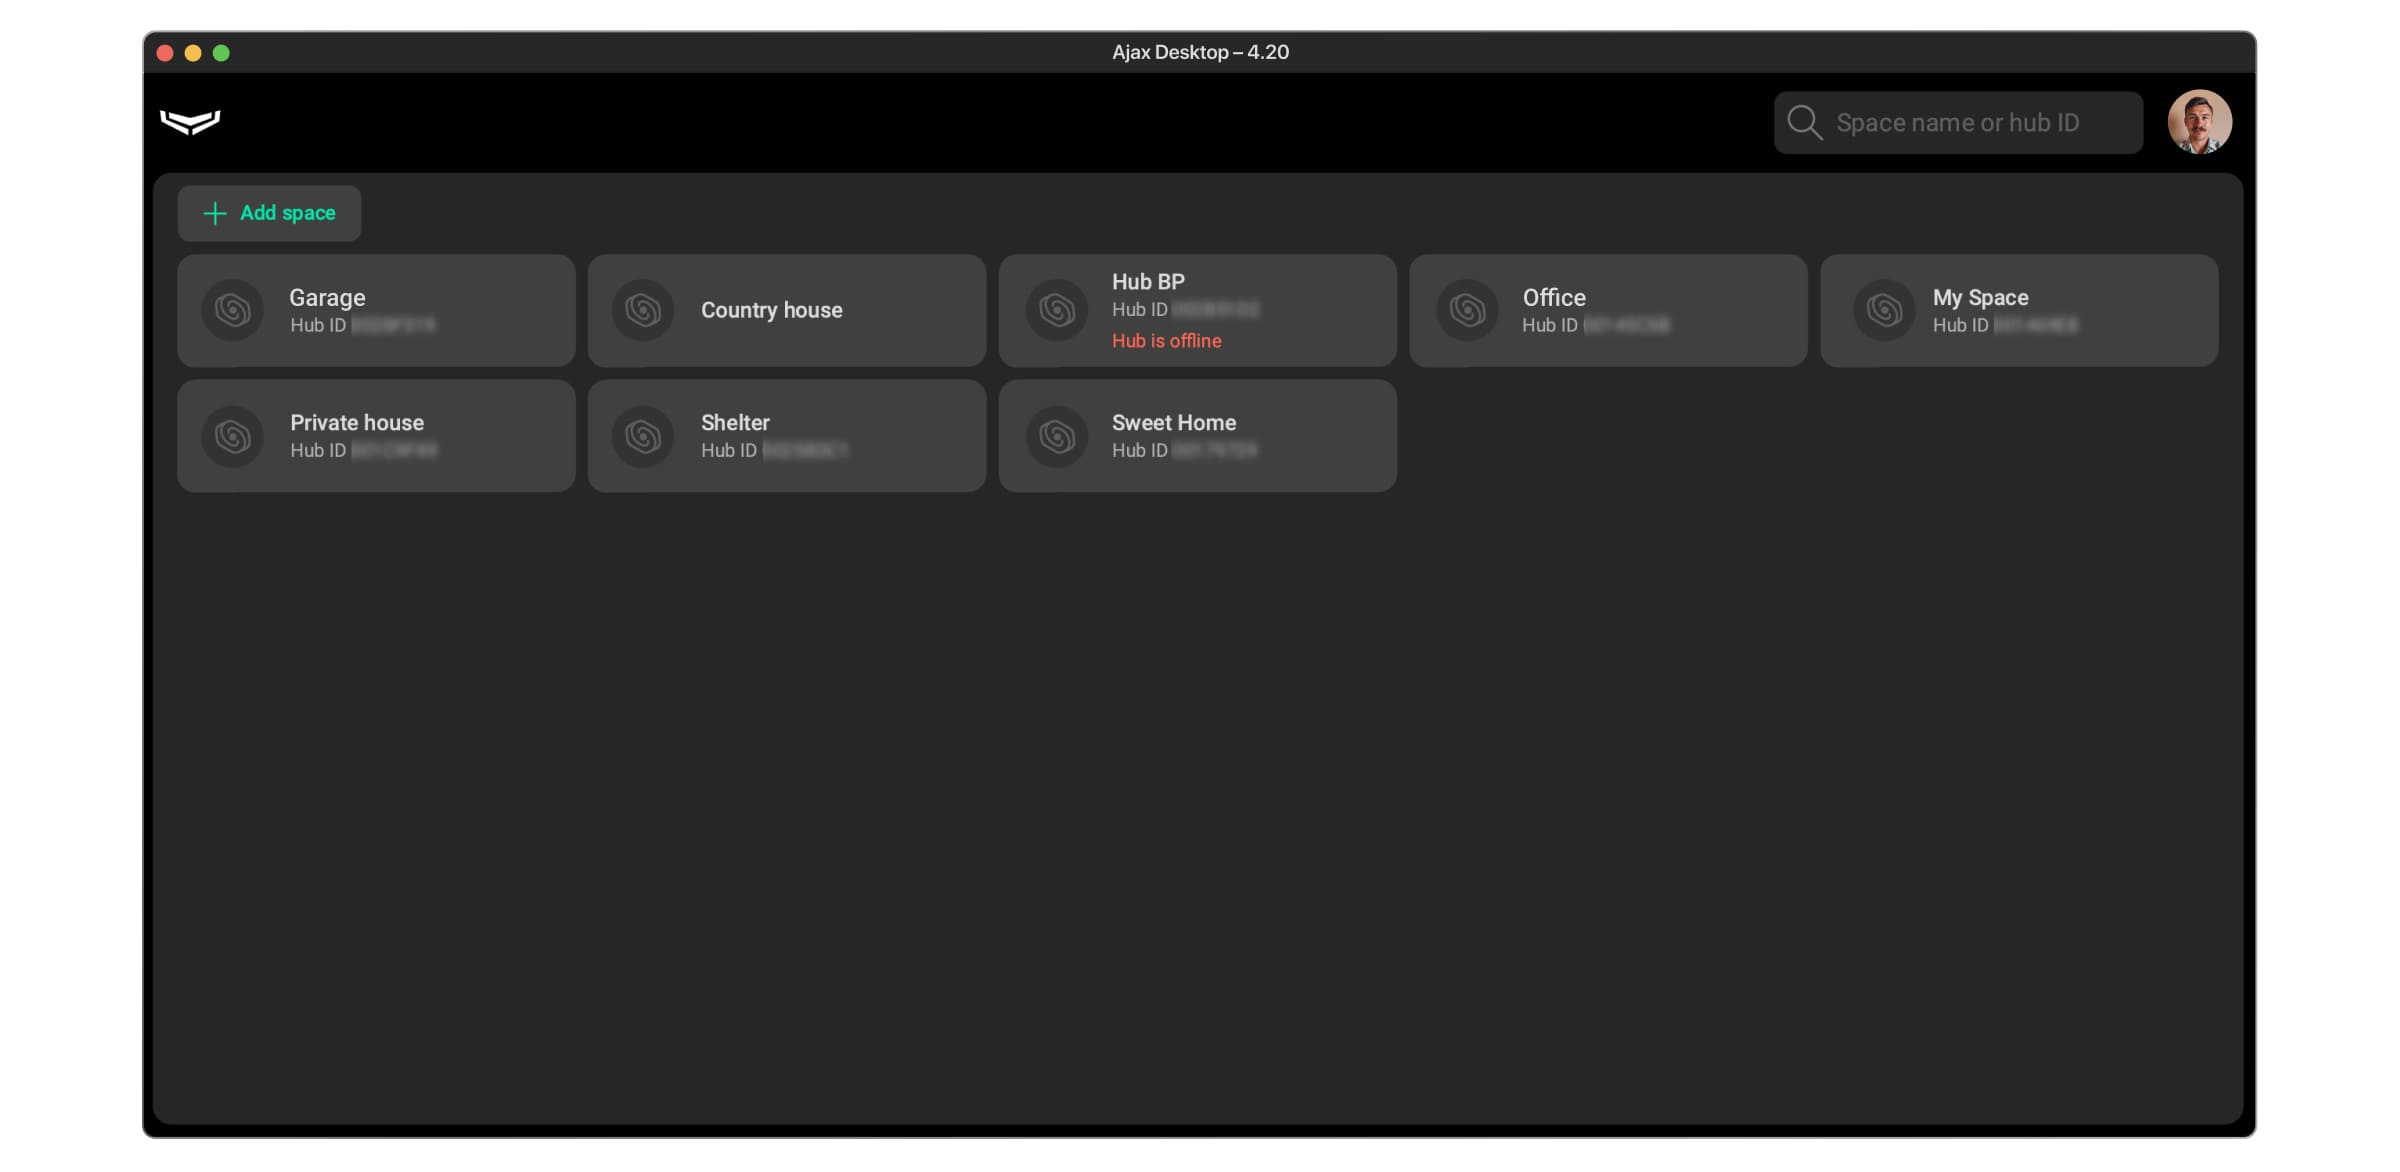
You can search for the required space using the search box next to your profile icon or image. Enter the space name or hub ID in the search box to find the required space.
To open the required space, simply select it on the page.
To create a new space, in the Ajax Desktop app:
- Go to the page with the list of your spaces, if any exist.
- Click Add space.
- Enter the space name.
- Optionally, you can upload the picture for the space.
- Click Add to finish creating the space.
Space page
Once a space is selected or created, Ajax Desktop will show you the space page.
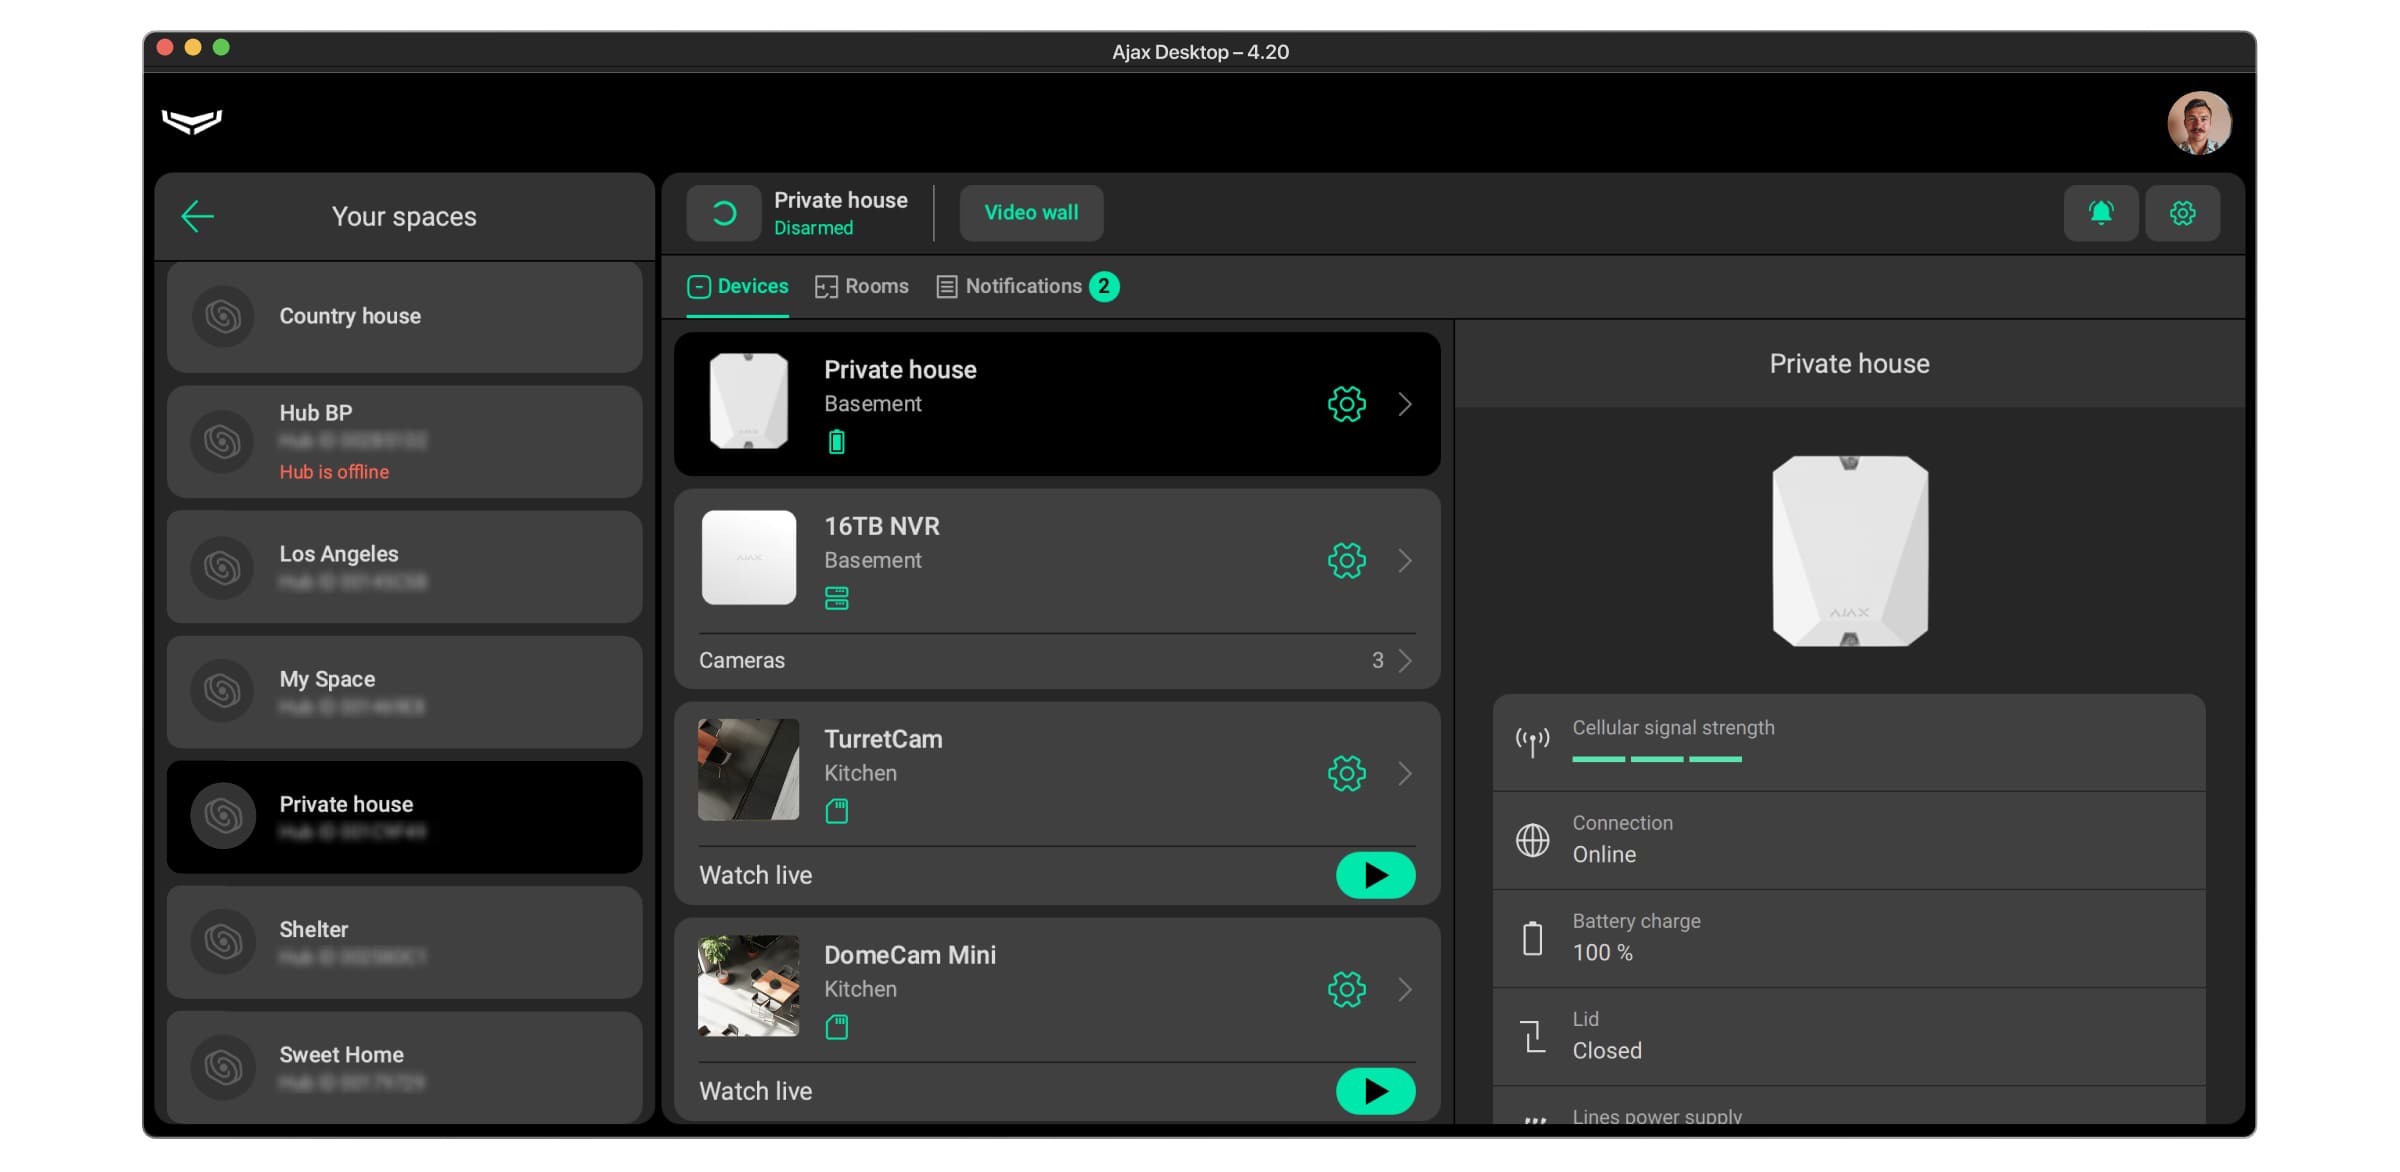
On the space page, you can:
- Manage and configure devices in the Devices tab.
- Manage your rooms in the Rooms tab.
- View the notification feed in the Notifications tab.
- Open the Video wall widget and manage the video surveillance.
- Control the system security states and send a panic alert.
- Configure the system in the space and hub settings.
- Process requests from PROs.
The available actions depend on the user’s role and permissions.
Also, on the space page, there is a sidebar with a list of spaces, so you can switch between the spaces with one click.
Devices
To open the device tab, select Devices in the top toolbar on the space page.
The Devices tab allows you to:
- View the list of devices;
- Access the states and settings of the hub and other devices;
- Control comfort and automation devices;
- Add new devices.
For more information on how to use and configure a device, refer to its user manual, which can be found on the Ajax Support page.
To add a device to the space, in the Ajax Desktop app:
- Ensure the space is disarmed and the hub is not starting an update (only for devices operating with hubs).
- Go to the Devices tab.
- Select Add device in the center of the page or at the end of the device list if at least one device is added to the space.
- Proceed with the steps required to add the device.
In Ajax Desktop, you cannot scan the QR code with the device ID using the camera when adding a device. You need to enter the device ID manually.
Rooms
To open the room tab, select Rooms in the top toolbar on the space page.
The Rooms tab allows you to:
- View a list of rooms and manage each room;
- View the icons of the device states and counter of device malfunctions for the room;
- See the average temperature in the room if at least one indoor device that can measure the temperature is added to the room;
- Open a list of devices added to the room and manage them;
- Add new rooms.
Each device added to the space must be assigned to a room. At least one room is required to add the first device to the space.
To add a room to the space, in the Ajax Desktop app:
- Ensure the space is disarmed.
- Go to the Rooms tab.
- Select Add room in the center of the page or at the end of the room list if at least one room is added to the space.
- Enter the room name.
- Optionally, you can upload the picture for the room.
- Click Add to finish adding the room.
You can also add a new device to the space and specific room at the same time directly from the Rooms tab:
- Space page → Rooms tab → Devices added to the room → Add device
Notifications
To open the notification tab, select Notifications in the top toolbar on the space page.
The Notifications tab allows you to open and view the notification feed. You can open the feed with all notifications or use the tabs to open the specific type of notifications. The following tabs are available:
- All
- Security
- Video
- Malfunctions
- Armed modes
- Smart home
- System-related
If there are no notifications of the specific type, the tab will be hidden.
When new notifications appear, a counter with the number of new notifications will appear next to Notifications in the top toolbar.
The notification feed can contain either 500 notifications or notifications for the last 2 years, depending on what limit is achieved first. The system automatically deletes notifications that are outside these limits.
Users cannot delete notifications or clear the notification feed, as the system restricts this.
Video wall
The video wall widget is available in Ajax Desktop if at least one video device is added to the space and a user has permission to view the video.
To open the video wall widget, select Video wall next to the space name and turn on the Open Video wall widget toggle.
The widget allows you to set up your video wall, manage cameras, watch the video in real time, access archived videos, and more.
Controlling the system security states
Ajax Desktop allows you to arm/disarm the system or individual groups (if the Group mode is enabled) and activate Night mode.
To control the system security states, click the button next to the space name, which displays the current space security state. Then, use the controls to arm/disarm the system or individual groups or activate Night mode in the Control window that opens.
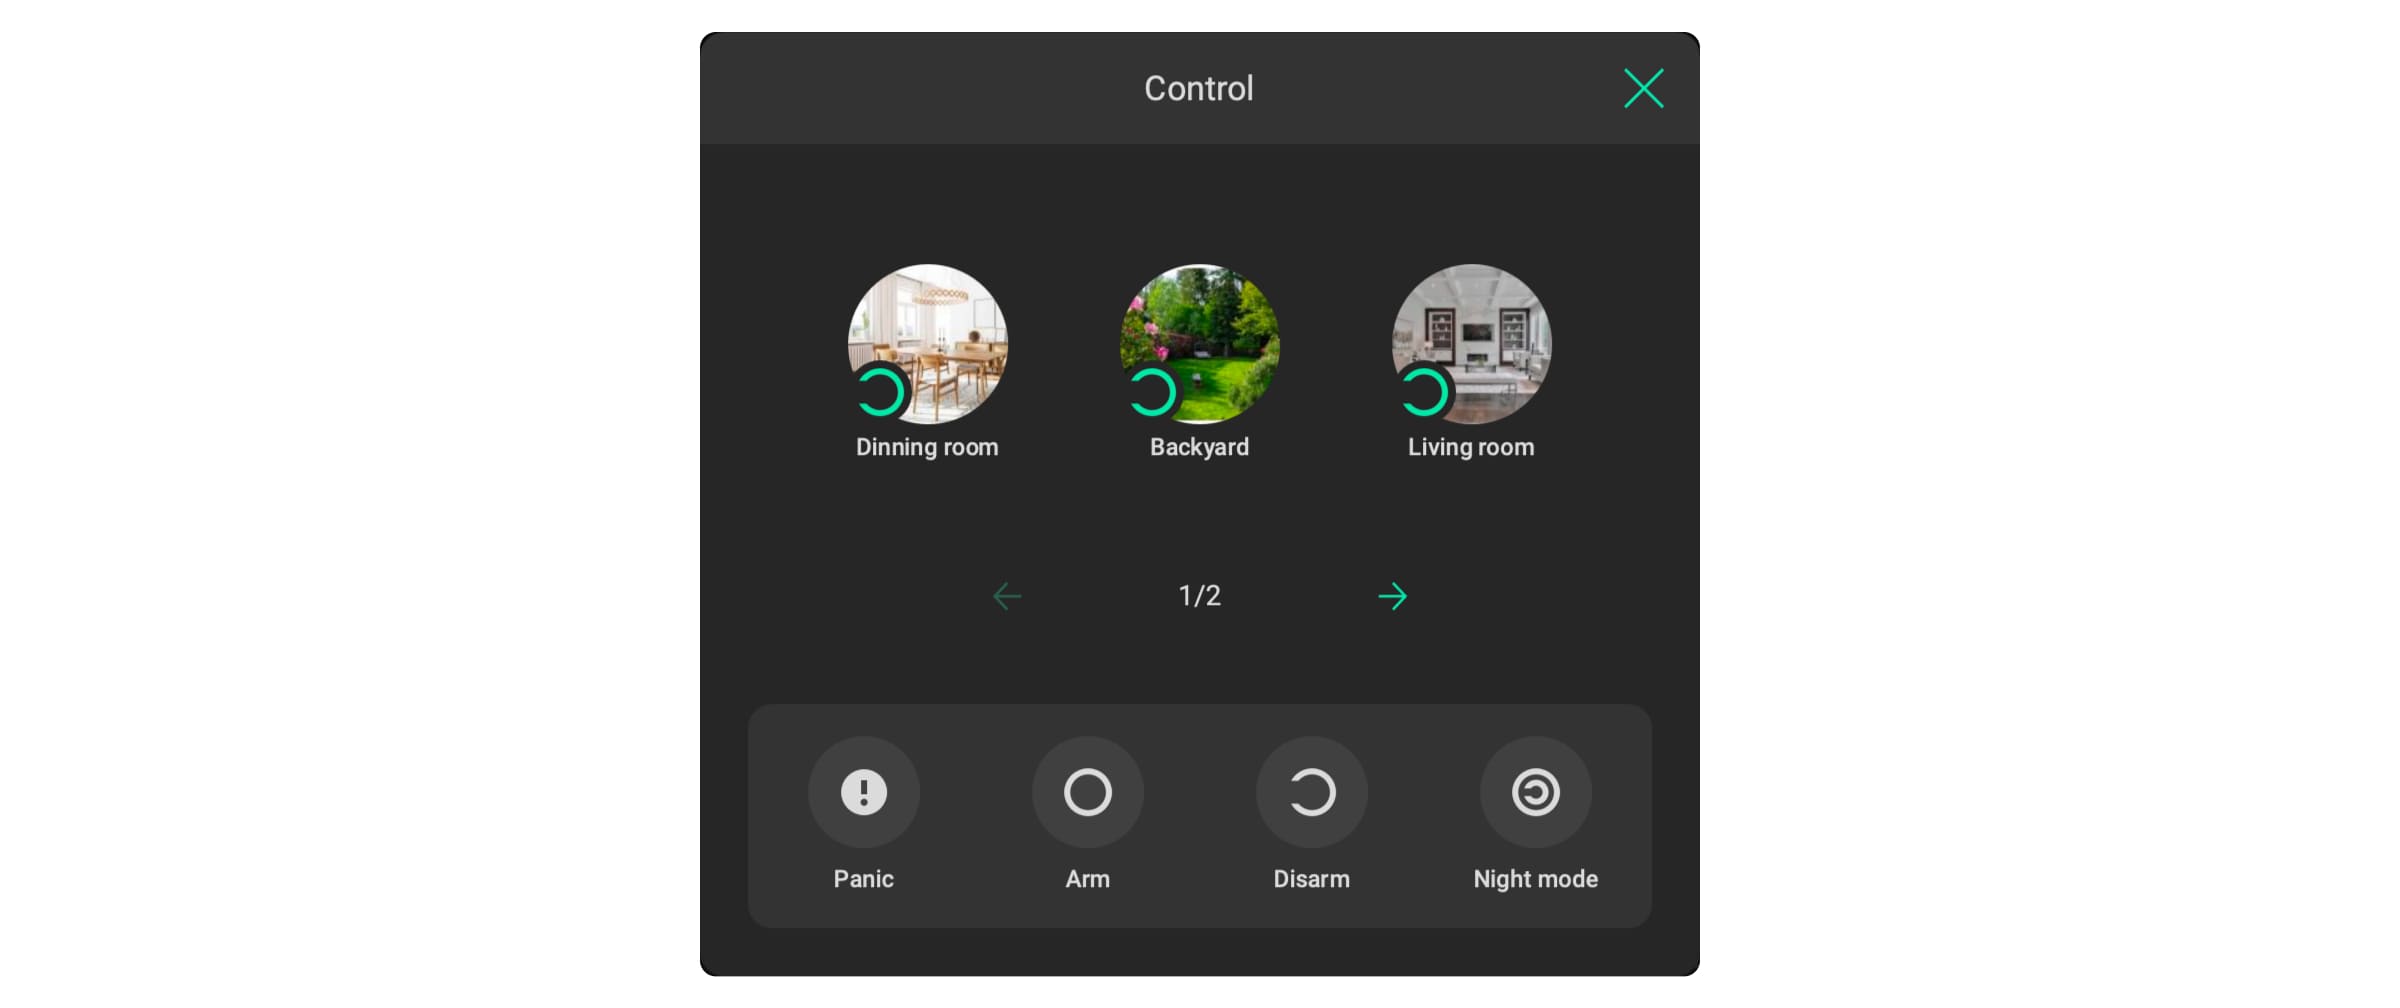
Note that you cannot arm empty spaces. Add at least one device to the space to control the system security states.
Sending a panic alert
Ajax Desktop allows you to send a panic alert by clicking the in-app Panic button.
To send a panic alert, in the Ajax Desktop app:
- Click the button that displays the current space security state next to the space name.
- Click Panic in the Control window that opens.
- Click Send alarm to confirm sending the panic alert.
Unlike the mobile app, Ajax Desktop does not transmit computer coordinates when panic alerts are sent.
Controlling automation devices
Unlike the Ajax Security System mobile app, Ajax Desktop has no dedicated tab or window that collects all automation devices and allows you to control them.
In the Ajax Desktop app, you can manage automation devices in the Devices tab:
- Go to the Devices tab.
- Find the required automation device in the list.
- Turn on/off the toggle to change the automation device state.
Space settings
To open the space settings, select ![]() Settings in the upper right corner of the space page.
Settings in the upper right corner of the space page.
The Geofence setting is not available in Ajax Desktop, as this feature is only designed for mobile devices.
Hub settings
If a hub is added to a space, you can configure the hub in Ajax Desktop.
To open the hub settings, in the Ajax Desktop app:
- Go to the Devices tab.
- Find the hub in the list.
- Click
 Settings to open the hub settings.
For more information on configuring the hub, refer to its user manual, which is available on the Ajax Support page.
Processing requests from PRO users
Ajax Desktop allows you to approve or reject requests from PRO users to access the system settings.
The requests appear in the notification feed, where you can open and process them. Select Approve to allow the access request or Reject to deny it.
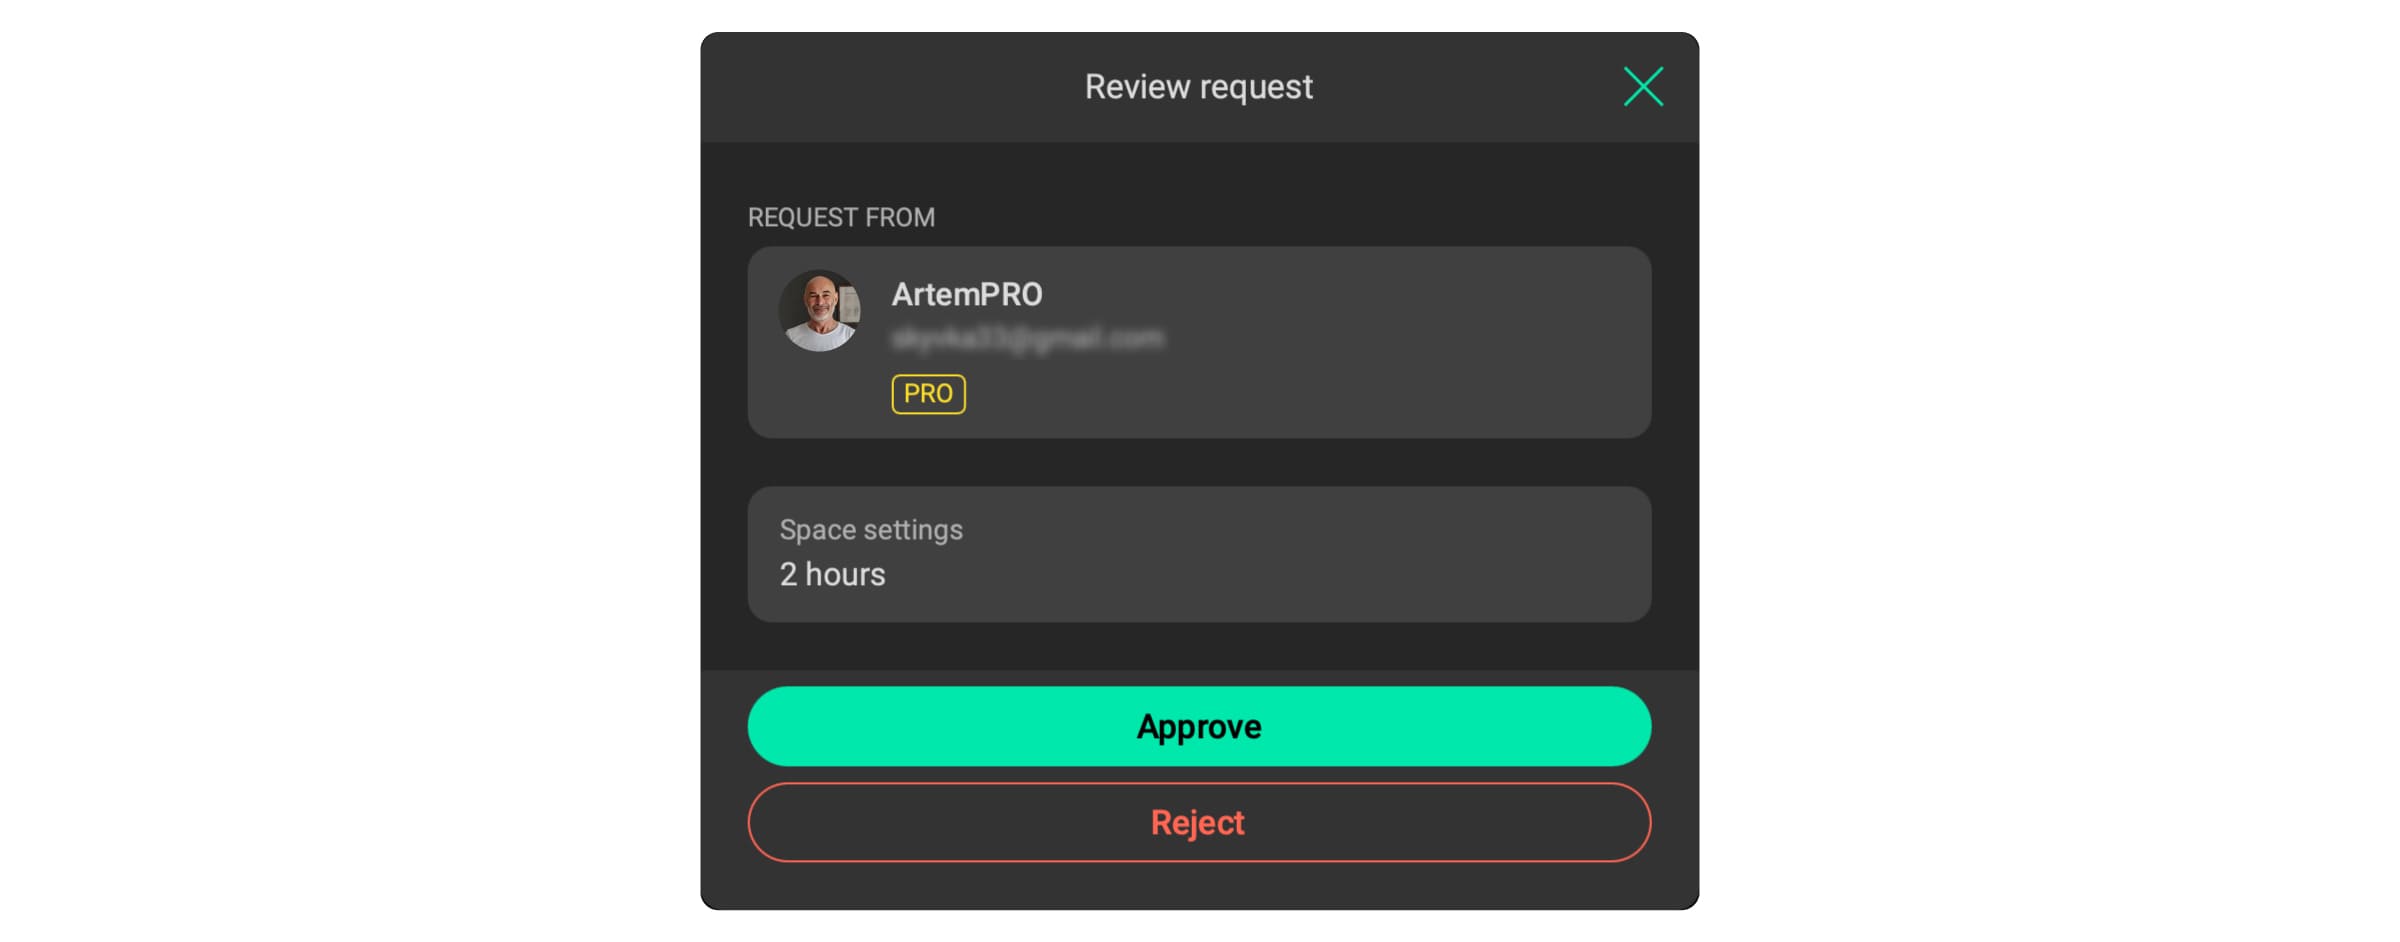
Also, if pop-up notifications are enabled on your computer, new requests from PRO users will appear as pop-up notifications.
Profile menu
The profile menu contains tools for managing and configuring your Ajax account and the Ajax Desktop app.
Using the profile menu, you can open your profile settings, report a problem, open your integrations, or log out of your account. The menu also contains links to the terms of service documents.
The profile menu is available only if you are logged in to your account in the Ajax Desktop app.
To open the profile menu, click your profile icon or image in the upper right corner of the app. The menu will open below.
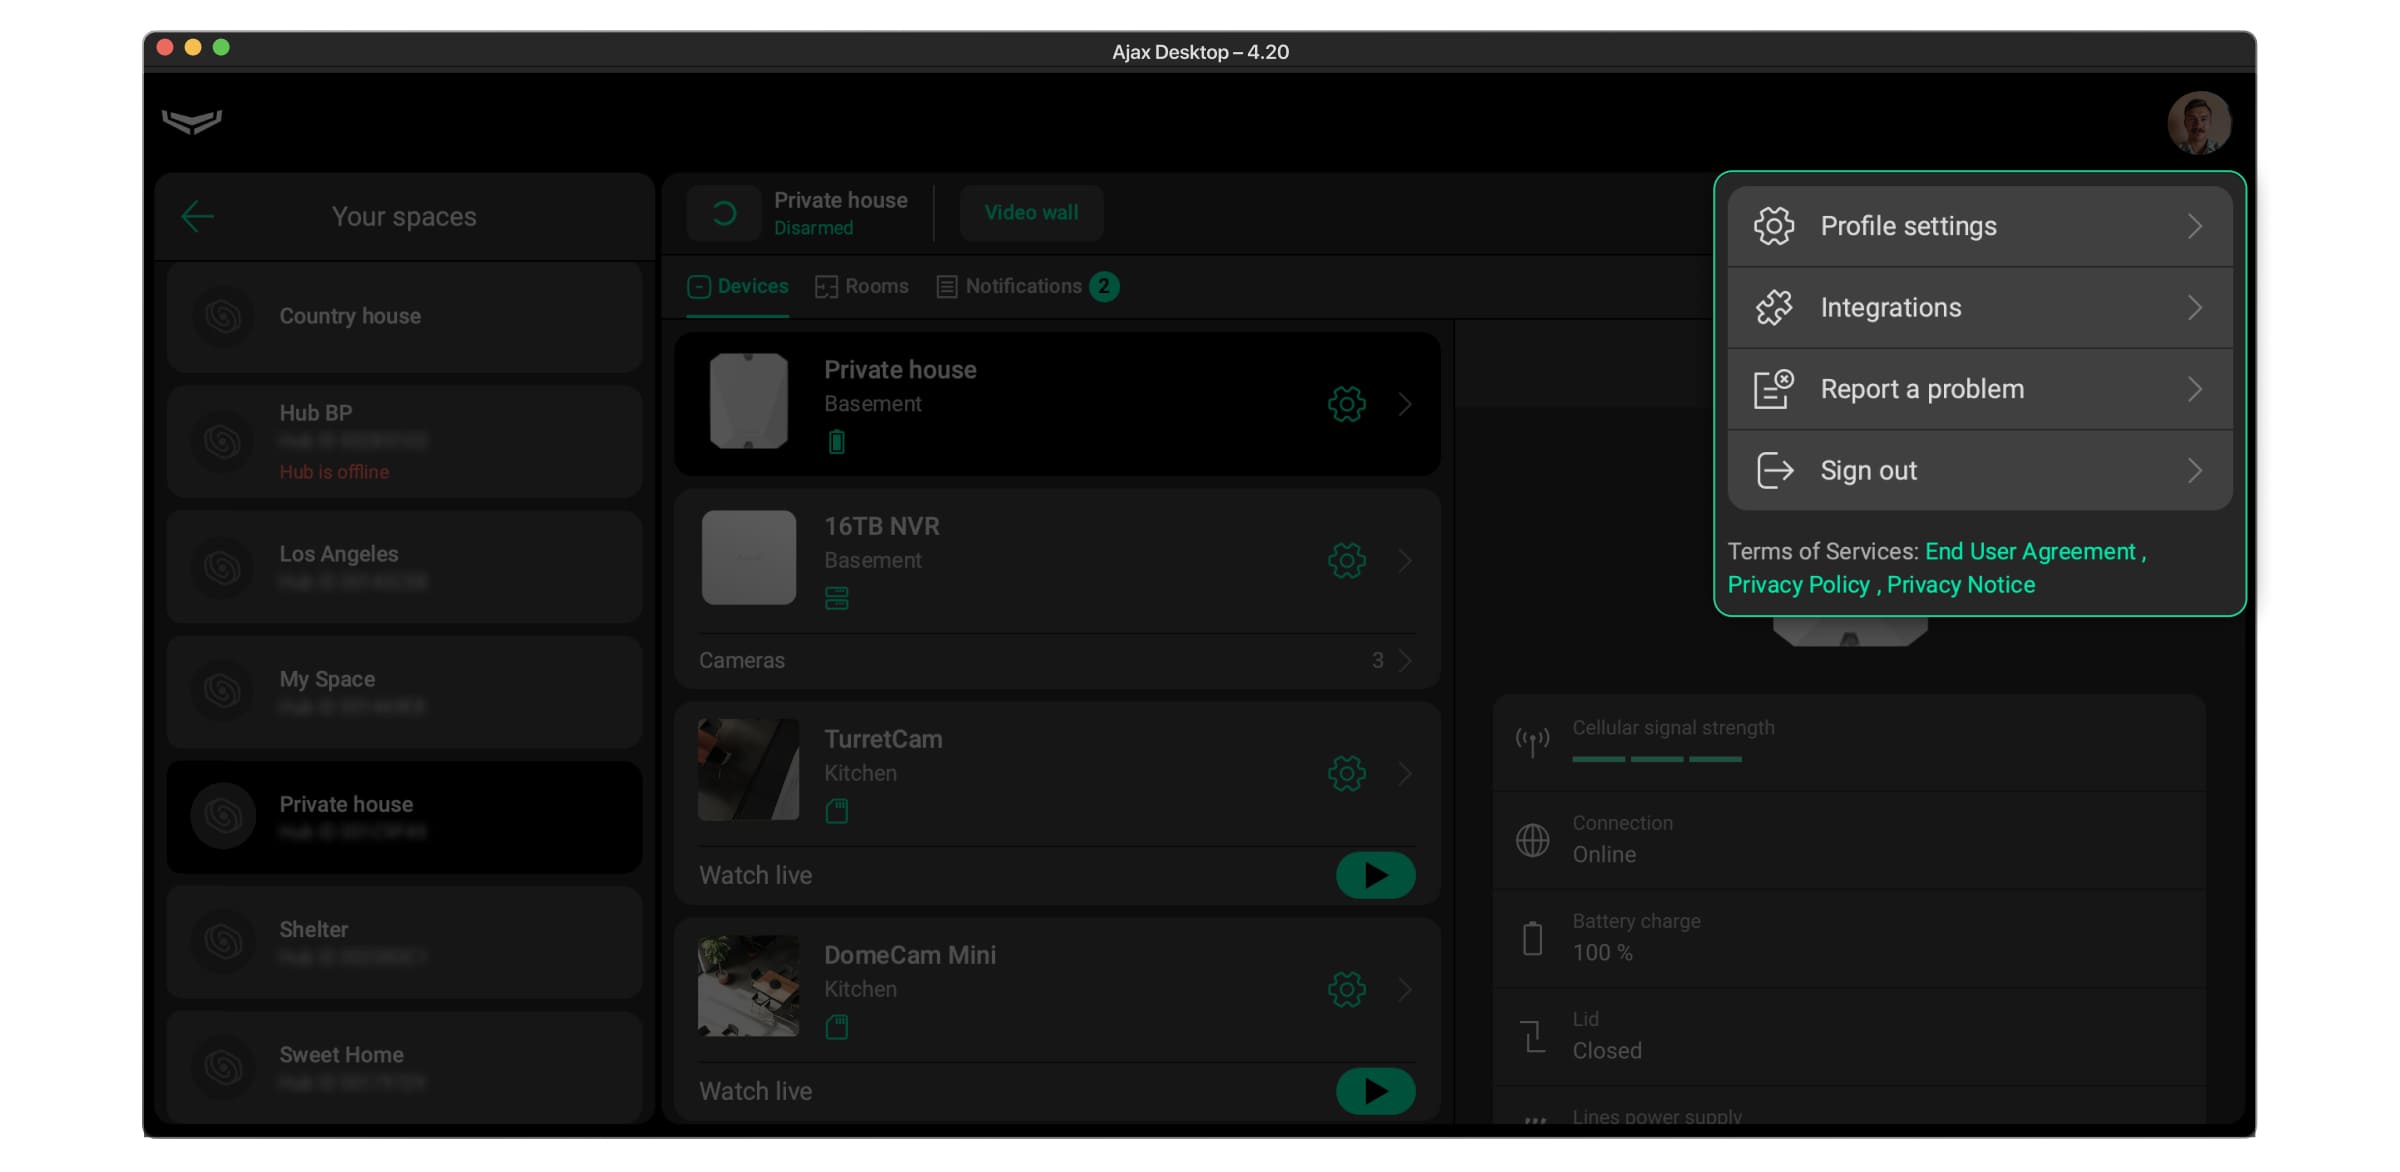
Profile settings
Profile settings allow you to configure your Ajax account and the Ajax Desktop app.
To open the profile settings, click your profile icon or image in the upper right corner of the app and select Profile settings.
Detailed information about profile settings is described in the Profile setup section.
Reporting a problem
If you encounter issues with the Ajax Desktop app, you can send a report to our technical support team so they can address them.
You can report an issue anytime from the profile menu or the welcome page.
- Click your profile icon or image in the upper right corner of the app.
- Select Report a problem.
- In the window that opens:
- Check the prefilled Name and Email fields or enter new data.
- Describe the issue in the Description field. Include as many details as possible.
- Click Add photo to attach a screenshot or a picture if you have one.
- Click Send to send the report.
Integrations
In the Ajax Desktop app, you can open the Integrations menu, which contains a list of all logged-in integrations.
To open your integrations, click your profile icon or image in the upper right corner of the app and select Integrations.
Logging out
To log out of the Ajax Desktop app, click your profile icon or image in the upper right corner of the app and select Sign out.
After you log out, the app will show the welcome page.
Also, the system automatically logs you out of the account when you exit the app.
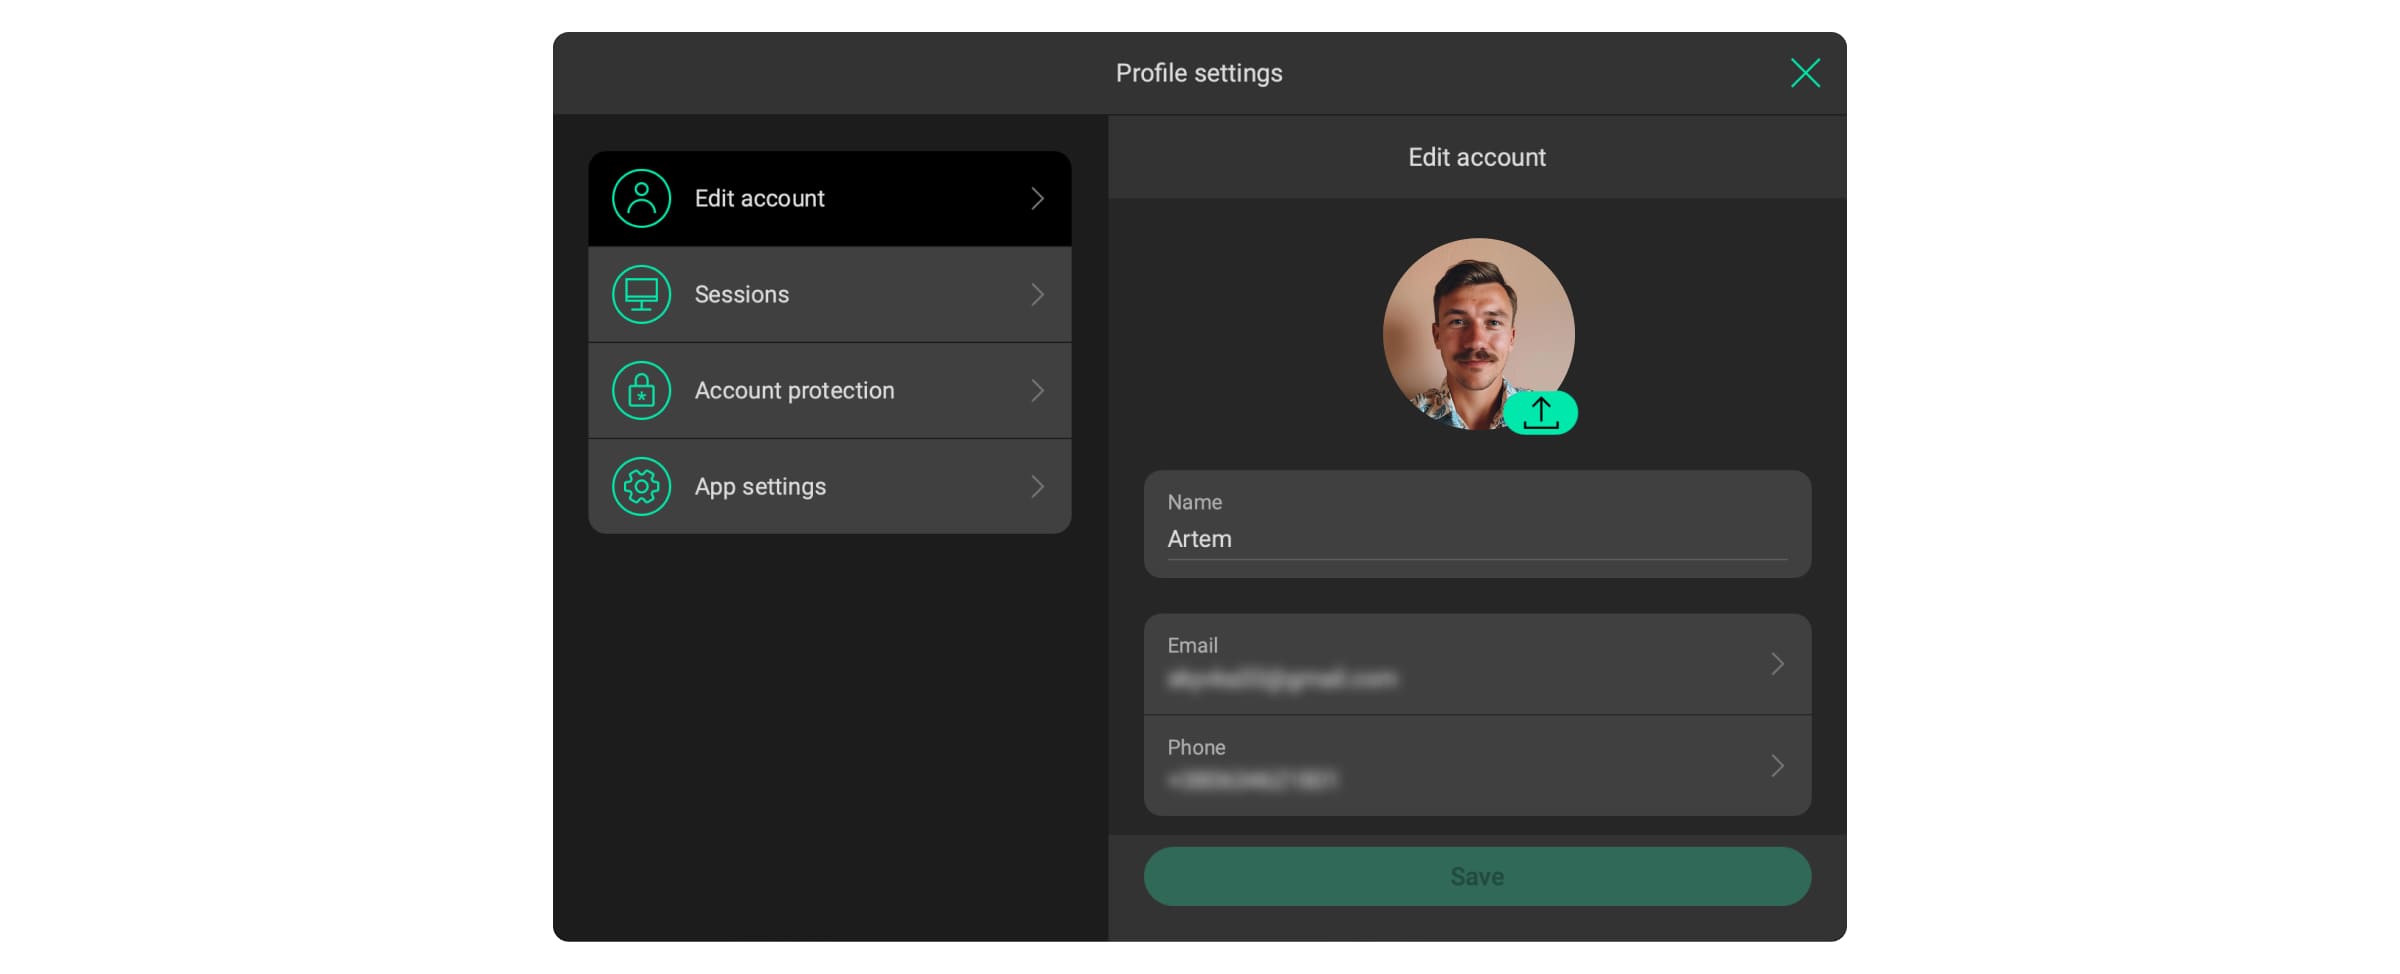
Profile setup
You can set up your profile in the profile settings. In these settings, you can manage your Ajax account, control your sessions and account protection, and adjust the app system settings.
To open the profile settings, click your profile icon or image in the upper right corner of the app and select Profile settings.
Refer to the sections below for more information on profile setup.
Editing an account
The Edit account settings allow you to configure your account data, such as profile photo, name, email, phone number, password, and language for system SMS and emails, or delete the account.
To open the Edit account settings:
- Click your profile icon or image in the upper right corner of the app.
- Select Profile settings.
- Select Edit account in the left sidebar.
| Parameter | Meaning |
| Profile photo |
A profile photo of the account. Once uploaded, it is displayed in the upper right corner of the app. In the space settings and related notifications, the profile photo will be displayed next to the username. You can upload, update, and delete the profile photo. |
| Name |
A username of the account. It is used for a user in the corresponding settings and notifications. To change the username, click on the text field. The name can contain up to 24 Latin characters or up to 12 Cyrillic characters. |
|
An email address of the account. It is required to create an account and perform basic actions with it, such as logging in, restoring access, receiving security codes, etc. To start changing an email address, select the email field. |
|
| Phone |
A phone number of the account. It is required to create an account, restore access to the account, and receive security codes and notifications if configured. To start changing the phone number, select the phone field. |
| Password |
The option is used to change your account password. |
| System emails & SMS language |
Selecting a language for system emails and SMS. By default, the app uses the system language on your computer. |
| Delete account |
The option is used to delete your Ajax account. |
Changing an email
Note that changing the account email will log you out of the account on all other devices.
To change your account email, in the Ajax Desktop app:
- Click your profile icon or image in the upper right corner of the app and go to:
- Profile settings → Edit account → Email
- Click Change email to confirm that you are logged out on other devices and continue.
- Enter your password in the Account password field.
- Enter your new email address in the New email address field.
- Click Continue to proceed.
- In the corresponding fields, enter security codes that the system sends via SMS and email.
- Click Next to verify your account and finish changing the email.
Changing a phone number
To change your account phone number, in the Ajax Desktop app:
- Click your profile icon or image in the upper right corner of the app and go to:
- Profile settings → Edit account → Phone
- Enter your password in the Account password field.
- Select a telephone country code in the dropdown list and enter your new phone number in the New phone number field.
- Click Continue to proceed.
- In the corresponding fields, enter security codes that the system sends via SMS and email.
- Click Next to verify your account and finish changing the phone number.
Changing a password
Note that changing your account password will log you out of the account on all other devices.
To change your account password, in the Ajax Desktop app:
- Click your profile icon or image in the upper right corner of the app and go to:
- Profile settings → Edit account → Password
- Click Change password to confirm that you are logged out on other devices and proceed.
- Enter your old password in the Old password field.
- Enter your new password in the New password and New password confirmation fields. The password should contain at least six symbols, including uppercase and lowercase letters, digits, and special characters.
- Click Continue to proceed.
- In the corresponding fields, enter security codes that the system sends via SMS and email.
- Click Next to verify your account and finish changing the password.
Deleting an account
Note that deleting your account will erase all your account data without the possibility of recovering it.
You cannot delete your account if you are the only user in at least one space. First, leave or delete all such spaces in the space settings. Afterward, you can delete your account.
To delete your Ajax account, in the Ajax Desktop app:
- Click your profile icon or image in the upper right corner of the app and go to:
- Profile settings → Edit account → Delete account
- Click Yes, delete to proceed with deleting the account.
- Check the spaces from which your account will also be deleted and click Next to continue.
- In the corresponding fields, enter security codes that the system sends via SMS and email.
- Click Delete account to finish deleting your account.
Sessions
The Sessions settings allow you to monitor and control active sessions on all devices where you are logged in with your account.
To open the session settings, click your profile icon or image in the upper right corner of the app, select Profile settings, and go to Sessions.
You can view the app version, device information, IP address, and status or date and time of each session if such information is available. You can also refresh the data by clicking the ![]() Refresh button.
Refresh button.
To terminate a session, click Terminate for the specific session or click Terminate all other sessions to terminate all of them.
Account protection
The Account protection settings allow you to secure your Ajax account using a two-factor authentication method. It means you must confirm your login with an additional one-time passcode generated by an authentication app.
To open the account protection settings, click your profile icon or image in the upper right corner of the app, select Profile settings, and go to Account protection.
To activate or deactivate two-factor authentication, turn on/off the Two-factor authentication toggle and follow the steps suggested by the Ajax Desktop app.
Activating two-factor authentication will log you out of the account on all other devices.
System settings
The System settings option allows you to configure the general Ajax Desktop settings on your computer.
To open the system settings, click your profile icon or image in the upper right corner of the app, select Profile settings, and go to System settings.
| Parameter | Meaning |
| Notifications | When the option is enabled, you receive pop-up notifications for system events. |
| Language |
Selecting a language for the app interface. By default, the app uses the system language on your computer. |
| Measurement system | Selecting a system for displaying measurements in the app:
|
| Screen scale |
Changing the size of in-app text and icons: from 100% to 200%. The default scale is 100%. |

