911 is a cloud-based software for mass monitoring of security systems and database administration of security objects. Install the 911 client program to deploy a security company central monitoring station on a single computer.
Starting from May 13, we will no longer support and update Ajax 911. All features will be available in Ajax PRO Desktop app. To automatically transfer all hubs data, download Ajax PRO Desktop and log in to your account, using your 911 account login and password
Minimal system requirements
| Processor | 2,6 GHz |
| RAM | 2 Gb |
| Internet access | Network interface controller 100 mbps |
| Operating system | Windows 7 and higher, macOS 10.11 and higher |
| HDD | 120 Gb |
Installation
Uncompress the executable file Ajax911.exe (Windows) or Ajax911.dmg (macOS) into the system folder of your OS.
Account and login
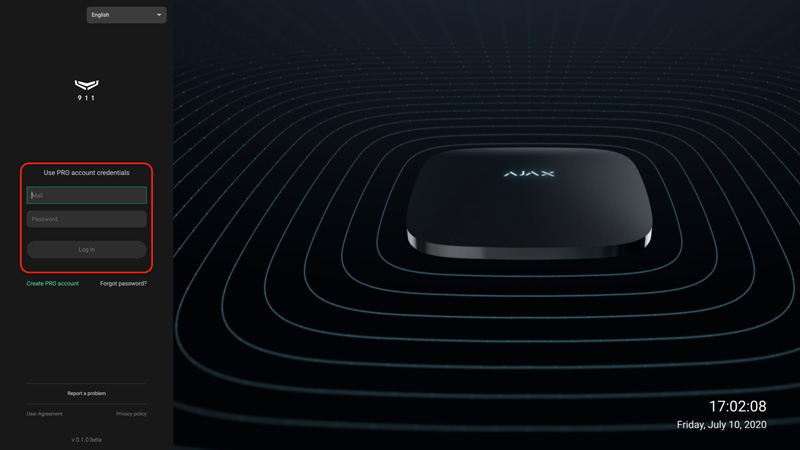
You need an Ajax PRO account to access 911. PRO account is different from the account created in the Ajax Security System app. If you have a PRO account, fill in the Mail and Password fields on the screen’s left side and click Log in. If you have not previously used a PRO app, click Create PRO account when logging into 911 and follow the instructions.
When creating a PRO account, you can use the same email and phone number as in the Ajax Security System account. The same account cannot be used to log in to 911 on multiple devices.
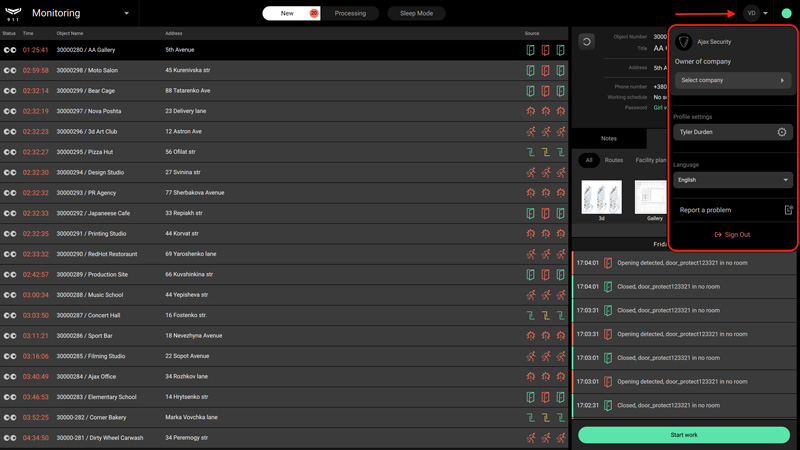
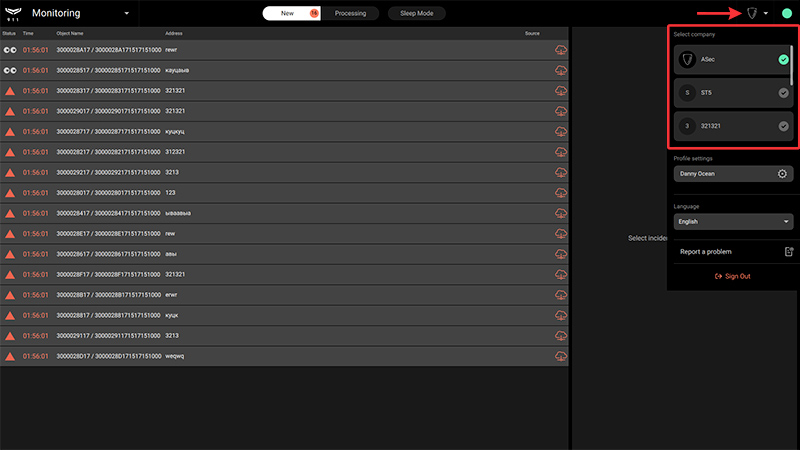
To see information about the account that is currently being used, log out, change its settings or the 911 interface language, click on the menu with the security company logo or initials in the upper right corner of the screen.
Company registration
To use all 911 modules, you need to register a company. Company account to unite under one profile all security objects, accounts of employees, and rapid response units.
If your company already monitors Ajax security systems that are connected through the Translator, you have an option to fully or partially transfer these security objects (hubs) to 911 without losing connection and re-configuring.
To register a company, click Apply when the program starts, fill out the form and click Send request. After Ajax Systems support considers your application, you will receive a notification to the email address you specified during registration: with confirmation of request acceptance or refusal with an indication of the reason. The PRO account that registered the company receives the role of the company owner.
Employee roles and permissions
Each employee added to 911 has a set of permissions according to their role. There are 4 roles:
- Owner of the company — has access to all program modules, can manage employee accounts, and change company data. The role can be assigned to one user only.
- Senior CMS engineer — can access all program modules, manage employee accounts, and cannot edit company data.
- Engineer — does not have access to the Monitoring module, can add employees who are equal or lower in the role.
- Head of operators — has access to all program modules, sees all incidents being processed. Can add employees who are equal or lower in the role.
- Operator — has access to all modules of the program, does not have access to the list of company employees, sees the list of new incidents and incidents being processed by him, coordinates the work of rapid response units.
Table of permissions according to user roles
| Menu/Role | Owner of the company | Senior CMS engineer |
Engineer | Head of operators | Operator |
| Company module | Has access | Has access | Has access | Has access | Has access |
| General information menu | View/Edit | View | View | View | No access |
| Employees menu | View/Edit | View/Edit | Limited View/Edit | Limited View/Edit | No access |
| Workstations menu | View/Edit | View/Edit | Limited View/Edit | Limited View/Edit | No access |
| Rapid response units (RRU) menu | View/Edit | View/Edit | View/Edit without the ability to delete crews | View | View |
| Objects module | View/Edit | View/Edit | View/Edit | View/Edit | View/Edit |
| Journal module | View | View | View | View | View |
| Monitoring module | Has access | Has access | No access | Has access | Has access |
| New menu | View | View | — | View | View |
| Processing menu | View/Edit | View/Edit | — | View/Edit All | View/Edit of processing by him |
| Sleep mode menu | View/Edit | View/Edit | — | View/Edit | View/Edit |
One PRO account can combine several roles within the same company, and also have different roles in different companies. You can switch the role of a PRO account by clicking Select a company in the account menu.
911 function test
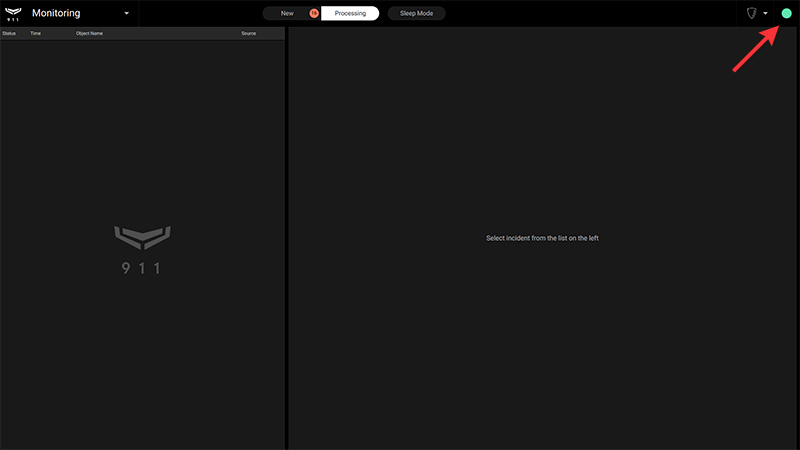
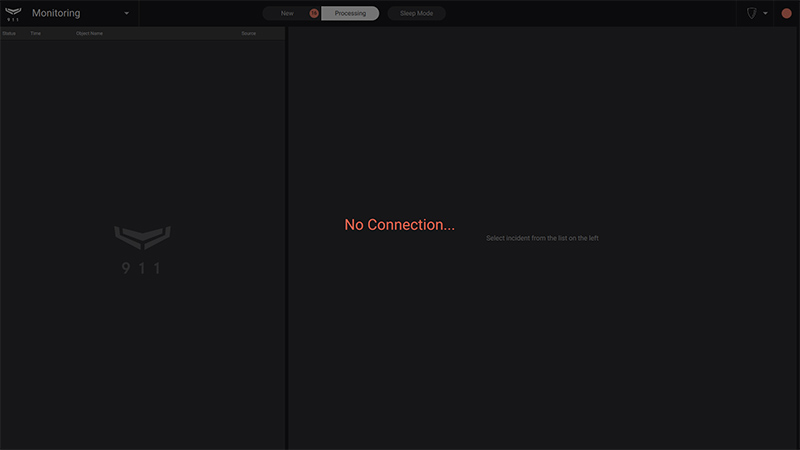
911 displays the real-time connection status to Ajax Cloud. If the Internet connection is active, the indicator in the upper right corner of the screen glows green. If there is no connection, the red indicator signals the need to check the Internet connection. When there is no internet connection, the message No connection is displayed on the screen, and 911 cannot receive notifications from objects.
Modules and features of 911
With 911, you can:
- Create an organizational structure for the company’s employees accounts — assignment of roles in the Company module, Employees menu, RRU menu.
- Administer an unlimited number of central panels in the Objects module.
- Maintain a client base of security objects in the Objects module/Hubs menu in the Company module.
- Receive, distribute among operators, and process received alarms from security systems at objects in the Monitoring module.
- Assign workplaces to operators by computer ID — the Company module.
- Generate reports on the availability of hubs and operators — the Journal module.
- Coordinate the work of rapid response units in the Monitoring module.
- Maintain a detailed log of events and alarms of security systems and their devices in the Journal module.
Monitoring
Module access: Company owner, Senior CMS Engineer, Head of operators, Operator
Monitoring module allows processing notifications received from security systems at protected objects, and 911 notifications about the work of operators. For quick access, New, Processing, and Sleep Mode tabs are fixed at the top of the 911 screen (except for the Company module).
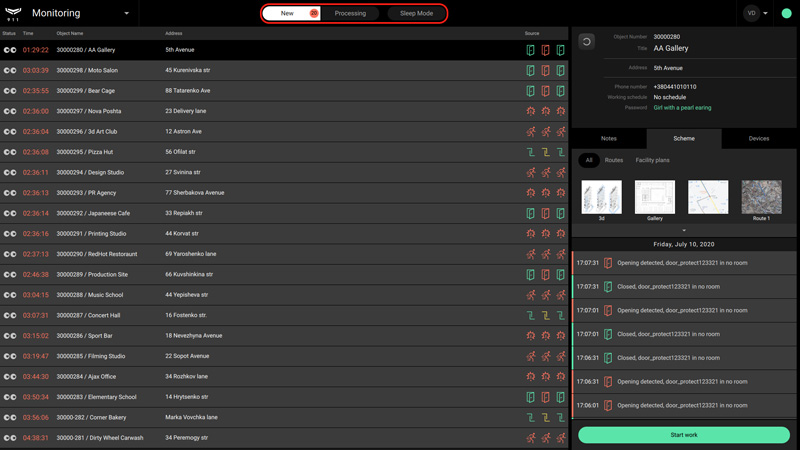
All new alarm notifications are displayed in the New tab and accompanied by sound alerts until the processing starts. One notification can include several alarms of security detectors or security system notifications. The recent three are displayed as icons in the notification line, in the Source column.
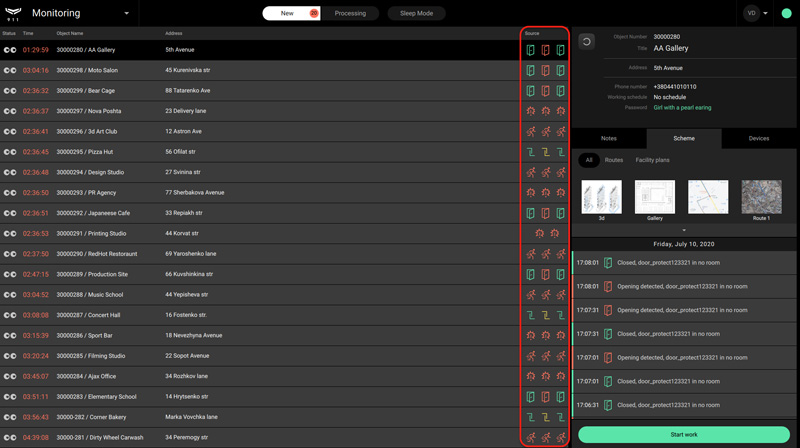
| Meaning of system alarms and events icons | ||
| Event icon | Description | Recovery icon |
| Malfunctions | ||
|
|
Testing | |
|
|
The device is temporarily deactivated |
|
|
|
Disconnecting of Ethernet communication channe |
|
|
|
Disconnecting of SIM communication channel |
|
|
|
Loss of detector connection |
|
|
|
Loss of hub connection |
|
|
|
Loss of siren connection |
|
|
|
Loss of hub main power |
|
|
|
Hub battery discharge |
|
| Alarms | ||
|
|
Leakage detector alarm |
|
|
|
Hub lid opened |
|
|
|
Device lid opened |
|
|
|
Security alarm of the motion detector |
|
|
|
Security alarm of the glass break detector |
|
|
|
Security alarm of the opening detector |
|
|
|
Security alarm of the shock/tilt detector |
|
|
|
Panic button: silent alarm |
|
|
|
Panic button: normal alarm |
|
|
|
Fire alarm |
|
|
|
Carbon monoxide concentration alarm |
|
|
|
Fire alarm: smoke |
|
|
|
Fire alarm: threshold temperature rise |
|
|
|
Gas alarm |
|
|
|
Medical assistance |
|
The notification line also displays the protected object address, name, and number in 911, the time elapsed from the moment of receipt, and the status of incident viewing by the operator. The Journal module records who and when started viewing the incident.
| Icons for operator incident viewing status | |
|
|
Not viewed |
|
|
Viewed |
|
|
Processing |
Separately, the monitoring module shows incidents related to operators’ work: communication loss and logins from an unverified computer. These types of incidents are generated according to the workstations created in the Company module. These incidents are processed similarly to security system alarms, with the incident’s cause indicated and recorded in the log.
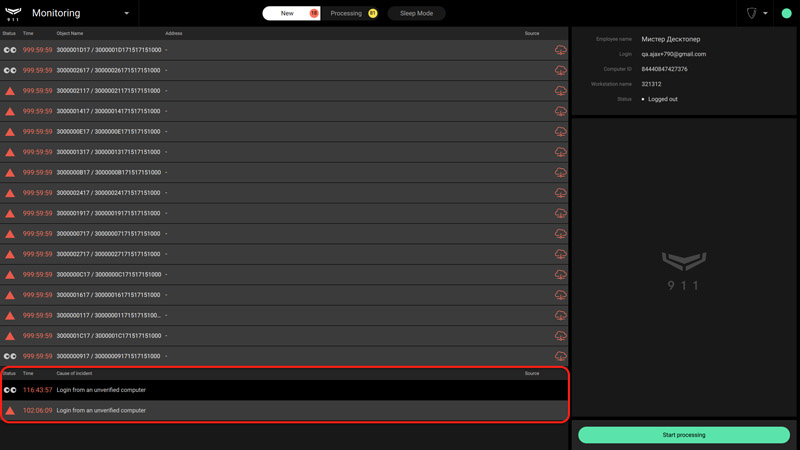
The Operator is offline notification is an incident type that contains information about the lost connection with a computer indicated as the operator’s workstation in the Company module.
The Login on an unverified computer notification is an incident type that contains information about the user and information about the computer from which the logon was made.
Processing incidents
Clicking on the selected notification opens the details of the incident on the right side of the screen (alarm time, detector, placement room, visual alarm verifications) and information about the object (address, contacts, facility plans, etc.).
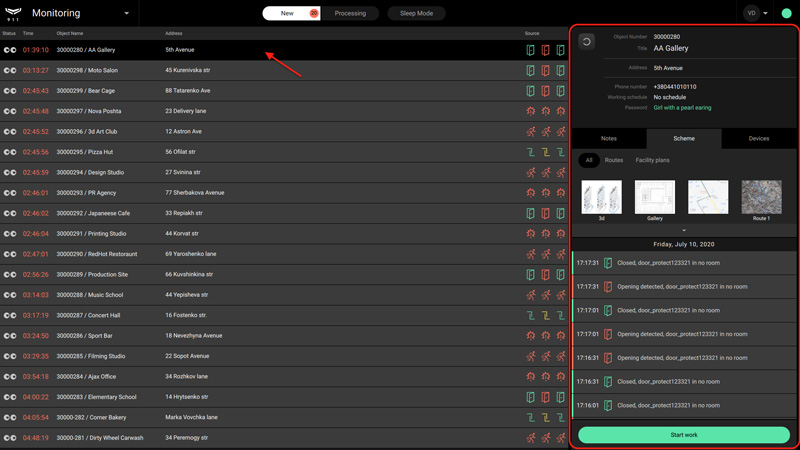
By clicking on the Start processing button on the right side of the screen, the operator starts processing the alarm, and the incident goes to the Processing tab. The operators have limited access to the tab: they see only those incidents that are processed by them. The head of operators has full access to see all incidents that are being processed by the operators.
General information about the object and a list of alarms, a security management menu, as well as notes, a list of devices, directions, and facility plans are displayed in the center of the screen in the Processing tab.
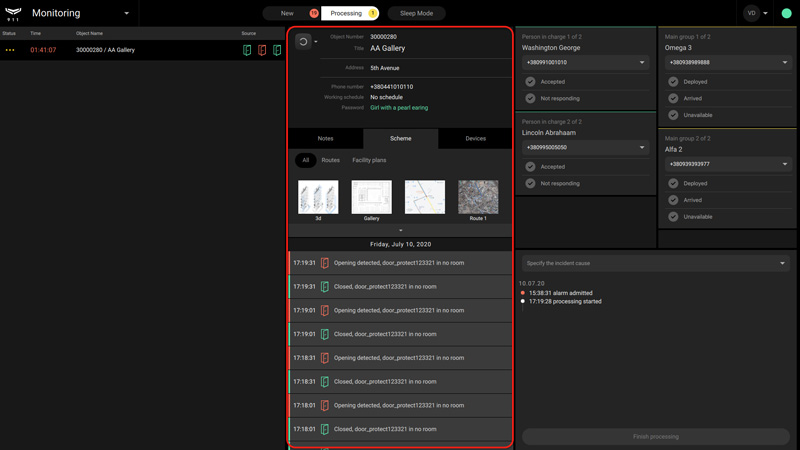
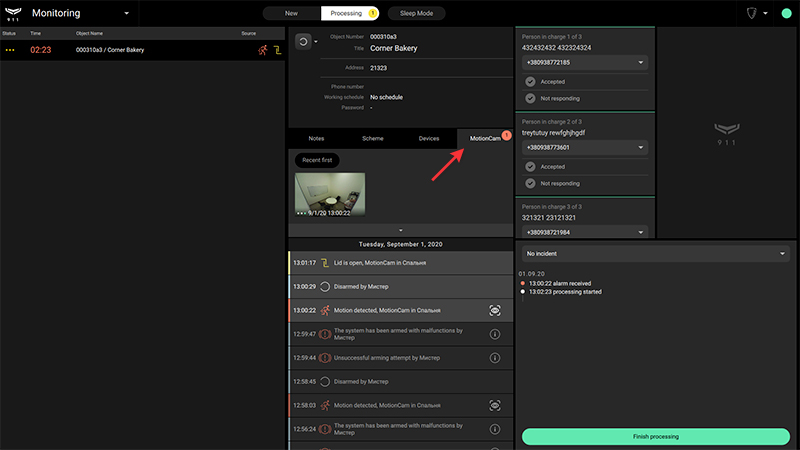
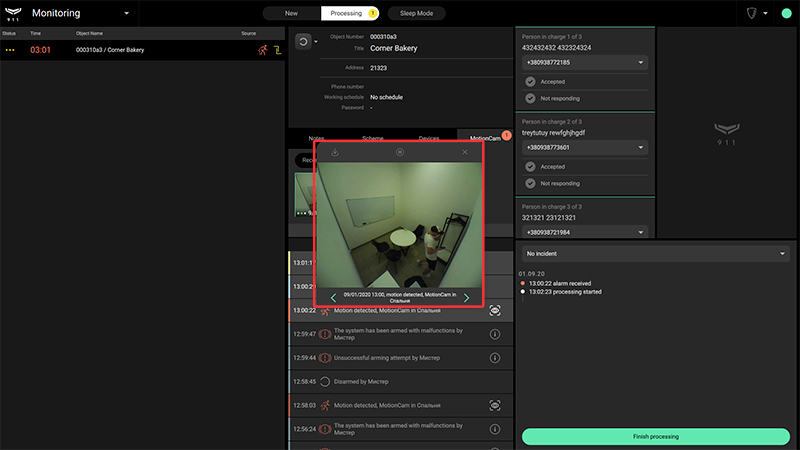
If there are MotionCam detectors with a photo camera on site, the operator can view a series of photos taken by MotionCam to verify the alarm. Pictures are displayed in the MotionCam tab in chronological order, starting with the most recent.
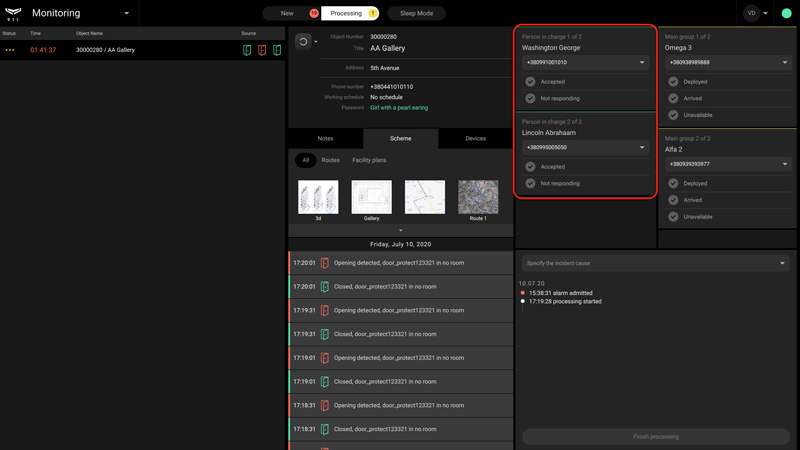
The operator can contact one of the persons in charge indicated in the object card — when processing an alarm, their contacts are displayed at the top right of the screen. Based on the results of communication, the operator checks the Accepted box — if it was possible to contact and if the person accepted the information. If there is no communication with the person in charge, then the operator checks the Not responding box. Use the green arrows to switch between persons in charge.
The rapid response units assigned to the object are displayed on the right side of the screen under the persons in charge. When communicating with the rapid response unit, the operator checks if the group has been Dispatched, Arrived, or is Unavailable. Use the yellow arrows to switch between assigned groups.
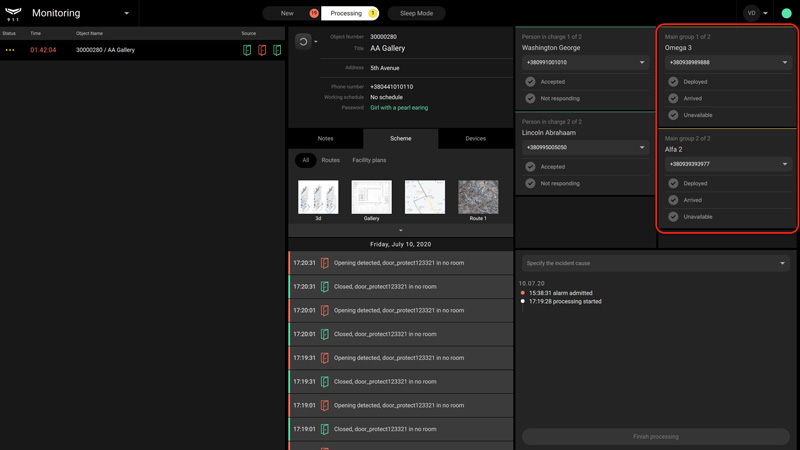
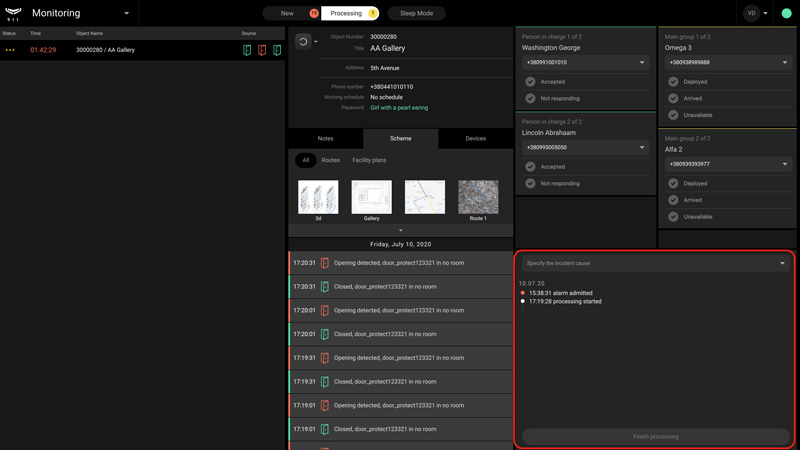
The incident processing log is displayed in the bottom right corner of the screen. For each record in the log, the operator can leave a comment by clicking on the record. At the top of the processing log, you can select the cause of the alarm (from the drop-down list) and complete the processing.
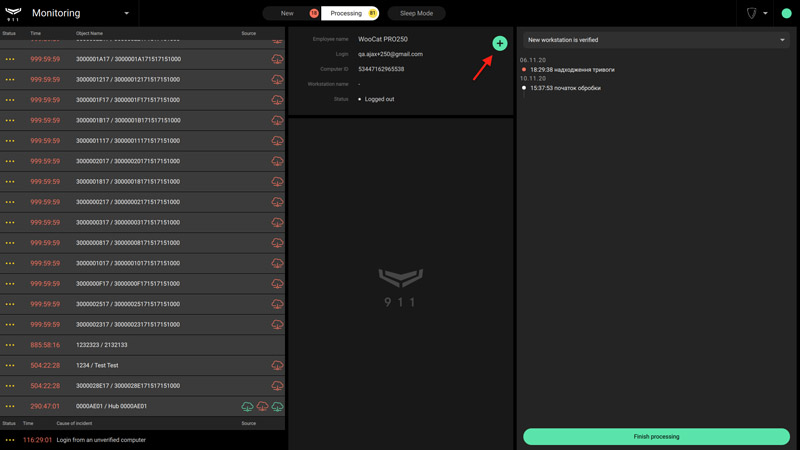
When processing an incident related to the operator’s workstation, you can indicate its cause from the drop-down list and, if necessary, add a comment. You can instantly verify the workstation by processing an incident on the operator login from an unverified computer. To do this, click the “+” button next to the operator details.
After the incident is processed, it closes and goes to the Journal where the log of its processing is stored. You cannot return to incident processing.
Sleep Mode
The Sleep Mode tab lists objects with alarms ignored. An operator or another employee who has access to the monitoring module can switch the object to Sleep mode if engineering work is carried out at the site or false alarms are received from it. You can switch an object to Sleep mode via the security management menu.
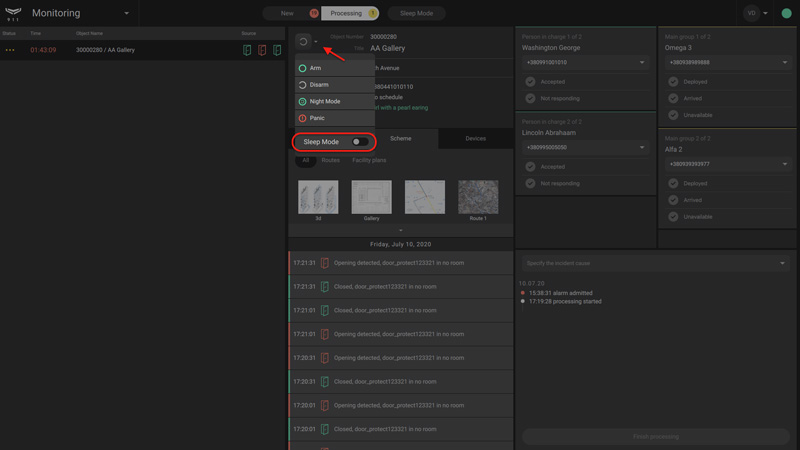
When switching an object to Sleep mode, the operator indicates the time after which the object restores to normal mode — selects a period of up to 30 minutes or indicates it manually.
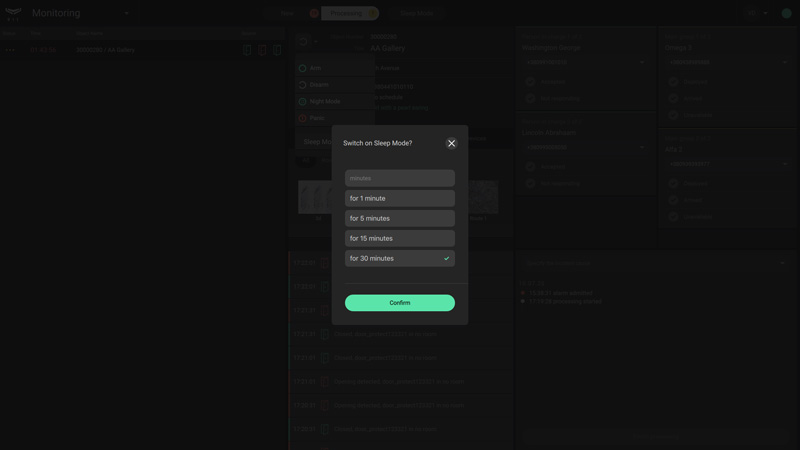
While the object is in the Sleep mode, the security mode icon displays an hourglass. At this time, 911 ignores alarms and events at the object — they are not displayed in the Incidents tab but are recorded in the Journal.
Journal
Module access: Company owner, Senior CMS Engineer, Engineer, Head of operators, Operator
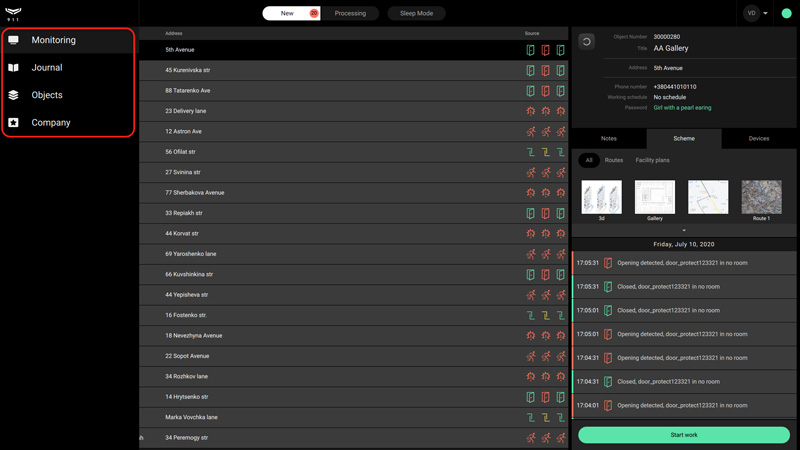
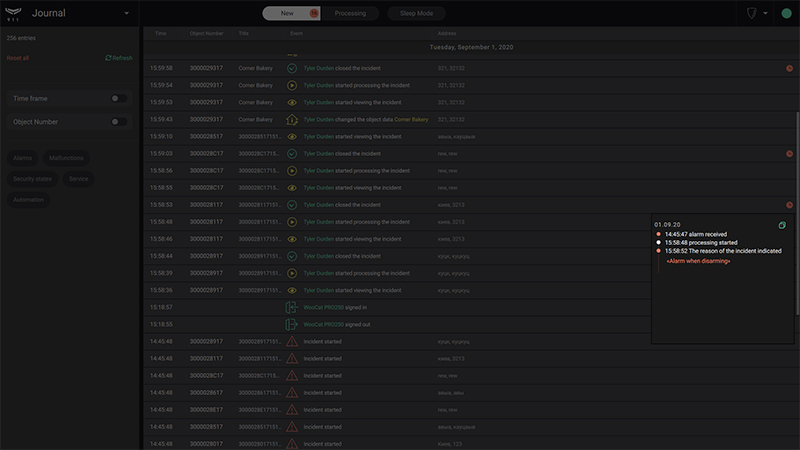
911 maintains a general log of alarms and events for all objects of the company, and also allows to generate reports on the availability of hubs and operators. To go to the log, select Journal in the list of modules in the upper left corner of the screen.
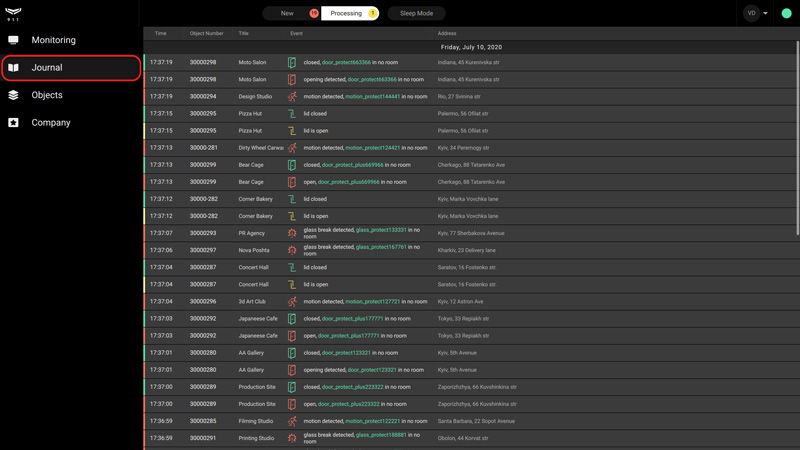
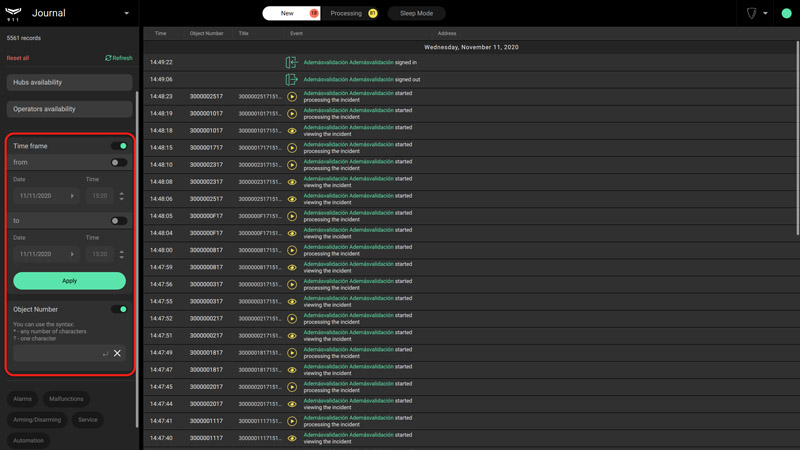
All notifications from all objects of the company are displayed in chronological order on the right of the log screen. To set the time interval for notifications, their type, or number of a specific object, use filters to the left of the log. Above the filters, the number of filtered records, the filter reset button, and the log refresh button are displayed.
To quickly filter notifications for the specific device, room, or user, click on them in the notification list. In addition, you can filter all notifications for this object by clicking on the object number in the column.
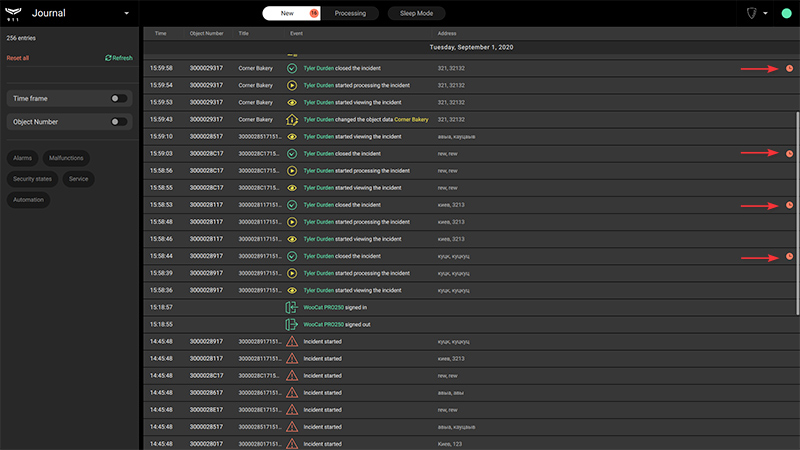
To open the incident processing log, click on the clock icon on the incident closure record.
Availability reports
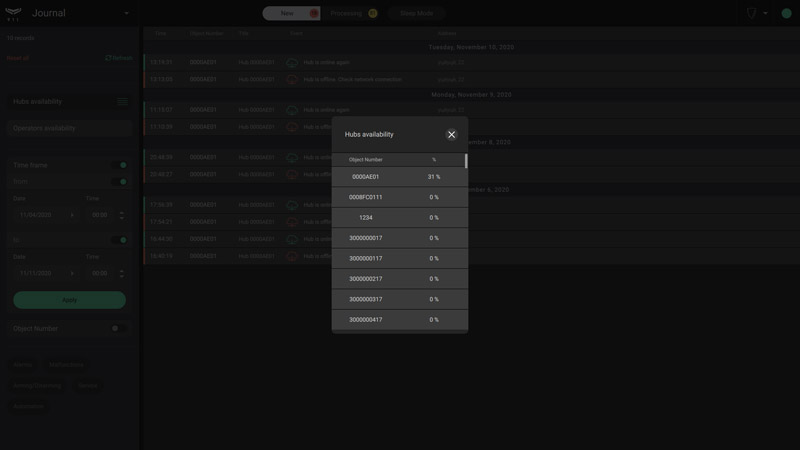
911 allows generating reports to show the total security systems online time (Hub availability). You can also generate a report on the monitoring station’s capacity to handle alarms (Operators availability). To generate reports on the availability of hubs, select the Hub availability filter. By default, the report is generated for the last 7 days. If necessary, the period can be changed in the Time period filter. The object number can be set as well.
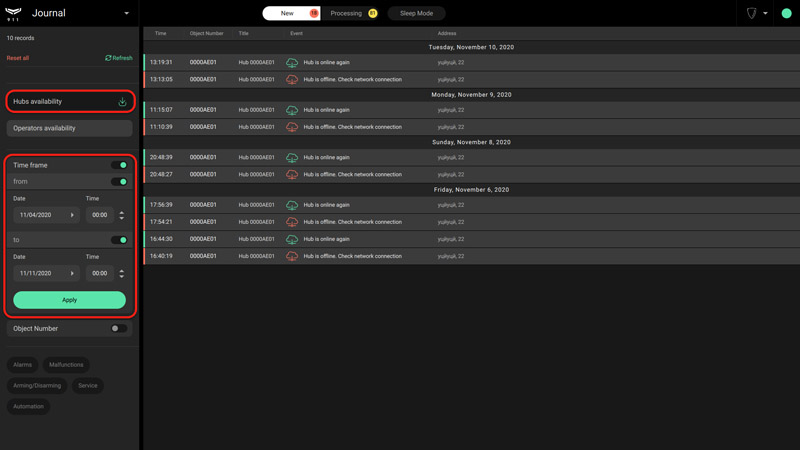
If the filter by object number is active, then the availability report will be generated only for the selected objects (single object or those containing the specified part in the number). If the filter by object number is inactive, the report will be generated for all hubs of the company. After setting the conditions, press the button for generating a report next to the filter name — the report will open in a new window.
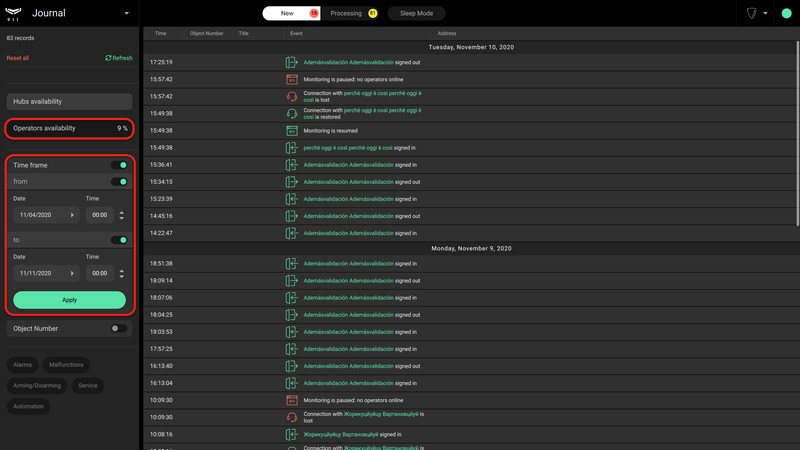
The report on the availability of operators takes into account only workplaces verified in the Company module. To generate a report on operators’ availability, click on the filter Operators availability. A list of events will appear on the right:
- Operator login means the system has registered the login to the operator’s account.
- Operator logged out means the system has registered the log out from the operator’s account.
- Loss of communication with the operator — the system has detected a loss of Internet connection with the operator’s computer.
- The operator is online again — the system detected the restoration of the Internet connection with the operator’s computer.
- Monitoring is paused — the system cannot find any available operator.
- Monitoring is resumed — at least one operator is available in the system.
Events can be filtered by time — by setting the range below and clicking Apply. To generate a report based on the specified parameters, click the report generation button next to the filter name.
Objects
Module access: Сompany owner, Senior CMS Engineer, Engineer, Head of operators, Operator
The Objects module is designed to administer security objects within 911: adding new hubs, tracking changes, or adding information that may be necessary for alarm processing. To go to the module, select Objects in the list of modules in the upper left corner of the screen.
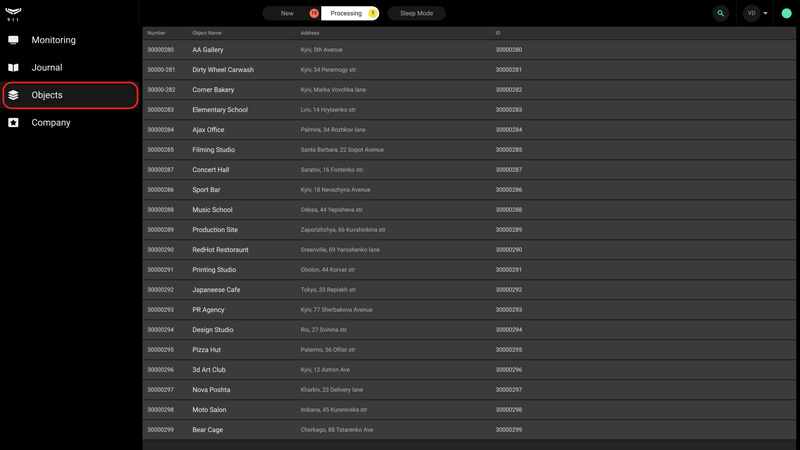
An object in 911 is a client security system controlled by a single hub. When adding a new object, the operator enters the hub identifier and assigns a number and a name to it. All devices connected to the hub are automatically bound to the object and displayed in the Equipment tab.
Only one hub can be bound to one object.
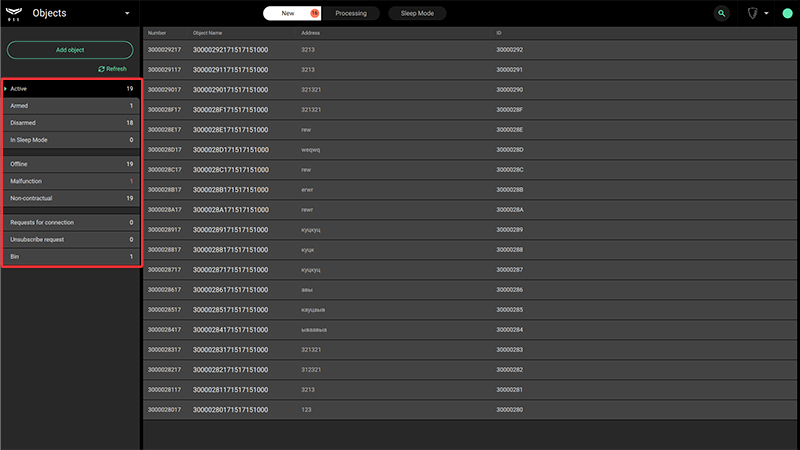
The module screen consists of two parts: a list of objects on the right and a sorting menu on the left. The list of objects shows their numbers in 911, names, addresses, and hub identifiers (IDs). The following items are available in the sorting menu:
- Active — the list of all objects within 911, aside objects in the bin.
- Armed — the list of objects with the currently armed security system.
- Disarmed — the list of all objects with the currently disarmed security system.
- In sleep mode — the list of objects with muted alarm notifications.
- No contract — the list of objects with empty information about the contract with the company. Contract information can be added at any stage.
- Offline — the list of objects where the hub is offline.
- Malfunctions — the list of objects where the security system reports a malfunction: low battery indicator, failed attempts to arm the detector, sensor cleaning notification, etc.
- Monitoring requests — the list of objects from which a monitoring request was submitted via the Ajax app.
- Unsubscribe requests — the list of objects from which an unsubscribe monitoring request was submitted via the Ajax app.
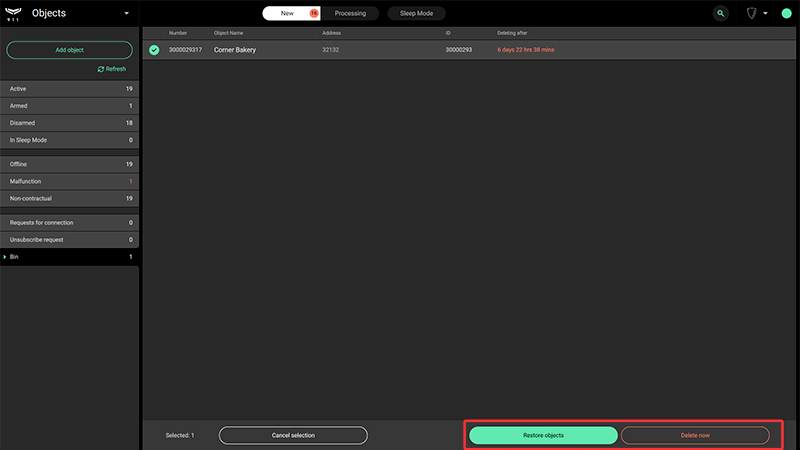
- Bin — the list of deleted objects. Objects are deleted from the bin automatically after 7 days.
Adding a new object
There are three ways to add a new object to 911: by accepting a monitoring request from the Ajax app, transferring the object from Translator to 911, or manually — using the QR code.
Adding an object using the QR code
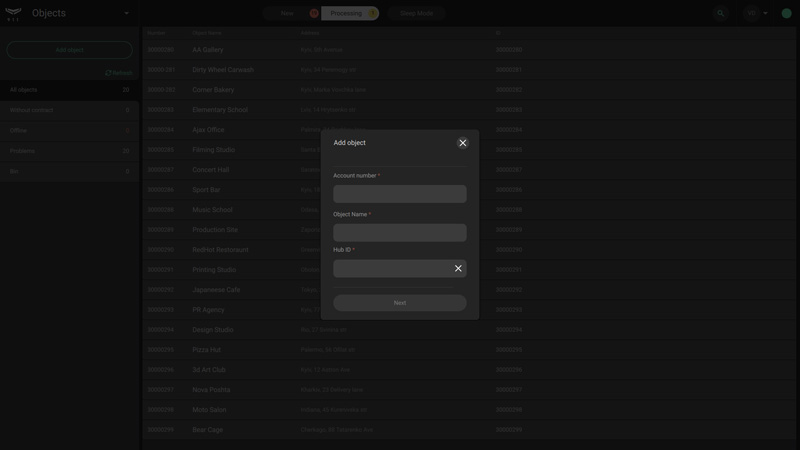
In the Objects module, click the Add Object button to create a new object card. In the form that opens, type in the number and name of the object (the company sets the format), as well as the 20-digit hub identifier (located under the QR code, layout is xxxxx-xxxxx-xxxxx-xxxxx).
You can add an object to 911 using QR code under two conditions: the hub should be online, and there should be no users on it. When adding an object, a card is created with all the information necessary for alarms processing: address, contacts, room diagrams, road maps, responsible persons, comments, etc.
Adding an object via a monitoring request
A monitoring request is sent through the Ajax app by a hub user with administrator rights or a PRO user with access to the hub settings. The lists of requests for monitoring and monitoring unsubscribe are displayed in the corresponding tabs of the Objects module and the Hubs menu of the Company module.
Click on the Monitoring requests menu in the Objects module — a sorted list of hubs that sent a request for monitoring by your security company will appear on the screen. Select the required hub and click Accept Request. For this hub, an object card will be automatically created to fill in with information. Enter the number, name of the object, and click Save, after which a new object will appear in 911.
Object card
Tabs in the object card contain security system data that can be supplemented and edited.
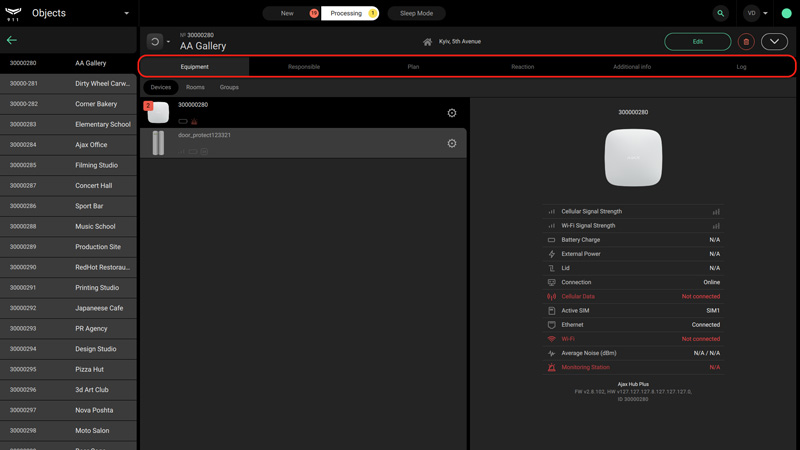
Object data is divided into tabs:
- Equipment — a list of devices, virtual rooms, and security groups of an object. When choosing a device, the screen of its states opens on the right, where the battery charge, the hub connection status, the tamper status, and other data on operation within the Ajax system are indicated.
- Responsible — names and phone numbers of people whom the operator can contact during an alarm processing.
- Plan — a map of entrances, room facility plans, and riding directions to the object.
- Reaction — menu for assigning the main and reserve rapid response units to the object. Rapid response units selected in this menu are created in the Company module.
- Additional info — technical information about the object: dates and details about installation, connecting to the central monitoring station, and data of the object engineer.
- Log — the event log of an object.
Editing a card and deleting an object
The following is located above the informational tabs of the object: a menu for managing security modes, number, name, and address, buttons for editing, deleting, and a button that expands the contacts and details of the object operation.
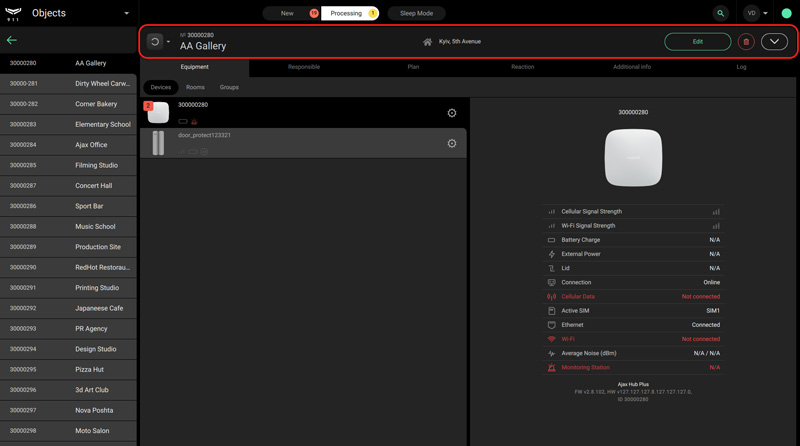
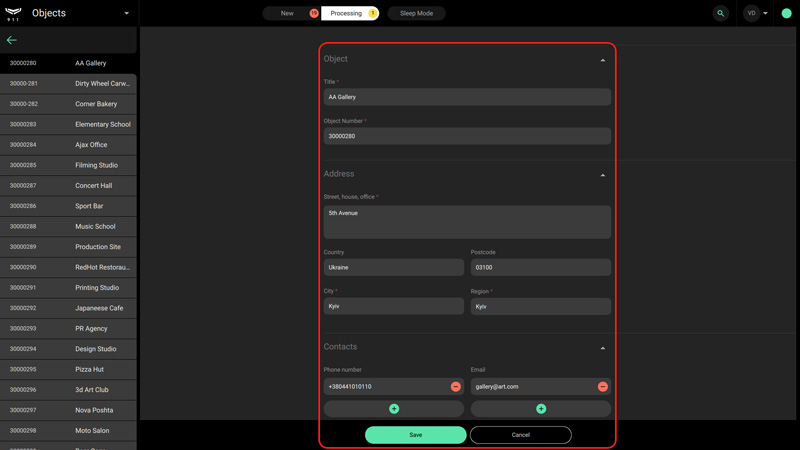
Click Edit to change the name or number of the object, indicate its location, contact information, specify password for cancelling the alarm, add a work schedule and enable the alarm when disarming after working hours, or specify the contract data. This information will be displayed in the Monitoring module during alarm processing. Required fields are marked with an asterisk. After entering or editing data, click Save.
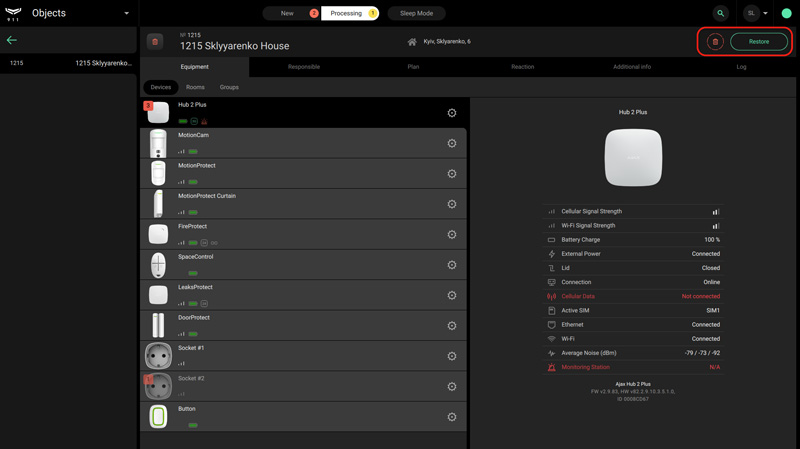
To delete an object, click the button with the trash icon. The object will be moved to the bin and automatically deleted after 7 days. During this time, the object can be returned to the Active list by going to Bin in the Objects module and clicking Restore.
To delete objects without waiting 7 days, select an object in the Bin and click the Delete Now button at the screen’s bottom.
Company
Module access: Company owner, Senior CMS Engineer, Engineer, Head of operators, Operator
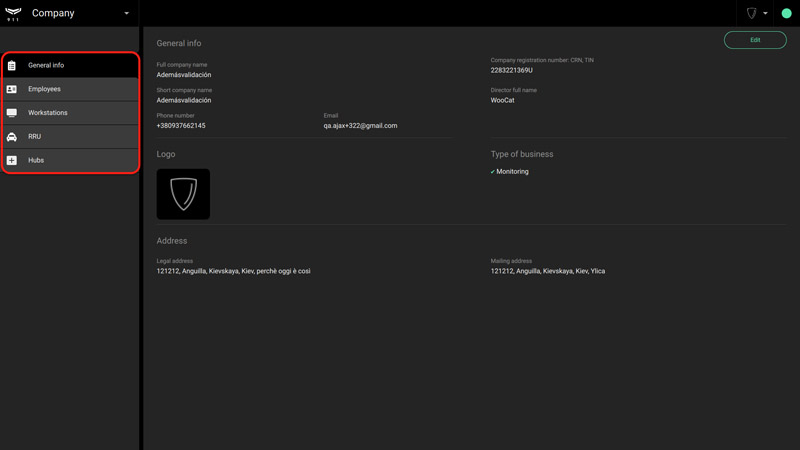
The Company module is designed to organize the work of a security company in 911: adding employees, assigning roles, and forming rapid response units. Menus on the left side of the screen are provided for these tasks as follows:
- General info — information about the company specified during registration. It may be changed by the owner of the company.
- Employees — the administration menu for employee accounts.
- Workstations — a menu for registration of computers on which operators work. It helps to calculate the operators availability and track operators’ logins from unverified devices.
- RRU — the administration menu for the rapid response units.
- Hubs — the administering menu for the hubs bounded to the company. This menu contains all the company’s hubs, including objects in the Translator, monitoring requests, unsubscribe requests and 911 objects.
Adding, editing, and deactivating employees
To be added, an employee should have a PRO account!
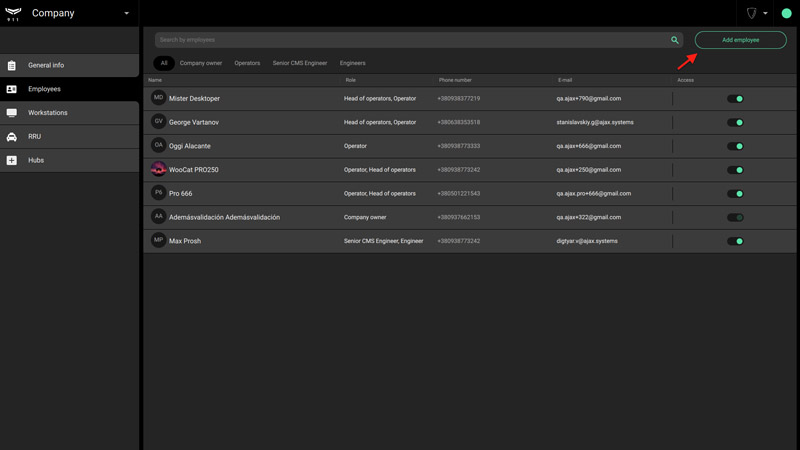
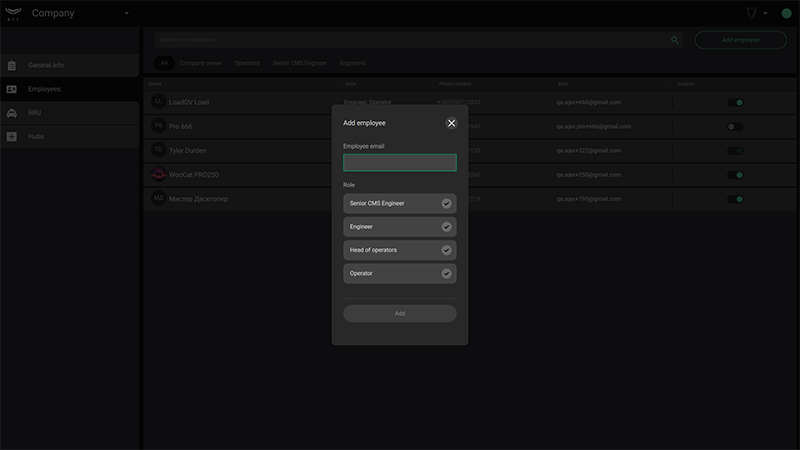
You can add a new employee in the Employees menu by clicking the Add employee button in the upper right part of the screen. In the window that opens, enter the employee email specified when registering their PRO account, select their role from the drop-down menu below, and click Add.
To edit data or delete an employee, click on the employee in the list. A window with details and the Edit and Delete account buttons will appear on the right.
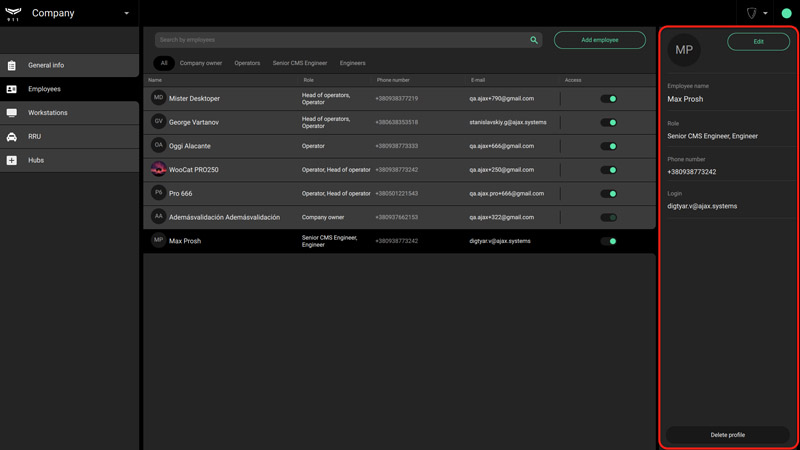
To quickly find an employee in the list, use the search or sort by role.
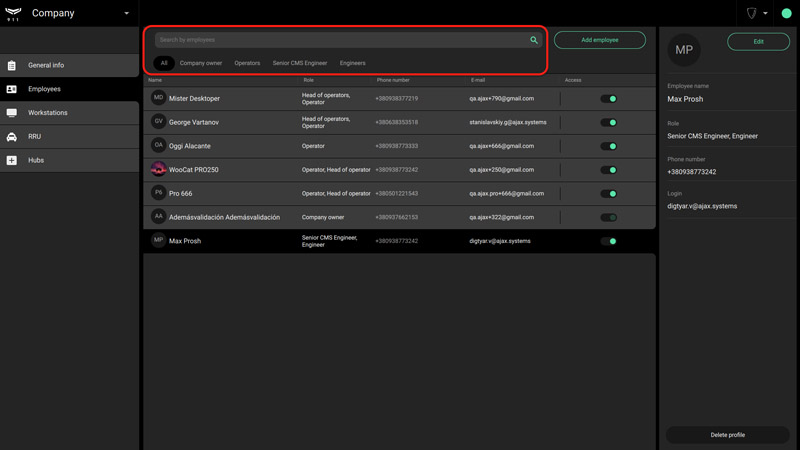
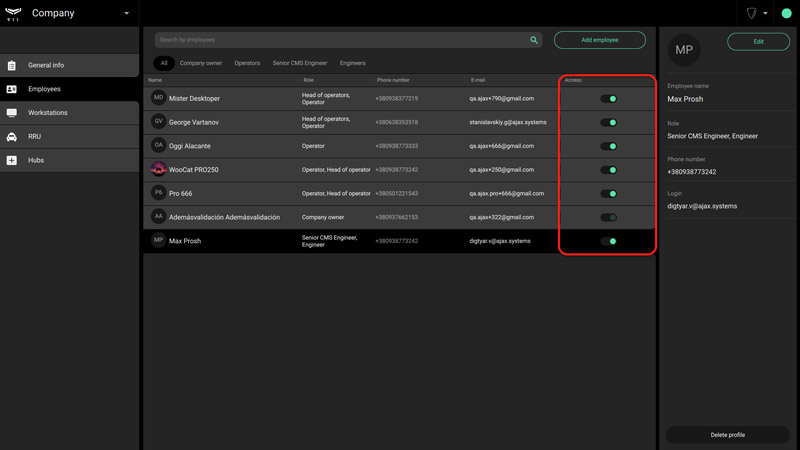
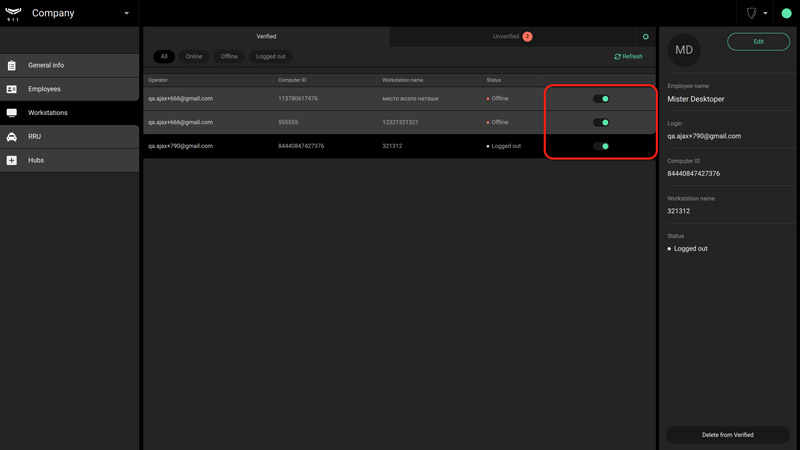
911 allows you to temporarily deactivate an employee account without deleting it from the system — in case of vacation or sick leave. To do this, switch the toggle opposite the name of the employee to an inactive position. A temporarily deactivated employee does not have access to 911 modules that are available to the company.
Workstations
The Workstations menu allows to assign a unique identifier to each computer and link an employee account to it. This data is used when generating the operators availability report.
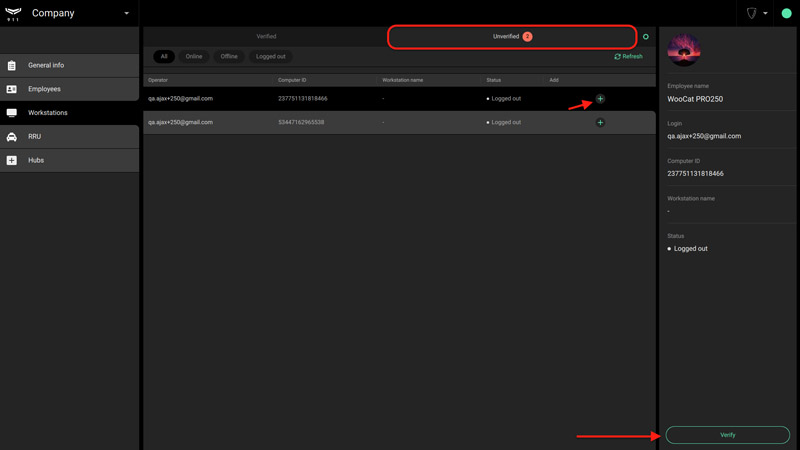
To assign a workstation to an operator, you need to verify his login to the account. This can be done by clicking “+” located in line with the operator’s email in the Unverified tab. When clicking on the entry, full account information opens on the right, and there is also the Verify button.
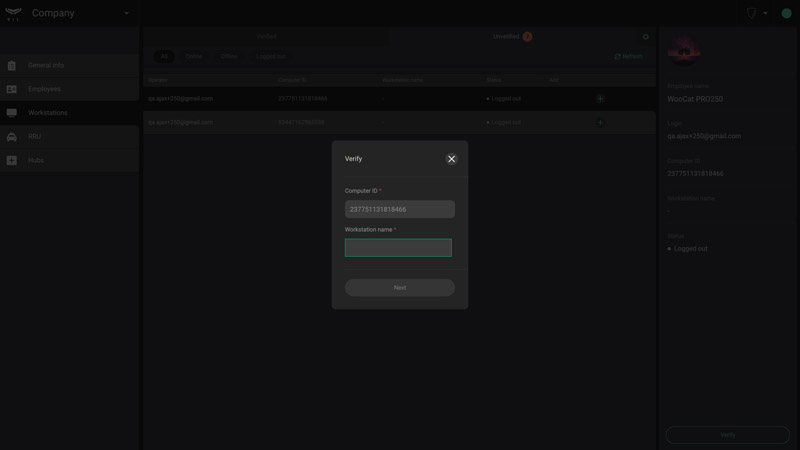
When verifying a workstation, it should be named for convenient indication in the event log. The computer ID is assigned automatically.
After verifying a new workstation, the operator account with information about the computer is displayed in the Verified tab. A workplace can be temporarily disabled (similar to an employee account) or deleted by selecting an entry in the list and clicking Remove from Verified in the side menu.
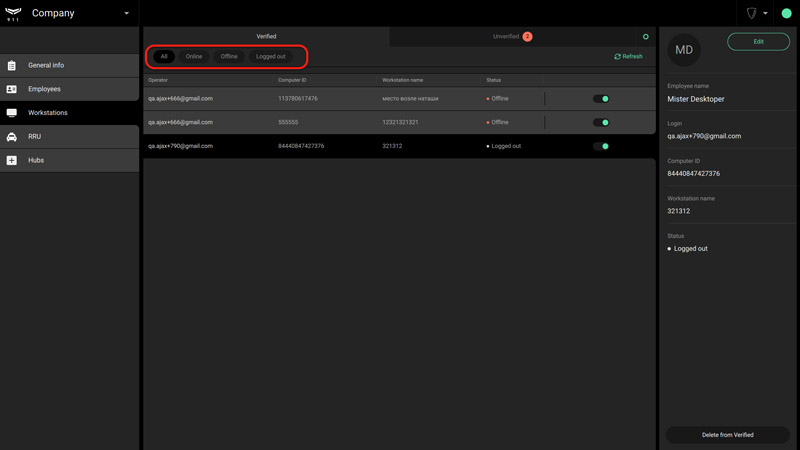
For convenient navigation through the list of workstations, filters are provided at the top of the screen.
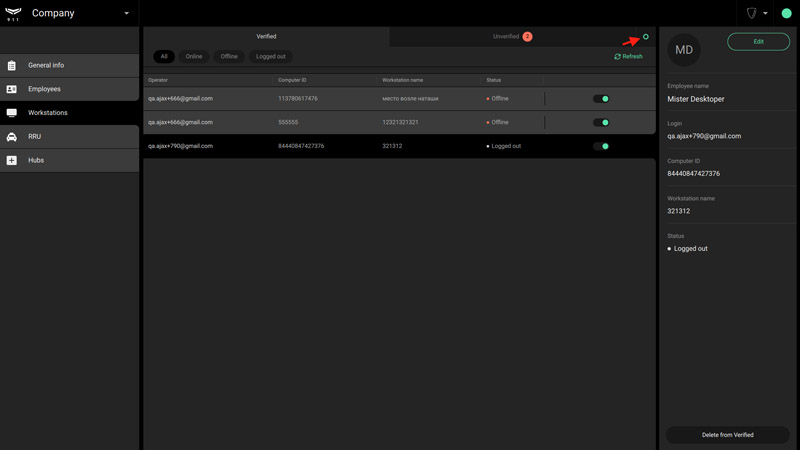
In the Workstations menu, you can select events to generate incidents in the Monitoring tab. To select events generating incidents — click on the gear icon next to the Unverified tab.
In the window that opens, select the types of events:
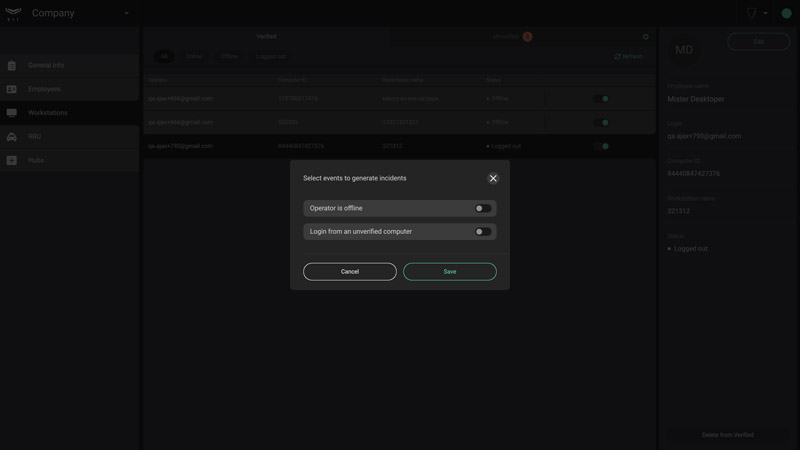
- Operator is offline — the system has detected no Internet connection with the operator’s computer.
- Login on an unverified computer — the system has recorded a login from a computer that is not verified by the supervisor.
Adding, editing, and deactivating a Rapid response unit
You can add a new rapid response unit in the RRU menu by clicking the Add RRU button in the upper right part of the screen.
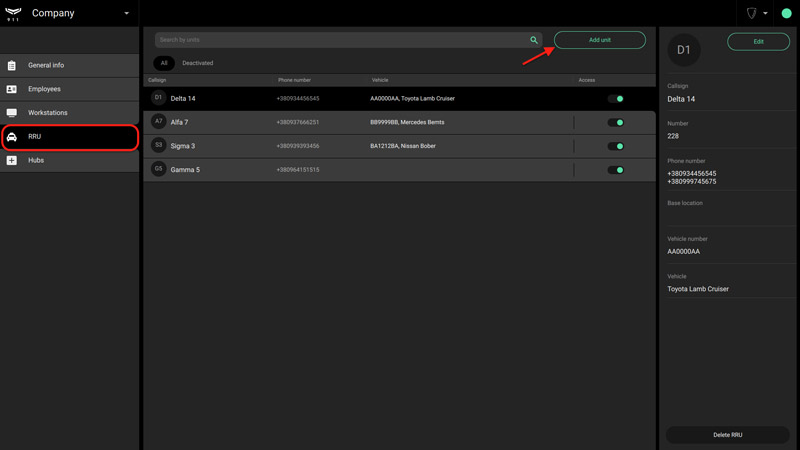
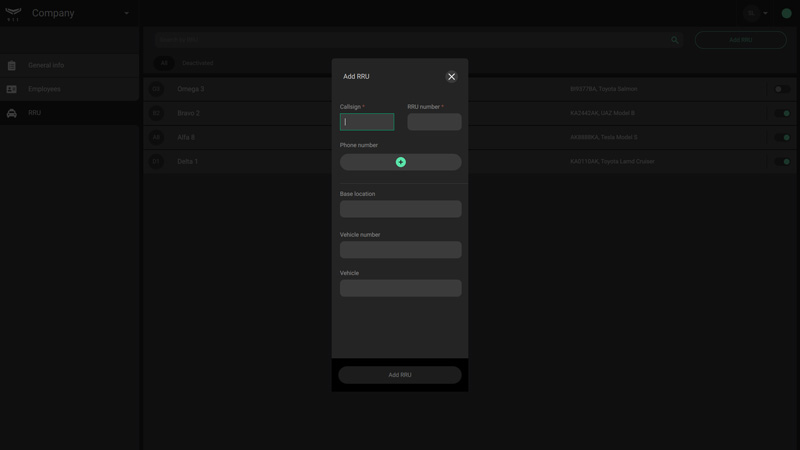
In the window that opens, fill out the form with the crew data that will be displayed in the Monitoring module when processing an alarm and attaching a group to an object in the Objects module. You can add two phone numbers to one crew. Required fields are marked with an asterisk.
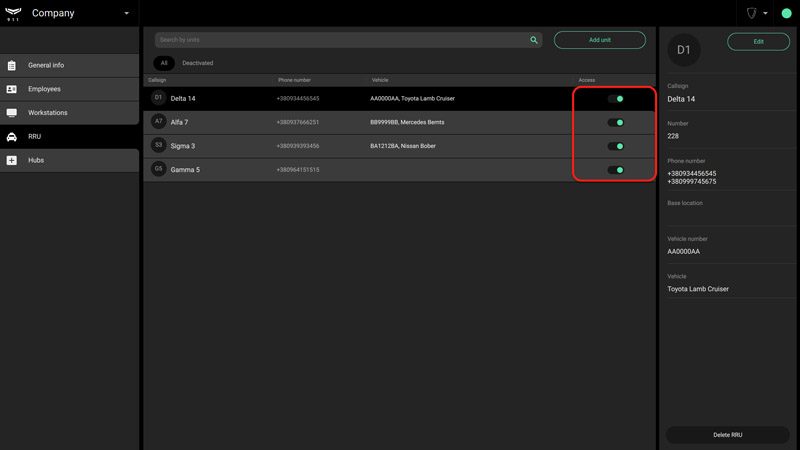
It is possible to deactivate the rapid response unit temporarily without removing it from the system. To do this, switch the toggle in the line of the selected rapid response unit into an inactive position.
Hubs
The Hubs menu is designed for administering hubs, bound to a company: accepting requests for monitoring/unsubscribing from monitoring, adding/removing objects in 911, and transferring objects from Translator to 911.
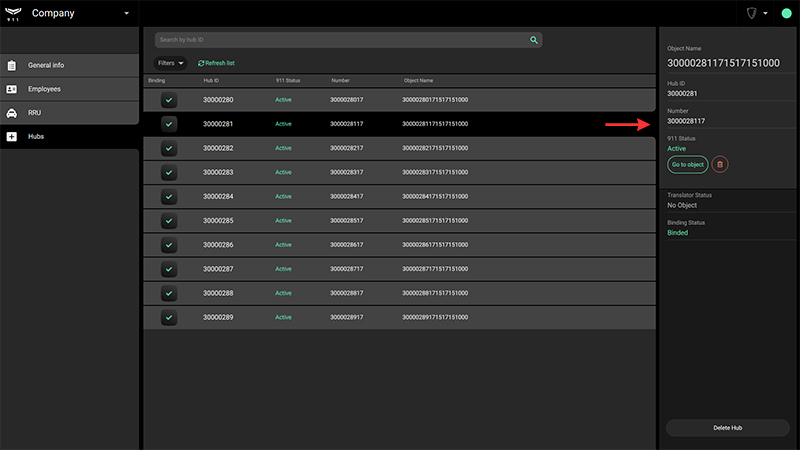
Hubs are displayed in the menu as a list with the hub identifier, object statuses, number, and name of the object in 911 indicated.
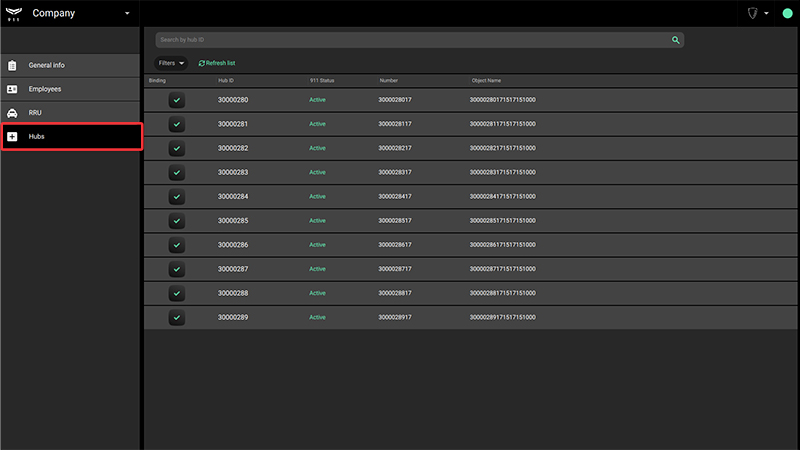
The hub status is displayed with an icon at the beginning of the line. Icon meanings:
 |
The object is created and monitored in 911 |
 |
The object is marked to delete |
When selecting a hub in the list on the right, a details window opens, where there are buttons for creating/deleting an object in 911, going to the object card, and deleting the hub from the company account. Deleting from the company account means that the object will be deleted in both 911 and Translator.
