Ajax Systems provides seamless integration of video surveillance with third-party monitoring software for central monitoring stations (CMSs). Available solutions meet different needs, providing flexibility and reliability. The following integration features are currently available:
- Events to CMS from Ajax video devices
- Alarm verification by video scenario
- URL to view in PRO Desktop – visual verification of camera detection events
- Integration via ONVIF/RTSP for Ajax video devices
This article describes how to configure existing integration types. It will be updated as new features are released.
Events to CMS from Ajax video devices
What a CMS receives: data in the format of CID and SIA codes.
What a CMS requires: connecting the system to the CMS via Ajax Translator or cloud signaling.
CMS software that supports the feature:
- ABsistemDC(NG)v2 by Alarm Automatika
- AM/Win by INSOCAM
- Bykom by Bykom
- CAMS by Suretek
- eLipse by Logetel
- evalink talos by Sitasys
- FullCenter by FullTime
- Gemini-Sense by Bold Communications
- Horus by AzurSoft
- IMMIX CS and GF platforms by Immix
- ISM by Innovative Business Systems
- Kronos by Next! s.c.
- LISA by Dr. Pfau Fernwirktechnik GmbH
- Listener by ORYX
- Manitou by Bold Group
- MASterMind by MAS
- Moniplus by Monitoreo Plus
- Patriot by Patriot Systems
- Point Security Service by Point Security Software Srl
- SBN by Innovative Business Software
- Securithor by MCDI Security Products
- Sentinel by Monitor Computer Systems
- SEON by SEON GmbH
- Softguard by Softguard Technologies Corp
- Stages by Bold Group
- V1 and F1 by ESI
- WBB by T2i
Ajax Translator receives a message from an Ajax system, decrypts it, and converts it into an event protocol supported by the CMS software. Cloud signaling is a service built into Ajax PRO Desktop that sends events from an Ajax system via the SIA DC-09 (SIA-DCS/ADM-CID) protocol. This message may contain additional information, such as web links, geographic coordinates, or other standardized data. The following events can be transmitted via Ajax Translator and cloud signaling:
- AI detection of a person, pet, or vehicle
- Motion detection
- Server connection
- Storage health
- Battery and external power source health
- Hardware errors
- Tamper alarm
- Software updates
When using Ajax Translator, please note that the feature must be enabled at the company level. To do so, contact technical support. Events from video devices will be sent to CMS with the same account number as the hub in the same space.
Alarm verification by video scenario
What a CMS receives: a series of 10 photos taken by a third-party camera connected to an Ajax NVR or by an Ajax camera when an Ajax detector added to the scenario is triggered.
What a CMS requires: connecting the system to the CMS via Ajax Translator or cloud signaling.
CMS software that supports the feature:
- ABsistemDC(NG)v2 by Alarm Automatika
- AM/Win by INSOCAM
- Bykom by Bykom
- FullCenter by FullTime
- Gemini-Sense by Bold Communications
- IMMIX CS and GF platforms by Immix
- ISM by Innovative Business Systems
- Kronos by Next! s.c.
- LISA by Dr. Pfau Fernwirktechnik GmbH
- Listener by ORYX
- Manitou by Bold Group
- MASterMind by MAS
- Moniplus by Monitoreo Plus
- Patriot by Patriot Systems
- SBN by Innovative Business Software
- Securithor by MCDI Security Products
- Sentinel by Monitor Computer Systems
- SEON by SEON GmbH
- Stages by Bold Group
- V1 and F1 by ESI
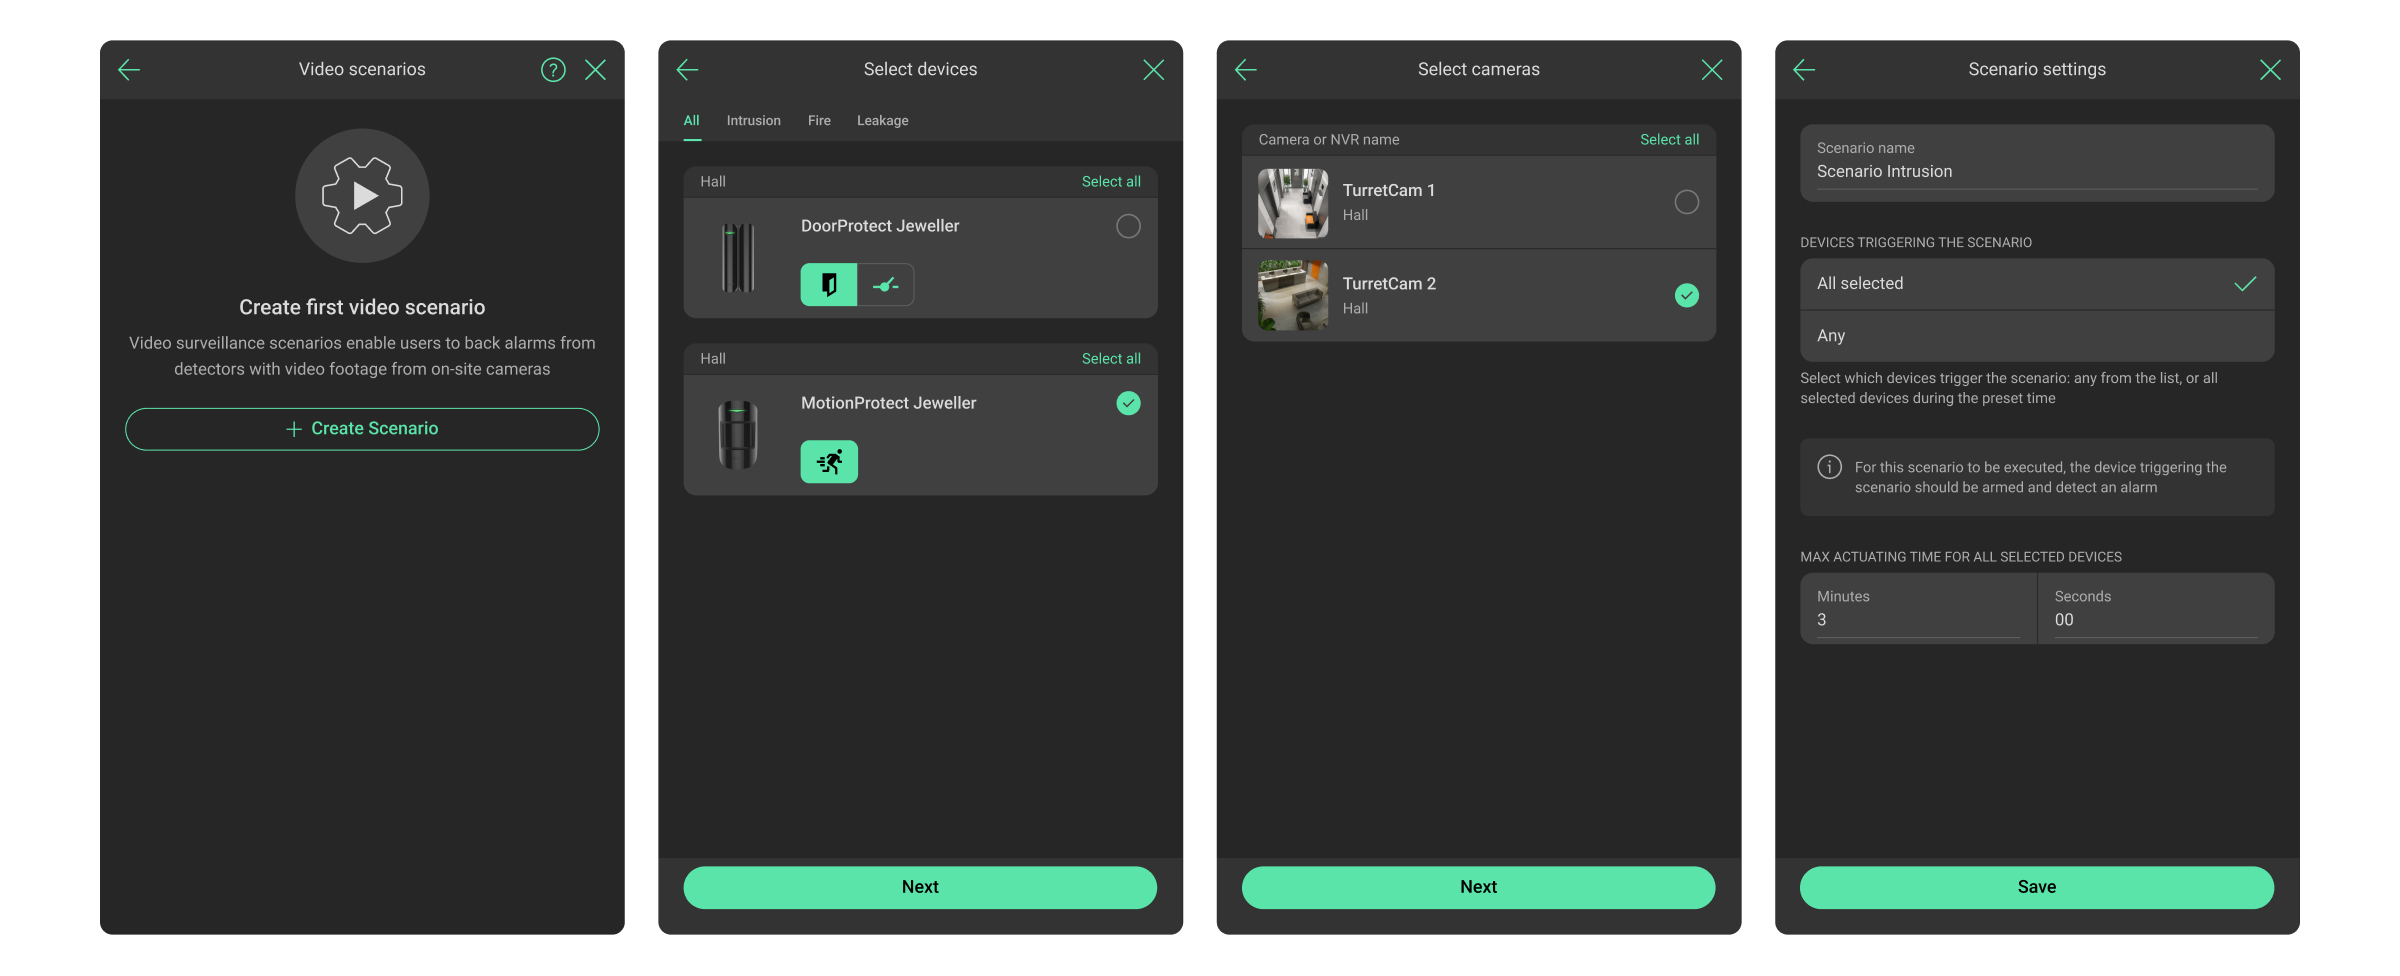
Ajax video surveillance devices can help verify alarms in the system. Video scenarios allow you to confirm alarms using cameras installed at the facility.
Cameras added to the system can be configured to respond to alarms from one, several, or all connected devices. Combined detectors can register various types of alarms. You can configure the detectors to respond to all types of alarms, several types, or only one.
To create and configure a video scenario:
- Log in to an Ajax app.
- Select the required space.
- Click on the gear icon
to go to Settings.
- Go to the Video scenarios menu.
- Click the Create scenario button if you are creating a scenario for the first time or the Add scenario button if you have already created scenarios in the system.
- Configure the video scenario according to this article.
Visual verification in Ajax PRO Desktop via URL
What a CMS receives: link to the video from an Ajax camera/NVR in the CMS event. The link opens the special view window in Ajax PRO Desktop, which shows a live stream from the camera and archive recording at the time of the event.
What a CMS requires: connecting the system to the CMS through cloud signaling via the SIA DC-09 protocol and Ajax PRO Desktop 4.20 and later.
CMS software that supports the feature:
- AM/Win by INSOCAM
- Stages by Bold Group
- LISA by Dr. Pfau Fernwirktechnik GmbH
- Patriot by Patriot Systems
- ISM by Innovative Business Systems
- Gemini-Sense by Bold Communications
PRO can enable visual verification of detection events from cameras. Monitoring companies that use cloud signaling can open and view videos from Ajax video devices. Videos are captured after the alarm is activated by the camera’s built-in motion detector or AI-powered object recognition directly in Ajax PRO Desktop.
To configure visual verification of detection events:
- Log in to Ajax PRO Desktop.
- Open the Company module.
- Click on the CMS connection menu.
- Click on the gear icon
to go to the required receiver settings.
- Choose the URL to view in PRO Desktop option in the Visual verification of cameras detection events field.
- Click Save.
When an Ajax video device is triggered, the CMS receives a URL that opens a new browser window. This URL leads to the Ajax PRO Desktop video wall widget, which displays two video streams: a live video and a recorded video segment.
Note that the operator can open up to five windows simultaneously.
Visual verification via URL without Ajax PRO Desktop
What a CMS receives: link to the video from an Ajax camera/NVR in the CMS event. The link opens the special view window in a new browser window, which shows a live stream from the camera and archive recording at the time of the event. Installation of PRO Desktop is not required.
What a CMS requires: connecting the system to the CMS through cloud signaling via the SIA DC-09, Microkey, and Manitou protocols.
CMS software that supports the feature:
- AM/Win by INSOCAM
- Stages by Bold Group
- LISA by Dr. Pfau Fernwirktechnik GmbH
- Patriot by Patriot Systems
- ISM by Innovative Business Systems
- Gemini-Sense by Bold Communications
- evalink talos by Sitasys
The CMS operator can open and view videos from Ajax video devices without having Ajax PRO Desktop installed. The flow is similar to the visual verification in Ajax PRO Desktop using the URL feature, but the received URL leads to a new browser window, not to the Ajax PRO Desktop video wall widget. The opened window also displays two video streams: a live video and a recorded video segment.
The feature is available in Google Chrome version 64 and later, and Safari version 12 and later.
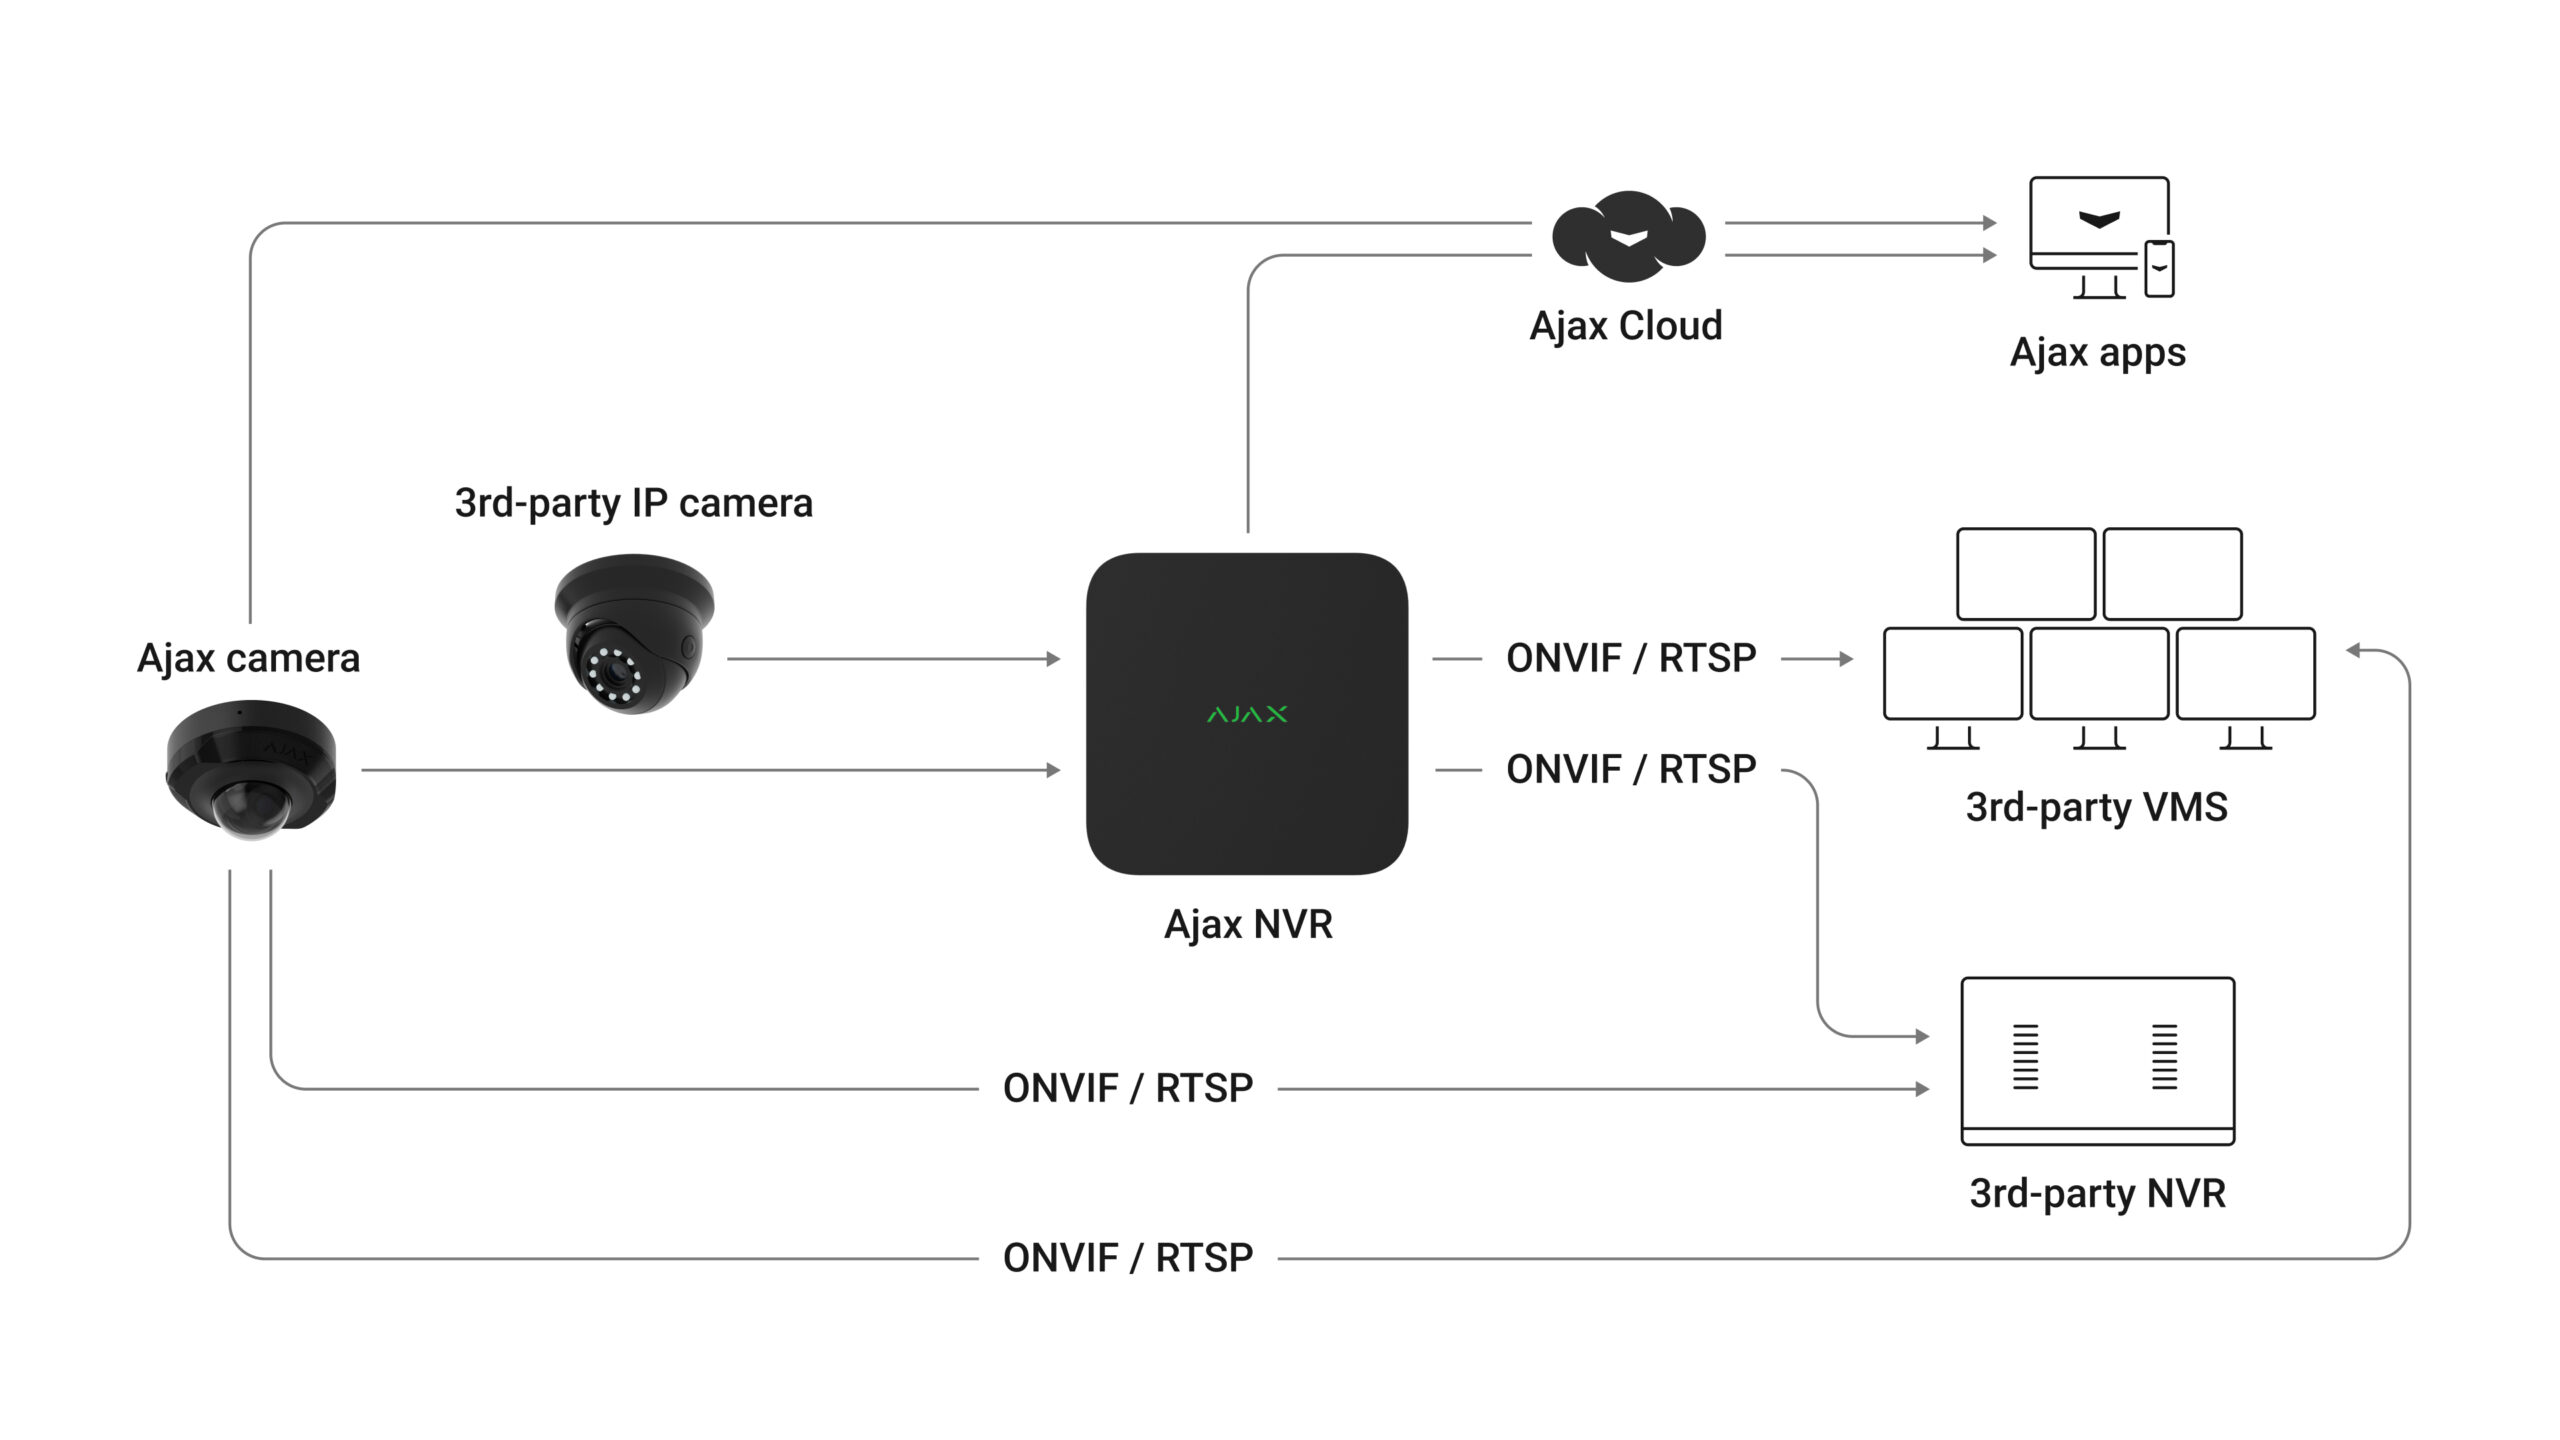
Integration via ONVIF/RTSP for Ajax video devices
What a CMS receives: streaming video and audio via RTSP to third-party VMSs or CMSs through integration modules.
What a CMS requires:
- Ajax PRO Desktop with version 4.20 and later or Ajax Desktop with version 4.21 and later.
- Ajax video device with the following firmware versions:
CMS software that supports the feature:
- ManitouNEO by Bold Group
- MASterMind by MAS
- Sentinel by Monitor Computer Systems
- SBN by Innovative Business Software
- IMMIX CS and GF platforms by Immix
- Horus by AzurSoft
- V1 by ESI
Video management systems (VMS) that support the feature:
- XProtect by Milestone Systems
- Genetec Security Center by Genetec
- Axxon One by AxxonSoft
- Digifort VMS by Digifort
- CathexisVision by Cathexis Technologies
With ONVIF authorization, Ajax cameras and NVRs can now transmit video streams directly to third-party clients using the standard ONVIF protocol, bypassing Ajax Cloud. Ajax video devices support ONVIF Profile S, which enables RTSP-based video and audio streaming, as well as H.264 encoding for video compression. In addition to the basic functionality of Profile S, Ajax video devices support the most requested features included in Profile T:
- H.265 (HEVC) encoding, which improves bandwidth efficiency;
- transmission of motion detection events and AI recognition;
- control over wide dynamic range (WDR) and other image settings.
In this case, Ajax Translator or cloud signaling is not required.
Connecting an Ajax video device to a third-party VMS via ONVIF requires bypassing Ajax Cloud.
The login and password of each user with access to the video stream can be a weak spot.
If you connect Ajax video devices via ONVIF, please keep passwords secure.
To configure connection via ONVIF, in an Ajax desktop app:
- Select the video device you want to connect via ONVIF.
- Click the gear icon
to go to the settings.
- Select the Service settings.
- Click Connection via ONVIF.
- Set up the connection according to this article.


