
Ajax Photo Mode is a service that enables sending events with attached photos to monitoring stations when an Ajax camera or doorbell detects an object or movement. The events containing photographic evidence allow monitoring companies to instantly see the reasons for triggering the video device, which helps to reduce false alarms and unnecessary dispatches.
The service is activated for each device separately and is available in a subscription-based format.
Operating principle
When the video device detects a specified trigger, it sends a series of three photos to the monitoring software. These photos allow monitoring companies to verify the threat and respond accordingly.
The system sends events about the detection of objects specified in the device detection settings: person, pet, vehicle, or any motion. For more information on the detection settings, refer to the corresponding video device user manual on the Ajax Support page.
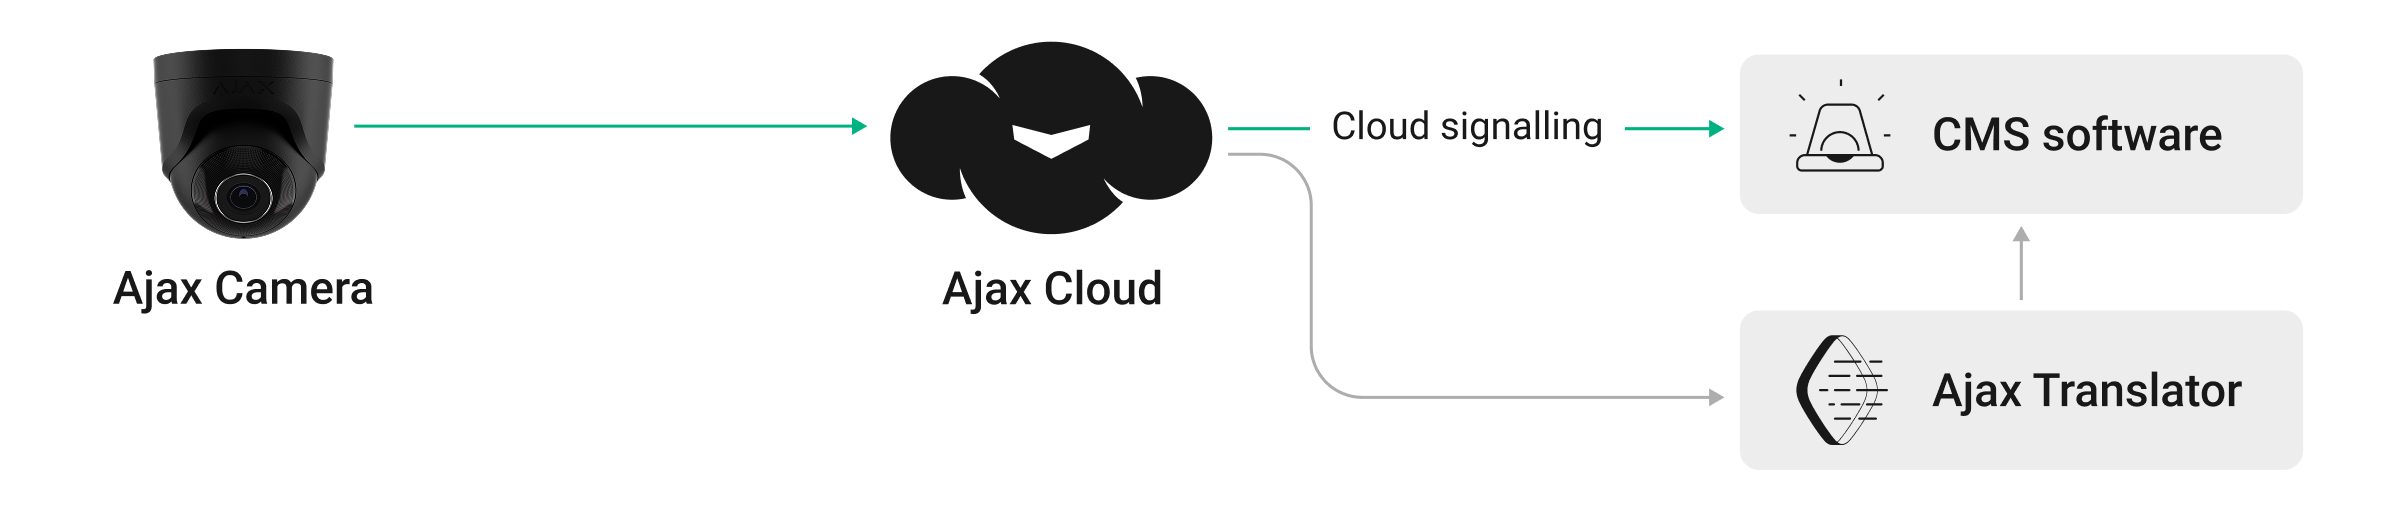
All events are delivered from Ajax Cloud to third-party monitoring software via Ajax Cloud Signaling, Ajax Translator, or Ajax Translator PRO.
The photos can be opened in the monitoring software or via a URL sent to the monitoring station, depending on the software.
Note that the Ajax Photo Mode service is not compatible with SurGuard (Contact ID) and ADEMCO 685 protocols, as they do not support image transmission.
Photo settings
Each detection event captured by the Ajax video device contains a series of three photos.
The series of photos is available for the next 2 hours after the event occurred.
The image resolution is the following:
| Ajax video device | Resolution |
| BulletCam DomeCam Mini TurretCam |
Substream resolution |
| IndoorCam | 640 × 480 px |
| DoorBell | 640 × 480 px |
Supported devices
The Ajax Photo Mode service can be activated for any Ajax camera or doorbell.
The service is not available for Ajax network video recorders.
Note that the service is activated on a per-camera basis.
Prerequisites
Before using the Ajax Photo Mode service, ensure the following prerequisites are met:
- Ajax Services are activated for the company.
- Connection to the monitoring station is established.
- At least one Ajax camera or doorbell is added to the space.
- The device connection to the monitoring station is enabled (the Monitoring parameters in the device settings).
Also, ensure the following settings are configured appropriately in the system:
- The user has provided access to the video devices for the monitoring company (in the Privacy menu in space settings).
- The desired objects or motion detection and corresponding notifications are configured for each camera or doorbell (the Detection and Notifications from camera detectors parameters in the device settings).
Refer to the following sections for more information.
Ajax Services
To use Ajax Photo Mode, Ajax Services must be enabled for your company. Only installers can activate the Ajax Photo Mode service. To do so, they must be registered as a company in Ajax PRO Desktop. For more information about Ajax Photo Mode, please fill out the form, and our representative will contact you shortly.
If the company only provides monitoring services to users, it can not provide additional services. This is because one company cannot be a distributor and an installer at the same time.
Therefore, the monitoring company must create an installation company to provide the extra services.
Connection to the monitoring station
The video device connection to the monitoring station should be configured to ensure the photos are sent and delivered to the monitoring software.
Additionally, in Ajax PRO apps, it is required to set the Monitoring parameters in the device settings:
- Select the required space or object.
- Go to the Devices
 tab.
tab. - Select the required device and go to its Settings
 .
. - Go to the Monitoring settings:
- Set the unique device identifier in the Zone number for CMS events field.
- Enable the Send events on detections to CMS option.
- Click Save to apply the settings.
Privacy settings
The user must provide the monitoring company with access to the video devices so that the company can receive and view the photos from the cameras.
Only users with admin rights can manage Privacy settings in the Ajax Security System and Ajax Desktop apps.
Privacy settings are not available for PRO users and companies in the Ajax PRO apps.
To provide access, the user should do the following:
- Open an Ajax app, select a space, and go to:
- Control
 → Settings → Privacy
- Control
- Go to Companies and select the required company.
- Select the required device category.
- Provide the required permissions for each video device.
- Tap Back to apply the settings.
Camera detection and notification settings
To ensure the photos of only desired detections are sent to the monitoring software from video devices, it is required to configure the Detection and Notifications from camera detectors parameters in the device settings. These parameters should be configured individually for each video device.
To configure the detection and notification parameters, in the Ajax apps:
- Select the required space or object.
- Go to the Devices tab.
- Select the required device and go to its settings :
- Go to the Detection menu: enable the required motion and object detections, and adjust their settings.
- Go to the Notifications from camera detectors menu: enable the notifications for the required objects or motion, and adjust additional settings.
- Tap Back to apply the settings.
For more information on the detection settings, refer to the corresponding video device user manual on the Ajax Support page.
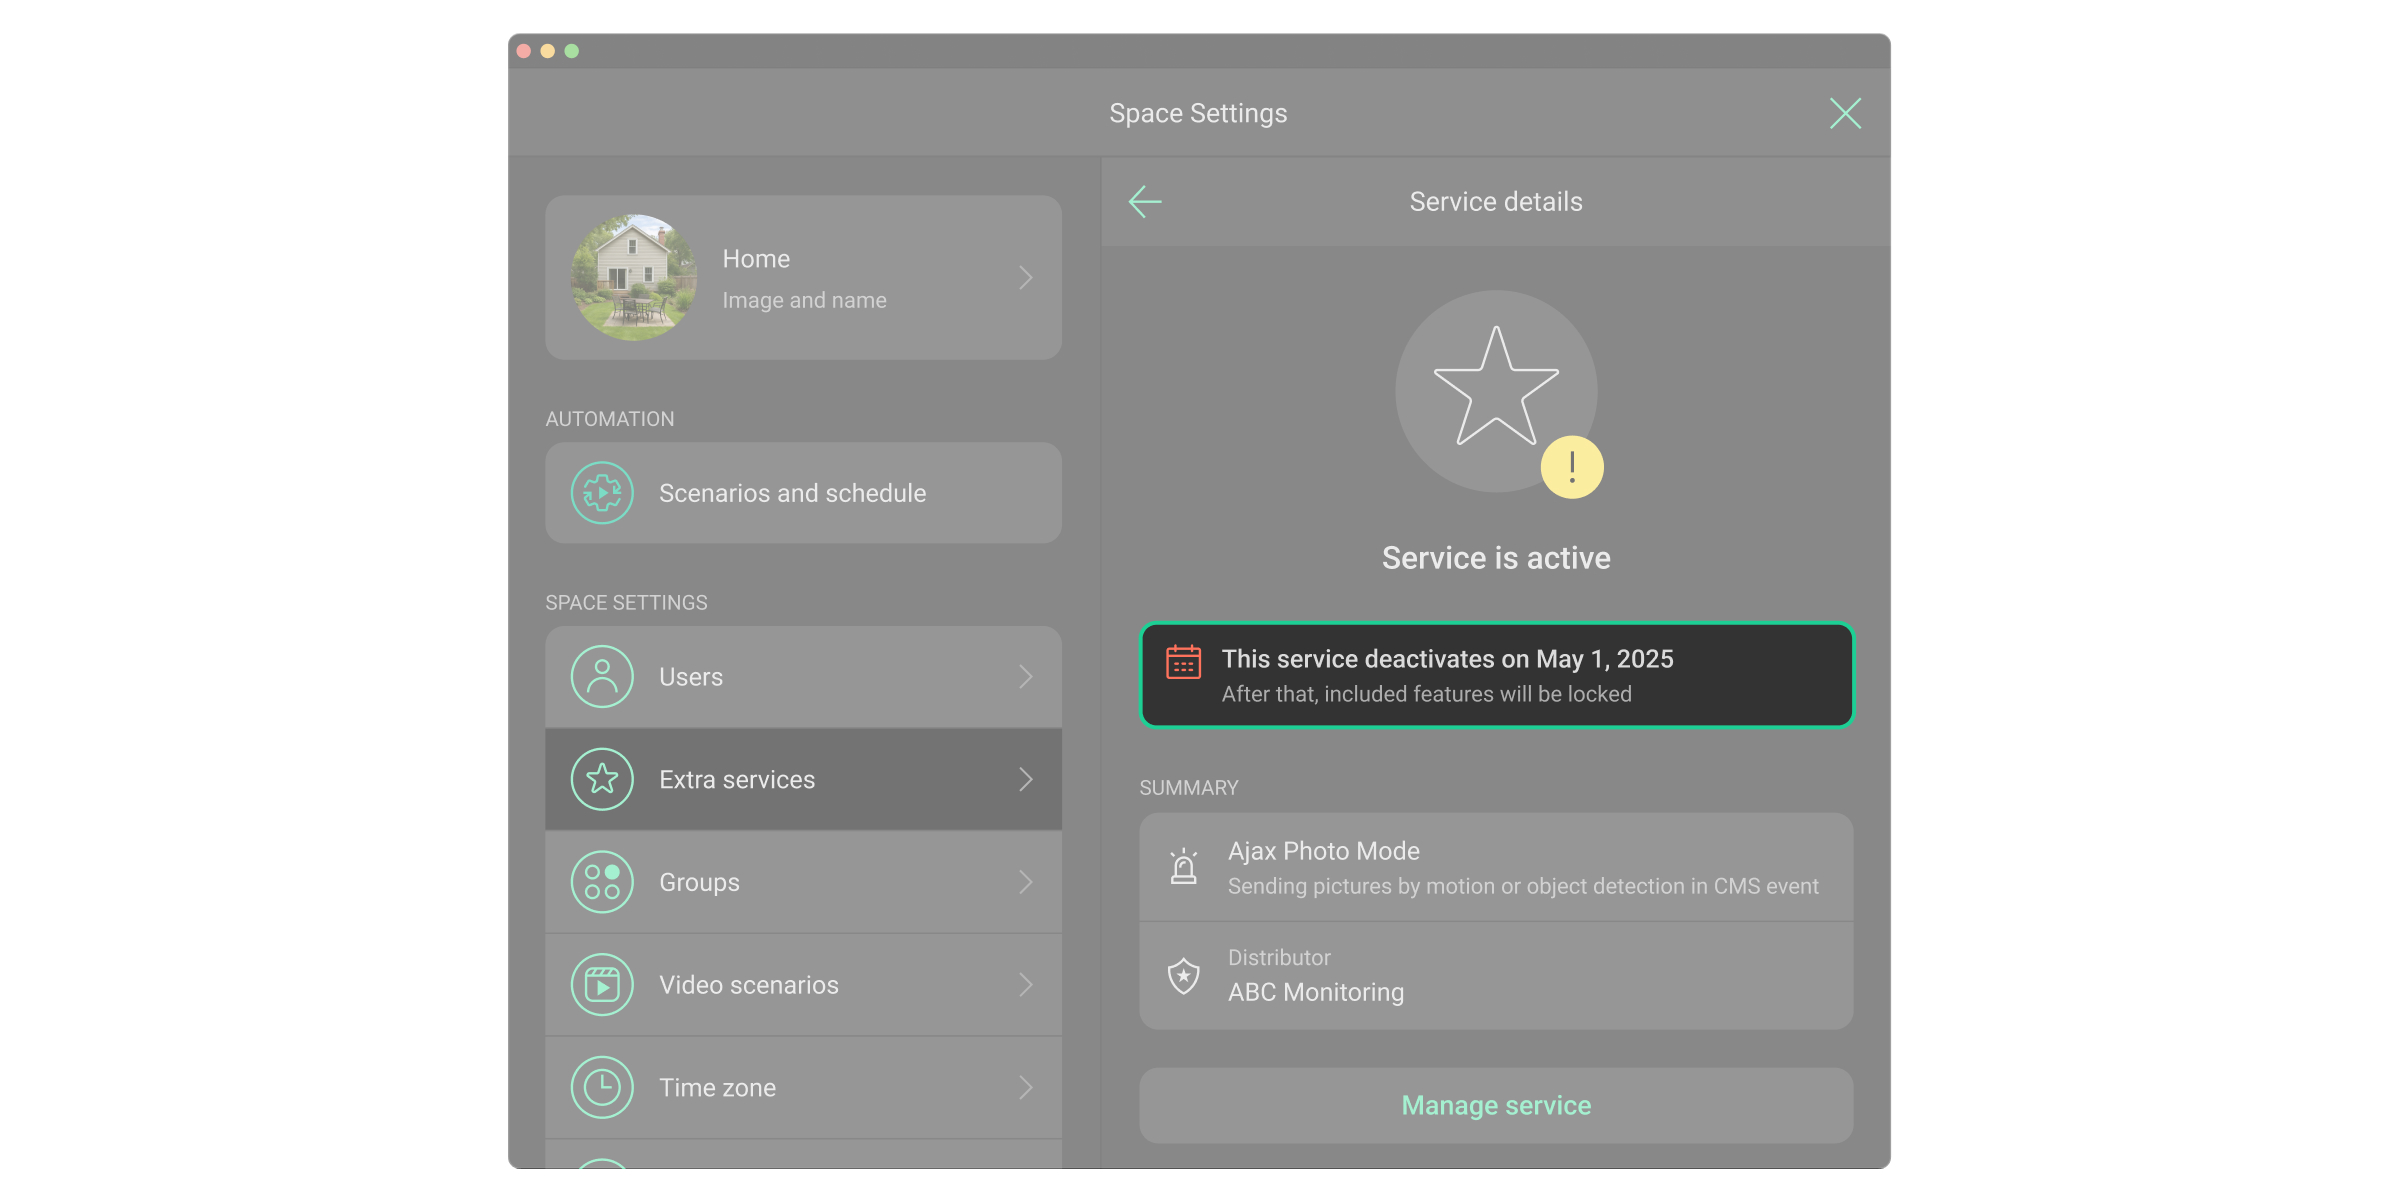
Managing the service
The Ajax Photo Mode service can be activated, managed, and deactivated in the Ajax PRO Desktop or Ajax PRO: Tool for Engineers app.
Activating
The service can be activated in the space settings in Ajax PRO apps.
- Select the required space or object.
- Go to the Control tab if you are using the mobile app.
- Go to the space settings .
- Go to the Extra services option.
- Click Assign services.
- Select the Ajax Photo Mode service, required video devices, and the company that provides the service.
- Click Activate in the opened window to confirm the service activation.
Deactivating
There are two options to deactivate the service for an account:
- Deactivate. The service will be available until the end of the month and will be permanently deactivated on the 1st day of the following month. This type of deactivation allows the service to be seamlessly restored until it expires.
- Stop now. The service will be deactivated immediately. Instant deactivation is possible both when the service is active and when it is pending expiration at the start of the following month.
The service can be deactivated in the space settings in Ajax PRO apps.
- Select the required space or object.
- Go to the Control tab if you are using the mobile app.
- Go to the space settings .
- Go to the Extra services option.
- Select the required service in the list:
- Click Deactivate to schedule the service deactivation on the 1st day of the following month.
- Click Stop now to deactivate the service immediately.
- Confirm the service deactivation in the opened window.
Once the service is deactivated, the information tile is displayed in the Service details menu.
Restoring
If the service was deactivated and is still available until the end of the month, it can be restored until it expires.
The service can be restored in the space settings in Ajax PRO apps.
- Select the required space or object.
- Go to the Control tab if you are using the mobile app.
- Go to the space settings .
- Go to the Extra services option.
- Select the required service in the list.
- Click Restore.
- Click Restore in the opened window to confirm the service restoration.
If the service is completely deactivated, it should be activated according to the activation flow, not the restoration one.
