Ajax Cloud Signaling is a service to establish communication between Ajax systems and third-party monitoring software. Acting as a link between a space and monitoring stations, Ajax Cloud Signaling converts the notifications received from the space into the event protocol supported by the Central Monitoring Station’s (CMS) software.
Ajax Cloud Signaling provides the ability to deliver events to the CMS directly from Ajax Cloud. The service is integrated into the Ajax PRO Desktop app. Alarm monitoring companies or companies that simultaneously install security systems and respond to their alarms and events can use Ajax PRO Desktop to set up and connect security systems. And security or monitoring companies can use the app to organize a CMS.
Operating principle
All data transmitted by an Ajax system is protected by block encryption with a dynamic key. Third-party CMS software cannot decrypt it independently. Ajax Cloud Signaling receives a message from an Ajax system, decrypts it, and converts it into standardized protocol messages. The service translates it into CMS software without installing any Ajax products on the Security company’s premises.
Ajax Cloud Signaling operates only in the store-and-forward mode. Each event generated by a space and transmitted to monitoring software via the Ajax Cloud server and Ajax Cloud Signaling must be acknowledged. When a space sends an event, it requires an acknowledgement only from Ajax Cloud. The space does not participate in communication between Ajax Cloud and the monitoring station. When Ajax Cloud receives an event from a space, it immediately acknowledges receipt and stores the event in cloud storage. When the event is forwarded to monitoring software, it is deleted from cloud storage only after the monitoring station acknowledges it.
Event transmission
When a connection to the monitoring station is available, alarms are transmitted immediately via the selected protocol. Ajax Cloud Signaling supports the following protocols for transmitting events to monitoring software:
- SIA DC-09
- Manitou
- MASXML
- Micro Key
- SoftGuard
- Sentinel
- SurGard (Contact ID)
- Listener
- ADEMCO 685
Ajax Cloud Signaling supports connection to monitoring software via two network addresses (primary and secondary), each with its own port. If the primary address is unavailable, the receiver switches to the secondary address if configured. Ajax Cloud Signaling supports SP1–SP5 and DP1–DP4 ATS categories.
The SIA DC-09 (SIA-DCS/ADM-CID) message can transmit additional information, such as web links, geographic coordinates, or other standardized data. The SIA DC-09 (SIA-DCS/ADM-CID) protocol can transfer photos from MotionCam/MotionCam Outdoor detectors, as well as user coordinates to the monitoring station when the panic button is pressed in an Ajax app.
SIA DC-09 (SIA-DCS/ADM-CID) message template:<LF><crc><0LLL><"id"><seq><Rrcvr> <Lpref> <#acct> [<pad> | ... data ...] [x… data…] <timestamp> < CR> |
|
<LF> |
Message beginning marker in ASCII, transmitted in binary value 0x0A. |
<crc> |
Checksum to check the integrity of the message, transmitted as four characters in ASCII. |
<0LLL> |
The message length, where the first character is always 0, and the next three are hex characters in ASCII. |
<"id"> |
Protocol type indicator. One of two values is used depending on “Format” field value:
|
<seq> |
The sequence number of the sent message. The range is 0001-9999, after which counting starts over from 0001. |
<Rrcvr> |
Receiver number — not used. |
<Lpref> |
Account number prefix. Constant value is L0. |
<#acct> |
Account number. The # character followed by 3 to 16 hex characters in ASCII. |
[<pad>|...data...] |
Alarm data. In the beginning, the # character and account number are indicated, then the separator “|”, followed by a message. If SIA-DCS format is used: The “N” constant indicates a new event, followed by the “ri” constant and the group number. Next, the “/” symbol indicates SIA event code, which consists of two Latin letters and a zone number. Example (Intrusion alarm from Device 1 in Group 2 for an Account number 1234): If ADM-CID format is used: The first digit is 1 (Alarm) or 3 (Restore), a three-digit event code by the Contact ID protocol, a group number, and a zone number. Example (Intrusion alarm from Device 1 in Group 2 for an Account number 1234): The message after the separator can contain from 3 to 16 hex characters in ASCII. |
[x…data…] |
Additional data, which may contain photo confirmation from MotionCam/MotionCam Outdoor detectors or the location of the device on which the user pressed the panic button in Ajax app. Photo confirmation is sent as a web link, at the beginning of which the data type is indicated — the V character (Verification). When the Transfer device or group name to CMS events toggle is enabled, the device or user name is sent with the data type of “I” (Alarm Text), while the group name is sent with the data type of “L” (Location). Coordinates are transmitted in the format |
<timestamp> |
Timestamp. |
<CR> |
End of message marker in ASCII, transmitted in binary value 0x0D. |
Please note that the series of photos is transmitted as a separate event. The photos will be available immediately after they are transferred to Ajax Cloud server. The links to the photos will remain valid for 7 days from the moment they are transmitted to the security company’s monitoring station.
The link to one photo can contain up to 425 symbols.
Sample of an event with two photos:
CB640375″ADM-CID”0086L0#1234[#1234|1130 02 001][Vhttps://ajax-sample.com/first_photo.jpg,https://ajax-sample.com/second_photo.jpg]_16:43:06,10-07-2020 |
The hub connects to the Ajax Cloud server via the Hub-to-Server (HtS) protocol. The hub establishes outbound connections to the Ajax Cloud endpoints required for event delivery.
Capacity and performance
The Ajax Cloud Signaling receiver operates with up to 50,000 different spaces. If the number of connected spaces exceeds the recommended limit, divide the receivers into several groups.
You can add up to 10 receivers for a single company. The total limit of 10 receivers applies to Ajax Cloud Signaling and Ajax Translator PRO receivers combined.
The maximum event processing rate is 50 events per second. The actual processing rate depends on receiver configuration and network conditions.
Event storage and retransmission
If a connection to the monitoring station is lost while an alarm is triggered, all stored events are automatically transmitted once the connection is restored.
Security mechanisms
Ajax Cloud Signaling is protected by security mechanisms that ensure reliable communication and prevent unauthorized interference.
Denial-of-Service (DoS) protection
Ajax Cloud Signaling implements protection mechanisms against Denial-of-Service (DoS) attacks in communication between Ajax Cloud, Ajax Cloud Signaling, and the monitoring station. A DoS attack on one transmission network interface does not adversely affect the operation of Ajax Cloud Signaling or any other transmission network interface.
If the system detects an abnormal traffic pattern (more than 500 invalid messages within 5 seconds), the connection to the monitoring station is automatically terminated. Invalid messages include, for example:
- messages without a sequence identifier;
- messages that cannot be parsed correctly.
When this protection rule is triggered, the connection to the monitoring station cannot be reestablished for 60 seconds.
DoS protection for Ajax Cloud Signaling is currently based on the cloud infrastructure security mechanisms. The Ajax Cloud server uses AWS Shield Advanced technology to protect its cloud resources from distributed denial-of-service (DDoS) attacks.
Protection against device spoofing
An Ajax system prevents a hub from being spoofed by another device, including identical or counterfeit equipment.
Only Ajax hubs and video devices can connect to Ajax Cloud and generate system events. The Ajax Cloud server verifies the device’s authenticity before accepting any communication.
Each hub is authenticated through a proprietary handshake process. The cryptographic key required for authentication is uploaded to the hub during manufacturing and cannot be modified during operation.
Ajax Cloud identifies each hub by its unique device ID, which cannot be changed. This ensures that a hub registered in the system cannot be replaced with another device without detection.
The connection between the hub and Ajax Cloud is protected by a NIST-certified cryptographic algorithm.
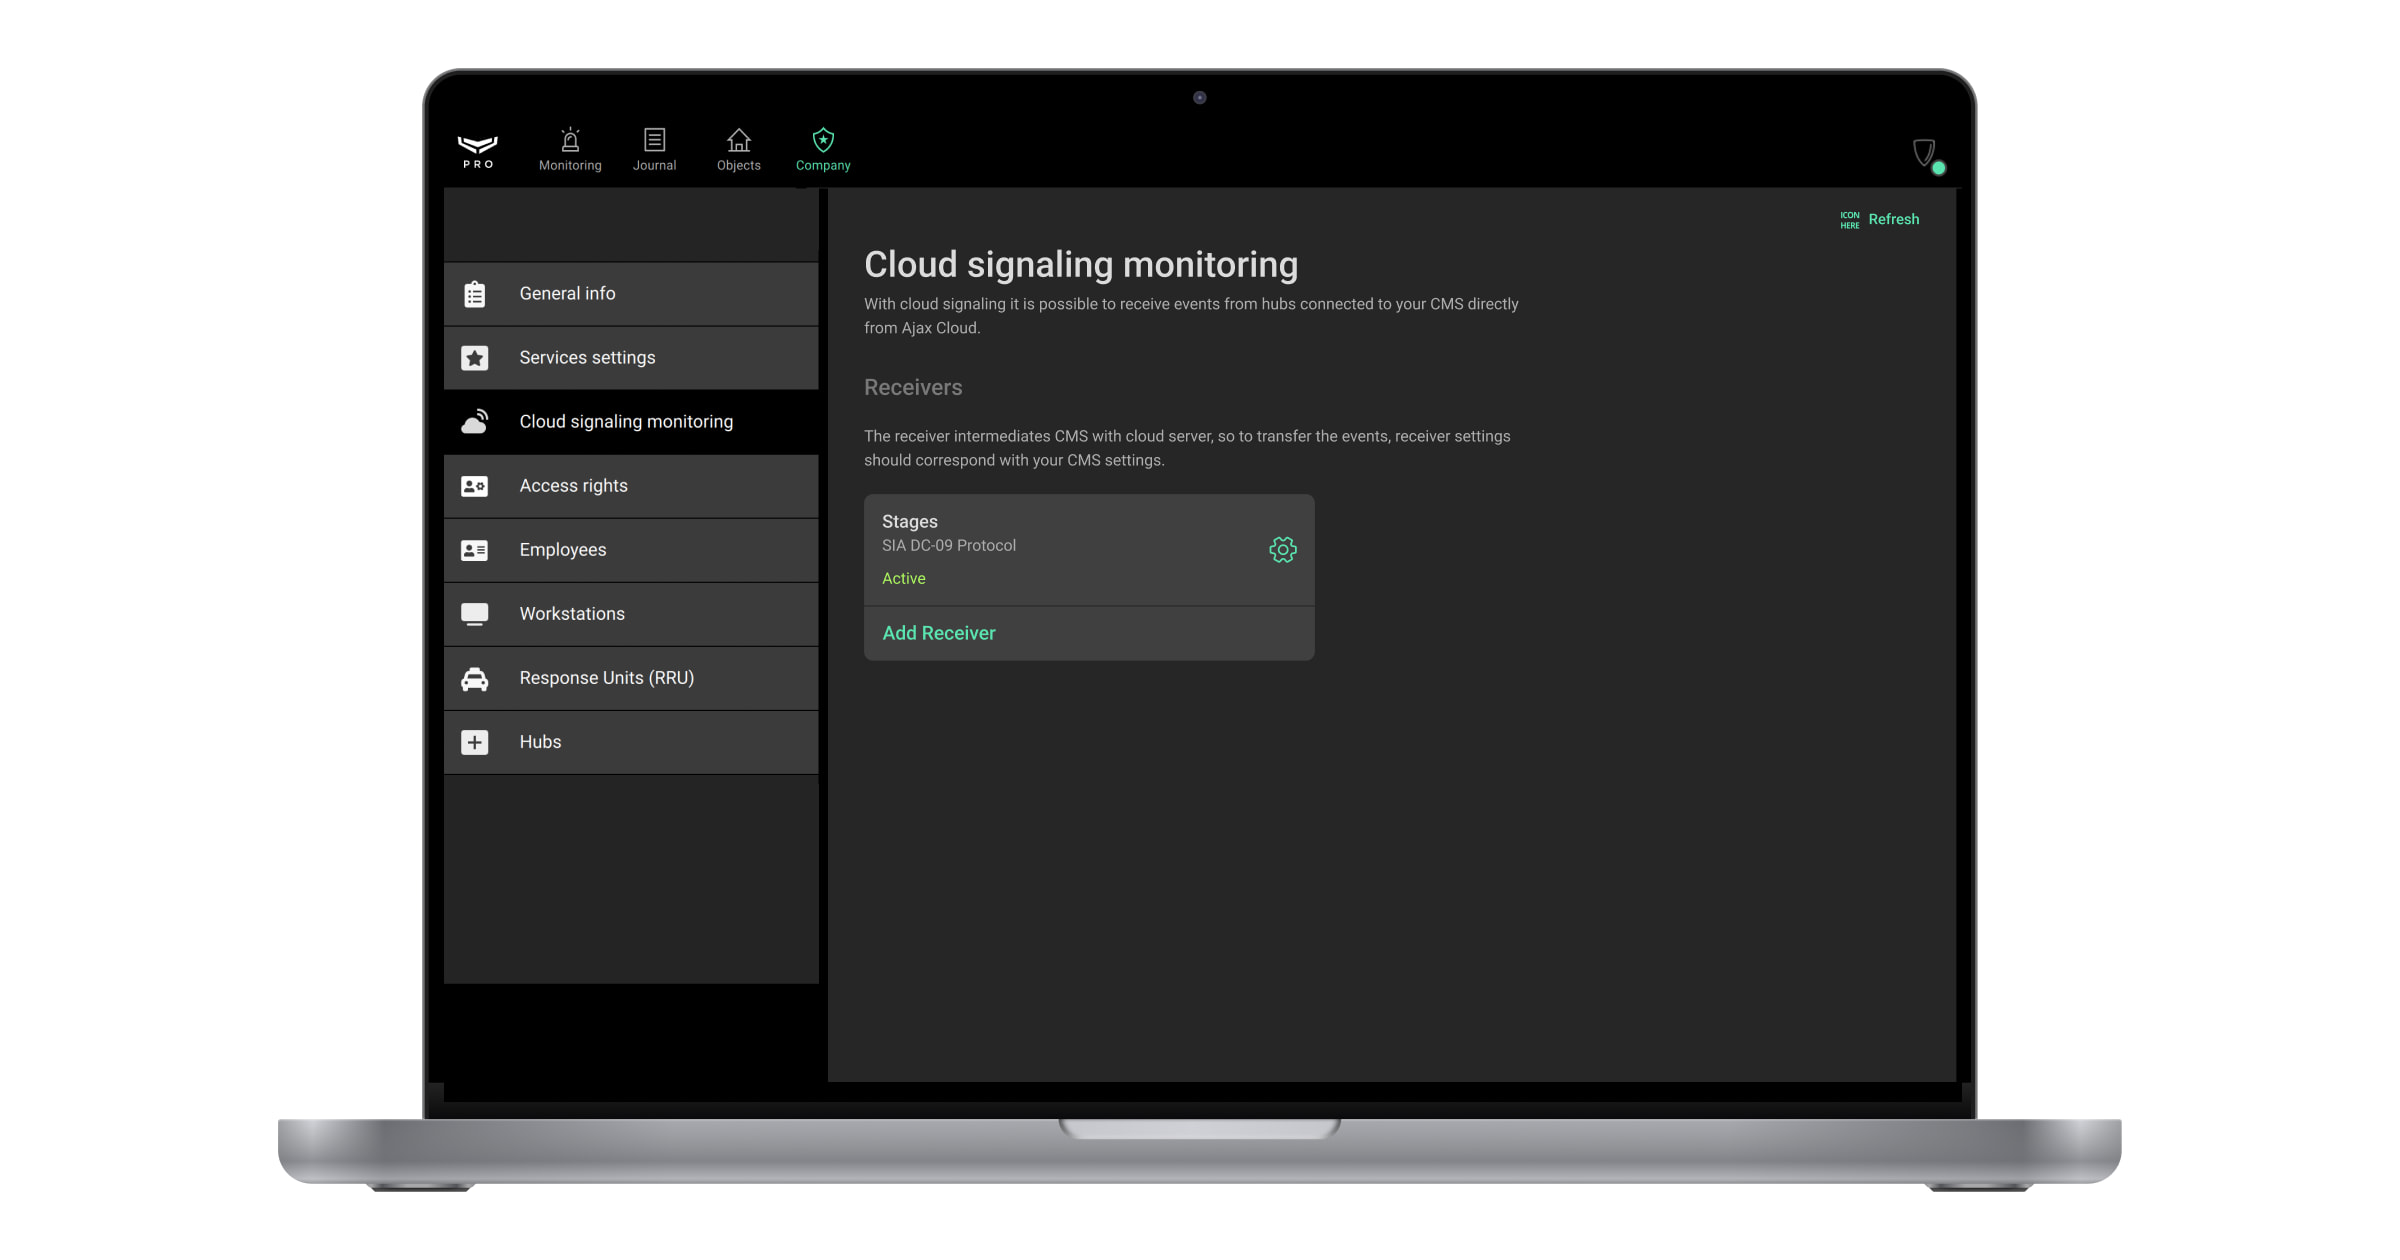
Adding the receiver
There are two roles available to use Ajax Cloud Signaling: Senior CMS Engineer and CMS Engineer. Only the Senior CMS Engineer has the right to add, update, and delete the receiver.
To add the receiver, in Ajax PRO Desktop:
- Sign in to a PRO account.
- Open the Company module.
- Click on the CMS Connection menu. It contains information about receivers that intermediate CMS with the cloud server. The user can add, delete, or change receiver details.
- Click the Add receiver button.
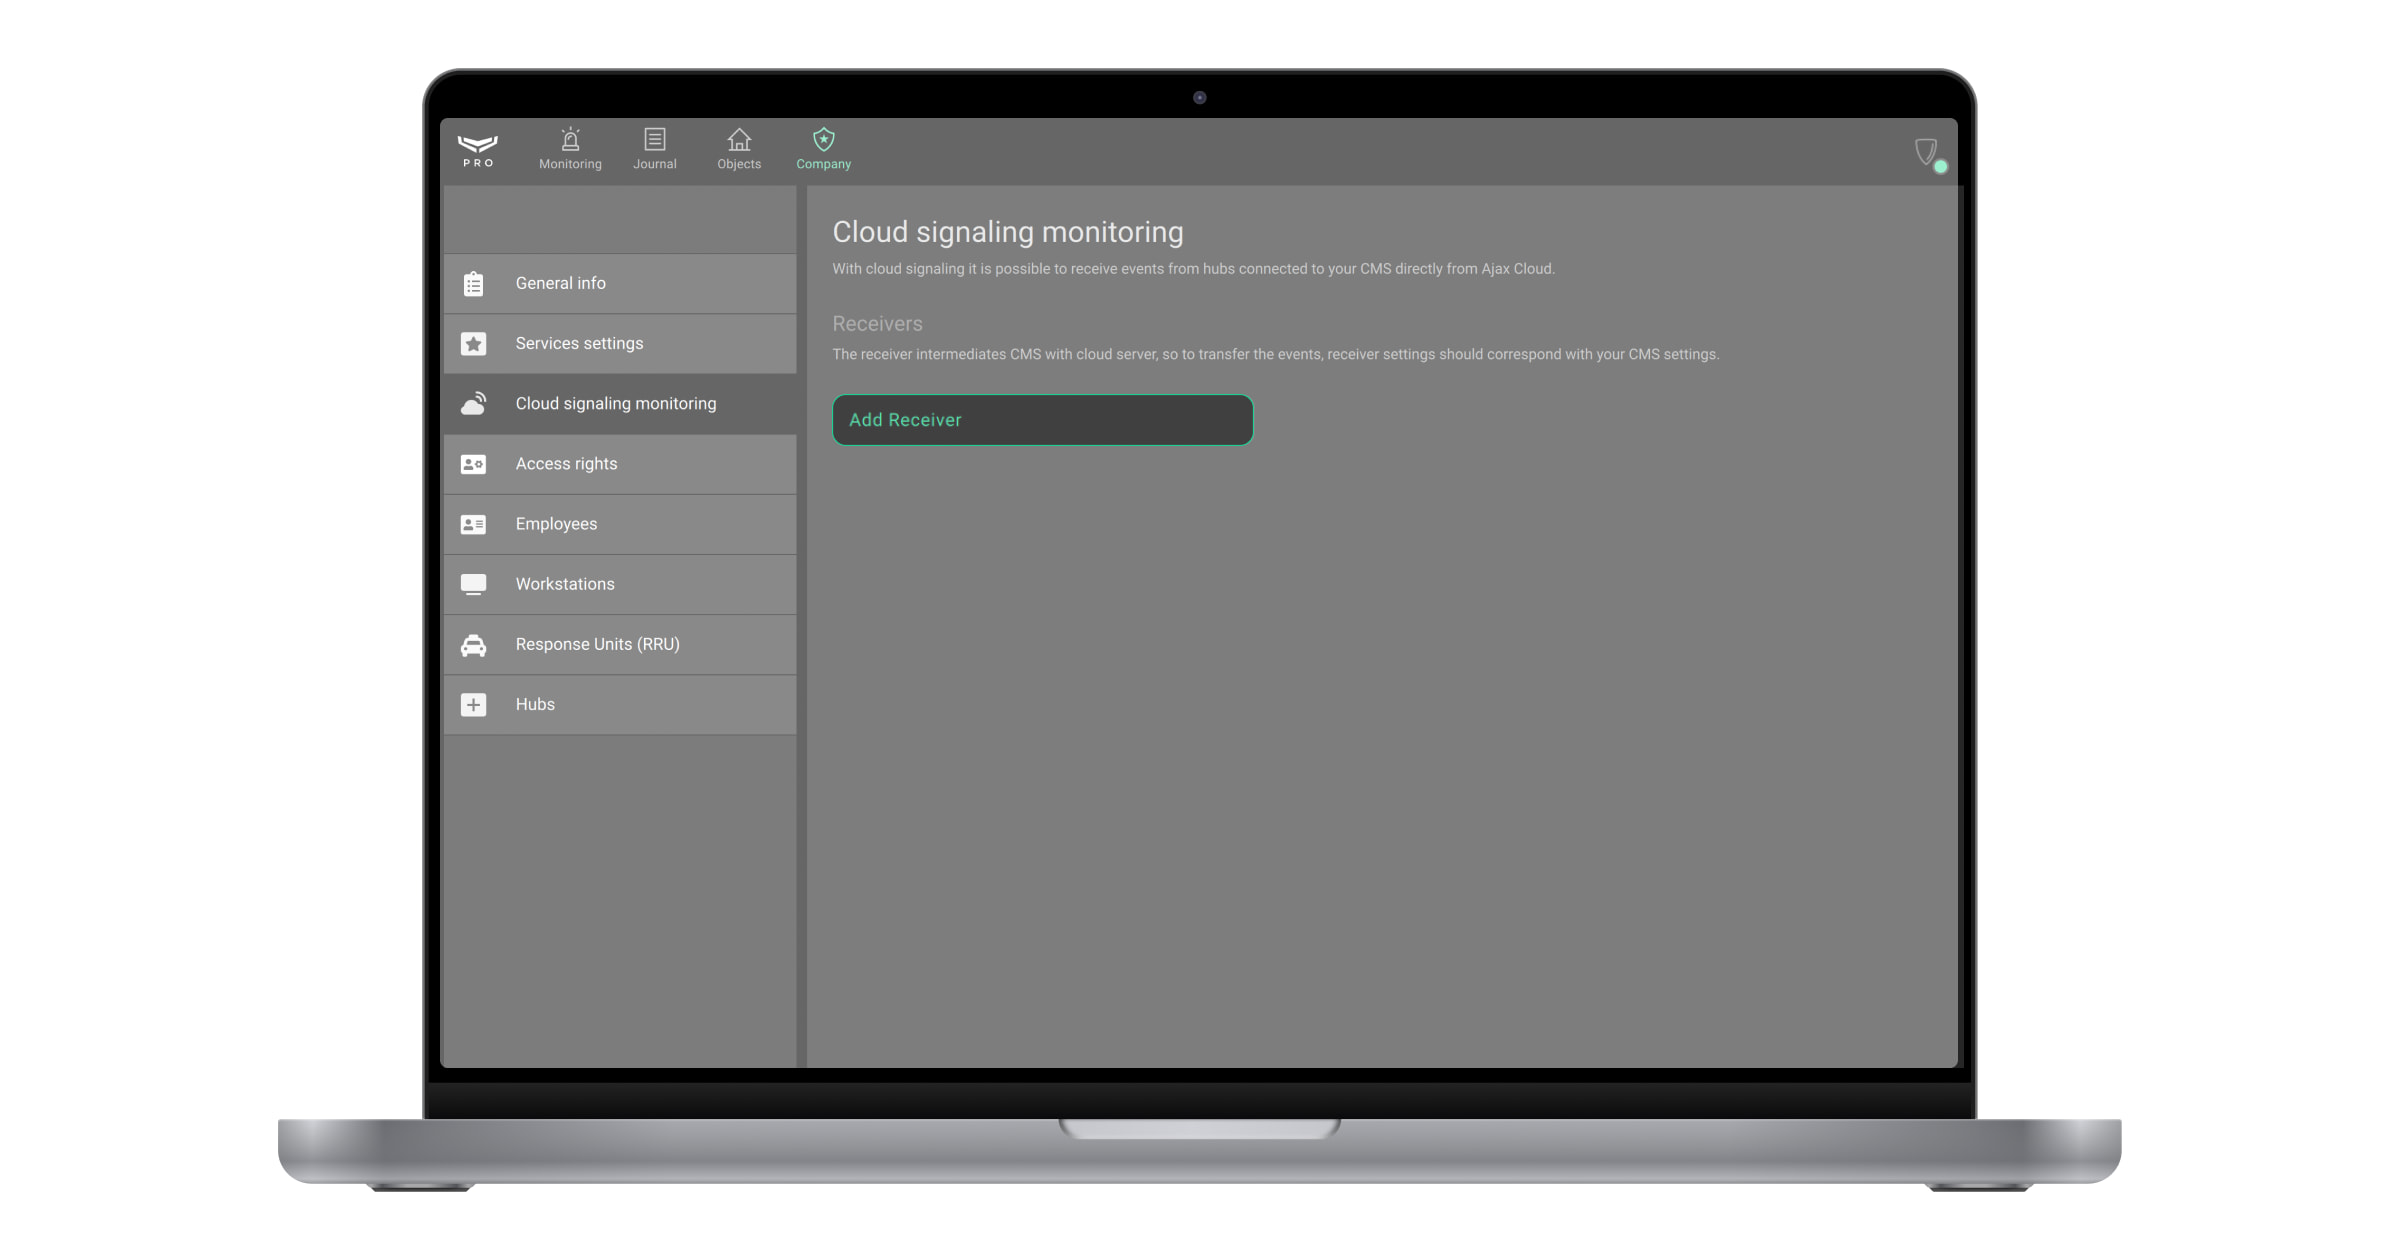
- Specify the receiver name, the primary address (IP or DNS) and its port, the secondary address and its port (optional).
- Select the required protocol.
- Set or adjust the following settings for the selected protocol.
- Click Save.
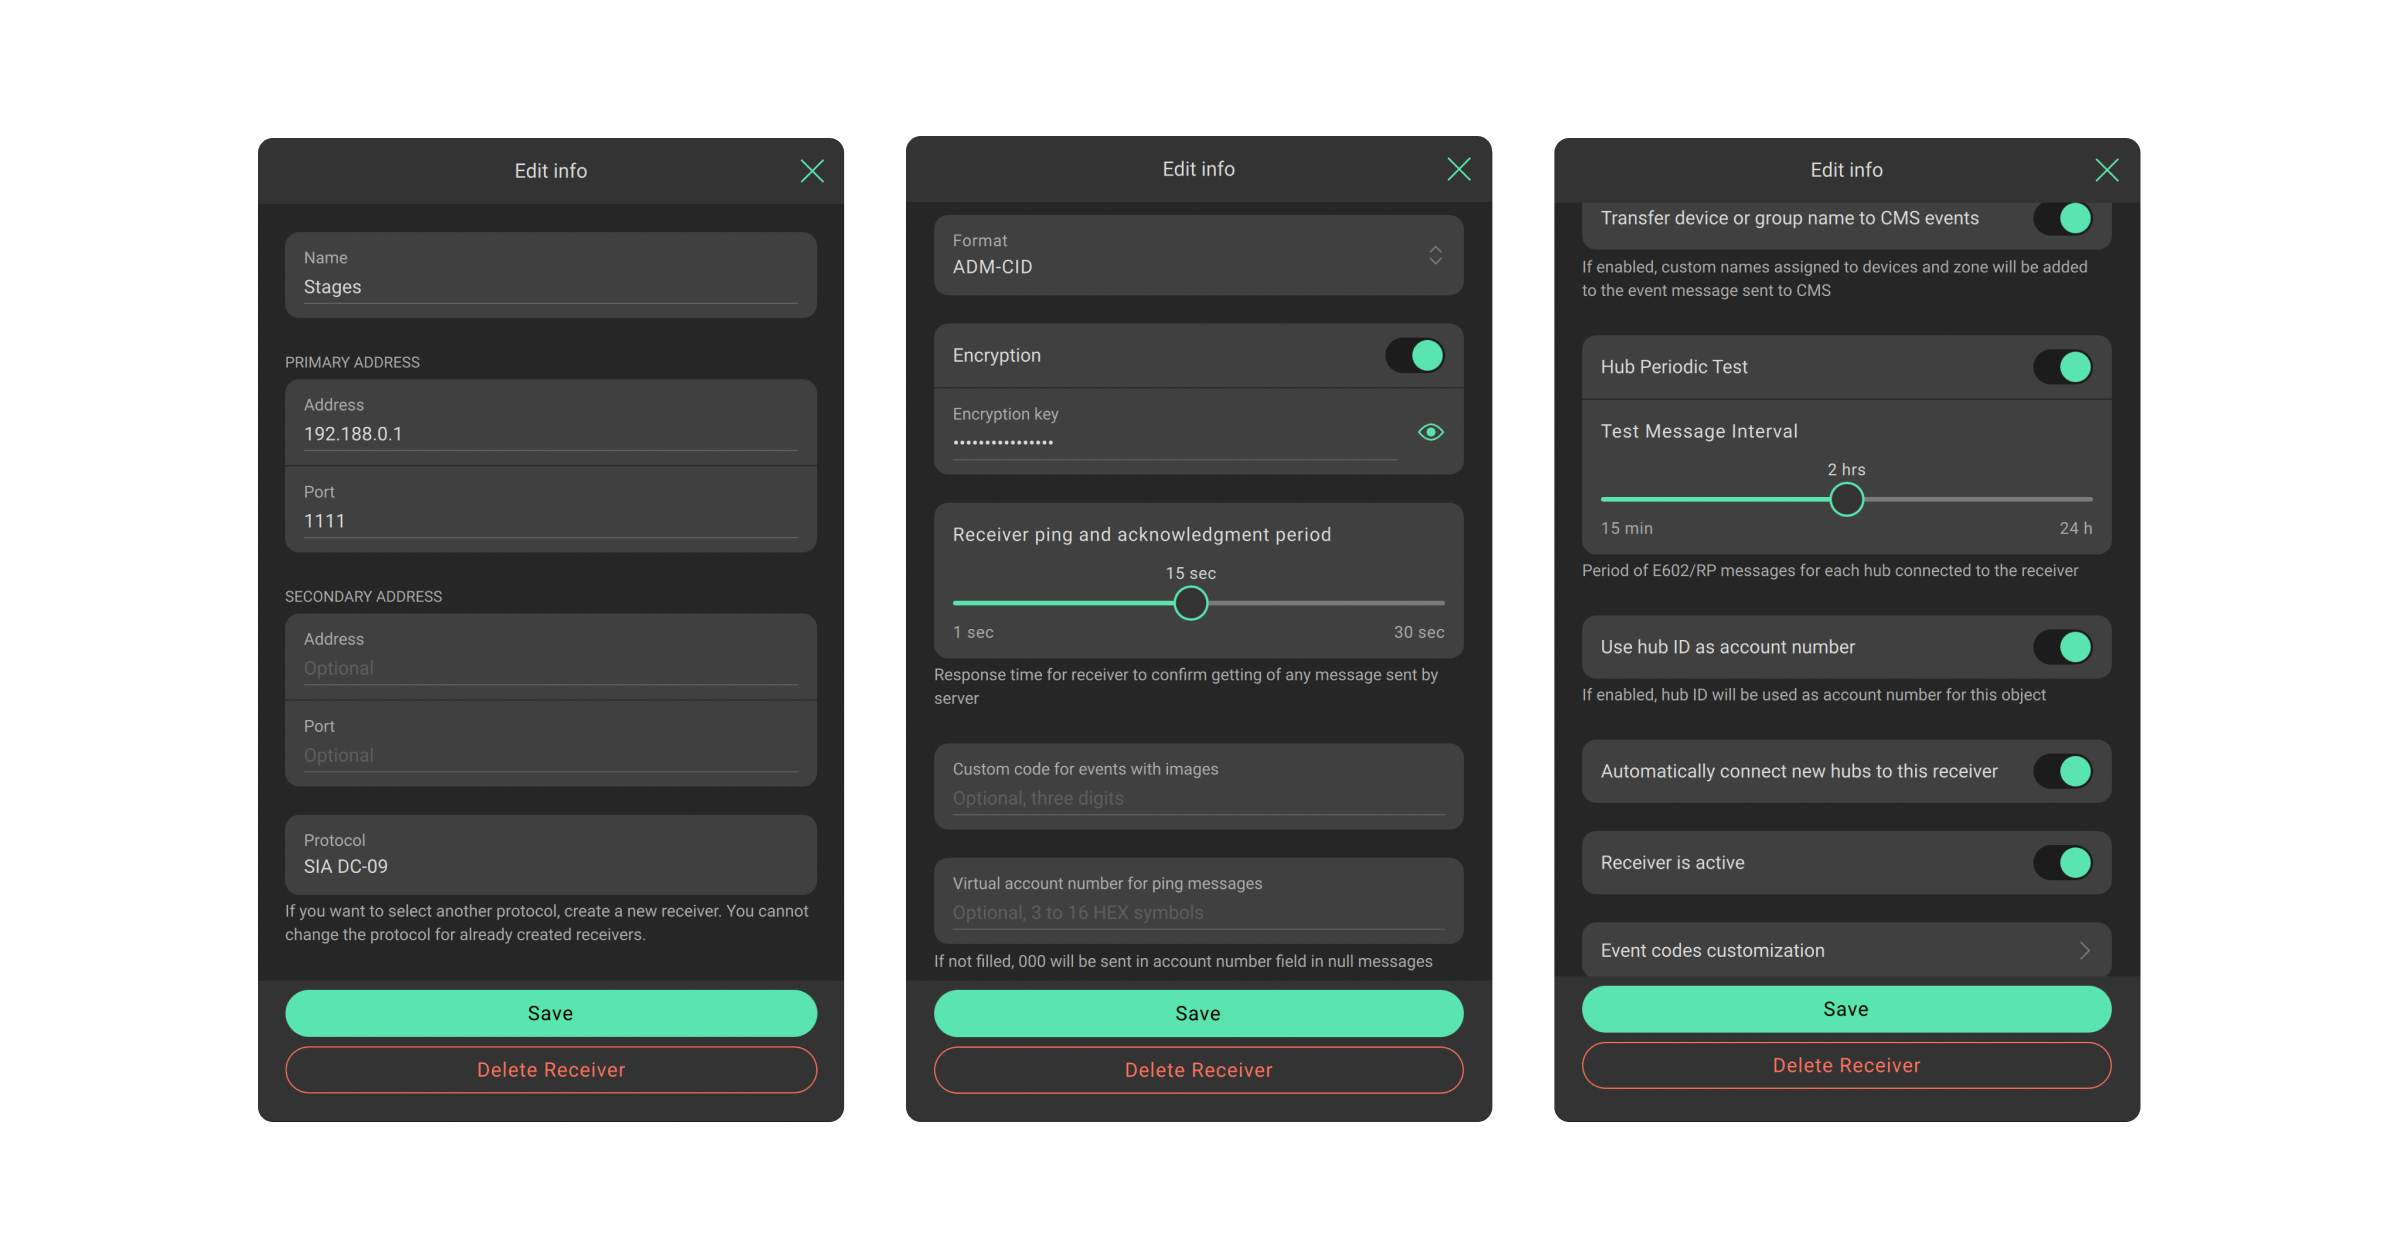
Ajax Cloud Signaling always expects message receipt confirmation from CMS. If Ajax Cloud Signaling does not receive confirmation, it reports the loss of connection with the CMS.
The range for the Receiver ping and acknowledgement period spans from 1 to 30 seconds. Specify the Virtual account number for ping messages. If this setting is not configured, the “000” text will be sent in the account number field in null messages instead.
SIA DC-09 ping message template:<LF><crc><0LLL><"NULL"><seq><Rrcvr><Lpref><#acct><timestamp><CR> |
|
<LF> |
Message beginning marker in ASCII, transmitted as the binary value 0x0A. |
<crc> |
Checksum to verify the integrity of the message, transmitted as four characters in ASCII. |
<0LLL> |
The message length, where the first character is always 0, followed by the next three hex characters in ASCII. |
<"NULL"> |
“NULL” constant. |
<seq> |
The sequence number of the sent message, ranging from 0001 to 9999. After reaching 9999, the count resets to 0001. |
<Rrcvr> |
Receiver number — not used. |
<Lpref> |
Account number prefix. The constant value is L0. |
<#acct> |
Virtual account number for ping messages. If not set, the “000” text will replace the account number field in null messages. |
<timestamp> |
Timestamp. |
<CR> |
Message ending marker in ASCII, transmitted as the binary value 0x0D. |
Specify whether and how you want to send images: in one message or separately.
Specify whether to allow sending audio recordings from voice modules when an alarm occurs. The device can record short audio fragments before or after the alarm is triggered and send them to the CMS.
Also, you can allow the visual verification of cameras’ detection events. With Ajax PRO Desktop 4.20 or later, monitoring companies that use cloud signaling monitoring can open and view directly in Ajax PRO Desktop video from Ajax video devices, which were captured after system triggering by the camera’s in-built motion detector or AI detector. To do this, choose URL to view in PRO Desktop in the Visual verification of cameras detection events field. When the video device is triggered, the CMS receives a URL that will open a new window of the Ajax PRO Desktop video wall with the recorded video fragment.
URLs start with ajax-pro-desktop:// and cannot be downloaded. If your CMS automatically downloads the attached footage, please ensure that links that start with ajax-pro-desktop:// are not downloaded.
Additionally, the CMS operator can open and view videos from Ajax video devices without having Ajax PRO Desktop installed. The flow is similar to the visual verification in Ajax PRO Desktop using the URL feature, but the received URL leads to a new browser window, not to the Ajax PRO Desktop video wall widget. The opened window also displays two video streams: a live video and a recorded video segment.
If the Transfer device or group name to CMS events toggle is enabled, custom names assigned to devices and zones will be added to the event message sent to the CMS.
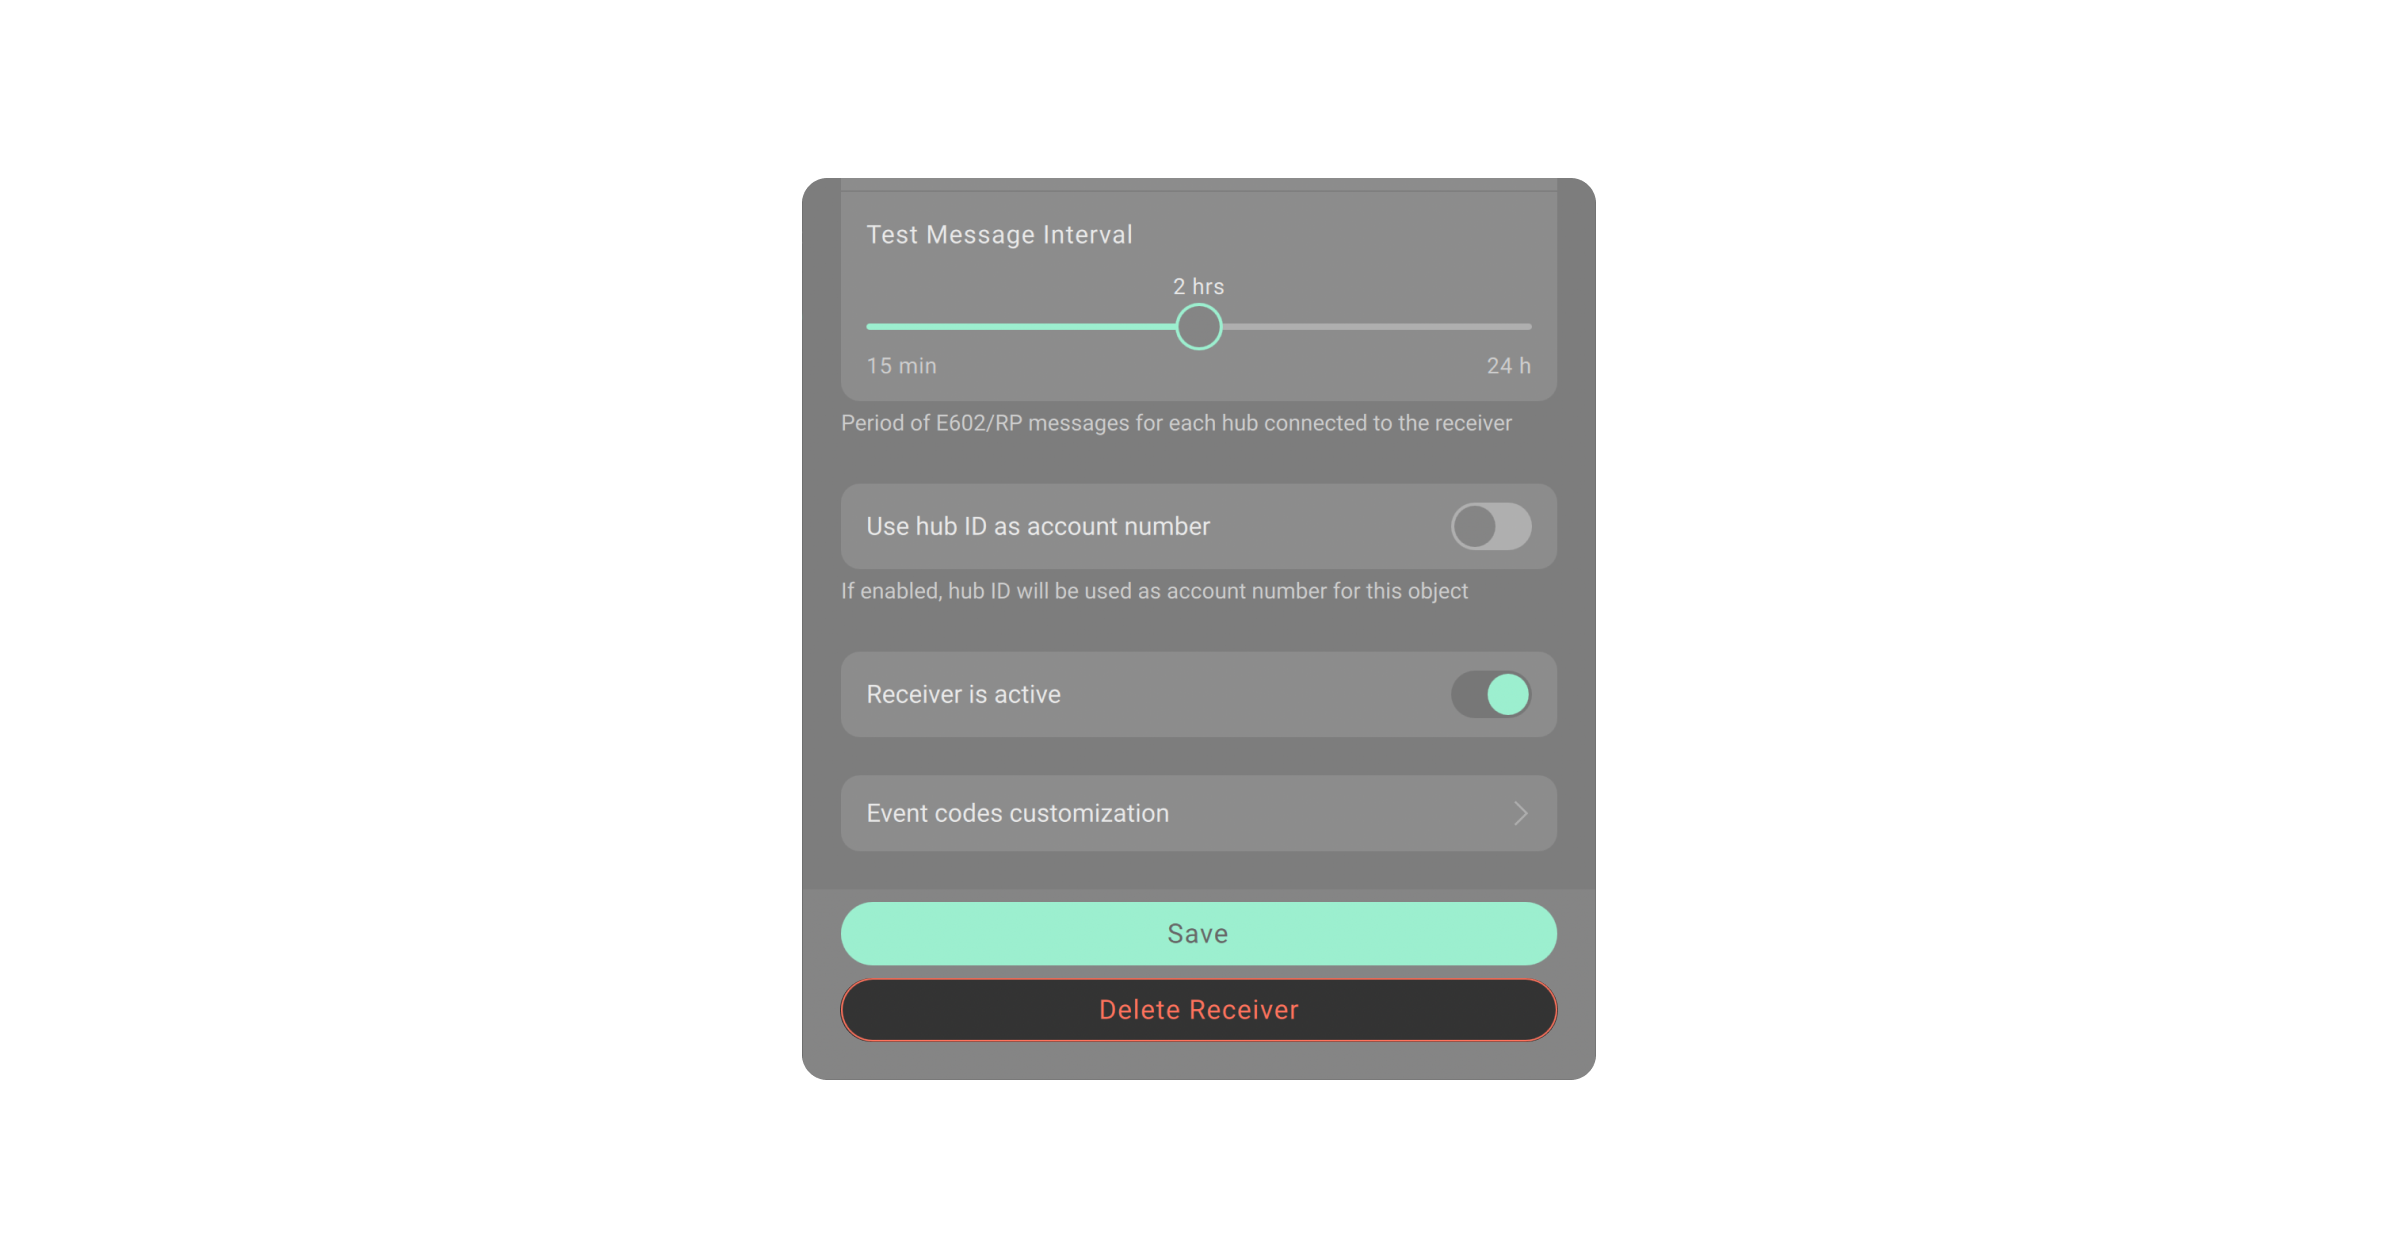
The Hub Periodic Test toggle allows disabling periodic test messages that are used to verify hub connection. Ajax Cloud Signaling sends these messages to the CMS under code E602, meaning the hub is connected.
The range of the Test Message Interval is from 15 minutes to 24 hours.
If you disable these regular test messages, the hub will continue to report the connection status at predetermined intervals. However, Ajax Cloud Signaling will only notify the CMS if the hub connection is lost. In this case, the program sends a single event to the CMS under code E350, and waits until the connection is restored. Once the hub connection is restored, Ajax Cloud Signaling transmits an event under code R350 to the CMS.
Enable the following toggle to use the hub ID as the account number for the object you’re adding:
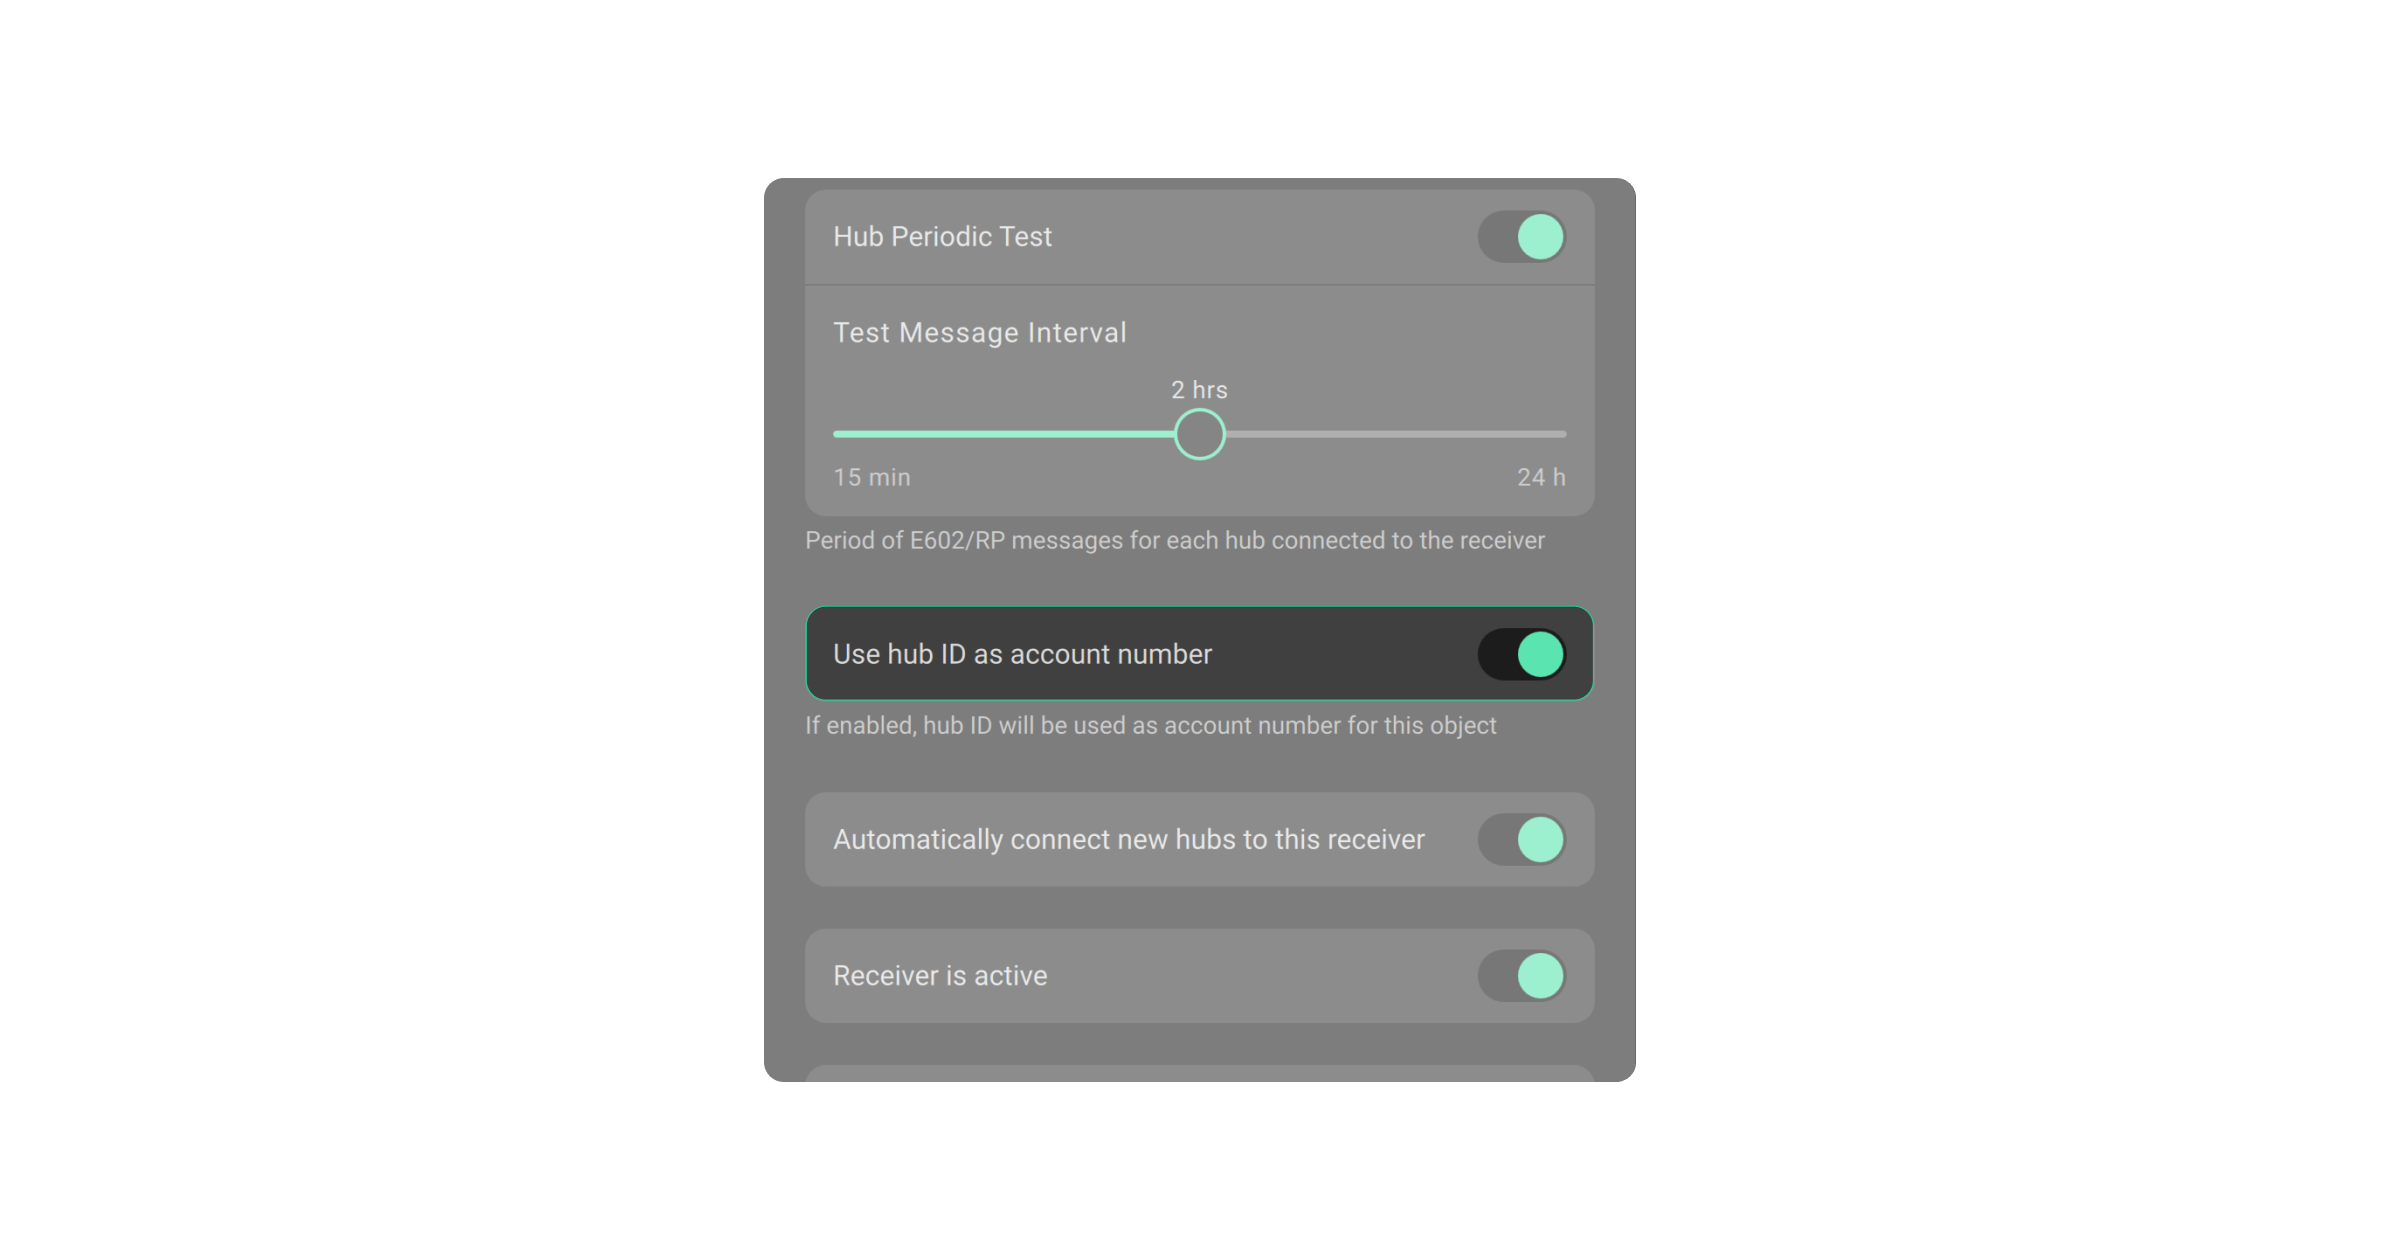
If the Automatically connect new hubs to this receiver toggle is enabled, the request to add the new hub will be immediately approved. The function is only available when the Use hub ID as account number toggle is also enabled.
To deactivate the receiver, disable the Receiver is active toggle. The Disabled connection state is now displayed on the receiver’s list. The receiver’s settings are saved, but the connection to the CMS is lost.
The Event codes customization settings allow changing the codes received by the CMS from Ajax hubs. The monitoring company changes the defined CID/SIA-DCS codes by itself.
The feature is available in Ajax PRO Desktop version 3.9 or later.
When the receiver is added, its name, protocol, and connection state are displayed on the CMS Connection menu.
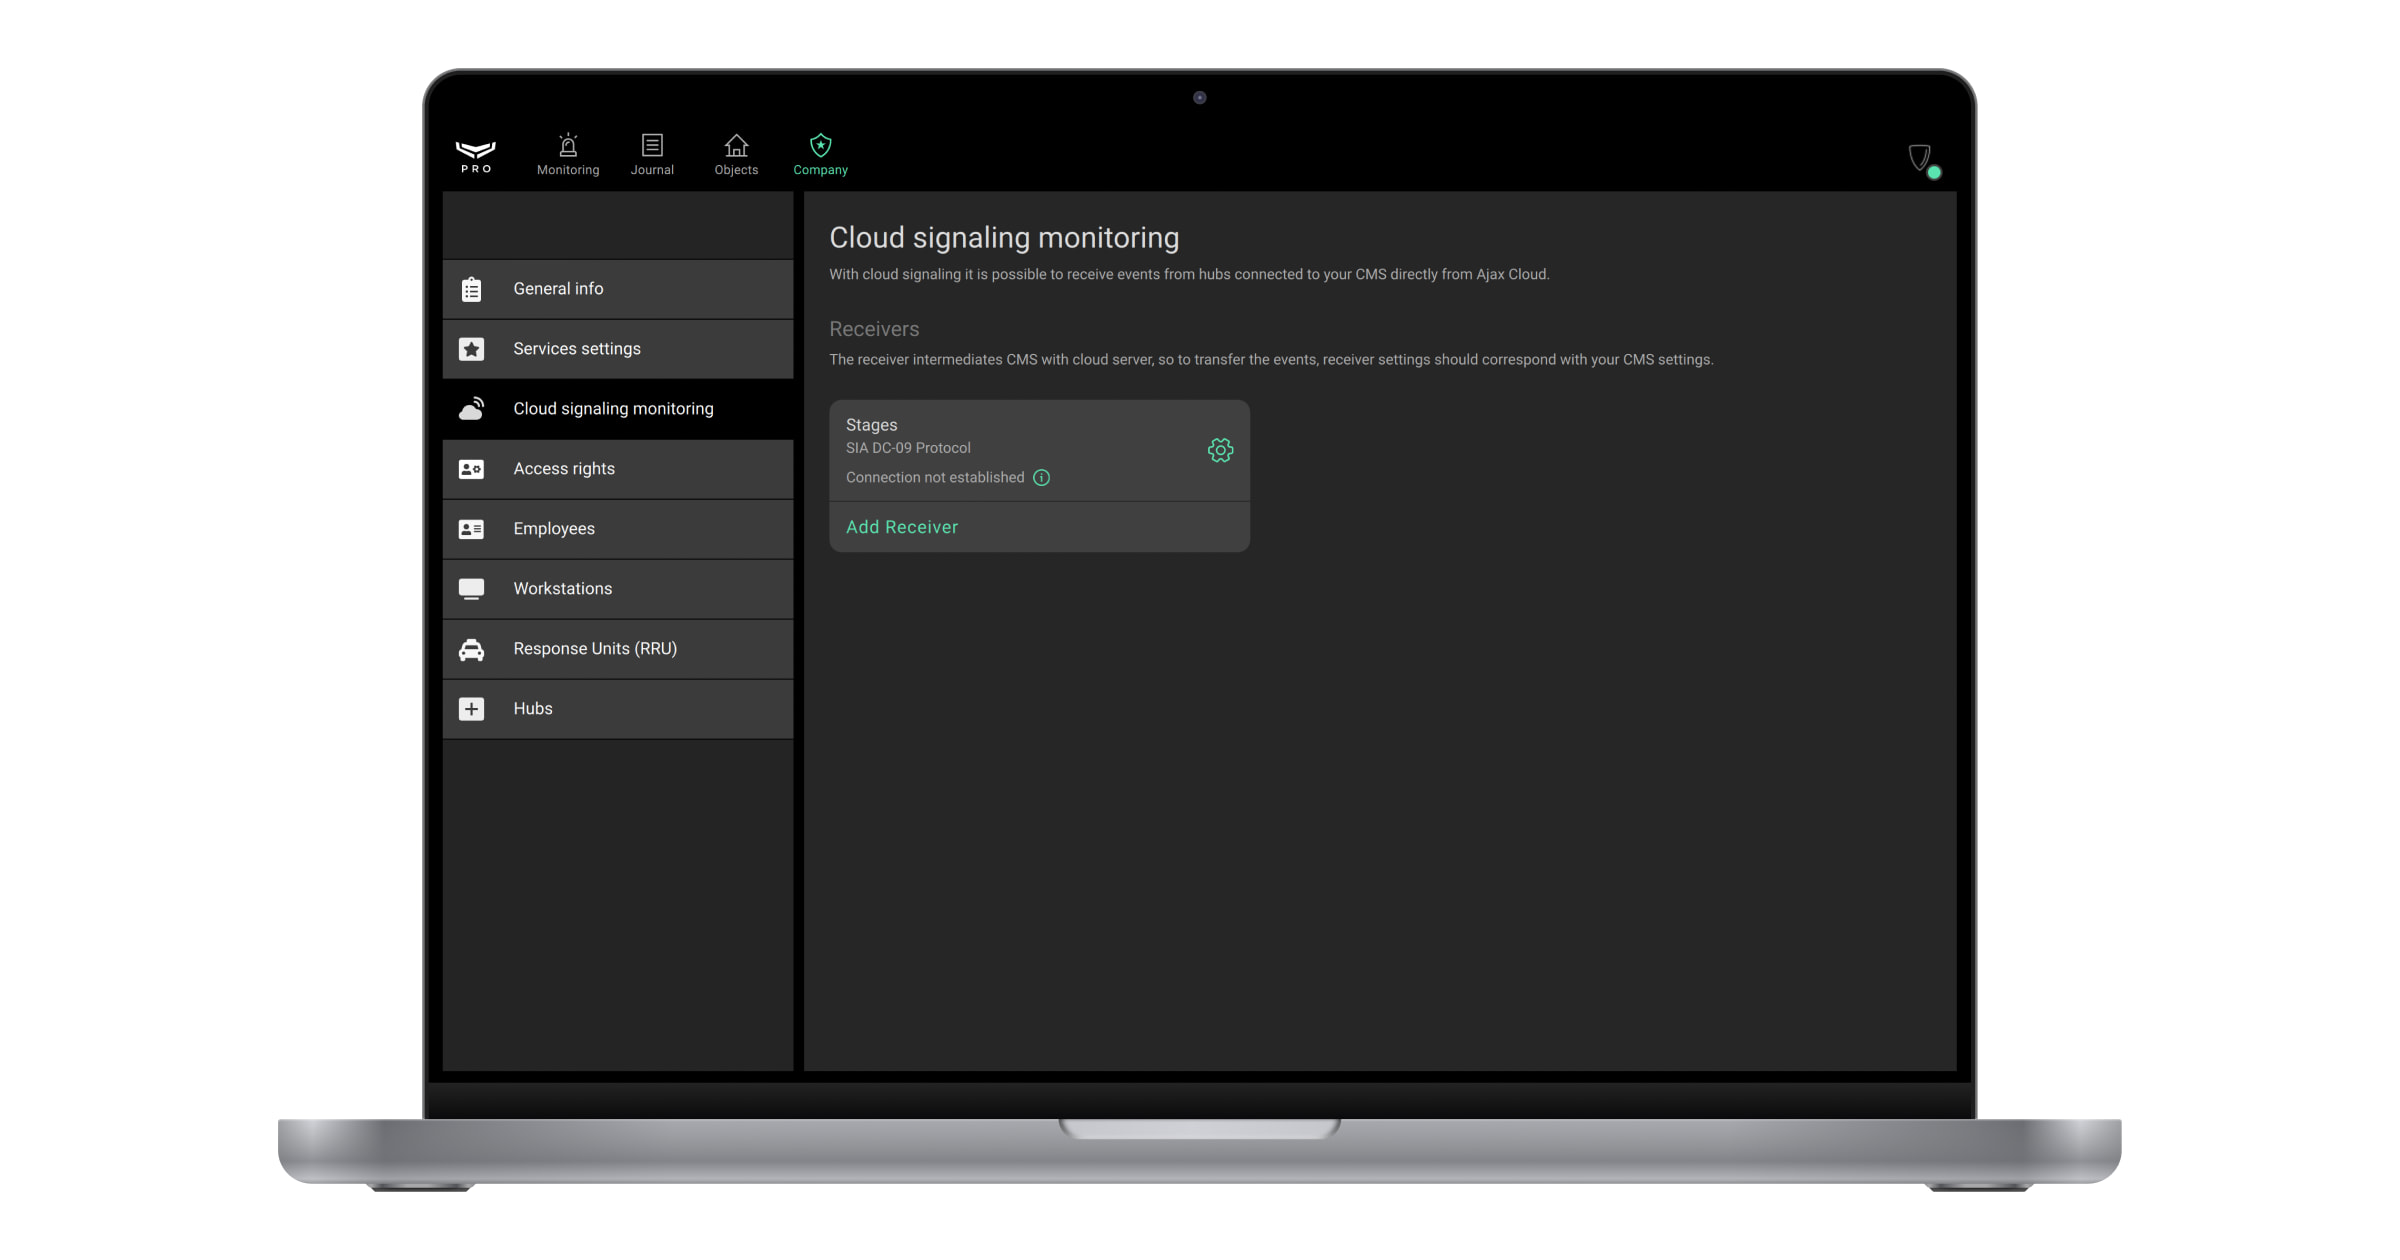
In the app, you can see one of the following states of connection to the CMS:
- Disabled — the receiver is disabled.
- Active — the receiver is connected to the CMS.
- Only primary address available — the receiver is connected to the CMS only by primary address (secondary is unreachable).
- Only secondary address available — the receiver is connected to the CMS only by secondary address (primary is unreachable).
- Connection not established — the receiver is enabled but waiting for the first event from the hub.
- Connection lost — the receiver is unable to connect to the CMS. Connection loss events are logged in the Journal module.
The server—receiver connection is established when at least one event is sent from the hub to the receiver.
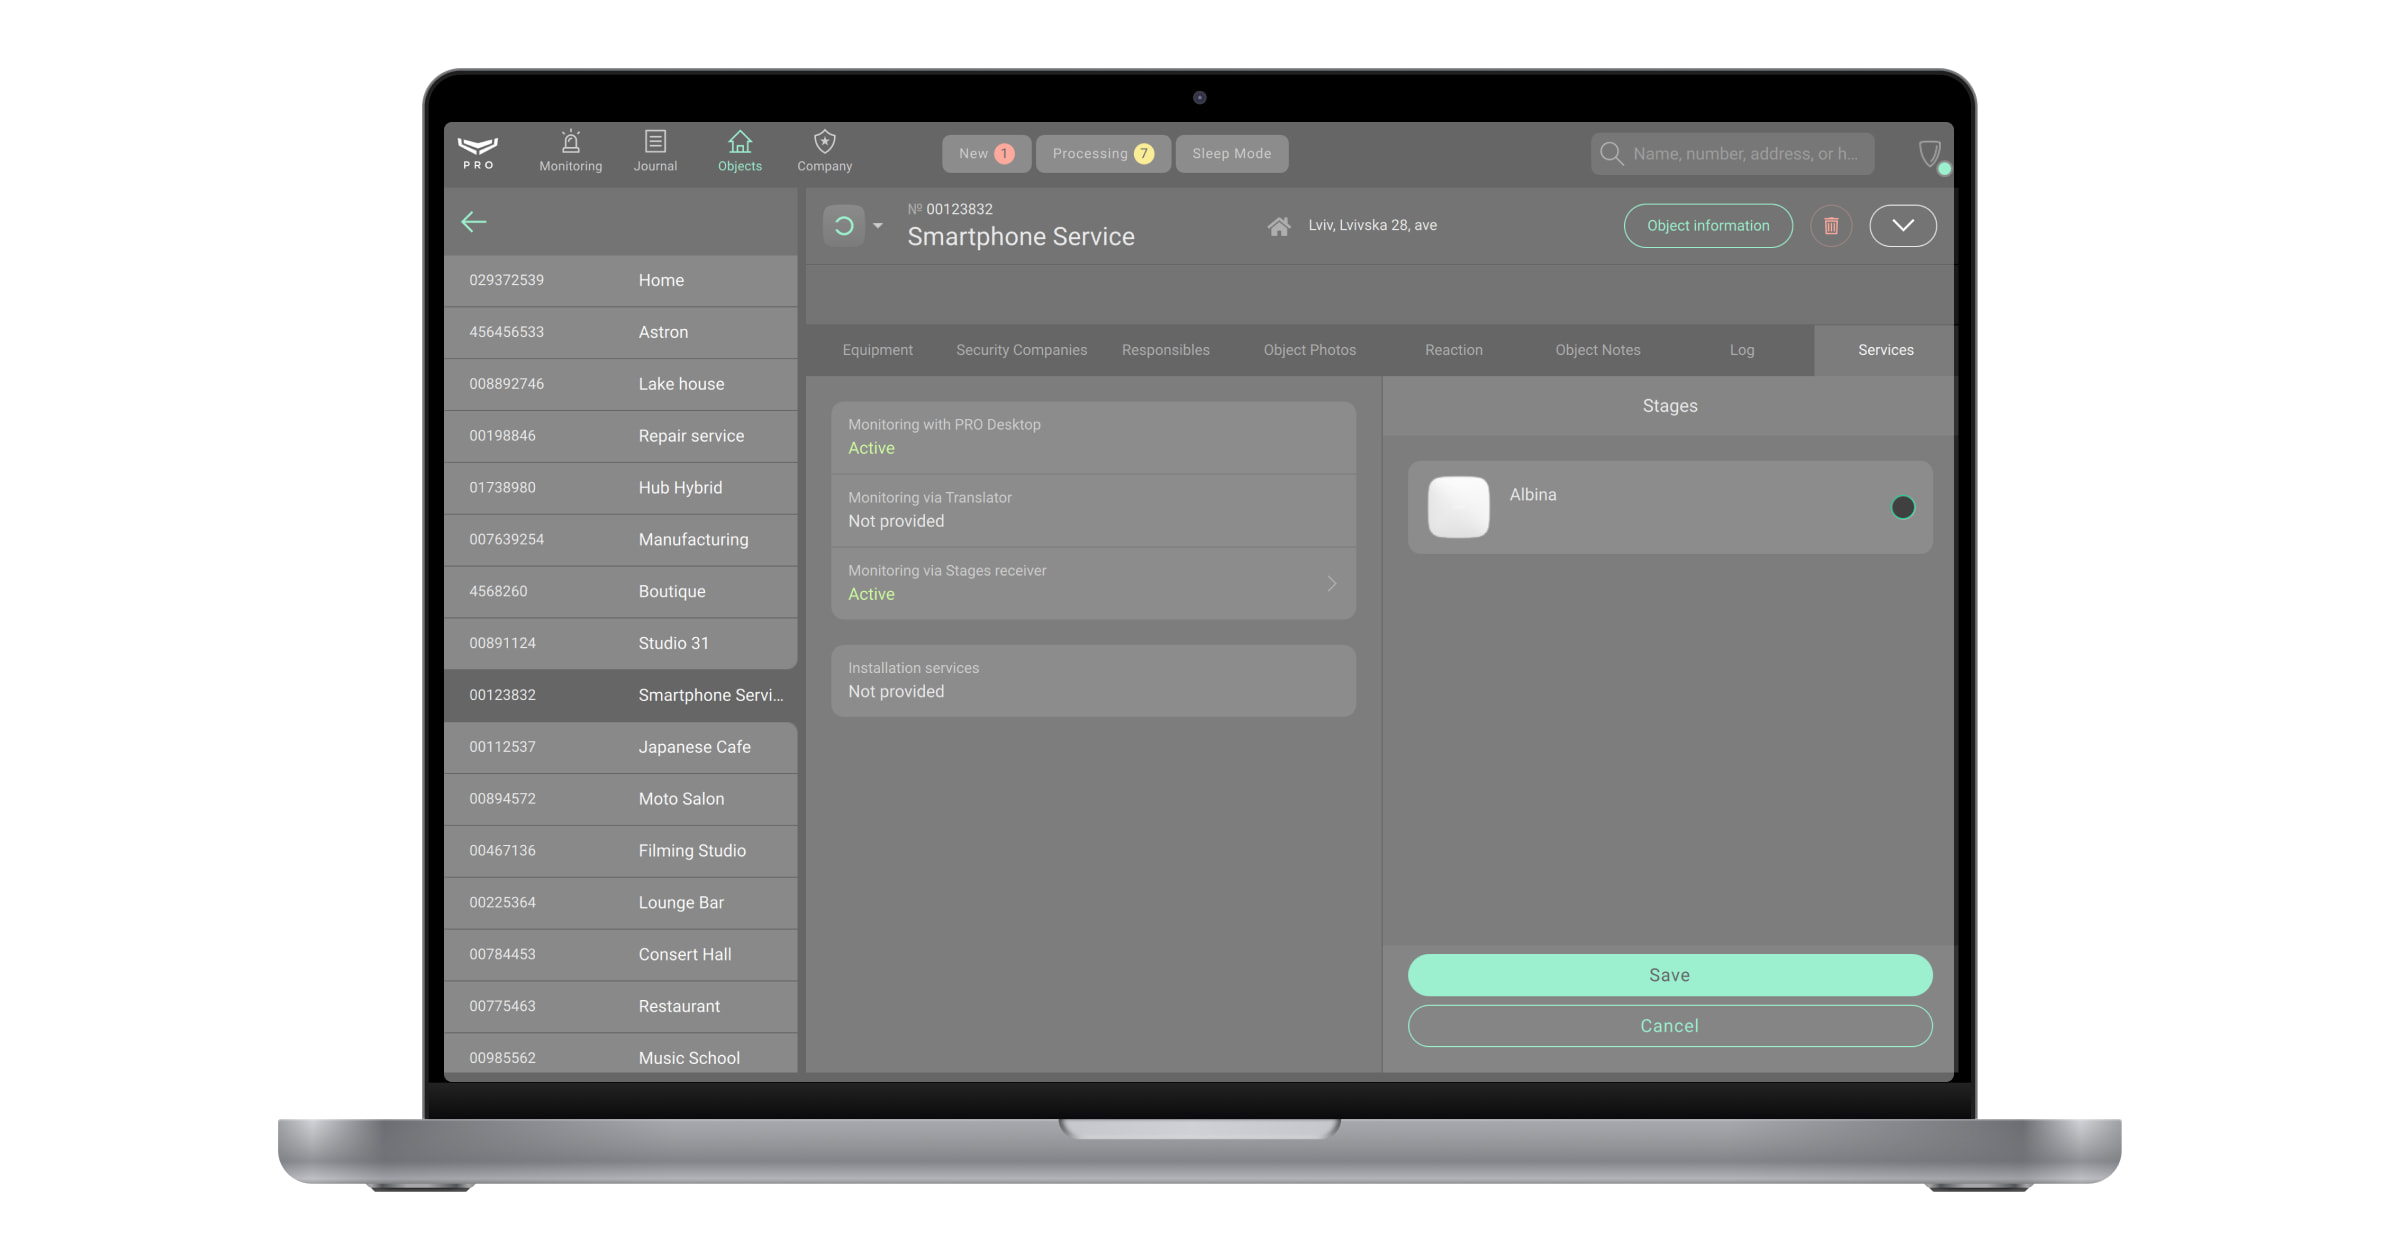
Mapping of the hub to the receiver
The Senior CMS Engineer and the CMS Engineer have the right to create, update, and view the mapping of the hub to the receiver. The Head of operators and the Operator can only view the mapping of the hub to the receiver.
To do this:
- Select the Objects module from the list of modules in the upper left corner of the screen.
- Select the object you want to map to the receiver.
- Click the Maintenance to view monitoring states.
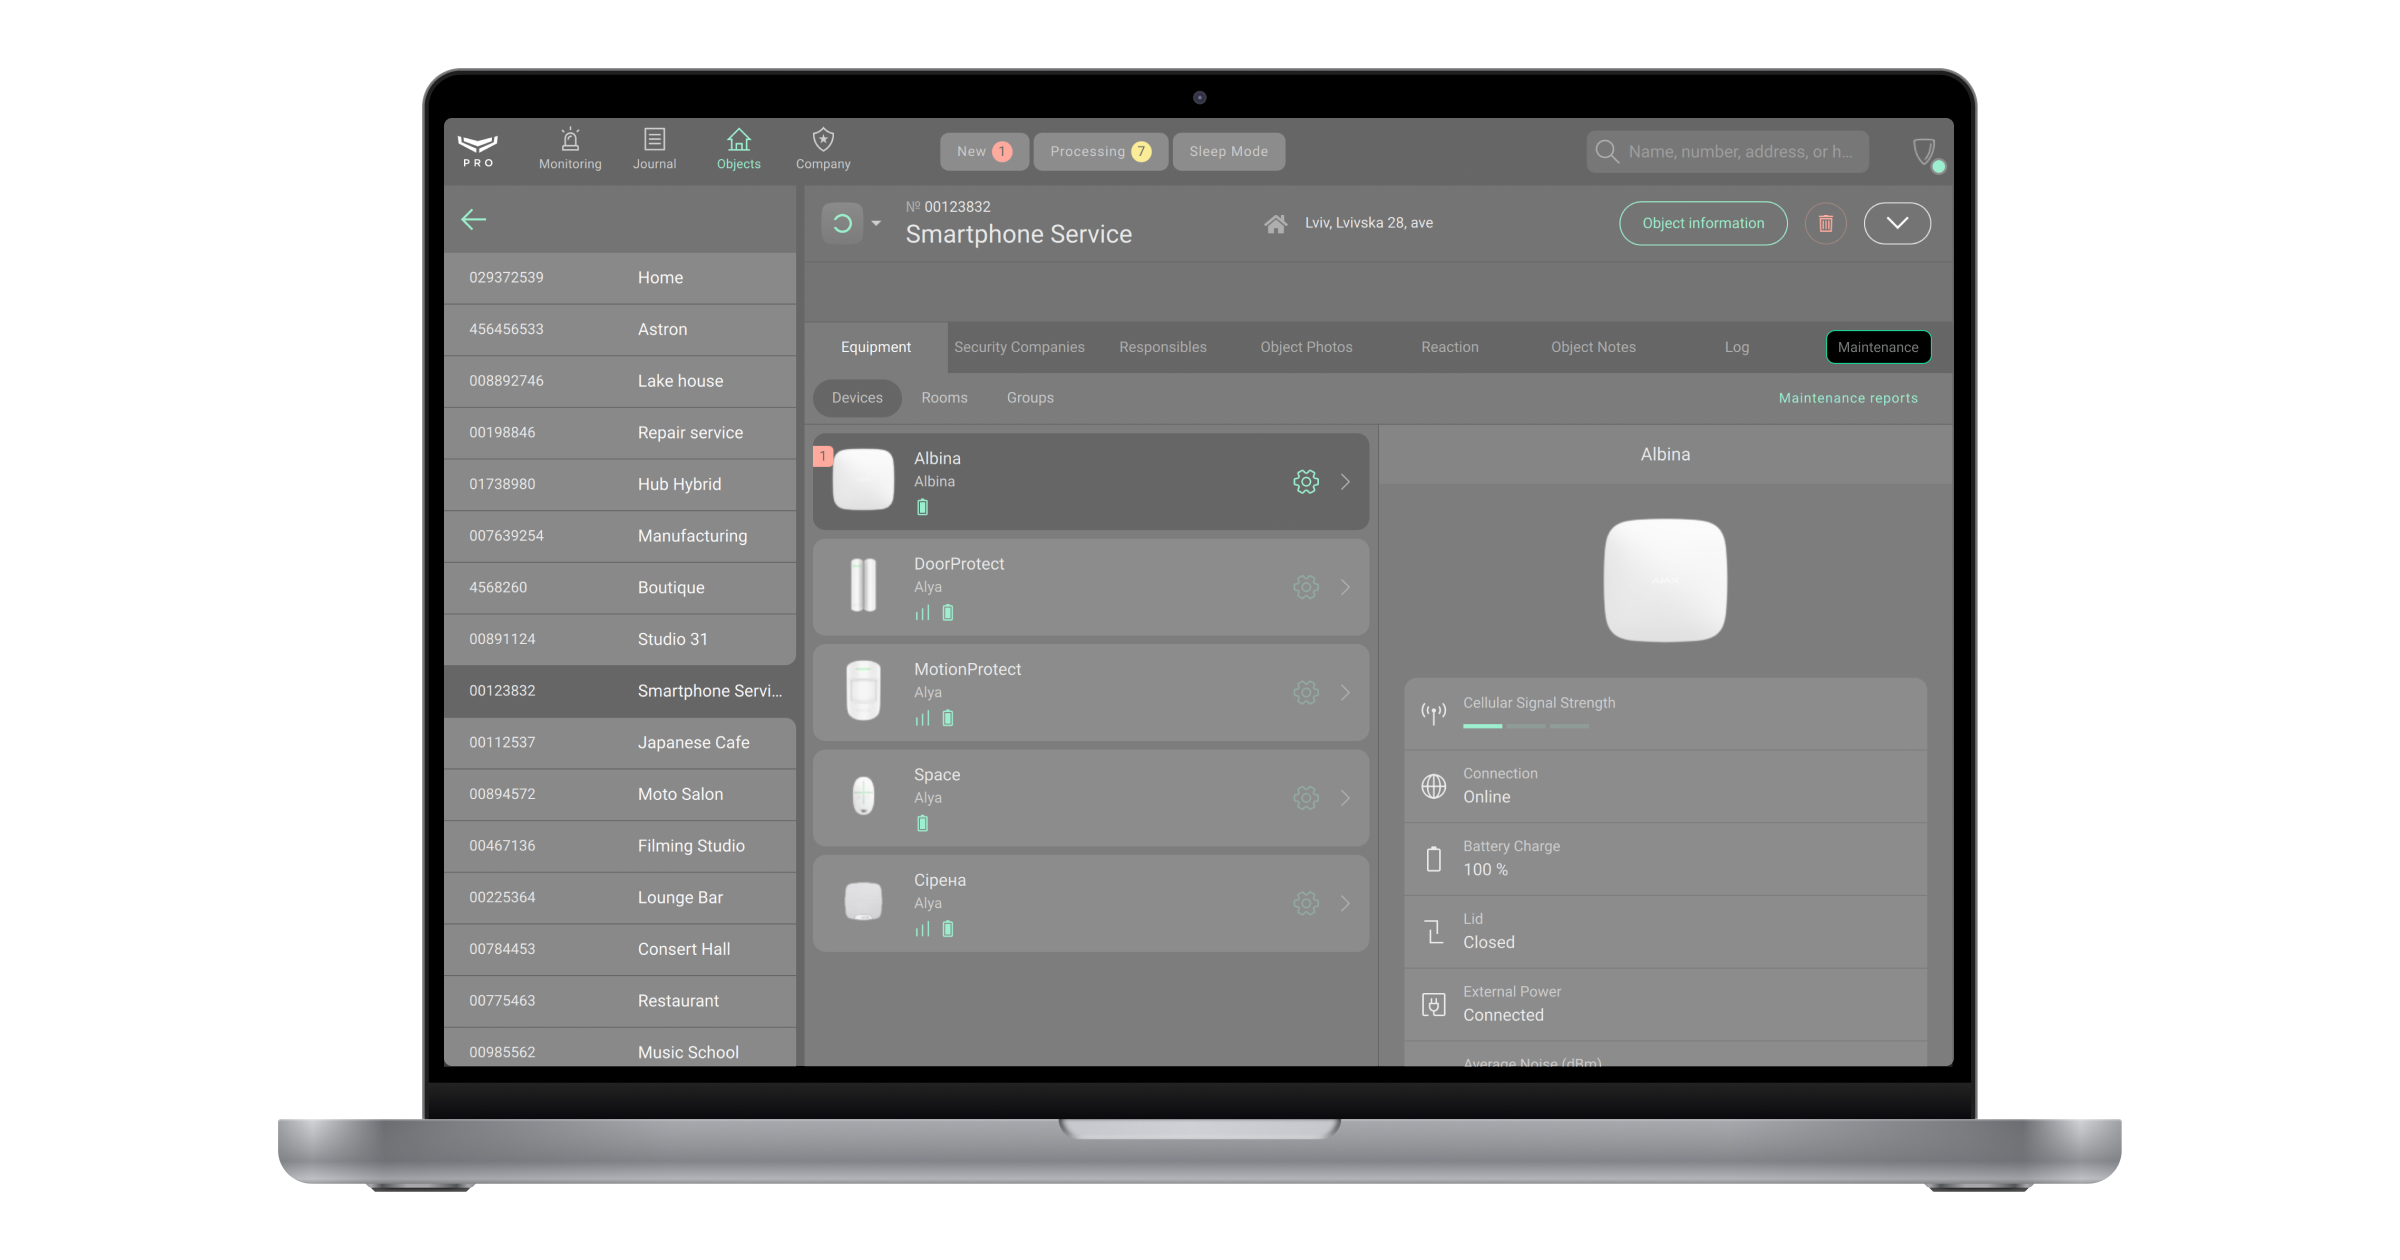
- Click the Monitoring via
<Name>receiver button.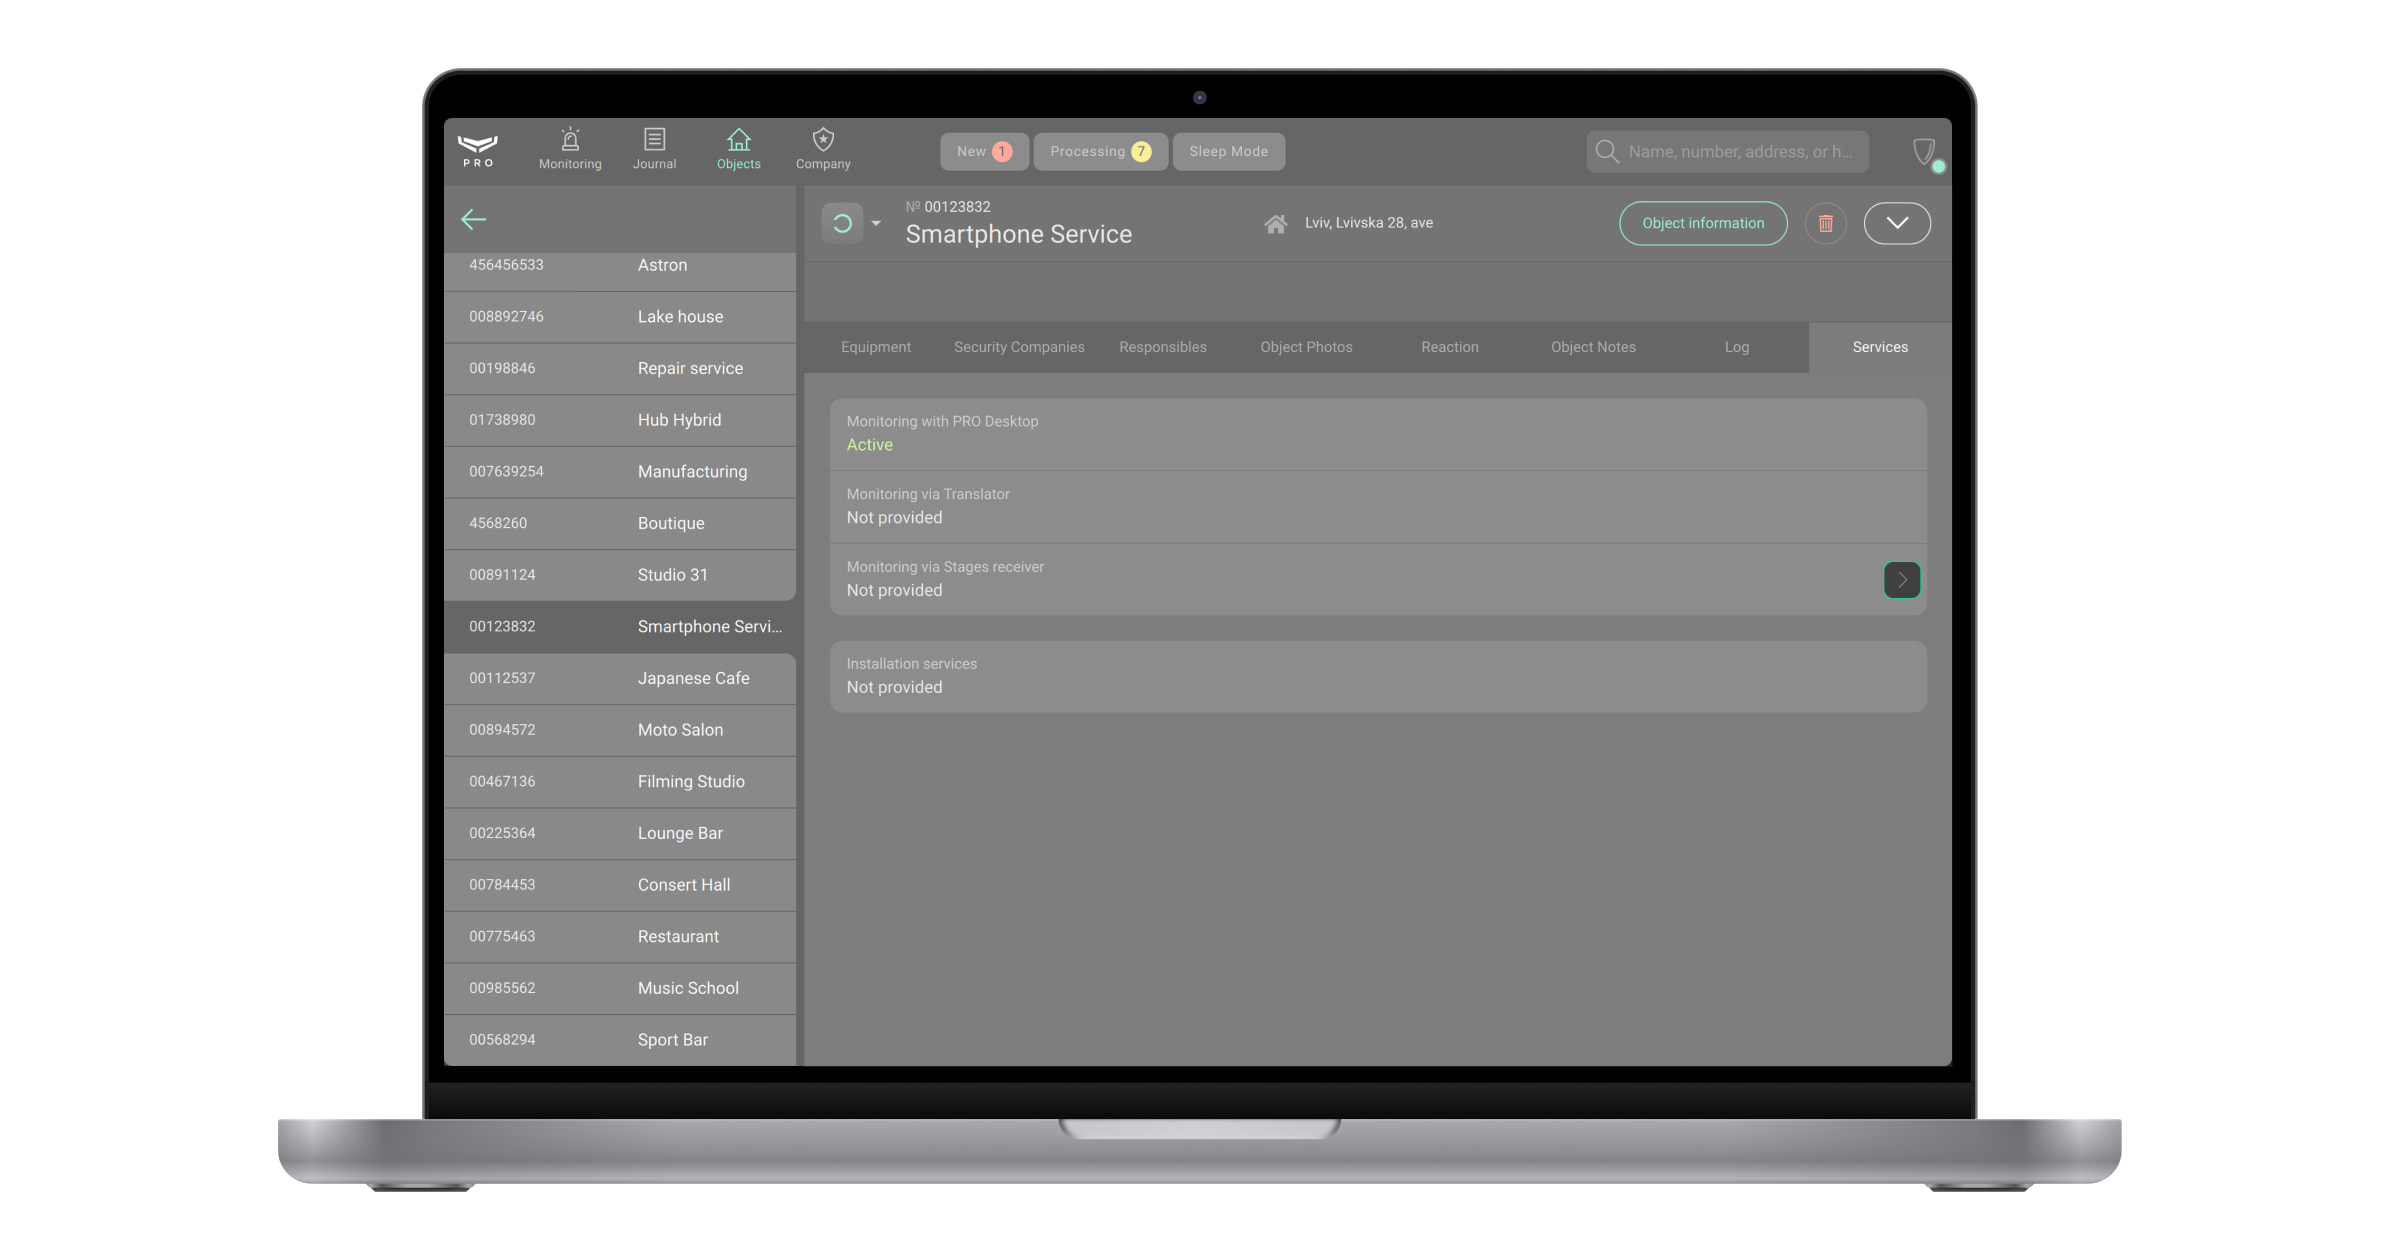
- Select the hub you want to map to the receiver.
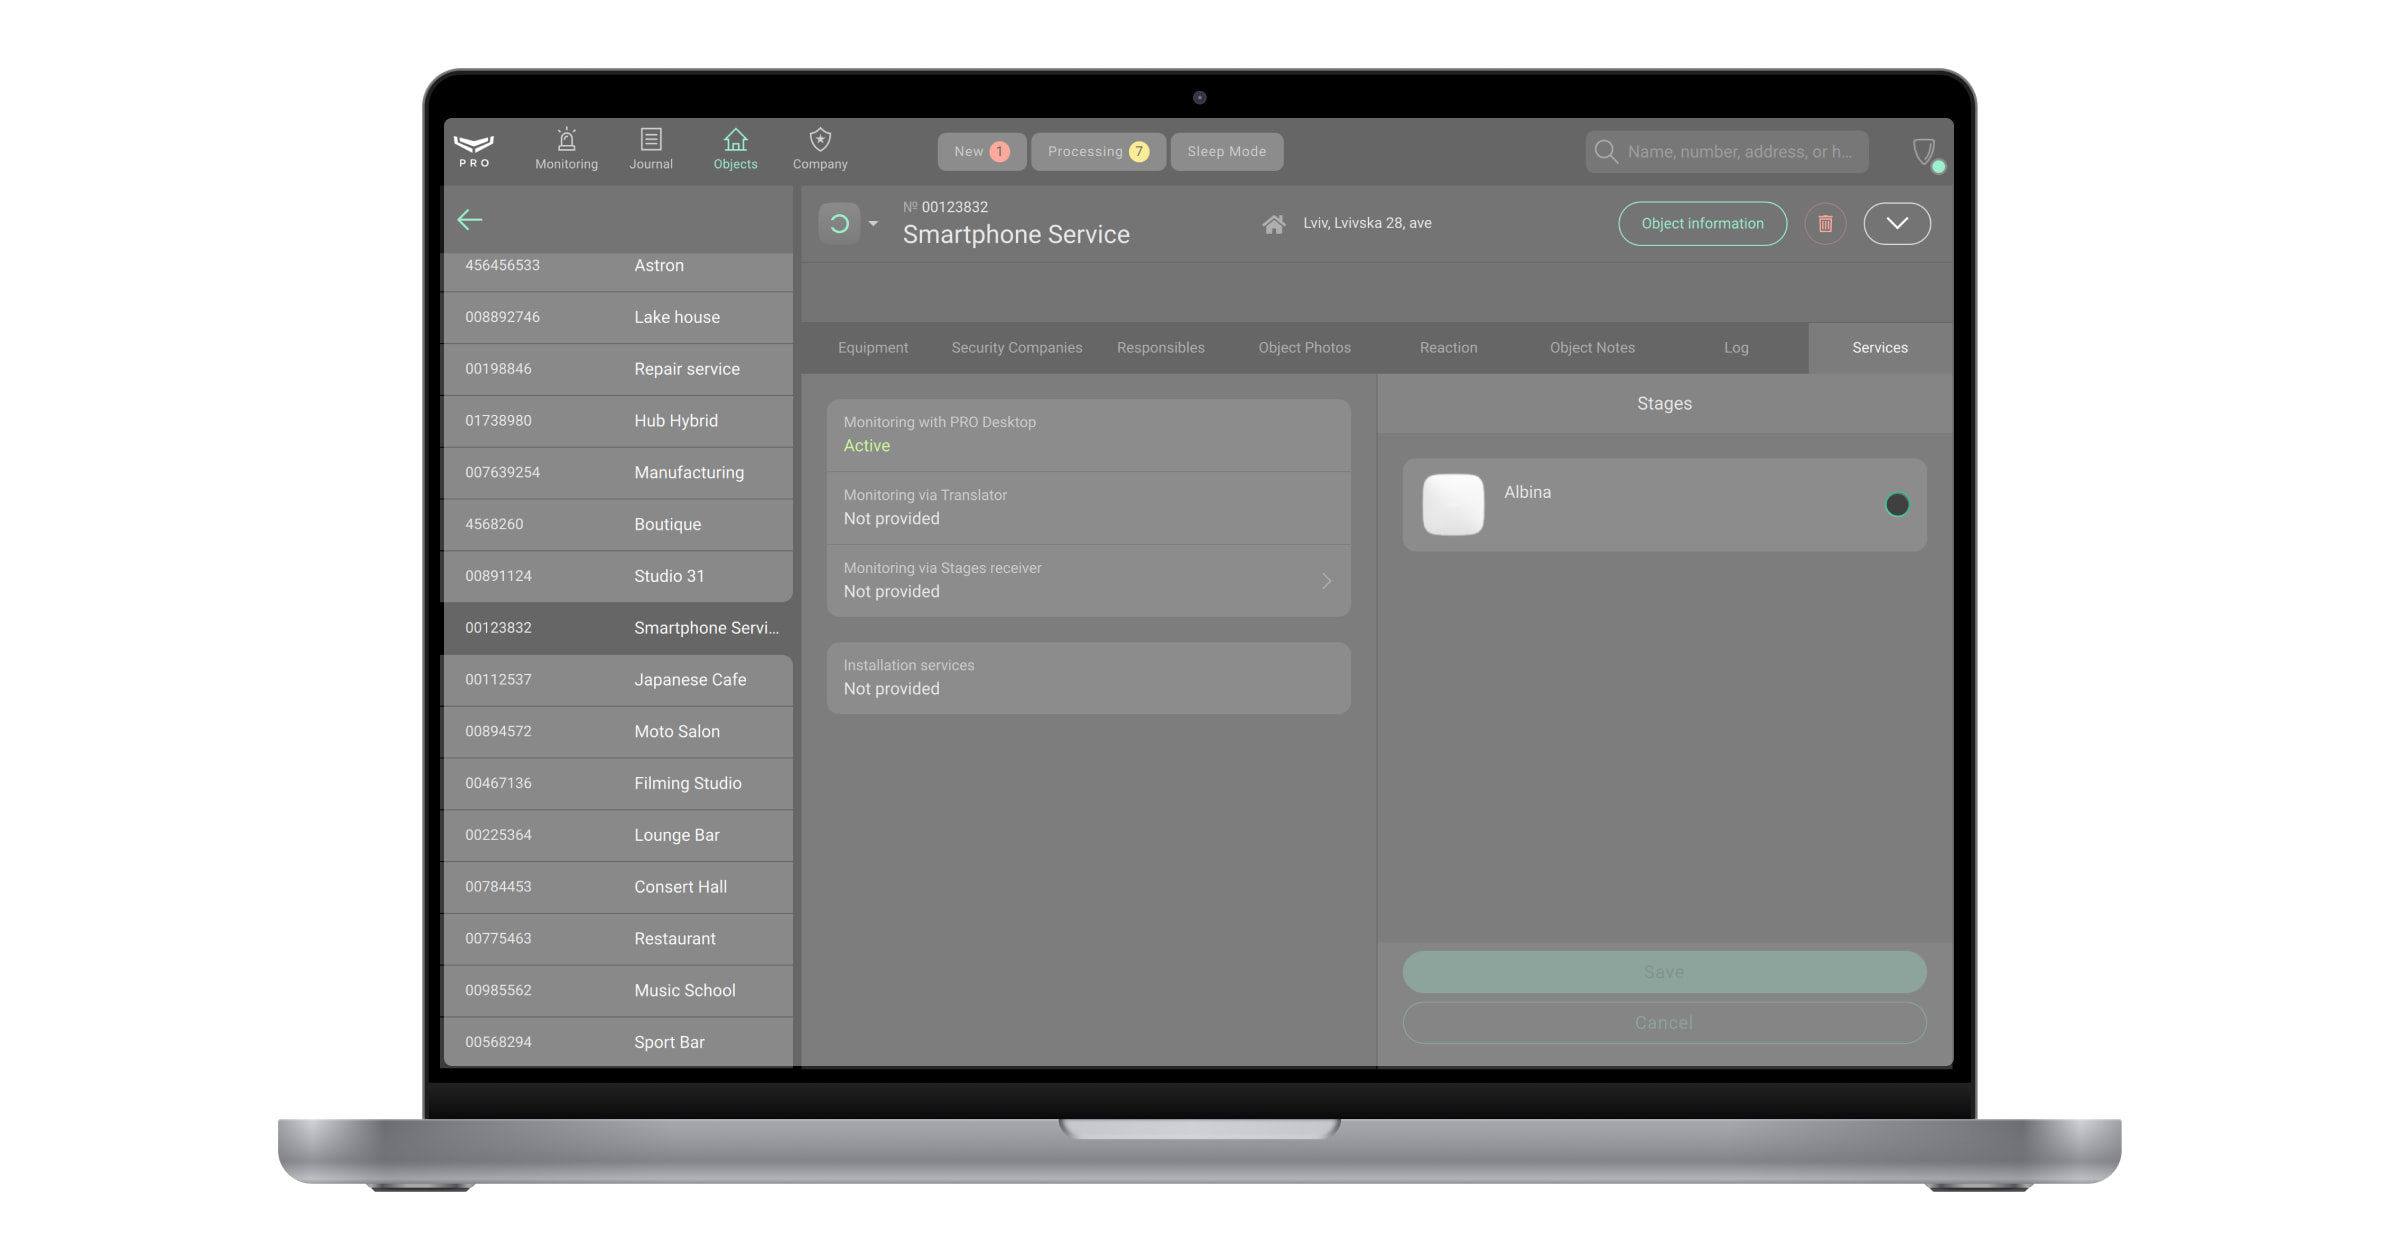
- Specify the Account number that is used for messages sent to the receiver. This is not the account number from the Ajax PRO Desktop app, but it may be the same. All hubs mapped to one receiver have a unique account number.
- Click Save. After that, the state Monitoring via
<Name>receiver will be changed from Not provided to Active.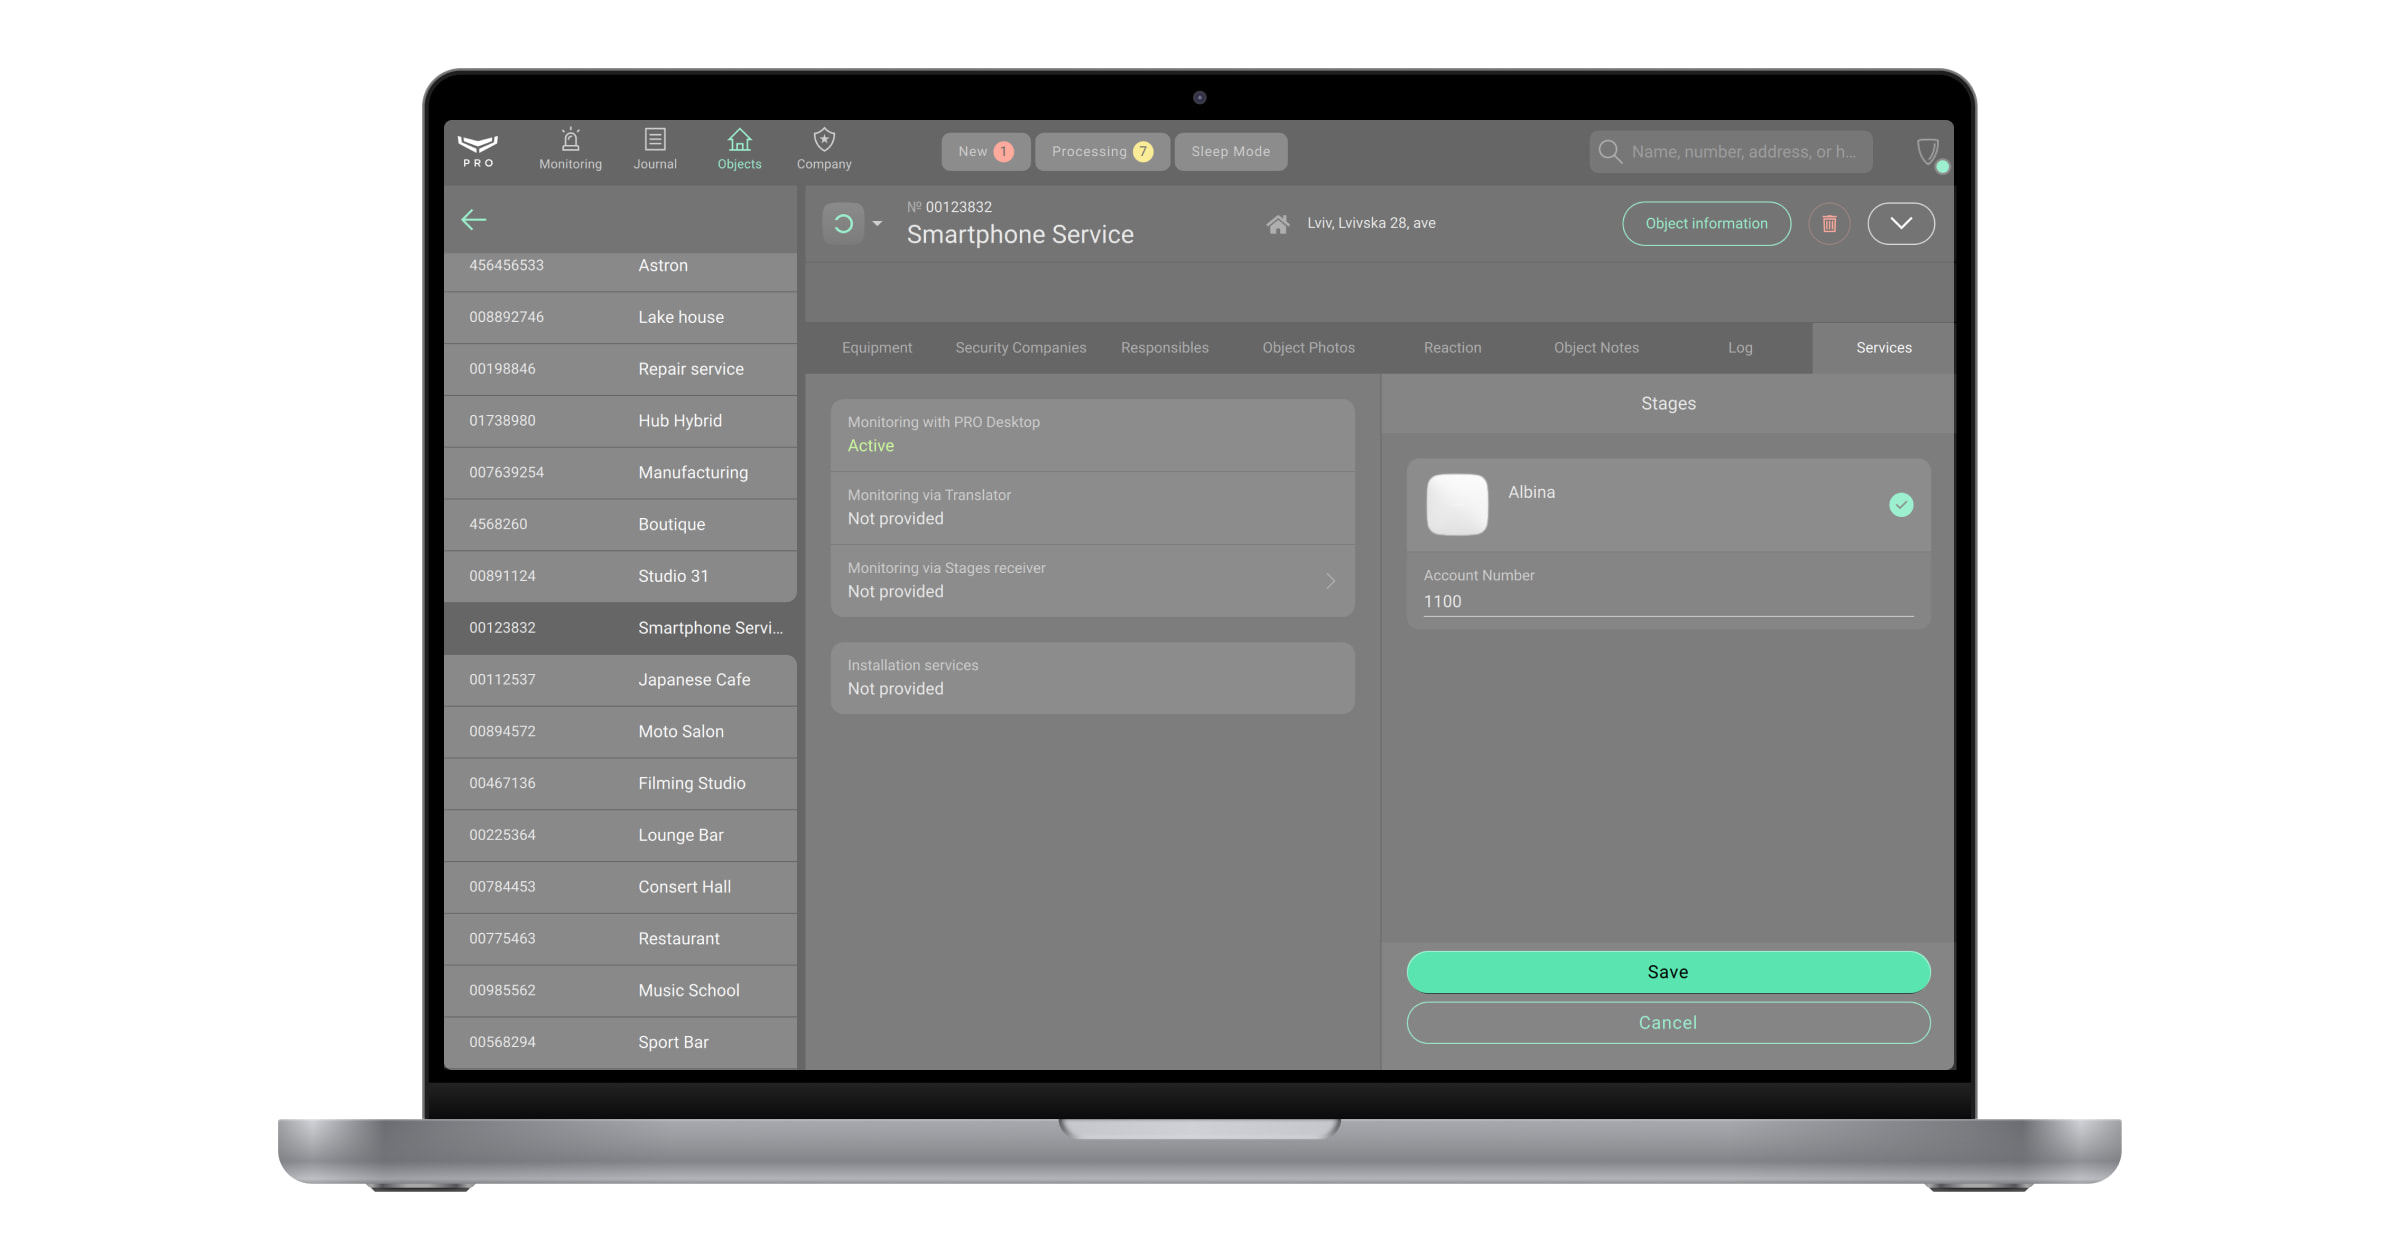
With Ajax PRO Desktop 4.0 or later, it’s available to activate/deactivate the Monitoring with PRO Desktop channel for any monitoring company.
Migrating objects from Ajax Translator to Ajax Cloud Signaling
An Ajax system allows users to independently export objects bound to Ajax Translator. This app generates a CSV file containing the hub ID and account number of active bindings. The file can then be uploaded to Ajax PRO Desktop to the selected Translator or Cloud signaling receiver.
Delete mapping of the hub to the receiver
The Senior CMS Engineer and the CMS Engineer have the right to delete the hub mapping.
To do this:
- Select the Objects module from the list of modules in the upper left corner of the screen.
- Select the object you no longer want to map to the receiver.
- Click Maintenance to view monitoring states.
- Click the Monitoring via
<Name>receiver button. - Select the hub you no longer want to map to the receiver.
- Click Save.
- Click the Stop monitoring button on the pop-up window. After that, the state Monitoring via
<Name>receiver will be changed from Active to Not provided.
Receiver events
Ajax PRO Desktop provides a detailed log of system alarms and events, as well as employee actions within the app. Log entries in the Journal module are stored for up to three years. Older entries are deleted. Alarm logs include a timestamp of when the event occurred in the space.
The Company owner, CMS Engineer, Senior CMS Engineer, Head of operators, Operator, and Head of installers have access to the Journal module.
To view receiver events:
- Select the Journal module from the list of modules in the upper-left corner of the screen.
- Select the object.
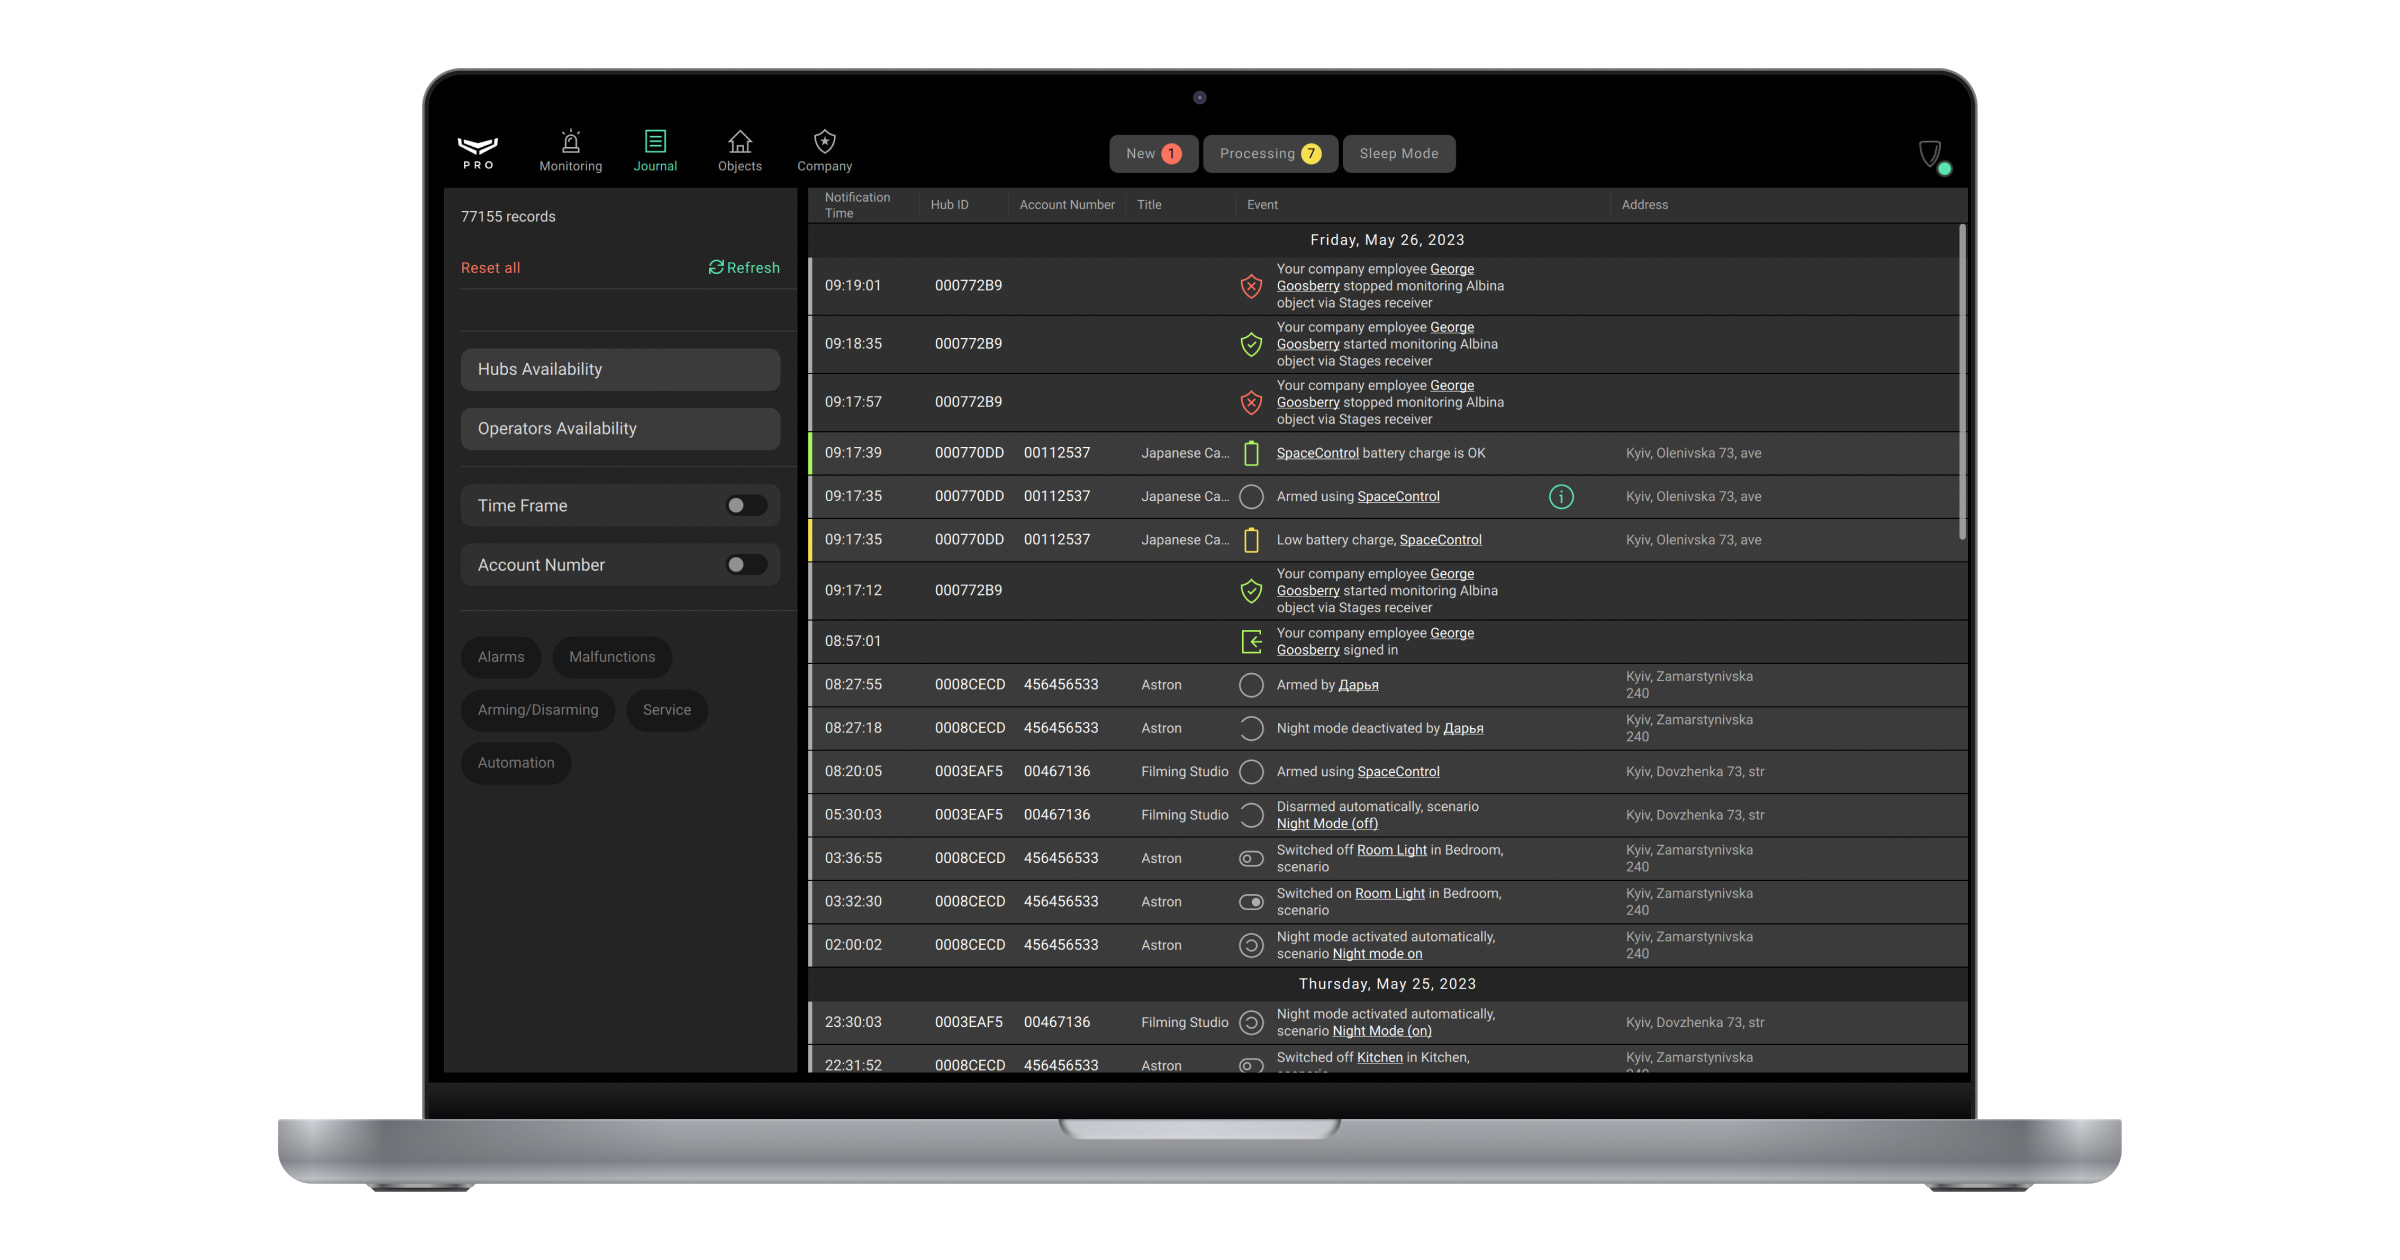
The Journal module will display a list of receiver events:
- Your company’s employee added a new receiver for cloud signaling monitoring.
- Your company’s employee changed the receiver settings.
- Your company’s employee deleted the receiver.
- The receiver lost connection via the primary/secondary address.
- The receiver restored connection via the primary/secondary address.
- Your company’s employee started monitoring the object via the receiver.
- Your company’s employee updated the object’s account number for the receiver.
- Your company’s employee stopped monitoring the object via the receiver.
Set the range and apply it to filter events by time. To generate a report based on the specified parameters, click the report generation button next to the filter name.
Log timestamps and time synchronization
Log timestamps are taken from the local machine where the logs are displayed, provided that its time is synchronized with the server UTC time (the local time zone is also taken into account). If the local machine time differs from the server time, the system displays a notification with instructions on how to correct it.
To synchronize Ajax Cloud Signaling with UTC time, enable automatic date and time settings on your computer:
- Go to date and time settings.
- Check the box to enable time synchronization with the server.
If the local machine time is not synchronized with the server, the server time is used for log timestamps.
Deleting the receiver
Only Senior CMS Engineer has the right to delete the receiver.
To delete the receiver, in Ajax PRO Desktop:
- Open the Company module.
- Click on the CMS connection menu.
- Click the
 button.
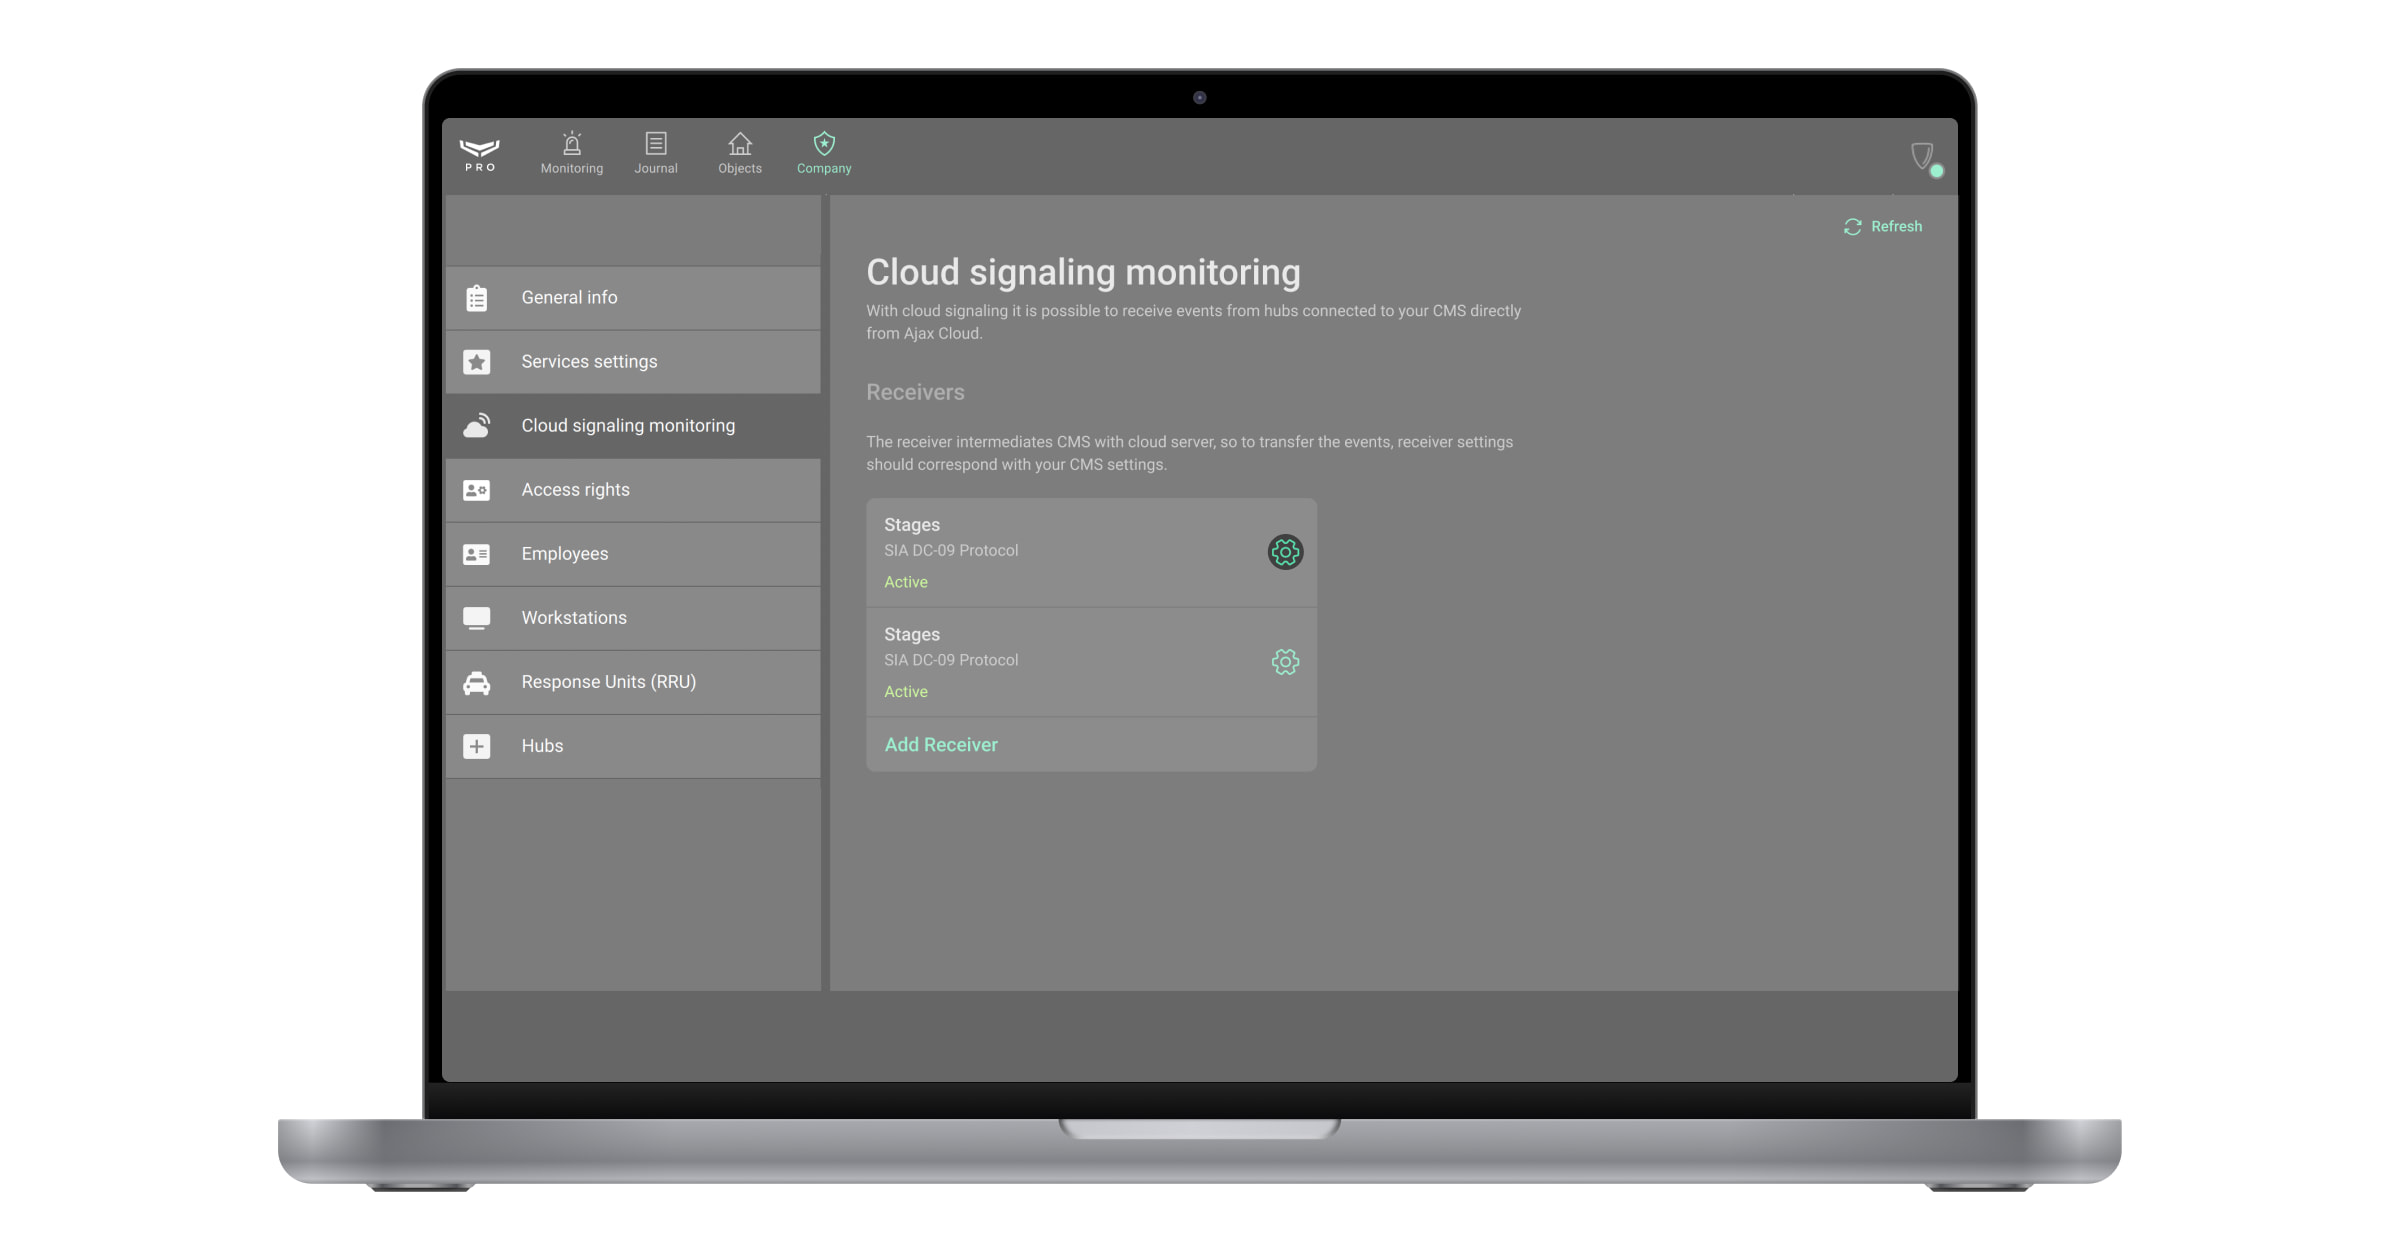
- Click the Delete receiver button.
- Click the Delete button on the pop-up window. When the receiver is deleted, all its settings are erased, and all connected hubs stop sending their events to the corresponding CMS.
The receiver cannot be deleted if at least one hub is mapped to that receiver. You should previously delete mapping of all hubs to the receiver.
