Socket — wireless smart plug with energy monitor, performed as a European type socket-to-plug adapter (Schuko type F) designed for controlling the power supply of electrical devices and rated at a load of up to 2.5 kW. It is equipped with overload protection, energy consumption meter and load level indicator. The device is connected to the Ajax security system via Jeweller secure technology, the communication range is up to 1,000 m without obstacles.
Socket only operates with hub. Connection to uartBridge or ocBridge Plus integration modules is not provided
The Ajax security system is self-sustaining, but the user can connect it to the central monitoring station of a private security company.
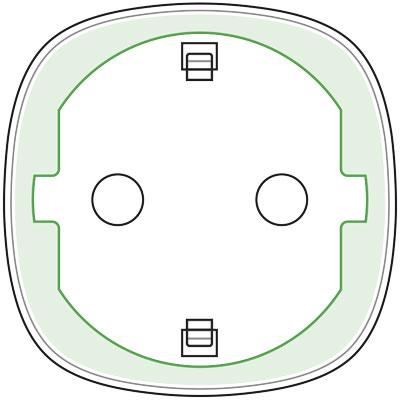
Functional Elements
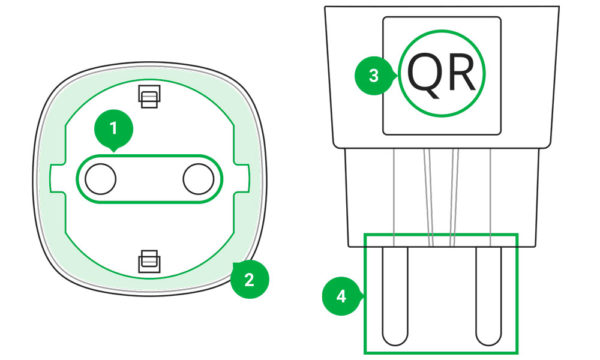
- Two-pin socket
- LED border
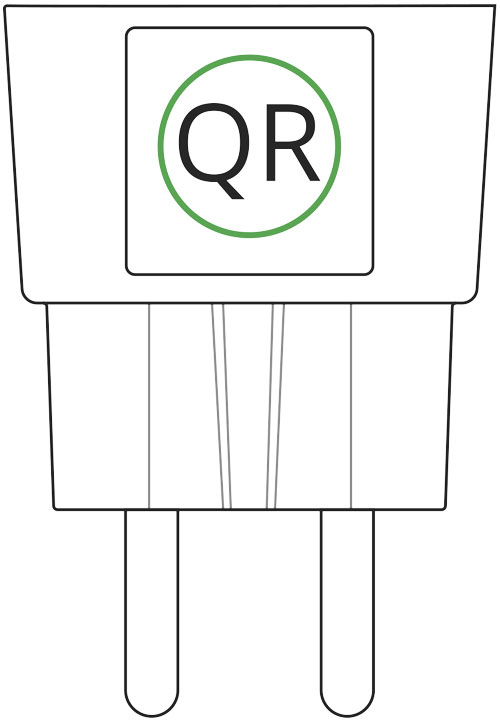
- QR Code
- Two-pin plug
Socket Operating Principle
Socket turns on/off 230 V power supply according to the scenarios or at user command via the Ajax Security System app.
Socket is furnished with a protection system against voltage variation beyond the range of 184 – 253 V or over-current protection above 11А. In this case, power supply is interrupted, resuming after normalization of the voltage and current values.
Maximum resistive load — 2.5 kW. In the case of inductive or capacitive loads, the maximum current is reduced to 8 A at 230 V AC!
You may view the consumed power of the electrical appliances connected via Socket through the application. There is a consumed electricity meter.
Under insignificant loads (below 25 W), inaccurate current and power consumption readings may be displayed due to hardware limitations.
Connecting to the hub
Before starting connection:
- Following the hub manual recommendations, install the Ajax app on your smartphone. Create an account, add the hub to the application, and create at least one room.
- Go to the Ajax app.
- Switch on the hub and check the internet connection (via Ethernet cable and/or GSM network).
- Ensure that the hub is disarmed and does not start updates by checking its status in the mobile application.
- Connect Socket to the power supply and wait for 30 seconds.
Only users with administrative rights can add the device to the hub.
How to connect Socket to the hub:
- Select the Add Device option in the Ajax application.
- Name the device, scan/write manually the QR Code (located on the body and packaging), and select the location room.
- Select Add — the countdown will begin.
- The device should automatically be added to the hub.
If the Socket was previously assigned to the hub, connect a device with a load of at least 22 W for 5 s in the application during countdown (e.g. an electric kettle or iron) and then disconnect the load.
The Socket will not be assigned to the hub if the smart socket communicates with another hub
For the detection and interfacing to occur, the device should be located within the coverage area of the wireless network of the hub (at a single protected object). Request for connection to the hub is transmitted for a short time at the time of switching on the device.
If the connection to Ajax hub failed, wait for 30 seconds and then try to add the device again.
Socket connected to the hub will appear in the list of devices of the hub in the application. Update of the detector statuses in the list depends on the device inquiry time set in the hub settings, with the default value – 36 seconds.
States
- Devices
- Socket
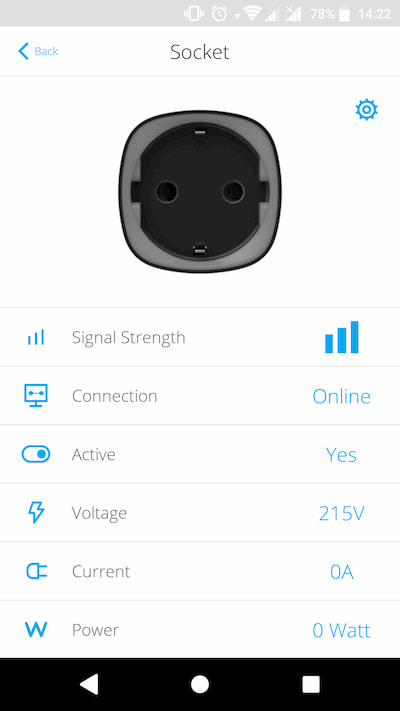
| Parameter | Value |
| Signal Strength | Signal strength between the hub and the Socket |
| Connection | Connection status between the hub and the Socket |
| Active | State of the Socket (turned on/off) |
| Voltage | The current input voltage level of Socket |
| Current | Current at the Socket input |
| Power | Current consumption in W |
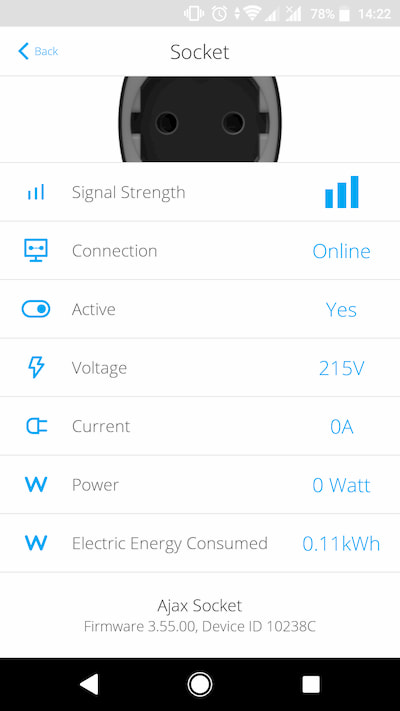
| Electric energy consumed |
The electric power consumed by the device connected to the Socket. The counter is reset when the Socket lose the power |
| Firmware | Device firmware version |
| Device ID | Device identifier |
Settings
- Devices
- Socket
- Settings

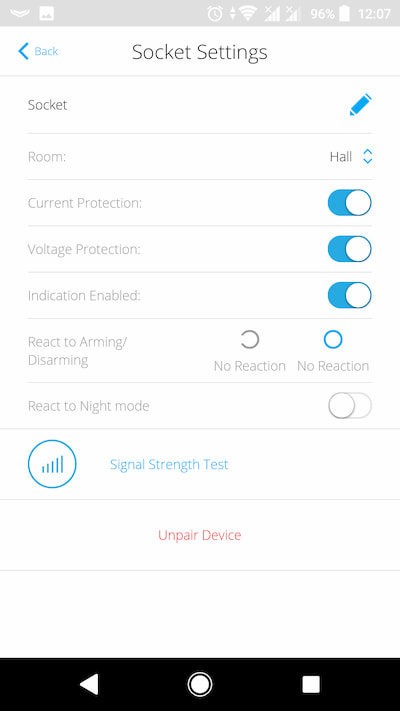
| Setting | Value |
| First field | Device name, can be edited |
| Room | Selecting the virtual room to which the device is assigned |
| Current protection | If active, power supply will be switched off if the strength of current exceeds 11A, in the inactive state the threshold is 16 A (or 13 A, if continues for 5 seconds) |
| Voltage protection | If active, power supply will be switched off in case of a voltage surge beyond the range of 184 – 253 V |
| Indication | The LED border shows the load level by means of color. |
| React to arming/disarming | Selecting a script for the Socket in case of arming/disarming
The Socket can respond separately to both the arming and disarming |
| React to night mode | If active, the arming / disarming scenarios will also work in the night mode |
| Signal Strength Test | Switches the device to the signal strength test mode |
| User Guide | Opens the Socket User Guide |
| Unpair Device | Disconnects the device from the hub and deletes its settings |
Indication
The Socket informs the user of the power level consumed by connected appliances using the LED border.
If the load is more than 3 kW (purple), the current protection activates.
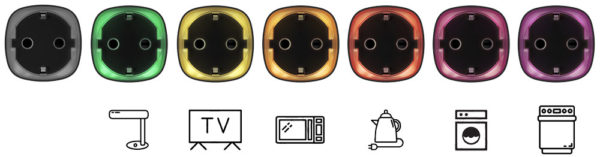
| Load level | Indication |
| No power on the Socket | Don’t have any indication |
| Socket turned off | Blue |
| Socket turned on, no load | Green |
| ~550 W | Yellow |
| ~1250 W | Orange |
| ~2000 W | Red |
| ~2500 W | Dark red |
| ~3000 W | Purple |
| One or more defenses triggered | Smoothly lights up and goes out red |
| Hardware failure | Quick red flashes |
The exact power can be seen in the Ajax Security System app.
Functionality Testing
The Ajax security system allows conducting tests for checking the functionality of connected devices.
The tests do not start straight away but within a period of 36 seconds when using the standard settings. The test time start depends on the settings of the detector scanning period (the paragraph on “Jeweller” settings in hub settings).
Installation of the Device
When choosing an installation place for the Socket, please consider the device remoteness from the hub and presence of objects that may obstruct the RF signal.
Do not install the device near sources of magnetic fields (magnets, magnetized objects, wireless chargers, etc.) and inside rooms with temperature and humidity outside the permissible limits!
To check the quality of the communication with the hub, test the signal strength in the Ajax Security System app for at least one minute.
If the device has a low or unstable signal strength, use a radio signal range extender ReX.
The Socket is designed to connect to a European two-pin socket (Schuko type F).
Maintenance
The device does not require maintenance.
Tech specs
| Actuating element | Electromagnetic relay |
| Service life | At least 200,000 switches |
| Voltage and type of external power supply | 230 V ±10% AC 50 Hz |
| Voltage protection for 230 V mains | Yes, 184–253 V |
| Maximum load current | 11 A (continuous), 13A (up to 5 s) |
| Maximum current protection | Yes, 11 A if the protection is turned on, up to 13 A if the protection is turned off |
| Maximum temperature protection | Yes, +85°С. The socket turns off automatically if the temperature is exceeded |
| Electric shock protection class | Class I (with grounding terminal) |
| Energy consumption parameter check | Yes (current, voltage, power consumption) |
| Load indicator | Yes |
| Output power (resistive load at 230 V) | Up to 2.5 kW |
| Average energy consumption of the device on standby | Less than 1 W⋅h |
| Frequency band | 868.0 – 868.6 MHz |
| Maximum radio signal power | 25 mW |
| Radio signal modulation | GFSK |
| Radio signal range | Up to 1000 m (when there are no obstacles) |
| Operating temperature range | From 0°С to +40°С |
| Operating humidity | up to 75% |
| Protection class | IP20 |
| Overall dimensions | 65.5 х 45 х 45 mm (with plug) |
| Weight | 58 g |
In case of using inductive or capacitance load, the maximum switched current is reduced to 8 A at 230 V AC!
Complete Set
- Socket
- Quick Start Guide
Warranty
Warranty for the “AJAX SYSTEMS MANUFACTURING” LIMITED LIABILITY COMPANY products is valid for 2 years after the purchase.
If the device does not work correctly, you should first contact the support service—in half of the cases, technical issues can be solved remotely!
Техническая поддержка: [email protected]
