تُمثّل KeyPad TouchScreen لوحة مفاتيح لاسلكية مزوّدة بشاشة تعمل باللمس مُصمّمة لإدارة نظام Ajax الأمني. ويمكن للمستخدمين المصادقة باستخدام الهواتف الذكية، ومفاتيح التحكُّم عن بُعد Tag، وبطاقات Pass، والرموز. الجهاز مُصمّم للاستخدام داخل المنشآت فقط.
تتصل KeyPad TouchScreen بلوحة التحكُّم عبر بروتوكولين لاسلكيين آمنين. تستخدم لوحة المفاتيح بروتوكول Jeweller لإرسال الإنذارات والأحداث، وبروتوكول Wings لتحديث البرامج الثابتة، ونقل قائمة المجموعات، والغرف، وغيرها من المعلومات الإضافية. يصل نطاق الاتصال في مساحة مفتوحة إلى 5,550 قدمًا.
العناصر الوظيفية
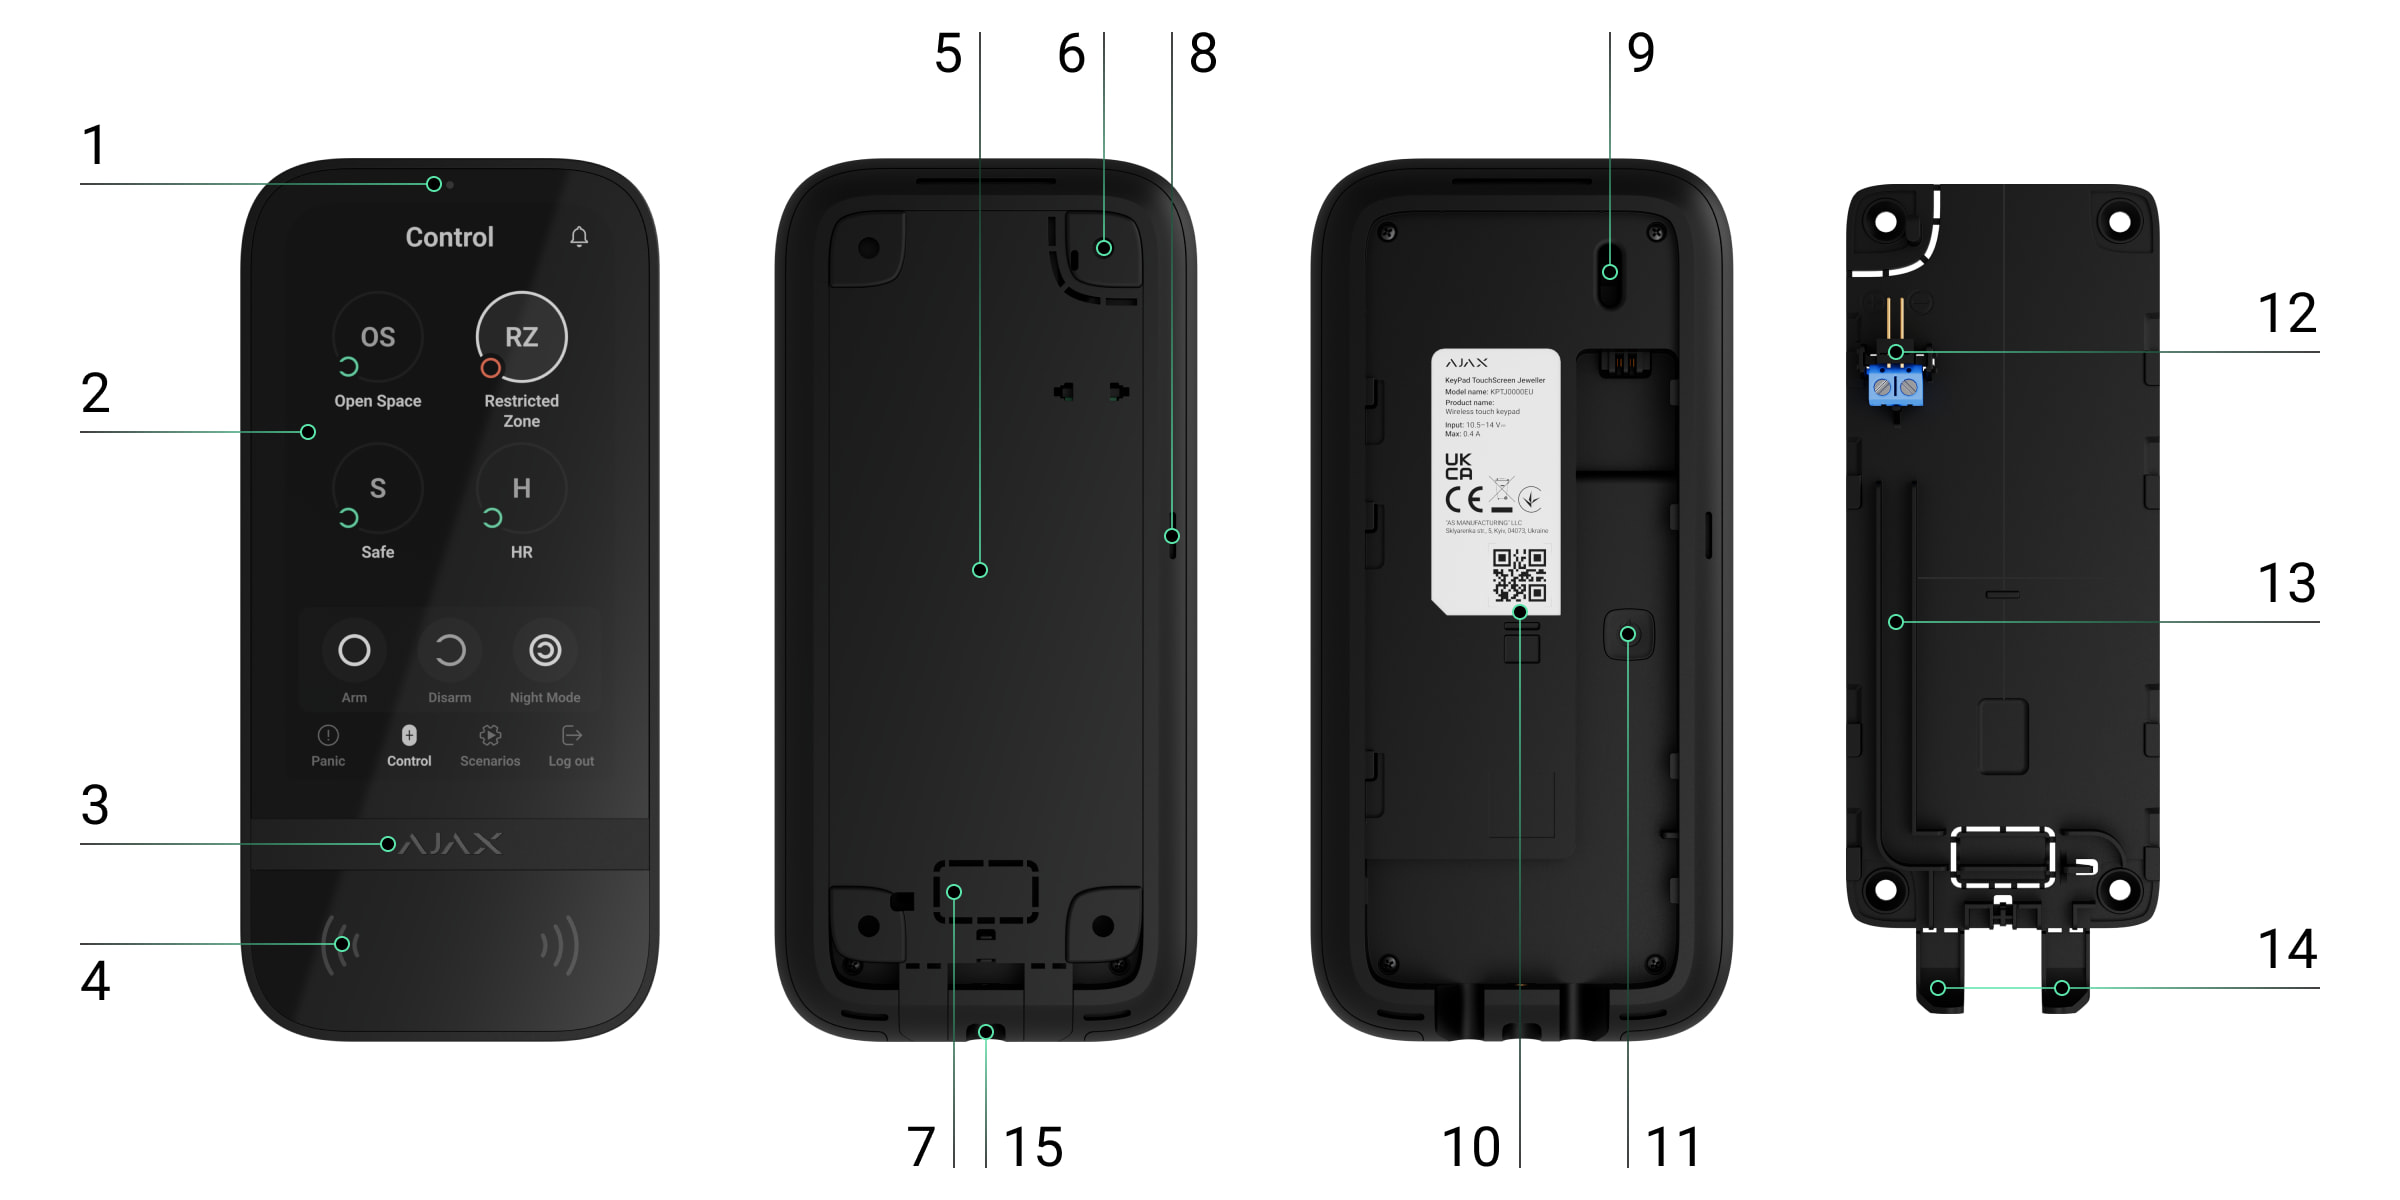
- مستشعر الضوء المحيط لضبط سطوع الإضاءة الخلفية تلقائيًا.
- شاشة IPS تعمل باللمس قطرها 5 بوصات.
- شعار Ajax مع مؤشر LED.
- البطاقات/مفاتيح تحكُّم عن بُعد/قارئ يعمل بالبلوتوث.
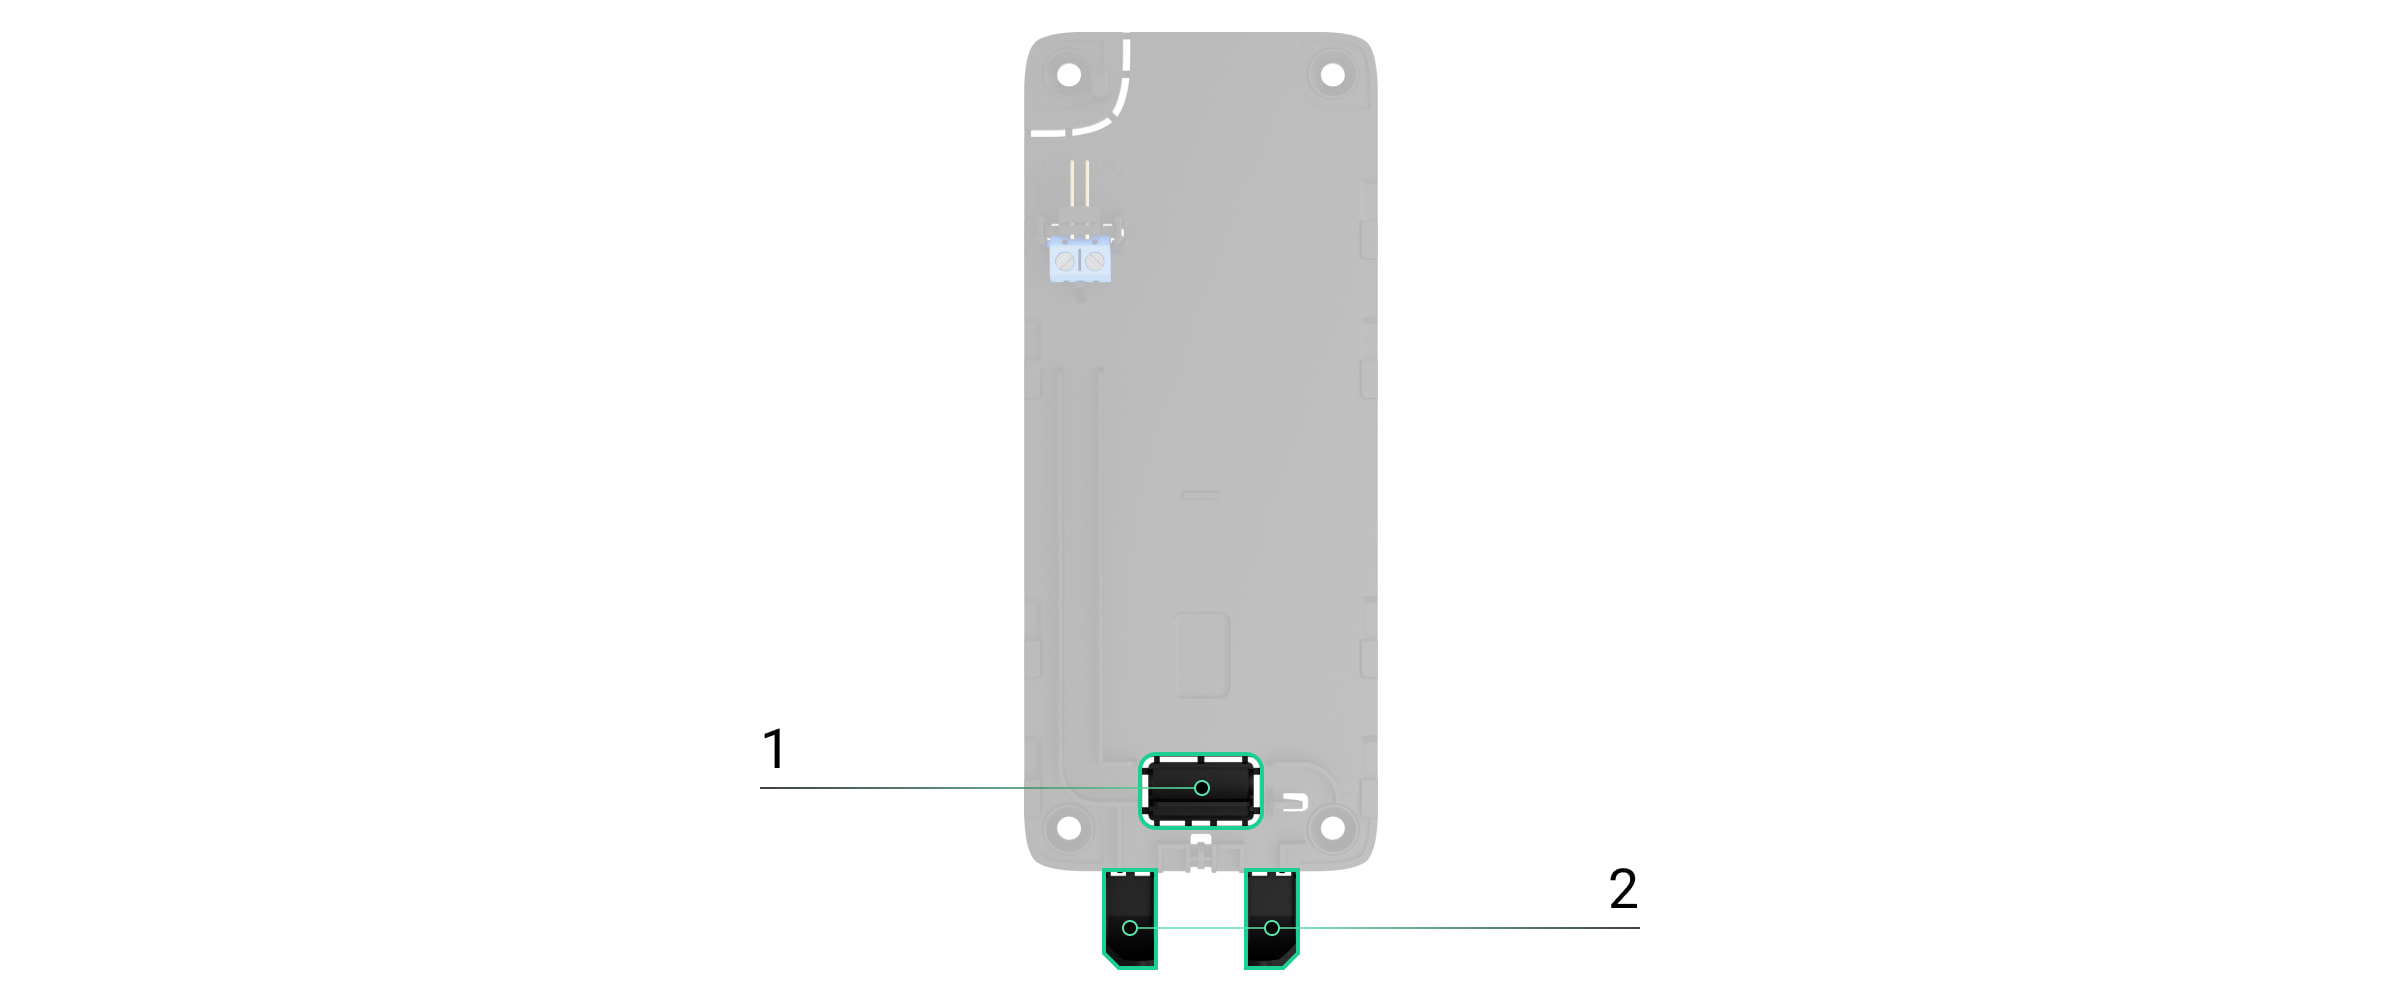
- لوحة التعليق SmartBracket. لإزالة اللوحة، حرّكها لأسفل.
- جزء مثقوب من لوحة التعليق لتحفيز زر الحماية من التلاعب عند محاولات فصل لوحة المفاتيح عن السطح. فلا تكسره.
- جزء مثقوب في لوحة التعليق لتمرير الكابلات عبر الحائط.
- جرس مُدمج.
- زر الحماية من التلاعب.
- رمز الاستجابة السريعة (QR) مع معرّف الجهاز لإضافة لوحة المفاتيح إلى نظام Ajax.
- زر التشغيل.
- أطراف لتوصيل وحدة إمداد طاقة خارجية (غير مُرفقة). يمكن إزالة الأطراف من الحوامل عند الضرورة.
- قناة الكابل لتمرير الكابل من وحدة إمداد الطاقة من مصنّعين آخرين.
- جزء مثقوب في لوحة التعليق لتمرير الكابلات من الأسفل.
- فتحة تركيب لوحة التعليق SmartBracket باستخدام مسمار تثبيت.
لوحات التحكُّم و موسعات النطاق المتوافقة
تتطلب لوحة المفاتيح وجود لوحة تحكّم متوافقة مع OS Malevich 2.16.1 أو أحدث للعمل.
مبدأ التشغيل
تتميز KeyPad TouchScreen بجرس مُدمَج، وشاشة تعمل باللمس، وقارئ لتفويض بلا تلامس. يمكن استخدام لوحة المفاتيح لتغيير أوضاع الأمن والتحكُّم في أجهزة التشغيل الآلي، بالإضافة إلى الإخطار بإنذارات النظام.
يمكن للوحة المفاتيح ضبط سطوع الإضاءة الخلفية تلقائيًا وتنشط عند الاقتراب. الحساسية قابلة للتعديل في التطبيق. واجهة KeyPad TouchScreen منسوخة من تطبيق Ajax Security System. ويمكن الاختيار بين الواجهة الفاتحة والداكنة. توفر الشاشة اللمسية بحجم 5 بوصات إمكانية الوصول إلى وضع الأمن في المنشأة أو أي مجموعة ويمكنها التحكُّم في سيناريوهات التشغيل الآلي. تعرض الشاشة أيضًا أعطال النظام في حال وجودها (عند تفعيل التحقُّق من سلامة النظام).
واعتمادًا على الإعدادات، يُخطر الجرس المُدمَج في KeyPad TouchScreen بما يلي:
- الإنذارات؛
- تغييرات وضع الأمن؛
- التأخير عند الدخول/الخروج؛
- تحفيز كواشف الفتح.
تعمل لوحة المفاتيح باستخدام بطاريات مُدمَجة. يمكن أيضًا تشغيلها بواسطة وحدة إمداد طاقة تابعة لمصنّعين آخرين ذات نطاق جهد 10.5-14 فولت⎓ وتيار تشغيل لا يقل عن 0.5 أمبير. عند توصيل مصدر طاقة خارجي، تعمل البطاريات المُدمَجة كمصدر طاقة احتياطي.
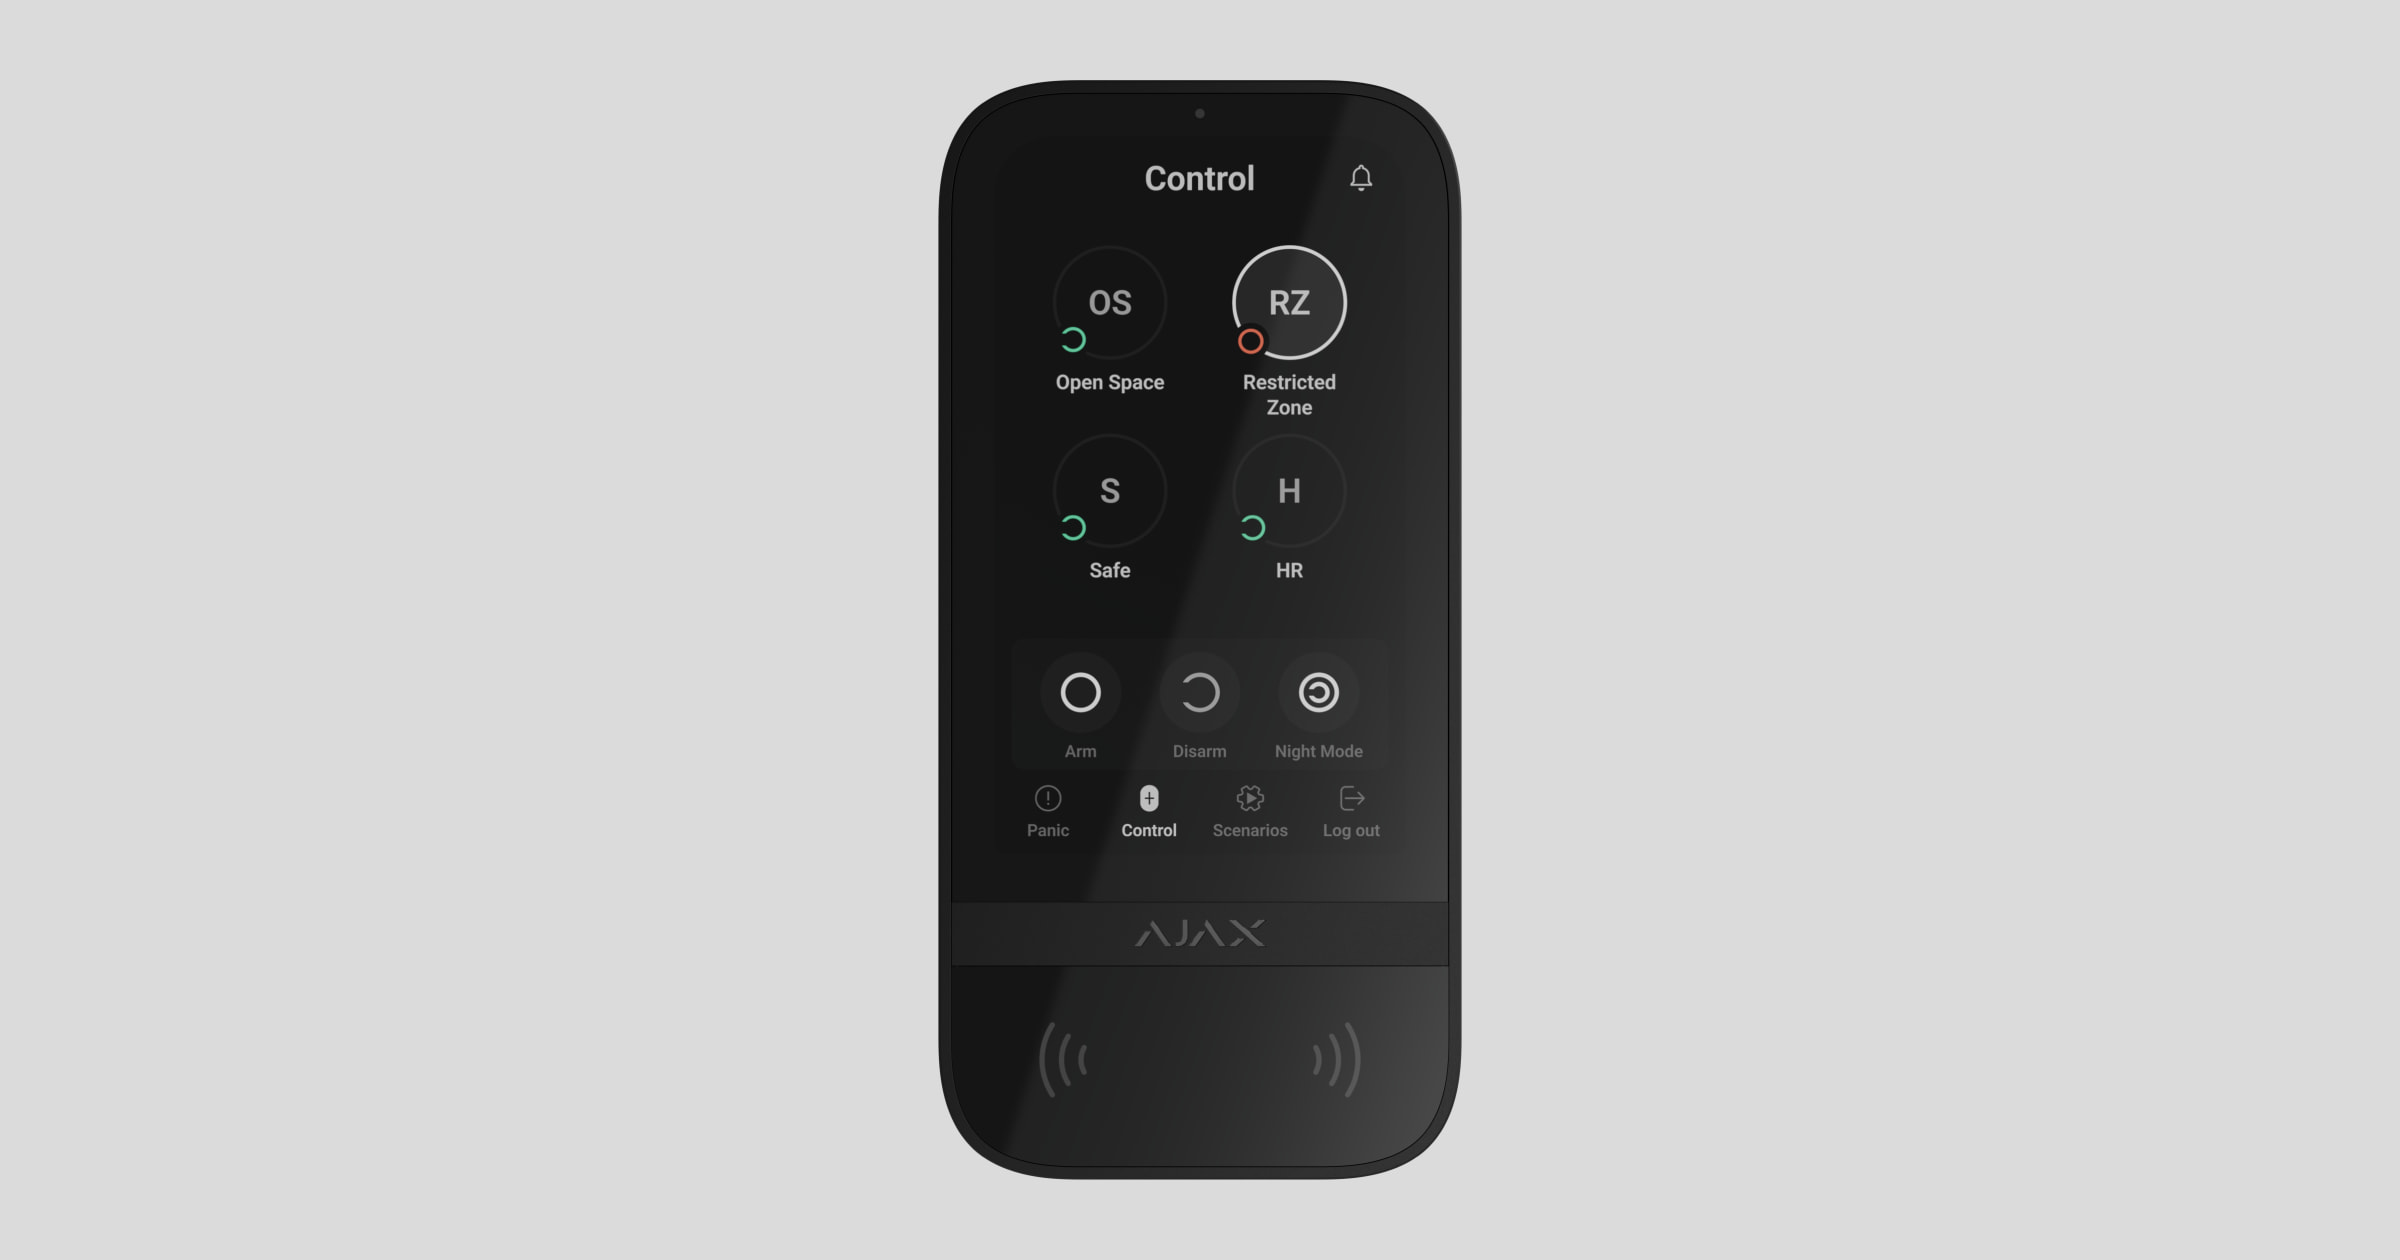
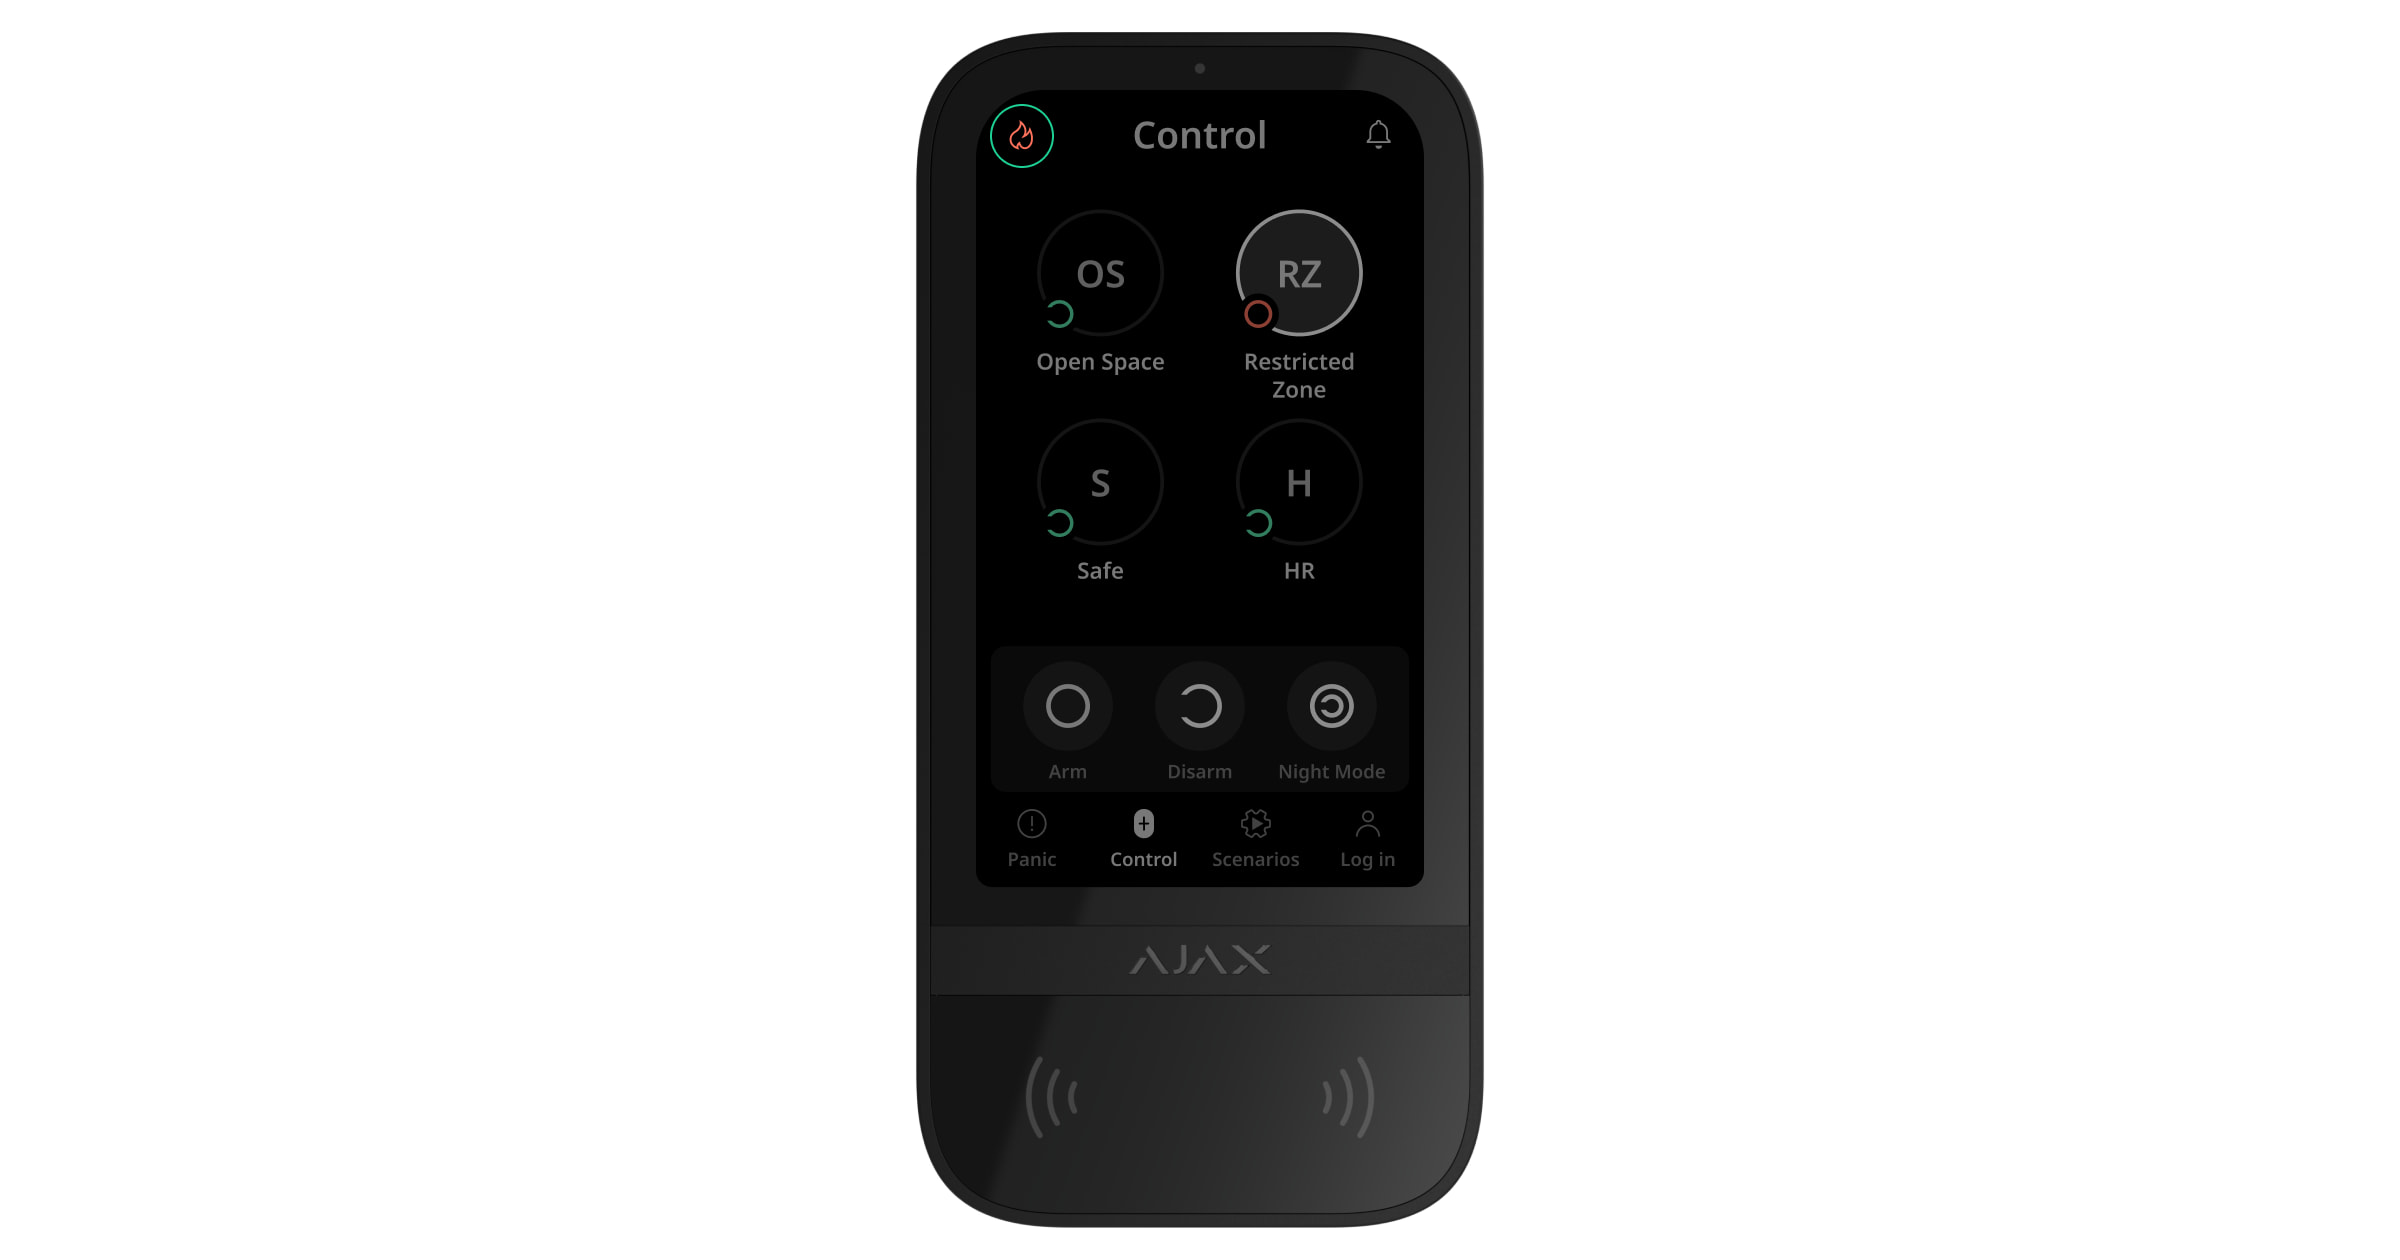
التحكُّم الأمني
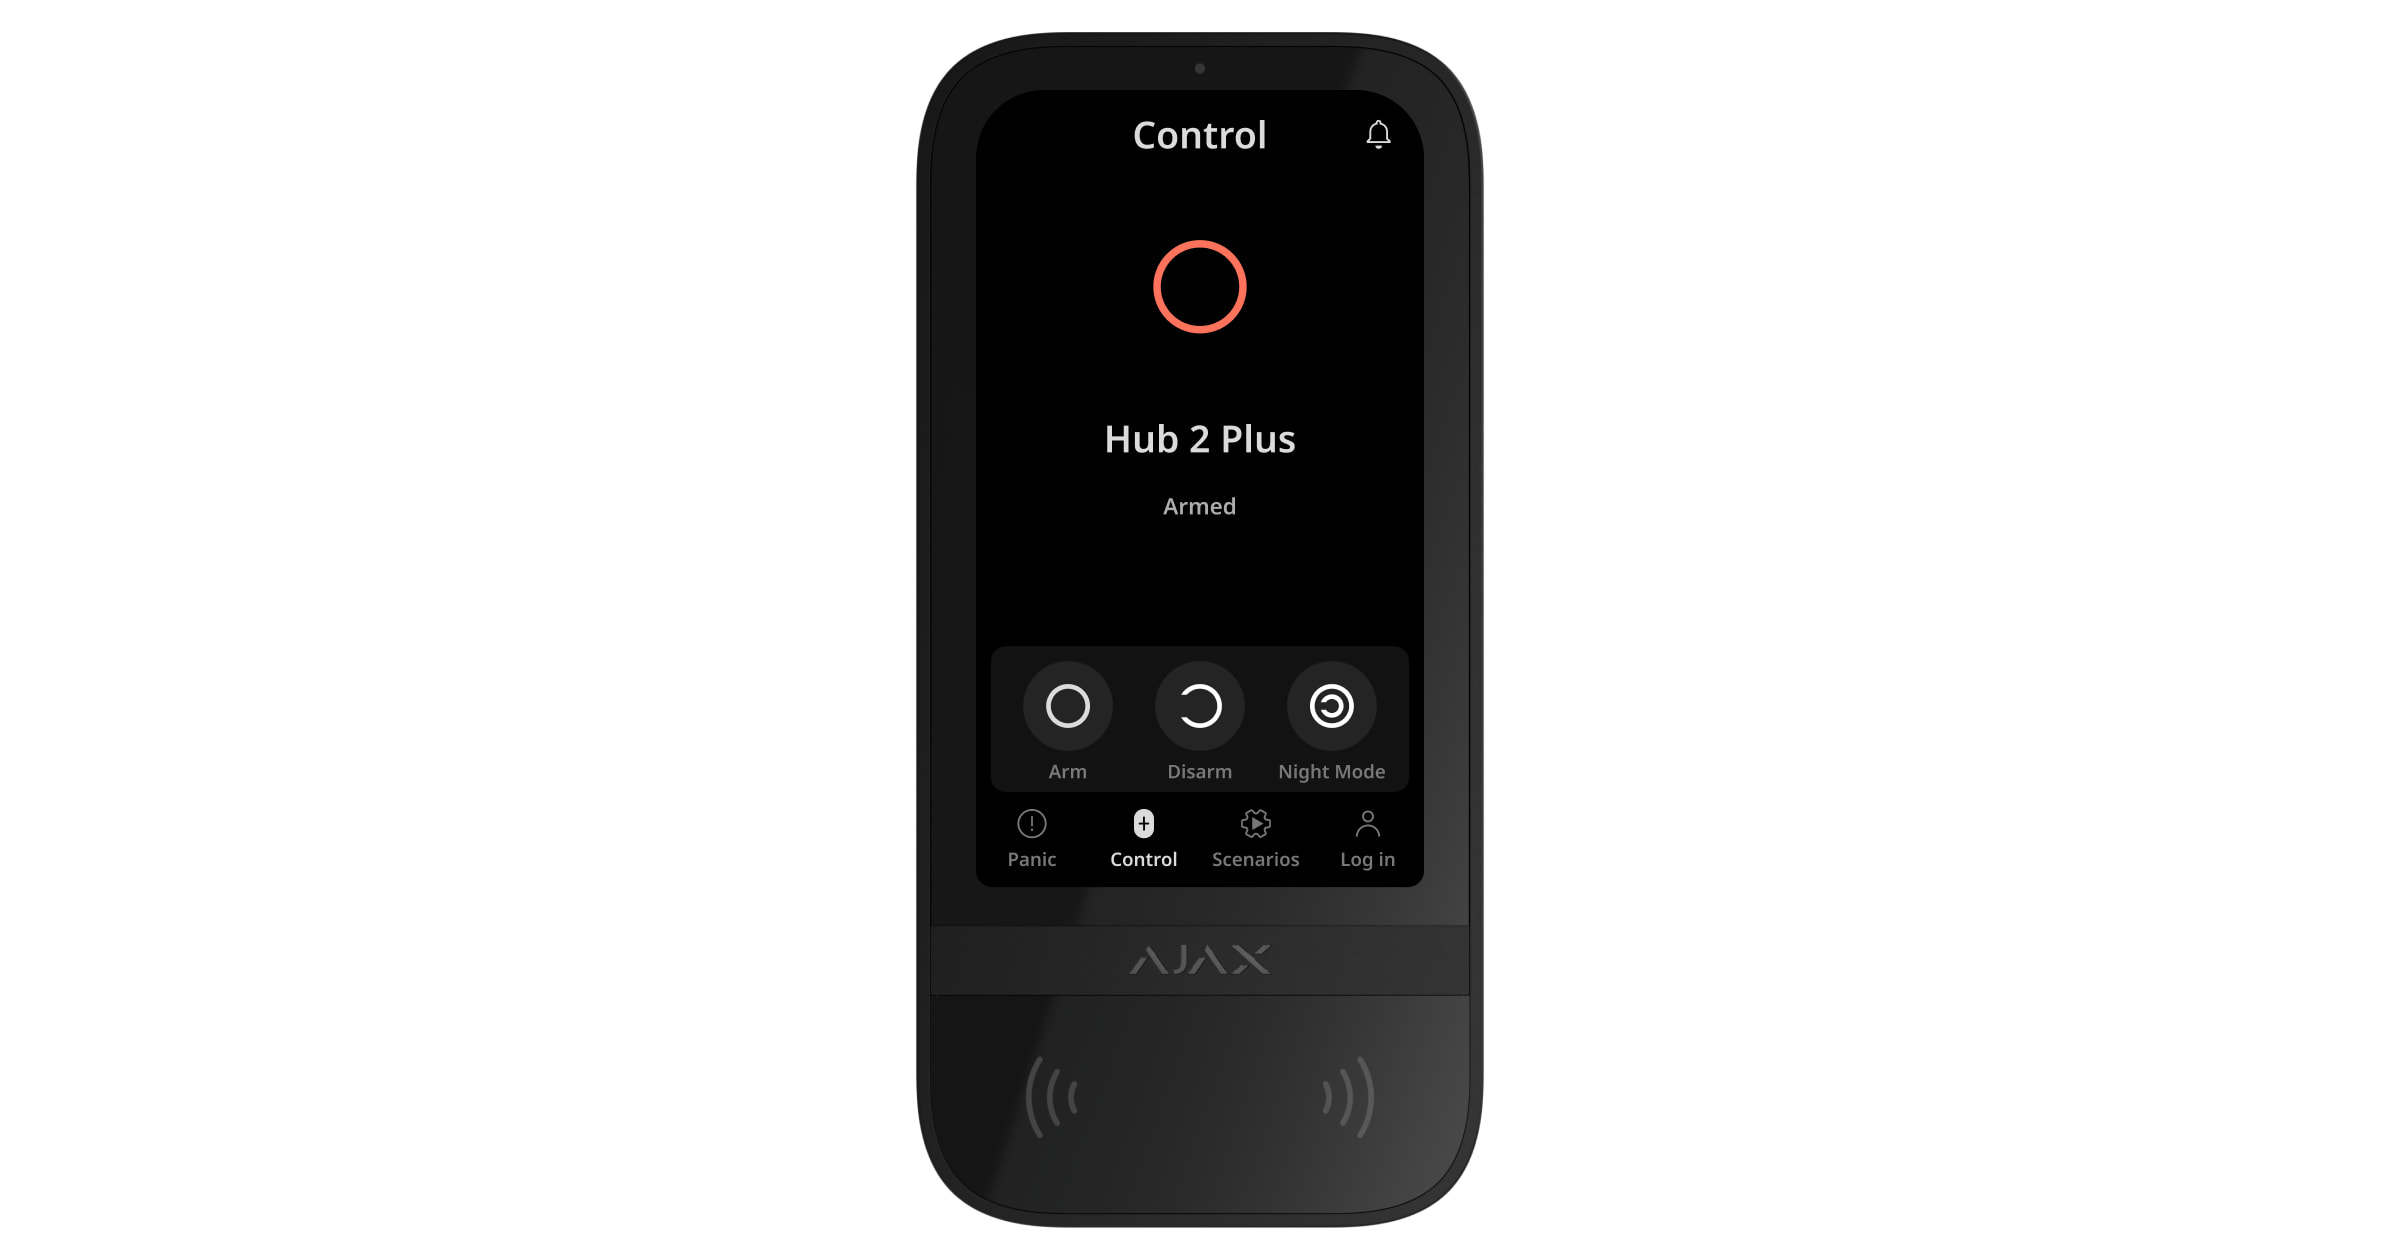
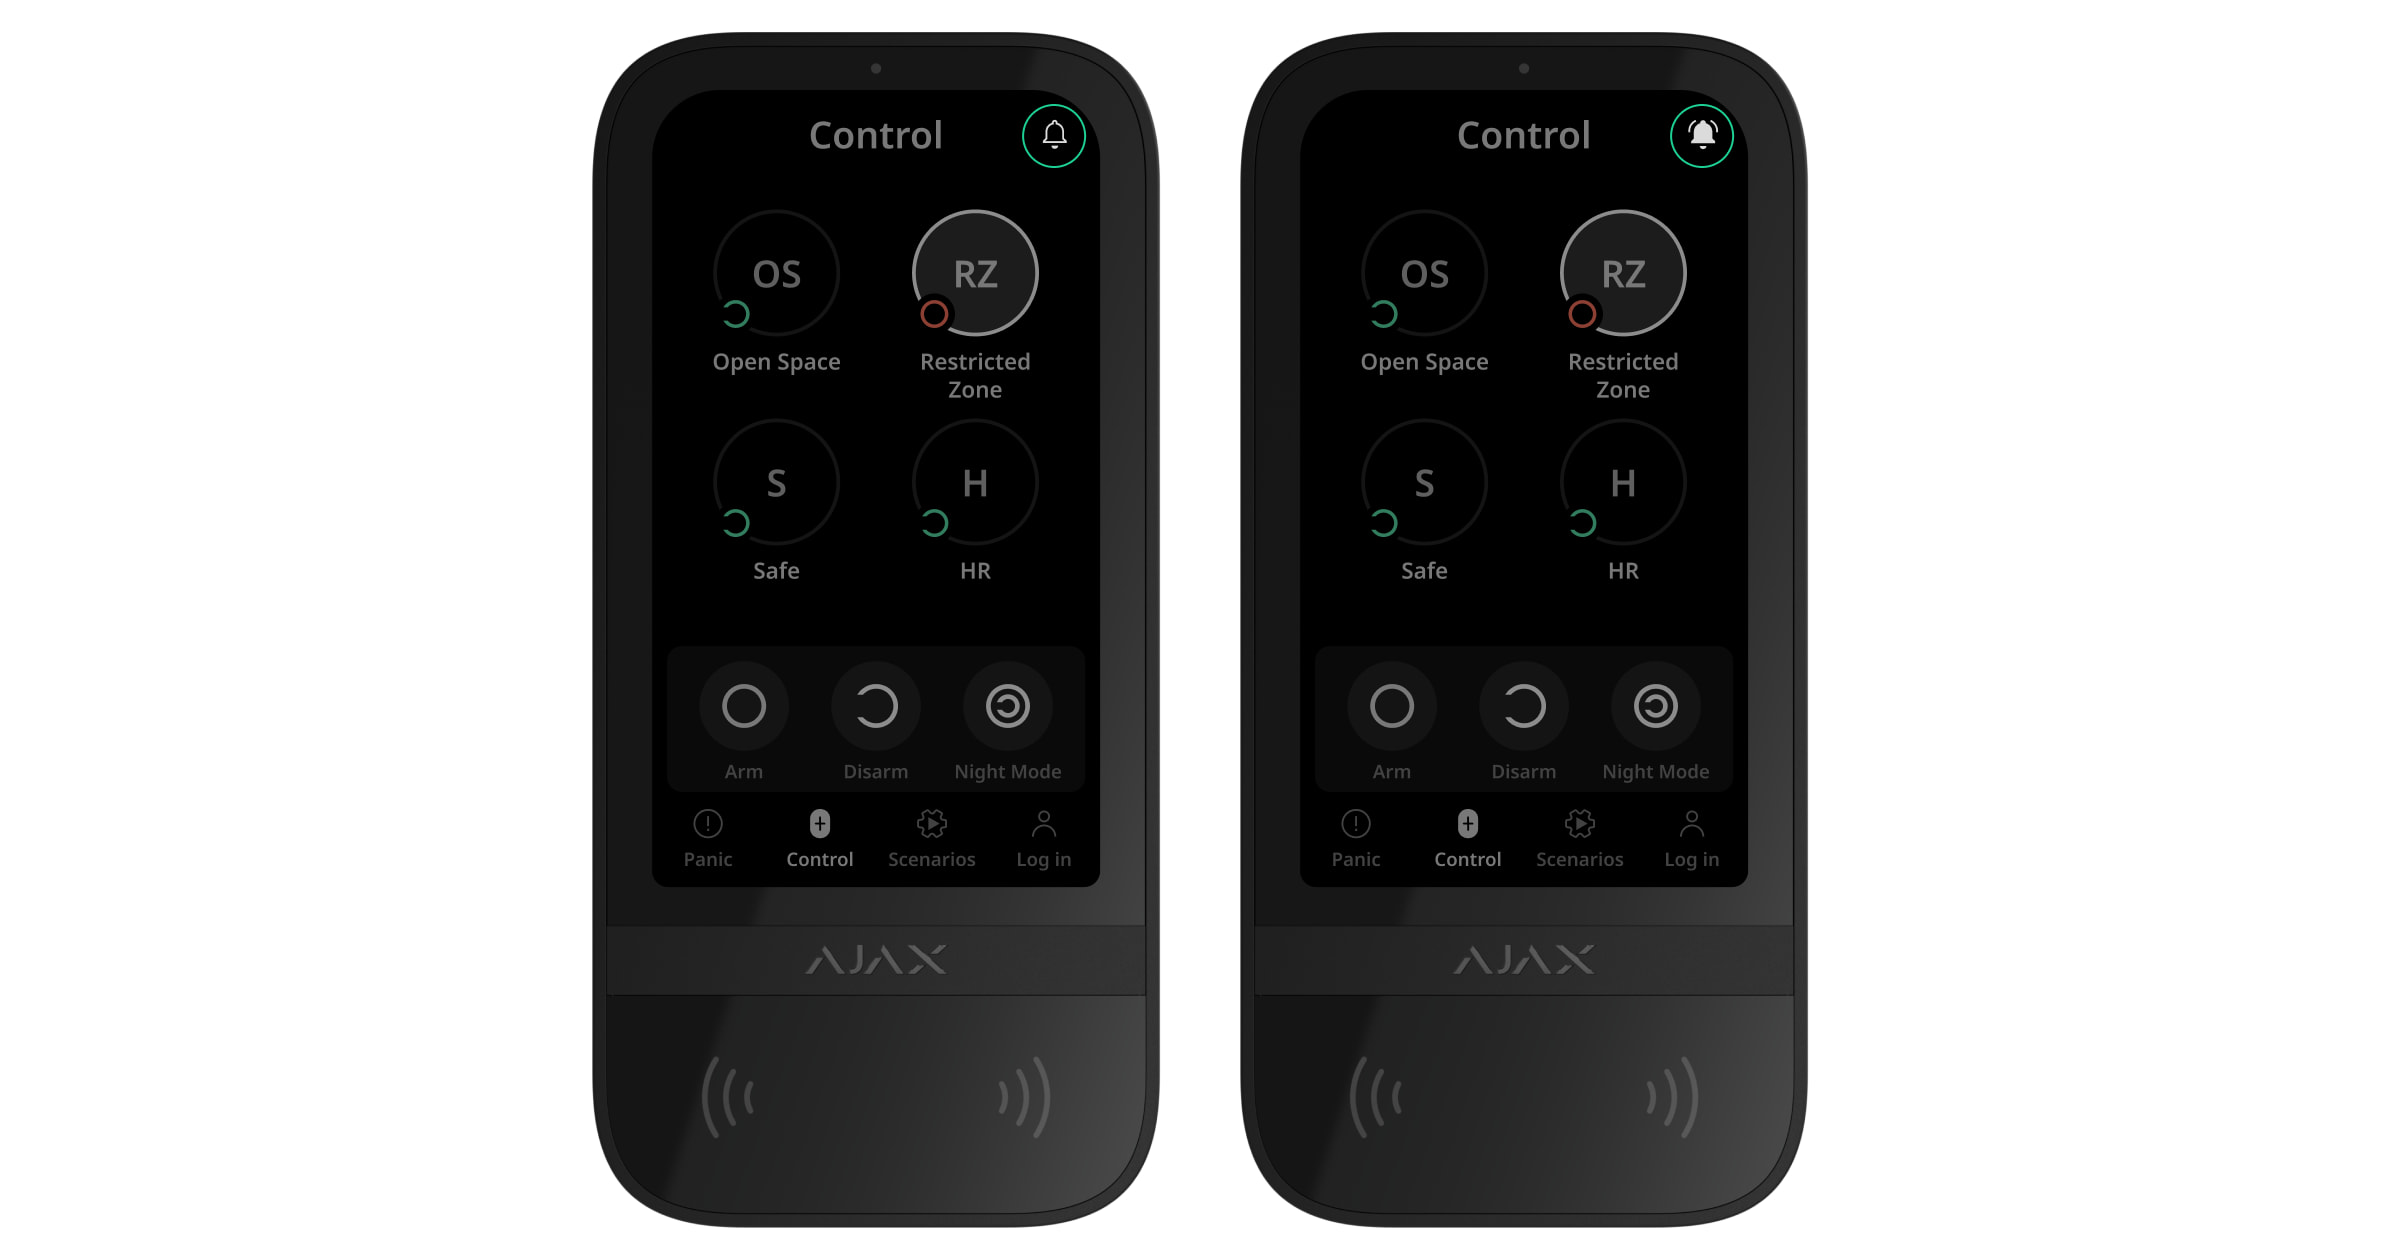
يمكن للوحة المفاتيح KeyPad TouchScreen تشغيل النظام أو إيقافه في المنشأة بأكملها أو في مجموعات معينة، وتنشيط الوضع الليلي. استخدم علامة التبويب التحكُّم ![]() لتغيير وضع الأمن. يمكنك التحكُّم في الأمن باستخدام KeyPad TouchScreen من خلال:
لتغيير وضع الأمن. يمكنك التحكُّم في الأمن باستخدام KeyPad TouchScreen من خلال:
- الهواتف الذكية. تطبيق Ajax Security System مُثبّت ودعم البلوتوث منخفض الطاقة (BLE). يمكن استخدام الهواتف الذكية بدلاً من Tag أو Pass لتفويض المستخدم. يشير BLE إلى بروتوكول لاسلكي منخفض استهلاك الطاقة. وتدعم لوحة المفاتيح الهواتف الذكية التي تعمل بنظامي Android وiOS مع ميزة البلوتوث منخفض الطاقة (BLE) 4.2 والإصدارات الأحدث.
- البطاقات أو مفاتيح التحكُّم عن بُعد. وللتعرُّف على المستخدمين بسرعة وأمان، تستخدم لوحة المفاتيح KeyPad TouchScreen تقنية DESFire®. وتعتمد تقنية DESFire® على المعيار الدولي ISO 14443 وتجمع بين تشفير 128 بت وحماية النسخ.
- الرموز. تدعم KeyPad TouchScreen الرموز العامة، والشخصية، ورموز المستخدمين غير المُسجّلين.
رموز الوصول
- رمز لوحة المفاتيح رمز عام مُخصّص للوحة المفاتيح. وعند استخدامه، تُرسَل جميع الأحداث إلى تطبيقات Ajax نيابةً عن لوحة المفاتيح.
- رمز المستخدم رمز شخصي مُخصّص للمستخدمين المتصلين بلوحة التحكُّم. وعند استخدامه، تُرسَل جميع الأحداث إلى تطبيقات Ajax نيابةً عن المستخدم.
- رمز الوصول إلى لوحة المفاتيح رمز مُخصّص لشخص غير مُسجّل في النظام. وعند استخدامه، تُرسَل الأحداث إلى تطبيقات Ajax مصحوبةً بالاسم المرتبط بهذا الرمز.
- رمز RRU رمز وصول لوحدات الاستجابة السريعة (RRU) التي تنشط بعد الإنذار وتكون صالحة لفترة مُحدّدة. عند تنشيط الرمز واستخدامه، تُرسل الأحداث إلى تطبيقات Ajax بعنوان مرتبط بهذا الرمز.
يعتمد عدد الوصول الشخصي، ورموز الوصول إلى لوحة المفاتيح، ورموز RRU على طراز لوحة التحكُّم.
يمكن تعديل حقوق الوصول والرموز في تطبيقات Ajax. وفي حال اختراق الرمز، فيمكن تغييره عن بُعد، فلا حاجة لاستدعاء فني تركيب إلى الموقع. إذا فقد المستخدم Pass، أو Tag، أو هاتفه الذكي، فيمكن للمسئول أو مستخدم من فئة PRO يتمتع بحقوق تهيئة النظام حظر الجهاز على الفور في التطبيق. وفي الوقت نفسه، يمكن للمستخدم استخدام رمز شخصي للتحكُّم في النظام.
التحكُّم الأمني في المجموعات
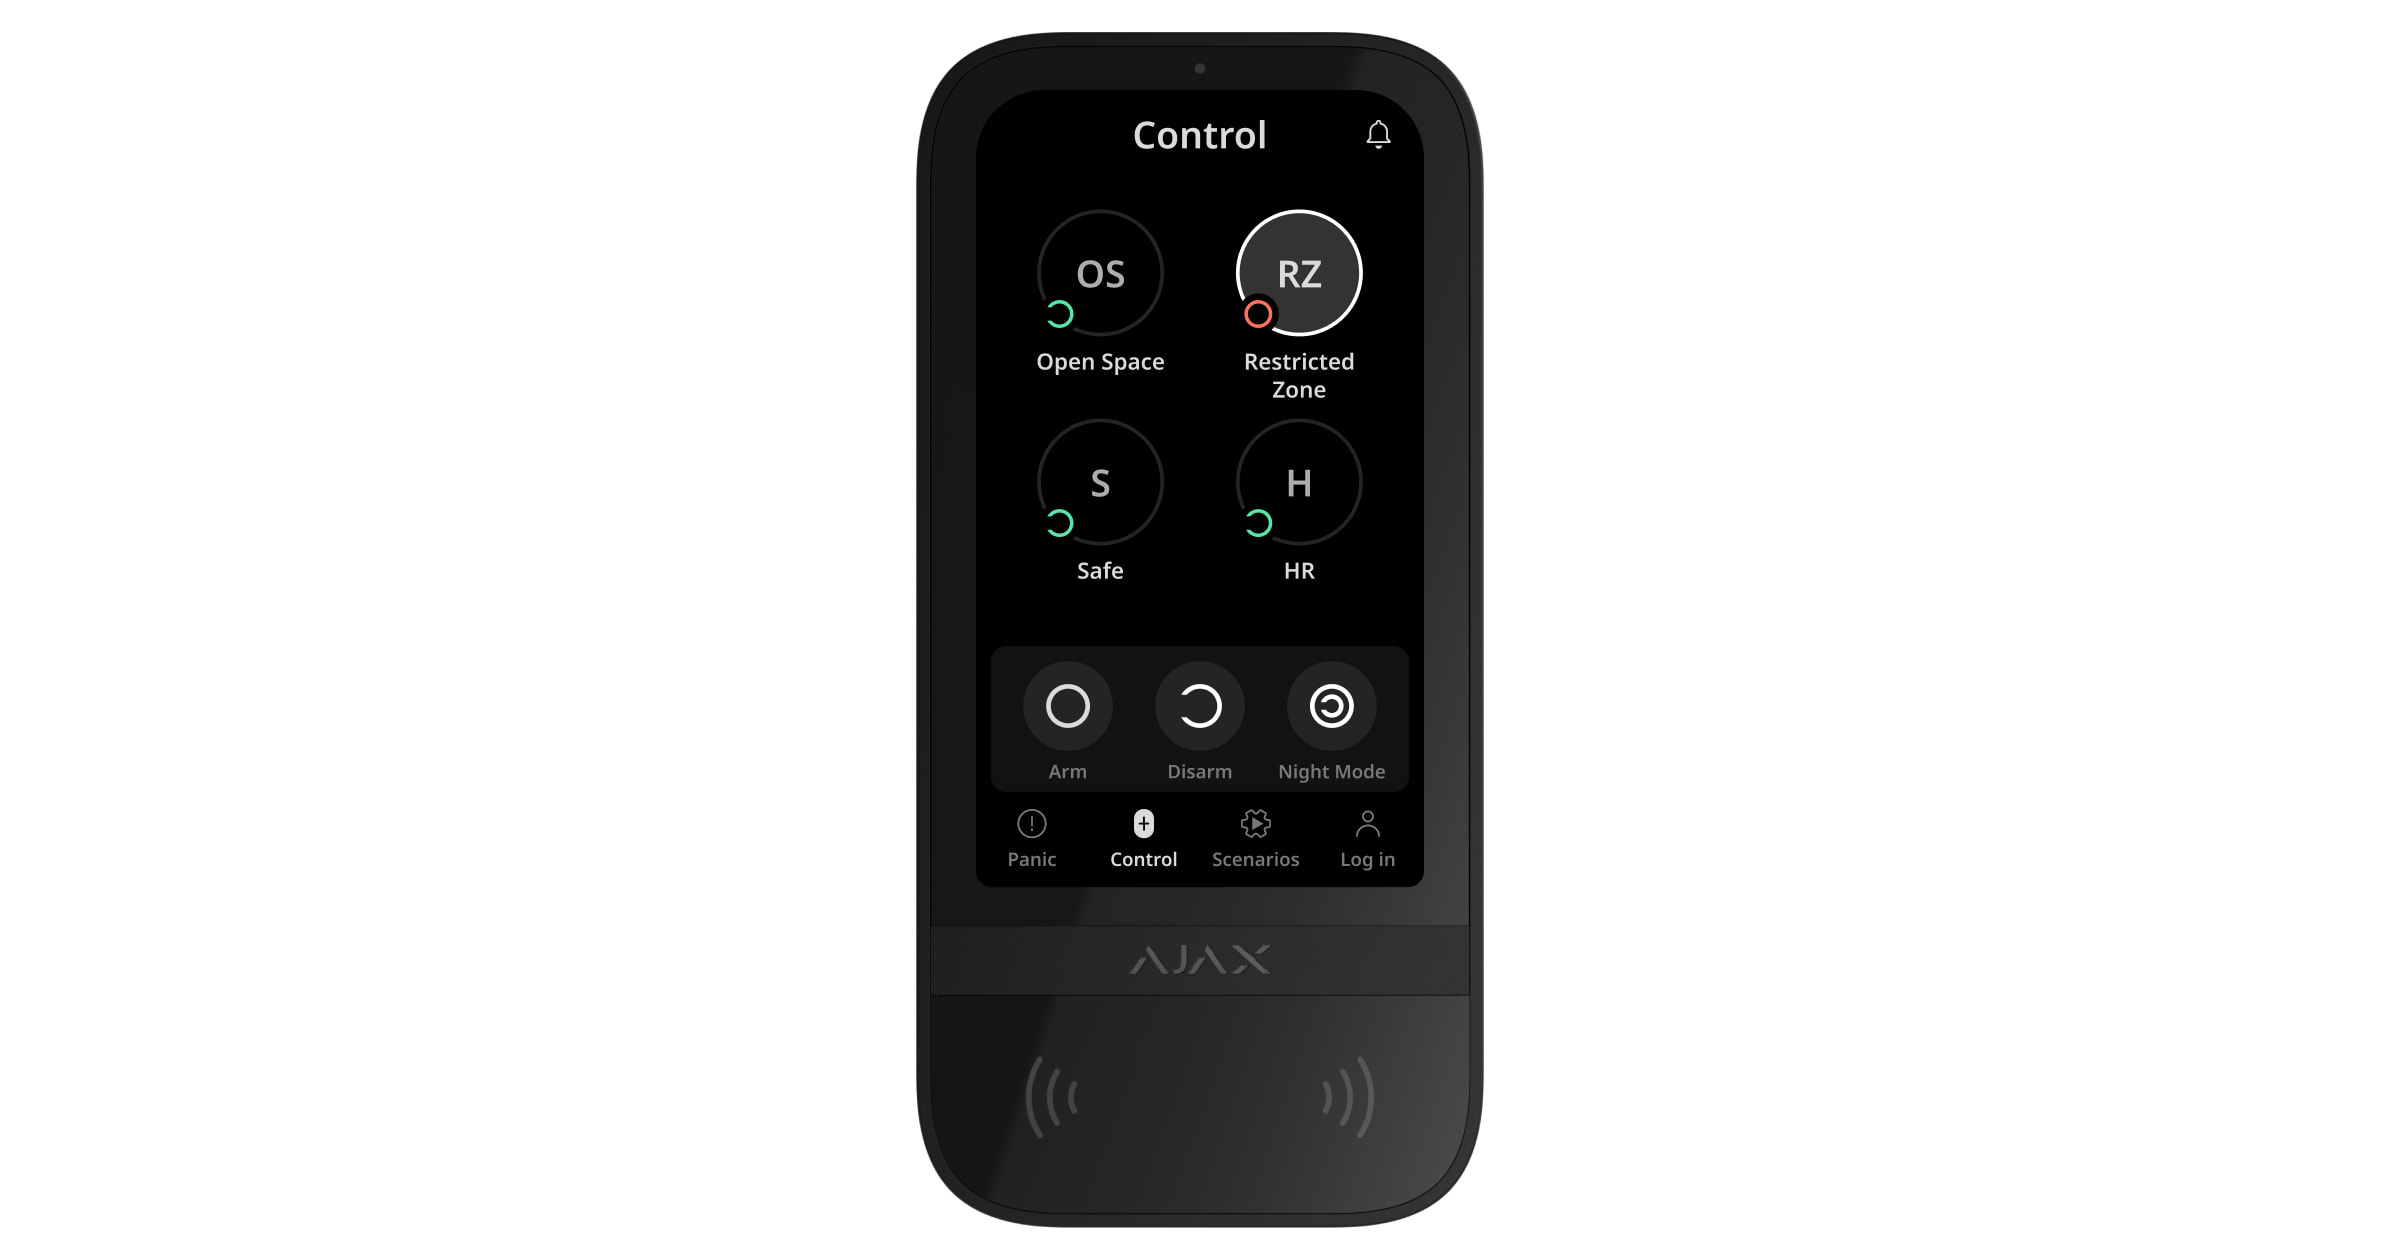
تتيح KeyPad TouchScreen التحكُّم في أمن المجموعات (في حال تفعيل وضع المجموعة). يمكنك أيضًا ضبط إعدادات لوحة المفاتيح لتحديد المجموعات التي ستُشَارك (مجموعات لوحة المفاتيح). وتكون جميع المجموعات ظاهرة افتراضيًا على شاشة لوحة المفاتيح في علامة التبويب التحكُّم ![]() . يمكنك معرفة المزيد حول إدارة أمن المجموعات في هذا القسم.
. يمكنك معرفة المزيد حول إدارة أمن المجموعات في هذا القسم.
في حالة تهيئة ميزة المجموعة المتبوعة للمجموعات، يمكن أن تتغير حالة الأمن الخاصة بها تلقائيًا وفقًا لإعداداتها وحالات البادئين.
.
أزرار الطوارئ
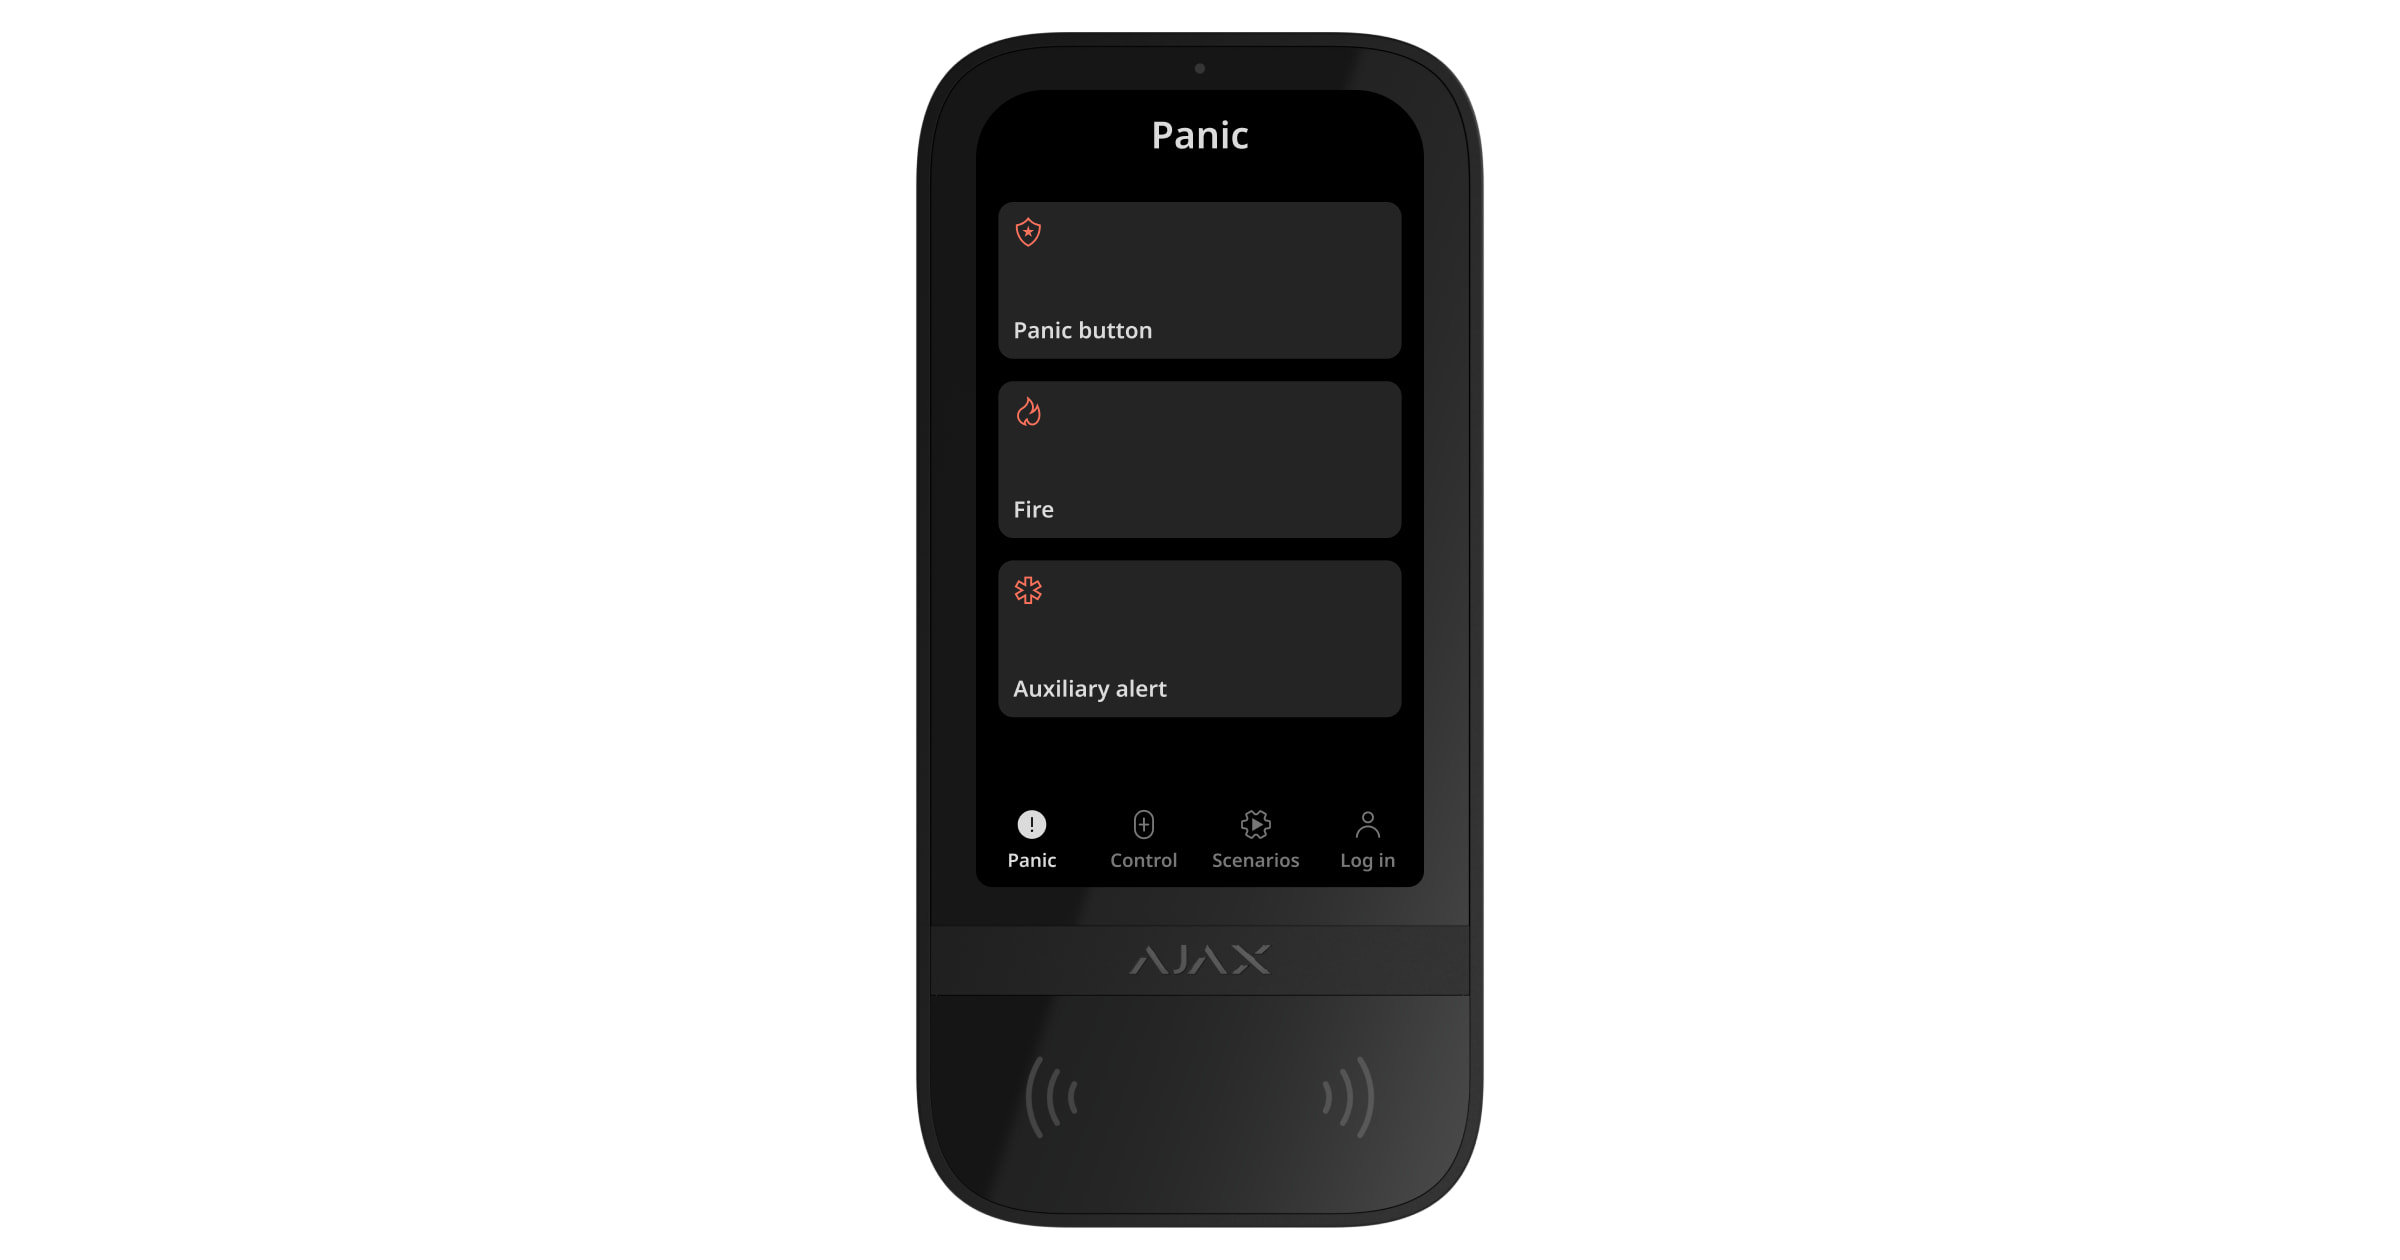
ولحالات الطوارئ، يوجد في لوحة المفاتيح علامة تبويب الذعر ![]() التي تحتوي على ثلاثة أزرار:
التي تحتوي على ثلاثة أزرار:
- زر الذعر؛
- الحرائق؛
- إنذار مساعد.
في تطبيق Ajax، يمكن لمسئول أو PRO يتمتع بحقوق تهيئة النظام تحديد عدد الأزرار المعروضة في علامة تبويب الذعر ![]() . يوجد خياران متاحان في إعدادات KeyPad TouchScreen: زر الذعر فقط (افتراضيًا) أو كل الأزرار الثلاثة. يعتمد نص الإشعارات في التطبيقات ورموز الأحداث المُرسَلة إلى مركز المراقبة (CMS) على نوع الزر المُحدّد.
. يوجد خياران متاحان في إعدادات KeyPad TouchScreen: زر الذعر فقط (افتراضيًا) أو كل الأزرار الثلاثة. يعتمد نص الإشعارات في التطبيقات ورموز الأحداث المُرسَلة إلى مركز المراقبة (CMS) على نوع الزر المُحدّد.
يمكنك أيضًا تنشيط الحماية من الضغط العرضي. في هذه الحالة، يؤكد المستخدم إرسال الإنذار بالضغط على الزر إرسال الموجود على شاشة لوحة المفاتيح. تظهر شاشة التأكيد بعد الضغط على أي زر ذعر.
يمكن أن يؤدي الضغط على أزرار الطوارئ إلى تحفيز سيناريوهات الإنذارات في نظام Ajax.
إدارة السيناريوهات
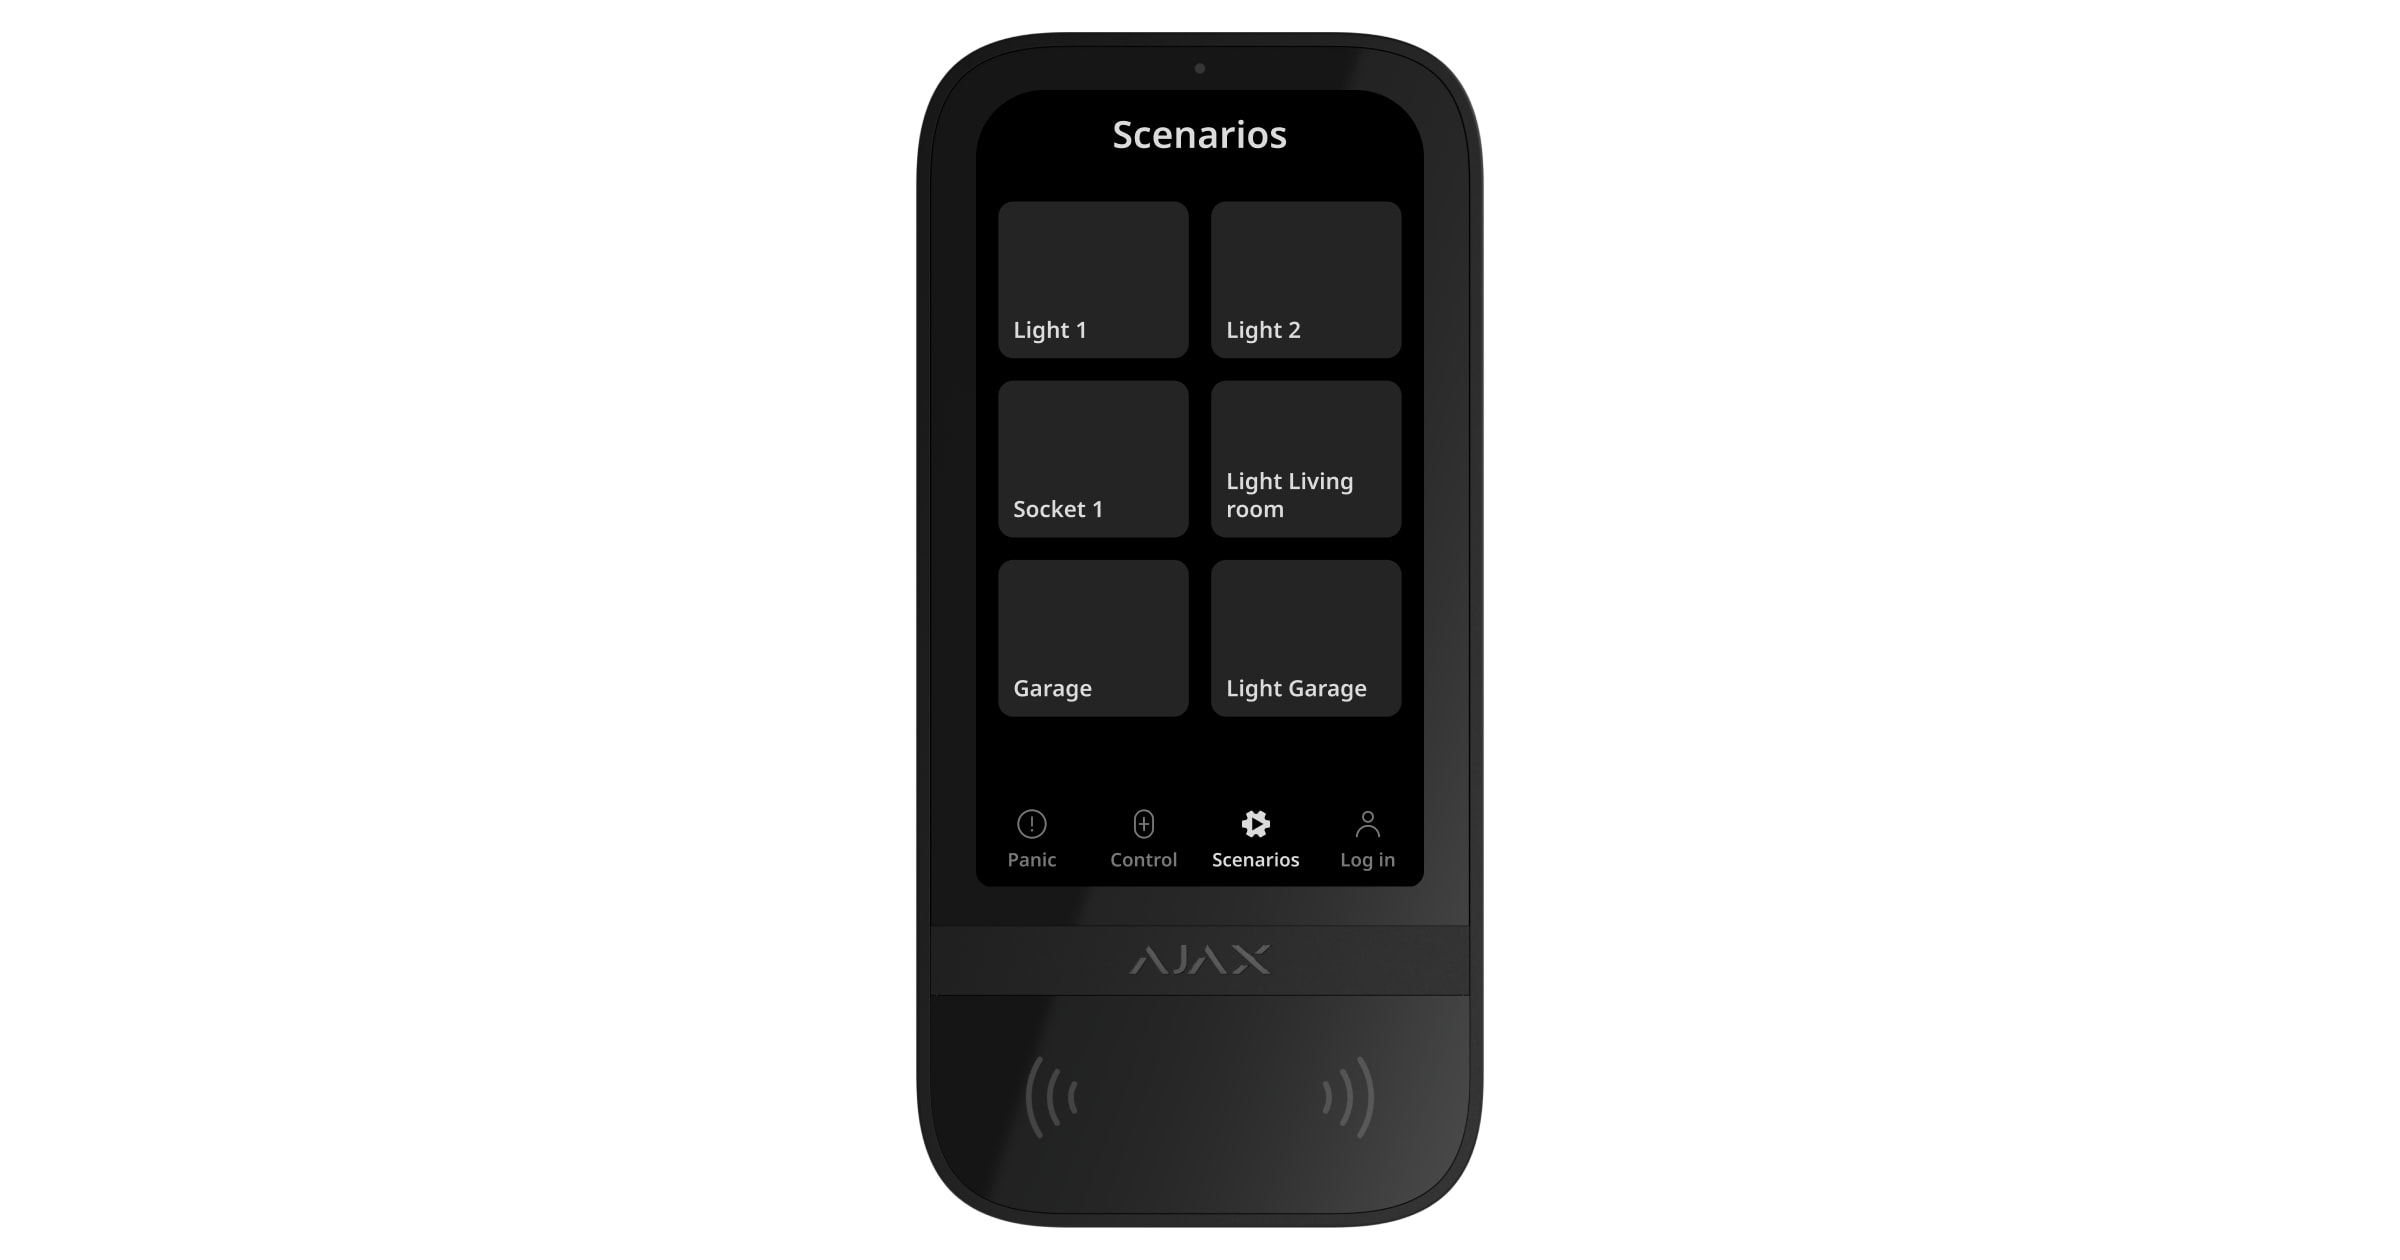
تضم علامة تبويب لوحة التحكُّم المنفصلة حتى ستة أزرار تتحكّم في جهاز تشغيل آلي واحد أو مجموعة أجهزة. توفر سيناريوهات المجموعة تحكمًا أفضل في عدة مفاتيح، أو مرحّلات، أو مقابس في وقت واحد.
يمكنك إنشاء سيناريوهات التشغيل الآلي في إعدادات لوحة المفاتيح وإدارتها باستخدام KeyPad TouchScreen.
التنبيه بالأعطال ووضع الأمن
تُعلم KeyPad TouchScreen المستخدمين بأعطال النظام ووضع الأمن من خلال:
- الشاشة؛
- الشعار؛
- تنبيه صوتي.
يضيء الشعار بضوء أحمر بشكل مستمر عند تشغيل النظام أو مجموعة معينة وفقًا للإعدادات. لا يظهر مؤشر KeyPad TouchScreen على الشاشة إلا عندما تكون نشطة. يُخطر الجرس المُدمَج بالإنذارات، وفتح الأبواب، والتأخير عند الدخول/الخروج.
كتم إنذار الحريق
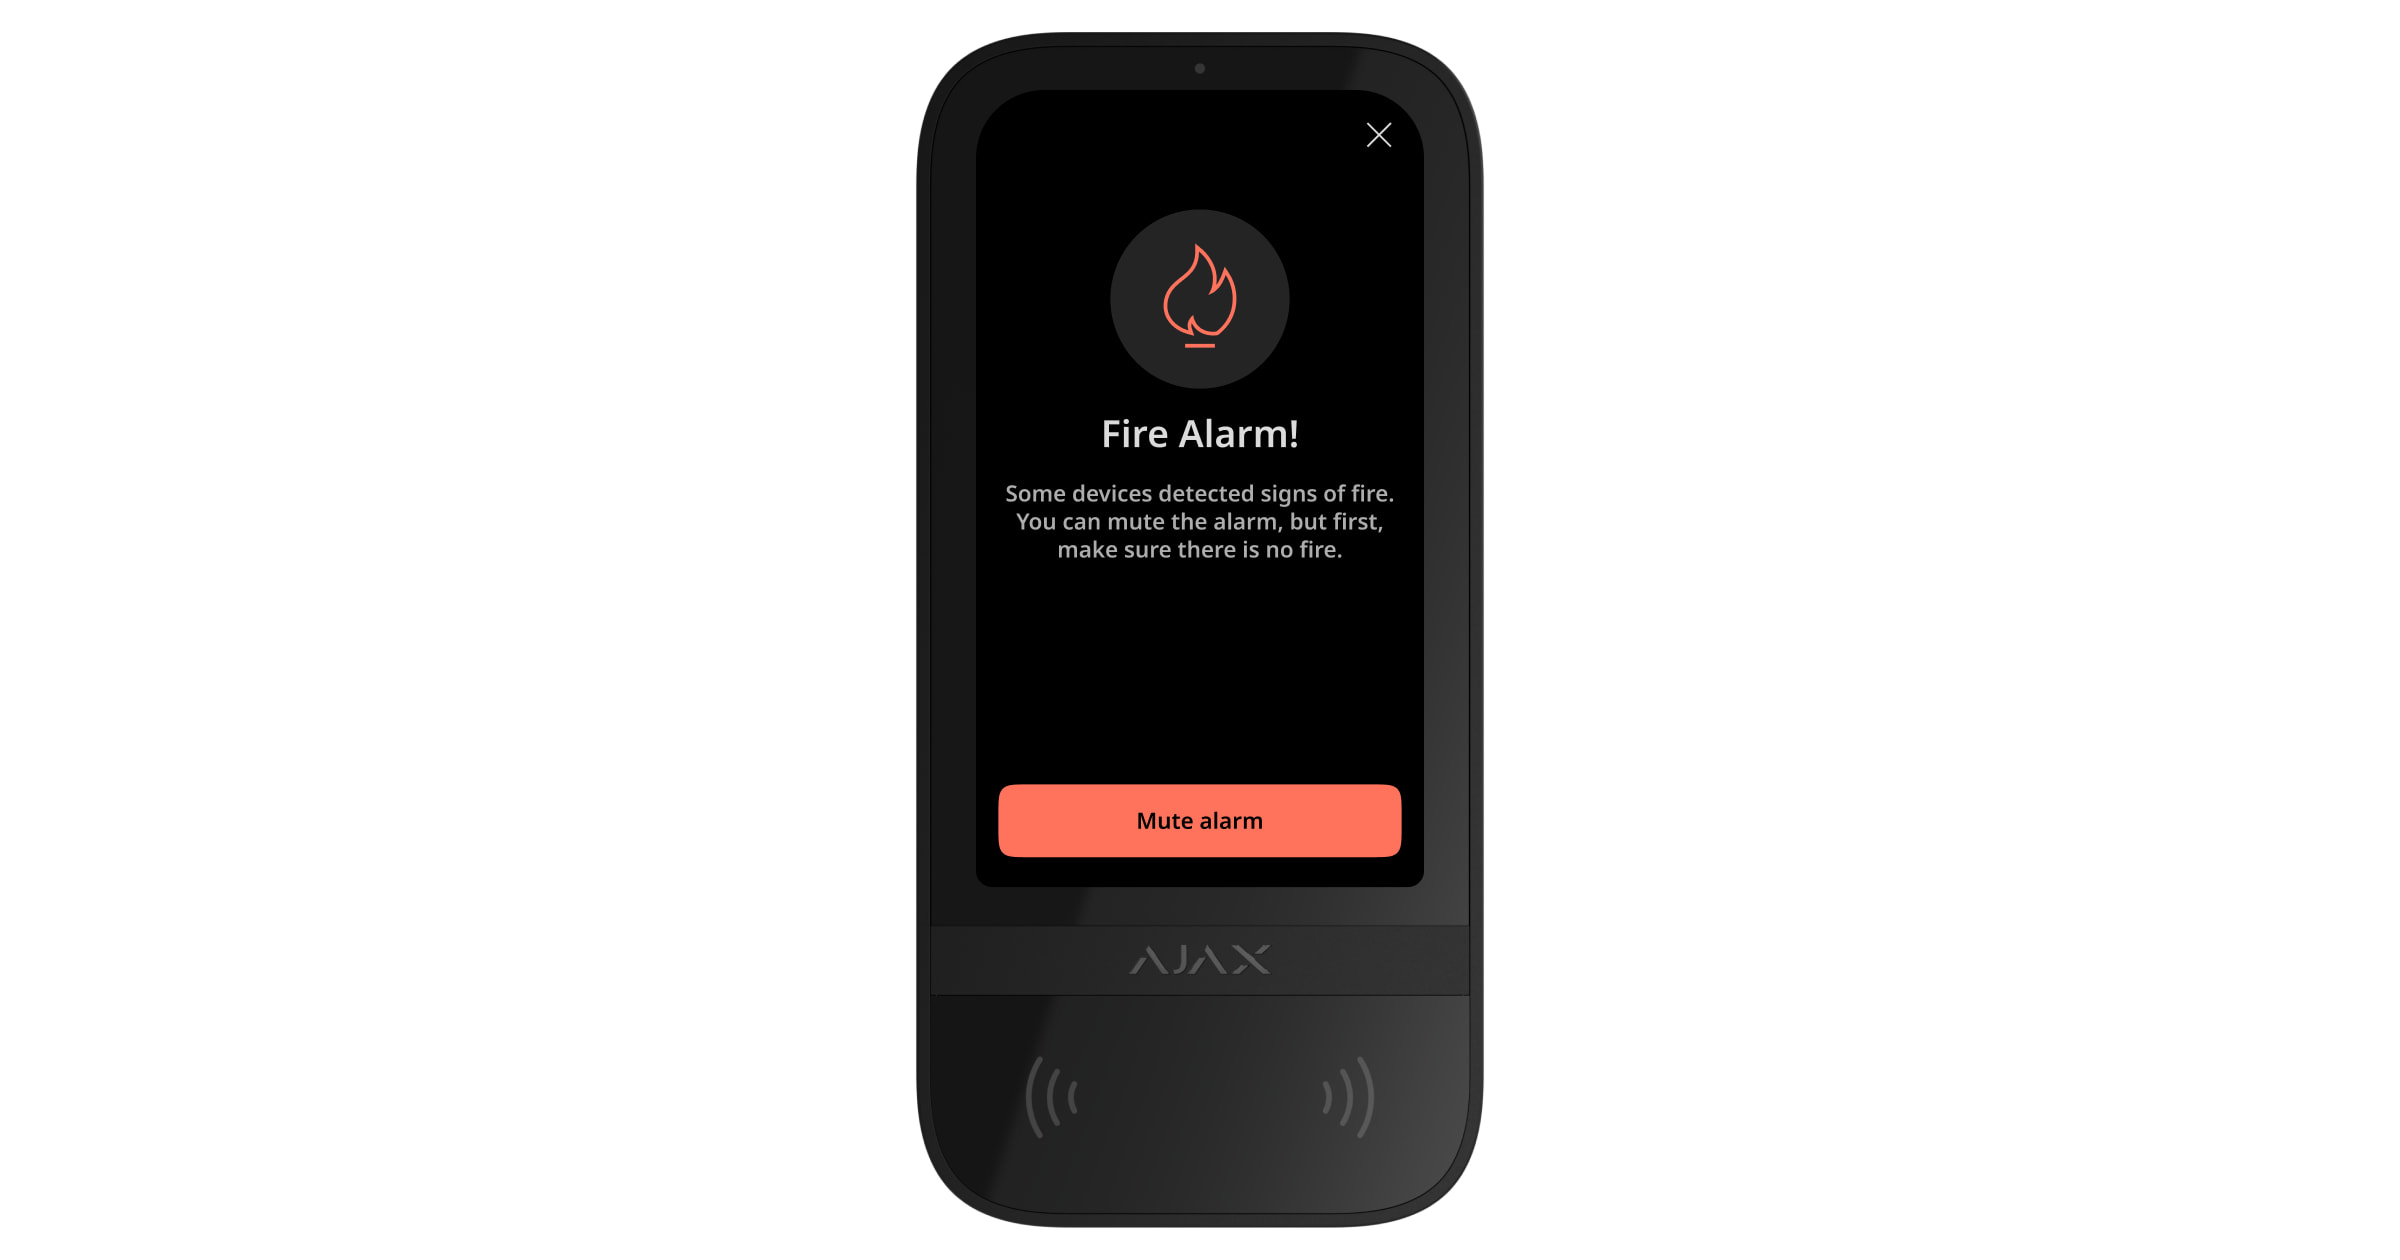
في حال وجود إنذار حريق في النظام، يمكنك كتم صوته باستخدام KeyPad TouchScreen.
لا يؤدي الضغط على زر طوارئ الحريق في علامة التبويب الذعر إلى تنشيط إنذار كواشف الحريق المرتبطة (إذا كان مُفعّلاً). عند إرسال إشارة طوارئ من لوحة المفاتيح، سيُرسل إشعار مناسب إلى التطبيق ومركز المراقبة (CMS).
ستظهر الشاشة، التي تحتوي على معلومات حول إنذار الحريق وزر كتم صوته، على جميع لوحات المفاتيح KeyPad TouchScreen المُفعّل عليها ميزة كتم إنذار الحريق. في حال الضغط على زر كتم الصوت بالفعل على لوحة مفاتيح أخرى، فسيظهر إشعار بذلك على شاشات KeyPad TouchScreen الأخرى. يمكن للمستخدمين إغلاق شاشة كتم صوت إنذار الحريق واستخدام ميزات لوحة المفاتيح الأخرى. لإعادة فتح شاشة كتم الصوت، اضغط على الأيقونة ![]() على شاشة KeyPad TouchScreen.
على شاشة KeyPad TouchScreen.
في حالة تحفيز إنذار الحريق عن طريق ManualCallPoint Jeweller، أو إذا كان مستوى أول أكسيد الكربون أو الدخان في مستوى خطر، فلا يمكن كتم صوت الإنذار من لوحة المفاتيح.
تتوفر أنواع إنذار الحريق هذه للوحة المفاتيح KeyPad TouchScreen Jeweller ذات الإصدار الثابت 11.60.10.19 أو أحدث.
لعرض شاشة كتم صوت إنذار الحريق على KeyPad TouchScreen فورًا، فعّل زر التبديل الشاشة نشطة دائمًا في إعدادات لوحة المفاتيح. وصّل أيضًا مصدر الطاقة من مصنّع آخر.
وإلا فلن تُعرَض شاشة كتم الصوت إلا عند تنشيط لوحة المفاتيح.
رمز الإكراه
تدعم KeyPad TouchScreen رمز الإكراه الذي يسمح لك بمحاكاة إيقاف الإنذار. في هذه الحالة، لن يكشف تطبيق Ajax ولا صفارات الإنذار المُثبّتة في المنشأة عن أفعالك. لكن سيُرسل تنبيهًا إلى شركة الأمن ومستخدمي نظام الأمن الآخرين بشأن الحادثة.
التفويض المُسبق للمستخدم
ميزة التفويض المُسبق ضرورية لمنع الوصول غير المُصرَّح به إلى لوحة التحكُّم وحالة النظام الحالية. يمكن تنشيط الميزة بشكل منفصل في علامتي التبويب التحكُّم
![]() والسيناريوهات
والسيناريوهات ![]() في إعدادات لوحة المفاتيح.
في إعدادات لوحة المفاتيح.
تُعرَض شاشة إدخال الرمز على علامات التبويب التي نُشّط التفويض المُسبَق لها. يجب على المستخدم المصادقة أولاً، إما عن طريق إدخال رمز أو تقريب جهاز وصول شخصي إلى لوحة المفاتيح. ويُستثنى من ذلك علامة التبويب الإنذار ![]() ، والتي تسمح للمستخدمين غير المُفوّضين بإرسال إشارة طوارئ.
، والتي تسمح للمستخدمين غير المُفوّضين بإرسال إشارة طوارئ.
القفل التلقائي للوصول غير المُصرَّح به
في حال إدخال رمز غير صحيح أو استخدام جهاز وصول غير مُعتمد ثلاث مرات متتالية خلال دقيقة واحدة، فستُقفل لوحة المفاتيح للفترة المُحدّدة في الإعدادات. خلال هذا الوقت، ستتجاهل لوحة التحكُّم جميع الرموز وأجهزة الوصول، وفي الوقت نفسه، تُبلغ مستخدمي نظام الأمن عن محاولة الوصول غير المُصرَّح به. ستوقف KeyPad TouchScreen تشغيل القارئ وتحظر الوصول إلى جميع علامات التبويب. وستعرض شاشة لوحة المفاتيح إشعارًا مناسبًا.
يمكن لمستخدم يتمتع بحقوق تهيئة النظام أو PRO فتح لوحة المفاتيح من خلال التطبيق قبل انتهاء فترة القفل المُحددة.
تشغيل النظام على مرحلتين
يمكن أن تشارك KeyPad TouchScreen في تشغيل النظام على المرحلتين، ولكن لا يمكن استخدامها كجهاز مرحلة ثانية. تشبه عملية تشغيل النظام على مرحلتين باستخدام Tag، أو Pass، أو الهاتف الذكي استخدام رمز شخصي أو عام على لوحة المفاتيح.
بروتوكولا نقل البيانات Jeweller وWings
يُعد Jeweller و Wings بروتوكولي نقل بيانات لاسلكيين وثنائيي الاتجاه يوفران اتصالاً سريعًا وموثوقًا بين لوحة التحكُّم والأجهزة. تستخدم لوحة المفاتيح Jeweller لإرسال الإنذارات والأحداث، و Wings لتحديث البرامج الثابتة، ونقل قائمة المجموعات، والغرف، وغيرها من المعلومات الإضافية.
إرسال الأحداث إلى مركز المراقبة
يمكن لنظام Ajax إرسال الإنذارات إلى كل من تطبيق المراقبة PRO Desktop ومركز المراقبة (CMS) بتنسيقات SurGard (Contact ID)، وSIA (DC-09)، وADEMCO 685، وبروتوكولات أخرى.
تستطيع KeyPad TouchScreen نقل الأحداث التالية:
- إدخال رمز الإكراه.
- الضغط على زر الذعر. فكل زر له رمز حدث مُخصّص.
- قفل لوحة المفاتيح بسبب محاولة وصول غير مُصرّح به.
- إنذار التلاعب/الاستعادة.
- فقدان/استعادة الاتصال مع لوحة التحكُّم (أو موسع نطاق الإشارة اللاسلكية).
- تشغيل/إيقاف النظام.
- محاولة غير ناجحة لتشغيل نظام الأمن (مع تفعيل التحقُّق من سلامة النظام).
- التنشيط/الإيقاف الدائم للوحة المفاتيح.
- التنشيط/الإيقاف لمرة واحدة للوحة المفاتيح.
عند تلقي إنذار، يعرف المشغّل في مركز المراقبة التابع لشركة الأمن ما حدث ويعرف إلى أين يجب إرسال فريق الاستجابة السريعة بالضبط. تتيح إمكانية التعامل المباشر مع أجهزة Ajax بإرسال الأحداث إلى PRO Desktop أو مركز المراقبة (CMS)، بما في ذلك نوع الجهاز، واسمه، ومجموعة الأمن، والغرفة الافتراضية. لاحظ أن قائمة المعلمات المُرسلة قد تختلف وفقًا لنوع مركز المراقبة (CMS) والبروتوكول المُختار للاتصال بمركز المراقبة.
يمكن إيجاد المعرّف ورقم الجهاز في حالاته في تطبيق Ajax.
الإضافة إلى النظام
لا تتوافق KeyPad TouchScreen مع Hub Jeweller، و Hub Plus Jeweller، ولوحات التحكُّم من مصنّعين آخرين.
ولتوصيل KeyPad TouchScreen إلى لوحة التحكُّم، يلزم وجود لوحة المفاتيح في المنشأة المؤمّنة نفسها الموجود بها النظام (ضمن نطاق الشبكة اللاسلكية للوحة التحكُّم). لكي تعمل لوحة المفاتيح عبر موسّع نطاق الإشارة اللاسلكية ReX 2، يجب أولاً إضافة لوحة المفاتيح إلى لوحة التحكُّم، ثم إضافتها إلى ReX 2 في إعدادات موسّع النطاق.
لا تتوافق لوحة التحكُّم مع الجهاز الذي يعمل على ترددات لاسلكية مختلفة. قد يختلف نطاق التردد اللاسلكي للجهاز حسب المنطقة. نوصي بشراء واستخدام أجهزة Ajax الموجودة في المنطقة نفسها. يمكنك التحقُّق من نطاق ترددات الشبكة اللاسلكية العاملة من خلال خدمة الدعم الفني.
قبل إضافة جهاز
- ثبّت تطبيق Ajax.
- سجّل الدخول إلى حسابك أو أنشئ حسابًا جديدًا.
- اختر مساحة (Space) أو أنشئ واحدة جديدة.

تُتاح وظيفة المساحة (Space) في التطبيقات بالإصدارات التالية والإصدارات الأحدث:
- Ajax Security System 3.0 لنظام iOS؛
- Ajax Security System 3.0 لنظام Android؛
- Ajax PRO: Tool for Engineers 2.0 لنظام iOS؛
- Ajax PRO: Tool for Engineers 2.0 لنظام Andriod؛
- Ajax PRO Desktop 4.0 لنظام macOS؛
- Ajax PRO Desktop 4.0 لنظام Windows.
- أضف غرفة افتراضية واحدة على الأقل.
- أضف لوحة تحكُّم متوافقة إلى المساحة (Space). تأكد من تشغيل لوحة التحكُّم واتصالها بالإنترنت عبر شبكة الإيثرنت، و/أو شبكة Wi-Fi، و/أو شبكة الهاتف المحمول.
- تأكّد من إيقاف النظام في المساحة (Space)، وأن لوحة التحكُّم لا تبدأ التحديث عن طريق التحقُّق من الحالات في تطبيق Ajax.
لا يمكن إلا لمستخدم (PRO) أو مسئول مساحة (Space) يمتلك حقوق تهيئة النظام إضافة جهاز إلى لوحة التحكُّم.
التوصيل بلوحة التحكُّم
- افتح تطبيق Ajax. حدّد لوحة التحكُّم التي تريد إضافة لوحة المفاتيح إليها.
- انتقل إلى علامة تبويب الأجهزة
 . انقر على إضافة جهاز.
 - امنح الجهاز اسمًا، وامسح رمز الاستجابة السريعة (QR) ضوئيًا أو أدخله يدويًا (موجود على لوحة المفاتيح والعبوة)، وحدد غرفة ومجموعة (في حال تفعيل وضع المجموعة).
- انقر على إضافة.
- شغِّل لوحة المفاتيح بضغطة طويلة على زر التشغيل لمدة 3 ثوانٍ.
إذا فشل الاتصال، أوقِف تشغيل لوحة المفاتيح وأعِد المحاولة بعد 5 ثوانٍ. ولاحظ أنه في حال الوصول إلى الحد الأقصى لعدد الأجهزة التي يمكن إضافتها إلى لوحة التحكُّم (وفقًا لطراز لوحة التحكُّم)، فستتلقى إشعارًا عند محاولة إضافة جهاز جديد.
تحتوي KeyPad TouchScreen على جرس مُدمَج يمكنه الإخطار بالإنذارات وحالات معينة للنظام، ولكنه لا يُعد صفارة إنذار. يمكنك إضافة ما يصل إلى 10 أجهزة مماثلة (بما فيها صفارات الإنذار) إلى لوحة التحكُّم. ضع ذلك في اعتبارك عند تصميم نظامك الأمني.
وبمجرد الاتصال بلوحة التحكُّم، ستظهر لوحة المفاتيح في قائمة أجهزة لوحة التحكُّم في تطبيق Ajax. تعتمد وتيرة تحديث حالات الجهاز في القائمة على إعدادات Jeweller أو Jeweller/Fibra، حيث تبلغ القيمة الافتراضية 36 ثانية.
لا تعمل KeyPad TouchScreen إلا مع لوحة تحكُّم واحدة. وعند توصيلها بلوحة تحكُّم جديدة، تتوقف عن إرسال الأحداث إلى لوحة التحكُّم القديمة. لا تؤدي إضافة لوحة المفاتيح إلى لوحة تحكُّم جديدة إلى إزالتها تلقائيًا من قائمة أجهزة لوحة التحكُّم القديمة. ويجب إجراء ذلك من تطبيق Ajax.
الأعطال
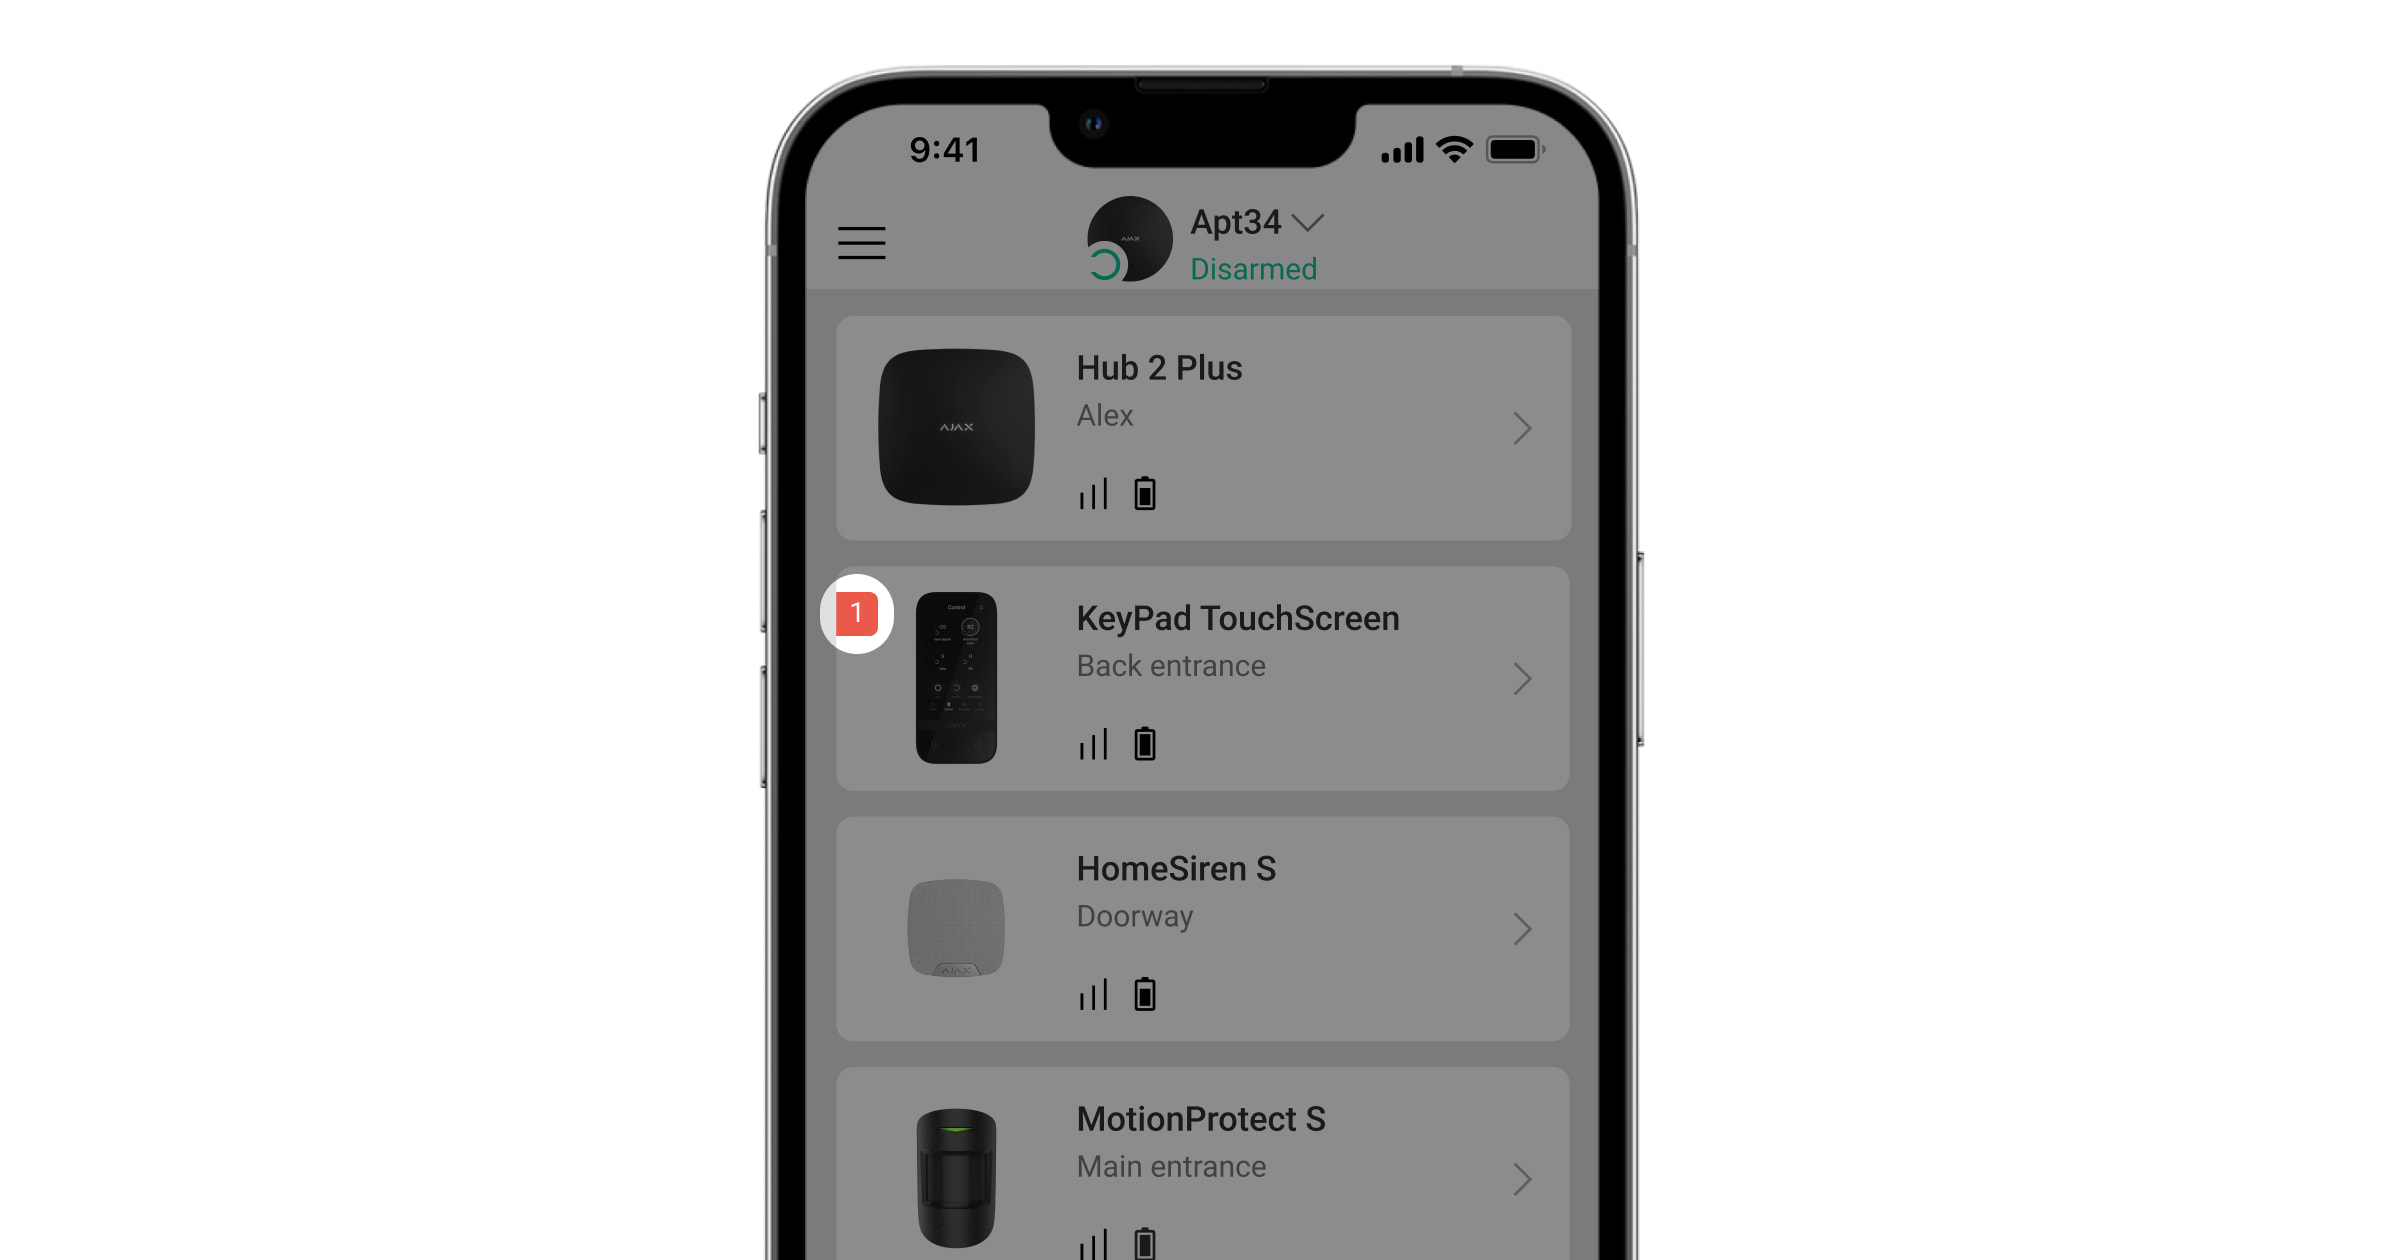
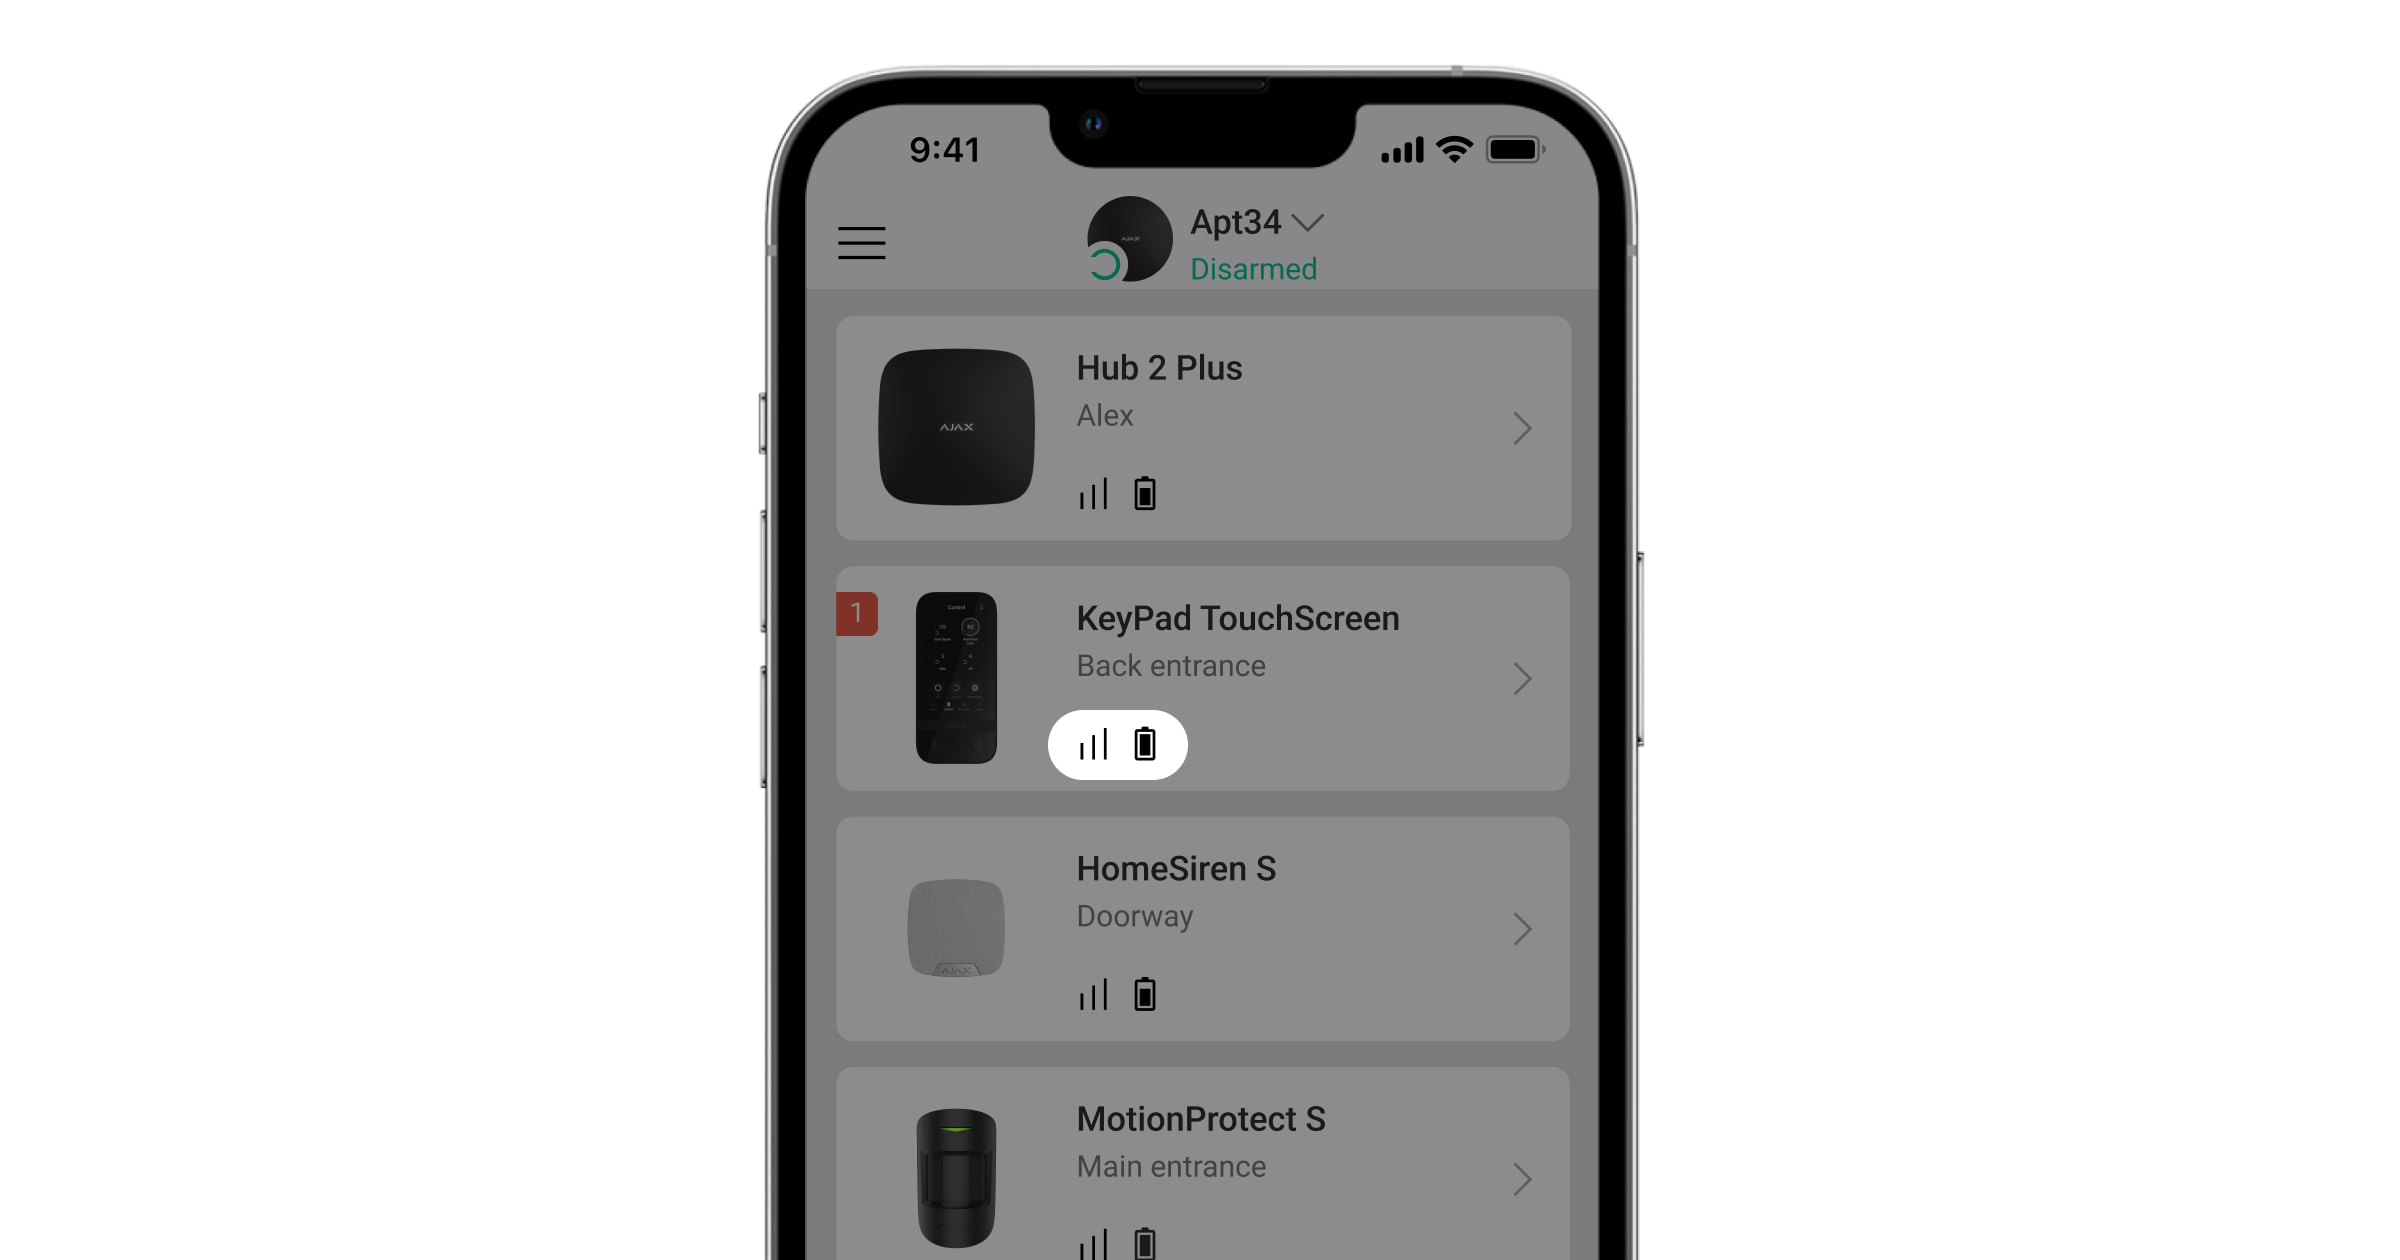
عند اكتشاف عطل في لوحة المفاتيح KeyPad TouchScreen، يعرض تطبيق Ajax عداد الأعطال على أيقونة الجهاز. تُعرَض كافة الأعطال في حالات لوحة المفاتيح. تُميّز الحقول ذات الأعطال بلون أحمر.
يُعرض العطل في حال:
- جسم الكاشف مفتوح (زر الحماية من التلاعب مُحفّز)؛
- عدم وجود اتصال مع لوحة التحكُّم أو موسّع نطاق الإشارة اللاسلكية عبر Jeweller؛
- عدم وجود اتصال مع لوحة التحكُّم أو موسّع نطاق الإشارة اللاسلكية عبر Wings؛
- مستوى شحن بطارية لوحة المفاتيح ضعيف؛
- درجة حرارة لوحة المفاتيح تتجاوز الحدود المقبولة.
الأيقونات
الأيقونات في التطبيق
تعرض الأيقونات في التطبيق بعض حالات لوحة المفاتيح. للوصول إليها:
- سجّل الدخول على تطبيق Ajax.
- اختر لوحة التحكُّم.
- انتقل إلى علامة تبويب الأجهزة .
| الأيقونة | المعنى |
|
قوة إشارة Jeweller. تعرض قوة الإشارة بين لوحة التحكُّم والجهاز. القيمة الموصى بها 2–3 شُرط. |
|
| مستوى بطارية لوحة المفاتيح جيد. | |
|
يوجد عطل في لوحة المفاتيح. تتوفر قائمة الأعطال في حالات لوحة المفاتيح. |
|
| يُعرَض عند تفعيل وحدة بلوتوث لوحة المفاتيح. | |
| لم يكتمل إعداد البلوتوث. الوصف مُتاح في حالات لوحة المفاتيح. | |
|
يتوفر تحديث للبرنامج الثابت. انتقل إلى حالات لوحة المفاتيح أو الإعدادات للعثور على الوصف وبدء التحديث. الأيقونة غير متوفرة في تطبيق Ajax Security System مع الإصدار 3.0 والإصدارات الأحدث لنظامي iOS و Android. لتحديث البرنامج الثابت، صل مصدر الطاقة الخارجي بلوحة المفاتيح KeyPad TouchScreen. |
|
| تظهر إذا كانت لوحة المفاتيح تعمل عبر موسّع نطاق الإشارة اللاسلكية. | |
| قراءة Pass/Tag مُفعّلة في إعدادات KeyPad TouchScreen. | |
| التنبيه الصوتي عند الفتح مُفعّل في إعدادات KeyPad TouchScreen. | |
|
الجهاز في وضع اختبار تضعيف الإشارة. |
|
|
الجهاز موقوف بشكل دائم. |
|
|
إشعارات إنذار التلاعب موقوفة بشكل دائم. |
|
|
الجهاز موقوف حتى إيقاف النظام لأول مرة. |
|
|
إشعارات إنذار التلاعب موقوفة حتى إيقاف النظام لأول مرة. |
|
| انقطاع اتصال الجهاز بلوحة التحكُّم أو انقطع اتصال لوحة التحكُّم بخادم Ajax Cloud. | |
|
لم يُنقَل الجهاز إلى لوحة التحكُّم الجديدة. |
الأيقونات على الشاشة
تظهر الأيقونات أعلى الشاشة وتُخطر بحالات أو أحداث معينة في النظام.
| الأيقونة | المعنى |
|
استعادة النظام إلزامية بعد الإنذار. يمكن للمستخدم إما إرسال طلب أو استعادة النظام اعتمادًا على نوع حسابه. لإجراء ذلك، انقر على الأيقونة وحدّد الزر المطلوب على الشاشة. |
|
|
كتم إنذار الحريق. تظهر بعد إغلاق شاشة كتم صوت إنذار الحريق. يمكن للمستخدمين النقر على الأيقونة في أي وقت وكتم صوت إنذار الحريق، بما في ذلك إنذار الحريق المترابط. في حالة تحفيز إنذار الحريق عن طريق ManualCallPoint Jeweller، أو إذا كان مستوى أول أكسيد الكربون أو الدخان في مستوى خطر، فلا يمكن كتم صوت الإنذار من لوحة المفاتيح. تتوفر أنواع إنذار الحريق هذه للوحة المفاتيح KeyPad TouchScreen Jeweller مع إصدار البرنامج الثابت 11.60.10.19 أو أحدث. |
|
|
التنبيه الصوتي عند الفتح موقوف. انقر على الأيقونة للتفعيل. تظهر على الشاشة عند ضبط الإعدادات المطلوبة. |
|
|
التنبيه الصوتي عند الفتح مُفعّل. انقر على الأيقونة للإيقاف. تظهر على الشاشة عند ضبط الإعدادات المطلوبة. |
الحالات
توفر الحالات معلومات حول الجهاز ومعلمات تشغيله. ويمكن الاطلاع على حالات KeyPad TouchScreen في تطبيق Ajax:
- انتقل إلى علامة تبويب الأجهزة .
- اختر KeyPad TouchScreen من القائمة.
| المعلمة | القيمة |
| استيراد البيانات | يعرض الخطأ عند نقل البيانات إلى لوحة التحكُّم الجديدة:
|
| العطل |
انقر على لا يُعرَض هذا الحقل إلا عند اكتشاف عطل. |
| يتوفر إصدار جديد من البرنامج الثابت |
يؤدي النقر على يُعرض الحقل في حال وجود إصدار جديد من البرنامج الثابت. تُعرض الحالة في تطبيق Ajax Security System مع الإصدار 3.0 والإصدارات الأحدث لنظامي iOS وAndroid. لتحديث البرنامج الثابت، صل مصدر الطاقة الخارجي بلوحة المفاتيح KeyPad TouchScreen. |
| تحذير |
يؤدي النقر على |
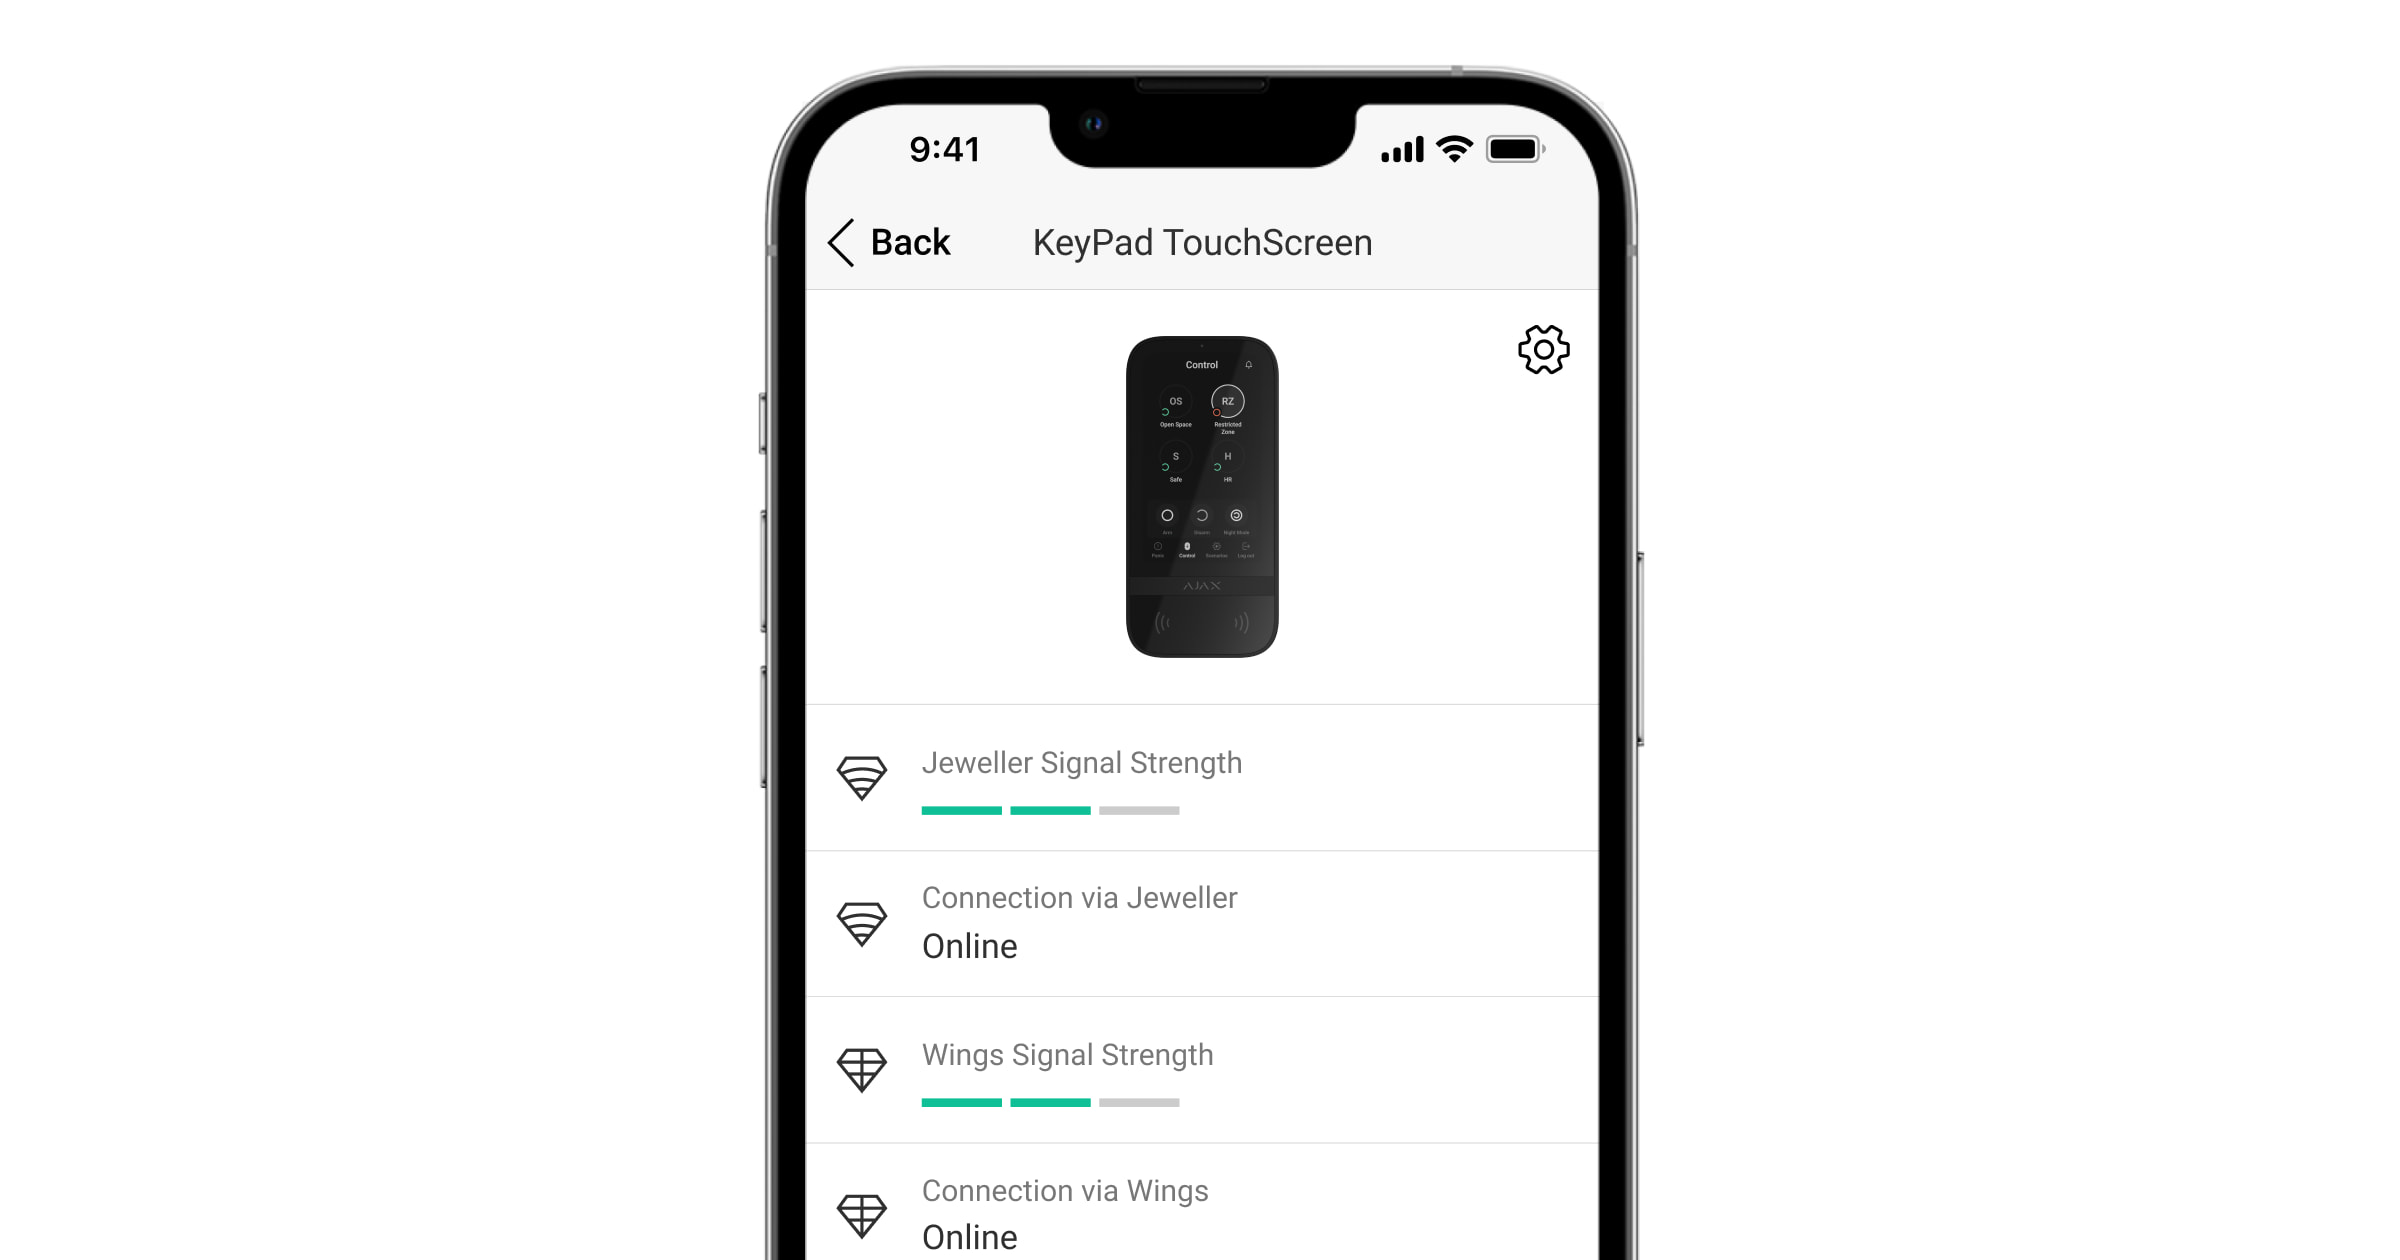
| قوة إشارة البروتوكول Jeweller |
قوة الإشارة بين لوحة التحكُّم أو موسّع النطاق والجهاز على قناة Jeweller. القيمة الموصى بها 2–3 شُرط. يُمثّل Jeweller بروتوكول نقل أحداث وإنذارات KeyPad TouchScreen. |
| الاتصال عبر بروتوكول Jeweller | حالة الاتصال على قناة Jeweller بين الكاشف ولوحة التحكُّم (أو موسّع النطاق):
|
| قوة إشارة البروتوكول Wings |
قوة الإشارة بين لوحة التحكُّم أو موسّع النطاق والجهاز على قناة Wings. القيمة الموصى بها 2–3 شُرط. يُمثّل Wings بروتوكولاً لتحديث البرامج الثابتة ونقل قائمة المجموعات، والغرف، والمعلومات الإضافية الأخرى. |
| الاتصال عبر Wings | حالة الاتصال على قناة Wings بين لوحة التحكُّم أو موسّع النطاق والجهاز:
|
| طاقة جهاز الإرسال |
يعرض الطاقة المحددة لجهاز الإرسال. وتظهر المعلمة عند تحديد الخيار الحد الأقصى أو التضعيف في قائمة اختبار تضعيف الإشارة. |
| شحن البطارية | مستوى شحن البطارية في الجهاز:
عندما ينخفض شحن البطاريات، ستتلقى تطبيقات Ajax وشركة الأمن الإشعارات المناسبة. بعد إرسال إشعار بانخفاض طاقة البطارية، يمكن أن تعمل لوحة المفاتيح لمدة تصل إلى أسبوعين. |
| الغطاء | حالة زر الحماية من التلاعب في لوحة المفاتيح الذي يستجيب لفصل غلاف الجهاز أو فتحه:
|
| مصدر طاقة خارجي | حالة اتصال لوحة المفاتيح بمصدر طاقة خارجي:
|
| الشاشة نشطة دائمًا | تُعرض عند تفعيل زر التبديل الشاشة نشطة دائمًا في إعدادات لوحة المفاتيح وتوصيل مصدر طاقة خارجي. |
| إشارة صوتية للإنذارات | تعرض حالة الإعداد تنشيط جرس لوحة المفاتيح عند اكتشاف إنذار في النظام. |
| مدة الإنذار |
مدة الإشارة الصوتية في حالة الإنذار. وتُضبَط بزيادات قدرها 3 ثوانٍ. تُعرَض عند تفعيل زر التبديل تنشيط جرس لوحة المفاتيح عند اكتشاف إنذار في النظام. |
| قراءة Tag/Pass | تُعرض في حال تفعيل قارئ البطاقات ومفاتيح التحكُّم عن بُعد. |
| البلوتوث | يُعرض في حال تفعيل وحدة البلوتوث في لوحة المفاتيح للتحكُّم في النظام باستخدام هاتف ذكي. |
| تغيير وضع تشغيل النظام بسهولة | يعرض التهيئة لميزة وضع تشغيل النظام بسهولة:
|
| إعدادات الإشارة الصوتية | |
| تشغيل النظام/إيقافه | عند التفعيل، تُخطر لوحة المفاتيح بشأن تشغيل النظام وإيقافه بإشارة صوتية قصيرة. |
| تنشيط/إيقاف الوضع الليلي | عند التفعيل، تنبهك لوحة المفاتيح عند تشغيل/إيقاف الوضع الليلي بإصدار إشارة صوتية قصيرة. |
| التأخير عند الدخول | عند التفعيل، تصدر لوحة المفاتيح إشارة صوتية بشأن التأخير عند الدخول. |
| التأخير عند الخروج | عند التفعيل، تصدر لوحة المفاتيح إشارة صوتية بشأن التأخير عند الخروج. |
| التأخير عند الدخول في الوضع الليلي | عند التفعيل، تصدر لوحة المفاتيح إشارة صوتية بشأن التأخير عند الدخول في الوضع الليلي. |
| التأخير عند الخروج في الوضع الليلي | عند التفعيل، تصدر لوحة المفاتيح إشارة صوتية بشأن التأخير عند الخروج في الوضع الليلي. |
| التنبيه الصوتي عند الفتح |
عند التفعيل، تُبلغك صفارة إنذار بتحفيز كواشف الفتح في وضع إيقاف النظام. |
| مستوى الإشارة الصوتية | يُعرض عند تنشيط إشعارات تشغيل النظام/إيقافه، والتأخير عند الدخول/الخروج، والفتح. يعرض مستوى صوت جرس الإشعارات. |
| الإيقاف الدائم | يعرض حالة وظيفة الإيقاف الدائم للوحة المفاتيح:
|
| الإيقاف لمرة واحدة | يعرض حالة إعداد إيقاف لوحة المفاتيح لمرة واحدة:
|
| البرنامج الثابت | إصدار البرنامج الثابت للوحة المفاتيح. |
| المعرّف | معرّف لوحة المفاتيح. متوفر أيضًا على رمز الاستجابة السريعة (QR) على جسم الجهاز والعبوة. |
| رقم الجهاز. | رقم حلقة الجهاز (المنطقة). |
الإعدادات
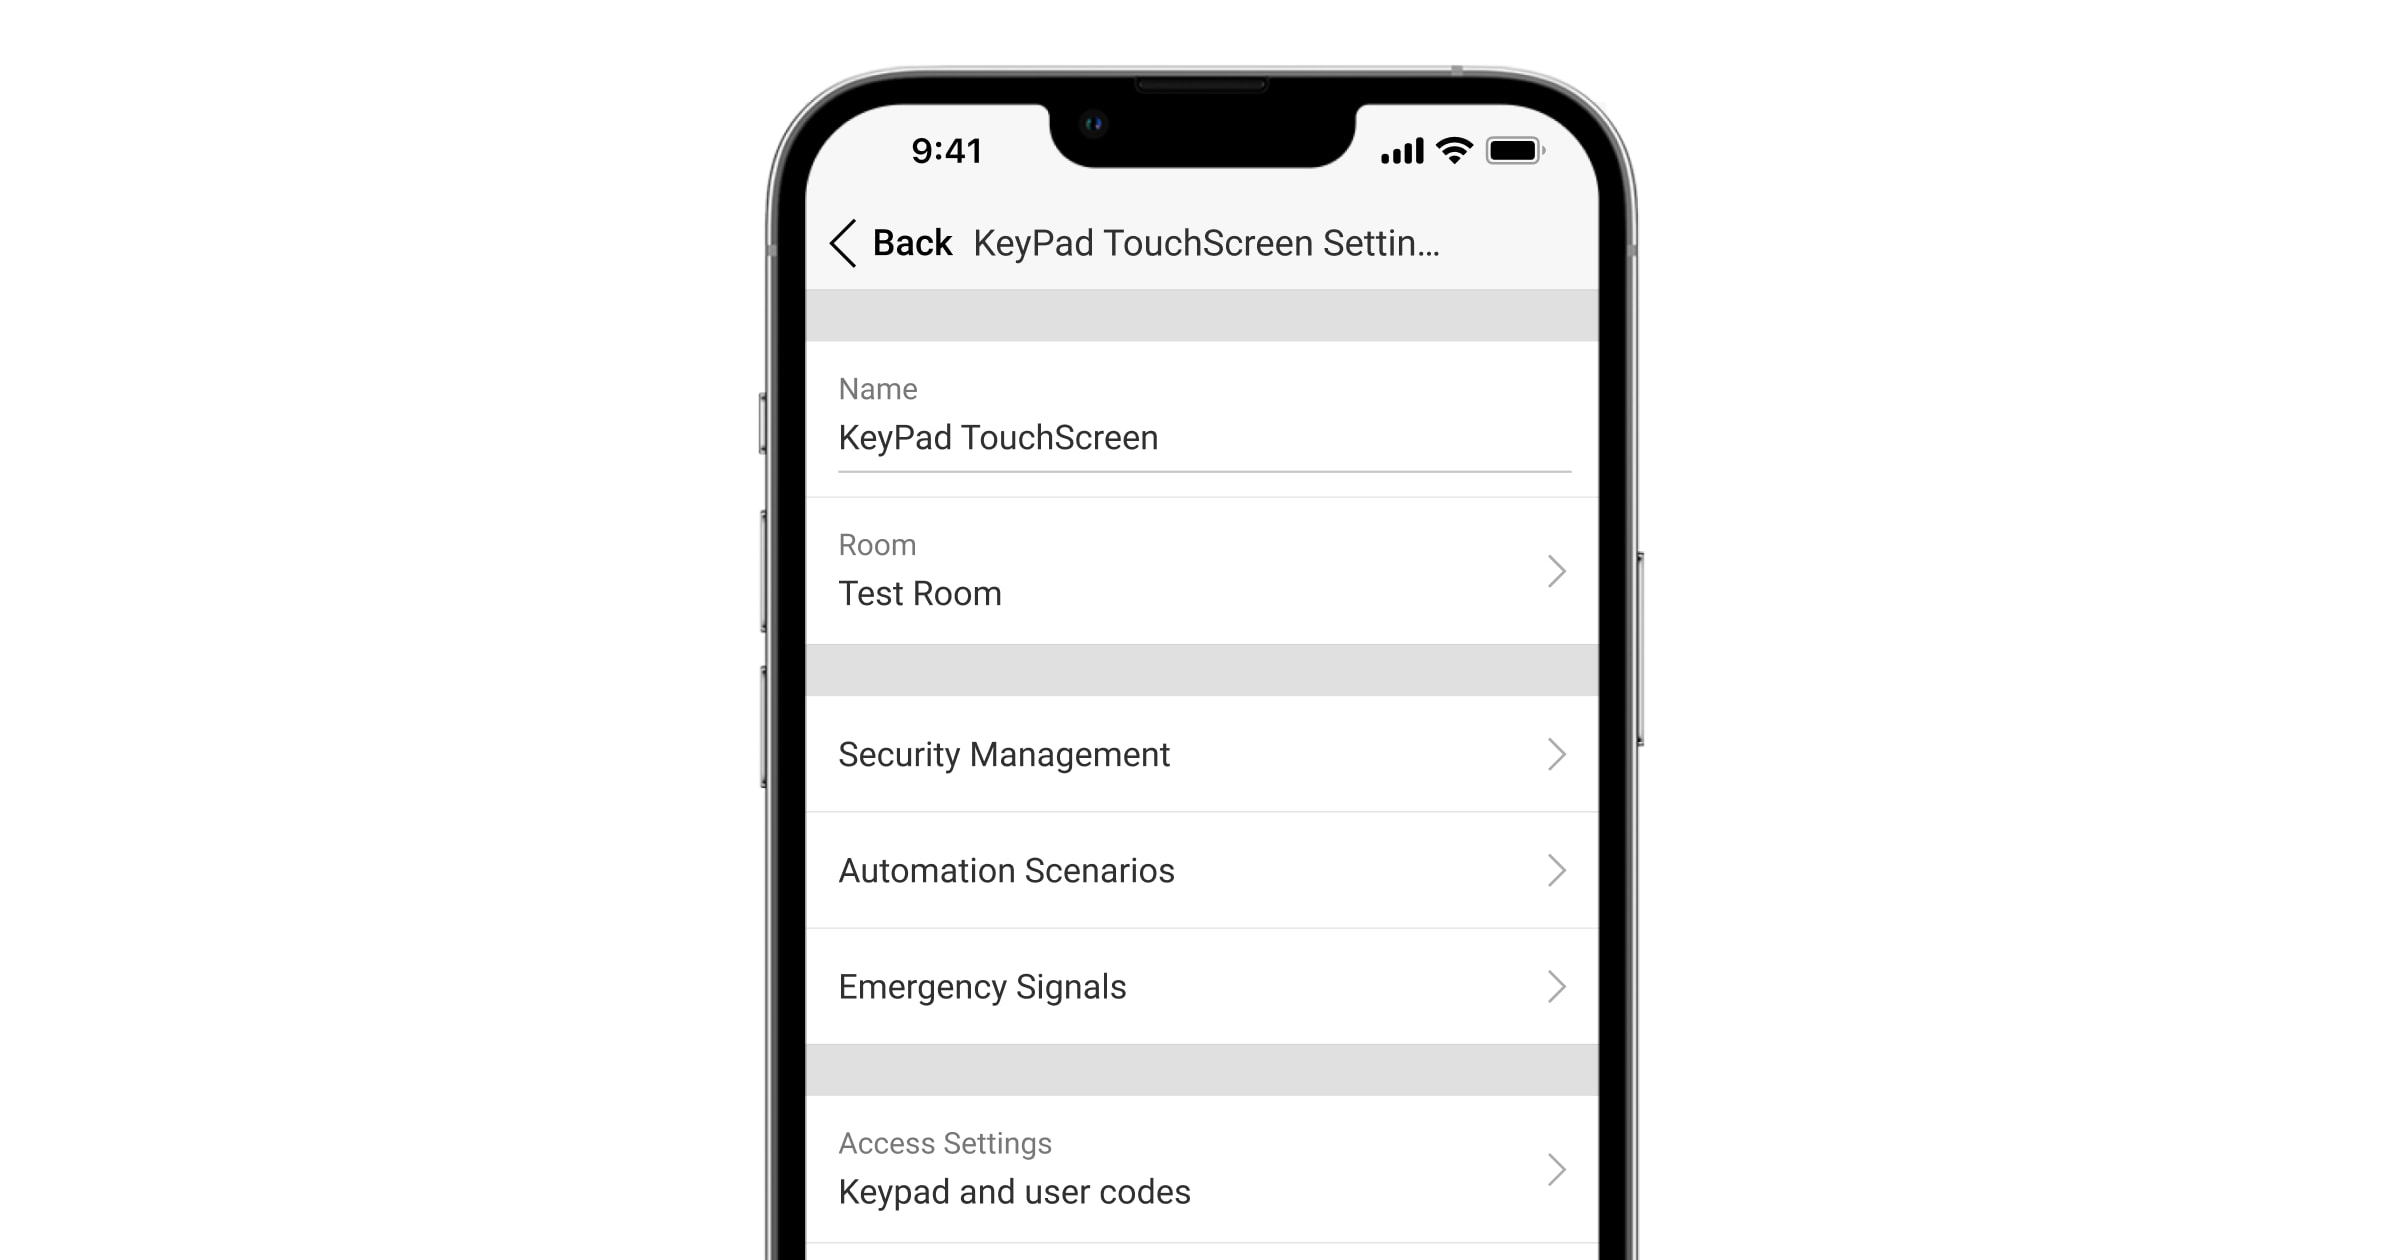
لتغيير إعدادات KeyPad TouchScreen في تطبيق Ajax:
- انتقل إلى علامة تبويب الأجهزة .
- اختر KeyPad TouchScreen من القائمة.
- انتقل إلى الإعدادات بالنقر على الأيقونة
 .
. - اضبط المعلمات المطلوبة.
- انقر على الرجوع لحفظ الإعدادات الجديدة.
| الإعدادات | القيمة |
| الاسم |
اسم لوحة المفاتيح. يظهر في قائمة أجهزة لوحة التحكُّم، ونص الرسالة النصية القصيرة، والإشعارات في موجز الأحداث. لتغيير اسم الجهاز، انقر على حقل النص. قد يتضمن الاسم حتى 12 حرفًا عربيًا أو ما يصل إلى 24 حرفًا لاتينيًا. |
| الغرفة |
تحديد الغرفة الافتراضية المُعيّن لها KeyPad TouchScreen. يظهر اسم الغرفة في نص الرسالة النصية القصيرة والإشعارات في موجز الأحداث. |
| إعدادات الوصول | تحديد طريقة تشغيل النظام/إيقافه:
لتنشيط رموز وصول لوحة المفاتيح للأشخاص غير المُسجّلين في النظام، حدد الخيارين على المفاتيح: رموز لوحة المفاتيح فقط أو رموز المستخدم ولوحة المفاتيح. |
| رمز لوحة المفاتيح | اختيار رمز عام للتحكُّم الأمني. ويتكون من 4 إلى 6 أرقام. |
| رمز الإكراه |
تحديد رمز إكراه عام للإنذار الصامت. ويتكون من 4 إلى 6 أرقام. |
| نطاق اكتشاف الشاشة | ضبط المسافة التي تتفاعل عندها لوحة المفاتيح مع الاقتراب وتشغّل الشاشة:
حدّد درجة الحساسية المُثلى حيث تستجيب لوحة المفاتيح عند الاقتراب منها. |
| كتم إنذار الحريق |
عند التفعيل، يمكن للمستخدمين كتم إنذارات كواشف Ajax للحريق (حتى المترابطة) باستخدام لوحة المفاتيح. في حالة تحفيز إنذار الحريق عن طريق ManualCallPoint Jeweller، أو إذا كان مستوى أول أكسيد الكربون أو الدخان في مستوى خطر، فلا يمكن كتم صوت الإنذار من لوحة المفاتيح. تتوفر أنواع إنذار الحريق هذه للوحة المفاتيح KeyPad TouchScreen Jeweller مع إصدار البرنامج الثابت 11.60.10.19 أو أحدث. |
| قراءة Tag/Pass | عند التفعيل، يمكن التحكُّم في الوضع الأمني باستخدام أجهزة الوصول Pass وTag. |
| البلوتوث | عند تفعيله، يمكن التحكُّم في وضع الأمن باستخدام هاتف ذكي. |
| حساسية البلوتوث | تعديل حساسية وحدة بلوتوث لوحة المفاتيح:
يُتاح عند تفعيل مفتاح التبديل البلوتوث. |
| القفل التلقائي للوصول غير المُصرَّح به |
عند تفعيل الخيار، ستُقفل لوحة المفاتيح لفترة مُحدّدة مُسبقًا في حالة إدخال رمز غير صحيح أو استخدام أجهزة وصول غير مُعتمدة أكثر من ثلاث مرات متتالية خلال دقيقة واحدة. يمكن لمستخدم يتمتع بحقوق تهيئة النظام أو PRO فتح لوحة المفاتيح من خلال التطبيق قبل انتهاء فترة القفل المُحددة. |
| وقت القفل التلقائي، بالدقائق | تحديد فترة قفل لوحة المفاتيح بعد محاولات الوصول غير المُصرَّح بها:
يكون متاحًا في حالة تفعيل زر التبديل القفل التلقائي عند محاولة الوصول غير المُصرَّح به. |
| إدارة التنبيه الصوتي باستخدام لوحة المفاتيح |
عند تفعيل هذا الخيار، يمكن للمستخدم تنشيط/إيقافه من إشعارات عرض لوحة المفاتيح المتعلقة بتحفيز كواشف الفتح. فعّل التنبيه الصوتي عند الفتح في إعدادات لوحة المفاتيح أيضًا ولكاشف ثنائي الاستقرار واحد على الأقل. |
| تحديث البرنامج الثابت |
يحوّل الجهاز إلى وضع تحديث البرنامج الثابت. لتحديث البرنامج الثابت، وصّل KeyPad TouchScreen بمصدر طاقة خارجي. |
| اختبار قوة إشارة البروتوكول Jeweller |
يحوِّل الجهاز إلى وضع اختبار قوة إشارة بروتوكول Jeweller. |
| اختبار قوة إشارة بروتوكول Wings |
يحوِّل الجهاز إلى وضع اختبار قوة إشارة بروتوكول Wings. |
| اختبار تضعيف الإشارة |
يحوِّل الجهاز إلى وضع اختبار تضعيف الإشارة. |
| إعادة ضبط Tag/Pass |
يسمح بحذف جميع لوحات التحكُّم المرتبطة بجهاز Tag أو Pass من ذاكرة الجهاز. |
| دليل الاستخدام | يفتح دليل استخدام KeyPad TouchScreen في تطبيق Ajax. |
| الإيقاف الدائم |
يسمح للمستخدم بإيقاف تشغيل الجهاز دون إزالته من النظام. تتوفر ثلاث خيارات:
|
| الإيقاف لمرة واحدة |
يتيح للمستخدم إيقاف أحداث الجهاز حتى إيقاف النظام لأول مرة. تتوفر ثلاث خيارات:
|
| حذف الجهاز | يلغي إقران الجهاز، ويقطع اتصاله بلوحة التحكُّم، ويحذف إعداداته. |
إدارة الأمن
| الإعدادات | القيمة |
| شاشة التحكُّم |
تنشيط/إيقاف التحكُّم في الأمن من لوحة المفاتيح. عند إيقاف هذا الإعداد، تختفي علامة التبويب التحكُّم |
| المجموعات المشتركة |
تحديد المجموعات التي ستجري مشاركتها مع جميع المستخدمين المعتمدين ويمكنهم إدارتها. تُشارَك جميع مجموعات النظام والمجموعات المُنشأة بعد إضافة KeyPad TouchScreen إلى لوحة التحكُّم بشكل افتراضي. متاح في حال تفعيل وضع المجموعة. |
| التفويض المُسبق | عند تفعيل هذا الإعداد، يجب على المستخدم المصادقة أولاً بإدخال رمز أو استخدام جهاز وصول شخصي لكي يتمكن من الوصول إلى لوحة التحكُّم وحالة النظام الحالية. |
| تأكيد التفويض برمز المرور |
عند التفعيل، يتطلب تفويض النظام باستخدام أجهزة الوصول تأكيد الإجراء من قبل المستخدم أو باستخدام رمز لوحة المفاتيح. يمكن للمستخدم أيضًا اختيار الوقت لتأكيد الإجراء. |
| تشغيل النظام دون رمز |
عند التفعيل، يمكن للمستخدم تشغيل النظام في الموقع دون إدخال رمز أو استخدام جهاز وصول شخصي. وفي حالة إيقافه، ينبغي إدخال الرمز أو استخدام جهاز الوصول لتشغيل النظام. تظهر شاشة إدخال الرمز بعد الضغط على الزر تشغيل النظام متاح في حالة إيقاف زر التبديل تأكيد التفويض باستخدام رمز مرور والتفويض المسبق. |
| تغيير وضع تشغيل النظام بسهولة | عند تفعيل هذا الإعداد، يمكن للمستخدمين تبديل وضع تشغيل النظام (أو المجموعة) باستخدام أجهزة الوصول دون الحاجة إلى التأكيد باستخدام أزرار لوحة المفاتيح:
|
| إظهار قائمة الأعطال على الشاشة |
عند تفعيل هذا الإعداد، ستظهر قائمة الأعطال التي تمنع تشغيل النظام على شاشة لوحة المفاتيح. ويُرجى تفعيل التحقُّق من سلامة النظام لهذا الغرض. قد يستغرق الأمر بعض الوقت لعرض القائمة. وهذا يقلل من وقت تشغيل لوحة المفاتيح من البطاريات المُدمَجة. |
سيناريوهات التشغيل الآلي
| الإعدادات | القيمة |
| إدارة السيناريوهات |
تنشيط/إيقاف إدارة السيناريوهات من لوحة المفاتيح. عند إيقاف هذا الإعداد، تختفي علامة التبويب السيناريوهات |
| سيناريوهات لوحة المفاتيح |
تسمح لك القائمة بإنشاء ما يصل إلى ستة سيناريوهات للتحكُّم في جهاز تشغيل آلي واحد أو مجموعة من الأجهزة. عند حفظ الإعدادات، تظهر أزرار إدارة السيناريوهات على شاشة لوحة المفاتيح (علامة التبويب السيناريوهات يمكن لمستخدم أو PRO يتمتع بحقوق تهيئة النظام إضافة سيناريوهات أو حذفها، وتشغيلها/إيقافها. ولا تظهر السيناريوهات الموقوفة في علامة التبويب السيناريوهات |
| التفويض المُسبق | عند تفعيل هذا الإعداد، يجب على المستخدم المصادقة أولاً بإدخال رمز أو استخدام جهاز وصول شخصي لكي يتمكن من إدارة السيناريوهات. |
إشارات الطوارئ
| الإعدادات | القيمة |
| أزرار الطوارئ على الشاشة |
عند تفعيل هذا الإعداد، يمكن للمستخدم إرسال إشارة طوارئ أو طلب المساعدة من علامة التبويب الذعر في لوحة المفاتيح عند إيقاف هذا الإعداد، تختفي علامة التبويب الذعر |
| نوع الزر | تحديد عدد الأزرار المعروضة في علامة التبويب الذعر
|
| الحماية من الضغطات العرضية | عند تفعيل هذا الإعداد، يتطلب إرسال إنذار تأكيدًا إضافيًا من المستخدم. |
| التنبيه باستخدام صفارة إنذار | |
| عند الضغط على زر الذعر | عند التفعيل، تنشط صفرات الإنذار المُضافة إلى النظام عند الضغط على زر الذعر. |
| عند الضغط على زر إنذار الحريق |
عند التفعيل، تنشط صفرات الإنذار المُضافة إلى النظام عند الضغط على زر الحريق. ويُعرض زر التبديل في حال تفعيل خيار الثلاثة أزرار في قائمة نوع الزر. |
| عند الضغط على زر الطلب المساعد |
عند التفعيل، تنشط صفارات الإنذار المُضافة إلى النظام عند الضغط على زر الإنذار المساعد. ويُعرض زر التبديل في حال تفعيل خيار الثلاثة أزرار في قائمة نوع الزر. |
إعدادات الشاشة
| الإعدادات | القيمة |
| الضبط التلقائي | زر التبديل مُفعّل بشكل افتراضي. يُضبَط سطوع الإضاءة الخلفية للشاشة تلقائيًا وفقًا لمستوى الإضاءة المحيطة. |
| تعديل السطوع يدويًا |
تحديد مستوى الإضاءة الخلفية للشاشة: من 0 إلى 100% (0 — أدنى مستوى للإضاءة الخلفية، 100 — أعلى مستوى للإضاءة الخلفية). وتُضبَط بزيادات قدرها 10%. ولا تعمل الإضاءة الخلفية إلا عندما تكون الشاشة نشطة. يتوفر الضبط اليدوي عند إيقاف زر التبديل الضبط التلقائي. |
| المظهر | تعديل مظهر الواجهة:
|
| الشاشة نشطة دائمًا |
تظل شاشة لوحة المفاتيح نشطة دائمًا عند تفعيل زر التبديل وتوصيل مصدر الطاقة الخارجي. وهذا الخيار موقوف افتراضيًا. في هذه الحالة، تدخل لوحة المفاتيح في وضع السكون بعد فترة زمنية معينة من آخر استخدام للشاشة. |
| مؤشر وضع تشغيل النظام | ضبط مؤشر LED للوحة المفاتيح:
|
| اللغة |
ضبط لغة واجهة لوحة المفاتيح. اللغة الإنجليزية مُعيّنة بشكل افتراضي. ولتغيير اللغة، حدد اللغة المطلوبة وانقر على حفظ. |
إعدادات الإشارة الصوتية
تحتوي KeyPad TouchScreen على جرس مُدمَج يؤدي الوظائف التالية وفقًا للإعدادات:
- يشير إلى حالة الأمن والتأخير عند الدخول/الخروج أيضًا.
- التنبيه الصوتي عند الفتح.
- الإبلاغ عن الإنذارات.
لا نوصي باستخدام KeyPad TouchScreen بدلاً من صفارة الإنذار. فجرس لوحة المفاتيح مُخصّص للإشعارات الإضافية فقط. لكن صفارات الإنذار من Ajax مُصمّمة لردع المتسلّلين ولفت الانتباه. كما يصعُب تفكيك صفارة الإنذار المركّبة بشكل صحيح بسبب تركيبها على ارتفاعات عالية مقارنةً بلوحة المفاتيح الموجودة في مستوى العين.
| الإعدادات | القيمة |
| إعدادات الإشارة الصوتية. إصدار إشارة صوتية عند تغيير وضع تشغيل النظام | |
| تشغيل النظام/إيقافه |
عند تفعيل هذا الإعداد: يُرسل إشعار صوتي عند تغيير وضع الأمن من لوحة المفاتيح، أو من جهاز آخر، أو من التطبيق. عند إيقافه: يُرسَل إشعار صوتي عند تغيير وضع الأمن من لوحة المفاتيح فقط. يعتمد مستوى الإشارة الصوتية على إعدادات مستوى صوت الأزرار. |
| تنشيط/إيقاف الوضع الليلي |
عند تفعيل هذا الإعداد: يُرسل إشعار صوتي عند تنشيط/إيقاف الوضع الليلي من لوحة المفاتيح، أو من جهاز آخر، أو من التطبيق. عند إيقافه: يُرسَل إشعار صوتي عند عند تنشيط/إيقاف الوضع الليلي من لوحة المفاتيح فقط. يعتمد مستوى الإشارة الصوتية على إعدادات مستوى صوت الأزرار. |
| كتم صوت الجهاز عند إدخال الرمز على لوحة المفاتيح | عند تفعيل هذا الخيار، تتوقف لوحة المفاتيح عن إصدار الإشارة الصوتية بمجرد أن يبدأ المستخدم في إدخال الرمز عليها. |
| إصدار إشارة صوتية عند التأخير | |
| التأخير عند الدخول |
عند التفعيل، يصدر الجرس المُدمج إشارة صوتية بشأن التأخير عند الدخول. |
| التأخير عند الخروج |
عند التفعيل، يصدر الجرس المُدمج إشارة صوتية بشأن التأخير عند الخروج. |
| التأخير عند الدخول في الوضع الليلي |
عند التفعيل، يصدر الجرس المُدمج إشارة صوتية بشأن التأخير عند الدخول في الوضع الليلي. |
| التأخير عند الخروج في الوضع الليلي |
عند التفعيل، يصدر الجرس المُدمج إشارة صوتية بشأن التأخير عند الخروج في الوضع الليلي. |
| إشارة صوتية سريعة عند التأخير | |
| إشارة صوتية سريعة عند انتهاء صلاحية التأخير عند الدخول | تُنبه المستخدم بقرب انتهاء فترة التأخير عند الدخول. تتوفر 4 خيارات لاختيار ما يناسبك من بينها عند بدء الإشارة الصوتية السريعة:
|
| إشارة صوتية سريعة عند انتهاء صلاحية التأخير عند الخروج | تُنبه المستخدم بقرب انتهاء فترة التأخير عند الخروج. تتوفر 4 خيارات لاختيار ما يناسبك من بينها عند بدء الإشارة الصوتية السريعة:
|
| إشارة صوتية عند إيقاف النظام | |
| التنبيه الصوتي عند الفتح |
عند التفعيل، يخبرك الجرس المُدمج بتحفيز كواشف الفتح في وضع إيقاف النظام عن طريق إشارة صوتية. |
| مستوى الإشارة الصوتية | تحديد مستوى صوت الجرس المُدمج للإشعارات عند تشغيل النظام/إيقافه، والتأخير الدخول/الخروج، والفتح:
|
| الأزرار | |
| مستوى الصوت | ضبط مستوى صوت إشعارات الجرس للتفاعلات مع شاشة لوحة المفاتيح. |
| الاستجابة للإنذارات | |
| إنذار مسموع | ضبط وضع إصدار الجرس المُدمج للإنذارات:
|
| تنشيط جرس لوحة المفاتيح عند اكتشاف إنذار في النظام | عند التفعيل، يخطر الجرس المُدمج بوجود إنذار في النظام. |
| الإنذارات في وضع المجموعة |
حدّد المجموعة (من المجموعات المشتركة) التي ستخطر لوحة المفاتيح بحدوث إنذار فيها. ويكون الخيار جميع المجموعات المشتركة مُفعّلاً افتراضيًا. إذا كانت لوحة المفاتيح تحتوي على مجموعة مشتركة واحدة فقط وحُذفت، فسيعود الإعداد إلى قيمته الأولية. ويظهر في حال تفعيل وضع المجموعة. |
| مدة الإنذار |
مدة الإشارة الصوتية في حالة الإنذار: من 3 ثواني إلى 3 دقائق. يوصى بتوصيل مصدر طاقة خارجي بلوحة المفاتيح للحصول على إشارة مسموعة تزيد مدتها عن 30 ثانية. |
ضبط التأخير عند الدخول/الخروج في إعدادات الكواشف المناسبة، وليس إعدادات لوحة المفاتيح.
ضبط استجابة لوحة المفاتيح لإنذارات الأجهزة
يمكن لجهاز KeyPad TouchScreen الاستجابة للإنذارات الصادرة من كل كاشف في النظام باستخدام جرس مُدمَج. وتكون الوظيفة مفيدة عندما لا تحتاج إلى تنشيط الجرس مع إنذار جهاز معين. فمثلاً يمكن تطبيق ذلك عند تحفيز كاشف التسرُّب LeaksProtect.
استجابة لوحة المفاتيح للإنذارات من جميع الأجهزة في النظام مُفعّلة بشكل افتراضي.
لضبط استجابة لوحة المفاتيح لإنذار جهاز:
- افتح تطبيق Ajax.
- انتقل إلى علامة تبويب الأجهزة .
- اختر الجهاز الذي تريد تهيئة استجابة لوحة المفاتيح له من القائمة.
- انتقل إلى إعدادات الجهاز بالنقر على الأيقونة .
- ابحث عن خيار التنبيه بصفارة إنذار وحدد مفاتيح التبديل التي ستنشطها. فعّل الوظيفة أو أوقفها.
- كرر الخطوات من 3 إلى 5 مع بقية أجهزة النظام.
ضبط استجابة لوحة المفاتيح لإنذار التلاعب
يمكن لجهاز KeyPad TouchScreen الاستجابة لإنذارات التلاعب بالغلاف الصادرة من كل جهاز في النظام باستخدام جرس مُدمَج. عند تنشيط الوظيفة، سيصدر الجرس المُدمَج في لوحة المفاتيح إشارة صوتية عند تحفيز زر الحماية من التلاعب في الجهاز.
لضبط استجابة لوحة المفاتيح لإنذار التلاعب:
- افتح تطبيق Ajax.
- انتقل إلى علامة تبويب الأجهزة .
- حدد لوحة التحكُّم وانتقل إلى إعداداتها .
- حدِّد قائمة الخدمة.
- انتقل إلى قسم الأصوات والتنبيهات.
- فعّل زر التبديل إذا كان غطاء لوحة التحكُّم أو أي كاشف مفتوحًا.
- انقر على الرجوع لحفظ الإعدادات الجديدة.
يستجيب زر الحماية من التلاعب لفتح وإغلاق الغلاف، بصرف النظر عن وضع تشغيل النظام كله أو الجهاز فقط.
إعداد استجابة لوحة المفاتيح للضغط على زر الذعر في تطبيقات Ajax
يمكنك تهيئة استجابة لوحة المفاتيح للإنذار عند الضغط على زر الذعر في تطبيقات Ajax. ولفعل ذلك، ينبغي اتباع الخطوات التالية:
- افتح تطبيق Ajax.
- انتقل إلى علامة تبويب الأجهزة .
- حدد لوحة التحكُّم وانتقل إلى إعداداتها .
- حدِّد قائمة الخدمة.
- انتقل إلى قسم الأصوات والتنبيهات.
- فعّل زر التبديل عند الضغط على زر الذعر في التطبيق.
- انقر على الرجوع لحفظ الإعدادات الجديدة.
إعداد إشارة ما بعد الإنذار في لوحة المفاتيح

يمكن للوحة المفاتيح الإخطار بالتحفيز في نظام قيد التشغيل عبر مؤشر LED.
يعمل الخيار على النحو التالي:
- يتعرّف النظام على الإنذار.
- تصدر لوحة المفاتيح إشارة إنذار (في حال تفعيلها). تعتمد مدة الإشارة وقوتها على إعدادات الجهاز.
- يومض مؤشر LED في لوحة المفاتيح مرتين (مرة كل 3 ثوانٍ) حتى إيقاف النظام.
بفضل هذه الميزة، بإمكان مستخدمي النظام وأفراد شركات الأمن العلم بصدور إنذار.
لا تعمل إشارة ما بعد الإنذار في KeyPad TouchScreen للكواشف النشطة دائمًا، في حال تحفيز الكاشف أثناء فترة إيقاف النظام.
ولتفعيل إشارة ما بعد الإنذار في KeyPad TouchScreen، في تطبيق Ajax PRO:
- انتقل إلى إعدادات لوحة التحكُّم:
- لوحة التحكُّم ← الإعدادات ← الخدمة ← مؤشر LED.
- لوحة التحكُّم ← الإعدادات
- حدّد الأحداث التي ستُبلغ عنها KeyPad TouchScreen بوميض مزدوج من مؤشر LED قبل إيقاف النظام:
- إنذار سطو مُسلح/تسلُّل مؤكّد.
- إنذار سطو مُسلح/تسلُّل واحد.
- فتح الغطاء.
- حدّد KeyPad TouchScreen المطلوبة في قائمة الأجهزة. انقر على رجوع لحفظ المعلمات.
- انقر على حفظ. ستُطبّق كل القيم.
كيفية ضبط التنبيه الصوتي
في حالة تفعيل التنبيه الصوتي عند الفتح، تُخطر KeyPad TouchScreen بتحفيز كواشف الفتح أثناء إيقاف النظام عن طريق إشارة صوتية قصيرة. وتُستخدم الميزة، على سبيل المثال، في المتاجر، لإخطار الموظفين عند دخول أي شخص إلى المبنى.
تُهيأ الإشعارات على مرحلتين: إعداد لوحة المفاتيح وإعداد كواشف الفتح. توفر هذه المقالة مزيدًا من المعلومات حول التنبيه الصوتي وكيفية إعداد الكواشف.
لضبط استجابة لوحة المفاتيح:
- افتح تطبيق Ajax.
- انتقل إلى علامة تبويب الأجهزة .
- اختر KeyPad TouchScreen وانتقل إلى إعداداتها .
- انتقل إلى الإشارات الصوتية القائمة ← إعدادات الإشارة الصوتية.
- يمكنك تفعيل زر التبديل التنبيه الصوتي عند الفتح في قسم إصدار إشارة صوتية أثناء إيقاف النظام.
- اضبط مستوى صوت الإشعارات المطلوب.
- انقر على رجوع لحفظ الإعدادات.
في حال ضبط الإعدادات بشكل صحيح، سيظهر رمز الجرس في علامة التبويب التحكُّم في تطبيق Ajax. انقر عليه لتنشيط التنبيه الصوتي عند الفتح أو إيقافه.
لضبط التحكُّم في التنبيه الصوتي من شاشة لوحة المفاتيح:
- افتح تطبيق Ajax.
- انتقل إلى علامة تبويب الأجهزة .
- اختر KeyPad TouchScreen وانتقل إلى إعداداتها .
- فعّل زر التبديل إدارة التنبيه الصوتي باستخدام لوحة المفاتيح.
في حال ضبط الإعدادات بشكل صحيح، ستظهر أيقونة الجرس في علامة التبويب التحكُّم ![]() على شاشة لوحة المفاتيح. انقر عليه لتنشيط/إيقاف التنبيه الصوتي عند الفتح.
على شاشة لوحة المفاتيح. انقر عليه لتنشيط/إيقاف التنبيه الصوتي عند الفتح.
إعداد الرموز
لإعداد رموز لوحة التحكُّم ورموز الإكراه:
- في تطبيق Ajax، انتقل إلى علامة التبويب الأجهزة .
- اختر لوحة المفاتيح التي تريد إعداد رمز الوصول لها.
- انتقل إلى الإعدادات .
- حدّد خيار رموز لوحة المفاتيح فقط أو رموز المستخدم ولوحة المفاتيح في قائمة إعدادات الوصول.
- ابحث عن قائمة رمز لوحة المفاتيح وانقر عليها.
- عيّن رمز لوحة المفاتيح. ويتكون من 4 إلى 6 أرقام.
- انقر على تم.
- ابحث عن قائمة رمز الإكراه وانقر عليها.
- عيّن رمز الإكراه للوحة المفاتيح. ويتكون من 4 إلى 6 أرقام.
- انقر على تم.
لتعيين رمز شخصي ورمز إكراه شخصي:
- حدّد لوحة التحكُّم في تطبيق Ajax.
- انتقل إلى الإعدادات .
- افتح قائمة المستخدمون.
- ابحث عن حسابك في القائمة وانقر عليه.
- انتقل إلى قائمة إعدادات رمز المرور.
- عيّن رمز المستخدم. ويتكون من 4 إلى 6 أرقام.
- انقر على حفظ.
- عيّن رمز الإكراه. ويتكون من 4 إلى 6 أرقام.
- انقر على حفظ.
- انقر على رجوع لحفظ الإعدادات.
لتعيين رمز وصول لمستخدم لا يمتلك حسابًا:
- حدّد لوحة التحكُّم في تطبيق Ajax.
- انتقل إلى الإعدادات .
- انتقل إلى قائمة رموز وصول لوحة المفاتيح.
- انقر على إضافة رمز. أدخِل الاسم ورمز الوصول. ويتكون من 4 إلى 6 أرقام.
- انقر على إضافة لحفظ البيانات.
لتعيين رمز إكراه لمستخدم لا يمتلك حسابًا:
- حدد قائمة رموز وصول لوحة المفاتيح في إعدادات لوحة التحكُّم.
- حدد المستخدم غير المُسجّل المطلوب.
- انقر على إضافة رمز إكراه. عيّن الرمز. ويتكون من 4 إلى 6 أرقام.
- انقر على حفظ.
بالنسبة إلى المستخدمين غير المُسجّلين، يمكنك ضبط الوصول إلى إدارة الأمن. أولاً، فعّل وضع المجموعة. بعد ذلك، حدّد قائمة رموز وصول لوحة المفاتيح في إعدادات لوحة التحكُّم، وابحث عن المستخدم المطلوب، واضبط المعلمات المناسبة في قائمة إدارة الأمن.
لا يمكن إلا لمستخدم PRO يمتلك حقوق تهيئة النظام إنشاء رموز وحدات الاستجابة السريعة (RRU) وضبطها في تطبيقات Ajax PRO. يمكنك العثور على مزيد من المعلومات حول تهيئة هذه الميزة في هذه المقالة.
رموز RRU مدعومة في لوحات التحكُّم (باستثناء طراز Hub) التي تعمل بنظام التشغيل OS Malevich 2.17 والإصدارات الأحدث.
إضافة البطاقات ومفاتيح التحكُّم عن بُعد
يمكن أن تعمل KeyPad TouchScreen مع مفاتيح Tag للتحكُّم عن بُعد وبطاقات Pass، وأجهزة المصنّعين الآخرين التي تدعم تقنية DESFire®.
قبل إضافة أجهزة مصنّعين آخرين تدعم ®DESFire، تأكد من أن لديها مساحة تخزين كافية للتعامل مع لوحة المفاتيح الجديدة. ومن الأفضل تهيئة جهاز المُصنّع الآخر بشكل مُسبق.
تقدّم هذه المقالة معلومات حول كيفية إعادة تعيين Tag أو Pass.
يعتمد الحد الأقصى لعدد Pass وTag المتصلة على طراز لوحة التحكُّم. لا تؤثر Pass وTag المتصلة على الحد الأقصى للأجهزة في لوحة التحكُّم.
| طراز لوحة التحكم | عدد أجهزة Tag أو Pass |
| Hub 2 (2G) | 50 |
| Hub 2 (4G) | 50 |
| Hub 2 Plus | 200 |
| Superior Hub Hybrid (2G) | 50 |
| Superior Hub Hybrid (4G) | 50 |
كيفية إضافة جهاز Tag أو Pass إلى النظام

- افتح تطبيق Ajax.
- اختر لوحة التحكُّم التي تريد إضافة Tag أو Pass إليها.
- انتقل إلى علامة تبويب الأجهزة .
تأكّد من تفعيل ميزة قراءة Pass/Tag في إعداد لوحة مفاتيح واحدة على الأقل.
- انقر على إضافة جهاز.
- حدّد إضافة Pass/Tag.
- حدد النوع (Tag أو Pass)، واللون، واسم الجهاز، والمستخدم (إذا لزم الأمر).
- انقر على التالي. وبعد ذلك، ستتحول لوحة التحكُّم إلى وضع تسجيل الجهاز.
- انتقل إلى أي لوحة مفاتيح متوافقة مُفعّل بها قراءة Pass/Tag ونشّطها.
بعد التنشيط، ستعرض KeyPad TouchScreen شاشة لتحويل لوحة المفاتيح إلى وضع تسجيل أجهزة الوصول. انقر على الزر ابدأ.
تُحدَّث الشاشة تلقائيًا عند التوصيل بمصدر طاقة خارجي وتفعيل زر التبديل الشاشة نشطة دائمًا في إعدادات لوحة المفاتيح.
ستظهر شاشة تبديل لوحة المفاتيح إلى وضع التسجيل في جميع KeyPad TouchScreen في النظام. عندما يبدأ مسئول أو PRO يمتلك حقوق تهيئة النظام في تسجيل Tag/Pass على لوحة مفاتيح واحدة، ستتحوّل البقية إلى حالتها الأولية.
- قرّب الجانب العريض من Tag أو Pass إلى قارئ لوحة المفاتيح لبضع ثوانٍ. حيث يتميّز بأيقونات الموجة
 على الجسم. وبعد نجاح الإضافة، ستتلقى إشعارًا في تطبيق Ajax وعلى شاشة لوحة المفاتيح.
وإذا فشل الاتصال، فحاول مرة أخرى خلال 5 ثوانٍ، يُرجى ملاحظة أنه في حال إضافة أقصى عدد من أجهزة Tag أو Pass إلى لوحة التحكُّم، ستتلقى إشعارًا بذلك في تطبيق Ajax عند إضافة جهاز جديد.
يمكن لكل من Tag وPass العمل مع عدة لوحات تحكُّم في آن واحد. الحد الأقصى لعدد لوحات التحكُّم هو 13. إذا حاولت ربط جهاز Tag أو Pass، وصل بالفعل إلى حد لوحات التحكُّم، فستتلقى إشعارًا بذلك. لربط مفتاح تحكُّم عن بُعد/بطاقة بلوحة تحكُّم جديدة، ستحتاج إلى إعادة تعيينها.
إذا كنت تريد إضافة Tag أو Pass آخر، فانقر إضافة Pass/Tag آخر في التطبيق. كرّر الخطوات من 6 إلى 9.
كيفية حذف Tag أو Pass من لوحة التحكُّم
يُرجى الانتباه إلى أن إعادة التعيين ستؤدي إلى حذف جميع إعدادات وربط مفاتيح التحكُّم عن بُعد والبطاقات. وفي هذه الحالة، لا تُزال أجهزة Tag وPass المُعاد ضبطها إلا من لوحة التحكُّم التي أُجريت إعادة التعيين منها. وتظل أجهزة Tag أو Pass معروضة في التطبيق على لوحات التحكُّم الأخرى، ولكن لا يمكن استخدامها لإدارة أوضاع الأمن. وينبغي إزالة هذه الأجهزة يدويًا.
- افتح تطبيق Ajax.
- اختر لوحة التحكُّم.
- انتقل إلى علامة تبويب الأجهزة .
- حدد لوحة مفاتيح متوافقة من قائمة الأجهزة.
تأكّد من تفعيل ميزة قراءة Pass/Tag في إعدادات لوحة المفاتيح.
- انتقل إلى إعدادات لوحة المفاتيح بالنقر على الأيقونة .
- انقر على قائمة إعادة تعيين Pass/Tag.
- انقر على متابعة.
- انتقل إلى أي لوحة مفاتيح متوافقة مُفعّل بها قراءة Pass/Tag ونشّطها.
بعد التنشيط، ستعرض KeyPad TouchScreen شاشة لتحويل لوحة المفاتيح إلى وضع إعادة تعيين أجهزة الوصول. انقر على الزر ابدأ.
تُحدَّث الشاشة تلقائيًا عند التوصيل بمصدر طاقة خارجي وتفعيل زر التبديل الشاشة نشطة دائمًا في إعدادات لوحة المفاتيح.
ستظهر شاشة تبديل لوحة المفاتيح إلى وضع إعادة التعيين في جميع KeyPad TouchScreen في النظام. عندما يبدأ مسئول أو PRO يمتلك حقوق تهيئة النظام في إعادة تعيين Tag/Pass على لوحة مفاتيح واحدة، ستتحوّل البقية إلى حالتها الأولية.
- ضع الجانب العريض من Tag أو Pass أمام قارئ لوحة المفاتيح لبضع ثوانٍ. حيث يتميّز بأيقونات الموجة على الجسم. وبعد نجاح التهيئة، ستتلقى إشعارًا في تطبيق Ajax وعلى شاشة لوحة المفاتيح. وحاول مرة أخرى إذا فشلت التهيئة.
- إذا كنت بحاجة إلى إعادة تعيين Tag أو Pass أخرى، فانقر على إعادة تعيين Pass/Tag آخر في التطبيق. كرّر الخطوة 9.
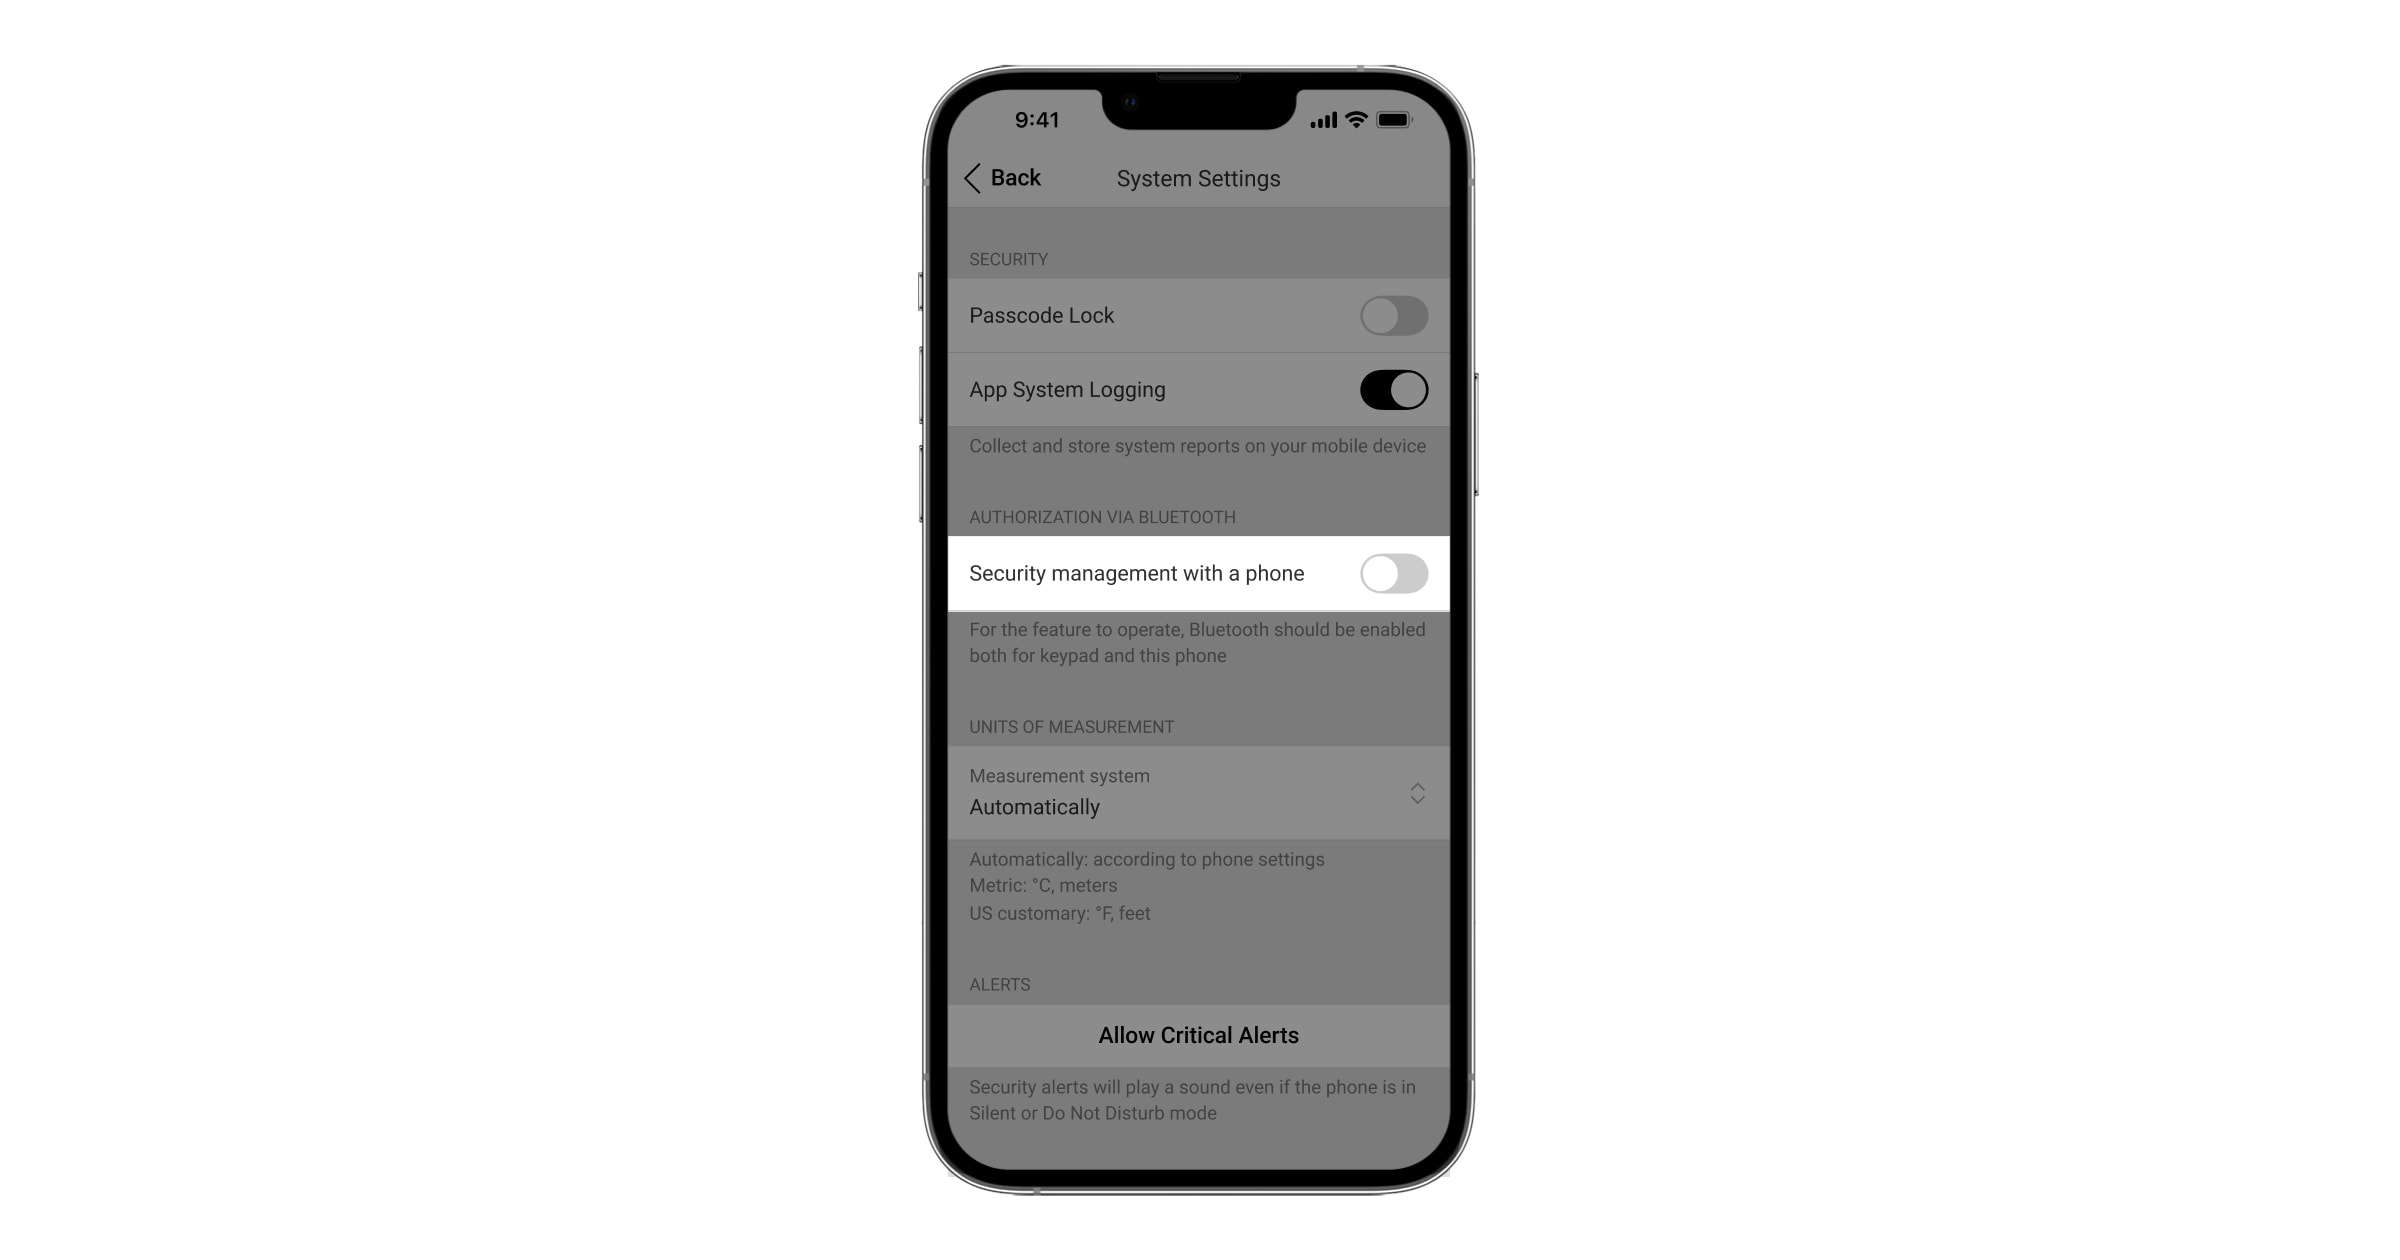
إعدادات البلوتوث
تدعم KeyPad TouchScreen التحكُّم في أوضاع الأمن من خلال تقريب الهاتف الذكي من المستشعر. تنشأ إدارة الأمن من خلال قناة اتصال بلوتوث. فهذه الطريقة مريحة، وآمنة، وسريعة، حيث لا توجد حاجة لإدخال كلمة مرور، أو إضافة هاتف إلى لوحة المفاتيح، أو استخدام Tag أو Pass قد يضيع.
لا تتاح المصادقة عبر البلوتوث إلا لمستخدمي Ajax Security System.
لتفعيل المصادقة عبر البلوتوث في التطبيق
- وصّل KeyPad TouchScreen بلوحة التحكُّم.
- تفعيل مستشعر بلوتوث لوحة المفاتيح:
الأجهزة
← KeyPad Touchscreen ←الإعدادات → تفعيل زر التبديل البلوتوث. - انقر على رجوع لحفظ الإعدادات.
لإعداد المصادقة عبر البلوتوث
- افتح تطبيق Ajax Security System وحدد لوحة التحكُّم المُضاف KeyPad TouchScreen إليها مع تفعيل المصادقة عبر البلوتوث. بشكل افتراضي، تتاح المصادقة عبر البلوتوث لجميع مستخدمي هذا النظام.
لحظر المصادقة عبر البلوتوث لمستخدمين محددين:
- في علامة التبويب الأجهزة
 حدد لوحة التحكُّم وانتقل إلى إعداداتها
  .
. - افتح قائمة المستخدمون والمستخدم المطلوب من القائمة.
- في قسم الصلاحيات، أوقف زر التبديل إدارة الأمن عبر البلوتوث.
- في علامة التبويب الأجهزة
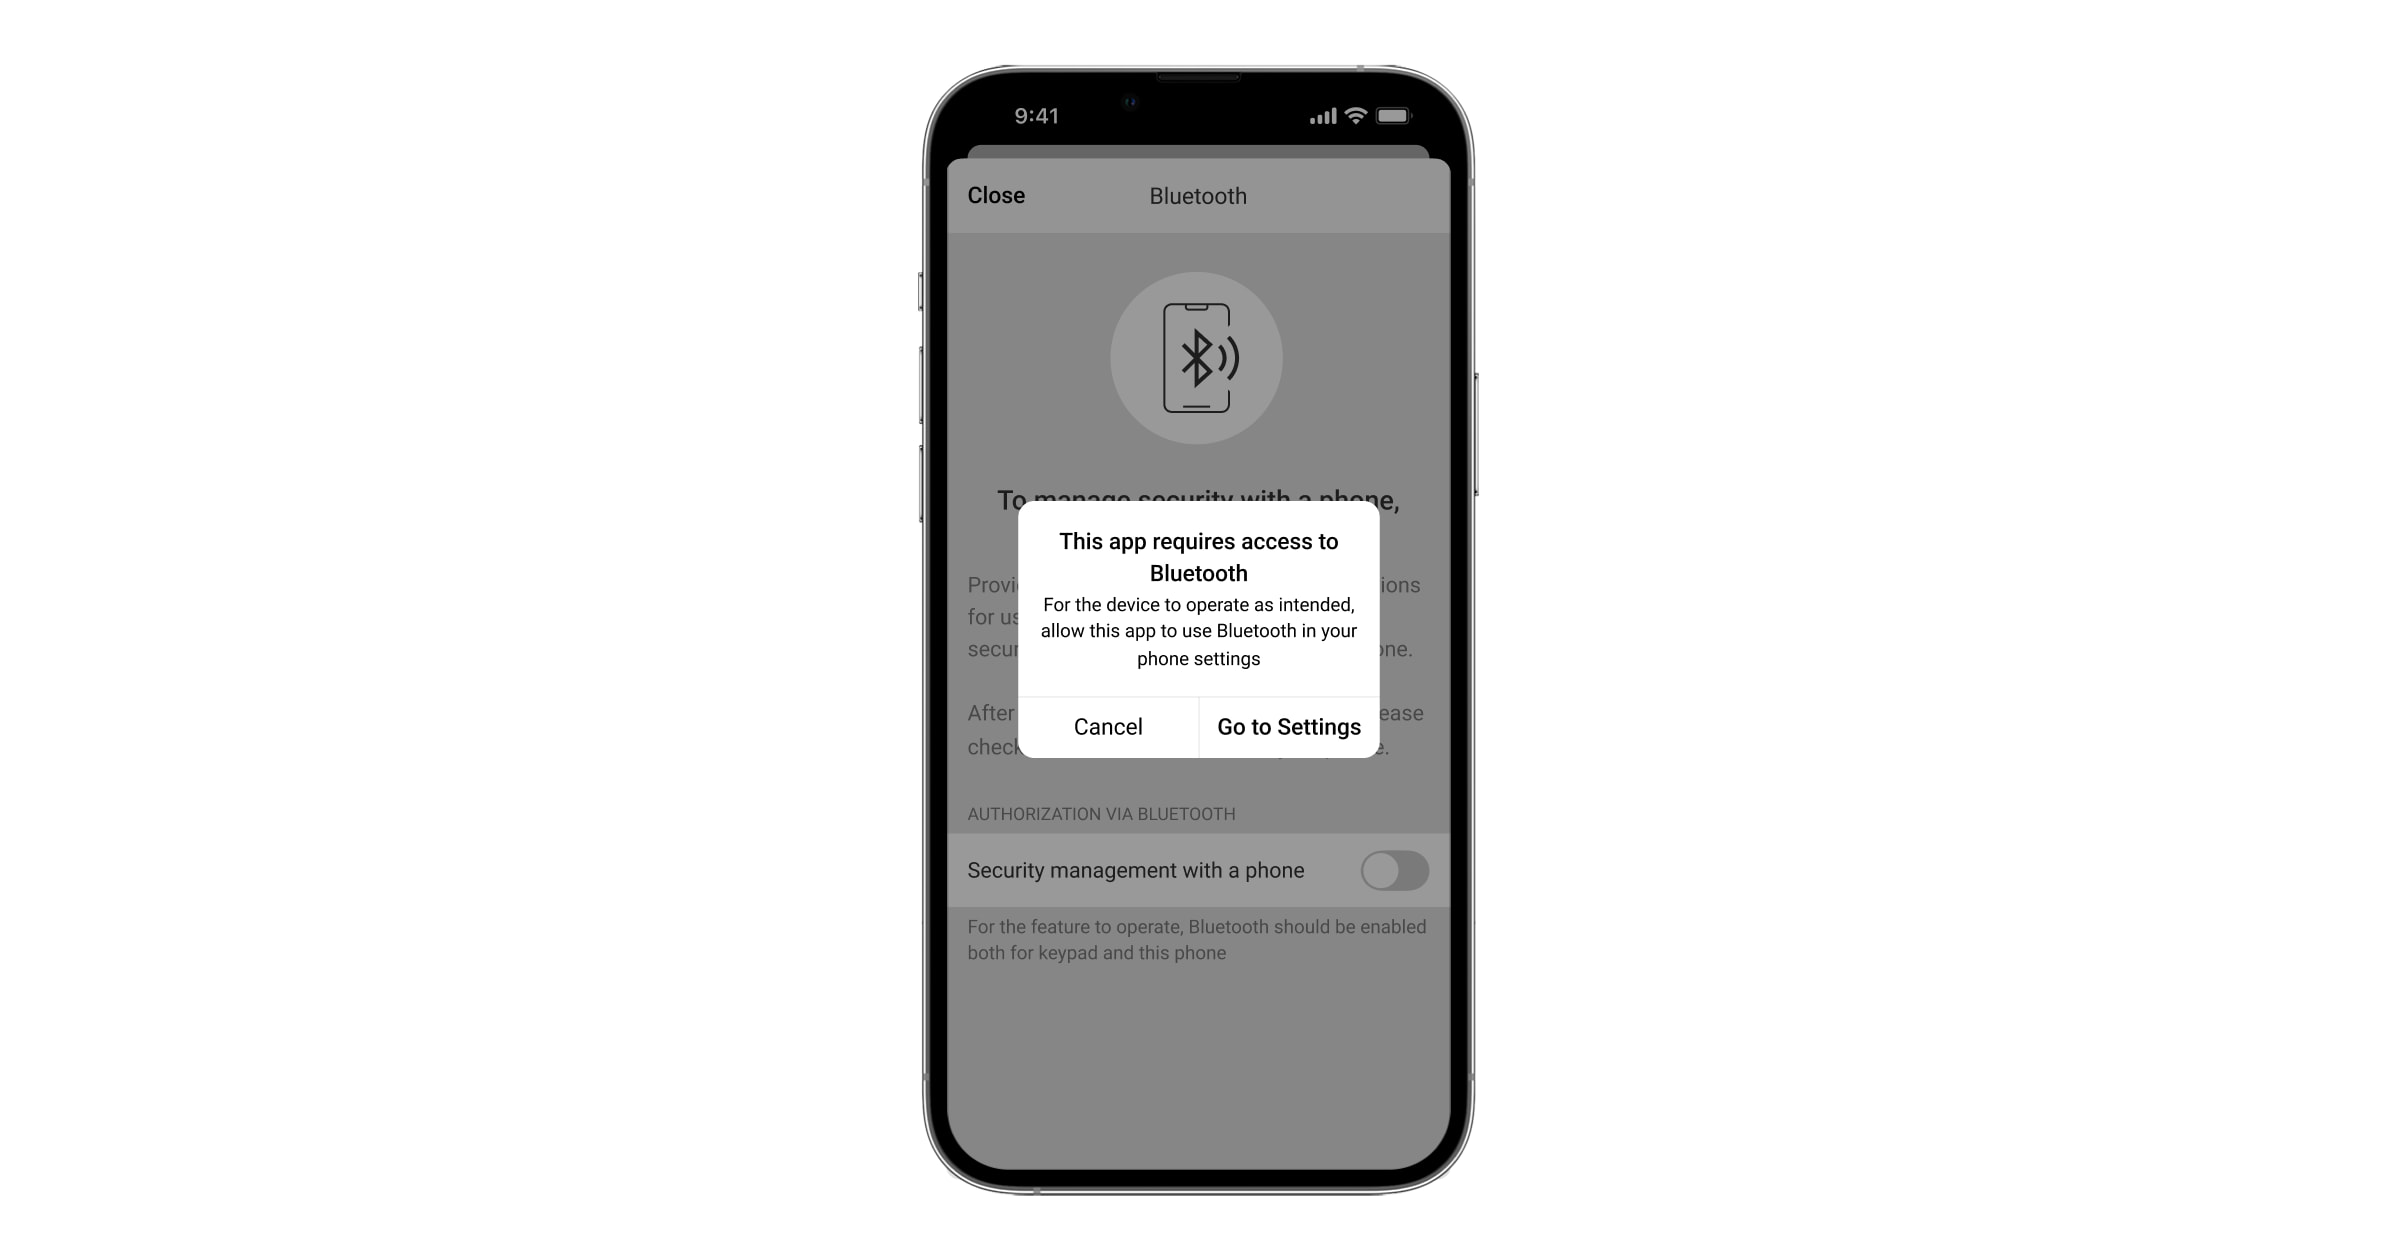
- السماح لتطبيق Ajax Security System باستخدام البلوتوث في حال عدم منح الصلاحية من قبل. في هذه الحالة، يظهر التحذير
 على حالات KeyPad TouchScreen. يؤدي الضغط على الرمز
  إلى فتح نافذة تعرض شرحًا للإجراءات الواجب اتباعها. فعّل زر التبديل إدارة الأمن باستخدام الهاتف في أسفل النافذة المفتوحة.
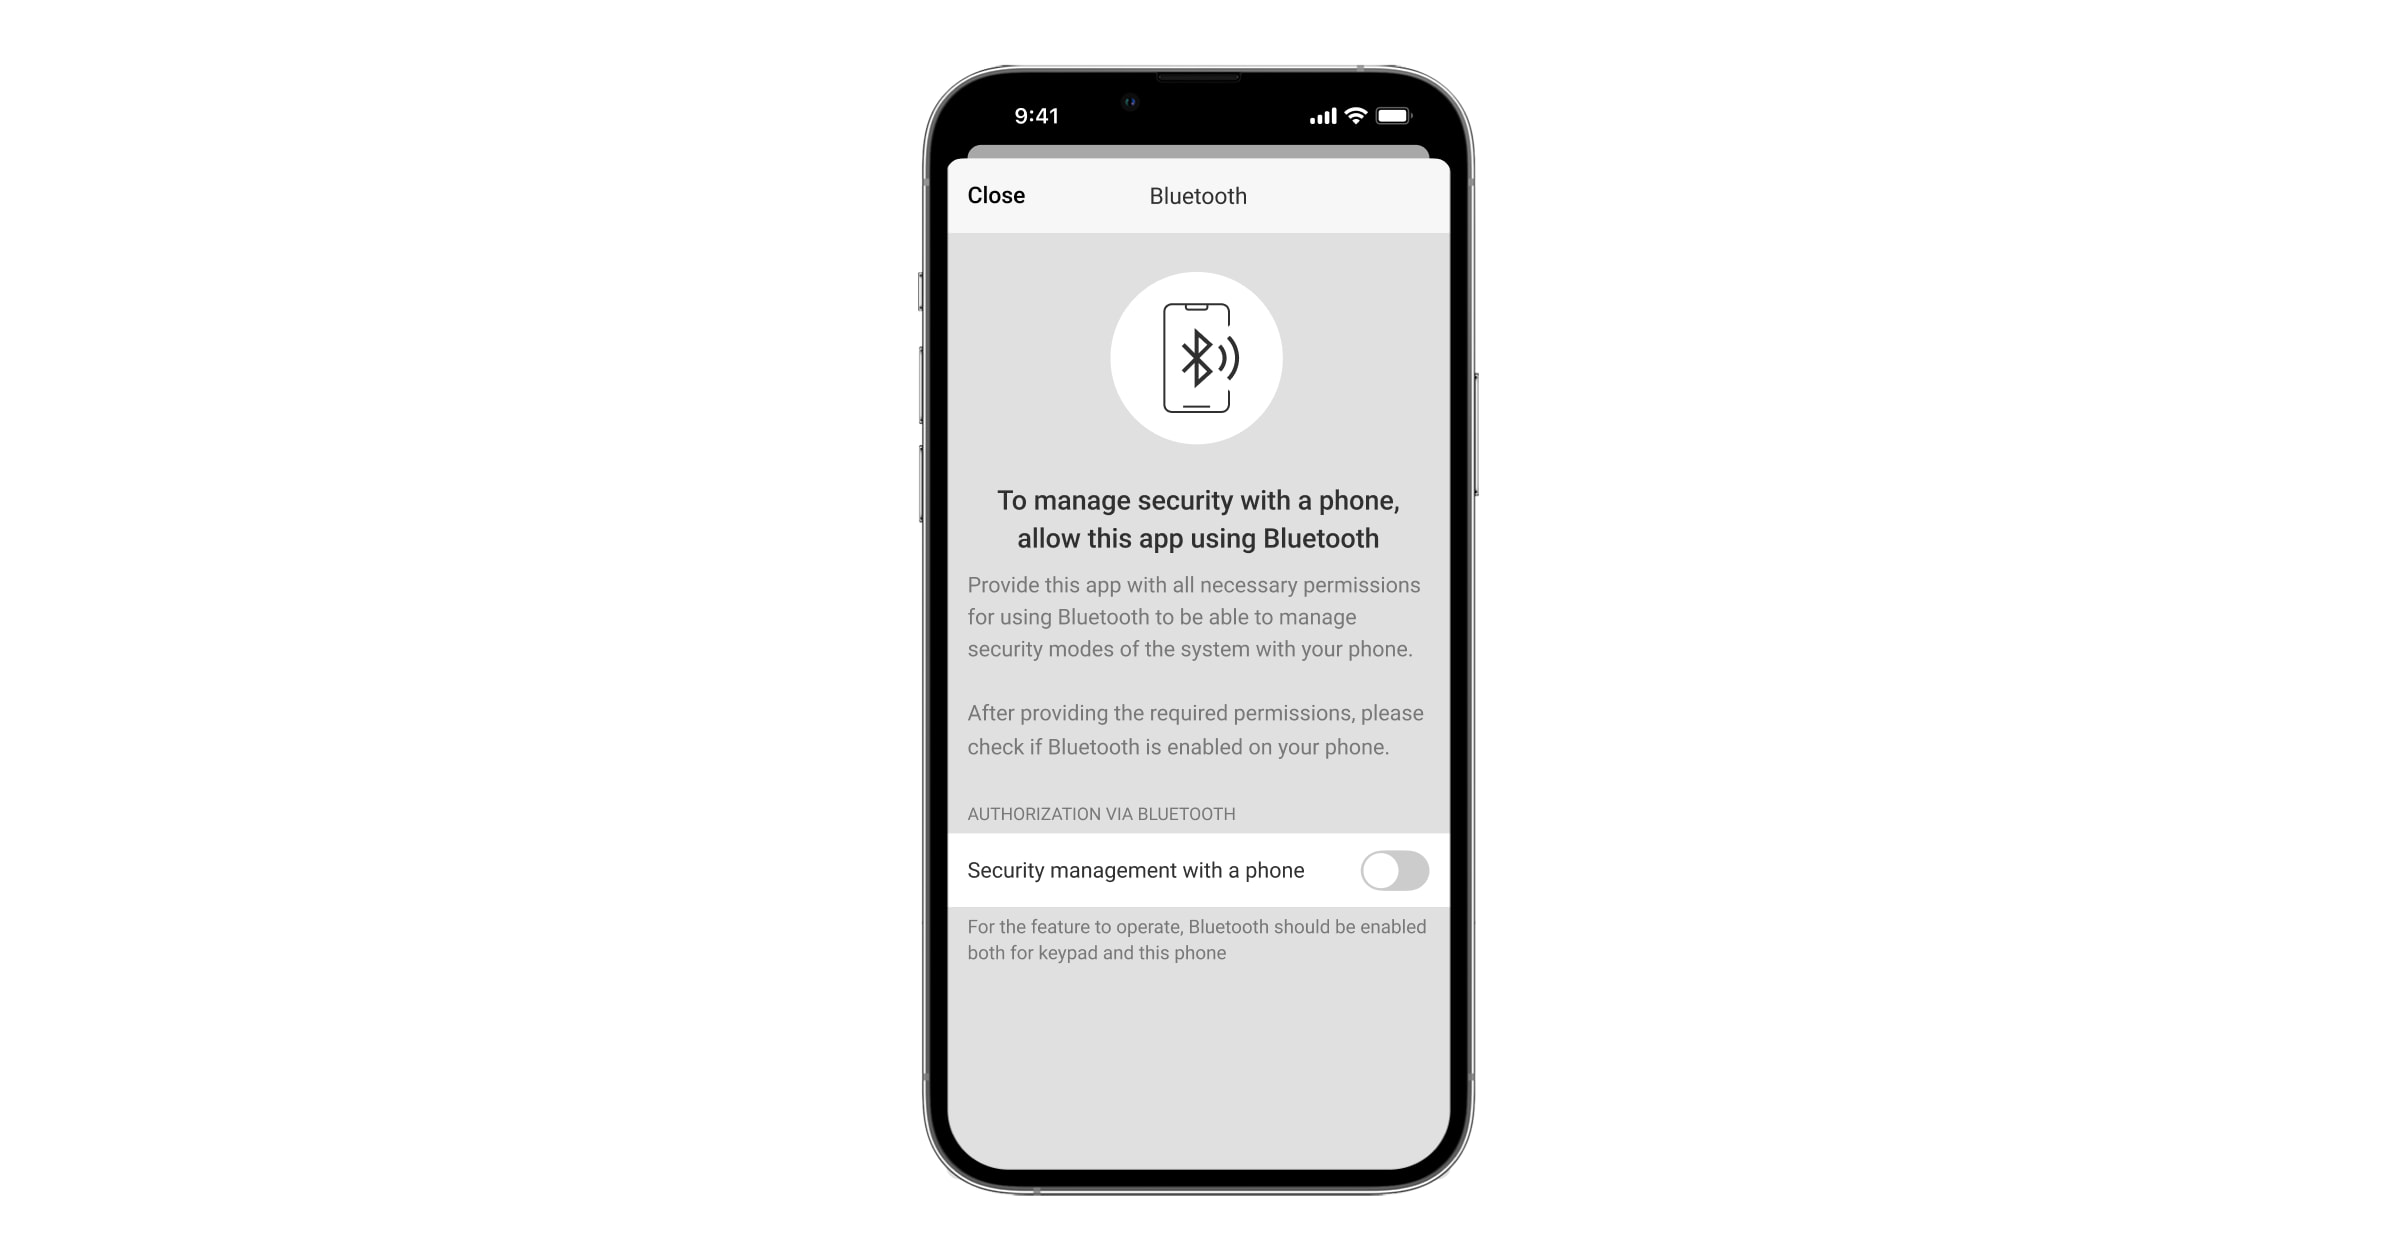
امنح التطبيق صلاحية العثور على الأجهزة القريبة والاتصال بها. يمكن أن تختلف النافذة المنبثقة في الهواتف الذكية التي تعمل بنظامي Android وiOS.
يمكن ايضًا تفعيل زر التبديل إدارة الأمن باستخدام الهاتف في إعدادات التطبيق:
- انقر على أيقونة
 في أعلى يمين الشاشة، وحدد قائمة إعدادات التطبيق.
 - افتح القائمة إعدادات النظام وفعّل زر التبديل إدارة الأمن باستخدام الهاتف.
- انقر على أيقونة
- نوصي بتهيئةالسياج الجغرافي لاستقرار أداء المصادقة عبر البلوتوث. يظهر التحذير في حالات KeyPad TouchScreen في حال إيقاف السياج الجغرافي وعدم السماح للتطبيق باستخدام موقع الهاتف الذكي. يؤدي الضغط على الرمز إلى فتح نافذة تعرض شرحًا للإجراءات الواجب اتباعها.
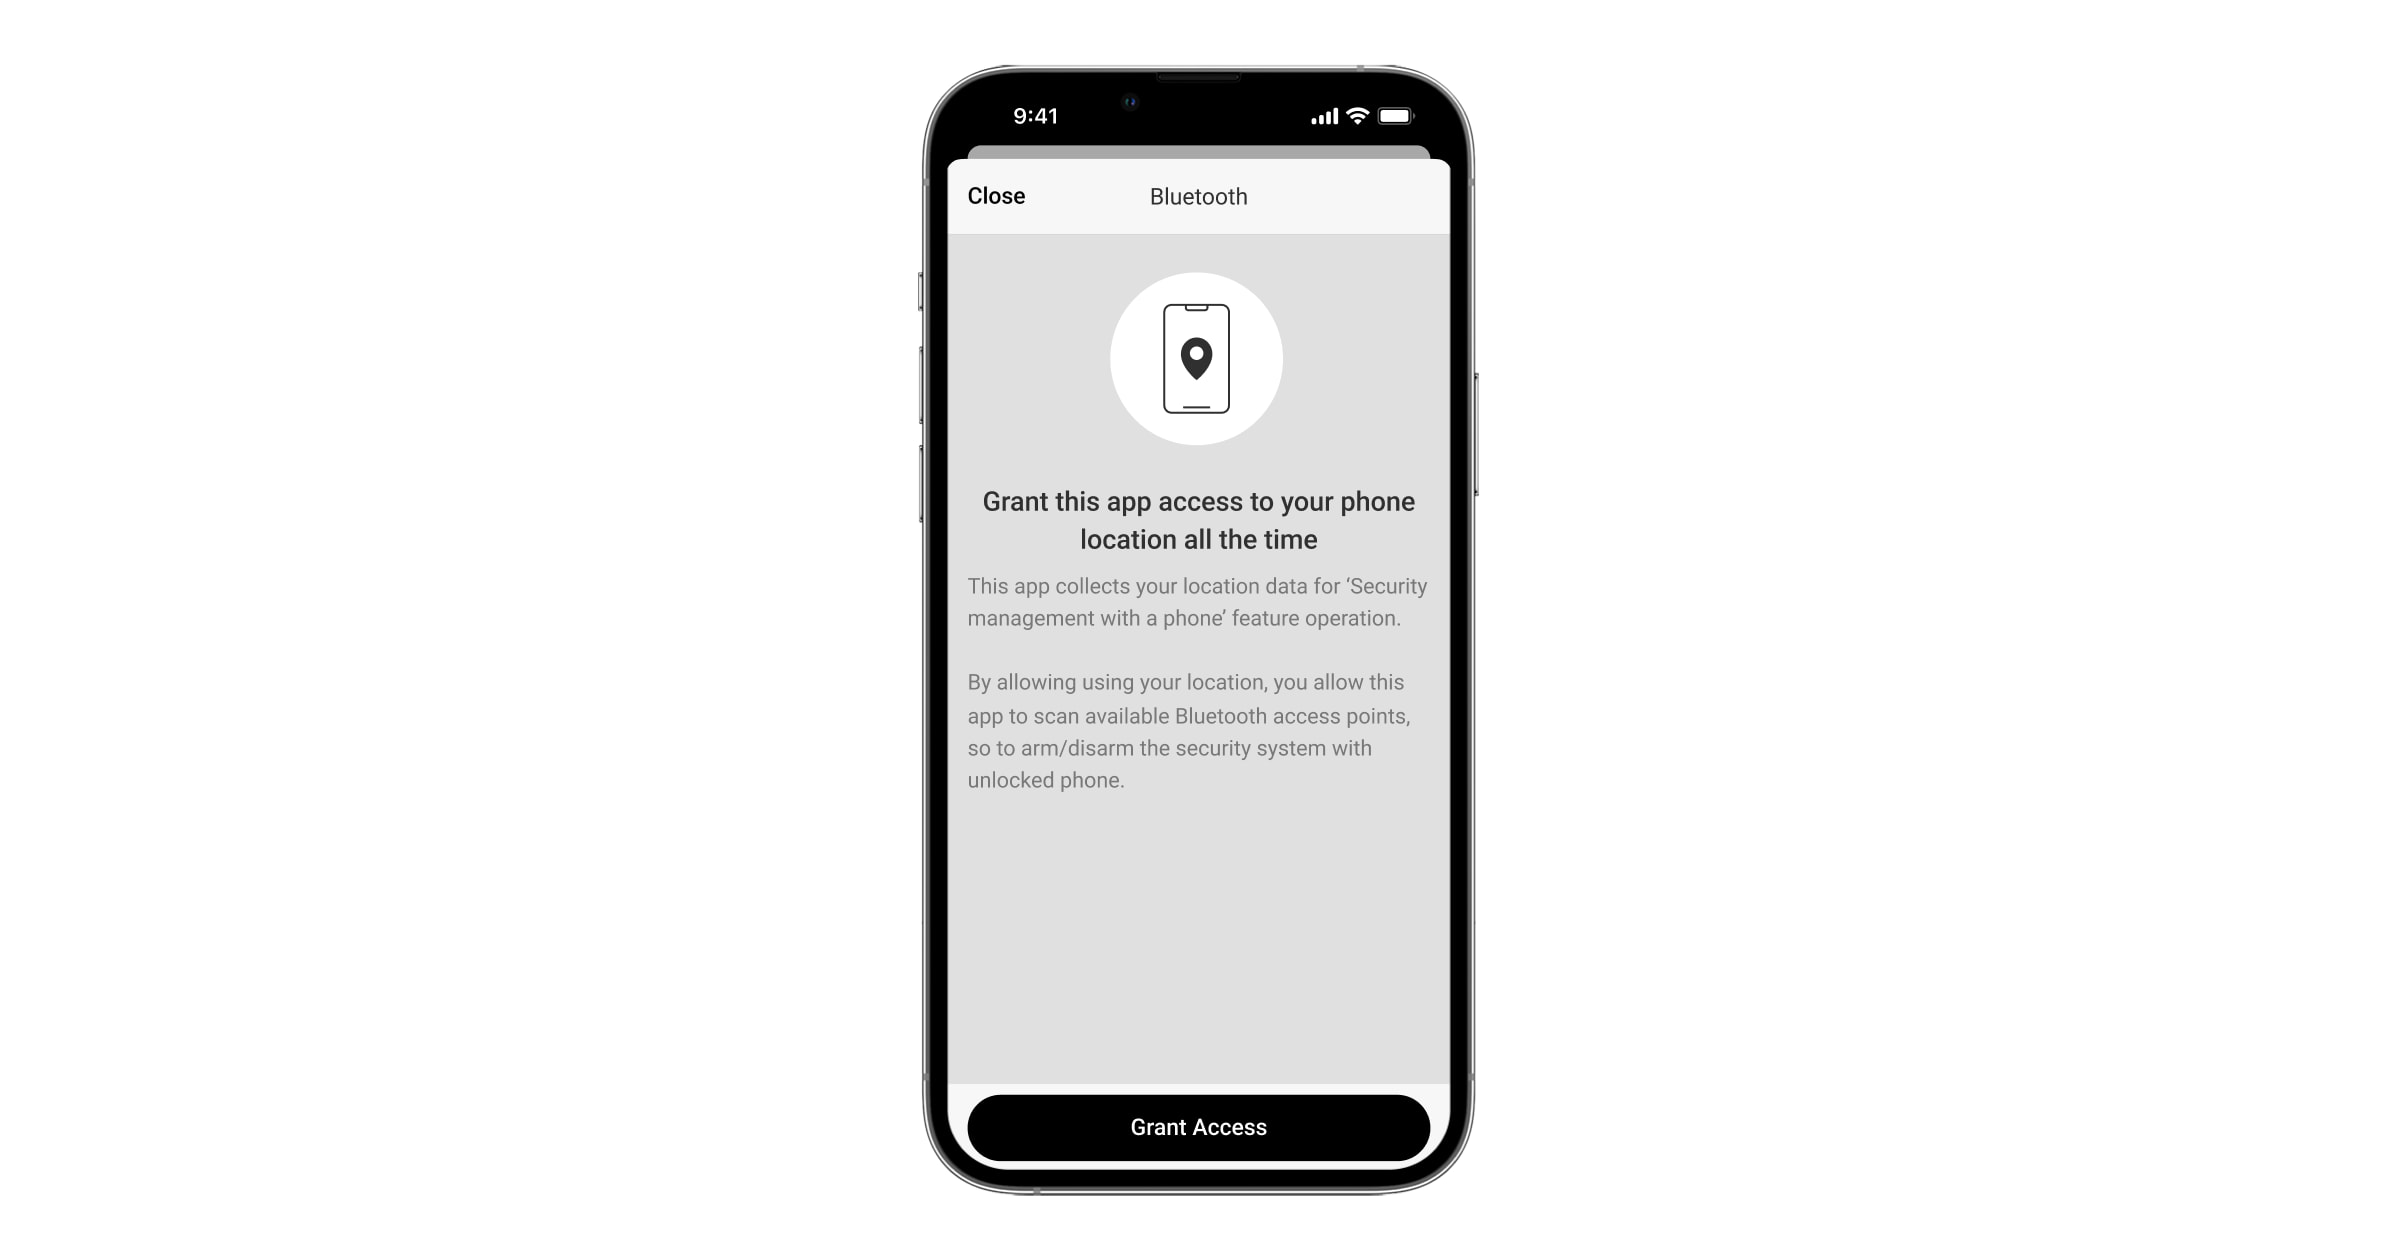
قد تكون المصادقة عبر البلوتوث غير مستقرة في حال إيقاف وظيفة السياج الجغرافي. ستحتاج إلى تشغيل التطبيق وتصغيره إذا كان النظام يحوله إلى وضع السكون.
يمكنك التحكُّم في النظام بشكل أسرع عبر البلوتوث عند تنشيط وتهيئة وظيفة السياج الجغرافي. ما عليك إلا فتح الهاتف وتقريبه من مستشعر لوحة المفاتيح.
- فعّل زر التبديل إبقاء التطبيق نشطًا لإدارة الأمن عبر البلوتوث. لهذا، انتقل إلى الأجهزة ← لوحة التحكُّم ← الإعدادات ← السياج الجغرافي.
- تأكّد من تفعيل البلوتوث على هاتفك الذكي. وفي حال الإيقاف، يظهر التحذير في حالات لوحة المفاتيح. يؤدي الضغط على الرمز إلى فتح نافذة تعرض شرحًا للإجراءات الواجب اتباعها.
- فعّل زر التبديل خدمة المحافظة على الاتصال في إعدادات التطبيق للهواتف الذكية التي تعمل بنظام Android. لإجراء هذا، في أعلى يمين الشاشة، انقر على ← إعدادات التطبيق ← إعدادات النظام.
التفويض المُسبق
عند تفعيل الميزة، يُحظَر الوصول إلى لوحة التحكُّم وحالة النظام الحالية. ولإلغاء الحظر، يجب على المستخدم المصادقة: إدخال الرمز المناسب أو تقريب جهاز وصول شخصي إلى لوحة المفاتيح.
في حال تفعيل التفويض المُسبق، تصبح ميزة تشغيل النظام دون رمز غير متوفرة في إعدادات لوحة المفاتيح.
يمكنك المصادقة بطريقتين:
- في علامة التبويب التحكُّم
 . بعد تسجيل الدخول، سيرى المستخدم المجموعات المشتركة في النظام (في حال نشيط وضع المجموعة). وتُحدد في إعدادات لوحة المفاتيح: إدارة الأمن ← المجموعات المشتركة. وتكون جميع مجموعات النظام مشتركة بشكل افتراضي.

- في علامة التبويب تسجيل الدخول
 . بعد تسجيل الدخول، سيرى المستخدم المجموعات المتاحة المخفية من قائمة المجموعات المشتركة.
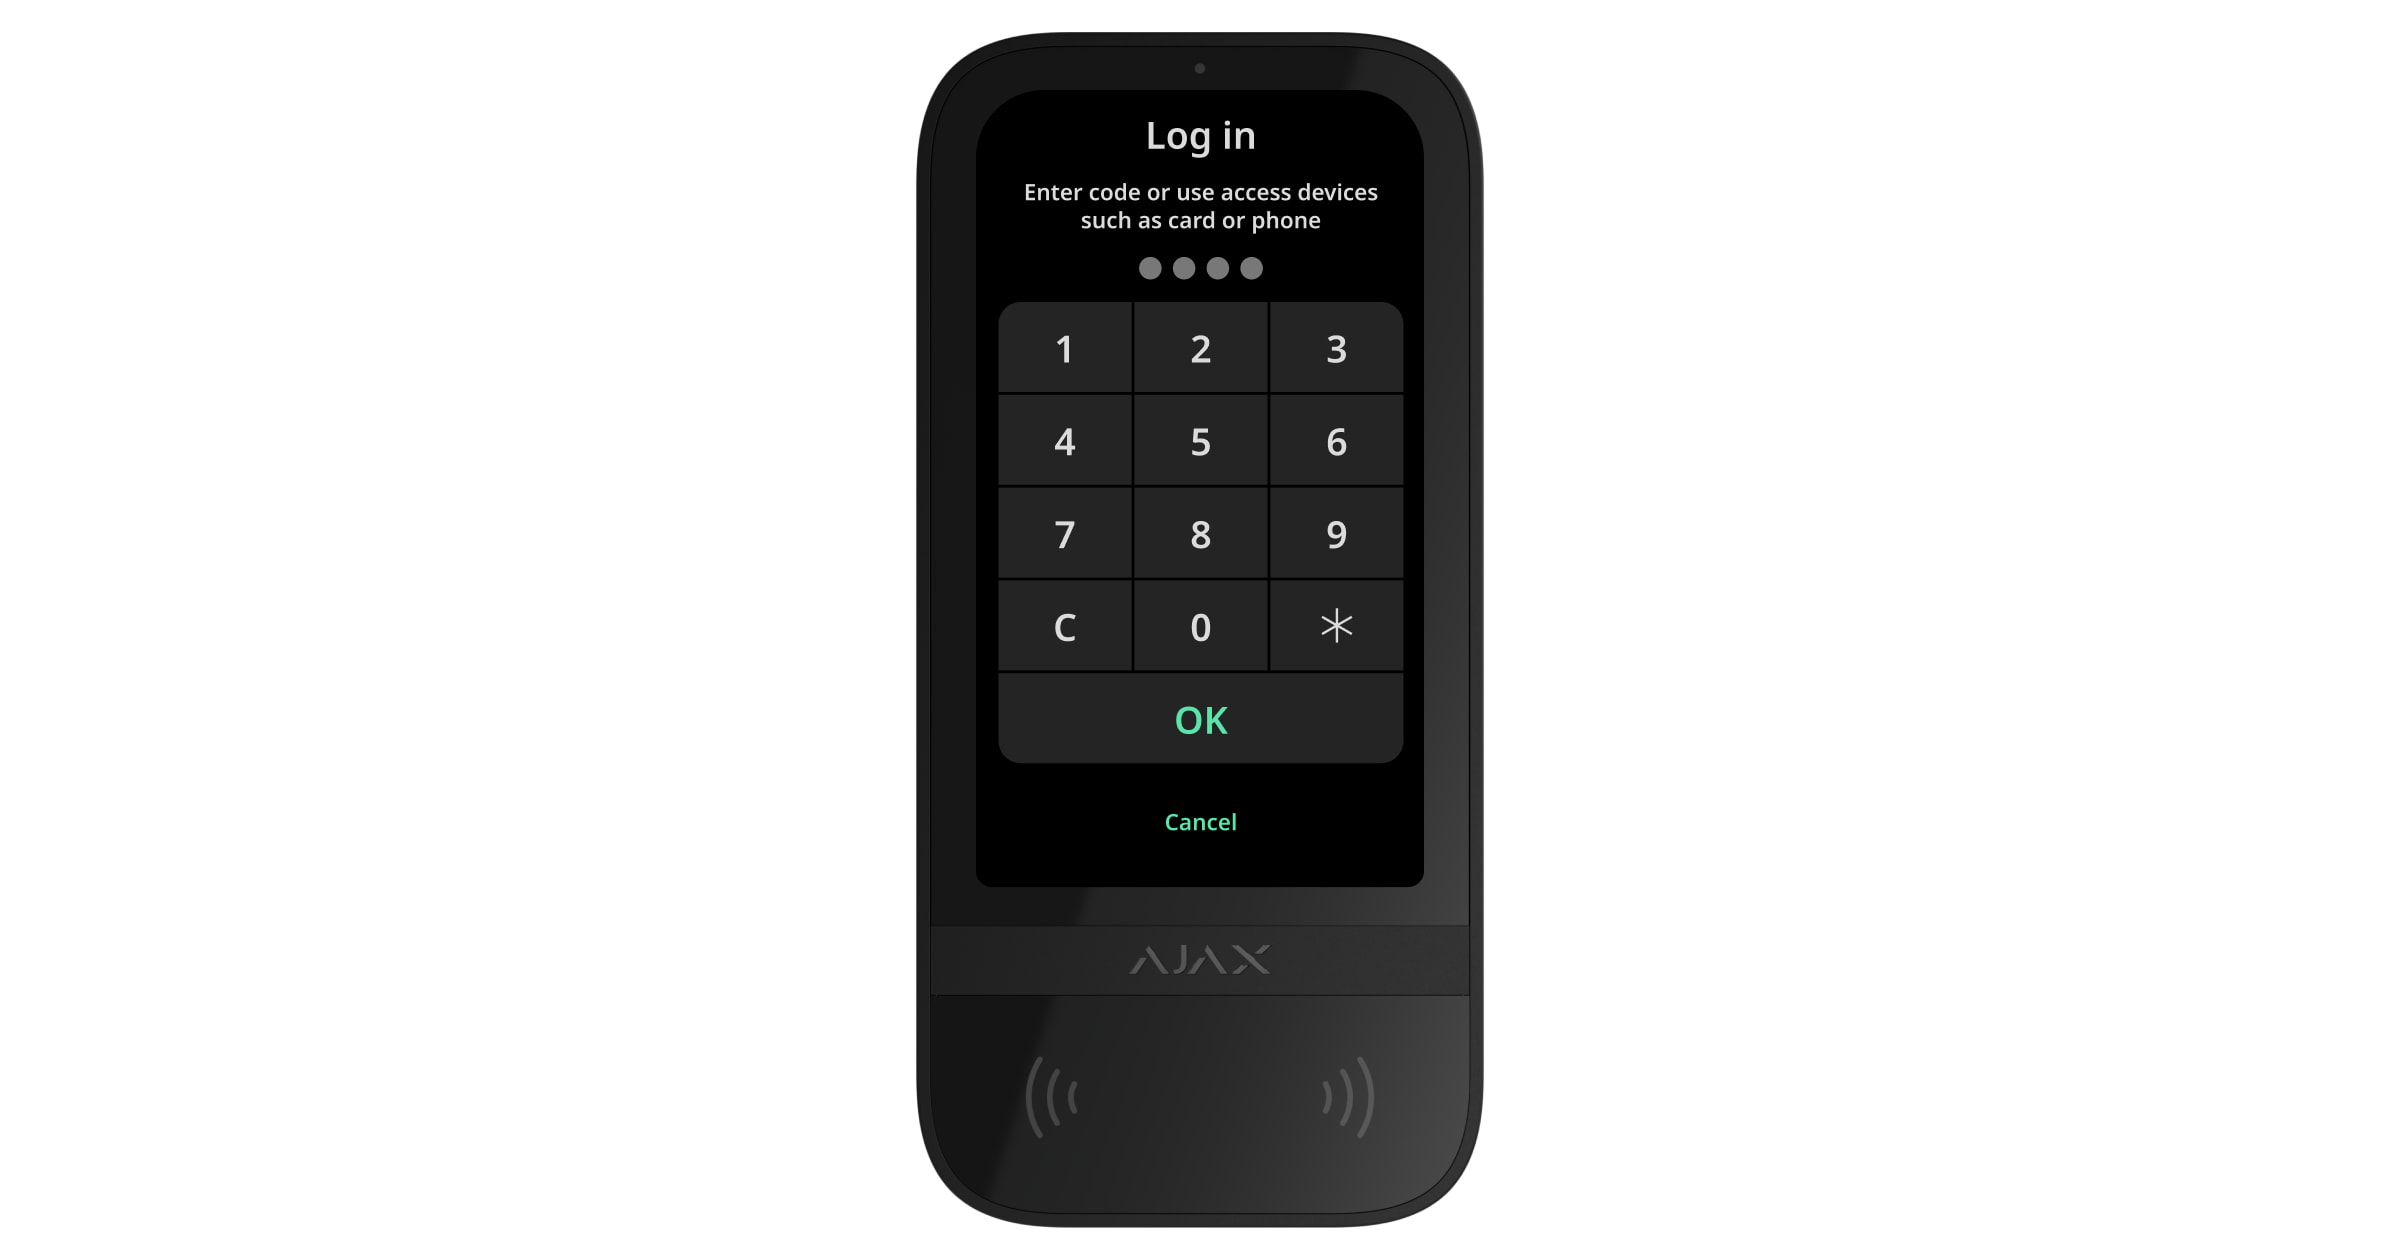
تعود شاشة لوحة المفاتيح إلى شاشة البدء بعد 10 ثوانٍ من آخر تفاعل معها. أدخل الرمز أو قرّب جهاز وصول شخصي مرة أخرى للتحكُّم في النظام باستخدام KeyPad TouchScreen.
- أدخل رمز لوحة المفاتيح أو رمز إكراه لوحة المفاتيح (إذا لزم الأمر).
- انقر على موافق.
على سبيل المثال: 1234 ← موافق.
يمكن مسح الأرقام التي أُدخِلت بشكل غير صحيح باستخدام الزر ![]() .
.
- أدخل معرّف المستخدم.
- اضغط على
 .
. - أدخل الرمز الشخصي أو رمز الإكراه الشخصي (إذا لزم الأمر).
- انقر على موافق.
على سبيل المثال: 4 ← ![]() ← 1234 ← موافق.
← 1234 ← موافق.
- أدخل رمز الوصول أو رمز وصول الإكراه (إذا لزم الأمر) لمستخدم غير مُسجل.
- انقر على موافق.
على سبيل المثال: 1234 ← موافق.
- أدخل رمز RRU.
- انقر على موافق.
على سبيل المثال: 1234 ← موافق.
قرّب Tag أو Pass مُعتمد من قارئ لوحة المفاتيح. حيث يتميّز بأيقونات الموجة ![]() على الجسم. يقدم هذا الفصل معلومات حول كيفية إضافة بطاقة/مفتاح تحكُّم عن بُعد إلى النظام.
على الجسم. يقدم هذا الفصل معلومات حول كيفية إضافة بطاقة/مفتاح تحكُّم عن بُعد إلى النظام.
قرّب هاتفًا ذكيًا مُعتمدًا مع تفعيل البلوتوث وفتح قفل الشاشة من قارئ لوحة المفاتيح. حيث يتميّز بأيقونات الموجة ![]() على الجسم. يوفر هذا الفصل معلومات حول كيفية ضبط إعدادات البلوتوث للوحة المفاتيح.
على الجسم. يوفر هذا الفصل معلومات حول كيفية ضبط إعدادات البلوتوث للوحة المفاتيح.
التحكُّم في الأمن
باستخدام الرموز، أو Tag/Pass، أو هاتف ذكي، يمكنك التحكُّم في الوضع الليلي وأمن المنشأة بأكملها أو المجموعات المنفصلة. يمكن للمستخدم أو PRO الذي يتمتع بحقوق تهيئة النظام إعداد رموز الوصول. يقدم هذا الفصل معلومات حول كيفية إضافة Tag أو Pass إلى لوحة التحكُّم. للتحكم باستخدام هاتف ذكي، اضبط معلمات البلوتوث المناسبة في إعدادات لوحة المفاتيح. شغّل بلوتوث الهاتف الذكي، والموقع، وافتح قفل الشاشة.
تُقفل KeyPad TouchScreen للوقت المحدد في الإعدادات في حال إدخال رمز غير صحيح، أو استخدام جهاز وصول غير معتمد ثلاث مرات متتالية خلال دقيقة واحدة. وتُرسل الإشعارات ذات الصلة إلى المستخدمين وإلى مركز المراقبة التابع لشركة الأمن. يمكن للمستخدم أو PRO يتمتع بحقوق تهيئة النظام فتح KeyPad TouchScreen في تطبيق Ajax.
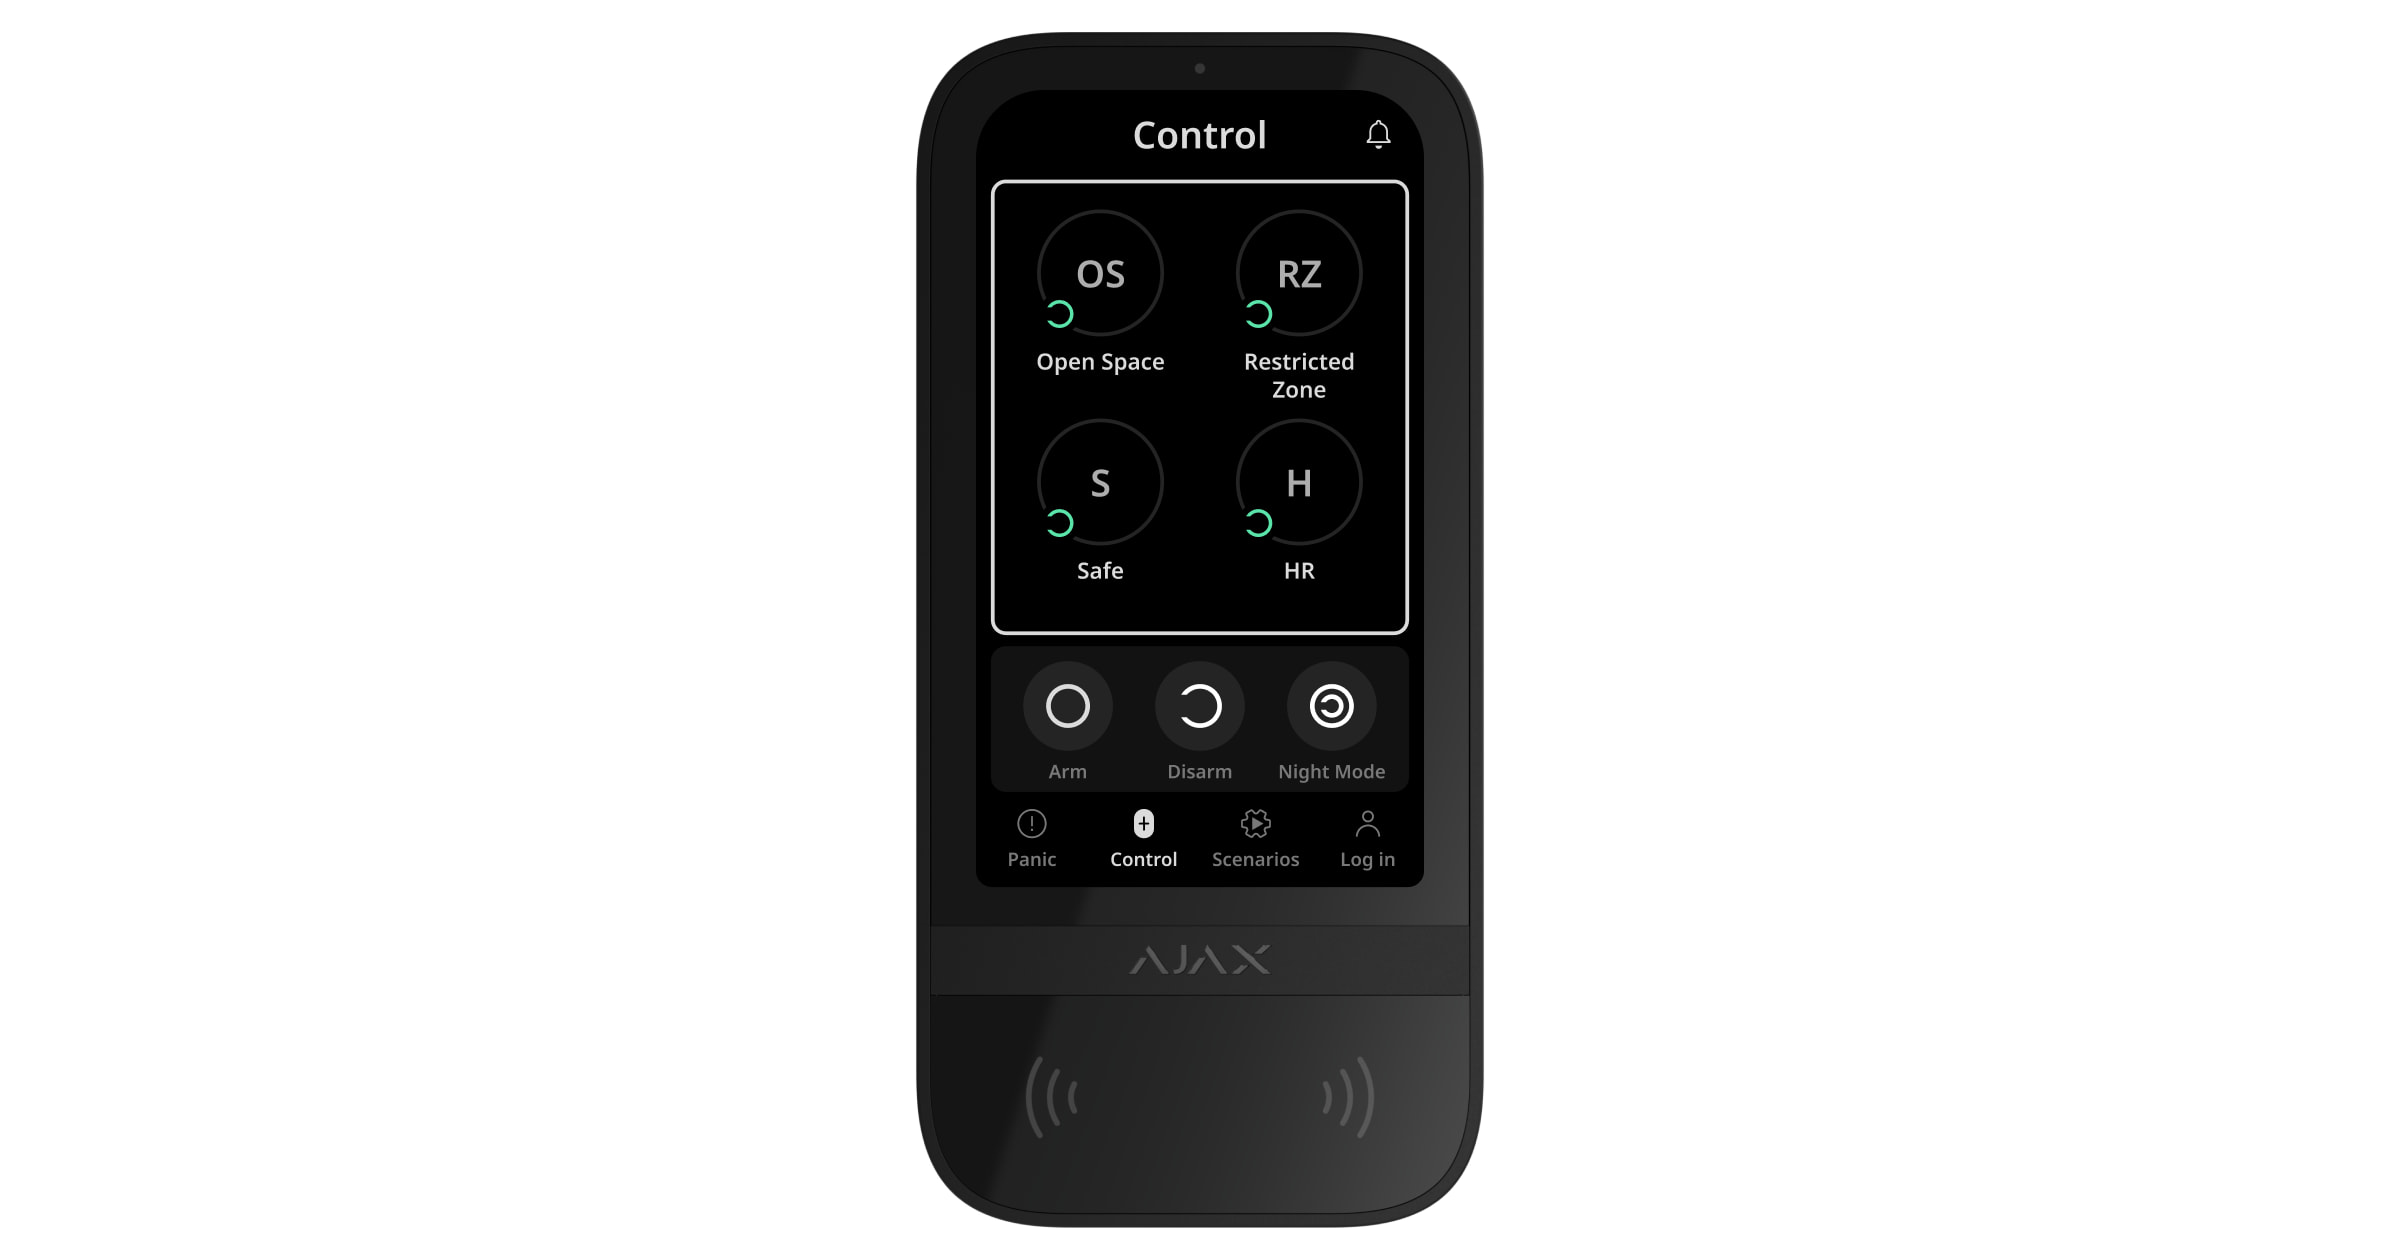
في حال إيقاف وضع المجموعة، ستظهر أيقونة مناسبة على شاشة لوحة المفاتيح تشير إلى وضع الأمن الحالي:
 — النظام قيد التشغيل.
 — النظام موقوف.
 – الوضع الليلي.
في حال تفعيل وضع المجموعة، سيرى المستخدمون وضع الأمن لكل مجموعة على حدة. يكون النظام قيد التشغيل في المجموعة إذا كان زرها مُحددًا بلون أبيض ومميّز بأيقونة ![]() . يكون النظام موقوفًا في المجموعة إذا كان زرها مُحددًا بلون رمادي ومميّز بأيقونة
. يكون النظام موقوفًا في المجموعة إذا كان زرها مُحددًا بلون رمادي ومميّز بأيقونة ![]() .
.
تُحاط أزرار المجموعات في الوضع الليلي بإطار مربع أبيض على شاشة لوحة المفاتيح.
في حال استخدام رمز شخصي أو رمز وصول، أو Tag/Pass، أو هاتف ذكي، يُعرَض اسم المستخدم الذي غيّر وضع الأمن في موجز أحداث لوحة التحكُّم وفي قائمة الإشعارات. في حالة استخدام رمز عام، يُعرَض اسم لوحة المفاتيح التي تغير وضع الأمن منها.
يعتمد تسلسل خطوات تغيير وضع الأمن باستخدام لوحة المفاتيح على تفعيل التفويض المُسبق للمستخدم في إعدادات KeyPad TouchScreen من عدمه.
في حال تفعيل التفويض المُسبق
- نشّط لوحة المفاتيح عن طريق الاقتراب منها أو وضع يدك أمام المستشعر. أجرِ التفويض المُسبق.
- في علامة التبويب التحكُّم اضغط على زر تشغيل النظام / إيقاف النظام / الوضع الليلي .
- نشّط لوحة المفاتيح عن طريق الاقتراب منها أو وضع يدك أمام المستشعر. أجرِ التفويض المُسبق.
- في علامة التبويب التحكُّم اضغط على المجموعات التي تريد تشغيل النظام أو إيقافه فيها.
ستكون مجموعات لوحة المفاتيح المشتركة متاحة بعد المصادقة في علامة التبويب التحكُّم ![]() . إذا ضغطت على زر تشغيل النظام
. إذا ضغطت على زر تشغيل النظام ![]() / إيقاف النظام
/ إيقاف النظام ![]() / الوضع الليلي
/ الوضع الليلي ![]() الموجود على شاشة لوحة المفاتيح في هذه الحالة، فسيتغير وضع الأمن لمجموعات لوحة المفاتيح المشتركة فقط.
الموجود على شاشة لوحة المفاتيح في هذه الحالة، فسيتغير وضع الأمن لمجموعات لوحة المفاتيح المشتركة فقط.
أجرِ المصادقة في علامة التبويب تسجيل الدخول ![]() لتغيير وضع الأمن للمجموعات المتاحة للمستخدم.
لتغيير وضع الأمن للمجموعات المتاحة للمستخدم.
لإيقاف النظام باستخدام رمز الإكراه:
- نشّط لوحة المفاتيح عن طريق الاقتراب منها أو وضع يدك أمام المستشعر. أجرِ التفويض المسبق باستخدام رمز الإكراه المناسب.
- اضغط على زر إيقاف النظام في علامة التبويب التحكُّم .
في حال إيقاف التفويض المُسبق
- نشّط لوحة المفاتيح عن طريق الاقتراب منها أو وضع يدك أمام المستشعر.
- في علامة التبويب التحكُّم اضغط على زر تشغيل النظام / إيقاف النظام / الوضع الليلي .
- أدخل الرمز المناسب، واستخدم Tag/Pass أو الهاتف الذكي.
- نشّط لوحة المفاتيح عن طريق الاقتراب منها أو وضع يدك أمام المستشعر.
- في علامة التبويب التحكُّم اضغط على المجموعات التي تريد تشغيل النظام أو إيقافه فيها.
- أدخل الرمز المناسب، واستخدم Tag/Pass أو الهاتف الذكي.
- لتغيير وضع الأمن للمجموعات المتاحة للمستخدم، أجرِ مصادقة باستخدام رمز، أو مفتاح تحكُّم عن بُعد/بطاقة، أو هاتف ذكي في علامة التبويب تسجيل الدخول أولاً. اضغط على المجموعات التي تريد تشغيل النظام أو إيقافه فيها.
إذا ضغطت على زر تشغيل النظام ![]() / إيقاف النظام
/ إيقاف النظام ![]() / الوضع الليلي
/ الوضع الليلي ![]() الموجود على شاشة لوحة المفاتيح، سيتغير وضع الأمن لجميع المجموعات المعروضة.
الموجود على شاشة لوحة المفاتيح، سيتغير وضع الأمن لجميع المجموعات المعروضة.
لإيقاف النظام باستخدام رمز الإكراه:
- نشّط لوحة المفاتيح عن طريق الاقتراب منها أو وضع يدك أمام المستشعر.
- اضغط على زر إيقاف النظام في علامة التبويب التحكُّم .
- أدخل رمز الإكراه المناسب.
مثال على إدخال الرموز
| الرمز | المثال | ملحوظة |
|
رمز لوحة المفاتيح رمز إكراه لوحة المفاتيح |
1234 ← موافق | ويمكن مسح الأرقام التي أُدخِلَت خطأ باستخدام الزر |
|
رمز المستخدم رمز إكراه المستخدم |
2 ← |
أدخل معرّف المستخدم أولاً، اضغط على زر ويمكن مسح الأرقام التي أُدخِلَت خطأ باستخدام الزر |
|
رمز المستخدم غير المُسجّل رمز الإكراه لمستخدم غير مُسجّل |
1234 ← موافق | ويمكن مسح الأرقام التي أُدخِلَت خطأ باستخدام الزر |
| رمز RRU | 1234 ← موافق | ويمكن مسح الأرقام التي أُدخِلَت خطأ باستخدام الزر |
تغيير وضع تشغيل النظام بسهولة
تتيح لك ميزة تغيير وضع تشغيل النظام بسهولة تبديل وضع الأمن باستخدام Tag/Pass أو الهاتف الذكي، دون تأكيد باستخدام أزرار تشغيل النظام ![]() أو إيقاف النظام
أو إيقاف النظام ![]() . انتقل إلى إعدادات لوحة المفاتيح لتفعيل الميزة.
. انتقل إلى إعدادات لوحة المفاتيح لتفعيل الميزة.
لتبديل وضع الأمن إلى العكس
- نشّط لوحة المفاتيح عن طريق الاقتراب منها أو وضع يدك أمام المستشعر. ويمكن إجراء التفويض المُسبق إذا لزم الأمر.
- قرّب Tag/Pass أو الهاتف الذكي.
تشغيل النظام على مرحلتين
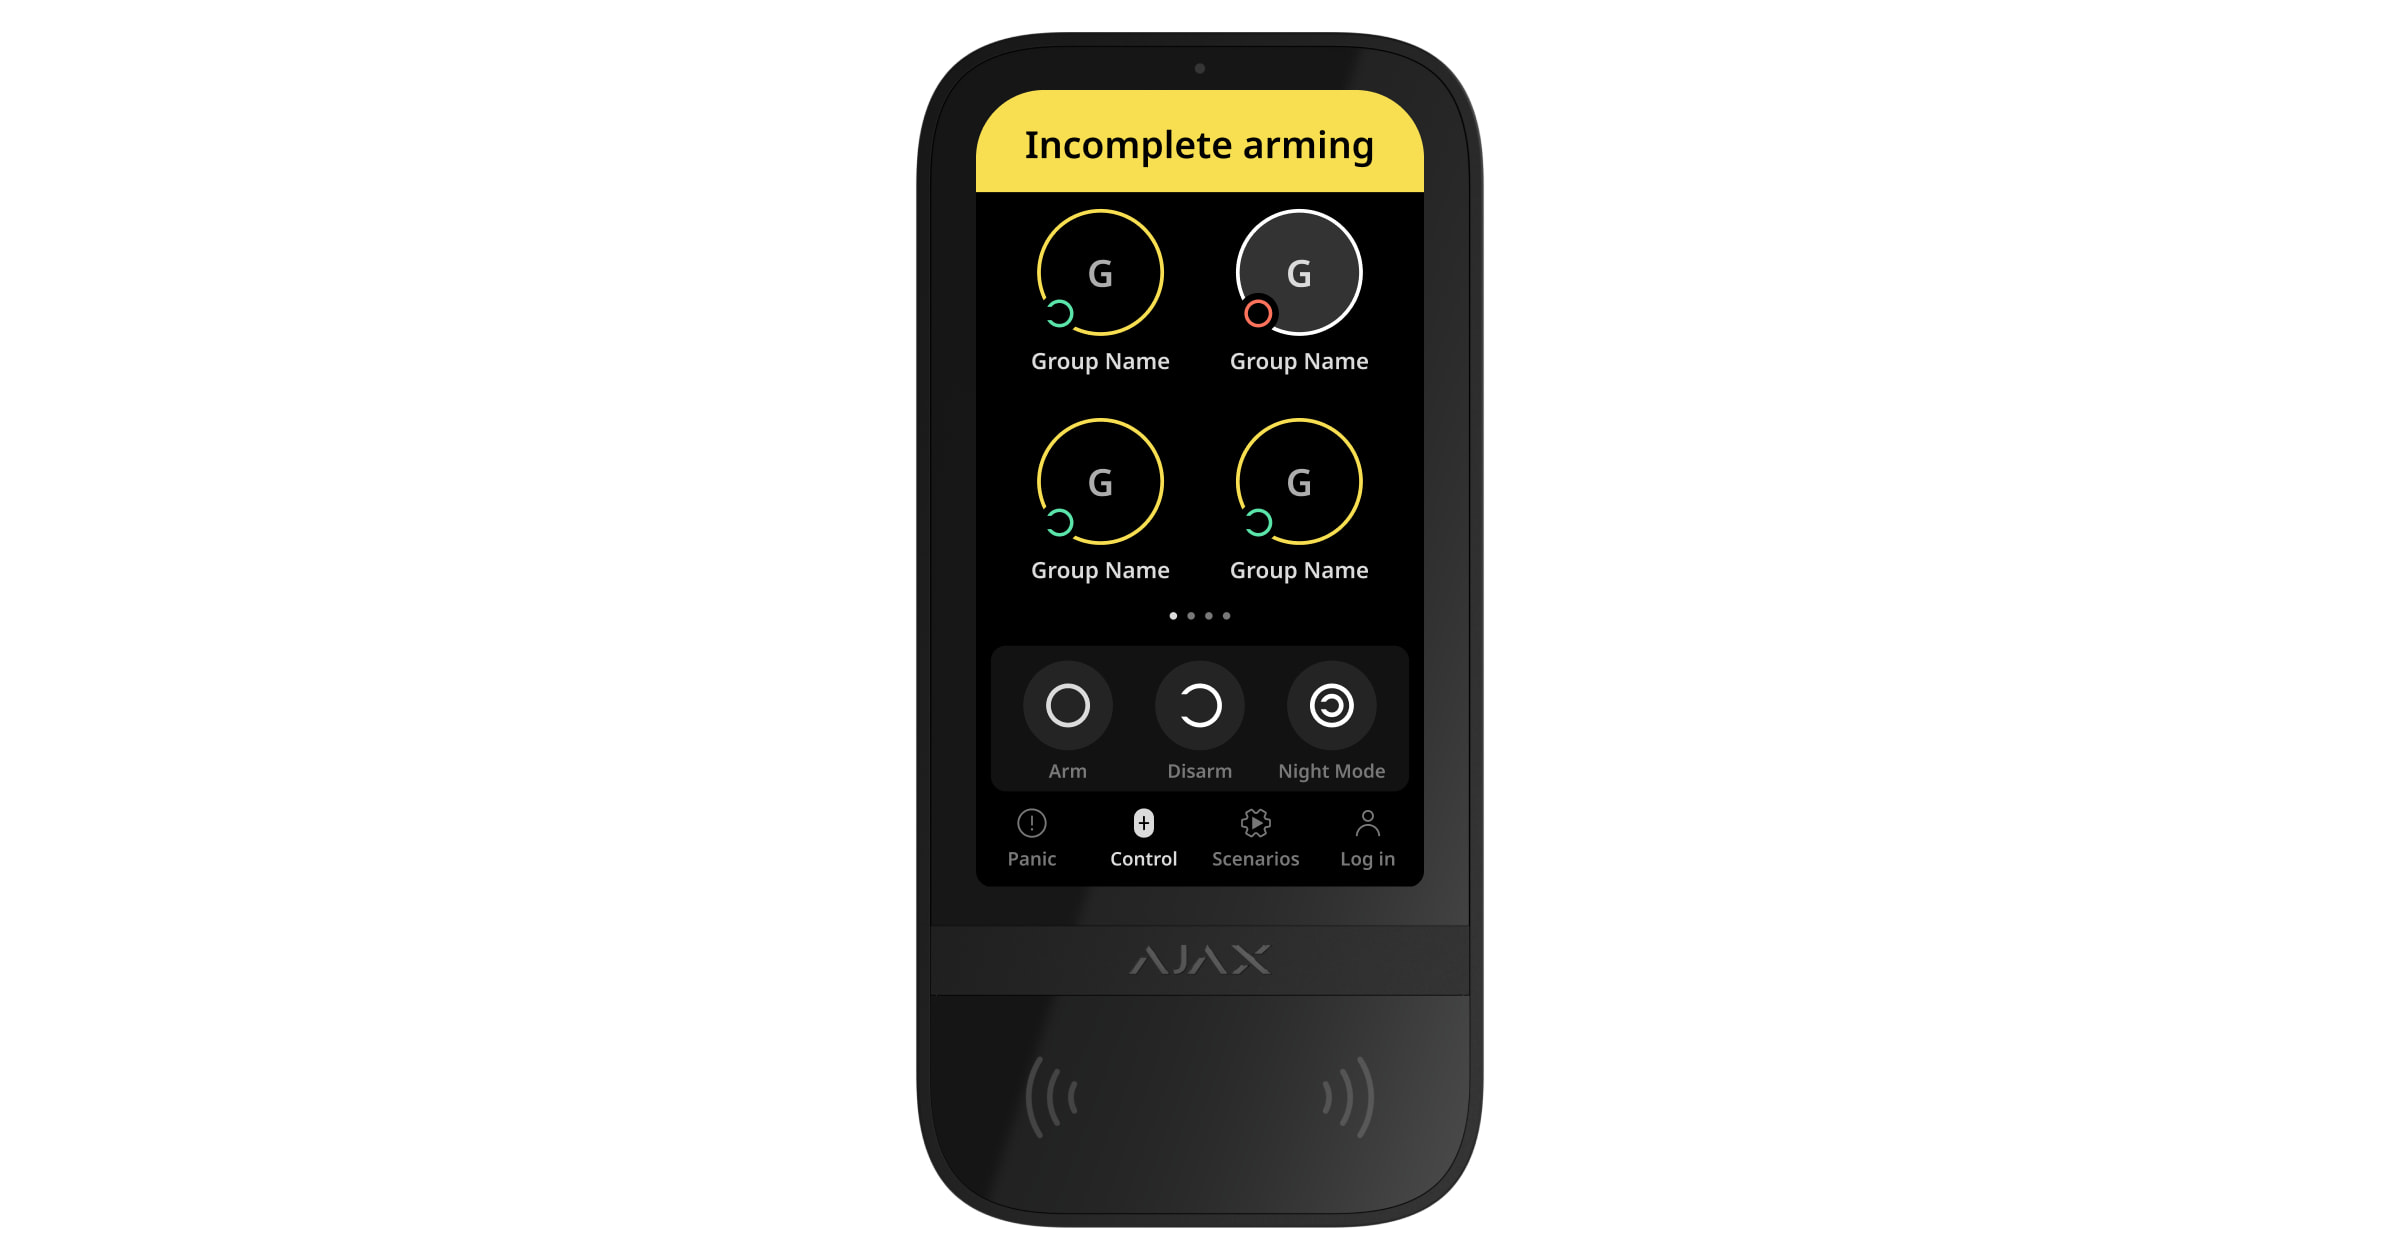
يمكن أن تشارك KeyPad TouchScreen في تشغيل النظام على مرحلتين ولكن لا يمكن استخدامها كجهاز مرحلة ثانية. تشبه عملية تشغيل النظام على مرحلتين باستخدام Tag، أو Pass، أو الهاتف الذكي استخدام رمز شخصي أو عام على لوحة المفاتيح.
يمكن لمستخدمي النظام معرفة ما إذا كان تشغيل النظام قد بدأ أو لم يكتمل على شاشة لوحة المفاتيح. في حال تنشيط وضع المجموعة، فإن لون أزرار المجموعات يعتمد على الحالة الحالية:
- رمادي — النظام موقوف، ولم تبدأ عملية تشغيل النظام.
- أخضر – بدأت عملية تشغيل النظام.
- أصفر — تشغيل النظام غير مكتمل.
- أبيض — النظام قيد التشغيل.
إدارة السيناريوهات باستخدام لوحة المفاتيح
تتيح لوحة المفاتيح KeyPad TouchScreen للمستخدمين إنشاء ما يصل إلى ستة سيناريوهات من نوعين. يتيح نوع السيناريو وفقًا لإجراء مُسبق التحكُّم في جهاز واحد أو أكثر من أجهزة التشغيل الآلي وAjax WaterStop Jeweller. يسمح نوع السيناريو عند تبديل الحالة للمستخدمين بتبديل حالة تشغيل آلي واحد أو Ajax WaterStop Jeweller من علامة تبويب السيناريوهات على لوحة المفاتيح.
- افتح تطبيق Ajax. حدد لوحة تحكُّم متصل بها KeyPad TouchScreen واحدة على الأقل وجهاز تشغيل الآلي. أضف واحدة إذا لزم الأمر.
- انتقل إلى علامة تبويب الأجهزة .
- اختر KeyPad TouchScreen من القائمة وانتقل إلى قائمة الإعدادات .
- انتقل إلى قائمة سيناريوهات التشغيل الآلي. فعّل زر التبديل إدارة السيناريوهات.
- افتح قائمة سيناريوهات لوحة المفاتيح.
- اضغط إضافة سيناريو.
- اختر نوع السيناريو >وفقًا إجراء مُسبَق.
- حدد جهازًا أو أكثر من أجهزة التشغيل الآلي. اضغط على التالي.
- أدخل اسم السيناريو في حقل الاسم.
- اختر إجراء الجهاز المفضل أثناء تنفيذ السيناريو.
- انقر على حفظ.
- اضغط على رجوع للعودة إلى قائمة سيناريوهات التشغيل الآلي.
- إذا لزم الأمر، نشّط مفتاح التبديل التفويض المُسبق.
تُعرَض السيناريوهات المُنشأة في التطبيق: KeyPad TouchScreen ← الإعدادات ![]() ← سيناريوهات التشغيل الآلي ← سيناريوهات لوحة المفاتيح. ويمكنك إيقافها، أو تعديل الإعدادات، أو حذفها في أي وقت.
← سيناريوهات التشغيل الآلي ← سيناريوهات لوحة المفاتيح. ويمكنك إيقافها، أو تعديل الإعدادات، أو حذفها في أي وقت.
لإزالة سيناريو:
- انتقل إلى الإعدادات في KeyPad TouchScreen.
- افتح قائمة سيناريوهات التشغيل الآلي ← سيناريوهات لوحة المفاتيح.
- حدد السيناريو الذي تريد إزالته.
- اضغط على التالي.
- اضغط حذف سيناريو.
يمكن للمستخدم رؤية سيناريوهات التشغيل الآلي وإدارتها بعد المصادقة عند تفعيل ميزة التفويض المُسبق. انتقل إلى علامة التبويب السيناريوهات ![]() ، وأدخل الرمز أو قرّب جهاز وصول شخصي إلى لوحة المفاتيح.
، وأدخل الرمز أو قرّب جهاز وصول شخصي إلى لوحة المفاتيح.
لتنفيذ سيناريو، اضغط على الزر المناسب في علامة التبويب السيناريوهات ![]() .
.
لا تعرض شاشة KeyPad TouchScreen إلا السيناريوهات النشطة في إعدادات لوحة المفاتيح.
المؤشر
تُعلم KeyPad TouchScreen المستخدمين بالإنذارات، والتأخير عند الدخول/الخروج، ووضع الأمن الحالي، والأعطال، وحالات النظام الأخرى بالوسائل التالية:
- الشاشة؛
- شعار بمؤشر LED؛
- جرس مُدمج.
لا يظهر مؤشر KeyPad TouchScreen على الشاشة إلا عندما تكون نشطة. تُعرَض الأيقونات التي تشير إلى بعض حالات النظام أو لوحة المفاتيح في الجزء العلوي من علامة التبويب التحكُّم ![]() . على سبيل المثال، يمكنها الإشارة إلى إنذار حريق، واستعادة النظام بعد الإنذار، وإصدار تنبيه صوتي عند الفتح. ستُحدّث المعلومات المتعلقة بوضع الأمن حتى إذا غيّره جهاز آخر: مفتاح تحكُّم عن بُعد، أو لوحة مفاتيح أخرى، أو في التطبيق.
. على سبيل المثال، يمكنها الإشارة إلى إنذار حريق، واستعادة النظام بعد الإنذار، وإصدار تنبيه صوتي عند الفتح. ستُحدّث المعلومات المتعلقة بوضع الأمن حتى إذا غيّره جهاز آخر: مفتاح تحكُّم عن بُعد، أو لوحة مفاتيح أخرى، أو في التطبيق.
| الحدث | المؤشر | ملحوظة |
| إنذار. | يُصدر الجرس المُدمج إشارة صوتية. |
تُعرَض عند تفعيل زر التبديل تنشيط جرس لوحة المفاتيح عند اكتشاف إنذار في النظام. تعتمد مدة الإشارة الصوتية على إعدادات لوحة المفاتيح. |
| اكتشاف إنذار في نظام قيد التشغيل. | يومض مؤشر LED مرتين كل 3 ثوانٍ تقريبًا حتى إيقاف النظام. |
للتنشيط، فعّل إشارة ما بعد الإنذار في إعدادات لوحة التحكُّم. اختر أيضًا KeyPad TouchScreen كجهاز الإبلاغ عن إنذارات الأجهزة الأخرى. يضيء المؤشر بعد انتهاء الجرس المُدمَج من إصدار إشارة الإنذار. |
| تشغيل الجهاز/تحميل تهيئة النظام المُحدثة إلى لوحة المفاتيح. | يظهر إشعار مناسب على الشاشة أثناء تحميل البيانات. | |
| إيقاف تشغيل الجهاز. | يُضيء مؤشر LED لمدة ثانية واحدة، ثم يومض ثلاث مرات. | |
| النظام بأكمله أو المجموعة قيد التشغيل. | يُصدر الجرس المُدمج إشارة صوتية قصيرة. | في حال تفعيل إشعارات تشغيل النظام/إيقاف النظام. |
| تحوّل النظام أو المجموعة إلى الوضع الليلي. | يُصدر الجرس المُدمج إشارة صوتية قصيرة. | في حال تفعيل إشعارات تنشيط/إيقاف الوضع الليلي. |
| إيقاف النظام. |
يُصدر الجرس المُدمج إشارتين صوتيتين قصيرتين. يضيء مؤشر LED بضوء أخضر مستمر عند توصيل مصدر طاقة خارجي. |
في حال تفعيل إشعارات تشغيل النظام/إيقاف النظام.
يتوفر هذا النوع من مؤشرات LED للوحة المفاتيح KeyPad TouchScreen Jeweller ذات الإصدار 11.60.10.19 من البرنامج الثابت أو الإصدار الأحدث. |
| النظام قيد التشغيل. |
يضيء مؤشر LED بضوء أحمر لفترة قصيرة كل 3 ثوانٍ إذا لم يوصّل مصدر طاقة خارجي. يضيء مؤشر LED بضوء أحمر مستمر عند توصيل مصدر طاقة خارجي. |
في حال تفعيل مؤشر وضع تشغيل النظام. يضيء المؤشر عندما تتحول لوحة المفاتيح إلى وضع السكون (تنطفئ الشاشة). |
| إدخال رمز غير صحيح. |
يظهر إشعار مناسب على الشاشة. يُصدر الجرس المُدمج إشارة صوتية قصيرة (في حال التعديل). |
يعتمد مدى ارتفاع الإشارة الصوتية على إعدادات مستوى صوت الأزرار. |
| حدوث خطأ عند إضافة بطاقة/مفتاح تحكُّم عن بُعد. |
يظهر إشعار مناسب على الشاشة. يضيء مؤشر LED بضوء أحمر مرة واحدة. يُصدر الجرس المُدمج إشارة صوتية طويلة. |
يعتمد مدى ارتفاع الإشارة الصوتية على إعدادات مستوى صوت الأزرار. |
| إضافة بطاقة/مفتاح تحكُّم عن بُعد بنجاح. |
يظهر إشعار مناسب على الشاشة. يُصدر الجرس المُدمج إشارة صوتية قصيرة. |
يعتمد مدى ارتفاع الإشارة الصوتية على إعدادات مستوى صوت الأزرار. |
| مستوى شحن البطارية منخفض. | يضيء مؤشر LED بسلاسة وينطفئ عند تحفيز زر الحماية من التلاعب، أو تنشيط الإنذار، أو تشغيل النظام أو إيقاف النظام (في حال تنشيط المؤشر). | |
| تحفيز زر الحماية من التلاعب. | يضيء مؤشر LED بضوء أحمر لمدة ثانية واحدة. | |
| اختبار قوة إشارة Jeweller/Wings. | يضيء مؤشر LED بضوء أخضر أثناء الاختبار. | يضيء بعد بدء الاختبار المناسب في إعدادات لوحة المفاتيح. |
| تحديث البرنامج الثابت. | يضيء مؤشر LED بضوء أخضر دوريًا أثناء تحديث البرنامج الثابت. | يضيء بعد بدء تحديث البرنامج الثابت في حالات لوحة المفاتيح. |
| كتم إنذار الحريق المترابط. |
يظهر إشعار مناسب على الشاشة. يُصدر الجرس المُدمج إشارة صوتية. |
|
| لوحة المفاتيح غير نشطة. | يظهر إشعار مناسب على الشاشة. | في حال تحديد الخيار بالكامل لإعدادات لوحة المفاتيح؛ دائمًا أو إيقاف لمرة واحدة. |
| يجب استعادة النظام. | شاشة مناسبة لاستعادة أو إرسال طلب لاستعادة النظام بعد ظهور الإنذار على الشاشة. |
يجب ضبط ميزة الاستعادة بعد الإنذار في النظام. تظهر الشاشة عند تشغيل النظام أو تبديله إلى الوضع الليلي إذا حدث إنذار أو عطل في النظام من قبل. يمكن للمسئولين أو مستخدمي PRO ممن يمتلكون حقوق تهيئة النظام استعادة النظام. يمكن للمستخدمين الآخرين إرسال طلب للاستعادة. |
| حساب التأخير عند الدخول/الخروج (في حالة تفعيل إصدار إشارة صوتية عند التأخير ) |
يعمل مؤشر LED والإشارات الصوتية في الوقت نفسه في حالة تفعيل ميزة الإشارة الصوتية السريعة عند التأخير. | يضيء مؤشر LED باللون الأحمر خلال التأخير عند الدخول وباللون الأخضر خلال التأخير عند الخروج.
يتوفر هذا النوع من المؤشرات للوحة المفاتيح KeyPad TouchScreen Jeweller ذات الإصدار 11.60.10.19 من البرنامج الثابت أو الإصدار الأحدث. |
الإشعارات الصوتية بالأعطال
إذا كان أي جهاز غير متصل بالإنترنت أو كانت البطارية منخفضة، فيمكن أن تخطر KeyPad TouchScreen مستخدمي النظام بصوت مسموع. سيومض أيضًا مؤشر LED الخاص بلوحة المفاتيح. ستُعرَض إشعارات الأعطال في موجز الأحداث، أو الرسائل النصية القصيرة، أو الإشعارات الفورية.
لتفعيل الإشعارات الصوتية عن الأعطال، استخدم تطبيقات Ajax PRO وPRO Desktop :
- انقر على الأجهزة ، اختر لوحة التحكُّم وافتح إعداداتها :
انقر على الخدمة ← الأصوات والتنبيهات.
- فعّل أزرار التبديل: إذا كانت بطارية أي جهاز منخفضة وإذا كان أي جهاز غير متصل بالإنترنت.
- انقر على رجوع لحفظ الإعدادات.
| الحدث | المؤشر | ملحوظة |
| إذا كان أي جهاز غير متصل بالإنترنت. |
إشارتان صوتيتان قصيرتان، يومض مؤشر LED مرتين. تصدر إشارة صوتية مرة واحدة في الدقيقة حتى تتصل جميع الأجهزة الموجودة في النظام بالإنترنت. |
يمكن للمستخدمين تأخير الإشارة الصوتية لمدة 12 ساعة. |
| إذا كانت KeyPad TouchScreen غير متصلة بالإنترنت. |
إشارتان صوتيتان قصيرتان، يومض مؤشر LED مرتين. تصدر إشارة صوتية مرة واحدة في الدقيقة حتى تتصل لوحة المفاتيح الموجودة في النظام بالإنترنت. |
لا يمكن تأخير الإشارة الصوتية. |
| إذا كانت بطارية أي جهاز منخفضة. |
ثلاث إشارات صوتية قصيرة، يومض مؤشر LED ثلاث مرات. تصدر إشارة صوتية مرة واحدة في الدقيقة حتى استعادة البطارية أو إزالة الجهاز. |
يمكن للمستخدمين تأخير الإشارة الصوتية لمدة 4 ساعات. |
تصدر إشعارات صوتية بالأعطال عند انتهاء إشارة لوحة المفاتيح. في حالة حدوث عدة أعطال في النظام، تخطر لوحة المفاتيح بانقطاع الاتصال بين الجهاز ولوحة التحكُّم أولاً.
اختبار الوظائف
يقدم نظام Ajax أنواعًا عديدة من الاختبارات للمساعدة في اختيار مكان التركيب الصحيح للأجهزة. لا يبدأ الاختبار على الفور. ومع ذلك، فإن وقت الانتظار لا يتجاوز مدة فاصل زمني واحد لفحص الاتصال “بين الجهاز ولوحة التحكُّم”. يمكن التحقق من الفاصل الزمني لفحص الاتصال وتهيئته في إعدادات لوحة التحكُّم (لوحة التحكُّم ← الإعدادات ![]() ← Jeweller أو Jeweller/Fibra).
← Jeweller أو Jeweller/Fibra).
لإجراء اختبار، في تطبيق Ajax:
- اختر لوحة التحكُّم المطلوبة.
- انتقل إلى علامة تبويب الأجهزة .
- اختر KeyPad TouchScreen من القائمة.
- انتقل إلى الإعدادات .
- اختر اختبارًا:
- اجرِ الاختبار.
موضع الجهاز
الجهاز مُصمم للاستخدام في الداخل فقط.
يُرجى مراعاة المعلمات التي تؤثر على تشغيل الجهاز عند اختيار موضع تركيبه:
- قوة إشارة Wings وJeweller.
- المسافة بين لوحة المفاتيح ولوحة التحكُّم أو موسّع النطاق.
- وجود عوائق تعيق مسار الإشارة اللاسلكية: الجدران، والأسقف بين الطوابق، والأجسام الكبيرة الموجودة في الغرفة.
يُرجى الاهتمام بتوصيات مكان التركيب عند تصميم مشروع لنظام الأمن في المنشأة. ويجب أن يصمّم نظام الأمن ويركّبه متخصصون. قائمة الشركاء المُوصى بهم متاحة هنا.
من الأفضل وضع KeyPad TouchScreen في الداخل بالقرب من المدخل. وهذا يتيح إيقاف النظام قبل انتهاء مهلة التأخير عند الدخول وتشغيل النظام بسرعة عند مغادرة المبنى.
يُوصى بتركيبها على ارتفاع 1.3–1.5 متر من الأرض. وركّب لوحة المفاتيح على سطح عمودي مستوٍ. وهذا يضمن تثبيت KeyPad TouchScreen بإحكام على السطح ويساعد في تجنُّب إنذارات التلاعب الكاذبة.
قوة الإشارة
تتحدّد قوة إشارة Jeweller وWings بعدد حزم البيانات التي لم تُسلّم أو المتضررة خلال فترة زمنية معينة. تشير الأيقونة ![]() في علامة التبويب الأجهزة
في علامة التبويب الأجهزة ![]() إلى قوة الإشارة:
إلى قوة الإشارة:
- ثلاث شُرط — قوة الإشارة ممتازة.
- شرطتان — قوة الإشارة جيدة.
- شرطة واحدة — الإشارة ضعيفة، ولا يمكن ضمان استقرار التشغيل.
- الأيقونة مشطوبة — لا توجد إشارة.
تحقّق من قوة إشارة Jeweller وWings قبل التركيب النهائي. فإذا كانت قوة الإشارة شرطة واحدة أو صفر، لا نضمن استقرار تشغيل الجهاز. فكر في تغيير موضع الجهاز حيث قد يؤدي تغيير موضعه، ولو بمقدار 20 سم، إلى تحسين قوة الإشارة بشكل ملحوظ. إذا ظلت الإشارة ضعيفة أو غير مستقرة بعد النقل، فاستخدم موسّع نطاق الإشارة اللاسلكية ReX 2. لا تتوافق KeyPad TouchScreen مع موسّع نطاق الإشارة اللاسلكية ReX.
الأماكن التي يحظر تركيب لوحة المفاتيح فيها
- في الأماكن المفتوحة. فقد يؤدي هذا إلى تلف لوحة المفاتيح.
- في الأماكن التي قد تتسبب فيها أغراض مثل الملابس (بالقرب من الشماعة مثلاً)، أو كابلات الكهرباء، أو سلك إيثرنت في إعاقة لوحة المفاتيح. يمكن أن يؤدي هذا إلى التحفيز الزائف للوحة المفاتيح.
- بالقرب من أي أجسام معدنية أو مرايا تسبب تلاشي الإشارة أو حجبها.
- داخل المباني التي تتجاوز فيها درجة الحرارة والرطوبة الحدود المسموح بها. فقد يؤدي ذلك إلى تلف الجهاز.
- على مسافة أقل من متر واحد من لوحة التحكُّم أو موسّع نطاق الإشارة اللاسلكية. يمكن أن يؤدي ذلك إلى فقدان الاتصال مع لوحة المفاتيح.
- في مكان به إشارة ضعيفة. قد يؤدي هذا إلى انقطاع الاتصال بلوحة التحكُّم.
- بالقرب من كواشف كسر الزجاج. قد يؤدي صوت الجرس المُدمج إلى تحفيز إنذار.
- في الأماكن حيث قد تضعف الإشارة الصوتية (داخل قطع الأثاث، أو خلف ستائر سميكة، إلخ).
التركيب
يُرجى التأكُّد من اختيار المكان الأمثل الذي يستوفي المتطلبات المذكورة في هذا الدليل قبل تركيب KeyPad TouchScreen.
لتعليق لوحة مفاتيح:
- افصل لوحة التعليق SmartBracket عن لوحة المفاتيح. فك مسمار التثبيت أولاً ثم اسحب اللوحة لأسفل.
- ثبّت لوحة التعليق SmartBracket باستخدام شريط لاصق مزدوج في مكان التركيب المرغوب.

لا يمكن استخدام الشريط اللاصق المزدوج إلا للتركيب المؤقت. فقد ينفصل الجهاز المُثبَّت بشريط لاصق عن السطح ويسقط في أي وقت. طالما أن الجهاز ملصوق، لن يُحفّز زر الحماية من التلاعب عند فصل الجهاز عن السطح.
تحتوي SmartBracket على علامات على الجانب الداخلي لسهولة التركيب. يُمثّل تقاطع الخطين مركز الجهاز (وليس لوحة التعليق). انتبه إليها عند تركيب لوحة المفاتيح.

- ضع لوحة المفاتيح على SmartBracket. سيومض مؤشر LED في الجهاز. وهي إشارة على أن غلاف لوحة المفاتيح مُغلق.
إذا لم يضيء مؤشر LED أثناء وضع الجهاز على SmartBracket، تحقّق من حالة زر الحماية من التلاعب في تطبيق Ajax، وصحة التثبيت، ومدى إحكام تثبيت لوحة المفاتيح على اللوحة.
- اختبر قوة إشارة Jeweller وWings. قوة الإشارة المُوصى بها شرطتان أو 3 شُرط. فإذا كانت قوة الإشارة منخفضة (شرطة واحدة)، فإننا لا نضمن استقرار تشغيل الجهاز. فكر في تغيير موضع الجهاز حيث قد يؤدي تغيير موضعه، ولو بمقدار 20 سم، إلى تحسين قوة الإشارة بشكل ملحوظ. إذا ظلت الإشارة ضعيفة أو غير مستقرة بعد النقل، فاستخدم موسّع نطاق الإشارة اللاسلكية ReX 2.
- أجرِ اختبار تضعيف الإشارة. أثناء الاختبار، يمكن تقليل قوة الإشارة وزيادتها لمحاكاة الظروف المختلفة في موقع التركيب. إذا اُختير مكان التركيب بشكل صحيح، فستحصل لوحة المفاتيح على قوة إشارة ثابتة من 2 إلى 3 شرطات.
- في حال اجتياز الاختبارات بنجاح، افصل لوحة المفاتيح عن SmartBracket.
- ثبِّت لوحة SmartBracket باستخدام مسامير التثبيت المُرفقة. استخدم جميع نقاط التثبيت.
عند استخدام مثبتات أخرى، تأكّد من أنها لا تلحق الضرر باللوحة أو تشوهها.
- ضع لوحة المفاتيح على لوحة التعليق SmartBracket.
- أحكم ربط المسمار الموجود في الجزء السفلي من غلاف لوحة المفاتيح. فالمسمار ضروري لإحكام التثبيت بشكل أكثر موثوقية ولحماية لوحة المفاتيح من التفكيك بسرعة.

توصيل وحدة إمداد طاقة من مصنّع آخر
عند توصيل وحدة إمداد الطاقة من مصنّع آخر واستخدام KeyPad TouchScreen، اتبع قواعد السلامة الكهربائية العامة فيما يتعلّق باستخدام الأجهزة الكهربائية، وكذلك المتطلبات القانونية التنظيمية المتعلقة بالسلامة الكهربائية.
تحتوي KeyPad TouchScreen على أطراف لتوصيل وحدة إمداد طاقة بقدرة 10.5–14 فولت⎓. المعلمات الكهربائية الموصى بها لوحدة إمداد الطاقة: 12 فولت⎓ بتيار لا يقل عن 0.5 أمبير.
نوصي بتوصيل مصدر طاقة خارجي عندما تحتاج إلى إبقاء الشاشة نشطة دائمًا ولتجنُّب تفريغ شحن البطارية بسرعة عند استخدام لوحة المفاتيح في أماكن ذات درجات حرارة منخفضة مثلاً. يلزم أيضًا توفُّر مصدر طاقة خارجي من أجل تحديث البرنامج الثابت للوحة المفاتيح.
عند توصيل مصدر طاقة خارجي، تعمل البطاريات المُدمَجة كمصدر طاقة احتياطي. لا تزيلها أثناء توصيل مصدر الطاقة.
قبل تركيب الجهاز، تأكّد من فحص الأسلاك للتأكد من عدم وجود أي تلف في العزل. ولا تستخدم إلا مصدر طاقة موصل بالأرض. ولا تحاول تفكيك الجهاز عندما يكون متصلاً بالتيار الكهربائي. لا تستخدم الجهاز مع كابل طاقة تالف.
لتوصيل وحدة إمداد طاقة من مصنّع آخر:
- أزل لوحة التعليق SmartBracket. افتح الجزء المثقوب من الغلاف بعناية لتجهيز الفتحات لمرور الكابل:
1 — لإخراج الكابل عبر الحائط.
2— لإخراج الكابل من الأسفل. يكفي فتح أحد الأجزاء المثقوبة - افصل كابل توصيل الطاقة من المصدر الخارجي.
- وصّل الكابل بأطراف التوصيل مع مراعاة الأقطاب (الموضحة على البلاستيك).
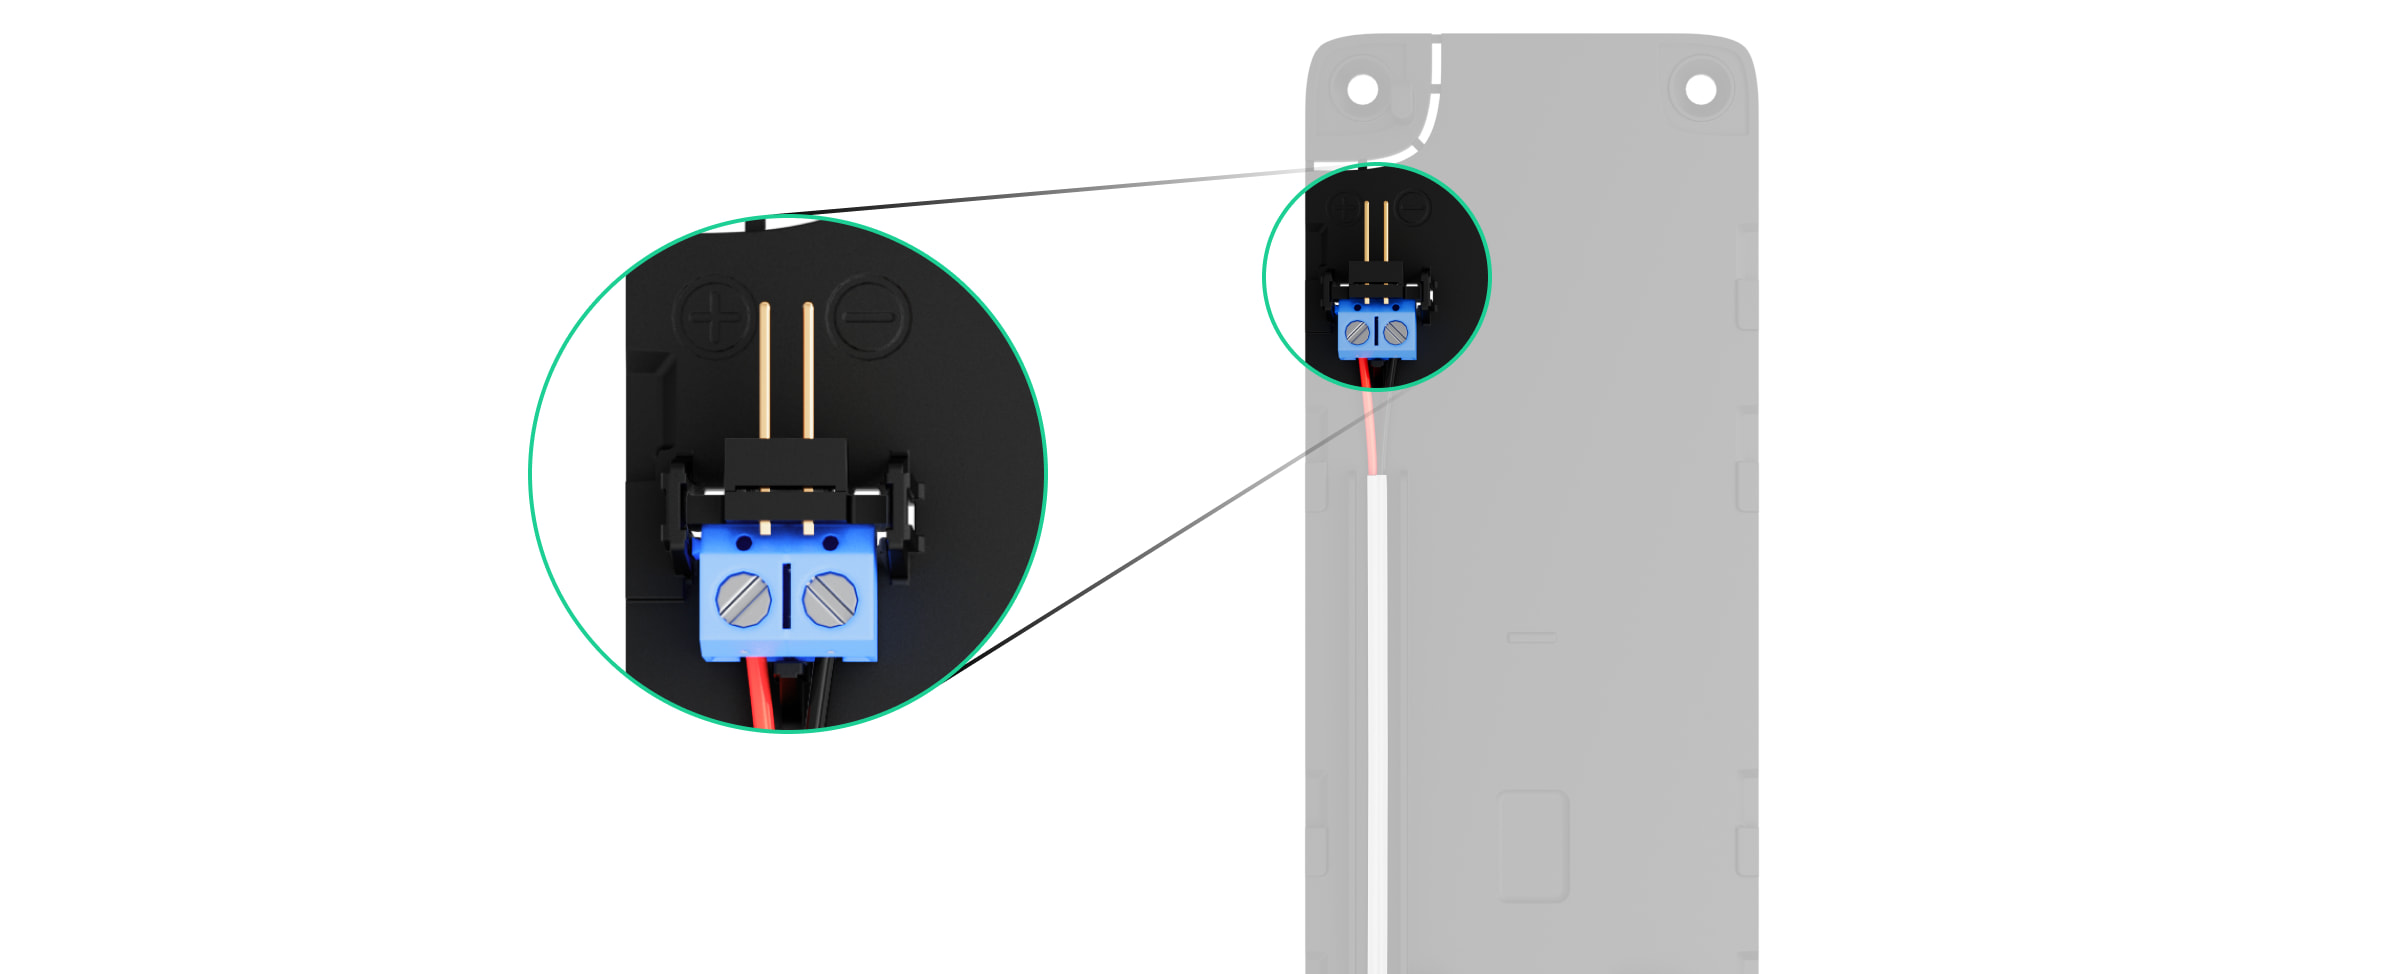
- مرّر الكابل في قناة الكابل. مثال على كيفية إخراج الكابل من أسفل لوحة المفاتيح:

- شغّل لوحة المفاتيح وضعها على لوحة التعليق.
- تحقق من حالة البطاريات، ومصدر الطاقة الخارجي في تطبيق Ajax، والتشغيل الكلي للجهاز.
لكي يتوافق النظام مع INCERT، لا توصّل وحدة إمداد الطاقة من مصنّعين آخرين بلوحة المفاتيح KeyPad TouchScreen Jeweller.
تحديث البرنامج الثابت
يمكن تثبيت تحديث البرنامج الثابت لجهاز KeyPad TouchScreen عند توفر إصدار جديد. ويمكنك معرفة ذلك من قائمة الأجهزة الموجودة في Ajax PRO: Tool for Engineers وPRO Desktop. في حالة توفر تحديث، ستظهر أيقونة ![]() على لوحة المفاتيح المعنية. يمكن لمسئول أو PRO يمتلك حقوق الوصول إلى إعدادات النظام بدء التحديث في حالات أو إعدادات KeyPad TouchScreen. يستغرق التحديث ما يصل إلى ساعة أو ساعتين (إذا كانت لوحة المفاتيح تعمل عبر ReX 2).
على لوحة المفاتيح المعنية. يمكن لمسئول أو PRO يمتلك حقوق الوصول إلى إعدادات النظام بدء التحديث في حالات أو إعدادات KeyPad TouchScreen. يستغرق التحديث ما يصل إلى ساعة أو ساعتين (إذا كانت لوحة المفاتيح تعمل عبر ReX 2).
لتحديث البرنامج الثابت، وصّل وحدة إمداد طاقة خارجية بجهاز KeyPad TouchScreen. ولن يبدأ التحديث دون توصيل مصدر طاقة خارجي.
وفي حال عدم توصيل KeyPad TouchScreen بمصدر طاقة خارجي في مكان التركيب، فيمكنك استخدام لوحة تعليق SmartBracket أخرى لجهاز KeyPad TouchScreen. لفعل ذلك، اخلع لوحة المفاتيح من لوحة التعليق الأساسية وركّبها على لوحة احتياطية متصلة بمصدر طاقة خارجي بجهد 10.5-14 فولت⎓ وتيار 0.5 أمبير أو أكثر.
يمكن شراء لوحة التعليق بشكل منفصل من شركاء Ajax Systems المعتمدين.
الصيانة
تحقُّق بانتظام من وظائف KeyPad TouchScreen. علمًا بأن التكرار الأمثل للفحوصات مرة كل ثلاثة أشهر. ونظِّف جسم الجهاز من الأتربة، وخيوط العنكبوت، وغيرها من الملوثات عند ظهورها. استخدِم منديلاً جافًا ناعمًا ومناسبًا لصيانة الجهاز.
لا تستخدِم المواد التي تحتوي على الكحول، والأسيتون، والبنزين،وأي مذيبات نشطة أخرى لتنظيف الجهاز. امسح شاشة اللمس بلطف.
يعمل الجهاز لمدة تصل إلى عام ونصف معتمدًا على البطاريات المُدمجة – وهي قيمة محسوبة بناءً على الإعدادات الافتراضية وما يصل إلى 4 تفاعلات يومية مع لوحة المفاتيح.
وسيرسل النظام تحذيرًا مبكرًا عندما يحين وقت استبدال البطاريات. عند تغيير وضع الأمن، سيضيء مؤشر LED ببطء وينطفئ.
المواصفات الفنية
الضمان
يسري ضمان منتجات شركة Limited Liability Company “Ajax Systems Manufacturing” لمدة عامين بعد الشراء.
إذا لم يعمل الجهاز بشكل صحيح، يُرجى الاتصال بخدمة “الدعم الفني” في Ajax أولاً. ففي معظم الحالات، يمكن حل المشاكل الفنية عن بُعد.
التواصل مع الدعم الفني:
صُنعت من قِبَل “AS Manufacturing” LLC
