
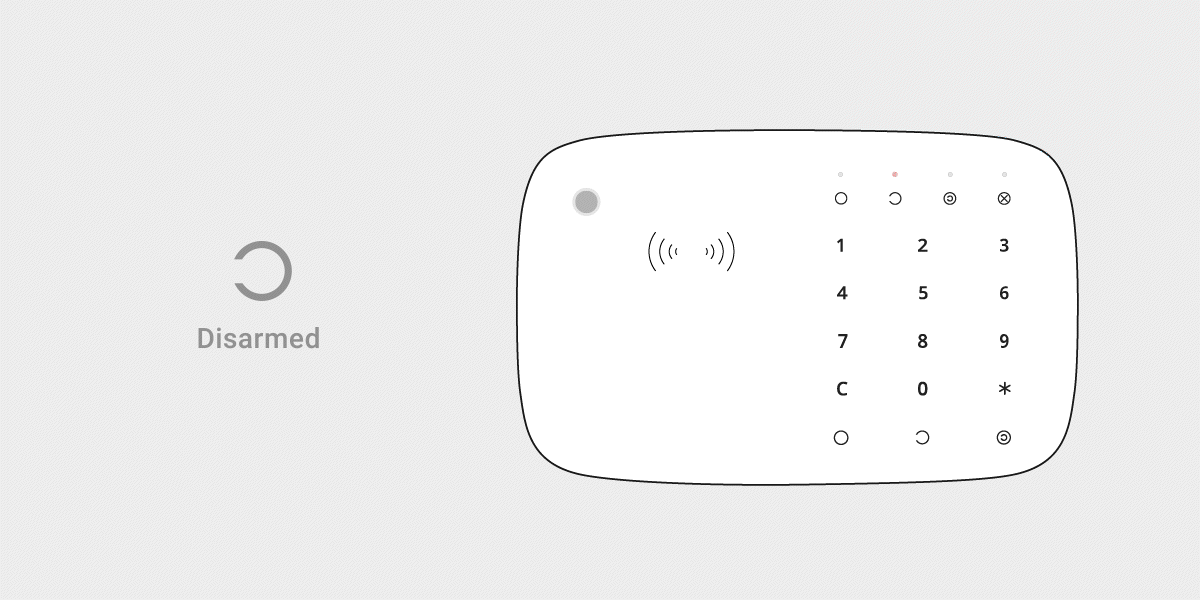
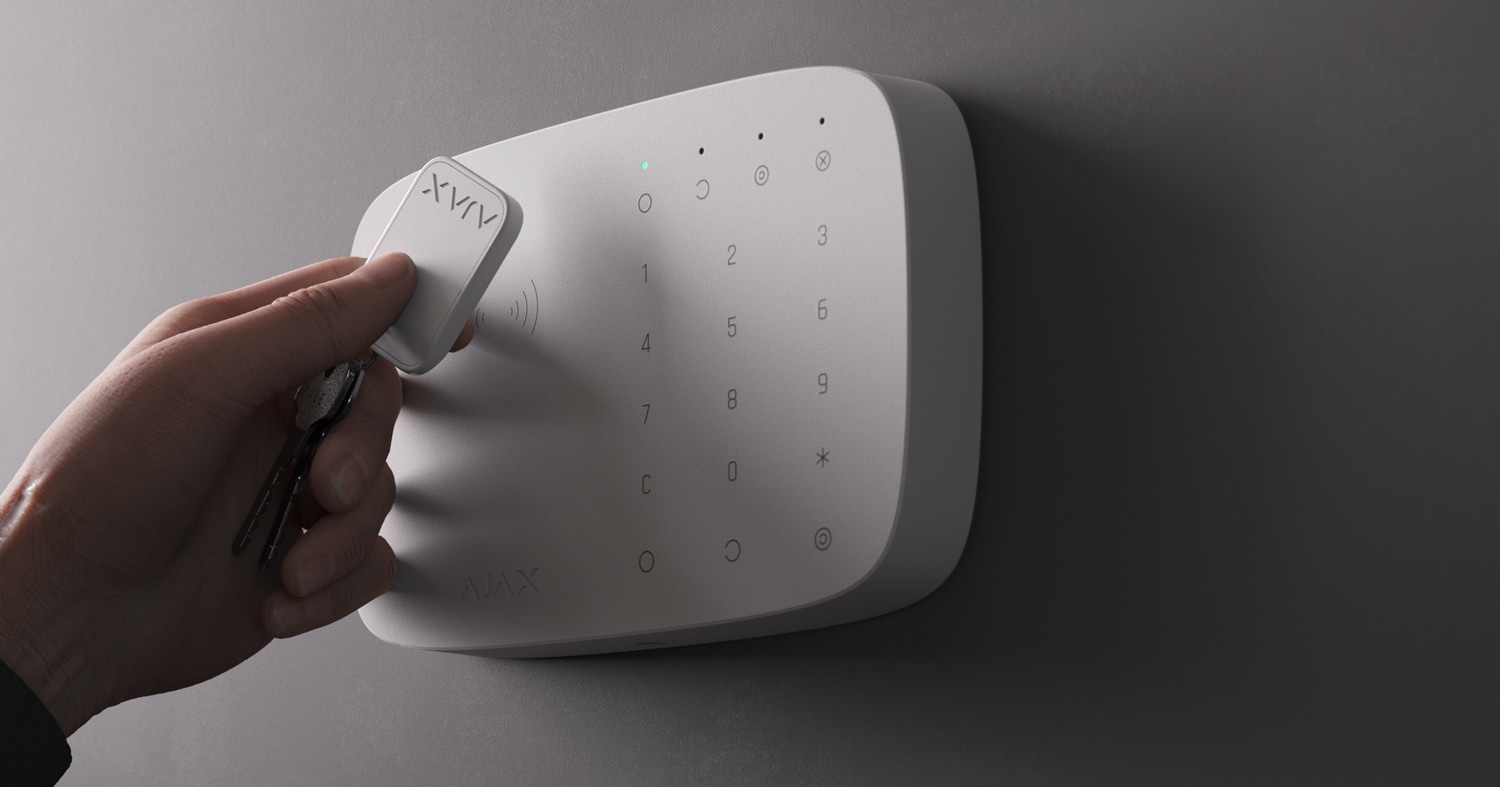
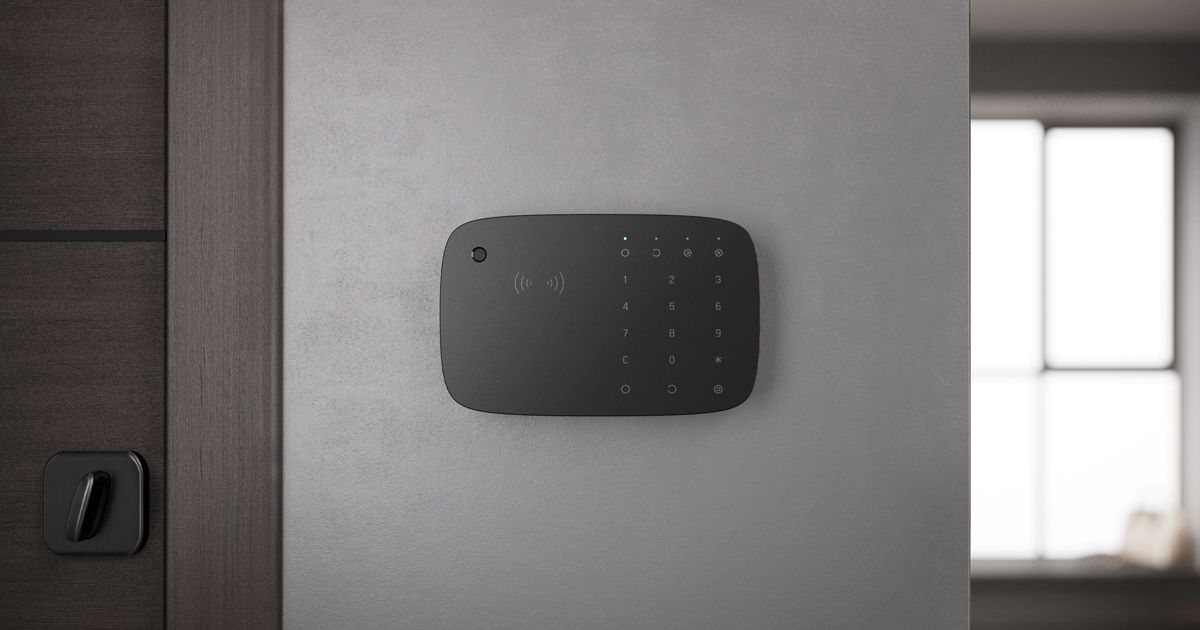
KeyPad Combi is een draadloos touch-bediendeel voor het beheren van Ajax-beveiligingssystemen met contactloze kaarten en sleutelhangers. Het is voorzien van een ingebouwde sirene. Het apparaat is ontworpen voor installatie binnenshuis.
KeyPad Combi is alleen compatibel met Hub (4G) Jeweller, Hub Plus Jeweller, Hub 2 Jeweller, Hub 2 Plus Jeweller, Hub Hybrid die draaien op OS Malevich 2.11 en nieuwer. Compatibel met signaalversterkers. Verbinding met Hub (2G) Jeweller en de ocBridge Plus en uartBridge integratiemodules wordt niet ondersteund!
Functionele elementen
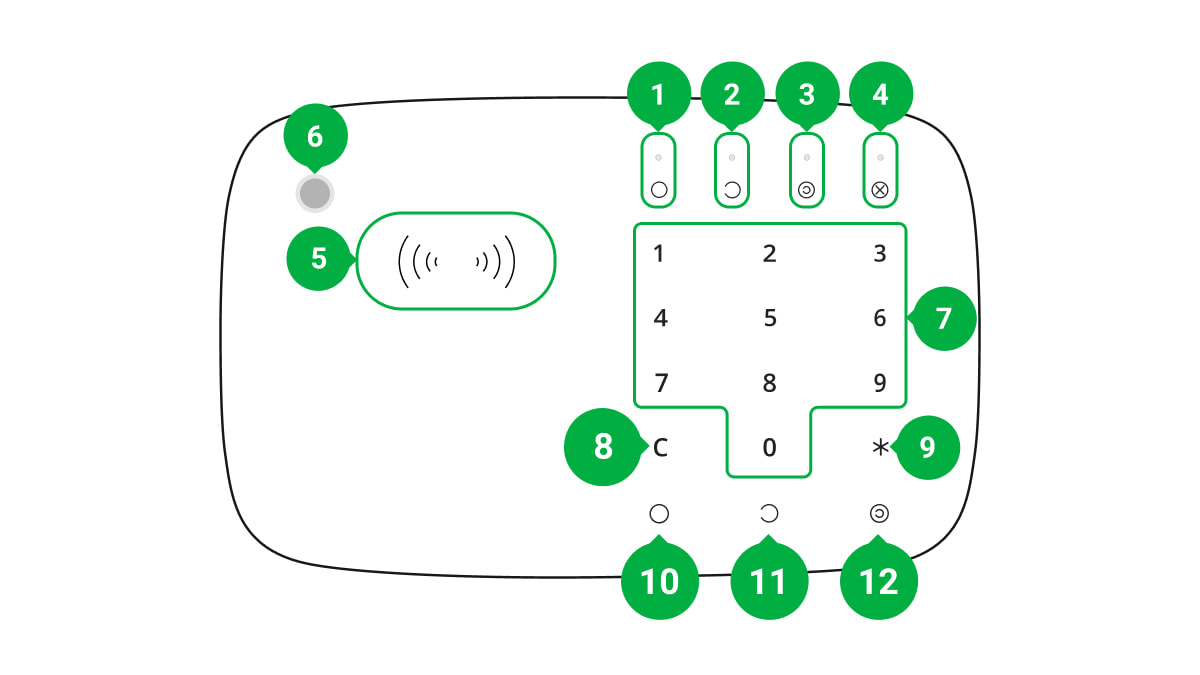
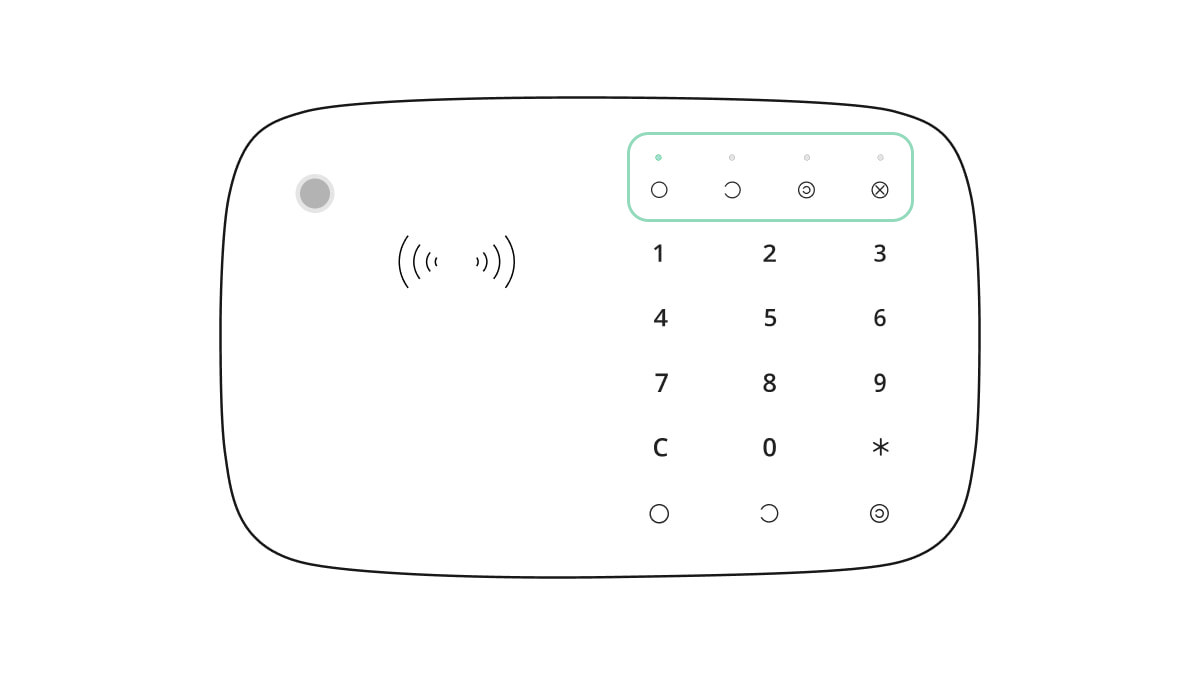
- Inschakelingsindicator
- Uitschakelingsindicator
- Deelinschakeling-indicator
- Storingsindicator
- Pass/Tag-lezer
- Sirene
- Numerieke aanraakknoppen
- Resetknop
- Functieknop
- Inschakelknop

- Uitschakelknop

- Knop voor de Deelinschakeling

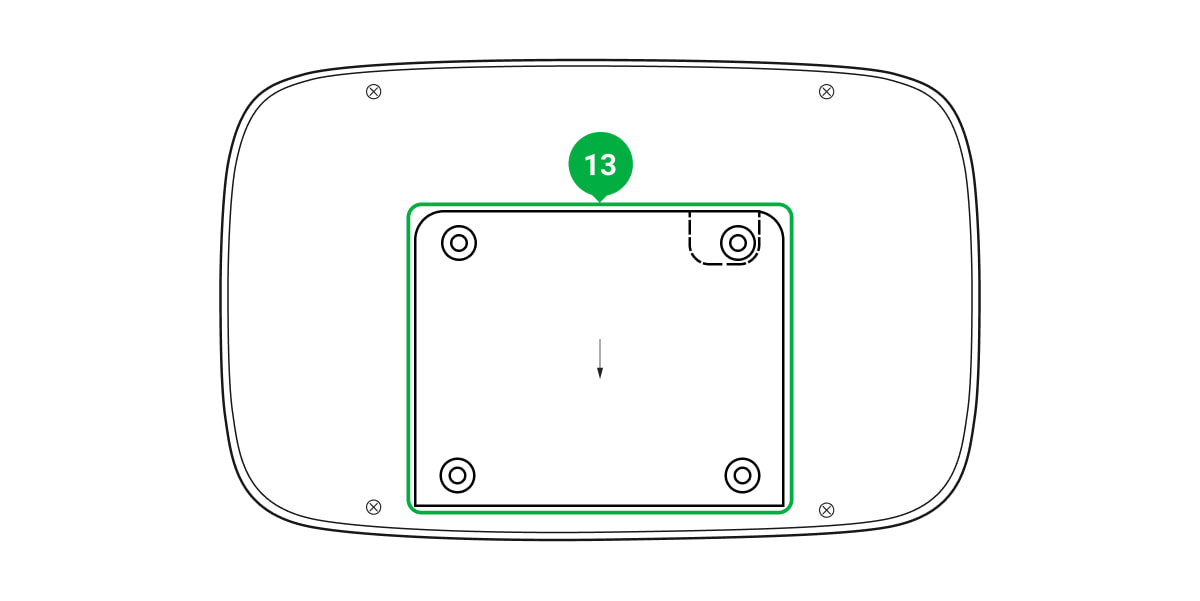
- SmartBracket-montagepaneel (schuif het naar beneden om het paneel te verwijderen)

Scheur het geperforeerde deel van de houder niet af. Dit is nodig om de sabotagebeveiliging te activeren bij een poging om het apparaat te demonteren.
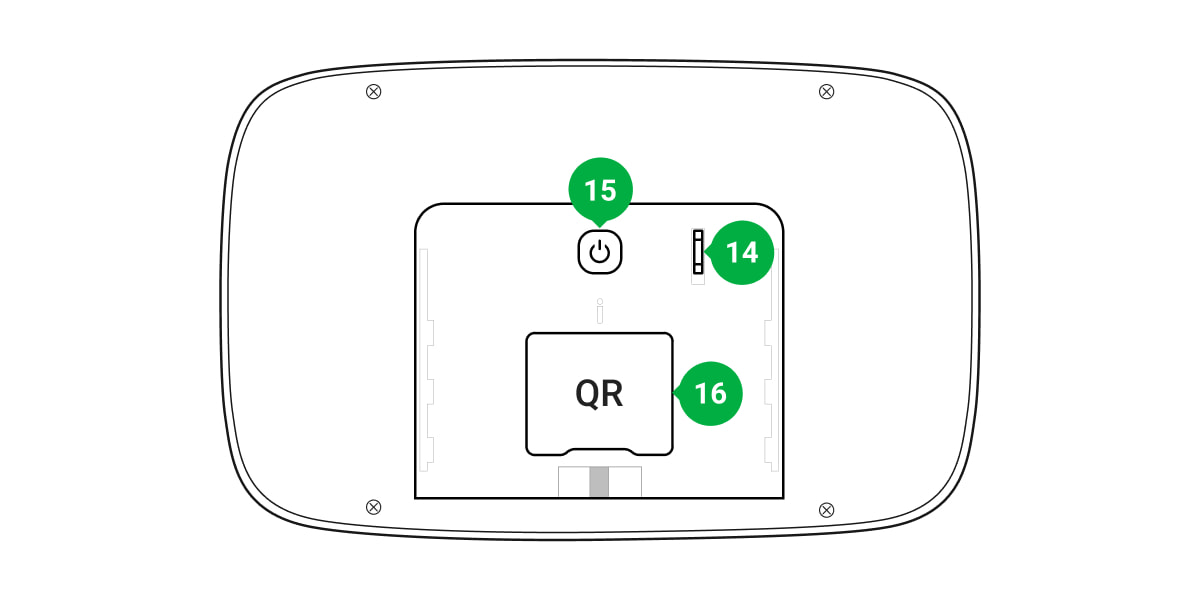
- Sabotagebeveiliging
- Aan/uit-knop
- QR-code
Werkingsprincipe
KeyPad Combi combineert twee apparaten: een sirene en een bediendeel die kaarten en sleutelhangers ondersteunt. Dit betekent dat hetzelfde apparaat kan worden gebruikt om de beveiligingsmodi te beheren en om te informeren over alarmen en gebeurtenissen van het systeem.
Beveiligingsbeheer
KeyPad Combi kan de beveiliging van de volledige locatie of afzonderlijke groepen in- en uitschakelen en kan de Deelinschakeling activeren. U kunt de beveiligingsmodi beheren met:
- Codes. KeyPad Combi ondersteunt algemene en persoonlijke codes en inschakeling zonder dat u een code hoeft in te voeren.
- Kaarten of sleutelhangers. KeyPad Combi gebruikt de DESFire®-technologie om gebruikers snel en veilig te identificeren. DESFire® is gebaseerd op de internationale norm ISO 14443 en combineert 128-bits versleuteling met beveiliging tegen kopiëren.
KeyPad Combi ondersteunt de volgende soorten code:
- Bediendeelcode: algemene code ingesteld voor het bediendeel. Indien gebruikt, worden de gebeurtenissen verzonden naar de Ajax-apps namens het bediendeel.
- Gebruikerscode: persoonlijke code ingesteld voor gebruikers verbonden met de hub. Indien gebruikt, worden alle gebeurtenissen verzonden naar de Ajax-apps namens de gebruiker.
- Bediendeel toegangscode: voor een persoon die niet in het systeem is geregistreerd. Indien gebruikt, worden alle gebeurtenissen verzonden naar de Ajax-apps met de naam die is gekoppeld aan deze code.
- RT-code is een toegangscode voor responsteams (RT) die na een alarm worden geactiveerd en geldig zijn voor een bepaalde periode. Wanneer de code wordt geactiveerd en gebruikt, worden gebeurtenissen verzonden naar de Ajax-apps met een titel die gekoppeld is aan deze code.
Het aantal persoonlijke-, toegang- en RT-codes is afhankelijk van het model van de hub.
Voordat u een code invoert of Tag/Pass gebruikt, dient u KeyPad Combi te activeren (“wekken”) door met uw hand van boven naar beneden over het aanraakgevoelig paneel te schuiven. Zodra u het apparaat activeert, wordt de indicatie voor de beveiligingsstatus ingeschakeld en piept het apparaat. De beveiligingsstatus wordt alleen weergegeven wanneer KeyPad Combi actief is.
Wanneer u op de knoppen drukt, klinkt er een geluidssignaal. Als u het bediendeel 12 seconden lang niet aanraakt, schakelt KeyPad Combi over op de energiebesparende modus en wordt de huidige status niet meer weergegeven.
Houd er rekening mee dat KeyPad Combi geen aanraakknoppen of Pass/Tag-lezer met achtergrondverlichting heeft.
De sirene gebruiken
KeyPad Combi bevat een volledig functionele sirene van het Ajax-beveiligingssysteem. Het apparaat heeft 2 taken:
- Informeren over alarmen. Het apparaat reageert op het activeren van de sabotagebeveiliging en alarmen van beveiligingssysteem in minder dan een seconde door de sirene in te schakelen, waardoor inbrekers worden afgeschrikt en de aandacht van buren wordt getrokken.
- De beveiligingsstatus aangeven. De sirene kan een melding geven bij het veranderen van de beveiligingsmodus en bij in-/uitloopvertragingen.
Functieknop
KeyPad Combi heeft een functieknop die in 3 modi kan werken:
- Uit: de knop is uitgeschakeld en er gebeurt niets als deze wordt ingedrukt.
- Alarm: nadat de functieknop is ingedrukt, stuurt het systeem een alarm naar de meldkamer van het beveiligingsbedrijf en alle gebruikers.
- Gekoppeld brandalarm dempen: nadat op de functieknop is gedrukt, dempt het systeem het alarm van Ajax-brandmelders. Houd er rekening mee dat deze optie alleen werkt als het gekoppeld brandalarm actief is.
Dwangcode
KeyPad Combi ondersteunt dwangcodes. Hiermee kunt u het deactiveren van het alarm simuleren. De Ajax-app en sirenes in het systeem geven in dit geval geen alarm af. Het beveiligingsbedrijf en andere gebruikers van het beveiligingssysteem worden over het incident gewaarschuwd.
Inschakelen in twee fasen
KeyPad Combi kan deelnemen aan het inschakelen in twee fasen, maar kan niet gebruikt worden als een tweede fase apparaat. De tweefasige inschakelprocedure met Tag of Pass is vergelijkbaar met het gebruik van een persoonlijke of algemene code.
Gebeurtenissen verzenden naar de meldkamer
Het Ajax-beveiligingssysteem kan verbinding maken met de meldkamer en gebeurtenissen en alarmen verzenden naar de meldkamer van een beveiligingsbedrijf via SurGard (Contact ID), SIA DC-09 en andere bedrijfseigen protocollen. Een volledige lijst met ondersteunde protocollen is hier beschikbaar. De apparaat-ID en het nummer van de loop (zone) zijn te vinden in de status ervan.
Aansluiting
KeyPad Combi is incompatibel met Hub (2G) Jeweller, beveiligingscentrales van derden en de integratiemodules ocBridge Plus en uartBridge.
Voordat u verbinding maakt
De hub en het apparaat dat op verschillende radiofrequenties werkt, zijn niet compatibel. Het radiofrequentiebereik van het apparaat kan per regio verschillen. We raden aan om Ajax-apparaten in dezelfde regio te kopen en gebruiken. U kunt de reikwijdte van de radiofrequenties verifiëren met de technische ondersteuningsdienst.
- Installeer de Ajax-app en maak een account aan. Voeg een hub toe en maak minstens één ruimte aan.
- Zorg ervoor dat de hub aanstaat en toegang heeft tot internet (via een ethernetkabel, wifi en/of een mobiel netwerk). Dit kunt u doen door de Ajax-app te openen of door te kijken naar het logo op het voorpaneel van de hub. Deze licht wit of groen op als de hub is verbonden met het netwerk.
- Controleer of de hub is uitgeschakeld en niet wordt bijgewerkt door de status te controleren in de Ajax-app.
Alleen een gebruiker of een PRO met volledige beheerdersrechten kan een apparaat aan de hub toevoegen.
Om KeyPad Combi aan te sluiten
- Open de Ajax-app. Als uw account toegang heeft tot meerdere hubs, selecteert u de hub waarmee u KeyPad Combi wilt verbinden.
- Ga naar het menu Apparaten
 en klik op Apparaat toevoegen.
 - Geef het apparaat een naam, scan of voer de QR-code in (deze bevindt zich op de verpakking en onder de SmartBracket-beugel) en selecteer een ruimte.
- Klik op Toevoegen en het aftellen begint.
- Schakel het apparaat in door de aan/uit-knop 3 seconden lang ingedrukt te houden. Eenmaal verbonden verschijnt KeyPad Combi in de lijst met apparaten van de hub in de app. Om verbinding te maken, plaatst u het apparaat in dezelfde locatie als het systeem (binnen het dekkingsgebied van het radionetwerk van de hub). Als de verbinding wordt verbroken, probeer het dan na 10 seconden opnieuw.
THet apparaat werkt slechts met één hub. Wanneer verbonden met een nieuwe hub, stopt het apparaat met het verzenden van opdrachten naar de oude hub. Als KeyPad Combi aan een nieuwe hub wordt toegevoegd, wordt deze niet uit de lijst met apparaten van de oude hub verwijderd. Dit moet handmatig gedaan worden via de Ajax-app.
KeyPad Combi schakelt 6 seconden na inschakelen automatisch uit als het apparaat geen verbinding kan maken met de hub. Daarom hoeft u dus het apparaat niet uit te schakelen om opnieuw verbinding te maken.
Het bijwerken van de statussen van apparaten in de lijst is afhankelijk van de Jeweller-instellingen. De standaardwaarde bedraagt 36 seconden.
Pictogrammen
De pictogrammen geven bepaalde statussen van KeyPad Combi aan. U kunt ze zien in het tabblad Apparaten ![]() in de Ajax-app.
in de Ajax-app.
| Pictogram | Waarde |
| Jeweller-signaalsterkte: Toont de signaalsterkte tussen de hub of signaalversterker en KeyPad Combi | |
|
Laadniveau van de batterij van KeyPad Combi |
|
| KeyPad Combi werkt via een signaalversterker | |
|
Het apparaat bevindt zich in de modus voor de dempingstest. |
|
|
KeyPad Combi statusmeldingen zijn tijdelijk uitgeschakeld |
|
|
KeyPad Combi is tijdelijk uitgesloten van de werking van het systeem |
|
| Pass/Tag-lezen is ingeschakeld in de instellingen van KeyPad Combi | |
| Pass/Tag-lezen is uitgeschakeld in de instellingen van KeyPad Combi | |
| Het apparaat heeft de verbinding met de hub verloren of de hub heeft de verbinding met de Ajax Cloud server verloren. | |
|
Het apparaat is niet overgezet naar de nieuwe hub. |
Statussen
Het statusscherm bevat informatie over het apparaat en de bedrijfswaarden. De statussen van KeyPad Combi zijn te vinden in de Ajax-app:
- Ga naar het tabblad Apparaten .
- Selecteer KeyPad Combi uit de lijst.
| Waarde | Waarde |
| Gegevensimport | Geeft de fout weer bij het overzetten van gegevens naar de nieuwe hub:
|
| Storing |
Door op Het veld wordt alleen weergegeven als er een storing is gedetecteerd |
| Temperatuur |
Temperatuur van het apparaat. Dit wordt gemeten op de processor en verandert geleidelijk. Toegestane afwijking in de waarde tussen de app en de kamertemperatuur: 2 °C. De waarde wordt bijgewerkt zodra de apparaat een temperatuurwijziging van minstens 2 °C signaleert. U kunt een scenario op basis van temperatuur configureren om automatiseringsapparaten te besturen. |
| Jeweller-signaalsterkte |
Jeweller-signaalsterkte tussen de hub (of de signaalversterker) en KeyPad Combi. Aanbevolen waarden: 2 – 3 streepjes. |
| Verbinding via Jeweller | Status van de verbinding tussen de hub/signaalversterker en het apparaat:
|
| Zendvermogen |
Geeft het geselecteerde vermogen van de zender weer. De waarde verschijnt wanneer de Max of Demping is geselecteerd in het menu Dempingtest . |
| Batterijlading | De batterijlading van het apparaat. Er zijn twee statussen beschikbaar:
Als de batterijen leeg zijn, ontvangen de Ajax-apps en het beveiligingsbedrijf de juiste waarschuwing. Na de melding van een laag batterijniveau, kan KeyPad Combi nog tot 2 maanden werken. Zo wordt het batterijniveau in de Ajax-apps weergegeven |
| Deksel | De status van de sabotagebeveiliging van het apparaat, die reageert op het losraken of beschadigen van de behuizing:
Wat is een sabotagebeveiliging |
| ReX naam van de signaalversterker |
Toont de status van het gebruik van een signaalversterker. Het veld wordt niet weergegeven als KeyPad Combi rechtstreeks met de hub werkt |
| Alarmduur, sec | Duur van het alarmgeluid: 3 tot 180 seconden. |
| Alarmvolume | Geluidsniveau bij een alarm:
|
| Pass/Tag lezen | Geeft aan of de lezer voor kaarten en sleutelhangers is ingeschakeld |
|
Pieptooninstellingen |
|
| In-/uitschakelen | Indien ingeschakeld, geeft het bediendeel een melding bij het in- en uitschakelen door een korte pieptoon te laten horen. |
| Activering/deactivering van de Deelinschakeling | Indien deze optie is ingeschakeld, meldt het bediendeel wanneer de Deelinschakeling wordt in- of uitgeschakeld door een korte pieptoon af te geven. |
| Inloopvertragingen | Indien ingeschakeld, laat het bediendeel een pieptoon horen bij vertragingen bij binnenkomst. |
| Uitloopvertragingen | Indien ingeschakeld, laat het bediendeel een pieptoon horen bij vertragingen bij vertrek. |
| Inloopvertragingen in deelinschakeling | Indien ingeschakeld, laat het bediendeel een pieptoon horen bij vertragingen bij binnenkomst in de Deelinschakeling. |
| Uitloopvertragingen in deelinschakeling | Indien ingeschakeld, laat het bediendeel een pieptoon horen bij vertragingen bij vertrek in de Deelinschakeling. |
| Bel bij openen |
Indien ingeschakeld, geeft een sirene een melding wanneer een openingsdetector geactiveerd als het systeem is uitgeschakeld. |
| Volume van de pieptoon | Wordt weergegeven als de meldingen over in-/uitschakelen, in-/uitloopvertragingen, en openingen zijn geactiveerd. Toont het volume van de zoemer voor meldingen. |
| Permanente deactivering | Geeft de status van de permanente deactiveringsfunctie van het apparaat weer:
|
| Eenmalige deactivering | Geeft de status van de eenmalige deactiveringsfunctie van het bediendeel weer:
|
| Firmware | Firmwareversie van KeyPad Combi |
| Apparaat-ID | Identificatiemiddel van het apparaat |
| Apparaatnr. | Het nummer van de apparaatloop (zone) |
Instellingen
KeyPad Combi wordt geconfigureerd in de Ajax-app:
- Ga naar het tabblad Apparaten .
- Selecteer KeyPad Combi uit de lijst.
- Ga naar de instellingen door op het tandwielpictogram
 te klikken.
Om de instellingen na het wijzigen toe te passen, klikt u op Terug.
| Waarde | Waarde |
| Naam |
Naam van het apparaat. Wordt getoond in de lijst van alle hub-apparaten, sms-berichten en notificaties in het logboek. Als u de naam van het apparaat wilt aanpassen, klikt u op het potloodpictogram De naam kan uit maximaal 12 cyrillische tekens of 24 Latijnse tekens bestaan. |
| Ruimte | Selecteer de virtuele ruimte waaraan KeyPad Combi is toegewezen. De naam van de ruimte wordt weergegeven in de tekst van het sms-bericht en in de meldingen in het logboek. |
| Groepsbeheer |
Kies de beveiligingsgroep die door het apparaat wordt beheerd. U kunt alle groepen of een enkele groep selecteren. Het veld is zichtbaar wanneer de Groepsmodus is ingeschakeld |
| Toegangsinstellingen | Kies een methode voor het in- en uitschakelen:
Om de bediendeel toegangscodes te activeren voor personen die niet in het systeem zijn geregistreerd, selecteert u de opties op het bediendeel: Alleen bediendeelcodes of bediendeel- en gebruikerscodes. |
| Bediendeelcode | Selecteer de algemene code voor beveiligingsbeheer. Bevat 4 tot 6 cijfers. |
| Dwangcode |
Stel een algemene dwangcode in voor een stil alarm. Bevat 4 tot 6 cijfers. |
| Functieknop | Selecteer de functie van de * knop (Functieknop):
|
| Bescherming tegen per ongeluk indrukken |
Beschikbaar met OS Malevich 2.31 of nieuwer.
|
| Inschakelen zonder code | Met deze optie kunt u het systeem inschakelen zonder een code in te voeren. Om dit te doen, klikt u gewoon op de knop Inschakelen of Deelinschakeling. |
| Ongeautoriseerde toegang automatische vergrendeling |
Indien actief, wordt het bediendeel voor de vooringestelde tijd vergrendeld als er een onjuiste code wordt ingevoerd of als er binnen 1 minuut meer dan 3 keer achter elkaar niet-geverifieerde Pass of Tag wordt gebruikt. Het is niet mogelijk om het systeem via het bediendeel uit te schakelen gedurende deze periode. U kunt KeyPad Combi ontgrendelen via de Ajax-app. |
| Automatische vergrendelingstijd, min | Selecteer de duur van de vergrendeling van het bediendeel na ongeautoriseerde toegangspogingen:
|
| Volume van knoppen | Selecteer het volume van de knoppen van KeyPad Combi wanneer deze worden ingedrukt. |
| Alarmen in groepsmodus | Selecteer de groep waaraan de sirene is toegewezen. U kunt één of alle groepen selecteren:
Ongeacht de geselecteerde groep zal de sirene reageren op het activeren van de Deelinschakeling en alarmen. Het veld is zichtbaar wanneer de Groepsmodus is ingeschakeld. |
| Alarmvolume | Selecteer het volumeniveau van de sirene van KeyPadCombi bij een alarm:
Het geluidsniveau is gemeten op een afstand van 1 meter van de sirene. |
| Alarmduur | Selecteer de alarmduur: 3 tot 180 seconden per activering. In stappen van 3 seconden. |
| Pieptoon bij in-/uitschakelen | Indien ingeschakeld, geeft de sirene een korte pieptoon af bij het in-/uitschakelen. |
| Pieptooninstellingen | Opent de meldingsinstellingen van de sirene van KeyPad Combi. Een gedetailleerde beschrijving van de instellingen is hieronder beschikbaar. |
| Pass/Tag lezen | Indien actief, kunt u beveiligingsmodi beheren met Pass/Tag-apparaten. |
| Autorisatiebevestiging met een toegangscode |
Indien ingeschakeld, moet de actie met een gebruikers- of bediendeelcode worden bevestigd om toegangsapparaten te gebruiken voor systeemautorisatie. Beschikbaar als de optie Pass/Tag-lezen is ingeschakeld. Deze instelling wordt ondersteund wanneer KeyPad Combi Jeweller is aangesloten op hubs met firmwareversie OS Malevich 2.20 of nieuwer. |
| Bevestigingstijd |
Selecteer de maximale tijd voor het bevestigen van de autorisatie met een wachtwoord na bevestiging van het toegangsapparaat. Beschikbaar als Autorisatiebevestiging met een toegangscode is ingeschakeld. Deze instelling wordt ondersteund wanneer KeyPad Combi Jeweller is verbonden met hubs met firmwareversie OS Malevich 2.21 of nieuwer. |
| Eenvoudig wijzigen van ingeschakelde modus |
Indien actief, is voor het wijzigen van de beveiligingsmodus met Tag of Pass geen bevestiging nodig door op de knop Inschakelen, Uitschakelen, of Deelinschakeling te drukken. De beveiligingsmodus verandert automatisch in het tegenovergestelde. Deze optie is beschikbaar als Pass/Tag-lezen is ingeschakeld in de instellingen van het bediendeel. Als de Groepsmodus is ingeschakeld in het systeem, wordt deze optie beschikbaar wanneer een enkele groep is geselecteerd in het veld Groepsbeheer in de instellingen van het bediendeel. |
| Jeweller-signaalsterktetest |
Schakelt KeyPad Combi naar de testmodus voor de signaalsterkte van Jeweller. |
| Volumetest |
Schakelt het apparaat naar de testmodus voor het volume |
| Signaaldempingtest |
Schakelt het apparaat over naar de modus voor de dempingstest. |
| Alarm met sirene als de paniekknop wordt ingedrukt |
Het veld wordt weergegeven als de optie Alarmis geselecteerd voor de functieknop Indien de optie is ingeschakeld, geven de sirenes die zijn verbonden met het beveiligingssysteem een alarm af wanneer de * knop (functieknop) wordt ingedrukt. |
| Pass/Tag resetten |
Maakt het mogelijk om alle hubs die verbonden zijn aan de Tag of Pass uit het geheugen te wissen |
| Gebruikershandleiding | Opent de gebruikershandleiding van KeyPad Combi in de Ajax-app |
| Permanente deactivering | Hiermee kan de gebruiker het apparaat uitschakelen zonder het uit het systeem te verwijderen. Er zijn drie opties beschikbaar:
Meer informatie over het tijdelijk uitschakelen van apparaten |
| Eenmalige deactivering |
Hiermee kan de gebruiker gebeurtenissen van het apparaat uitschakelen tot de eerste keer dat het apparaat wordt uitgeschakeld. Er zijn drie opties beschikbaar:
|
| Apparaat verwijderen | Koppelt KeyPad Combi los van de hub en wist de instellingen |
Instellingen voor meldingen van de sirene van KeyPad Combi
| In-/uitschakelen | Indien deze optie is ingeschakeld, waarschuwt de ingebouwde sirene bij het in- en uitschakelen door het led-frame te laten oplichten en met een korte pieptoon. |
| Activering/deactivering van de Deelinschakeling |
Indien ingeschakeld, meldt de ingebouwde sirene u door het led-frame te verlichten en een korte pieptoon af te geven bij het in- en uitschakelen van het systeem vanuit de Deelinschakeling. |
|
Pieptoon bij vertragingen |
|
| Inloopvertragingen |
Indien deze optie is ingeschakeld, geeft de ingebouwde sirene een pieptoon af om vertraging bij binnenkomst aan te geven. |
| Uitloopvertragingen |
Indien deze optie is ingeschakeld, geeft de ingebouwde sirene een pieptoon af om een uitloopvertraging aan te geven. |
| Inloopvertragingen in deelinschakeling |
Indien deze optie is ingeschakeld, geeft de ingebouwde sirene een pieptoon af om een inloopvertraging in de Deelinschakeling aan te geven. |
| Uitloopvertragingen in deelinschakeling |
Indien deze optie is ingeschakeld, geeft de ingebouwde sirene een pieptoon om een uitloopvertraging in de deelinschakeling aan te geven. |
|
Pieptoon bij uitschakeling |
|
| Bel bij openen |
Indien ingeschakeld, geeft de ingebouwde sirene 1 tot 4 keer een pieptoon af om aan te geven dat de openingsdetectoren geactiveerd zijn als het systeem is uitgeschakeld. |
| Volume van de pieptoon | Selecteer het volumeniveau van de ingebouwde sirene bij in-/uitschakelen, vertraging bij binnenkomst/vertrek en opening:
Het geluidsniveau werd op 1 m afstand van de sirene gemeten |
De in- en uitloopvertragingen worden ingesteld in de instellingen van de betreffende detector, niet in de instellingen van het bediendeel.
Houd er rekening mee dat KeyPad Combi geen indicatie na alarmen ondersteunt. Deze functie wordt ondersteund door HomeSiren, StreetSiren en StreetSiren DoubleDeck.
Het verwerken van alarmen van detectoren instellen
Met de Ajax-app kunt u opgeven op welke detectoren de sirene moet reageren als er een alarm wordt geactiveerd. Dit is noodzakelijk om situaties te voorkomen waarbij het beveiligingssysteem een alarm meldt door een detector waarop de sirene niet hoort te reageren, bijvoorbeeld van een LeaksProtect-detector.
De waarde kan worden aangepast in de instellingen van een detector of apparaat waarop de sirene zou moeten reageren.
Om de reactie van de sirene op alarmen van een specifieke detector of apparaat uit te schakelen, in de Ajax app:
- Ga naar het menu Apparaten .
- Selecteer de detector of het apparaat.
- Ga naar de Instellingen en stel de benodigde waarden in voor het activeren van de sirene.
De reactietijd van het sabotagealarm instellen
De sirene van KeyPad Combi kan reageren op sabotagealarmen. Deze optie is standaard uitgeschakeld. Let op dat de sabotagebeveiliging reageert op het openen en sluiten van het deksel, zelfs als het systeem niet is ingeschakeld!
Om ervoor te zorgen dat de sirene van KeyPad Combi reageert op sabotage, in de Ajax-app:
- Ga naar het menu Apparaten .
- Selecteer een hub (bovenaan de lijst).
- Ga naar de Instellingen .
- Selecteer het item Service.
- Ga naar de instellingen van de sirene.
- Schakel de optie Alarm met sirene als de hub of het deksel van de detector open is in.
De reactie instellen op het indrukken van de paniekknop in de Ajax-app
De sirene van KeyPad Combi kan reageren op het indrukken van de paniekknop in de Ajax-apps. Houd er rekening mee dat u de paniekknop zelfs kunt indrukken als het systeem is uitgeschakeld!
Om de sirene te laten reageren op het indrukken van de paniekknop, in de Ajax-app:
- Ga naar het menu Apparaten .
- Selecteer een hub (bovenaan de lijst)
- Ga naar de Instellingen .
- Selecteer het item Service.
- Ga naar de instellingen van de sirene.
- Schakel de optie Alarm met sirene als de paniekknop wordt ingedrukt (app) in.
Bel instellen
Bel is een geluidssignaal dat de activatie van de openingsdetectoren aangeeft wanneer het systeem is uitgeschakeld. De functie wordt bijvoorbeeld gebruikt in winkels om het personeel te laten weten dat er iemand het gebouw binnenkomt.
Notificaties worden in twee fasen geconfigureerd: het instellen van de sirenes en daarna van de openingsdetectoren.
Instellingen voor de sirene van KeyPad Combi
- Ga naar het menu Apparaten .
- Selecteer de KeyPad Combi.
- Ga naar de instellingen door op het tandwielpictogram in de rechterbovenhoek te klikken.
- Ga naar het menu Pieptooninstellingen.
- Scrol naar beneden en schakel de optie Bel bij opening in de categorie Pieptoon bij uitschakelen in.
- Stel het volume van de meldingen in. Er zijn drie opties beschikbaar:
- Gedempt (81 dB op een afstand van 1 m).
- Luid (93 dB op een afstand van 1 m).
- Zeer luid (105 dB op een afstand van 1 m).

Het opgegeven volume van de pieptoon is ook van toepassing op het volume van de meldingen van de sirene het bij in-/uitschakelen en voor de in-/uitloopvertragingen.
- Klik op Terug om de instellingen op te slaan.
Instellingen van de detectoren
- Ga naar het menu Apparaten .
- Selecteer de detector.
- Ga naar de instellingen door op het tandwielpictogram in de rechterbovenhoek te klikken.
- Ga naar het menu Belinstellingen.
- Selecteer de gewenste gebeurtenissen die door de sirene gemeld moeten worden:
- Als opening gedetecteerd wordt.
- Als een extern contact open is (beschikbaar als de optie Extern contact is ingeschakeld).
- Selecteer het meldingsgeluid: 1 tot 4 korte pieptonen. De Ajax-app laat het geluid horen zodra het geselecteerd is.
- Klik op Terug om de instellingen op te slaan.
- Herhaal stappen 2 tot en met 7 voor andere detectoren waarvoor u meldingen wilt inschakelen.
Codes configureren
Met het Ajax-beveiligingssysteem kunt u een bediendeel- en persoonlijke codes voor gebruikers die aan de hub worden toegevoegd instellen.
Met de OS Malevich 2.13.1-update is er ook de optie om toegangscodes te maken voor niet-geregistreerde personen die niet aan de hub zijn toegevoegd. Dit is bijvoorbeeld handig om een schoonmaakbedrijf toegang te geven tot het beveiligingsbeheer. Lees hieronder hoe u elk type code instelt en gebruikt.
Om de bediendeelcode in te stellen
- Ga naar de instellingen van het bediendeel.
- Selecteer bediendeelcode.
- Stel de gewenste bediendeelcode in.
Om de dwangcode voor het bediendeel in te stellen
- Ga naar de instellingen van het bediendeel.
- Selecteer Dwangcode.
- Stel de dwangcode voor het bediendeel in.
Om een persoonlijke code in te stellen in de Ajax-app:
- Ga naar de instellingen van het gebruikersprofiel (hub — Instellingen → Gebruikers → Uw profielinstellingen.
- Selecteer Toegangscode instellingen (Gebruikers-ID is ook zichtbaar in dit menu).
- Stel een Gebruikerscode en Dwangcode in.
De persoonlijke code moet voor elke gebruiker afzonderlijk worden ingesteld. De beheerder van de hub kan niet de codes voor alle gebruikers instellen.
Om een toegangscode in te stellen voor een persoon die niet in het systeem is geregistreerd
- Ga naar de instellingen van de hub (Hub → Instellingen ).
- Selecteer bediendeel toegangscodes.
- Stel een Gebruikersnaam en Toegangscode in.
Als u een dwangcode wilt instellen, de instellingen voor toegang tot groepen, de Deelinschakeling of een code-ID wilt wijzigen, of deze code tijdelijk wilt uitschakelen of verwijderen, selecteer deze dan in de lijst en breng de wijzigingen aan.
Een PRO of een gebruiker met beheerdersrechten kan een toegangscode instellen of de instellingen ervan wijzigen. Deze functie wordt ondersteund door hubs met OS Malevich 2.13.1 en nieuwer. Toegangscodes worden niet ondersteund door het Hub (2G) Jeweller-bedieningspaneel.
Om een RT-code in te stellen
Alleen een PRO met de rechten om het systeem te configureren, kan RT-codes in de Ajax PRO-apps aanmaken en configureren. Meer informatie over het configureren van deze functie vindt u in dit artikel.
RT-codes worden ondersteund door hubs (behalve Hub (2G) Jeweller) met OS Malevich 2.17 en nieuwer.
Kaarten en sleutelhangers toevoegen
KeyPad Combi kan werken met Tag-sleutelhangers, Pass-kaarten en apparaten van derden die DESFire®-technologie ondersteunen.
Het maximale aantal Pass- en Tag-apparaten dat kan worden toegevoegd is afhankelijk van het model van de hub. De aangesloten Passes en Tags hebben geen invloed op de totale limiet van apparaten op de hub.
Voordat u apparaten van derden toevoegt die DESFire® ondersteunen, moet u ervoor zorgen dat er voldoende geheugen beschikbaar is voor het nieuwe bediendeel. Het apparaat van derden moet bij voorkeur vooraf geformatteerd zijn.
| Hub-model | Aantal Tag- of Pass-apparaten |
| Hub (4G) Jeweller | 50 |
| Hub Plus Jeweller | 99 |
| Hub 2 Jeweller | 50 |
| Hub 2 Plus Jeweller | 200 |
| Superior Hub Hybrid | 50 |
De procedure voor het koppelen van een Tag, Pass of kaarten en sleutelhangers van derden is hetzelfde. Zie de instructies hiervoor hier.
Beveiliging beheren met codes
U kunt de Deelinschakeling, de beveiliging van het gehele object of individuele groepen beheren met algemene of persoonlijke codes en toegangscodes (geconfigureerd door PRO of een gebruiker met beheerdersrechten). KeyPad Combi ondersteunt codes van 4 tot 6 cijfers. Onjuist ingevoerde nummers kunnen worden gewist met de C-knop.
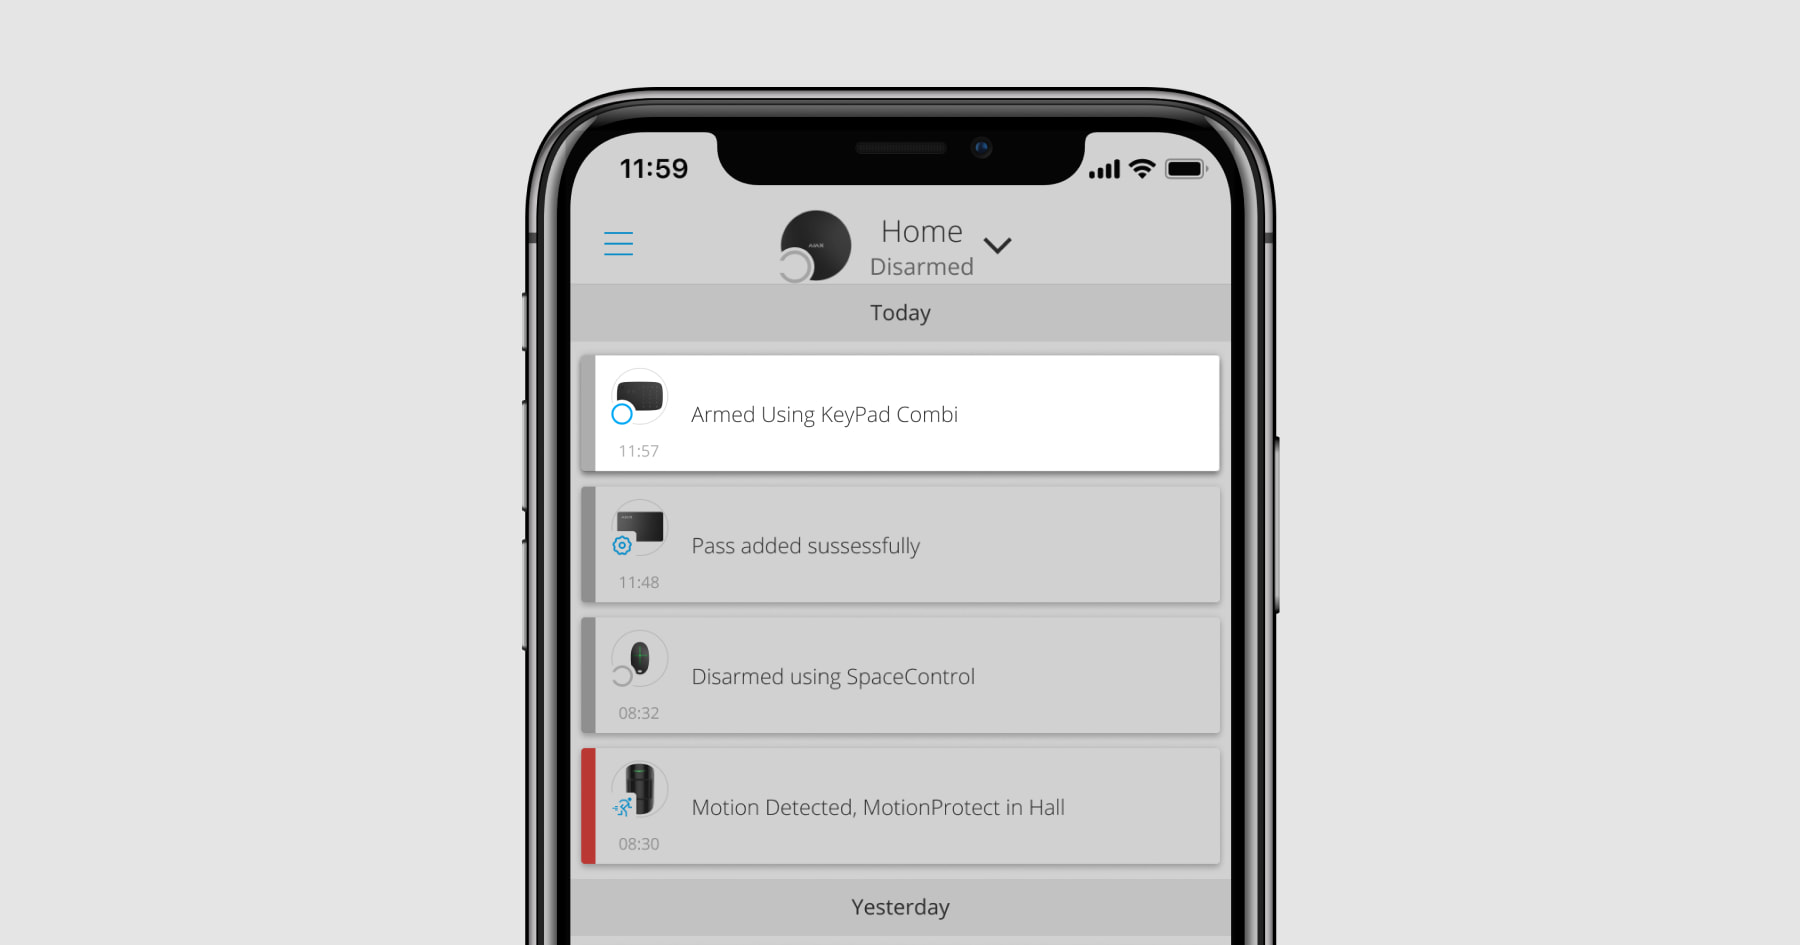
Als er een persoonlijke code of toegangscode wordt gebruikt, wordt de naam van de gebruiker die het systeem heeft in- of uitgeschakeld weergegeven in het logboek van de hub en in de meldingenlijst. Als er een algemene code wordt gebruikt, wordt de naam van de gebruiker die de beveiligingsmodus heeft gewijzigd niet weergegeven.
Hubs met OS Malevich 2.13.1 en nieuwer ondersteunen bediendeel toegangscodes. Hub (2G) Jeweller ondersteunt deze functie niet.
|
Inschakelen met een persoonlijke code De gebruikersnaam wordt weergegeven in de meldingen en het logboek. |
 |
|
Inschakelen met een algemene code De Naam van het apparaat wordt weergegeven in de meldingen en het logboek. |
 |
KeyPad Combi wordt vergrendeld voor de in de instellingen opgegeven tijd wanneer er binnen 1 minuut drie keer achter elkaar een onjuiste code wordt ingevoerd. Meldingen over verkeerde codes worden naar gebruikers en het beveiligingsbedrijf gestuurd. Een gebruiker of PRO met beheerdersrechten kan KeyPad Combi ontgrendelen in de Ajax-app.
Beveiliging van het object regelen via algemene codes
- Activeer het bediendeel door er met uw hand over te vegen. Houd de Tag of Pass voor de pass/tag-lezer van het bediendeel als de functie Autorisatiebevestiging met een toegangscode is geactiveerd.
- Voer de algemene code in.
- Druk op de knop Inschakelen /Uitschakelen /Deelinschakeling .
Bijvoorbeeld: 1234 → ![]()
Groepsbeheer met een algemene code
- Activeer het bediendeel door er met uw hand over te vegen. Houd de Tag of Pass voor de pass/tag-lezer van het bediendeel als de functie Autorisatiebevestiging met een toegangscode is geactiveerd.
- Voer de algemene code in.
- Druk op * (functieknop).
- Voer de Groeps-ID in.
- Druk op de knop Inschakelen /Uitschakelen /Deelinschakeling .
Bijvoorbeeld: 1234 → * → 2 → ![]()
Als er een groep is toegewezen aan KeyPad Combi (in het veld Groepsbeheer in de instellingen van het apparaat), hoeft u de groep-ID niet in te voeren. Om de modus van de groep te beheren, voert u een algemene of persoonlijke code in en drukt u op de knop Inschakelen ![]() /Uitschakelen
/Uitschakelen ![]() /Deelinschakeling
/Deelinschakeling ![]() button will do.
button will do.
Bijvoorbeeld: 1234 → ![]()
Als er een groep is toegewezen aan KeyPad Combi, kunt u Deelinschakeling niet beheren met een algemene code. In dit geval kan de Deelinschakeling alleen worden beheerd met een persoonlijke code als de gebruiker over de juiste rechten beschikt.
Beveiliging beheren bij het object via een persoonlijke code
- Activeer het bediendeel door er met uw hand over te vegen. Houd de Tag of Pass voor de pass/tag-lezer van het bediendeel als de functie Autorisatiebevestiging met een toegangscode is geactiveerd.
- Voer de gebruikers-ID in.
- Druk op * (functieknop).
- Voer uw persoonlijke code in.
- Druk op de knop Inschakelen /Uitschakelen /Deelinschakeling .
Bijvoorbeeld: 2 → * → 1234 → ![]()
Groepsbeheer met een persoonlijke code
- Activeer het bediendeel door er met uw hand over te vegen. Houd de Tag of Pass voor de pass/tag-lezer van het bediendeel als de functie Autorisatiebevestiging met een toegangscode is geactiveerd.
- Voer de gebruikers-ID in.
- Druk op * (functieknop).
- Voer uw persoonlijke code in.
- Druk op * (functieknop).
- Voer de Groeps-ID in.
- Druk op de knop Inschakelen /Uitschakelen /Deelinschakeling .
Bijvoorbeeld: 2 → * → 1234 → * → 5 → ![]()
Als er een groep is toegewezen aan KeyPad Combi (in het veld Groepsbeheer in de instellingen van het apparaat), hoeft u de groeps-ID niet in te voeren. Om de modus van de groep te beheren, voert u een persoonlijke code in en drukt u op de knop Inschakelen ![]() /Uitschakelen
/Uitschakelen ![]() /Deelinschakeling
/Deelinschakeling ![]() .
.
Bijvoorbeeld: 1234 → ![]()
Beveiligingsbeheer van het gehele object met een toegangscode
Voer de Toegangscode in en druk op de knop inschakelen ![]() / uitschakelen
/ uitschakelen ![]() / Deelinschakeling activeren
/ Deelinschakeling activeren ![]() .
.
Bijvoorbeeld: 1234 → ![]()
Beveiligingsbeheer van de groep met een toegangscode
Voer de toegangscode in, druk op *icon*, voer de groeps-ID in en druk op de knop inschakelen ![]() / uitschakelen
/ uitschakelen ![]() / Deelinschakeling activeren.
/ Deelinschakeling activeren.
Bijvoorbeeld: 1234 → * → 2 → ![]()
Een dwangcode gebruiken
Met een dwangcode kunt u het uitschakelen van het alarm simuleren. De Ajax-app en sirenes zullen de gebruiker in dit geval niet verraden, maar het beveiligingsbedrijf en andere gebruikers ontvangen wel een melding over het incident. Zowel persoonlijke als algemene dwangcodes worden ondersteund. In Bediendeel toegangscodes kunt u ook een dwangcode instellen voor personen die niet in het systeem zijn geregistreerd.
Scenario’s en sirenes reageren op het uitschakelen onder dwang op dezelfde manier als op normaal uitschakelen.
Om een algemene dwangcode voor een bediendeel te gebruiken
- Activeer het bediendeel door er met uw hand over te vegen. Houd de Tag of Pass voor de pass/tag-lezer van het bediendeel als de functie Autorisatiebevestiging met een toegangscode is geactiveerd.
- Voer de algemene dwangcode in.
- Druk op de uitschakelknop .
Bijvoorbeeld: 4321 → ![]()
Om een persoonlijke dwangcode van een geregistreerde gebruiker te gebruiken
- Activeer het bediendeel door er met uw hand over te vegen. Houd de Tag of Pass voor de pass/tag-lezer van het bediendeel als de functie Autorisatiebevestiging met een toegangscode is geactiveerd.
- Voer de gebruikers-ID in.
- Druk op * (functieknop).
- Voer de persoonlijke dwangcode in.
- Druk op de uitschakelknop .
Bijvoorbeeld: 2 → * → 4422 → ![]()
Om een dwangcode te gebruiken van een persoon die niet in het systeem is geregistreerd:
Voer de dwangcode in die is ingesteld in de bediendeel toegangscodes en druk op de knop uitschakelen ![]() .
.
Bijvoorbeeld: 4567 → ![]()
Een RT-code gebruiken
De RT-code wordt geactiveerd nadat het alarm is geactiveerd tijdens de tijd die is geconfigureerd in de instellingen van de hub en is geldig voor een bepaalde periode. Dit zorgt ervoor dat een dergelijke code alleen wordt gebruikt bij gevaar, in tegenstelling tot bediendeel- of gebruikerscodes.
Beveiligingsbeheer van het object met een RT-code:
Voer de RT-code in en druk op de knop inschakelen ![]() / uitschakelen
/ uitschakelen ![]() / Deelinschakeling activeren
/ Deelinschakeling activeren ![]() .
.
Bijvoorbeeld: 1234 → ![]()
Beveiligingsbeheer van een groep met een RT-code:
Voer RT-code in, druk op *, voerde Groeps-ID in en druk op de knop inschakelen ![]() / uitschakelen
/ uitschakelen ![]() / Deelinschakeling activering
/ Deelinschakeling activering ![]() .
.
Bijvoorbeeld: 1234 → * → 2 → ![]()
Beveiligingsbeheer met Tag of Pass
- Activeer het bediendeel door er met uw hand over te vegen. KeyPad Combi piept (indien ingeschakeld in de instellingen) en geeft de huidige status aan.
- Houd een Tag of Pass voor de lezer van KeyPad Combi. Het is gemarkeerd met golfjes.
- Voer de vereiste code in als de functie Autorisatiebevestiging met een toegangscode is geactiveerd.
- Druk op de knop Inschakelen, Uitschakelen of Deelinschakeling op KeyPad Combi.
Houd er rekening mee dat als de Eenvoudig wijzigen van ingeschakelde modus is ingeschakeld in de instellingen van KeyPad Combi, u niet op de knop Inschakelen, Uitschakelen of Deelinschakeling hoeft te drukken. De beveiligingsmodus van het systeem of de groep (als het apparaat gebonden is aan een groep) verandert naar de tegenovergestelde modus nadat u op Tag of Pass tikt.
Als de groepsmodus is ingeschakeld, maar KeyPad Combi niet aan een specifieke groep is gekoppeld, geef na het drukken op Tag of Pass de Group ID op en bevestig het in- of uitschakelen door op de desbetreffende knop op KeyPad Combi te drukken.
De functie Gekoppeld brandalarm dempen
KeyPad Combi kan een brandalarm dempen door op de functieknop te drukken (indien de vereiste instelling is ingeschakeld). De reactie van het systeem op het indrukken van de knop is afhankelijk van de instellingen en de status van het systeem:
- Gekoppeld FireProtect-alarmen hebben zich al verspreid: bij de eerste druk op de functieknop worden alle sirenes van de brandmelder gedempt, behalve diegene die het alarm hebben geregistreerd. Door nog een keer op de knop te drukken, worden de overgebleven melders gedempt.
- Vertragingstijd voor gekoppelde alarmen duurt: door op de functieknop te drukken, wordt de sirene van de geactiveerde Ajax-brandmelders gedempt.
Houd er rekening mee dat deze optie alleen actief is als gekoppelde FireProtect-alarmen zijn ingeschakeld in de instellingen van de hub.
Met de OS Malevich 2.12-update kunnen gebruikers brandalarmen in hun groepen dempen zonder detectoren in de groepen waarvoor ze geen toegang hebben te beïnvloeden.
Indicatie
KeyPad Combi geeft alarmen, vertragingen bij binnenkomst/vertrek, de huidige beveiligingsmodus, indrukken van de knop, storingen en zijn eigen status aan met leds en pieptonen.
De huidige beveiligingsmodus wordt weergegeven met de bijbehorende leds na activering van KeyPad Combi. De informatie over de huidige beveiligingsmodus is relevant, zelfs als de modus wordt gewijzigd door een ander apparaat: een sleutelhanger, een ander bediendeel of een app.
U activeert KeyPad Combi door uw hand van boven naar beneden over het aanraakgevoelig paneel te bewegen. Wanneer geactiveerd, gaat de achtergrondverlichting van het bediendeel aan, en klinkt er een pieptoon (indien ingeschakeld).
| Gebeurtenis | Indicatie |
| Alarm | De sirene van KeyPad Combi piept. De duur en het volume van het alarm zijn afhankelijk van de instellingen. |
| Vertraging bij binnenkomst/vertrek | De sirene van KeyPad Combi piept ongeveer één keer per seconde. Het volume hangt af van de instellingen. |
| Activering | Alle leds lichten kort op en het apparaat geeft een korte pieptoon |
| Deactivering | Led X (Storing) licht een paar seconden op en begint dan te knipperen. Daarna schakelt KeyPad Combi uit en gaat de indicatie uit. |
| Er is geen verbinding met de hub of de signaalversterker | Led X (Storing) knippert, en de sirene geeft een lange pieptoon |
| Het deksel van KeyPad Combi is open (het SmartBracket-montagepaneel is verwijderd) | Led X knippert één keer kort terwijl het apparaat wordt verwijderd |
| Aanraakknop ingedrukt | Korte pieptoon, de led voor de statusindicatie knippert eenmaal |
| Het systeem is ingeschakeld | Korte pieptoon en de led voor Ingeschakeld of Deelinschakeling licht op |
| Het systeem is uitgeschakeld | Twee korte pieptonen en de led Uitgeschakeld brandt |
| Er is een onjuiste code ingevoerd of er is geprobeerd de beveiligingsmodus te wijzigen met een niet-geverifieerde of gedeactiveerde kaart/sleutelhanger. | Lange pieptoon en de led voor de beveiligingsstatus knippert 3 keer |
| De beveiligingsmodus kan niet worden geactiveerd (bijvoorbeeld wanneer een raam open staat en de Integriteitscontrole van het systeem is ingeschakeld) | Lange pieptoon en de led voor de beveiligingsstatus knippert 3 keer |
| Het bediendeel is geblokkeerd omdat een verkeerde code is ingevoerd of een ongeautoriseerde kaart of sleutelhanger is gebruikt. | Lange pieptoon, waarbij alle leds van het bediendeel 3 keer knipperen. |
| De batterijen zijn bijna leeg. |
Na het wijzigen van de beveiligingsmodus, licht led X (Storing) op. De aanraakknoppen zijn gedurende deze tijd vergrendeld. Als u KeyPad Combi probeert in te schakelen terwijl de batterijen leeg zijn, klinkt er een lange pieptoon, gaat de licht X led geleidelijk op en weer uit, waarna het bediendeel wordt uitgeschakeld. |
| Het systeem vereist bevestiging van de autorisatie met een wachtwoord na bevestiging van het toegangsapparaat. Beschikbaar als de functie Autorisatiebevestiging met een toegangscode is geactiveerd | De led voor de beveiligingsstatus knippert voor de ingestelde tijd ter bevestiging |
Geluidsmeldingen bij storingen
Als een apparaat offline is of de batterij bijna leeg is, kan KeyPad Combi de gebruikers van het systeem hiervan op de hoogte stellen met een hoorbaar geluid. De leds van het bedieningspaneel [X] knipperen. Storingsmeldingen worden weergegeven in het logboek, sms-berichten of pushmeldingen.
Om geluidsmeldingen bij storingen in een Ajax PRO-apps in te schakelen:
- Klik op Apparaten , kies hub en open de instellingen :
Klik Service → Geluiden en alarmen - Schakel de opties Als de batterij van een apparaat bijna leeg is en Als een apparaat offline is in.
- Klik op Terug om de instellingen op te slaan.
Instellingen voor geluidsmeldingen bij storingen zijn beschikbaar voor alle hubs met firmwareversie OS Malevich 2.15 of nieuwer.
Geluidsmeldingen bij storingen worden ondersteund door KeyPad Combi met firmwareversie 5.57.7.0 of nieuwer.
| Gebeurtenis | Indicatie | Opmerking |
| Als een apparaat offline is |
Twee korte geluidssignalen, de storingsindicator [Х] knippert twee keer. Geef eenmaal per minuut een pieptoon totdat alle apparaten in het systeem online zijn. |
Gebruikers kunnen de geluidsindicatie 12 uur uitstellen. |
| Als KeyPad Combi offline is |
Twee korte geluidssignalen, de storingsindicator [Х] knippert twee keer. Geeft eenmaal per minuut een pieptoon totdat het bediendeel in het systeem online is. |
Het is onmogelijk om de geluidindicatie te vertragen. |
| Als de batterij van een apparaat bijna leeg is |
Drie korte geluidssignalen, de storingsindicator [Х] knippert drie keer. Geeft eenmaal per minuut een pieptoon totdat de batterij is opgeladen of het apparaat is verwijderd. |
Gebruikers kunnen de geluidsindicatie 4 uur uitstellen. |
Geluidsmeldingen over storing verschijnen wanneer de indicatie van het bediendeel is voltooid. Bij meerdere storingen in het systeem, meldt het bediendeel eerst over het verbindingsverlies tussen het apparaat en de hub.
Testen van de functionaliteit
Het Ajax-beveiligingssysteem heeft verschillende tests waarmee u kunt nagaan of de installatielocatie van de apparaten juist gekozen is.
De functionaliteitstests voor KeyPad Combi starten direct, ongeacht de pingperiode van de hub-detector (36 seconden met de standaardinstellingen van de hub).
De tests zijn beschikbaar in het menu met instellingen van het apparaat (Ajax-app → Apparaten ![]() → KeyPad Combi → Instellingen
→ KeyPad Combi → Instellingen ![]() ):
):
Een locatie kiezen
KeyPad Combi kan het beste binnen bij de ingang worden geplaatst. Hiermee kunt u het systeem uitschakelen voordat de inloopvertraging is afgelopen, en het systeem snel inschakelen bij het verlaten van het gebouw.
Als u KeyPad Combi in uw handen houdt of op een tafel gebruikt, kunnen we niet garanderen dat de aanraakknoppen goed zullen werken.
Voor het gemak is het een goed idee om KeyPad Combi 1,3 tot 1,5 meter vanaf de vloer te installeren. Installeer het apparaat op een vlak, verticaal oppervlak. Hierdoor kan de KeyPad Combi stevig aan het oppervlak worden bevestigd zonder dat de sabotagebeveiliging vals geactiveerd wordt.
Houd bij het kiezen van de locatie ook rekening met de volgende waarden: signaalsterkte, gebruiksgemak en hoorbaarheid van de sirene.
Signaalsterkte
Installeer KeyPad Combi op een plek met een stabiele Jeweller signaalsterkte (2 – 3 streepjes in een Ajax-app). Bij het selecteren van de installatieplaats moet u rekening houden met de afstand tussen de detector en de hub of signaalversterker en met de aanwezigheid van obstakels tussen de apparaten die het radiosignaal blokkeren: muren, vloeren en grote objecten in de ruimte.
Zorg ervoor dat u de signaalsterkte van Jeweller op de installatielocatie controleert. Als de signaalsterkte laag is (één streepje of minder), kunnen we geen stabiele werking van het systeem garanderen! Verplaats het apparaat minstens 20 cm zodat de signaalontvangst aanzienlijk kan verbeteren.
Als de KeyPad Combi na verplaatsing nog steeds een lage of onstabiele signaalsterkte heeft, gebruik dan een signaalversterker.
Gebruiksgemak en hoorbaarheid van de sirene
Installeer KeyPad Combi zodat u het apparaat gemakkelijk kunt gebruiken. Het apparaat mag niet worden belemmerd door verschillende objecten, en de toegang tot het apparaat moet vrij zijn van obstakels. Houd ook rekening met de hoorbaarheid van de sirenes. Als het apparaat op een onjuiste plaats is geïnstalleerd, kan het voorkomen dat het signaal van de sirenes in een andere kamer of ruimte niet hoorbaar is.
Installeer KeyPad Combi niet:
- Op plaatsen waar textiel (bijvoorbeeld naast een kledinghanger), voedingskabels of ethernetkabels het bediendeel kunnen blokkeren. Dit kan leiden tot een valse activering van het bediendeel.
- In gebouwen met een temperatuur en luchtvochtigheid buiten de toegestane grenzen. Dit kan leiden tot schade aan het apparaat.
- In de buurt van metalen voorwerpen en spiegels (deze kunnen het radiosignaal afschermen en verzwakken).
- Op plaatsen waar de KeyPad Combi een onstabiele of slechte signaalsterkte heeft met de hub of de signaalversterker.
- Binnen 1 meter van een hub of signaalversterker. Dit kan leiden tot verbindingsverlies met het bediendeel.
- In de buurt van de glasbreukdetectoren. Het geluid van de sirene kan een alarm veroorzaken.
- Dicht bij elektrische bekabeling. Dit kan communicatiestoringen veroorzaken.
- Buitenshuis. Dit kan leiden tot schade aan het apparaat.
- Op plaatsen waar het geluidssignaal kan worden verstoord.
Installatie van KeyPad Combi
Voordat u KeyPad Combi installeert, moet u de optimale locatie kiezen volgens de vereisten van deze handleiding!
- Bevestig KeyPad Combi op het oppervlak met dubbelzijdige tape en voer de signaalsterkte– en dempingstest uit. Als de signaalsterkte onstabiel is of als er slechts één streepje op het scherm wordt weergegeven, verplaats het apparaat of gebruik een signaalversterker.
Dubbelzijdige tape mag alleen gebruikt worden voor tijdelijke bevestiging van KeyPad Combi. Een met plakband bevestigde apparaat kan op elk moment losraken van de ondergrond en vallen, wat tot een defect kan leiden.
Houd er rekening mee dat als het apparaat met plakband is bevestigd, de sabotagebeveiliging niet wordt geactiveerd wanneer u het apparaat probeert los te maken.
- Voer de volumetestuit. Als KeyPad Combi nauwelijks hoorbaar is, verplaats dan het apparaat of wijzig het volumeniveau in de instellingen van het apparaat.
- Zorg ervoor dat het gemakkelijk is om codes in te voeren of Tag/Pass te gebruiken. Verplaats KeyPad Combi als het beheren van de beveiliging op de geselecteerde locatie onhandig is.
- Verwijder het apparaat van het SmartBracket-montagepaneel.
- Bevestig het SmartBracket-paneel aan het oppervlak met de meegeleverde schroeven. Gebruik bij het bevestigen minimaal twee bevestigingspunten. Zorg ervoor dat u de geperforeerde hoek op het SmartBracket-paneel bevestigt, zodat de sabotagebeveiliging kan werken.
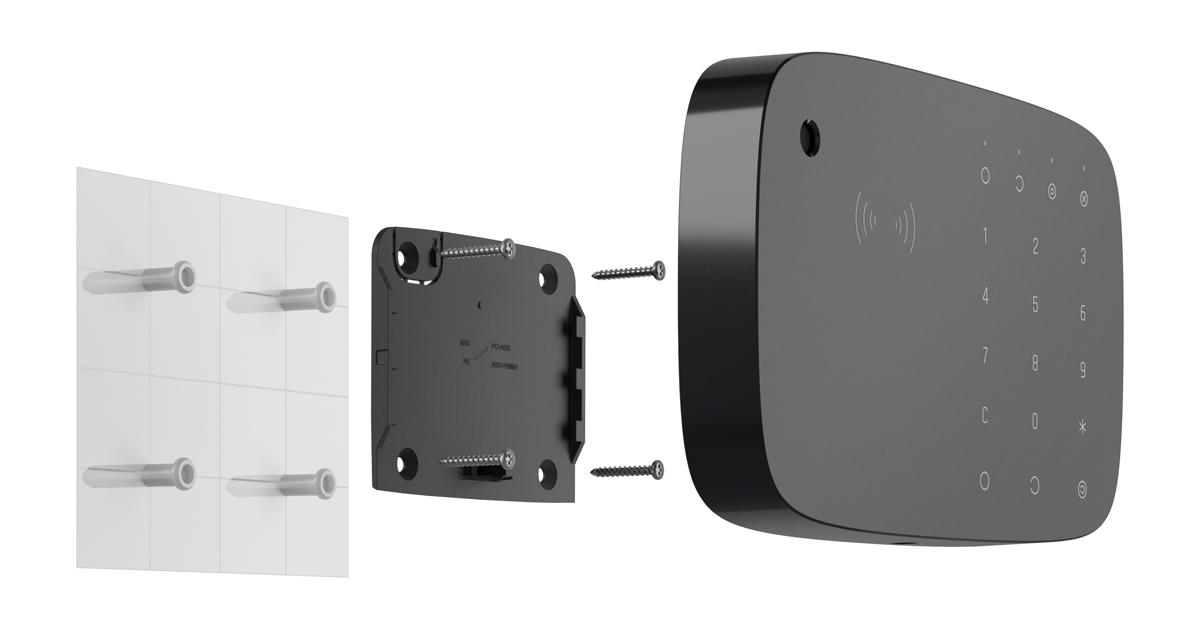
- Schuif KeyPad Combi op het montagepaneel en draai de bevestigingsschroef aan de onderkant van de behuizing vast. Dit is nodig voor een goede bevestiging en zodat KeyPad Combi niet snel verwijderd kan worden van het paneel.
- Zodra het apparaat op SmartBracket is bevestigd, knippert het één keer met led X (Storing) , dit is een signaal dat de sabotagebeveiliging is geactiveerd. Als de led na installatie op SmartBracket niet knippert, controleer dan de status van de sabotagebeveiliging in de Ajax-app en zorg ervoor dat het paneel stevig is bevestigd.
Onderhoud
Test regelmatig het functioneren van KeyPad Combi. De optimale testfrequentie is eenmaal per week. Verwijder regelmatig stof, spinnenwebben en ander vuil van de behuizing. Gebruik een zachte, droge doek die geschikt is voor het onderhoud van de apparatuur.
Gebruik geen middelen die alcohol, aceton, benzine of andere actieve oplosmiddelen bevatten om het apparaat te reinigen. Veeg het bediendeel voorzichtig schoon: krassen kunnen de gevoeligheid van het bediendeel verminderen.
De in de KeyPad Combi geïnstalleerde batterijen zorgen bij standaardinstellingen voor maximaal 3,5 jaar autonome werking. Als de batterij bijna leeg is, stuurt het systeem de juiste meldingen, en led X (Storing) licht soepel op en gaat uit na elke succesvolle invoer van het wachtwoord.
KeyPad Combi kan nog tot 2 maanden werken nadat het aangeeft dat de batterij bijna leeg is. We raden echter wel aan om de batterijen direct te vervangen nadat u de melding heeft ontvangen.
We raden het gebruik van lithiumbatterijen aan. Ze hebben een grote capaciteit en zijn minder gevoelig voor temperaturen.
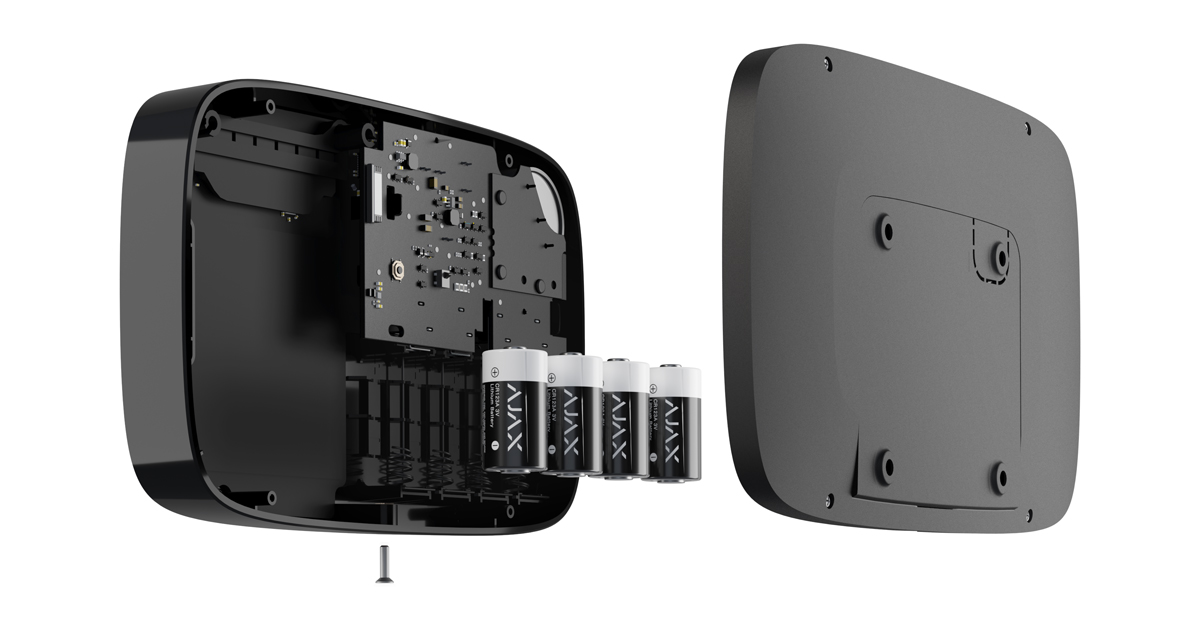
Volledige set
- KeyPad Combi
- SmartBracket-montagepaneel
- 4 voorgeïnstalleerde CR123A-lithiumbatterijen
- Installatieset
- Snelstartgids
Garantie
De garantie voor de producten van de Limited Liability Company “Ajax Systems Manufacturing” is geldig gedurende 2 jaar na aankoop en geldt niet voor de meegeleverde batterijen.
Indien het apparaat niet goed functioneert, raden we u aan om eerst contact op te nemen met de ondersteuningsdienst, aangezien de helft van de technische problemen op afstand kan worden opgelost!
Contact opnemen met de technische ondersteuning:
