
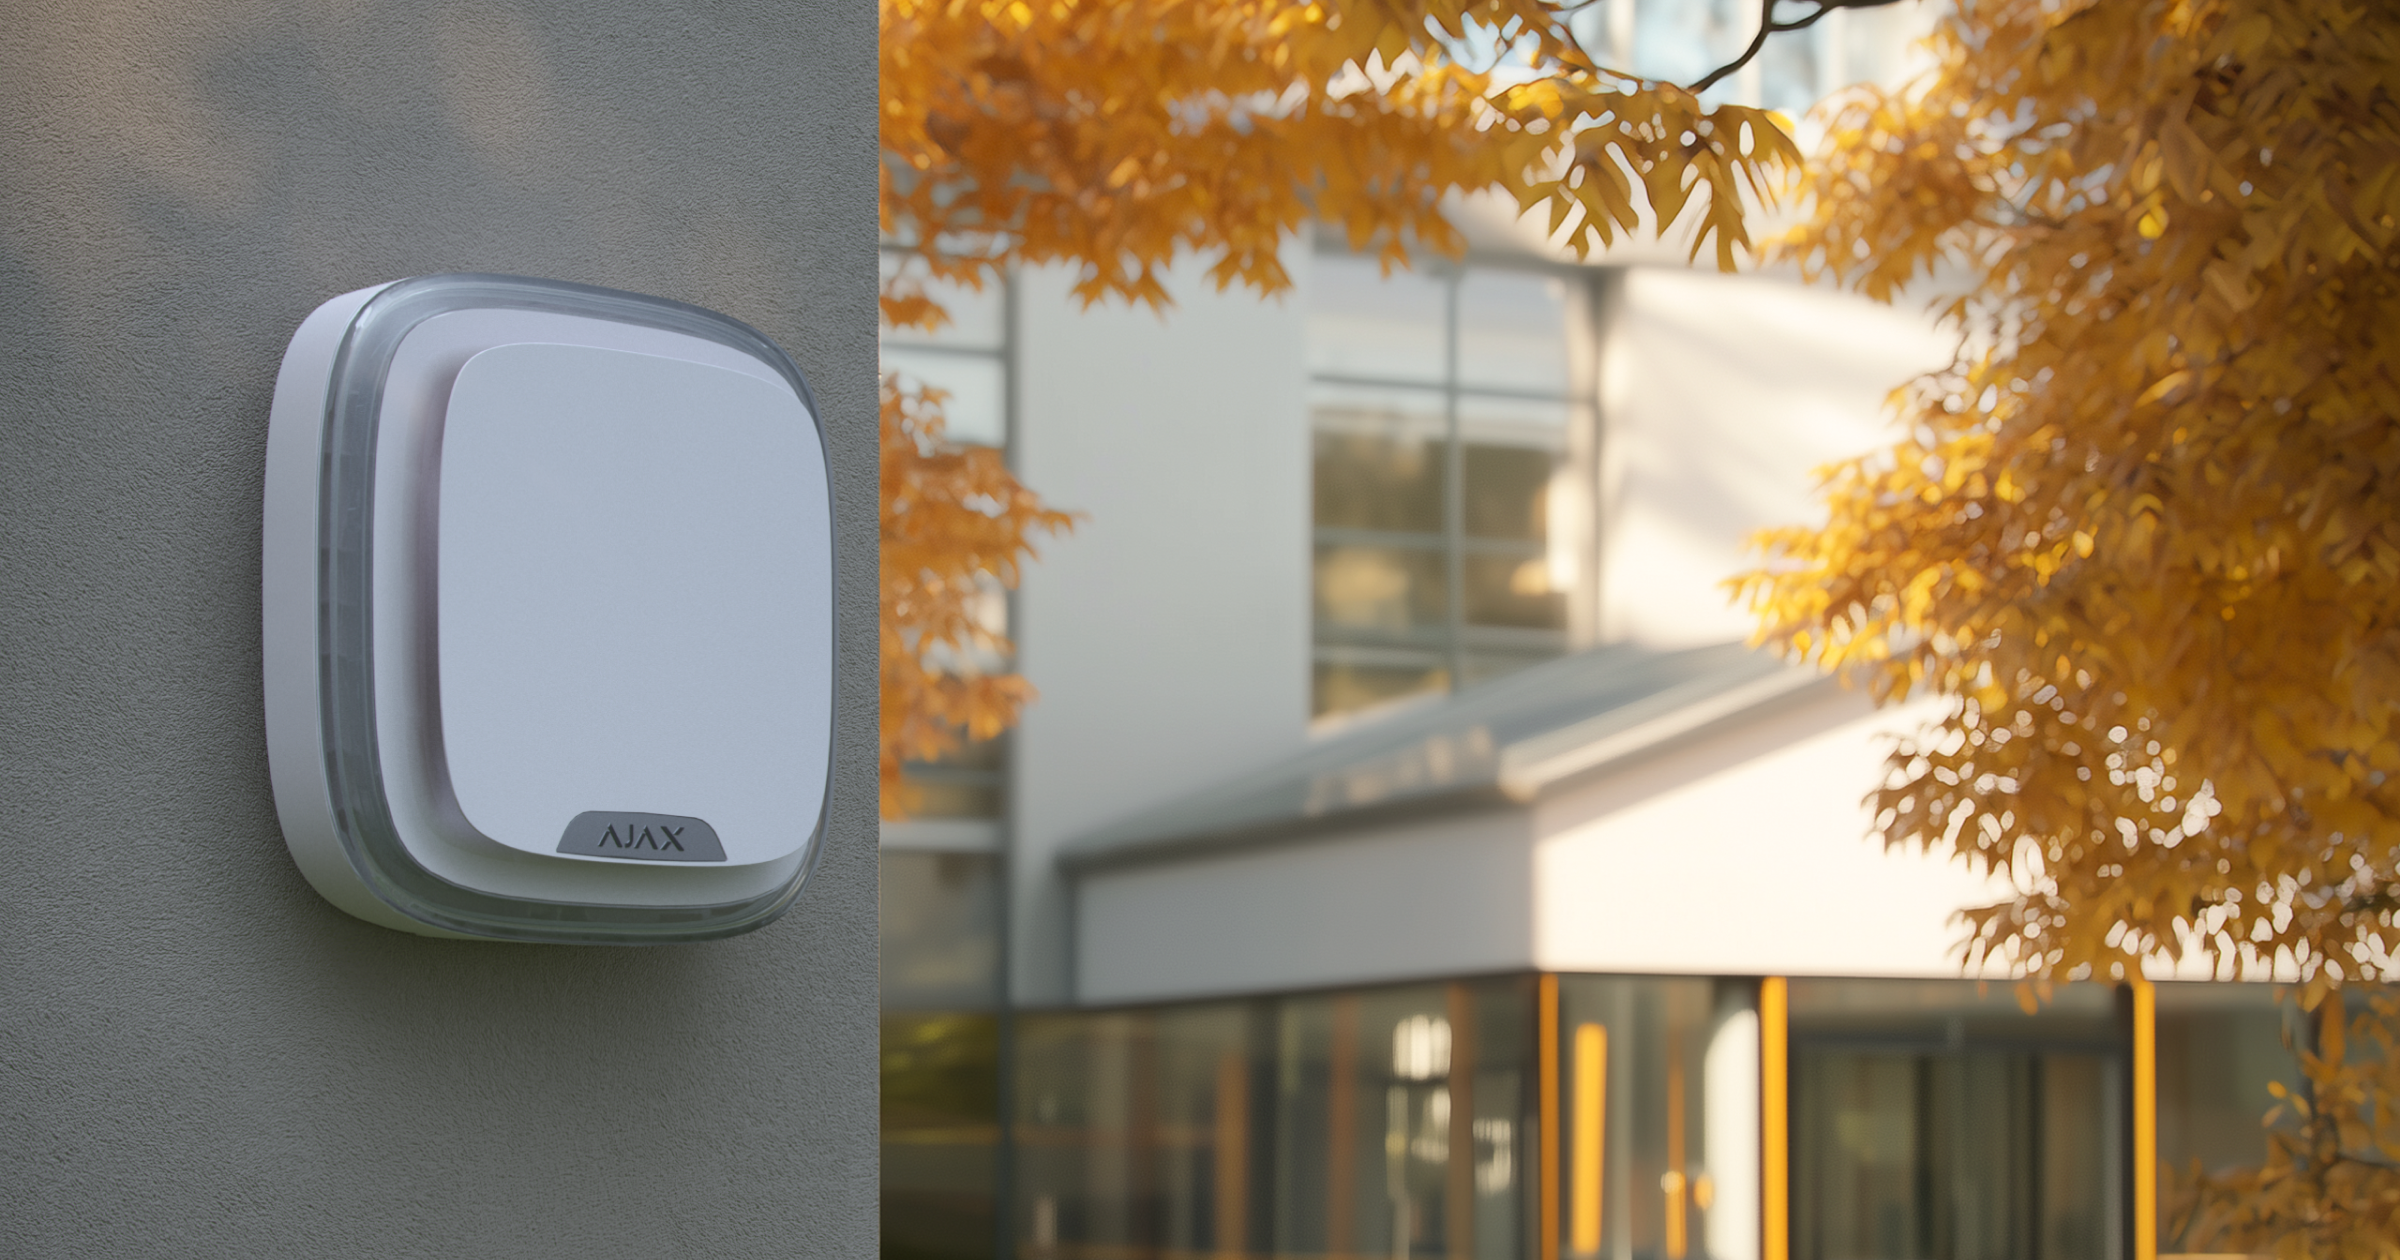
Superior StreetSiren Plus G3 Jeweller — це бездротова сирена для використання на вулиці та в приміщенні. Вона оснащена світлодіодною рамкою та динаміком, який видає звук із гучністю до 107 дБ. До сирени також можна підʼєднанти стороннє джерело живлення 12 В⎓.
Superior StreetSiren Plus G3 Jeweller працює в системі Ajax і звʼязується з хабом за допомогою захищених протоколів Jeweller і Wings. Залежно від моделі хаба дальність зв’язку за відсутності перешкод становить до 11 450 футів. Сирена працює до 10 років від попередньо встановлених батарей у режимі очікування і до 4,2 року за умови одного звукового оповіщення тривалістю 90 секунд на добу.
Superior StreetSiren Plus G3 Jeweller — це пристрій лінійки продуктів Superior. Тільки акредитовані партнери Ajax Systems можуть встановлювати, продавати й обслуговувати продукти Superior.
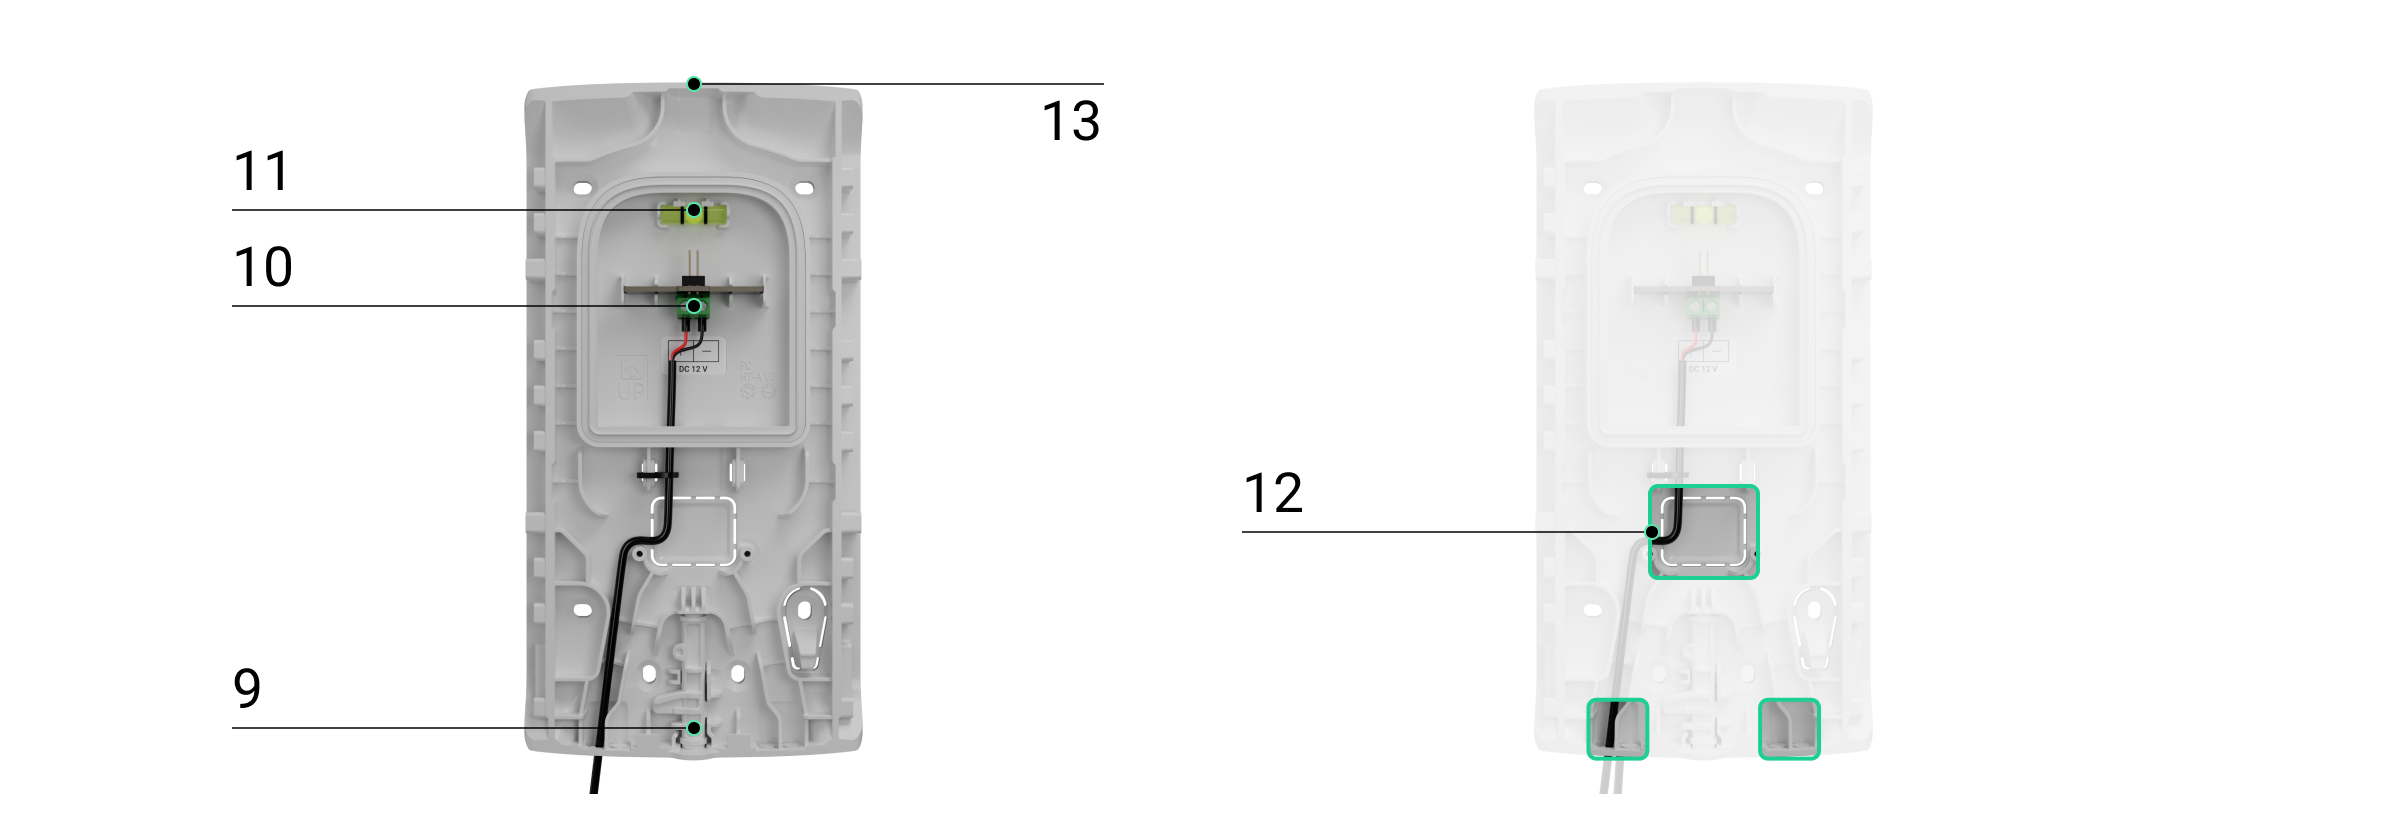
Функціональні елементи
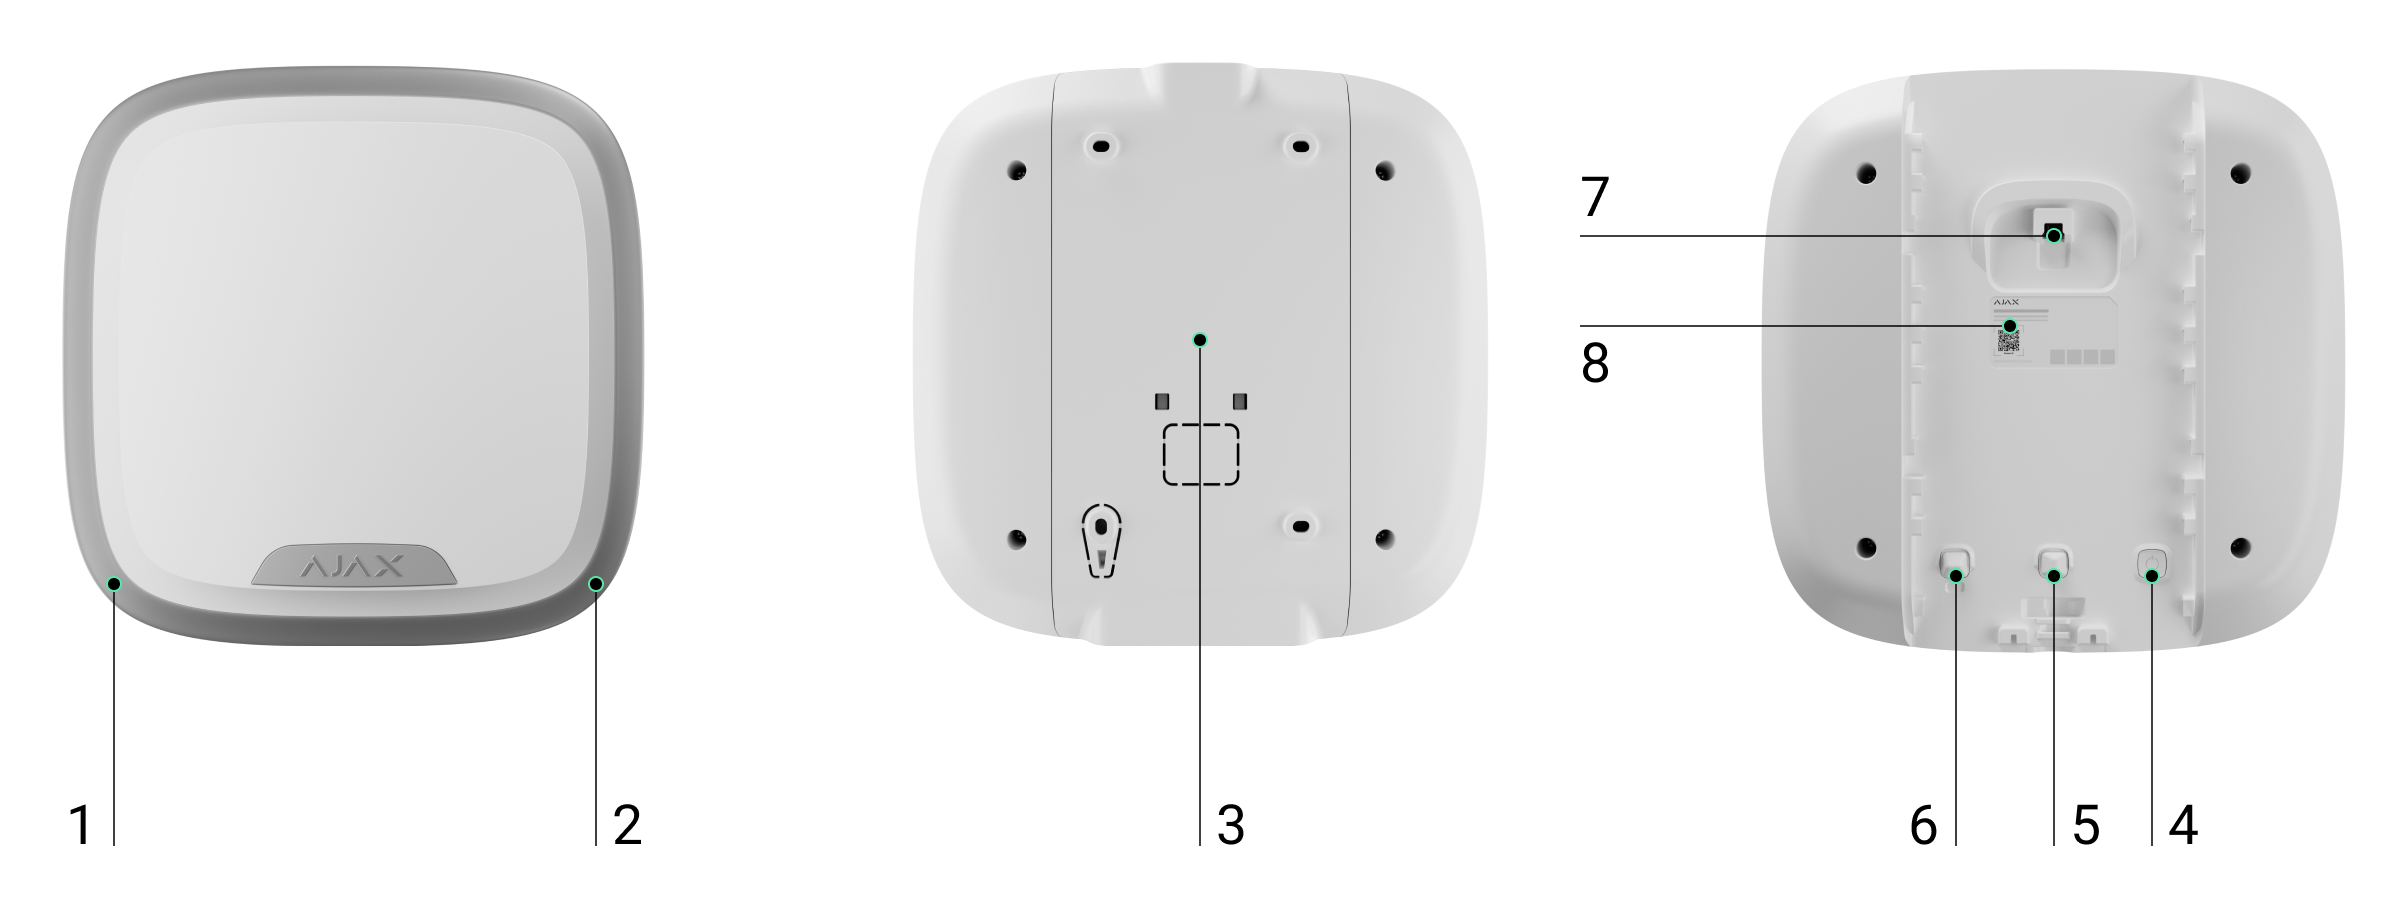
- Світлодіодна рамка.
- Світлодіодний індикатор.
- Кріпильна панель SmartBracket.
- Кнопка живлення.
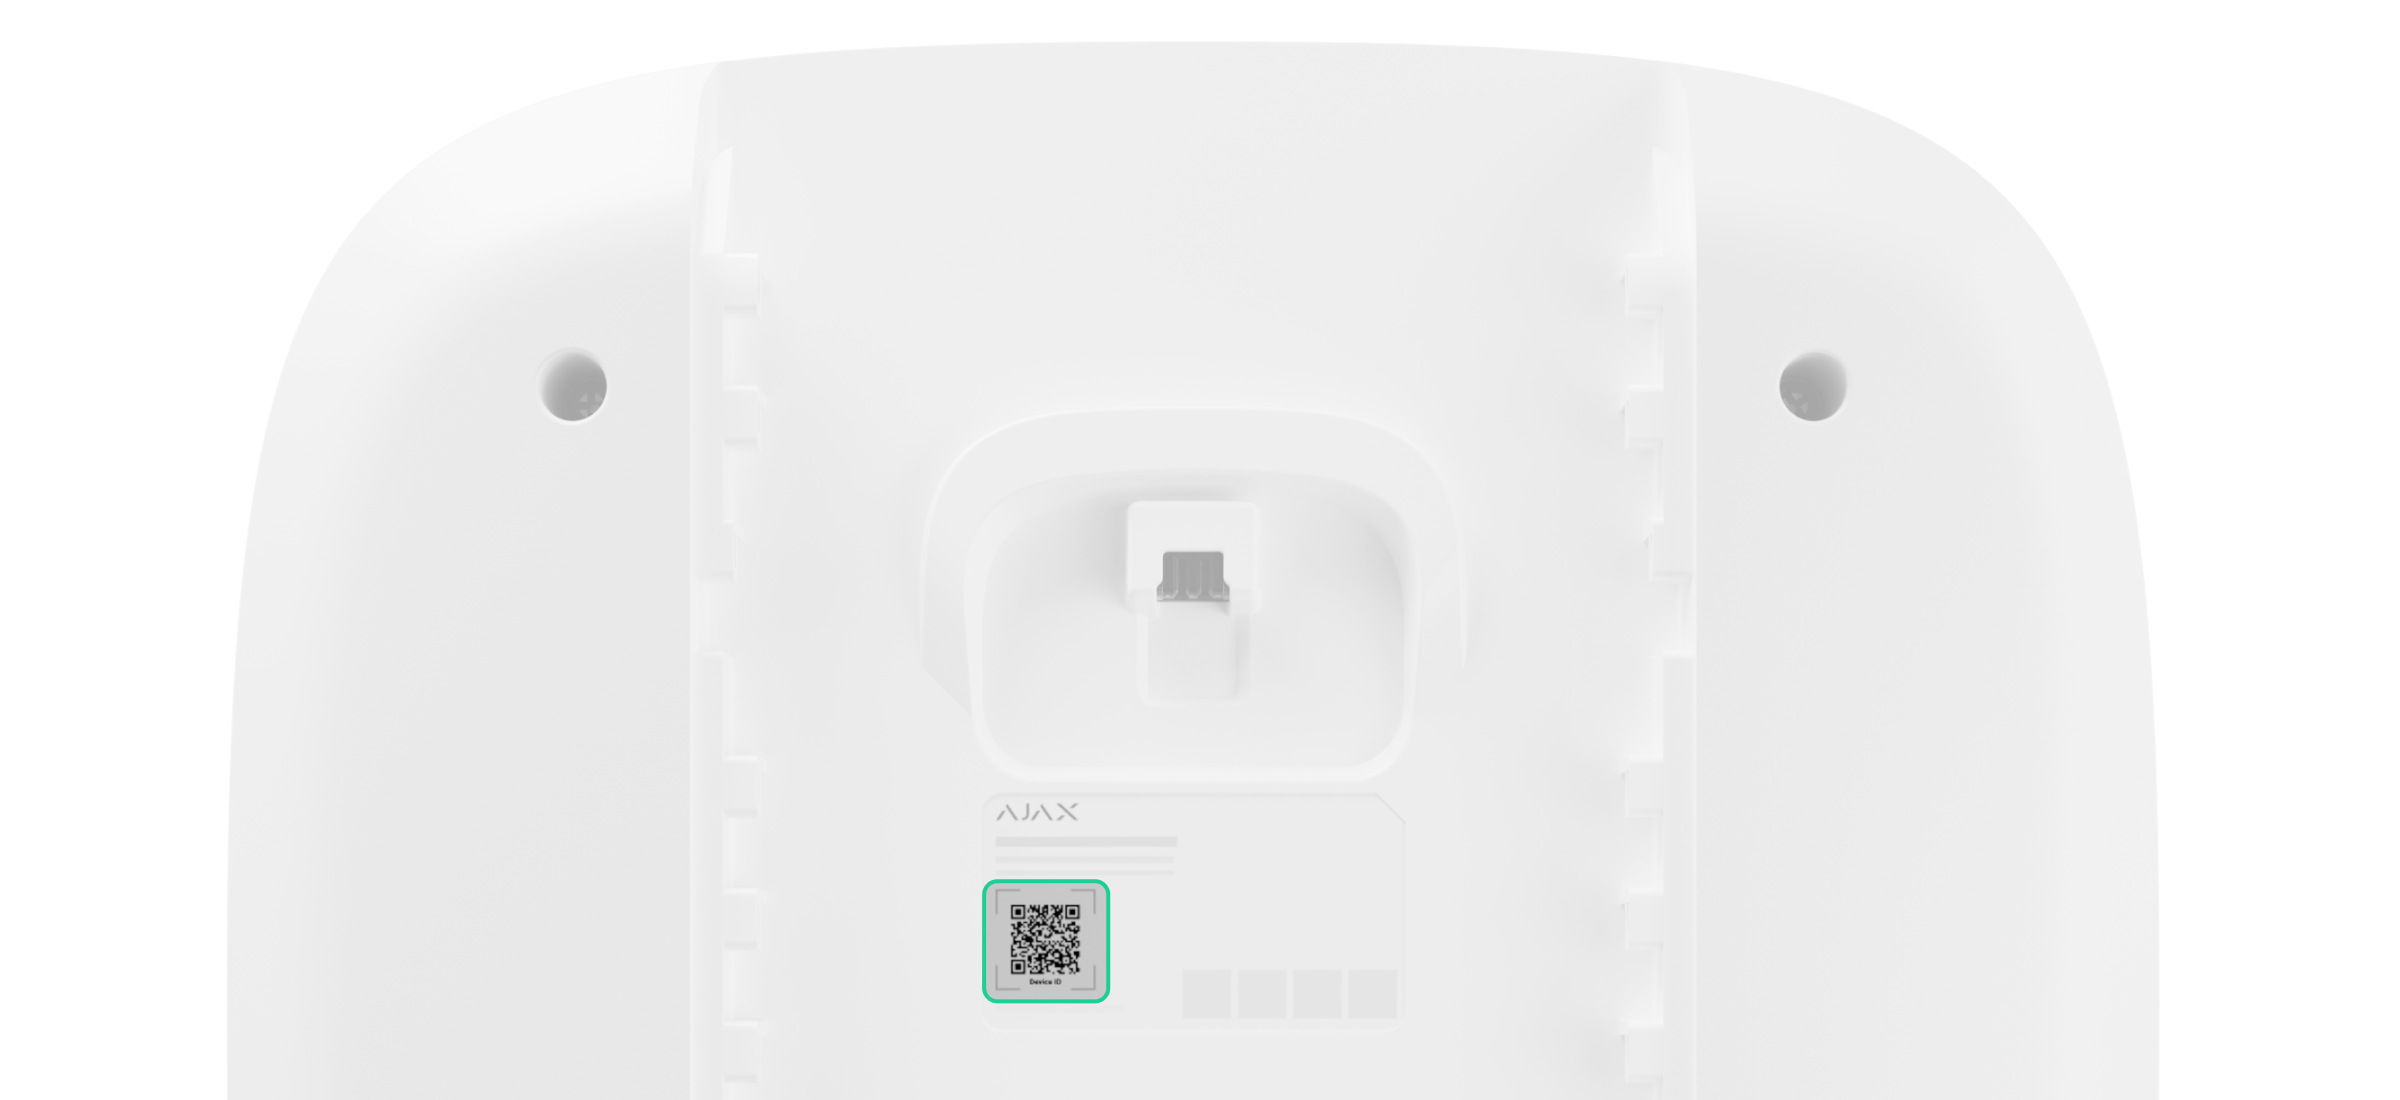
- Перша кнопка тампера. Спрацьовує, коли розблоковано SmartBracket.
- Друга кнопка тампера. Спрацьовує в разі спроби відірвати сирену від поверхні або зняти її з кріпильної панелі SmartBracket.
- Розʼєм для підʼєднання зовнішнього живлення.
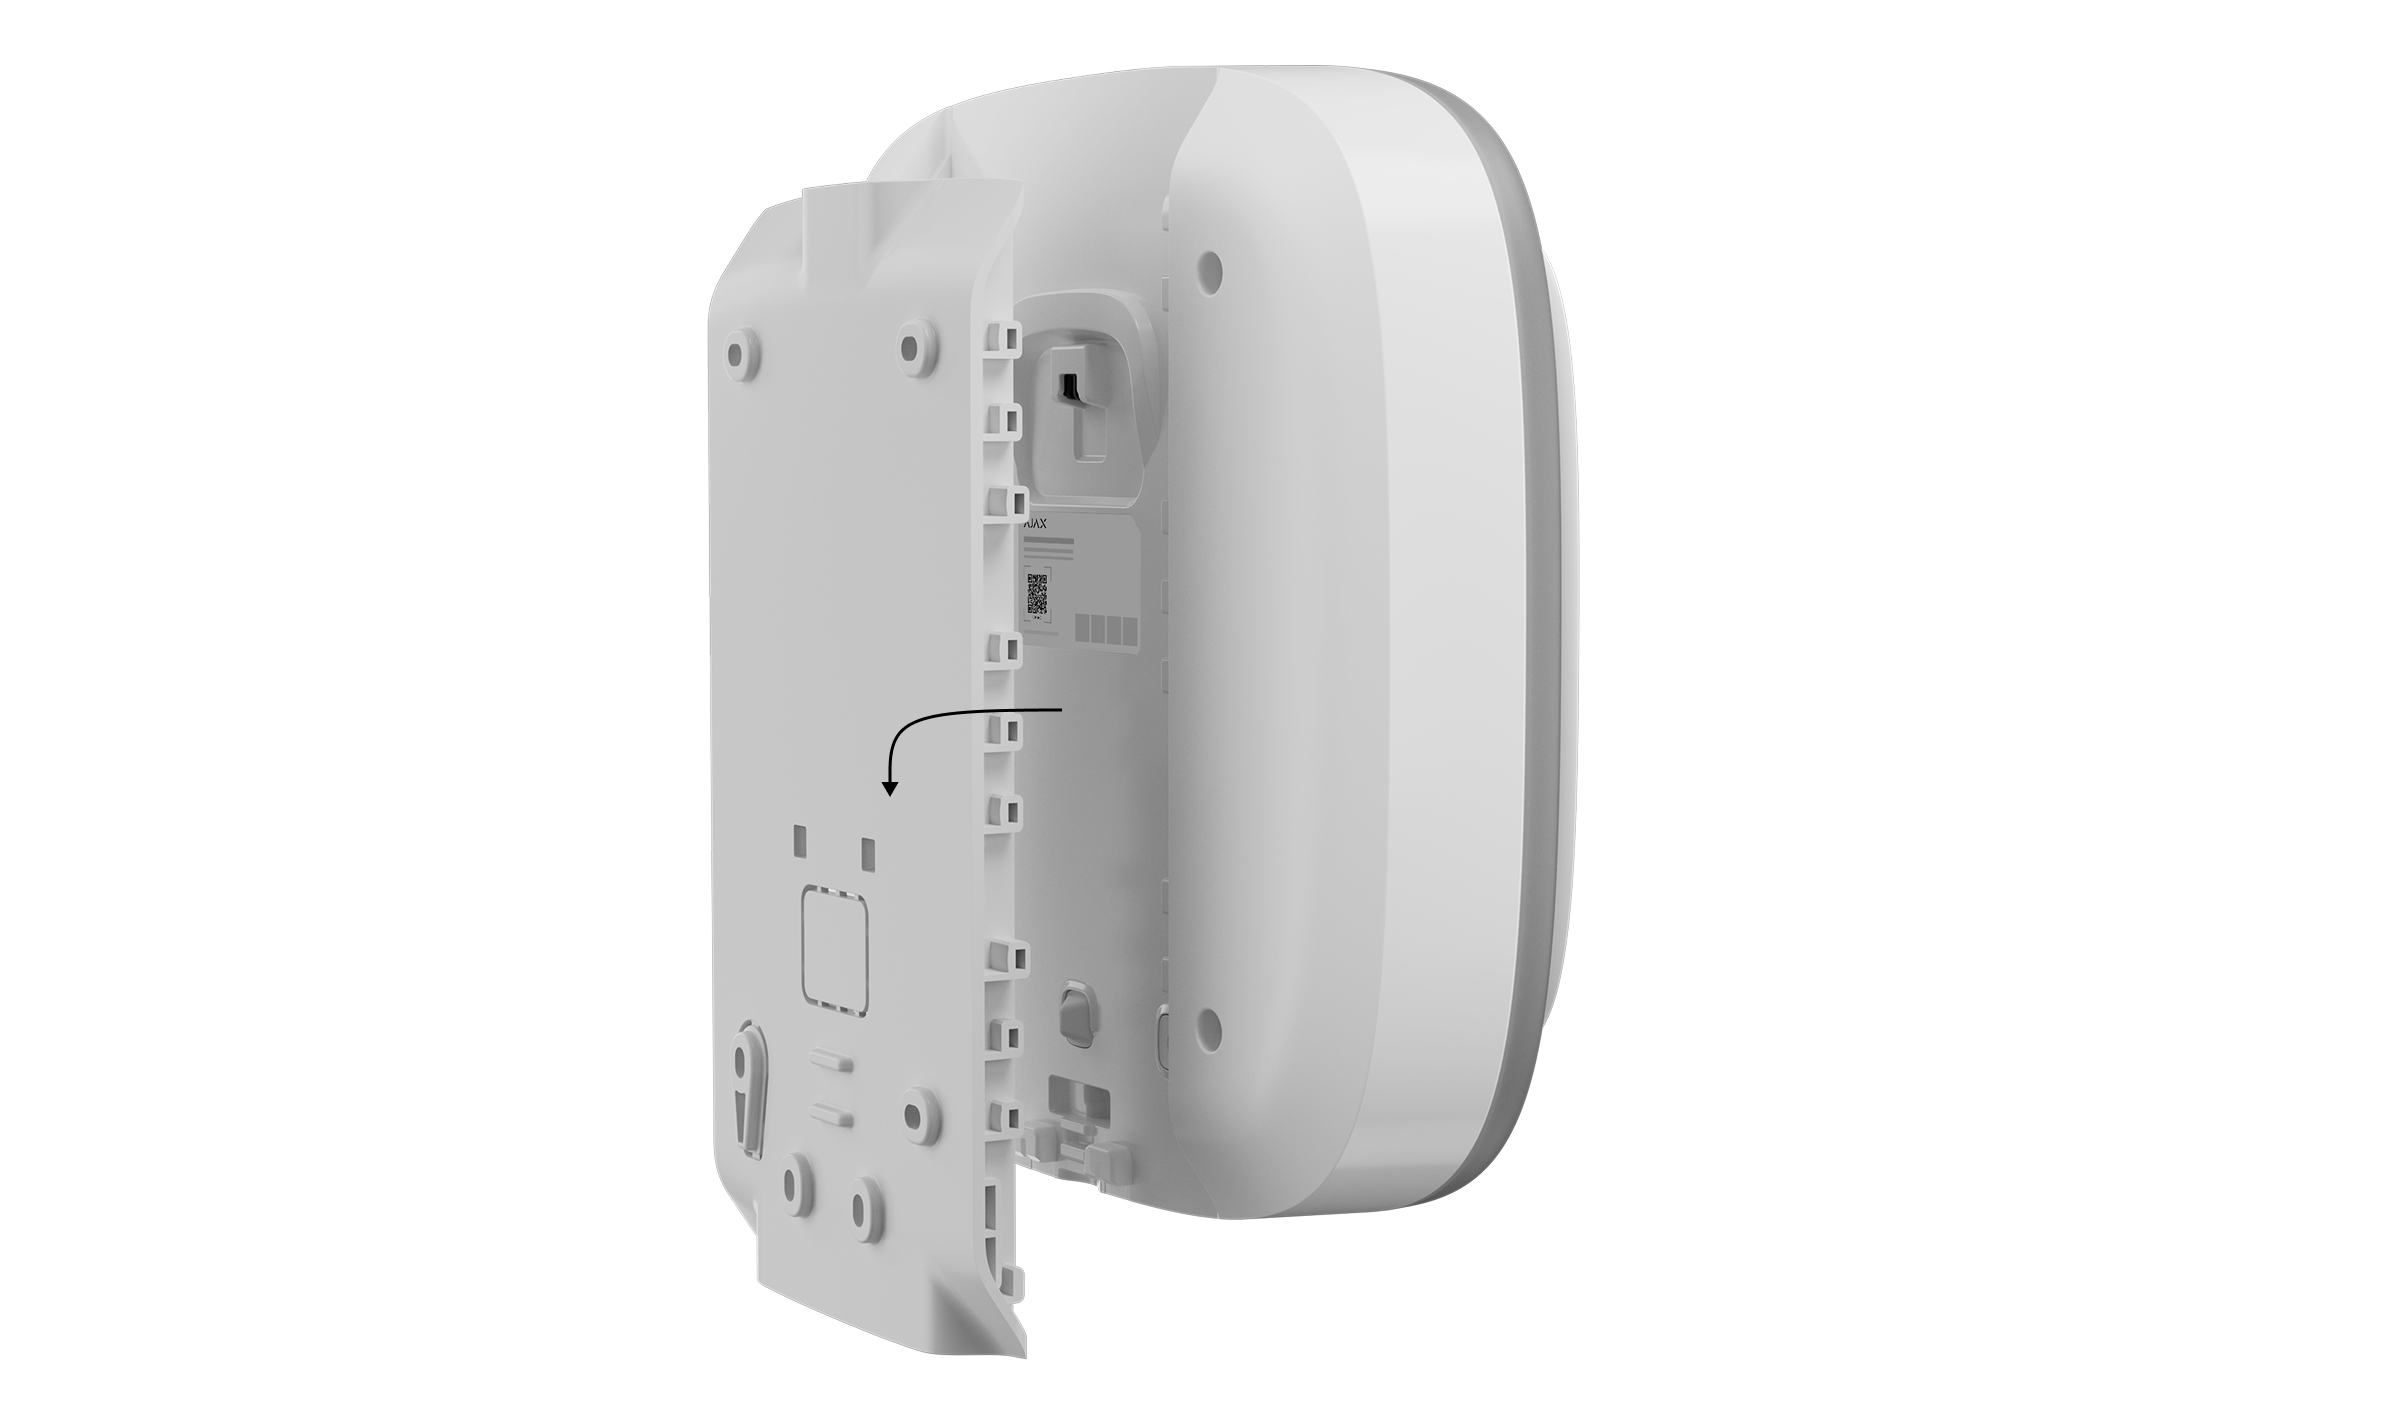
- QR-код з ідентифікатором пристрою. Використовується, щоб додати сирену на хаб.
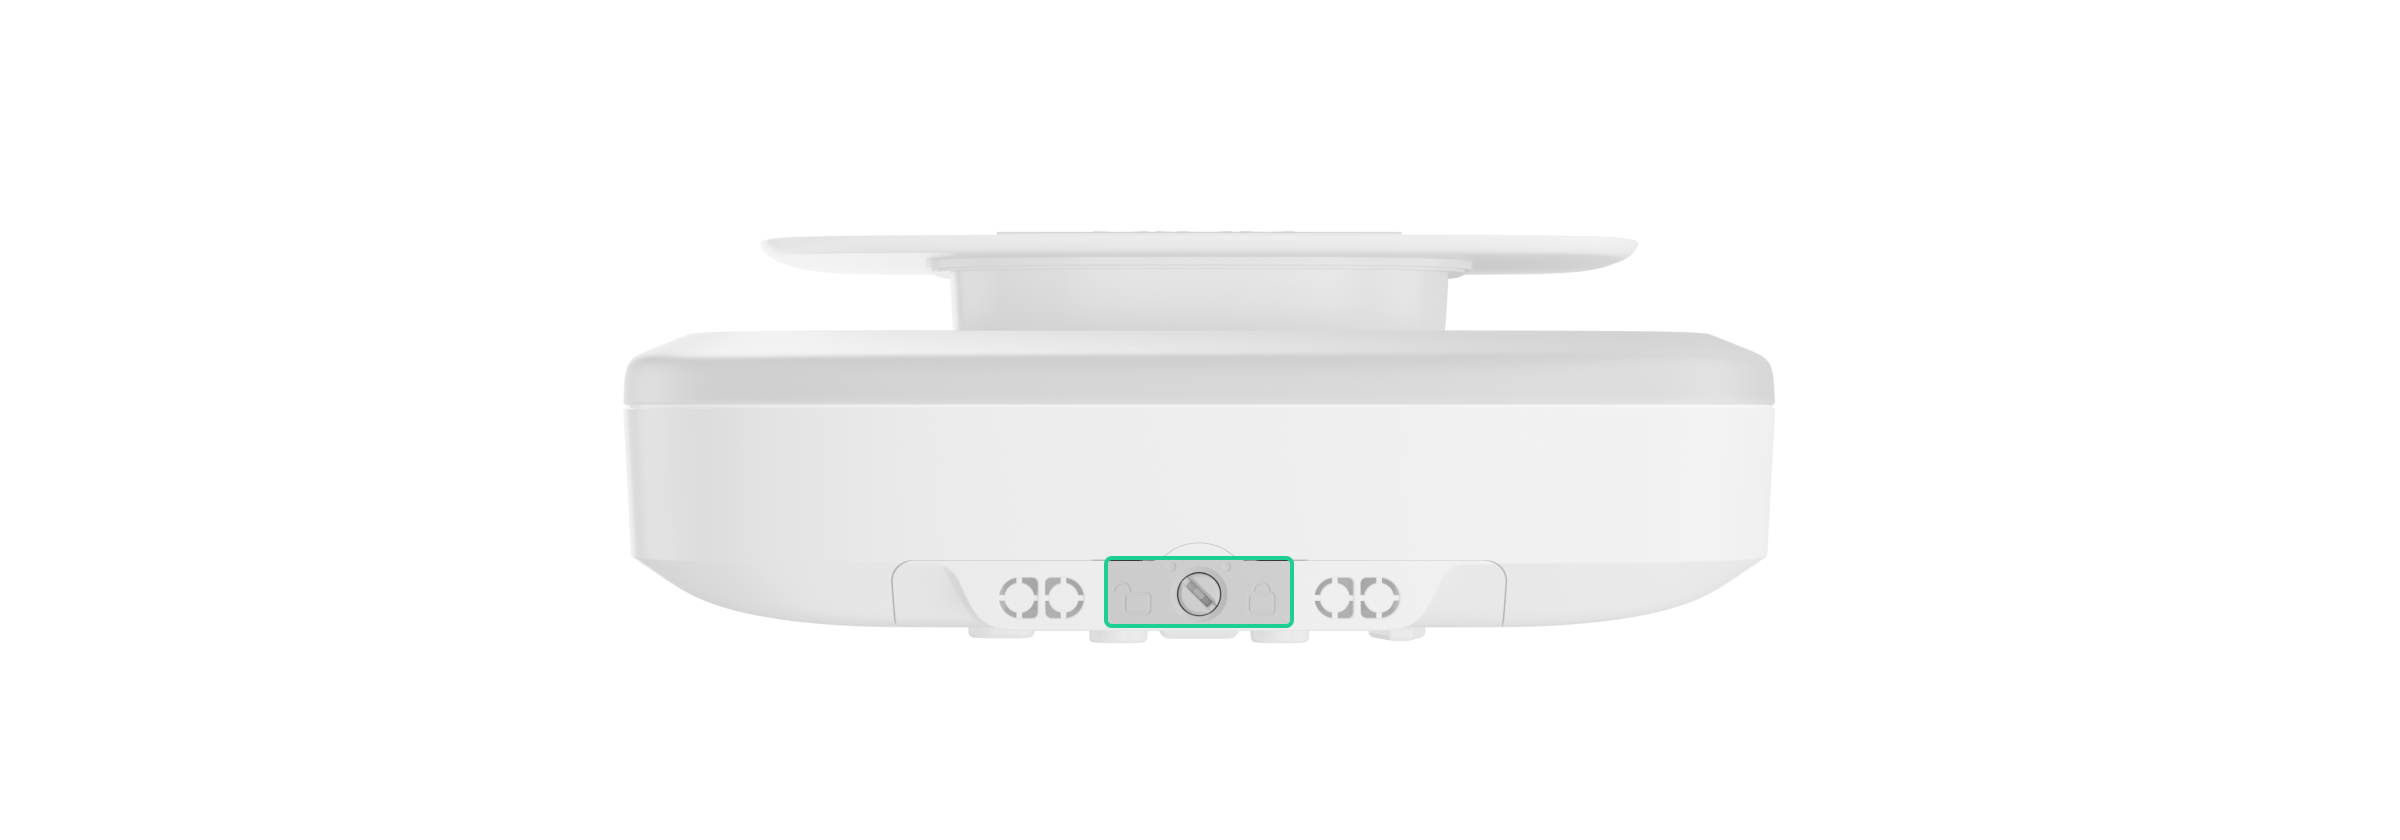
- Замок для SmartBracket. Використовується, щоб зафіксувати пристрій на кріпильній панелі.
- Клеми для підʼєднання зовнішнього джерела живлення.
- Бульбашковий рівень для перевірки кута нахилу кріпильної панелі під час встановлення сирени.
- Перфоровані частини корпусу для прокладання кабелів.
- Заглиблення для зручного свердління отворів.
Сумісні хаби та ретранслятори
Сирена сумісна з хабом Ajax із версією OS Malevich 2.35 або новішою.
Принцип роботи
Сирена виконує чотири функції:
- Інформує про тривоги. Сирена реагує на спрацювання кнопки тампера і тривоги системи. Завдяки динаміку та світлодіодній індикації сирена може відлякувати зловмисників і привертати увагу.
- Показує стан охорони. Світлодіодна індикація сирени інформує про те, що обʼєкт встановлено під охорону. Сирена інформує користувачів про затримки на вхід/вихід звуковим сигналом і підсвічуванням.
- Сповіщає про відчинення дверей (Сповіщення про відчинення). Коли систему не встановлено під охорону, сирена спеціальним звуком сповіщає користувачів про спрацювання датчиків відчинення. Функцію можна використовувати, наприклад, у магазинах, щоб сповістити співробітників, що хтось увійшов до приміщення.
- Сповіщає про спрацювання, доки систему не буде знято з охорони. Після звукового сигналу світлодіодний індикатор у нижньому правому куті сирени починає блискати. Ця функція дає змогу користувачам і проїжджим патрулям побачити, що спрацювала сирена.
Гучність і тривалість сигналу тривоги
Після активації тривоги звуковий сигнал сирени лунає від 3 секунд до 3 хвилин із гучністю від 85 до 107 дБ. У застосунках Ajax можна налаштувати тривалість і гучність сигналу тривоги, а також визначити, які пристрої активують сирену.
Захист від саботажу
Superior StreetSiren Plus G3 Jeweller оснащена кнопками тампера. Кнопка тампера спрацьовує, коли корпус сирени відкрито чи пошкоджено або коли хтось намагається зняти сирену зі SmartBracket.
У разі саботажу користувачі й охоронна компанія точно знають, яку саме сирену намагаються вимкнути зловмисники. Сповіщення містять таку інформацію:
- Імʼя хаба (імʼя обʼєкта, що охороняється).
- Час події.
- Імʼя сирени.
- Тип сигналу тривоги.
- Віртуальна кімната, до якої привʼязано сирену.
Якщо сирену встановлено правильно, зловмисникам буде складно демонтувати або вимкнути її в разі спрацювання. Сирена має міцний корпус та захищений динамік і працює від попередньо встановлених батарей. Таким чином, пристрій продовжить працювати навіть у разі відключення електроенергії на обʼєкті. Крім того, кнопка живлення блокується, щойно систему встановлено під охорону. Це запобігає вимкненню сирени.
Виявлення глушіння
Superior StreetSiren Plus G3 Jeweller використовує алгоритм виявлення радіозавад. У разі потенційної спроби глушіння алгоритм виявляє раптове збільшення або зменшення рівня шуму. Він враховує не лише амплітуду шуму, але і його тривалість. Це допомагає відрізнити короткі тимчасові збої, спричинені умовами навколишнього середовища, від тривалих завад, що свідчать про навмисне глушіння.
Коли сирена Superior StreetSiren Plus G3 Jeweller виявляє потенційний сигнал глушіння, вона аналізує сигнал, щоб підтвердити глушіння. Якщо глушіння підтверджено, сирена активує тривогу.
Коли опцію Виявлення глушіння радіоефіру увімкнено, охоронна компанія та користувачі отримають сповіщення про спробу саботажу, а звук сирени відлякає зловмисників.
Протокол передавання даних Superior Jeweller
Superior Jeweller — це оновлений радіопротокол для пристроїв Superior, що забезпечує відповідність стандарту EN 50131 (Grade 3). Він має покращене шифрування і використовує радіочастотний гопінг. Повний радіочастотний гопінг доступний лише тоді, коли всі пристрої в системі використовують протокол Superior Jeweller. Якщо хоча б один пристрій системи працює за протоколом Jeweller, система відповідатиме тільки класу безпеки Grade 2: шифрування даних зберігатиметься, але радіочастотний гопінг буде недоступний. Залежно від хаба пристрої Superior також можуть працювати за звичайним протоколом Jeweller.
Протокол передавання даних Wings
Wings — це пропрієтарна бездротова технологія звʼязку для передавання великих пакетів даних. Пристрій використовує Wings для завантаження оновлень прошивки.
Покращений зашифрований звʼязок
Звʼязок між Superior StreetSiren Plus G3 Jeweller і хабом захищений передовим шифруванням, що гарантує конфіденційність і цілісність даних. А саме гарантує, що всі чутливі дані в повідомленні зашифровані, і кожне повідомлення містить унікальну мітку автентифікації, яка дає змогу системі перевірити, що дані не були змінені під час передавання. Система може надійно виявляти пошкодження та відхиляти підроблені або змінені повідомлення, забезпечуючи надійний захист як від пасивних, так і від активних атак. Це забезпечує захищений звʼязок між пристроєм і хабом, а також надійний захист системи та даних.
Радіочастотний гопінг
Щоб відповідати вимогам Grade 3, сирена Superior StreetSiren Plus G3 Jeweller використовує радіочастотний гопінг для радіозвʼязку з хабом (або ретранслятором радіосигналу). За допомогою цього методу хаб і додані на нього пристрої змінюють свою робочу частоту відповідно до заданого шаблону. Послідовність гопінгу охоплює певний набір каналів у межах робочих діапазонів, а пристрої перемикаються на іншу частоту синхронно з хабом. Навіть якщо деякі канали піддаються глушінню, повідомлення можуть успішно передаватися через інші канали. Радіочастотний гопінг підвищує надійність і ефективність системи та забезпечує її стійкість до навмисних завад і спроб глушіння.
Радіочастотний гопінг не спричиняє затримок або пауз у радіозвʼязку та не зменшує швидкість передавання даних. Якщо в систему додано ретранслятори, радіочастотний гопінг використовується для радіозвʼязку «пристрій — ретранслятор» і «ретранслятор — хаб».
Система використовує радіочастотний гопінг для радіозвʼязку, лише якщо всі бездротові пристрої підтримують цей метод.
Якщо хоча б один пристрій, доданий у систему, не підтримує радіочастотний гопінг, хаб і всі пристрої перемикаються на робочі частоти цього пристрою та не використовують радіочастотний гопінг для радіозвʼязку.
Оновлення прошивки
Якщо доступна нова версія прошивки для Superior StreetSiren Plus G3 Jeweller, у застосунках Ajax у вкладці Пристрої ![]() зʼявиться іконка
зʼявиться іконка ![]() . Встановити оновлення прошивки може адміністратор або PRO-користувач із доступом до налаштувань системи у станах або налаштуваннях пристрою. Інструкції на екрані допоможуть успішно оновити прошивку.
. Встановити оновлення прошивки може адміністратор або PRO-користувач із доступом до налаштувань системи у станах або налаштуваннях пристрою. Інструкції на екрані допоможуть успішно оновити прошивку.
Передавання подій на ПЦС
Система Ajax може передавати події та тривоги в застосунок Ajax PRO Desktop, а також на ПЦС у форматах SurGard (Contact ID), SIA (DC-09), ADEMCO 685 та інших протоколів.
Superior StreetSiren Plus G3 Jeweller може передавати наступні події:
- Кришку відкрито/закрито.
- Кріпильну панель заблоковано/розблоковано.
- Основне живлення відʼєднано/підʼєднано.
- Зʼєднання з хабом втрачено/відновлено.
- Сирену увімкнено/вимкнено.
У разі тривоги оператор пульта централізованого спостереження (ПЦС) знає, що сталося й куди направити групу швидкого реагування. Адресність пристроїв Ajax дає змогу надсилати в застосунок Ajax PRO Desktop і на ПЦС події із зазначеними типом пристрою, ім’ям, групою охорони та кімнатою. Список параметрів, які отримує ПЦС, може відрізнятися залежно від типу ПЦС і вибраного протоколу зв’язку з пультом.
Ідентифікатор пристрою та номер шлейфу (зони) можна знайти у станах пристрою.
Додавання в систему
Хаб і пристрій, які працюють на різних радіочастотах, несумісні. Діапазон радіочастот пристрою може відрізнятися залежно від регіону. Рекомендовано купувати та використовувати пристрої Ajax в одному регіоні. Дізнатися діапазон робочих частот можна в служби технічної підтримки.
Перевірте сумісність пристроїв перед додаванням сирени в систему. Superior StreetSiren Plus G3 Jeweller — це пристрій лінійки продуктів Superior. Тільки акредитовані партнери Ajax Systems можуть встановлювати, продавати й обслуговувати продукти Superior.
Перш ніж додати пристрій
- Встановіть PRO-застосунок Ajax.
- Увійдіть в обліковий запис PRO-користувача або створіть новий.
- Виберіть простір або створіть новий.
- Додайте хоча б одну віртуальну кімнату.
- Додайте в простір сумісний хаб. Переконайтеся, що хаб увімкнений і підключений до інтернету: через Ethernet, Wi-Fi та/або стільникову мережу.
- Переконайтеся, що простір не перебуває під охороною, а хаб не оновлюється. Для цього перевірте стани в застосунку Ajax.
Додавання на хаб
- Відкрийте PRO-застосунок Ajax. Виберіть простір, на який потрібно додати пристрій.
- Перейдіть у вкладку Пристрої
 та натисніть Додати пристрій.
 - Задайте ім’я пристрою.
- Відскануйте QR-код або введіть ідентифікатор пристрою вручну. QR-код з ідентифікатором можна знайти на корпусі пристрою. Також він продубльований на коробці.
- Виберіть віртуальну кімнату та групу охорони (якщо активовано Режим груп).
- Натисніть Додати, після чого буде запущено зворотний відлік часу.
- Увімкніть пристрій, утримуючи кнопку живлення три секунди. Хаб надсилає запит на зʼєднання лише тоді, коли сирена увімкнена.
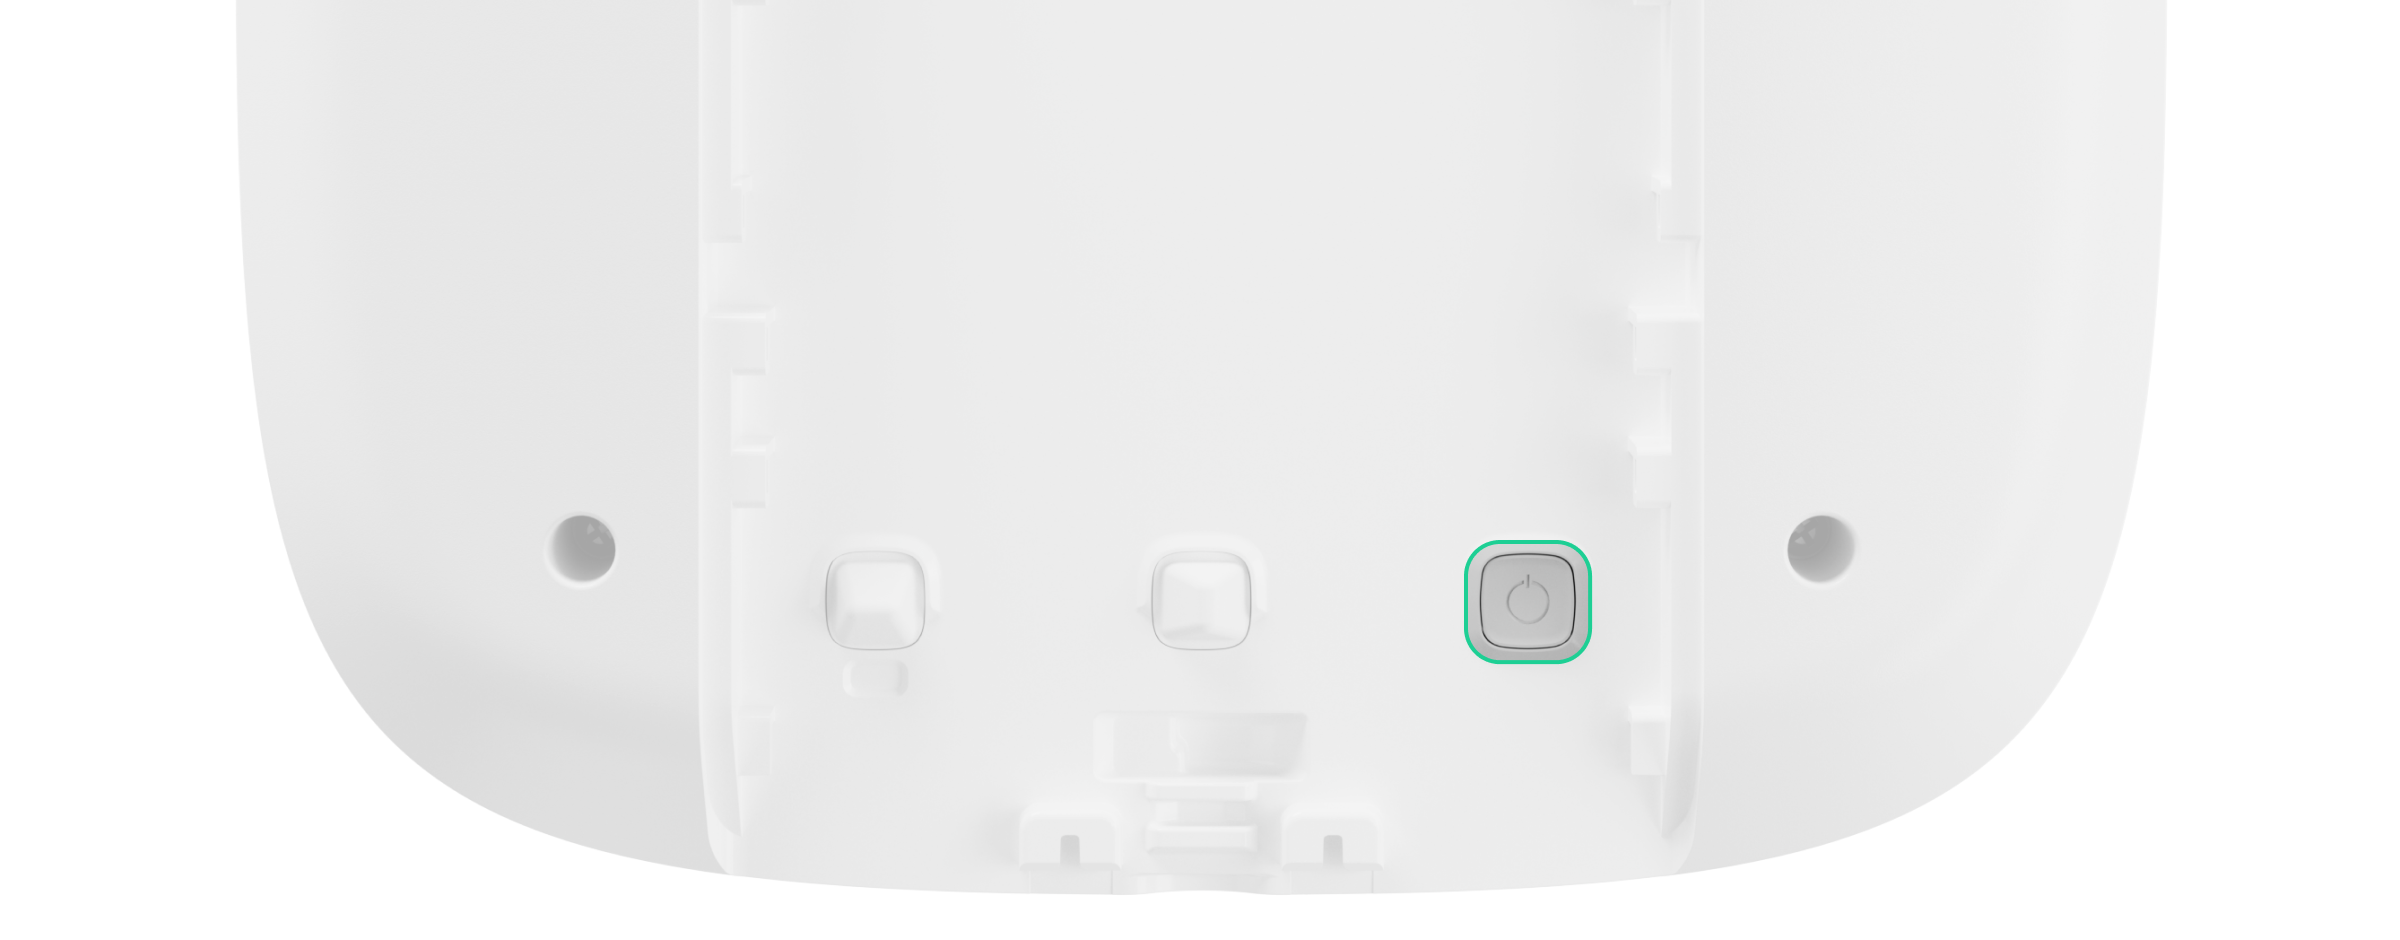
Кнопка живлення заглиблена в корпус, тож її важко натиснути. Можна використовувати тонкий твердий предмет, наприклад олівець.
Щоб додати Superior StreetSiren Plus G3 Jeweller на хаб, сирена повинна перебувати в зоні дії радіозвʼязку хаба, тобто на тому самому обʼєкті, що охороняється.
Superior StreetSiren Plus G3 Jeweller автоматично вимикається через шість секунд після ввімкнення, якщо її не вдалося додати на хаб. Тож для повторної спроби підключення не потрібно самостійно вимикати пристрій. Якщо сирену Superior StreetSiren Plus G3 Jeweller вже привʼязано до іншого хаба, вимкніть сирену й виконайте стандартну процедуру додавання на хаб.
Додана на хаб сирена зʼявиться у вкладці Пристрої в застосунку. Оновлення станів пристроїв у списку залежить від інтервалу опитування, визначеного в налаштуваннях Jeweller. Значення за початкових налаштувань — 36 секунд.
Несправності
Якщо виявлено несправність, у застосунку Ajax відображається лічильник несправностей на іконці пристрою. Усі несправності можна побачити у станах пристрою. Поля з несправностями підсвічуються червоним.
Несправність відображається, якщо:
- Температура пристрою виходить за допустимі межі.
- SmartBracket розблоковано (спрацювання кнопки тампера).
- Відсутній зв’язок із хабом або ретранслятором через протокол Jeweller.
- Відсутній зв’язок із хабом або ретранслятором радіосигналу через протокол Wings.
- Батарея пристрою розряджена.
Іконки
Іконки відображають деякі стани Superior StreetSiren Plus G3 Jeweller. Щоб переглянути їх:
- Увійдіть у застосунок Ajax.
- Виберіть хаб.
- Перейдіть у вкладку Пристрої .
| Іконка | Значення |
|
Рівень сигналу Jeweller. Відображає рівень сигналу між хабом і пристроєм. Рекомендоване значення: 2–3 поділки. |
|
|
Рівень заряду батареї сирени — OK. |
|
| Доступне оновлення прошивки. Опис і запуск оновлення доступні у станах і налаштуваннях пристрою. | |
| Відображається, якщо заряд батареї становить 25% або менше. | |
|
Відображається, якщо кріпильну панель розблоковано. |
|
|
Відображається, якщо виявлено високий рівень радіозавад. |
|
|
Відображається, якщо для опції Тест згасання сигналу вибрано параметр Згасання або Максимальна. |
|
| Відображається, коли сирена працює через ретранслятор радіосигналу. | |
|
Сирена інформує, що двері відчинено. |
|
|
Пристрій перебуває в режимі Тест згасання сигналу. |
|
|
Сирену примусово вимкнено. |
|
|
Сповіщення про тривоги тампера примусово вимкнено. |
|
|
Сирену вимкнено, доки систему не буде знято з охорони. |
|
|
Сповіщення про тривоги тампера вимкнено, доки систему не буде знято з охорони. |
|
| Пристрій втратив звʼязок із хабом, або хаб втратив звʼязок із сервером Ajax Cloud. | |
|
Пристрій не було перенесено на новий хаб. |
Стани
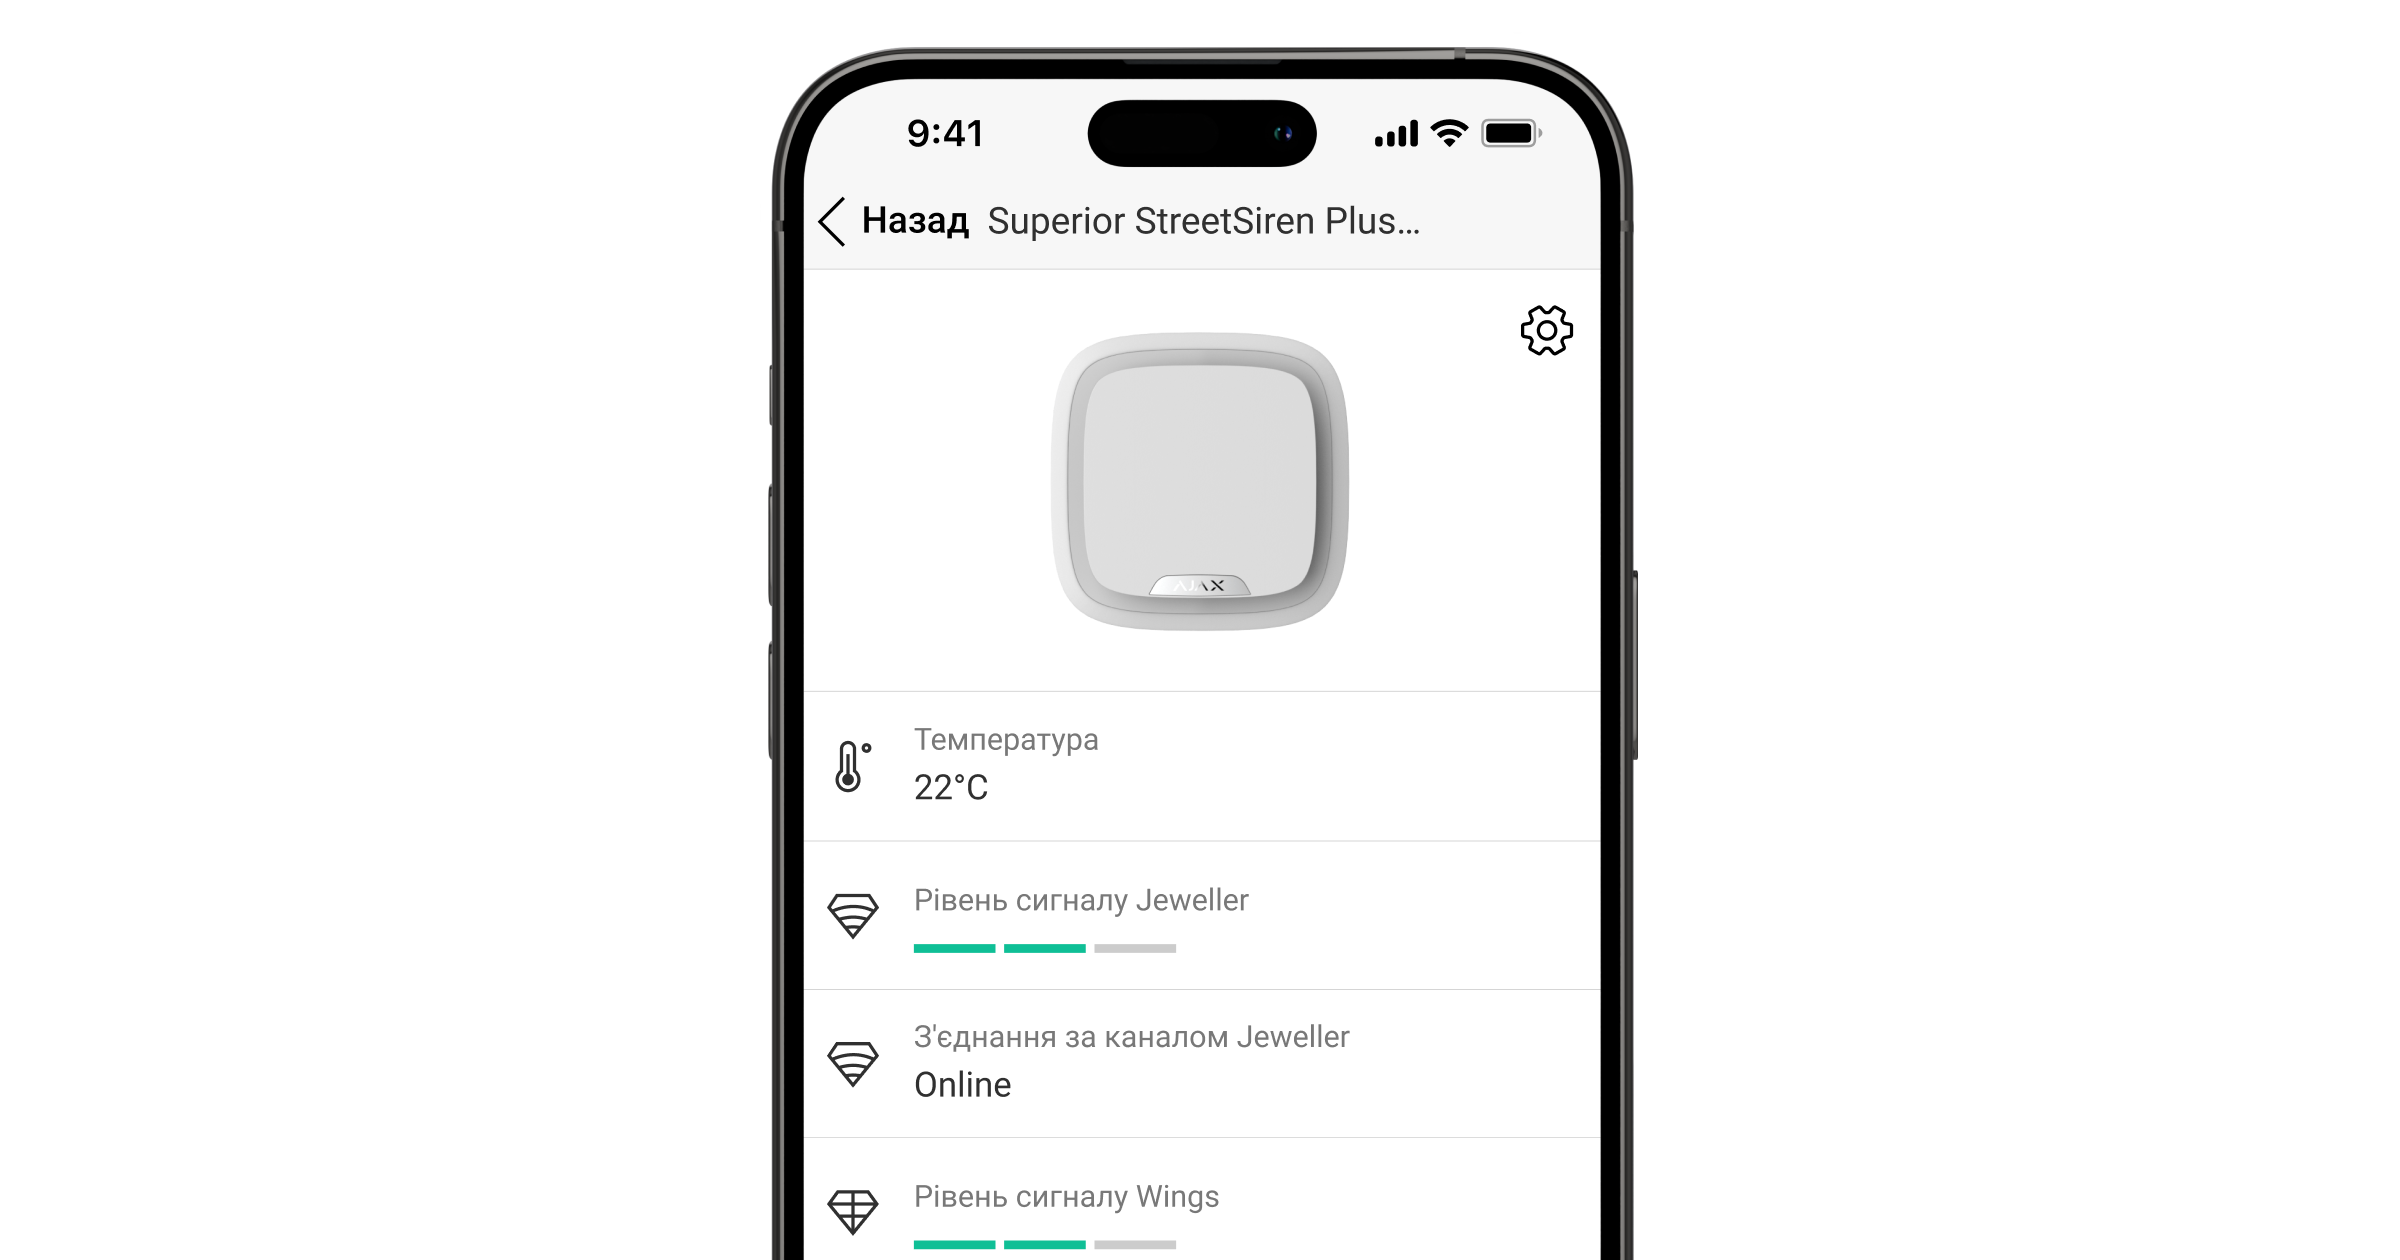
Стани містять інформацію про пристрій і його робочі параметри. Про стани Superior StreetSiren Plus G3 Jeweller можна дізнатися в застосунках Ajax:
- Перейдіть у вкладку Пристрої .
- Виберіть Superior StreetSiren Plus G3 Jeweller у списку.
| Параметр | Значення |
| Імпорт даних | Відображає помилку перенесення даних на новий хаб:
|
| Несправність |
Натисніть Поле з’являється, лише якщо виявлено несправність. |
| Доступна нова версія прошивки |
Натисніть Поле відображається, коли доступна нова версія прошивки. |
| Температура |
Температура пристрою. Вимірюється процесором і змінюється залежно від температури навколишнього середовища. Ви можете налаштувати сценарій за температурою для керування пристроями автоматизації. |
| Рівень сигналу Jeweller |
Рівень сигналу Jeweller між сиреною та хабом (або ретранслятором радіосигналу). Рекомендоване значення: 2–3 поділки. Jeweller — протокол для передавання подій і тривог. |
| З’єднання через канал Jeweller | Стан з’єднання між сиреною і хабом (або ретранслятором радіосигналу) через канал Jeweller:
|
| Рівень сигналу Wings |
Рівень сигналу Wings між сиреною та хабом (або ретранслятором радіосигналу). Рекомендоване значення: 2–3 поділки. Wings — протокол для оновлення прошивки пристрою. |
| З’єднання за каналом Wings | Стан з’єднання між сиреною і хабом (або ретранслятором радіосигналу) через канал Wings:
|
| Потужність радіопередавача |
Відображає вибрану потужність радіопередавача. Поле відображається, якщо вибрано опцію Максимальна або Згасання в меню Тест згасання сигналу. |
| <Імʼя ретранслятора> |
Стан з’єднання сирени з ретранслятором радіосигналу. Поле не відображається, якщо сирена працює прямо через хаб. |
| Заряд батареї | Рівень заряду батареї сирени. Є два стани:
Коли батарею потрібно буде замінити, користувачі й охоронна компанія отримають відповідні сповіщення. |
| Корпус | Стан кнопки тампера сирени, яка реагує на порушення цілісності корпусу:
|
| Кріпильна панель | Стан кнопки тампера сирени, яка реагує на розблокування SmartBracket:
|
| Зовнішнє живлення | Стан зовнішнього живлення сирени:
|
| Гучність сигналу тривоги | Гучність звукового сигналу в разі тривоги:
Рівень гучності вимірюється на відстані 3,3 фута від сирени. |
| Тривалість сигналу тривоги |
Тривалість звукового сигналу в разі тривоги: від 3 секунд до 3 хвилин. Налаштовується з кроком у три секунди. |
| LED-індикація | Налаштування світлодіодної індикації сирени:
|
| Посилене шифрування | Стан посиленого шифрування звʼязку між пристроєм і хабом або ретранслятором радіосигналу:
|
|
Налаштування сповіщень |
|
| Встановлення/зняття з охорони | Коли опцію ввімкнено, сирена попереджає про зміну режиму охорони блисканням світлодіодного індикатора та коротким звуковим сигналом |
| Увімкнення/вимкнення Нічного режиму | Коли опцію ввімкнено, сирена повідомляє про увімкнення та вимкнення Нічного режиму блисканням світлодіодного індикатора та коротким звуковим сигналом. |
| Затримки на вхід | Якщо опцію ввімкнено, сирена оповіщає про затримки на вхід коротким звуковим сигналом. |
| Затримки на вихід | Якщо опцію ввімкнено, сирена оповіщає про затримки на вихід коротким звуковим сигналом. |
| Затримки на вхід в Нічному режимі | Якщо опцію ввімкнено, сирена оповіщає про затримки на вхід у Нічному режимі звуковим сигналом. |
| Затримки на вихід в Нічному режимі | Якщо опцію ввімкнено, сирена оповіщає про затримки на вихід у Нічному режимі звуковим сигналом. |
| Про відчинення або натискання кнопки дзвінка |
Якщо опцію ввімкнено, сирена оповіщає про спрацювання датчиків відчинення або натискання кнопки відеодзвінка DoorBell, коли систему знято з охорони, звуковим сигналом. |
| Гучність сповіщень | Гучність звукових сповіщень про зміну режиму охорони, затримки на вхід/вихід або відчинення дверей:
Рівень гучності вимірюється на відстані 3,3 фута від сирени. |
| Рівень радіозавад | Поле показує рівень шуму в радіоканалі:
|
| Примусове вимкнення | Поле показує стан налаштування примусового вимкнення сирени:
|
| Вимкнення до зняття з охорони | Поле показує стан налаштування вимкнення до зняття з охорони сирени:
|
| Прошивка | Версія прошивки сирени. |
| Ідентифікатор | Ідентифікатор сирени. Також доступний на зворотному боці корпусу та на коробці пристрою. |
| Пристрій № | Номер шлейфа (зони) пристрою. |
Налаштування
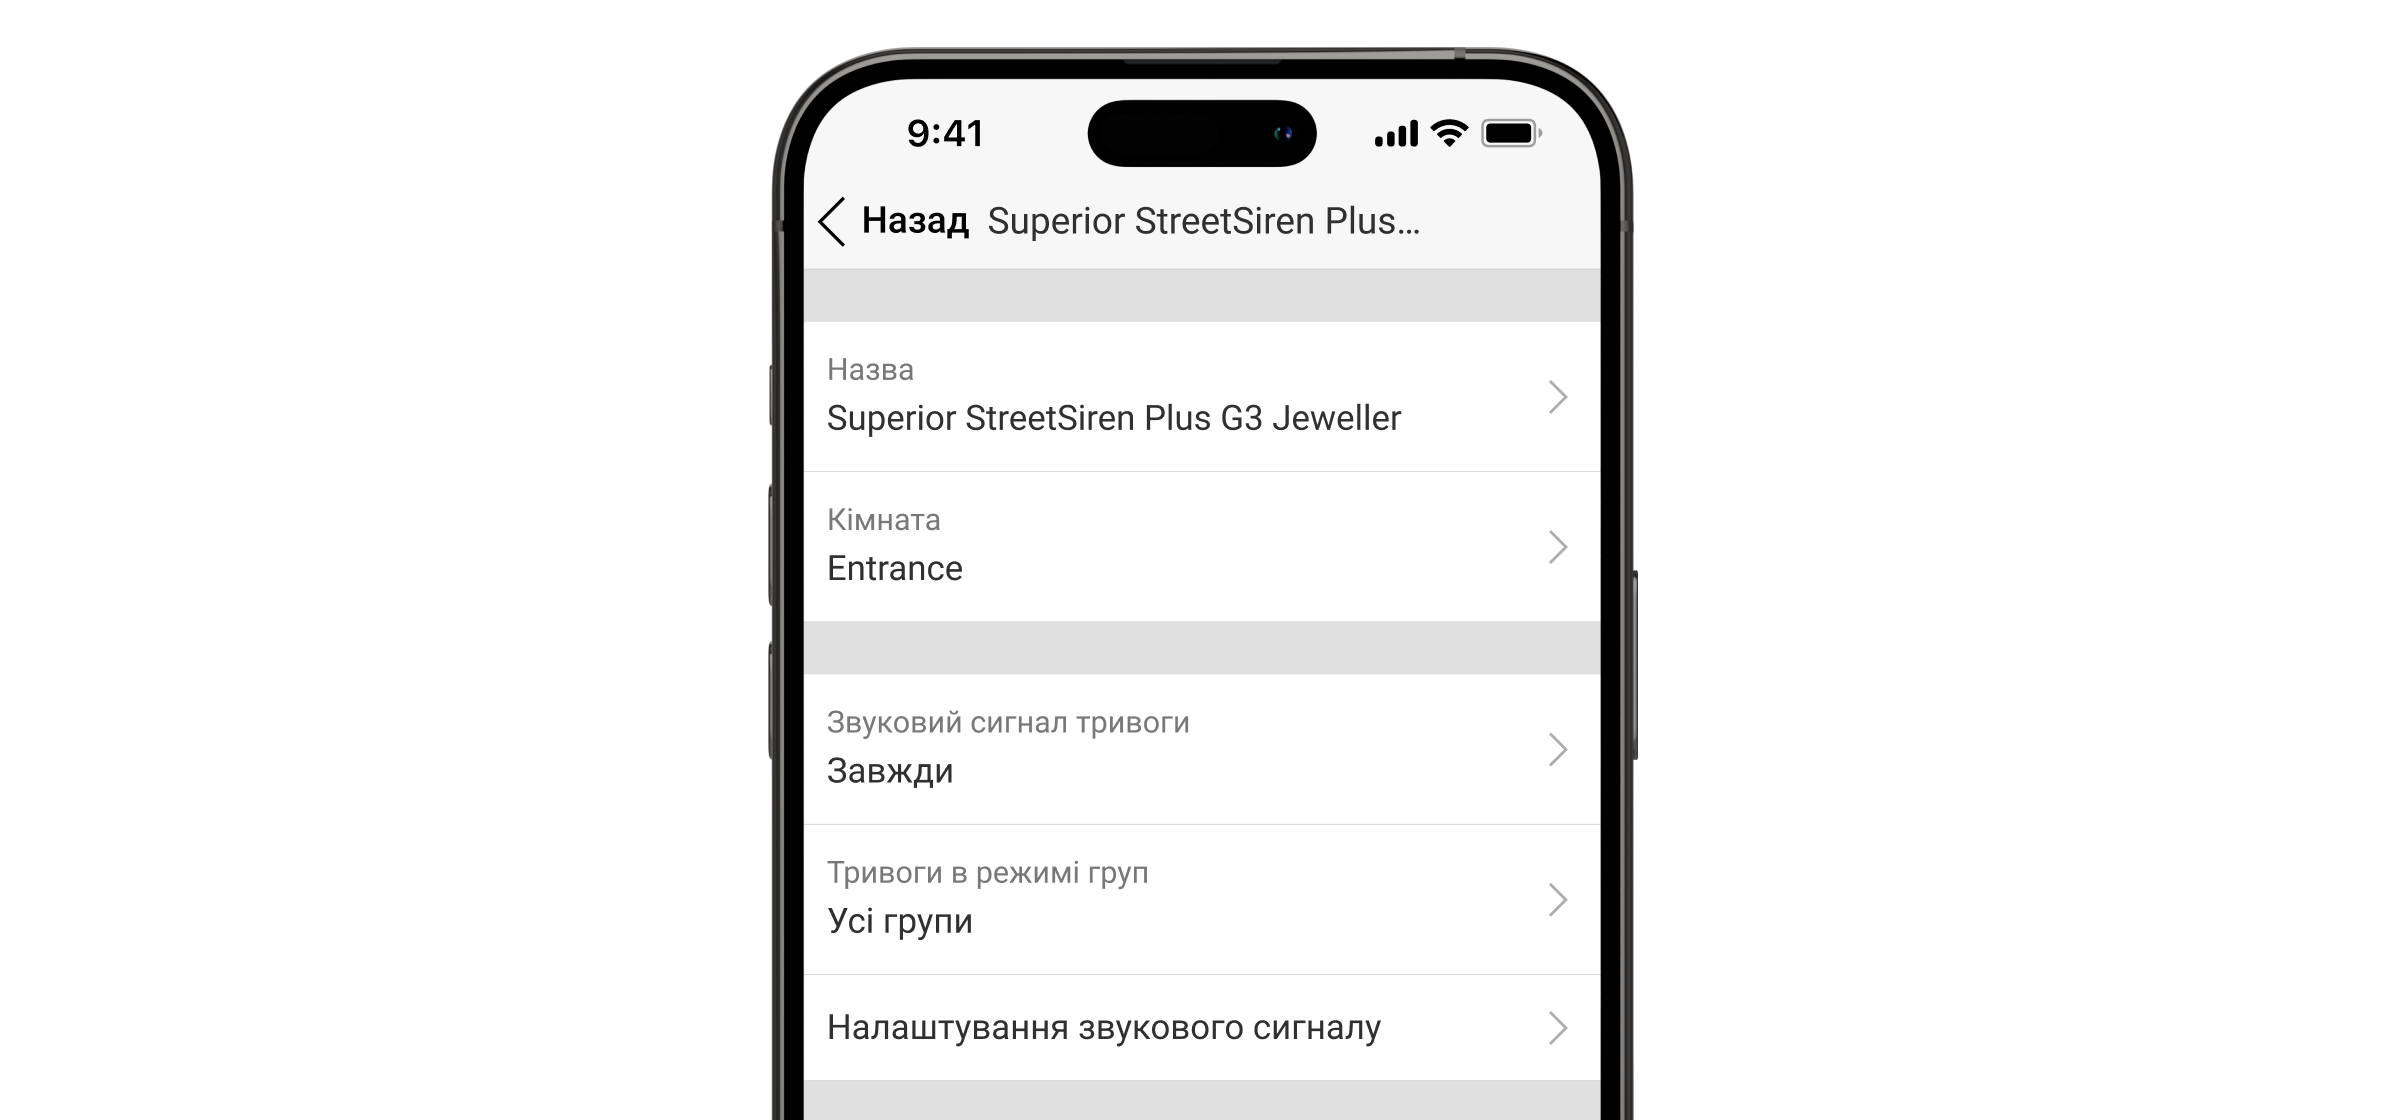
Щоб змінити налаштування Superior StreetSiren Plus G3 Jeweller, у застосунках Ajax:
- Перейдіть у вкладку Пристрої .
- Виберіть Superior StreetSiren Plus G3 Jeweller у списку.
- Перейдіть у Налаштування, натиснувши на іконку шестерні
 .
. - Задайте необхідні параметри.
- Натисніть Назад, щоб зберегти нові налаштування.
| Налаштування | Значення |
| Імʼя |
Імʼя сирени. Відображається у списку пристроїв хаба, SMS-повідомленнях і сповіщеннях у стрічці подій. Щоб змінити імʼя сирени, натисніть на текстове поле. Ім’я може містити до 12 символів кирилицею чи до 24 символів латиницею. |
| Кімната |
Вибір віртуальної кімнати, до якої слід привʼязати Superior StreetSiren Plus G3 Jeweller. Назва кімнати відображається у тексті SMS і сповіщень у стрічці подій. |
| Звуковий сигнал тривоги | Налаштування звукового оповіщення про тривогу.
|
| Тривоги в режимі груп | Вибір групи, до якої слід привʼязати сирену. Можна вибрати всі групи або одну:
Незалежно від вибраної групи сирена реагуватиме на активацію та тривоги в Нічному режимі. |
| Гучність сигналу тривоги | Сирена реагує на тривоги системи з вибраною гучністю:
Рівень гучності вимірюється на відстані 3,3 фута від сирени. |
| Тривалість сигналу тривоги |
Тривалість звукового сигналу в разі тривоги: від 3 секунд до 3 хвилин. Налаштовується з кроком у 3 секунди. |
| Звук сигналу тривоги | Дає змогу вибрати тип сигналу тривоги:
|
| LED-індикація | Налаштування світлодіодної індикації сирени:
|
| Тип LED-індикації | Коли підʼєднано зовнішнє живлення, можна вибрати тип підсвічування LED-рамки:
|
| Виявлення глушіння радіоефіру | Якщо опцію ввімкнено, охоронна компанія та користувачі отримають сповіщення про спробу саботажу. |
| Налаштування сповіщень | Відкривається меню налаштування сповіщень сирени. Детальний опис налаштувань доступний нижче. |
|
Вмикати сирену |
|
| Якщо відчинено корпус | Якщо опцію ввімкнено, сирена активує тривогу в разі відкриття корпусу. |
| Якщо зафіксовано високий рівень радіоперешкод | Якщо опцію ввімкнено, сирена активує тривогу в разі виявлення високого рівня радіозавад. |
| Тест рівня сигналу Jeweller |
Дає змогу користувачу перевести сирену в режим Тест рівня сигналу Jeweller. |
| Тест рівня сигналу Wings |
Дає змогу користувачу перевести сирену у режим Тест рівня сигналу Wings. Тест дає змогу перевірити рівень сигналу між хабом (або ретранслятором радіосигналу) та сиреною через бездротовий протокол передавання даних Wings, щоб визначити оптимальне місце встановлення. |
| Оновлення прошивки | Дає змогу користувачу перевести сирену в режим Оновлення прошивки за наявності нової версії. |
| Тест гучності |
Дає змогу користувачу перевести сирену в режим Тест гучності. |
| Тест згасання сигналу |
Дає змогу користувачу перевести сирену в режим Тест згасання сигналу. |
| Діагностика пристрою | Сирена запустить діагностику, щоб перевірити, чи достатньо заряду батареї для роботи. |
| Інструкція користувача | Дає змогу користувачу відкрити інструкцію з використання Superior StreetSiren Plus G3 Jeweller у застосунку Ajax. |
| Примусове вимкнення |
Дає змогу користувачу вимкнути сирену, не видаляючи її із системи. Доступні три опції:
Система також може автоматично вимкнути сирену після перевищення заданої кількості тривог або після закінчення таймера відновлення. |
| Вимкнення до зняття з охорони |
Дає змогу користувачу вимкнути сирену, доки систему не буде знято з охорони. Доступні три опції:
|
| Видалити пристрій | Дає змогу відключити Superior StreetSiren Plus G3 Jeweller від хаба та видалити її налаштування. |
Налаштування сповіщень
| Налаштування | Значення |
|
Сповіщення про зміну режиму охорони |
|
| Встановлення/зняття з охорони | Коли опцію ввімкнено, сирена попереджає про зміну режиму охорони блисканням світлодіодного індикатора та коротким звуковим сигналом |
| Увімкнення/вимкнення Нічного режиму |
Коли опцію ввімкнено, сирена повідомляє про увімкнення та вимкнення Нічного режиму блисканням світлодіодного індикатора та коротким звуковим сигналом. |
| Заглушати пристрій під час введення коду на клавіатурі | Вимикає звукові оповіщення, коли користувач починає вводити код на клавіатурі. Завдяки цій опції користувачі можуть зосередитися на знятті системи з охорони. |
|
Сповіщення про затримки |
|
| Затримки на вхід |
Якщо опцію ввімкнено, сирена оповіщає про затримки на вхід звуковим сигналом. |
| На вихід |
Якщо опцію ввімкнено, сирена оповіщає про затримки на вихід звуковим сигналом. |
| На вхід в Нічному режимі |
Якщо опцію ввімкнено, сирена оповіщає про затримки на вхід у нічному режимі звуковим сигналом. |
| На вихід в Нічному режимі | Якщо опцію ввімкнено, сирена оповіщає про затримки на вихід у нічному режимі звуковим сигналом. |
|
Прискорений сигнал затримок |
|
| Прискорений сигнал про завершення затримки на вхід | Інформує користувача про те, що час Затримки на вхід спливає. Можна вибрати один із чотирьох варіантів, коли має починатися прискорений сигнал:
|
| Прискорений сигнал про завершення затримки на вихід | Інформує користувача про те, що час Затримки на вихід спливає. Можна вибрати один із чотирьох варіантів, коли має починатися прискорений сигнал:
|
|
Сповіщення не під охороною |
|
| Про відчинення або натискання кнопки дзвінка |
Якщо опцію ввімкнено, сирена видає короткий звуковий сигнал, що свідчить про спрацювання датчиків відчинення, коли систему знято з охорони. |
| Гучність сповіщень | Дає змогу користувачу вибрати рівень гучності оповіщень про зміну режиму охорони, затримку на вхід/вихід і відчинення дверей:
Рівень гучності вимірюється на відстані 3,3 фута від сирени. |
Реакція сирени на тривогу пристрою
У застосунках Ajax можна окремо налаштувати реакцію сирени на тривоги кожного пристрою в системі. У налаштуваннях певного пристрою можна задати, щоб сирена не оповіщала про його спрацювання. Наприклад, якщо LeaksProtect Jeweller активує сигнал тривоги.
Щоб налаштувати реакцію сирени на тривогу пристрою:
- Відкрийте застосунок Ajax.
- Перейдіть у вкладку Пристрої .
- Виберіть пристрій, для якого потрібно налаштувати реакцію сирени.
- Перейдіть у Налаштування .
- Знайдіть розділ Активувати сирену і увімкніть потрібні опції.
- Повторіть кроки 3–5 для решти пристроїв у системі.
Сирена за початкових налаштувань реагує на тривоги всіх пристроїв у системі.
Реакція сирени на тривогу тампера
У застосунках Ajax можна налаштувати реакцію сирени на тривоги тампера кожного пристрою системи. Якщо опцію ввімкнено, сирена видасть короткий сигнал, коли спрацює кнопка тампера пристрою.
Щоб налаштувати реакцію сирени на тривогу тампера:
- Відкрийте застосунок Ajax.
- Перейдіть у вкладку Пристрої .
- Виберіть хаб і перейдіть у його Налаштування .
- Виберіть меню Сервісні.
- Перейдіть у розділ Звуки тривог і несправностей.
- Увімкніть опцію Якщо відкрито корпус хаба або датчика.
- Натисніть Назад, щоб зберегти налаштування.
Реакція сирени на натискання тривожної кнопки в застосунку
Сирена може реагувати на натискання тривожної кнопки в застосунку.
Тривожну кнопку можна натиснути, навіть якщо систему знято з охорони.
Щоб налаштувати реакцію сирени на натискання тривожної кнопки в застосунку:
- Відкрийте застосунок Ajax.
- Перейдіть у вкладку Пристрої .
- Виберіть хаб і перейдіть у його Налаштування .
- Виберіть меню Сервісні.
- Перейдіть у розділ Звуки тривог і несправностей.
- Увімкніть опцію Якщо натиснуто тривожну кнопку в застосунку.
- Натисніть Назад, щоб зберегти налаштування.
Налаштування індикації сирен після тривоги
Світлодіодною індикацією сирена може інформувати, що в системі під охороною було спрацювання.
Принцип роботи:
- Система фіксує тривогу.
- Сирена видає звуковий сигнал тривоги. Тривалість і гучність залежать від налаштувань.
- Тип світлодіодної індикації сирени відповідає налаштуванню Тип LED-індикації:
- Світлодіодний індикатор у нижньому правому куті блискає двічі приблизно кожні три секунди.
- Вся світлодіодна рамка блискає один раз приблизно кожні три секунди, якщо підʼєднано зовнішнє живлення.
Індикація триватиме, поки систему не буде знято з охорони.
Ця функція дає змогу користувачам і проїжджим патрулям побачити, що спрацювала сирена.
Індикація сирени після тривоги не працює для завжди активних датчиків, якщо на момент спрацювання систему було знято з охорони.
Щоб увімкнути індикацію сирени після тривоги, у PRO-застосунку Ajax:
- Перейдіть у налаштування хаба:
- Хаб → Налаштування → Сервісні → LED-індикація
- Хаб → Налаштування
- Виберіть, про які події сирени інформуватимуть подвійним блисканням світлодіодного індикатора до зняття системи з охорони:
- Підтвердженої тривоги
- Непідтвердженої тривоги
- Розкриття корпусу
- Виберіть потрібні сирени. Поверніться до LED-індикації. Задані параметри будуть збережені.
- Натисніть Назад. Всі значення будуть застосовані.
Спецсигнали на скасування та відміну тривоги
У PRO-застосунках Ajax можна налаштувати, які пристрої мають спрацьовувати в разі скасування тривоги, а які — в разі її відміни. Сповіщення про скасування тривоги та Сповіщення про відміну тривоги є обов’язковими для систем, які повинні відповідати стандартам ANSI/SIA CP-01-2019*.
Щоб вибрати пристрої для сповіщення про скасування та відміну сигналу тривоги, у PRO-застосунку Ajax:
- Виберіть потрібний хаб і перейдіть у:
- Налаштування → Сервісні → Встановлення/зняття з охорони
- Налаштування
- Переконайтеся, що для налаштування Відповідність стандартам вибрано ANSI/SIA CP-01-2019.
- Виберіть пристрої, щоб налаштувати опції Спецсигнал на скасування тривоги та Спецсигнал на відміну тривоги.
- Натисніть Назад, щоб зберегти налаштування.
* Сирена Superior StreetSiren Plus G3 Jeweller не сертифікована відповідно до вимог ANSI/SIA CP-01-2019.
Як налаштувати cповіщення про відчинення
Сповіщення про відчинення — це звуковий сигнал про спрацювання датчиків відчинення, коли система не перебуває в режимі охорони. Функцію можна використовувати, наприклад, у магазинах, щоб сповістити співробітників, що хтось увійшов до приміщення.
Сповіщення налаштовуються у два етапи: перший — налаштування сирен, другий — налаштування датчиків відчинення.
Індикація
| Подія | Індикація |
| Тривога |
Сирена видає звуковий сигнал, а світлодіодна рамка блискає червоним. Тривалість і гучність звукового сигналу, а також наявність світлодіодної індикації залежать від налаштувань сирени. |
|
У системі під охороною виявлено тривогу (якщо увімкнено індикацію після тривоги) |
Світлодіодний індикатор в правому нижньому куті блискає червоним двічі приблизно кожні три секунди, доки систему не буде знято з охорони. Якщо функція Повне підсвічування увімкнена, уся світлодіодна рамка блискає червоним один раз кожні три секунди. Світлодіодна індикація вмикається після того, як сирена припиняє видавати звуковий сигнал. |
| Увімкнення сирени | Світлодіодна рамка блискає червоним один раз. |
| Вимкнення сирени | Світлодіодна рамка загоряється червоним приблизно на секунду, а потім блискає тричі. |
| Не вдалося встановити звʼязок із хабом | Світлодіодний індикатор у правому нижньому куті блискає шість разів. Тоді вся світлодіодна рамка блискає тричі, а потім сирена вимикається. |
|
Систему встановлено під охорону (якщо ввімкнено LED-індикацію) |
Світлодіодна рамка блискає один раз, а сирена видає короткий звуковий сигнал |
|
Систему знято з охорони (якщо ввімкнено LED-індикацію) |
Світлодіодна рамка блискає двічі, а сирена видає два короткі звукові сигнали. |
|
Сирена перебуває в режимі охорони (якщо ввімкнено LED-індикацію) |
Світлодіодний індикатор у правому нижньому куті загоряється що три секунди. Якщо ввімкнено опцію Повне підсвічування , вся світлодіодна рамка загоряється що три секунди. |
| Низький заряд батареї | Світлодіодний індикатор у нижньому правому куті плавно загоряється й гасне в разі зміни режиму охорони, активації тривоги, відкриття корпусу сирени або спроби відірвати її від поверхні. |
|
Триває затримка на вхід/вихід (якщо ввімкнено Сповіщення про затримки) |
Світлодіодний індикатор у нижньому правому куті блискає раз на секунду. Якщо увімкнено опцію Повне підсвічування, вся світлодіодна рамка блискає раз на секунду. Індикація вмикається, коли починається затримка. Якщо ввімкнено опцію Прискорений сигнал затримок, світлодіодний індикатор блискає що пів секунди, коли час затримки спливає. |
| Звʼязок із хабом втрачено | Світлодіодний індикатор блискає червоним тричі кожні шість секунд. |
Тестування працездатності
У системі Ajax передбачено декілька тестів, які допомагають правильно вибрати місце встановлення сирени. Тестування починається не одразу: час очікування не перевищує тривалість одного інтервалу опитування пристрою. Інтервал опитування можна перевірити та встановити в налаштуваннях хаба (Хаб → Налаштування ![]() → Jeweller або Jeweller/Fibra).
→ Jeweller або Jeweller/Fibra).
Щоб запустити тест, у застосунку Ajax:
- Виберіть потрібний хаб.
- Перейдіть у вкладку Пристрої .
- Виберіть Superior StreetSiren Plus G3 Jeweller у списку.
- Перейдіть у Налаштування .
- Виберіть тест:
- Запустіть і проведіть тестування.
Діагностика пристрою
Діагностика пристрою дає змогу користувачам перевірити стан батареї. Тест запускається автоматично раз на 24 години одразу після увімкнення пристрою та після того, як закрито кришку. Діагностику також можна запустити вручну в застосунку Ajax, щоб перевірити стан батареї у будь-який час.
Ручна діагностика триває до 10 секунд, тоді як автоматична не перериває роботу пристрою і триває до 2 секунд.
Вибір місця встановлення
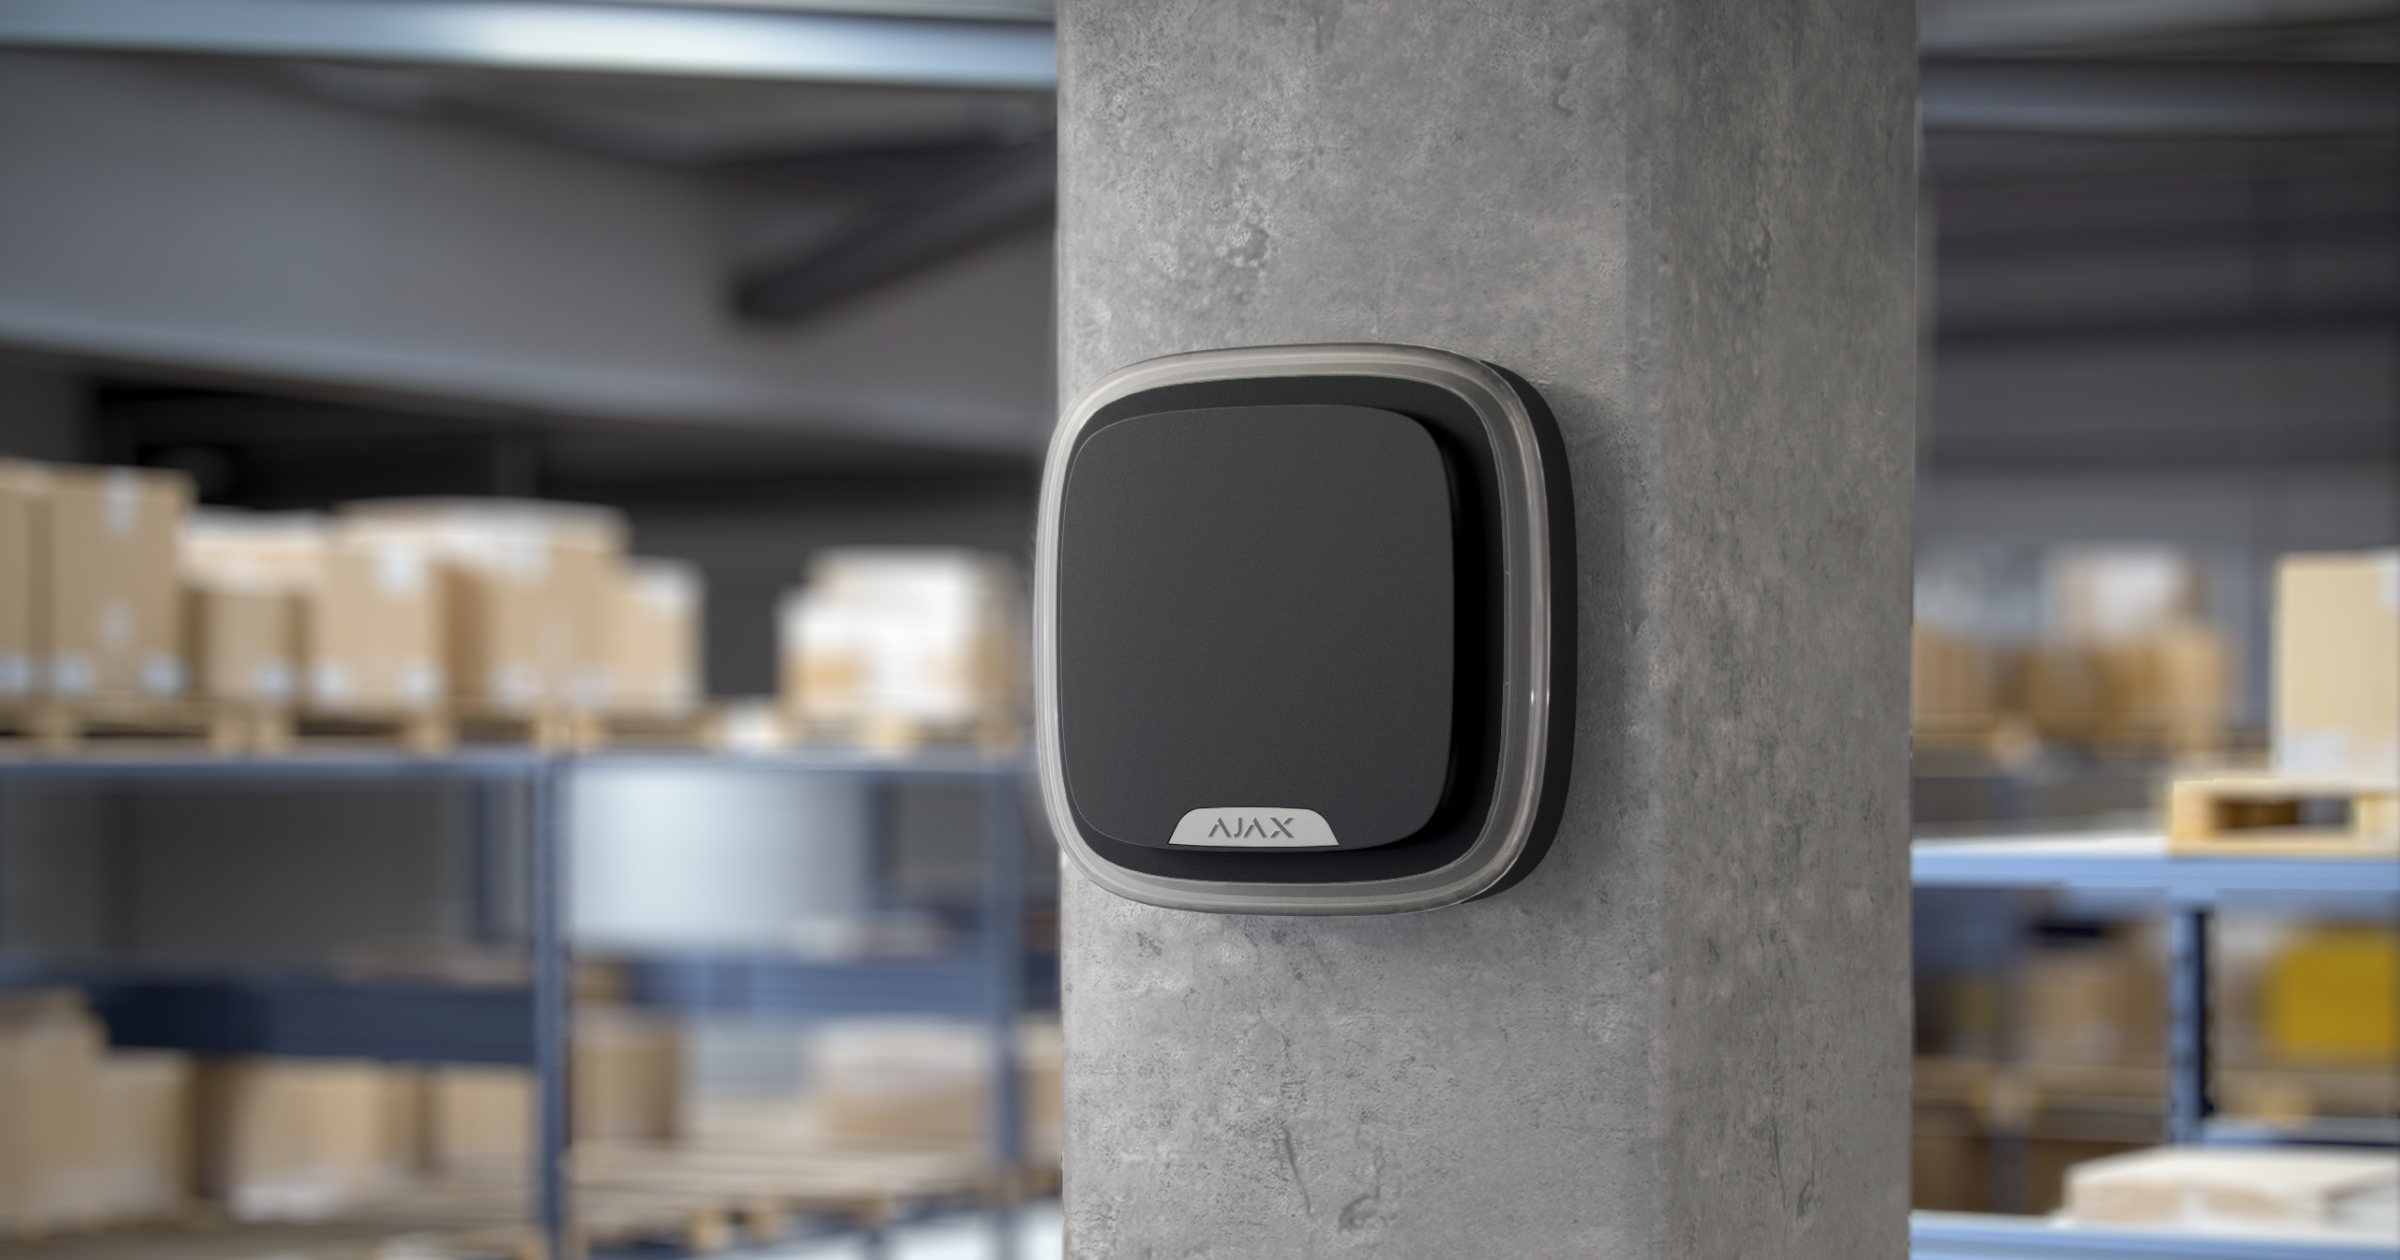
Місце встановлення Superior StreetSiren Plus G3 Jeweller визначається відстанню від хаба та наявністю перешкод, що заважають проходженню радіосигналу, як-от стін, міжповерхових перекриттів або великих конструкцій на обʼєкті.
Під час вибору місця встановлення слід враховувати рівень гучності сирени, а також видимість світлодіодної індикації, оскільки від цього залежить ефективність роботи пристрою.
Superior StreetSiren Plus G3 Jeweller витримує спеку, холод і перепади температури. Герметичний корпус сертифікований і відповідає класу захисту IP54. Сирена захищена від дощу та снігу, тож її можна встановлювати на фасадах будівель без навісу.
Рівень сигналу
Рівень сигналу Jeweller визначається кількістю недоставлених або пошкоджених пакетів даних за певний проміжок часу. Іконка ![]() у вкладці Пристрої
у вкладці Пристрої ![]() повідомляє про рівень сигналу:
повідомляє про рівень сигналу:
- Три поділки — відмінний рівень сигналу.
- Дві поділки — достатній рівень сигналу.
- Одна поділка — низький рівень сигналу; стабільну роботу не гарантовано.
- Перекреслена іконка — сигнал відсутній.
Перевіряйте рівень сигналу Jeweller перед встановленням. Якщо рівень сигналу показує одну поділку або сигнал відсутній, стабільну роботу пристрою не гарантовано. У цьому разі рекомендуємо перемістити пристрій: зміна положення навіть на 7,87″ може значно поліпшити рівень сигналу. Якщо після переміщення сирена все ще має низький або нестабільний рівень сигналу, використовуйте ретранслятор радіосигналу.
Де не можна встановлювати сирену
- Поблизу датчиків розбиття скла. Звук сирени може активувати тривогу.
- У місцях, де звуковий сигнал пристрою може бути заглушений.
- У місцях, де не буде видно світлодіодну індикацію сирени.
- Поблизу металевих предметів і дзеркал. Вони можуть спричиняти згасання й екранування сигналу.
- На відстані ближче ніж 3,3 фута до хаба (або ретранслятора радіосигналу). Це може призвести до втрати звʼязку між сиреною та хабом.
- У місцях із низьким або нестабільним рівнем сигналу. Це може призвести до втрати звʼязку з хабом.
Встановлення
Під’єднання зовнішнього живлення
Під час підʼєднання зовнішнього джерела живлення й експлуатації Superior StreetSiren Plus G3 Jeweller дотримуйтеся загальних правил електробезпеки щодо користування електроприладами, а також вимог нормативно-правових актів з електробезпеки.
Superior StreetSiren Plus G3 Jeweller працює до 10 років від попередньо встановлених батарей і оснащена клемами для підʼєднання джерела живлення 12 В⎓.
Перед встановленням пристрою переконайтеся, що кабелі не пошкоджені. Використовуйте лише джерело живлення із заземленням. Категорично заборонено розбирати пристрій під напругою. Не використовуйте пристрій із пошкодженим кабелем живлення.
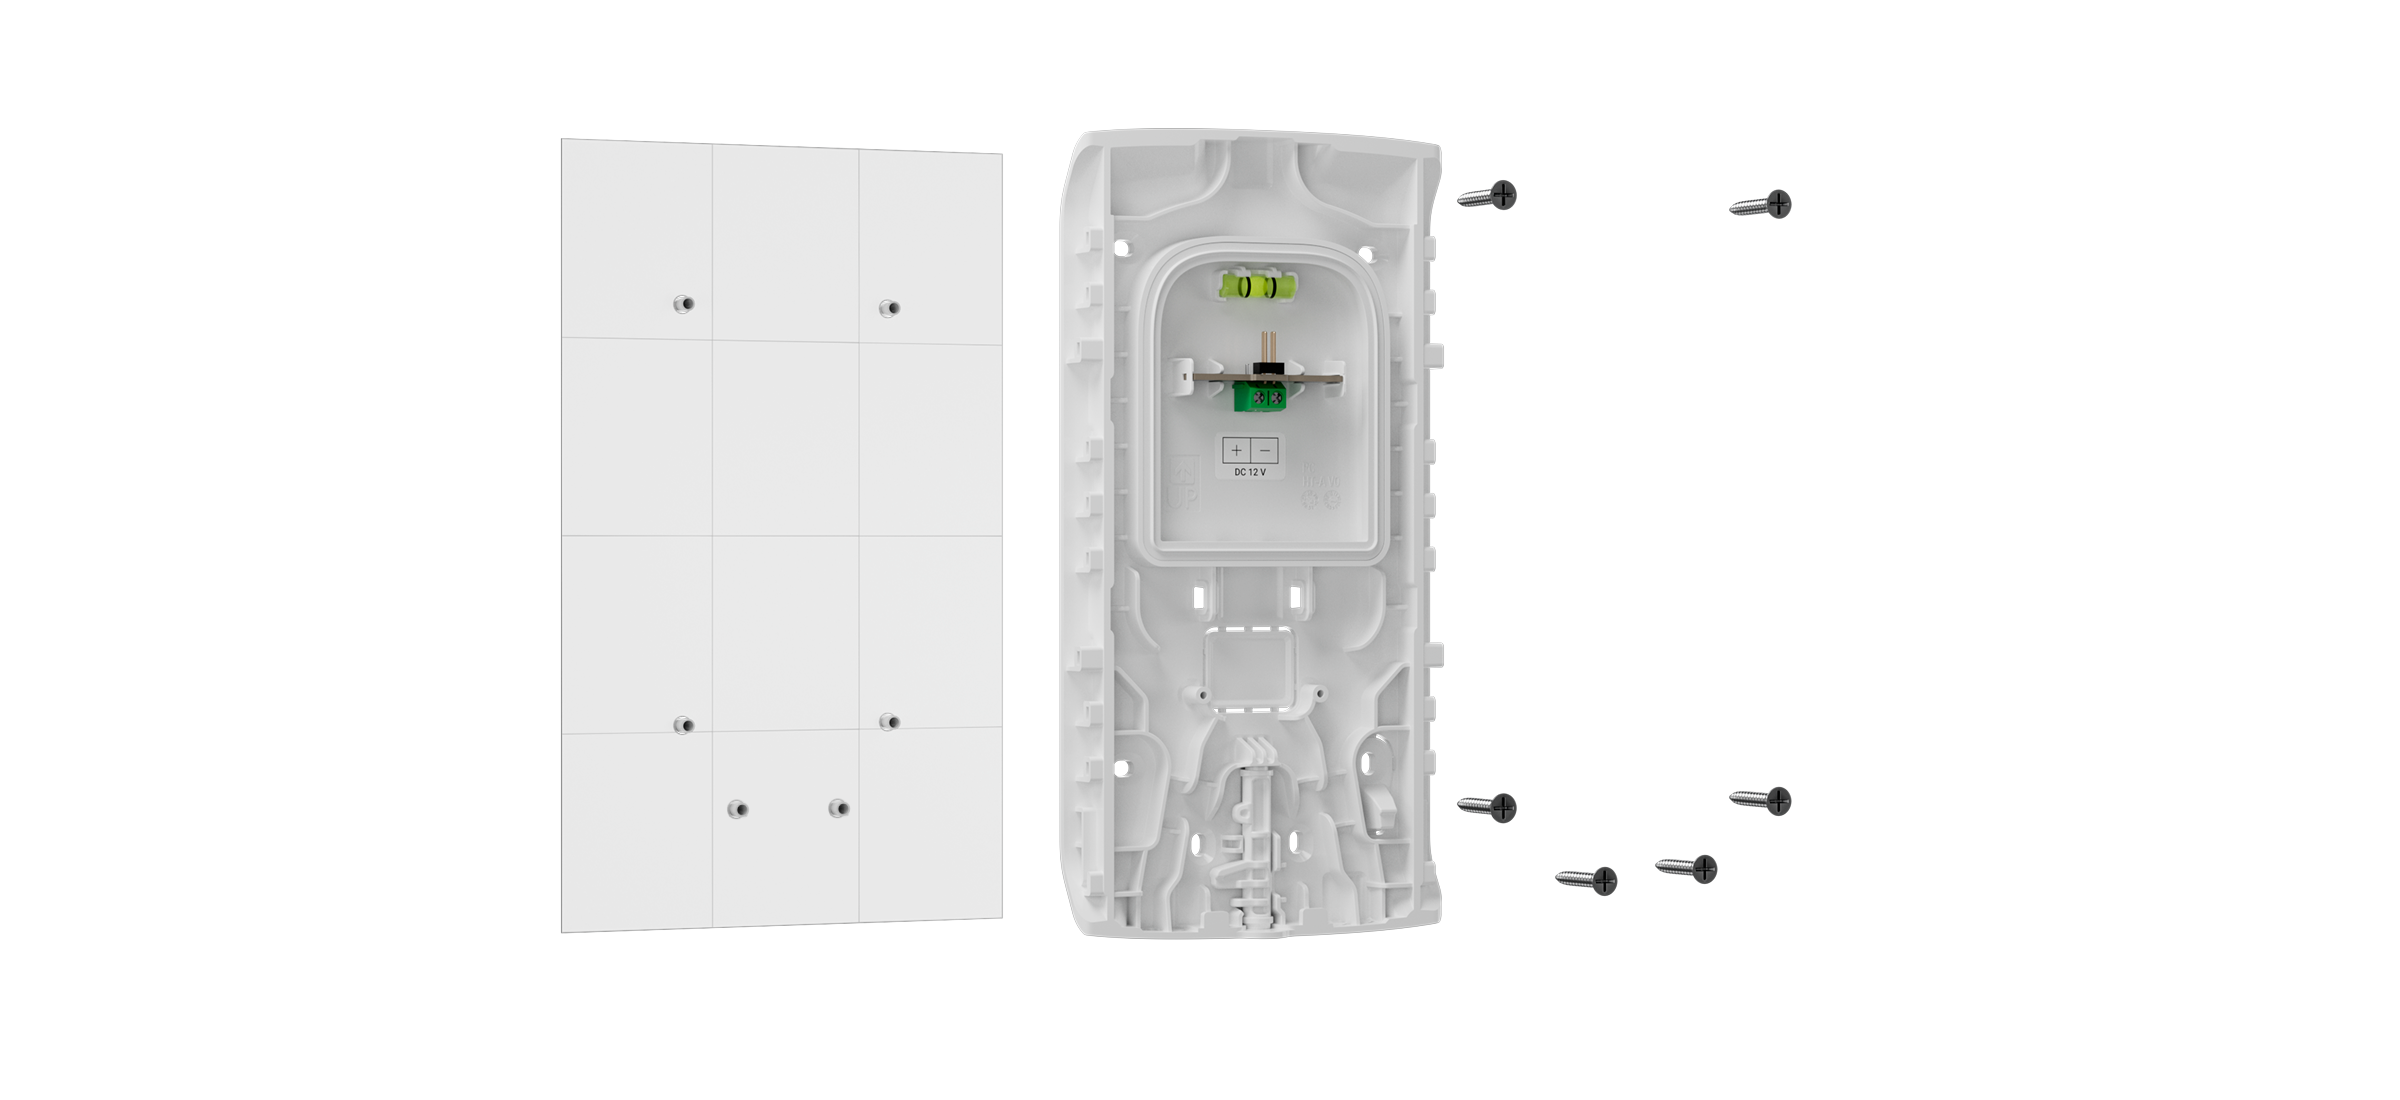
Щоб під’єднати сторонній блок живлення:
- Обережно відламайте відповідну перфоровану частину, щоб прокласти кабель ззаду або знизу SmartBracket. Якщо потрібно вивести кабель зверху, просвердліть отвір 0,24″ у верхній частині позначеної області на кріпильній панелі SmartBracket.
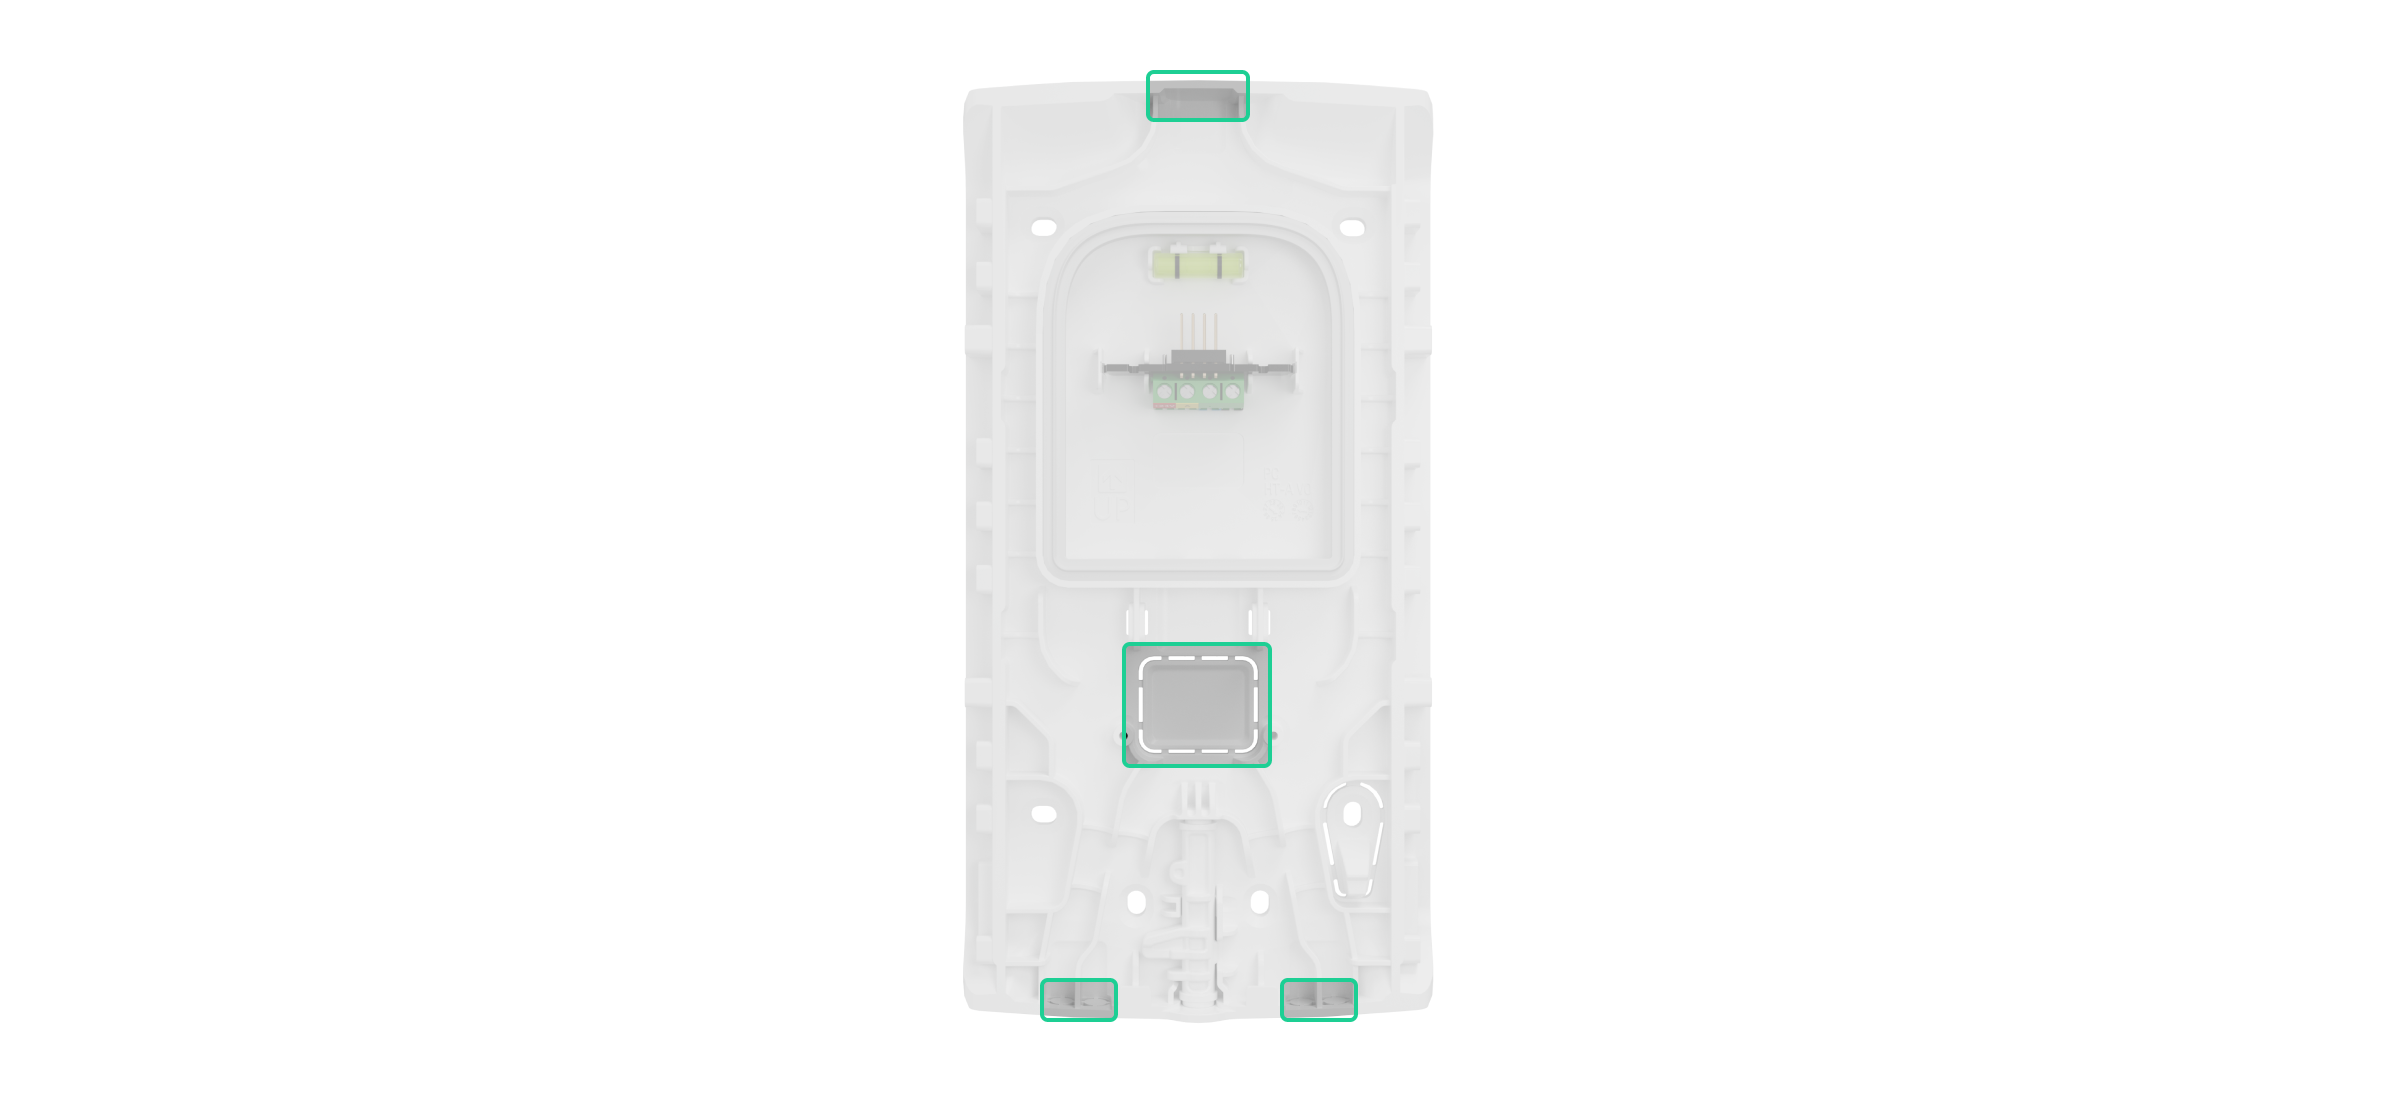
- Виведіть кабель знеструмленого джерела живлення через кріпильну панель.
- Підʼєднайте кабель до клемної колодки, дотримуючись полярності.

- вімкніть живлення, і значення Зовнішнє живлення у станах сирени Superior StreetSiren Plus G3 Jeweller зміниться на Підключено.
- Встановіть сирену.
Після підʼєднання живлення не виймайте батареї із сирени, оскільки вони працюють як резервне джерело.
Система сповістить користувачів про необхідність проведення технічного обслуговування, коли рівень заряду батареї зменшиться до 25%.
Встановлення сирени
Перед встановленням сирени переконайтеся, що вибрали оптимальне місце, яке відповідає умовам цієї інструкції.
Мінімальна рекомендована висота встановлення — 8,2 фута, тож зловмисникам буде важче дотягнутися до пристрою Якщо хтось спробує зняти сирену з кріпильної панелі, система активує тривогу. Охоронна компанія та користувачі отримають сповіщення про спробу саботажу, а сирена відлякає зловмисників.
Щоб встановити сирену:
- Закріпіть панель SmartBracket на поверхні комплектними гвинтами. Якщо ви використовуєте інші засоби кріплення, переконайтеся, що вони не пошкоджують і не деформують кріпильну панель.

Використовуйте двосторонній скотч тільки для тимчасового кріплення. Закріплений на скотч пристрій може будь-якої миті відклеїтися від поверхні. Поки пристрій закріплено на двосторонній скотч, кнопка тампера не спрацює, якщо хтось спробує відірвати пристрій від поверхні.
- Прикріпіть сирену до SmartBracket і натисніть на неї, щоб встановити.
- Зафіксуйте сирену за допомогою спеціального замка. Це знижує ризик крадіжки.
Обслуговування
Регулярно перевіряйте сирену, щоб переконатися, що вона працює належним чином. Очищайте корпус пристрою від пилу, павутиння й інших забруднень, щойно вони з’являтимуться. Використовуйте м’яку суху серветку, яка підходить для догляду за технікою.
Не використовуйте для очищення пристрою речовини, що містять спирт, ацетон, бензин чи інші активні розчинники.
Встановлені батареї забезпечують до 10 років автономної роботи сирени. Коли батарея розрядиться, ви отримаєте відповідне сповіщення. Крім того, світлодіодний індикатор у нижньому правому куті плавно загоряється й гасне в разі зміни режиму охорони, активації тривоги, відкриття корпусу сирени або спроби відірвати її від поверхні.
Гарантія
Гарантія на продукцію товариства з обмеженою відповідальністю «Аджакс Сістемс Манюфекчурінг» діє 2 роки після придбання.
Якщо пристрій працює некоректно, рекомендуємо спочатку звернутися до служби технічної підтримки Ajax: у більшості випадків технічні питання можна владнати дистанційно.
Зв’язатися зі службою технічної підтримки:
Вироблено ТОВ «АС Манюфекчурінг»
