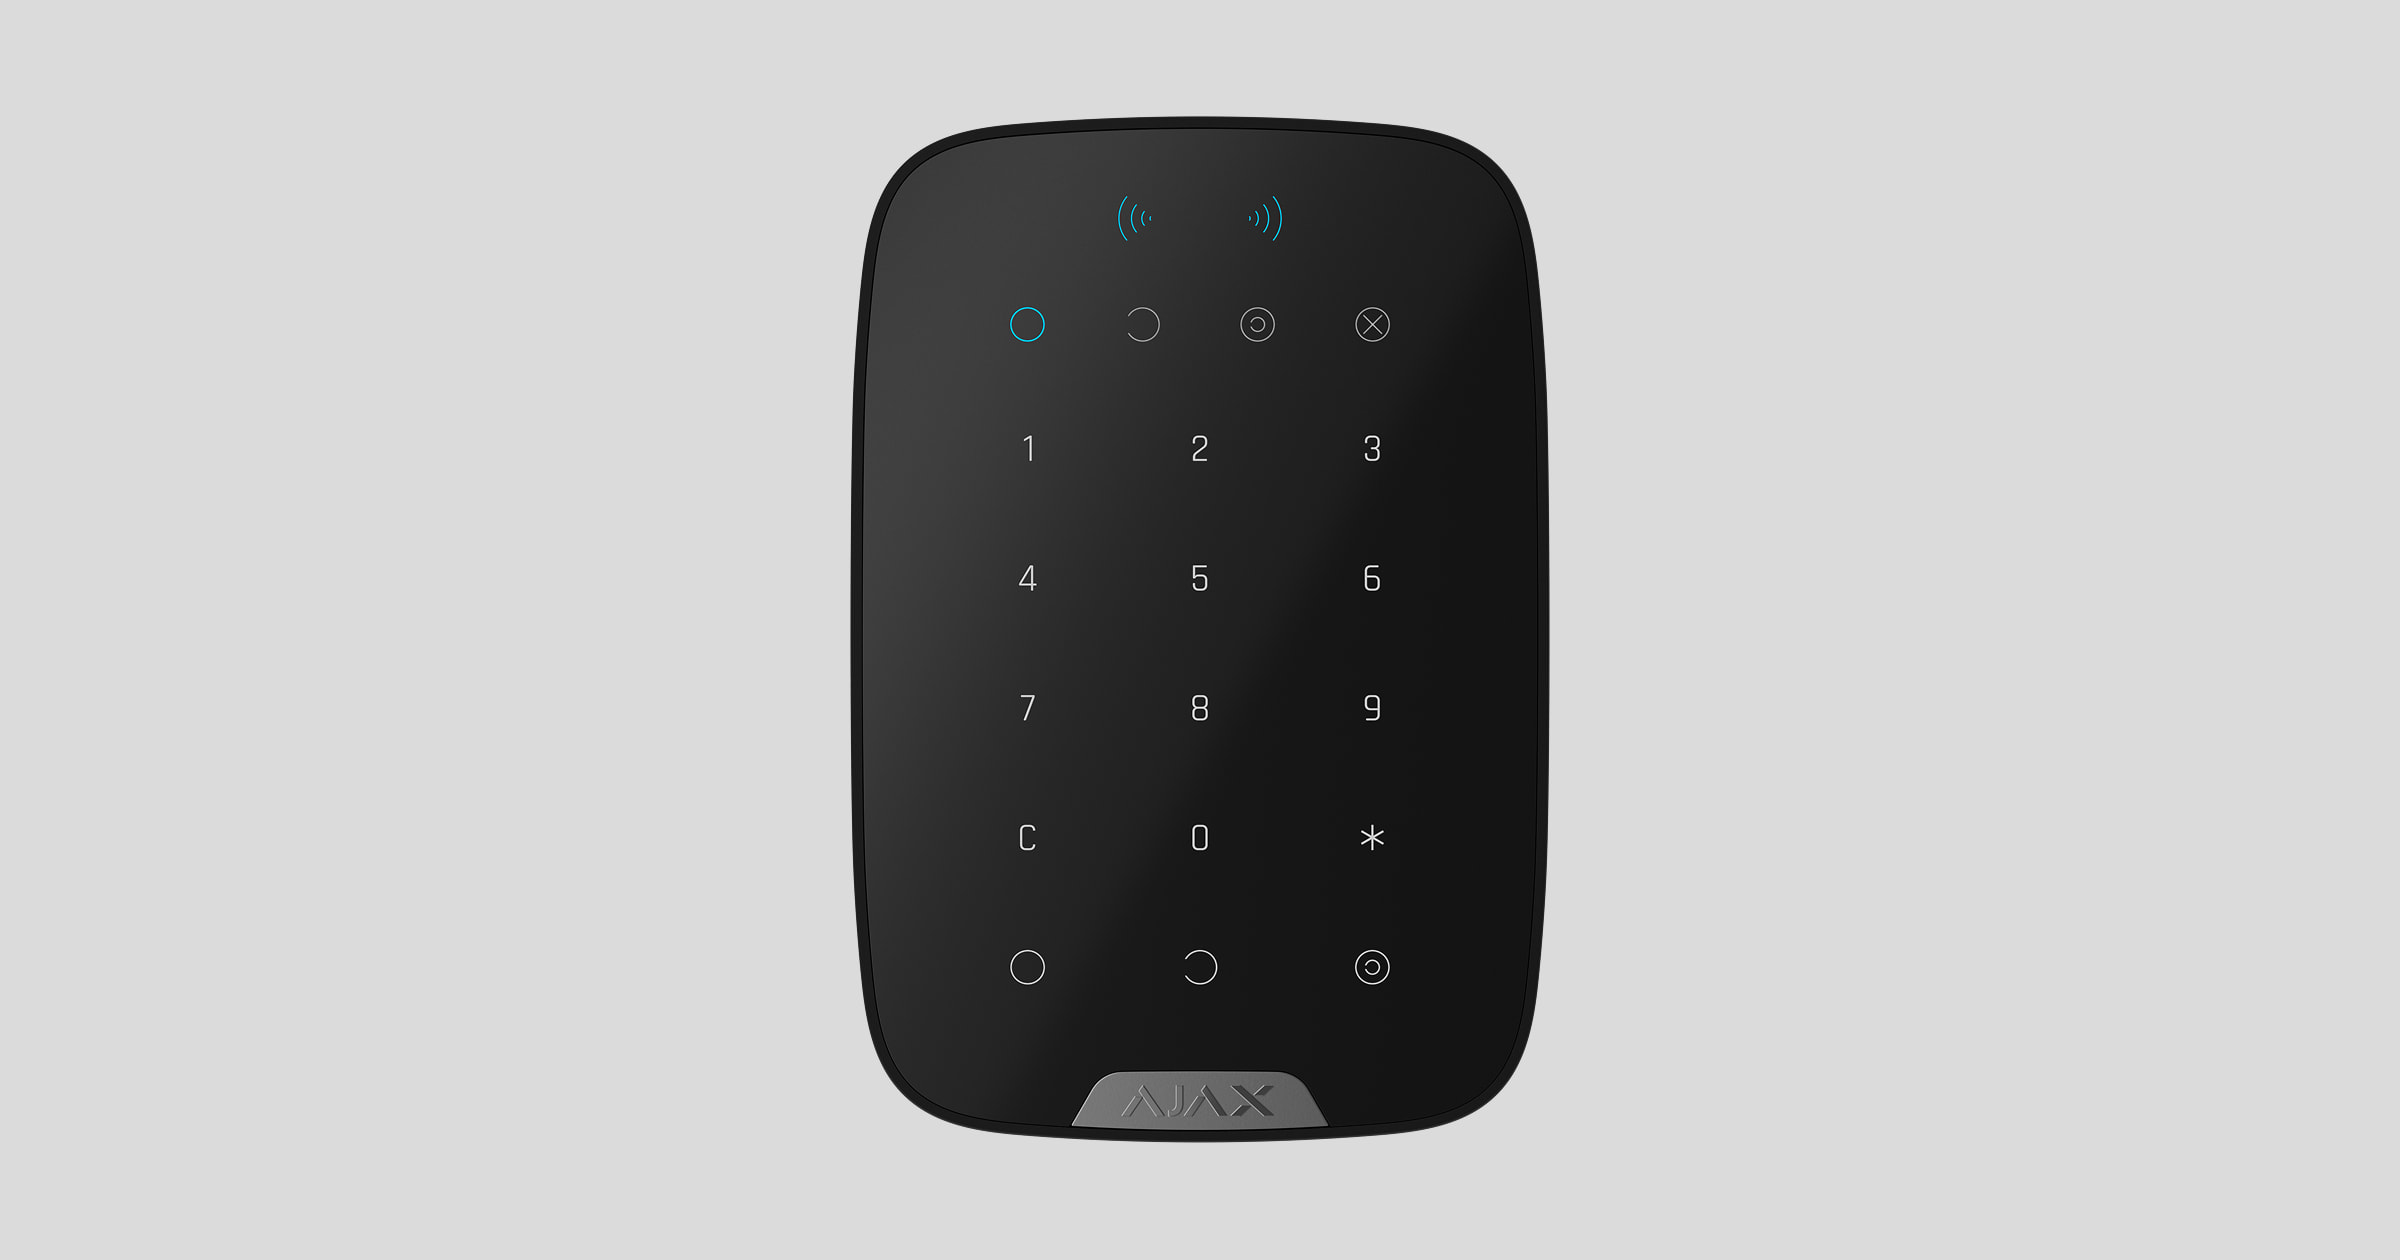
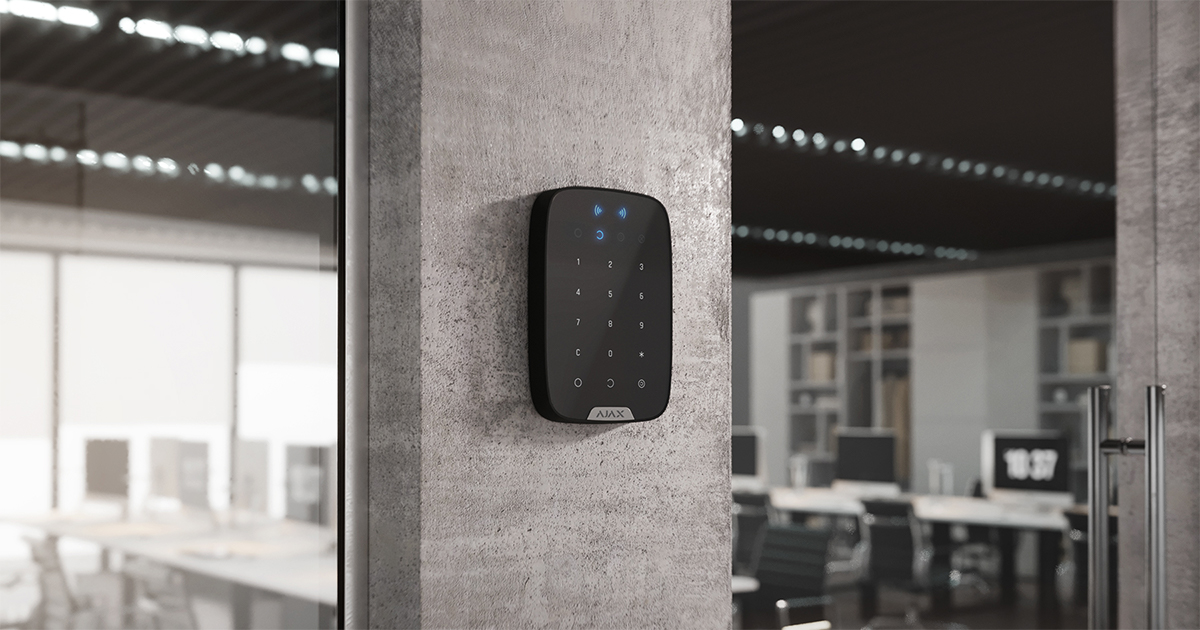
Superior KeyPad Plus G3 Jeweller — це бездротова клавіатура, призначена для керування системами Ajax. Автентифікація користувачів можлива за допомогою брелоків Tag, карток Pass і кодів. Пристрій призначений для використання лише в приміщенні.
Клавіатура працює в системі Ajax та обмінюється даними з хабом через захищений протокол бездротового зв’язку Jeweller.
Superior KeyPad Plus G3 Jeweller — це пристрій з лінійки продуктів Superior. Тільки акредитовані партнери Ajax Systems можуть продавати, встановлювати й обслуговувати продукти Superior.
Функціональні елементи
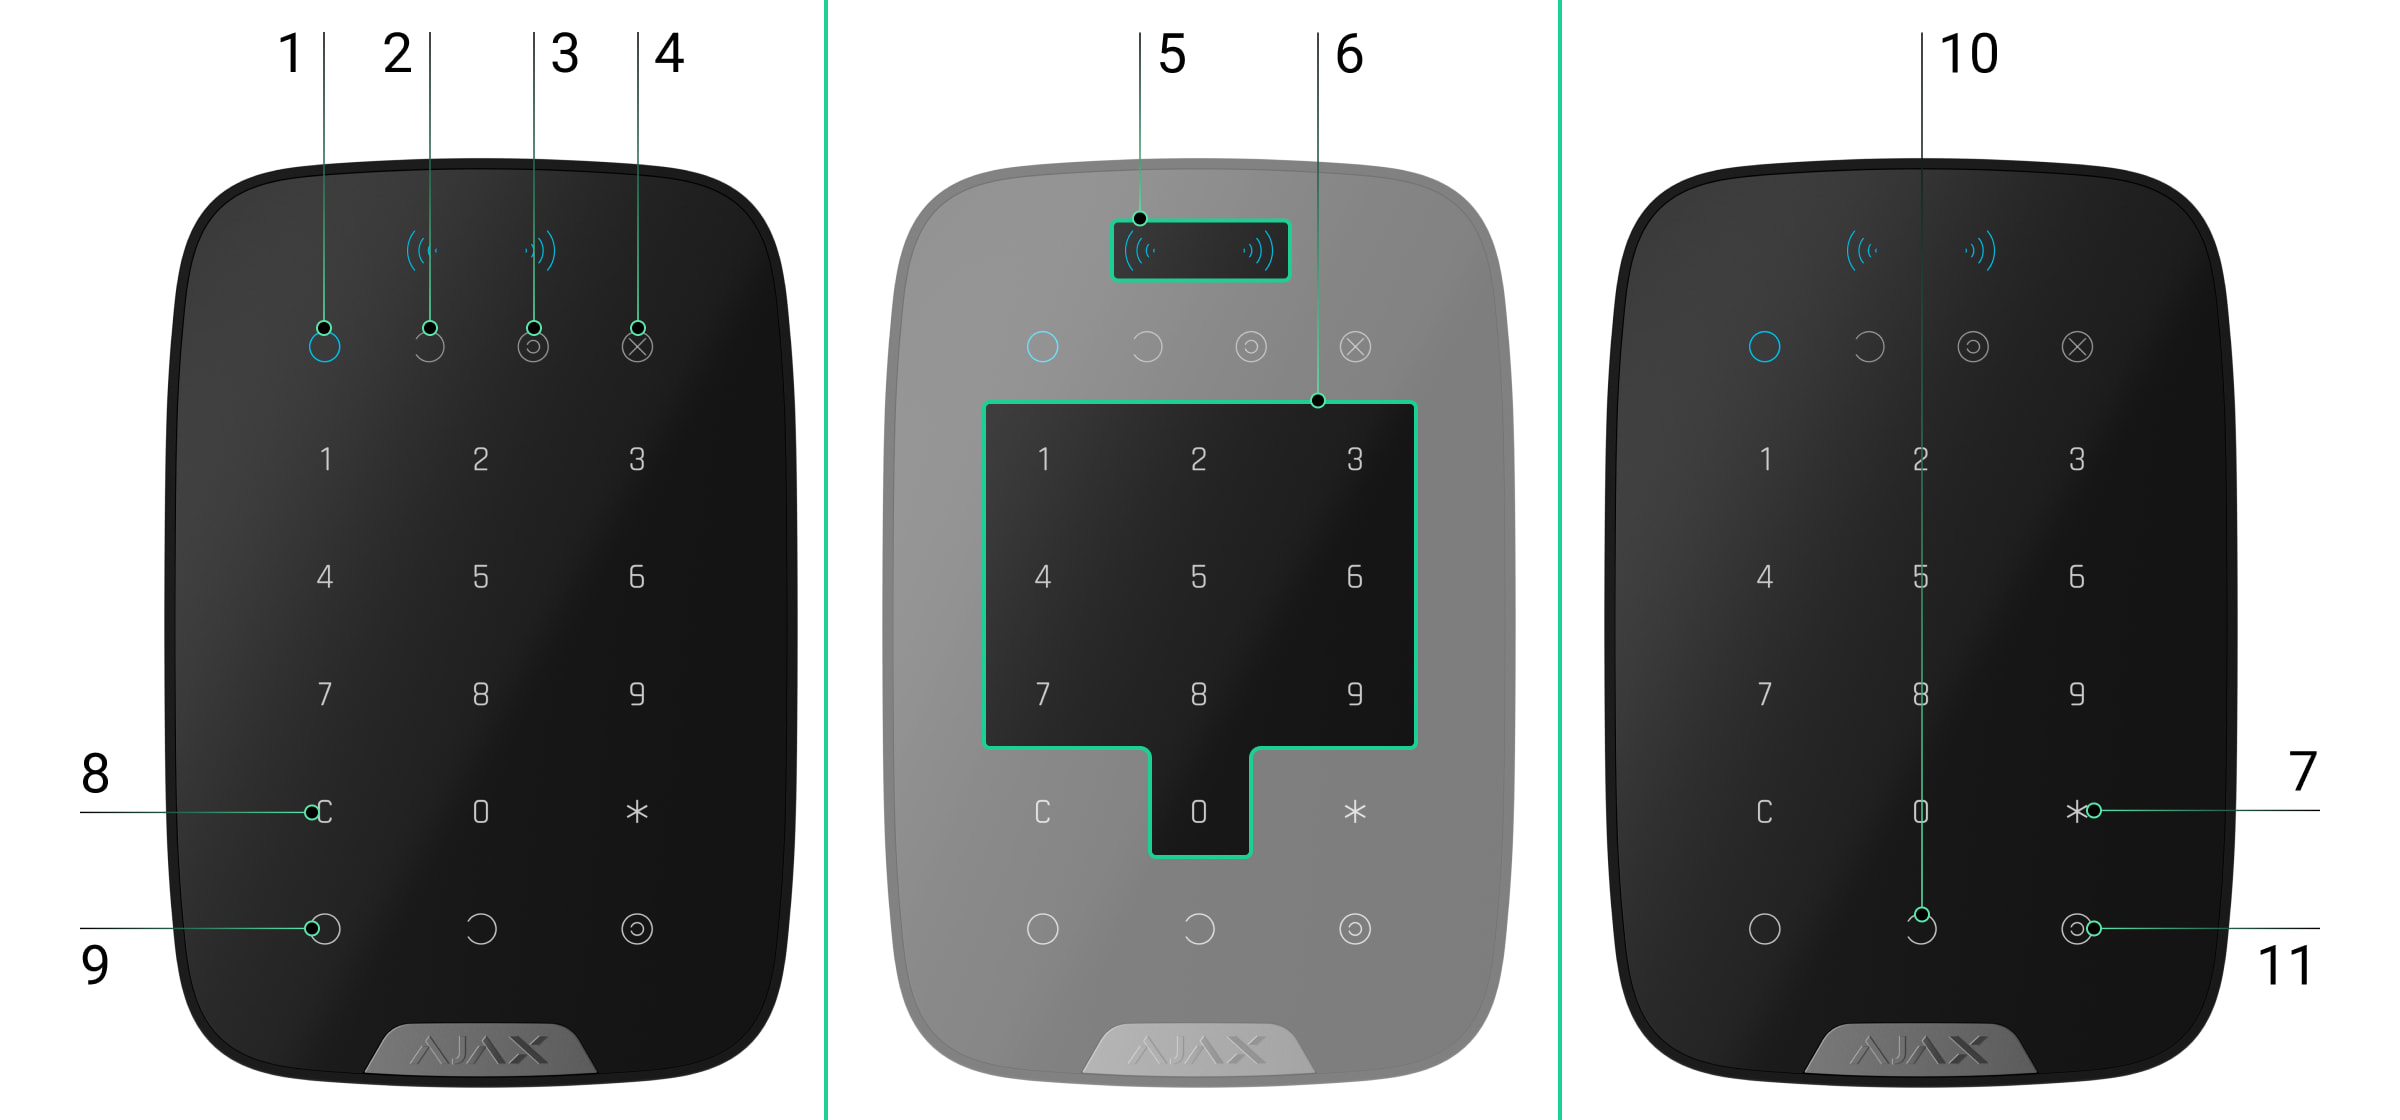
- Індикатор Під охороною.
- Індикатор Знято з охорони.
- Індикатор Нічний режим.
- Індикатор Несправність.
- Зчитувач карток Pass і брелоків Tag.
- Цифровий блок сенсорних кнопок.
 Кнопка Функція.
 Кнопка Скинути.
 Кнопка Під охорону.
 Кнопка З охорони.
 Кнопка Нічний режим.
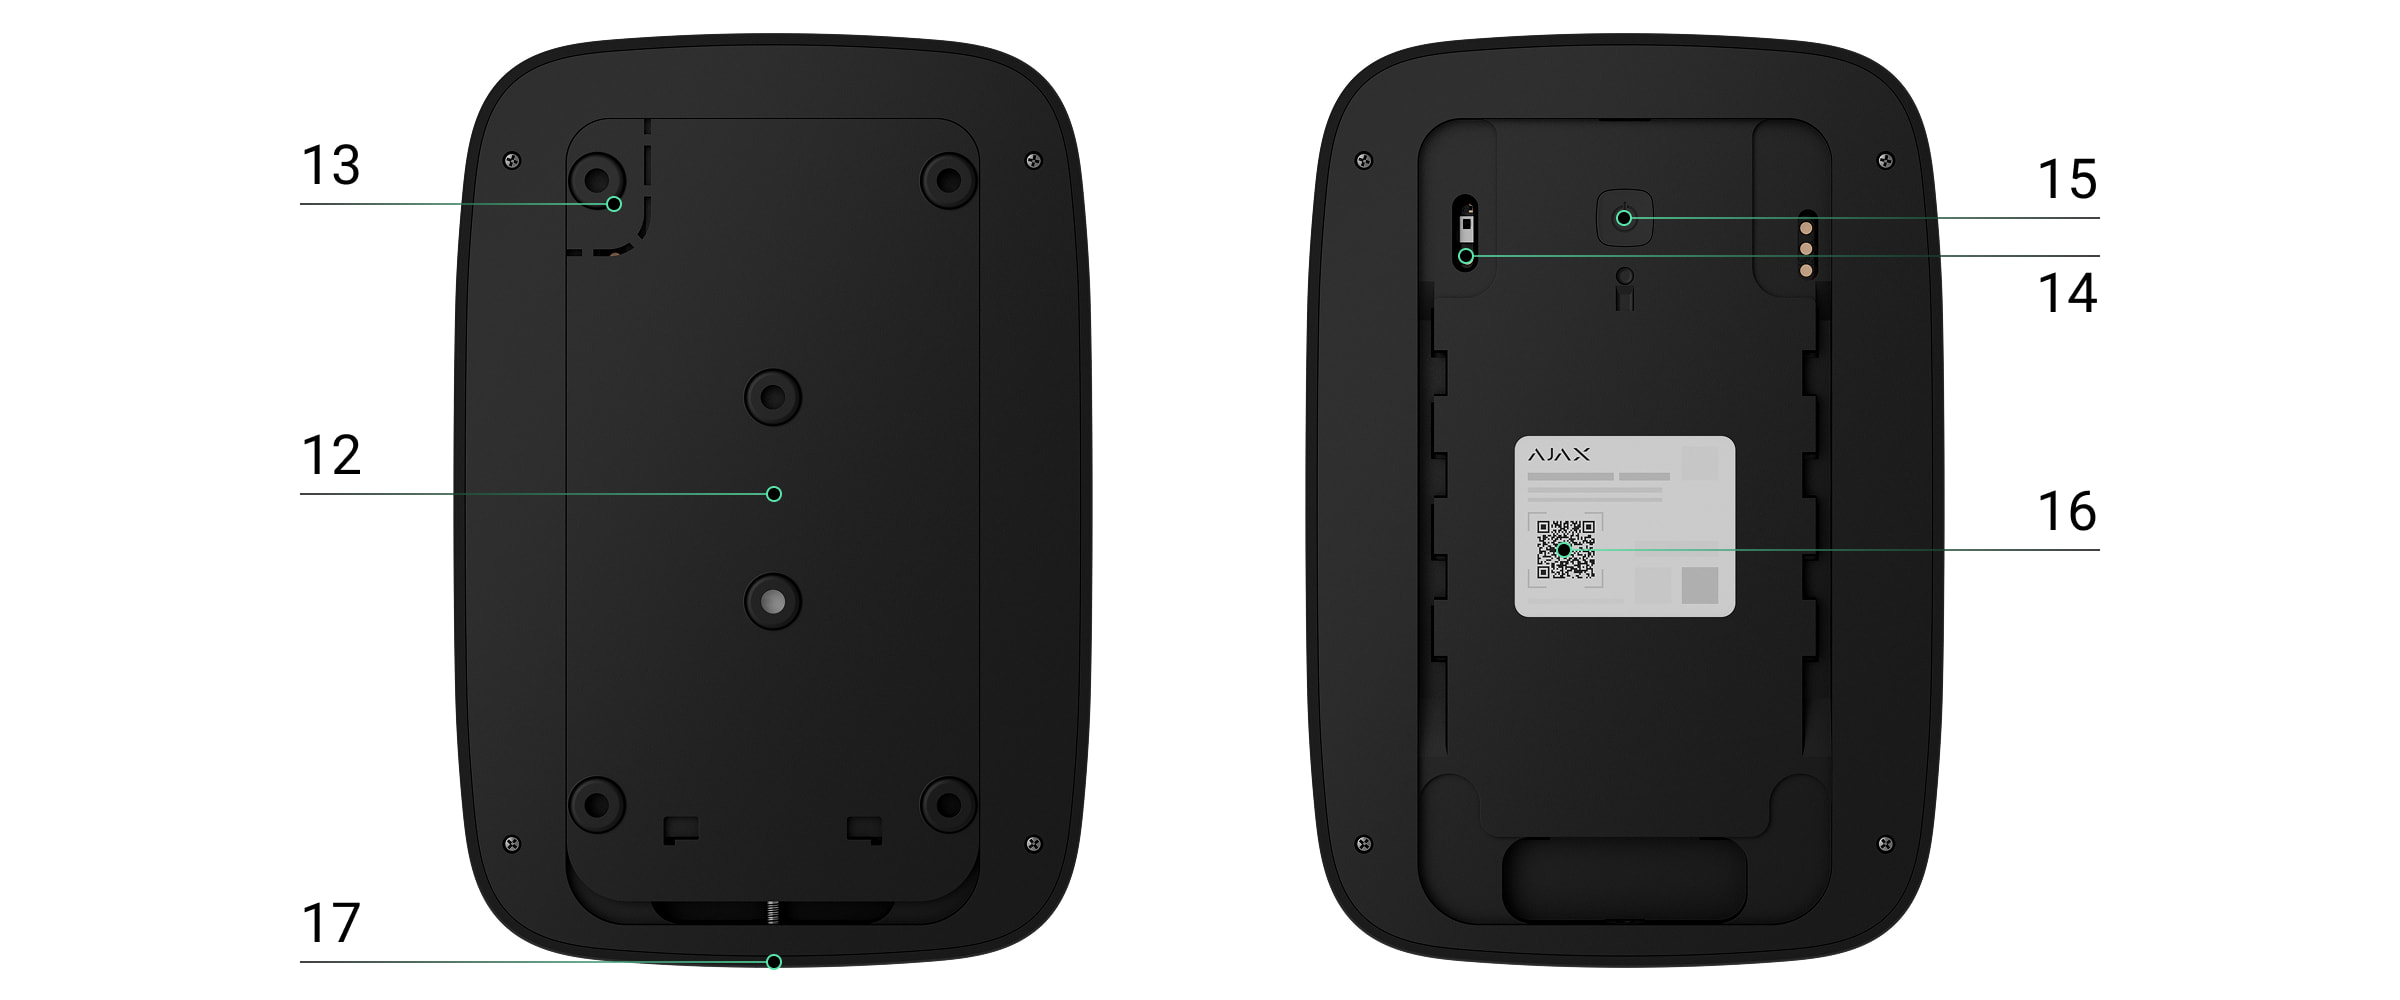
- Кріпильна панель SmartBracket. Щоб зняти панель, викрутіть утримувальний гвинт і посуньте її вниз.
- Перфорована частина кріпильної панелі. Потрібна для спрацювання кнопки тампера в разі спроби відірвати пристрій від поверхні. Не виламуйте її.
- Кнопка тампера.
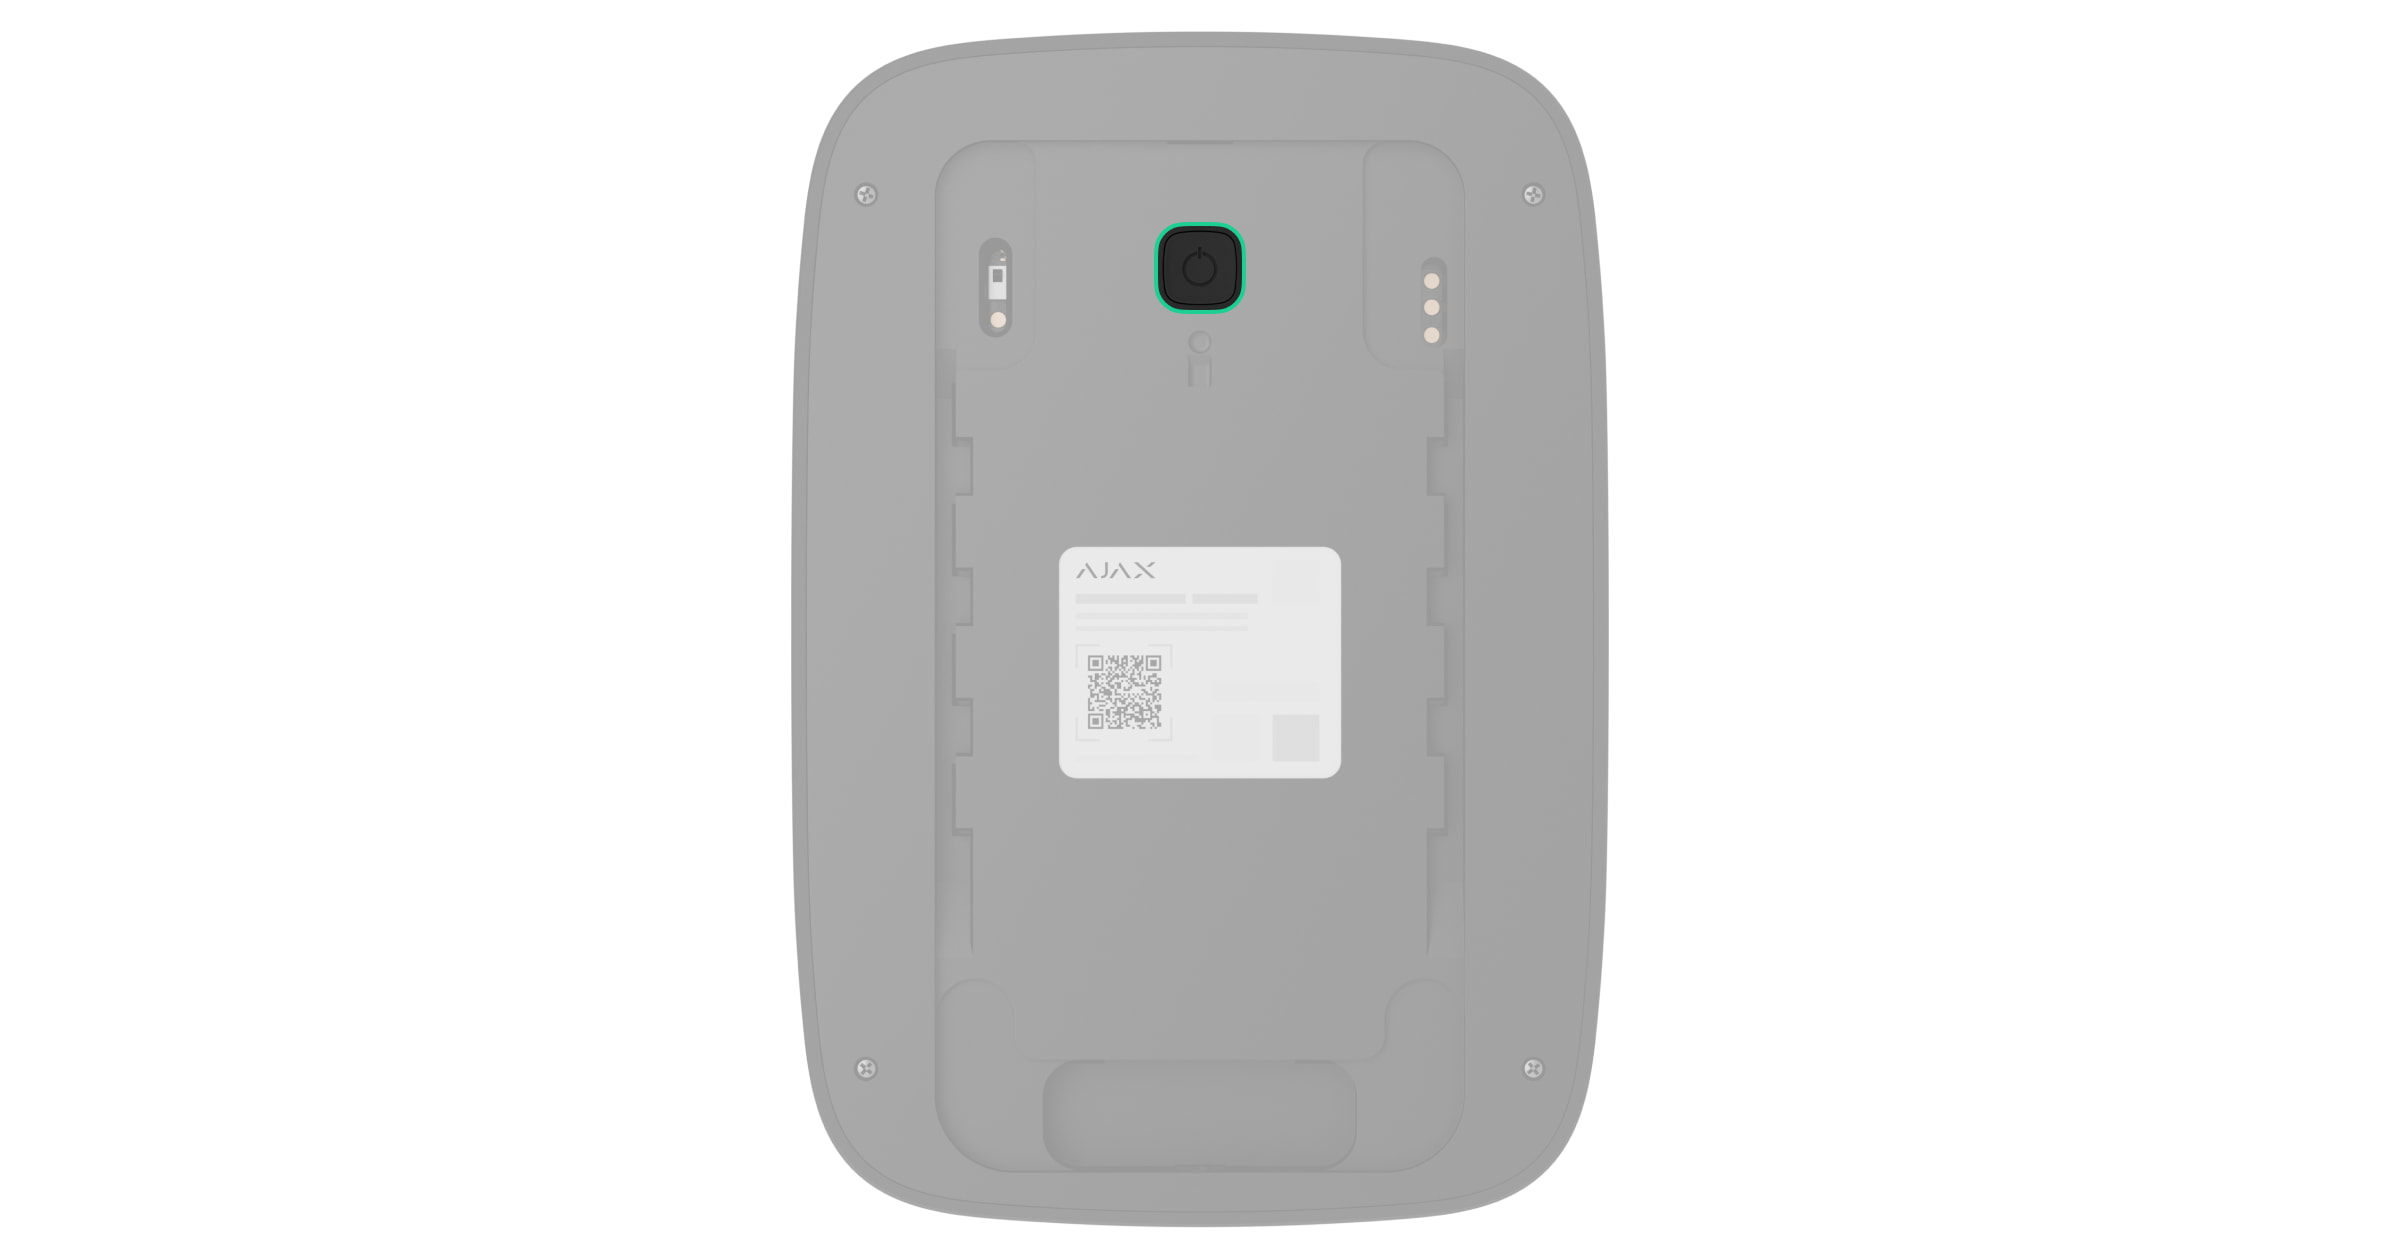
- Кнопка живлення.
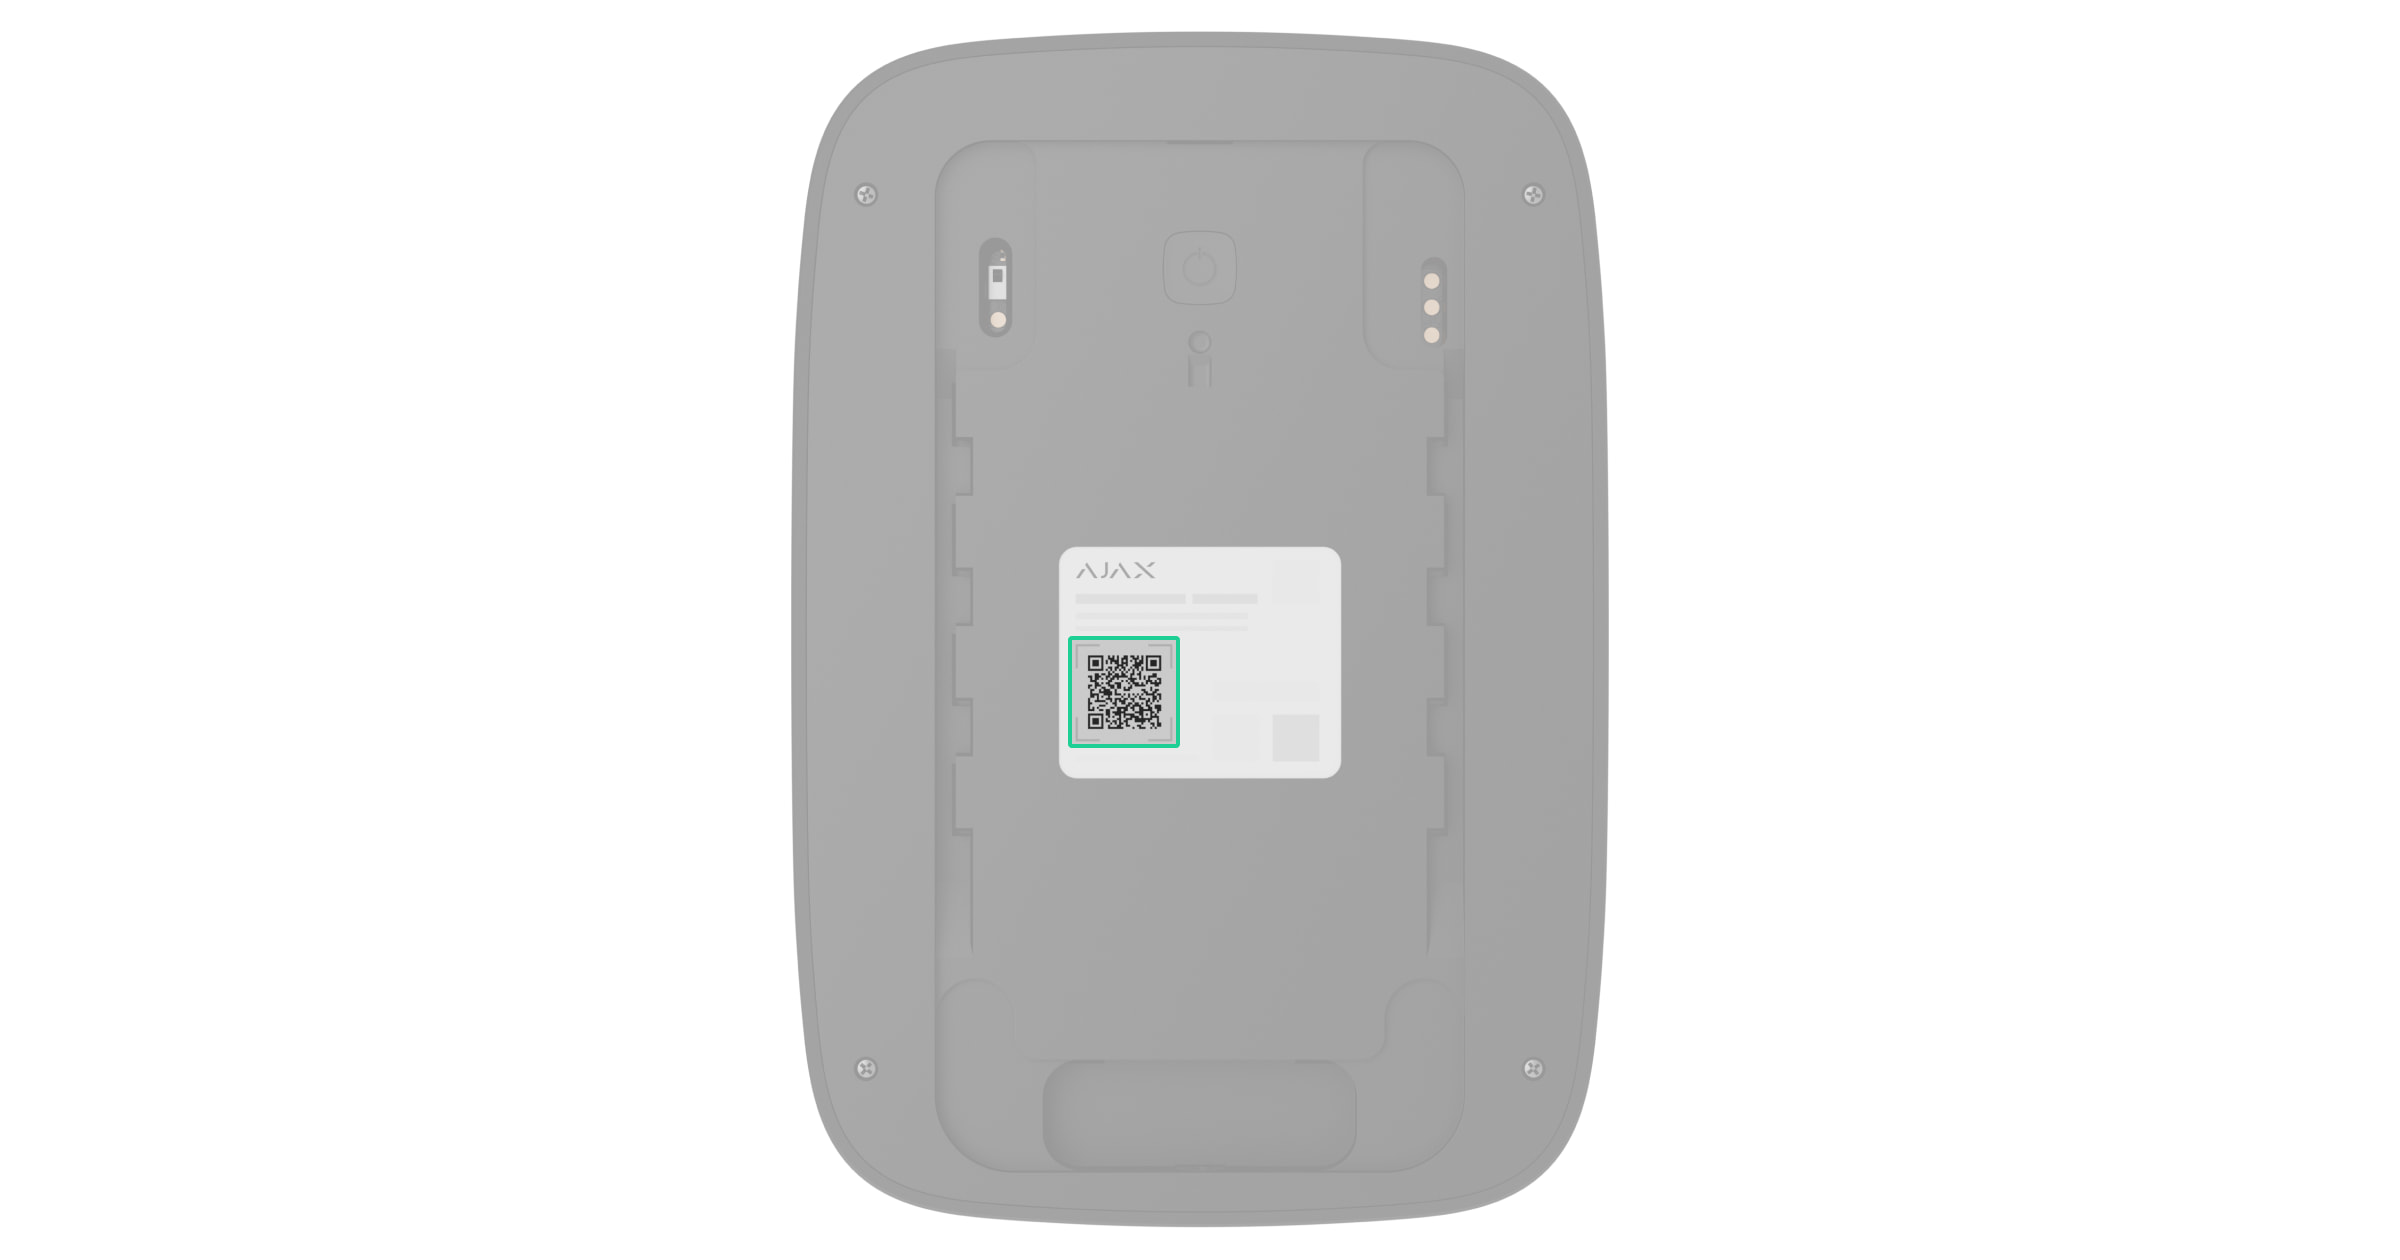
- QR-код з ідентифікатором пристрою. Використовується, щоб додати пристрій на хаб.
- Утримувальний гвинт для фіксації клавіатури на SmartBracket.
Сумісні хаби
Для роботи клавіатури потрібен хаб із версією OS Malevich 2.35 або новішою.
Принцип роботи
Клавіатура Superior KeyPad Plus G3 Jeweller оснащена великими сенсорними кнопками, зчитувачем для безконтактної авторизації та світлодіодними індикаторами. Клавіатура використовується для керування режимами охорони, надсилання тривоги або вимкнення пожежної сигналізації.
Superior KeyPad Plus G3 Jeweller має світлодіодні індикатори, що показують поточний режим охорони та несправності клавіатури (якщо такі є). Стан безпеки відображається лише тоді, коли клавіатура активна (підсвічування пристрою увімкнене).
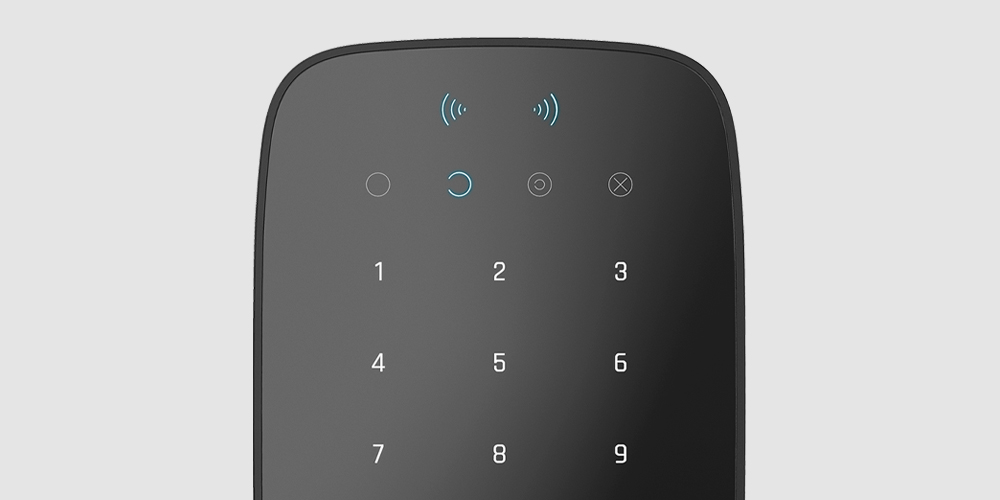
Завдяки підсвічуванню Superior KeyPad Plus G3 Jeweller можна використовувати в умовах недостатнього освітлення. Натискання кнопок супроводжується звуковим сигналом. Яскравість підсвічування і гучність клавіатури регулюються в налаштуваннях. Якщо не торкатися клавіатури протягом чотирьох секунд, яскравість її підсвічування зменшиться. Через вісім секунд клавіатура переходить у режим енергозбереження й вимикає дисплей.
Якщо заряд батареї низький, вмикається мінімальне підсвічування незалежно від налаштувань.
Керування режимами охорони
За допомогою Superior KeyPad Plus G3 Jeweller можна змінити режим охорони всього обʼєкта або певних груп та активувати Нічний режим. Користувачі можуть керувати режимами охорони, використовуючи:
- Картки або брелоки. Для швидкої та безпечної ідентифікації користувачів Superior KeyPad Plus G3 Jeweller використовує технологію DESFire®. Вона розроблена на основі міжнародного стандарту ISO 14443 і поєднує в собі комплексне 128-бітне шифрування та захист від копіювання. Пристрої Tag і Pass підтримують цю технологію та сумісні з Superior KeyPad Plus G3 Jeweller.
- Коди. Superior KeyPad Plus G3 Jeweller підтримує загальні коди, персональні коди та коди для незареєстрованих користувачів.
Коди доступу
- Код клавіатури — загальний код, який задається для клавіатури. У разі використання всі події надходять у застосунки Ajax від імені клавіатури.
- Код користувача — персональний код, який задається для доданого на хаб користувача. У разі використання всі події надходять у застосунки Ajax від імені користувача.
- Код доступу клавіатури — код, який задається для незареєстрованого користувача. У разі використання події надходять у застосунки Ajax з іменем особи, повʼязаної з цим кодом.
- Код для ГШР — код доступу для груп швидкого реагування (ГШР), що активується після тривоги та діє протягом визначеного періоду. Коли код активовано та використано, події надходять у застосунки Ajax із назвою, повʼязаною з цим кодом.
Кількість кодів користувача, кодів доступу клавіатури та кодів для ГШР залежить від моделі хаба.
Права доступу та коди можна налаштувати в застосунках Ajax. Якщо код скомпрометовано, його можна змінити дистанційно — інженер монтажу може не виїжджати на обʼєкт. Якщо користувач загубив свою картку Pass або брелок Tag, адміністратор або PRO з правами налаштування системи може негайно заблокувати пристрій у застосунку. Тим часом користувач може використовувати персональний код для керування системою.
Керування режимами охорони груп
Superior KeyPad Plus G3 Jeweller дає змогу керувати режимами охорони груп (якщо увімкнено Режим груп). Адміністратор або PRO з правами налаштування системи може також змінювати налаштування клавіатури, щоб визначити, які групи будуть спільними (групи клавіатур). У цьому розділі наведено детальну інформацію про керування режимами охорони груп.
Кнопка Функція
Superior KeyPad Plus G3 Jeweller має кнопку ![]() Функція, яка працює в одному з трьох режимів:
Функція, яка працює в одному з трьох режимів:
- Вимкнено — кнопку Функція вимкнено, і після її натискання нічого не відбувається.
- Тривога — після натискання кнопки Функція система надсилає тривогу на пульт централізованого спостереження охоронної компанії та всім користувачам.
- Глушити пожежну тривогу — після натискання кнопки Функція система вимикає тривогу пожежних датчиків Ajax. Доступно, якщо увімкнено опцію Синхронна тривога пожежних датчиків (Хаб → Налаштування
 → Сервісні → Налаштування пожежних датчиків).
Код примусу
Superior KeyPad Plus G3 Jeweller підтримує код примусу, що дає змогу користувачеві імітувати вимкнення тривоги. Таким чином, застосунок Ajax та сирени, встановлені на обʼєкті, не викриють ваших дій. Водночас охоронна компанія та інші користувачі системи будуть сповіщені про інцидент.
Блокування в разі спроб злому
Якщо протягом однієї хвилини тричі поспіль буде введено неправильний код або буде використано неверифікований пристрій доступу, клавіатура заблокується на час, вказаний в налаштуваннях. Протягом цього часу хаб ігноруватиме всі коди та пристрої доступу та сповіщатиме користувачів системи про спроби неавторизованого доступу.
PRO або користувач із правами налаштування системи може розблокувати клавіатуру в застосунку до закінчення встановленого часу блокування.
Двоетапне встановлення під охорону
Клавіатуру Superior KeyPad Plus G3 Jeweller можна використовувати для двоетапного встановлення під охорону, проте лише як пристрій першого етапу. Двоетапний процес встановлення під охорону за допомогою Tag або Pass подібний до використання персонального чи загального коду на клавіатурі.
Глушіння пожежної тривоги
Якщо натиснути кнопку Функція, клавіатура Superior KeyPad Plus G3 Jeweller вимкне синхронну тривогу пожежних датчиків (якщо відповідну опцію увімкнено в налаштуваннях клавіатури). Реакція системи на натискання кнопки залежить від налаштувань і стану системи:
- Синхронна тривога пожежних датчиків вже поширилася — після першого натискання кнопки вимикаються всі сирени пожежних датчиків, крім тих, які активували тривогу. Повторне натискання кнопки вимикає решту датчиків.
- Час затримки синхронної тривоги триває — після натискання кнопки Функція вимикається сирена пожежних датчиків Ajax, що спрацювали.
Ця опція доступна, якщо увімкнено опцію Синхронна тривога пожежних датчиків у налаштуваннях хаба.
Протокол передавання даних Superior Jeweller
Superior Jeweller — це оновлений радіопротокол для пристроїв Superior, що забезпечує відповідність стандарту Grade 3 (EN 50131). Він використовує покращене шифрування й радіочастотний гопінг. Повний радіочастотний гопінг доступний лише тоді, коли всі пристрої в системі використовують протокол Superior Jeweller. Якщо хоча б один пристрій системи працює через протокол Jeweller, система відповідатиме тільки класу безпеки Grade 2: шифрування даних зберігатиметься, але радіочастотний гопінг буде недоступний. Залежно від хаба пристрої Superior також можуть працювати, використовуючи протокол Jeweller.
Покращений зашифрований звʼязок
Звʼязок між Superior KeyPad Plus G3 Jeweller і хабом захищений передовим шифруванням, що гарантує конфіденційність і цілісність даних. А саме гарантує, що всі чутливі дані в повідомленні зашифровані, і кожне повідомлення містить унікальну мітку автентифікації, яка дає змогу системі перевірити, що дані не були змінені під час передавання. Система надійно виявляє втручання та відхиляє підроблені або змінені повідомлення, забезпечуючи захист від пасивних і активних атак. Це гарантує захищений звʼязок між пристроєм і хабом, а також надійний захист системи та даних.
Радіочастотний гопінг
Щоб відповідати вимогам Grade 3, клавіатура Superior KeyPad Plus G3 Jeweller використовує радіочастотний гопінг для радіозвʼязку з хабом (або ретранслятором радіосигналу). За допомогою цього методу хаб і додані на нього пристрої змінюють свою робочу частоту відповідно до заданого шаблону. Послідовність гопінгу охоплює певний набір каналів у межах робочих діапазонів, а пристрої перемикаються на іншу частоту синхронно з хабом. Навіть якщо деякі канали піддаються глушінню, повідомлення можуть успішно передаватися через інші канали. Радіочастотний гопінг підвищує надійність і ефективність системи та забезпечує її стійкість до навмисних завад і спроб глушіння.
Радіочастотний гопінг не спричиняє затримок або пауз у радіозвʼязку та не зменшує швидкість передавання даних. Якщо в систему додано ретранслятори, радіочастотний гопінг використовується для радіозвʼязку «пристрій — ретранслятор» і «ретранслятор — хаб».
Система використовує радіочастотний гопінг для радіозвʼязку, лише якщо всі бездротові пристрої підтримують цей метод.
Якщо хоча б один пристрій, доданий у систему, не підтримує радіочастотний гопінг, хаб і всі пристрої перемикаються на робочі частоти цього пристрою та не використовують радіочастотний гопінг для радіозвʼязку.
Передавання подій на ПЦС
Тривоги системи Ajax надходять у застосунок для моніторингу Ajax PRO Desktop, а також на ПЦС у форматах SurGard (Contact ID), SIA (DC-09), ADEMCO 685 та інших протоколів.
Superior KeyPad Plus G3 Jeweller передає такі події:
- Зміна режиму охорони системи.
- Введення коду примусу.
- Натискання тривожної кнопки.
- Блокування клавіатури через спробу неавторизованого доступу.
- Невдала спроба встановити систему під охорону (якщо увімкнено перевірку цілісності системи).
- Тривога тампера. Відновлення кнопки тампера.
- Втрата і відновлення зв’язку з хабом.
- Примусове вимкнення/ввімкнення пристрою.
- Вимкнення до зняття з охорони / увімкнення пристрою.
У разі тривоги оператор охоронної компанії знає, що сталося і куди направити групу швидкого реагування. Пристрої Ajax адресні, тому застосунок Ajax PRO Desktop і ПЦС отримують не лише події, а й тип пристрою, його ім’я, групу охорони та віртуальну кімнату. Список параметрів, які отримує ПЦС, може відрізнятися залежно від типу ПЦС і вибраного протоколу зв’язку з пультом.
Ідентифікатор пристрою та номер шлейфу (зони) можна знайти у станах пристрою.
Вибір місця встановлення
Під час вибору місця встановлення Superior KeyPad Plus G3 Jeweller враховуйте чинники, що впливають на його роботу:
Дотримуйтеся цих рекомендацій на етапі розробки проєкту системи для об’єкта. Лише кваліфіковані спеціалісти мають проєктувати й встановлювати систему Ajax. Перелік авторизованих партнерів Ajax доступний за посиланням.
Superior KeyPad Plus G3 Jeweller найкраще встановлювати в приміщенні біля входу. Таким чином користувачі можуть зняти систему з охорони перед входом до приміщення або до закінчення затримки на вхід. Користувачі також можуть швидко встановити обʼєкт під охорону, залишаючи приміщення.
Рекомендовано встановлювати клавіатуру на висоті 4–5 футів. Монтаж клавіатури слід виконувати на рівній вертикальній поверхні, щоб забезпечити надійне кріплення та уникнути хибних тривог тампера.
Якщо тримати Superior KeyPad Plus G3 Jeweller у руках або використовувати на столі, сенсорні кнопки можуть працювати некоректно.
Рівень сигналу
Рівень сигналу визначається кількістю недоставлених або пошкоджених пакетів даних за певний проміжок часу. Про рівень сигналу повідомляє іконка ![]() у вкладці Пристрої
у вкладці Пристрої ![]() в застосунках Ajax:
в застосунках Ajax:
- три поділки — відмінний рівень сигналу;
- дві поділки — достатній рівень сигналу;
- одна поділка — низький рівень сигналу, стабільну роботу не гарантовано;
- перекреслена іконка — сигнал відсутній.
Перевірте рівень сигналу Jeweller перед остаточним встановленням. Якщо рівень сигналу показує одну поділку або сигнал відсутній, стабільну роботу пристрою не гарантовано. У такому випадку рекомендуємо перемістити пристрій: зміна положення навіть на 8 дюймів може значно поліпшити рівень сигналу. Якщо після переміщення пристрій усе ще має низький або нестабільний рівень сигналу, використовуйте ретранслятор радіосигналу Ajax.
Детальну інформацію про те, як запустити тест рівня сигналу Jeweller, наведено в розділі Тестування працездатності.
Де не можна встановлювати клавіатуру
- На вулиці. Це може призвести до виходу пристрою з ладу.
- У місцях, де кабелі живлення або Ethernet, предмети декору чи інші речі можуть заважати роботі клавіатури.
- У місцях, де показники температури чи вологості не відповідають робочим параметрам. Це може призвести до пошкодження пристрою.
- На відстані ближче ніж 3,3 фута до хаба або ретранслятора радіосигналу.
- У місцях із низьким або нестабільним рівнем сигналу Jeweller.
Встановлення
Перед монтажем Superior KeyPad Plus G3 Jeweller переконайтеся, що вибрали оптимальне місце встановлення, яке відповідає умовам цієї інструкції.
Щоб встановити пристрій:
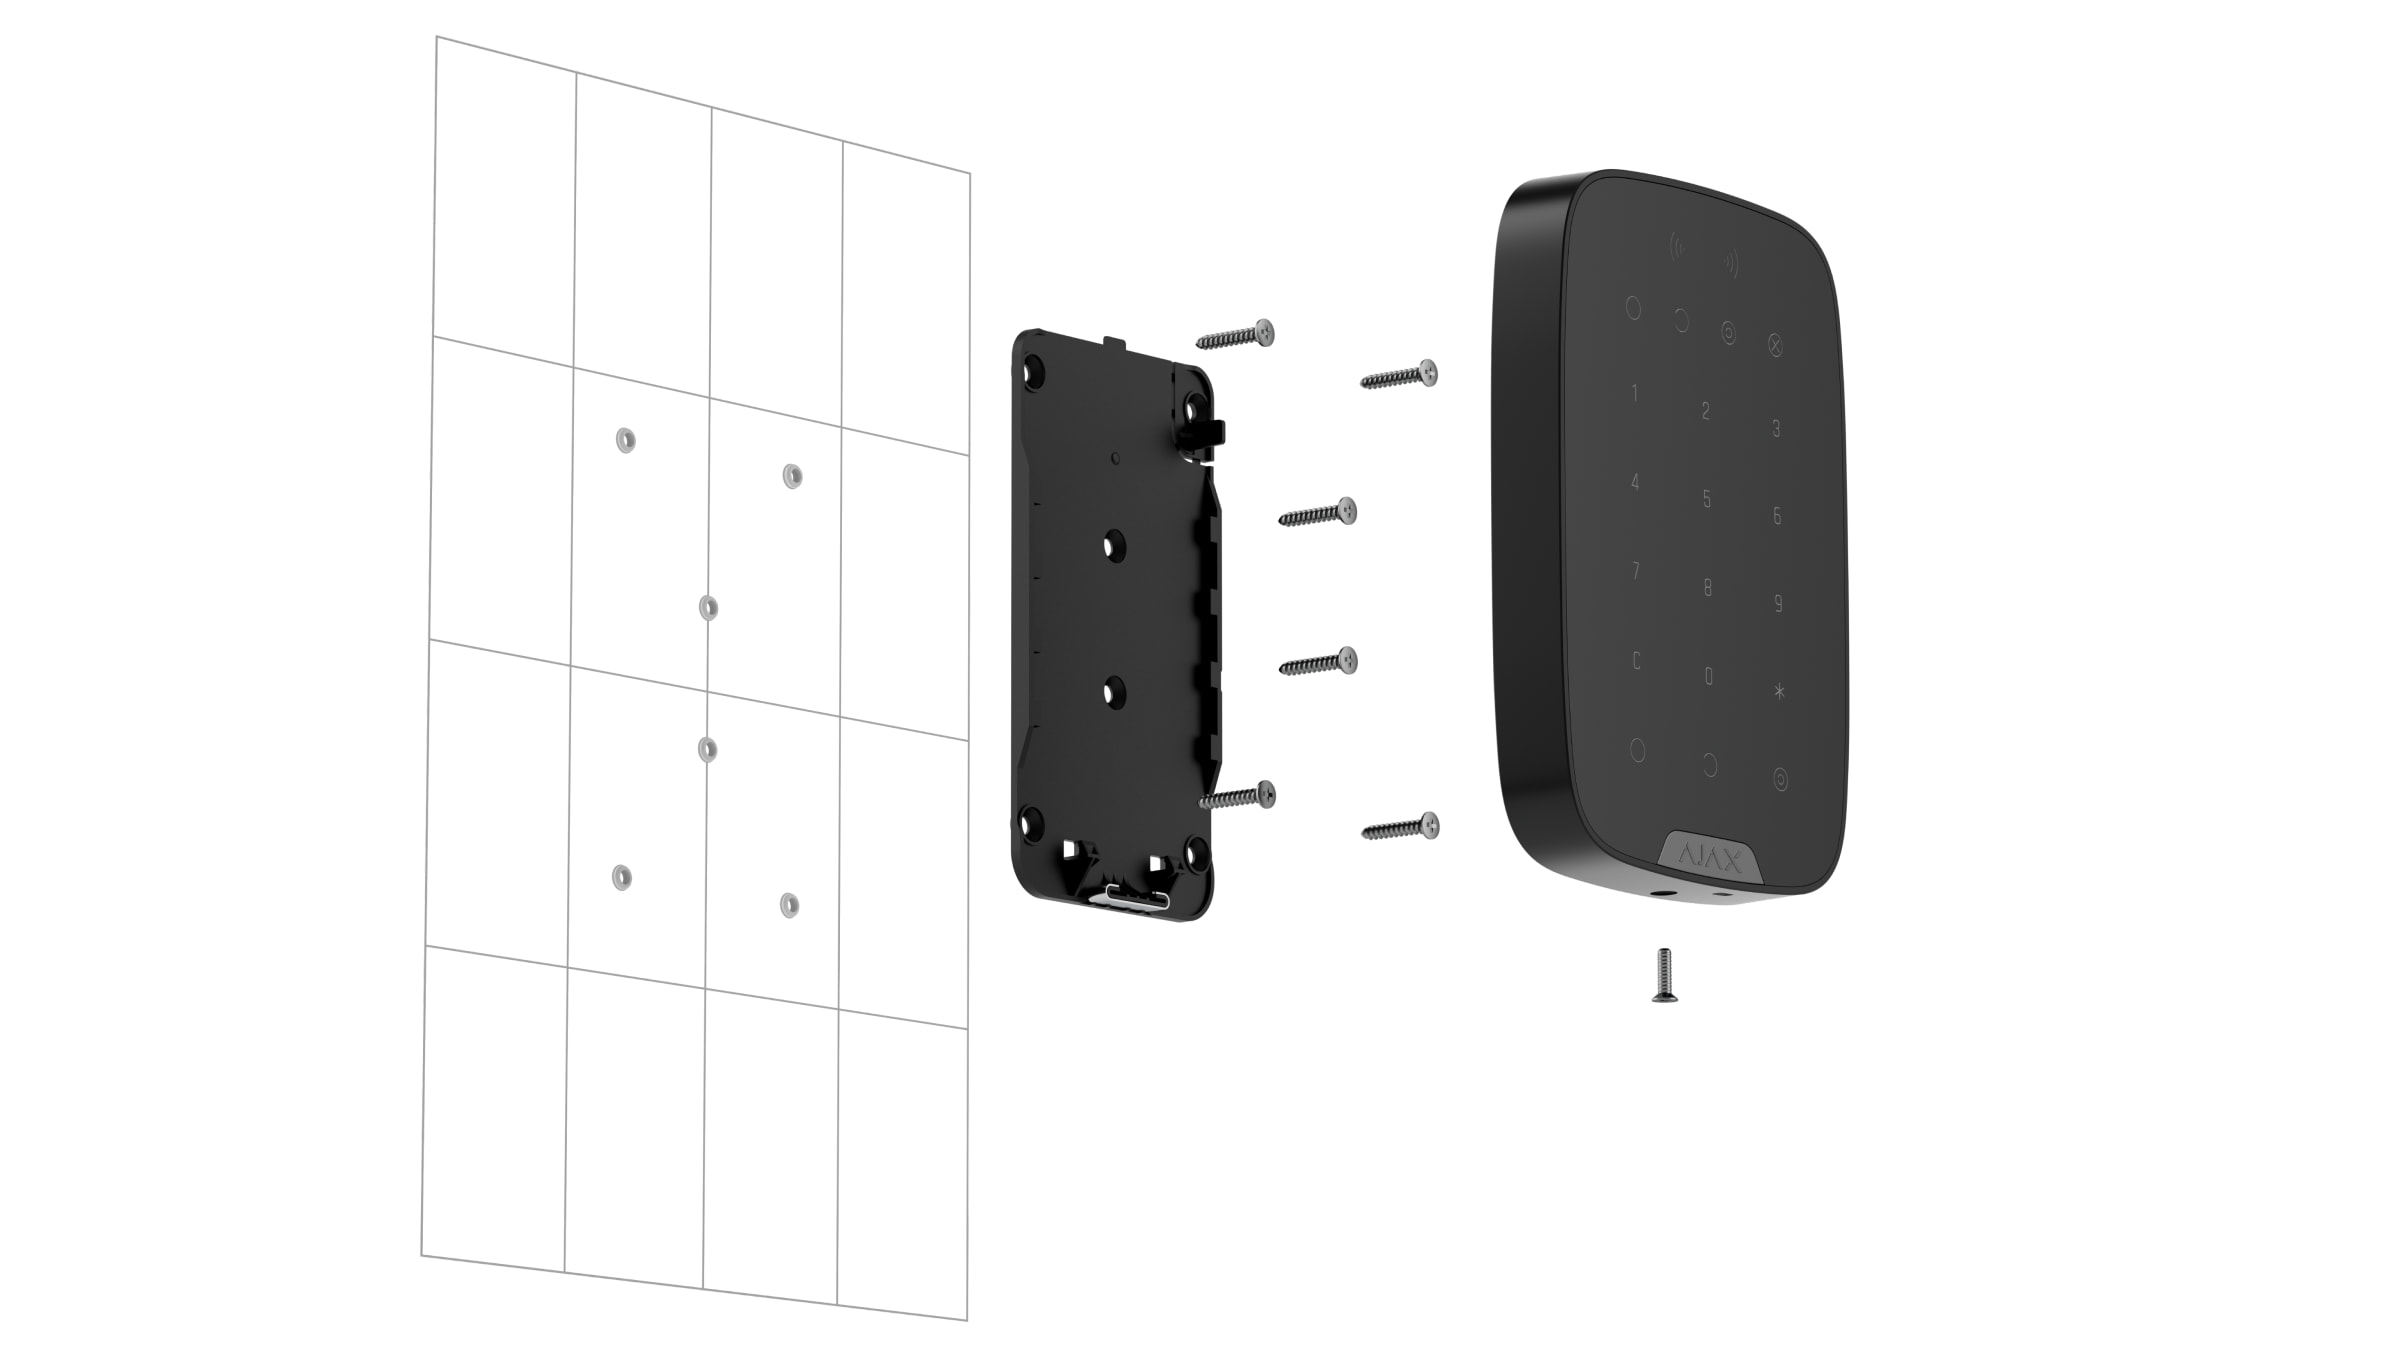
- Відкрутіть утримувальний гвинт у нижній частині пристрою та зніміть клавіатуру з кріпильної панелі SmartBracket.
- Додайте пристрій у систему.
- Зафіксуйте панель SmartBracket за допомогою двостороннього скотчу або іншого тимчасового кріплення.

Використовуйте двосторонній скотч тільки для тимчасового кріплення. Закріплений на скотч пристрій може будь-якої миті відклеїтися від поверхні. Поки пристрій закріплено на двосторонній скотч, кнопка тампера не спрацює, якщо хтось спробує відірвати пристрій від поверхні.
- Встановіть клавіатуру на кріпильну панель SmartBracket. Світлодіодний індикатор X на пристрої блисне, показуючи, що корпус закрито.
- Проведіть тестування працездатності.
- Якщо під час тесту не виявлено помилок, зніміть клавіатуру зі SmartBracket.
- Закріпіть панель SmartBracket на поверхні комплектними гвинтами. Використовуйте всі отвори.

Якщо ви використовуєте інші засоби кріплення, переконайтеся, що вони не пошкоджують і не деформують кріпильну панель.
- Встановіть клавіатуру на кріпильну панель SmartBracket.
- Затягніть утримувальний гвинт у нижній частині корпусу клавіатури. Гвинт потрібен, щоб надійно закріпити та захистити пристрій від швидкого демонтажу.

Додавання в систему
Хаб і пристрій, які працюють на різних радіочастотах, несумісні. Діапазон радіочастот пристрою може відрізнятися залежно від регіону. Рекомендовано купувати та використовувати пристрої Ajax в одному регіоні. Діапазон робочих радіочастот можна перевірити у служби технічної підтримки Ajax.
Перевірте сумісність пристроїв перед додаванням пристрою в систему. Додавати та налаштовувати пристрої Superior можуть лише авторизовані партнери Ajax Systems в PRO-застосунках Ajax.
Перш ніж додати пристрій
- Встановіть PRO-застосунок Ajax.
- Увійдіть в обліковий запис PRO-користувача або створіть новий.
- Виберіть простір або створіть новий.
- Додайте хоча б одну віртуальну кімнату.
- Додайте в простір сумісний хаб. Переконайтеся, що хаб увімкнений і підключений до інтернету: через Ethernet, Wi-Fi та/або стільникову мережу.
- Переконайтеся, що простір не встановлено в режим охорони, а хаб не оновлюється. Для цього перевірте стани в застосунку Ajax.
Додавання на хаб
- Відкрийте PRO-застосунок Ajax. Виберіть простір, на який потрібно додати пристрій.
- Перейдіть у вкладку Пристрої
 та натисніть Додати пристрій.
 - Задайте ім’я пристрою.
- Відскануйте QR-код або введіть ідентифікатор пристрою вручну. QR-код з ідентифікатором можна знайти на корпусі пристрою. Також він продубльований на коробці пристрою.
- Виберіть віртуальну кімнату та групу охорони (якщо активовано режим груп).
- Натисніть Додати, після чого буде запущено зворотний відлік часу.
- Увімкніть пристрій, утримуючи кнопку ввімкнення 3 секунди.
Якщо підключення не вдалося, спробуйте ще раз через пʼять секунд. Якщо на хаб уже додано максимальну кількість пристроїв, то під час спроби додати ще один пристрій буде надіслано відповідне сповіщення.
Доданий на хаб пристрій з’явиться у списку пристроїв хаба в застосунку Ajax. Час оновлення станів пристрою у списку залежить від налаштувань Jeweller або Jeweller/Fibra; за початкових налаштувань він становить 36 секунд.
Superior KeyPad Plus G3 Jeweller працює лише з одним хабом. Щойно пристрій додано на новий хаб, він припиняє передавати команди на старий. Після додавання на новий хаб клавіатура автоматично не видаляється зі списку пристроїв старого хаба. Це потрібно зробити вручну в застосунку Ajax.
Тестування працездатності
У системі Ajax передбачено декілька тестів, які допомагають правильно вибрати місце встановлення пристроїв. Для Superior KeyPad Plus G3 Jeweller доступні такі тести:
- Тест рівня сигналу Jeweller — дає змогу визначити рівень і стабільність сигналу між хабом (або ретранслятором радіосигналу) і пристроєм через бездротовий протокол передавання даних Jeweller у місці встановлення пристрою.
- Тест згасання сигналу — дає змогу зменшувати або збільшувати потужність радіопередавача, імітуючи мінливі умови на об’єкті, щоб перевірити стабільність зв’язку між пристроєм і хабом.
Іконки
Іконки в застосунку Ajax відображають деякі стани Superior KeyPad Plus G3 Jeweller. Побачити їх можна в застосунку Ajax у вкладці Пристрої ![]() .
.
| Іконка | Значення |
|
Рівень сигналу Jeweller. Відображає рівень сигналу між хабом і пристроєм. Рекомендоване значення: 2–3 поділки. |
|
|
Рівень заряду батареї пристрою. |
|
|
Пристрій працює через ретранслятор радіосигналу. |
|
| Зчитування карток/брелоків увімкнено у налаштуваннях клавіатури. | |
|
Пристрій перебуває в режимі тестування згасання сигналу. |
|
|
Пристрій примусово вимкнено. |
|
|
Сповіщення про тривоги тампера примусово вимкнено. |
|
|
Пристрій вимкнено до першого зняття системи з охорони. |
|
|
Сповіщення про тривоги тампера вимкнено до першого зняття системи з охорони. |
|
| Пристрій втратив звʼязок із хабом, або хаб втратив звʼязок із сервером Ajax Cloud. | |
|
Пристрій не було перенесено на новий хаб. |
Стани
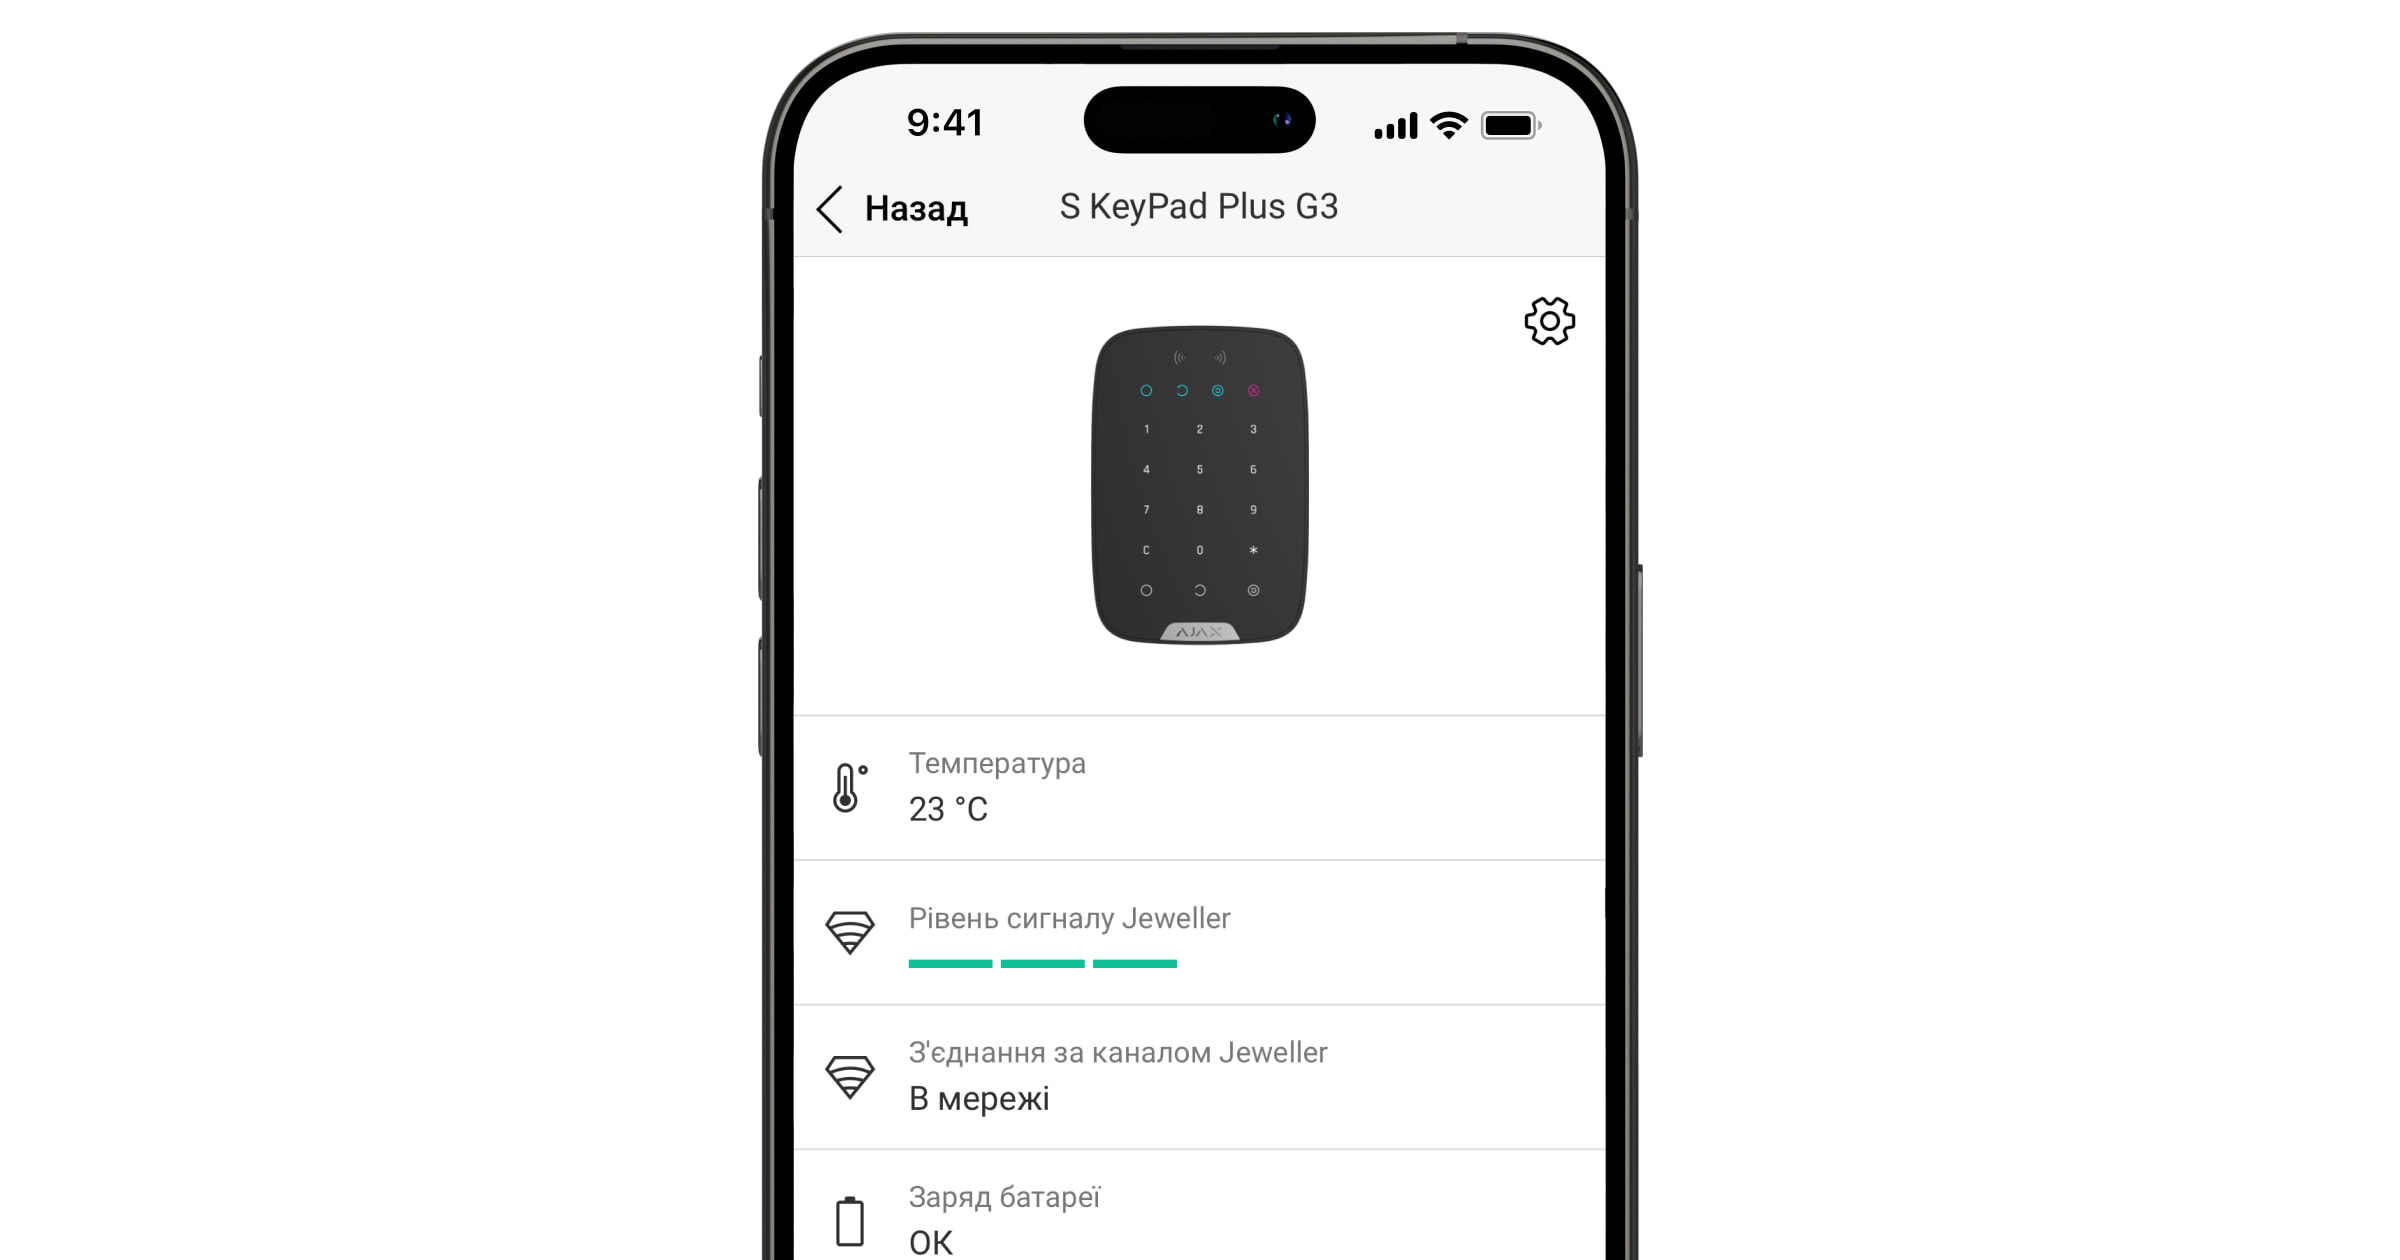
Стани містять інформацію про пристрій і його робочі параметри. Про стани Superior KeyPad Plus G3 Jeweller можна дізнатися в застосунку Ajax:
- Перейдіть у вкладку Пристрої .
- Виберіть Superior KeyPad Plus G3 Jeweller у списку.
| Параметр | Значення |
| Імпорт даних | Відображає помилку перенесення даних на новий хаб:
|
| Несправність |
Після натискання на Поле з’являється, лише якщо виявлено несправність. |
| Температура |
Температура пристрою. Вимірюється процесором і змінюється залежно від температури навколишнього середовища. Ви можете налаштувати сценарій за температурою для керування пристроями автоматизації. |
| Рівень сигналу Jeweller |
Рівень сигналу Jeweller між пристроєм і хабом (або ретранслятором радіосигналу). Рекомендоване значення: 2–3 поділки. Jeweller — протокол для передавання подій і тривог. |
| З’єднання за каналом Jeweller | Стан з’єднання між пристроєм і хабом (або ретранслятором радіосигналу) через канал Jeweller:
|
| Потужність радіопередавача |
Показує вибрану потужність радіопередавача. Поле відображається, якщо вибрано опцію Максимальна або Згасання в меню Тест згасання сигналу. |
| <Імʼя ретранслятора> | Статус використання ретранслятора радіосигналу:
Відображається, якщо пристрій працює через ретранслятор радіосигналу. |
| Заряд батареї | Рівень заряду батареї пристрою. Є два стани:
Коли батареї потрібно буде замінити, користувачі та охоронна компанія отримають відповідні сповіщення. |
| Корпус | Стан кнопки тампера, що реагує на спробу відірвати пристрій від поверхні або порушити цілісність корпусу:
|
| Зчитування карток/брелоків | Показує, чи ввімкнено зчитувач для карток і брелоків. |
| Легке керування охороною | Показує налаштування опції Легке керування охороною:
У налаштуваннях хаба в PRO-застосунку Ajax потрібно задати фіксовану довжину пароля. |
| Посилене шифрування | Стан посиленого шифрування звʼязку між пристроєм і хабом або ретранслятором радіосигналу:
|
| Примусове вимкнення | Стан налаштування примусового вимкнення пристрою:
|
| Вимкнення до зняття з охорони | Стан налаштування вимкнення пристрою до зняття з охорони:
|
| Прошивка | Версія прошивки пристрою. |
| Ідентифікатор | Ідентифікатор пристрою. Також доступний на QR-коді на корпусі пристрою та коробці. |
| Пристрій № | Номер пристрою. Цей номер передається на ПЦС у разі тривоги чи події. |
Налаштування
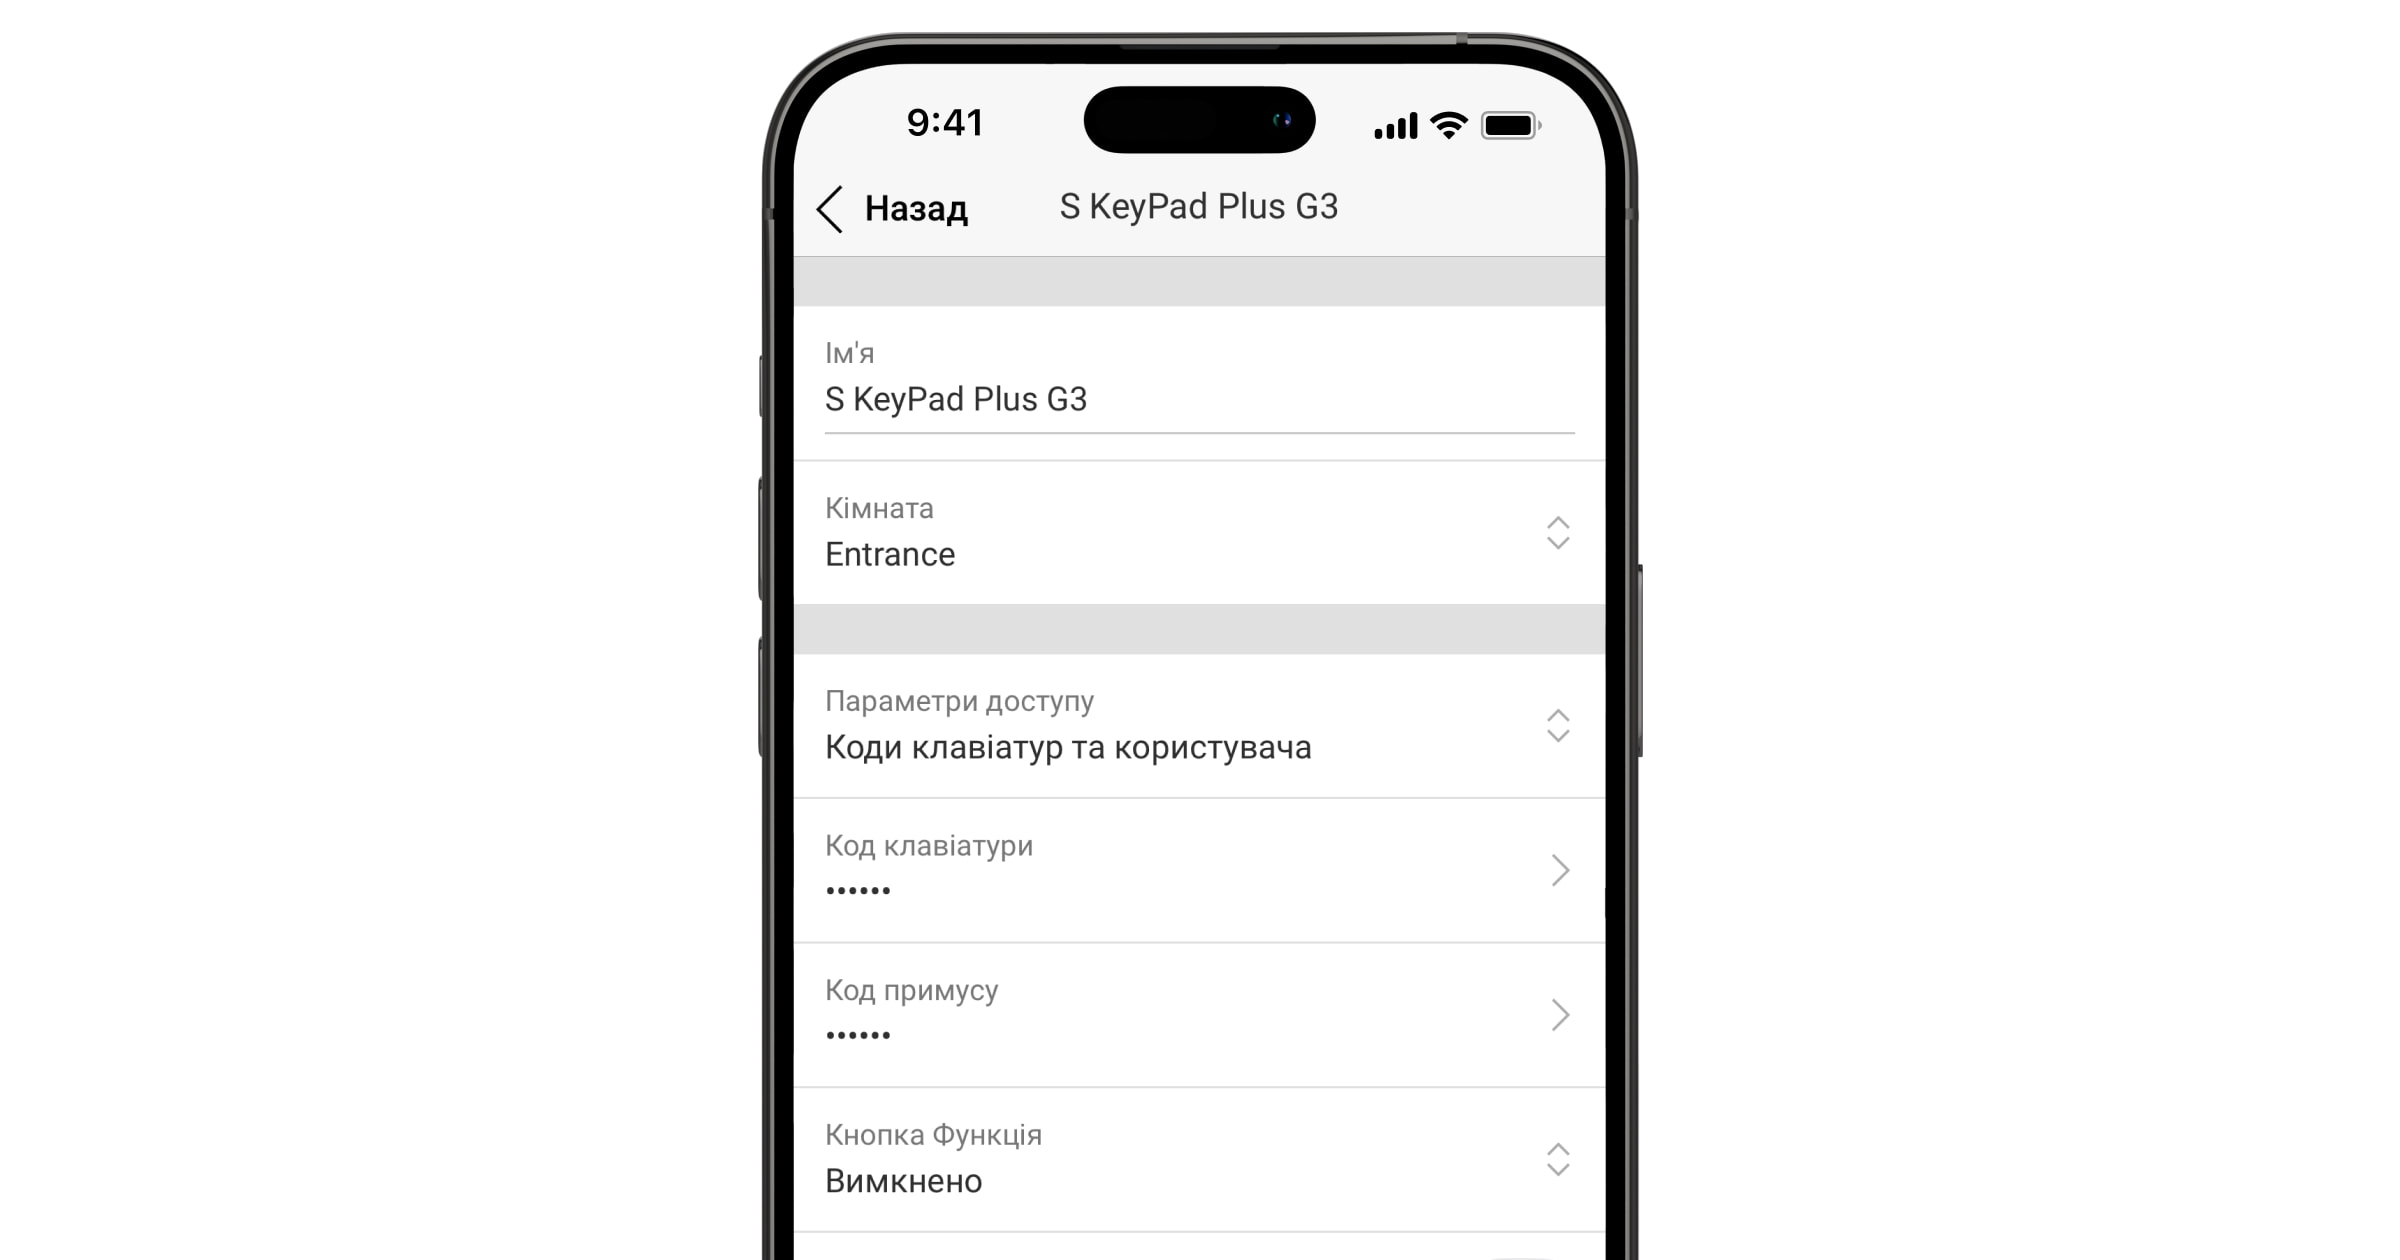
Щоб змінити налаштування Superior KeyPad Plus G3 Jeweller, у застосунках Ajax:
- Перейдіть у вкладку Пристрої .
- Виберіть Superior KeyPad Plus G3 Jeweller у списку.
- Перейдіть у Налаштування .
- Задайте потрібні налаштування.
- Натисніть Назад, щоб зберегти нові налаштування.
| Налаштування | Значення |
| Ім’я |
Ім’я пристрою. Відображається у списку пристроїв хаба, SMS-повідомленнях і сповіщеннях у стрічці подій. Щоб змінити ім’я пристрою, натисніть на текстове поле. Ім’я може містити до 24 символів латиницею або до 12 символів кирилицею. |
| Кімната |
Вибір віртуальної кімнати, до якої потрібно привʼязати Superior KeyPad Plus G3 Jeweller. Назва кімнати відображається в SMS-повідомленнях і сповіщеннях у стрічці подій. |
| Керування групами |
Вибір групи охорони, якою керує пристрій. Можна вибрати всі групи або лише одну. Поле відображається, якщо ввімкнено опцію Режим груп. Якщо для груп налаштовано функцію Наслідувані групи, їхній режим охорони може автоматично змінюватися залежно від налаштувань і станів груп-ініціаторів. |
| Параметри доступу | Вибір способу зміни режиму охорони:
Щоб активувати Коди доступу клавіатур для незареєстрованих користувачів, виберіть опцію Лише коди клавіатур або Коди клавіатур та користувача. |
| Код клавіатури | Вибір загального коду для керування охороною. Може містити від чотирьох до шести цифр. |
| Код примусу |
Вибір загального коду примусу для беззвучної тривоги. Може містити від чотирьох до шести цифр. |
| Кнопка Функція | Вибір режимів кнопки
|
| Захист від випадкового натискання |
Коли опцію ввімкнено, кнопку Функція потрібно натиснути двічі, щоб надіслати сигнал тривоги. Налаштування доступне, якщо для налаштування Кнопка Функція вибрано значення Тривога. |
| Блокування в разі спроб злому |
Коли опцію ввімкнено, клавіатура блокується на попередньо встановлений час, якщо протягом однієї хвилини тричі поспіль введено неправильний код або використано неверифіковані пристрої доступу. PRO або користувач із правами налаштування системи може розблокувати клавіатуру через застосунок до закінчення встановленого часу блокування. |
| Період блокування, хв | Вибір періоду, на який блокуватиметься клавіатура після спроби неавторизованого доступу:
Доступно, якщо опцію Блокування в разі спроб злому увімкнено. |
| Яскравість |
Налаштування яскравості підсвічування кнопок клавіатури. Підсвічування працює, лише коли клавіатура активна. Опція не впливає на рівень яскравості індикаторів зчитувача Pass/Tag та режимів охорони. |
| Гучність кнопок | Вибір рівня гучності кнопок клавіатури під час натискання. |
| Зчитувач Pass/Tag | Коли опцію ввімкнено, режимом охорони можна керувати за допомогою пристроїв доступу Pass і Tag. |
| Підтвердження авторизації за допомогою коду |
Коли опцію ввімкнено, користувачі можуть змінити режим охорони системи лише після успішної двоетапної авторизації: за допомогою пристроїв Pass або Tag і відповідного коду доступу. |
| Час для підтвердження кодом |
Вибір максимального часу для підтвердження авторизації кодом після використання пристрою доступу. Доступно, якщо ввімкнено опцію Підтвердження авторизації за допомогою коду. |
| Легке керування охороною |
Дає змогу користувачам змінювати режим охорони системи без підтвердження дії на клавіатурі. Доступні три опції:
У налаштуваннях хаба в PRO-застосунку Ajax потрібно задати фіксовану довжину пароля. |
| Під охорону без введення коду |
Якщо опцію ввімкнено, користувач може встановити обʼєкт під охорону без введення коду або використання персонального пристрою доступу. Якщо опцію вимкнено, необхідно ввести код або використати пристрій доступу, щоб встановити систему під охорону. Екран для введення коду зʼявляється після натискання кнопки |
| Автоматичне пробудження під час затримки на вхід |
Клавіатура активується на час, поки триває Затримка на вхід будь-якого охоронного пристрою. Функція автопробудження може зменшити час роботи клавіатури від батарей. |
| Активувати сирену, якщо натиснуто тривожну кнопку |
Налаштування відображається, якщо для налаштування Кнопка Функція вибрано значення Тривога. Якщо опцію ввімкнено, додані в систему сирени активують звуковий сигнал, коли натиснуто кнопку |
| Тест рівня сигналу Jeweller |
Переводить пристрій у режим тестування рівня сигналу Jeweller. Тест дає змогу перевірити рівень сигналу між пристроєм і хабом (або ретранслятором радіосигналу) через бездротовий протокол передавання даних Jeweller, щоб визначити оптимальне місце встановлення. |
| Тест згасання сигналу |
Переводить пристрій у режим тестування згасання сигналу. |
| Форматування карток/брелоків |
Дає змогу видалити з пам’яті пристрою всі хаби, привʼязані до Tag або Pass. |
| Інструкція з використання | Опція відкриває інструкцію з використання Superior KeyPad Plus G3 Jeweller у застосунку Ajax. |
| Примусове вимкнення |
Дає змогу користувачеві ігнорувати події пристрою, не видаляючи його із системи. Доступні три опції:
|
| Вимкнення до зняття з охорони |
Дає змогу користувачеві ігнорувати події пристрою до першого зняття з охорони. Доступні три опції:
|
| Видалити пристрій | Відв’язує пристрій від хаба та видаляє його налаштування. |
Налаштування кодів
У PRO-застосунках Ajax у налаштуваннях хаба можна задати вимоги до довжини кодів, які використовуються для авторизації користувачів і доступу до системи. Можна вибрати опцію Гнучка (від 4 до 6 символів) або задати фіксовану довжину коду: 4 символи, 5 символів або 6 символів.
Встановлення фіксованої довжини коду призведе до скидання всіх кодів доступу, що були налаштовані раніше.
Фіксована довжина коду потрібна для функції Легке керування охороною, яка дає змогу знімати систему з охорони без натискання кнопки З охорони на клавіатурі після того, як було введено код або використано пристрій доступу.
Коди доступу клавіатур
Щоб встановити код клавіатури та код примусу:
- У застосунку Ajax перейдіть у вкладку Пристрої .
- Виберіть клавіатуру, для якої потрібно встановити код доступу.
- Перейдіть у Налаштування .
- У меню Параметри доступу виберіть опцію Лише коди клавіатур або Коди клавіатур та користувача.
- Перейдіть у меню Код клавіатури.
- Задайте код клавіатури. Може містити від чотирьох до шести цифр.
- Натисніть Зберегти.
- Перейдіть у меню Код примусу.
- Задайте код примусу. Може містити від чотирьох до шести цифр.
- Натисніть Зберегти.
Коди зареєстрованих користувачів
Щоб задати персональний код і персональний код примусу:
- Виберіть простір у застосунку Ajax.
- Перейдіть у меню Налаштування .
- Відкрийте меню Користувачі.
- Знайдіть свій обліковий запис у переліку та натисніть на нього.
- Перейдіть у меню Налаштування кодів доступу.
- Задайте Код користувача. Може містити від чотирьох до шести цифр.
- Натисніть Зберегти.
- Задайте Код примусу. Може містити від чотирьох до шести цифр.
- Натисніть Зберегти.
- Натисніть Назад, щоб зберегти налаштування.
Коди незареєстрованих користувачів
Щоб задати код доступу для користувача, який не має облікового запису:
- Виберіть хаб у застосунку Ajax.
- Перейдіть у вкладку Налаштування .
- Перейдіть у меню Коди доступу клавіатур.
- Натисніть Додати код. Задайте Імʼя та Код доступу. Може містити від чотирьох до шести цифр.
- Натисніть Додати, щоб зберегти дані.
Щоб задати код примусу для користувача, який не має облікового запису:
- Виберіть меню Коди доступу клавіатур в налаштуваннях хаба.
- Виберіть потрібного незареєстрованого користувача.
- Натисніть Додати код примусу. Задайте код. Може містити від чотирьох до шести цифр.
- Натисніть Зберегти.
Для незареєстрованих користувачів доступ до керування режимами охорони може налаштувати адміністратор або PRO з правами налаштування системи. Спочатку увімкніть Режим груп. Потім у налаштуваннях хаба виберіть меню Коди доступу клавіатур, знайдіть потрібного користувача та задайте відповідні параметри в меню Керування охороною.
Код для ГШР
Тільки PRO-користувач із правами налаштування системи може створювати та налаштовувати коди для ГШР у PRO-застосунках Ajax. Докладнішу інформацію про налаштування цієї функції можна знайти у статті.
Картки та брелоки
Superior KeyPad Plus G3 Jeweller може працювати з брелоками Tag, картками Pass та сторонніми пристроями, які підтримують технологію DESFire®.
Перш ніж додати сторонні пристрої з підтримкою DESFire® переконайтеся, що вони мають достатньо вільної памʼяті для роботи з новою клавіатурою. Рекомендовано попередньо відформатувати сторонній пристрій.
У цьому розділі наведено інформацію щодо форматування Tag або Pass.
Максимальна кількість пристроїв Pass і Tag, доданих на хаб, залежить від моделі хаба. Додані пристрої Pass і Tag не впливають на загальний ліміт пристроїв на хабі.
Додавання Tag або Pass
- Відкрийте застосунок Ajax.
- Виберіть простір із хабом, на який потрібно додати Tag або Pass.
- Перейдіть у вкладку Пристрої .
Переконайтеся, що опцію Зчитування карток/брелоків увімкнено принаймні для однієї клавіатури в системі.
- Натисніть Додати пристрій.
- Виберіть Додати картку/брелок.
- Зазначте тип (Tag або Pass), колір, імʼя пристрою та користувача (якщо необхідно).
- Натисніть Далі. Після цього хаб перейде в режим реєстрації пристроїв.
- Підійдіть до будь-якої сумісної клавіатури з увімкненою опцією Зчитування карток/брелоків. Натисніть кнопку З охорони, щоб перевести клавіатуру в режим реєстрації пристроїв доступу.
- Піднесіть Tag або Pass до зчитувача клавіатури на декілька секунд. Після успішного додавання пристрою ви отримаєте відповідне сповіщення в застосунку Ajax.
Якщо підключення не вдалося, спробуйте ще раз через пʼять секунд. Якщо на хаб вже додано максимальну кількість пристроїв Tag або Pass, то під час спроби додати новий пристрій у застосунку Ajax буде показано відповідне сповіщення.
Пристрої Tag і Pass можуть працювати з декількома хабами одночасно. Максимальна кількість хабів — 13. Якщо брелок або картку вже додано на максимальну кількість хабів, під час спроби підключити їх до нового хаба система надішле відповідне сповіщення. Щоб прив’язати такі пристрої до нового хаба, їх необхідно відформатувати.
Якщо потрібно додати ще один Tag або Pass, натисніть Додати іншу картку/брелок у застосунку. Повторіть кроки 6–9.
Видалення (форматування) Tag або Pass
Форматування видалить усі налаштування та привʼязки брелоків і карток. У цьому випадку відформатовані пристрої Tag і Pass видаляються лише з того хаба, на якому було виконано форматування. Tag або Pass відображатимуться в списку пристроїв інших хабів у застосунку, але їх не можна буде використати для керування режимами охорони. Ці пристрої слід видалити вручну.
- Відкрийте застосунок Ajax.
- Виберіть потрібний простір.
- Перейдіть у вкладку Пристрої .
- Виберіть сумісну клавіатуру зі списку пристроїв.
Переконайтеся, що опцію Зчитування карток/брелоків увімкнено в налаштуваннях клавіатури.
- Перейдіть у налаштування клавіатури, натиснувши іконку .
- Натисніть Форматування карток/брелоків.
- Натисніть Продовжити.
- Підійдіть до будь-якої сумісної клавіатури з увімкненим зчитуванням карток/брелоків. Натисніть кнопку З охорони, щоб перевести клавіатуру в режим форматування пристроїв.
- Прикладіть Tag або Pass широкою стороною до зчитувача клавіатури на декілька секунд. Після успішного форматування пристрою ви отримаєте відповідне сповіщення в застосунку Ajax. Якщо форматування не вдалося, спробуйте ще раз.
Якщо потрібно відформатувати ще один пристрій Tag або Pass, натисніть Очистити іншу картку/брелок у застосунку. Повторіть крок 9.
Керування режимами охорони
За допомогою кодів і пристроїв Tag або Pass можна керувати Нічним режимом та охороню всього обʼєкта або окремих груп. Користувач або PRO з правами налаштування системи може задавати коди доступу. У цьому розділі наведено інформацію про те, як додати Tag або Pass на хаб.
Якщо використовується персональний код, код доступу, Tag або Pass, імʼя користувача, який змінив режим охорони, відображається у стрічці подій хаба та у списку сповіщень. Якщо використовується загальний код, відображається імʼя клавіатури, з якої було змінено режим охорони.
Якщо протягом однієї хвилини тричі поспіль введено неправильний код або використано неверифіковані пристрої доступу, клавіатура Superior KeyPad Plus G3 Jeweller блокується на заданий у налаштуваннях час. У такому разі користувачі та ПЦС отримають відповідні сповіщення. Користувач або PRO з правами налаштування системи може розблокувати Superior KeyPad Plus G3 Jeweller у застосунку Ajax.
Послідовність дій для зміни режиму охорони за допомогою клавіатури залежить від того, чи увімкнені в налаштуваннях Superior KeyPad Plus G3 Jeweller опції Під охорону без введення коду, Підтвердження авторизації за допомогою коду та Легке керування охороною.
За допомогою Tag або Pass
- Активуйте клавіатуру, піднісши руку до екрана.
- Піднесіть Tag або Pass до зчитувача карток/брелоків клавіатури.
- Введіть потрібний код, якщо увімкнено функцію Підтвердження авторизації за допомогою коду.
- Натисніть на клавіатурі кнопку Під охорону, З охорони або Нічний режим.
Якщо увімкнено опцію Легке керування охороною, не потрібно натискати кнопку Під охорону, З охорони або Нічний режим після зчитування пристрою доступу.
За допомогою кодів
Неправильно введені коди можна видалити, натиснувши кнопку ![]() Скинути.
Скинути.
| Код | Приклад | Примітка |
| Керування режимами охорони обʼєкта | ||
|
Код клавіатури Код примусу клавіатури |
1234 → |
|
|
Код користувача Код примусу користувача |
5 → |
5 — ідентифікатор користувача |
|
Код для незареєстрованого користувача Код примусу для незареєстрованого користувача |
1234 → |
|
| Код для ГШР | 1234 → |
|
| Керування режимами охорони груп | ||
|
Код клавіатури Код примусу клавіатури |
1234 → |
2 — ідентифікатор групи |
|
Код користувача Код примусу користувача |
5 → |
5 — ідентифікатор користувача 2 — ідентифікатор групи |
|
Код для незареєстрованого користувача Код примусу для незареєстрованого користувача |
1234 → |
2 — ідентифікатор групи |
| Код для ГШР | 1234 → |
2 — ідентифікатор групи |
Підтвердження авторизації за допомогою коду
Підтвердження авторизації за допомогою коду — функція, яка дає змогу налаштувати двофакторну автентифікацію для користувачів під час керування режимами охорони системи. Це означає, що користувач повинен спочатку піднести до клавіатури пристрій доступу (Pass або Tag), а потім ввести код для підтвердження авторизації в системі.
Індикація
Superior KeyPad Plus G3 Jeweller може повідомляти про поточний режим охорони, натискання клавіш, несправності та стан за допомогою світлодіодної індикації та звукових сигналів. Підсвічування показує поточний режим охорони після активації клавіатури. Інформація про поточний режим охорони залишається актуальною, навіть якщо режим охорони змінено іншим брелоком, іншою клавіатурою або в застосунку.
Ви можете активувати клавіатуру, провівши рукою біля сенсорної панелі зверху вниз. Після активації увімкнеться підсвічування клавіатури й пролунає звуковий сигнал (якщо опцію увімкнено).
| Подія | Індикація | Примітка |
| Увімкнення пристрою | Усі індикатори та підсвічування цифрової клавіатури загоряються на короткий час. Після цього пролунають три короткі звукові сигнали різної тональності, загориться індикатор поточного режиму охорони й увімкнеться підсвічування цифрової клавіатури. Після цього підсвічування плавно згасне, і пролунають два короткі звукові сигнали | |
| Увімкнення пристрою, який не було додано на хаб | Усі індикатори та підсвічування цифрової клавіатури загоряються на короткий час. Після цього світлодіодний індикатор X блискає шість разів, а потім швидко блискає ще тричі | Клавіатура вимикається, щойно всі індикатори гаснуть |
| Вимкнення пристрою | Світлодіодний індикатор X загоряється приблизно на одну секунду, а потім блискає тричі | Система надсилає сповіщення, коли клавіатуру вимкнено за допомогою кнопки живлення |
| Пристрій видалено з хаба | Світлодіодний індикатор X блискає шість разів, а потім швидко блискає ще тричі | Клавіатура вимикається після згасання індикації |
| Відсутній зв’язок із хабом або ретранслятором радіосигналу | Світлодіодний індикатор X блискає | |
| Кришка пристрою відкрита (знято панель SmartBracket) | Світлодіодний індикатор X швидко блискає один раз | |
| Натискання сенсорної кнопки | Короткий звуковий сигнал, світлодіодний індикатор поточного стану системи блискає один раз | Гучність залежить від налаштувань клавіатури |
| Систему встановлено під охорону | Короткий звуковий сигнал, загоряється світлодіодний індикатор Під охороною або Нічний режим | |
| Систему знято з охорони | Два короткі звукові сигнали, загоряється світлодіодний індикатор Знято з охорони | |
| Введено неправильний код, або була спроба змінити режим охорони за допомогою непідключеної або деактивованої карти/брелока | Довгий звуковий сигнал, підсвічування цифрової клавіатури блискає тричі | |
| Режим охорони неможливо активувати (не вдалося виконати перевірку цілісності системи) | Довгий звуковий сигнал, світлодіодний індикатор поточного стану системи блискає тричі | |
| Система вимагає ввести код після використання пристрою доступу, щоб підтвердити авторизацію. Доступно, якщо ввімкнено опцію Підтвердження авторизації за допомогою коду | Світлодіодний індикатор поточного стану охорони блискає протягом заданого часу для підтвердження | |
| Клавіатуру заблоковано через спробу введення неправильного коду або використання неавторизованої картки/брелока | Довгий звуковий сигнал, упродовж якого світлодіодні індикатори стану охорони та підсвічування клавіатури блискають тричі | |
| Хаб не відповідає | Довгий звуковий сигнал, загоряється світлодіодний індикатор X | |
| Низький заряд батареї |
Після зміни режиму охорони загоряється світлодіодний індикатор X. Сенсорні кнопки в цей час заблоковані. У разі спроби увімкнути клавіатуру з розрядженими батареями вона видає довгий звуковий сигнал, світлодіодний індикатор X плавно загоряється й гасне, після чого клавіатура вимикається. |
Як замінити батареї |
Звукові сигнали про несправності
Superior KeyPad Plus G3 Jeweller може інформувати користувачів системи звуковим сигналом про розрядження або вимкнення будь-якого пристрою. Світлодіодний індикатор Х на клавіатурі почне блискати. Інформація про несправності відображатиметься у стрічці подій, SMS-повідомленнях або пуш-сповіщеннях.
Щоб увімкнути звукові сигнали про несправності, у PRO-застосунку Ajax:
- Перейдіть у вкладку Пристрої .
- Виберіть хаб і перейдіть у його налаштування .
- Перейдіть у меню Сервісні → Звуки тривог і несправностей.
- Увімкніть опції Коли будь-який пристрій розрядився та Коли будь-який пристрій поза мережею.
- Натисніть Назад, щоб зберегти налаштування.
| Подія | Індикація | Примітка |
| Коли будь-який пристрій поза мережею |
Два короткі звукові сигнали, світлодіодний індикатор Х блискає двічі. Сигнал лунає раз на хвилину, поки всі пристрої в системі не підключаться до мережі. |
Користувачі можуть відкласти звукове сповіщення на 12 годин |
| Якщо Superior KeyPad Plus G3 Jeweller не в мережі |
Два короткі звукові сигнали, світлодіод Х блискає двічі. Сигнал лунає раз на хвилину, поки клавіатура в системі не підключиться до мережі. |
Неможливо відкласти звукове оповіщення |
| Якщо батарея будь-якого пристрою розряджена |
Три короткі звукові сигнали, світлодіодний індикатор Х блискає тричі. Сигнал лунає раз на хвилину, поки заряд батареї не буде відновлено або батарею не буде замінено. |
Користувачі можуть відкласти звукове оповіщення на чотири години |
Звукові сигнали про несправності лунають після вимкнення індикації клавіатури. Якщо в системі виникає кілька несправностей, клавіатура спочатку повідомить про втрату звʼязку з хабом.
Несправності
Якщо у пристрої виявлено несправність (наприклад, відсутній зв’язок через протокол Jeweller), у застосунку Ajax у лівому верхньому кутку іконки пристрою відображається лічильник несправностей.
Усі несправності можна побачити у станах пристрою. Поля з несправностями підсвічуються червоним.
Несправність відображається, якщо:
- Температура пристрою виходить за допустимі межі.
- Відкрито корпус пристрою (спрацювання кнопки тампера).
- Відсутній зв’язок із хабом або ретранслятором через протокол Jeweller.
- Батарея пристрою розряджена.
Обслуговування
Регулярно перевіряйте роботу пристрою. Оптимальний інтервал перевірки — що три місяці. Очищайте корпус пристрою від пилу, павутиння й інших забруднень, щойно вони з’являтимуться. Використовуйте м’яку суху серветку для догляду за технікою.
Не очищайте пристрій речовинами, що містять спирт, ацетон, бензин або інші активні розчинники.
Якщо батарея клавіатури розряджена, система надсилає відповідні сповіщення, а світлодіодний індикатор Х Несправність плавно загоряється й гасне після кожного успішного введення коду.
Superior KeyPad Plus G3 Jeweller може працювати до двох місяців після сигналу про низький заряд батареї. Однак ми рекомендуємо замінити батареї одразу після оповіщення. Рекомендовано використовувати літієві батареї. Вони мають велику ємність і менш чутливі до температури.
Технічні характеристики
Гарантія
Гарантія на продукцію товариства з обмеженою відповідальністю «Аджакс Сістемс Манюфекчурінг» діє 2 роки після придбання.
Якщо пристрій працює некоректно, рекомендуємо спочатку звернутися до служби технічної підтримки Ajax: у більшості випадків технічні питання можна владнати дистанційно.
Зв’язатися зі службою технічної підтримки:
Вироблено ТОВ «АС Манюфекчурінг»
