
KeyArm Zone is een speciaal type input waarmee u de modus van het systeem kunt wijzigen met externe apparaten die zijn aangesloten op Ajax-integratiemodules. Deze apparaten van derden zijn bijvoorbeeld o.a. toegangscontrollers, mechanische sleutelschakelaars, drukknopschakelaars, radiocontrollers, of telefoonrelais.
Met KeyArm kunt u het systeem, afzonderlijke groepen of de deelinschakeling in-/uitschakelen. Deze functie is beschikbaar in de Ajax-apps.
Systeemvereisten
De KeyArm-functie wordt ondersteund door alle integratiemodules die zijn toegevoegd aan hubs (behalve Hub (2G) Jeweller en Hub (4G) Jeweller) met OS Malevich 2.17 of nieuwer. Een PRO of een gebruiker met rechten om het systeem te configureren kan de functie configureren.
Gebruik de nieuwste Ajax-apps en versies van OS Malevich om toegang te krijgen tot alle beschikbare functies en een goede werking van het systeem te garanderen.
Hoe de instelling werkt
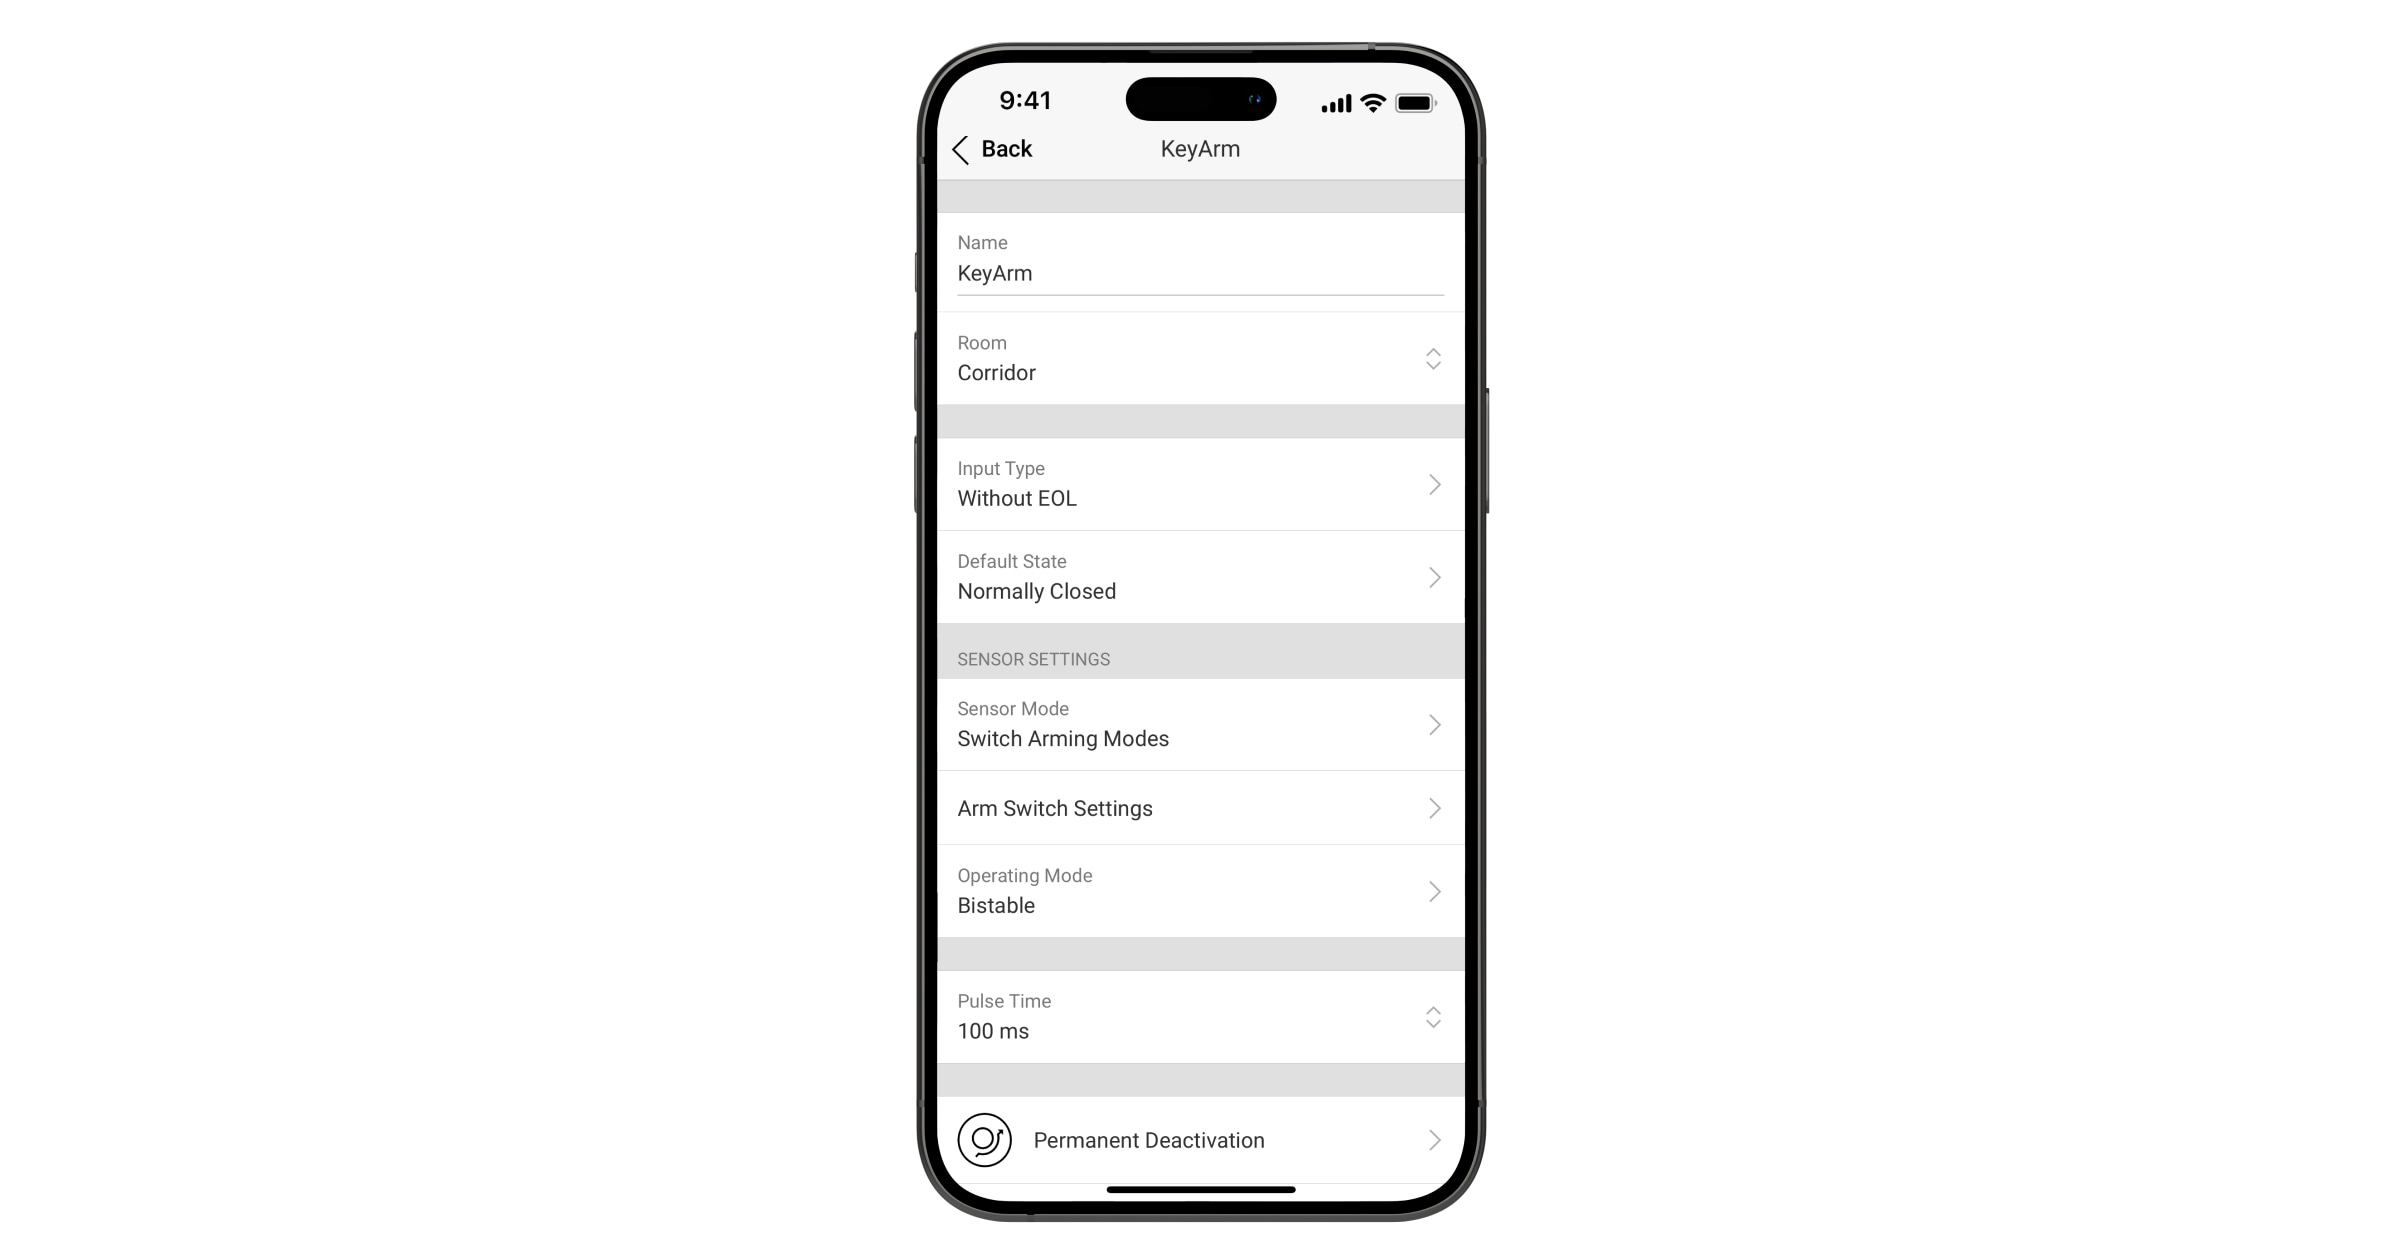
- Vooraf ingestelde actie: de actie die wordt uitgevoerd op de systeemstatus zodra de KeyArm Zone wordt geactiveerd. U kunt de functies voor in-/uitschakelen, alleen inschakelen, of alleen uitschakelen, opgeven als de actie van het apparaat met KeyArm.
- Beveiligingsobjecten: wijzig de status van het hele systeem, een individuele groep of een reeks groepen, of beheer de deelinschakeling.
- Invoertype: Configureer de aansluiting van het KeyArm-apparaat op de invoer. Afhankelijk van de versie van de Transmitter of MultiTransmitter kan dit zonder EOL, EOL, 2EOL, of 3EOL.
- Standaard Status: kan normaal gesloten (NC) of normaal open (NO) zijn.
- Bedrijfsmodus: Bistabiel of Puls.
Afhankelijk van de gebruikte hub kunt u maximaal 18 of 50 KeyArm Zones installeren en configureren voor uw systeem.
| Hub-model | Aantal KeyArm-zones |
| Hub Plus Jeweller | 50 |
| Hub 2 Plus Jeweller | 50 |
| Hub 2 (2G) Jeweller | 18 |
| Hub 2 (4G) Jeweller | 18 |
| Superior Hub Hybrid (2G) | 18 |
| Superior Hub Hybrid (4G) | 18 |
Bovendien zorgen regelmatige integriteitscontroles van het systeem en volledige vergrendeling van de KeyArm wanneer een sabotagebeveiliging wordt geactiveerd, voor de beste systeembeveiliging.
Vergrendel de schakelaar als de deksel open is
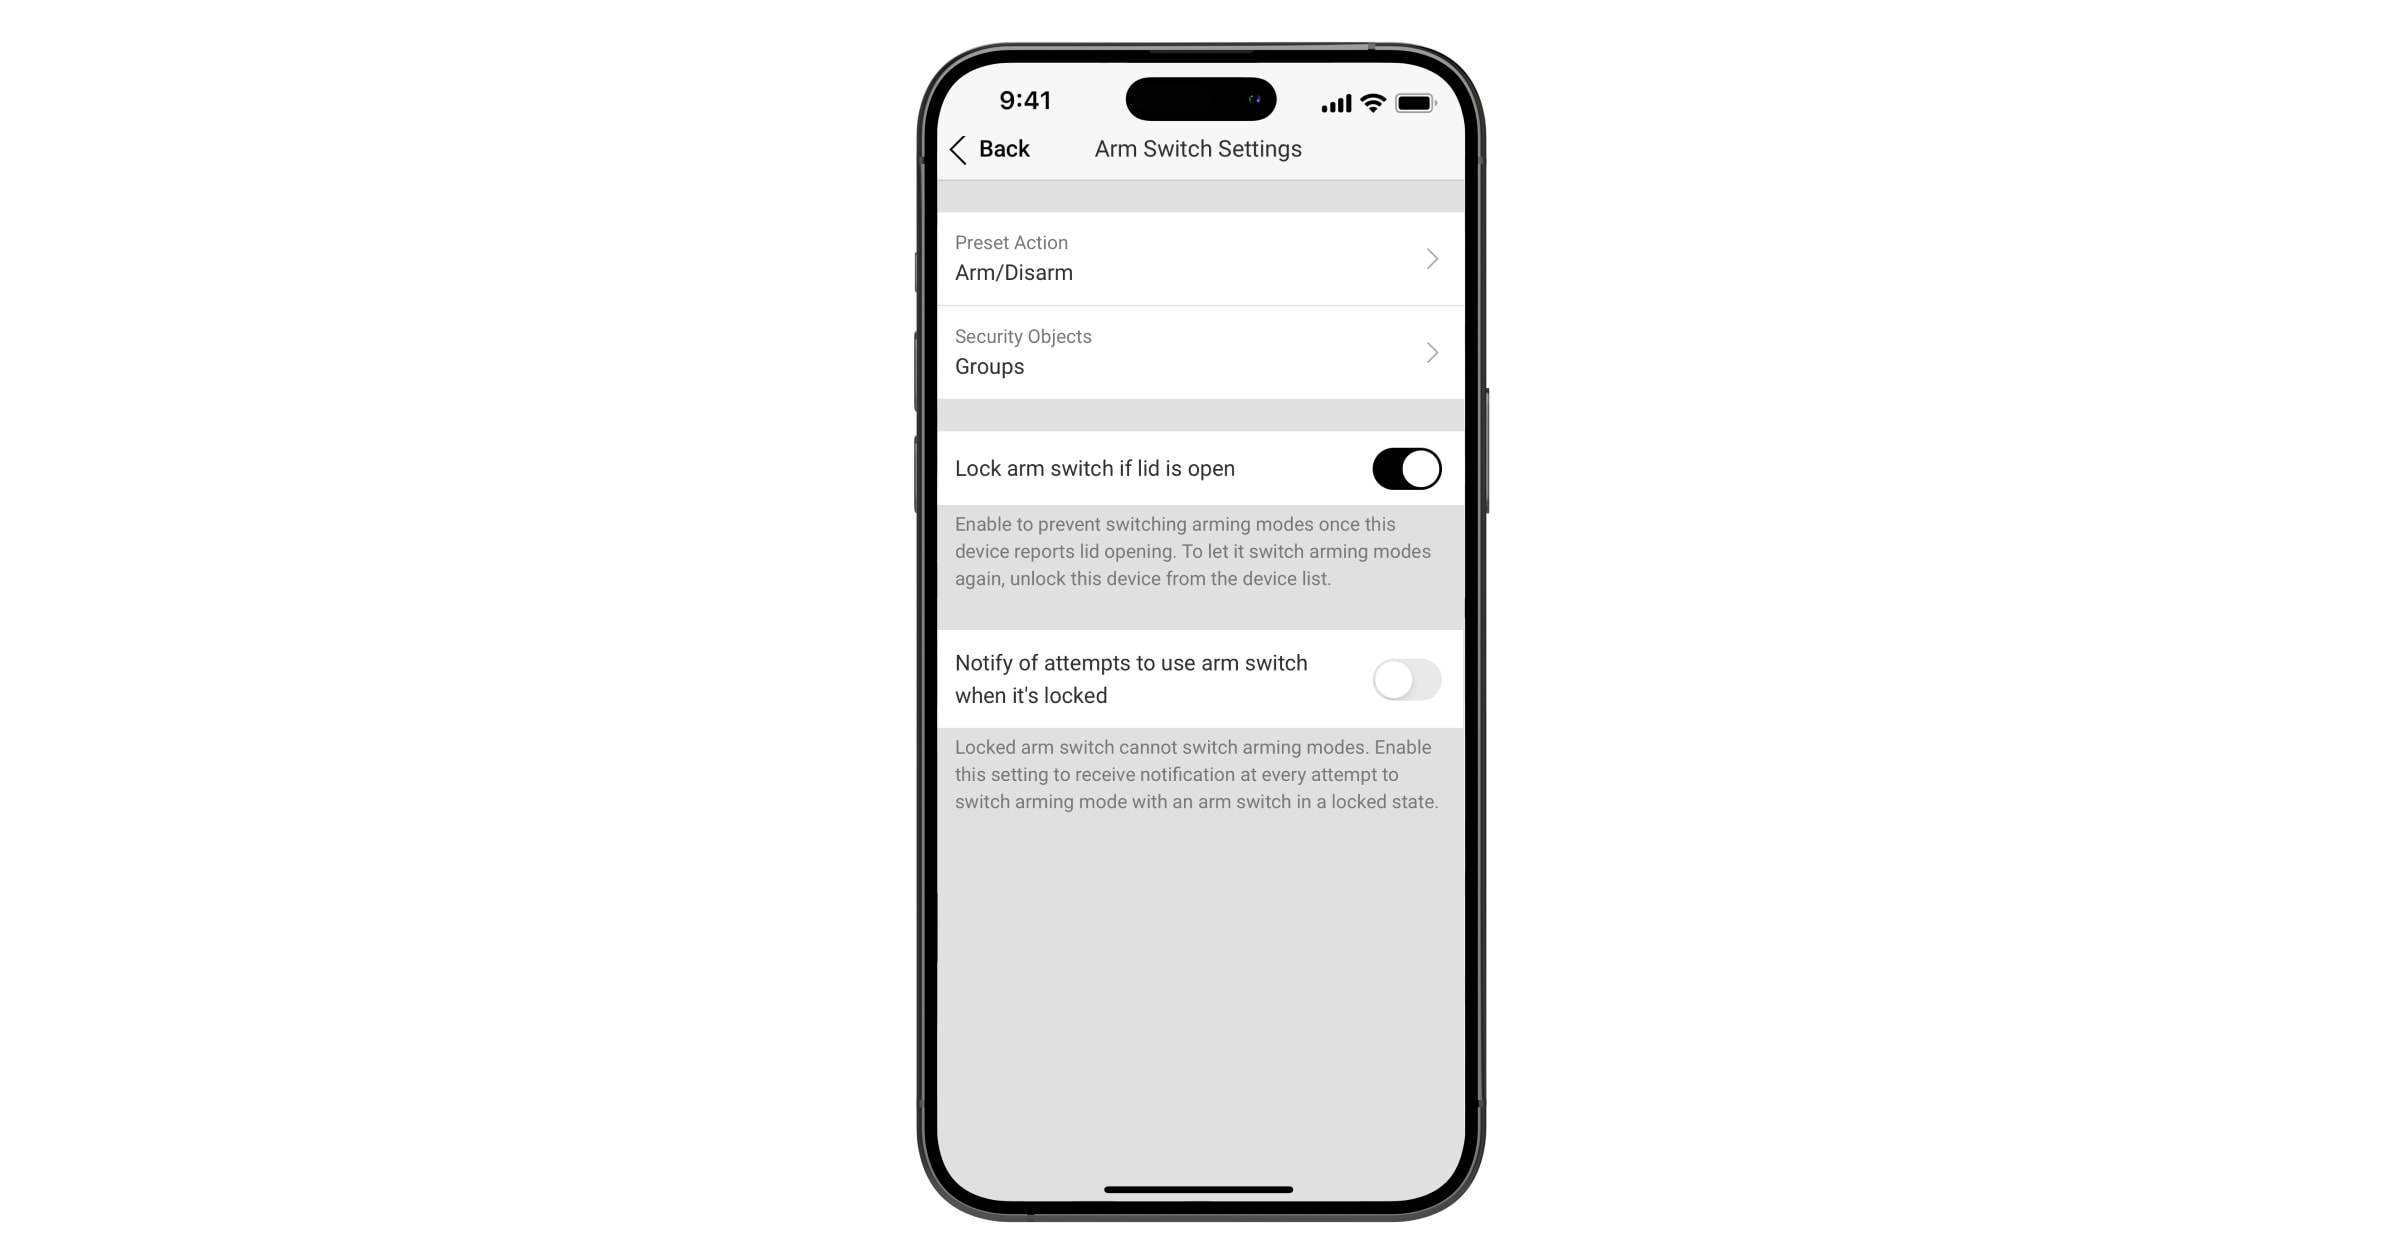
Om de betrouwbaarheid van het systeem te verhogen, bieden we de mogelijkheid om KeyArm te vergrendelen als er sabotage wordt gedetecteerd om te voorkomen dat het systeem wordt in-/uitgeschakeld via een defect extern toegangsapparaat. Met OS Malevich 2.19 kunt u meldingen te activeren wanneer geprobeerd wordt om ingeschakelde modus te wijzigen met een vergrendelde inschakelschakelaar.
Houd er rekening mee dat de vergrendelingsfunctie alleen beschikbaar is voor integratiemodules waarbij de input van de sensor is geconfigureerd als sabotage.
U kunt de KeyArm-sabotagebeveiliging activeren en beheren in de Ajax-apps. De volgende sectie beschrijft hoe u de KeyArm Zone configureert.
Als KeyArm is vergrendeld door een geactiveerd sabotagealarm, kunt u het alleen ontgrendelen in de Ajax-app.
Aansluiten en toevoegen aan het systeem
Typische toegangsapparaten van derden moeten op dezelfde manier worden aangesloten op de KeyArm-invoer als elk ander activeringsapparaat.
Afhankelijk van het gebruikte apparaat voor de KeyArm Zone, kan het invoertype worden geconfigureerd als NO, NC, EOL, 2EOL, of 3EOL.
Zodra het toegangsapparaat is aangesloten op de integratiemodule, moet u het toevoegen aan het systeem in de Ajax-app. Raadpleeg de gebruikershandleiding van de integratiemodule om een extern apparaat toe te voegen aan het systeem.
KeyArm Zone activeren en configureren in de app
Er is een klein verschil tussen de configuratie van Transmitter Jeweller en andere integratiemodules.
- Open de Ajax-app en selecteer de space. Zorg ervoor dat de hub is uitgeschakeld.
- Ga naar het tabblad Apparaten
 .
. - Zoek de integratiemodule en ga naar Apparaten.
- Selecteer het gewenste apparaat en ga naar Instellingen
 .
. - Ga naar de instelling Sensormodus.
- Selecteer de optie Wijzig ingeschakelde modi.
- Ga naar het item Instellingen inschakelschakelaar.
- Configureer de volgende instellingen naar wens:
- Als KeyArm Zone is ingesteld voor NO, NC of EOL:
- selecteer inschakelen voor Vooraf ingestelde actie;
- selecteer de Beveiligingsobjecten die moeten worden beheerd door KeyArm.
- selecteer Onmiddellijk inschakelen ondanks gedetecteerde systeemstoringen (beschikbaar als Integriteitscontrole van het systeem en Toestemming voor inschakelen zijn ingeschakeld en de opties In-/uitschakelen of Alleen inschakelen zijn geselecteerd voor de instelling Vooraf ingestelde actie).

De functie Onmiddellijk inschakelen ondanks gedetecteerde systeemstoringen is beschikbaar voor hubs met OS Malevich 2.24 of nieuwer.
- Als KeyArm Zone is ingesteld voor 2EOL of 3EOL:
- selecteer inschakelen voor Vooraf ingestelde actie;
- selecteer de Beveiligingsobjecten die moeten worden beheerd door KeyArm;
- selecteer Onmiddellijk inschakelen ondanks gedetecteerde systeemstoringen (beschikbaar als Integriteitscontrole van het systeem en Toestemming voor inschakelen zijn ingeschakeld en de opties In-/uitschakelen of Alleen inschakelen zijn geselecteerd voor de instelling Vooraf ingestelde actie).
- configureer de instelling Vergrendel inschakelschakelaar als deksel open is;
- configureer de functie Waarschuw bij pogingen om de inschakelschakelaar te gebruiken wanneer deze is vergrendeld (beschikbaar als de functie Vergrendel inschakelschakelaar als deksel open is is ingeschakeld).
De functie Waarschuw bij pogingen om de inschakelschakelaar te gebruiken wanneer deze is vergrendeld is beschikbaar voor hubs met OS Malevich 2.19 of nieuwer.
- Als KeyArm Zone is ingesteld voor NO, NC of EOL:
Merk op dat voor 2EOL en 3EOL, KeyArm Zone alleen voor Sensor 2 kan worden geactiveerd. In dit geval kan het vergrendelen van KeyArm bij activering van de sabotagebeveiliging alleen worden geactiveerd als Sensor 1 of Sensor 3 is ingesteld als een sabotagealarm.