Superior KeyPad TouchScreen G3 Jeweller, Ajax sistemlerini yönetmek için tasarlanmış dokunmatik ekranlı bir kablosuz tuş takımıdır. Kullanıcılar akıllı telefonları, Tag anahtarlıkları, Pass kartları ve kodları kullanarak kimlik doğrulaması yapabilirler. Cihaz sadece iç mekan kullanımı için tasarlanmıştır.
Superior KeyPad TouchScreen G3 Jeweller, iki güvenli telsiz protokolü üzerinden hub ile iletişim kurar. Tuş takımı, alarmları ve olayları iletmek için Jeweller protokolünü, aygıt yazılımını güncellemek, grup ve oda listesini ve diğer ek bilgileri iletmek için ise Wings protokolünü kullanır. Açık alanda 8,202 ft kadar iletişim menzili vardır. Maksimum menzil hub modeline göre değişir.
Superior ürünleri yalnızca akredite Ajax Systems iş ortakları tarafından satış, kurulum ve bakım için kullanılabilir ve korumalı ve yüksek değerli bir gelir kanalı sağlar.
Superior ve Baseline ürün serileri birbiriyle uyumludur. Böylece herhangi bir konfigürasyonda sistem oluşturmak için sayısız olasılık vardır.
İşlevsel unsurlar
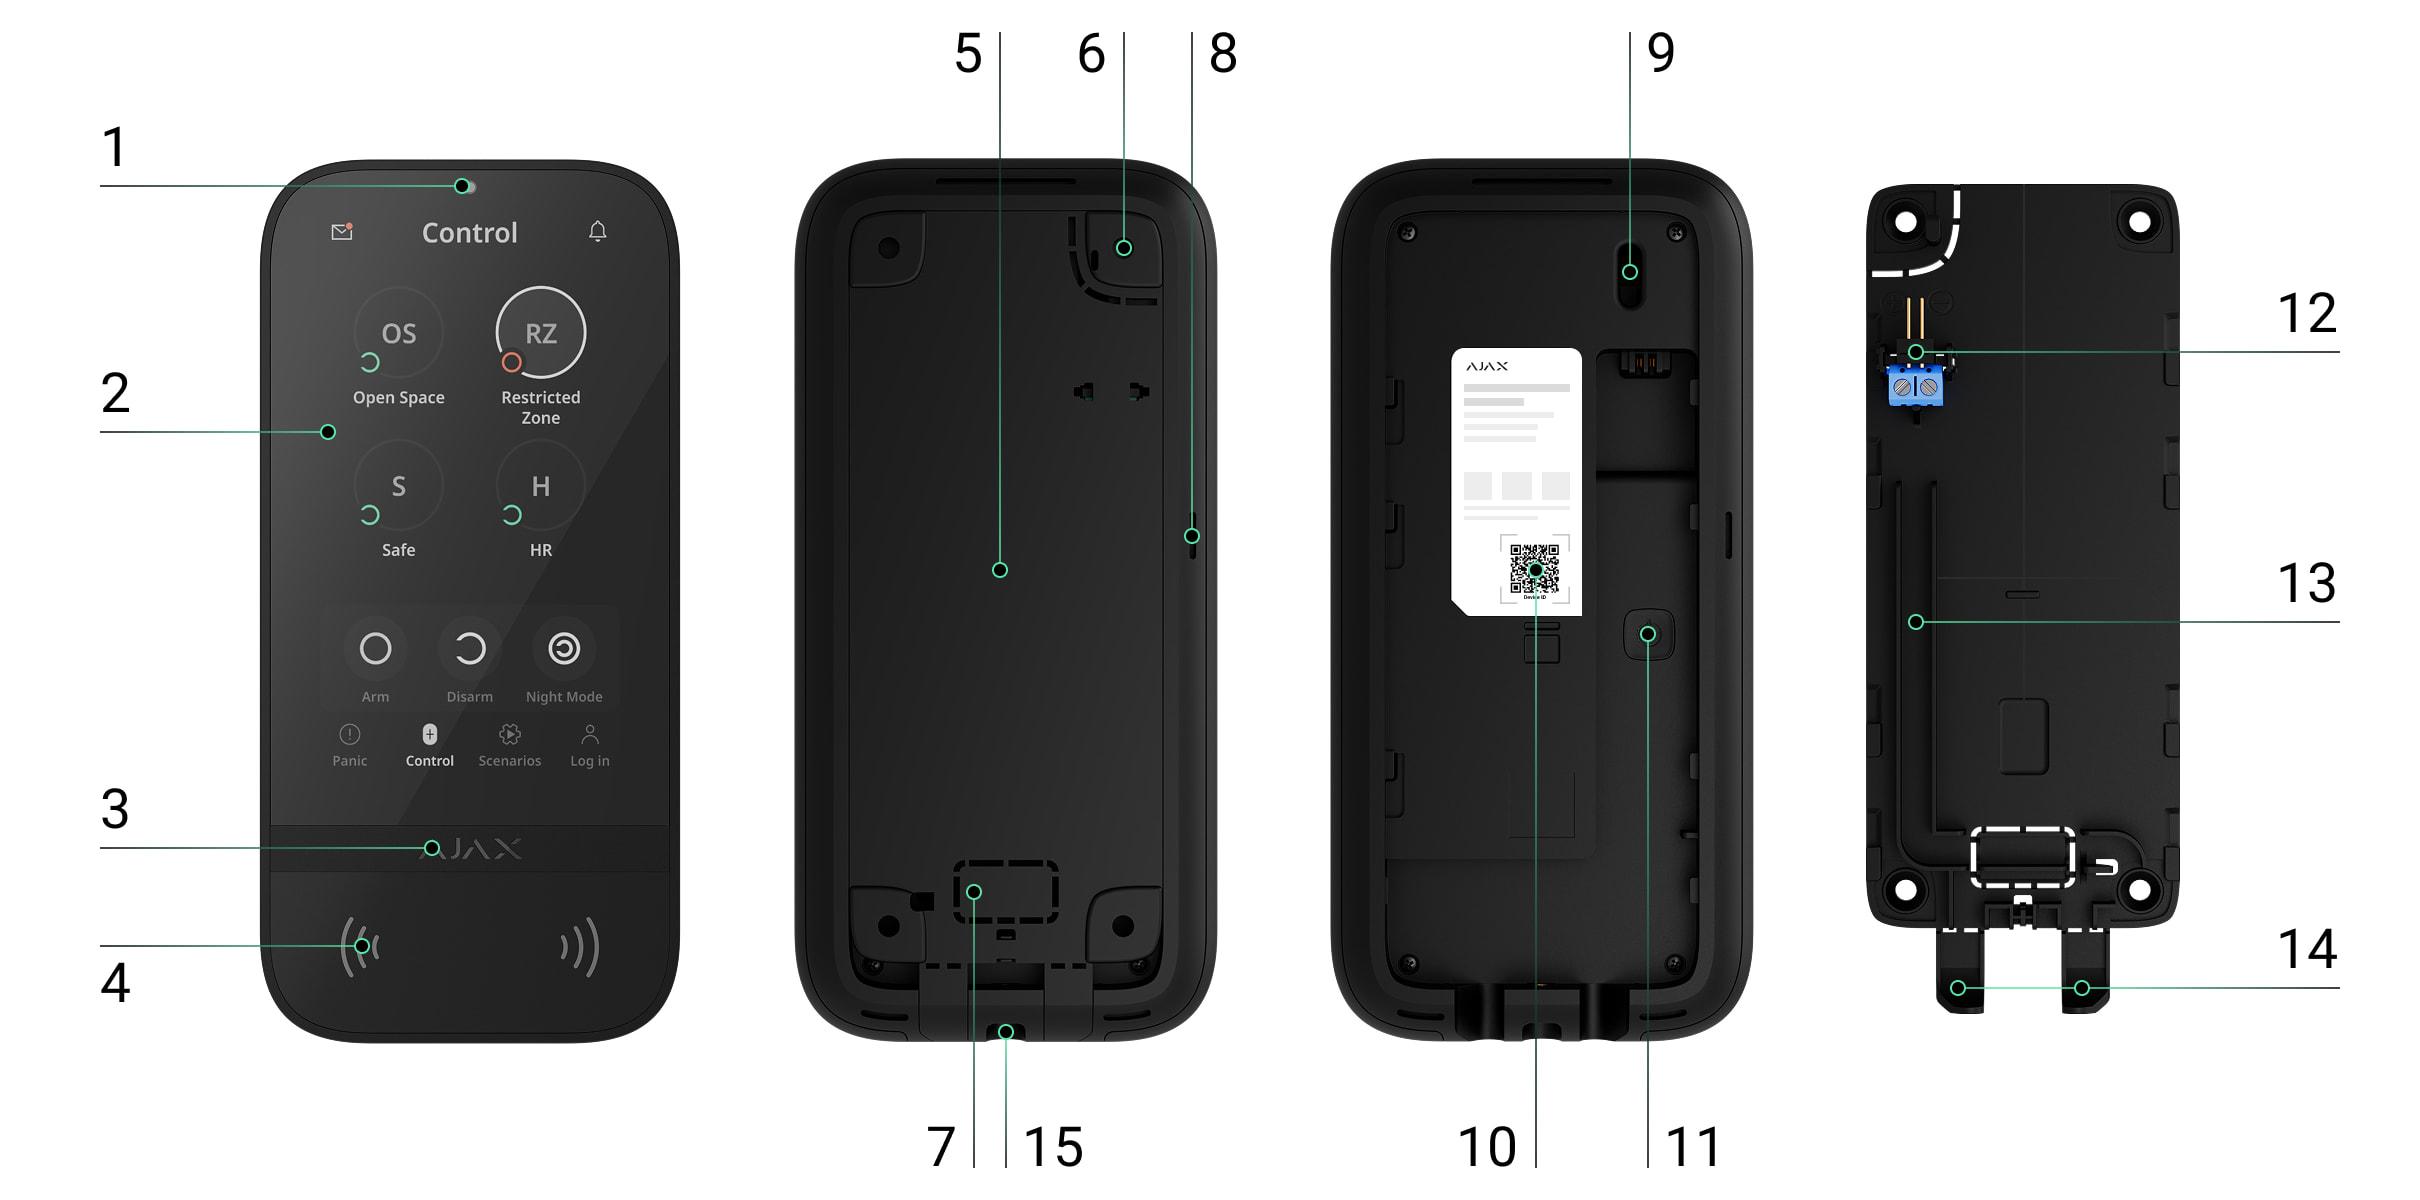
- Arka ışık parlaklığını otomatik olarak ayarlamak için ortam ışığı sensörü.
- 5-inç diyagonal IPS dokunmatik ekran.
- LED göstergeli Ajax logosu.
- Kart/anahtarlık/Bluetooth okuyucu.
- SmartBracket montaj paneli. Paneli çıkarmak için aşağı kaydırınız.
- Tuş takımını yüzeyden ayırma girişimlerinde tamperi tetiklemek için montaj panelinin delikli kısmı. Koparmayınız.
- Kabloları duvardan geçirmek için montaj panelinin delikli kısmı.
- Yerleşik sesli uyarı.
- Tamper butonu.
- Tuş takımını Ajax sistemine eklemek için cihaz kimliğini içeren QR kodu.
- Güç butonu.
- Harici bir güç kaynağı ünitesi bağlamak için terminaller (dahil değildir). Terminaller gerektiğinde tutuculardan çıkarılabilir.
- Üçüncü taraf güç kaynağı ünitesinden gelen kabloyu yönlendirmek için kablo kanalı.
- Kabloları alttan yönlendirmek için montaj panelinin delikli kısmı.
- SmartBracket montaj panelini tutucu vida ile sabitlemek için delik.
Uyumlu hub’lar ve kapsama alanı genişleticiler
Tuş takımının çalışması için OS Malevich 2.35 ve sonraki sürümlere sahip bir Ajax hub gereklidir.
Çalışma prensibi
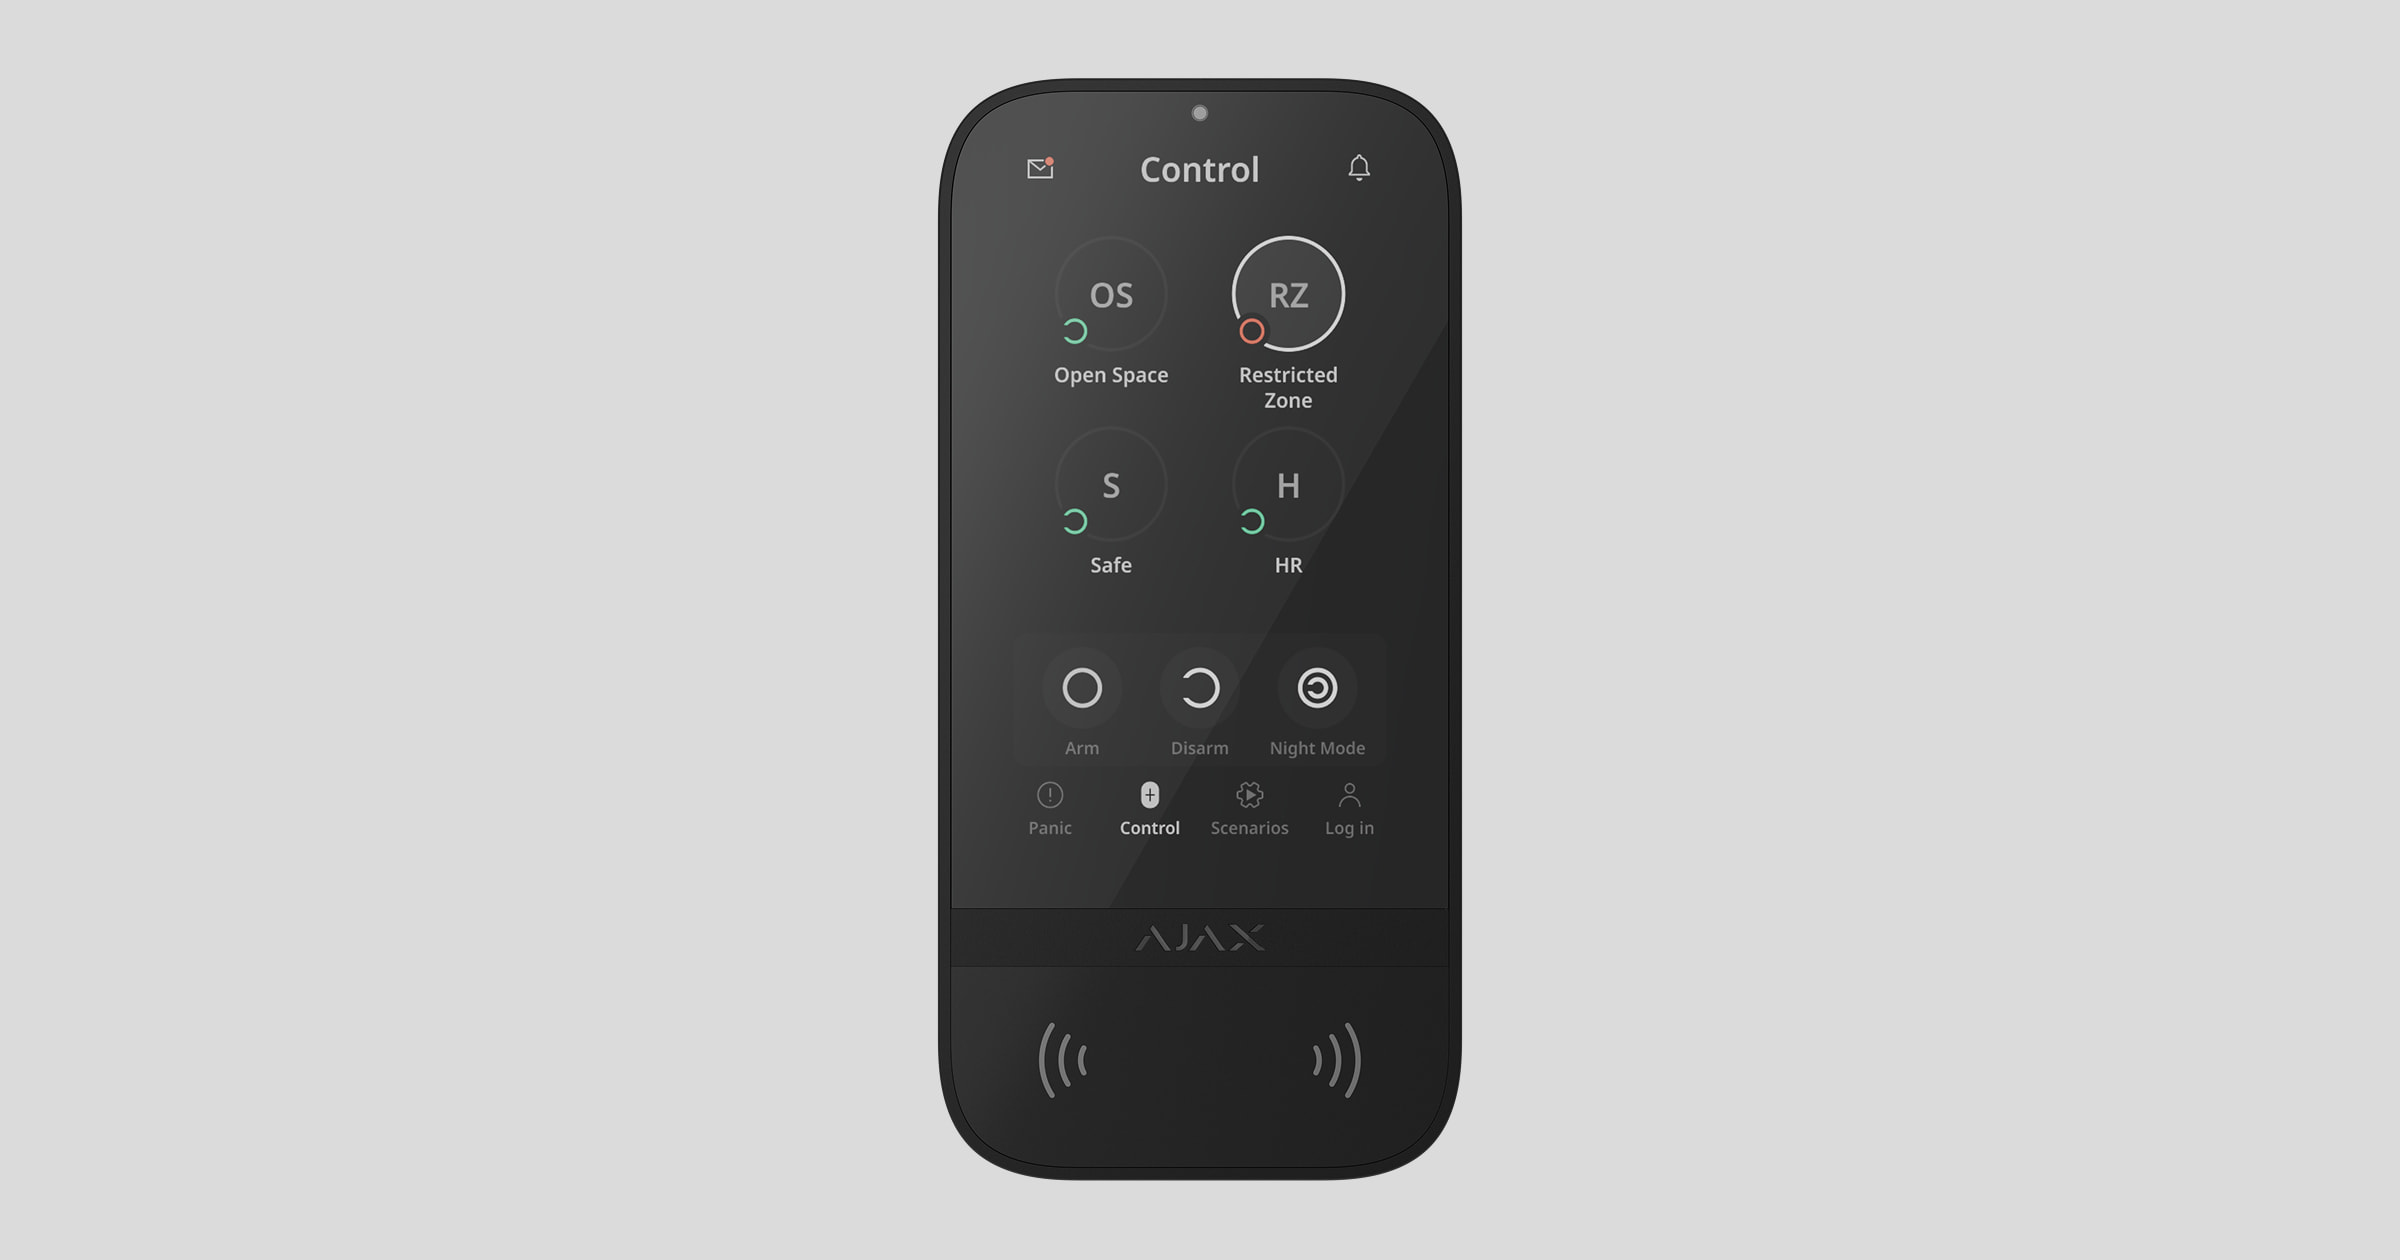
Superior KeyPad TouchScreen G3 Jeweller’da yerleşik bir sesli uyarı, dokunmatik bir ekran ve temassız yetkilendirme için bir okuyucu bulunur. Tuş takımı, güvenlik modlarını değiştirmek ve otomasyon cihazlarını kontrol etmek, ayrıca kullanıcıları sistem alarmları hakkında bilgilendirmek için kullanılabilir.
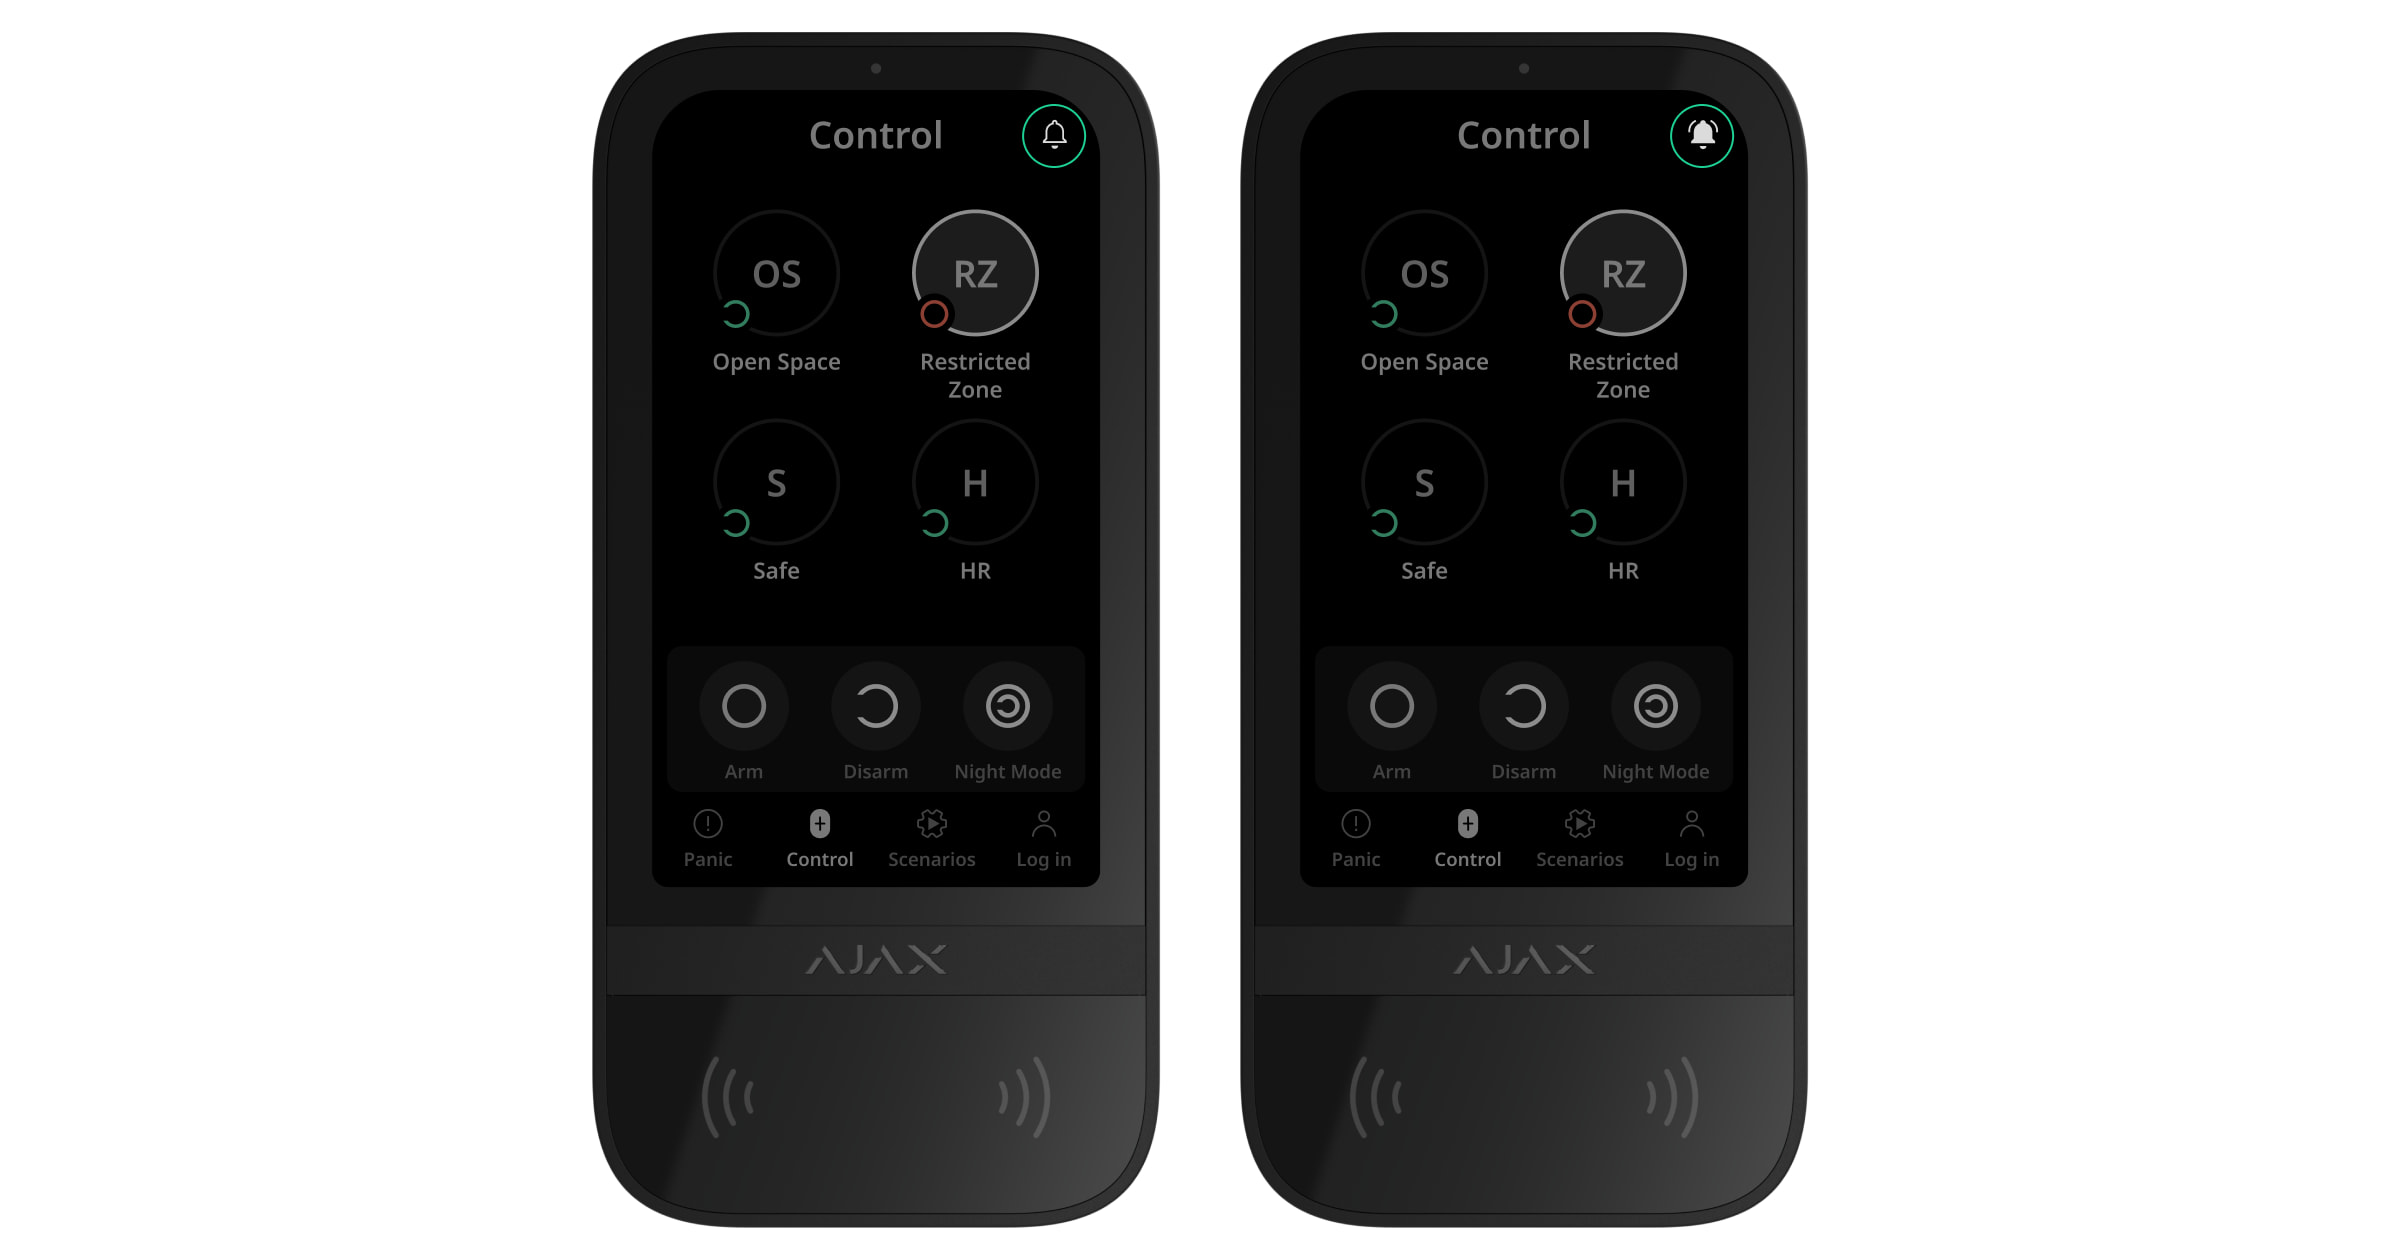
Tuş takımı arka aydınlatma parlaklığını otomatik olarak ayarlar ve yaklaşıldığında uyanır. Bunun hassasiyeti uygulamada ayarlanabilir. Superior KeyPad TouchScreen G3 Jeweller arayüzü, Ajax Security System uygulamasının arayüzüne benzer. Seçilebilecek koyu ve açık görünümler vardır. 5 inç dokunmatik ekran, tüm sistemin veya belirli grupların güvenlik modlarına ve otomasyon senaryosu kontrolüne hızlı erişim sağlar. Ekran, sistem bütünlüğü kontrolü seçeneği etkinleştirildiğinde sistem arızalarını da gösterir.
Superior KeyPad TouchScreen G3 Jeweller’ın yerleşik sesli uyarısı, sistem ayarlarına bağlı olarak sesli bildirimler sağlar ve kullanıcıları aşağıdakiler hakkında bilgilendirir:
- alarmlar;
- güvenlik modu değişiklikleri;
- giriş/çıkış gecikmeleri;
- açılma dedektörlerinin tetiklenmesi.
Tuş takımı, hazır kurulu pillerle çalışır ve ayrıca 10.5–14 V⎓ voltaj aralığında ve minimum 0.5 A çalışma akımında üçüncü taraf bir güç kaynağı ünitesiyle de beslenebilir. Harici güç bağlandığında hazır kurulu piller yedek güç kaynağı olarak görev yapar.
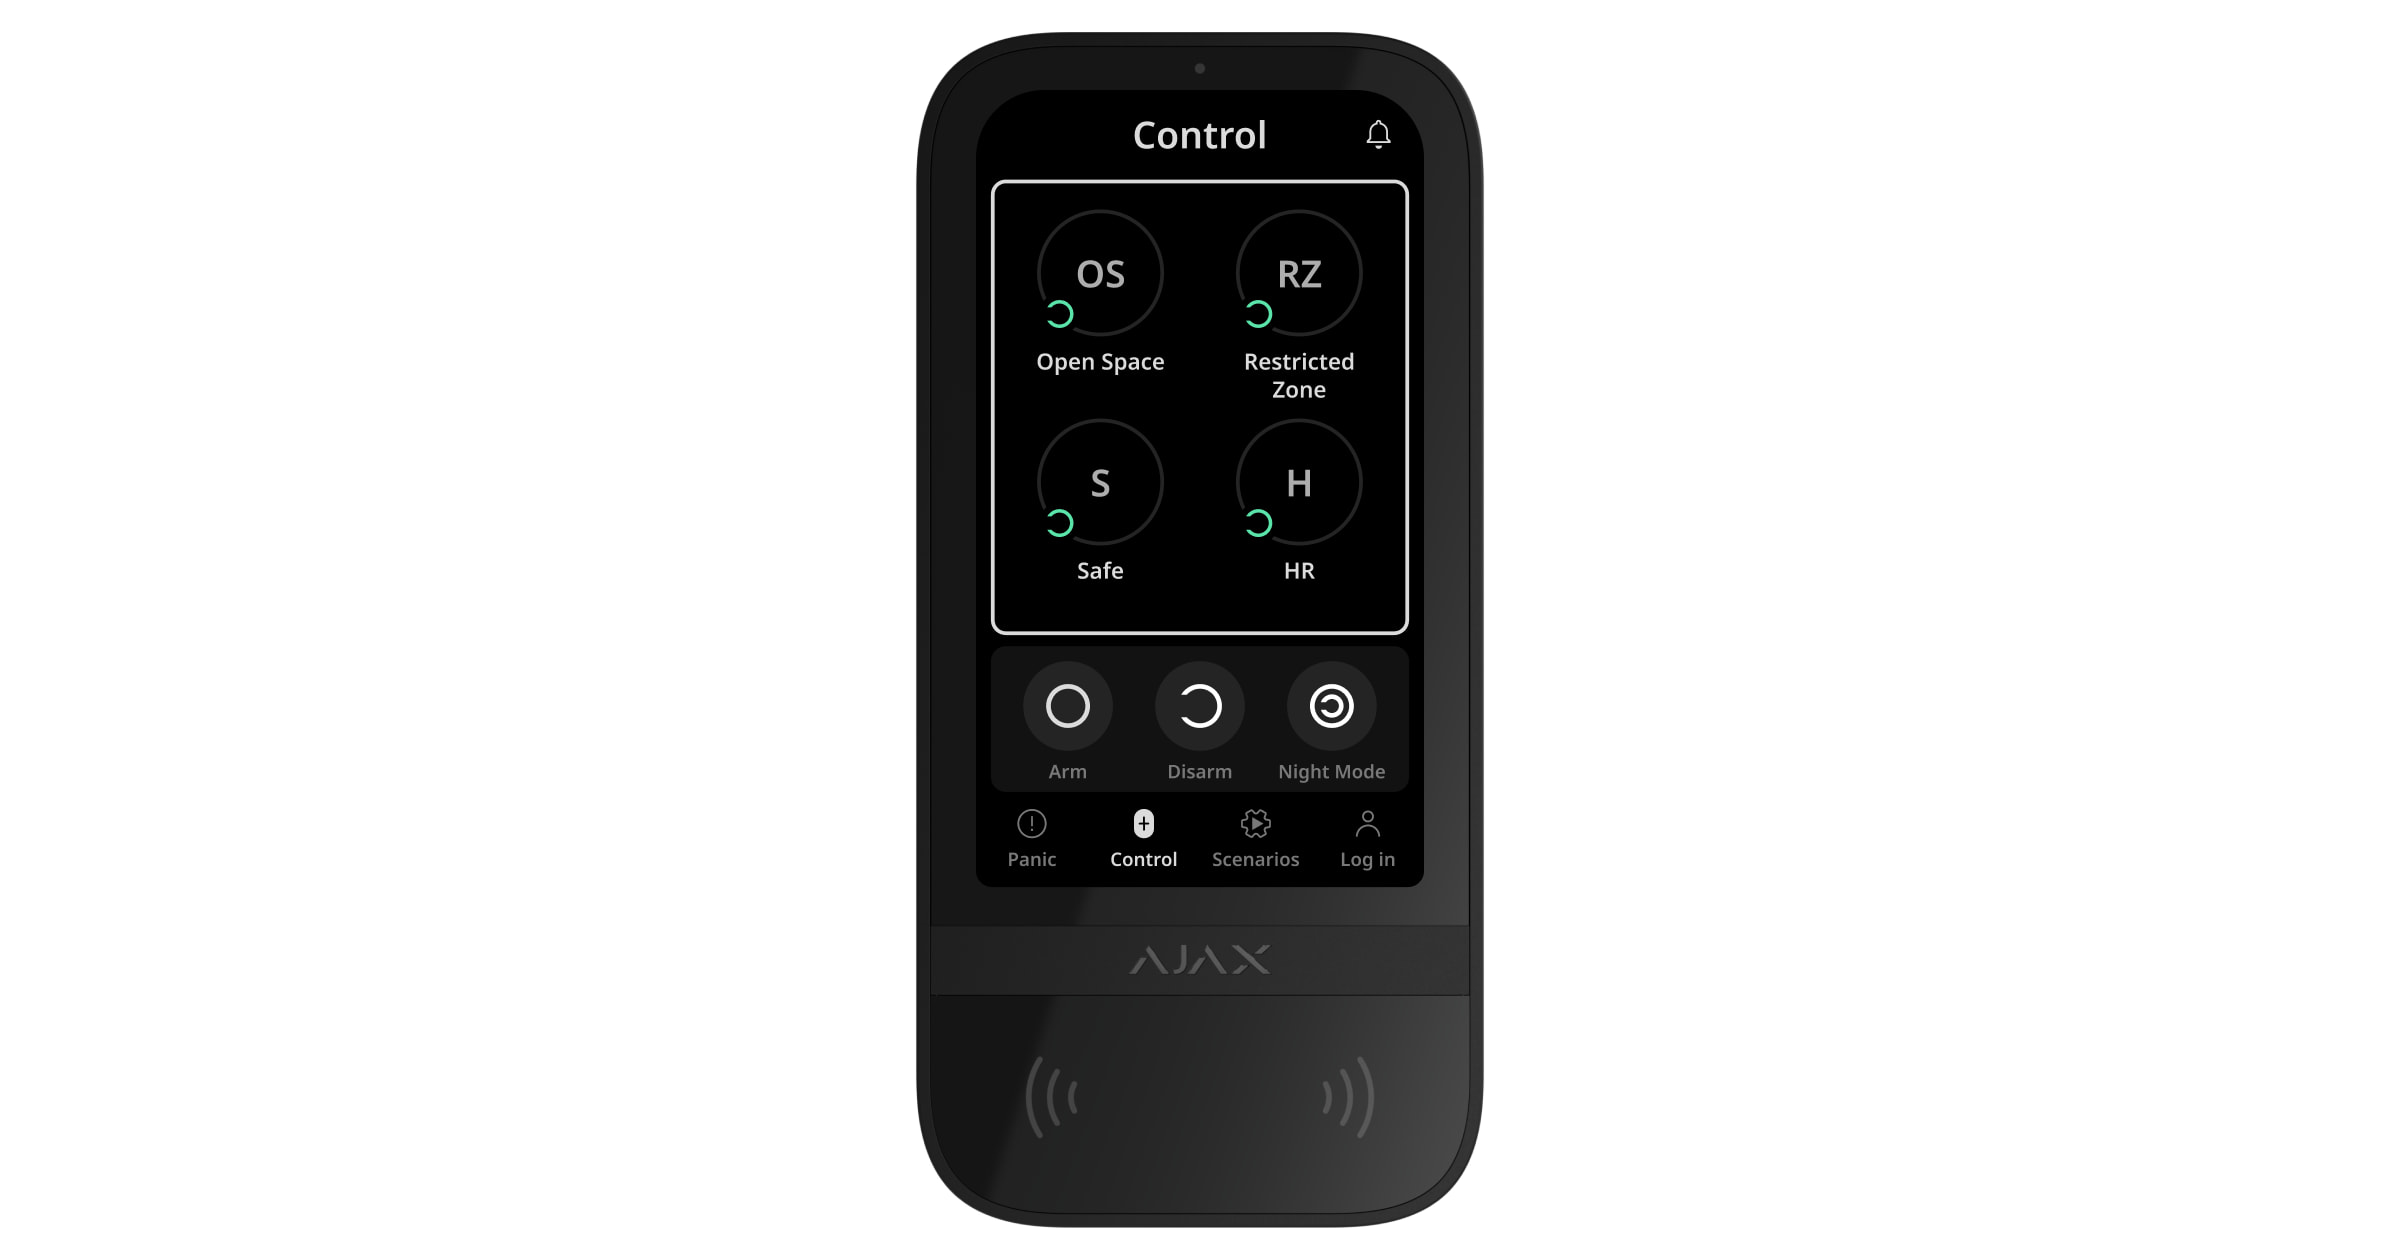
Güvenlik kontrolü
Superior KeyPad TouchScreen G3 Jeweller, tüm sistemi veya belirli grupları kurmak ve çözmek ve Gece modunu etkinleştirmek için kullanılabilir. Güvenlik modunu değiştirmek için Kontrol ![]() sekmesini kullanınız. Kullanıcılar, Superior KeyPad TouchScreen G3 Jeweller’da aşağıdaki yollarla kimlik doğrulaması yapabilir:
sekmesini kullanınız. Kullanıcılar, Superior KeyPad TouchScreen G3 Jeweller’da aşağıdaki yollarla kimlik doğrulaması yapabilir:
- Akıllı telefonlar. Bluetooth Low Energy (BLE) destekleyen akıllı telefonlarda Ajax Security System uygulaması üzerinden kimlik doğrulaması yapılabilir. BLE, akıllı telefonların kullanıcı kimlik doğrulaması için Tag veya Pass’e alternatif olarak kullanılmasını sağlayan düşük güç tüketimli bir telsiz protokolüdür. Tuş takımı, BLE sürüm 4.2 ve üzeri bulunan Android ve iOS akıllı telefonları destekler.
- Kartlar veya anahtarlıklar. Superior KeyPad TouchScreen G3 Jeweller, kullanıcıları hızlı ve güvenli bir şekilde tanımlamak için DESFire® teknolojisini kullanır. DESFire®, uluslararası ISO 14443 standardını temel almakta olup 128 bit kapsamlı şifreleme sistemi ile kopya koruma metodunu bir araya getirir.
- Kodlar. Superior KeyPad TouchScreen G3 Jeweller, genel tuş takımı kodlarını, kişisel kullanıcı kodlarını ve kayıtlı olmayan kullanıcılar için kodları destekler.
Erişim kodları
- Tuş takımı kodu, tuş takımına atanan genel bir koddur. Kullanıldığında tüm olaylar Ajax uygulamalarında tuş takımının adı altında görüntülenir.
- Kullanıcı kodu hub’a bağlı kullanıcılar için ayarlanmış kişisel bir koddur. Kullanıldığında tüm olaylar Ajax uygulamalarında ilgili kullanıcının adı altında görüntülenir.
- Tuş takımı erişim kodu, kayıtlı olmayan bir kişi için oluşturulan bir koddur. Kullanıldığında olaylar, Ajax uygulamalarında bu kodla ilişkilendirilen ad altında görüntülenir.
- RRU kodu, hızlı müdahale birimleri (RRU) için alarmdan sonra belirli bir süre boyunca etkinleştirilen geçici bir erişim kodudur. Kod etkinleştirildiğinde ve kullanıldığında olaylar, Ajax uygulamalarında bu kodla ilişkilendirilen başlık altında görüntülenir.
Desteklenen kullanıcı kodu, tuş takımı erişim kodu ve RRU kodlarının sayısı hub modeline göre değişir.
Erişim hakları ve kodları doğrudan Ajax uygulamalarında yönetilebilir. Kodun gizliliği ifşa edilmişse kurulumcunun ziyareti gerekmeden uzaktan değiştirilebilir. Bir kullanıcı Pass, Tag veya akıllı telefonunu kaybederse sistem yapılandırma yetkilerine sahip bir yönetici veya PRO, Ajax uygulamasında kayıp cihazı anında engelleyebilir. Bu sırada kullanıcı, sistemi kişisel kodu üzerinden kontrol etmeye devam edebilir.
Zorlama kodu
Superior KeyPad TouchScreen G3 Jeweller, kullanıcıların sistemi çözüyormuş gibi görünürken gizlice alarm göndermesine olanak tanıyan bir zorlama kodunu destekler. Zorlama kodu girildiğinde sistem sirenleri etkinleştirmez veya Ajax uygulamalarında herhangi bir görünür uyarı göstermez. Ancak sessiz bir alarm, güvenlik şirketine ve diğer güvenlik sistemi kullanıcılarına acil durumu bildirmek üzere derhal iletilir.
Grupların güvenlik kontrolü
Superior KeyPad TouchScreen G3 Jeweller, Grup modu etkinleştirildiğinde grupların güvenliğini kontrol etmeye olanak tanır. Tuş takımı ayarlarında, hangi grupların görüntüleneceğini (tuş takımı grupları) belirleyebilirsiniz. Varsayılan olarak tüm gruplar, Kontrol ![]() sekmesinde tuş takımı ekranında görünür. Grup güvenlik yönetimi hakkında bu bölümde daha fazla bilgi edinebilirsiniz.
sekmesinde tuş takımı ekranında görünür. Grup güvenlik yönetimi hakkında bu bölümde daha fazla bilgi edinebilirsiniz.
Gruplar için Takip edilen grup özelliği yapılandırılmışsa güvenlik modları ayarlarına ve başlatıcıların durumlarına bağlı olarak otomatik olarak değişir.
.
Kullanıcı ön yetkilendirmesi
Ön yetkilendirme özelliği, kontrol paneline ve mevcut sistem durumuna yetkisiz erişimi önlemek için gereklidir. Özellik, tuş takımı ayarlarında Kontrol ![]() ve Senaryolar
ve Senaryolar ![]() sekmeleri için ayrı ayrı etkinleştirilebilir.
sekmeleri için ayrı ayrı etkinleştirilebilir.
Belirlenen sekmeler için ön yetkilendirme etkinleştirildiğinde bu sekmelerde bir kod giriş ekranı görüntülenir. Kullanıcılar, herhangi bir işlem gerçekleştirmeden önce bir kod girerek veya bir erişim cihazını tuş takımına göstererek kimlik doğrulaması yapmalıdır. Alarm ![]() sekmesi için bir istisna geçerlidir ve bu sekme tüm kullanıcılar tarafından erişilebilir durumda kalır; böylece kullanıcılar kimlik doğrulaması olmadan acil durum sinyali gönderebilir.
sekmesi için bir istisna geçerlidir ve bu sekme tüm kullanıcılar tarafından erişilebilir durumda kalır; böylece kullanıcılar kimlik doğrulaması olmadan acil durum sinyali gönderebilir.
Yetkisiz erişim otomatik kilitleme
Bir dakika içinde üç kez yanlış kod girilirse veya doğrulanmamış bir erişim cihazı kullanılırsa tuş takımı, ayarlarında belirlenen süre boyunca kilitlenecektir. Bu süre zarfında hub, tüm kod girişlerini ve erişim cihazlarını yok sayar ve güvenlik sistemi kullanıcılarını yetkisiz erişim girişimi hakkında bilgilendirir. Superior KeyPad TouchScreen G3 Jeweller, okuyucuyu kapatır ve tüm sekmelere erişimi engeller. Tuş takımı ekranında ilgili bir bildirim görüntülenir.
Bir PRO veya sistem yapılandırma yetkilerine sahip bir kullanıcı, belirtilen kilitlenme süresi dolmadan önce uygulama üzerinden tuş takımının kilidini açabilir.
İki aşamalı kurma
Superior KeyPad TouchScreen G3 Jeweller, iki aşamalı kurmayı destekler ve süreci başlatmak için kullanılabilir ancak ikinci aşama cihazı olarak görev yapamaz. Tag, Pass veya bir akıllı telefon kullanılarak gerçekleştirilen iki aşamalı kurma işlemi, tuş takımına girilen kişisel veya genel bir kodla kurma işlemine benzer şekilde çalışır.
Acil durum butonları
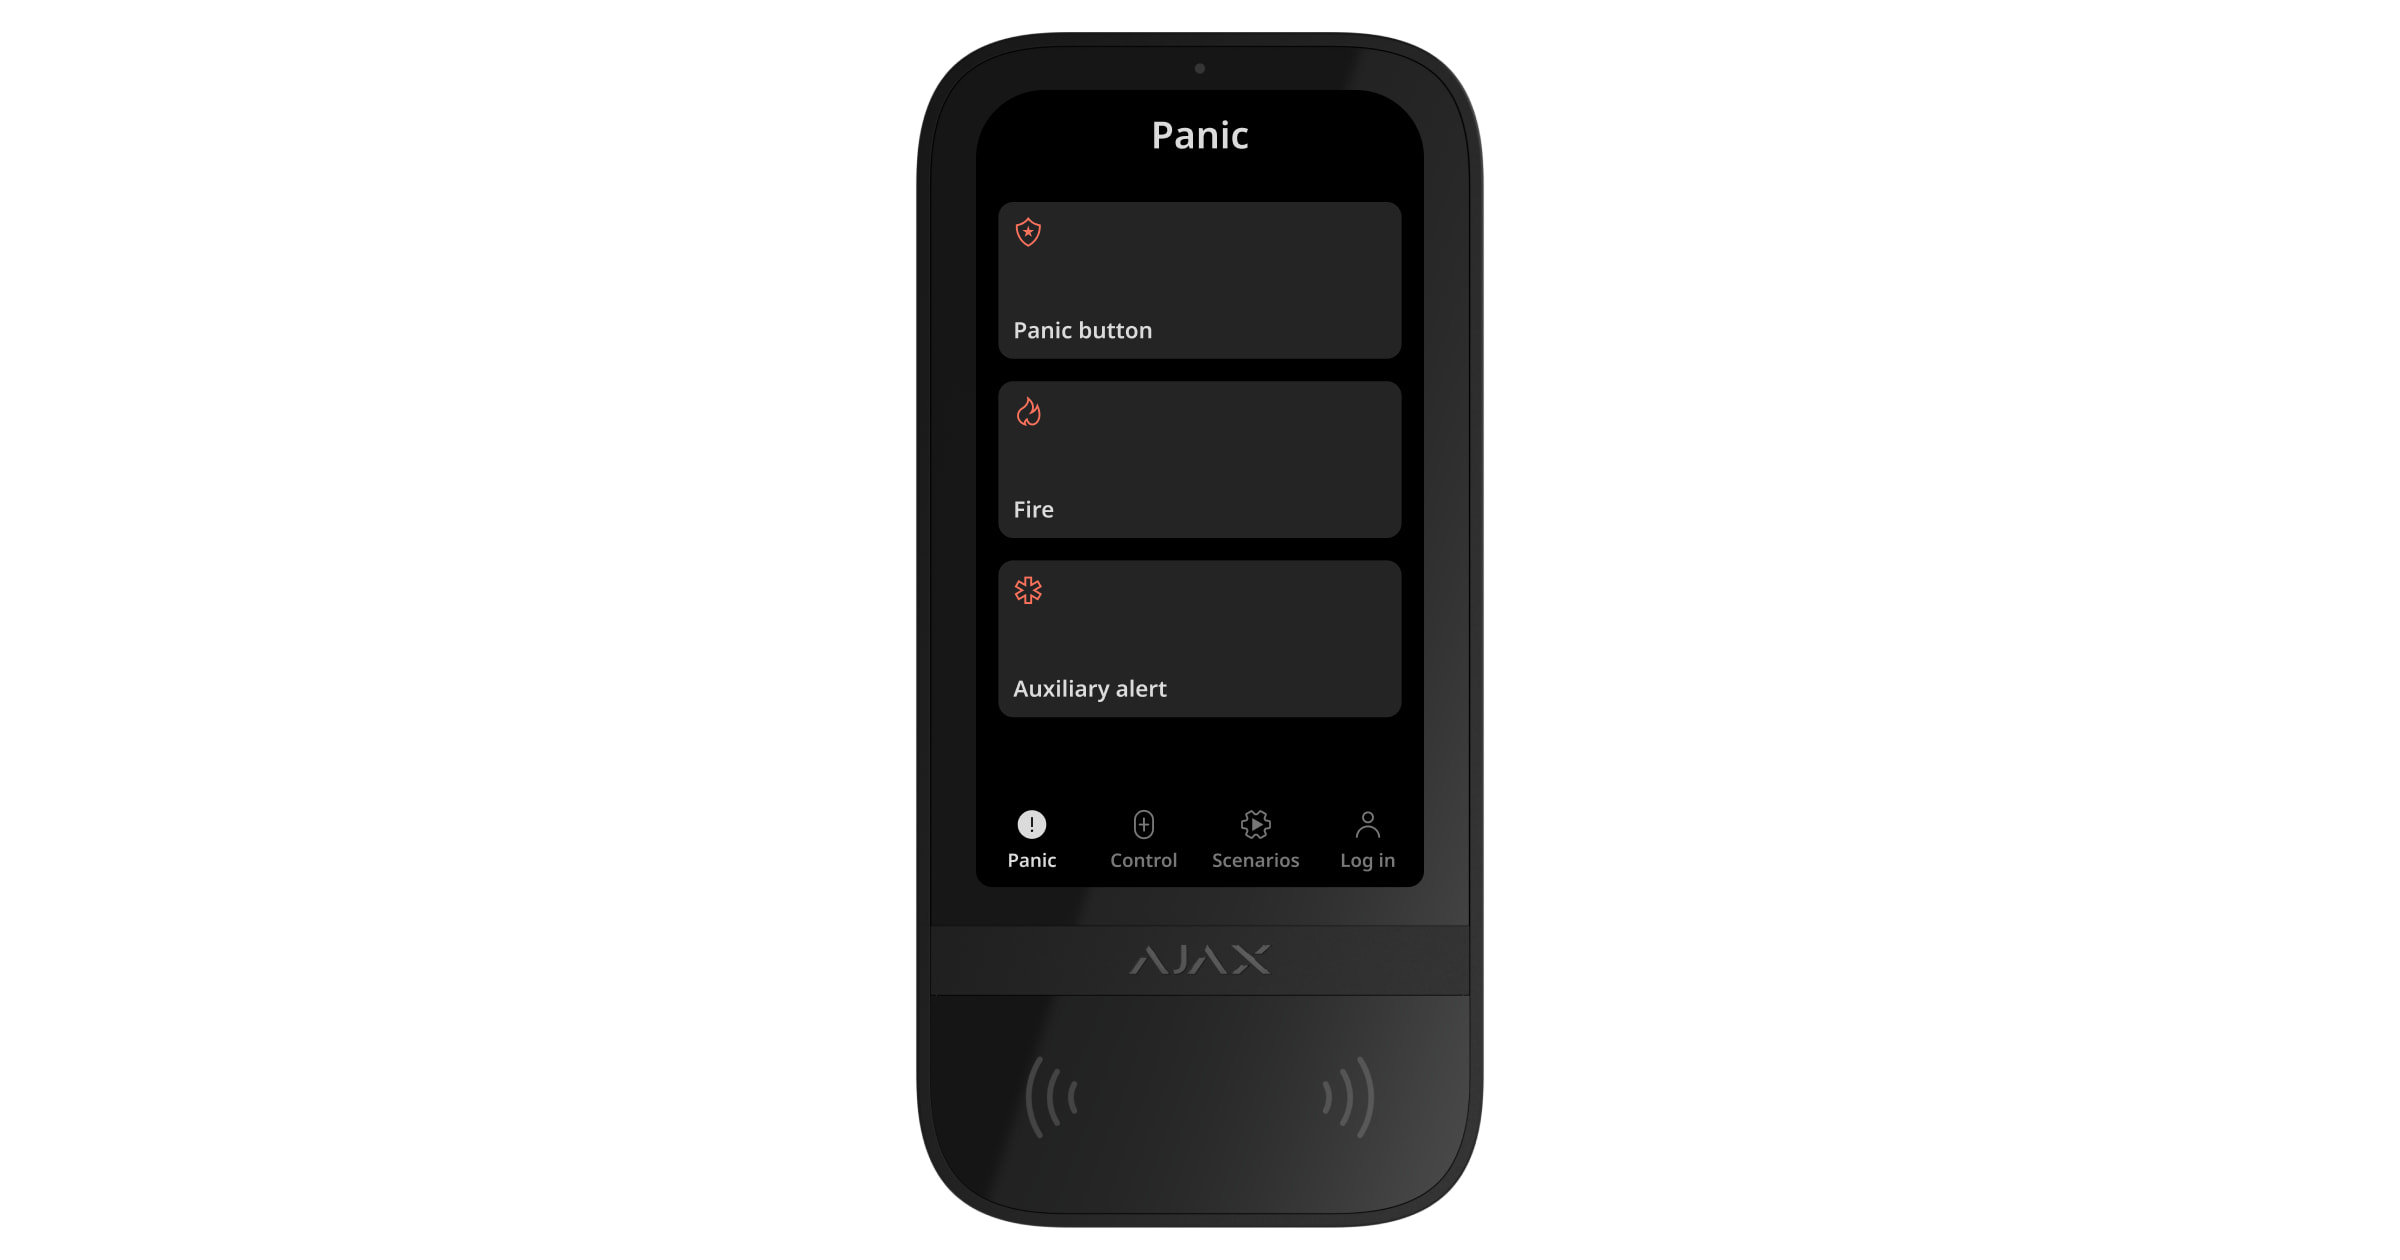
Acil durumlar için tuş takımı, üç butonlu Panik ![]() sekmesine sahiptir:
sekmesine sahiptir:
- Panik butonu;
- Yangın;
- Yardımcı alarm.
Ajax uygulamasında, sistem yapılandırma yetkilerine sahip bir yönetici veya PRO, Panik ![]() sekmesinde hangi butonların görüntüleneceğini özelleştirebilir. Superior KeyPad TouchScreen G3 Jeweller ayarlarında iki seçenek mevcuttur: yalnızca Panik butonu (varsayılan olarak) veya üç butonun tümü. Uygulama içi bildirimlerin metni ve Alarm İzleme Merkezine (AİM) iletilen olay kodları, seçilen buton türüne bağlıdır.
sekmesinde hangi butonların görüntüleneceğini özelleştirebilir. Superior KeyPad TouchScreen G3 Jeweller ayarlarında iki seçenek mevcuttur: yalnızca Panik butonu (varsayılan olarak) veya üç butonun tümü. Uygulama içi bildirimlerin metni ve Alarm İzleme Merkezine (AİM) iletilen olay kodları, seçilen buton türüne bağlıdır.
Yanlış alarmları önlemek için yanlışlıkla basma korumasını da etkinleştirebilirsiniz. Etkinleştirildiğinde kullanıcı tuş takımı ekranındaki Gönder butonuna basarak alarm iletimini onaylamalıdır. Onay ekranı, herhangi bir acil durum butonuna basıldıktan sonra görüntülenir.
Acil durum butonlarına basılması, bir Ajax sistemi içinde Alarm senaryolarını tetikleyebilir.
Senaryo yönetimi
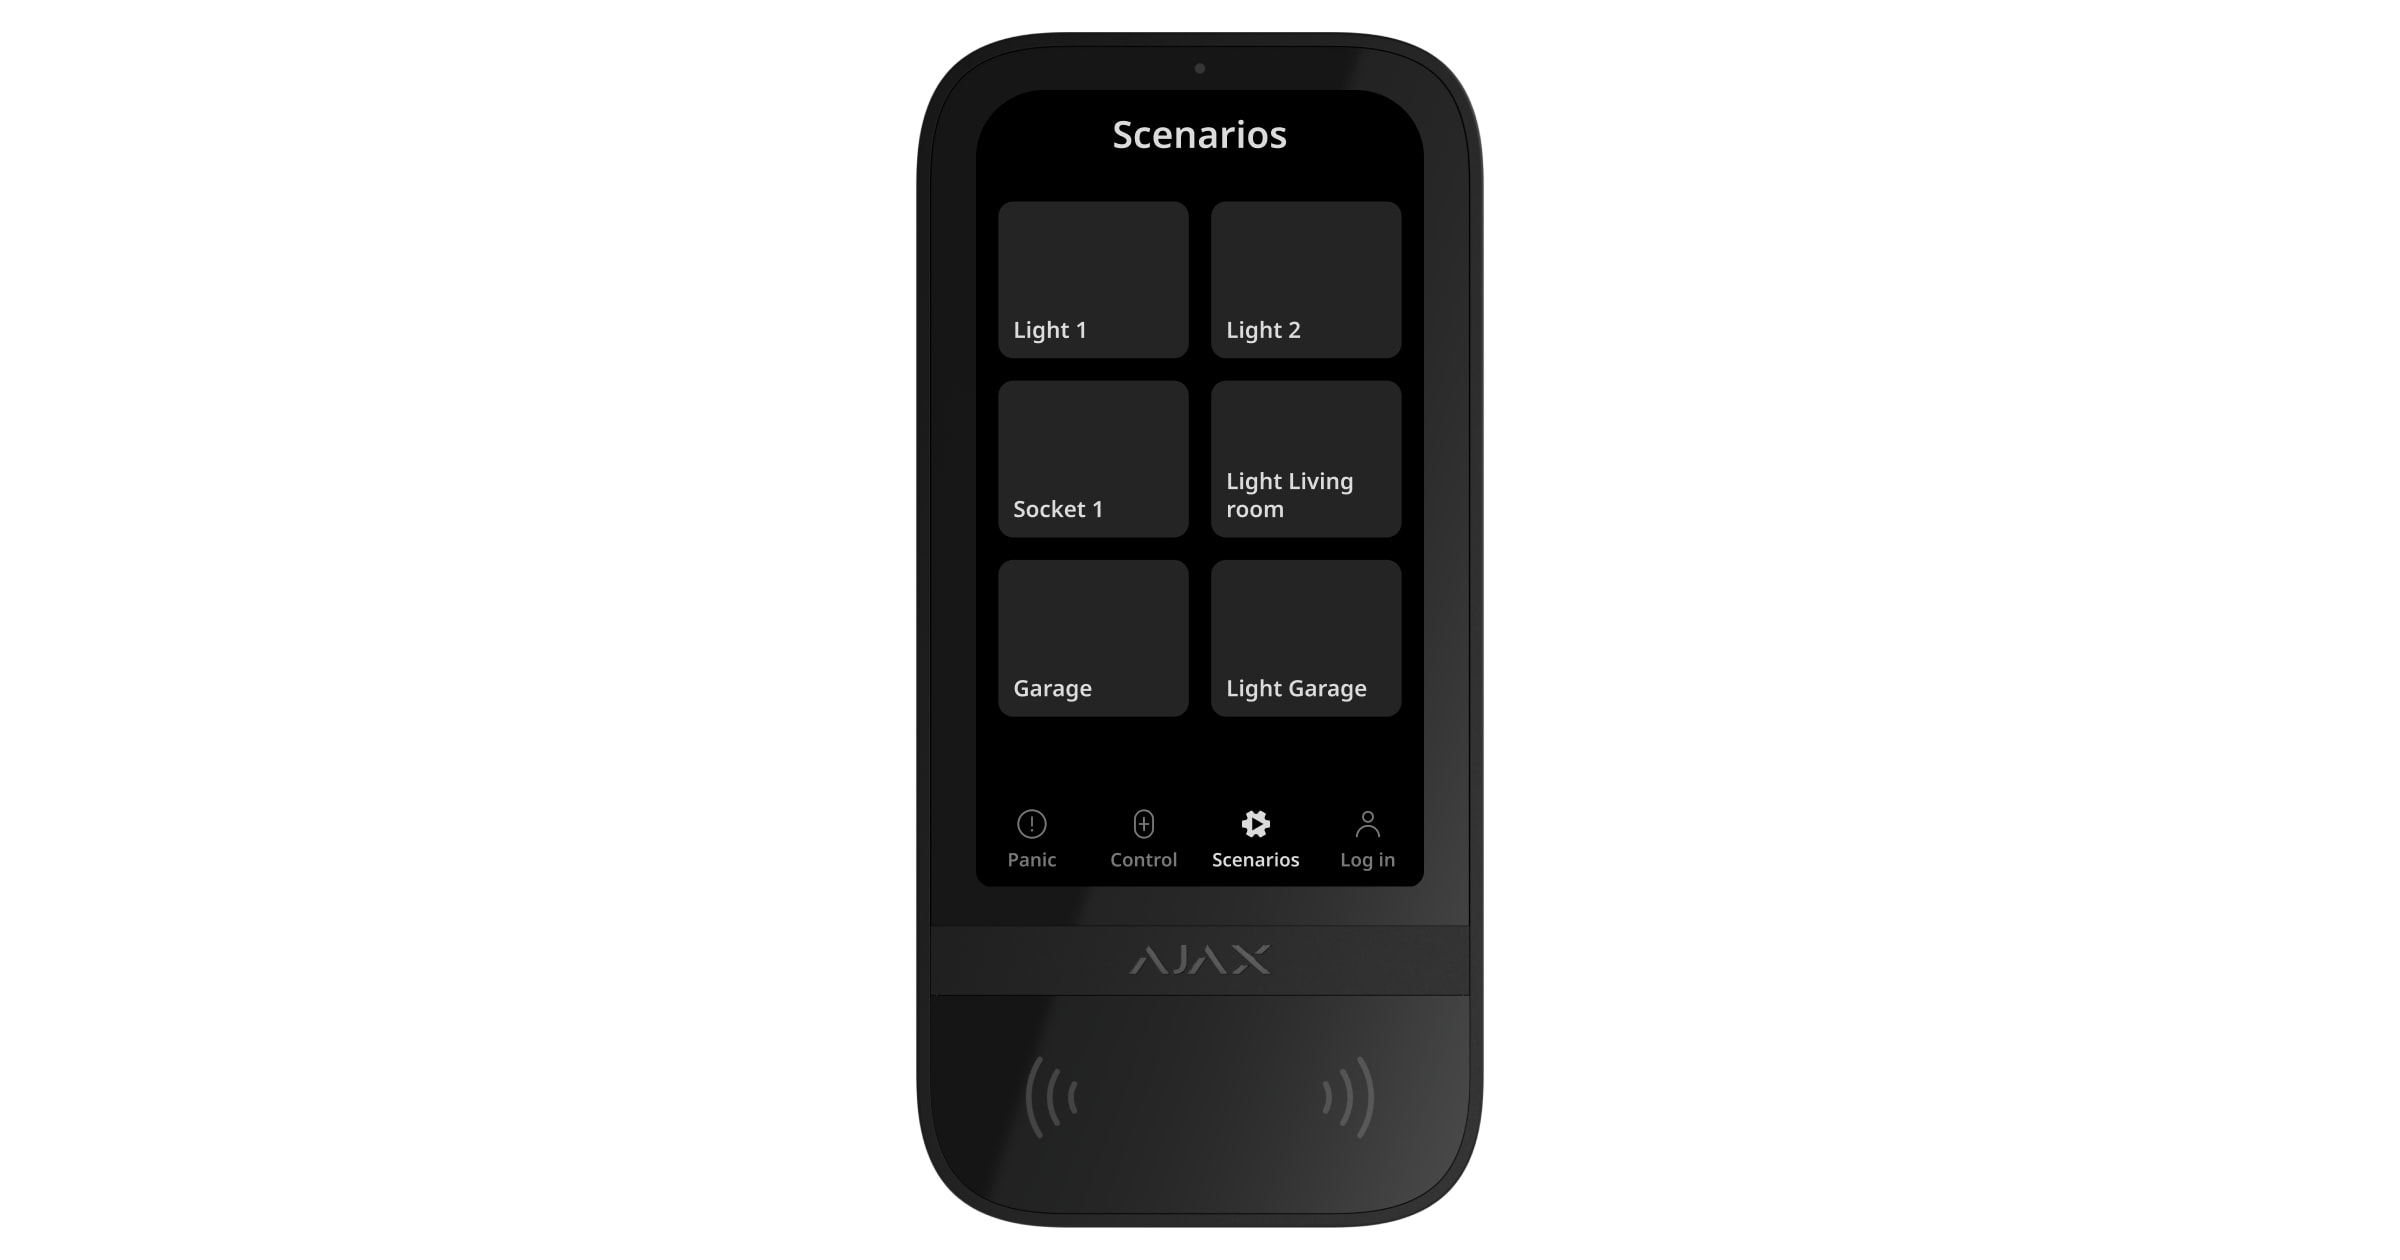
Tuş takımı, bir otomasyon cihazını veya bir cihaz grubunu kontrol eden en fazla altı buton barındırabilen özel bir Senaryolar sekmesine sahiptir. Grup senaryoları, birden fazla anahtarın, rölenin veya prizlerin eş zamanlı olarak daha kolay kontrol edilmesini sağlar.
Otomasyon senaryolarını doğrudan tuş takımı ayarlarında oluşturunuz ve Superior KeyPad TouchScreen G3 Jeweller kullanarak yönetiniz.
OS Malevich 2.38‘den itibaren sistem, hangi yetkili kullanıcının, tuş takımından bir otomasyon senaryosu başlattığını kaydeder. Bu bilgi, hub olay akışında görüntülenir.
Arıza belirtisi ve güvenlik modu
Superior KeyPad TouchScreen G3 Jeweller, kullanıcıları sistem arızaları ve mevcut güvenlik modu hakkında aşağıdaki yollarla bilgilendirir:
- Ekran — aktif olduğunda sistem durumunu gösterir;
- Logo — ayarlara bağlı olarak sürekli kırmızı yanar veya yalnızca sistem ya da bir grup kurulduğunda yanar;
- Sesli gösterge — yerleşik sesli uyarı, alarmları, kapıların açılmasını ve giriş/çıkış gecikmelerini bildirir.
Son olaylara ilişkin bilgilendirme
Superior KeyPad TouchScreen G3 Jeweller, son kontrolden bu yana gerçekleşen en fazla 100 sistem olayını görüntüler. Olaylar, gerçekleşme tarihlerine göre gruplanır ve sıralanır.
Bir olay aşağıdaki bilgileri içerir:
- cihaz adı;
- eylem;
- oda;
- gerçek zaman (SS:DD).
Tuş takımında en son olayların görüntüleme özelliğini etkinleştirmek için:
- Bir Ajax uygulaması açınız. Cihazın eklendiği bir space seçiniz.
- Cihazlar
 sekmesine gidiniz.
 - Superior KeyPad TouchScreen Jeweller’ı seçiniz ve
 dişli simgesine dokunarak Ayarlar bölümüne gidiniz.
 - Tuş takımı bildirim merkezi bölümünü seçiniz.
- Olay onayı bölümü geçişini etkinleştiriniz.
- Yeni ayarları kaydetmek için Geri‘ye dokununuz.
Tuş takımı ekranında en son olayları görüntülemek için:
- Kontrol
 sekmesine gidiniz.
 - Son olayların listesini görüntülemek için
 simgesine dokununuz. Yeni olaylar varsa, simgenin sağ üst köşesinde kırmızı bir rozet görüntülenir.
 - Son olaylar listesini temizlemek için Tümünü okundu olarak işaretle butonuna dokununuz. Olaylar Ajax uygulamalarında olay akışında kalacaktır.
Tüm olayları okundu olarak işaretlemek, yalnızca kullanılmakta olan tuş takımındaki son olaylar listesini temizler. Aynı huba eklenmiş diğer tuş takımları, son olayları göstermeye devam eder.
Yangın alarmını susturma
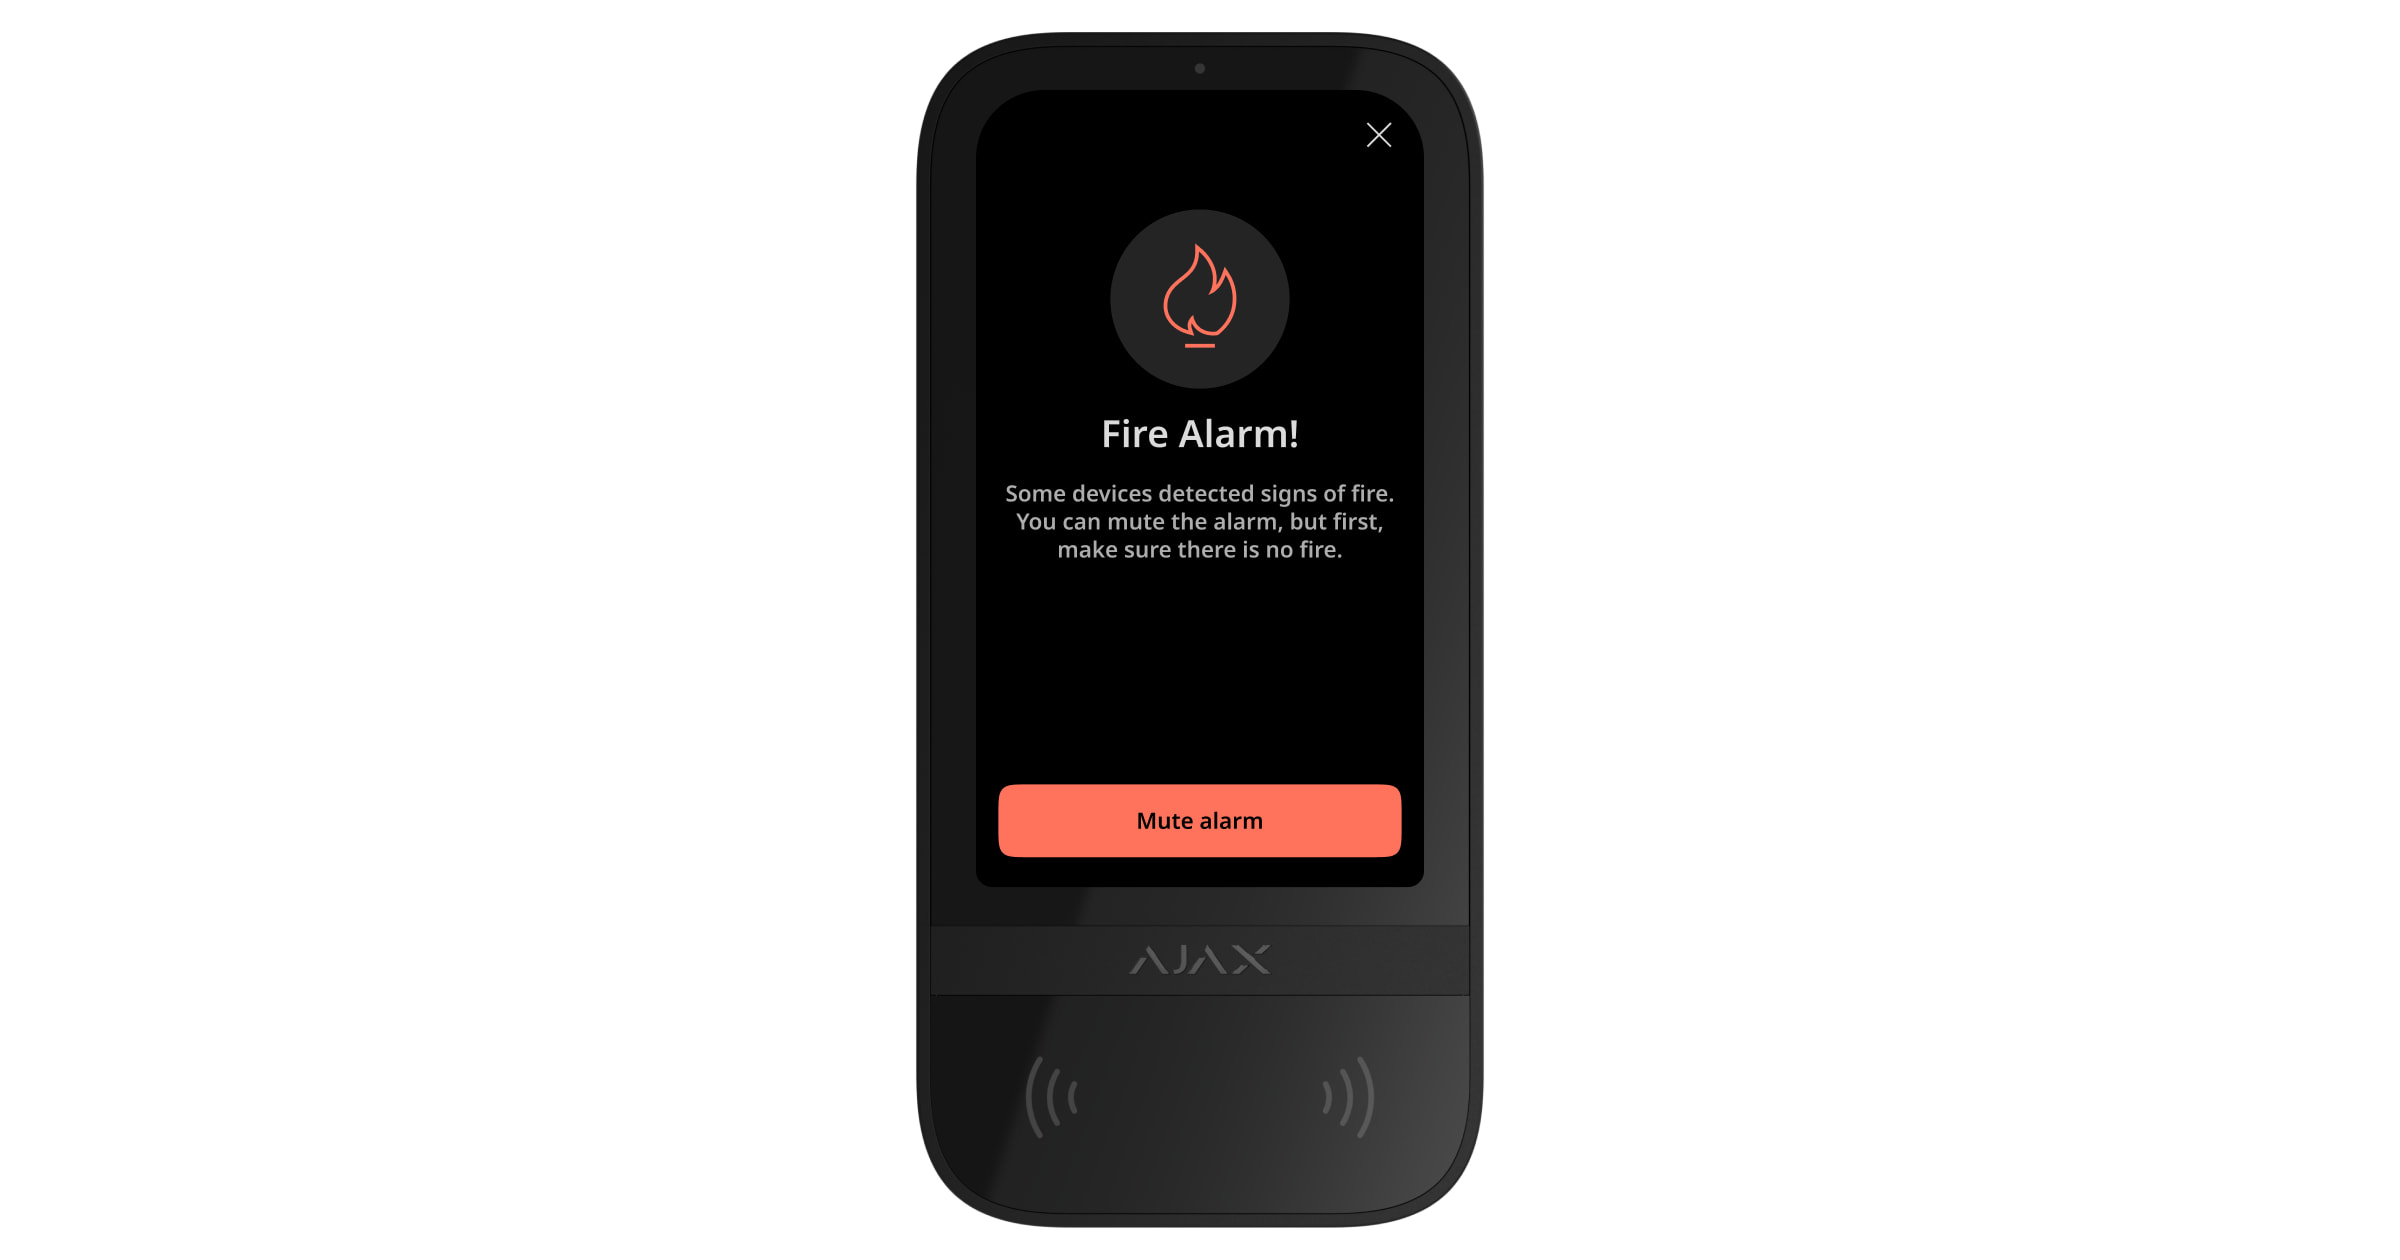
Sistemde bir yangın alarmı olması durumunda Superior KeyPad TouchScreen G3 Jeweller kullanılarak alarm susturulabilir.
Panik sekmesindeki Yangın acil durum butonuna basılması, Birbirine bağlı yangın dedektörleri alarmını (etkinse) etkinleştirmez. Bunun yerine, tuş takımı üzerinden bir acil durum sinyali gönderildiğinde Ajax uygulamalarına ve AİM’ye ilgili bir bildirim iletilir.
Yangın alarmını sustur özelliği etkinleştirildiğinde sistemdeki tüm Superior KeyPad TouchScreen G3 Jeweller cihazları, yangın alarmı bilgilerini ve bir susturma butonunu içeren bir ekran görüntüler. Susturma butonuna başka bir tuş takımında zaten basılmışsa kalan Superior KeyPad TouchScreen G3 Jeweller ekranlarında ilgili bir bildirim görüntülenir. Kullanıcılar, yangın alarmını susturma ekranını kapatabilir ve tuş takımının diğer özelliklerini kullanmaya devam edebilir. Susturma ekranını yeniden açmak için Superior KeyPad TouchScreen G3 Jeweller ekranındaki ![]() simgesine dokununuz.
simgesine dokununuz.
Yangın alarmı ManualCallPoint Jeweller tarafından tetiklenirse ve CO veya duman seviyeleri kritikse alarm tuş takımı üzerinden susturulamaz.
Superior KeyPad TouchScreen G3 Jeweller’da yangın alarmını susturma ekranını anında görüntülemek için Ekran ayarları bölümünde Her zaman aktif ekran geçişini etkinleştiriniz ve harici bir güç kaynağı bağlayınız.
Aksi takdirde, susturma ekranı yalnızca tuş takımı uyandığında görüntülenir.
Superior Jeweller veri aktarım protokolü
Superior Jeweller, Superior cihazlar için geliştirilmiş bir telsiz protokolüdür, Grade 3‘e (EN 50131) uygunluğu garanti eder. Gelişmiş şifreleme ve frekans atlama özelliklerine sahiptir. Tam frekans atlama, sadece sistemdeki tüm cihazlar Superior Jeweller kullandığında mevcuttur. Eğer en az bir cihaz standart Jeweller protokolü ile çalışıyorsa, sistem Grade 2 ile sınırlı olacaktır: Sifreleme devam eder, ancak atlama devre dışıdır. Superior devices can also operate on the regular Jeweller protocol, depending on the hub.
Wings veri aktarım protokolü
Wings, büyük veri paketlerini iletmek için kullanılan tescilli kablosuz iletişim teknolojisidir. Cihaz, fotoğrafları iletmek ve aygıt yazılımı güncellemelerini yüklemek için Wings kullanır.
Gelişmiş şifreli iletişim
Superior KeyPad TouchScreen G3 Jeweller ile hub arasındaki iletişim, veri gizliliği ve bütünlüğünü sağlayan gelişmiş bir şifreleme şeması ile korunmaktadır. Bu, mesajdaki tüm hassas verilerin şifrelendiği ve her bir mesajın, sistemin iletim sırasında verilerin değiştirilmediğini kontrol etmesini sağlayan benzersiz bir kimlik doğrulama etiketi içerdiği anlamına gelir. Sistem, hem pasif hem de aktif saldırılara karşı güçlü koruma sağlayarak kurcalamayı güvenilir bir şekilde algılar ve sahte ya da değiştirilmiş mesajları reddeder. Bu, cihaz ile hub arasındaki güvenli iletişimi ve ayrıca sistem ile veri korumasını sağlar.
Frekans atlama
Grade 3 gerekliliklerine uymak için Superior KeyPad TouchScreen G3 Jeweller, hub (veya telsiz sinyali kapsama alanı genişletici) ile telsiz iletişiminde frekans atlama kullanır. Bu yöntemle hub ve ona eklenen cihazlar, tanımlı bir modele göre çalışma frekanslarını değiştirir. Atlama dizisi, çalışma bantları içindeki tanımlı bir kanal kümesini kapsar ve cihazlar frekansları hub ile senkronize şekilde değiştirir. Bazı kanallar sinyal engellemeden etkilenmiş olsa bile, mesajlar diğer kanallar üzerinden başarıyla iletilir. Frekans atlama, sistemin güvenilirliğini ve performansını artırır ve kasıtlı parazit ile sinyal engelleme girişimlerine karşı dayanıklılığını sağlar.
Frekans atlama, telsiz iletişim sırasında gecikmelere veya duraklamalara neden olmaz ve veri aktarım hızını düşürmez. Sisteme kapsama alanı genişleticiler eklenirse, frekans atlama tüm telsiz iletişimleri için kullanılır: “Cihaz ↔ kapsama alanı genişletici” ve “kapsama alanı genişletici ↔ hub”.
Sistem, telsiz iletişimi için frekans atlamayı yalnızca tüm kablosuz cihazlar bu yöntemi destekliyorsa kullanır.
Sisteme eklenen en az bir cihaz frekans atlamayı desteklemiyorsa, hub ve tüm cihazlar bu cihazın çalışma frekanslarına geçer ve telsiz iletişimi için frekans atlamayı kullanmaz.
Olayları izleme istasyonuna gönderme
Ajax sistemleri, alarmları SurGard (Contact ID), SIA (DC-09), ADEMCO 685 ve diğer desteklenen protokolleri kullanarak hem Ajax PRO Desktop izleme uygulamasına hem de Alarm İzleme Merkezine (AİM) iletebilir.
Superior KeyPad TouchScreen G3 Jeweller aşağıdaki olayları iletebilir:
- Zorlama kodunun girilmesi.
- Panik butonuna basılması. Her butonun kendine ait bir olay kodu vardır.
- Yetkisiz erişim girişimi nedeniyle tuş takımının kilitlenmesi.
- Kurcalama alarmı/geri yükleme.
- Hub veya telsiz sinyali kapsama alanı genişletici ile bağlantının kaybı/geri yüklenmesi.
- Sistemin kurulması/çözülmesi.
- Başarısız kurma girişimi (sistem bütünlüğü kontrolü etkinse).
- Tuş takımının kalıcı olarak devre dışı bırakılması/etkinleştirilmesi.
- Tuş takımının tek seferlik devre dışı bırakılması/etkinleştirilmesi.
Bir alarm alındığında güvenlik şirketinin izleme istasyonundaki operatör ne olduğunu ve hızlı müdahale ekibini tam olarak nereye göndereceğini bilir. Ajax cihazlarının adreslenebilirliği; cihaz türü, adı, güvenlik grubu ve sanal oda dâhil olmak üzere olayları Ajax PRO Desktop veya AİM’ye göndermeye olanak tanır. İletilen parametrelerin listesi AİM’nin türüne ve seçilen iletişim protokolüne bağlı olarak farklılık gösterebilir.
Cihaz kimliği ve numarası, Ajax uygulamasında cihazın durumlarında bulunabilir.
Sisteme ekleme
Superior KeyPad TouchScreen G3 Jeweller, Hub (2G) Jeweller, Hub (4G) Jeweller, Hub Plus Jeweller ve üçüncü taraf güvenlik kontrol panelleriyle uyumlu değildir.
Superior KeyPad TouchScreen G3 Jeweller’ı hub’a bağlamak için tuş takımı sistemle aynı korunan tesiste — hub’ın telsiz ağının kapsama alanı içinde bulunmalıdır. Tuş takımının ReX 2 Jeweller telsiz sinyali kapsama alanı genişletici üzerinden çalışması için önce tuş takımını hub’a ekleyiniz ve ardından kapsama alanı genişleticinin ayarlarında ReX 2 Jeweller’ye bağlayınız.
Uyumlu olabilmeleri için hub ve cihaz aynı telsiz frekansında çalışmalıdır. Cihazın telsiz frekans aralığı bölgeye göre değişebilir. Ajax cihazlarını satın aldığınız bölgede kullanmanızı öneririz. Desteklenen frekans aralığını doğrulamak için teknik destek hizmetimizle iletişime geçiniz.
Bir cihaz eklemeden önce
- Bir Ajax uygulaması yükleyiniz.
- Hesabınıza giriş yapınız veya yeni bir hesap oluşturunuz.
- Bir space seçiniz veya yeni bir space oluşturunuz.

Space işlevi, aşağıdaki ve daha sonraki sürümlere sahip uygulamalarda kullanılabilir:
- iOS için Ajax Security System 3.0.
- Android için Ajax Security System 3.0.
- iOS için Ajax PRO: Tool for Engineers 2.0.
- Android için Ajax PRO: Tool for Engineers 2.0.
- macOS için Ajax PRO Desktop 4.0.
- Windows için Ajax PRO Desktop 4.0.
- En az bir sanal oda ekleyiniz.
- Space’e uyumlu bir hub ekleyiniz. Hub’ın açık olduğundan ve Ethernet, Wi-Fi ve/veya hücresel ağ üzerinden internete bağlandığından emin olunuz.
- Ajax uygulamasında durumlarını kontrol ederek space’in çözülü olduğundan ve hub’ın güncellenmediğinden emin olunuz.
Yalnızca sistem yapılandırma yetkilerine sahip bir PRO veya bir space yöneticisi, cihaza hub’a ekleyebilir.
Hub’a bağlanma
- Bir Ajax uygulaması açınız. Tuş takımını eklemek istediğiniz hub’ı seçiniz.
- Cihazlar sekmesine gidiniz. Cihaz ekle‘ye tıklayınız.
- Cihaz için bir ad giriniz, ardından QR kodunu tarayınız veya manuel olarak giriniz (QR kodu tuş takımı üzerinde ve ambalaj kutusunda bulunur). Bir oda ve bir grup seçiniz (Grup modu etkinse).
- Ekle‘ye basınız.
- Güç butonuna 3 saniye basılı tutarak cihazı açınız.
Bağlantı başarısız olursa tuş takımını kapatınız ve 5 sn sonra tekrar deneyiniz.
Hub’a eklenebilecek maksimum cihaz sayısına (hub modeline bağlı olarak) ulaşılmışsa yeni bir cihaz eklemeye çalıştığınızda bilgilendirilirsiniz.
Hub’a bağlandıktan sonra tuş takımı, Ajax uygulamalarında hub cihazları listesinde görünür. Cihaz durumları için güncelleme sıklığı, Jeweller veya Jeweller/Fibra ayarlarına bağlıdır ve varsayılan aralık 36 saniyedir.
Superior KeyPad TouchScreen G3 Jeweller aynı anda yalnızca tek bir hub ile çalışabilir. Yeni bir hub’a bağlandığında önceki hub ile iletişimi durdurur. Ancak tuş takımının yeni bir hub’a eklenmesi, onu eski hub’ın cihaz listesinden otomatik olarak kaldırmaz — bu işlem Ajax uygulaması üzerinden manuel olarak yapılmalıdır.
Arızalar
Superior KeyPad TouchScreen G3 Jeweller’da bir arıza algılandığında Ajax uygulamaları cihaz simgesinde bir sayaç görüntüler. Tüm arızalar, tuş takımının durumlarında gösterilir ve etkilenen alanlar kırmızı renkle vurgulanır.
Aşağıdaki durumlarda bir arıza görüntülenir:
- tuş takımı muhafazası açık (tamper tetiklendi);
- Jeweller üzerinden hub veya kapsama alanı genişletici ile bağlantı yok;
- Wings üzerinden hub veya kapsama alanı genişletici ile bağlantı yok;
- tuş takımının pili zayıf;
- tuş takımının sıcaklığı kabul edilebilir aralığın dışında.
Simgeler
Uygulamadaki simgeler
Uygulamadaki simgeler bazı tuş takımı durumlarını gösterir. Bunlara erişmek için:
- Ajax uygulamasına giriş yapınız.
- Hub’ı seçiniz.
- Cihazlar sekmesine gidiniz.
| Simge | Anlamı |
|
Jeweller sinyal gücü. Hub ile cihaz arasındaki sinyal gücünü gösterir. Önerilen değer 2–3 diştir. |
|
|
Tuş takımı pil seviyesi iyi. |
|
|
Tuş takımında bir arıza var. Arıza listesi tuş takımı durumlarında mevcuttur. |
|
| Tuş takımının Bluetooth modülü etkinleştirildiğinde görüntülenir. | |
| Bluetooth kurulumu tamamlanmadı. Açıklama tuş takımı durumlarında mevcuttur. | |
|
Bir aygıt yazılımı güncellemesi mevcuttur. Açıklamayı görmek ve bir güncelleme başlatmak için tuş takımı durumlarına gidiniz. Ikona nie jest dostępna w aplikacji Ajax Security System w wersji 3.0 lub nowszej dla systemów iOS i Android. Aygıt yazılımını güncellemek için Superior KeyPad TouchScreen G3 Jeweller’ı harici güç kaynağına bağlayınız. |
|
| Tuş takımı bir telsiz sinyali kapsama alanı genişletici üzerinden çalıştığında görüntülenir. | |
| Tuş takımı ayarlarında Pass/Tag okuma özelliği etkinleştirildiğinde görüntülenir. | |
| Tuş takımı ayarlarında Açılışta zil sesi özelliği etkinleştirildiğinde görüntülenir. | |
|
Cihaz sinyal zayıflatma testi modundadır. |
|
|
Cihaz kalıcı olarak devre dışıdır. |
|
|
Kurcalama alarmı bildirimleri kalıcı olarak devre dışı bırakılmıştır. |
|
|
Cihaz, sistemin ilk kez çözülmesine kadar devre dışı bırakılır. |
|
|
Kurcalama alarmı bildirimleri sistemin ilk kez çözülmesine kadar devre dışı bırakılmıştır. |
|
| Cihazın hub ile bağlantısı kesildi veya hub’ın Ajax Cloud sunucusu ile bağlantısı kesildi. | |
|
Cihaz yeni hub’a aktarılmamıştır. |
Ekrandaki simgeler
Simgeler ekranın üst kısmında görünür ve belirli sistem durumları veya olaylar hakkında bilgi verir.
| Simge | Anlamı |
|
Alarmdan sonra sistemin geri yüklenmesi gerekir. Kullanıcı, hesap türüne bağlı olarak bir istek gönderebilir veya sistemi geri yükleyebilir. Bunu yapmak için simgeye tıklayınız ve ekranda gerekli butonu seçiniz. |
|
|
Yangın alarmını sustur. Yangın alarmını susturma ekranı kapatıldıktan sonra görüntülenir. Kullanıcılar simgeye istedikleri zaman tıklayabilir ve bağlantılı yangın alarmı dahil olmak üzere yangın alarmını susturabilir. Yangın alarmı ManualCallPoint Jeweller tarafından tetiklenirse ve CO veya duman seviyeleri kritikse alarm tuş takımı üzerinden susturulamaz. |
|
|
Açılışta zil sesi devre dışı bırakılır. Etkinleştirmek için simgeye tıklayınız. Gerekli ayarlar yapıldığında ekranda görüntülenir. |
|
|
Açılışta zil sesi etkinleştirilir. Devre dışı bırakmak için simgeye tıklayınız. Gerekli ayarlar yapıldığında ekranda görüntülenir. |
Durumlar
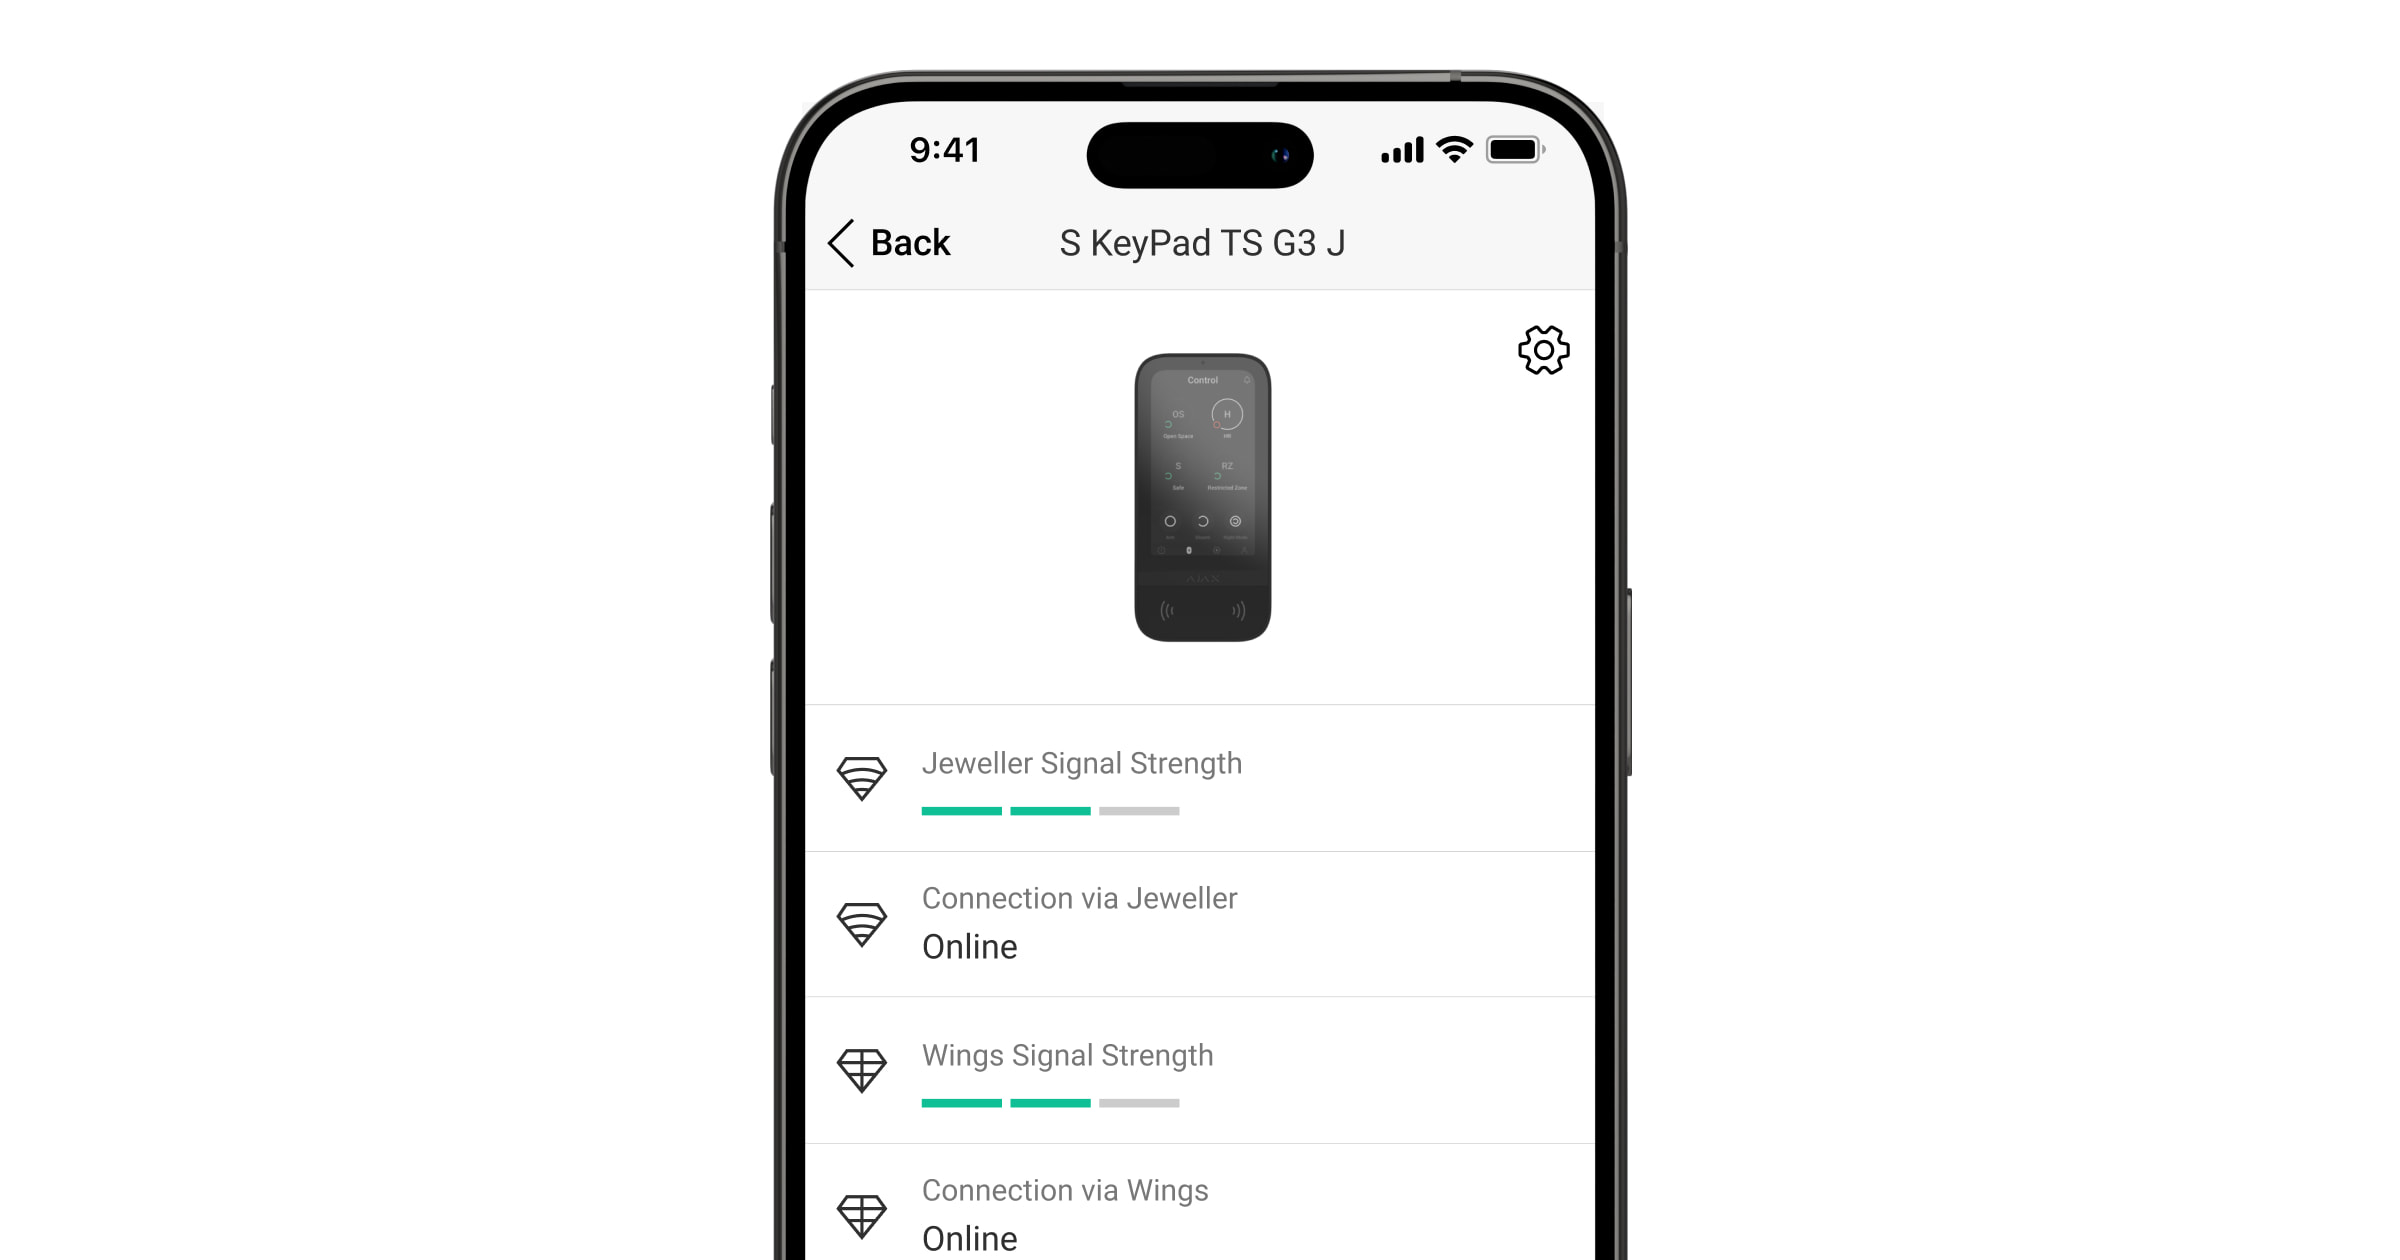
Durumlar, cihaz ve çalışma parametreleri hakkında bilgi sağlar. Superior KeyPad TouchScreen G3 Jeweller durumları bir Ajax uygulamasında bulunabilir:
- Cihazlar sekmesine gidiniz.
- Listeden Superior KeyPad TouchScreen G3 Jeweller‘ı seçiniz.
| Parametre | Değer |
| Veri içe aktarma | Veriler yeni hub’a aktarılırken oluşan hatayı görüntüler:
|
| Arıza |
Bu alan yalnızca bir arıza tespit edildiğinde görüntülenir. |
| Yeni aygıt yazılımı sürümü mevcut |
Bu alan yalnızca yeni bir aygıt yazılımı sürümü mevcutsa görüntülenir. Durum, iOS ve Android için 3.0 ve sonraki sürümlere sahip Ajax Security System uygulamasında görüntülenmez. Aygıt yazılımını güncellemek için Superior KeyPad TouchScreen G3 Jeweller’ı harici güç kaynağına bağlayınız. |
| Uyarı |
|
| Jeweller sinyal gücü |
Hub veya kapsama alanı genişletici ile Jeweller kanalındaki cihaz arasındaki sinyal gücü. Önerilen değer 2–3 diştir. Jeweller, Superior KeyPad TouchScreen G3 Jeweller’ın olaylarını ve alarmlarını ileten bir protokoldür. |
| Jeweller üzerinden bağlantı | Cihaz ile hub (veya kapsama alanı genişletici) arasındaki Jeweller kanalındaki bağlantı durumu:
|
| Wings sinyal gücü |
Hub veya kapsama alanı genişletici ile Wings kanalındaki cihaz arasındaki sinyal gücü. Önerilen değer 2–3 diştir. Wings, aygıt yazılımını güncellemek ve grup, oda listelerini iletmek ile diğer ek bilgileri aktarmak için kullanılan bir protokoldür. |
| Wings üzerinden bağlantı | Wings kanalında hub veya kapsama alanı genişletici ile cihaz arasındaki bağlantı durumu:
|
| Verici gücü |
Vericinin seçilen gücünü görüntüler. Bu parametre, Maksimum veya Zayıflatma seçeneği Sinyal zayıflama testi menüsünde seçildiğinde görünür. |
| Pil seviyesi | Cihazın pil şarj seviyesi:
Piller azaldığında Ajax uygulamaları ve güvenlik şirketi gerekli bildirimleri alacaktır. Düşük pil bildirimi gönderildikten sonra tuş takımı 2 haftaya kadar çalışabilir. |
| Kapak | Cihaz muhafazasının sökülmesine veya açılmasına yanıt veren tuş takımı tamper durumunun durumu:
|
| Harici güç | Tuş takımı harici güç kaynağı bağlantı durumu:
|
| Her zaman aktif ekran | Tuş takımı ayarlarında Her zaman aktif ekran geçişi etkinleştirildiğinde ve harici güç kaynağı bağlandığında görüntülenir. |
| Alarm ses göstergesi | Sistemde bir alarm algılanırsa tuş takımı sesli uyarısını etkinleştirin ayarının durumunu gösterir. |
| Alarm süresi |
Alarm durumunda ses sinyalinin süresi. 3 saniyelik artışlarla ayarlanır. Sistemde alarm algılanırsa tuş takımı sesli uyarısını etkinleştirin seçeneği etkinleştirildiğinde görüntülenir. |
| Pass/Tag okuma | Kartlar ve anahtarlıklar için okuyucunun etkin olup olmadığını görüntüler. |
| Bluetooth | Sistemi akıllı telefonla kontrol etmek için tuş takımının Bluetooth modülünün etkinleştirilip etkinleştirilmediğini görüntüler. |
| Kolay kurulu mod değişimi | Kolay kurulu mod değişimi özelliği için yapılandırmayı gösterir:
|
| Gelişmiş şifreleme | Cihaz ile hub veya telsiz sinyali kapsama alanı genişletici arasındaki gelişmiş şifrelemeli iletişimin durumu:
|
| Bip sesi ayarları | |
| Kurma/çözme | Etkinleştirildiğinde, tuş takımı kurma ve çözme hakkında kısa bir bip sesiyle bildirimde bulunur. |
| Gece modu etkinleştirme/devre dışı bırakma | Etkinleştirildiğinde tuş takımı, Gece modunun açılıp kapatıldığını kısa bir bip sesiyle bildirir. |
| Tuş takımına kod girilirken cihazı sustur | Etkinleştirildiğinde kullanıcı tuş takımında kodu girmeye başladığında cihaz gecikmeler veya diğer sesli bildirimler için bip sesi vermeyi durdurur. |
| Giriş gecikmeleri | Etkinleştirildiğinde tuş takımı Giriş gecikmeleri hakkında bip sesi çıkarır. |
| Çıkış gecikmeleri | Etkinleştirildiğinde tuş takımı Çıkış gecikmeleri hakkında bip sesi çıkarır. |
| Gece modunda giriş gecikmeleri | Etkinleştirildiğinde tuş takımı Gece modunda Giriş gecikmeleri hakkında bip sesi çıkarır. |
| Gece modunda çıkış gecikmeleri | Etkinleştirildiğinde tuş takımı Gece modunda Çıkış gecikmeleri hakkında bip sesi çıkarır. |
| Açılışta veya kapı zili butonuna basıldığında zil sesi |
Etkinleştirildiğinde tuş takımı Çözülü sistem modunda tetiklenen açılma dedektörlerini bildirir. |
| Bip sesi seviyesi | Kurma/çözme, giriş/çıkış gecikmesi ve açılma ile ilgili bildirimler etkinleştirilmişse görüntülenir. Bildirimler için sesli uyarının ses seviyesini gösterir. |
| Kalıcı devre dışı bırakma | Tuş takımının kalıcı devre dışı bırakma ayarının durumunu gösterir:
|
| Tek seferlik devre dışı bırakma | Tuş takımının tek seferlik devre dışı bırakma işlevinin durumunu gösterir:
|
| Aygıt yazılımı | Tuş takımı aygıt yazılımı sürümü. |
| Cihaz kimliği | Tuş takımı kimliği. QR kodu ayrıca cihazın mahfazası ve paketlendiği kutuda mevcuttur. |
| Cihaz No. | Cihaz çevriminin (bölge) numarası. |
Ayarlar
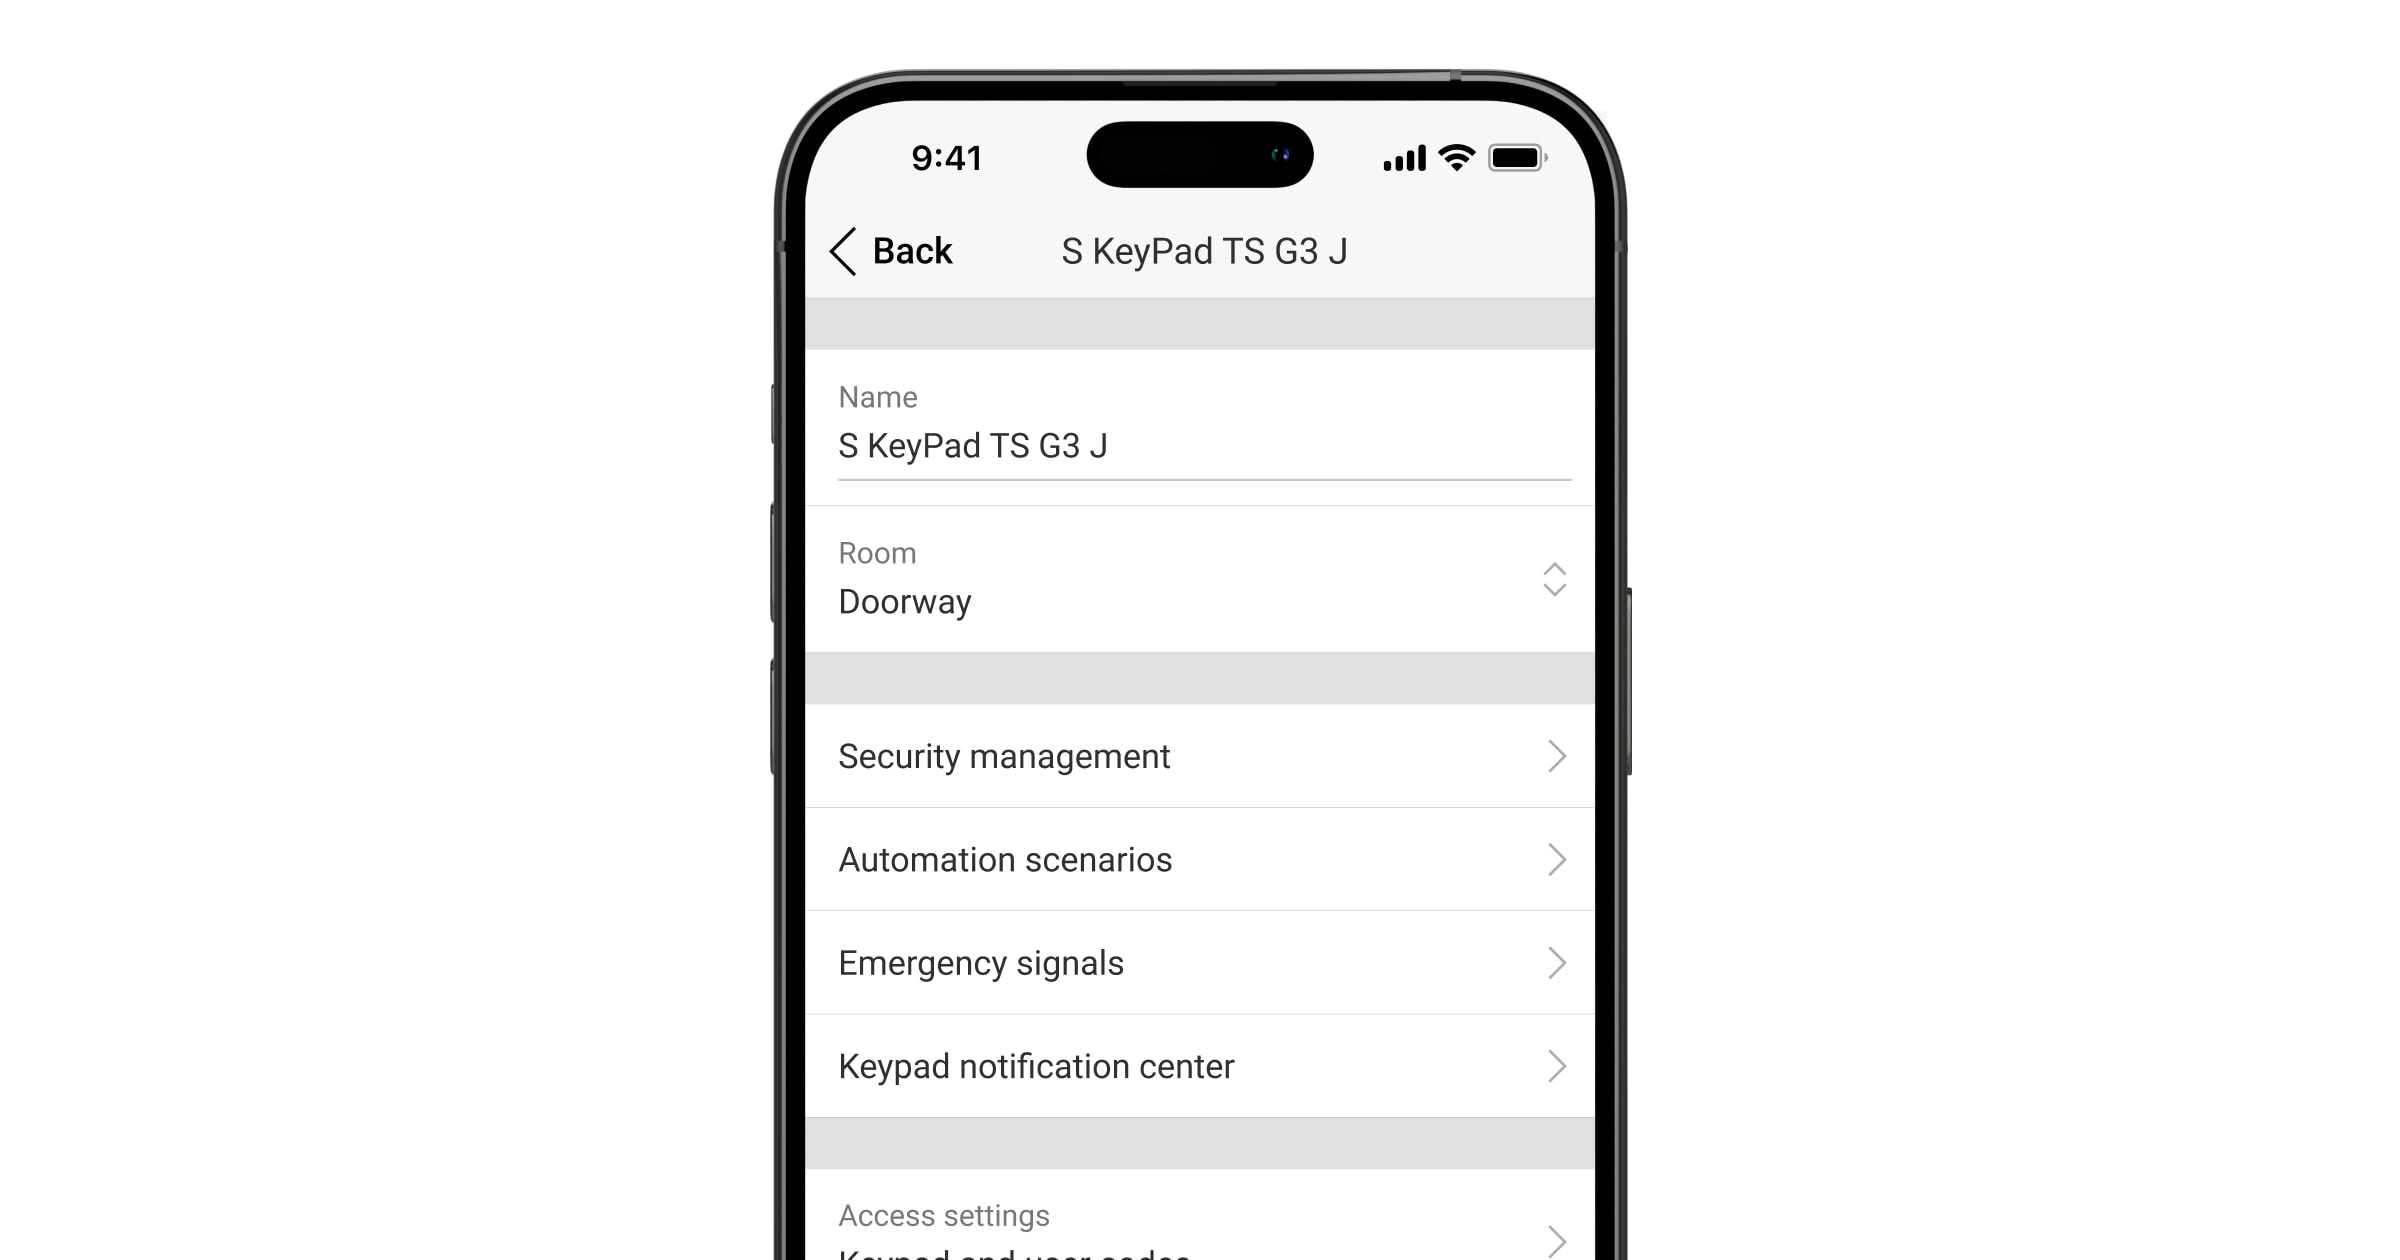
Superior KeyPad TouchScreen G3 Jeweller ayarlarını değiştirmek için bir Ajax uygulamasında:
- Cihazlar sekmesine gidiniz.
- Listeden Superior KeyPad TouchScreen G3 Jeweller‘ı seçiniz.
- simgesine tıklayarak Ayarlar‘a gidiniz.
- Gerekli parametreleri ayarlayınız.
- Yeni ayarları kaydetmek için Geri‘ye tıklayınız.
| Ayar | Değer |
| Adı |
Tuş takımının adı. Hub cihazları listesinde, SMS metninde ve olay akışındaki bildirimlerde görüntülenir. Cihazın adını değiştirmek için metin alanına tıklayınız. Belirlenen isimde Kiril alfabesinden en fazla 12 veya Latin alfabesinden en fazla 24 karakter kullanılabilir. |
| Oda |
Superior KeyPad TouchScreen G3 Jeweller’ın atandığı sanal oda seçilir. Oda adı, SMS metninde ve olay akışındaki bildirimlerde görüntülenir. |
| Erişim ayarları | Kurma/çözme yönteminin seçilmesi:
Sistemde kayıtlı olmayan kişiler için ayarlanan Tuş takımı erişim kodlarını etkinleştirmek için tuş takımındaki seçenekleri seçin: Yalnızca tuş takımı kodları veya Tuş takımı ve kullanıcı kodları. |
| Tuş takımı kodu | Güvenlik kontrolü için genel bir kodun seçilmesi. 4 ila 6 rakam içerir. |
| Zorlama kodu |
Sessiz alarm için genel bir zorlama kodunun seçilmesi. 4 ila 6 rakam içerir. |
| Ekran algılama menzili | Tuş takımının yaklaşmaya tepki verdiği ve ekranı açtığı mesafenin yapılandırılması:
Tercihinize göre yaklaşmaya yanıt verecek en uygun hassasiyeti seçiniz. |
| Yangın alarmını sustur |
Etkinleştirildiğinde kullanıcılar Ajax yangın dedektörleri alarmını (Bağlantılı olanlar dahil) tuş takımı üzerinden susturabilir. Yangın alarmı ManualCallPoint Jeweller tarafından tetiklenirse ve CO veya duman seviyeleri kritikse alarm tuş takımı üzerinden susturulamaz. |
| Pass/Tag okuma | Etkinleştirildiğinde güvenlik modu Pass ve Tag erişim cihazlarıyla kontrol edilebilir. |
| Bluetooth | Etkinleştirildiğinde güvenlik modu bir akıllı telefon ile kontrol edilebilir. |
| Bluetooth hassasiyeti | Tuş takımının Bluetooth modülünün hassasiyetini ayarlama:
Bluetooth geçişi etkinse kullanılabilir. |
| Yetkisiz erişim otomatik kilitleme |
Etkinleştirildiğinde yanlış bir kod girilirse veya doğrulanmamış erişim cihazları 1 dakika içinde arka arkaya üç defadan fazla kullanılırsa, tuş takımı önceden ayarlanan süre boyunca kilitlenecektir. PRO veya sistem yapılandırma haklarına sahip bir kullanıcı, belirlenen kilitleme süresi dolmadan uygulama aracılığıyla tuş takımının kilidini açabilir. |
| Otomatik kilitleme süresi, dk | Yetkisiz erişim denemelerinden sonra tuş takımı kilitleme süresinin seçilmesi:
Yetkisiz erişim otomatik kilitleme geçişi etkinse kullanılabilir. |
| Tuş takımı ile Chime yönetimi |
Etkinleştirildiğinde kullanıcı, açılma dedektörlerinin tetiklenmesine ilişkin bildirimleri tuş takımı ekranından etkinleştirebilir veya devre dışı bırakabilir. Tuş takımı ayarlarında Açılışta zil sesi seçeneğini ve en az bir çift konumlu dedektör için bu özelliği ayrıca etkinleştiriniz. |
| Aygıt yazılımı güncellemesi |
Cihazı aygıt yazılımı güncelleme moduna geçirir. Aygıt yazılımını güncellemek için Superior KeyPad TouchScreen G3 Jeweller’ı harici güç kaynağına bağlayınız. |
| Jeweller sinyal gücü testi |
Cihazı Jeweller sinyal gücü testi moduna geçirir. |
| Wings sinyal gücü testi |
Cihazı Wings sinyal gücü testi moduna geçirir. |
| Sinyal zayıflatma testi |
Cihazı sinyal zayıflatma testi moduna geçirir. |
| Pass/Tag sıfırlama |
Tag veya Pass ile ilişkili tüm hub’ların cihaz belleğinden silinmesini sağlar. |
| Kullanım kılavuzu | Ajax uygulamasında Superior KeyPad TouchScreen G3 Jeweller kullanım kılavuzunu açar. |
| Kalıcı devre dışı bırakma |
Kullanıcının cihazı sistemden çıkarmadan devre dışı bırakmasını sağlar. Üç seçenek mevcuttur:
|
| Tek seferlik devre dışı bırakma |
Kullanıcının ilk çözme işlemine kadar cihazın olaylarını devre dışı bırakmasını sağlar. Üç seçenek mevcuttur:
|
| Cihazı sil | Cihazın eşleştirmesini kaldırır, hub ile bağlantısını keser ve ayarlarını siler. |
Güvenlik yönetimi
| Ayar | Değer |
| Kontrol ekranı |
Tuş takımı üzerinden güvenlik kontrolünü etkinleştirir veya devre dışı bırakır. Devre dışı bırakıldığında Kontrol |
| Paylaşılan gruplar |
Hangi grupların paylaşılacağını ve tüm yetkili kullanıcılar tarafından yönetim için kullanılabilir olacağını seçme. Superior KeyPad TouchScreen G3 Jeweller hub’a eklendikten sonra sistemdeki tüm gruplar ve sonradan oluşturulan gruplar varsayılan olarak paylaşılır. Grup modu etkinse kullanılabilir. |
| Ön yetkilendirme | Etkinleştirildiğinde kontrol paneline ve mevcut sistem durumuna erişebilmek için kullanıcının önce kimlik doğrulaması yapması gerekir: bir kod girmeli veya kişisel bir erişim cihazı sunmalıdır. |
| Parola ile yetkilendirme onaylama |
Etkinleştirildiğinde, erişim cihazlarını kullanarak sistem yetkilendirmesi, eylemin kullanıcı kodu veya tuş takımı koduyla onaylanmasını gerektirir. Kullanıcı ayrıca eylem onayı için zaman da seçebilir. |
| Şifresiz kurma* |
Etkinleştirildiğinde kullanıcı bir kod girmeden veya kişisel erişim cihazını göstermeden sistemi kurabilir. Devre dışı bırakılmışsa, sistemi kurmak için bir kod girin veya erişim cihazını gösterin. Kodun girileceği ekran, Kurma Şifre ile yetkilendirme onaylama ve Ön yetkilendirme geçişleri devre dışıysa kullanılabilir. |
| Kolay kurulu mod değişimi | Etkinleştirildiğinde, kullanıcılar tuş takımı butonlarıyla onay vermeden erişim cihazlarını kullanarak sistemin (veya grubun) kurulu modunu değiştirebilir:
|
| Ekranda arıza listesini göster |
Etkinleştirildiğinde kurmayı engelleyen arızaların listesi tuş takımı ekranında görüntülenir. Bunun için sistem bütünlüğü kontrolünü etkinleştiriniz. Listenin görüntülenmesi biraz zaman alabilir. Bu durum, tuş takımının hazır kurulu pillerle çalışma süresini azaltır. |
* — etkinleştirildiğinde sisteminiz EN 50131 (Grade 2 ve 3) ile uyumsuz hale gelir.
Otomasyon senaryoları
| Ayar | Değer |
| Senaryo yönetimi |
Tuş takımı üzerinden senaryo yönetimini etkinleştirir veya devre dışı bırakır. Devre dışı bırakıldığında Senaryolar |
| Tuş takımı senaryoları |
Bu menü, bir otomasyon cihazını veya bir cihaz grubunu kontrol etmek için en fazla altı senaryo oluşturmanıza olanak tanır. Ayarlar kaydedildiğinde senaryoları yönetmeye yönelik butonlar tuş takımı ekranında (Senaryolar Sistemi yapılandırma yetkilerine sahip bir kullanıcı veya PRO, senaryoları ekleyebilir veya silebilir ve açıp kapatabilir. Devre dışı bırakılan senaryolar, tuş takımı ekranındaki Senaryolar |
| Ön yetkilendirme | Etkinleştirildiğinde senaryoları yönetebilmek için kullanıcının önce kimlik doğrulaması yapması gerekir: bir kod girmeli veya kişisel bir erişim cihazı sunmalıdır. |
Acil durum sinyalleri
| Ayar | Değer |
| Ekran üzerindeki acil durum butonları |
Etkinleştirildiğinde kullanıcı tuş takımının Panik Devre dışı bırakıldığında Panik |
| Buton türü | Panik
|
| Yanlışlıkla basma koruması | Etkinleştirildiğinde alarm gönderimi kullanıcıdan ek onay gerektirir. |
| Siren ile uyarı | |
| Panik butonuna basılırsa | Etkinleştirildiğinde Panik butonuna basıldığında sisteme eklenen sirenler etkinleştirilir. |
| Yangın ihbar butonuna basılırsa |
Etkinleştirildiğinde Yangın butonuna basıldığında sisteme eklenen sirenler etkinleştirilir. Geçiş, Buton türü menüsünde üç butonlu bir seçenek etkinleştirildiğinde görüntülenir. |
| Yardımcı istek butonuna basılırsa |
Etkinleştirildiğinde Yardımcı uyarı butonuna basıldığında sisteme eklenen sirenler etkinleştirilir. Geçiş, Buton türü menüsünde üç butonlu bir seçenek etkinleştirildiğinde görüntülenir. |
Tuş takımı bildirim merkezi
| Ayar | Değer |
| Olay onay bölümü |
Etkinleştirildiğinde, en son olayların listesi tuş takımı ekranında görüntülenir. Yeni olaylar varsa |
Ekran ayarları
| Ayar | Değer |
| Otomatik ayarlama | Bu geçiş varsayılan olarak etkindir. Ekran arka aydınlatma parlaklığı, ortam ışık seviyesine bağlı olarak otomatik olarak ayarlanır. |
| Manuel parlaklık ayarı |
Ekran arka aydınlatma seviyesinin seçilmesi: %0 ile %100 arasında (0 — arka aydınlatma minimumdur, 100 — arka aydınlatma maksimumdur). %10’luk artışlarla ayarlanır. Arka aydınlatma yalnızca ekran aktif olduğunda açıktır. Otomatik ayarlama geçişi devre dışı bırakıldığında manuel ayarlama kullanılabilir. |
| Görünüm | Arayüz görünüm ayarı:
|
| Her zaman aktif ekran |
Geçiş etkinleştirildiğinde ve harici güç kaynağı bağlandığında tuş takımı ekranı her zaman etkin kalır. Geçiş varsayılan olarak devre dışıdır. Bu durumda tuş takımı, ekranla yapılan son etkileşimden belirli bir süre sonra uyku moduna geçer. |
| Kurulu mod göstergesi | Tuş takımının LED göstergesini ayarlama:
|
| Dil |
Tuş takımı arayüz dilini yapılandırma. İngilizce varsayılan olarak ayarlanmıştır. Dili değiştirmek için gerekli olanı seçiniz ve Kaydet‘e tıklayınız. |
Ses göstergesi
Superior KeyPad TouchScreen G3 Jeweller, ayarlara bağlı olarak aşağıdaki işlevleri yerine getiren yerleşik bir sesli uyarıya sahiptir:
- Güvenlik durumunu ve ayrıca Giriş/Çıkış gecikmelerini gösterir.
- Açılışta Chime’lar.
- Alarmlar hakkında bilgilendirir.
Siren yerine Superior KeyPad TouchScreen G3 Jeweller kullanılmasını önermiyoruz. Tuş takımının sesli uyarısı yalnızca ek bildirimler için tasarlanmıştır. Buna karşılık, Ajax sirenleri izinsiz girenleri caydırmak ve dikkat çekmek amacıyla tasarlanmıştır. Doğru şekilde kurulmuş bir siren, göz hizasında bulunan bir tuş takımına kıyasla daha yüksek bir konuma yerleştirildiği için sökülmesi daha zordur.
| Ayar | Değer |
| Bip sesi ayarları |
|
| Kurulu mod değişikliğinde bip sesi | |
| Kurma/çözme |
Etkinleştirildiğinde: güvenlik modu tuş takımı, başka bir cihaz veya bir uygulama üzerinden değiştirildiğinde sesli bir bildirim gönderilir. Devre dışı bırakıldığında: güvenlik modu yalnızca tuş takımı üzerinden değiştirildiğinde sesli bir bildirim gönderilir. Bip sesinin seviyesi yapılandırılmış butonların ses seviyesine bağlıdır. |
| Gece modu etkinleştirme/devre dışı bırakma |
Etkinleştirildiğinde: Gece modu tuş takımı, başka bir cihaz veya bir uygulama üzerinden etkinleştirildiğinde/devre dışı bırakıldığında sesli bir bildirim gönderilir. Devre dışı bırakıldığında: Gece modu yalnızca tuş takımı üzerinden etkinleştirildiğinde/devre dışı bırakıldığında sesli bir bildirim gönderilir. Bip sesi seviyesi, butonların ses seviyesi ayarına bağlıdır. |
| Tuş takımına kod girilirken cihazı sustur | Bu seçenek etkinleştirildiğinde, kullanıcı tuş takımına şifreyi girmeye başladığında bip sesi duyulmaz. |
| Gecikmelerde bip sesi | |
| Giriş gecikmeleri |
Etkinleştirildiğinde yerleşik sesli uyarı Giriş gecikmesi hakkında bip sesi çıkarır. |
| Çıkış gecikmeleri |
Etkinleştirildiğinde yerleşik sesli uyarı çıkış gecikmesi hakkında bip sesi çıkarır. |
| Gece modunda giriş gecikmeleri |
Etkinleştirildiğinde yerleşik sesli uyarı, Gece modundaki giriş gecikmesini bip sesiyle bildirir. |
| Gece modunda çıkış gecikmeleri |
Etkinleştirildiğinde yerleşik sesli uyarı, Gece modundaki çıkış gecikmesini bip sesiyle bildirir. |
| Gecikmelerde hızlı bip sesi | |
| Giriş gecikmesi süresi dolduğunda hızlı bip sesi | Giriş gecikmesi süresinin bitmek üzere olduğunu kullanıcıya bildirir. Hızlı bip sesinin ne zaman başlayacağını belirlemek için 4 seçenek vardır:
|
| Çıkış gecikmesi süresi dolduğunda hızlı bip sesi | Çıkış gecikmesi süresinin bitmek üzere olduğunu kullanıcıya bildirir. Hızlı bip sesinin ne zaman başlayacağını belirlemek için 4 seçenek vardır:
|
| Çözülü olduğunda bip sesi | |
| Açılışta veya kapı zili butonuna basıldığında zil sesi pressed |
Etkinleştirildiğinde yerleşik sesli uyarı, Çözülü sistem modunda açılma dedektörlerinin tetiklendiğini kısa bir bip sesiyle bildirir. |
| Bip sesi seviyesi | Kurma/çözme, giriş/çıkış gecikmesi ve açılma ile ilgili bildirimler için yerleşik sesli uyarı ses seviyesinin seçilmesi:
|
| Butonlar | |
| Ses seviyesi | Tuş takımı ekranı ile etkileşimlerde sesli uyarının ses seviyesinin ayarlanması. |
| Alarm tepkisi | |
| Sesli alarmlar | Yerleşik sesli uyarı bir alarmı etkinleştirdiğinde modun ayarlanması:
|
| Sistemde alarm algılanırsa tuş takımı sesli uyarısını etkinleştirir | Etkinleştirildiğinde, yerleşik sesli uyarı sistemdeki bir alarmı bildirir. |
| Grup modunda alarmlar |
Tuş takımının alarmını bildireceği grubun (paylaşılanlardan) seçilmesi. Tüm paylaşılan gruplar seçeneği varsayılan olarak ayarlanmıştır. Tuş takımının yalnızca bir paylaşılan grubu varsa ve bu grup silinirse, ayar başlangıç değerine geri dönecektir. Grup modu etkinleştirilmişse görüntülenir. |
| Alarm süresi |
Alarm durumunda ses sinyalinin süresi: 3 saniyeden 3 dakikaya kadar. 30 saniyeden uzun süreli sesli sinyal için tuş takımına harici güç kaynağı bağlanması önerilir. |
Giriş/çıkış gecikmelerini tuş takımı ayarlarından değil, ilgili dedektör ayarlarından ayarlayınız.
Aygıt yazılımı güncellemesi
Superior KeyPad TouchScreen G3 Jeweller aygıt yazılımı güncellemesi, yeni bir sürüm mevcut olduğunda yüklenebilir. Bunu Ajax PRO: Tool for Engineers ve Ajax PRO Desktop uygulamalarındaki cihazlar listesinde öğrenebilirsiniz. Bir güncelleme mevcutsa ilgili tuş takımı simge ![]() ile işaretlenir. Sistem ayarlarına erişimi olan bir yönetici veya PRO, Superior KeyPad TouchScreen G3 Jeweller durumlarında veya ayarlarında güncellemeyi başlatabilir. Güncelleme, 1 veya 2 saate kadar (tuş takımı ReX 2 Jeweller üzerinden çalışıyorsa) sürebilir.
ile işaretlenir. Sistem ayarlarına erişimi olan bir yönetici veya PRO, Superior KeyPad TouchScreen G3 Jeweller durumlarında veya ayarlarında güncellemeyi başlatabilir. Güncelleme, 1 veya 2 saate kadar (tuş takımı ReX 2 Jeweller üzerinden çalışıyorsa) sürebilir.
Aygıt yazılımını güncellemek için Superior KeyPad TouchScreen G3 Jeweller’a harici bir güç kaynağı ünitesi bağlayınız. Harici güç kaynağı olmadan bir güncelleme başlatılmaz.
Superior KeyPad TouchScreen G3 Jeweller kurulum yerinde harici bir güç kaynağından beslenmiyorsa Superior KeyPad TouchScreen G3 Jeweller için ayrı bir SmartBracket montaj paneli kullanabilirsiniz. Bunu yapmak için tuş takımını ana montaj panelinden çıkarınız ve 10.5–14 V⎓ voltaj ve 0.5 A veya daha fazla akım sağlayan harici bir güç kaynağına bağlı yedek bir panele takınız.
Montaj paneli, yetkili Ajax Systems iş ortaklarından ayrı olarak satın alınabilir.
Cihaz alarmlarına tuş takımı tepkisini ayarlama
Superior KeyPad TouchScreen G3 Jeweller, sistemdeki her dedektörden gelen alarmlara yerleşik bir sesli uyarı ile tepki verebilir. Bu özellik, belirli bir cihazın alarmı için sesli uyarıyı etkinleştirmeniz gerekmediğinde kullanışlıdır. Örneğin, bu durum LeaksProtect Jeweller sızıntı dedektörünün tetiklenmesi için uygulanabilir.
Varsayılan olarak, sistemdeki tüm cihazların alarmları için tuş takımı tepkisi etkindir.
Bir cihaz alarmına tuş takımı tepkisini ayarlamak için:
- Ajax uygulamasını açınız.
- Cihazlar sekmesine gidiniz.
- Listeden tuş takımı tepkisini yapılandırmak istediğiniz cihazı seçiniz.
- simgesine tıklayarak cihaz Ayarlarına gidiniz.
- Siren ile uyar seçeneğini bulunuz ve etkinleştirilecek seçenekleri seçiniz. İşlevi etkinleştiriniz veya devre dışı bırakınız.
- Sistem cihazlarının geri kalanı için 3–5 arasındaki adımları tekrarlayınız.
Tamper alarmına tuş takımı tepkisini ayarlama
Superior KeyPad TouchScreen G3 Jeweller, her bir sistem cihazından gelen kurcalama alarmlarına yerleşik bir sesli uyarı ile tepki verebilir. Özellik etkinleştirildiğinde cihazın tamper butonu tetiklendiğinde tuş takımının yerleşik sesli uyarısı bir ses sinyali verir.
Bir kurcalama alarmına tuş takımı tepkisini ayarlamak için:
- Ajax uygulamasını açınız.
- Cihazlar sekmesine gidiniz.
- Hub’ı seçiniz ve Ayarlarına gidiniz.
- Servis menüsünü seçiniz.
- Sesler ve uyarılar bölümüne gidiniz.
- Kapak açıksa (hub veya dedektör) seçeneğini etkinleştiriniz.
- Yeni ayarları kaydetmek için Geri‘ye tıklayınız.
Tamper butonu cihazın veya sistemin kurulu modundan bağımsız olarak muhafazanın açılmasına ve kapanmasına tepki verir.
Ajax uygulamalarında panik butonuna basılmasına tuş takımının vereceği tepkinin ayarlanması
Ajax uygulamalarında panik butonuna basıldığında alarm için tuş takımının vereceği tepkisi yapılandırabilirsiniz. Bunun için şu adımları izleyiniz:
- Ajax uygulamasını açınız.
- Cihazlar sekmesine gidiniz.
- Hub’ı seçiniz ve Ayarlarına gidiniz.
- Servis menüsünü seçiniz.
- Sesler ve uyarılar bölümüne gidiniz.
- Uygulama içi panik butonuna basılırsa seçeneğini etkinleştiriniz.
- Yeni ayarları kaydetmek için Geri‘ye tıklayınız.
Alarm sonrası tuş takımı göstergesi ayarları

Tuş takımı, LED göstergesi aracılığıyla kurulu sistemdeki tetikleme hakkında bilgi verebilir.
Bu özellik şu şekilde çalışır:
- Sistem alarmı kaydeder.
- Tuş takımı bir alarm sinyali çalar (etkinleştirilmişse). Sinyalin süresi ve ses seviyesi cihaz ayarlarına bağlıdır.
- Sistem devre dışı bırakılana kadar tuş takımının LED’i iki kez (her 3 saniyede bir) yanıp söner.
Bu özellik sayesinde sistem kullanıcıları ve güvenlik şirketi devriyeleri alarmın oluştuğunu anlayabilir.
Superior KeyPad TouchScreen G3 Jeweller alarm sonrası göstergesi, dedektör sistem çözülüyken tetiklenmişse her zaman aktif dedektörler için çalışmaz.
Ajax PRO uygulamasında Superior KeyPad TouchScreen G3 Jeweller alarm sonrası göstergesini etkinleştirmek için:
- Hub ayarlarına gidiniz:
- Hub → Ayarlar → Servis → LED Gösterge.
- Hub → Ayarlar
- Superior KeyPad TouchScreen G3 Jeweller’ın sistem çözülmeden önce çift yanıp sönerek hangi olaylar hakkında bilgi vereceğini belirleyiniz:
- Onaylanmış izinsiz giriş/gecikme alarmı.
- Tekli izinsiz giriş/gecikme alarmı.
- Kapak açık.
- Cihazlar menüsünde gerekli Superior KeyPad TouchScreen G3 Jeweller’ı seçiniz.
- Geri‘ye tıklayınız. Tüm değerler uygulanacaktır.
Chime nasıl ayarlanır
Tuş takımı ile Chime yönetimi etkinleştirildiğinde Superior KeyPad TouchScreen G3 Jeweller, sistem çözülü durumdayken açılma dedektörleri tetiklendiğinde kısa bir bip sesiyle bildirir. Bu özellik, örneğin mağazalarda çalışanlara birinin binaya girdiğini bildirmek için kullanılır.
Bildirimler iki aşamada yapılandırılır: Tuş takımının ayarlanması ve açılma dedektörlerinin ayarlanması. Bu yazı Chime ve dedektörlerin nasıl ayarlanacağı hakkında daha fazla bilgi sağlar.
Tuş takımı tepkisini ayarlamak için:
- Ajax uygulamasını açınız.
- Cihazlar sekmesine gidiniz.
- Superior KeyPad TouchScreen G3 Jeweller’ı seçiniz ve Ayarlarına gidiniz.
- Ses göstergesi menüsü → Bip sesi ayarlarına gidiniz.
- Çözüldüğünde bip sesi kategorisindeki Açılışta veya kapı zili butonuna basıldığında zil sesi geçişini etkinleştiriniz.
- Gerekli bildirim ses seviyesini ayarlayınız.
- Ayarları kaydetmek için Geri‘ye tıklayınız.
Ayarlar doğru şekilde yapıldığında Ajax uygulamasının Kontrol sekmesinde bir zil simgesi görünür. Açılışta Chime’ı etkinleştirmek veya devre dışı bırakmak için buna tıklayınız.
Tuş takımı ekranından Chime kontrolünü ayarlamak için:
- Ajax uygulamasını açınız.
- Cihazlar sekmesine gidiniz.
- Superior KeyPad TouchScreen G3 Jeweller’ı seçiniz ve Ayarlarına gidiniz.
- Tuş takımı ile Chime yönetimini etkinleştirin.
Ayarlar doğru şekilde yapıldığında tuş takımı ekranındaki Kontrol ![]() sekmesinde bir zilsimgesi görünür. Açılışta Chime’ı etkinleştirmek veya devre dışı bırakmak için buna tıklayınız.
sekmesinde bir zilsimgesi görünür. Açılışta Chime’ı etkinleştirmek veya devre dışı bırakmak için buna tıklayınız.
Kod ayarı
Tuş takımı ve tuş takımı zorlama kodlarını ayarlamak için:
- Bir Ajax uygulamasında Cihazlar sekmesine gidiniz.
- Erişim kodunu ayarlamak istediğiniz tuş takımını seçiniz.
- Ayarlarına gidiniz.
- Yalnızca tuş takımı kodları veya Tuş takımı ve kullanıcı kodları seçeneğini Erişim ayarları menüsünden seçiniz.
- Tuş takımı kodu menüsünü bulunuz ve tıklayınız.
- Tuş takımı kodunu ayarlayınız. 4 ila 6 rakam içerir.
- Bitti‘ye basınız.
- Zorlama kodu menüsünü bulunuz ve tıklayınız.
- Tuş takımı zorlama kodunu ayarlayınız. 4 ila 6 rakam içerir.
- Bitti‘ye basınız.
Kişisel bir kod ve kişisel bir zorlama kodu ayarlamak için:
- Ajax uygulamasında hub’ı seçiniz.
- Ayarlar menüsüne gidiniz.
- Kullanıcı menüsünü açınız.
- Listeden hesabınızı bulunuz ve üzerine tıklayınız.
- Şifre ayarları menüsüne gidiniz.
- Kullanıcı kodunu ayarlayınız. 4 ila 6 rakam içerir.
- Kaydet‘e basınız.
- Zorlama Kodunu ayarlayınız. 4 ila 6 rakam içerir.
- Kaydet‘e basınız.
- Ayarları kaydetmek için Geri‘ye tıklayınız.
Hesabı olmayan bir kullanıcı için bir erişim kodu ayarlamak için:
- Ajax uygulamasında hub’ı seçiniz.
- Ayarlar menüsüne gidiniz.
- Tuş takımı erişim kodları menüsüne gidiniz.
- Kod ekle‘ye tıklayınız. Kullanıcı adı ve Erişim kodu belirleyiniz. 4 ila 6 rakam içerir.
- Verileri kaydetmek için Ekle‘ye tıklayınız.
Hesabı olmayan bir kullanıcı için bir zorlama kodu ayarlamak için:
- Hub ayarlarında Tuş takımı erişim kodları menüsünü seçiniz.
- Gerekli kayıtlı olmayan kullanıcıyı seçiniz.
- Zorlama kodu ekle‘ye tıklayınız. Kodu ayarlayınız. 4 ila 6 rakam içerir.
- Bitti‘ye tıklayınız.
Kayıtlı olmayan kullanıcılar için güvenlik yönetimine erişimi ayarlayabilirsiniz. İlk olarak Grup modunu etkinleştiriniz. Ardından hub ayarlarında Tuş takımı erişim kodları menüsünü seçiniz, gerekli kullanıcıyı bulunuz ve Güvenlik yönetimi menüsünde uygun parametreleri ayarlayınız.
Yalnızca sistemi yapılandırma haklarına sahip bir PRO, Ajax PRO uygulamalarında RRU kodlarını oluşturabilir ve yapılandırabilir. Bu özelliği yapılandırma hakkında daha fazla bilgiyi bu yazıda bulabilirsiniz.
RRU kodları, OS Malevich 2.17 ve sonraki sürümlü hub’lar (Hub modeli hariç) tarafından desteklenir.
Kartları ve anahtarlıkları ekleme
Superior KeyPad TouchScreen G3 Jeweller, Tag anahtarlıklar, Pass kartlar ve DESFire® teknolojisini destekleyen üçüncü taraf cihazlarla çalışabilir.
DESFire®’ı destekleyen üçüncü taraf cihazları eklemeden önce, yeni tuş takımını kullanmaya yetecek kadar boş belleğe sahip olduklarından emin olunuz. Üçüncü taraf cihazın önceden biçimlendirilmiş olması tercih edilir.
Bu yazı Tag veya Pass cihazlarının sıfırlanması hakkında bilgiler sağlar.
Bağlanabilecek maksimum Pass ve Tag sayısı hub modeline göre değişir. Bağlı Pass ve Tag’lar hub’daki toplam cihaz sınırını etkilemez.
| Hub modeli | Tag veya Pass cihazlarının sayısı |
| Hub 2 (2G) | 50 |
| Hub 2 (4G) | 50 |
| Hub 2 Plus | 200 |
| Superior Hub Hybrid (2G) | 50 |
| Superior Hub Hybrid (4G) | 50 |
| Superior Hub G3 Jeweller | 200 |
| Superior Hub Hybrid 2 | 200 |
| Hub BP Jeweller | 50 |
Sisteme bir Tag veya Pass nasıl eklenir

- Ajax uygulamasını açınız.
- Tag veya Pass eklemek istediğiniz hub’ı seçiniz.
- Cihazlar sekmesine gidiniz.
En az bir tuş takımı ayarında Pass/Tag okuma özelliğinin etkinleştirildiğinden emin olunuz.
- Cihaz ekle‘ye tıklayınız.
- Kart/anahtarlık ekle‘yi seçiniz.
- Türü (Tag veya Pass), rengi, cihaz adını ve kullanıcıyı (gerekirse) belirleyiniz.
- Sonraki tuşuna tıklayınız. Bundan sonra hub, cihaz kayıt moduna geçecektir.
- Kart/anahtarlık okuma özelliği etkin olan uyumlu herhangi bir tuş takımına gidiniz ve etkinleştiriniz.
Etkinleştirildikten sonra Superior KeyPad TouchScreen G3 Jeweller, tuş takımını erişim cihazları kayıt moduna geçirmek için bir ekran görüntüler. Başlat butonuna tıklayınız.
Tuş takımı ayarlarında Her zaman aktif ekran geçişi etkinleştirildiğinde ve harici güç kaynağı bağlandığında ekran otomatik olarak güncellenir.
Tuş takımını kayıt moduna geçirme ekranı, sistemdeki tüm Superior KeyPad TouchScreen G3 Jeweller cihazlarında görüntülenir. Sistemi yapılandırma yetkilerine sahip bir yönetici veya PRO, bir tuş takımında Tag/Pass kaydını başlattığında diğerleri başlangıç durumuna döner.
- Pass veya Tag’i geniş tarafıyla birkaç saniye boyunca tuş takımı okuyucusuna gösteriniz. Bu taraf gövde üzerinde
 dalga simgeleri ile işaretlenmiştir. Başarılı ekleme sonrasında Ajax uygulamasında ve tuş takımı ekranında bir bildirim alırsınız.
Bağlantı başarısız olursa, 5 saniye sonra tekrar deneyiniz. Hub’a zaten maksimum sayıda Tag veya Pass cihazı eklenmişse yeni bir cihaz eklerken Ajax uygulamasında buna karşılık gelen bir bildirim alacağınızı lütfen unutmayınız.
Hem Tag hem de Pass aynı anda birden fazla hub ile çalışabilir. Maksimum hub sayısı 13’tür. Hub sınırına zaten ulaşmış olan bir hub’a Tag veya Pass bağlamaya çalışırsanız ilgili bir bildirim alırsınız. Böyle bir anahtarlığı/kartı yeni bir hub’a bağlamak için sıfırlamanız gerekir.
Başka bir kart veya anahtarlık eklemeniz gerekiyorsa uygulamada Başka bir kart/anahtarlık ekle’ye tıklayınız. 6–9 arasındaki adımları tekrarlayınız.
Hub’dan bir Tag veya Pass nasıl silinir
Sıfırlama, anahtarlıkların ve kartların tüm ayarlarını ve bağlantılarını siler. Bu durumda, sıfırlanan Tag ve Pass sadece sıfırlamanın yapıldığı hub’dan kaldırılır. Diğer hub’larda Tag veya Pass uygulamada görüntülenmeye devam eder ancak güvenlik modlarını yönetmek için kullanılamaz. Bu cihazlar manuel olarak kaldırılmalıdır.
- Ajax uygulamasını açınız.
- Hub’ı seçiniz.
- Cihazlar sekmesine gidiniz.
- Cihaz listesinden uyumlu bir tuş takımı seçiniz.
Tuş takımı ayarlarında Pass/Tag okuma özelliğinin etkinleştirildiğinden emin olunuz.
- simgesine tıklayarak tuş takımı ayarlarına gidiniz.
- Kart/anahtarlık sıfırlama menüsüne tıklayınız.
- Devam‘a tıklayınız.
- Kart/anahtarlık okuma özelliği etkin olan uyumlu herhangi bir tuş takımına gidiniz ve etkinleştiriniz.
Etkinleştirildikten sonra Superior KeyPad TouchScreen G3 Jeweller, tuş takımını erişim cihazlarını sıfırlama moduna geçirmek için bir ekran görüntüler. Başlat butonuna tıklayınız.
Tuş takımı ayarlarında Her zaman aktif ekran geçişi etkinleştirildiğinde ve harici güç kaynağı bağlandığında ekran otomatik olarak güncellenir.
Tuş takımını sıfırlama moduna geçirme ekranı, sistemdeki tüm Superior KeyPad TouchScreen G3 Jeweller cihazlarında görüntülenir. Sistemi yapılandırma yetkilerine sahip bir yönetici veya PRO, bir tuş takımında Tag/Pass sıfırlama işlemini başlattığında diğerleri başlangıç durumuna döner.
- Pass veya Tag’i geniş tarafıyla birkaç saniye boyunca tuş takımı okuyucusuna gösteriniz. Bu taraf gövde üzerinde dalga simgeleri ile işaretlenmiştir. Başarılı biçimlendirme sonrasında Ajax uygulamasında ve tuş takımı ekranında bir bildirim alırsınız. Biçimlendirme başarısız olursa tekrar deneyiniz.
- Başka bir Tag veya Pass’i sıfırlamanız gerekirse uygulamada Başka bir kartı/anahtarlığı sıfırla seçeneğine tıklayınız. 9 numaralı adımı tekrarlayınız.
Bluetooth ayarı
Superior KeyPad TouchScreen G3 Jeweller, sensöre bir akıllı telefon göstererek güvenlik modlarını kontrol etmeyi destekler. Güvenlik yönetimi Bluetooth iletişim kanalı üzerinden kurulur. Bu yöntem kullanışlı, güvenli ve hızlıdır, çünkü şifre girmeye, tuş takımına telefon eklemeye veya kaybolabilecek Tag veya Pass kullanmaya gerek yoktur.
Bluetooth kimlik doğrulaması yalnızca Ajax Security System kullanıcıları tarafından kullanılabilir.
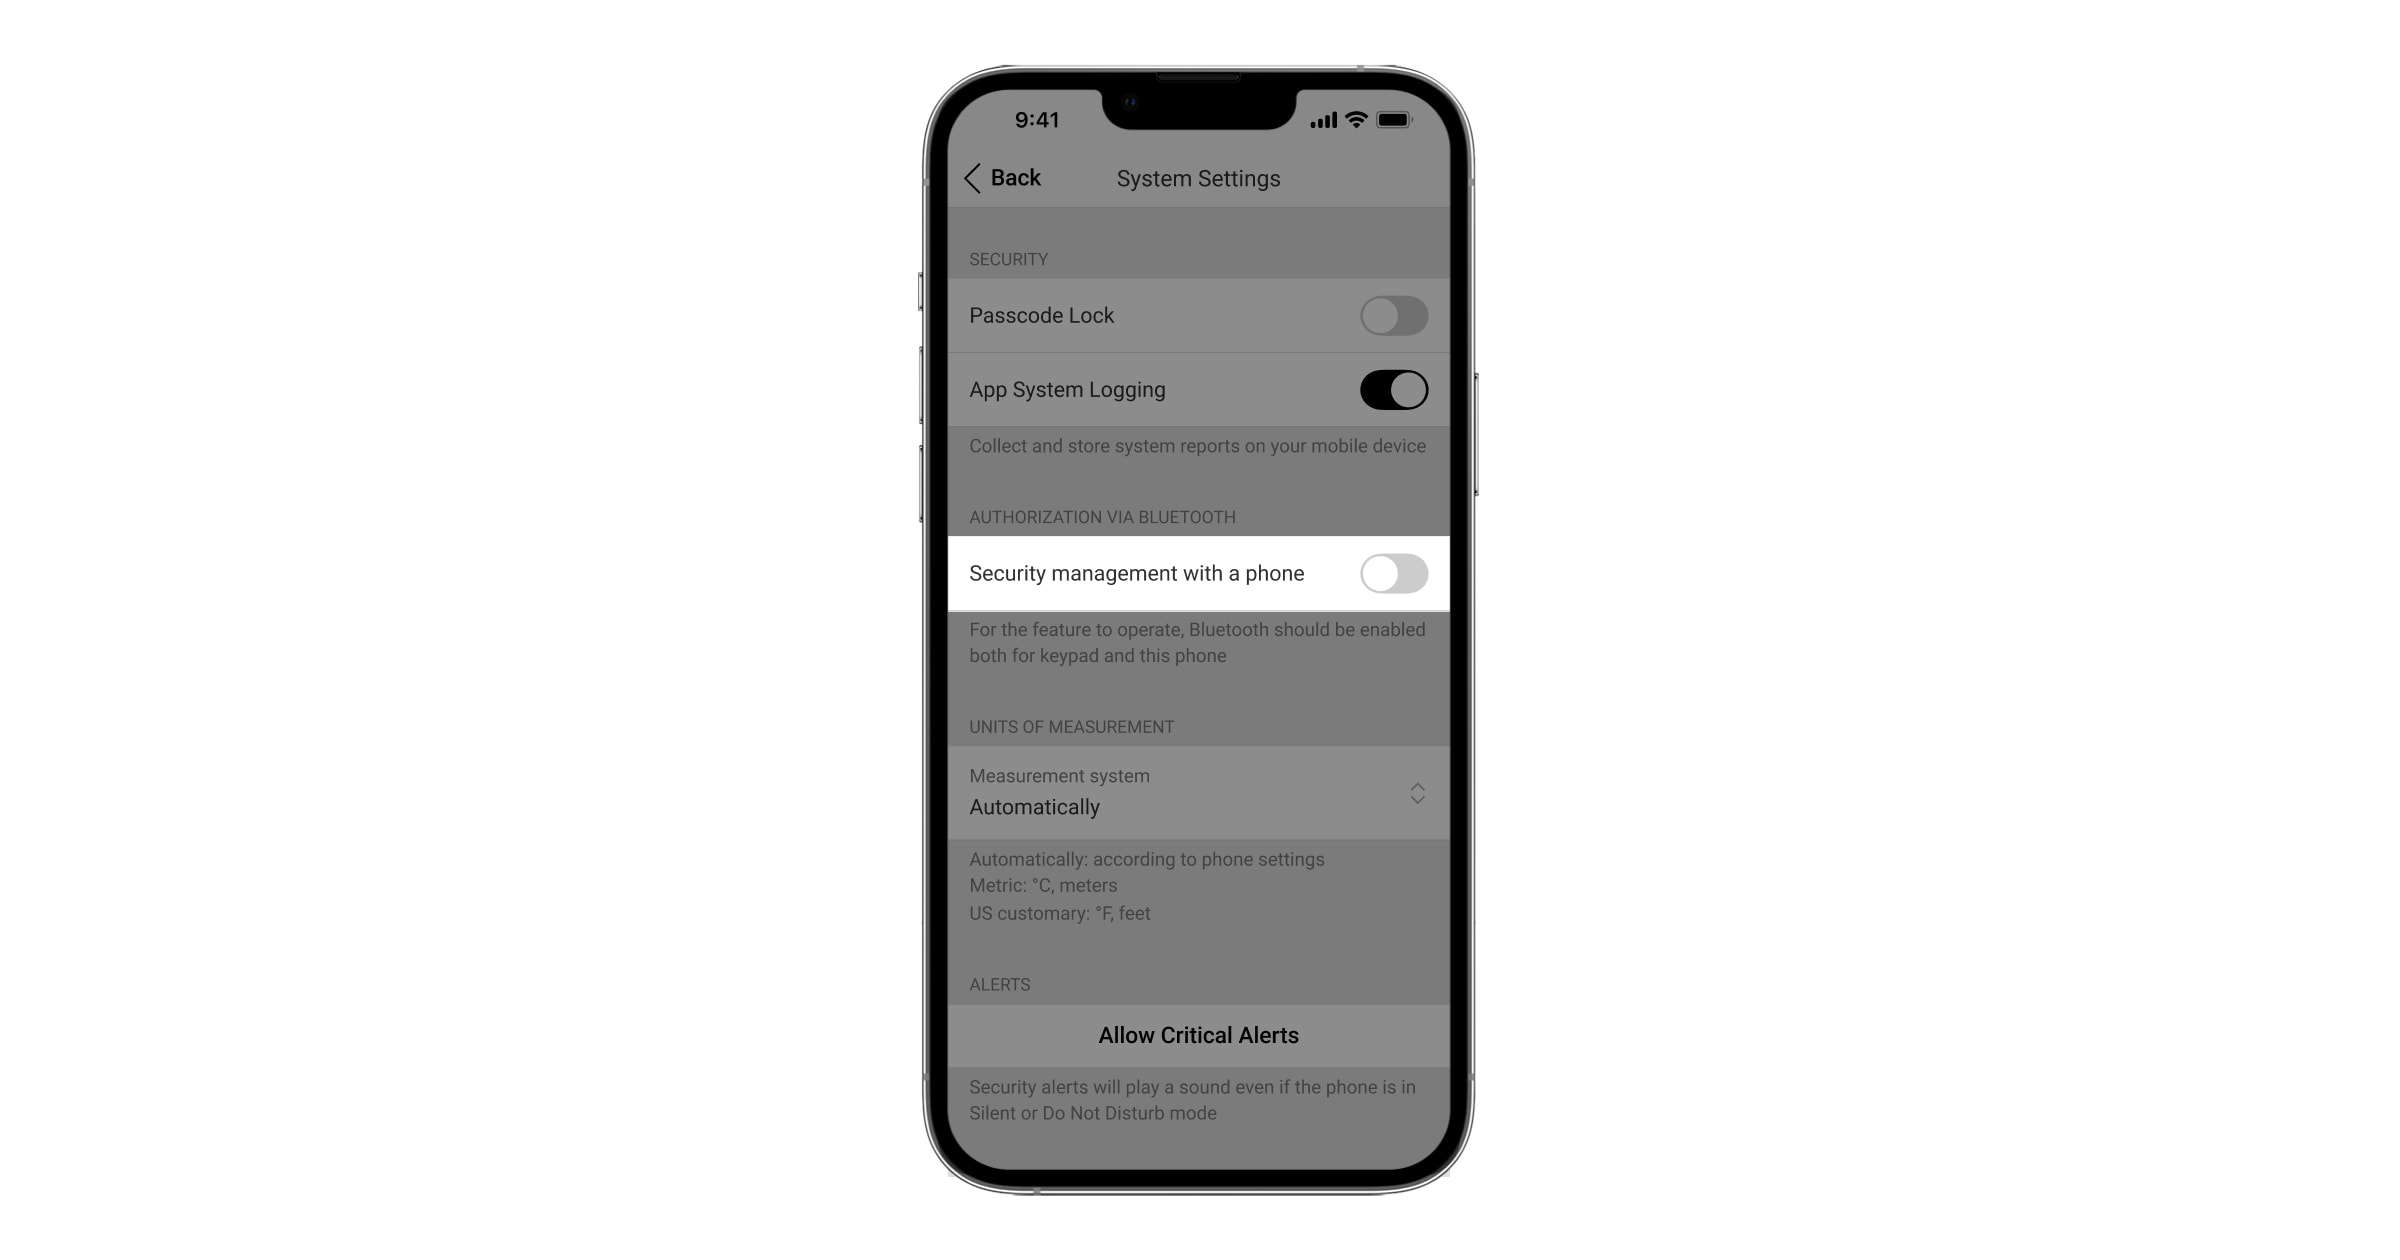
Uygulamada Bluetooth kimlik doğrulamasını etkinleştirmek için
- Superior KeyPad TouchScreen G3 Jeweller’ı hub’a bağlayınız.
- Tuş takımı Bluetooth sensörünü etkinleştiriniz:
Cihazlar
→ Superior KeyPad TouchScreen G3 Jeweller → Ayarlar → Bluetooth geçişini etkinleştiriniz. - Ayarları kaydetmek için Geri‘ye tıklayınız.
Bluetooth kimlik doğrulamasını ayarlamak için
- Ajax Security System uygulamasını açınız ve Bluetooth kimlik doğrulaması etkinleştirilmiş Superior KeyPad TouchScreen G3 Jeweller’ın eklendiği hub’ı seçiniz. Varsayılan olarak, Bluetooth ile kimlik doğrulama bu tür bir sistemin tüm kullanıcıları tarafından kullanılabilir.
Belirli kullanıcıların Bluetooth kimlik doğrulamasını kullanmasını engellemek için:
- Cihazlar
 sekmesinde hub’ı seçiniz ve ayarlarına gidiniz
  .
. - Kullanıcılar menüsünü açınız ve listeden gerekli kullanıcıyı seçiniz.
- İzinler bölümünde, Bluetooth üzerinden güvenlik yönetimi seçeneğini devre dışı bırakınız.
- Cihazlar
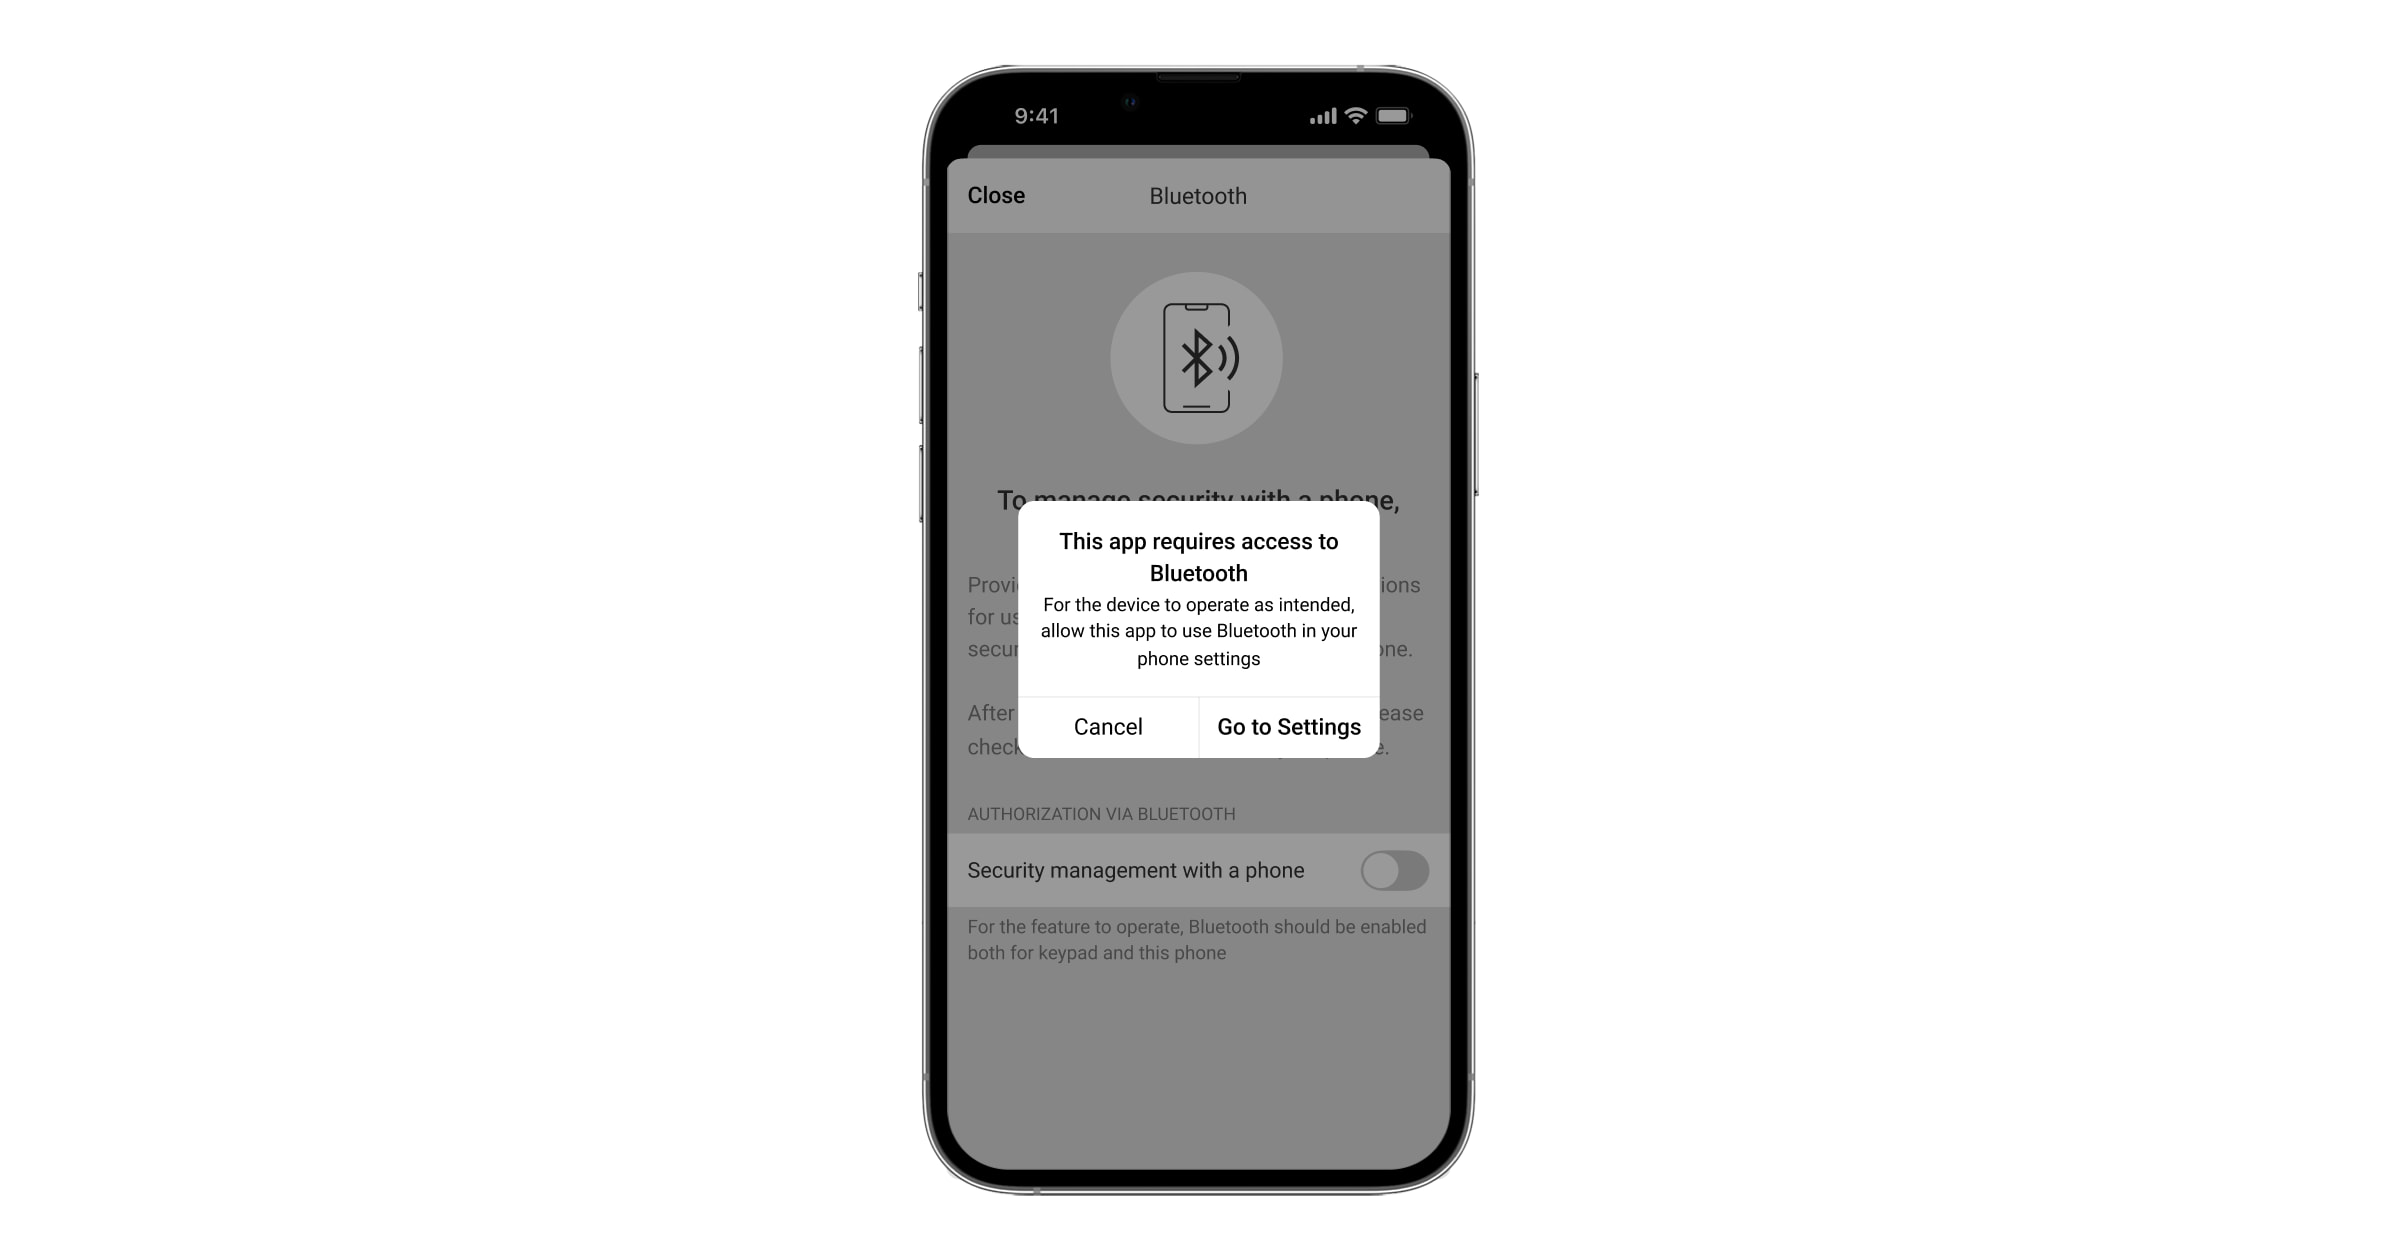
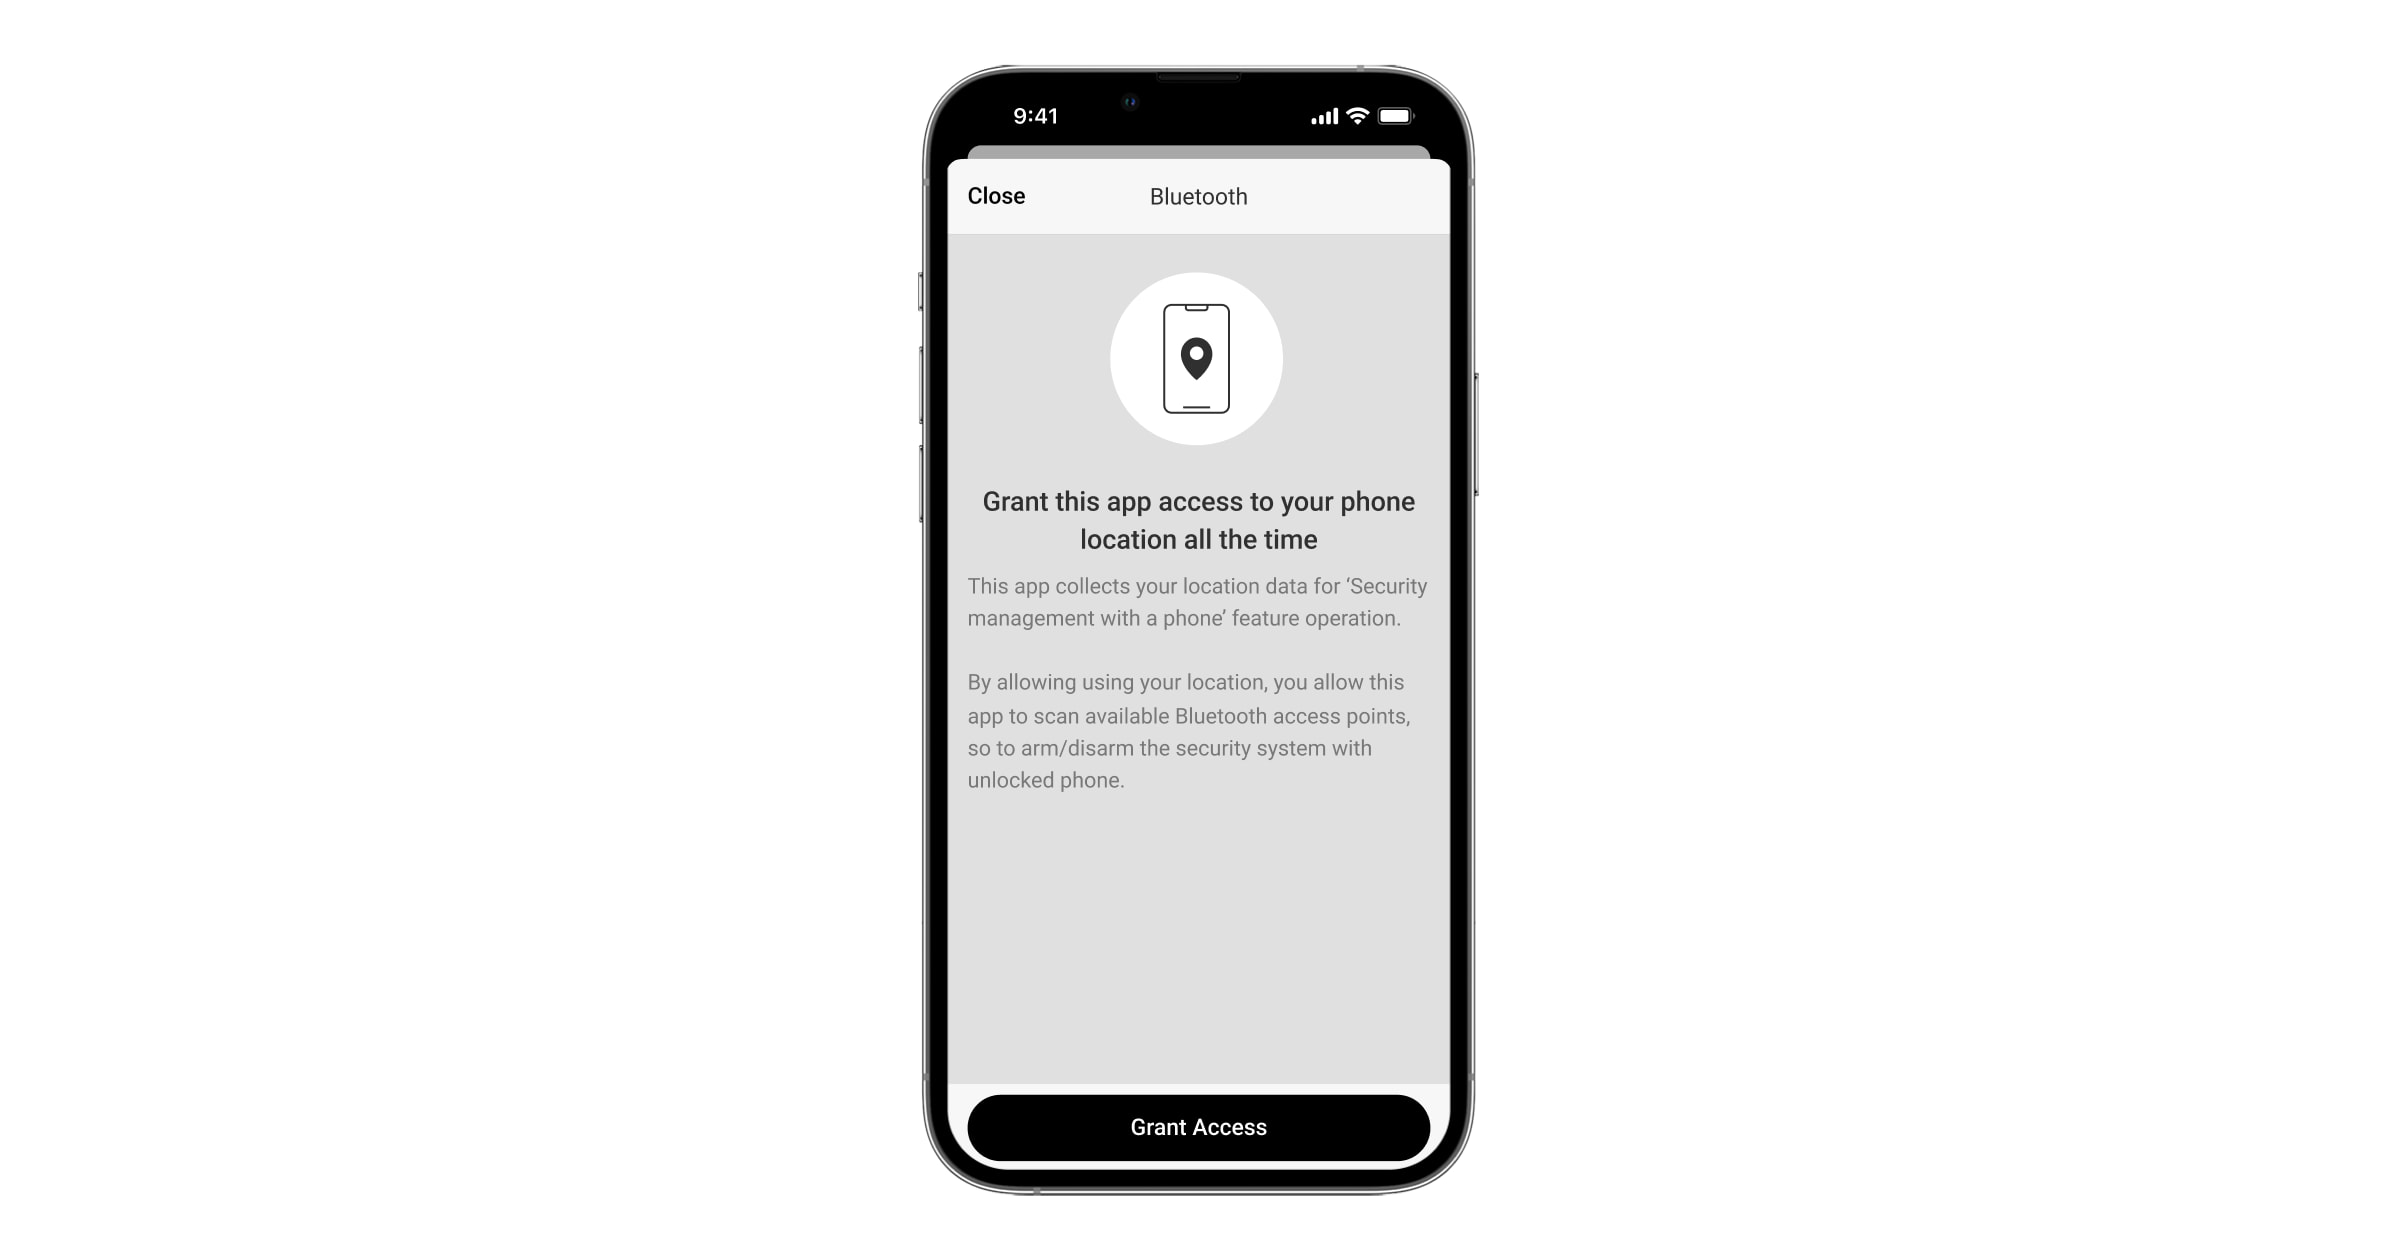
- Daha önce izin verilmemişse Ajax Security System uygulamasının Bluetooth kullanmasına izin veriniz. Bu durumda,
 uyarısı Superior KeyPad TouchScreen G3 Jeweller Durumlarında görüntülenir.
  sembolüne basıldığında ne yapılacağına ilişkin açıklamaların yer aldığı pencere açılır. Açılan pencerenin altındaki Bir telefon ile güvenlik yönetimi seçeneğini etkinleştiriniz.
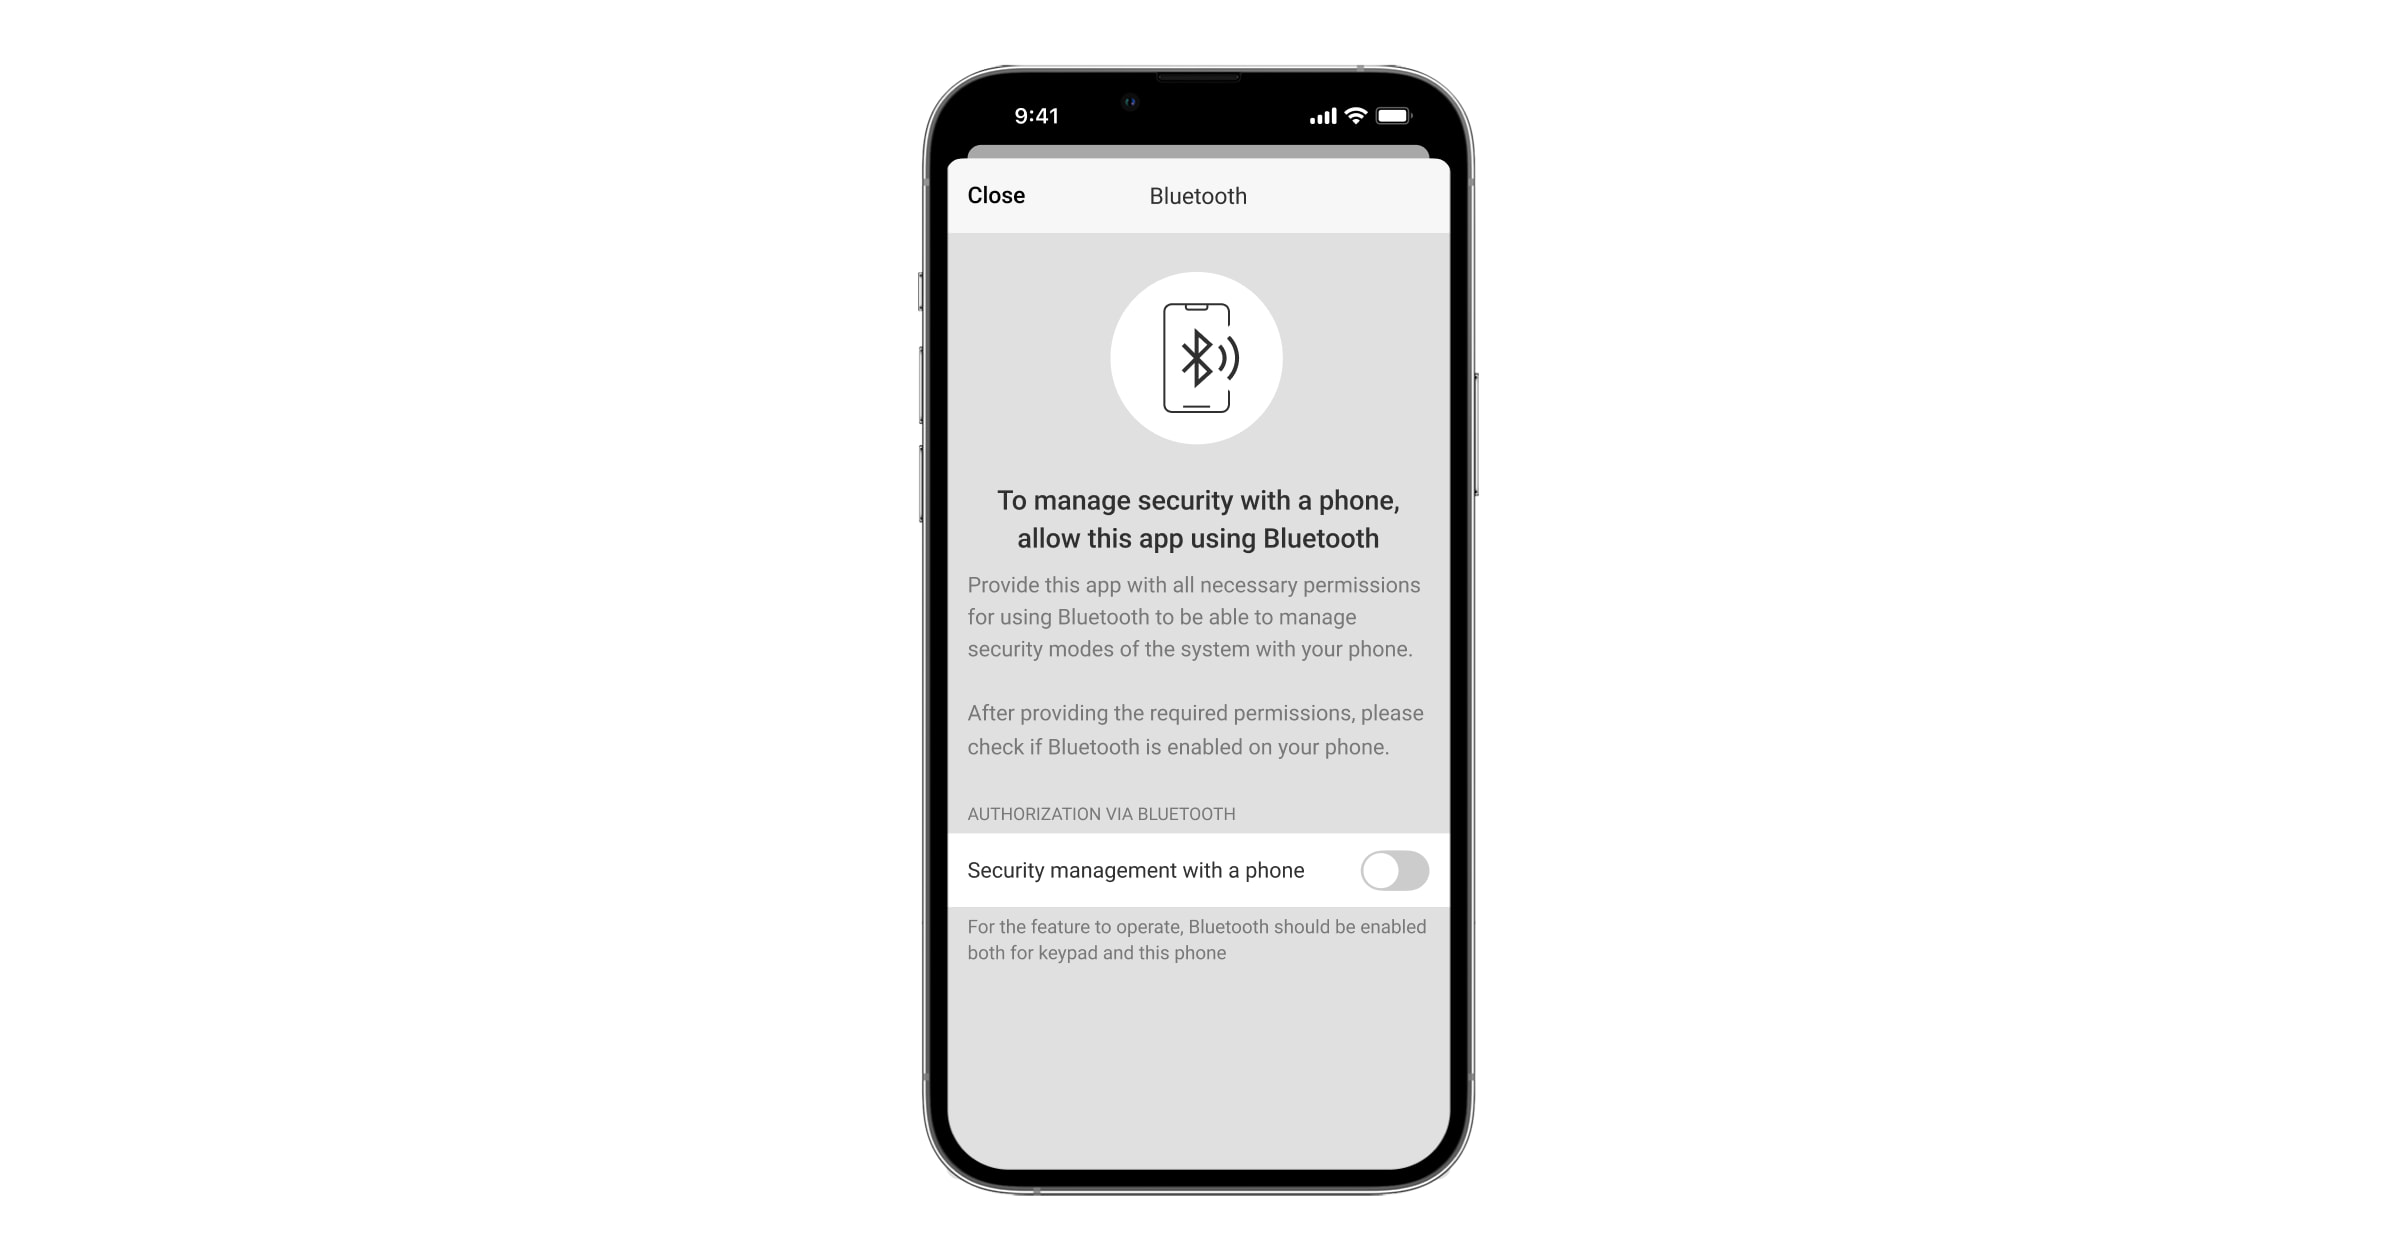
Uygulamaya yakındaki cihazları bulma ve bunlara bağlanma izni veriniz. Açılan pencereler Android ve iOS akıllı telefonlar için farklı olabilir.
Ayrıca, Bir telefon ile güvenlik yönetimi seçeneği uygulama ayarlarından da etkinleştirilebilir:
- Ekranın sol üst köşesindeki
 simgesine tıklayınız, Uygulama ayarları menüsünü seçiniz.
 - Sistem ayarları menüsünü açınınız ve Bir telefon ile güvenlik yönetimi geçişini etkinleştiriniz.
- Ekranın sol üst köşesindeki
- Bluetooth kimlik doğrulamasının stabil performans vermesi için Geofence‘i yapılandırmanızı öneririz. uyarısı Superior KeyPad TouchScreen G3 Jeweller Durumlarında, eğer Geofence devre dışı bırakılmışsa ve uygulamaya akıllı telefonun konumunu kullanma izni verilmemişse görünür. sembolüne basıldığında ne yapılacağına ilişkin açıklamaların yer aldığı pencere açılır.
Geofence seçeneği devre dışıysa Bluetooth kimlik doğrulaması kararsız olabilir. Sistem uyku moduna geçerse uygulamayı başlatmanız ve simge durumuna küçültmeniz gerekecektir.
Geofence seçeneği etkinleştirilip yapılandırıldığında Bluetooth üzerinden sistemi daha hızlı kontrol edebilirsiniz. Yapmanız gereken tek şey telefonu kilidini açmak ve tuş takımı sensörüne yaklaştırmaktır.
- Bluetooth üzerinden güvenliği yönetmek için uygulamayı canlı tutun seçeneğini etkinleştiriniz. Bunun için şuraya gidiniz: Cihazlar → Hub → Ayarlar → Geofence.
- Akıllı telefonunuzda Bluetooth’un açık olduğundan emin olunuz. Devre dışıysa, uyarısı tuş takımı Durumlarında görünür. sembolüne basıldığında ne yapılacağına ilişkin açıklamaların yer aldığı pencere açılır.
- Android akıllı telefonlar için uygulama ayarlarında Canlı tutma hizmeti geçişini etkinleştiriniz. Bunun için ekranın sol üst köşesindeki → Uygulama ayarları → Sistem ayarlarına tıklayınız.
Ön yetkilendirme
Özellik etkinleştirildiğinde kontrol paneline ve mevcut sistem durumuna erişim engellenir. Engeli kaldırmak için kullanıcının kimlik doğrulaması yapması gerekir: uygun bir kod girmeli veya kişisel bir erişim cihazını tuş takımına göstermelidir.
Ön yetkilendirme etkinse Şifresiz kurma özelliği tuş takımı ayarlarında kullanılamaz.
İki şekilde kimlik doğrulaması yapabilirsiniz:
- Kontrol sekmesinde. Giriş yaptıktan sonra kullanıcı, sistemin paylaşılan gruplarını görür (Grup modu etkinse). Bunlar tuş takımı ayarlarında belirtilir: Güvenlik yönetimi → Paylaşılan gruplar. Varsayılan olarak sistemdeki tüm gruplar paylaşılır.

- Giriş
 sekmesinde. Giriş yaptıktan sonra kullanıcı, paylaşılan gruplar listesinden gizlenmiş olan kullanılabilir grupları görür.
Tuş takımı ekranı, onunla yapılan son etkileşimden 10 saniye sonra başlangıç ekranına geçer. Superior KeyPad TouchScreen G3 Jeweller ile sistemi kontrol etmek için kodu yeniden giriniz veya kişisel bir erişim cihazını gösteriniz.
- Tuş takımı kodunu veya tuş takımı zorlama kodunu giriniz (gerekirse).
- Tamam‘a basınız.
Örneğin: 1234 → Tamam.
Yanlış girilen numaralar ![]() butonu ile silinebilir.
butonu ile silinebilir.
- Kullanıcı kimliğini giriniz.
 simgesine basınız.
- Kişisel kodu veya kişisel zorlama kodunu (gerekirse) giriniz.
- Tamam‘a basınız.
Örneğin: 4 → ![]() → 1234 → Tamam.
→ 1234 → Tamam.
- Kayıtlı olmayan bir kullanıcının erişim kodunu veya zorlama erişim kodunu (gerekirse) giriniz.
- Tamam‘a basınız.
Örneğin: 1234 → Tamam.
- RRU kodunu giriniz.
- Tamam‘a basınız.
Örneğin: 1234 → Tamam.
Doğrulanmış bir Tag veya Pass’i tuş takımı okuyucusuna gösteriniz. Bu taraf gövde üzerinde ![]() dalga simgeleri ile işaretlenmiştir. Bu bölüm, bir kartın/anahtarlığın sisteme nasıl ekleneceği hakkında bilgi sağlar.
dalga simgeleri ile işaretlenmiştir. Bu bölüm, bir kartın/anahtarlığın sisteme nasıl ekleneceği hakkında bilgi sağlar.
Bluetooth etkin ve ekranı kilidi açık olan doğrulanmış bir akıllı telefonu tuş takımı okuyucusuna gösteriniz. Bu taraf gövde üzerinde dalga ![]() simgeleri ile işaretlenmiştir. Bu bölüm, tuş takımı için Bluetooth ayarlarının nasıl yapılacağı hakkında bilgi sağlar.
simgeleri ile işaretlenmiştir. Bu bölüm, tuş takımı için Bluetooth ayarlarının nasıl yapılacağı hakkında bilgi sağlar.
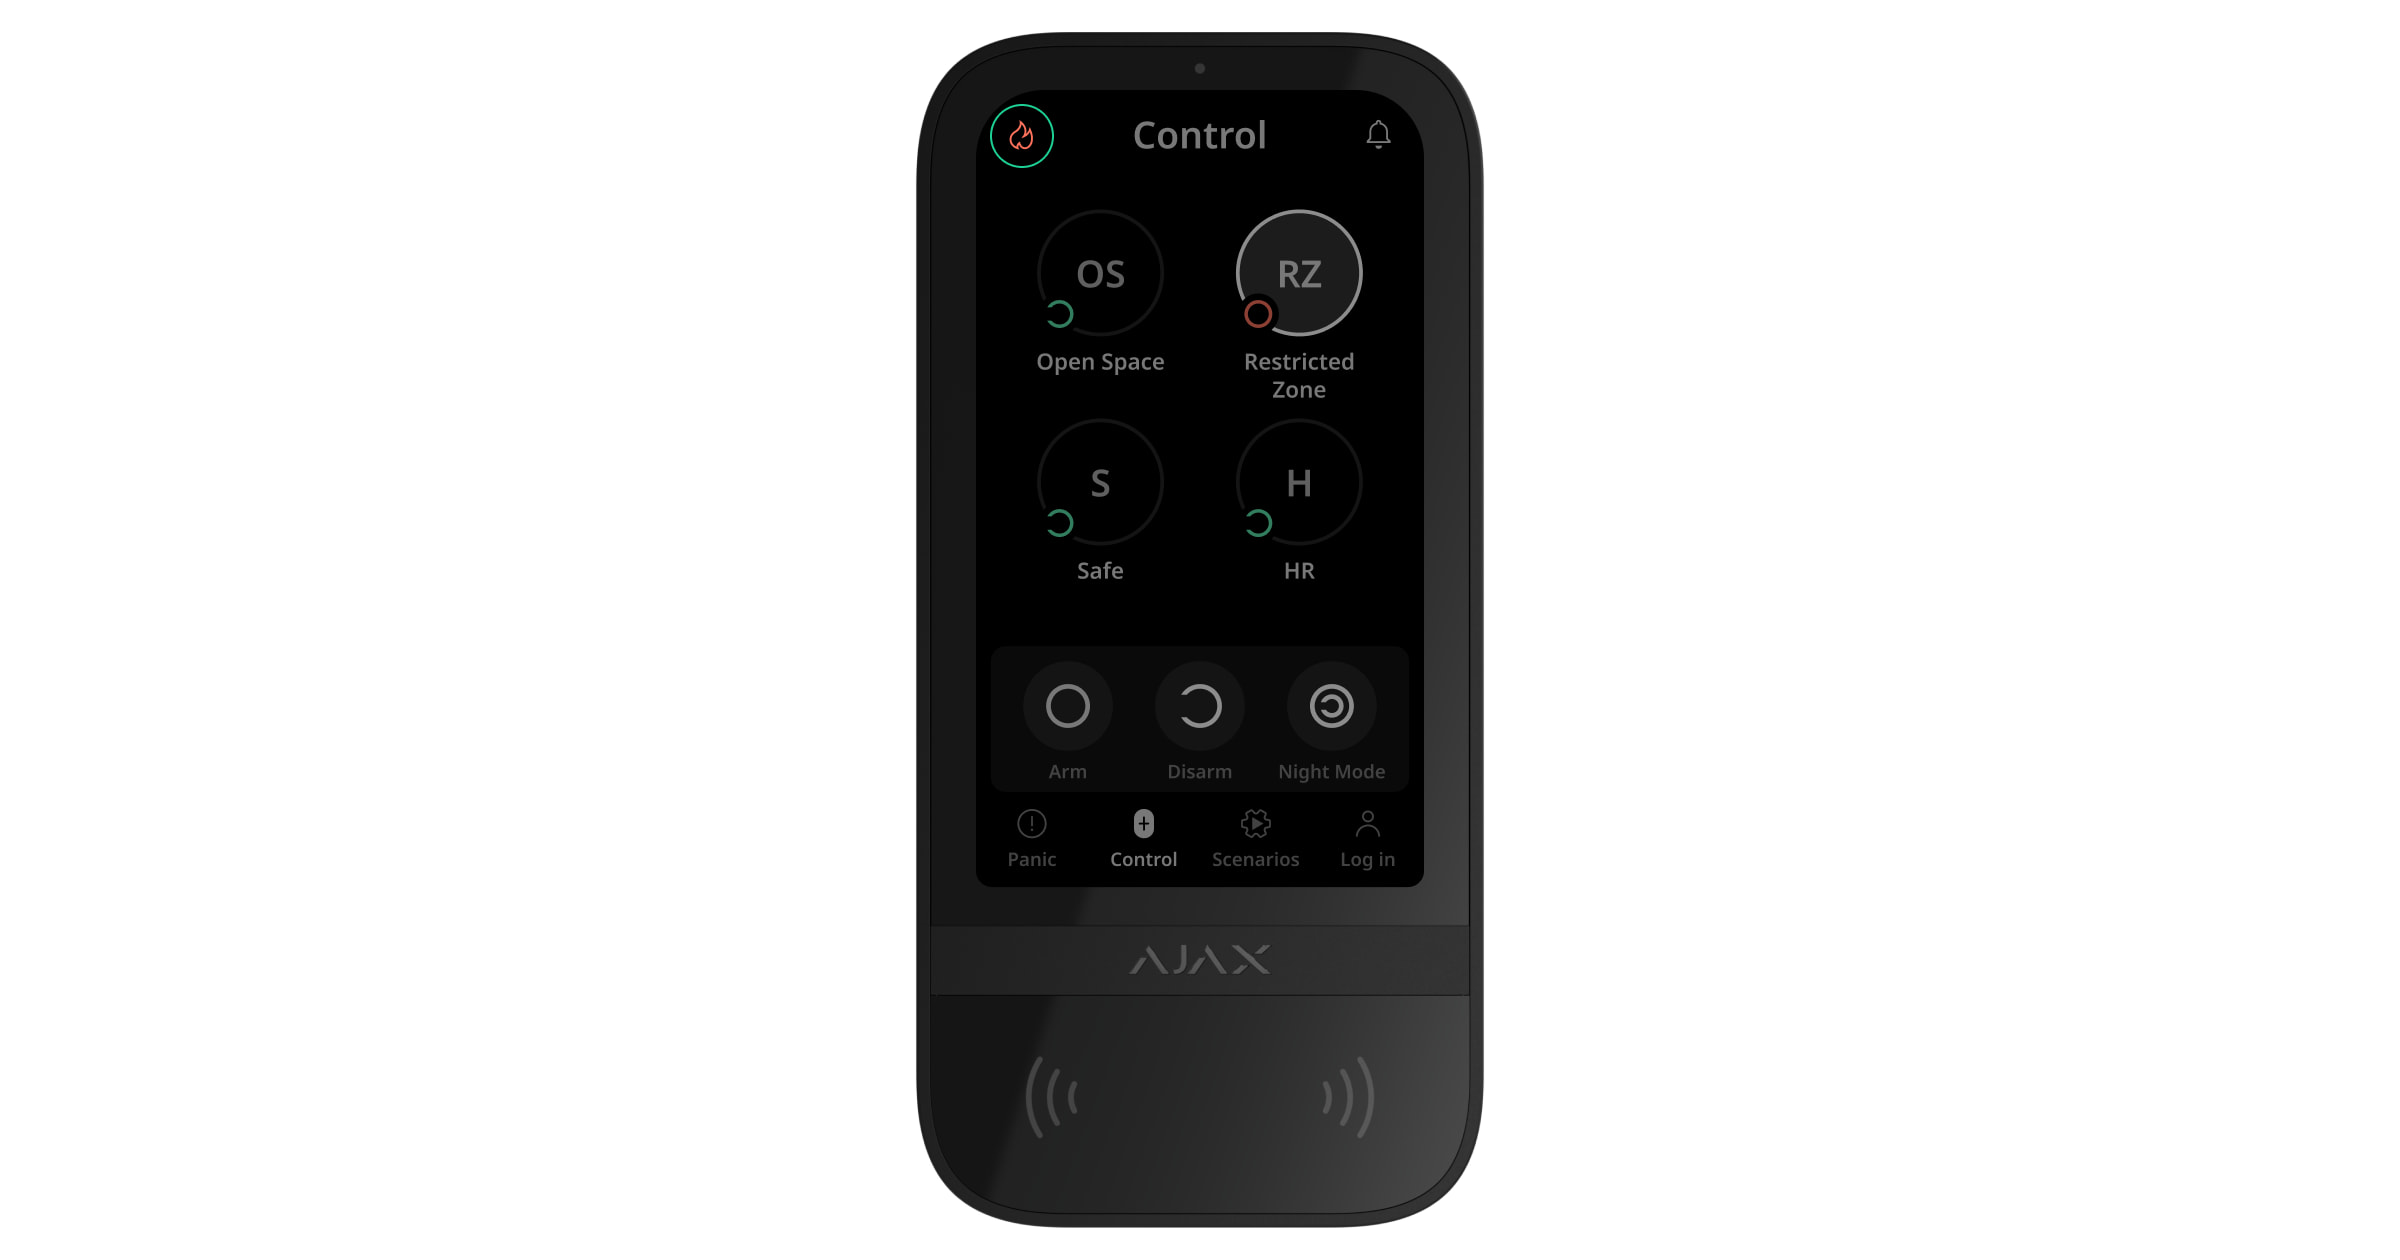
Güvenliği kontrol etme
Kodlar, Tag/Pass veya bir akıllı telefon kullanarak Gece modunu ve tüm sistemin veya ayrı grupların güvenliğini kontrol edebilirsiniz. Sistemi yapılandırma yetkisine sahip kullanıcı veya PRO erişim kodlarını ayarlayabilir. Bu bölümde Tag veya Pass’ın hub’a nasıl eklendiği hakkında bilgiler bulunmaktadır. Bir akıllı telefon ile kontrol etmek için tuş takımı ayarlarında gerekli Bluetooth parametrelerini ayarlayın. Akıllı telefonun Bluetooth ve Konum özelliğini ve ekran kilidini açınız.
Yanlış bir kod girilirse veya doğrulanmamış bir erişim cihazı 1 dakika içinde arka arkaya üç kez gösterilirse Superior KeyPad TouchScreen G3 Jeweller ayarlarda belirtilen süre boyunca kilitlenir. İlgili bildirimler kullanıcılara ve güvenlik şirketinin izleme istasyonuna gönderilir. Sistemi yapılandırma haklarına sahip bir kullanıcı veya PRO, Ajax uygulamalarında Superior KeyPad TouchScreen G3 Jeweller’ın kilidini açabilir.
Grup modu devre dışıysa tuş takımı ekranındaki ilgili bir simge mevcut güvenlik modunu gösterir:
 — Kurulu.
 — Çözülü.
 — Gece modu.
Grup modu etkinse kullanıcılar her grubun güvenlik modunu ayrı ayrı görür. Grup kurulu moddaysa buton çerçevesi beyaz olur ve ![]() simgesi ile işaretlenir. Grup çözülü moddaysa buton çerçevesi gri olur ve
simgesi ile işaretlenir. Grup çözülü moddaysa buton çerçevesi gri olur ve ![]() simgesi ile işaretlenir.
simgesi ile işaretlenir.

Gündüz modundaki grupların butonları tuş takımı ekranında beyaz bir kare ile çerçevelenir.
Kişisel veya erişim kodu, Tag/Pass ya da akıllı telefon kullanılırsa güvenlik modunu değiştiren kullanıcının adı hub olay akışında ve bildirimler listesinde görüntülenir. Genel bir kod kullanılmışsa, güvenlik modunun değiştirildiği tuş takımının adı görüntülenir.
Güvenlik modunu tuş takımıyla değiştirme adım sırası, Superior KeyPad TouchScreen G3 Jeweller ayarlarında kullanıcı ön yetkilendirmesinin etkinleştirilip etkinleştirilmediğine bağlıdır.
Ön yetkilendirme etkinse
- Tuş takımına yaklaşarak veya elinizi sensörün önünde tutarak tuş takımını etkinleştiriniz. Ön yetkilendirme gerçekleştiriniz.
- Kontrol sekmesinde Kurma / Çözme / Gece modu butonuna basınız.
- Tuş takımına yaklaşarak veya elinizi sensörün önünde tutarak tuş takımını etkinleştiriniz. Ön yetkilendirme gerçekleştiriniz.
- Kontrol sekmesinde kurmak veya çözmek istediğiniz gruplara basınız.
Paylaşılan tuş takımı grupları, Kontrol ![]() sekmesinde kimlik doğrulamasından sonra kullanılabilir olur. Bu durumda tuş takımı ekranındaki Kurma
sekmesinde kimlik doğrulamasından sonra kullanılabilir olur. Bu durumda tuş takımı ekranındaki Kurma ![]() / Çözme
/ Çözme ![]() / Gece modu
/ Gece modu ![]() butonuna basarsanız güvenlik modu yalnızca paylaşılan tuş takımı grupları için değişir.
butonuna basarsanız güvenlik modu yalnızca paylaşılan tuş takımı grupları için değişir.
Kullanıcı için mevcut grupların güvenlik modunu değiştirmek için Giriş ![]() sekmesinde kimlik doğrulaması yapınız.
sekmesinde kimlik doğrulaması yapınız.
Sistemi bir zorlama koduyla çözmek için:
- Tuş takımına yaklaşarak veya elinizi sensörün önünde tutarak tuş takımını etkinleştiriniz. Uygun bir zorlama kodu ile ön yetkilendirme yapınız.
- Kontrol sekmesinde Çözme butonuna basınız.
Ön yetkilendirme devre dışıysa
- Tuş takımına yaklaşarak veya elinizi sensörün önünde tutarak tuş takımını etkinleştiriniz.
- Kontrol sekmesinde Kurma / Çözme / Gece modu butonuna basınız.
- Uygun bir kod giriniz, Tag/Pass veya akıllı telefonu gösteriniz.
- Tuş takımına yaklaşarak veya elinizi sensörün önünde tutarak tuş takımını etkinleştiriniz.
- Kontrol sekmesinde kurmak veya çözmek istediğiniz gruplara basınız.
- Uygun bir kod giriniz, Tag/Pass veya akıllı telefonu gösteriniz.
- Kullanıcı için mevcut grupların güvenlik modunu değiştirmek amacıyla önce Giriş sekmesinde bir kod, Tag/Pass veya akıllı telefon ile kimlik doğrulaması yapınız. Kurmak veya Çözmek istediğiniz gruplara basınız.
Tuş takımı ekranında Kurma ![]() / Çözme
/ Çözme ![]() / Gece modu
/ Gece modu ![]() butonuna basarsanız güvenlik modu görüntülenen tüm gruplar için değişir.
butonuna basarsanız güvenlik modu görüntülenen tüm gruplar için değişir.
Sistemi bir zorlama koduyla çözmek için:
- Tuş takımına yaklaşarak veya elinizi sensörün önünde tutarak tuş takımını etkinleştiriniz.
- Kontrol sekmesinde Çözme butonuna basınız.
- Uygun bir zorlama kodu giriniz.
Kod girme örneği
| Kod | Örnek | Not |
|
Tuş takımı kodu Tuş takımı zorlama kodu |
1234 → OK | Yanlış girilen numaralar |
|
Kullanıcı kodu Kullanıcı zorlama kodu |
2 → |
Önce kullanıcı kimliğini giriniz, Yanlış girilen numaralar |
|
Kayıtlı olmayan kullanıcı kodu Kayıtlı olmayan kullanıcının zorlama kodu |
1234 → OK | Yanlış girilen numaralar |
| RRU Kodu | 1234 → OK | Yanlış girilen numaralar |
Kolay kurulu mod değişimi
Kolay kurulu modu değişimi özelliği, Tag/Pass veya akıllı telefon kullanarak Kurma ![]() veya Çözme
veya Çözme ![]() butonlarıyla onaylamadan güvenlik modunu tersine değiştirmenize olanak tanır. Özelliği etkinleştirmek için tuş takımı ayarlarına gidiniz.
butonlarıyla onaylamadan güvenlik modunu tersine değiştirmenize olanak tanır. Özelliği etkinleştirmek için tuş takımı ayarlarına gidiniz.
Güvenlik modunu tersine değiştirmek için
- Tuş takımına yaklaşarak veya elinizi sensörün önünde tutarak tuş takımını etkinleştiriniz. Gerekirse ön yetkilendirme gerçekleştiriniz.
- Tag/Pass veya akıllı telefon gösteriniz.
İki aşamalı kurma
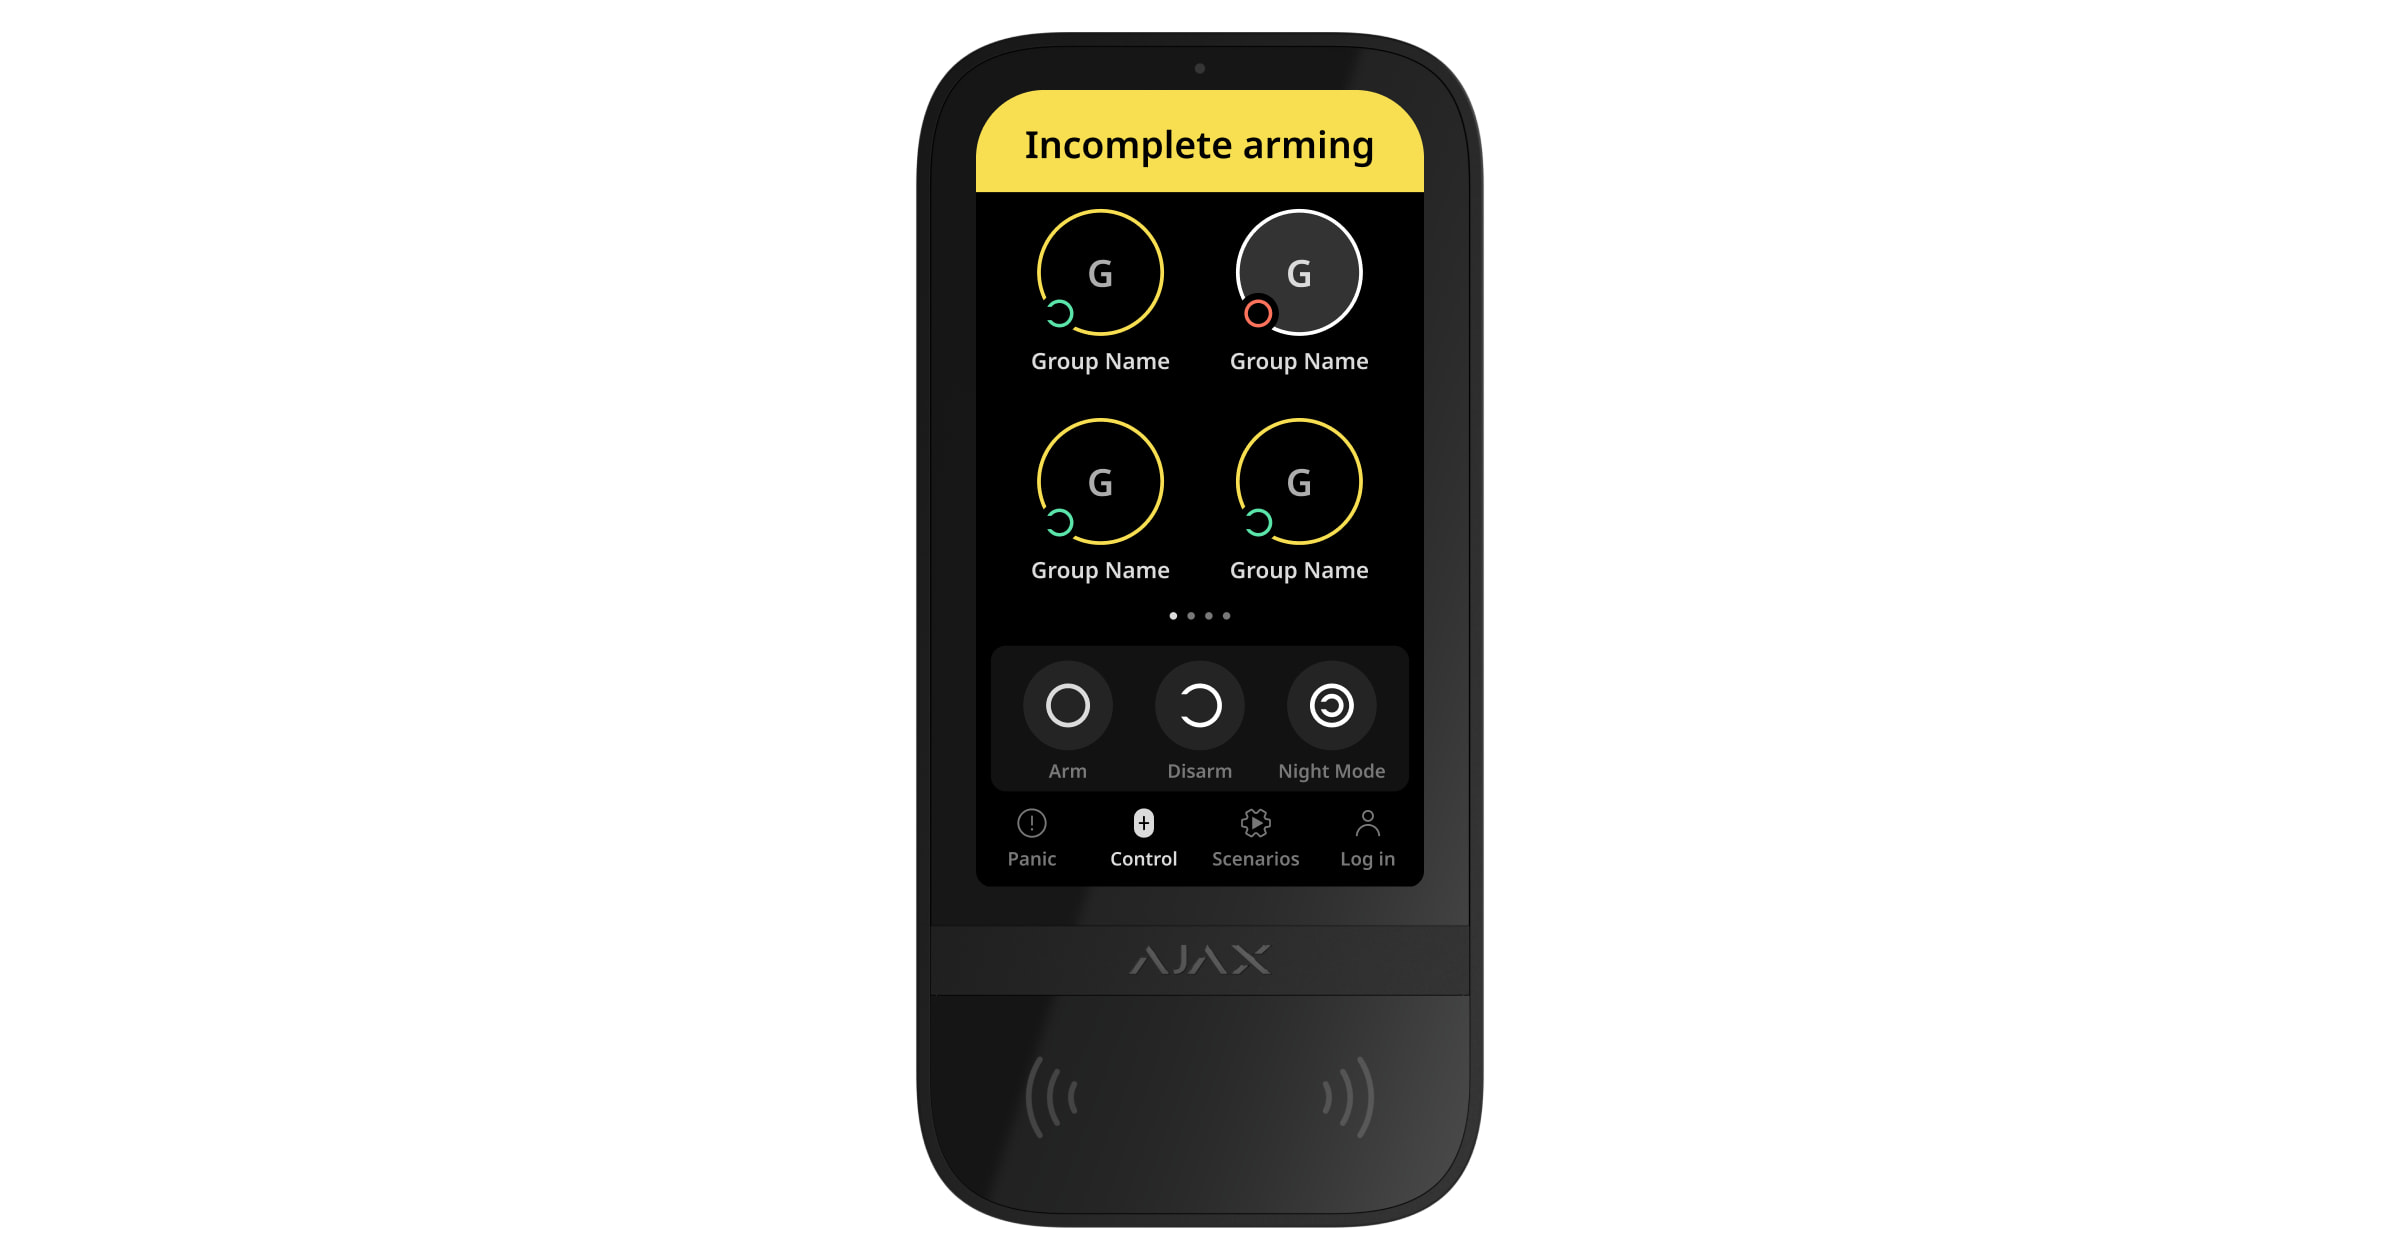
Superior KeyPad TouchScreen G3 Jeweller iki aşamalı kurma işlemine katılabilir, ancak ikinci aşama cihazı olarak kullanılamaz. Tag, Pass veya akıllı telefon kullanarak iki aşamalı kurma işlemi, tuş takımında kişisel veya genel bir kod kullanmaya benzer.
Sistem kullanıcıları, tuş takımı ekranında kurmanın başlatılıp başlatılmadığını veya tamamlanıp tamamlanmadığını görebilir. Grup modu etkinse grup butonlarının rengi mevcut duruma bağlıdır:
- Gri — çözülü, kurma işlemi başlamadı.
- Yeşil — kurma işlemi başladı.
- Sarı — kurma işlemi tamamlanmadı.
- Beyaz — kurulu.
Tuş takımı ile senaryoları yönetme
Superior KeyPad TouchScreen G3 Jeweller, kullanıcıların iki türde altı adede kadar senaryo oluşturmasına olanak tanır. Önceden ayarlanmış eylemle senaryo türü, bir veya birden fazla otomasyon cihazı ve Ajax WaterStop Jeweller kontrolünü sağlar. Durum değiştirildiğinde senaryo tipi, kullanıcıların tek bir otomasyon cihazının veya Ajax WaterStop Jeweller durumunu tuş takımının Senaryolar sekmesinden değiştirmesine olanak tanır.
OS Malevich 2.38‘den itibaren sistem, hangi yetkili kullanıcının, tuş takımından bir otomasyon senaryosu başlattığını kaydeder. Bu bilgi, hub olay akışında görüntülenir.
- Bir Ajax uygulaması açınız. En az bir Superior KeyPad TouchScreen G3 Jeweller ve otomasyon cihazı bulunan space’i seçiniz. Gerekirse bir tane ekleyiniz.
- Cihazlar sekmesine gidiniz.
- Listeden Superior KeyPad TouchScreen G3 Jeweller’ı seçiniz ve Ayarlar menüsüne gidiniz.
- Otomasyon senaryoları menüsüne gidiniz. Senaryo Yönetimi seçeneğini etkinleştiriniz.
- Tuş takımı senaryoları menüsünü açınız.
- Senaryo ekle‘ye basınız.
- Önceden ayarlanmış eylemle senaryo türünü seçiniz.
- Bir veya daha fazla otomasyon cihazı seçiniz. Sonraki‘ye basınız.
- Ad alanına senaryo adını giriniz.
- Senaryo yürütme sırasında tercih edilen cihaz eylemini seçiniz.
- Kaydet‘e basınız.
- Otomasyon senaryoları menüsüne dönmek için Geri‘ye basınız.
- Gerekirse Ön yetkilendirme geçişini etkinleştiriniz.
Oluşturulan senaryolar uygulamada görüntülenir: Superior KeyPad TouchScreen G3 Jeweller → Ayarlar ![]() → Otomasyon senaryoları → Tuş takımı senaryoları. İstediğiniz zaman bunları kapatabilir, ayarlarını değiştirebilir veya silebilirsiniz.
→ Otomasyon senaryoları → Tuş takımı senaryoları. İstediğiniz zaman bunları kapatabilir, ayarlarını değiştirebilir veya silebilirsiniz.
Bir senaryoyu kaldırmak için:
- Superior KeyPad TouchScreen G3 Jeweller’ın Ayarlar‘a gidiniz.
- Otomasyon senaryoları → Tuş takımı senaryoları menüsünü açınız.
- Kaldırmak istediğiniz senaryoyu seçiniz.
- Sonraki‘ye basınız.
- Senaryoyu sil‘e basınız.
Ön yetkilendirme özelliği etkinleştirildiğinde kullanıcı, kimlik doğrulamasından sonra otomasyon senaryolarını görebilir ve yönetebilir. Senaryolar ![]() sekmesine gidiniz, kodu giriniz veya tuş takımına kişisel bir erişim cihazı gösteriniz.
sekmesine gidiniz, kodu giriniz veya tuş takımına kişisel bir erişim cihazı gösteriniz.
Senaryoyu çalıştırmak için Senaryolar ![]() sekmesinde uygun butona basınız.
sekmesinde uygun butona basınız.
Superior KeyPad TouchScreen G3 Jeweller ekranı, tuş takımı ayarlarında yalnızca etkinleştirilmiş senaryoları gösterir.
Gösterge
Superior KeyPad TouchScreen G3 Jeweller, kullanıcıları alarmlar, giriş/çıkış gecikmeleri, mevcut güvenlik modu, arızalar ve diğer sistem durumları hakkında şunlarla bilgilendirir:
- ekran;
- lED göstergeli logo;
- yerleşik sesli uyarı (buzzer).
Superior KeyPad TouchScreen G3 Jeweller göstergesi yalnızca aktif olduğunda ekranda gösterilir. Kontrol ![]() sekmesinin üst kısmında bazı sistem veya tuş takımı durumlarını gösteren simgeler görüntülenir. Örneğin, bunlar yangın alarmını, alarm sonrası sistemin geri yüklenmesini ve açılışta zil sesini gösterebilir. Güvenlik modu hakkında bilgiler; anahtarlık, başka bir tuş takımı veya uygulama gibi başka bir cihaz tarafından değiştirilse bile güncellenecektir.
sekmesinin üst kısmında bazı sistem veya tuş takımı durumlarını gösteren simgeler görüntülenir. Örneğin, bunlar yangın alarmını, alarm sonrası sistemin geri yüklenmesini ve açılışta zil sesini gösterebilir. Güvenlik modu hakkında bilgiler; anahtarlık, başka bir tuş takımı veya uygulama gibi başka bir cihaz tarafından değiştirilse bile güncellenecektir.
| Olay | Gösterge | Not |
| Alarm | Yerleşik sesli uyarı akustik bir sinyal verir. |
Sistemde alarm algılanırsa tuş takımı sesli uyarısını etkinleştir geçişi etkinse. Akustik sinyalin süresi tuş takımı ayarlarına bağlıdır. |
| Kurulu sistemde bir alarm algılandı | LED gösterge, sistem çözülene kadar yaklaşık her 3 sn’de iki kez yanıp söner. |
Etkinleştirmek için Alarm sonrası göstergeyi hub ayarlarında etkinleştiriniz. Ayrıca, diğer cihazların alarmları hakkında bilgilendirme için Superior KeyPad TouchScreen G3 Jeweller’ı cihaz olarak belirtiniz. Gösterge, yerleşik sesli uyarı alarm sinyalini tamamladıktan sonra yanar. |
| Cihazın açılması / Güncellenmiş sistem yapılandırmasının tuş takımına yüklenmesi | Veriler yüklenirken ekranda uygun bir bildirim gösterilir. | |
| Cihazı kapatma | LED gösterge yaklaşık 1 saniye boyunca yanar, ardından üç kez yanıp söner. | |
| Sistem veya grup kurulu modunda | Yerleşik sesli uyarı kısa bir bip sesi çıkarır. | Kurma/çözme bildirimleri etkinse. |
| Sistem veya grup Gece moduna geçirilir | Yerleşik sesli uyarı kısa bir bip sesi çıkarır. | Gece modu Etkinleştirme/devre dışı bırakma bildirimleri etkinse. |
| Sistem çözülü |
Yerleşik sesli uyarı iki kısa bip sesi çıkarır. Harici güç bağlıysa LED göstergesinin ışığı sürekli yeşil yanar. |
Kurma/çözme bildirimleri etkinse. |
| Sistem kurulu modda |
Harici güç bağlı değilse LED gösterge yaklaşık her 3 sn’de kısa süreli kırmızı renkte yanar. Harici güç bağlıysa LED gösterge sürekli kırmızı renkte yanar. |
Kurulu mod göstergesi etkinse. Tuş takımı uyku moduna geçtiğinde (ekran kapanır) gösterge yanar. |
| Yanlış bir kod girildi |
Ekranda uygun bir bildirim gösterilir. Yerleşik sesli uyarı, kısa bir bip sesi çıkarır (ayarlanmışsa). |
Bip sesinin seviyesi yapılandırılmış butonların ses seviyesine bağlıdır. |
| Kart/anahtarlık eklenirken hata oluşur |
Ekranda uygun bir bildirim gösterilir. LED göstergesi bir kez kırmızı renkte yanar. Yerleşik sesli uyarı uzun bir bip sesi çıkarır. |
Bip sesinin seviyesi yapılandırılmış butonların ses seviyesine bağlıdır. |
| Kart/anahtarlık başarıyla eklendi |
Ekranda uygun bir bildirim gösterilir. Yerleşik sesli uyarı kısa bir bip sesi çıkarır. |
Bip sesinin seviyesi yapılandırılmış butonların ses seviyesine bağlıdır. |
| Düşük pil | Tamper tetiklendiğinde, bir alarm etkinleştirildiğinde veya sistem kurulduğunda ya da çözüldüğünde (gösterge etkinse) LED gösterge yavaşça yanar ve söner. | |
| Tamper tetiklenmesi | LED gösterge 1 saniye boyunca kırmızı renkte yanar. | |
| Jeweller/Wings sinyal gücü testi | LED gösterge test sırasında yeşil renkte yanar. | Tuş takımı ayarlarında uygun bir testi başlattıktan sonra yanar. |
| Aygıt yazılımı güncellemesi | Aygıt yazılımı güncellenirken LED göstergesi periyodik olarak yeşil yanar. | Tuş takımı Durumlarında aygıt yazılımı güncellemesini başlattıktan sonra yanar. |
| Birbirine bağlı yangın alarmını sustur |
Ekranda uygun bir bildirim gösterilir. Yerleşik sesli uyarı akustik bir sinyal verir. |
|
| Tuş takımı devre dışı bırakıldı | Ekranda uygun bir bildirim gösterilir. | Kalıcı veya Tek seferlik devre dışı bırakma tuş takımı ayarları için Tamamen seçeneği seçilirse. |
| Sistem geri yüklemesi gerekir | Alarmdan sonra sistemi geri yüklemek veya geri yükleme isteği göndermek için uygun ekran ekranda görüntülenir. |
Alarm sonrası geri yükleme özelliği sistemde ayarlanmalıdır. Ekran, sistem daha önce bir alarm veya arıza yaşadıysa sistemi kurarken veya sistemi Gece moduna geçirirken görüntülenir. Sistemi yapılandırma yetkisine sahip yönetici veya PRO kullanıcıları sistemi geri yükleyebilir. Diğer kullanıcılar geri yükleme için istek gönderebilir. |
| Giriş/Çıkış gecikmelerinin geri sayımı (Gecikmelerde bip sesi etkinse) |
Gecikmelerde hızlı bip sesi özelliği etkinse LED gösterge ve bip sesleri eş zamanlı olarak yanar. | LED gösterge Giriş gecikmeleri için kırmızı, Çıkış gecikmeleri için yeşil yanar. |
Arızaların sesli bildirimleri
Herhangi bir cihaz çevrimdışıysa veya pil zayıfsa Superior KeyPad TouchScreen G3 Jeweller sistem kullanıcılarını duyulabilir bir sesle bilgilendirebilir. Tuş takımının LED göstergesi de yanıp sönecektir. Arıza bildirimleri olay akışında, SMS metninde veya anlık bildirimde görüntülenecektir.
Arıza sesli bildirimlerini etkinleştirmek için bir Ajax PRO ve Ajax PRO Desktop uygulamasını kullanınız:
- Cihazlar öğesine tıklayınız, hub’ı seçiniz ve ayarlarını açınız :
Servis‘e tıklayınız → Sesler ve uyarılar.
- Geçişleri etkinleştiriniz: Herhangi bir cihazın pili zayıfsa ve Herhangi bir cihaz çevrimdışıysa.
- Ayarları kaydetmek için Geri‘ye tıklayınız.
| Olay | Gösterge | Not |
| Herhangi bir cihaz çevrimdışıysa |
İki kısa ses sinyali, LED gösterge iki kez yanıp söner. Sesli uyarı, sistemdeki tüm cihazlar çevrimiçi olana kadar dakikada bir kez çalar. |
Kullanıcılar, sesli göstergeleri 12 saatliğine erteleyebilir. |
| Superior KeyPad TouchScreen G3 Jeweller çevrimdışıysa |
İki kısa ses sinyali, LED gösterge iki kez yanıp söner. Sesli uyarı, sistemdeki tuş takımı çevrimiçi olana kadar dakikada bir kez çalar. |
Ses göstergesi gecikmesi mümkün değildir. |
| Herhangi bir cihazın pili zayıfsa |
Üç kısa ses sinyali, LED gösterge üç kez yanıp söner. Sesli uyarı, pil geri yüklenene veya cihaz çıkarılana kadar dakikada bir kez çalar. |
Kullanıcılar, sesli göstergeleri 4 saatliğine erteleyebilir. |
Tuş takımı göstergesi tamamlandığında arızaların sesli bildirimleri ortaya çıkar. Sistemde birden fazla arıza meydana gelirse tuş takımı ilk olarak cihaz ile hub arasındaki bağlantının kesildiğini bildirecektir.
İşlevsellik testi
Ajax sistemi, cihazlar için doğru kurulum yerinin seçilmesine yardımcı olmak üzere çeşitli test türleri sunar. Testler hemen başlamaz. Ancak bekleme süresi, bir “hub—cihaz” yoklama aralığı süresini aşmaz. Yoklama aralığı hub ayarlarında kontrol edilebilir ve yapılandırılabilir (Hub → Ayarlar ![]() → Jeweller veya Jeweller/Fibra).
→ Jeweller veya Jeweller/Fibra).
Ajax uygulamasında bir test yapmak için:
- Gerekli space’i seçiniz.
- Cihazlar sekmesine gidiniz.
- Listeden Superior KeyPad TouchScreen G3 Jeweller‘ı seçiniz.
- Ayarlar’a gidiniz.
- Bir test seçiniz:
- Testi başlatınız.
Cihaz yerleştirme
Cihaz, sadece iç mekanlarda kullanım için tasarlanmıştır.
Cihaz için bir konum seçerken onun çalışmasını etkileyen parametreleri göz önünde bulundurunuz:
- Jeweller ve Wings sinyal gücü.
- Tuş takımı ile hub veya kapsama alanı genişletici arasındaki mesafe.
- Telsiz sinyallerinin geçişinin önündeki engeller: duvarlar, katlar arası tavanlar, odada bulunan büyük nesneler.
Tesisiniz için bir güvenlik sistemi projesi geliştirirken yerleştirmeyle ilgili önerileri dikkate alınız. Güvenlik sistemi uzmanlar tarafından tasarlanmalı ve kurulmalıdır. Önerilen iş ortaklarının listesine buradan ulaşabilirsiniz.
Superior KeyPad TouchScreen G3 Jeweller, girişe yakın iç mekanda yerleştirilmesi en uygunudur. Bu, giriş gecikmeleri sona ermeden sistemin çözülmesine ve binadan çıkarken sistemin hızlı bir şekilde kurulmasına olanak tanır.
Önerilen kurulum yüksekliği yerden 4.3–4.9 ft arasındadır. Tuş takımını düz, dikey bir yüzeye kurunuz. Bu sayede Superior KeyPad TouchScreen G3 Jeweller yüzeye güvenli bir şekilde takılır ve yanlış tamper alarmlarının önlenmesine yardımcı olunur.
Sinyal gücü
Jeweller ve Wings sinyal gücü, belirli bir süre içinde teslim edilmeyen veya bozulan veri paketlerinin sayısına göre belirlenir. Cihazlar ![]() sekmesindeki simgesi
sekmesindeki simgesi ![]() sinyal gücünü gösterir:
sinyal gücünü gösterir:
- Üç diş — mükemmel sinyal gücü.
- İki diş — iyi sinyal gücü.
- Bir diş — düşük sinyal gücü, stabil çalışma garanti edilmez.
- Çarpı işaretli simge — sinyal yok.
Kurulumu tamamlamadan önce Jeweller ve Wings sinyal gücünü kontrol ediniz. Sinyal gücü bir veya sıfır diş olduğunda, cihazın düzgün çalışacağını garanti etmiyoruz. Cihazın yerini değiştirmeyi düşünün, çünkü 7.9 inch bir konum değişimi bile sinyal gücünü önemli ölçüde artırabilir. Yer değişiminden sonra sinyal hâlâ zayıf veya kararsızsa ReX 2 Jeweller telsiz sinyali kapsama alanı genişletici kullanınız. Superior KeyPad TouchScreen G3 Jeweller, ReX telsiz sinyali kapsama alanı genişleticileriyle uyumlu değildir.
Tuş takımı nerelere kurulmaz
- Dış mekanlara. Bu tuş takımı arızasına yol açabilir.
- Giysi parçalarının (örneğin askının yanına), güç kablolarının veya Ethernet kablosunun tuş takımını engelleyebileceği yerlere. Bu, tuş takımının yanlış tetiklenmesine yol açabilir.
- Sinyalin bloke olmasına veya zayıflamasına neden olan herhangi bir metal nesnenin veya aynanın yakınına veya içine.
- Sıcaklık ve nem koşulları kabul edilebilir sınırların dışında olan binalara. Bu, tuş takımına zarar verebilir.
- Hub’ın veya telsiz sinyali kapsama alanı genişleticinin 3.3 ft yakınına. Bu, tuş takımıyla iletişimin kesilmesine yol açabilir.
- Sinyal seviyesinin düşük olduğu yerlere. Bu, hub ile olan bağlantının kesilmesine neden olabilir.
- Cam kırılma dedektörlerinin yakınına. Yerleşik sesli uyarı bir alarmı tetikleyebilir.
- Akustik sinyalin zayıflayabileceği yerlere (mobilyaların içine, kalın perdelerin arkasına vb.).
Kurulum
Superior KeyPad TouchScreen G3 Jeweller’ı kurmadan önce en ideal konumu seçtiğinizden ve bu yerin kılavuzda belirtilen gerekliliklere uygun olduğundan emin olunuz.
Bir tuş takımı monte etmek için:
- SmartBracket montaj panelini tuş takımından çıkarınız. Önce tutucu vidayı sökünüz ve paneli aşağı kaydırınız.
- SmartBracket panelini çift taraflı bant kullanarak seçilen kurulum noktasına sabitleyiniz.

Çift taraflı bant sadece geçici kurulum için kullanılabilir. Bantla tutturulan cihaz her an yüzeyden düşebilir. Cihaz bantlı olduğu sürece, tamper koruması cihaz yüzeyden ayrıldığında tetiklenmeyecektir.
SmartBracket, kolay kurulum için iç tarafında işaretlere sahiptir. İki çizginin kesişimi cihazın merkezini gösterir (montaj paneli değil). Tuş takımını kurarken bunları esas alınız.

- Tuş takımını SmartBracket üzerine yerleştiriniz. Cihazın LED göstergesi yanıp sönecektir. Bu, tuş takımının muhafazasının kapalı olduğunu gösteren bir sinyaldir.
SmartBracket üzerine yerleştirirken LED gösterge yanmazsa Ajax uygulamasındaki tamper durumunu, bağlantıların düzgün yapıldığını ve dedektörün panele sıkıca sabitlendiğini kontrol ediniz.
-
Jeweller ve Wings sinyal gücü testlerini çalıştırınız. Önerilen sinyal gücü iki veya üç diştir. Sinyal gücü düşükse (tek diş), cihazın düzgün çalışacağını garanti etmiyoruz. Cihazın yerini değiştirmeyi düşününüz, çünkü 7.9 inch bir konum değişimi bile sinyal gücünü önemli ölçüde artırabilir. Yer değişiminden sonra sinyal hâlâ zayıf veya kararsızsa ReX 2 Jeweller telsiz sinyali kapsama alanı genişletici kullanınız.
- Sinyal zayıflatma testini çalıştırınız. Test sırasında montaj yerindeki farklı koşulları simüle etmek için sinyal gücü azaltılabilir ve artırılabilir. Kurulum yeri doğru seçilirse tuş takımı 2–3 diş seviyesinde istikrarlı bir sinyal gücüne sahip olur.
- Testler başarıyla geçilirse, tuş takımını SmartBracket’tan çıkarınız.
- SmartBracket montaj panelini birlikte verilen vidalarla yüzeye sabitleyiniz. Tüm sabitleme noktalarını kullanınız.
Başka tutturucular kullanırken bunların paneli zedelemediğinden veya kırmadığından emin olunuz.
- Tuş takımını SmartBracket montaj paneline yerleştiriniz.
- Tuş takımının muhafazasının altındaki tutucu vidayı sıkınız. Bu vida, tuş takımının daha sağlam bir şekilde sabitlenmesi ve hızlıca sökülmeye karşı korunması için gereklidir.

Üçüncü taraf bir güç kaynağı ünitesi bağlama
Üçüncü taraf bir güç kaynağı ünitesini bağlama ve Superior KeyPad TouchScreen G3 Jeweller’ı kullanma esnasında elektrikli cihazların kullanımına ilişkin genel elektrik güvenliği kuralları ve talimatları ile elektrik güvenliğine ilişkin yasal düzenlemelere uyunuz.
Superior KeyPad TouchScreen G3 Jeweller, 10.5 V–14 V⎓ güç kaynağı ünitesini bağlamak için terminallerle donatılmıştır. Güç kaynağı için önerilen elektriksel parametreler: 12 V⎓ ve en az 0.5 A akım.
Tuş takımının ekranını sürekli aktif tutmanız ve pilin hızlı boşalmasını önlemeniz gerektiğinde örneğin düşük sıcaklıklı ortamlarda kullanırken harici bir güç kaynağı bağlamanızı öneririz. Tuş takımının aygıt yazılımını güncellemek için de harici bir güç kaynağı gereklidir.
Harici güç bağlandığında, hazır kurulu piller yedek güç kaynağı olarak çalışır. Güç kaynağını bağlarken bunları çıkarmayınız.
Cihazı kurmadan önce kablolarda yalıtım hasarı olup olmadığını kontrol ediniz. Yalnızca topraklanmış bir güç kaynağı kullanınız. Cihazı gerilim altında sökmeyiniz. Hasarlı güç kablosu olan bir cihazı kullanmayınız.
Üçüncü taraf bir güç kaynağı ünitesini bağlamak için:
- SmartBracket montaj panelini çıkarınız. Kablolar için delikleri hazırlamak amacıyla delikli muhafaza parçasını dikkatlice kırınız:
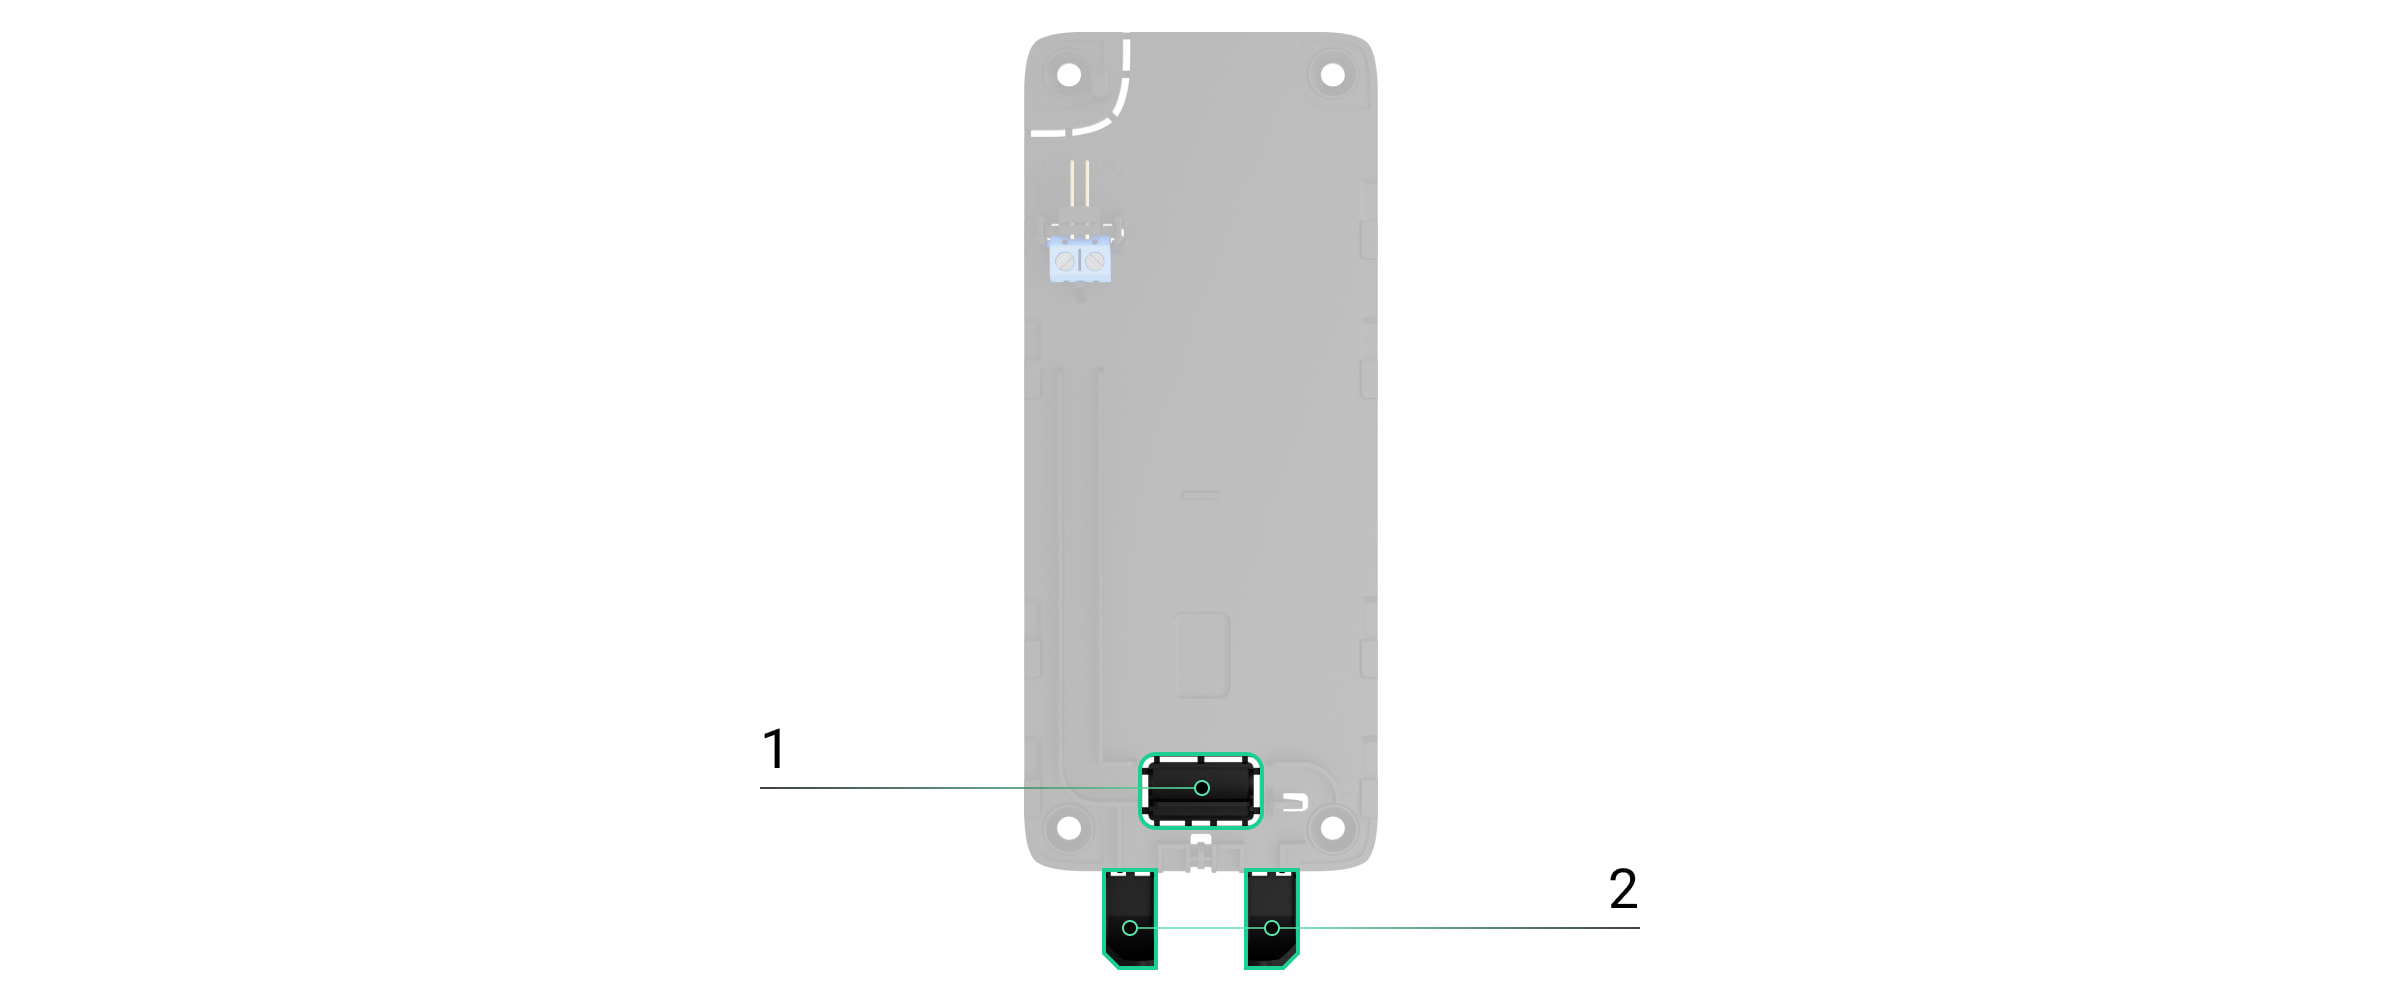
1 — kablonun duvardan geçirilmesi için.
2 — kablonun alttan geçirilmesi için. Delikli parçalardan yalnızca birini kırmak yeterlidir. - Harici güç kaynağı kablosunun enerjisini kesiniz.
- Kabloyu kutuplara dikkat ederek terminallere bağlayınız (plastik üzerinde işaretlenmiştir).
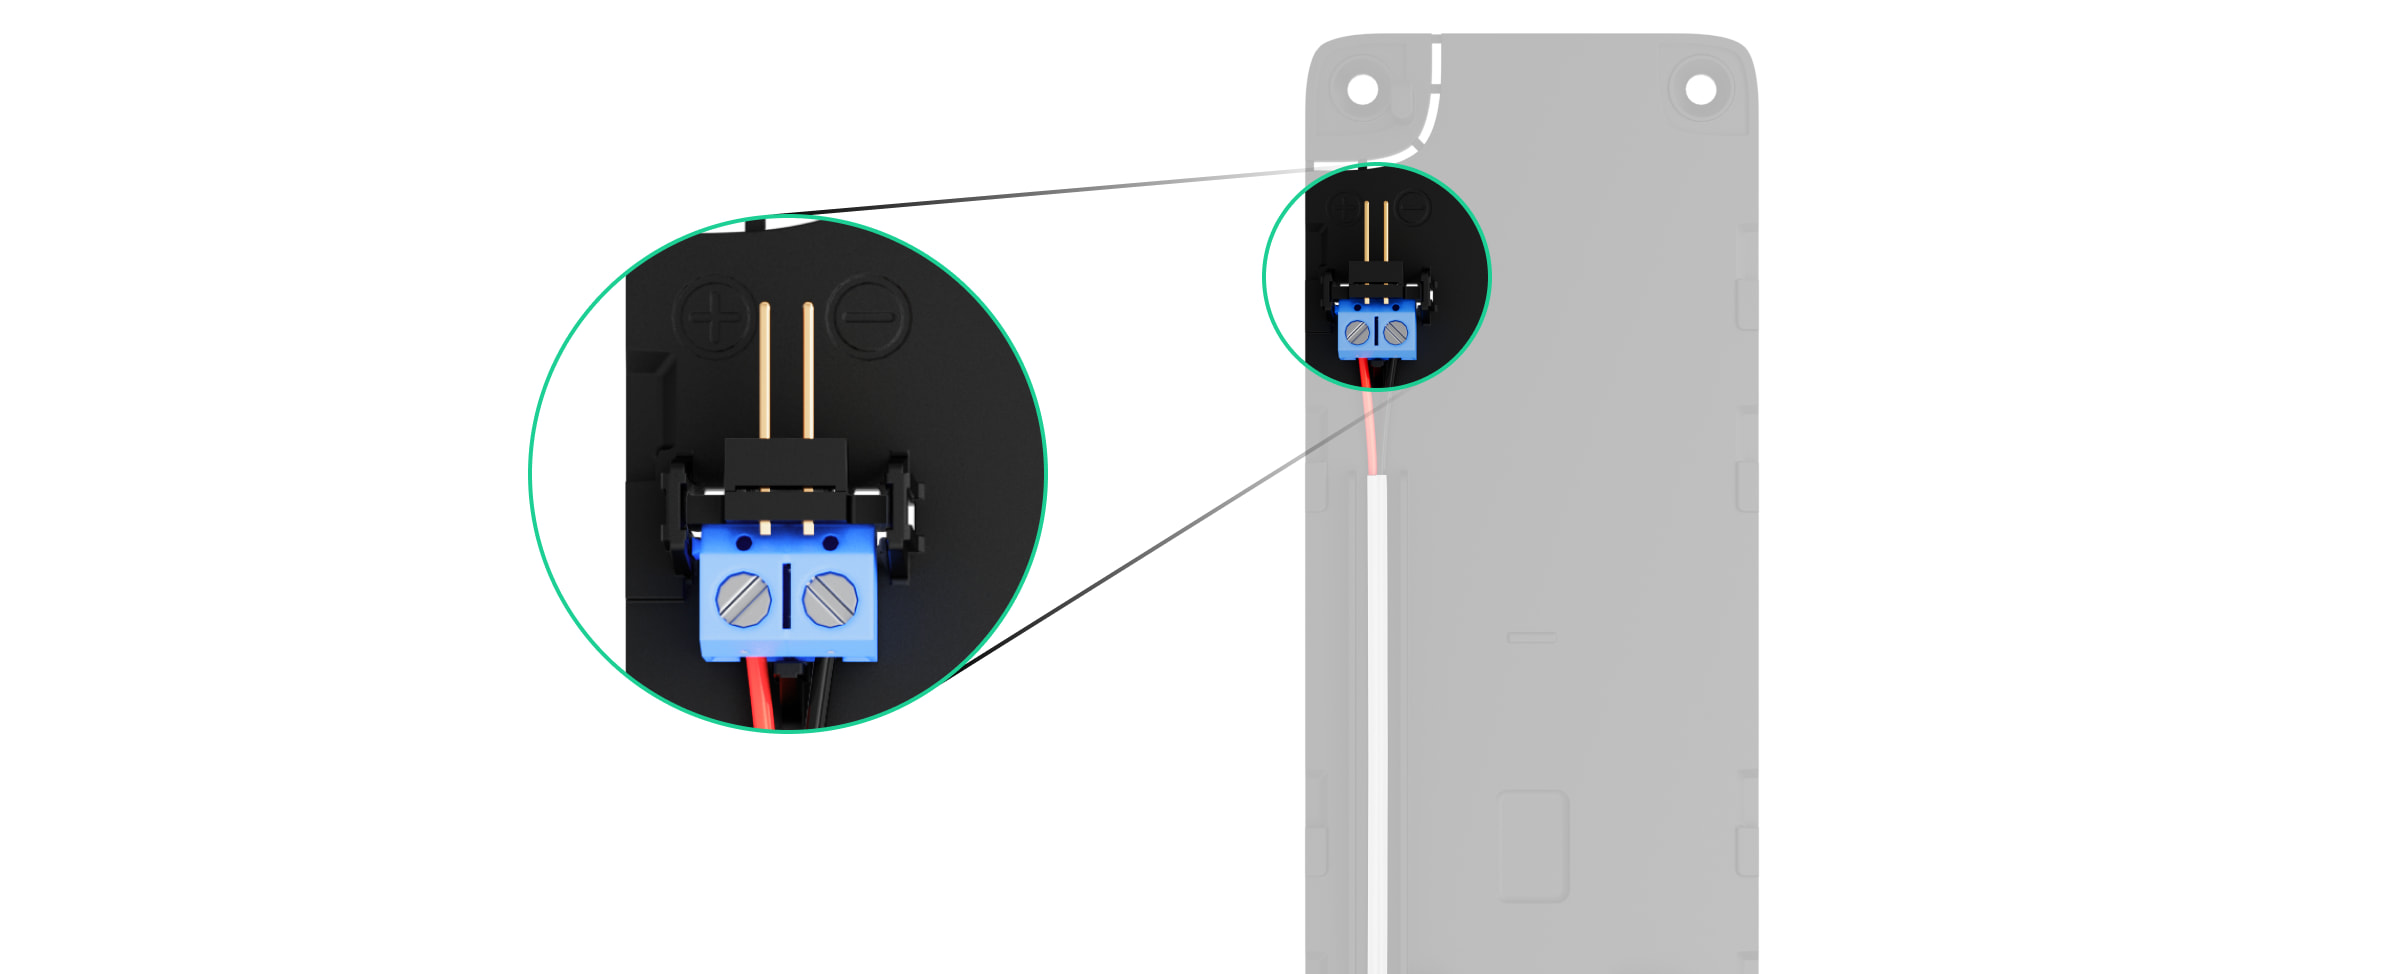
- Kabloyu kablo kanalından yönlendiriniz. Tuş takımının altından kabonun geçirilme örneği:

- Tuş takımını açınız ve montaj paneline yerleştiriniz.
- Pil durumunu, harici gücü ve cihazın genel çalışmasını Ajax uygulamasında kontrol ediniz.
INCERT uyumlu bir sistem için Superior KeyPad TouchScreen G3 Jeweller’a üçüncü taraf bir güç kaynağı ünitesini bağlamayınız.
Bakım
Superior KeyPad TouchScreen G3 Jeweller’ın çalışmasını düzenli olarak kontrol ediniz. İdeal kontrol sıklığı üç ayda birdir. Cihaz muhafazasını toz, örümcek ağı ve diğer maddelerle kirlendikçe temizleyiniz. Ekipman bakımı için uygun yumuşak kuru bir bez kullanınız.
Cihazı temizlemek için alkol, aseton, benzin ve aktif çözücü içeren başka maddeler kullanmayınız. Dokunmatik ekranı nazikçe siliniz.
Cihaz, hazır kurulu pillerle en fazla 1.5 yıl çalışır — bu, varsayılan ayarlara ve tuş takımıyla günde en fazla 4 etkileşime dayalı hesaplanmış bir değerdir.
Pil değiştirme zamanı geldiğinde sistem erken uyarı gönderir. Güvenlik modu değiştirilirken LED gösterge yavaşça yanar ve söner.
Teknik özellikler
Garanti
Limited Liability Company “Ajax Systems Manufacturing” ürünlerinin garantisi satın alındıktan sonra 2 yıl boyunca geçerlidir.
Cihaz düzgün çalışmıyorsa, çoğu durumda teknik sorunlar uzaktan çözülebileceğinden, önce destek servisiyle iletişime geçmenizi öneririz.
Teknik Destek ile iletişime geçin:
“AS Manufacturing” LLC tarafından üretilmiştir
