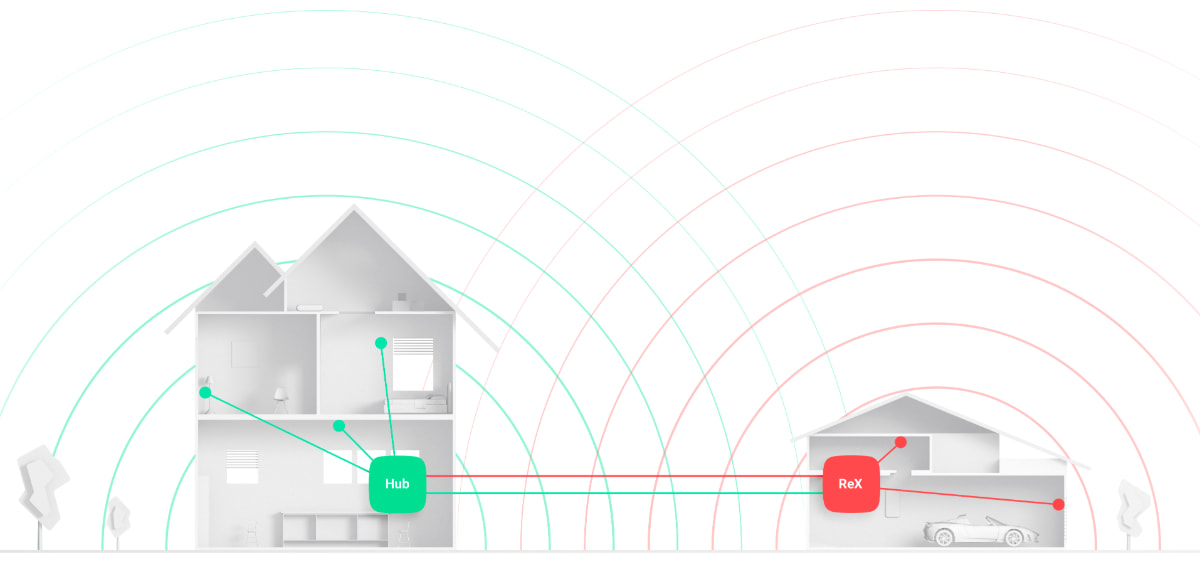
ReX Jeweller, hub ile donatılmış Ajax cihazlarının telsiz iletişim menzilini 2 kata kadar genişleten bir iletişim sinyalleri kapsama alanı genişleticisidir. Sadece iç mekan kullanımı için geliştirilmiştir. Yerleşik bir tamper direncine sahiptir ve harici güç olmadan 35 saate kadar çalışma sağlayan bir pil ile donatılmıştır.
Genişletici sadece Ajax hub‘ları ile uyumludur! uartBridge ve ocBridge Plus ile bağlantı desteği yoktur.
Cihaz, iOS ve Android akıllı telefonlar için mobil uygulama aracılığıyla yapılandırılır. Anlık bildirimler, SMS mesajları ve aramalar (etkinleştirilmişse) ReX Jeweller kullanıcısını tüm olaylar hakkında bilgilendirir.
Ajax sistemi, sahanın bağımsız olarak izlenmesi için kullanılabilir ve güvenlik şirketinin Alarm İzleme Merkezine bağlanabilir.
İşlevsel unsurlar
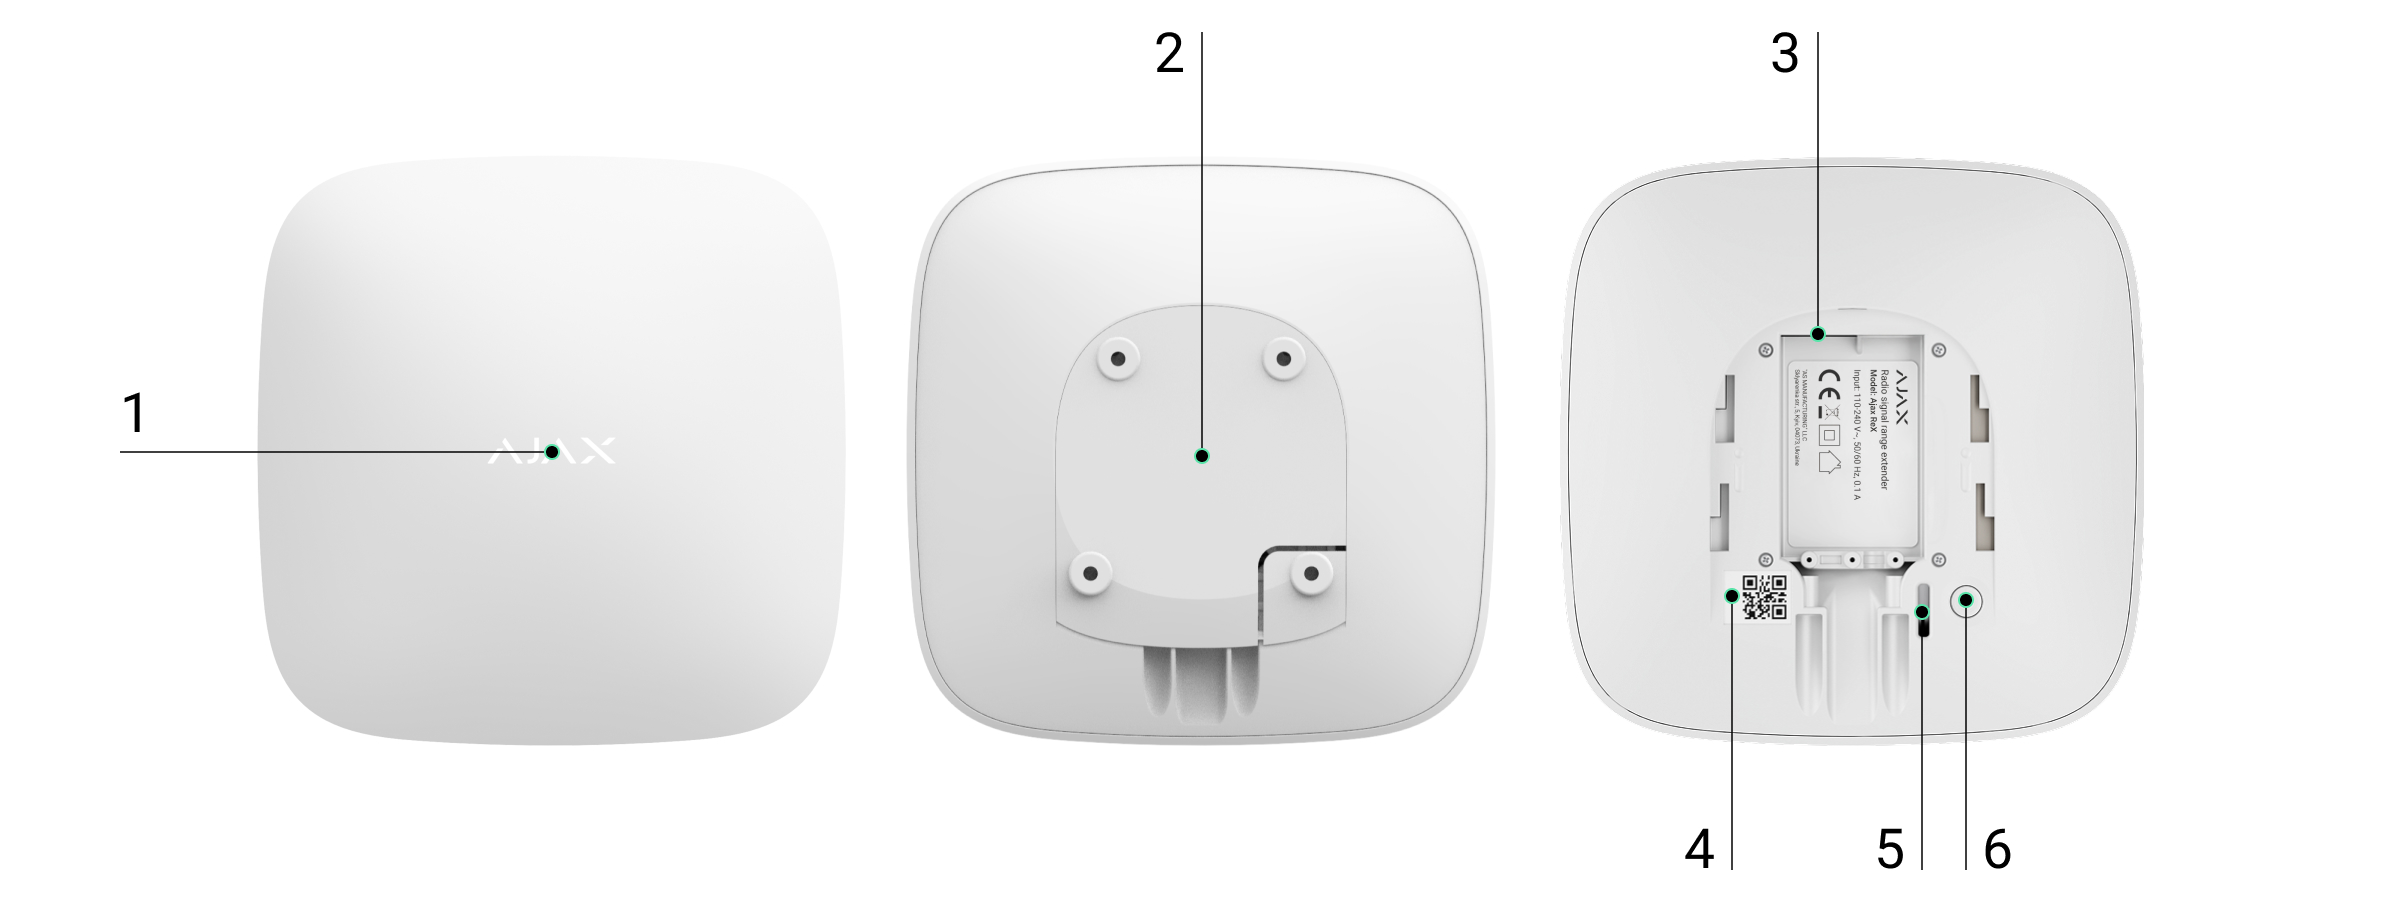
- Işık göstergeli logo
- SmartBracket montaj paneli (delikli bölüm, sabit ReX Jeweller’ı yüzeyden kaldırma girişimi sırasında tamperi tetiklemek için gereklidir)
- Güç konektörü
- QR kodu
- Tamper butonu
- Güç tuşu
Çalışma prensibi
ReX Jeweller, güvenlik sisteminin telsiz iletişim menzilini genişleterek Ajax cihazlarının hub’dan daha uzak bir mesafeye kurulmasına olanak tanır.
ReX Jeweller ile cihaz arasındaki iletişim menzili, cihazın telsiz sinyal menzili ile sınırlıdır (web sitesindeki cihaz özelliklerinde ve Kullanım kılavuzunda belirtilmiştir).
ReX Jeweller hub sinyallerini alır ve bunları ReX Jeweller’a bağlı cihazlara iletir ve cihazlardan gelen sinyalleri hub’a iletir. Hub genişleticiyi her 12~300 saniyede bir yoklarken (varsayılan olarak: 36 saniye) alarmlar 0.3 saniye içinde iletilir.
ReX Jeweller’a bağlı cihaz sayısı
Hub modeline bağlı olarak hub’a aşağıdaki sayıda kapsama alanı genişletici bağlanabilir:
| Hub (2G) Jeweller | 1 ReX Jeweller |
| Hub (4G) Jeweller | 1 ReX Jeweller |
| Hub Plus Jeweller | 5 adede kadar ReX Jeweller |
| Hub 2 (2G) Jeweller | 5 adede kadar ReX Jeweller |
| Hub 2 (4G) Jeweller | 5 adede kadar ReX Jeweller |
| Hub 2 Plus Jeweller | 5 adede kadar ReX Jeweller |
| Hub BP Jeweller / Hub BP Jeweller (without casing) | 5 adede kadar ReX Jeweller |
| Superior Hub G3 Jeweller | 5 adede kadar ReX Jeweller |
| Superior Hub Hybrid (2G) / Superior Hub Hybrid (4G) / Superior Hub Hybrid (4G) (without casing) | 5 adede kadar ReX Jeweller |
| Superior Hub Hybrid 2 / Superior Hub Hybrid 2 (without casing) | 5 adede kadar ReX Jeweller |
Birden fazla ReX Jeweller’ın hub’a bağlanması, OS Malevich 2.8 ve üzeri sürümlere sahip cihazlar tarafından desteklenir. Aynı zamanda, ReX Jeweller yalnızca doğrudan hub’a bağlanabilir ve bir kapsama alanı genişleticinin diğerine bağlanması desteklenmez.
ReX Jeweller hub’a bağlı cihaz sayısını artırmaz!
ReX Jeweller’ın hub’a bağlanması
Farklı radyo frekanslarında çalışan hub ve cihazlar uyumsuzdur. Cihazın radyo frekans bandı bölgeye göre değişebilir. Ajax cihazlarını satın aldığınız bölgede kullanmanızı öneririz. Bölgenizdeki radyo frekans bantlarını kontrol etmek için Ajax Teknik Destek ile iletişime geçebilirsiniz.
Bir cihaz eklemeden önce
- Ajax uygulamasını veya Ajax PRO‘yu yükleyiniz.
- Bir hesaba giriş yapınız veya yeni bir hesap oluşturunuz.
- Bir space seçiniz veya yeni bir space oluşturunuz.

Space işlevi, aşağıda listelenen uygulama sürümleri ve sonraki sürümlerde mevcuttur:
- iOS için Ajax Güvenlik System 3.0;
- Android için Ajax Security System 3.0;
- iOS için Ajax PRO: Tool for Engineers 2.0;
- Android için Ajax PRO: Tool for Engineers 2.0;
- macOS için Ajax PRO Desktop 4.0;
- Windows için Ajax PRO Desktop 4.0.
- En az bir sanal oda ekleyiniz.
- Space’e uyumlu bir hub ekleyiniz. Hub’ın açık olduğundan ve Ethernet, Wi-Fi ve/veya mobil ağ üzerinden internete bağlandığından emin olunuz.
- Space’in devre dışı bırakıldığından ve Ajax uygulamasında durumunu kontrol ederek Hub’ın güncelleme başlatmadığından emin olunuz.
Yalnızca yönetici haklarına sahip kullanıcılar cihazı Hub’a ekleyebilir.
ReX Jeweller’ı hub’a bağlamak için
- Ajax uygulamasında Cihaz ekle‘ye tıklayınız.
- Genişleticiyi adlandırın, QR kodunu (kapakta ve pakette bulunur) tarayın veya manuel olarak girin ve cihazın bulunduğu odayı seçiniz.

- Ekle‘ye tıkladığınızda geri sayım başlar.
- Güç butonuna 3 saniye basarak ReX Jeweller’ı açınız — hub’a bağlandıktan kısa bir süre sonra logo, ReX Jeweller açıldıktan sonra 30 saniye içinde rengini kırmızıdan beyaza değiştirecektir.

Algılama ve eşleştirmenin gerçekleşmesi için ReX Jeweller hub’ın telsiz iletişim menzili içinde (aynı korunan tesiste) bulunmalıdır.
Hub’a bağlanma isteği yalnızca cihaz etkinleştirildiğinde iletilir. Hub’a bağlantı başarısız olursa, güç butonuna 3 saniye basarak genişleticiyi kapatın ve 5 saniye sonra bağlantı prosedürünü yeniden deneyin.
Hub’a bağlı genişletici, uygulamadaki hub cihazları listesinde görünecektir. Listedeki cihaz durumlarının güncellenmesi hub ayarlarında ayarlanan yoklama süresine bağlıdır; varsayılan değer 36 saniyedir.
ReX Jeweller üzerinden çalıştırmak için cihaz seçimi
Genişleticiye bir cihaz atamak için
- ReX Jeweller ayarlarına gidiniz (Aygıtlar → ReX Jeweller → Ayarlar
 ).
). - Aygıtla eşleştir‘e basınız.
- Genişletici üzerinden çalışacak cihazları seçiniz. Model adı, cihaz adı veya kimliğini aratabilir ya da odaya veya gruba göre filtreleyebilirsiniz.
- ReX Jeweller ayarlar menüsüne geri dönünüz.
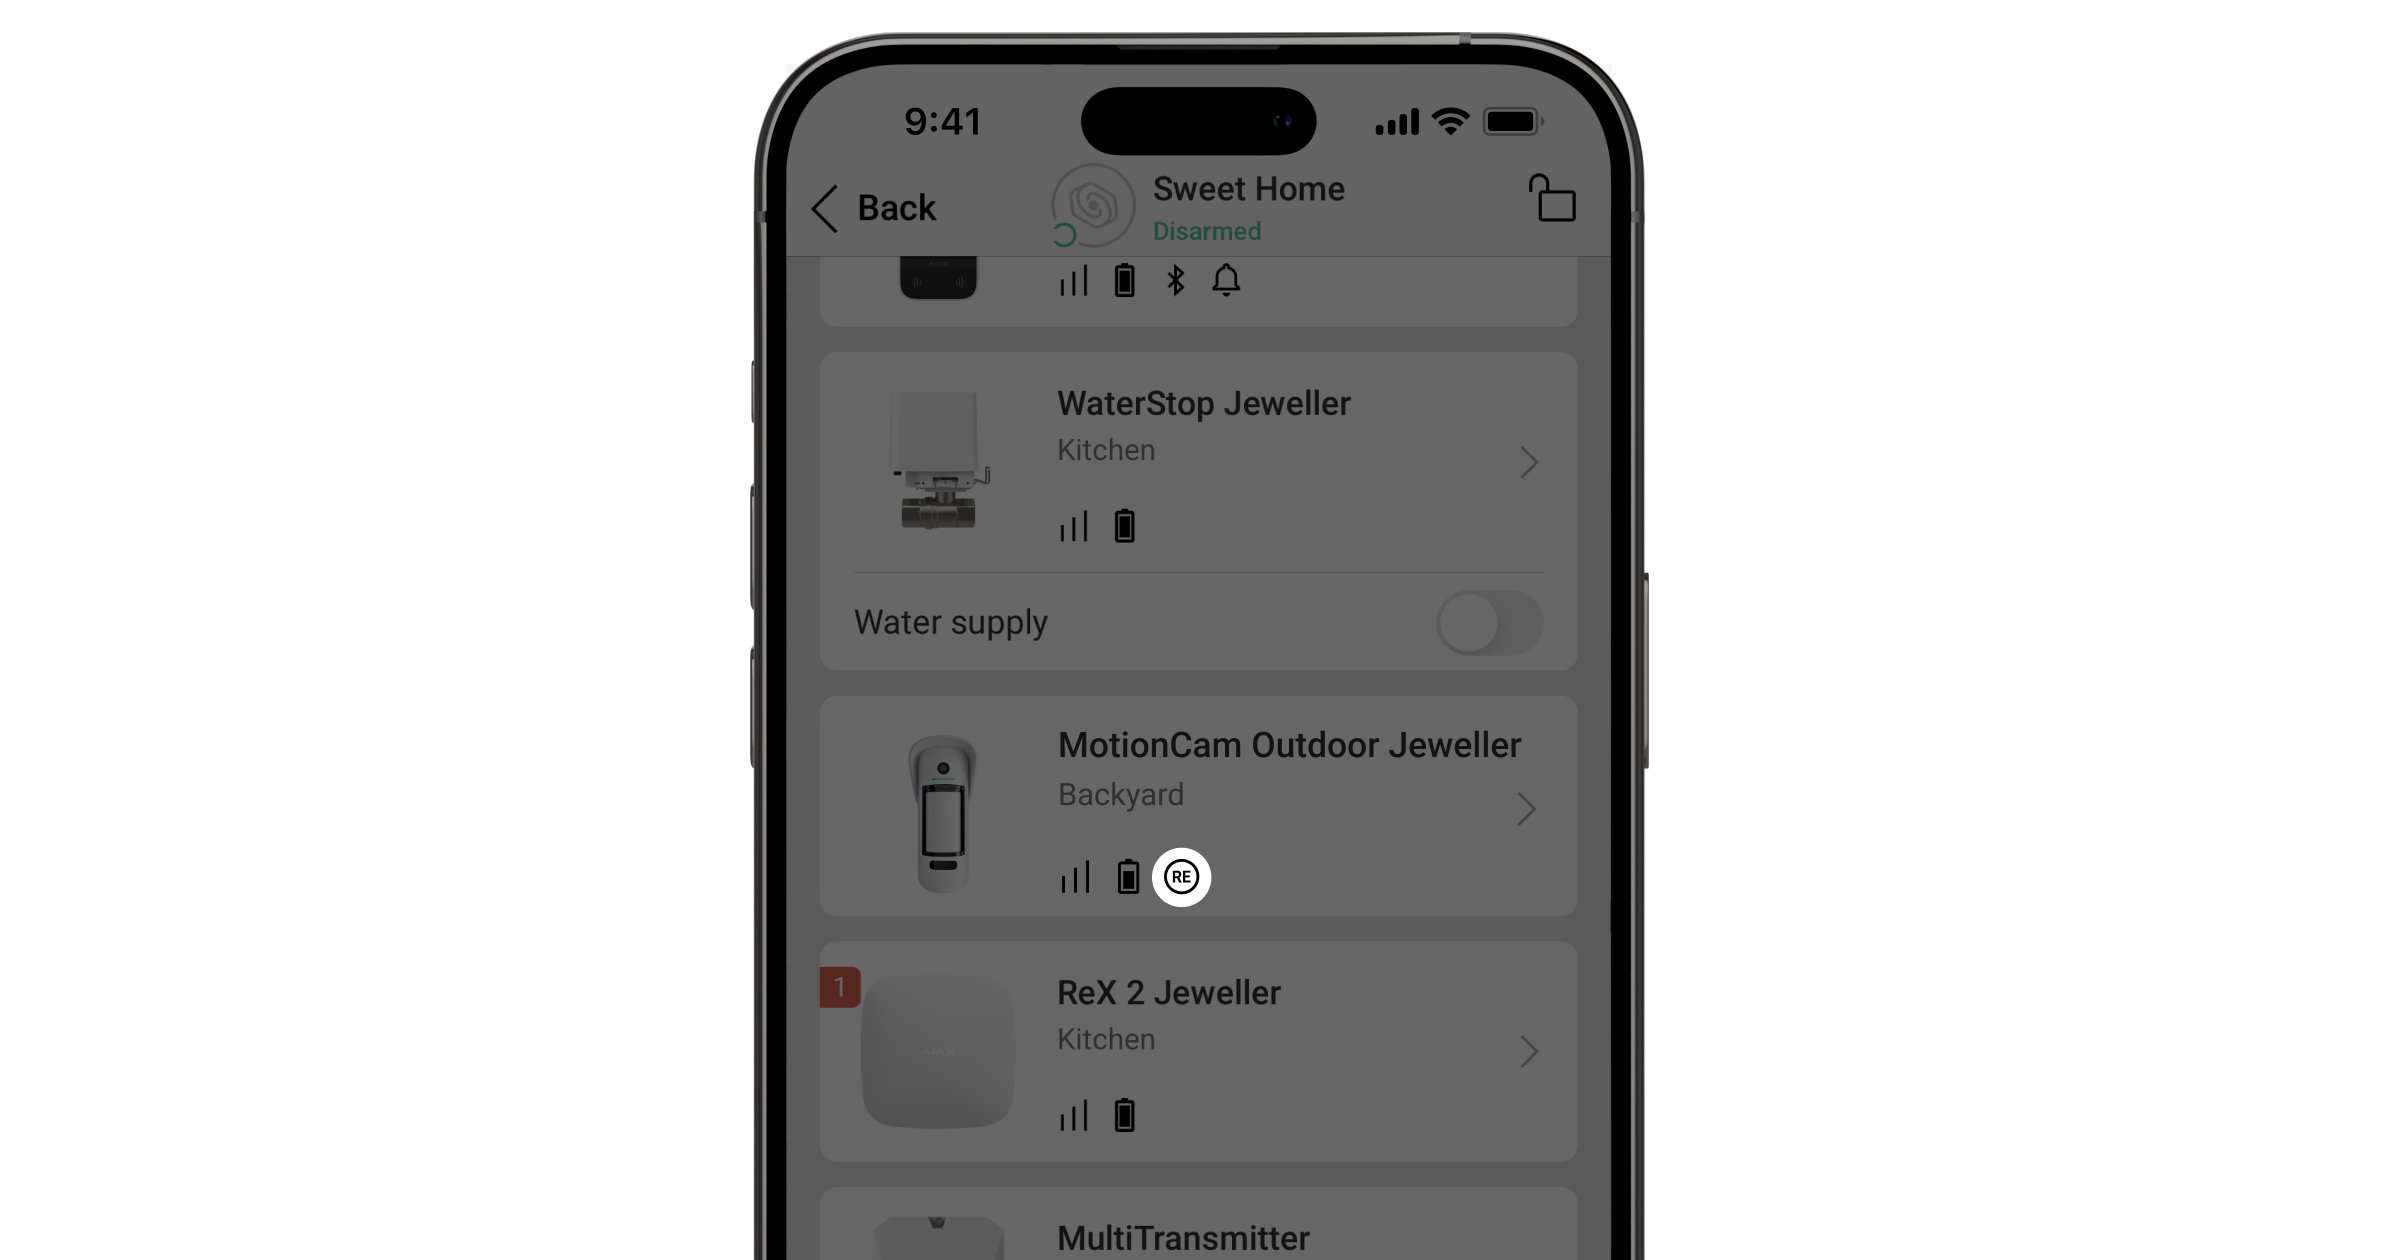
Bağlantı kurulduktan sonra, seçilen cihazlar mobil uygulamada ![]() simgesiyle işaretlenecektir.
simgesiyle işaretlenecektir.
ReX Jeweller, görsel alarm doğrulamalı MotionCam hareket dedektörü ile eşleştirmeyi desteklemez, çünkü ikincisi ek Wings telsiz protokolü kullanır.
Cihaz yalnızca bir ReX Jeweller ile eşleştirilebilir. Cihaz bir kapsama alanı genişleticiye atandığında, bağlı olan başka bir kapsama alanı genişleticiyle bağlantısı otomatik olarak kesilir.
Hub’a bir cihaz atamak için
- ReX Jeweller ayarlarına gidiniz (Aygıtlar → ReX Jeweller → Ayarlar ).
- Aygıtla eşleştir‘e basınız.
- Hub’a doğrudan bağlanması gereken cihazların işaretini kaldırınız.
- ReX Jeweller ayarlar menüsüne geri dönünüz.
ReX Jeweller durumları
- Cihazlar

- ReX Jeweller
| Parametre | Değer |
| Verileri İçe Aktarma | Veriler yeni hub’a aktarılırken oluşan hatayı görüntüler:
|
| Bazı işlevler çalışmıyor |
Hub ve ReX Jeweller kapsama alanı genişleticinin aygıt yazılımı sürümleri eşleşmiyorsa bu alan görüntülenir. ReX Jeweller, sistem devre dışı bırakıldığında yarım saat içinde güncellenir. Aygıt yazılımının güncellenmesi için aşağıdaki koşullar önemlidir:
|
| Jeweller sinyal gücü | Hub ile ReX Jeweller arasındaki sinyal gücü |
| Bağlantı | Hub ile genişletici arasındaki bağlantı durumu |
| Verici gücü |
Vericinin seçilen gücünü görüntüler. Bu parametre, Maksimum veya Zayıflatma seçeneği Sinyal zayıflama testi menüsünde seçildiğinde görünür. |
| Pil seviyesi |
Cihazın pil seviyesi. Yüzdelik oranla gösterilir |
| Kapak | Genişletici gövdesini ayırma veya bütünlüğünü ihlal etme girişimine tepki veren tamper modu |
| Harici güç | Harici güç kullanılabilirliği |
| Telsiz verici gücü | Zayıflatma testi etkinleştirilmişse bu alan görüntülenir.
|
| Kalıcı devre dışı bırakma | Cihazın durumunu gösterir: Aktif, kullanıcı tarafından tamamen devre dışı bırakılmış veya sadece cihaz tamper butonunun tetiklenmesiyle ilgili bildirimler devre dışı bırakılmış |
| Aygıt yazılımı | ReX Jeweller aygıt yazılımı sürümü |
| Cihaz kimliği | Cihazın tanımlayıcısı |
ReX Jeweller ayarları
- Cihazlar
- ReX Jeweller
- Ayarlar
| Öğe | Değer |
| Adı | Cihaz adı, düzenlenebilir |
| Oda | Cihazın atandığı sanal oda seçimi |
| Şarj etme modu |
Bu ayar yalnızca Ajax PRO uygulamalarında mevcuttur. OS Malevich 2.24 veya üzeri hub’larla çalışan ReX Jeweller için kullanılabilir. Bu ayar, cihazın yerleşik pilinin harici bir kaynaktan ne kadar hızlı şarj olacağını tanımlar. İki seçenek mevcuttur:
|
| LED parlaklığı | Logo ışığının parlaklığını ayarlar |
| Aygıtla eşleştir | Genişletici için cihazların atanması |
| Jeweller sinyal gücü testi | Genişletici ile hub arasında sinyal gücü testi |
| Sinyal zayıflatma testi |
Cihazı sinyal zayıflatma testi moduna geçirir. Test sırasında, nesnenin durumundaki bir değişikliği simüle etmek ve dedektör ile hub (veya telsiz sinyali kapsama alanı genişletici) arasındaki iletişimin istikrarını kontrol etmek için radyo vericisinin gücü azaltılır veya artırılır. |
| Kalıcı devre dışı bırakma |
Kullanıcının cihazı sistemden çıkarmadan devre dışı bırakmasını sağlar. Üç seçenek mevcuttur:
Cihazların kalıcı olarak devre dışı bırakılması hakkında daha fazla bilgi edinin Sistemin yalnızca devre dışı bırakılan cihazı yok sayacağını unutmayın. ReX Jeweller aracılığıyla bağlanan cihazlar normal şekilde çalışmaya devam edecektir |
| Kullanım kılavuzu | ReX Jeweller Kullanım kılavuzunu açma |
| Cihaz eşleştirmesini kaldır | Genişleticiyi hub’dan ayırma ve ayarlarını silme |
Arızalar
ReX Jeweller herhangi bir arıza durumunda bildirimde bulunabilir. Arızalar kısmı Cihaz Durumları içindedir. ![]() öğesine tıklandığında tüm arızaların listesi açılır. Bu kısım bir arıza tespit edilirse görüntülenir.
öğesine tıklandığında tüm arızaların listesi açılır. Bu kısım bir arıza tespit edilirse görüntülenir.
| Arıza | Açıklama | Çözüm |
| Bazı işlevler çalışmıyor. | Hub ve ReX Jeweller kapsama alanı genişleticinin aygıt yazılımı sürümleri eşleşmiyorsa bu alan görüntülenir. | Hub ayarlarında otomatik güncellemelerin etkinleştirildiğinden emin olun. ReX Jeweller, sistem devre dışı bırakıldığında ve sunucuda yeni bir aygıt yazılımı sürümü mevcut olduğunda yarım saat içinde güncellenir. |
Gösterge
ReX Jeweller LED göstergesi cihazın durumuna bağlı olarak kırmızı veya beyaz yanabilir.
| Olay | LED göstergeli logo durumu |
| Cihaz hub’a bağlı | Sürekli beyaz yanar |
| Cihaz hub ile bağlantısını kaybetti | Sürekli kırmızı yanar |
| Harici güç yok | Her 10 saniyede bir yanıp söner |
İşlevsellik testi
ReX Jeweller cihazlarıyla ilişkili işlevsellik testi OS Malevich’in bir sonraki güncellemelerine eklenecektir.
Ajax güvenlik sistemi, bağlı cihazların işlevselliğini kontrol etmek için testlerin yapılmasına olanak tanır.
Testler hemen başlamaz, ancak standart ayarlar kullanıldığında 36 saniyelik bir süre içinde başlar. Test süresinin başlangıcı dedektör tarama periyodu ayarlarına bağlıdır (Hub ayarlarındaki “Jeweller” paragrafı).
Kapsama alanı genişletici ile hub arasındaki ve kapsama alanı genişletici ile ona bağlı cihaz arasındaki Jeweller sinyal gücünü test edebilirsiniz.
Kapsama alanı genişletici ile hub arasındaki Jeweller sinyal gücünü kontrol etmek için ReX Jeweller ayarlarına gidin ve Jeweller Sinyal gücü testi‘ni seçin.
Kapsama alanı genişletici ile cihaz arasındaki Jeweller sinyal gücünü kontrol etmek için ReX Jeweller’a bağlı cihazın ayarlarına gidin ve Jeweller Sinyal gücü testi‘ni seçin.
Cihaz kurulumu
Kurulum yerinin seçilmesi
ReX Jeweller’ın konumu, hub’a olan mesafesini, genişleticiye bağlı cihazları ve telsiz sinyalinin geçişini engelleyen engellerin varlığını belirler: Duvarlar, katlar arası köprüler ve tesiste bulunan büyük nesneler.
Cihaz yalnızca iç mekan kullanımı için geliştirilmiştir.
Kurulum yerindeki sinyal gücünü kontrol edin!
Sinyal gücü göstergede sadece bir dişe ulaşırsa, güvenlik sisteminin stabil çalışması garanti edilemez. Sinyal kalitesini artırmak için gereken her türlü önlemi alın! En azından ReX Jeweller’ı veya hub’ı taşıyın — 20 cm’lik yer değiştirme bile alım kalitesini önemli ölçüde artırabilir.
Kurulum prosedürü
ReX Jeweller’ı kurmadan önce bu kılavuzun gerekliliklerini karşılayan en iyi konumu seçtiğinizden emin olun! Genişleticinin kolayca görülemeyecek yerlere kurulması tercih edilir.
Montaj ve çalıştırma esnasında, elektrikli cihazların kullanımına ilişkin genel elektrik güvenliği kurallarının yanı sıra, elektrik güvenliği yasa ve yönetmeliklerine uyunuz.
Cihaz montajı
- SmartBracket montaj panelini birlikte verilen vidalarla sabitleyiniz. Başka bağlantı elemanları kullanmayı tercih ederseniz, bunların panele zarar vermediğinden veya deforme etmediğinden emin olunuz.

Kurulum için çift taraflı yapışkan bant kullanılması önerilmez. Bu, ReX Jeweller’ın düşmesine ve cihazın arızalanmasına neden olabilir.
- ReX Jeweller’ı montaj panelinin üzerine kaydırınız. Kurulumdan sonra Ajax uygulamasında tamper durumunu ve ardından panel sıkılığını kontrol ediniz.
- Daha yüksek güvenilirlik sağlamak için ReX Jeweller’ı birlikte verilen vidalarla SmartBracket paneline sabitleyiniz.

Kapsama alanı genişleticiyi dikey olarak (örneğin duvara) takarken ters veya yan çevirmeyiniz. Düzgün sabitlendiğinde Ajax logosu yatay şekilde okunabilir olacaktır.
Genişleticiyi yüzeyden ayırma veya montaj panelinden çıkarma girişimi algılanırsa bir bildirim alırsınız.
Güç kaynağına bağlı cihazın sökülmesi tehlikeli ve kesinlikle yasaktır! Hasarlı güç kablosu olan bir cihazı kullanmayınız. ReX Jeweller’ı veya herhangi bir parçasını sökmeyin veya üzerinde değişiklik yapmayın — bu cihazın düzgün çalışmasını engelleyebilir veya arızalanmasına neden olabilir.
ReX Jeweller nerelere kurulmaz:
- Odanın dışına (dış mekanlara).
- Telsiz sinyallerinin zayıflamasına veya perdelenmesine neden olan metal nesnelerin ve aynaların yakınına.
- Nem ve sıcaklığı izin verilen sınırların dışında olan odalara.
- Telsiz parazit kaynaklarının, router ve güç kablolarının 1 metre yakınlarına.
Cihazın bakımı
Ajax sisteminin işlevselliğini düzenli olarak kontrol edin.
Cihaz gövdesini toz, örümcek ağı ve diğer maddelerle kirlendikçe temizleyiniz. Ekipman bakımı için uygun yumuşak kuru bir bez kullanınız.
Genişleticiyi temizlemek için alkol, aseton, benzin ve aktif çözücü içeren başka maddeler kullanmayınız.
Garanti
“Ajax Systems Manufacturing” Limited Şirketi ürünlerinin garantisi satın alındıktan sonra 2 yıl boyunca geçerlidir ve hazır kurulu aküler için geçerli değildir.
Cihaz düzgün çalışmıyorsa öncelikle müşteri hizmetleriyle iletişime geçiniz – teknik sorunlar vakaların yarısında uzaktan çözülebilir!
Teknik Destek ile iletişime geçin:
