O espaço é uma entidade virtual onde vários dispositivos autónomos estão reunidos no mesmo objeto físico. Para criar um espaço, o utilizador não necessita de um hub Ajax. Os dispositivos são adicionados ao sistema de acordo com as necessidades da instalação.
Compatibilidade dos dispositivos
A funcionalidade de espaço está disponível para apps dessas versões ou posteriores:
- Ajax Security System 3.0 para iOS;
- Ajax Security System 3.0 para Android;
- Ajax PRO: Tool for Engineers 2.0 para iOS;
- Ajax PRO: Tool for Engineers 2.0 para Android;
- Ajax PRO Desktop 4.0 para macOS;
- Ajax PRO Desktop 4.0 para Windows.
Não é necessária atualização do firmware.
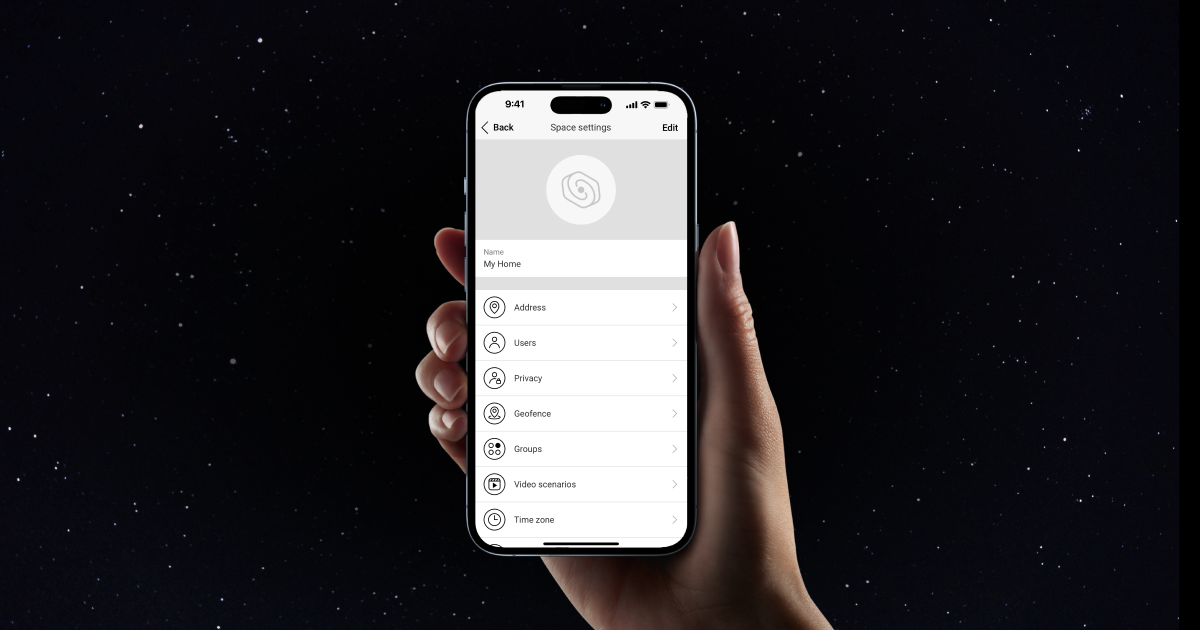
Definições do espaço
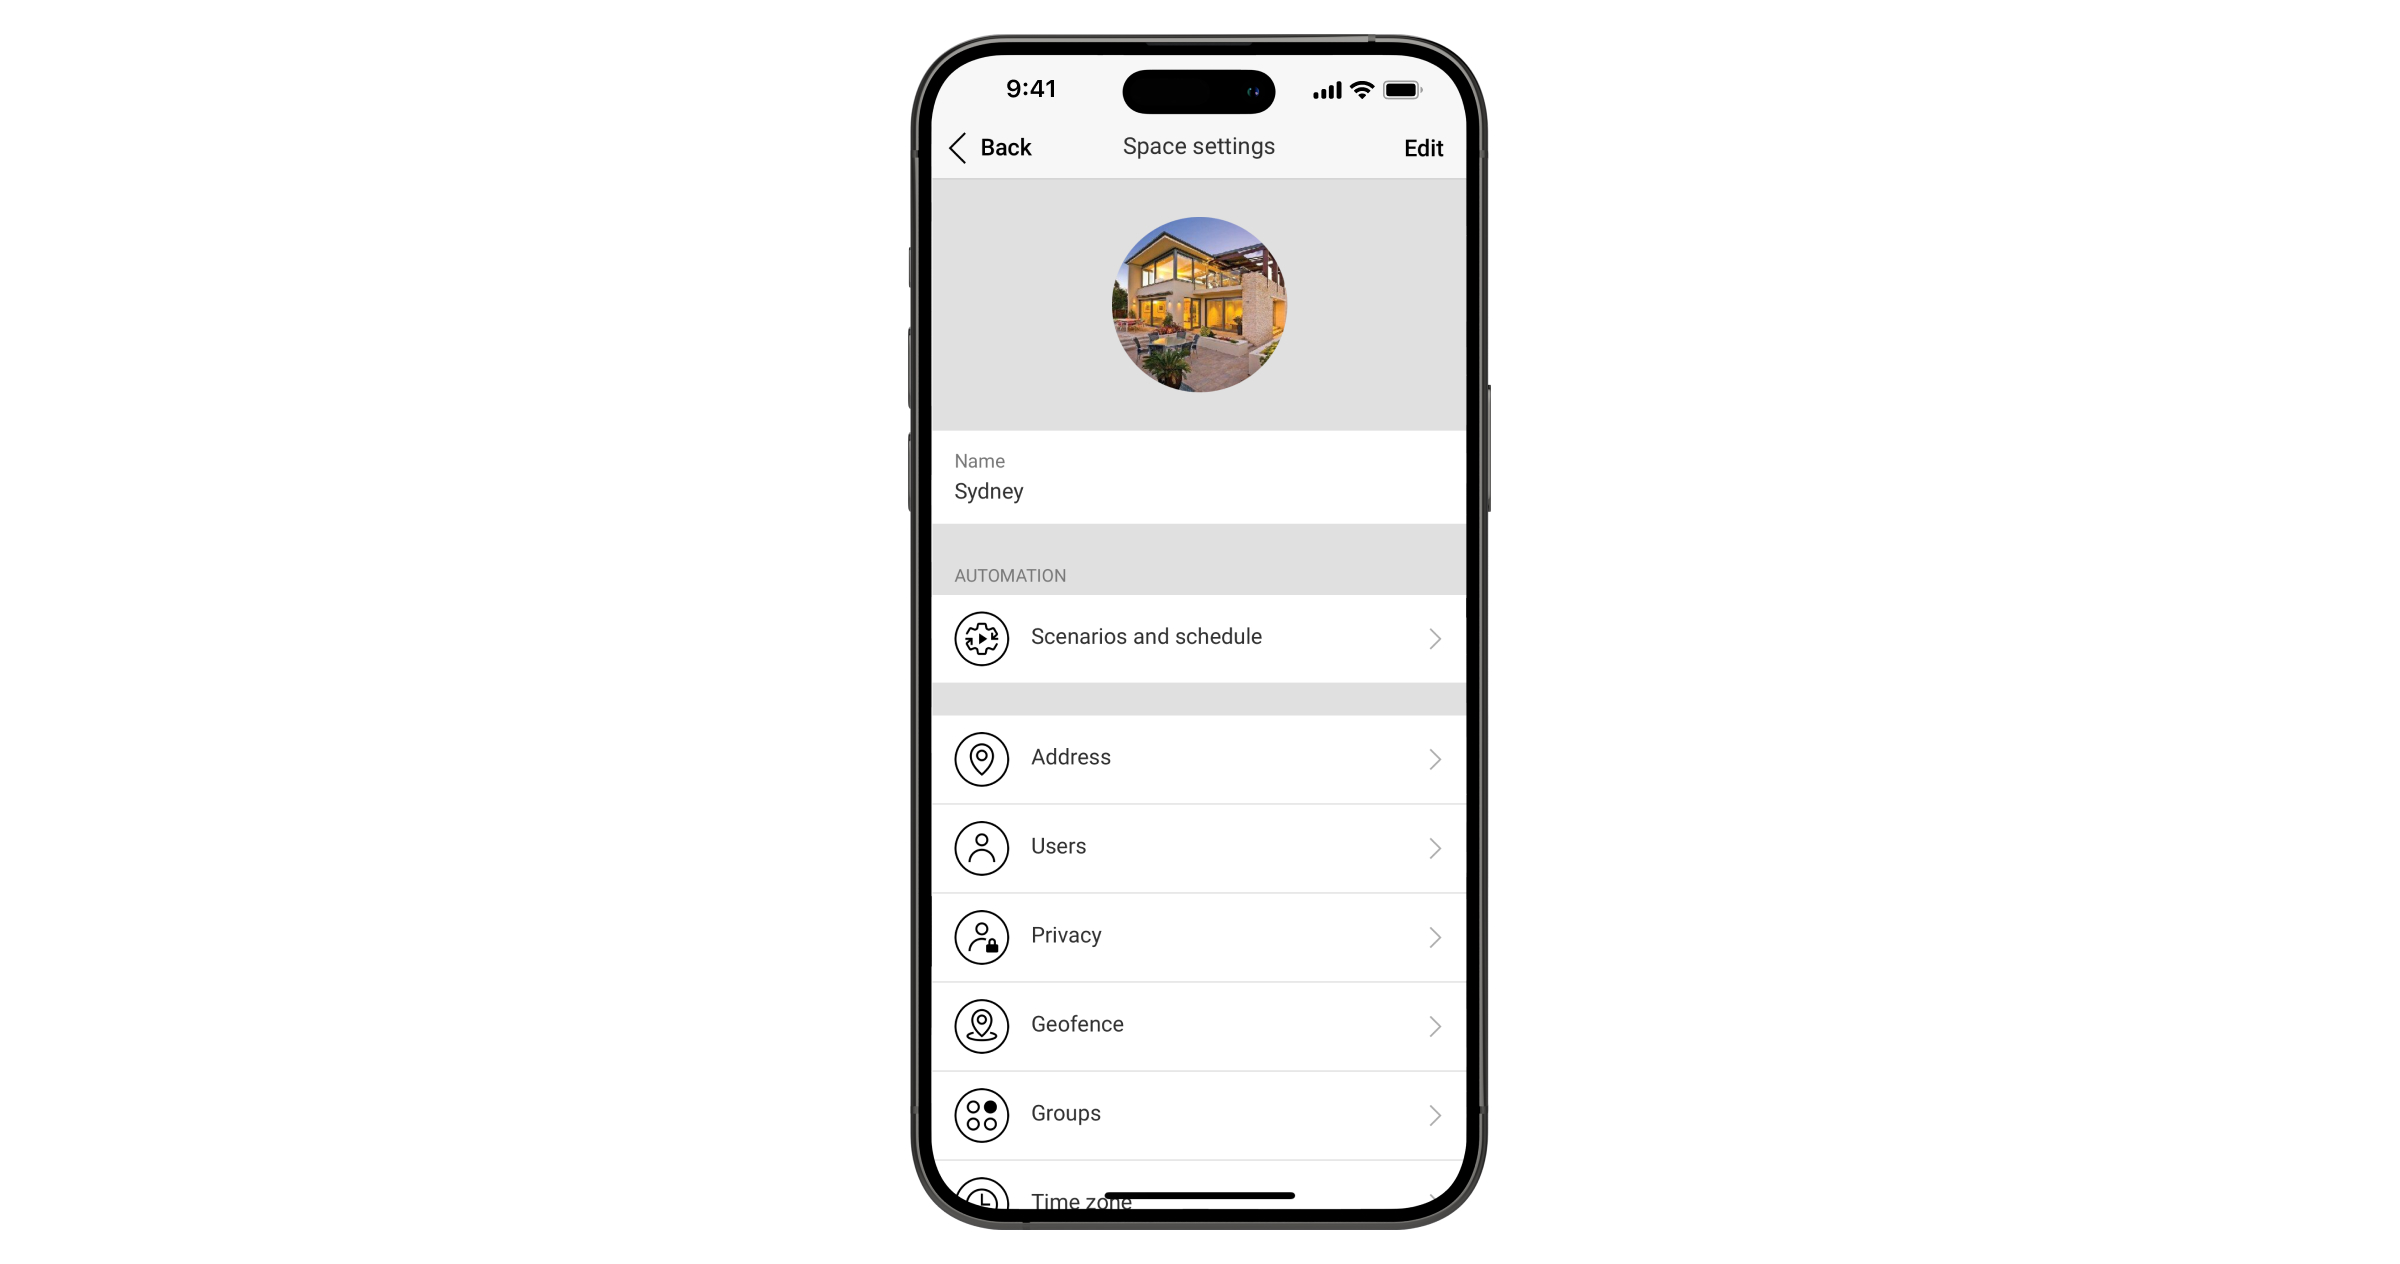
As definições podem ser alteradas na app Ajax:
- Selecione o hub se tiver vários ou se estiver a utilizar a app Ajax PRO.
- Aceda ao separador Controlo.
- Aceda às Definições tocando no ícone da engrenagem
 no canto inferior direito.
 - Defina os parâmetros necessários.
- Clique em Voltar para guardar as novas definições.
Permite configurar a imagem principal do sistema Ajax. É apresentado no menu de seleção do hub e ajuda a identificar o objeto pretendido.
Toque em Editar no canto Superior direito para alterar ou definir uma imagem.
O nome do espaço é apresentado no texto das notificações push e SMS. Toque em Editar no canto Superior direito para alterar o nome.
Permite configurar cenários e programações de segurança para automatizar a segurança e reduzir o número de ações de rotina.
Permite configurar o endereço do objeto, como a cidade, a região, o país e o código postal. Com o endereço preenchido, pode obter funcionalidades adicionais disponíveis nessa região.
Nesta categoria de definições, é possível convidar e eliminar utilizadores, editar os seus direitos e definir a forma como o sistema de segurança notifica os utilizadores sobre eventos e alarmes.
Para alterar as definições de um utilizador específico, clique no seu nome de utilizador na lista de utilizadores ativos.
Definições do utilizador
Admin — selecionar o nível de acesso à gestão e configuração do sistema: admin ou utilizador.
Definições de notificações — um admin ou um PRO com direitos para configurar o sistema pode escolher os eventos a informar e a forma de notificar os utilizadores: através de notificações push, SMS ou chamada telefónica.
Gestão das definições de privacidade — quando ativado, um admin ou um PRO com direitos para configurar o sistema pode controlar o acesso de outros utilizadores às câmaras de vigilância e aos NVRs.
Permissões
Esta definição permite conceder acesso seletivo para gerir as seguintes funcionalidades do sistema.
A lista de definições disponíveis depende da configuração do sistema. As definições de permissões alargadas para o utilizador final estão disponíveis para hubs que executam OS Malevich 2.38 ou posterior e em apps com as seguintes versões ou posteriores:
Gestão do sistema
- Definições do sistema — acesso às definições do espaço e do dispositivo com permissão para as editar.
- Acesso ao sistema de incêndio, nível 2 — acesso a funcionalidades específicas do sistema de incêndio: iniciar a evacuação, repor e silenciar o alarme, configurar o teste e a desativação.
- Alteração do nome e da imagem do espaço.
- Convite de utilizadores para o espaço — permite convidar outros utilizadores para o espaço, exceto instaladores privados, empresas de instalação e segurança.
- Gestão das definições de privacidade — permite definir as permissões de outros utilizadores para fotos por pedido e transmissões de câmara.
- Gestão de cenários de automatização — permite criar, editar e eliminar cenários de automatização.
- Ativação de serviços adicionais — permite atribuir e gerir novos serviços para o espaço.
- Gestão de códigos de acesso — permite criar, editar e eliminar códigos de acesso para a gestão do sistema.
Dispositivos e divisões
- Visualização de dispositivos e divisões.
- Alteração dos nomes dos dispositivos.
- Edição de dispositivos não monitorizados — permite alterar as definições dos dispositivos que não enviam eventos para a central recetora de alarmes.
- Gestão de divisões.
- Desativação única do dispositivo — permissão para ignorar dispositivos durante um ciclo de armamento.
- Visualização das câmaras.
Ecrã de controlo
- Armamento e desarmamento do espaço.
- Armamento com problemas — quando esta opção está ativada, o utilizador pode armar o sistema apesar dos problemas existentes. Pode configurar os problemas com os quais este utilizador tem permissão para armar o sistema.
- Gestão de segurança via Bluetooth — permite alterar os modos de segurança ao aproximar o smartphone do teclado. O Bluetooth também deve estar ativado nas definições do teclado.
- Enviar alarme de pânico.
- Ativação da campainha.
- Controlo da domótica.
- Silenciamento dos alarmes dos detetores de incêndio.
Gestão de grupos — seleção dos grupos aos quais o utilizador pode aceder. Com acesso ao grupo, o utilizador pode armá-lo e desarmá-lo. Os administradores têm sempre acesso a todos os grupos no espaço.
Restauração após alarme — esta definição permite selecionar os eventos após os quais o sistema pode ser restaurado pelo utilizador.
Gestão de alarme diurno
Escolha se este utilizador pode entrar e sair das zonas de alarme diurno sem acionar um alarme utilizando o seu Pass/Tag ou código de acesso:
- Sem acesso — a desativação não é permitida.
- Temporária — a desativação dura até os dispositivos de intrusão serem acionados o número de vezes definido ou até o temporizador expirar.
- Permanente — a desativação dura indefinidamente até ser desativada.
Eliminar utilizador
Esta definição é utilizada para remover o utilizador do espaço.
A categoria está disponível para os utilizadores que têm o direito de gerir as definições de privacidade. As definições aplicam-se a câmaras de vigilância e NVRs Ajax adicionados ao sistema.
Permitir fotos por pedido — quando ativado, é permitido tirar fotografias por pedido em todo o sistema.
Permissões
- Utilizadores — definição de níveis de acesso e configuração de todas as funcionalidades existentes da câmara, bem como tirar e visualizar fotos por pedido, visualizar a transmissão em direto e o arquivo da câmara e descarregá-lo para os utilizadores do sistema.
- Instaladores — definição de níveis de acesso e configuração de todas as funcionalidades da câmara, bem como tirar e visualizar fotos por pedido, visualizar a transmissão em direto e o arquivo da câmara e descarregá-lo para instaladores profissionais.
- Empresas — definição de níveis de acesso e configuração de todas as funcionalidades da câmara, bem como tirar e visualizar fotos por pedido, visualizar a transmissão em direto e o arquivo da câmara e descarregá-lo para empresas de monitorização e instalação. Também é possível conceder acesso temporário a dispositivos de videovigilância apenas após um alarme para funcionários da empresa.
Permitir fotos por cenários — quando ativado, o disparo automático em cenários é permitido para detetores de movimento que suportem a funcionalidade Foto por pedido.
Regras de execução do cenário — com esta definição, é possível especificar se a execução do cenário depende do modo de segurança: quando o sistema está armado ou independentemente do modo de segurança.
Permite configurar lembretes para armar/desarmar o sistema ao atravessar uma área especificada. A localização do utilizador é determinada utilizando o módulo GPS do smartphone.
Configuração do modo de grupo. Os grupos combinam dispositivos de sistema independentemente da sua localização física e tornam a gestão da segurança mais cómoda e flexível.
Permite criar e configurar cenários de vídeo do sistema.
Permite selecionar o fuso horário em que o espaço funciona. É utilizado para cenários por programação. Por conseguinte, antes de criar cenários, defina o fuso horário correto.
Estação de monitorização
Definições para ligação direta à CRA da empresa de segurança. Os parâmetros são definidos pelos engenheiros das empresas de segurança. Tenha em atenção que os eventos e os alarmes podem ser enviados para a CRA da empresa de segurança mesmo sem estas definições.
Protocolo — permite selecionar o protocolo utilizado pelo hub para enviar os alarmes para a CRA da empresa de segurança através de uma ligação direta. Protocolos disponíveis: Ajax Translator e SIA DC-09 (SIA-DCS).
Canal de alarme — o canal que envia alarmes e eventos para a CRA. Recomendamos a utilização simultânea de todos os canais de comunicação para aumentar a fiabilidade da transmissão e garantir a proteção contra falhas do lado dos operadores de telecomunicações.
- Ethernet
- Dados móveis
Um endereço IP para todos os canais de alarme — quando ativado, o sistema envia alarmes e eventos para os mesmos endereços IP, independentemente do tipo de canal.
Endereço IP principal
- Endereço IP e Porta são definições do endereço IP principal e da porta do servidor da empresa de segurança para o qual são enviados os eventos e os alarmes.
Endereço IP secundário
- Endereço IP e Porta são definições do endereço IP secundário e da porta do servidor da empresa de segurança para o qual são enviados os eventos e os alarmes.
Intervalo de ping da estação de monitorização — define o período de envio de mensagens de teste: de 1 minuto à 24 horas. A definição também pode ser desativada.
- Ligação a pedido — ative esta opção se necessitar de ligar à CRA apenas quando transmitir um evento. Se a opção estiver desativada, a ligação é mantida continuamente. A opção só está disponível para o protocolo SIA.
- Número do objeto — o número de um objeto (ou de um hub) na estação de monitorização. A opção só está disponível para o protocolo SIA.
Encriptação — definições de encriptação da transmissão de eventos no protocolo SIA. É utilizada a encriptação AES de 128 bits.
- Encriptação — se ativada, os eventos e alarmes transmitidos à CRA no formato SIA são encriptados.
- Chave de encriptação — chave de encriptação dos eventos e alarmes transmitidos. Deve corresponder ao valor registado na CRA.
Enviar coordenadas — se ativado, premir um botão de pânico na app envia as coordenadas do dispositivo no qual a app está instalada para a CRA e é premido um botão de pânico.
Restauração de alarmes no ARC
A definição permite-lhe selecionar quando é que o evento de reposição de alarme será enviado para a CRA: imediatamente/na reposição do detetor (por predefinição) ou ao desarmar.
A definição Enviar código de restauração permite-lhe escolher o momento em que o evento de restauração é enviado para a CRA.
Enviar evento de restauração do dispositivo de pânico (emergência) — se ativado, o sistema envia o evento de restauração 3 segundos após o alarme ter sido ativado.
As suas empresas
Lista das empresas de segurança às quais o objeto está ligado.
Empresas disponíveis
Lista de empresas de segurança na sua área. A região é determinada pelos dados GPS ou pelas definições regionais do seu smartphone.
Empresas instaladoras
As definições permitem-lhe determinar as permissões concedidas às empresas de instalação.
Instaladores privados
Definições para utilizadores PRO — instaladores e representantes de empresas de segurança ligadas ao sistema.
As definições permitem-lhe determinar quem tem acesso ao sistema, que direitos são concedidos aos utilizadores e como o sistema os notifica de eventos e alarmes.
Abre o manual do utilizador do interruptor na app Ajax.
Permite-lhe apagar o espaço.
Depois de eliminar o espaço, o hub adicionado ao espaço será reposto para as definições de fábrica. Os utilizadores perderão o acesso ao espaço eliminado.
Permite-lhe deixar o espaço enquanto outros utilizadores do sistema ainda o podem utilizar.
Salas na app Ajax
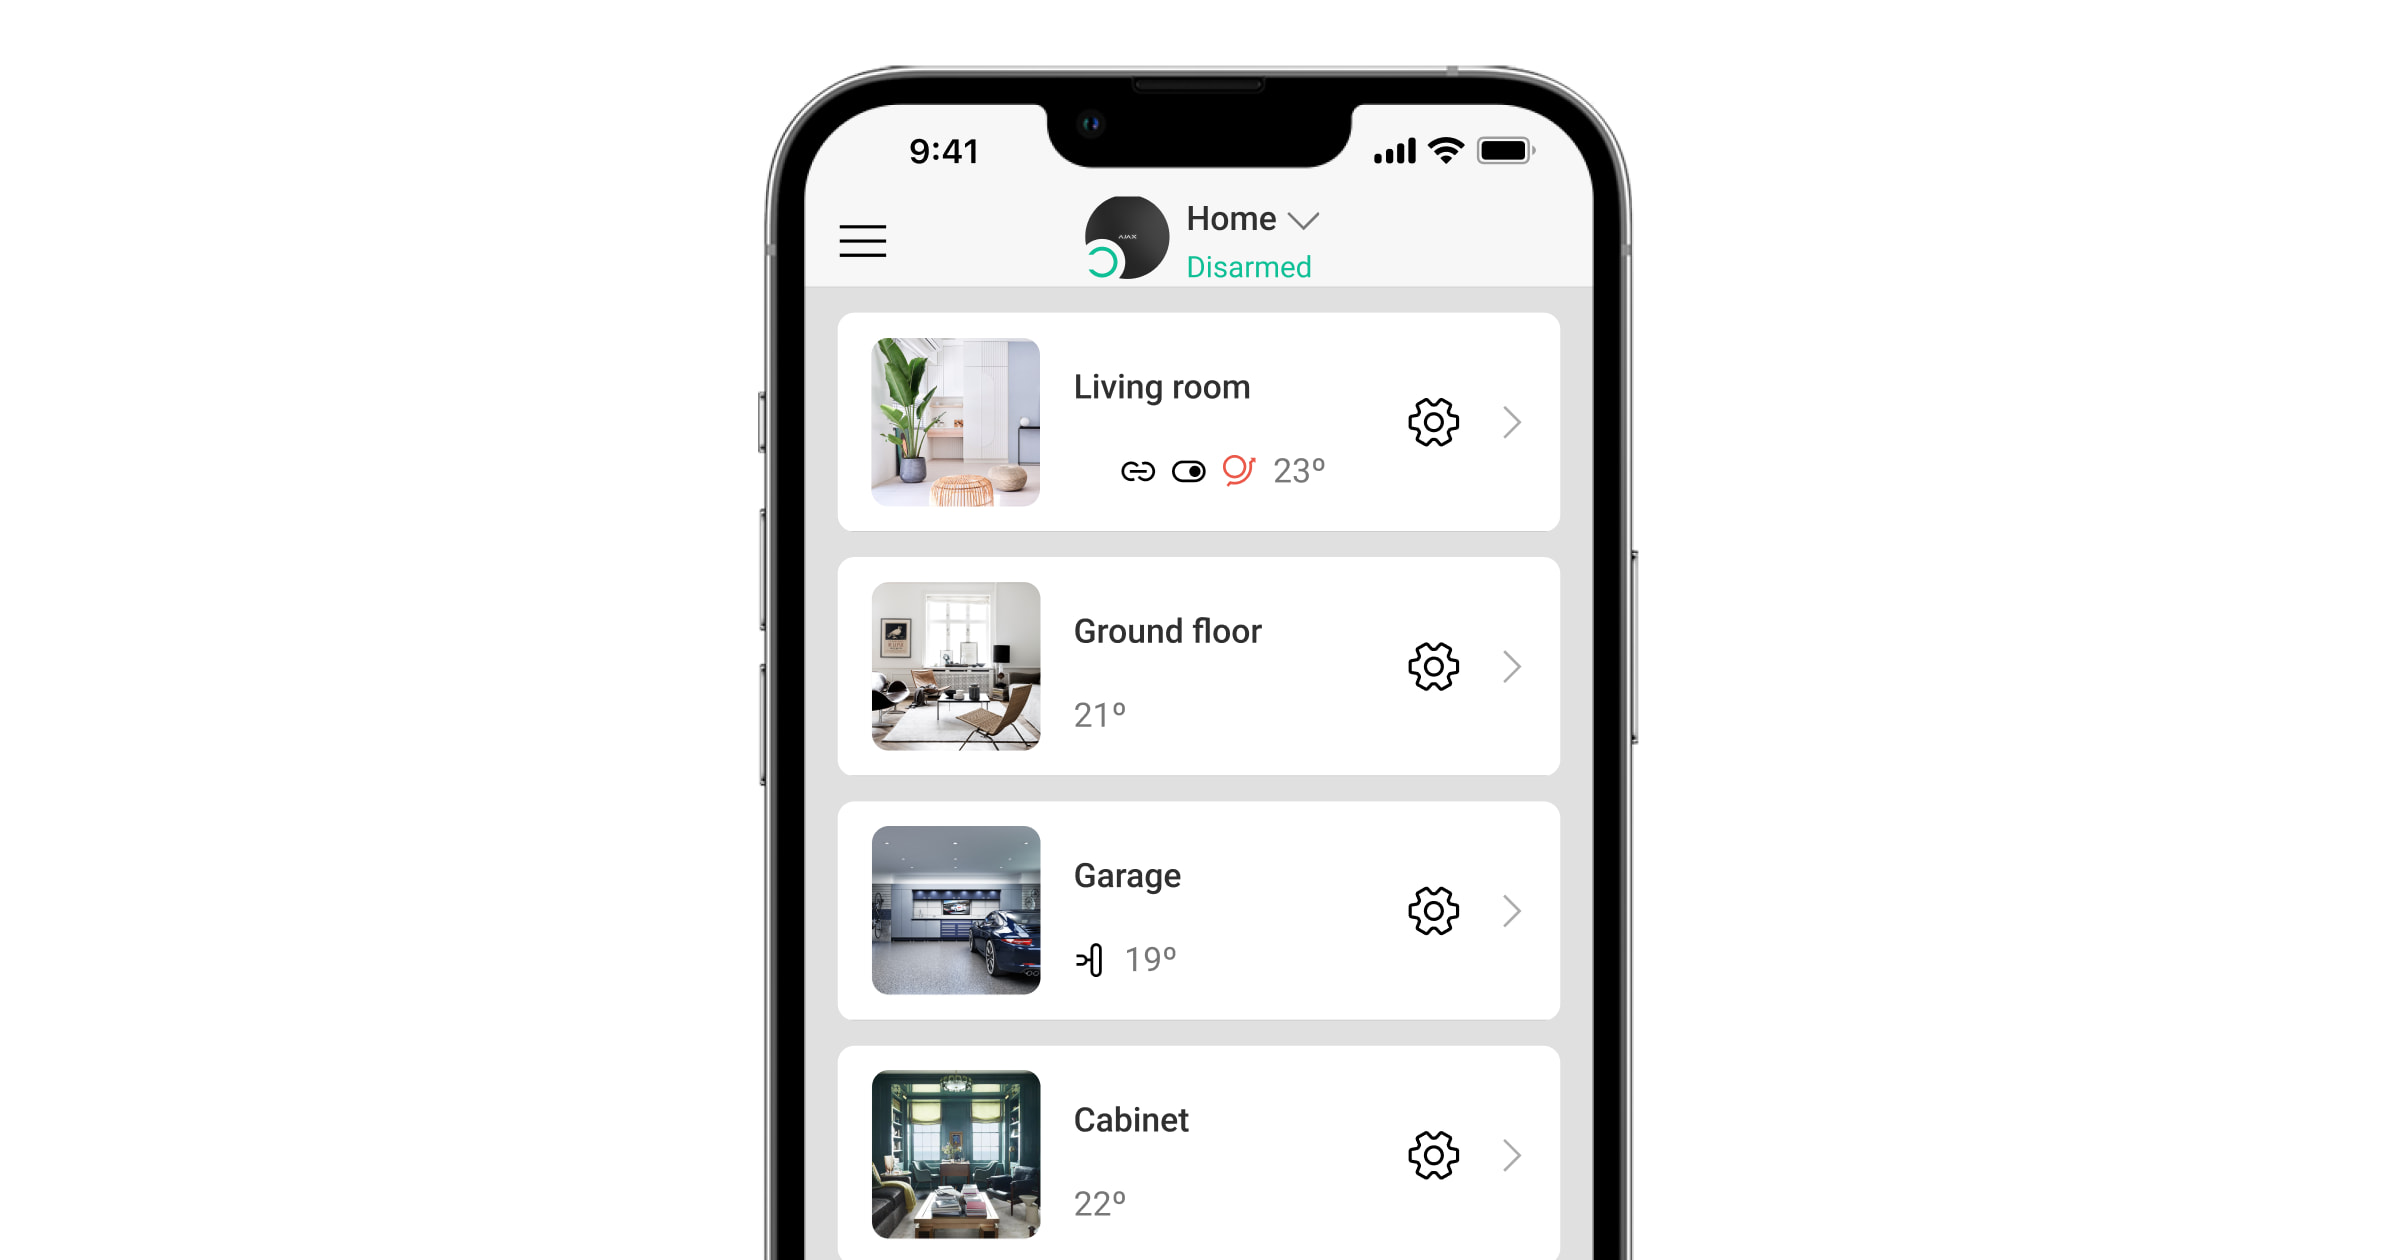
As salas virtuais são utilizadas para agrupar os dispositivos ligados. Um utilizador pode criar até 50 salas. Se um hub for adicionado ao espaço, o número de salas é limitado pelas especificações do modelo do hub. Cada dispositivo está localizado apenas numa sala.
Antes de adicionar um dispositivo a um espaço, crie pelo menos uma sala.
Criar e configurar uma sala
Para criar uma sala na app Ajax:
- Selecione o hub se tiver vários ou se estiver a utilizar a app Ajax PRO.
- Aceda o separador Salas
 .
. - Toque em Adicionar sala.
- Atribua-lhe um nome. Se possível, anexe ou tire uma fotografia da sala para facilitar a sua localização na lista.
- Toque em Adicionar.
Para eliminar uma sala ou alterar a sua imagem ou nome, aceda às Definições da sala tocando no ícone da engrenagem ![]() .
.
Notificações de eventos e alarmes
Depois de adicionar o espaço à conta, passa a ser o administrador desse espaço. O espaço pode ter até 200 utilizadores, utilizadores PRO e empresas. Se um hub for adicionado ao espaço, o número de utilizadores do sistema é limitado pelas especificações do modelo do hub. O administrador do espaço, o utilizador PRO com direitos de configuração do sistema ou a empresa de instalação podem convidar utilizadores para o sistema e determinar os seus direitos.

O sistema notifica os utilizadores de eventos de três formas: através de notificações push, SMS e chamadas telefónicas.
O sistema permite que os utilizadores personalizem as suas preferências de notificações push de alarmes para garantir que não perdem eventos críticos, evitando alertas desnecessários. O acesso às opções de configuração depende das permissões do utilizador:
- Um administrador ou um PRO com direitos de configuração do sistema pode configurar as preferências de notificações push para todos os utilizadores no espaço atual.
- Um utilizador sem direitos de configuração do sistema apenas pode configurar as suas próprias preferências de notificações push.
| Tipo de evento | Para que é utilizado | Tipos de notificações |
| Alarmes |
É possível configurar cada tipo de alarme com uma das seguintes opções de alerta:
|
|
| Deteções de vídeo |
|
|
| Avarias |
|
|
| Modos armados |
|
|
| Eventos do sistema |
|
|
| Alertas não relacionados com a segurança | Alteração dos parâmetros de qualidade do ar:
|
|
| Dispositivos de automatização |
|
|
| Eventos da fechadura inteligente |
|
|
| Campainha a tocar |
Pressão do botão DoorBell Pode configurar a notificação push de toque de campainha com uma das seguintes opções de alerta:
|
|
Quando a função Chime está ativada e configurada, o sistema não notifica os utilizadores do disparo dos detetores de abertura no modo desarmado. Só as sirenes ligadas ao sistema avisam da abertura.
Ligação à estação de monitorização da empresa de segurança
A lista de empresas que ligam o sistema Ajax à CRA é fornecida no menu Empresas de segurança das definições do espaço.
Contacte os representantes da empresa que presta serviços na sua cidade e negoceie a ligação.
A ligação à CRA é possível através do SurGard (Contact ID), ADEMCO 685, SIA DC-09 (SIA-DCS) e outros protocolos proprietários. Uma lista completa dos protocolos suportados está disponível aqui.