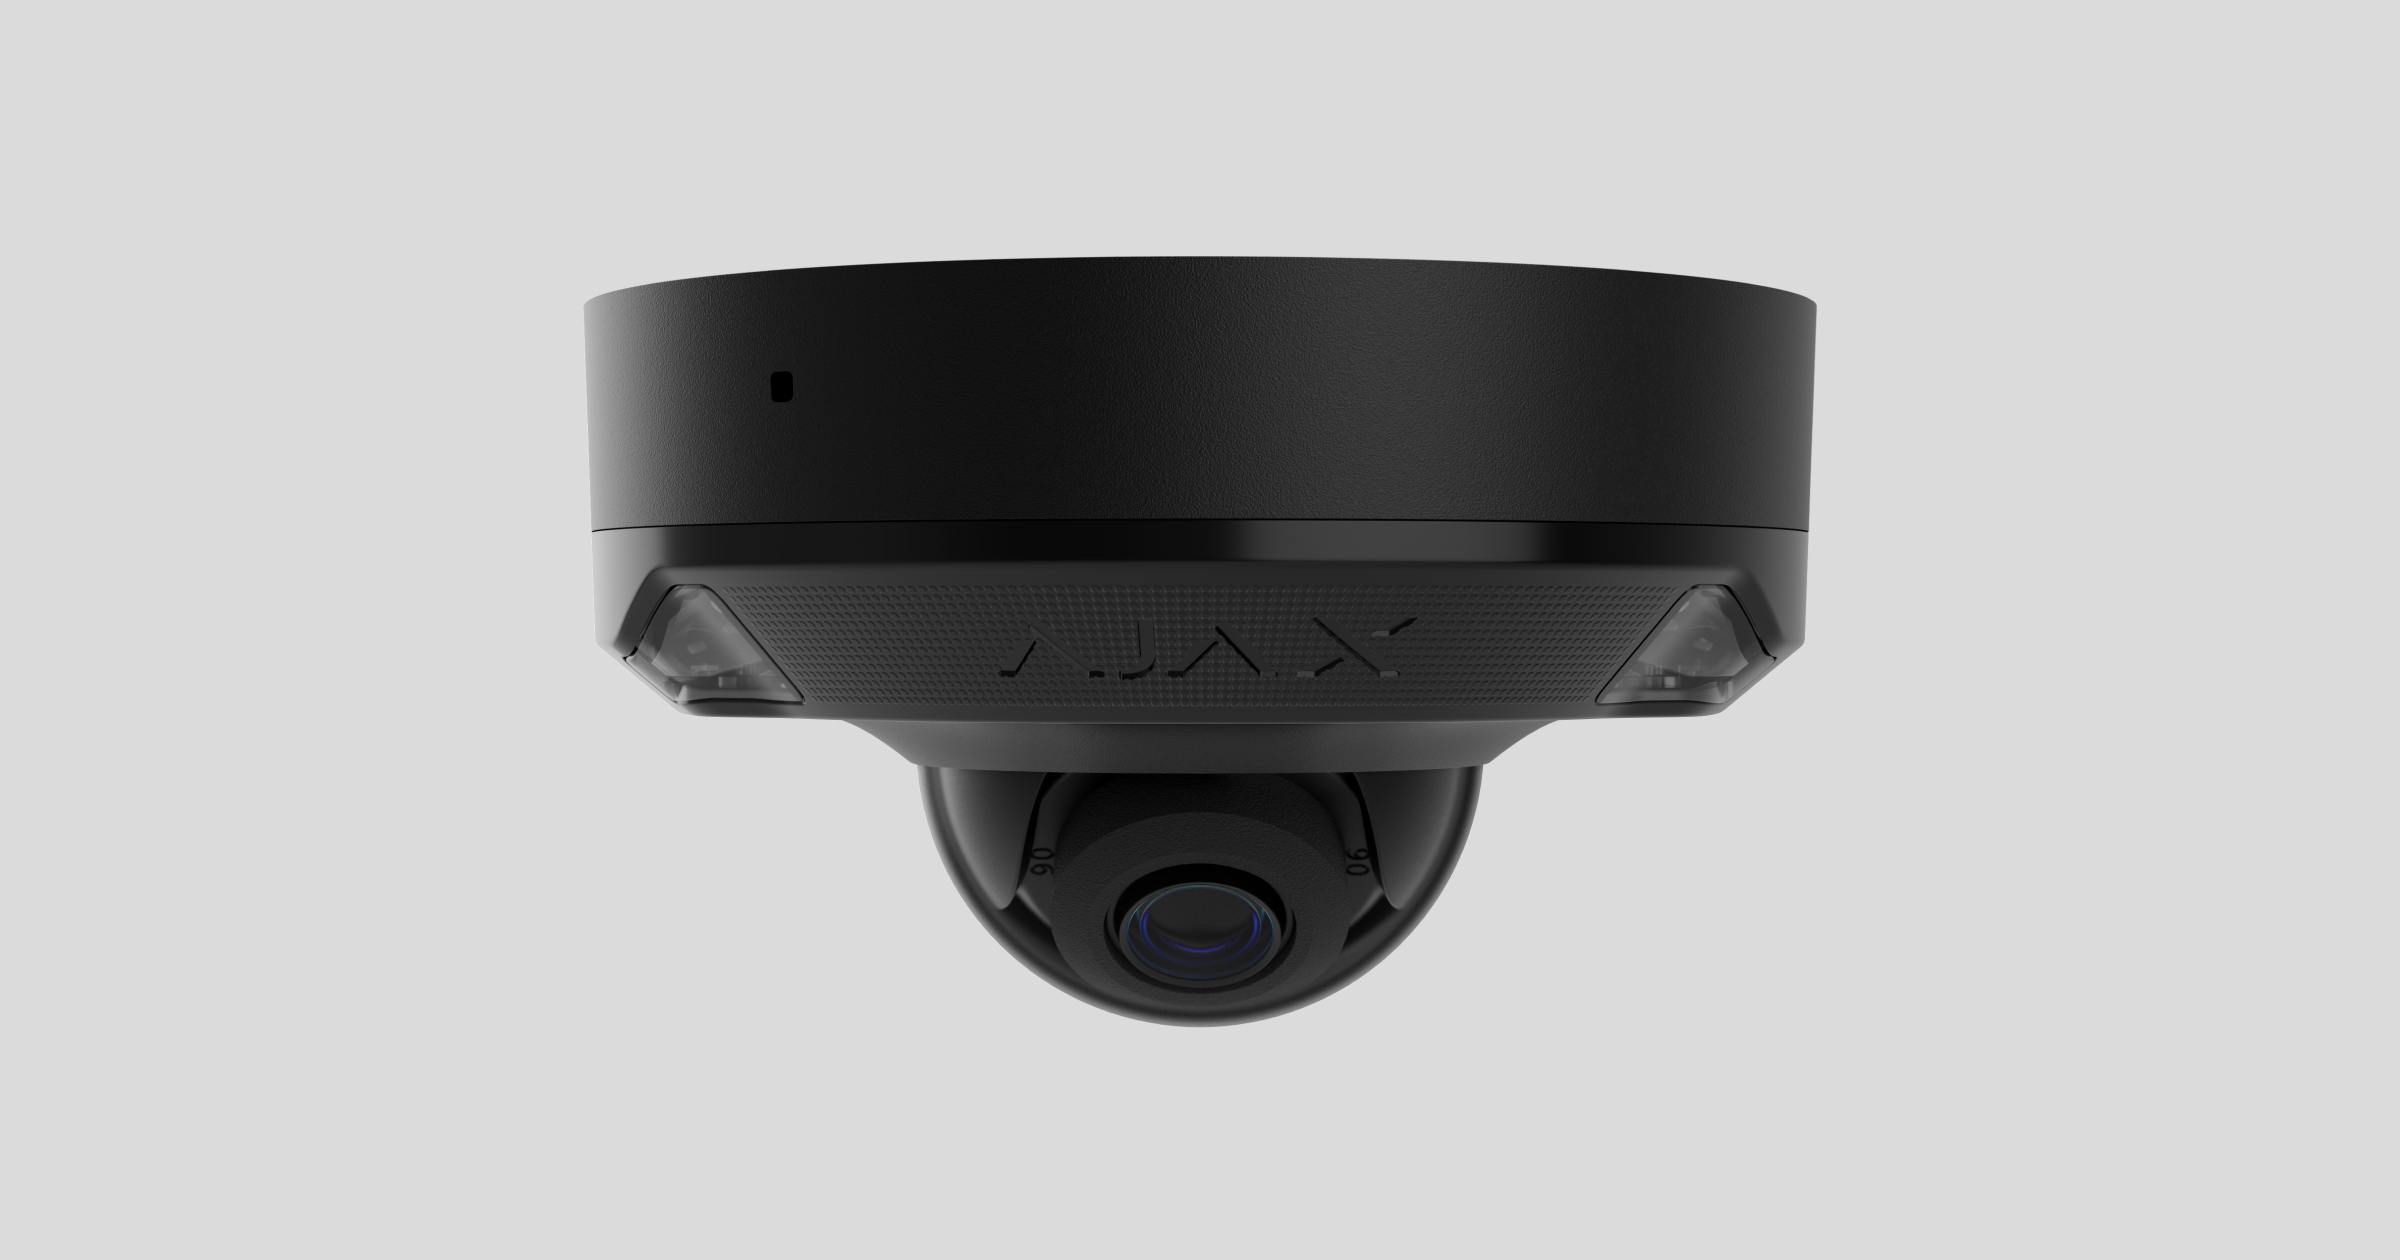
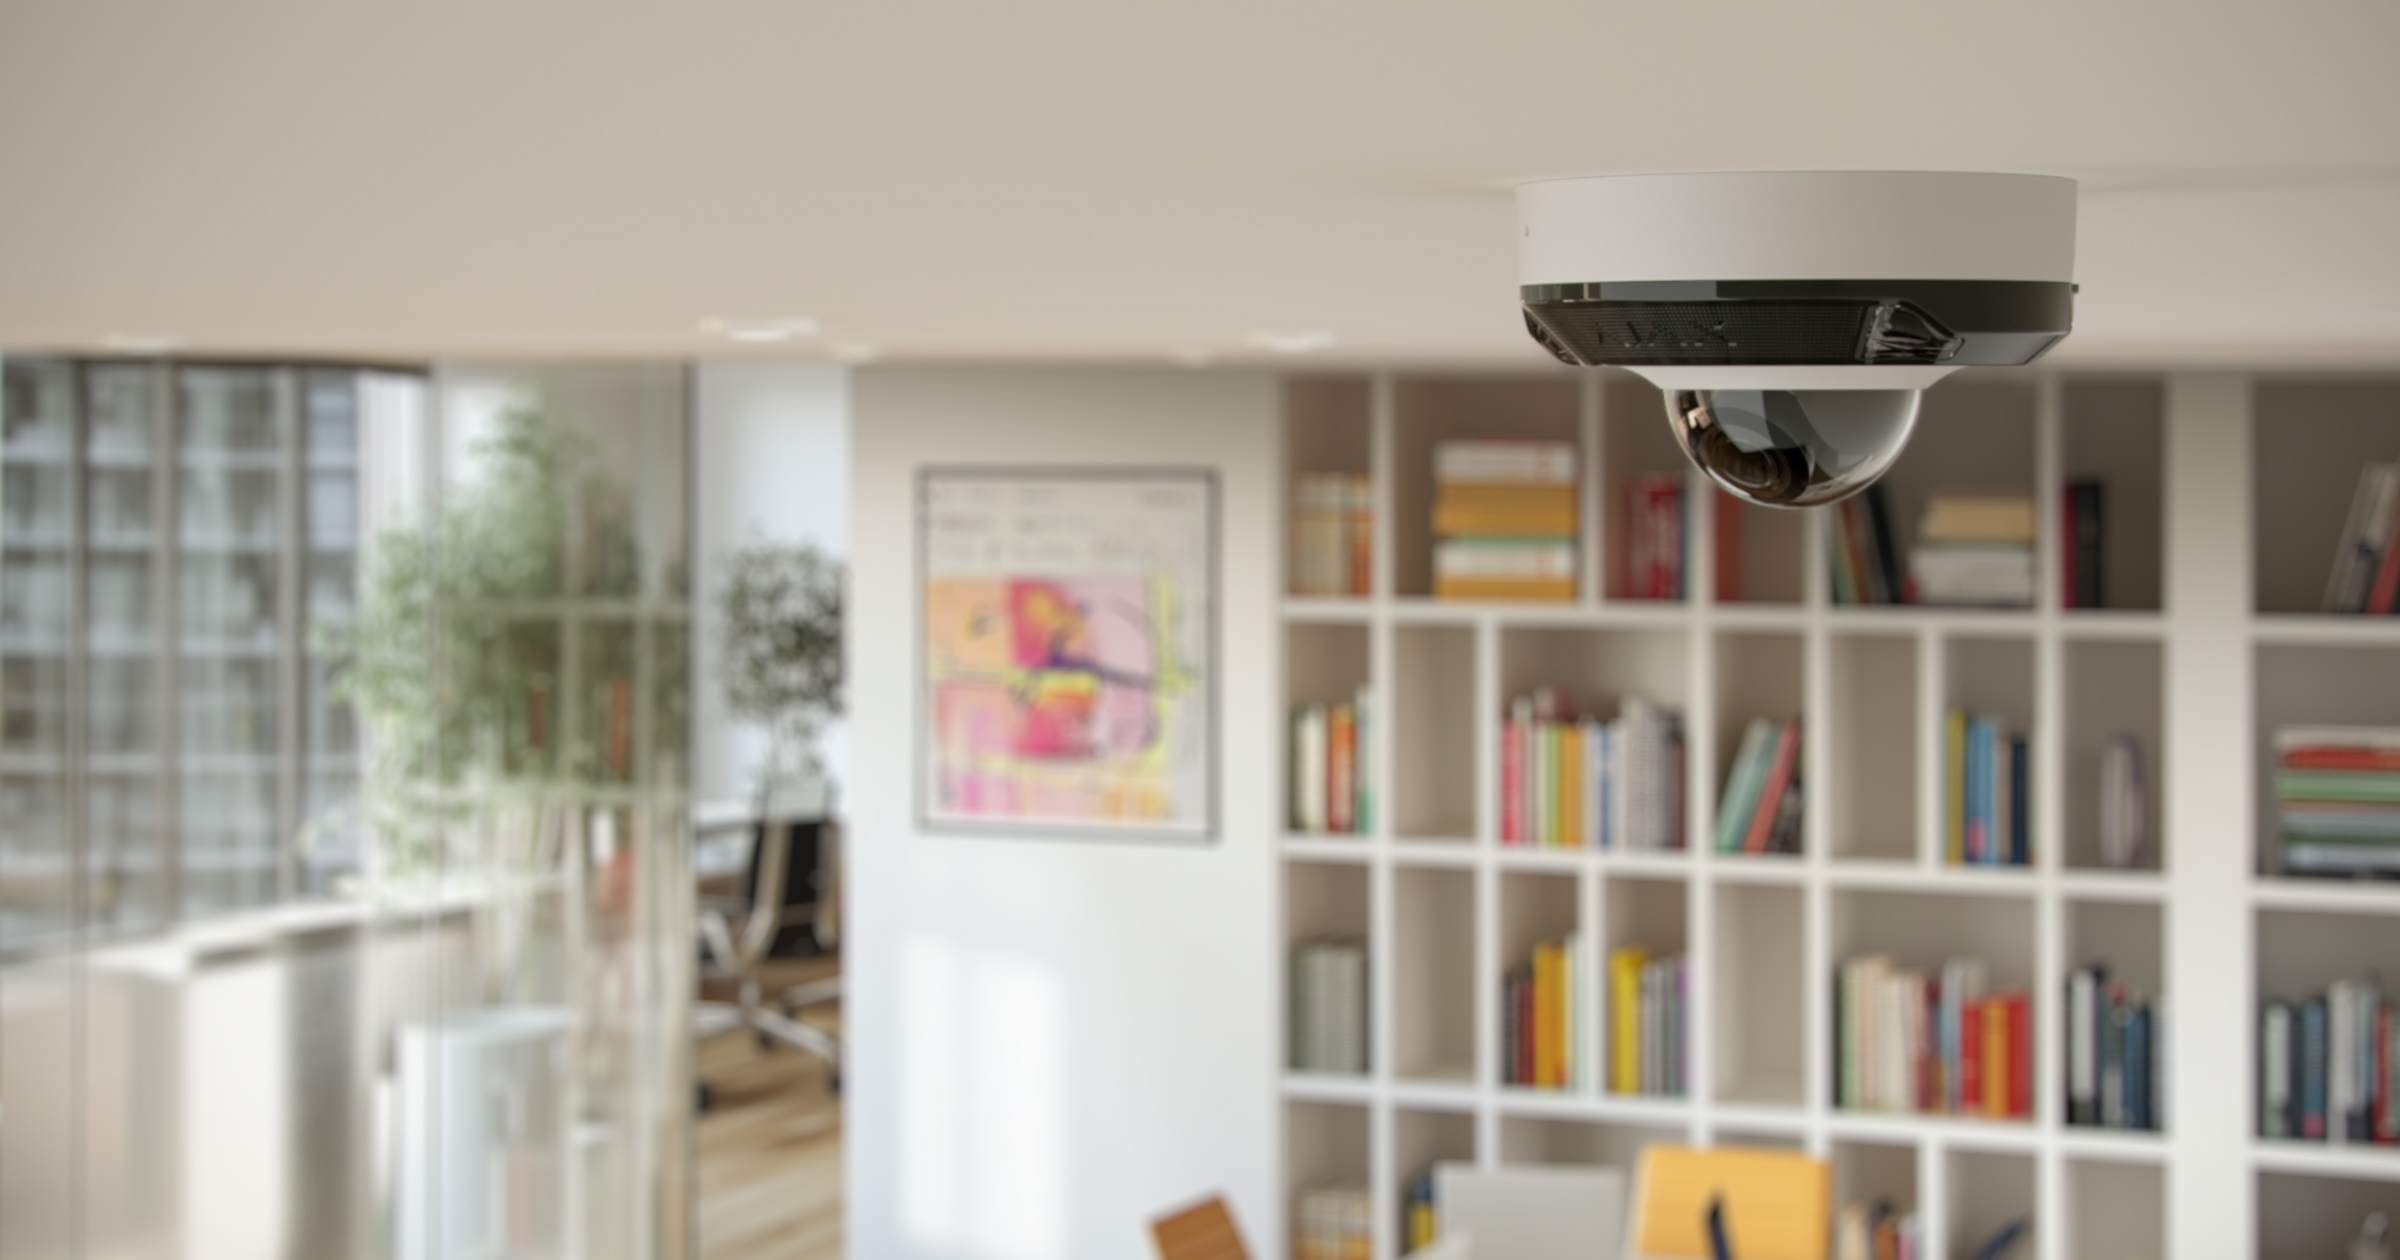
DomeCam Mini HL to przewodowa kamera IP ze sztuczną inteligencją i hybrydowym oświetleniem, które poprawia jakość obrazu w nocy. W standardowym trybie nocnym kamery wykorzystują podświetlenie w podczerwieni. Po wykryciu ruchu kamera DomeCam Mini HL natychmiast włącza białe światło, aby wydobyć kolory obiektu. Kamera wyposażona jest w funkcję wykrywania ruchu i rozpoznawania obiektów oraz umożliwia użytkownikom przeglądanie zarchiwizowanych filmów i podgląd transmisji na żywo. Kamera jest przeznaczona do użytku zewnętrznego i wewnętrznego.
Kamera jest podłączona do systemu przez sieć Ethernet. Nagrane filmy mogą być przechowywane na rejestratorze Ajax NVR dodanym do tej samej sieci lub na karcie pamięci zainstalowanej w kamerze.
Kamera jest dostępna w kilku wersjach:
- DomeCam Mini HL (5 Mp/2.8 mm);
- DomeCam Mini HL (5 Mp/4 mm);
- DomeCam Mini HL (8 Mp/2.8 mm);
- DomeCam Mini HL (8 Mp/4 mm).
Dostępne są również wersje kamer z innymi wersjami obudowy. Wszystkie kamery Ajax są dostępne tutaj.
Elementy funkcjonalne
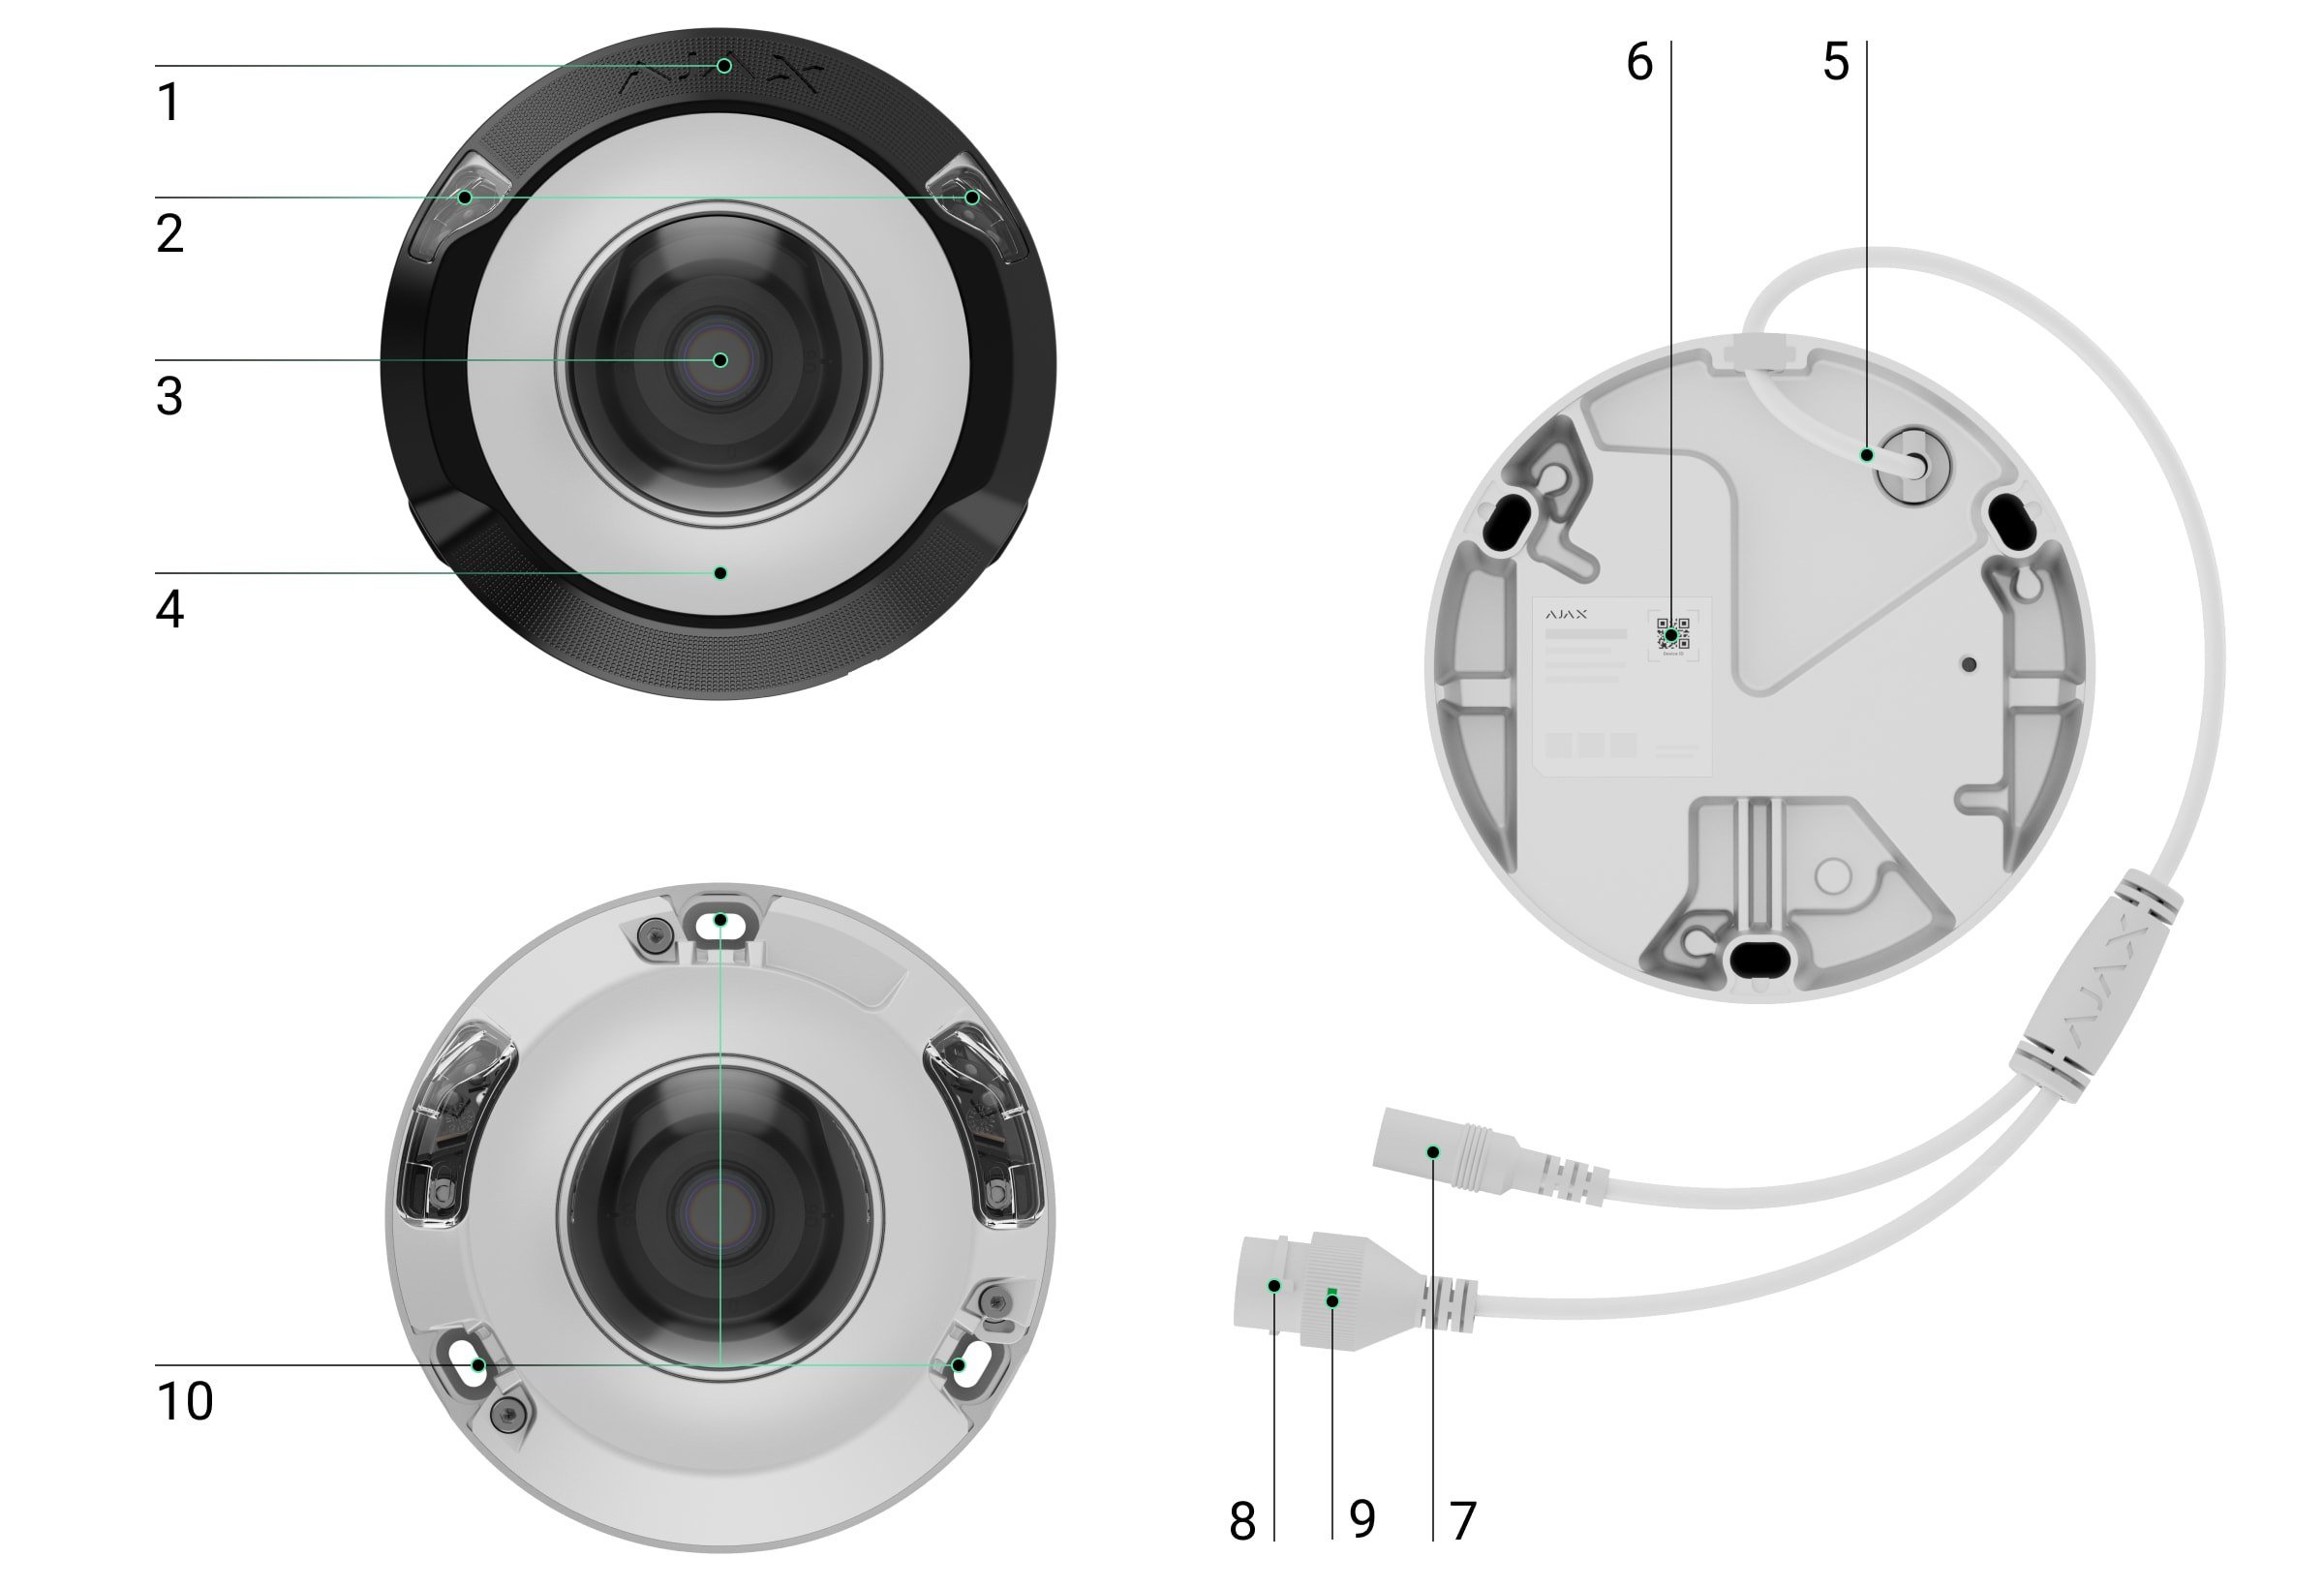
- Plastikowa osłonka.
- Białe i podczerwone diody LED. Służy do nagrywania filmu w ciemności i przy słabym oświetleniu.
- Przezroczysta osłonka ochronna obiektywu.
- Obudowa kamery.
- Przewód ze złączami.
- Kod QR z identyfikatorem urządzenia. Służy do dodawania kamery do przestrzeni.
- Złącze zasilania.
- Złącze Ethernet.
- Wskaźnik LED.
- Otwory do mocowania kamery do powierzchni.
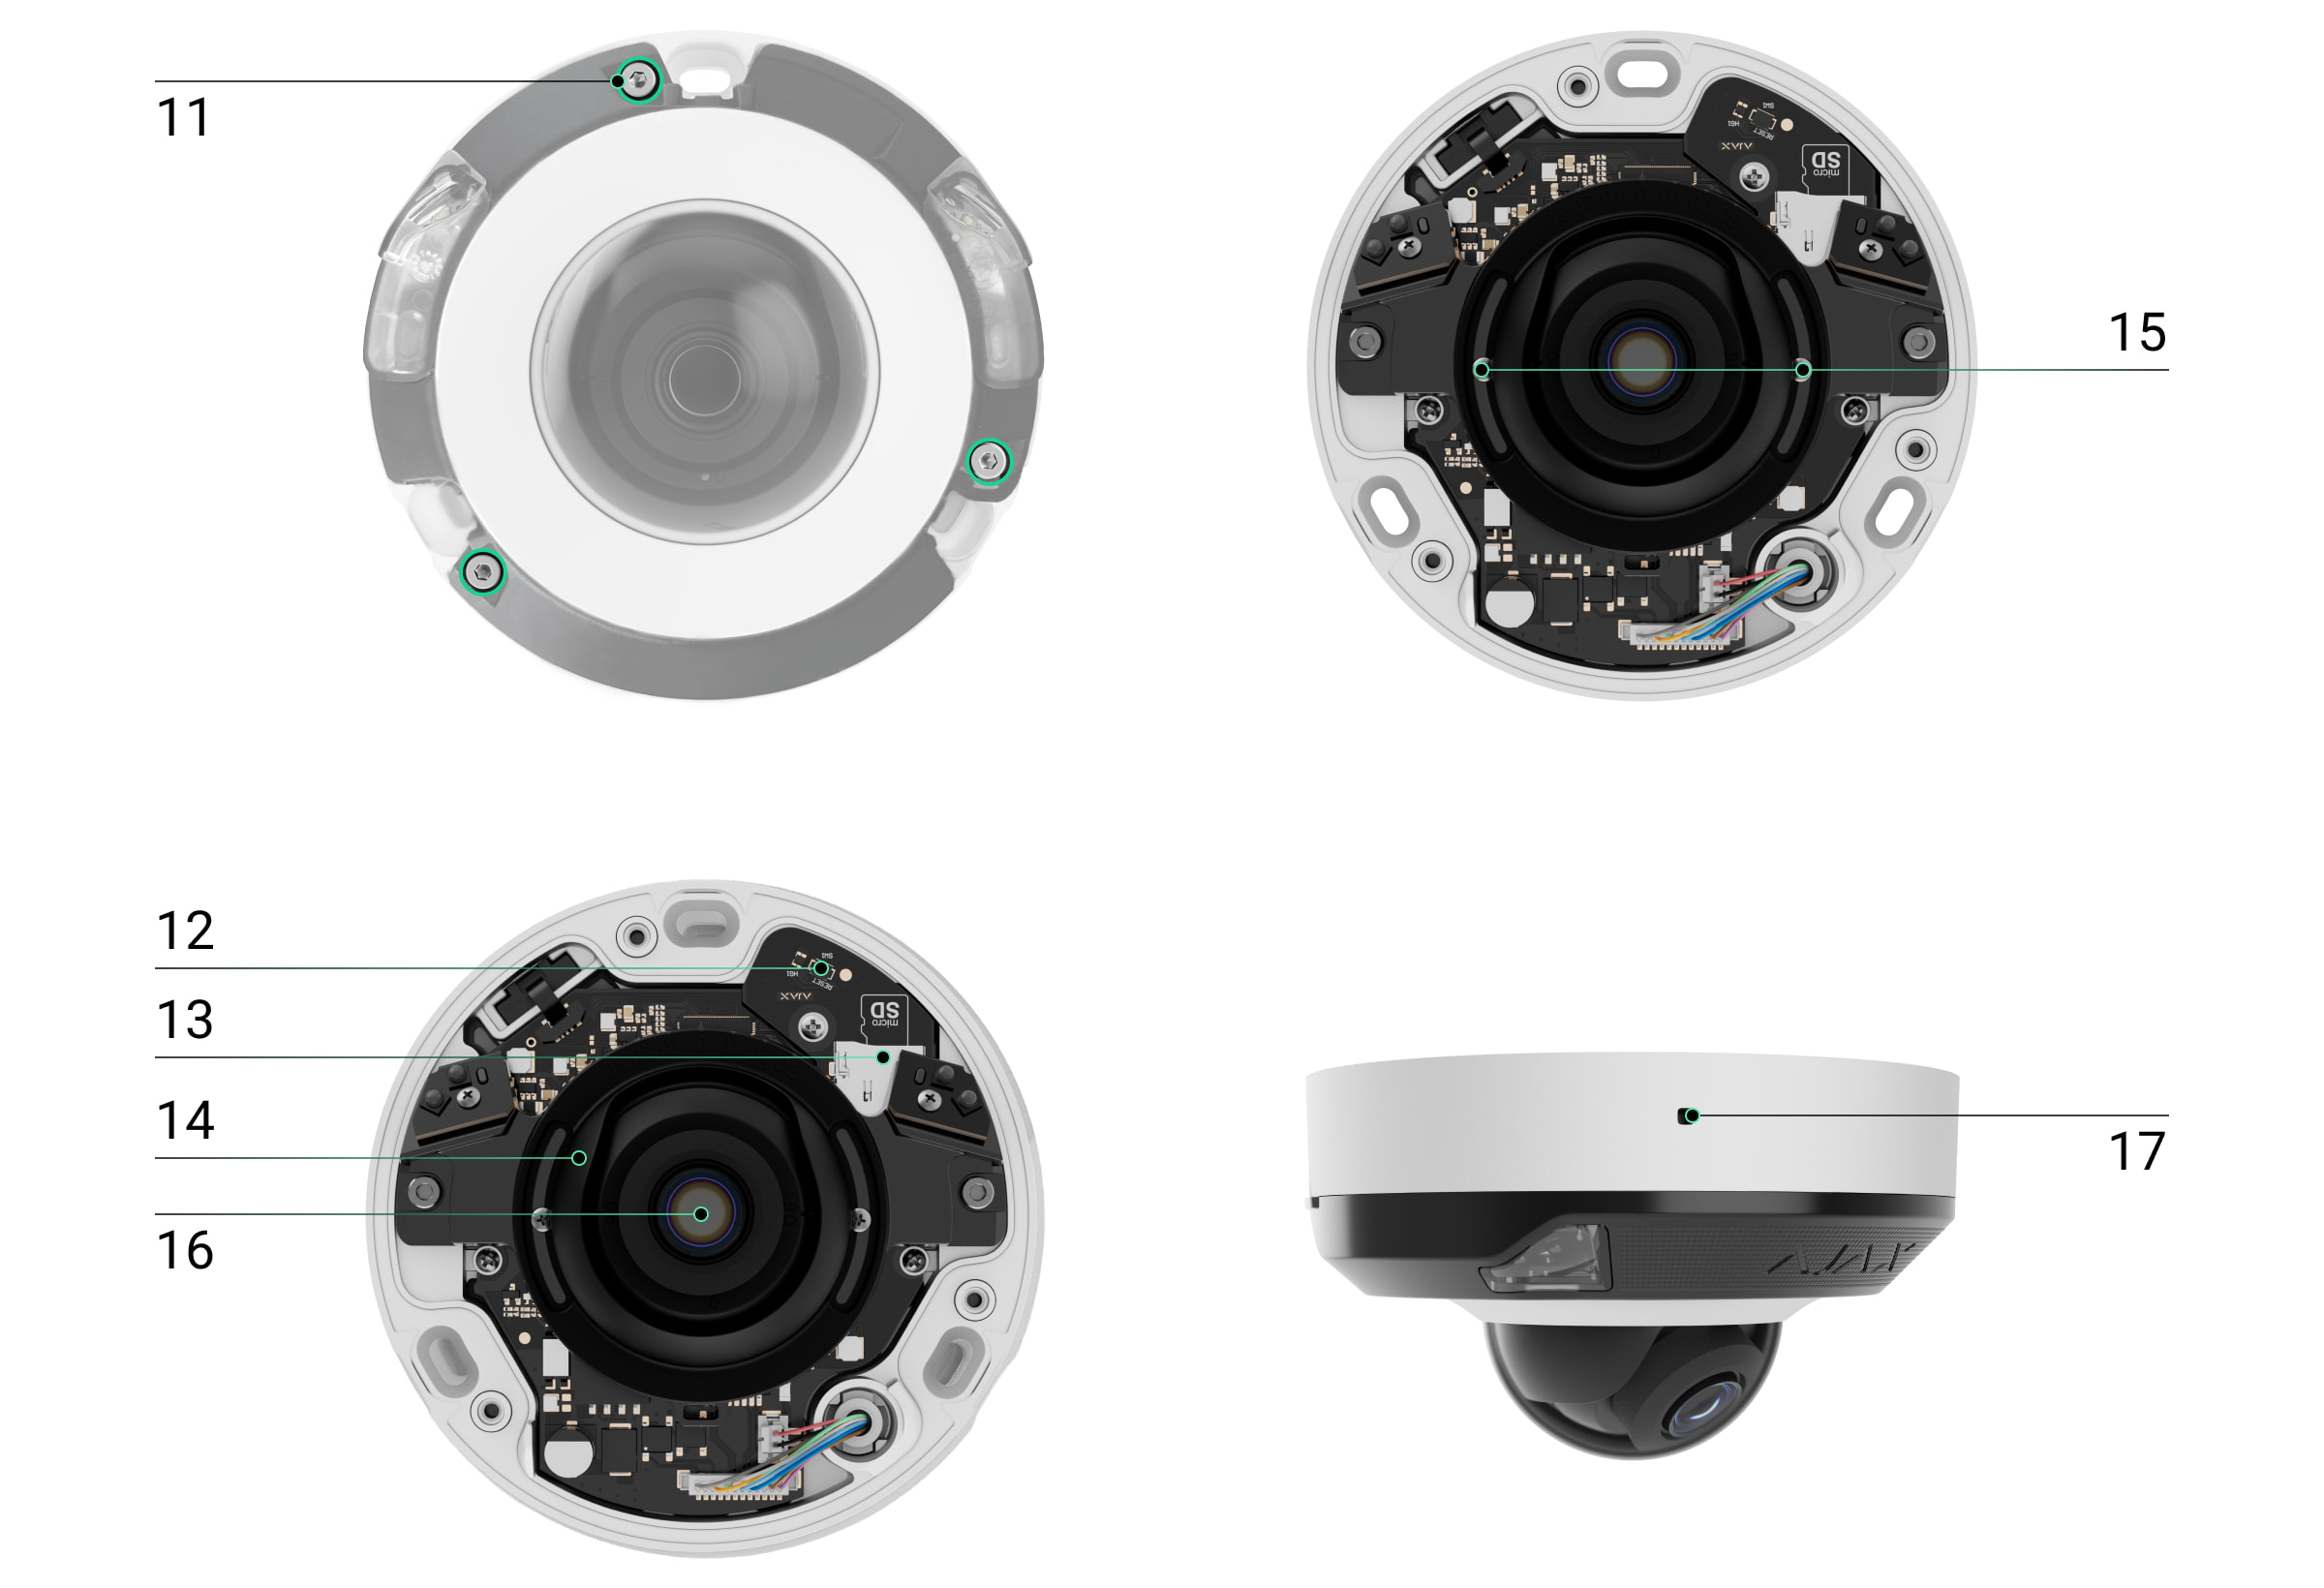
- Wkręty do zamocowania obudowy kamery. Mogą być odkręcone przy pomocy dołączonego klucza sześciokątnego (Ø 2,5 mm).
- Przycisk resetowania ze wskaźnikiem LED.
- Slot na kartę microSD.
- Obudowa obiektywu kamery.
- Wkręty do zamocowania obiektywu kamery.
- Obiektyw kamery.
- Mikrofon.
Zasada działania
DomeCam Mini HL to kamera IP wykorzystująca sztuczną inteligencję (AI) do rozpoznawania obiektów. Jej algorytmy mogą identyfikować ruchome obiekty, rozróżniając ludzi, zwierzęta lub pojazdy.
Urządzenie jest wyposażone w hybrydowe oświetlenie, łączące podczerwień i światło białe, aby zapewnić wysoką jakość obrazu w każdych warunkach oświetleniowych. Kamera DomeCam Mini HL automatycznie przełącza się między podczerwienią a światłem białym w zależności od sceny, zapewniając wyraźne czarno-białe obrazy przy słabym oświetleniu i zapewniając kolorowe obrazy po wykryciu ruchu lub gdy wymagane jest dodatkowe oświetlenie. Kamera dostosowuje również natężenie światła w czasie rzeczywistym, aby zapobiec prześwietleniu, zapewniając wyraźną widoczność zarówno bliskich, jak i odległych obiektów.
DomeCam Mini HL ma stopień ochrony IP65, dzięki czemu nadaje się do instalacji na zewnątrz. Solidna metalowa obudowa chroni urządzenie przed sabotażem.
Możesz zainstalować kartę microSD o pojemności pamięci od 32 GB do 256 GB (nie jest zawarta w kompletnym zestawie kamery). Karta pamięci powinna mieć oznaczenie V30 lub szybsze. Ponadto urządzenie może działać bez karty pamięci lub za pośrednictwem NVR.
Korzystając z Kalkulatora pamięci wideo, można obliczyć wymaganą pojemność pamięci dla NVR lub kamery i szacowany czas nagrywania zgodnie z wybranymi ustawieniami transmisji wideo.
DomeCam Mini HL umożliwia:
- Podgląd wideo w czasie rzeczywistym z możliwością przybliżenia obrazu.
- Dostęp do zarchiwizowanych nagrań wideo, nawigacja po nich na podstawie chronologii nagrań i kalendarza (ta funkcja jest dostępna, jeśli w kamerze zainstalowana jest karta pamięci microSD lub jest ona podłączona do NVR z zainstalowanym dyskiem twardym).
- Konfigurowanie stref wykrywania ruchu i dostosowanie poziomu ich czułości.
- Wyświetlanie Ściany wideo, która łączy obrazy ze wszystkich podłączonych kamer.
- Szybki dostęp do sterowania urządzeniami automatyzacji z menu odtwarzacza wideo kamery.
- Tworzenie scenariuszy, które wysyłają krótkie nagranie wideo z wybranej kamery do aplikacji Ajax po wyzwoleniu czujnika bezpieczeństwa.
- Pobierz wymagane segmenty nagranych nagrań wideo z archiwum na smartfony lub komputery (funkcja ta jest dostępna, jeśli w kamery zainstalowana jest karta pamięci microSD lub jest podłączona do NVR z zainstalowanym dyskiem twardym).
- Skonfiguruj połączenie za pomocą ONVIF, aby zintegrować urządzenie z systemami zarządzania wideo (VMS), takimi jak Milestone, Genetec, Axxon i Digifort.

Segmenty nagrań wideo pobrane z kamery DomeCam Mini HL mają podpis cyfrowy Ajax, który weryfikuje integralność wyeksportowanego wideo. Aby zweryfikować autentyczność pobranych nagranych wideo, użyj oprogramowania Ajax Media Player.
Administrator lub PRO z uprawnieniami do konfiguracji systemu może skonfigurować połączenie przez ONVIF w aplikacjach Ajax PRO Desktop i Ajax Desktop.
Scenariusze wideo
System Ajax oferuje możliwość wykorzystania kamer IP do weryfikacji alarmów. Scenariusze wideo pozwalają na uzasadnienie wyzwolenia alarmu poprzez odpowiednie materiały wideo z kamer zainstalowanych w obiekcie.
Kamery można skonfigurować tak, aby reagowały na alarmy z jednego urządzenia, wielu urządzeń lub wszystkich podłączonych urządzeń. Czujniki zespolone są zdolne do rejestrowania różnorodnych typów alarmów, co pozwala na elastyczną konfigurację reakcji na szeroki zakres rodzajów alarmów, niezależnie od tego, czy jest to tylko jeden, kilka, czy wszystkie z nich.
Możesz również skonfigurować syreny, aby aktywowały się, gdy wykryty zostanie ruch lub określony obiekt zostanie rozpoznawany przez sztuczną inteligencję. Gdy urządzenia wideo wykryją ruch lub określony obiekt rozpoznany przez sztuczną inteligencję, system automatycznie aktywuje syreny dodane do huba w celu uruchomienia alarmu.
Ściana wideo
Użytkownik może zarządzać materiałami wideo na karcie Ściana wideo ![]() , dostępnej po dodaniu co najmniej jednej kamery. Funkcja ta zapewnia szybki dostęp do wszystkich podłączonych kamer, wyświetlanych zgodnie z ustawieniami prywatności.
, dostępnej po dodaniu co najmniej jednej kamery. Funkcja ta zapewnia szybki dostęp do wszystkich podłączonych kamer, wyświetlanych zgodnie z ustawieniami prywatności.
W aplikacjach mobilnych Ajax masz możliwość:
- Przełączania między kamerami.
- Wyszukiwania żądanej kamery według nazwy.
- Zarządzania kamerą PTZ.
W Ajax PRO Desktop można:
- Przełączania między kamerami.
- Wyszukiwania żądanej kamery według nazwy.
- Organizowania kamer według pomieszczeń, NVR lub grup.
- Zarządzania kamerą PTZ.
- Zapisywania niestandardowych układów do wyświetlania wideo z kamer.
- Zmiany kolejności wyświetlania obrazu wideo z kamery.
- Tworzenia szablonów do wyświetlania filmów w pokazie slajdów.
Strefy prywatności
System pozwala na ukrycie części kadru. Na przykład, jeśli wrażliwy obszar lub obiekt jest widoczny, aktywność wokół niego może być rejestrowana bez ujawniania jego zawartości poprzez ustawienie odpowiedniej strefy. Żaden ruch ani obiekt nie zostanie wykryty i zarejestrowany w strefie prywatności.
Aby to zrobić, w aplikacji Ajax:
- Przejdź do karty Urządzenia
 .
. - Wybierz kamerę z listy. Opcjonalnie, jeśli kamera jest podłączona do rejestratora wideo, znajdź NVR, naciśnij Kamery i wybierz kamerę.
- Przejdź do stanu urządzenia, dotykając ikony koła zębatego
 .
. - Naciśnij ikonę koła zębatego ponownie, aby otworzyć Ustawienia.
- Wybierz menu Strefy prywatności.
- Otwórz menu Konfiguruj strefy prywatności i wybierz wymaganą strefę.
- Naciśnij ikonę
 i wróć do ustawień kamery.
Użytkownik może utworzyć maksymalnie cztery strefy prywatne.
Aktualizacja oprogramowania sprzętowego
Jeśli dostępna jest nowa wersja oprogramowania sprzętowego dla DomeCam Mini HL, ikona ![]() pojawia się w aplikacjach Ajax na karcie Urządzenia
pojawia się w aplikacjach Ajax na karcie Urządzenia ![]() . Administrator lub PRO z dostępem do ustawień systemu może uruchomić aktualizację poprzez stany urządzenia lub ustawienia. Instrukcje wyświetlane na ekranie ułatwiają pomyślną aktualizację oprogramowania sprzętowego.
. Administrator lub PRO z dostępem do ustawień systemu może uruchomić aktualizację poprzez stany urządzenia lub ustawienia. Instrukcje wyświetlane na ekranie ułatwiają pomyślną aktualizację oprogramowania sprzętowego.
Wybór miejsca instalacji
Wybierając optymalną lokalizację do instalacji kamery DomeCam Mini HL, należy wziąć pod uwagę kąt widzenia kamery i wszelkie potencjalne przeszkody, które mogą zasłaniać jej widok.
Uwzględnij te zalecenia podczas tworzenia projektu systemu alarmowego dla obiektu. System alarmowy powinien być zaprojektowany i zainstalowany przez profesjonalistów. Lista rekomendowanych partnerów jest dostępna tutaj.
Gdzie nie należy instalować kamery
- W pomieszczeniach lub na zewnątrz, gdzie poziomy temperatury i wilgotności nie są zgodne z określonymi parametrami pracy.
- W miejscach, w których obiekty lub konstrukcje mogą zasłaniać widok z kamery.
- W bezpośrednim jasnym świetle lub na jasnych powierzchniach (np. białej ścianie), ponieważ może to pogorszyć jakość obrazu. Jasna powierzchnia odbija podświetlenie podczerwone i oślepia kamerę w ciemności.
Instalacja
Przed zainstalowaniem DomeCam Mini HL należy zapoznać się z zaleceniami dotyczącymi obsługi i konserwacji kamery oraz wybrać optymalną lokalizację zgodną z wymaganiami niniejszej instrukcji.
Należy pamiętać, że niewłaściwe warunki instalacji mogą spowodować kondensację lub uszkodzenie urządzenia.
Podczas podłączania zewnętrznego źródła zasilania i użytkowania urządzenia DomeCam Mini HL należy przestrzegać ogólnych przepisów bezpieczeństwa dotyczących korzystania z urządzeń elektrycznych, jak również wymagań określonych w aktach prawnych dotyczących bezpieczeństwa elektrycznego.
Aby zainstalować urządzenie:
- Podłącz przewód Ethernet do kamery. Jeśli kamera jest zasilana przez PoE, zewnętrzne zasilanie nie jest wymagane; w przeciwnym razie należy podłączyć zarówno zewnętrzne źródło zasilania, jak i przewód Ethernet.
- Włącz zasilanie kamery. Po nawiązaniu połączenia sieciowego wskaźnik LED na złączu przeowdu zaświeci się na zielono.
- Dodaj kamerę do systemu.
- Odłącz przewód Ethernet i zasilacz od kamery.
- Usuń plastikową osłonkę.
- Używając dołączonego klucza sześciokątnego (Ø 2,5 mm), odkręć trzy wkręty mocujące obudowę kamery. Usuń obudowę kamery z osłonką ochronną.
- Włóż kartę microSD (brak w zestawie) do odpowiedniego gniazda.
- Używając śrubokręta, poluzuj oba wkręty mocujące obudowę obiektywu kamery w miejscu.
- Dostosuj pozycję obiektywu w obudowie obiektywu kamery. Dokręć dwa wkręty mocujące obudowę obiektywu kamery.
- Złóż obudowę kamery i dokręcić trzy wkręty mocujące obudowę kamery za pomocą dołączonego klucza sześciokątnego (Ø 2,5 mm).
- Korzystając z szablonu montażowego, zaznacz punkty wiercenia na powierzchni, na której chcesz zamontować kamerę. Przymocuj szablon do wybranego miejsca instalacji za pomocą taśmy i wywierć trzy otwory zgodnie ze wskazaniami na szablonie.
- Poprowadź kabel i przymocuj kamerę do powierzchni za pomocą dołączonych wkrętów.
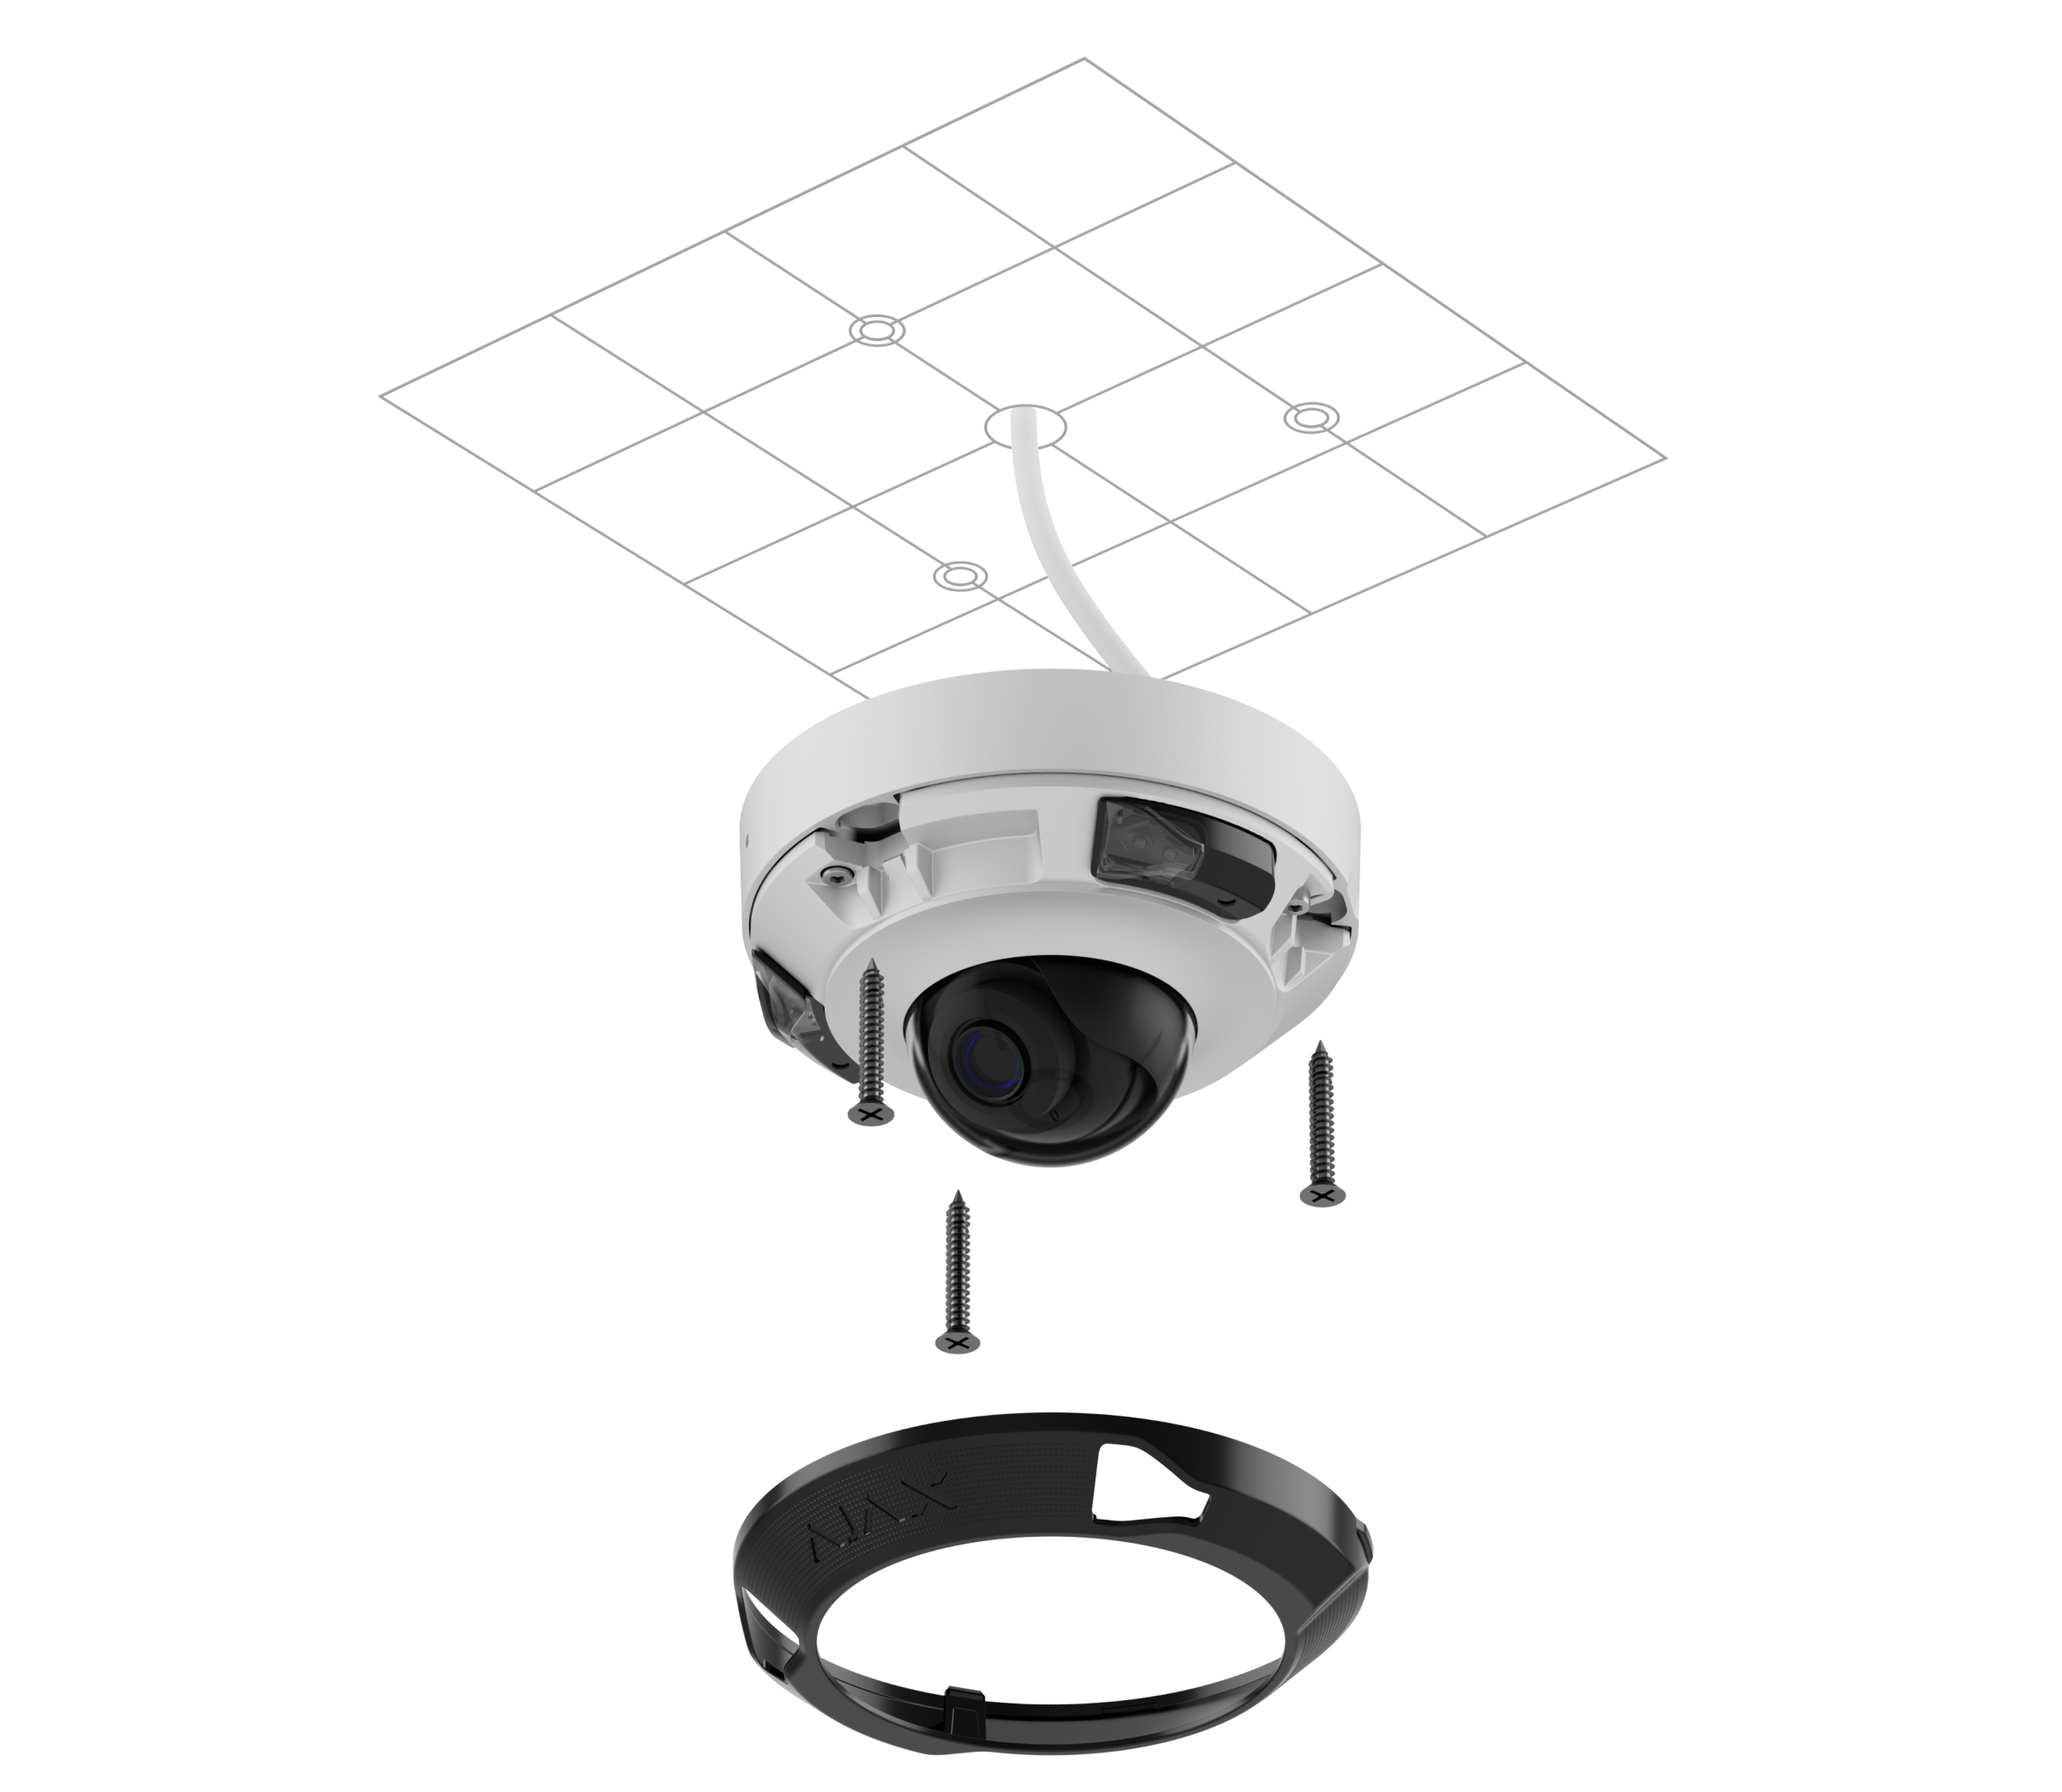
- Zainstaluj plastikową osłonkę.
- Podłącz przewód Ethernet do kamery. Zainstaluj wodoodporny złącze jeśli kamery są używane na zewnątrz lub w pomieszczeniach, gdzie wilgotność przekracza dopuszczalne parametry pracy.

- Jeśli kamera nie jest zasilana przez PoE, podłącz do niej zewnętrzny zasilacz.
Zalecane parametry elektryczne zewnętrznego źródła zasilania to 12 V⎓ ± 20% przy natężeniu prądu wynoszącym co najmniej 1 A.
- Włącz zasilanie kamery. Po nawiązaniu połączenia sieciowego wskaźnik LED zaświeci się na zielono.
- Upewnij się, że obiektyw kamery jest skierowany w stronę chronionego obszaru. W razie potrzeby wyreguluj pozycję obiektywu, zdejmując obudowę kamery i obracając obiektyw w jego mocowaniu.
Po dodaniu kamery DomeCam Mini HL do systemu należy sformatować kartę pamięci w ustawieniach kamery.
Dodawanie do systemu
Przed dodaniem urządzenia
- Zainstaluj aplikację Ajax.
- Zaloguj się na swoje konto lub utwórz nowe.
- Wybierz przestrzeń lub utwórz nową.
- Dodaj co najmniej jedno wirtualne pomieszczenie.
- Upewnij się, że przestrzeń jest rozbrojona.
Tylko PRO lub administrator przestrzeni z uprawnieniami do konfiguracji systemu może dodać urządzenie do przestrzeni.
Dodawanie do przestrzeni
- Otwórz aplikację Ajax. Wybierz przestrzeń, do której chcesz dodać urządzenie.
- Przejdź do karty Urządzenia i naciśnij Dodaj urządzenie.
- Zeskanuj kod QR lub wprowadź ID urządzenia ręcznie. Kod QR z identyfikatorem jest umieszczony na obudowie urządzenia. Jest on również podany na opakowaniu urządzenia.

- Przypisz nazwę urządzeniu.
- Wybierz wirtualne pomieszczenie i grupę bezpieczeństwa (jeśli włączony jest tryb grupowy).
- Naciśnij Dodaj urządzenie, aby kontynuować.
- Poczekaj, aż DomeCam Mini HL nawiąże połączenie. Po połączeniu zobaczysz obraz na żywo z urządzenia.
- Naciśnij Zakończ, aby dodać urządzenie.
Podłączone urządzenie pojawi się na liście urządzeń w aplikacji Ajax.
Należy pamiętać, że DomeCam Mini HL jest kompatybilny tylko z jedną przestrzenią. Aby podłączyć urządzenie do nowej przestrzeni, usuń ją z listy aktualnie przypisanej przestrzeni. Proces usuwania należy przeprowadzić ręcznie w aplikacji Ajax.
Liczbę kamer i rejestratorów NVR, które można dodać do przestrzeni, można obliczyć za pomocą Kalkulatora urządzeń wideo.
Parowanie z Ajax NVR
Jeśli DomeCam Mini HL jest już dodany do przestrzeni jako samodzielne urządzenie, można go w łatwy sposób sparować z rejestratorem Ajax NVR. Jeśli nie, zapoznaj się z sekcją Dodawanie do przestrzeni, aby dowiedzieć się, jak dodać DomeCam Mini HL do NVR lub jako samodzielne urządzenie.
Parowanie DomeCam Mini HL z rejestratorem NVR w aplikacji Ajax:
- Przejdź do karty Urządzenia .
- Wybierz NVR z listy i naciśnij Kamery.
- Naciśnij Dodaj kamerę i poczekaj na zakończenie skanowania sieci i wyświetlenie dostępnych urządzeń podłączonych do sieci lokalnej.
Należy pamiętać, że DomeCam Mini HL musi być podłączony do tej samej sieci lokalnej co rejestrator NVR.
- Wybierz urządzenie.
- Przypisz nazwę do urządzenia, wybierz wirtualne pomieszczenie i grupę, a następnie naciśnij Zakończ.
- Poczekaj, aż system doda urządzenie, a następnie naciśnij Zamknij.
Nowe urządzenie pojawi się teraz na liście kamer NVR w aplikacji Ajax.
Należy pamiętać, że jedną kamerę można sparować z kilkoma rejestratorami wideo w jednej przestrzeni jednocześnie.
Przywracanie ustawień domyślnych
Aby zresetować kamerę do ustawień domyślnych:
- Wyłącz kamerę, odłączając zewnętrzne źródło zasilania lub przewód Ethernet (jeśli kamera jest zasilana przez PoE).
- Naciśnij i przytrzymaj przycisk resetowania.
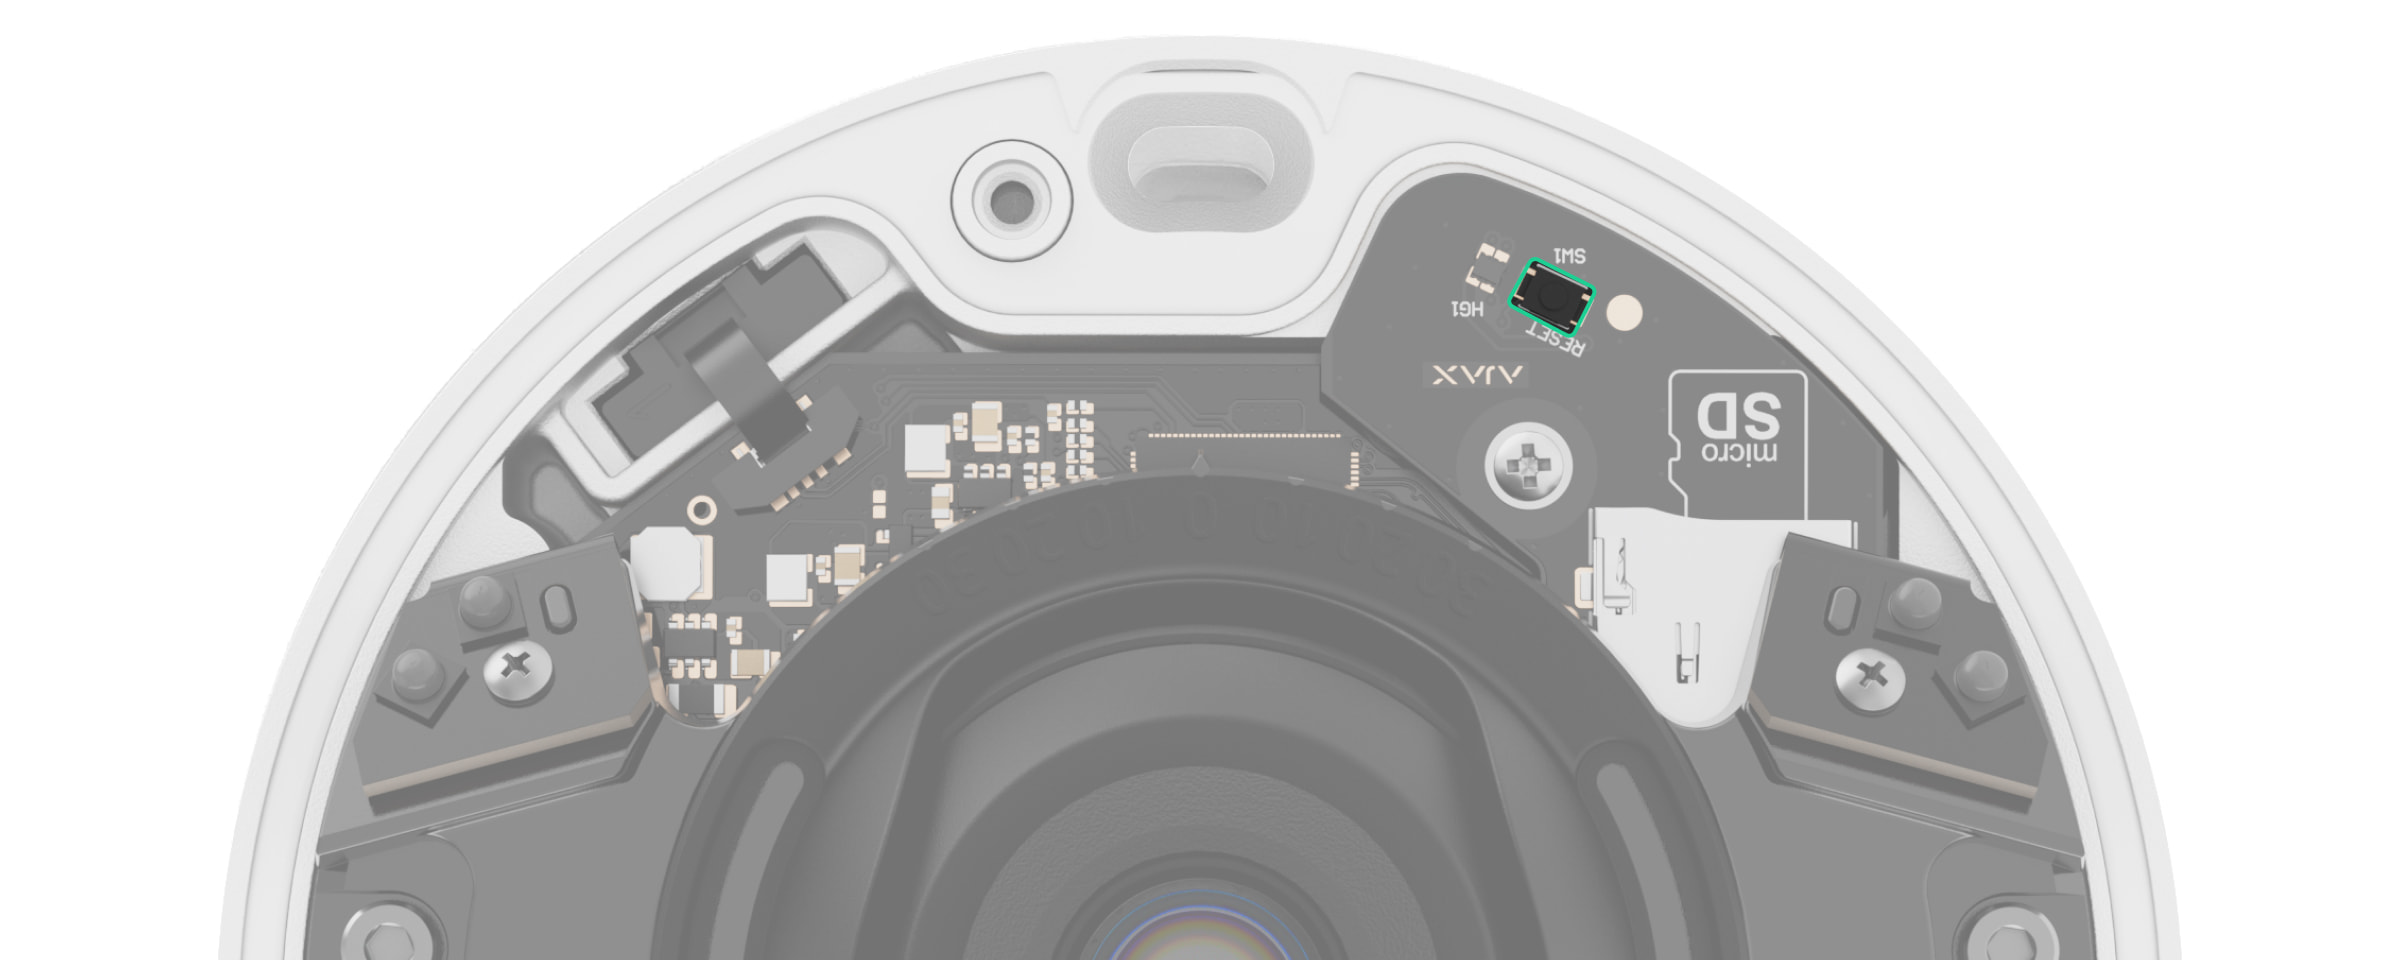
- Podłącz zasilanie do kamery, trzymając wciśnięty przycisk resetowania, a następnie poczekaj, aż wskaźnik LED przycisku zaświeci na fioletowo. Powinno zająć to około 50 sekund.
Wskaźnik LED przycisku zapala się na niebiesko przez 20 sekund po włączeniu kamery przyciskiem resetowania. Następnie wyłącza się na 30 sekund i zapala się fioletowo. Oznacza to, że w kamerze przywrócono ustawienia domyślne.
- Zwolnij przycisk.
Ikony
Ikony w aplikacji wyświetlają niektóre stany urządzenia. Aby uzyskać do nich dostęp:
- Wybierz przestrzeń w aplikacji Ajax.
- Przejdź do karty Urządzenia .
- Znajdź DomeCam Mini HL na liście.
| Ikona | Znaczenie |
|
Dodatkowe usługi są aktywowane zgodnie z subskrybują. |
|
|
Urządzenie działa w Trybie nocnym. |
|
| Karta microSD nie jest zainstalowana. | |
| Karta microSD jest zainstalowana. | |
| Wykryto nieprawidłowe działanie karty microSD. Zalecane jest sformatowanie karty microSD. | |
| Karta microSD jest formatowana. | |
| Dostępna jest nowa wersja oprogramowania sprzętowego. | |
| Trwa aktualizacja oprogramowania sprzętowego: pobieranie/instalowanie najnowszej wersji. | |
| Podczas aktualizacji oprogramowania sprzętowego wykryto błąd. | |
| Urządzenie utraciło połączenie z serwerem Ajax Cloud. | |
|
Połączenie urządzenia przez ONVIF jest włączone. |
|
| Nie ma dostępu do podglądu wideo urządzenia. |
Stany
Stany zawierają informacje o urządzeniu i jego parametrach pracy. Stany DomeCam Mini HL można znaleźć w aplikacjach Ajax:
- Przejdź do karty Urządzenia .
- Wybierz DomeCam Mini HL z listy. Opcjonalnie, jeśli kamera jest podłączona do rejestratora wideo, znajdź NVR, naciśnij Kamery i wybierz DomeCam Mini HL.
- Przejdź do stanu urządzenia, dotykając ikony koła zębatego .
| Parametr | Znaczenie |
| Usługi dodatkowe |
Pole jest dostępne w aplikacjach Ajax PRO i wyświetlane, gdy dodatkowe usługi są dostępne lub aktywowane dla urządzenia zgodnie z subskrypcją. Naciśnięcie tego pola powoduje wyświetlenie informacji o przypisanych usługach i kontaktach firmy świadczącej te usługi. |
| Awaria |
Naciśnięcie otwiera Pole to jest wyświetlane tylko w przypadku wykrycia awarii. |
| Aktualizacja oprogramowania sprzętowego | Pole jest wyświetlane, gdy dostępna jest aktualizacja oprogramowania sprzętowego:
Naciśnięcie |
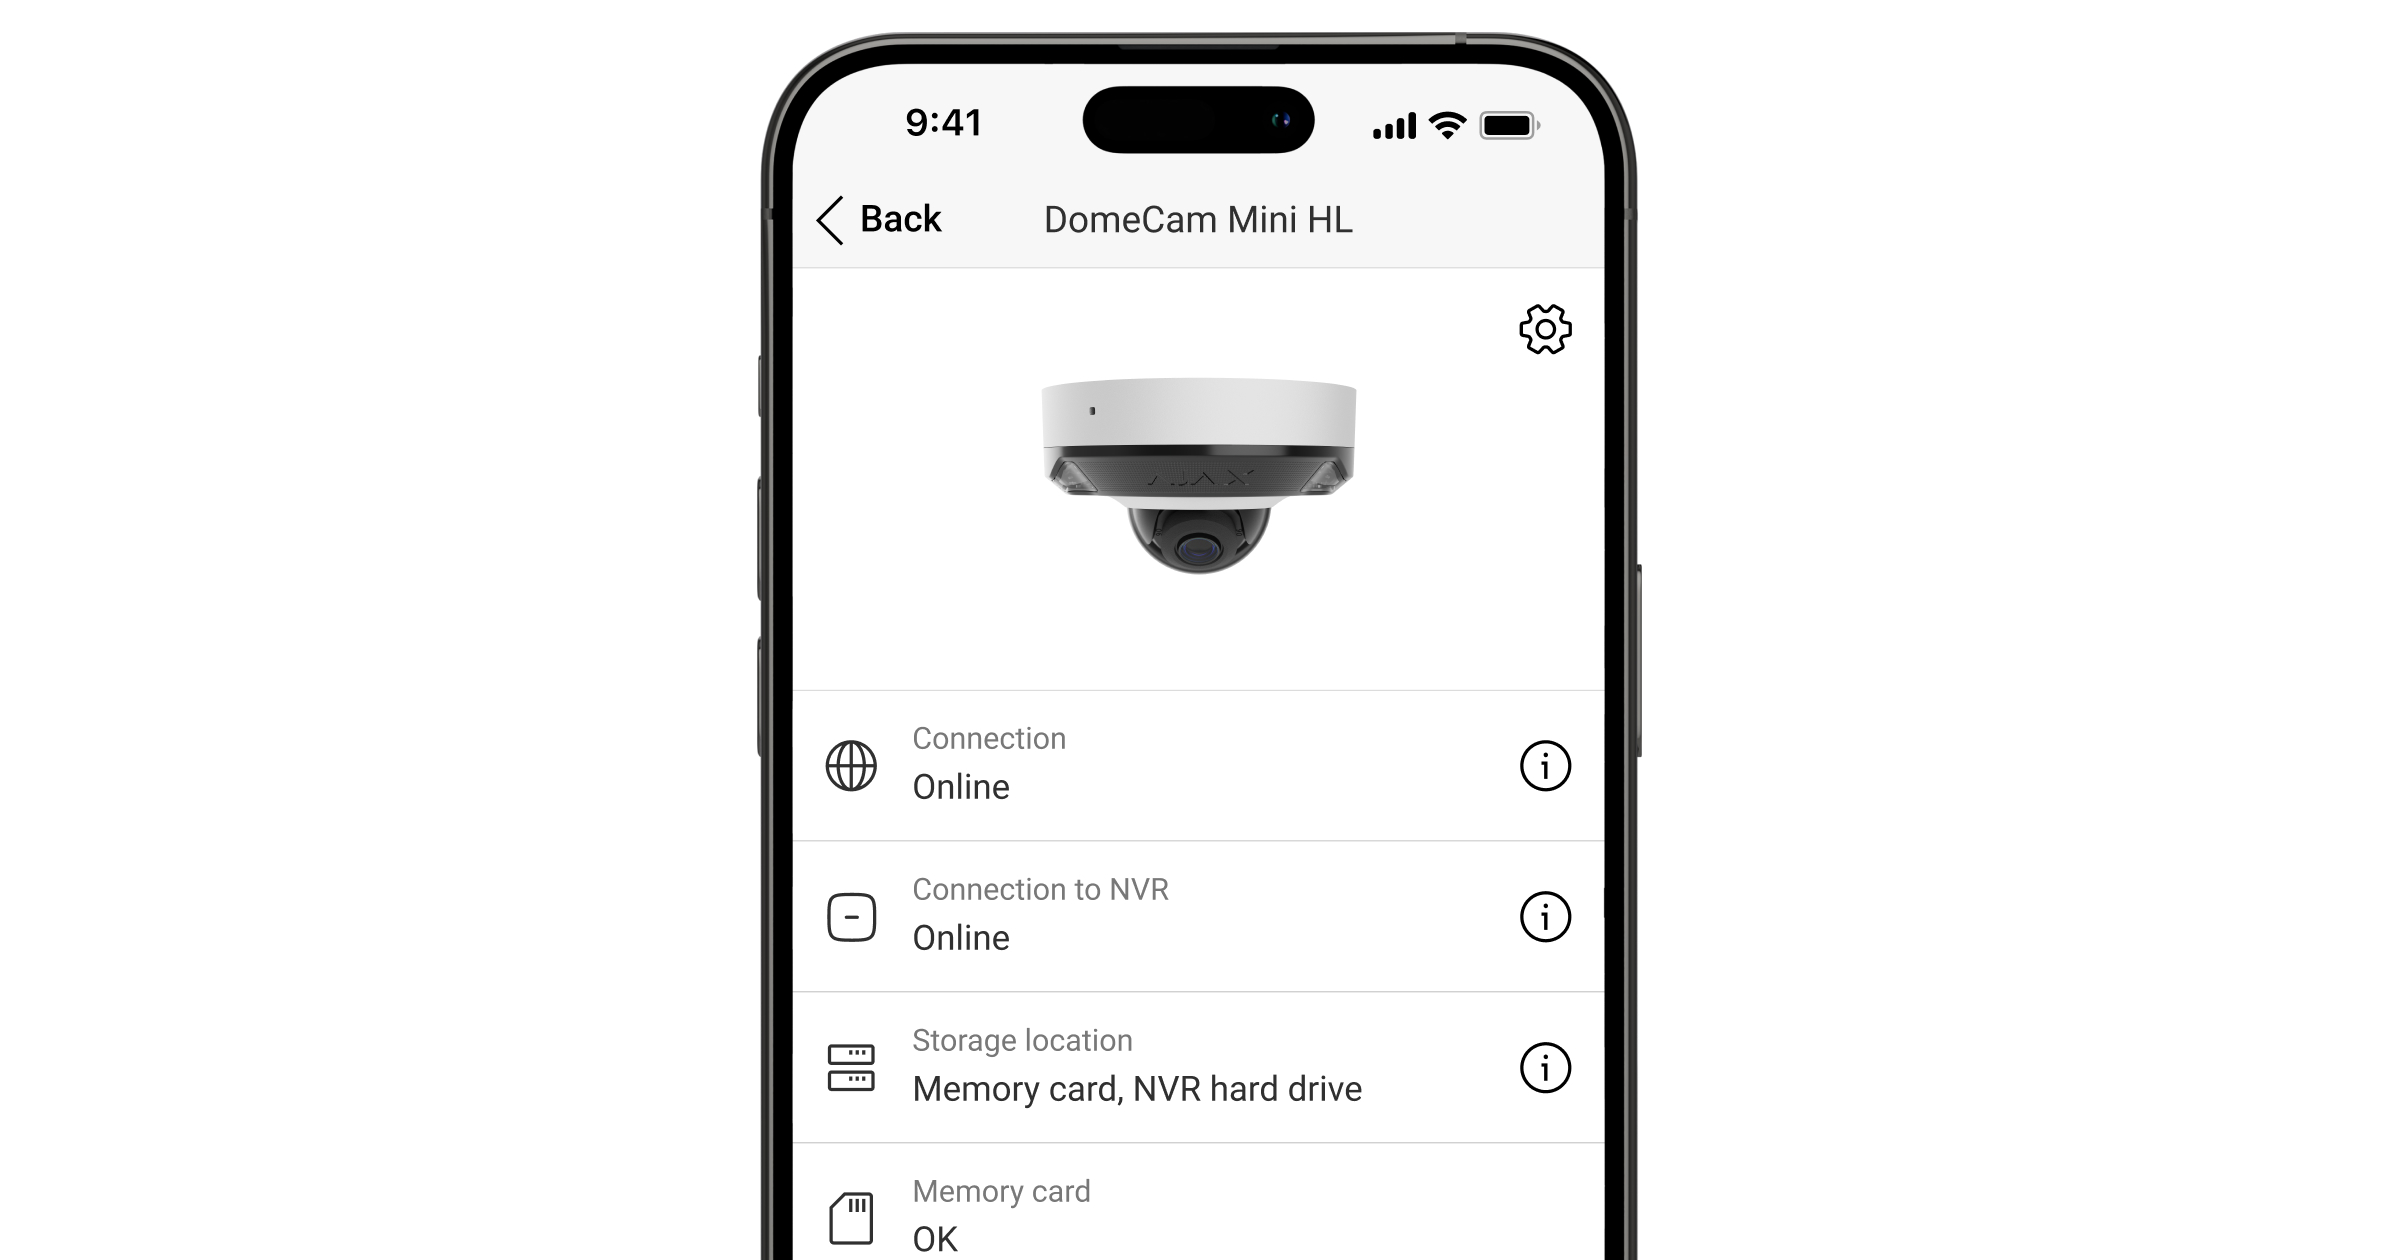
| Połączenie | Status połączenia internetowego urządzenia przez sieć Ethernet:
Naciśnięcie ikony |
| Połączenie z NVR |
Wyświetlane, gdy kamera jest podłączona do NVR. Status połączenia urządzenia z NVR:
Naciśnięcie ikony |
| Miejsce przechowywania | Wyświetla listę urządzeń pamięci masowej podłączonych do kamery:
Naciśnięcie ikony |
| Karta pamięci | Stan połączenia karty pamięci z kamerą:
|
| Rozdzielczość | Bieżąca rozdzielczość kamery. |
| Klatki na sekundę | Bieżąca liczba klatek na sekundę kamery. |
| Szybkość transmisji | Bieżąca szybkość transmisji kamery. |
| Kodek wideo | Bieżący kodek wideo:
|
| Wykrywania ruchu | Status funkcji Wykrywania ruchu:
|
| Wykrywania obiektów | Ustawienia funkcji Wykrywania obiektów:
|
| Integracja z ONVIF |
Pokazuje obecny status integracji ONVIF urządzenia. Stan ten jest wyświetlany tylko wtedy, gdy włączona jest integracja ONVIF. |
| Uprawnienia do wyświetlania |
Wyświetla liczbę użytkowników, którzy mają dostęp do podglądu wideo z urządzenia. Naciśnięcie Stan nie jest dostępny w aplikacjach Ajax PRO. |
| Czas pracy | Czas pracy kamery od ostatniego ponownego uruchomienia. |
| Reakcja na alarm | |
| Tryb pracy | Wskazuje, w jaki sposób urządzenie reaguje na alarmy:
|
| Opóźnienie na wejście |
Opóźnienie na wejście (opóźnienie aktywacji alarmu) to czas, jaki użytkownik ma na rozbrojenie systemu alarmowego po wejściu do obiektu. |
| Opóźnienie na wyjście |
Opóźnienie przy wyjściu (opóźnienie uzbrojenia) to czas, jaki użytkownik ma na opuszczenie chronionego obszaru po uzbrojeniu. |
| Uzbrojenie w Trybie nocnym |
Jeśli ta opcja jest włączona, urządzenie przejdzie do trybu uzbrojenia, gdy system jest ustawiony w Trybie nocnym. |
| Opóźnienie Trybu nocnego na wejście |
Czas opóźnienia na wejście w Trybie nocnym. Opóźnienie na wejście (opóźnienie aktywacji alarmu) to czas, jaki użytkownik ma na rozbrojenie systemu alarmowego po wejściu do obiektu. |
| Opóźnienie Trybu nocnego na wyjście |
Czas opóźnienia przy wyjściu w Trybie nocnym. Opóźnienie przy wyjściu (opóźnienie uzbrojenia) to czas, jaki użytkownik ma na opuszczenie chronionego obszaru po uzbrojeniu. |
| Oprogramowanie sprzętowe | Wersja oprogramowania sprzętowego urządzenia. |
| Identyfikator urządzenia | Identyfikator urządzenia. Dostępne również jako kod QR na obudowie urządzenia i jego opakowaniu. |
Prywatności
Aby zmienić ustawienia kamery w aplikacji Ajax:
- Przejdź do karty Urządzenia .
- Wybierz DomeCam Mini HL z listy. Opcjonalnie, jeśli kamera jest podłączona do rejestratora wideo, znajdź NVR, naciśnij Kamery i wybierz DomeCam Mini HL.
- Przejdź do stanu urządzenia, dotykając ikony koła zębatego .
- Przejdź do Ustawienia, naciskając ikonę kółka zębatego ponownie.
- Ustaw wymagane parametry.
- Naciśnij Powrót, aby zapisać nowe ustawienia.
System Ajax umożliwia PRO stosowanie wielu wstępnie skonfigurowanych ustawień do wielu urządzeń wideo jednocześnie za pomocą szablonów ustawień.
| Prywatności | Znaczenie |
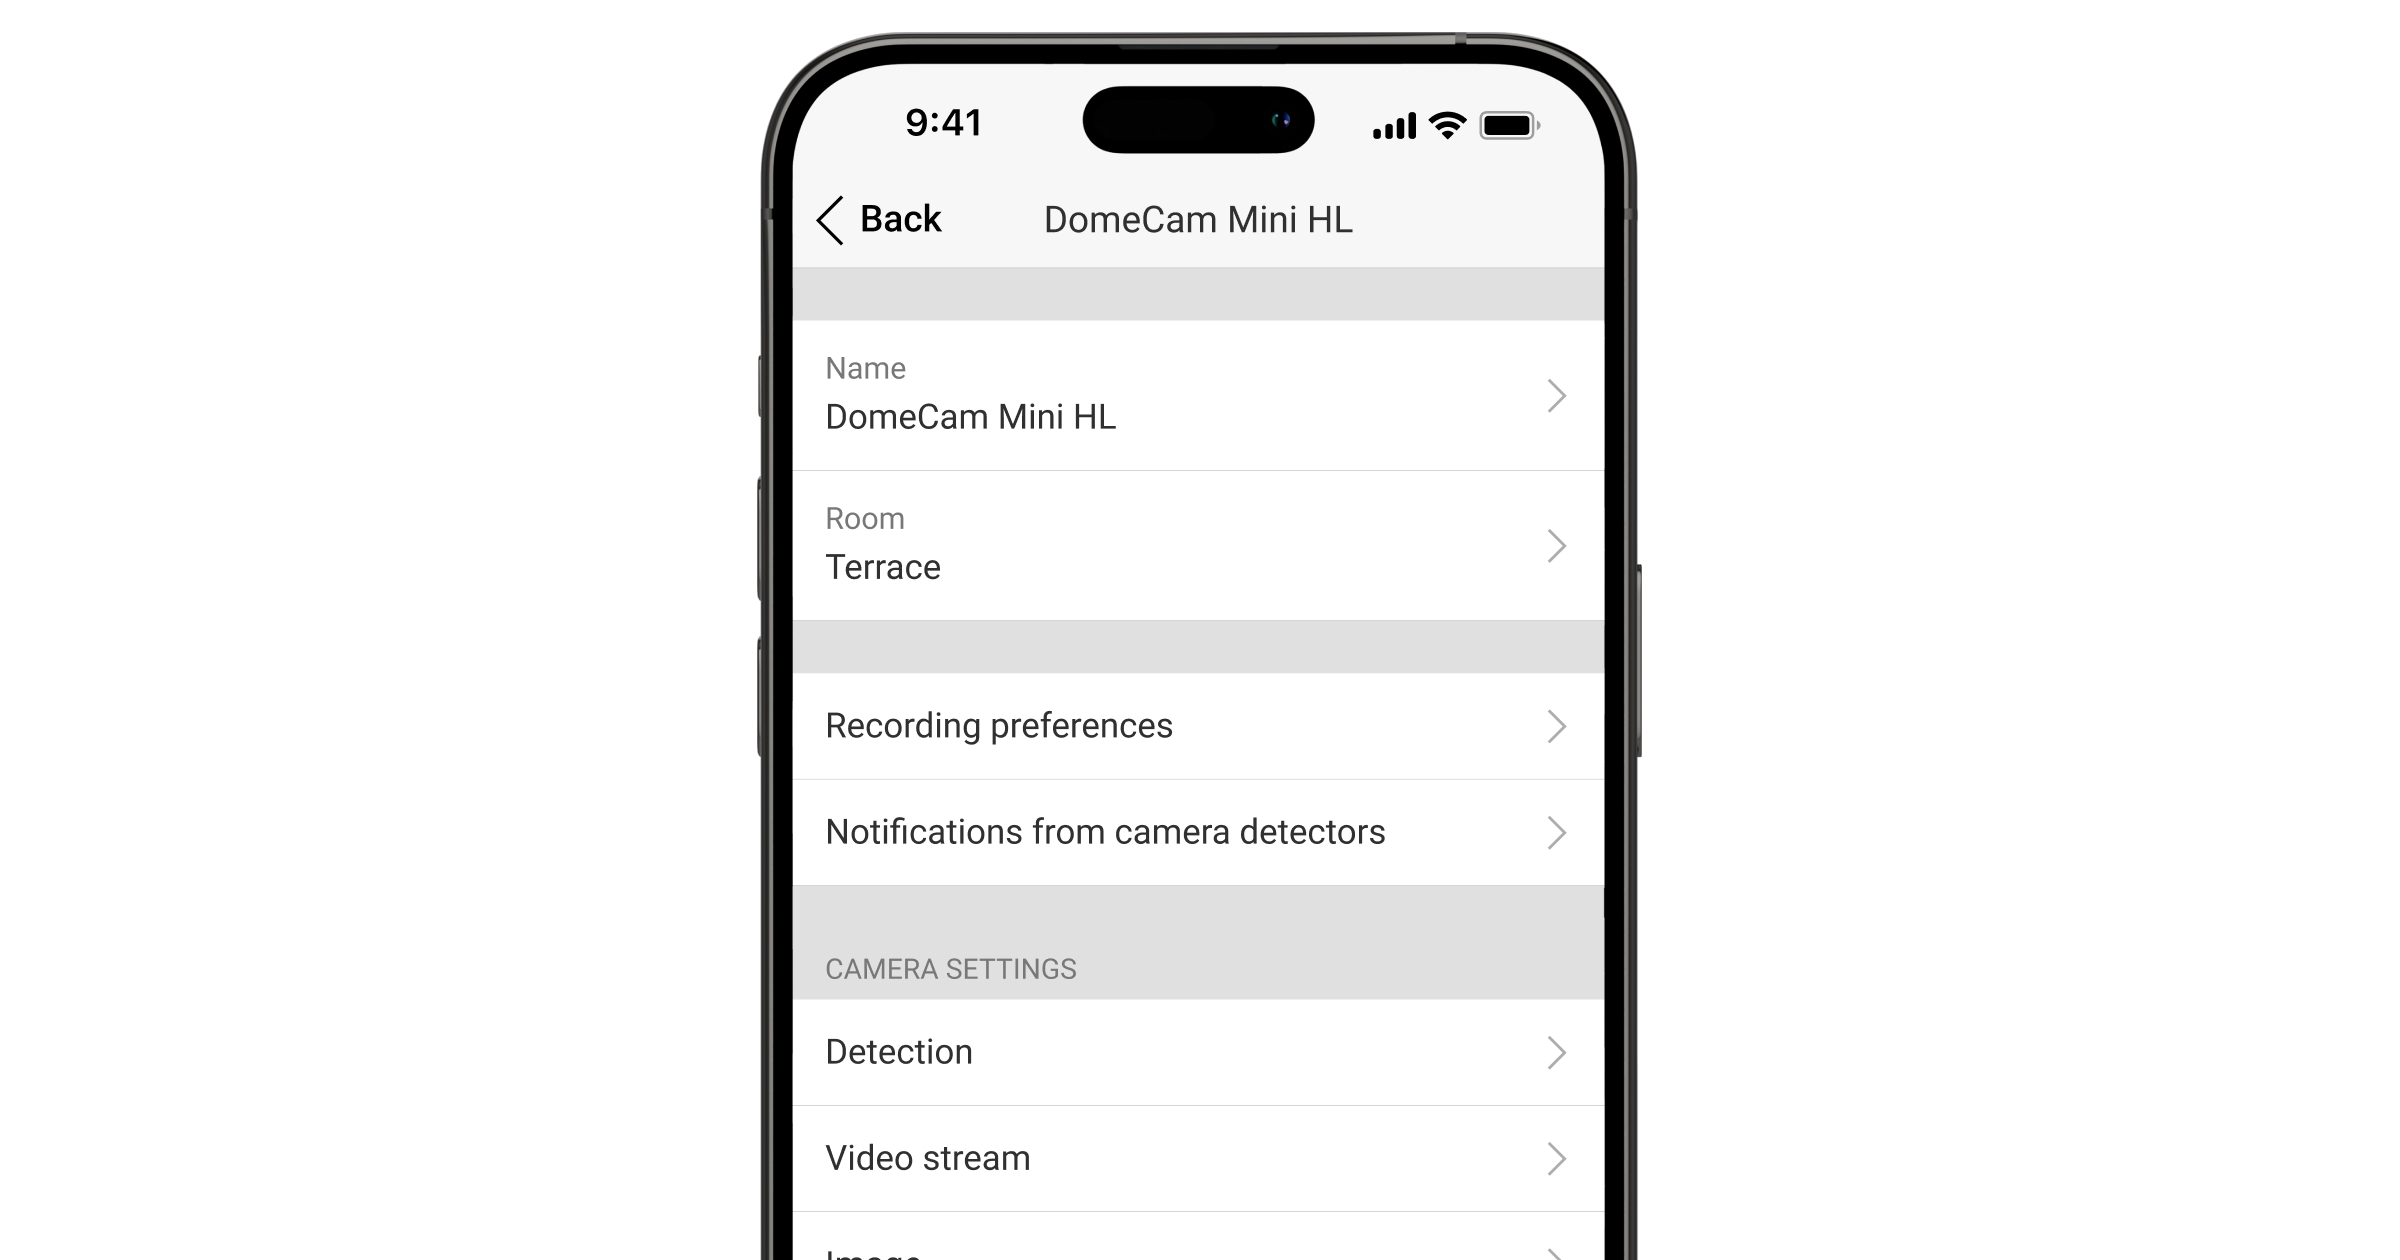
| Nazwa |
Nazwa kamery. Wyświetlana na liście wszystkich urządzeń huba, w SMS-ach i powiadomieniach o zdarzeniach. Aby zmienić nazwę urządzenia, naciśnij pole tekstowe. Nazwa może zawierać do 12 znaków cyrylicy lub do 24 znaków łacińskich. |
| Pomieszczenie |
Wybór wirtualnego pomieszczenia, do którego przypisano DomeCam Mini HL. Nazwa pomieszczenia jest wyświetlana w treści SMS-ów i w powiadomieniach o zdarzeniach. |
| Preferencje nagrywania | Wybór Trybu nagrywania dla każdego urządzenia pamięci masowej:
Wybór trybu uzbrojenia, podczas nagrywania wideo przez kamerę:
|
| Powiadomienia z czujników kamer |
Otwiera menu z ustawieniami Powiadomienia z czujników kamery. |
| Wykrywanie |
Otwiera menu z ustawieniami Wykrywania. |
| Transmisja wideo |
Otwiera menu z ustawieniami Transmisji wideo. |
| Obraz |
Otwiera menu z ustawieniami Obrazu. |
| Dźwięk | Ustawienia przechwytywania i odtwarzania dźwięku.
|
| Strefy prywatności |
Umożliwia użytkownikowi wybranie stref, które nie są wyświetlane w obrazie wideo z kamery. Zamiast tego użytkownik widzi czarny prostokąt. |
| Reakcja na alarm |
Otwiera menu z ustawieniami Reakcji na alarm. |
| Aktualizacja oprogramowania sprzętowego |
Przełącza urządzenie w tryb aktualizacji oprogramowania sprzętowego, jeśli dostępna jest nowa wersja. |
| Połączenie |
Ustawienie wyboru typu połączenia kamery z usługą Ajax Cloud przez sieć Ethernet. Dostępne typy połączeń:
|
| Karta pamięci |
Wybór maksymalnej głębokości archiwum. Może wynosić od 1 do 360 dni lub być nieograniczony. Umożliwia użytkownikowi sformatowanie karty pamięci. |
| Opcje systemowe |
Otwiera menu z ustawieniami Opcji systemowych. |
| Monitorowanie |
Ustawienie jest dostępne w aplikacjach Ajax PRO. Pozwala PRO z uprawnieniami do konfiguracji systemu na ustawienie:
|
| Zgłoś problem | Pozwala opisać problem i wysłać raport. |
| Instrukcja użytkownika | Otwiera instrukcję użytkownika kamery. |
| Odłączanie od NVR |
Usuwa sparowanie urządzenia od rejestratora NVR, z którym zostało sparowane. Opcja jest dostępna, jeśli urządzenie jest sparowane z NVR. |
| Usuń urządzenie | Usuwa wszystkie ustawienia urządzenia i usuwa urządzenie z przestrzeni. Ponadto usuwa sparowanie urządzenia z NVR, jeśli takie połączenie jest ustawione. |
Powiadomienia z czujników kamer
| Prywatności | Znaczenie |
| Powiadomienie w przypadku wykrycia | Użytkownik może wybrać rodzaj obiektu lub ruchu, a gdy zostanie on rozpoznany, zostanie odebrane powiadomienie i aktywowane zostaną syreny:
Każdy typ zdarzenia można skonfigurować za pomocą jednej z następujących opcji alertu: Standardowe powiadomienie lub Alarm. Wybrana opcja określa kolor zdarzenia w kanale powiadomień i typ alertu w telefonie. Należy pamiętać, że odpowiednie rodzaje obiektów lub ruchu powinny być włączone w ustawieniach Wykrywania. Aby określić, czy wykrywanie ruchu ma aktywować syreny, naciśnij na wymagany rodzaj obiektu lub ruchu i włącz opcję Aktywuj syreny po wykryciu. Funkcja jest dostępna po dodaniu kamery i co najmniej jednej syreny do huba Ajax z OS Malevich 2.31 i nowszymi wersjami. Należy pamiętać, że kamera i hub muszą być w trybie online w momencie wykrycia ruchu, aby system mógł aktywować syreny. |
| Kiedy powiadomić | Wybór trybu, w którym kamera wysyła powiadomienia:
|
| Opóźnienie i interwał powiadomień | |
| Odstęp czasowy w zgłaszaniu podobnych zdarzeń |
Wybór interwału czasowego raportowania podobnych zdarzeń: od 30 sekund do 8 godzin. Domyślny interwał wynosi 3 minuty. Wybrany czas dotyczy każdego typu wykrywania osobno i pomaga uniknąć wielokrotnego informowania o tej samej przyczynie wyzwolenia. |
| Czas wykrywania obiektu dla powiadomienia |
Wybieranie, jak długo obiekt powinien pozostawać w polu widzenia kamery, aby system wysłał powiadomienie o wykrytym obiekcie. Dostępne wartości to Natychmiastowe powiadomienie lub 2, 3, 4 lub 5 sekund. Domyślny czas to 2 sekundy. |
Ustawienia wykrywania
| Prywatności | Znaczenie |
| Wykryciu ruchu | Gdy opcja Wykrywanie ruchu jest włączona, kamera wykrywa ruch przy pomocy wbudowanego oprogramowania. |
| Analizowanie obrazu |
Algorytm oprogramowania do analizy obrazu wykorzystywany do wykrywania ruchu. Opcja jest dostępna, gdy włączone jest Wykrywanie ruchu. |
| Ustawienia wykrywania ruchu | Otwiera menu z ustawieniami wykrywania ruchu:
Opcja jest dostępna, gdy włączone jest Wykrywanie ruchu. |
| Wykrywanie obiektów | Gdy opcja jest włączona, kamera identyfikuje rodzaj poruszających się obiektów za pomocą wbudowanego algorytmu. Na nagraniach wideo ludzie, zwierzęta i pojazdy są wyróżnione kolorowymi prostokątami. |
| Ustawienia wykrywania obiektów | Otwiera menu z ustawieniami wykrywania obiektów:
Opcja jest dostępna, gdy funkcja Wykrywania obiektów jest włączona. |
Ustawienia transmisji wideo
Ustawienia parametrów transmisji głównej i dodatkowej (substream).
| Prywatności | Znaczenie |
| Transmisja główna | |
| Kodek wideo | Wybór standardu kompresji wideo:
|
| Rozdzielczość | Wybór głównej rozdzielczości (w zależności od modelu kamery):
|
| Klatki na sekundę | Wybór częstotliwości odświeżania: od 3 do 25 z przyrostem 1 klatki/s. |
| Rodzaj prędkości transmisji | Wybór rodzaju szybkości transmisji:
|
| Szybkość transmisji | Ustawienie szybkości transmisji w kbit/s. |
| Długość GOP | Wybór długości GOP od 1 do 250 z przyrostem co 1 klatkę. |
| Jakość VBR / Jakość CBR | Wybór jakości kompresji: od 0 do 100 z przyrostem 1. |
| Transmisja dodatkowa | |
| Kodek wideo | Wybór standardu kompresji wideo:
|
| Rozdzielczość | Wybór rozdzielczości transmisji dodatkowej:
|
| Klatki na sekundę | Wybór częstotliwości odświeżania: od 3 do 25 z przyrostem 1 klatki/s. |
| Rodzaj prędkości transmisji | Wybór rodzaju szybkości transmisji:
|
| Szybkość transmisji | Ustawienie szybkości transmisji w kbit/s. |
| Długość GOP | Wybór długości GOP od 1 do 250 z przyrostem co 1 klatkę. |
| Jakość VBR / Jakość CBR | Wybór jakości kompresji: od 0 do 100 z przyrostem 1. |
Ustawienia obrazu
Ustawienia jakości obrazu z kamery.
| Prywatności | Znaczenie |
| Ustawienia obrazu | Wybór trybu ustawień obrazu:
|
| Tryb przechwytywania | Wybieranie konkretnych ustawień dla każdej sceny i warunków nagrywania wideo:
Można skonfigurować jasność obrazu, nasycenie kolorów, ostrość i kontrast dla każdego warunku przechwytywania wideo. Tylko dla ustawień Specyficznych dla sceny. |
| Tryb żywy: styl intensywności kolorów | Zmiana ustawień wyświetlania, aby uzyskać cieplejszy, jaśniejszy i bogatszy obraz wykraczający poza naturalne odcienie. |
| Jasność | Regulacja jasności obrazu. |
| Nasycenie kolorów | Regulacja nasycenia kolorów obrazu. |
| Ostrość | Regulacja ostrości obrazu. |
| Kontrast | Regulacja kontrastu obrazu. |
| Szeroki zakres dynamiki (WDR) |
Włączanie lub wyłączanie WDR. Gdy funkcja WDR jest włączona, pomaga w poprawieniu obrazu z kamery w zbyt ciemnych lub jasnych obszarach. |
| Stabilizacja oświetlenia | Regulowanie ekspozycji:
To ustawienie jest dostępne, jeśli włączona jest funkcja Szerokiego zakresu dynamiki (WDR). |
| Tryb Dzień/Noc | Wybór trybu widzenia kamery w zależności od warunków oświetleniowych:
|
| Warunki przełączania trybów | Wybieranie warunków przełączania między trybem dziennym i nocnym:
To ustawienie jest dostępne, jeśli Tryb Dzienny/nocny jest ustawiony na Automatycznie. |
| Oświetlenie sceny | Wybieranie trybu oświetlenia sceny:
|
| Wyzwalacze do przełączania światła | Wybór aktywności w polu widzenia kamery spowoduje aktywację trybu światła białego:
To ustawienie jest dostępne, jeśli dla Oświetlenia sceny wybrano opcję Oświetlenie hybrydowe. |
| Tryb podświetlenia w podczerwieni (IR) | Regulacja intensywności podświetlenia w podczerwieni:
To ustawienie służy do rejestrowania wyraźnych czarno-białych obrazów w nocy lub przy słabym oświetleniu i zapewnia widoczność za pomocą diod LED na podczerwień, gdy konwencjonalne oświetlenie jest nieskuteczne. To ustawienie jest dostępne, jeśli dla Oświetlenia sceny wybrano opcję Oświetlenie w podczerwieni. |
| Intensywność podczerwieni |
Regulacja intensywności podświetlenia w podczerwieni. Ustawienie to jest dostępne, jeśli tryb Oświetlenia w podczerwieni (IR) jest ustawiony na Niestandardowy. |
| Tryb podświetlenia białą diodą LED | Regulacja intensywności podświetlenia białymi diodami LED:
Ustawienie to służy do rejestrowania wyraźnych kolorowych obrazów w nocy lub przy słabym oświetleniu i zapewnia widoczność przy użyciu białych diod LED, gdy normalne oświetlenie jest nieskuteczne. To ustawienie jest dostępne, jeśli dla opcji Oświetlenie sceny wybrano ustawienie Biała dioda LED. |
| Intensywność LED |
Regulacja intensywności białego podświetlenia LED. Ustawienie to jest dostępne, jeśli Tryb podświetlenia białą diodą LED jest ustawiony na Niestandardowy. |
| Obracanie obrazu | Wybór orientacji obrazu z kamery:
|
| Ustaw ekspozycję na podstawie | Wybranego obszaru kadru, na którym oparta jest ekspozycja:
|
| Tryb ekspozycji | Wybór trybu ekspozycji:
|
| Preferencje obrazu |
Regulacja czasu otwarcia migawki w celu zmniejszenia rozmycia ruchu lub zmniejszenia szumów obrazu. To ustawienie jest dostępne, jeśli Tryb ekspozycji jest ustawiony na Automatycznie. |
| Kompensacja ekspozycji |
Możliwość zastąpienia automatycznych ustawień ekspozycji w celu ręcznego sterowania jasnością obrazu. To ustawienie jest dostępne, jeśli Tryb ekspozycji jest ustawiony na Automatycznie. |
| Czas otwarcia migawki |
Wybór czasu otwarcia migawki w celu zapewnienia prawidłowej ekspozycji obrazu. To ustawienie jest dostępne, jeśli Tryb ekspozycji jest ustawiony na Ustawienie ręczne. |
| Redukcja szumów | Włączanie lub wyłączanie redukcji szumów. |
| Wartość parametru |
Regulacja poziomu redukcji szumów. To ustawienie jest dostępne, jeśli włączona jest Redukcja szumów. |
| Anti-flicker (częstotliwość zasilania) | Wybór częstotliwości sieci energetycznej w celu zmniejszenia migotania obrazu. To ustawienie jest używane, gdy kamera rejestruje obraz w warunkach słabego oświetlenia, a na obrazie z kamery widoczne jest migotanie spowodowane częstotliwością sieci elektrycznej. Dostępne parametry:
|
Ustawienia reakcji na alarm
| Prywatności | Znaczenie |
| Tryb pracy | Określa sposób reakcji urządzenia na alarmy:
|
| Opóźnienie na wejście |
Wybór czasu opóźnienia na wejście: od 5 do 255 sekund. Opóźnienie na wejście (opóźnienie aktywacji alarmu) to czas, jaki użytkownik ma na rozbrojenie systemu alarmowego po wejściu do obiektu. |
| Opóźnienie na wyjście |
Wybór czasu opóźnienia na wyjście: od 5 do 255 sekund. Opóźnienie przy wyjściu (opóźnienie uzbrojenia) to czas, jaki użytkownik ma na opuszczenie chronionego obszaru po uzbrojeniu. |
| Uzbrojenie w Trybie nocnym |
Po włączeniu urządzenie przełącza się w tryb uzbrojenia, gdy system jest ustawiony na Tryb nocny. |
| Opóźnienie Trybu nocnego na wejście |
Czas opóźnienia na wejście w Trybie nocnym: od 5 do 255 sekund. Opóźnienie na wejście (opóźnienie aktywacji alarmu) to czas, jaki użytkownik ma na wyłączenie Trybu nocnego po wejściu do obiektu. |
| Opóźnienie Trybu nocnego na wyjście |
Czas opóźnienia na wyjście w Trybie nocnym: od 5 do 255 sekund. Opóźnienie na wyjście (opóźnienie uzbrojenia) to czas, jaki użytkownik ma na opuszczenie obiektu po włączeniu Trybu nocnego. |
| Opóźnienie Trybu nocnego |
Czas opóźnienia w Trybie nocnym: 5 do 255 sekund. Jest to czas, w którym użytkownik musi wyłączyć Tryb nocny (opóźnienie aktywacji alarmu) po wyzwoleniu czujnika Wejścia/Wyjścia. Ustawienie jest wyświetlane, jeśli urządzenie jest ustawione w trybie pracy Follower i włączona jest opcja Uzbrojenie w trybie nocnym. |
Ustawienia usług
| Prywatności | Znaczenie |
| Strefa czasowa |
Wybór strefy czasowej. Zdefiniowana przez użytkownika i wyświetlana podczas odtwarzania wideo z kamer IP. |
| Połączenie przez ONVIF |
Konfigurowanie połączenia urządzenia przez ONVIF z systemami VMS innych firm. |
| Certyfikaty bezpieczeństwa | Umożliwia pobranie wbudowanych certyfikatów w chmurze w celu bezpiecznej integracji HTTPS z systemami innych firm za pośrednictwem ONVIF. |
| Połączenie z serwerem | |
| Opóźnienie alarmu awarii połączenia z chmurą, sek |
Opóźnienie pomaga zmniejszyć ryzyko fałszywego zdarzenia utraty połączenia z serwerem. Opóźnienie może być ustawione w zakresie od 30 do 600 sekund. |
| Interwał odpytywania w chmurze, sek |
Częstotliwość odpytywania serwera Ajax Cloud jest ustawiona w zakresie od 30 do 300 sekund. Im krótszy interwał, tym szybciej zostanie wykryta utrata połączenia z chmurą. |
| Otrzymuj powiadomienia o utracie połączenia z serwerem bez alarmu | Gdy przełącznik jest włączony, system powiadamia użytkowników o utracie połączenia z serwerem za pomocą standardowego dźwięku powiadomienia zamiast alarmu syreny. |
Wskazanie
Zielony wskaźnik LED jest umieszczony na złączu Ethernet kamery.
| Zdarzenie | Wskazanie | Uwaga |
| Połączenie sieciowe zostało nawiązane. | Świeci się na zielono. |
Awaria
Po wykryciu awarii aplikacja Ajax wyświetla licznik usterek na ikonie urządzenia. Wszystkie usterki są widoczne w Stanach kamery. Pola z usterkami zostaną zaznaczone na czerwono.

Awaria jest wyświetlana w następujących sytuacjach:
- Kamera utraciła połączenie z serwerem.
- Awaria urządzenia pamięci masowej kamery. Naciśnij przycisk resetowania kamery lub sformatuj urządzenie pamięci masowej w ustawieniach kamery.
- Urządzenie pamięci masowej wymaga sformatowania. Sformatuj urządzenie pamięciowe w ustawieniach kamery.
Konserwacja
Regularnie sprawdzaj działanie urządzenia. Jeśli zauważalne jest pogorszenie jakości obrazu, utrata wyrazistości lub zaciemnienie, należy sprawdzić, czy kamera nie jest zabrudzona. Czyść na bieżąco obudowę urządzenia z kurzu, pajęczyn i innych zanieczyszczeń. Używaj miękkiej, suchej chusteczki odpowiedniej do konserwacji sprzętu.
Do czyszczenia urządzenia nie należy używać żadnych substancji zawierających alkohol, aceton, benzynę lub inne aktywne rozpuszczalniki. Obiektyw należy przecierać delikatnie: zarysowania mogą prowadzić do niskiej jakości obrazu i awarii kamery.
Należy upewnić się, że kamera jest przechowywana i działa w środowisku spełniającym określone parametry pracy.
Zapobieganie zaparowaniu obiektywu
Obiektyw kamery może zaparować, jeśli jego obudowa zostanie zdemontowana w nieodpowiednich warunkach (np. podczas regulacji pola widzenia obiektywu, instalacji karty microSD, resetowania kamery itp.).
Aby zapobiec parowaniu obiektywu kamery:
- Nie należy demontować obudowy kamery na zewnątrz w warunkach wysokiej wilgotności (np. podczas deszczu, mżawki, mgły itp.).
- Podczas instalacji kamery na zewnątrz należy unikać nagłych zmian temperatury i wilgotności otoczenia.
- Do czasu zakończenia instalacji należy chronić kamerę przed kontaktem z wodą.
- Podczas montażu obudowy kamery należy mocno dokręcić wkręty, aby zapewnić szczelność obudowy.
Kamery Ajax zawierają wewnątrz pochłaniacze wilgoci, jednak może minąć kilka dni, zanim wchłoną nadmiar wilgoci. Jeśli obiektyw kamery pozostaje zaparowany przez ponad tydzień, należy sprawdzić szczelność obudowy lub skontaktuj się z Wsparciem technicznym Ajax.
Dane techniczne
Gwarancja
Gwarancja dla produktów spółki z ograniczoną odpowiedzialnością „Ajax Systems Manufacturing” jest ważna 2 lata po zakupie.
Jeśli urządzenie nie działa prawidłowo, zalecamy skontaktowanie się z Działem wsparcia technicznego Ajax. W większości przypadków problemy techniczne można rozwiązać zdalnie.
Kontakt ze wsparciem technicznym:
Producent: „AS Manufacturing” LLC
