As capacidades da Ajax não se limitam à proteção contra roubos, incêndio e inundação, uma vez que o sistema pode automatizar ações de rotina, poupar tempo e tornar a vida mais confortável.
Já escrevemos sobre como controlar um portão ou uma barreira de tráfego. Este artigo descreve a ligação de estores e persianas elétricos ao sistema Ajax e as nuances do seu controlo através de apps, cenários ou botões e teclados.
Porque é que estores e persianas são necessários e que tipos existem
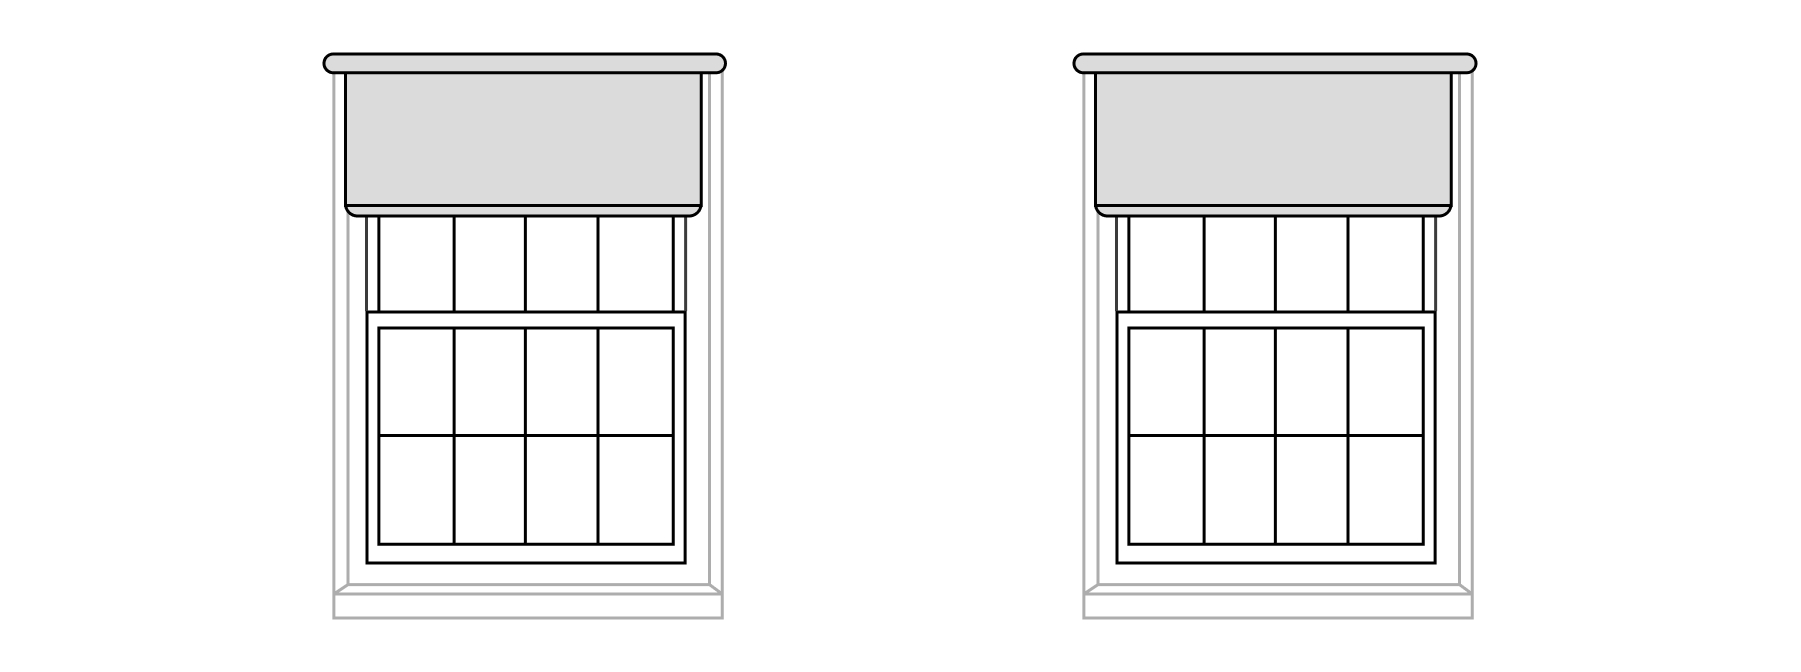
Os estores e as persianas têm objetivos diferentes. As persianas desempenham funções de proteção e bloqueiam o acesso ao território ou às instalações. E os estores são utilizados de forma semelhante às cortinas — protegem da luz e dos olhares indiscretos.
As persianas podem ser utilizadas para proteger janelas, portas e telhados de vidro. Também vale a pena mencionar os portões/grades de enrolar.

Os estores decorativos são normalmente instalados no interior. As suas cortinas podem ser isoladas para reduzir a perda de calor. Protegem da luz solar e, em certa medida, proporcionam isolamento acústico.
Tipos de estores e persianas de acordo com o método de controlo
Os estores e as persianas são abertos/fechados manualmente (mecanicamente) e/ou por transmissão elétrica. As persianas mecânicas podem ser automatizadas através de uma transmissão elétrica.
Que estores/persianas podem ser controlados com Ajax
Ajax pode controlar quaisquer estores/persianas equipados com uma transmissão elétrica.
Se os estores/persianas estiverem equipados com um controlador (modelos mais caros e raros), será necessário ligar os fios aos seus terminais de controlo. Na ausência de um controlador, faça uma ligação diretamente ao acionamento elétrico.
Ligação ao acionamento
O sistema Ajax permite-lhe controlar estores e persianas com um acionamento elétrico de qualquer tipo — com rede de 110/230 V CA (a maioria dos modelos) e tipo de baixa corrente (12/24 V CC).
Os acionamentos elétricos de potência, normalmente, são instalados em persianas de proteção, e os de baixa corrente são mais frequentemente encontrados em persianas decorativas.
As informações sobre o tipo de acionamento elétrico podem ser encontradas no manual do equipamento e/ou no website do fabricante de persianas/estores.
Ligação ao controlador
Alguns modelos de estores/persianas podem ser equipados com uma unidade de controlo. Esta é composta por um controlador e dispositivos de controlo, tais como controlos remotos. O controlador recebe comandos dos dispositivos de controlo e ativa o mecanismo de abertura e fecho.
Para se integrar com Ajax, o controlador deve ter uma entrada de controlo para ligar botões e relés com fios. O controlador pode ter uma entrada de controlo não convencional ou modos especiais de controlo e funcionamento, que também devem ser tidos em conta durante a integração.
Antes de começar a ligar o equipamento, estude a documentação técnica dos estores/persianas.
Que dispositivos são utilizados na ligação
Dispositivos principais:
- Estores ou persianas com acionamento elétrico.
- Hub — coordena o funcionamento dos dispositivos do sistema.
- Relés — controlam a alimentação elétrica do equipamento e dão o comando de abertura ou fecho das persianas/estores. Consulte as especificações técnicas dos relés para escolher o mais adequado para a sua app.
Com a ajuda do WallSwitch Jeweller ou Superior MultiRelay Fibra, as persianas ou os estores podem ser desenergizados por comando da app ou automaticamente ao armar. Desta forma, os intrusos não poderão abrir os estores ou persianas, mesmo que tenham acesso aos botões de controlo.
Serviços adicionais:
- Módulos de integração — transmitem ao sistema em tempo real o estado dos estores/persianas: abertos ou fechados.
- Botões e teclados — permitem enviar um comando para abertura ou fecho de estores/persianas.
- Detetores de abertura Ajax — detetam o arrombamento das persianas. Disponível para Superior DoorProtect Plus Jeweller, DoorProtect Plus Jeweller, Superior DoorProtect Plus Fibra, e Superior DoorProtect G3 Fibra.
- Baterias de reserva com capacidade e corrente de saída adequadas — para abrir ou fechar a cortina em caso de falta de energia, bem como para alimentação de reserva dos relés.
O hub pode funcionar até 16 horas com uma bateria de reserva e os restantes dispositivos Ajax funcionam durante 2 a 7 anos com baterias pré-instaladas.
Requisitos de segurança
Ligue as persianas e os estores de acordo com as instruções do fabricante, respeitando as regras gerais de segurança elétrica.
Não desmonte dispositivos sob tensão. Não utilize dispositivos com o cabo de alimentação danificado.
Relés devem ser instalados e ligados por um técnico qualificado. Não ligue relés a uma fonte de alimentação com tensões que excedam a gama suportada especificada para o dispositivo. Isto representa um risco de incêndio e danifica o dispositivo.
Durante a instalação, não permita que a humidade penetre nos relés ou nas ligações dos cabos. Tenha em conta a gama de temperaturas de funcionamento e a humidade; não deixe os dispositivos ao ar livre.
Recomendamos a utilização de persianas equipadas com um sistema de elevação manual de emergência — em caso de falha prolongada de energia ou incêndio.
Como ligar persianas/estores a Ajax para controlar a abertura-fecho
O esquema de ligação e o tipo de relé dependem do tipo de sistema de controlo de estores/persianas:
- A abertura e o fecho são iniciados por uma fonte de alimentação de 110/230 V — deve ser utilizado um relé de potência. is used.
- A abertura e o fecho são iniciados por uma fonte de alimentação de 12/24 V — deve ser utilizado um relé de baixa corrente.
- A abertura e o fecho são controlados pelo controlador — deve ser utilizado um relé de baixa corrente.
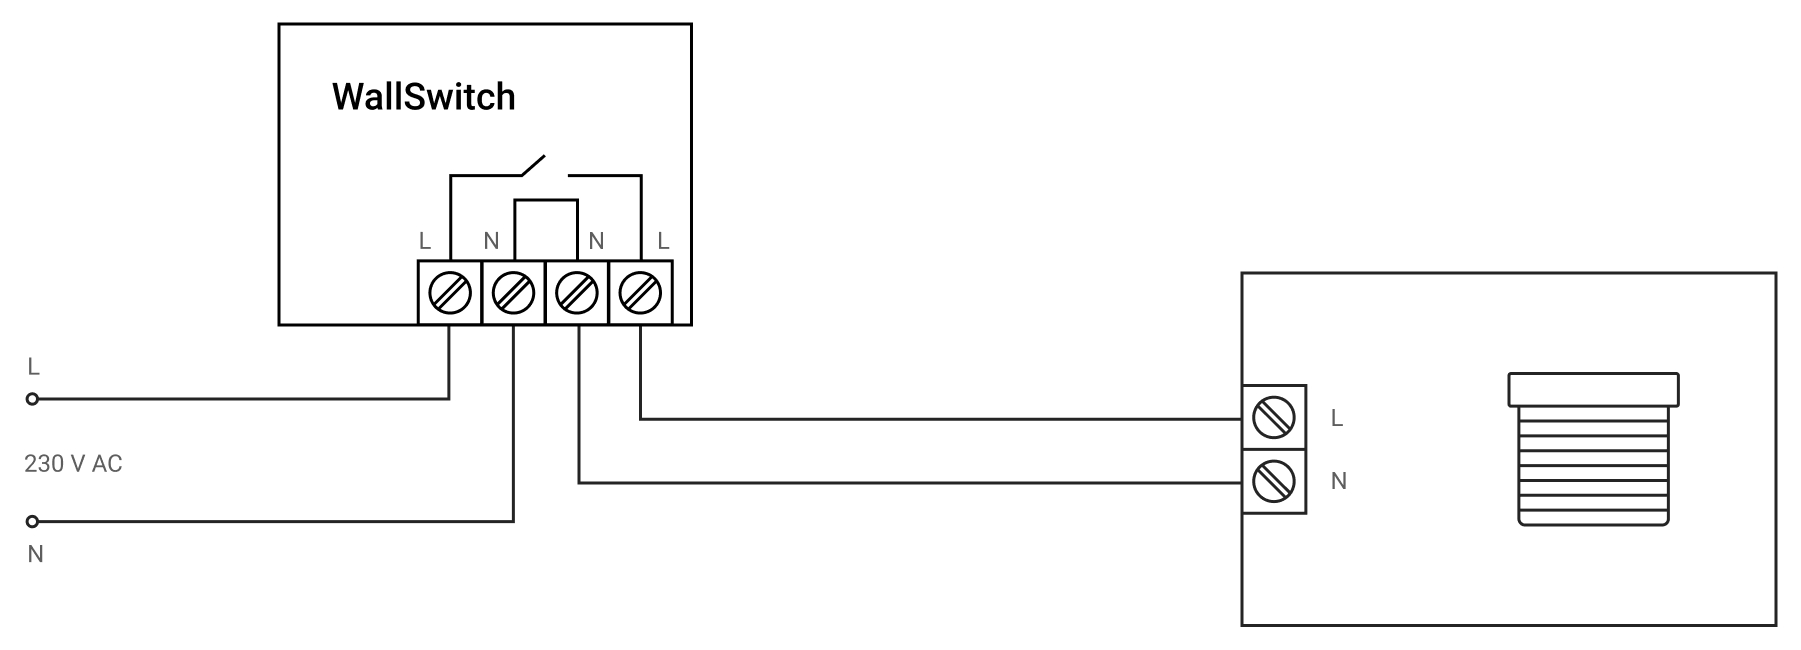
Ligação de estores/persianas a Ajax com alimentação elétrica de 110/230 V
De acordo com o diagrama abaixo, ligue o relé de potência WallSwitch Jeweller ao circuito de alimentação do acionamento elétrico e configure o sistema.
Esquema de ligação de WallSwitch Jeweller
WallSwitch Jeweller e acionamento elétrico de estores/persianas podem ser alimentados pela mesma fonte de alimentação.
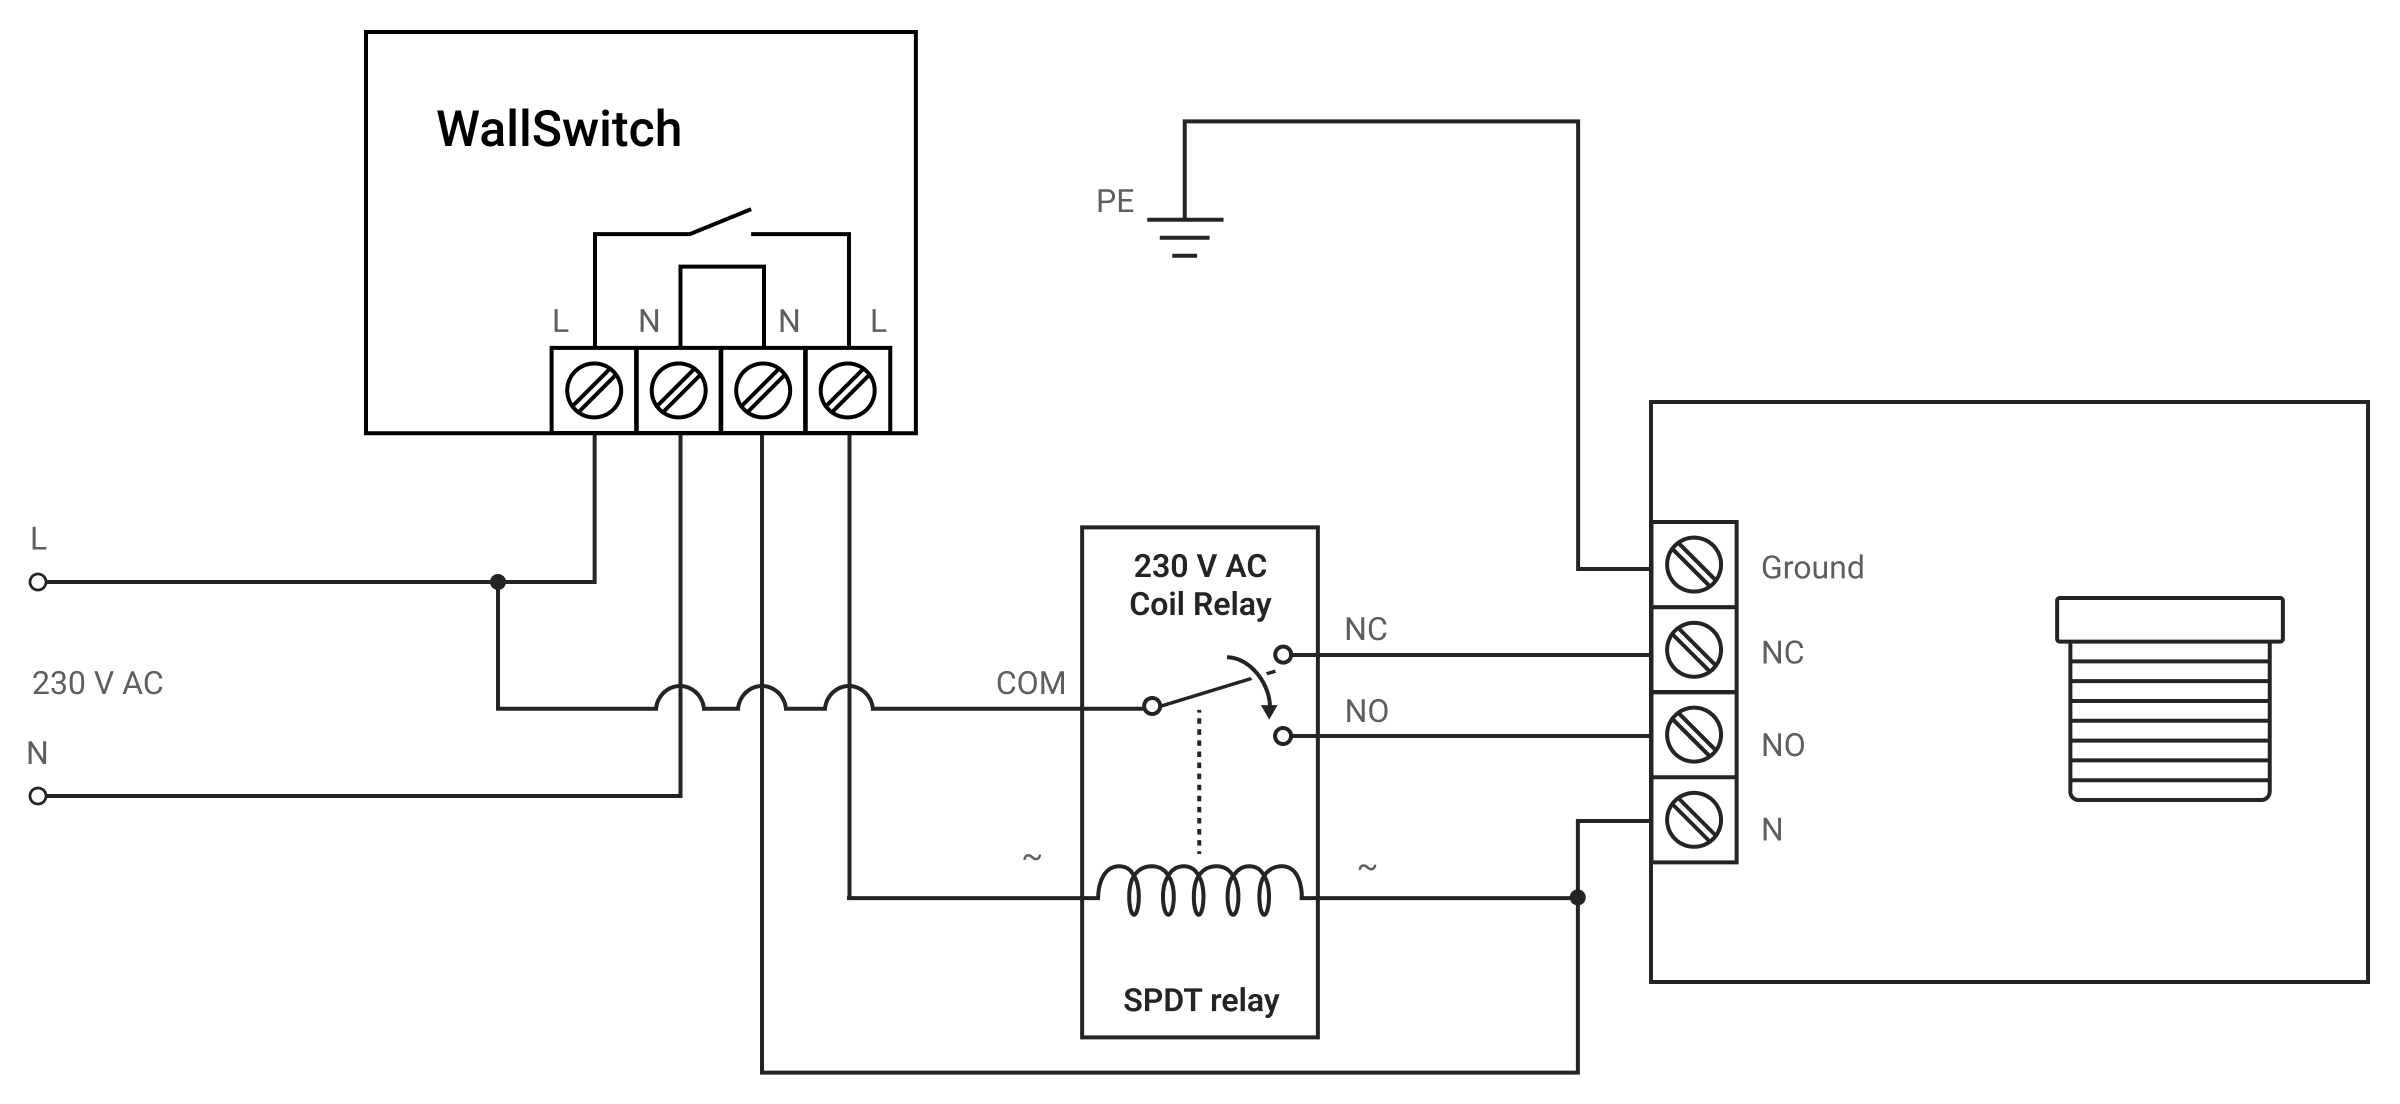
- Ligue a fonte de alimentação aos terminais de alimentação do WallSwitch Jeweller, respeitando a polaridade.
- Ligue a alimentação do relé SPDT de acoplamento aos terminais de saída do WallSwitch Jeweller.
- Ligue o terminal comum (“COM”) do relé de acoplamento à fase (“L”) da fonte de alimentação.
- Ligue o terminal NC do relé de acoplamento à entrada de abertura do acionamento elétrico de estore/persiana e o terminal NO à entrada de fecho.
- Ligue o zero (“N”) do acionamento elétrico da persiana/estore ao zero (“N”) da fonte de alimentação.
- Ligue à terra o contacto apropriado da válvula solenoide, se exigido pelo fabricante.
Configuração do WallSwitch Jeweller
Na app Ajax:
- Aceda ao separador Dispositivos
 .
. - Selecione WallSwitch Jeweller e aceda às suas Definições
 .
. - Defina os parâmetros necessários.
- Modo de funcionamento do Relay: biestável ou impulso.
- Estado do contacto: normalmente fechado ou normalmente aberto.

As configurações dependem do modelo de estore/persiana. As recomendações de ligação encontram-se na documentação técnica do dispositivo.
- Clique Voltar duas vezes para guardar as definições.
Para notificações mais informativas, renomeie o WallSwitch Jeweller, por exemplo, nomeando o dispositivo como Entrada Principal.
Ligação ao Ajax de persianas/estores com fonte de alimentação de 12/24 V
Com Relay Jeweller
De acordo com o esquema abaixo, ligue Relay Jeweller de baixa corrente ao circuito de alimentação do acionamento elétrico e configure o sistema.
Esquema de ligação do Relay Jeweller
Relay Jeweller, o relé de acoplamento e o acionamento elétrico das persianas/estores podem ser alimentados pela mesma fonte de alimentação.
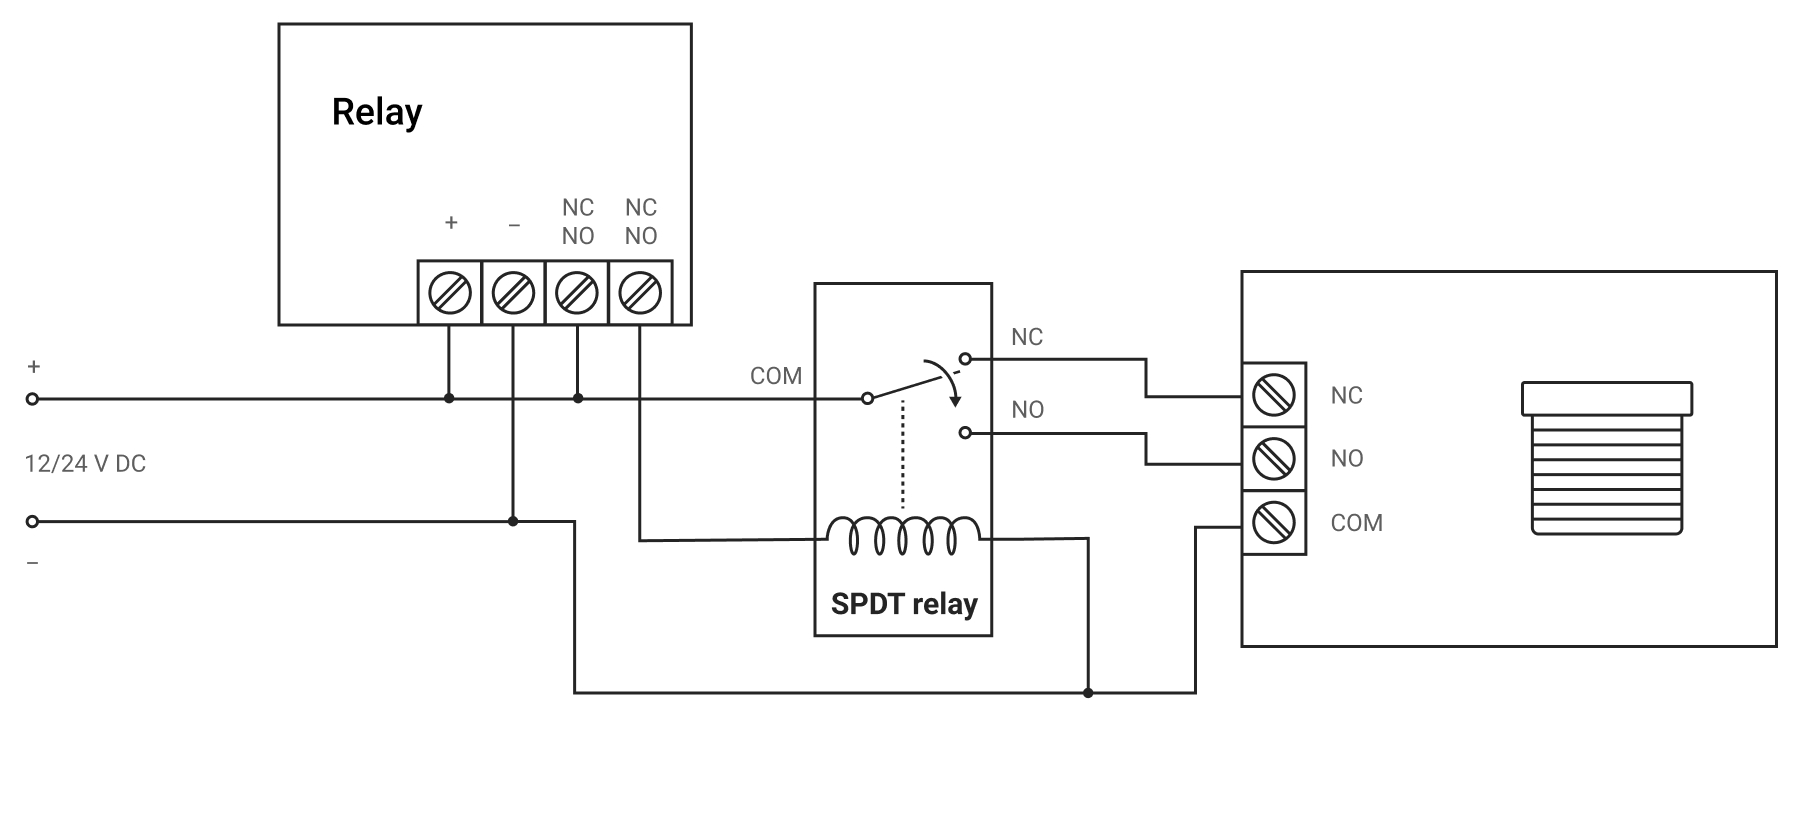
- Ligue a fonte de alimentação aos terminais de alimentação do Relay Jeweller.
- Ligue o “+” da fonte de alimentação a um dos terminais de contacto de saída do Relay Jeweller, e o “+” do relé de acoplamento — ao outro terminal de contactos do Relay Jeweller.
- Ligue o contacto “–” do acionamento elétrico da persiana (contacto comum) e o “–” do relé de acoplamento ao “–” da alimentação.
- Ligue o terminal comum (“COM“) do relé de acoplamento ao “+” da fonte de alimentação.
- Ligue o terminal NC do relé de acoplamento à entrada de controlo de abertura do estore/persiana e o terminal NO à entrada de fecho.
Configuração do Relay Jeweller
Na app Ajax:
- Aceda ao separador Dispositivos .
- Selecione Relay Jeweller e aceda às suas Definições .
- Defina os parâmetros necessários.
- Modo de funcionamento de Relay: impulso ou biestável.
- Duração do impulso (se for selecionado o modo pulsado) é de 0.5 a 255 segundos. A duração deve ser maior ou igual ao tempo de fecho-abertura do estore ou persiana.
- Estado do contacto: normalmente fechado ou normalmente aberto.
As configurações dependem do modelo de estore/persiana. As recomendações de ligação encontram-se na documentação técnica do dispositivo.
- Clique Voltar duas vezes para guardar as definições.
Para notificações mais informativas, renomeie Relay Jeweller, por exemplo, nomeando o dispositivo como Entrada Principal.
Com Superior MultiRelay Fibra
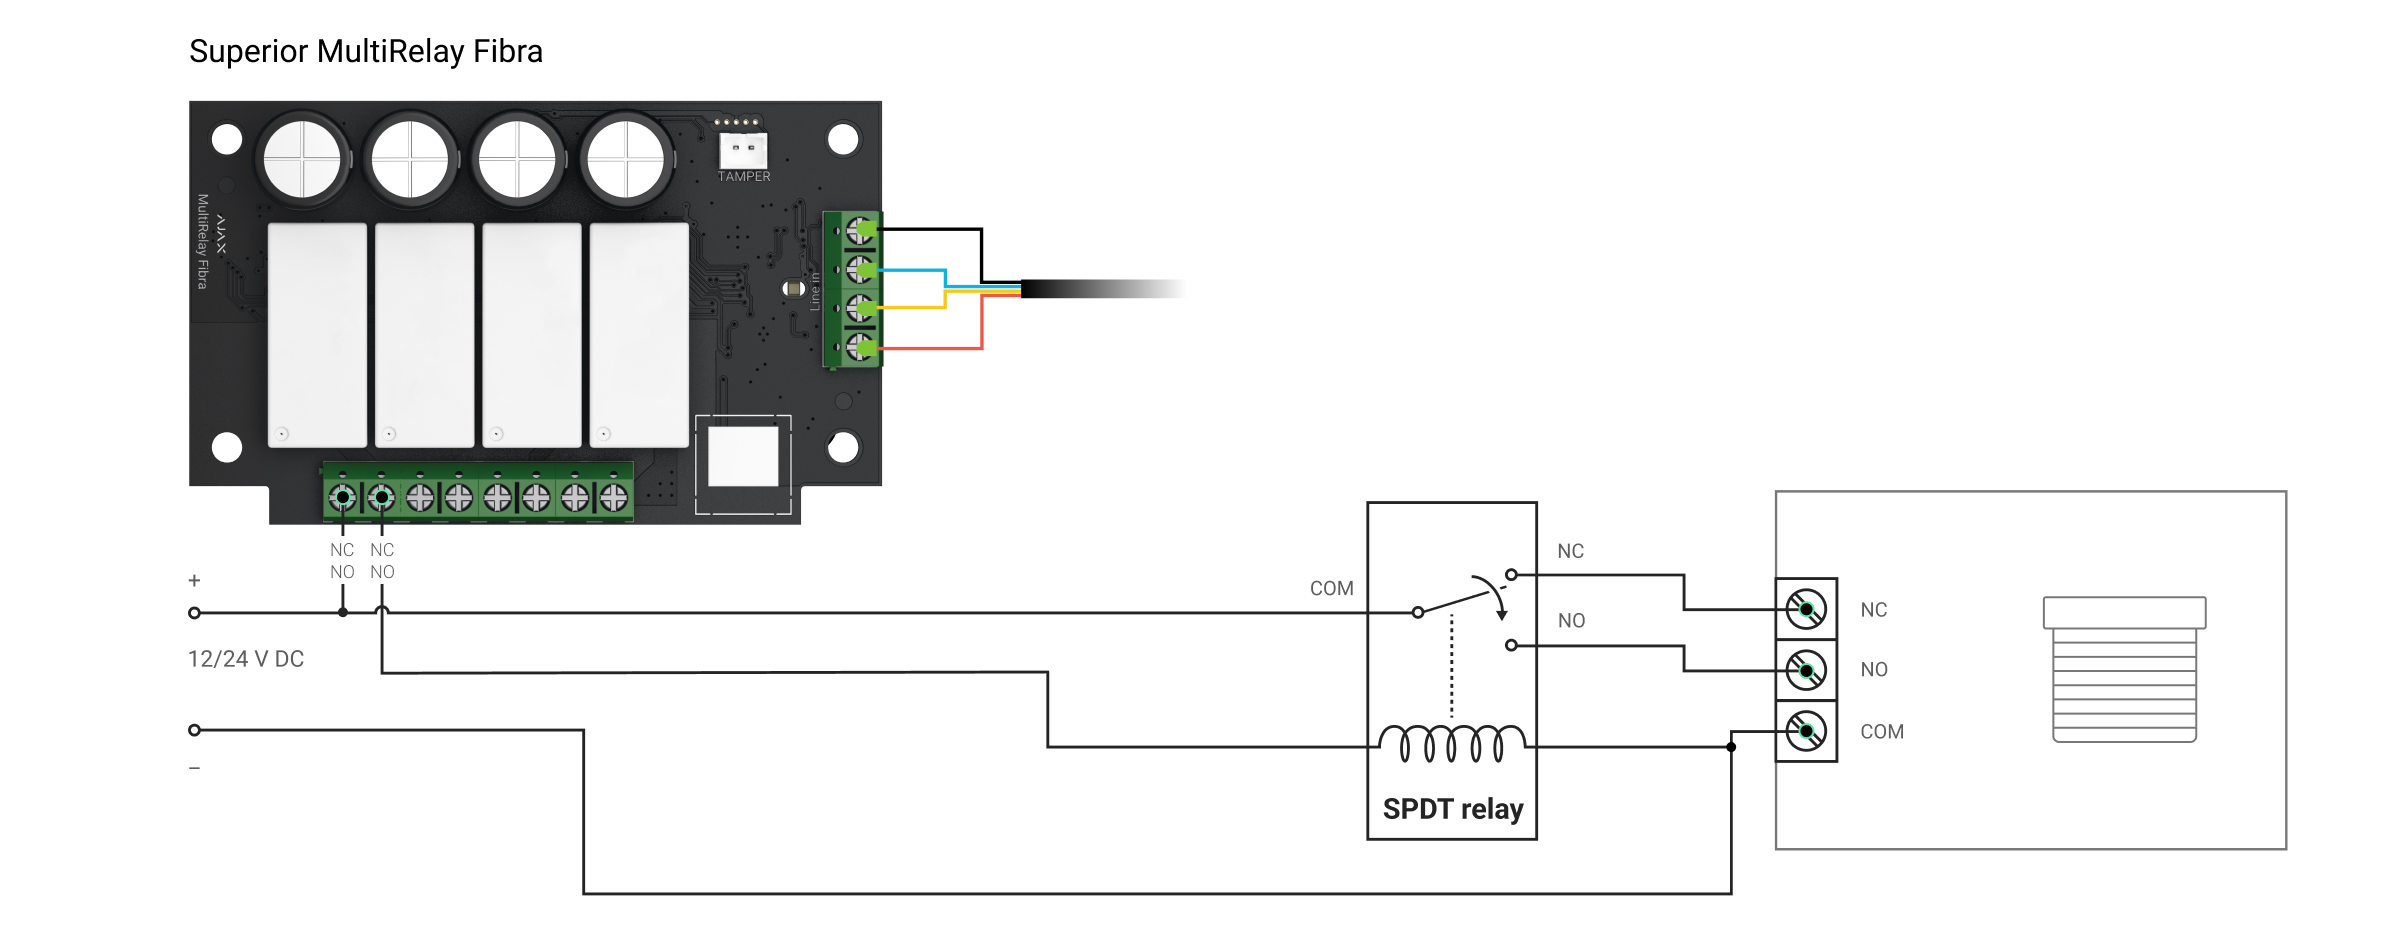
- Ligue Superior MultiRelay Fibra ao hub através da linha Fibra.
- Ligue os terminais de saída de relé à entrada de controlo.
Se o relé estiver ligado a um controlador que abre as persianas/estores quando os contactos se abrem, forneça energia de reserva ao relé. No caso de uma falha de energia, os contactos do relé mudam para um estado aberto, o que abrirá as persianas/estores.
Configuração do Superior MultiRelay Fibra
Na app Ajax:
- Aceda ao separador Dispositivos .
- Selecione Superior MultiRelay Fibra e aceda às suas Definições .
- Selecione o Relay que está ligado ao controlador de estores/persianas.
- Defina os parâmetros necessários.
As configurações dependem do modelo de estore/persiana. Consulte as recomendações de ligação na documentação técnica do dispositivo.
- Nome: para notificações mais informativas, mude o nome do Relay. Por exemplo, nomeie o dispositivo “Entrada”.
- Ative: deve estar ativado para que o relé funcione.
- Modo de saída: selecione a opção Relay.
- Notificações: permite configurar as notificações para o relé.
- Estado do contacto: normalmente fechado ou normalmente aberto.
- Desativação por temporizador: opção para desativar o dispositivo controlado após um tempo definido.
- Tempo de funcionamento (se a opção de Desativação por temporizador estiver ativada): de 1 segundo a 2 horas. A duração deve ser maior ou igual ao tempo de fecho/abertura das estores/persianas.

Um Tempo de funcionamento incorretamente selecionado pode fazer com que as persianas se fechem imediatamente após a abertura, ou se abram/se fechem de forma incompleta.
- Clique Voltar duas vezes para guardar as definições.
Com Superior MultiTransmitter IO (4X4) Fibra
- Ligue Superior MultiTransmitter IO (4X4) Fibra ao hub através da linha Fibra.
- Ligue os terminais de saída de relé à entrada de controlo.
Se o relé estiver ligado a um controlador que abre as persianas/estores quando os contactos se abrem, forneça energia de reserva ao relé. No caso de uma falha de energia, os contactos do relé mudam para um estado aberto, o que abrirá as persianas/estores.
Configuração de Superior MultiTransmitter IO (4X4) Fibra
Na app Ajax:
- Aceda ao separador Dispositivos .
- Selecione Superior MultiTransmitter IO (4X4) Fibra e aceda às suas Definições .
- Selecione a Saída de relé que está ligada ao controlador de persianas/estores.
- Defina os parâmetros necessários.
As configurações dependem do modelo de estore/persiana. Consulte as recomendações de ligação na documentação técnica do dispositivo.
- Nome: para notificações mais informativas, mude o nome do Relay. Por exemplo, nomeie o dispositivo “Entrada”.
- Ative: deve estar ativado para que o relé funcione.
- Modo de saída: selecione a opção Relay.
- Notificações: permite configurar as notificações para o relé.
- Estado do contacto: normalmente fechado ou normalmente aberto.
- Desativação por temporizador: opção para desativar o dispositivo controlado após um tempo definido.
- Tempo de funcionamento (se a opção de Desativação por temporizador estiver ativada): de 1 segundo a 2 horas. A duração deve ser maior ou igual ao tempo de fecho/abertura das estores/persianas.
Um Tempo de funcionamento incorretamente selecionado pode fazer com que as persianas se fechem imediatamente após a abertura, ou se abram/se fechem de forma incompleta.
- Clique Voltar duas vezes para guardar as definições.
Ligação ao Ajax de estores/persianas com um controlador
O controlador de estores/persianas pode ter uma ou mais entradas de controlo. O esquema de ligação depende disto.
Um Relay Jeweller é suficiente se a entrada for combinada e for responsável tanto pela abertura como pelo fecho dos estores/persianas. Se as entradas forem separadas (uma responsável pela abertura e a outra pelo fecho), são necessários dois relés.
Ligação de estores/persianas com entrada de controlo combinada
Ligue o Relay Jeweller de baixa corrente ao controlador de acordo com o esquema abaixo e configure o sistema.
Esquema de ligação do Relay Jeweller
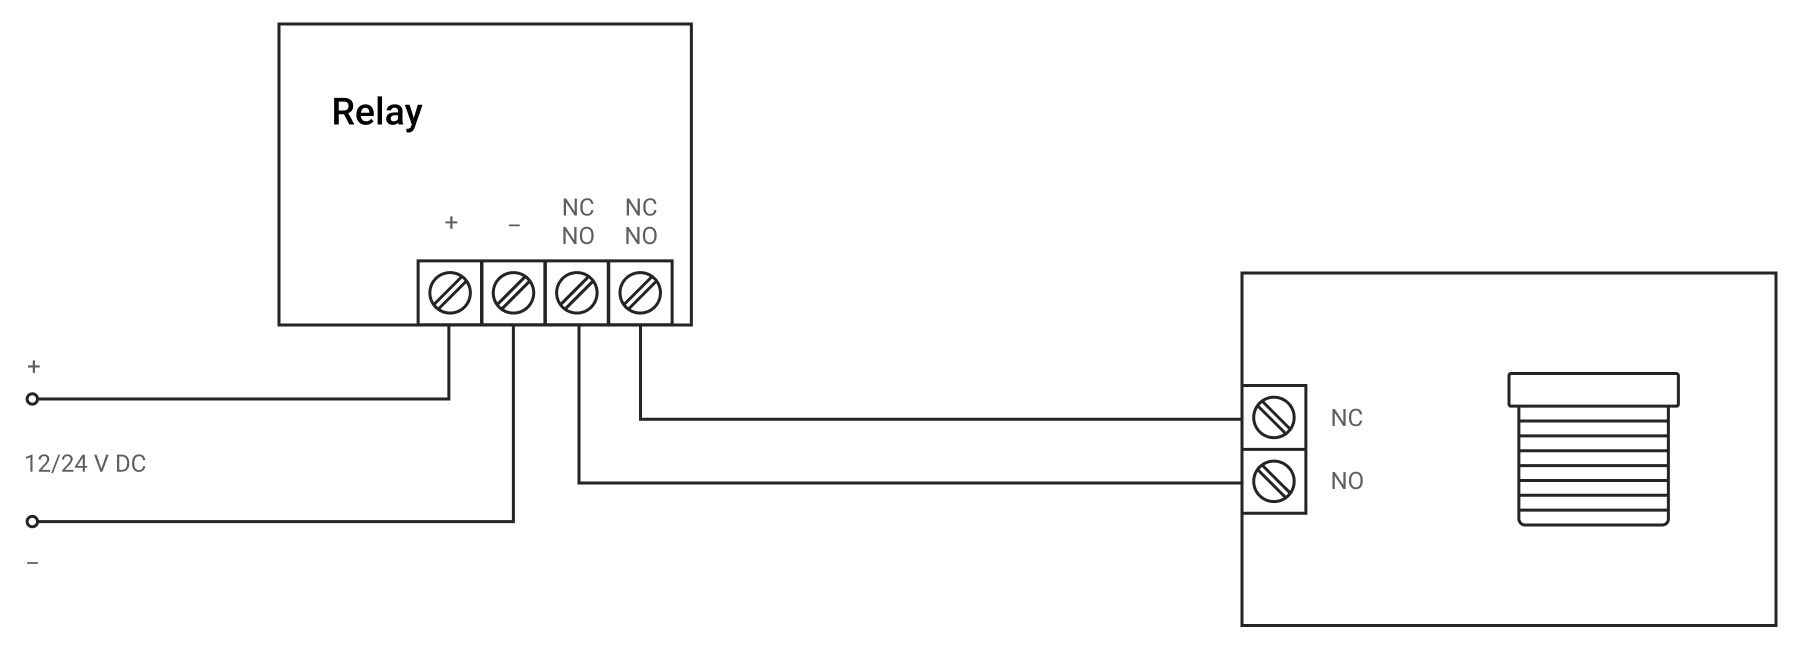
- Ligue a fonte de alimentação aos terminais de alimentação do relé.
- Ligue os terminais de contacto do relé à entrada de controlo.
Se o Relay Jeweller estiver ligado a um controlador que abre as persianas/estores quando os contactos abrem, forneça ao Relay Jeweller energia de reserva. No caso de uma falha de energia, os contactos do Relay Jeweller abrem-se, o que levará à abertura das persianas/estores.
Configuração do Relay Jeweller
Na app Ajax:
- Aceda ao separador Dispositivos .
- Selecione Relay Jeweller e aceda às suas Definições .
- Defina os parâmetros necessários.
As definições dependem do modelo das suas persianas/estores. As recomendações de ligação encontram-se na documentação técnica do dispositivo.
- Modo de funcionamento de Relay: impulso ou biestável.
- Duração do impulso (se for selecionado o modo pulsado) é de 0.5 a 255 segundos. A duração deve ser maior ou igual ao tempo de fecho-abertura do estore ou persiana.
Uma duração de impulso incorretamente selecionada pode levar a que os estores ou persianas não se abram ou se fechem completamente.
- Estado do contacto: normalmente fechado ou normalmente aberto.
- Clique Voltar duas vezes para guardar as definições.
Para notificações mais informativas, renomeie Relay Jeweller, nomeando o dispositivo como Entrada Principal.
Ligação de estores/persianas com entradas de controlo separadas
Ligue os relés de baixa corrente ao controlador de acordo com o esquema abaixo e configure o sistema. Com este esquema de ligação, um Relay Jeweller controla a abertura e o outro Relay Jeweller controla o fecho.
Esquema de ligação do Relay Jeweller

- Ligue a fonte de alimentação aos terminais de alimentação de ambos os relés.
- Ligue os terminais de contacto do primeiro Relay Jeweller à primeira entrada de controlo.
- Ligue os terminais de contacto do segundo Relay Jeweller à segunda entrada de controlo.
Configuração do Relay Jeweller
Na app Ajax:
- Aceda ao separador Dispositivos .
- Selecione Relay Jeweller e aceda às suas Definições .
- Defina os parâmetros necessários.
As definições dependem do modelo das suas persianas/estores. As recomendações de ligação encontram-se na documentação técnica do dispositivo.
- Modo de funcionamento de Relay: impulso ou biestável.
- Duração do impulso (se for selecionado o modo pulsado) é de 0.5 a 255 segundos. A duração deve ser maior ou igual ao tempo de fecho-abertura do estore ou persiana.
Uma duração de impulso incorretamente selecionada pode levar a que os estores ou persianas não se abram ou se fechem completamente.
- Estado do contacto: normalmente fechado ou normalmente aberto.
- Clique Voltar duas vezes para guardar as definições.
- Repita os passos 1–4 para o segundo relé.
Para notificações mais informativas, renomeie Relay Jeweller, por exemplo, nomeando o dispositivo como Entrada Principal.
Como controlar a fonte de alimentação das persianas/estores utilizando Ajax
O controlo da alimentação elétrica funcionará em paralelo com o controlo da abertura/fecho das persianas/estores. De acordo com o esquema abaixo, ligue o relé de energia WallSwitch Jeweller ao circuito de alimentação elétrica do controlador e configure o sistema.
Esquema de ligação de WallSwitch Jeweller
- Ligue a fonte de alimentação aos terminais de alimentação do WallSwitch Jeweller.
- Ligue os terminais de contacto do relé às entradas da fonte de alimentação do estore/persiana.
Configuração do WallSwitch Jeweller
Na app Ajax:
- Aceda ao separador Dispositivos .
- Selecione WallSwitch Jeweller e aceda às suas Definições .
- Defina os parâmetros necessários.
As definições dependem do modelo do seu estore/persiana. As recomendações de ligação encontram-se na documentação técnica do dispositivo.
- Modo de funcionamento do relé: biestável.
- Estado do contacto: normalmente fechado ou normalmente aberto.
- Clique Voltar duas vezes para guardar as definições.
Para notificações mais informativas, renomeie WallSwitch Jeweller, por exemplo, nomeando o dispositivo Fonte de alimentação de estores.
Como controlar os estores ou as persianas com Button Jeweller
O hub funciona no OS Malevich 2.10 e posterior permite configurar diferentes ações para pressões curtas e longas de Button Jeweller. Por exemplo, uma pressão curta pode abrir ou fechar persianas/estores e uma pressão longa pode desenergizar o dispositivo.
Para controlar as persianas/estores utilizando Button, configure os cenários apropriados no menu da app Ajax → Dispositivos → Button Jeweller → Definições → Cenários.
Como ver o estado das persianas/estores numa app Ajax: “fechado”, “aberto”
Para visualizar o estado dos estores/persianas (abertos ou fechados) nas apps Ajax, ligue o módulo de integração à saída de estado do controlador do estore/persiana.
Com Transmitter Jeweller
Ligue a saída de estado do controlador de estores/persianas aos terminais de tamper ou de alarme do Transmitter Jeweller. O algoritmo de funcionamento das notificações depende disto.
Ligação aos terminais de tamper do Transmitter Jeweller
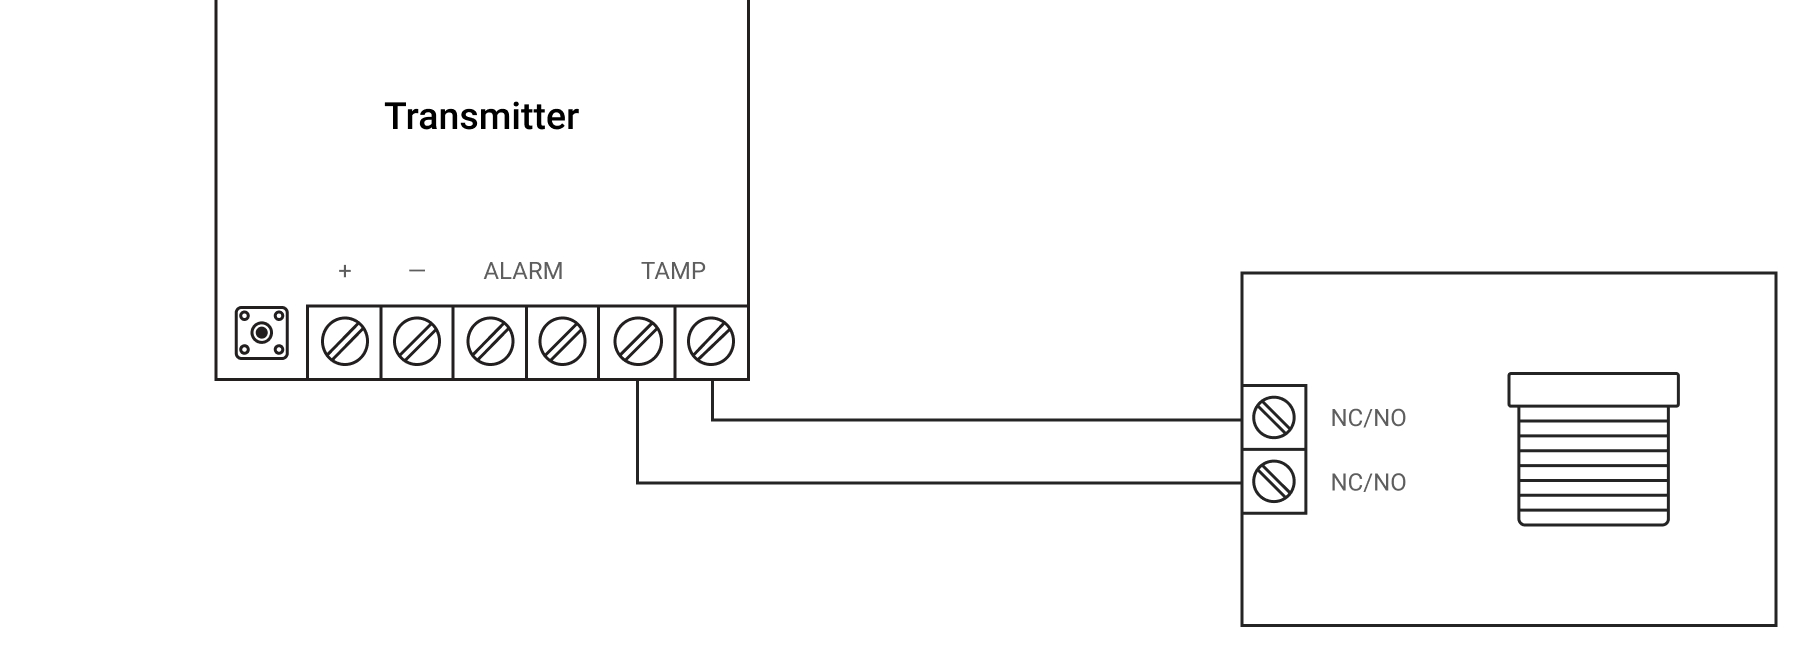
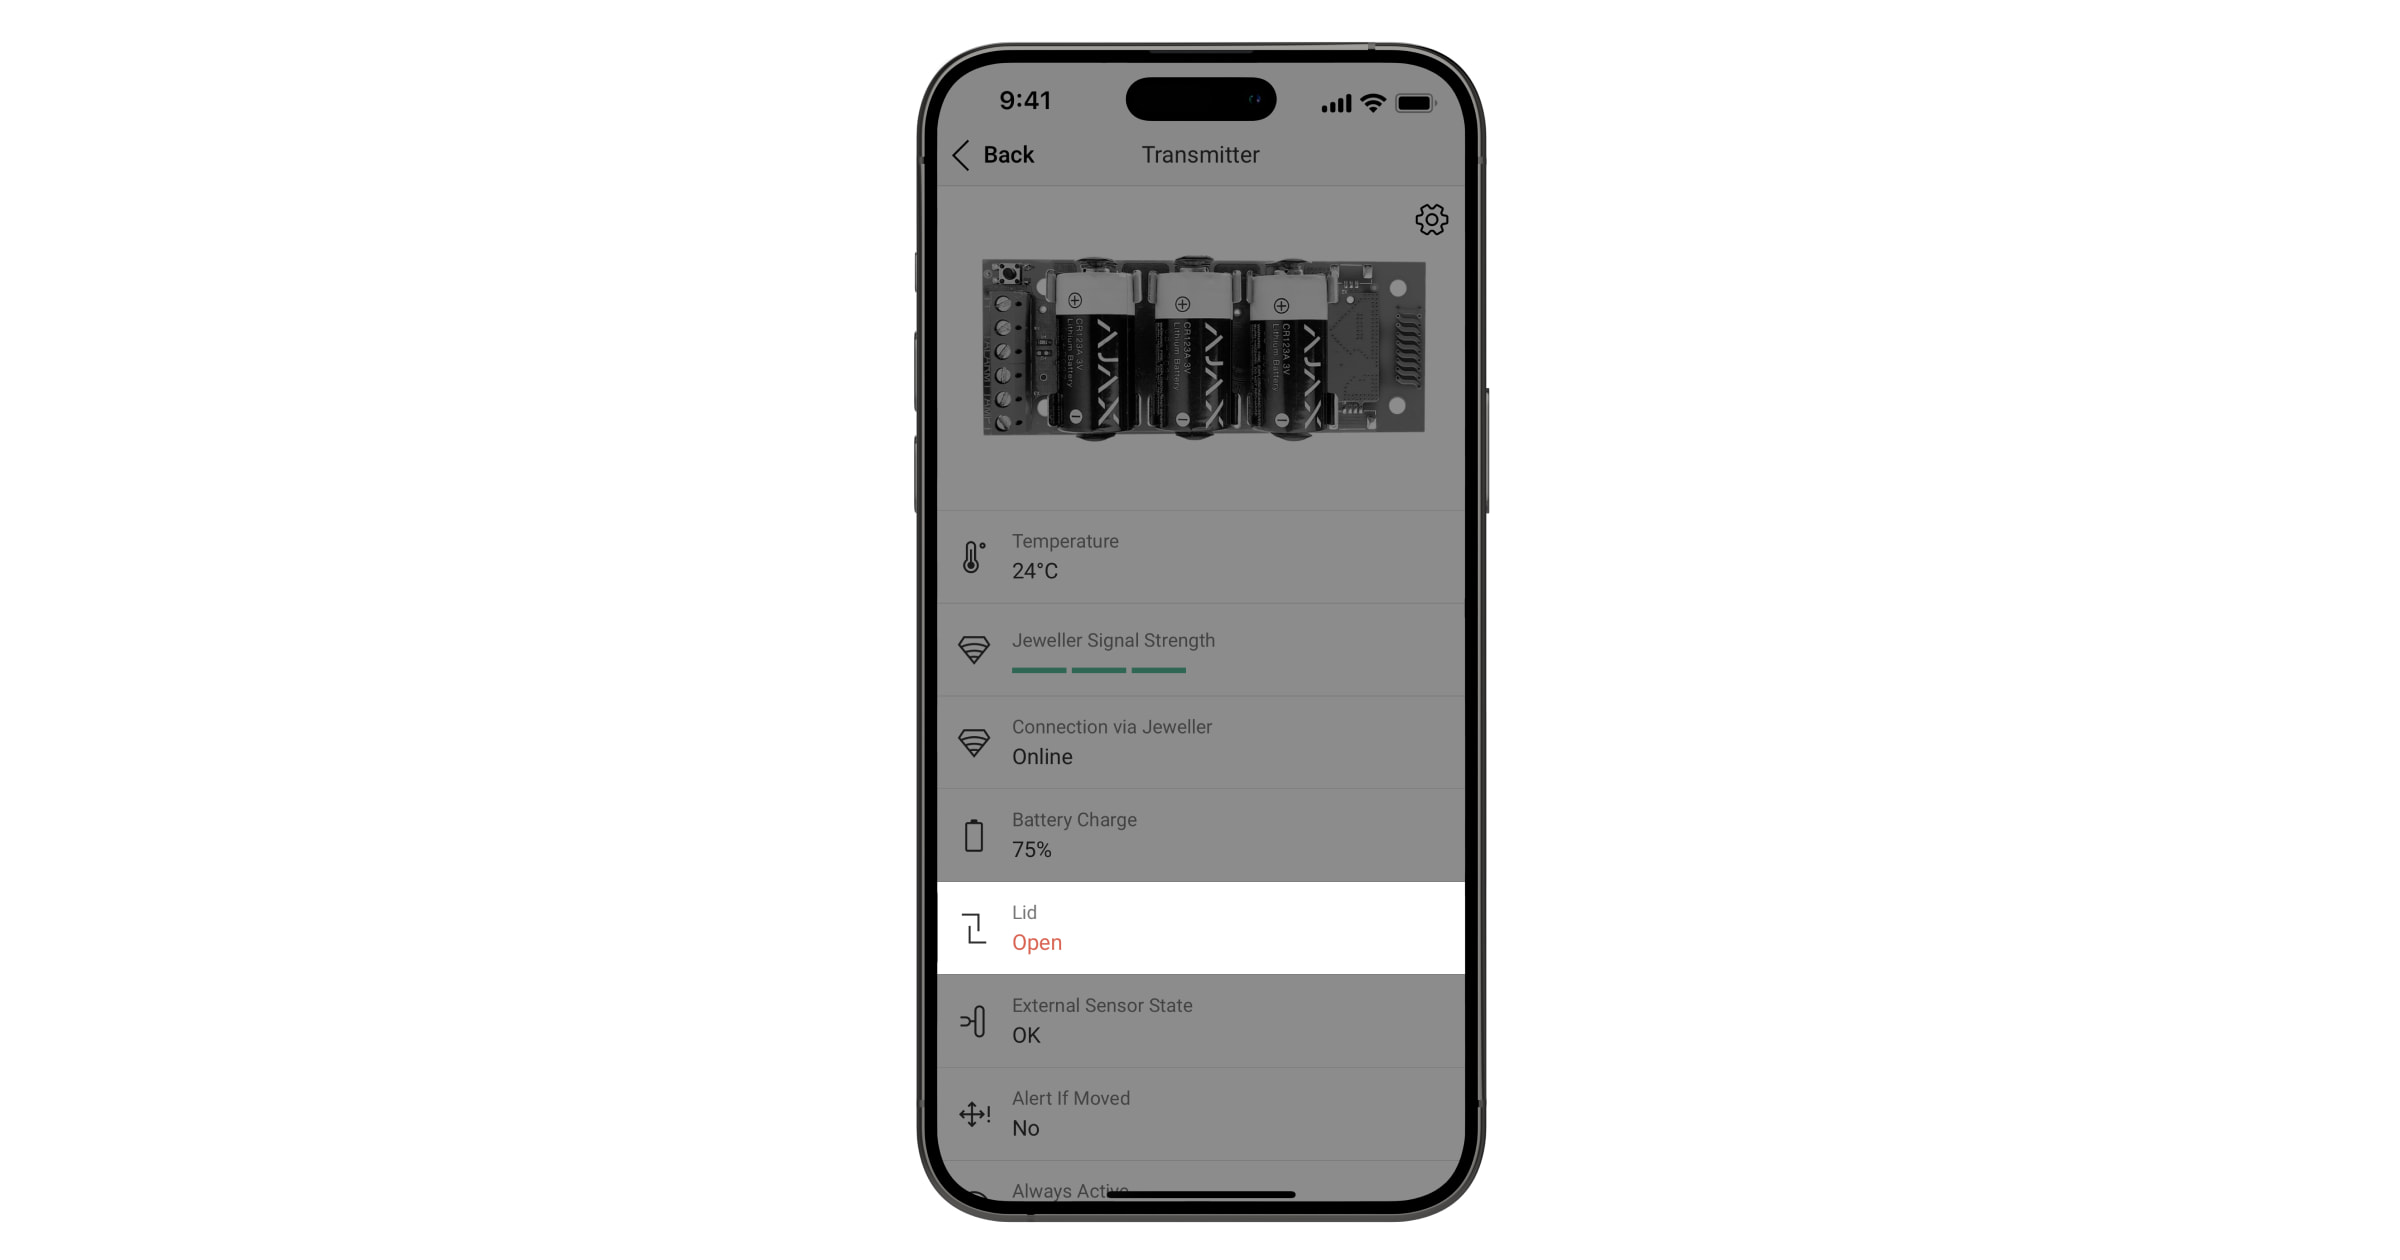
Quando ligado através dos terminais de tamper do Transmitter Jeweller, o sistema de segurança notifica a abertura ou o fecho, independentemente do modo de segurança.
O estado das persianas/estores é apresentado em tempo real no campo Tampa nos estados do Transmitter Jeweller:
- App Ajax
- Dispositivos .
- Transmitter Jeweller
Ligação aos terminais de alarme do Transmitter Jeweller
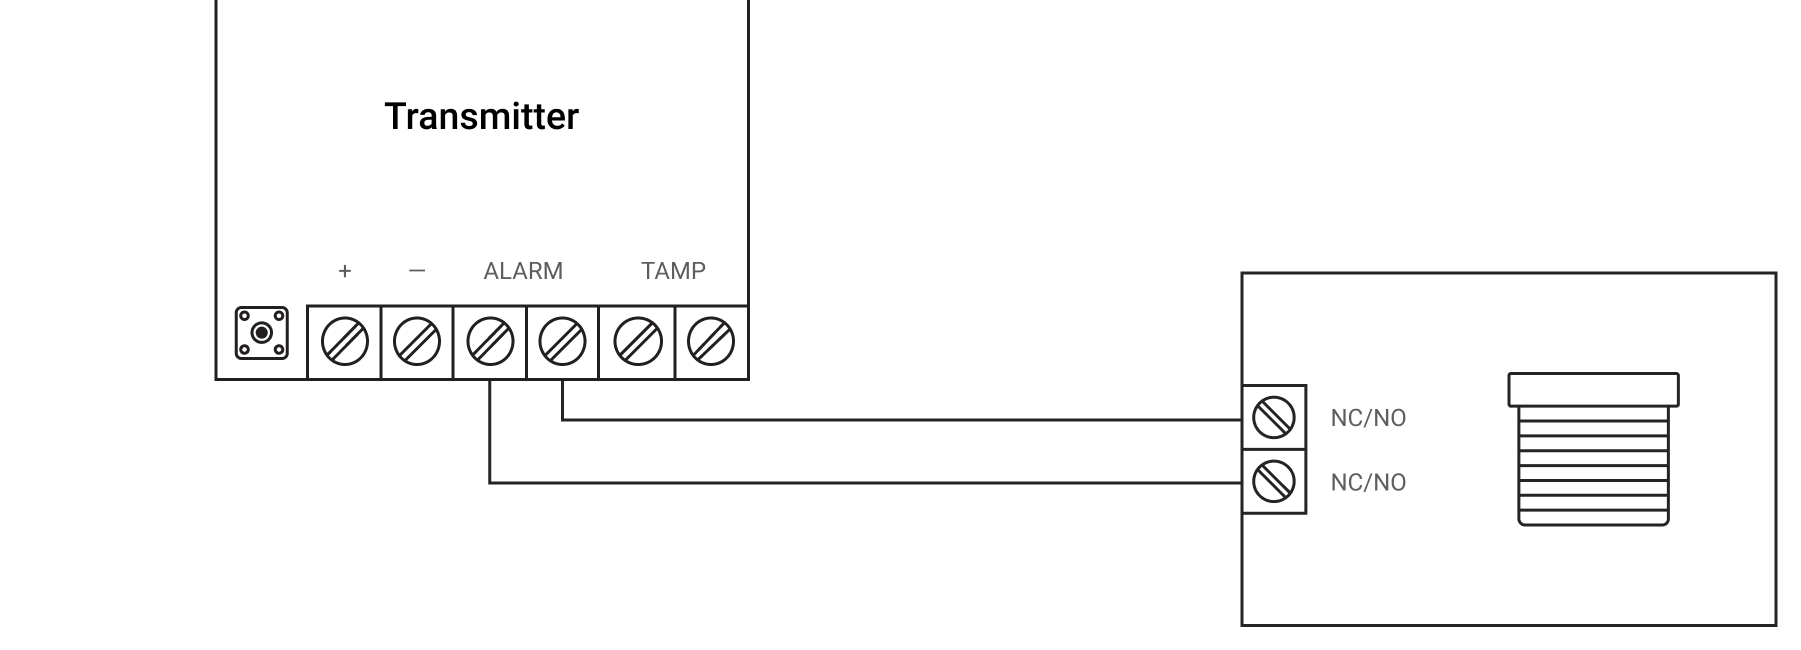
Quando ligado através dos terminais de alarme de Transmitter Jeweller, o sistema notifica a abertura ou o fecho apenas quando todo o sistema ou grupo ao qual Transmitter Jeweller está adicionado está armado. Exceção: Transmitter Jeweller funciona no modo Sempre Ativo.
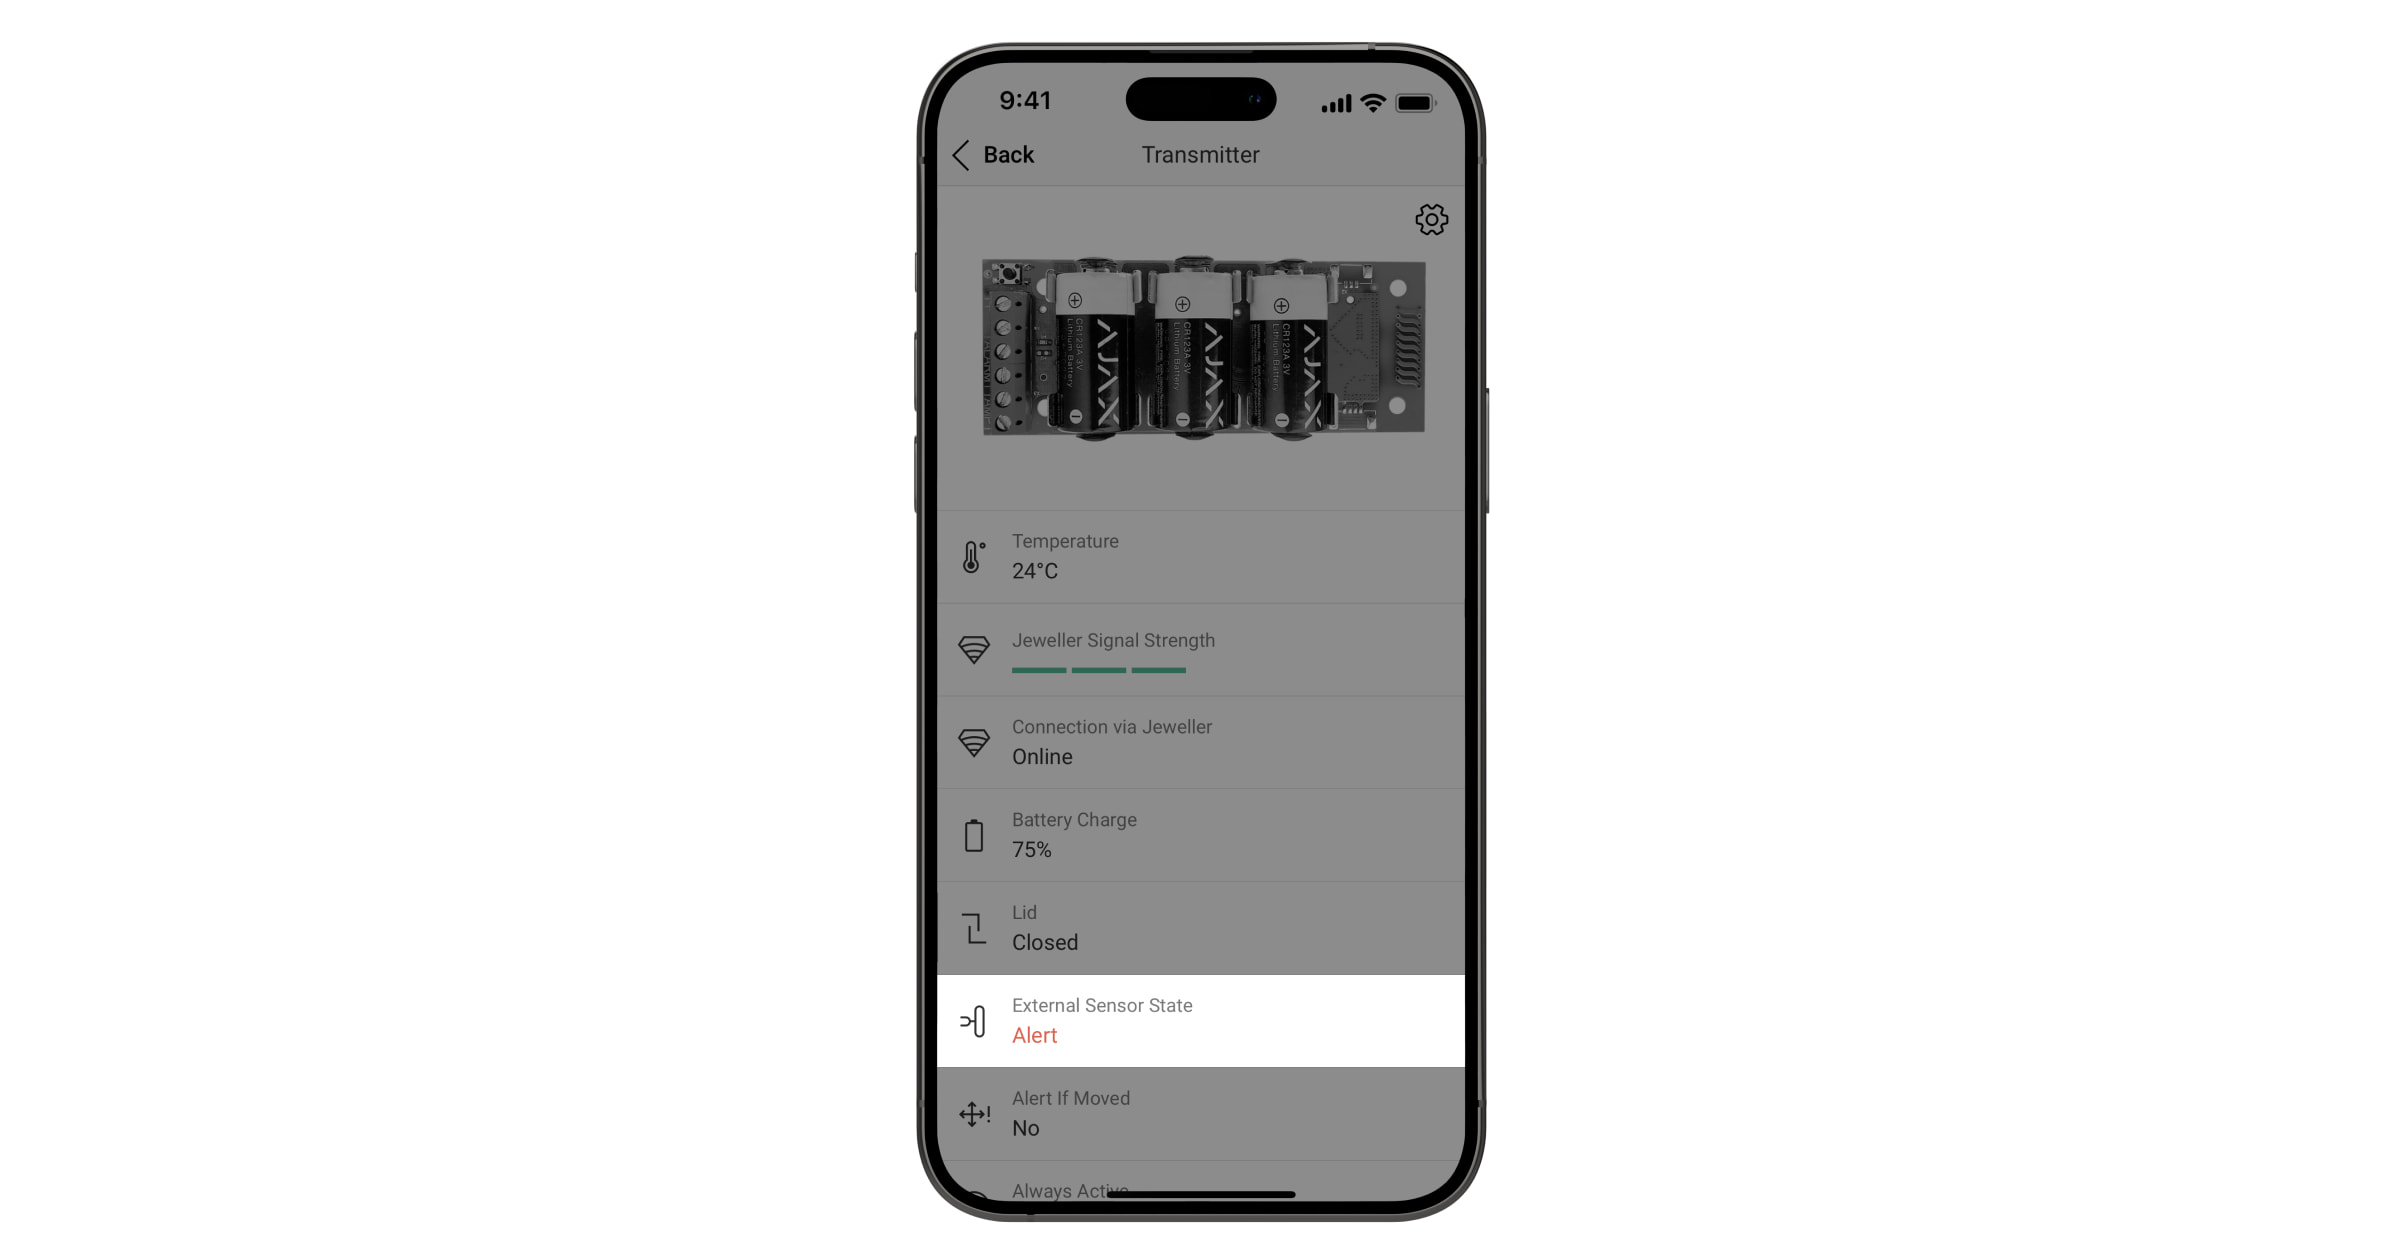
O estado do estore/persiana é apresentado em tempo real no campo Estado do detetor nos estados de Transmitter Jeweller:
- App Ajax
- Dispositivos .
- Transmitter Jeweller
Com outros módulos de integração
É possível receber o estado das persianas/estores através do Superior Transmitter Fibra, MultiTransmitter Jeweller, Superior MultiTransmitter Fibra e Superior MultiTransmitter IO (4X4) Fibra.
Esquema de ligação dos módulos de integração
Ligue a saída de estado do controlador de estores/persianas a uma zona desocupada do módulo de integração.
Configuração dos módulos de integração
Na app Ajax:
- Aceda ao separador Dispositivos .
- Selecione o módulo de integração e aceda aos seus Dispositivos .
- Prima Adicionar dispositivo, digite o seu Nome e selecione Zona de entrada de fios com persianas/estores ligados; atribua uma divisão virtual.
- Selecione o dispositivo adicionado e aceda às suas Definições .
- Defina os parâmetros necessários.
As definições dependem do seu modelo de estores/persianas. Consulte as recomendações de ligação na documentação técnica do dispositivo.
- Nome: altere-o para obter notificações mais informativas.
- Divisão: selecione a divisão virtual.
- Tipo de entrada: sem EOL, EOL, 2EOL, 3EOL ou persiana.
- Modo do sensor: selecione Detetar alarmes.
- Tipo de evento: selecione Personalizado.
- Estado por defeito: normalmente fechado ou normalmente aberto.
- Modo de funcionamento: biestável ou impulso.
- Sempre ativo: deve ser ativado.
- Tempo de impulso: 20 ms, 100 ms ou 1 seg.
- Alerta com sirene se for detetado um alarme: deve ser desativado.
- Definições de Chime: permite configurar um sinal sonoro ligado à sirene do hub para notificar os utilizadores sobre a abertura do dispositivo.
- Modo de funcionamento: pode ser Alarme instantâneo, Entrada/Saída, Seguidor.
- Clique Voltar duas vezes para guardar as definições.
Como detetar um arrombamento de persianas utilizando Ajax
Para a deteção de arrombamento, pode utilizar um detetor de movimento de persianas de terceiros, ligando-o ao Superior DoorProtect Plus Jeweller, DoorProtect Plus Jeweller, Superior DoorProtect Plus Fibra, ou Superior DoorProtect G3 Fibra através de um terminal externo. Também pode utilizar o módulo de integração para detetar arrombamentos.
Para ligar um detetor de movimento aos detetores de abertura Ajax mencionados, siga as instruções:
Como controlar persianas/estores numa app Ajax
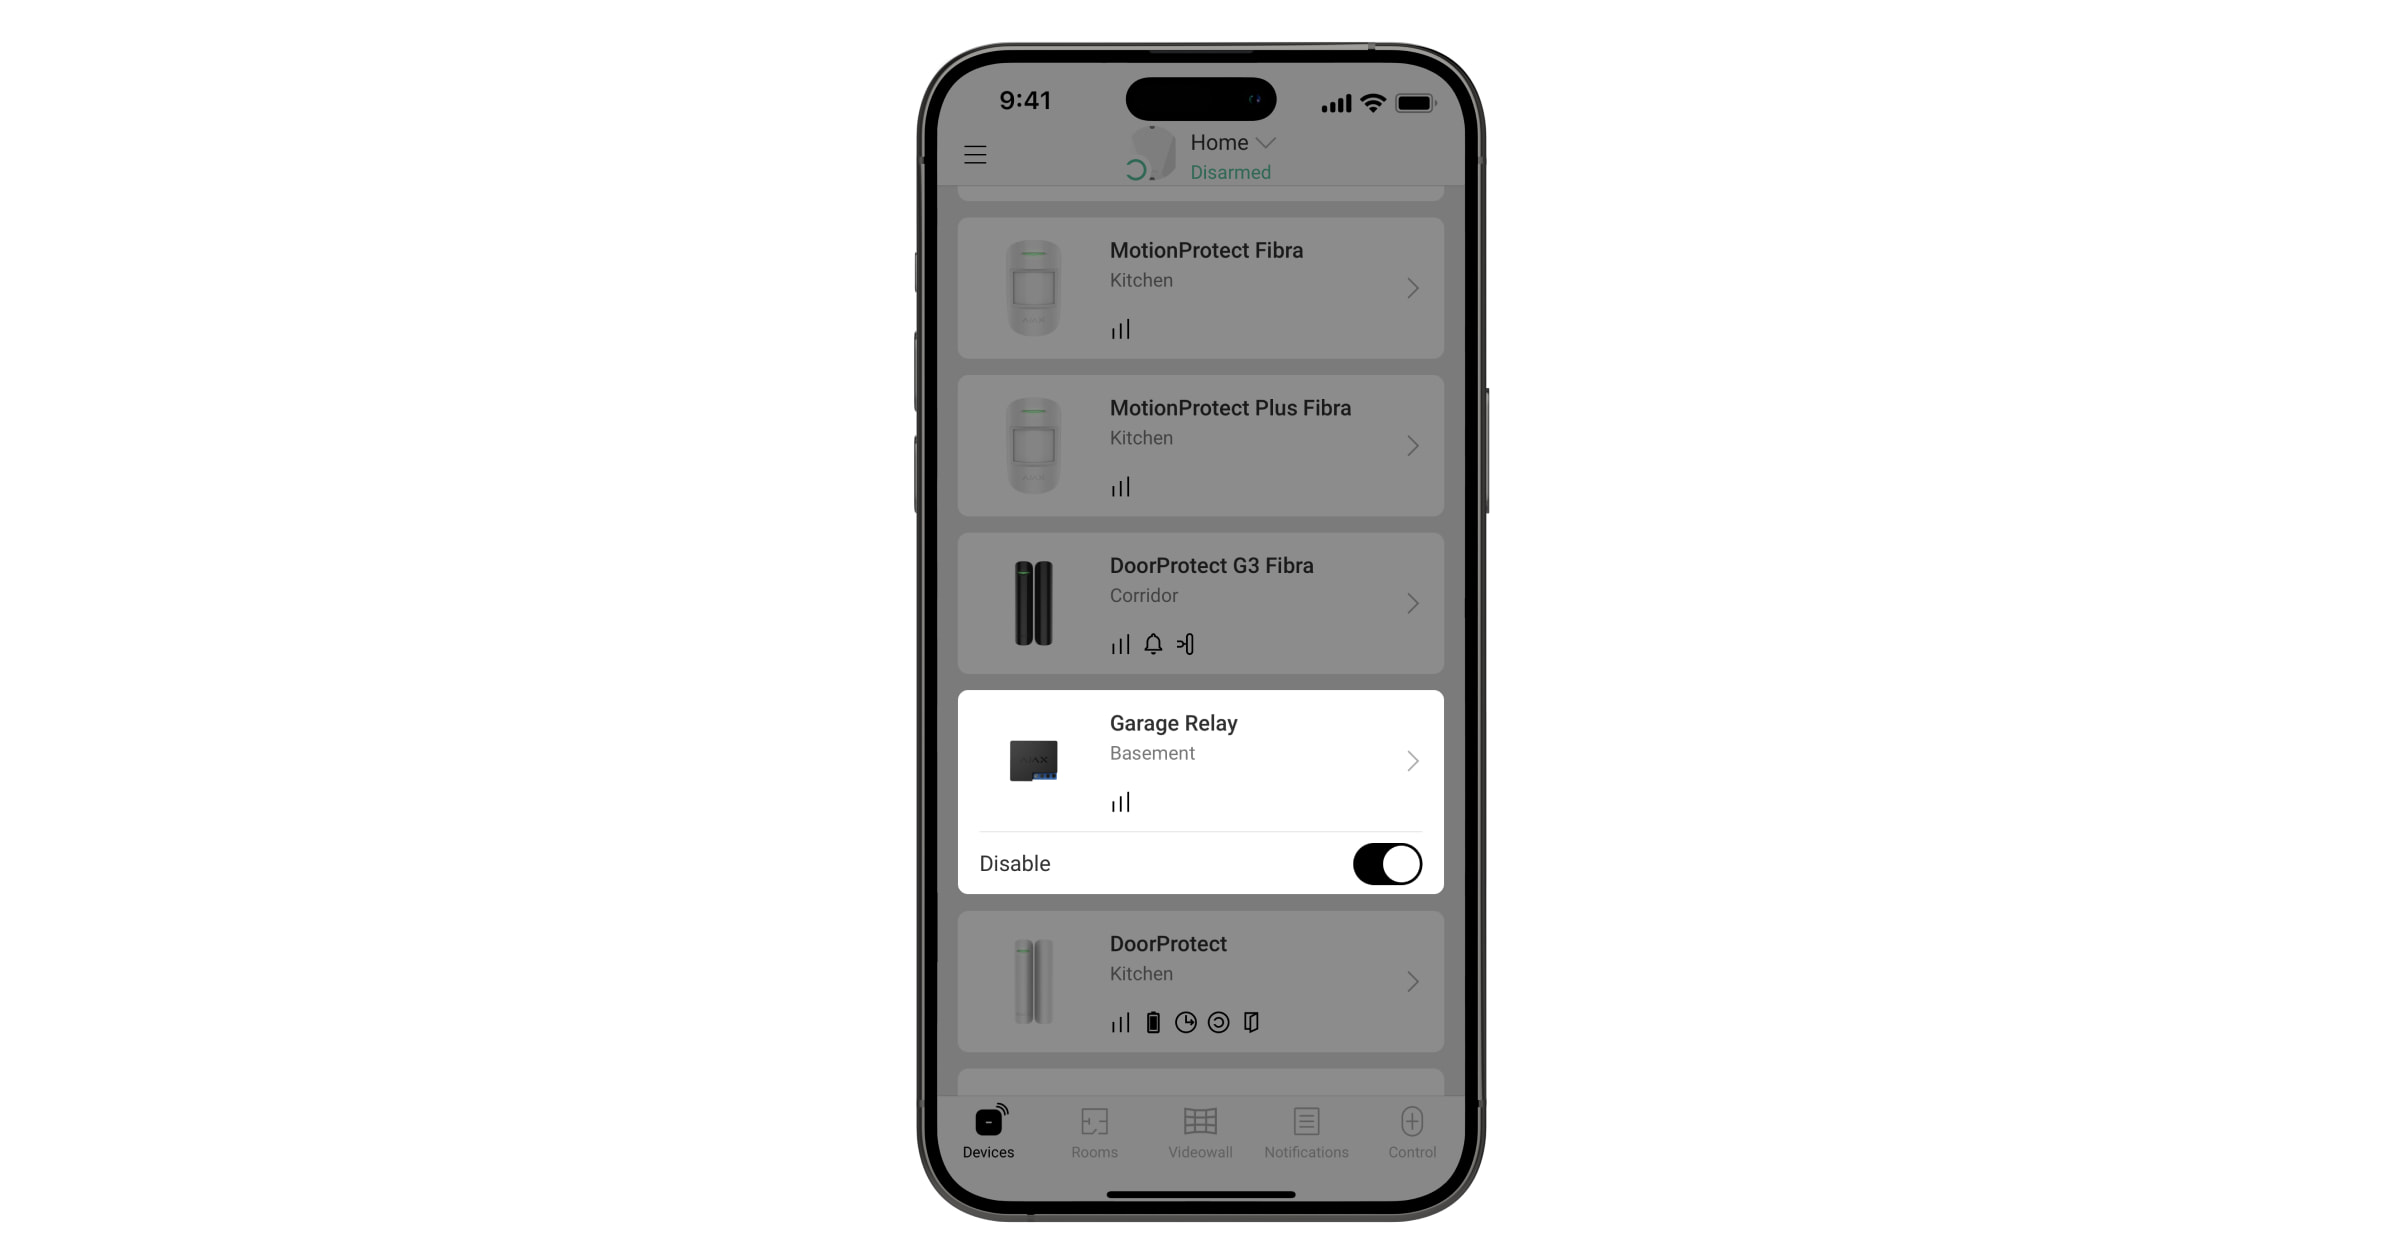
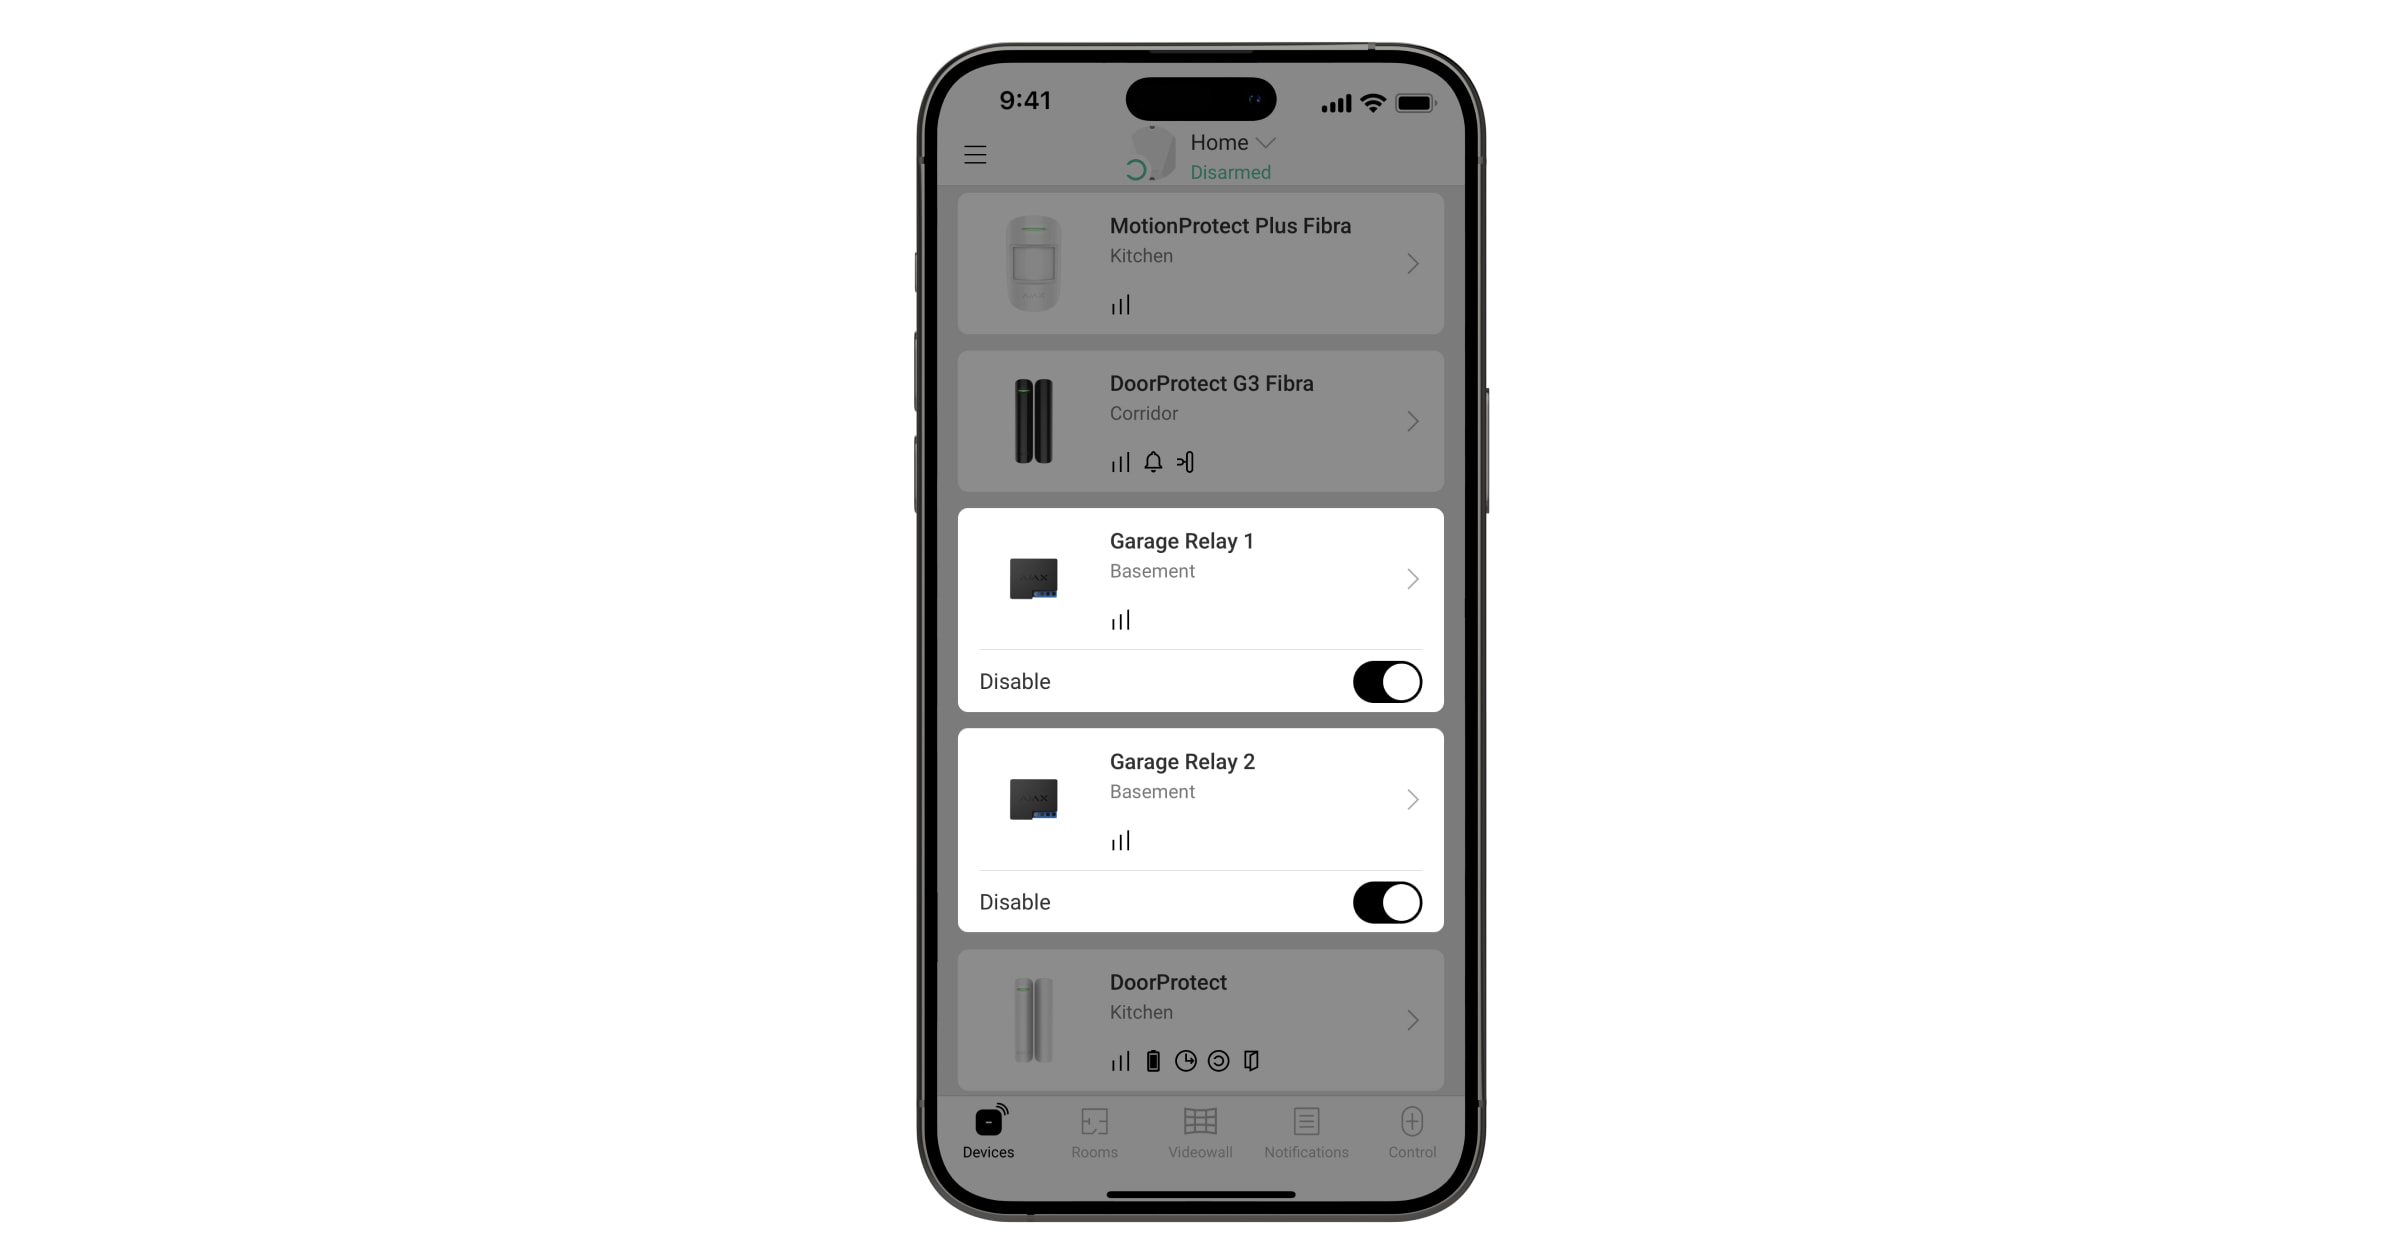
Clique no interrutor no campo do relé no menu Dispositivos ![]() da app Ajax — o estado dos contactos do relé mudará para o oposto e as persianas/estores de enrolar abrir-se-ão ou fechar-se-ão.
da app Ajax — o estado dos contactos do relé mudará para o oposto e as persianas/estores de enrolar abrir-se-ão ou fechar-se-ão.
Se tiver ligado a um controlador com entradas de controlo separadas, para abrir as persianas/estores, prima o interrutor no campo do relé de baixa corrente correspondente. Para fechar, utilize um interrutor semelhante no campo do segundo relé de baixa corrente.
Como controlar a alimentação elétrica do acionamento de persianas/estores na app Ajax
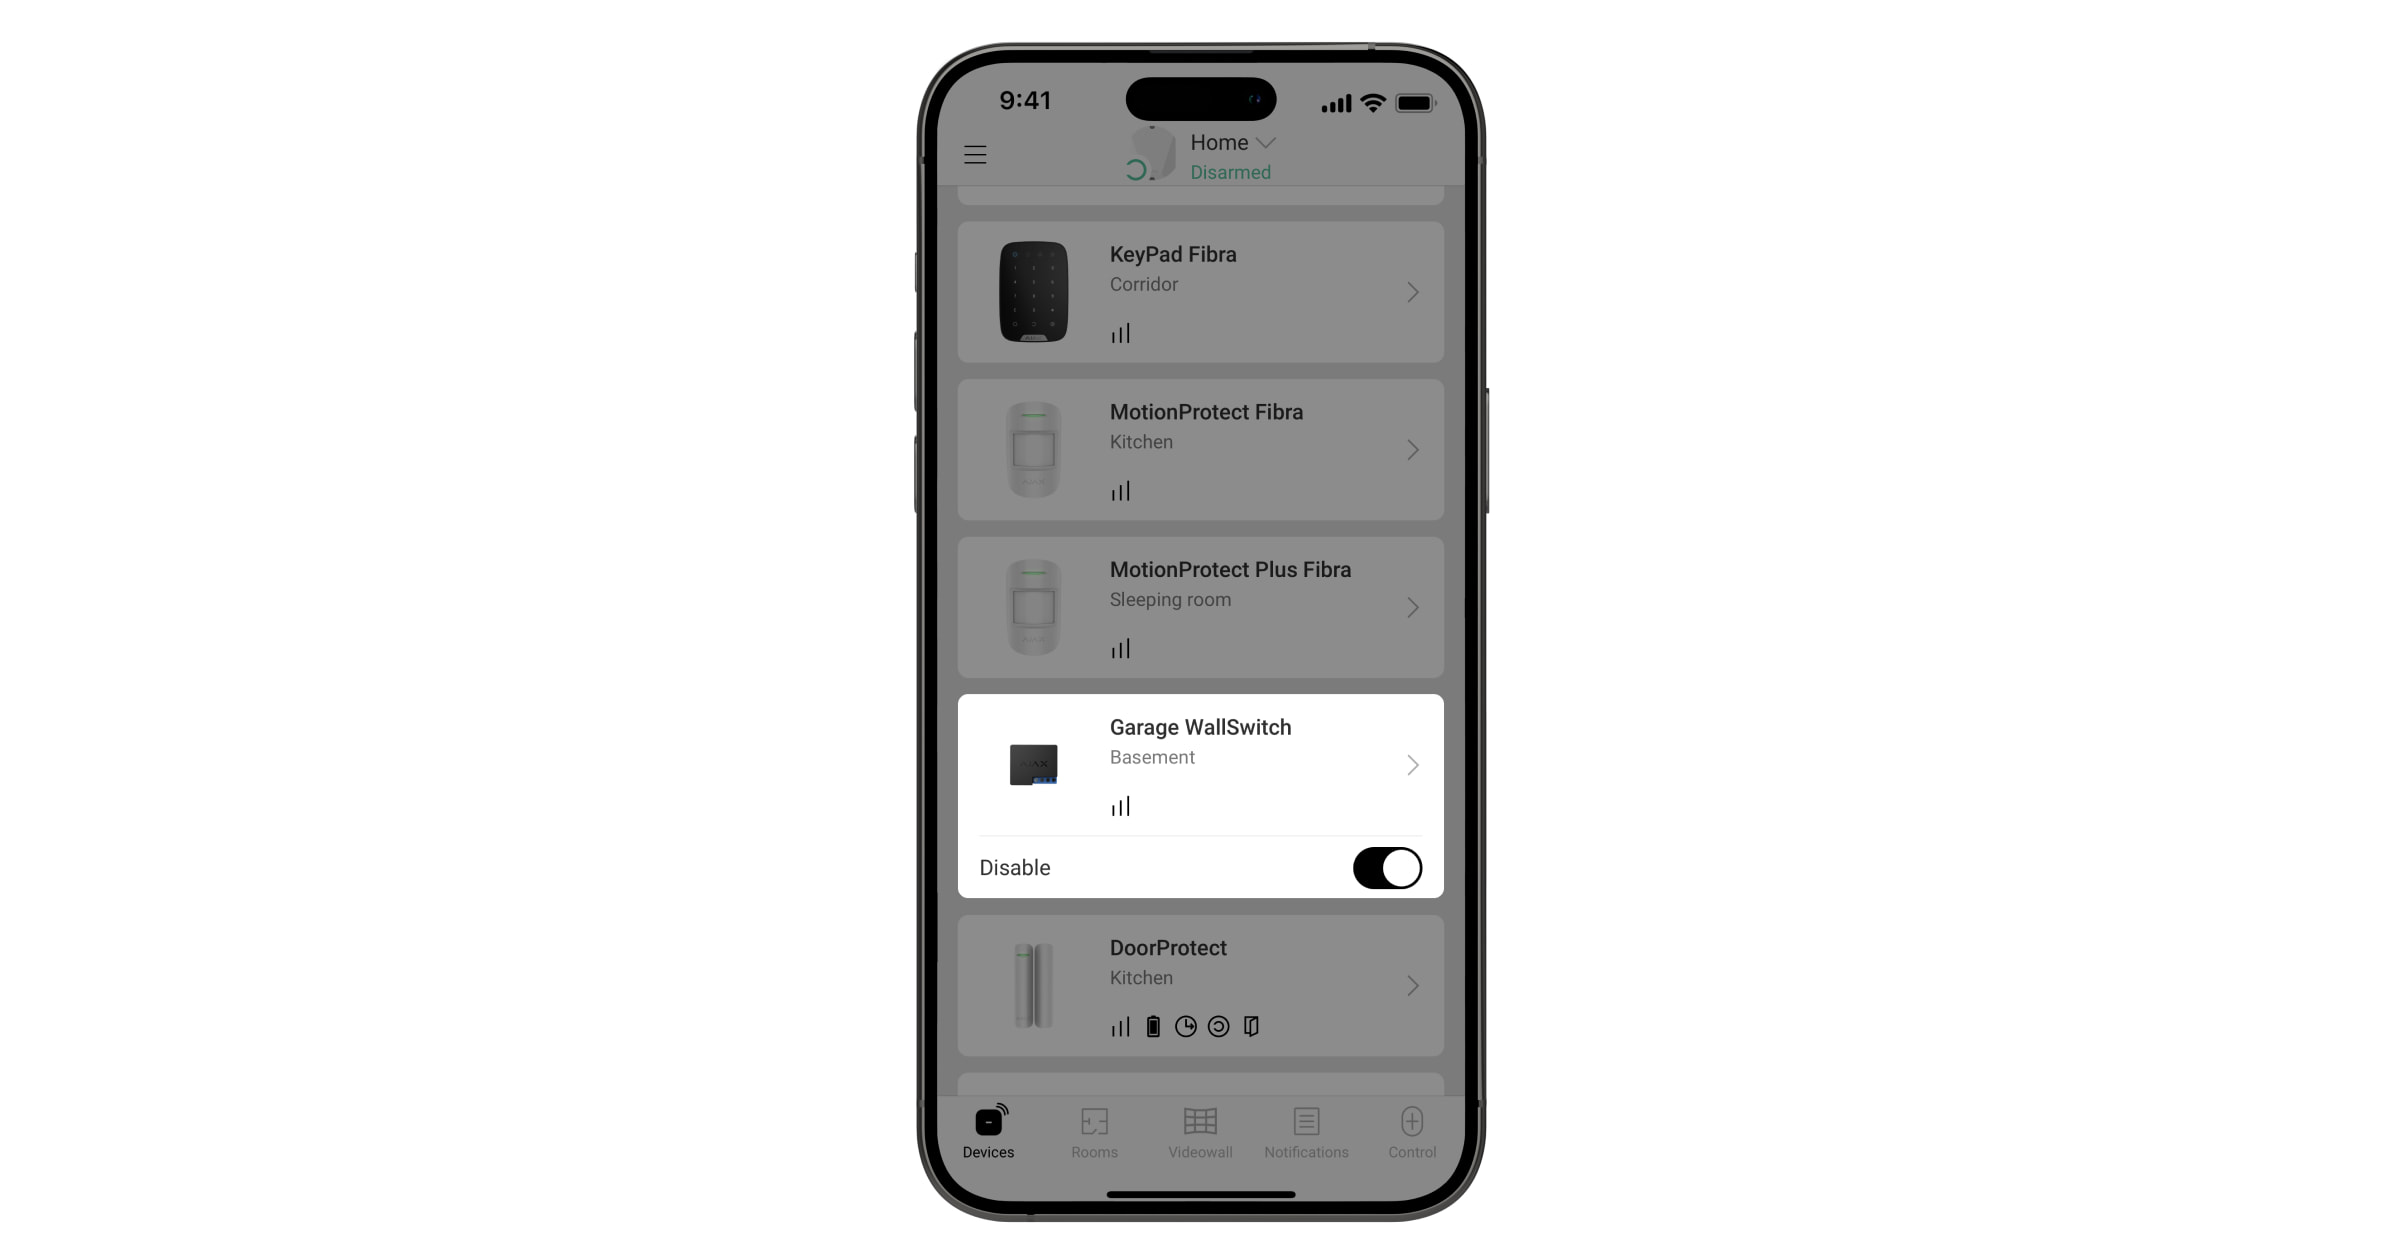
Prima o interrutor no campo do relé de energia — o estado dos contactos mudará para o oposto. Quando os contactos estão fechados, é fornecida energia ao dispositivo e os estores/persianas podem ser controlados. Quando os contactos estão abertos, a alimentação elétrica do dispositivo é interrompida e as persianas/estores são bloqueados.
Como programar cenários para abrir, fechar e controlar a alimentação elétrica de persianas/estores
Os cenários Ajax permitem-lhe abrir e fechar, bem como ligar e desligar as persianas/estores ao alterar o modo de segurança, ao ligar/desligar o Modo Noturno, por alarme ou por programação.
Os cenários em que a alteração do modo de segurança pode ser utilizada tanto para todo o sistema Ajax como para a utilização de grupos.
O Ajax security system permite controlar os dispositivos de automatização por programação. É possível definir o tempo de ativação dos relés.
É possível definir um cenário para o alarme do detetor de incêndio. Se o detetor de incêndio detetar fumo, temperatura limite excessiva ou o seu aumento rápido, o sistema de segurança Ajax pode abrir as persianas de acordo com o cenário para facilitar a evacuação.
Para criar cenários para controlar os estores/persianas, aceda ao menu:
- App Ajax
- Dispositivos
- Selecione o relé correspondente
- Definições
- Cenários