FireProtect 2 (CO) Jeweller is een draadloze brandmelder met een ingebouwde sirene. Ontworpen voor installatie binnenshuis. Detecteert gevaarlijke koolmonoxideniveaus (CO). De melder kan ook zonder een hub werken.
Het is verkrijgbaar in twee versies: met ingebouwde batterijen (heeft SB in de naam) die 10 jaar meegaan, en met vervangbare batterijen (heeft RB in de naam) die 5 jaar meegaan.
Een lijst van compatibele hubs en signaalversterkers is hier beschikbaar. De FireProtect 2 (CO)-melder is alleen compatibel met hubs* die draaien op OS Malevich 2.15 of nieuwer. Hub (4G) Jeweller moet over OS Malevich 2.28 of nieuwer beschikken om deze melder te ondersteunen.
Alleen de FireProtect 2 RB (CO) UL Jeweller-melder is gecertificeerd volgens de UL/ULC-normen en is compatibel met hubs die draaien op OS Malevich 2.19 of nieuwer.
* Alleen Hub 2 Plus Jeweller en Hub 2 (4G) Jeweller zijn gecertificeerd volgens UL/ULC-normen.
De melder maakt deel uit van het Ajax-systeem en communiceert met de hub via het beveiligde Jeweller-radioprotocol. Het communicatiebereik van de hub bedraagt maximaal 5,577 ft zonder obstakels.
Er zijn ook versies van de melder met andere sensorcombinaties verkrijgbaar. Alle Ajax-brandmelders zijn hier beschikbaar.
Functionele elementen
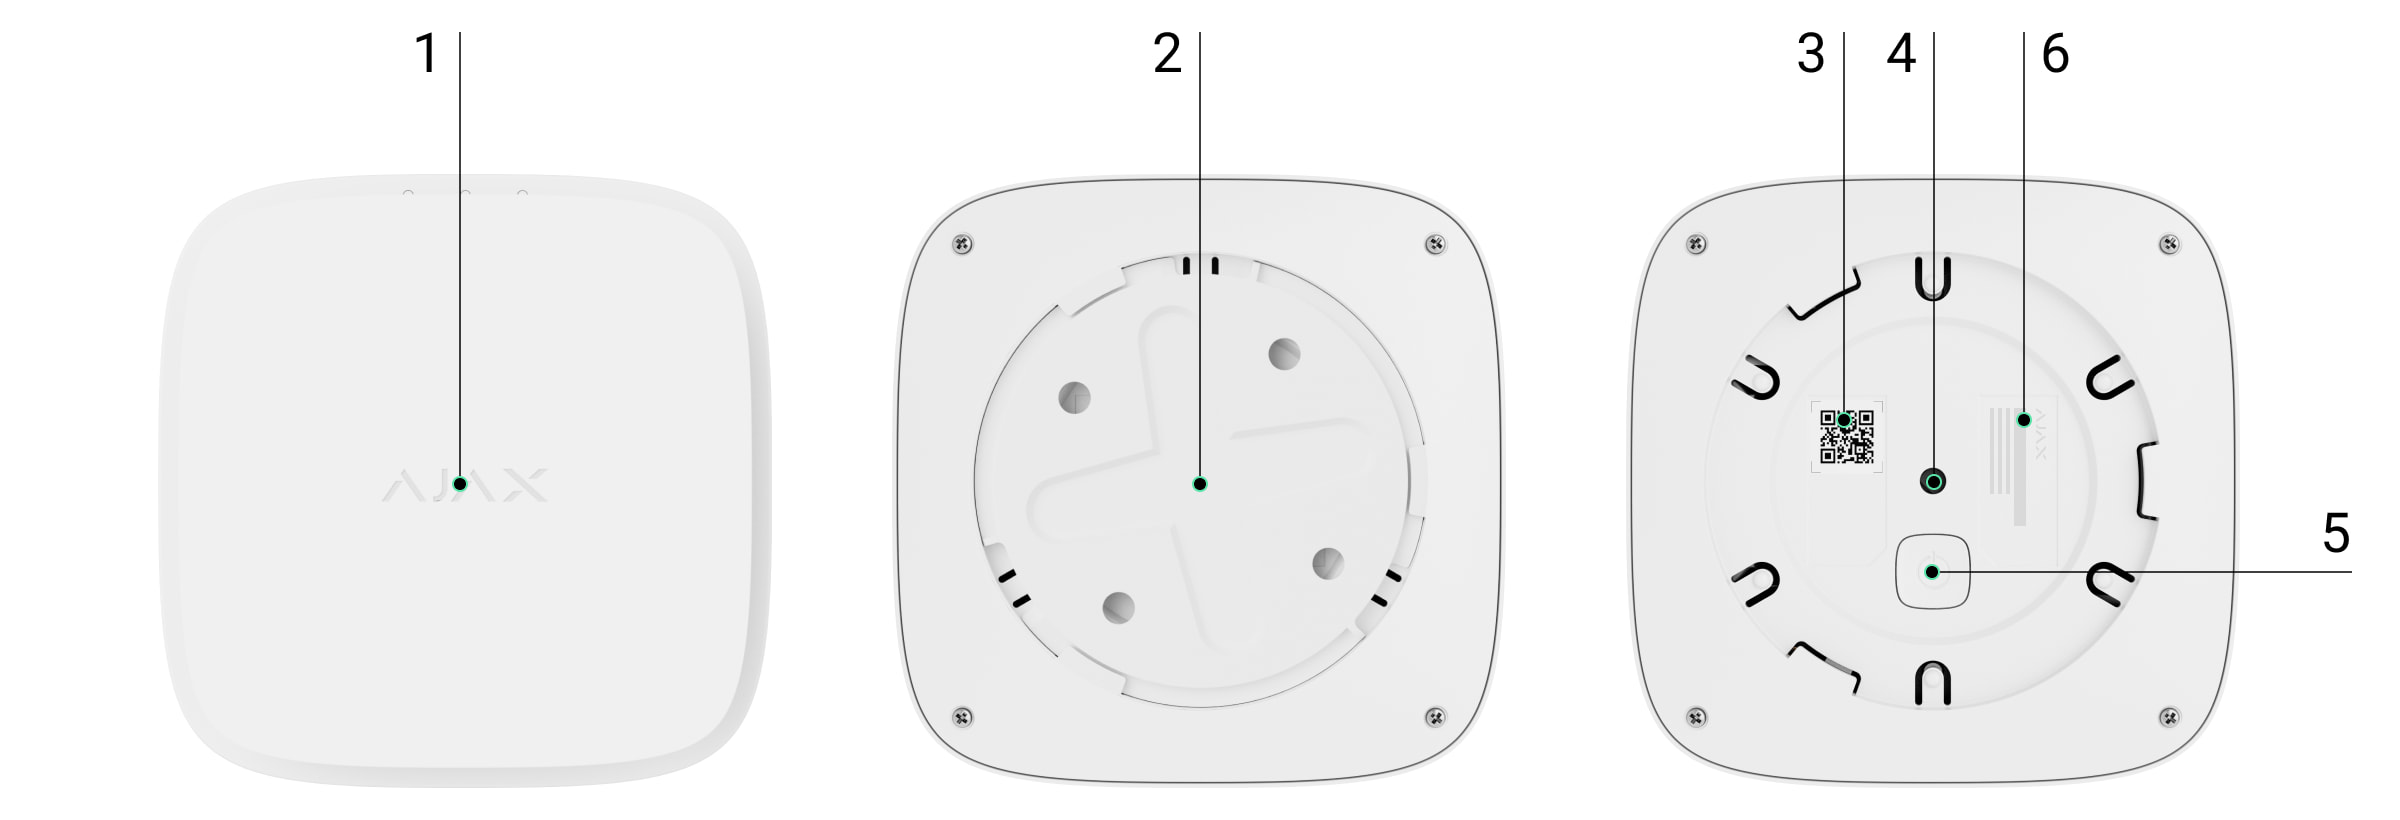
- Het voorpaneel van de melder met een Test-/dempingsknop. Druk op het midden van het paneel om de knop te activeren.
- SmartBracket-montagepaneel. Om het paneel te verwijderen, draait u het tegen de klok in.
- QR-code en ID (serienummer) van het apparaat. Deze wordt gebruikt om de melder toe te voegen aan het Ajax-systeem.
- Sabotagebeveiliging. Wordt geactiveerd bij een poging om de melder van het oppervlak los te halen of het montagepaneel te verwijderen.
-
Serviceknop.
- Informatie over de certificering de melder.
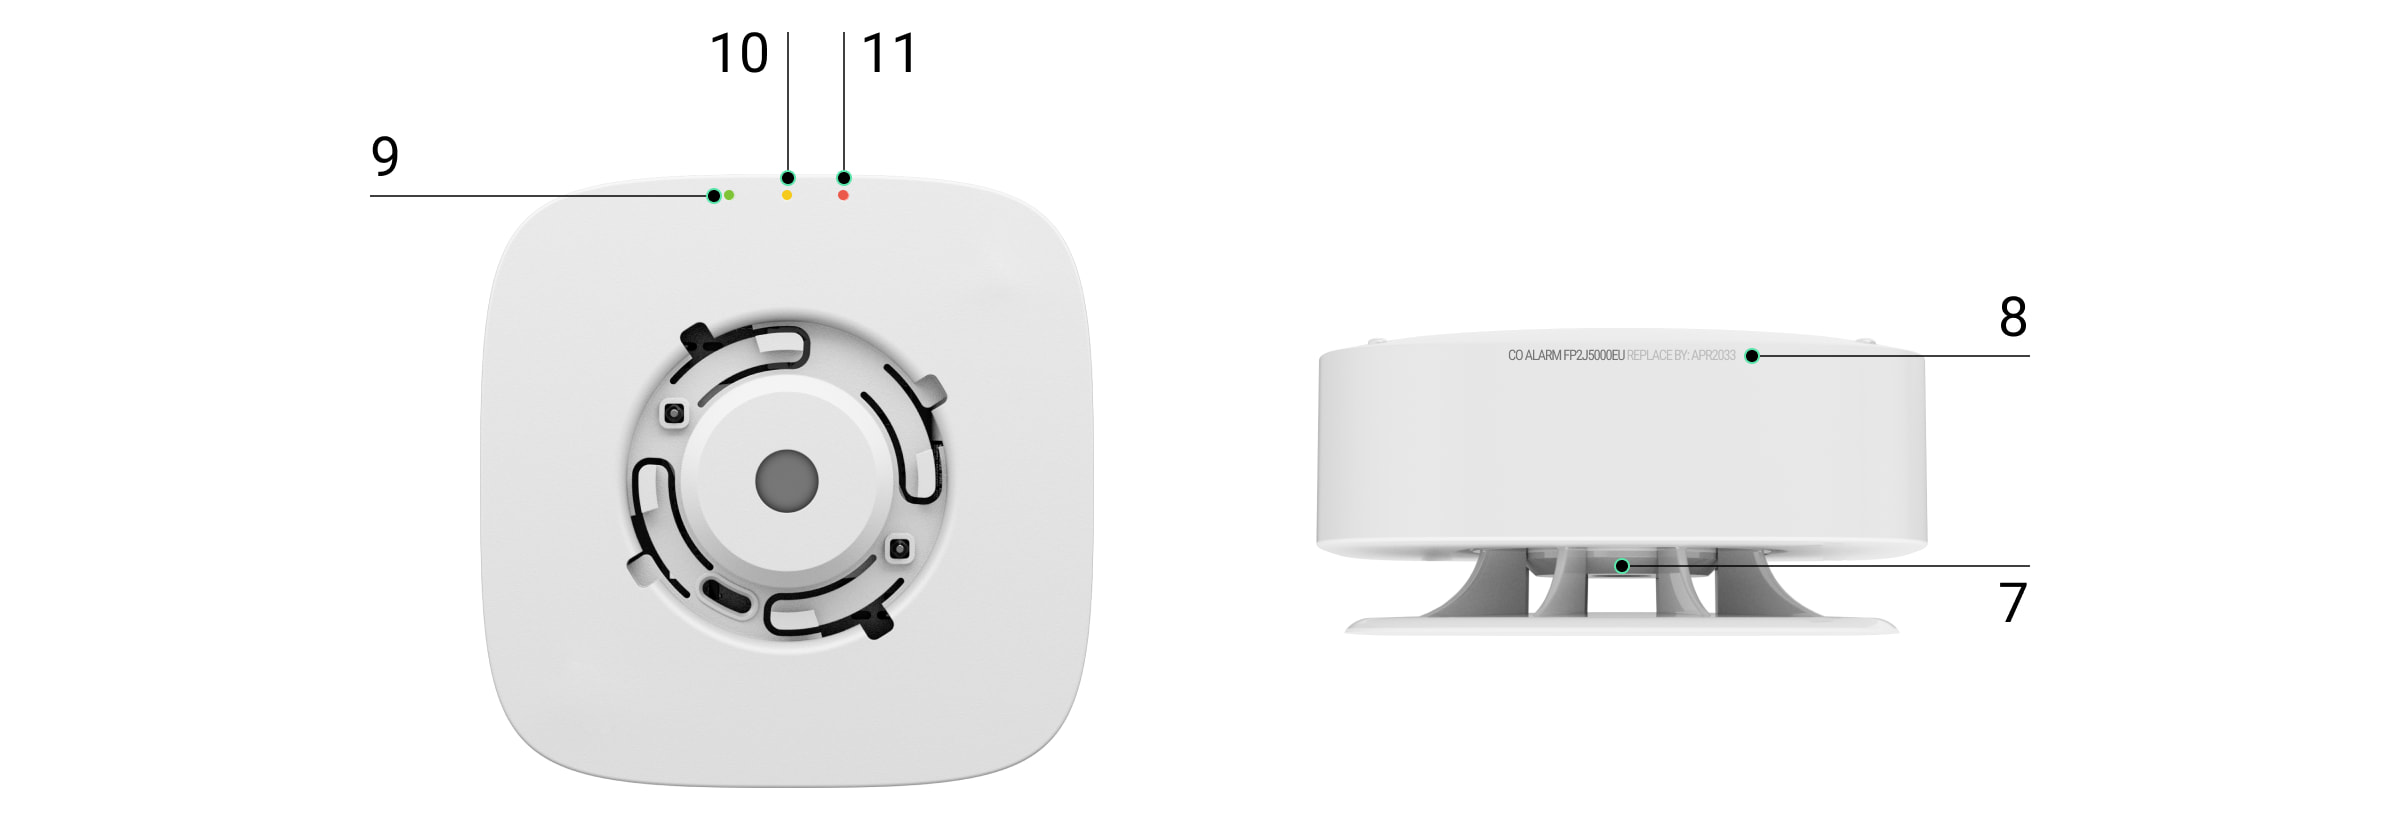
- Sirene.
- Informatie over de einddatum van de levenscyclus van de melder.
- Groene led-indicator.
- Gele led-indicator.
- Rode led-indicator.
Werkingsprincipe
FireProtect 2 (CO) is een draadloze brandmelder ontworpen voor installatie binnenshuis. Verkrijgbaar in twee versies:
- Met ingebouwde batterijen. Zo’n melder heeft SB in zijn naam. De levensduur van de ingebouwde batterij is 10 jaar. Nadat de batterijen leeg zijn, moet de melder vervangen worden door een nieuwe.
- Met vervangbare batterijen. Zo’n melder heeft RB in zijn Naam. De voorgeïnstalleerde batterij gaat tot tot 5 jaar mee. Wanneer de batterijen leeg zijn, kunnen ze worden vervangen door nieuwe.
De functie Optimalisatie van de levensduur van de batterij* moet worden ingeschakeld om een dergelijke levensduur voor ingebouwde en voorgeïnstalleerde batterijen te garanderen.
* Niet van toepassing op UL-gecertificeerde FireProtect 2-melders.
De melder is uitgerust met een sirene (piëzo-elektrische zoemer) voor geluidsmeldingen van alarmen en gebeurtenissen met een volume van maximaal 85 dB (op een afstand van 10 ft van de melder). De melder is altijd actief en reageert 24/7 op een brand, ongeacht de beveiligingsmodus van het systeem.
FireProtect 2 is beveiligd met een sabotagebeveiliging. De sabotagebeveiliging controleert het verwijderen van de melder van het SmartBracket-montagepaneel: de melder reageert met een led-indicatie en stuurt meldingen naar gebruikers in Ajax-apps en de meldkamer.
Ajax-automatiseringsapparaten reageren op FireProtect 2-alarmen en voeren door de gebruiker gedefinieerde acties uit met automatiseringsscenario’s. De relais van WallSwitch kunnen bijvoorbeeld het ventilatiesysteem uitschakelen en de noodverlichting inschakelen bij een alarm.
CO-sensor (koolmonoxide)
FireProtect 2 heeft een chemische sensor die gevaarlijke koolmonoxideniveaus detecteert. Het werkingsprincipe van de sensor is gebaseerd op een chemische reactie. In de sensor bevindt zich een bad van elektrolyt. Wanneer een bepaald koolmonoxideniveau wordt bereikt, wordt een chemische reactie in gang gezet. De melder registreert dit en zet deze om in een alarm.
De melder slaat alarm als een CO-niveau bereikt wordt van:
- 70 ppm (0,007%) — in 60 – 240 minuten.
- 150 ppm (0,015%) — in 10 – 50 minuten.
- 400 ppm (0,04%) — in 4 – 15 minuten.
Een CO-concentratie van 400 ppm (0,04%) voor drie uur is levensbedreigend. De melder stopt met waarschuwen over een gevaarlijk koolmonoxideniveau zodra de concentratie daalt tot 40 ppm (0,004%).
Test-/dempingsknop
Om de Test-/dempingsknop te activeren, druk met uw hand lichtjes in het midden van het voorpaneel. Gebruik een geschikt voorwerp (bijv. een bezemsteel) als u niet met uw hand bij de melder kunt. De Test-/dempingsknop is een mechanische knop onder het voorpaneel van de melder.
De knop heeft verschillende functies:
- In de normale modus start het de zelftest van de melder.
- Bij een alarm dempt deze het alarm van de melder of het gekoppelde alarm van alle brandmelders in het systeem voor 5 minuten.
- Bij een storing of een laag batterijniveau worden de geluids- en led-indicatie voor 12 uur uitgeschakeld.
- Bij het einde van de levensduur dempt deze de geluids- en de led-indicatie voor 29 dagen. Daarna kan de indicatie niet meer worden gedempt.
Om de zelftest uit te voeren, wacht u minimaal 3 minuten nadat u de melder heeft ingeschakeld. U kunt elke willekeurige functie voor het dempen van het geluid gebruiken (bijv. via het Ajax-bediendeel) zolang u zich in het zichtveld van de CO-sensor bevindt.
Alarmen van gekoppelde brandmelders*
Voor FireProtect 2-melders die zijn gecertificeerd volgens de UL/ULC-normen, werkt de functie Gekoppeld alarm voor brandmelders alleen met een hub.
Alle brandmelders van de FireProtect 2-productlijn ondersteunen de functie voor een gekoppeld alarm. Deze functie activeert de ingebouwde sirenes van alle brandmelders in het systeem zodra minstens één van de brandmelders een alarm detecteert. De sirenes van FireProtect 2-melders worden binnen 20 seconden na het detecteren van een alarm geactiveerd. FireProtect en FireProtect Plus worden geactiveerd binnen een ping-interval van de melder. Deze wordt ingesteld in de Jeweller (of Jeweller/Fibra) instellingen, maar duurt niet langer dan 60 seconden.
De FireProtect 2-melders hebben verschillende geluids- en led-indicaties voor de alarmtypen, zodat gebruikers ze gemakkelijker van elkaar kunnen onderscheiden. In het geval van een gekoppeld alarm geven de FireProtect 2-melders het alarmtype aan dat door de alarmerende melder is gedetecteerd.
Gebeurtenissen naar de meldkamer verzenden
Het Ajax-systeem kan gebeurtenissen en alarmen verzenden naar de PRO Desktop-bewakingsapp, en naar de meldkamer via SurGard (Contact ID), SIA DC-09 (ADM-CID), ADEMCO 685 en andere protocollen. De lijst met ondersteunde protocollen vindt u hier.
Dankzij de adresseerbaarheid van de Ajax-apparaten kunnen er niet alleen gebeurtenissen naar PRO Desktop en de meldkamer worden gestuurd, maar ook het type van het apparaat, de naam, de groep en de virtuele ruimte die eraan is toegewezen. De lijst van verzonden waarden kan variëren, afhankelijk van het type meldkamer en het geselecteerde communicatieprotocol.
Het ID en het loopnummer (zone) van de melder zijn beschikbaar in de statussen.
Aan het systeem toevoegen
Voordat u een apparaat toevoegt
- Installeer de Ajax-app.
- Log in op uw account of maak een nieuwe aan.
- Selecteer een space of maak een nieuwe aan.

Een space is beschikbaar voor apps van deze versies of nieuwer:
- Ajax Security System 3.0 voor iOS.
- Ajax Security System 3.0 voor Android.
- Ajax PRO: Tool for Engineers 2.0 voor iOS.
- Ajax PRO: Tool for Engineers 2.0 voor Android.
- Ajax PRO Desktop 4.0 voor macOS.
- Ajax PRO Desktop 4.0 voor Windows.
- Voeg minstens één virtuele ruimte toe.
- Voeg een compatibele hub toe aan de space. Zorg dat de hub aanstaat en toegang heeft tot het internet via een ethernetkabel, wifi, en/of een mobiel netwerk.
- Zorg ervoor dat de space is uitgeschakeld en de hub niet begint met updaten door de status in de Ajax-app te controleren.
Alleen een PRO of beheerder van een space met rechten om het systeem te configureren kan een apparaat aan de hub toevoegen.
Om verbinding te maken met de hub, moet de melder zich binnen het dekkingsgebied van het radionetwerk van de hub bevinden. Om te werken via een signaalversterker, verbindt u eerst de melder met de hub en vervolgens met de signaalversterker. U kunt dit doen in de instellingen van de signaalversterker in de Ajax-apps.
FireProtect 2 aansluiten op een hub
- Open de Ajax-app.
- Selecteer de hub als u er meerdere heeft of als u de Ajax PRO-app gebruikt.
- Ga naar het tabblad Apparaten
 . Druk op Apparaat toevoegen.
 - Voer de naam van het apparaat in.
- Scan de QR-code van de hub of voer de ID handmatig in. De QR-code bevindt zich op de achterkant van de behuizing (onder het montagepaneel) en op de verpakking van het apparaat. De apparaat-ID bevindt zich onder de QR-code.
- Selecteer de virtuele ruimte en een beveiligingsgroep (als de groepsmodus is ingeschakeld).
- Klik op Toevoegen en het aftellen begint.
Als het maximale aantal apparaten is toegevoegd aan de hub, ontvangt u een melding wanneer u het apparaat toevoegt dat het limiet voor apparaten is overschreden. Het aantal apparaten dat u op de hub kunt aansluiten, hangt af van het model van het bedieningspaneel.
-
Zet de melder aan door de serviceknop 3 seconden ingedrukt te houden. Het verbindingsverzoek met de hub wordt alleen verzonden als de melder is ingeschakeld. Als het koppelen van de melder met de hub mislukt, probeer het dan na 5 seconden opnieuw.
De melder kan geen verbinding maken met de hub als ze op verschillende radiofrequenties werken. Het radiofrequentiebereik van apparaten kan per regio verschillen. Neem alstublieft contact op met onze technische ondersteuning voor informatie over het operationele frequentiebereik van uw apparaten.
Eenmaal verbonden verschijnt FireProtect 2 in de apparatenlijst van de hub in de Ajax-app. De statusupdate van het apparaat hangt af van het ping-interval dat is ingesteld in de instellingen van Jeweller of Jeweller/Fibra. De standaardwaarde is 36 seconden.
FireProtect 2 werkt slechts met één hub. Als de melder is verbonden met een nieuwe hub, stopt het met het verzenden van gegevens naar de oude hub. Zodra FireProtect 2 is toegevoegd aan een nieuwe hub, wordt deze niet verwijderd uit de apparatenlijst van de oude hub. Dit moet gedaan worden via de Ajax-apps.
Zelfstandige bedrijfsmodus
De FireProtect 2-melders kunnen zelfstandig worden gebruikt zonder verbinding te maken met een Ajax-hub. In dit geval meldt de melder brand of een gevaarlijk CO-niveau met alleen een ingebouwde sirene en de led-indicatie. Gebruikers ontvangen geen meldingen hiervan in elk van de Ajax-apps, inclusief Ajax Translator of PRO Desktop.
Om de melder zelfstandig te gebruiken, volgt u deze stappen:
- Selecteer de optimale locatie van de melder met behulp van de aanbevelingen in de sectie Selectie van de installatieplaats.
- Monteer de melder op het SmartBracket-paneel zoals beschreven in het gedeelte Installatie.
-
Druk op de serviceknop om de melder in te schakelen.
- Wacht minstens 3 minuten en start een zelftest met de Test-/dempingsknop. Druk op het midden van het voorpaneel en houd dit 1,5 seconden ingedrukt.
Tijdens een zelftest meldt FireProtect 2 elke stap met een ingebouwde sirene en led-indicatie. Zodra een zelftest is voltooid, gaat de led-indicatie uit en werkt de melder zelfstandig.
Druk bij een alarm op de Test-/dempingsknop of los de oorzaak van het alarm op om de sirene uit te schakelen.
Indicatie
De led-indicatie en de ingebouwde sirene van de melder kunnen alarmen en bepaalde statussen van de melder aangeven.
| Led-indicatie | Geluid indicatie | Gebeurtenis | Opmerkingen |
| De rode led knippert 4 keer elke 5 seconden. | De sirene klinkt synchroon met de led-indicatie. Signalen worden elke 3 seconden herhaald. | Alarm veroorzaakt door gevaarlijk CO-niveau (koolmonoxide). |
De melder stopt het alarm zodra het CO-niveau onder de 70 ppm zakt. U kunt ook het alarm dempen door op de Test-/dempingsknop of Button Jeweller, of door Ajax-bediendelen te gebruiken. De led- en geluidsindicaties worden hervat als de oorzaak van het alarm nog steeds aanwezig is nadat de dempingstijd (5 minuten) is verstreken. |
| Nee. | Korte en lage pieptoon. | Het dempen van een alarm is verboden. |
Het geluid wordt afgespeeld nadat de Test-/dempingsknop is ingedrukt. Het alarm kan niet worden gedempt als er een kritisch rookniveau in de lucht hangt. |
| De rode led knippert elke 4 seconden. | Nee. | Gedempt alarm. | De melder geeft geen alarm meer af als de oorzaak ervan verholpen is. |
| De rode led knippert 2 keer achter elkaar. | Nee. | Herstel na alarm. | De melder wordt automatisch hersteld als de oorzaak van het alarm verholpen is. |
| De gele led brandt voor 1 seconde. | Nee. |
Sabotagealarm. De melder is verwijderd uit het SmartBracket-montagepaneel. |
|
| De groene led licht voor 1 seconde op. | Nee. | De melder is geïnstalleerd op het SmartBracket-montagepaneel. | Gaat aan wanneer de sabotagebeveiliging wordt geactiveerd. |
| Groene, gele en rode leds knipperen. | Nee. | De melder wordt ingeschakeld. | Houd de serviceknop 1 seconde ingedrukt om de melder in te schakelen. |
| De groene, gele en rode leds branden tegelijkertijd en gaan dan uit in omgekeerde volgorde. | Nee. | De melder wordt uitgeschakeld. | Om de melder uit te schakelen drukt u de serivceknop 2 seconden in. |
| De groene led brandt voortdurend. | Nee. | Verbinding met de hub wordt uitgevoerd. | De indicatie gaat uit nadat de melder op de hub is aangesloten. |
| De groene led knippert 6 keer achter elkaar. | Nee. | De melder is van de hub verwijderd. | De indicatie gaat aan wanneer de melder informatie ontvangt dat deze van de hub is verwijderd. |
| De gele led knippert elke minuut 2 keer achter elkaar. | De sirene klinkt elke minuut synchroon met de led-indicatie. | Storing gedetecteerd. |
Alle storingen worden weergegeven in de statussen van de melder in de Ajax-apps. Velden met storingen worden rood gemarkeerd. Als de melder moet worden gerepareerd, neem dan contact op met onze technische ondersteuning. |
| De gele led knippert 1 keer per minuut. | De sirene klinkt elke minuut synchroon met de led-indicatie. | Batterij bijna leeg. |
U kunt de batterijen alleen vervangen in de melder met vervangbare batterijen (heeft RB in de naam). Een melder met ingebouwde batterijen (met SB in de naam) moet worden vervangen door een nieuwe als de batterijen leeg zijn. |
| De gele led knippert constant. | Nee. | De batterijen zijn volledig leeg. |
U kunt de batterijen alleen vervangen in de melder met vervangbare batterijen (heeft RB in de naam). Een melder met ingebouwde batterijen (heeft SB in de naam) moet worden vervangen door een nieuwe als de batterijen leeg zijn. |
| De rode led knippert 5 keer, knippert daarna nog 3 keer maar langzamer. | De sirene piept 5 keer, daarna maakt het 3 langere piepen. | Voert een zelftest uit. | De test kan worden gestart door de Test-/dempingsknop in te drukken of in de instellingen van de melder in de Ajax-app. |
| De gele led knippert elke minuut 3 keer achter elkaar. | De sirene gaat 3 keer elke minuut af. | De levensduur van het apparaat is verstreken. |
Het apparaat was werkzaam voor meer dan 10 jaar. De gevoeligheid van de sensoren kan zijn afgenomen. We raden aan om deze melder te vervangen door een nieuwe. |
Testen van de melder
Testen van de functionaliteit
Met de test kunt u de status van de sensoren van de melders controleren. U kunt dit op twee manieren uitvoeren: door op de Test-/dempingsknop van de melder te drukken en in de Ajax-apps.
Om de zelftest uit te voeren, wacht u minimaal 3 minuten nadat u de melder heeft ingeschakeld.
Als de melder zich in een alarmstatus bevindt, is de zelftest niet beschikbaar.
Om de test uit te voeren met de Test-/dempingsknop, druk op het midden van het voorpaneel en houd dit 1,5 seconden ingedrukt.
Om de test uit te voeren, in een Ajax app:
- Open de Ajax-app.
- Selecteer de hub als u er meerdere heeft of als u de Ajax PRO-app gebruikt.
- Ga naar het menu Apparaten .
- Selecteer FireProtect 2 (CO).
- Ga naar de instellingen door op het tandwielpictogram
 te klikken.
 - Klik op het veld Zelftest van het apparaat.
Nadat de test gestart is knippert de rode led van de melder 5 keer achter elkaar en daarna nog 3 keer, maar langzamer. De sirene van de melder klinkt synchroon met de led-indicatie. Als de test voltooid is, ontvangen gebruikers een melding over de status van de melder in de Ajax-apps.
De melder informeert ook over het testresultaat met geluids- en led-indicaties. Als de test faalt en er een storing wordt gedetecteerd, begint de melder een storing aan te geven 3 seconden nadat de test is begonnen: de gele led knippert twee keer en de sirene piept synchroon met de led-indicatie.
De zelftest begint niet onmiddellijk, maar uiterlijk 30 seconden na het indrukken van de Test-/dempingsknop of nadat het gestart is via de Ajax-app.
Om een zelftest te stoppen, druk nogmaals op de Test-/dempingsknop.
Als er geen geluid- of led-indicatie optreedt tijdens de zelftest, dan mag de melder niet worden gebruikt. Neem contact op met onze technische ondersteuning.
Test op de installatieplaats
Het Ajax-systeem heeft diverse testen om de juiste installatieplaats voor de apparaten te selecteren. De Jeweller-signaalsterktetest is beschikbaar voor FireProtect 2. Deze test bepaalt de sterkte en stabiliteit van het signaal op de beoogde locatie van het apparaat.
Om de test uit te voeren, in een Ajax app:
- Selecteer de hub als u er meerdere heeft of als u de Ajax PRO-app gebruikt.
- Ga naar het menu Apparaten .
- Selecteer FireProtect 2 (CO).
- Ga naar de instellingen door op het tandwielpictogram te klikken.
- Selecteer Jeweller-signaalsterktetest.
- Voer de test uit volgens de aanwijzingen van de app.
De test start niet onmiddellijk, maar de wachttijd overschrijdt niet de duur van één ping-interval van de melder. De standaardwaarde is 36 seconden. U kunt het pinginterval van de melder wijzigen in het menu Jeweller (of Jeweller/Fibra) in de instellingen van de hub.
Pictogrammen
De pictogrammen geven bepaalde statussen van de melder aan. U kunt ze in de Ajax-app inzien via het tabblad Apparaten ![]() .
.
| Pictogram | Betekenis |
|
Signaalsterkte van Jeweller tussen de melder en de hub of signaalversterker. De aanbevolen waarde is twee of drie streepjes. |
|
|
Laadniveau van de batterij van het apparaat. |
|
|
De functie Gekoppeld alarm voor brandmelders is geactiveerd. |
|
|
De melder werkt in de modus Altijd actief. Het pictogram wordt permanent weergegeven. FireProtect 2 is altijd actief en reageert 24/7 op een brand, ongeacht de beveiligingsmodus van het systeem. |
|
| De melder is verbonden via de signaalversterker. | |
|
De melder is permanent gedeactiveerd. |
|
| De melder heeft een gevaarlijk CO-niveau (koolmonoxide) gedetecteerd. | |
| De melder is verwijderd van het SmartBracket-montagepaneel of de integriteit van de behuizing is op een andere manier geschonden. Controleer of de melder nog vastzit. | |
| De sirene van de melder activeert een alarmgeluid. | |
|
De levensduur van de melder is verstreken. Het apparaat was werkzaam voor meer dan 10 jaar. De gevoeligheid van de sensoren kan zijn afgenomen. We raden aan om deze melder te vervangen door een nieuwe. |
|
| Storing gedetecteerd. De lijst met storingen is beschikbaar in de statussen van de melder. | |
|
De melder heeft gebeurtenissen voor activering van de sabotagebeveiliging gedeactiveerd. |
|
| Het apparaat heeft de verbinding met de hub verloren of de hub heeft de verbinding met de Ajax Cloud server verloren. | |
|
Het apparaat is niet overgezet naar de nieuwe hub. |
Statussen
Het statusscherm bevat informatie over het apparaat en de bedrijfswaarden. U kunt de statussen van FireProtect 2 (CO) bekijken in de Ajax-apps. Om ze te bekijken:
- Open de Ajax-app.
- Selecteer een hub als u er meerdere heeft of als u de Ajax PRO-app gebruikt.
- Ga naar het tabblad Apparaten .
- Selecteer het apparaat uit de lijst.
| Waarde | Betekenis |
| Gegevensimport | Geeft de fout weer bij het overzetten van gegevens naar de nieuwe hub:
|
| Temperatuur |
Luchttemperatuur in de ruimte waar FireProtect 2 is geïnstalleerd. Gemeten in Celsius of Fahrenheit, dit is afhankelijk van de instellingen van de app. In de normale status wordt de temperatuurwaarde in het zwart weergegeven. Als de temperatuur stijgt, kleurt het veld rood. U kunt een scenario op basis van temperatuur configureren om automatiseringsapparaten te besturen. |
| Jeweller-signaalsterkte |
Signaalsterkte van Jeweller tussen FireProtect 2 en de hub of de radiosignaalversterker. De aanbevolen waarde is twee of drie streepjes. Jeweller is een protocol voor het verzenden van gebeurtenissen en alarmen van FireProtect 2. |
| Verbinding via Jeweller | Verbindingsstatus tussen FireProtect 2 en de hub of een signaalversterker via Jeweller:
|
| Batterijlading | De batterijlading van het apparaat:
Wanneer de batterijen leeg zijn, ontvangen gebruikers en de meldkamer hierover een melding. Na de melding dat de batterij bijna leeg is, kan de melder onder normale omstandigheden nog een maand werken. Bij een alarm is de batterijlading voldoende om 4 minuten lang een geluids- en led-indicatie te garanderen. Zo wordt de batterijlading weergegeven U kunt de batterijen alleen vervangen in de melder met vervangbare batterijen (heeft RB in de naam). Een melder met ingebouwde batterijen (met SB in de naam) moet worden vervangen door een nieuwe als de batterijen leeg zijn. |
| Deksel | De status van de sabotagebeveiliging van de melder die reageert op het loshalen van het apparaat van het oppervlak of het openen van de behuizing:
|
| Hoog CO-niveau | CO (koolmonoxide)-niveau in de ruimte waar FireProtect 2 is geïnstalleerd:
Als de melder een gevaarlijk CO-niveau detecteert, licht het tekstveld rood op. |
| Permanente deactivering | Geeft de status van de permanente deactiveringsfunctie van het apparaat weer:
|
| Firmware | De firmwareversie van FireProtect 2. |
| Apparaat-ID | ID (serienummer) van FireProtect 2. Dit ook te vinden op de behuizing van de melder (onder het montagepaneel) onder de QR-code en op de verpakkingsdoos. |
| Apparaatnr. | Nummer van de loop (zone) van FireProtect 2. Gebeurtenissen worden met dit nummer naar de meldkamer gestuurd. |
Instellingen
Om de instellingen van FireProtect 2 (CO) in de Ajax-app te wijzigen:
- Open de Ajax-app.
- Selecteer de hub als u er meerdere heeft of als u de Ajax PRO-app gebruikt.
- Ga naar het tabblad Apparaten .
- Selecteer het apparaat uit de lijst.
- Ga naar de Instellingen door op het tandwielpictogram te klikken.
- Stel de vereiste instellingen in.
- Klik op Terug om de nieuwe instellingen op te slaan.
| Instellingen | Betekenis |
| Naam |
Naam van de melder. Wordt weergegeven in de lijst met apparaten van de hub, tekst van het sms-bericht en meldingen in het logboek. Als u de naam wilt aanpassen, klikt u op het tekstveld. De naam kan uit maximaal 12 cyrillische tekens of 24 Latijnse tekens bestaan. |
| Ruimte |
Selecteer de virtuele ruimte waaraan FireProtect 2 is toegewezen. De naam van de ruimte wordt weergegeven in de tekst van het sms-bericht en in de meldingen in het logboek. Als u de ruimte wilt aanpassen, klikt u op het veld. |
| Alarm met sirene | |
| Als CO gedetecteerd wordt | Als deze optie is ingeschakeld, worden de Ajax-sirenes die op het systeem zijn aangesloten geactiveerd wanneer de melder een gevaarlijk CO-niveau detecteert. |
| Jeweller-signaalsterktetest |
Schakelt de melder naar de testmodus voor de signaalsterkte van Jeweller. De test helpt bij het bepalen van de optimale installatieplaats voor FireProtect 2. De test toont de signaalsterkte tussen de melder en de hub of signaalversterker via het Jeweller-protocol voor draadloze gegevensoverdracht. De aanbevolen waarde is twee of drie streepjes. |
| Zelftest van het apparaat |
Voert de zelftest van de melder uit. |
| Gebruikershandleiding | Opent de gebruikershandleiding voor FireProtect 2 in de Ajax-app. |
| Permanente deactivering | Hiermee kan een gebruiker het apparaat uitschakelen zonder het uit het systeem te verwijderen. Er zijn drie opties beschikbaar:
|
| Ontkoppelen | Koppelt FireProtect 2 los van de hub en verwijderd de instellingen. |
Instelling voor optimalisatie van de levensduur van de batterij
De functie Optimalisatie van de levensduur van de batterij is voorzien om de batterijcapaciteit van de melders te besparen. Het is alleen beschikbaar voor hubs drie draaien op OS Malevich 2.14 of nieuwer waar FireProtect 2-melders op zijn aangesloten. Deze functie is standaard ingeschakeld.
Wanneer de functie Optimalisatie van de levensduur van de batterij is ingeschakeld, verhoogt de hub het ping-interval voor FireProtect 2-melders.
Deze functie heeft geen invloed op de levertijd van alarmmeldingen.
Om de functie Optimalisatie van de levensduur van de batterij uit te schakelen:
- Open de Ajax-app.
- Selecteer de hub waarop de FireProtect 2-melders zijn aangesloten.
- Ga naar:
Hub → Instellingen
→ Service → Instellingen brandmelders. - Schakel Optimalisatie van de levensduur van de batterij uit.
- Klik op Terug om de instellingen op te slaan.
Als de functie Optimalisatie van de levensduur van de batterij is uitgeschakeld:
- Bedraagt de batterijduur van de ingebouwde batterij van FireProtect 2 SB (CO) 5 jaar (i.p.v. 10).
- Bedraagt de batterijduur van de ingebouwde batterij van FireProtect 2 RB (CO) 3,5 jaar (i.p.v. 7).
De functie Optimalisatie van de levensduur van de batterij is niet van toepassing op UL-gecertificeerde FireProtect 2-melders. Ze werken maximaal 5 jaar op de voorgeïnstalleerde batterijen.
Selectie van de installatieplaats
De melder is alleen ontworpen voor installatie binnenshuis.
Het dekkingsgebied van één FireProtect 2 (CO) bedraagt 538–646 sq. ft, afhankelijk van het type gebouw. De melder moet in elke ruimte geïnstalleerd worden. De melder is geschikt voor installatie in gebouwen waar het genereren van gassen/dampen/rook deel uitmaakt van het bedrijfsproces. Bijvoorbeeld in een garage, keuken of een ruimte met een boiler.
De melder moet aan de muur worden bevestigd op een hoogte van 4.92 ft vanaf de vloer. Als alternatief kan het aan het plafond worden bevestigd. De melder moet worden geplaatst op een afstand van 12″ de verlichting, kroonluchters of andere decoratieve voorwerpen die de alarmdetectie kunnen verstoren.
In hallen of smalle gangen moeten melders op een afstand van maximaal 24.6 ft van elkaar worden geïnstalleerd.
Zorg er bij installatie aan de muur voor dat de leds zichtbaar zijn voor de gebruiker. Dit betekent dat FireProtect 2 ondersteboven moet worden geïnstalleerd.
Bij de keuze waar u de melder wilt installeren, moet u rekening houden met welke waarden de werking ervan beïnvloeden:
- Jeweller-signaalsterkte.
- Afstand tussen de melder en de hub.
- Aanwezigheid van obstakels die de doorgang van het radiosignaal tussen apparaten verhinderen: muren, plafonds tussen verdiepingen, grote objecten in de ruimte.
Volg bij het ontwerpen van een Ajax-systeem voor het object altijd de plaatsingsadviezen. Het beveiligingssysteem moet ontworpen en geïnstalleerd zijn door specialisten. De lijst met aanbevolen partners vindt u hier.
Signaalsterkte
De signaalsterkte van de Jeweller wordt bepaald door de verhouding van het aantal verwachte pakketten met het aantal niet-geleverde of corrupte gegevenspakketten die gedurende een bepaalde tijd tussen de hub en de melder worden uitgewisseld. De signaalsterkte wordt aangegeven door het pictogram ![]() in het tabblad Apparaten
in het tabblad Apparaten ![]() :
:
- Drie streepjes — uitstekende signaalsterkte.
- Twee streepjes — goede signaalsterkte.
- Eén streepje — lage signaalsterkte; een stabiele werking wordt niet gegarandeerd.
- Doorgestreept pictogram — geen signaal; stabiele werking kan niet gegarandeerd worden.
Controleer de signaalsterkte van Jeweller op de plaats van de installatie. Als de signaalsterkte slechts één of nul streepjes bedraagt, kunnen we de stabiele werking van het apparaat niet garanderen. Verplaats in dit geval het apparaat. Verplaats het minstens 8 inches zodat de signaalontvangst aanzienlijk kan verbeteren.
Als de melder na verplaatsing nog steeds een lage of onstabiele signaalsterkte heeft, gebruik dan een signaalversterker.
Installeer de melder niet
- Buitenshuis. Dit kan leiden tot een defecte melder.
- Op plaatsen met een lage of instabiele Jeweller-signaalsterkte. Dit kan leiden tot verbindingsverlies.
- In gebouwen met een temperatuur en luchtvochtigheid buiten de toegestane grenzen. Dit kan de melder beschadigen.
- Op plekken met snelle luchtcirculatie. Bijvoorbeeld in de buurt van ventilators, open ramen of deuren. Dit kan leiden tot valse alarmen.
- In de hoeken van de ruimte. Dit kan leiden tot valse alarmen.
- In de buurt van lampen, decoraties en andere voorwerpen in het interieur die de luchtcirculatie in de ruimte kunnen verstoren. Dit kan leiden tot valse alarmen.
- Dichter dan 1 – 1,5 meter bij open vuur. Bijvoorbeeld bij een open haard, grill of fornuis. Dit kan leiden tot valse alarmen.
- In te hoge of onhandige plaatsen. Toegang tot de Test-/dempingsknop is vereist om het alarm te dempen en de melder te testen als deze wordt gebruikt zonder verbinding met een hub.
Installatie
Zorg ervoor dat u de optimale installatieplaats heeft gekozen en dat deze voldoet aan de vereisten van deze handleiding.
Alleen een bevoegde specialist mag dit apparaat installeren.
Om de melder te installeren:
- Verwijder het SmartBracket-montagepaneel van de melder. Om het paneel te verwijderen, draait u het tegen de klok in.
- Bevestig het SmartBracket-paneel op een oppervlak met dubbelzijdig plakband of andere tijdelijke bevestigingsmiddelen. Het montagepaneel heeft een UP-teken dat de juiste positie aangeeft.

Gebruik dubbelzijdig plakband voor tijdelijke bevestiging. Het apparaat dat met plakband is bevestigd, kan op elk moment van het oppervlak loslaten, wat tot schade kan leiden als het apparaat valt.
- Voer de Jeweller-signaalsterktetest uit. De aanbevolen waarde is twee of drie streepjes.
Overweeg om het apparaat minstens 8 inches te verplaatsen zodat de signaalsterkte aanzienlijk kan verbeteren. Als de signaalsterkte nog steeds laag of instabiel blijft na het verplaatsen, gebruik dan een signaalversterker.
- Verwijder de melder van het montagepaneel.
- Bevestig het SmartBracket-paneel met de meegeleverde schroeven op alle bevestigingspunten. Als u andere bevestigingsmiddelen gebruikt, let er dan op dat deze het montagepaneel niet beschadigen of vervormen.
- Bevestig de melder op het bevestigingspaneel van SmartBracket.
- Pas indien nodig de positie van de melder aan.
Het is noodzakelijk om een zelftest uit te voeren nadat de installatie is voltooid.
Wat te doen bij een CO-alarm
- Open onmiddellijk alle deuren en ramen om het gebouw te ventileren indien u dit veilig kunt doen.
NEGEER HET ALARM NOOIT! Als u de deuren en ramen opent voor ventilatie kan het CO-niveau dalen tot een aanvaardbaar niveau en kan het alarm gestopt zijn tegen de tijd dat er hulp arriveert. Deze oplossing voor het probleem kan echter slechts tijdelijk zijn. U moet de bron van de CO bepalen en een reparatie uitvoeren.
- Indien mogelijk, schakel alle apparaten die op brandstof werken uit.
- Evacueer het gebouw en laat de deuren en ramen open.
Waarschuwing: Als u het CO-alarm hoort, heeft het gevaarlijke niveaus van koolmonoxide gedetecteerd. Evacueer altijd het gebouw, zelfs als u niet zeker bent over de oorzaak van het CO-alarm.
- Als u hoofdpijn heeft en misselijkheid bent, roep dan onmiddellijk medische hulp in. Deze kunnen het gevolg zijn van koolmonoxidevergiftiging, dus raadpleeg uw arts.
- Bel de hotline van uw gas- of andere brandstofleverancier. Bewaar dit nummer op een goed zichtbare plaats.
- Betreed het gebouw niet totdat het alarm stopt.
Als het alarm werd uitgeschakeld door op de Test-/dempingsknop te drukken, controleer dan het CO-niveau in de Ajax-app. Als het veilig is om het gebouw te betreden, druk dan opnieuw op de Test-/dempingsknop om het CO-niveau te controleren.
U kunt elke willekeurige functie voor het dempen van het geluid gebruiken (bijv. via het Ajax-bediendeel) zolang u zich in het zichtveld van de CO-sensor bevindt.
- Gebruik de brandstof- of gasapparaten niet opnieuw totdat geregistreerde installateurs of experts deze hebben gecontroleerd.
Invloed van koolmonoxide
Koolmonoxidevergiftiging komt regelmatig voor: hierdoor komen elk jaar veel mensen om het leven en voor nog veel meer mensen veroorzaakt het een slechte gezondheid. CO is een onzichtbaar, reukloos, smaakloos en een extreem giftig gas. CO wordt geproduceerd door de verbranding van brandstoffen zoals benzine, diesel, kolen, olie, aardgas, flessengas, paraffine, hout, houtskool, enz. Het hart en de hersenen raken snel beschadigd door zuurstofgebrek omdat de rode bloedcellen in de longen sneller CO opnemen dan zuurstof.
De meest voorkomende redenen voor hoge CO-niveaus in gebouwen:
- Motoren van auto’s, generatoren, enz. laten draaien in kleine ruimtes (bijvoorbeeld een garage).
- Verkeerd of slecht geïnstalleerde brandstof verbruikende apparaten.
- Geblokkeerde of beschadigde ventilatieopeningen of schoorstenen/rookkanalen.
- Benauwde ruimtes waar apparaten voor het verbranden van brandstoffen of open haarden zijn geïnstalleerd.
- Slechte ventilatie in ruimtes met kachels die draaien op gas of paraffine.
BELANGRIJK: Een CO-alarm mag niet worden gebruikt als vervanging voor een juiste installatie, gebruik en onderhoud van brandstofbranders, inclusief geschikte ventilatie en uitlaatsystemen.
Hoe lang men blootgesteld is aan CO is ook belangrijk. Een laag niveau voor een lange periode (bijvoorbeeld 150 ppm voor 90 minuten) kan dezelfde symptomen veroorzaken als een hoog CO-niveau voor een korte periode (bijvoorbeeld 300 ppm CO voor 30 minuten). De onderstaande tabel toont hoe de verschillende CO-concentraties mensen kan beïnvloeden.
FireProtect 2 kan de chronische effecten van blootstelling aan koolmonoxide mogelijk niet voorkomen en zal mensen uit groepen met een hoog risico niet volledig beschermen.
| CO-concentratie in de lucht, ppm | Geschatte inhalatietijd en consequenties |
| 35 | De maximaal toelaatbare concentratie voor voortdurende blootstelling in een periode van 8 uur (volgens de Occupational Safety and Health Association; OSHA). |
| 150 | Lichte hoofdpijn na 1,5 uur. |
| 200 | Lichte hoofdpijn, vermoeidheid, duizeligheid en misselijkheid na 2 – 3 uur. |
| 400 | Frontale hoofdpijn binnen 1 – 2 uur, levensbedreigend na 3 uur. |
| 800 | Duizeligheid, misselijkheid en stuiptrekkingen binnen 45 minuten. Bewusteloosheid binnen 2 uur. Dood binnen 2 – 3 uur. |
| 1,600 | Hoofdpijn, duizeligheid en misselijkheid binnen 20 minuten. Dood binnen 1 uur. |
| 3,200 | Hoofdpijn, duizeligheid en misselijkheid binnen 5 – 10 minuten. Dood binnen 25 – 30 minuten. |
| 6,400 | Hoofdpijn, duizeligheid en misselijkheid binnen 1 – 2 minuten. Dood binnen 10 – 15 minuten. |
| 12,800 | Dood binnen 1 – 3 minuten. |
Zelfs als mensen realiseren dat ze zich niet goed voelen, maakt koolmonoxide hun zo gedesoriënteerd zodat ze niet meer in staat zijn zichzelf te redden; ze kunnen niet om hulp roepen of het ruimte verlaten. Uit veel gevallen van koolmonoxidevergiftiging blijkt dat kinderen en huisdieren het eerst worden getroffen.
Storingen
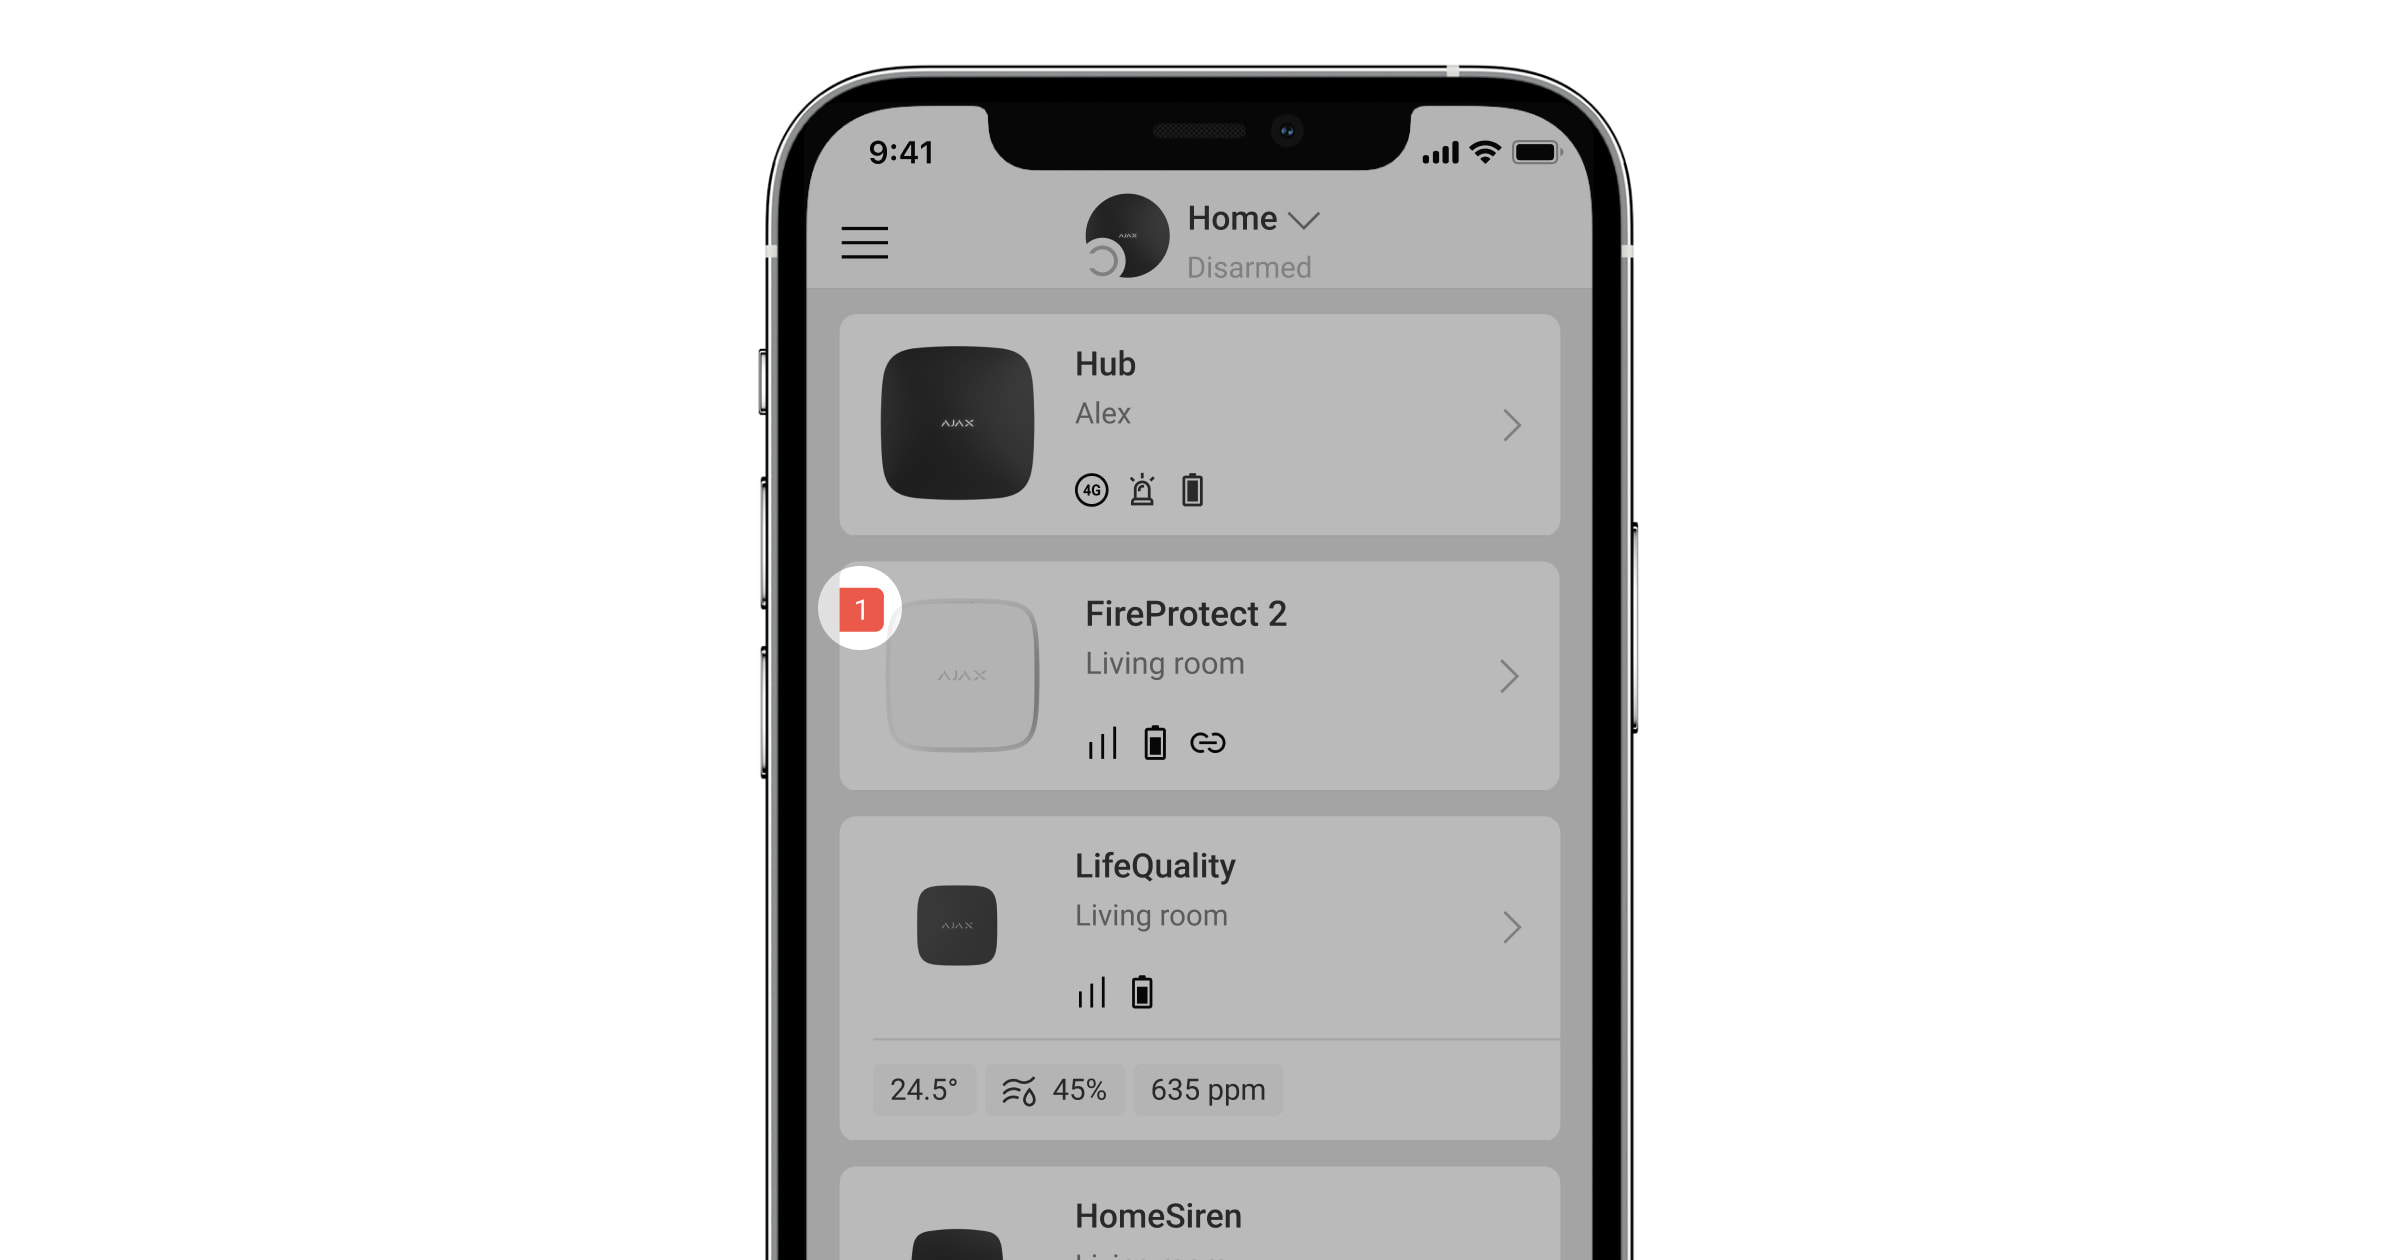
Als er een FireProtect 2-storing wordt gedetecteerd (er is bijvoorbeeld geen verbinding met de hub), wordt de storingsteller weergegeven in het apparaatveld in de Ajax-apps.
Alle storingen worden weergegeven in de statussen van de melder. Velden met storingen worden rood gemarkeerd.
Het apparaat meldt storingen aan de meldkamer en aan gebruikers via pushmeldingen en sms-berichten.
Storingen van FireProtect 2 (CO):
- Er geen verbinding is met de hub of de radiosignaalversterker.
- De behuizing van de melder is open.
- Batterij bijna leeg is.
- De levensduur van het apparaat is verstreken.
- Er is een hardwarestoring (storing van de sensor van de melder).
Onderhoud
De melder heeft een systeem voor een zelftest en vereist geen tussenkomst van de gebruiker of installateur. We raden aan om regelmatig een zelftest uit te voeren om mensen vertrouwd te maken met het alarmgeluid en de led-indicatie.
De FireProtect 2-apparaten die zijn aangesloten op de Ajax-hubs hoeven over het algemeen niet regelmatig getest te worden. Er wordt constant toezicht gehouden op de aangesloten apparaten voor mogelijke fouten, lage batterijlading en signalen over het einde van de levensduur.
Wij raden alle gebruikers aan om FireProtect 2-apparaten regelmatig (maandelijks)* te testen, zodat de bewoners van het gebouw vertrouwd raken met de alarmsignalen van het systeem.
*Houd er rekening mee dat uw lokale regelgeving mogelijk vereist dat er vaker getest moet worden (bijvoorbeeld wekelijks).
Verwijder stof, spinnenwebben en ander vuil van de behuizing van de melder. Gebruik een zachte, droge doek die geschikt is voor het onderhoud van de apparatuur. Gebruik geen middelen die alcohol, aceton, benzine of andere actieve oplosmiddelen bevatten.
De levensduur van de melder is 10 jaar. Na deze periode neemt de gevoeligheid van de sensoren af. We raden aan de melder te vervangen door een nieuwe om een ononderbroken brandbeveiliging in het gebouw te garanderen.
De versie van de melder met vervangbare batterijen (heeft RB in de naam) werkt 5 jaar op de voorgeïnstalleerde batterijen. Wanneer de batterijen leeg zijn, vervang ze dan door nieuwe.
Een melder met ingebouwde batterijen (heeft SB in de naam) moet worden vervangen door een nieuwe als de batterijen leeg zijn.
Zorg ervoor dat de batterijen met de juiste polariteit worden geïnstalleerd. De polariteit is aangegeven in de behuizing. Voer een zelftest uit in de Ajax-apps of door op de Test-/dempingsknop te drukken nadat de batterijen zijn vervangen om te controleren of de melder correct werkt.
Waarschuwingen
Vermijd de situaties in de onderstaande tabellen. Ze kunnen de betrouwbaarheid van de CO-sensor op korte of lange termijn beïnvloeden.
Situaties die vermeden moeten worden
| Situatie | Mogelijke gevolgen |
| Verontreiniging door alkalimetalen | Grote veranderingen in de kwaliteit van de sensor wanneer de sensor wordt verontreinigd door alkalimetalen, met name zoutwaternevel. |
| Blootstelling aan hoge concentraties van veelvoorkomende (niet-zure) gassen | Blootstelling aan hoge concentraties van gewone gassen zoals ammoniak kan onomkeerbare veranderingen veroorzaken. Vermijd langdurige blootstelling aan of het gebruik van verpakkingsmaterialen die deze gassen kunnen genereren. |
| Invloed van vluchtige organische stoffen (VOC’s) | Langdurige blootstelling aan dergelijke VOC’s kan onomkeerbare veranderingen veroorzaken:
Verpak de FireProtect 2 niet in een dicht afgesloten verpakking waarin VOC-gassen aanwezig kunnen zijn. Overmatige blootstelling aan alcohol- of acetondampen kan de sensor tijdelijk buiten werking stellen. |
| Contact met water | Als de sensor nat wordt dan kunnen de kenmerken veranderen. |
Situaties die u indien mogelijk moet vermijden
| Situatie | Mogelijke gevolgen |
| Blootstelling aan dampen van siliconen | Sensor kan defect raken door blootstelling aan op siliconen gebaseerde lijmen, haarverzorgingsmateriaal, rubber of kit. |
| Dauwcondensatie | Kan de route van de diffusie van gas verstoppen of het detectiemembraan verslechteren. Vermijd ernstige dauwcondensatie die gedurende langere tijd binnen of op het sensoroppervlak optreedt. |
| Blootstelling aan waterstofsulfide of zwavelzuur | Corrosie van sensoronderdelen, wat leidt tot beschadiging van de sensor. |
| Aanwezigheid van stof en olienevel | De interne structuur van de sensor kan verstopt raken door extreem hoge concentraties stof of olienevel. |
Extra voorzorgsmaatregelen voor installatie
De sensor heeft zuurstof nodig om goed te functioneren en de eigenschappen te bieden die in deze handleiding worden beschreven. De sensor werkt niet goed in een zuurstofloze omgeving.
Technische specificaties
Garantie
De garantie op de producten van de Limited Liability Company, “Ajax Systems Manufacturing”, is 2 jaar geldig na aankoop.
Als het apparaat niet goed werkt, neem dan eerst contact op met de technische ondersteuning van Ajax. In de meeste gevallen kunnen technische problemen op afstand worden opgelost.
Contact opnemen met de technische ondersteuning:
