A funcionalidade Foto por cenário permite-lhe criar cenários para todos os detetores MotionCam (PhOD). Nestes cenários, os detetores tiram fotografias quando outros dispositivos Ajax são acionados ou por programação. Com esta funcionalidade, é possível, por exemplo, verificar a causa do alarme de incêndio e monitorizar regularmente a situação nas instalações protegidas.
A capacidade de tirar fotos por cenário está disponível nos sistemas Ajax com a atualização OS Malevich 2.13, enquanto a funcionalidade Foto por programação está disponível com a atualização OS Malevich 2.19.
Os detetores MotionCam (PhOD) também suportam a funcionalidade Foto por pedido.
Dispositivos que suportam Foto por Cenário
Os detetores:
- Superior MotionCam AM (PhOD) Jeweller.
- Superior MotionCam HD (PhOD) Jeweller.
- Superior MotionCam (PhOD) Jeweller.
- MotionCam (PhOD) Jeweller.
- MotionCam Outdoor HighMount (PhOD) Jeweller.
- MotionCam Outdoor (PhOD) Jeweller.
- Superior MotionCam (PhOD) Fibra.
Outros detetores não suportam a funcionalidade Foto por Cenário.
Hubs:
Versões da app que suportam Foto por Cenário
As versões mais recentes das apps Ajax podem tirar fotos por alarme automaticamente de outros dispositivos ou numa hora específica.
- Ajax Security System 2.33 e posteriores (para iOS).
- Ajax Security System 2.35 e posteriores(para Android).
- Ajax PRO: Tool for Engineers 1.27 e posteriores (para iOS).
- Ajax PRO: Tool for Engineers 1.26 para Android).
- Ajax PRO Desktop 3.16 e posteriores (para macOS).
- Ajax PRO Desktop 3.16 e posteriores (para Windows).
Definições de privacidade
O OS Malevich 2.13 acrescenta um novo direito do utilizador: gerir as definições de privacidade (menu espaço definições, Privacidade).
Dois tipos de utilizadores do sistema podem gerir as definições de privacidade:
- Utilizadores com direitos de administrador (por defeito).
- Utilizadores sem direitos de administrador, caso tenham sido previamente atribuídos.
Por defeito, a funcionalidade Foto por Cenário está desativada para todos os detetores. Um administrador ou um utilizador com acesso às definições de privacidade pode ativar esta funcionalidade. Um PRO não pode gerir as definições de privacidade, mas pode conceder esse direito a qualquer utilizador do sistema.
Acesso às fotos por cenário
As fotos por cenário estão disponíveis para todos os utilizadores do sistema com acesso ao historial de eventos. O evento de uma foto em caso de alarme dos dispositivos Ajax é enviado para a central de monitorização da empresa de segurança através do SIA (DC-09) e de outros protocolos proprietários. O código do evento é 730.
As fotos tiradas pelo cenário estão disponíveis para os engenheiros da CRA se o software da CRA suportar a verificação de fotos. As fotos por cenário também estão disponíveis na app PRO Desktop.
As fotos por cenário não serão enviadas para a CRA se for utilizada apenas uma ligação direta com a central de monitorização da empresa de segurança.
Como configurar a Fotografia por Cenário

Um administrador ou um utilizador com acesso às definições de privacidade pode ativar a funcionalidade Foto por Cenário.
Para o fazer, na app Ajax:
- Selecione o espaço, se tiver vários.
- Aceda ao separador Controlo
.
- Clique no ícone de engrenagem
para aceder às definições de espaço.
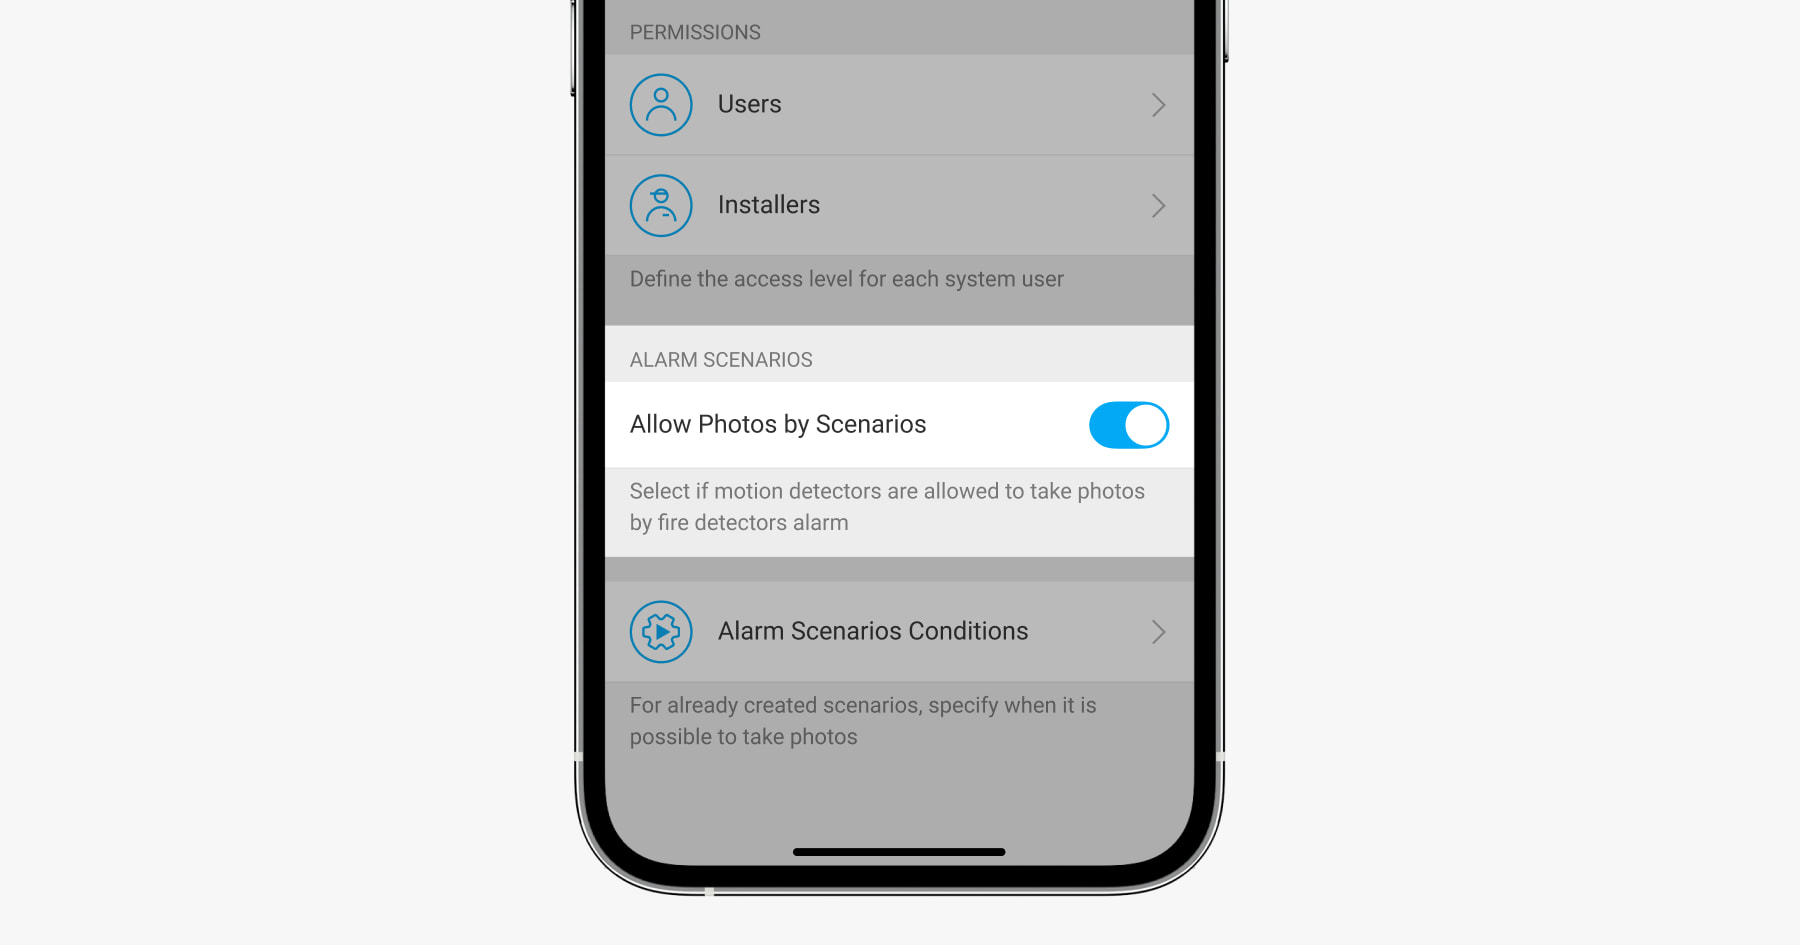
- Selecione o menu Privacidade e ative a opção Permitir Fotos por Cenários.
- Clique Voltar para guardar as definições.
Como configurar cenários
Qualquer utilizador ou PRO com direitos de configuração do sistema pode criar e configurar cenários.
Tirar fotos por alarme a partir de dispositivos Ajax
- Na app Ajax, selecione o espaço pretendido.
- Aceda ao separador Dispositivos
e selecione um detetor com verificação por fotografia.
- Aceda Definições do hub clicando no ícone de engrenagem
.
- Selecione o menu Cenários na lista.
- Clique em Adicionar cenário.
- Selecione menu Por alarme.
- Selecione dispositivos Ajax e tipos de alarmes para os quais os detetores irão tirar fotos.
- Clique em Seguinte.
- Especificar:
- Nome do cenário.
- A quantidade de dispositivos que iniciam o cenário (o parâmetro está disponível se existirem dois ou mais detetores de incêndio Ajax no sistema).
– Qualquer — o cenário será executado se pelo menos um dispositivo for acionado.
– Todos os selecionados — o cenário será executado se todos os dispositivos selecionados forem acionados. - Tempo de ativação para todos os dispositivos (o parâmetro está disponível se, no bloco Dispositivos ativação do cenário, for especificada a opção Todos os selecionados).
Para iniciar o cenário, todos os dispositivos selecionados devem emitir um alarme dentro do tempo especificado. Se os dispositivos não emitirem um alarme num determinado período de tempo, o temporizador será reiniciado e o cenário não será executado.
- Quando o detetor pode tirar fotos: sempre ou quando está no modo armado. A opção só está disponível para os utilizadores com direito de controlar as definições de privacidade. Por defeito, o detetor tira fotos por cenário apenas no modo armado.
- Clique em Guardar. O cenário aparecerá na lista de cenários do dispositivo.
Tirar fotos por programação
- Na app Ajax, selecione o espaço pretendido.
- Aceda ao separador Dispositivos
e selecione um detetor com verificação por fotografia.
- Aceda Definições do hub clicando no ícone de engrenagem
.
- Selecione o menu Cenários na lista.
- Clique em Adicionar cenário.
- Selecione menu Por programação.
- Especificar:
- Nome do cenário.
- Hora em que o detetor tira fotos.
- Dias da semana em que o detetor tira fotos.
- Se o detetor tira fotos sempre ou somente quando armado.
- Clique em Guardar.
O cenário não será executado se a opção Permitir fotos por cenários estiver desativada no menu Privacidade (definições de espaço).
Para eliminar ou editar um cenário, clique nele na lista. Também é possível desativar o cenário: as suas definições serão guardadas, mas não será iniciado se o dispositivo for acionado. Para o fazer, utilize um botão de alternância junto ao nome do cenário.
Os detetores PhOD permanentemente desativados não podem tirar fotos por cenário, e os dispositivos permanentemente desativados não acionam o cenário para tirar fotos.
Como definir a resolução e a quantidade de imagens ao tirar fotos por cenário
O utilizador ou PRO com direitos de configuração do sistema pode definir a resolução, bem como o número de fotos.
Para o fazer, na app Ajax:
- Selecione o hub se tiver vários.
- Aceda ao separador Dispositivos
e selecione o detetor pretendido com verificação fotográfica.
- Clique no ícone de engrenagem
para aceder às Definições do detetor.
- Determine o número de fotos em caso de alarme (o número especificado de fotos será tirado pelo detetor em caso de alarmes de movimento).
- Para as fotos programadas, determine o número na configuração de Foto por pedido.
- Define a resolução da foto. A resolução especificada também será utilizada em caso de alarmes de movimento e fotos programadas.
- Clique Voltar para guardar as definições.
- Repita os passos 2-6 para outros detetores dos quais pretende ajustar a resolução e o número de fotos.
O número de fotos tiradas por um cenário é igual ao número de Fotos por alarme especificado nas definições do detetor.
O número de fotos tiradas por um horário é igual ao número de Fotos por pedido.
Velocidade de entrega de fotos por cenário
Tempo de entrega de fotos dos detetores MotionCam Outdoor (PhOD) Jeweller e MotionCam Outdoor HighMount (PhOD) Jeweller
| Resolução, px | Tempo de entrega, s |
| 320 × 176 (predefinição) |
Até 9 |
| 640 × 352 | Até 20 |
Tempo de entrega de fotos dos detetores Superior MotionCam AM (PhOD) Jeweller e Superior MotionCam HD (PhOD) Jeweller
| Resolução, px | Tempo de entrega, s |
| 160 × 120 | Até 3 |
| 320 × 240 | Até 4,5 |
| 640 × 480 (predefinição) |
Até 11 |
| 960 × 720 | Até 15,5 |
Tempo de entrega de fotos dos detetores Superior MotionCam (PhOD) Jeweller e MotionCam (PhOD) Jeweller
| Resolução, px | Tempo de entrega, s |
| 160 × 120 | Até 7 |
| 320 × 240 (predefinição) |
Até 9 |
| 640 × 480 | Até 20 |
Tempo de entrega das fotos dos detetores MotionCam (PhOD) Fibra
| Resolução, px | Tempo de entrega, s |
| 160 × 120 | Até 7 |
| 320 × 240 (predefinição) |
Até 12 |
| 640 × 480 | Até 21 |
As tabelas mostram o tempo de entrega de uma imagem com uma intensidade de sinal de 2-3 barras entre o detetor e o hub. O hub deve estar ligado à Internet através de Ethernet, Wi-Fi ou LTE). O tempo de entrega quando o detetor está conectado através de um repetidor é disponível no link.
Como visualizar fotos por cenário
As fotos por cenário são tiradas e enviadas automaticamente para as apps Ajax. Fotos são tiradas dentro de 3 segundos após a deteção de um alarme ou em um horário programado.
Os utilizadores do sistema que tenham ativadas as notificações push sobre os eventos, receberão notificações de fotos.
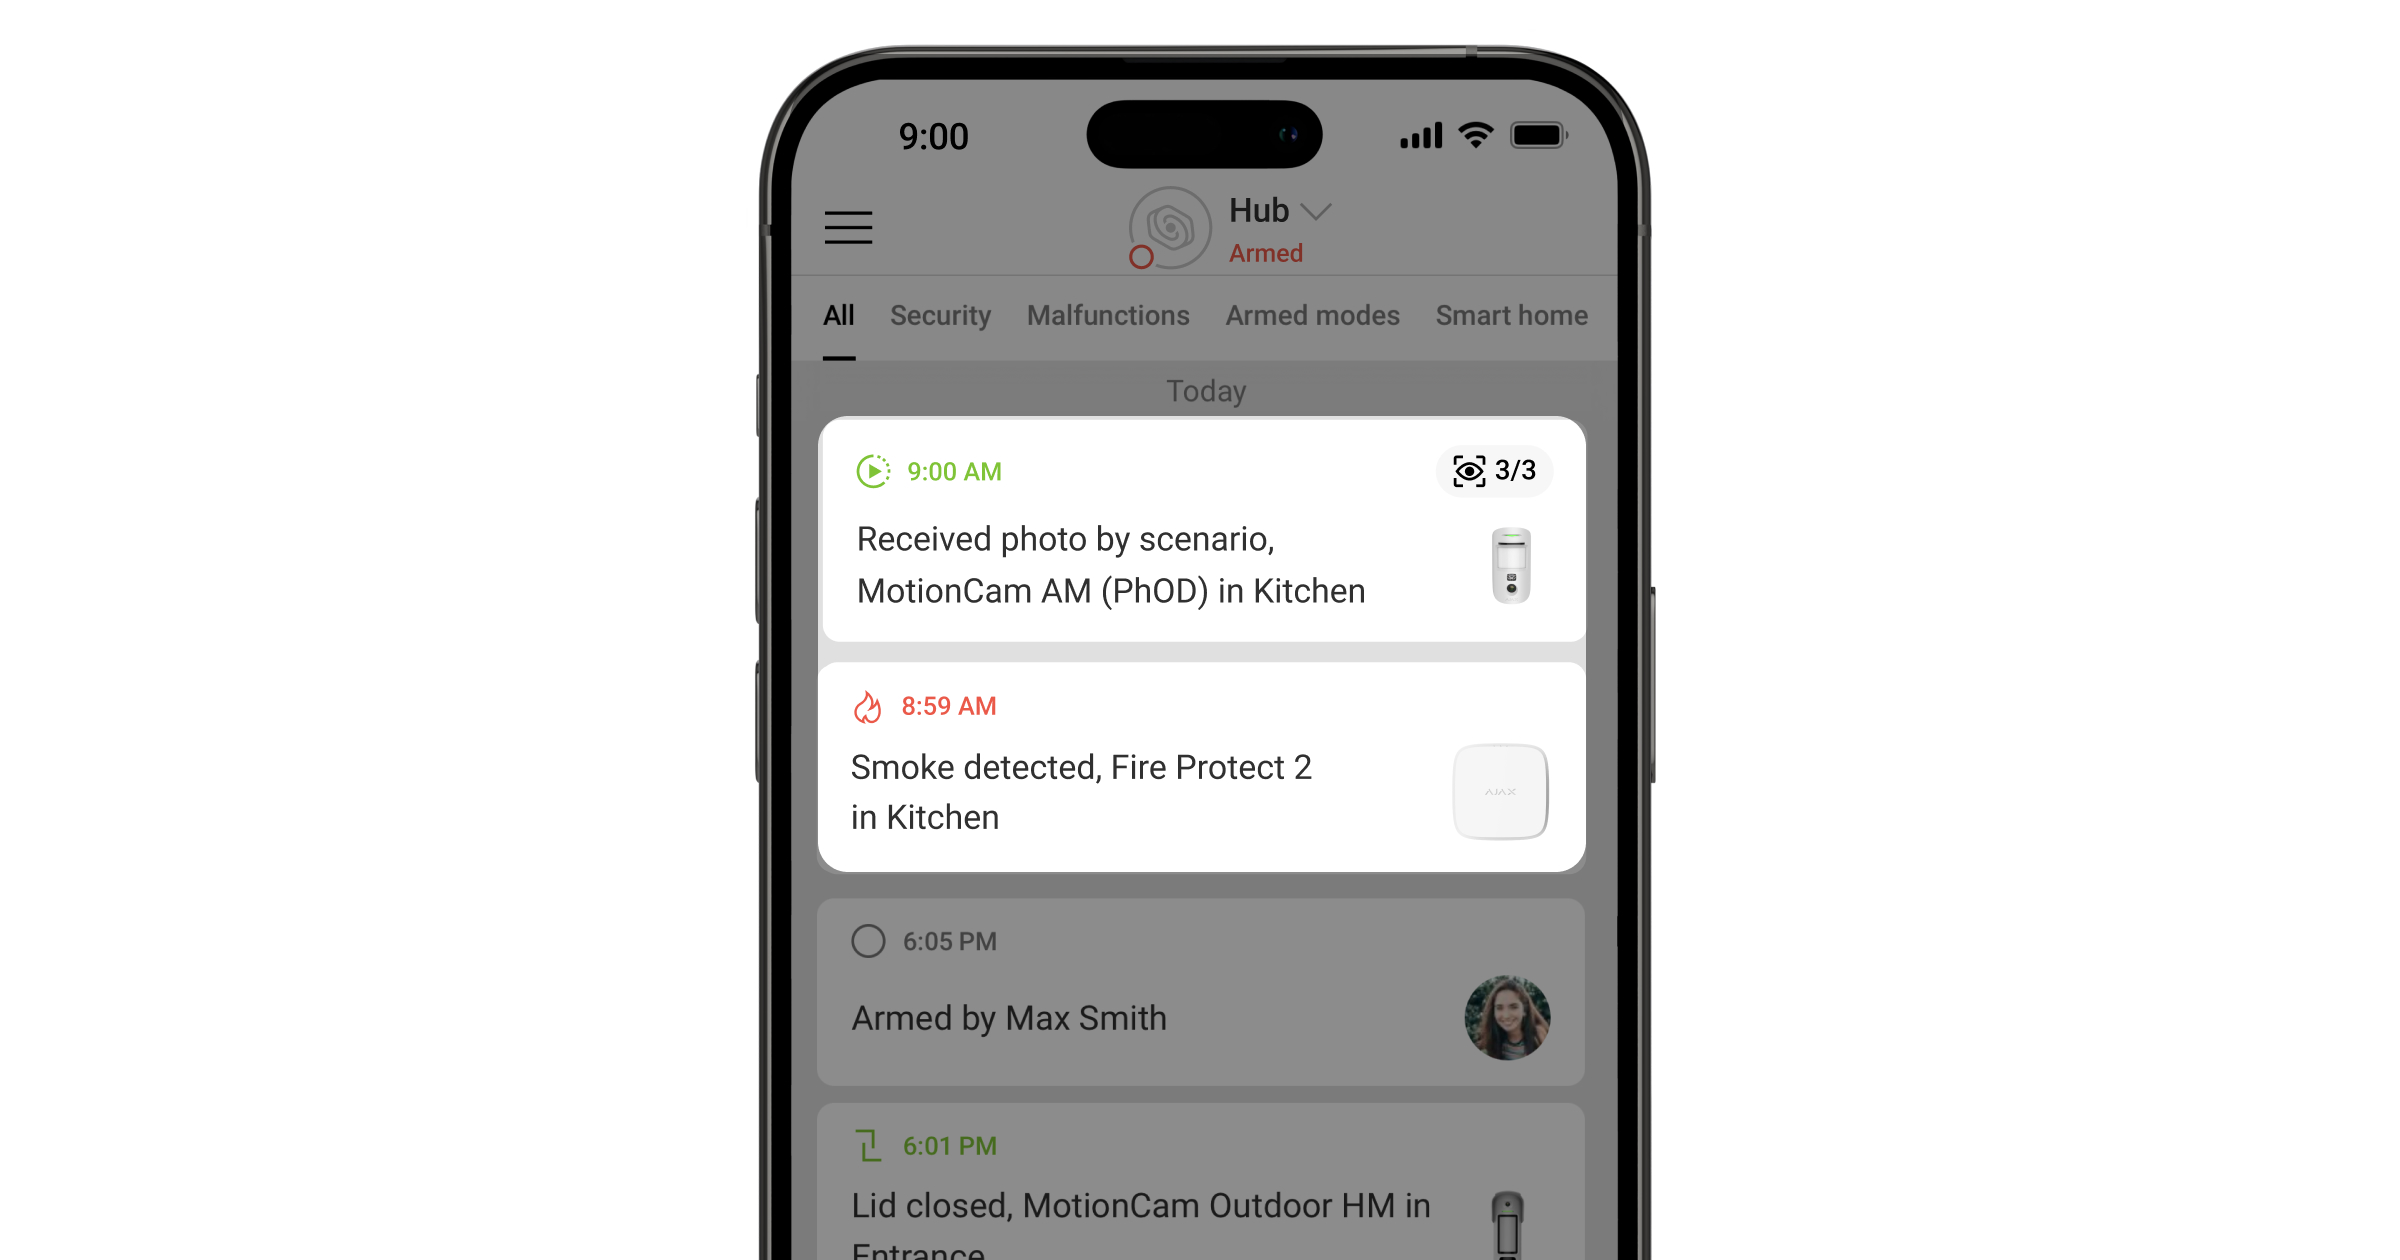
As fotos por cenário estão disponíveis para todos os utilizadores do sistema com acesso ao historial de eventos. Assim que a imagem estiver disponível para visualização, aparecerá uma notificação correspondente no historial de eventos. Um ícone de olho com um contador de imagens enviadas é exibido em frente à notificação. Para ver as fotos, clique na notificação.
Funcionalidades adicionais e links úteis
Os detetores que têm (PhOD) no seu nome também podem tirar fotos por pedido.
A linha de produtos do sistema de segurança Ajax também inclui detetores com verificação fotográfica, que não podem tirar fotos por pedido ou por cenário.
Pode obter mais informações sobre as funcionalidades da verificação de fotos no sistema de segurança Ajax através deste link.
As câmaras Ajax e os NVRs podem ser ligados ao sistema Ajax. Também é suportada a integração rápida com câmaras Dahua, Hikvision, Safire, Uniview, EZVIZ e DVRs.

