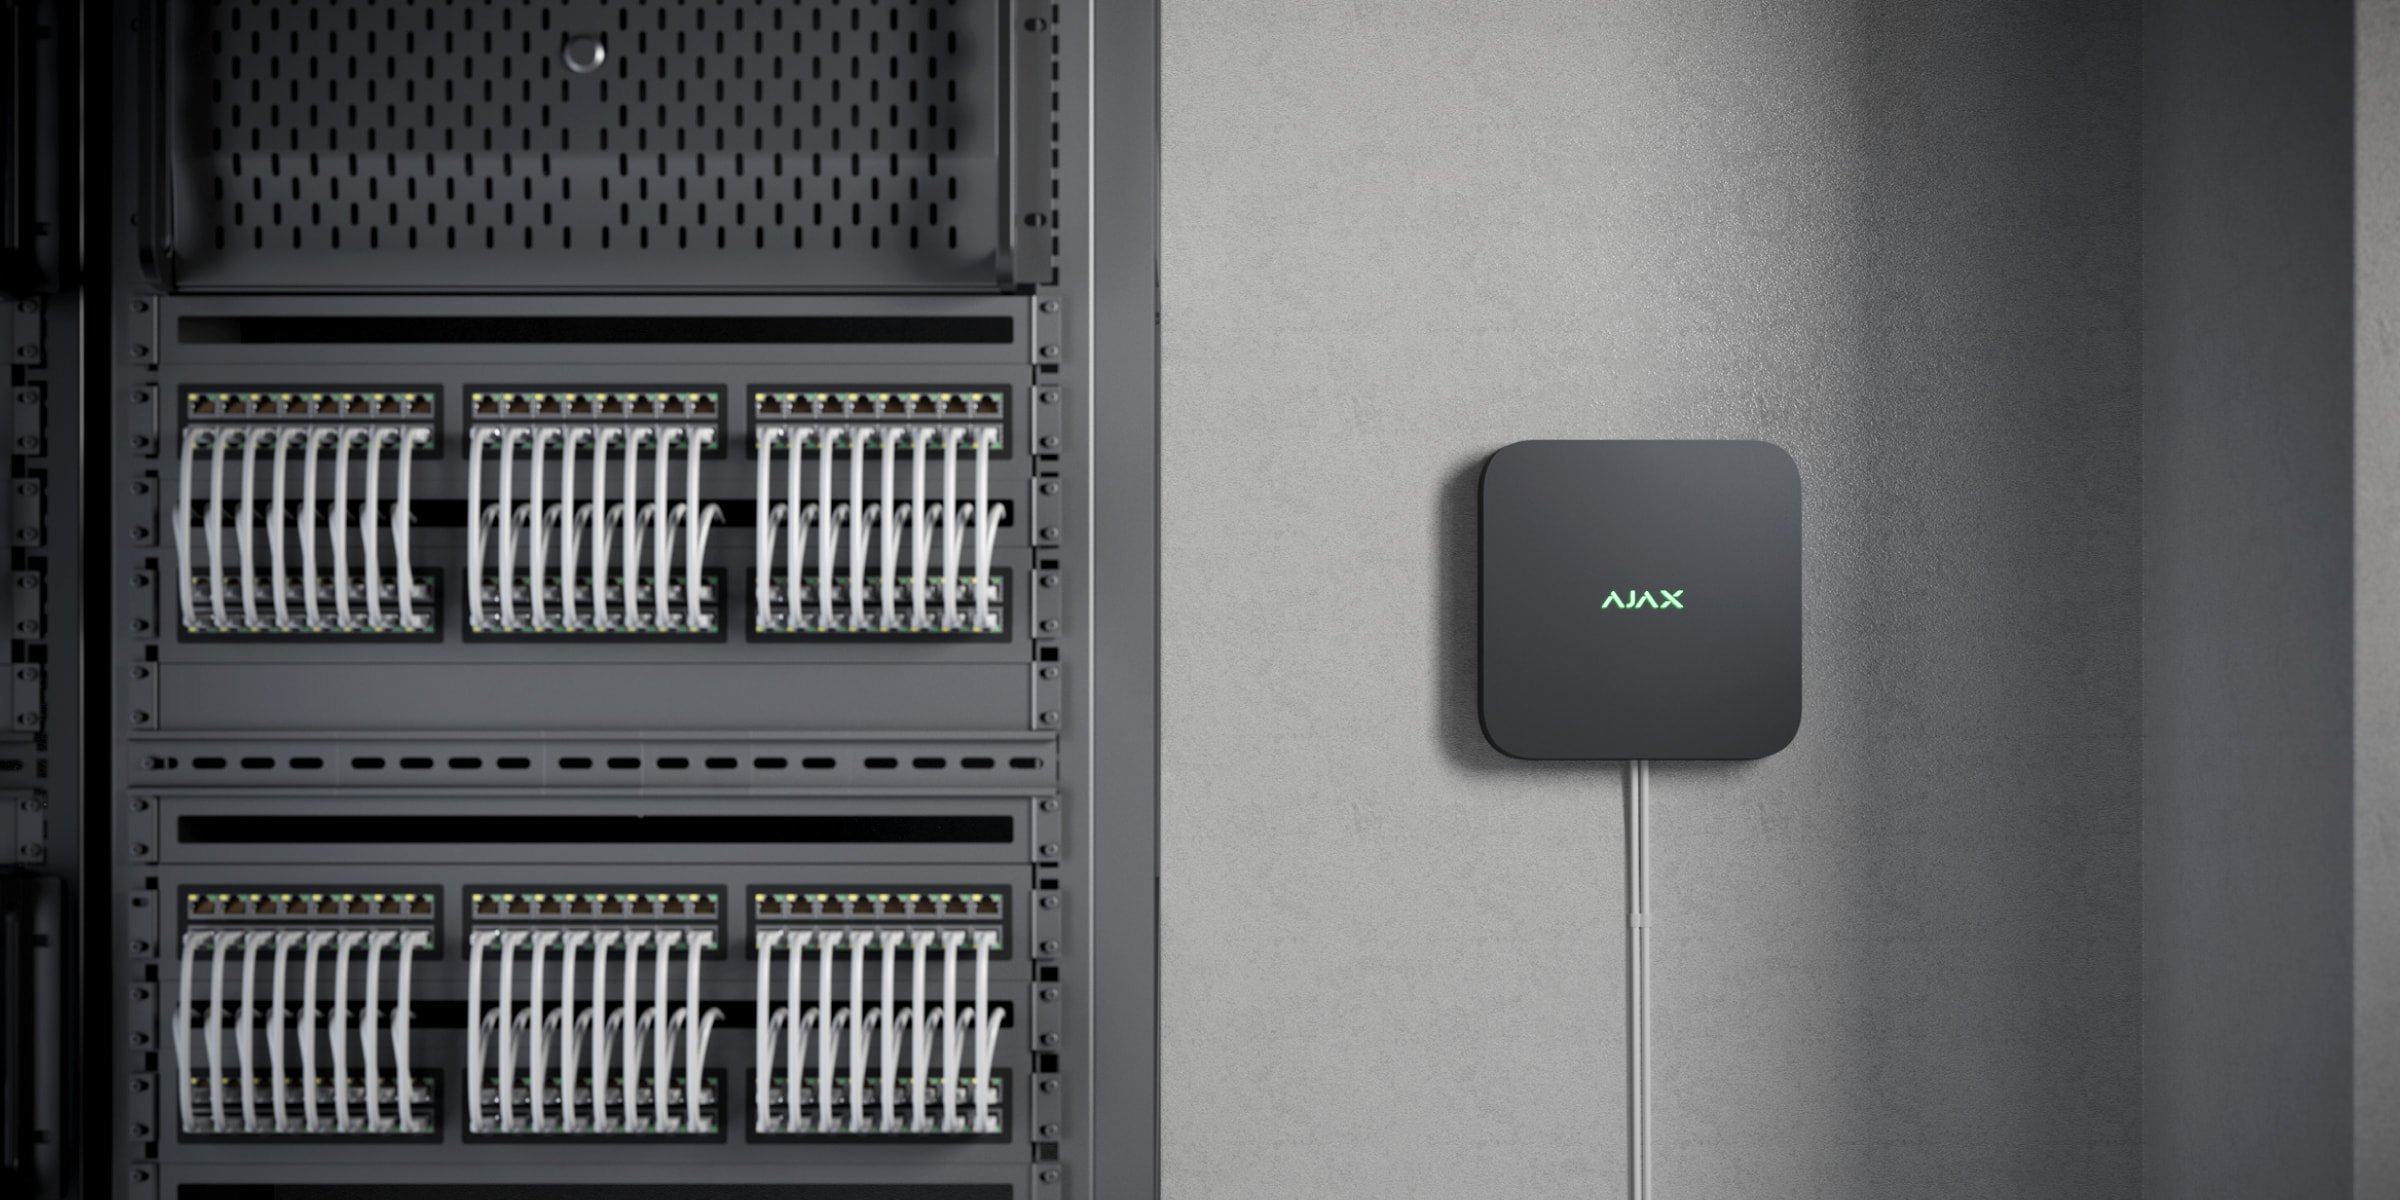
NVR, ev ve ofis video izlemesi için bir ağ video kaydedicisidir. Ajax kameraları ve üçüncü taraf IP kameraları cihaza bağlayabilirsiniz.
Kullanıcı, arşivlenmiş ve canlı videoları Ajax uygulamalarında görüntüleyebilir. NVR, alınan verileri ilgili ayarlar ve bir sabit sürücü (dahil değildir) ile kaydeder. Sabit sürücü takılı değilse, video kaydedici yalnızca üçüncü taraf IP kameralarını Ajax sistemine entegre etmek için kullanılır. NVR, kullanıcılara video alarm doğrulaması sağlar.
Güç tüketimi 7 W’tan fazla olmayan bir sabit sürücü kullanın.
NVR’nin, Ajax Cloud hizmetine bağlanabilmesi için İnternet erişimi gereklidir. Video kaydedici, ilgili konektör kullanılarak Ethernet üzerinden ağa bağlanır.
Cihazın çeşitli versiyonları mevcuttur:
- NVR (8-ch);
- NVR (16-ch);
- NVR DC (8-ch);
- NVR DC (16-ch).
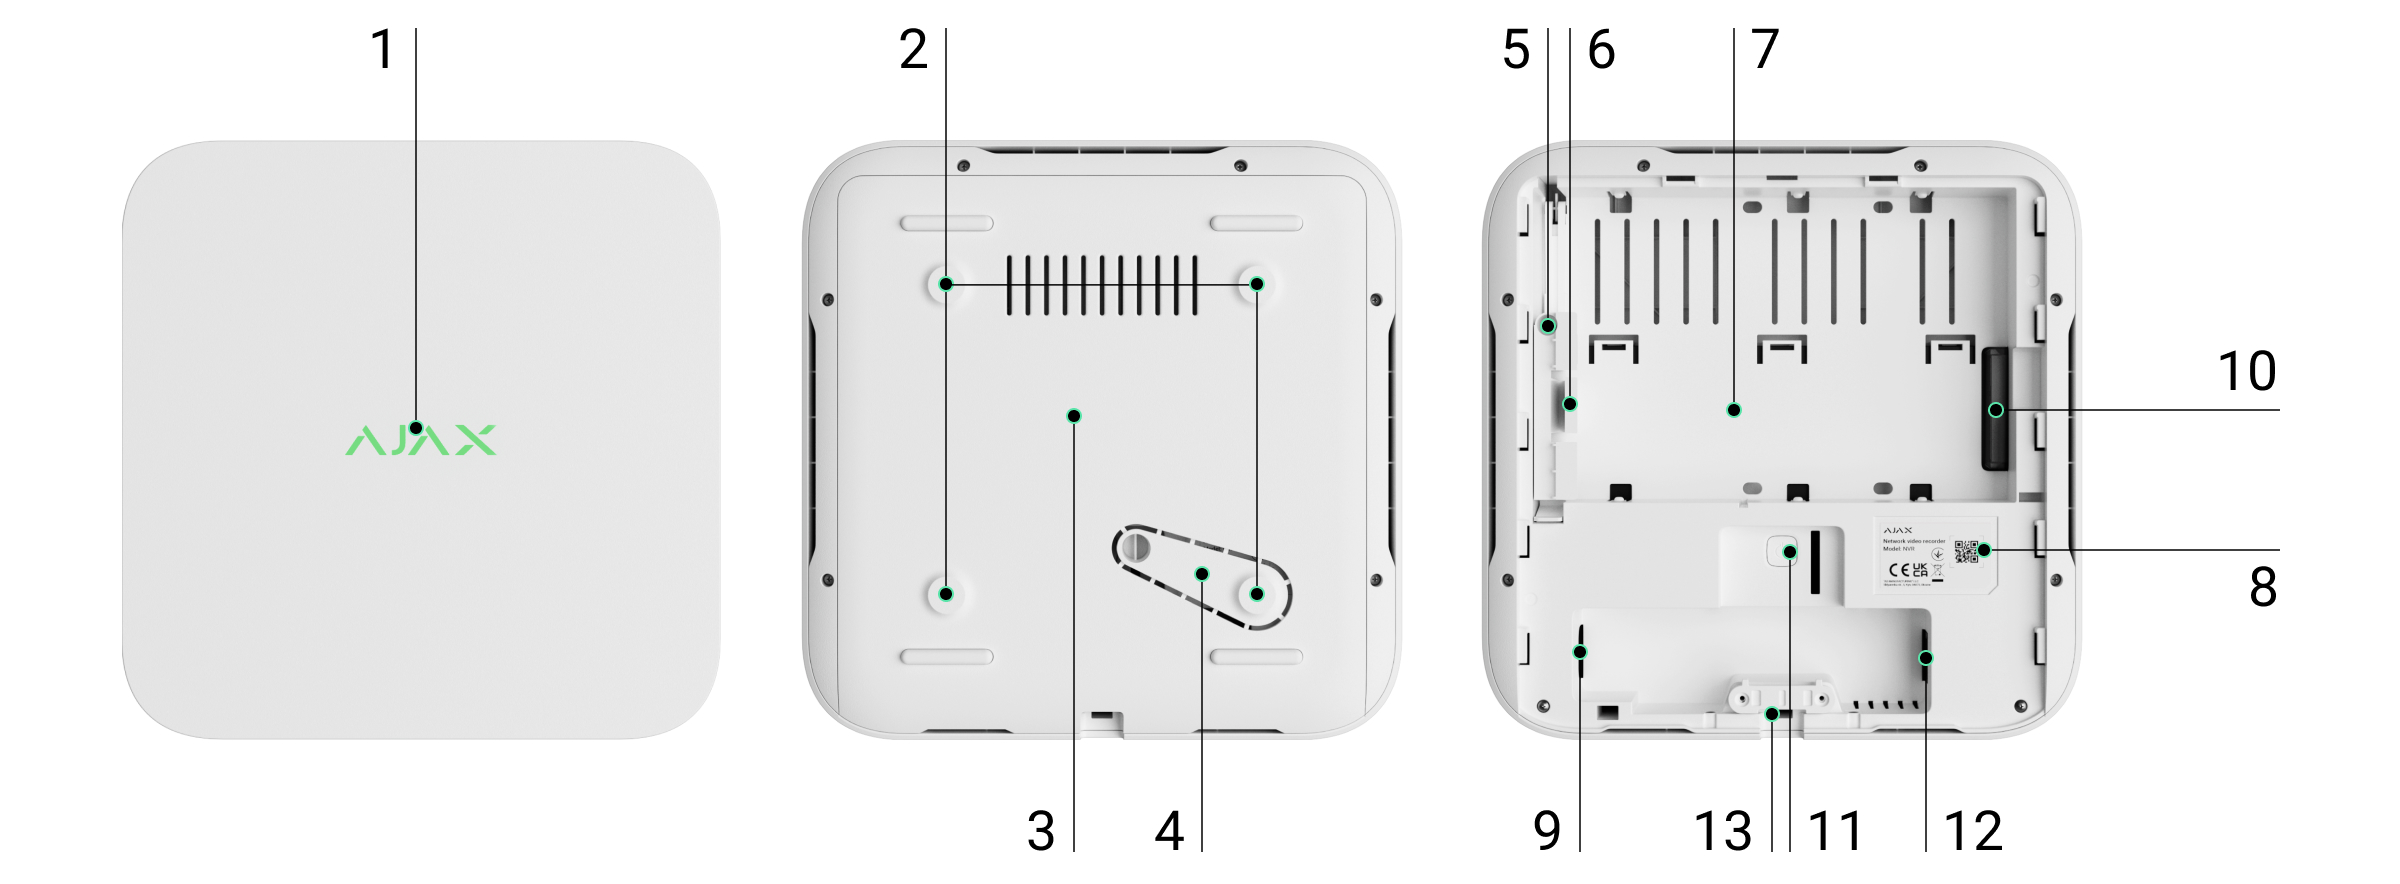
İşlevsel unsurlar
- LED göstergeli logo.
- SmartBracket montaj panelini yüzeye tutturmak için delikler.
- SmartBracket montaj paneli.
- Montaj panelinin delikli kısmı. Koparmayınız. Cihazı yüzeyden ayırmaya yönelik herhangi bir girişim tamperi tetikler.
- Bir vida kullanarak sabit sürücü mandalını takmak için bir delik.
- Sabit sürücü mandalı.
- Sabit sürücünün takılacağı yer.
- Cihaz kimliği bulunan QR kodu. Bir Ajax sistemine NVR eklemek için kullanılır.
- Güç kaynağı konektörü.
- Sabit sürücü için konektör.
- Parametreleri sıfırlamak için buton.
- Ethernet kablosu konektörü.
- Kablo toplama kelepçesi.
Çalışma prensibi
NVR, ONVIF ve RTSP protokollerine ve Ajax kameralara sahip üçüncü taraf IP kameraları bağlamak için kullanılan bir video kaydedicidir. Bellek kapasitesi 16 TB’a kadar olan bir depolama cihazı takmanıza olanak tanır (NVR paketine dahil değildir). Ayrıca, NVR sabit sürücü olmadan da çalışabilir.
Video depolama hesaplayıcısını kullanarak, ayarlara bağlı olarak NVR gerekli depolama kapasitesini ve tahmini kayıt süresini hesaplayabilirsiniz.
NVR şunları sağlar:
- IP kameraları ekleme ve yapılandırma (kamera çözünürlüğü, parlaklık, kontrast, vb.).
- Yakınlaştırma özelliğiyle eklenen kameralardan gelen videoları gerçek zamanlı olarak izleme.
- Kayıt kronolojisi ve takvime göre gezinerek arşivdeki videoları izleme ve dışa aktarma (sabit sürücü video kaydediciye bağlıysa).
- Çerçevedeki hareketin nasıl algılanacağını seçme — kamerada veya NVR’de.
- NVR üzerinde hareket algılamayı yapılandırma (algılama bölgeleri, hassasiyet seviyesi).
- Bağlı tüm kameralardan gelen görüntüleri birleştiren Videowall‘u görünteleme.
- Dedektör tetiklendiğinde seçilen kameradan Ajax uygulamasına kısa bir video gönderen video senaryoları oluşturma.
Aygıt yazılımı 2.244 ve sonrası olan NVR’den indirilen video kayıt segmentleri, dışa aktarılan videonun bütünlüğünü doğrulayan Ajax dijital imzası sağlanır. İndirilen video kayıtlarının gerçekliğini doğrulamak için Ajax medya oynatıcısı yazılımını kullanın.
- Cihazı Milestone, Genetec, Axxon ve Digifort gibi video yönetim sistemleriyle (VMS) entegre etmek için ONVIF üzerinden bağlantıyı yapılandırınız.
ONVIF yetkilendirmesi, NVR’nin 2.289 veya sonrası aygıt yazılımı sürümü tarafından desteklenmektedir.
Sistemi yapılandırma haklarına sahip bir yönetici veya PRO, ONVIF üzerinden bir bağlantı kurabilir:
- Uygulama sürümü 3.25 veya sonrası olan Ajax Security System.
- Uygulama sürümü 2.25 veya sonrası olan Ajax PRO: Tool for Engineers.
- Uugulama sürümü 4.20 veya sonrası olan Ajax PRO Desktop.
- Uygulama sürümü 4.21 veya sonrası olan Ajax Desktop.
NVR, iç mekan kurulumu için tasarlanmıştır. Sabit sürücünün daha iyi ısı değişimi için video kaydediciyi yatay veya dikey düz bir yüzeye kurmanızı öneririz. Üzerini başka eşyalarla kapatmayın.
Cihaz bir tamper ile donatılmıştır. Tamper, dış gövdenin kapağını kırma veya açma girişimlerine tepki verir ve Ajax uygulamaları aracılığıyla aktivasyonu bildirir.
Cihaz konumunun seçilmesi

NVR’nin meraklı gözlerden gizlendiği, örneğin kiler gibi bir kurulum yeri seçilmesi tavsiye edilir. Sabotaj olasılığını azaltmaya yardımcı olacaktır. Cihazın yalnızca iç mekanda kurulum için tasarlandığını unutmayınız.
Cihaz, pasif soğutmalı kompakt bir dış gövdeye sahiptir. NVR yeterince havalandırılmayan odalara kurulursa, bellek sürücüsünün çalışma sıcaklığı aşılabilir. Dış gövdeyi monte etmek için sert, düz bir yatay veya dikey yüzey seçin ve üzerini başka nesnelerle kapatmayın.
Bir nesne için Ajax sistemini tasarlarken yerleştirme önerilerini izleyin. Güvenlik sistemi profesyoneller tarafından tasarlanmalı ve kurulmalıdır. Yetkili Ajax iş ortaklarının listesine buradan ulaşabilirsiniz.
NVR’nin kurulmaması gereken yerler:
- Dış mekana. Bu, video kaydedicinin bozulmasına neden olabilir.
- Çalışma parametrelerine uymayan sıcaklık ve nem değerlerine sahip tesislerin içine.
Kurulum
NVR kurulumu:
- Arka paneli aşağı çekerek SmartBracket’i video kaydediciden çıkarınız.
- SmartBracket’i birlikte verilen vidalarla sert ve düz bir yüzeye sabitleyiniz. En az iki sabitleme noktası kullanınız. Tamperin sökme girişimlerine yanıt verebilmesi için, muhafazayı delikli bir alana sahip bir noktadan sabitlediğinizden emin olunuz.

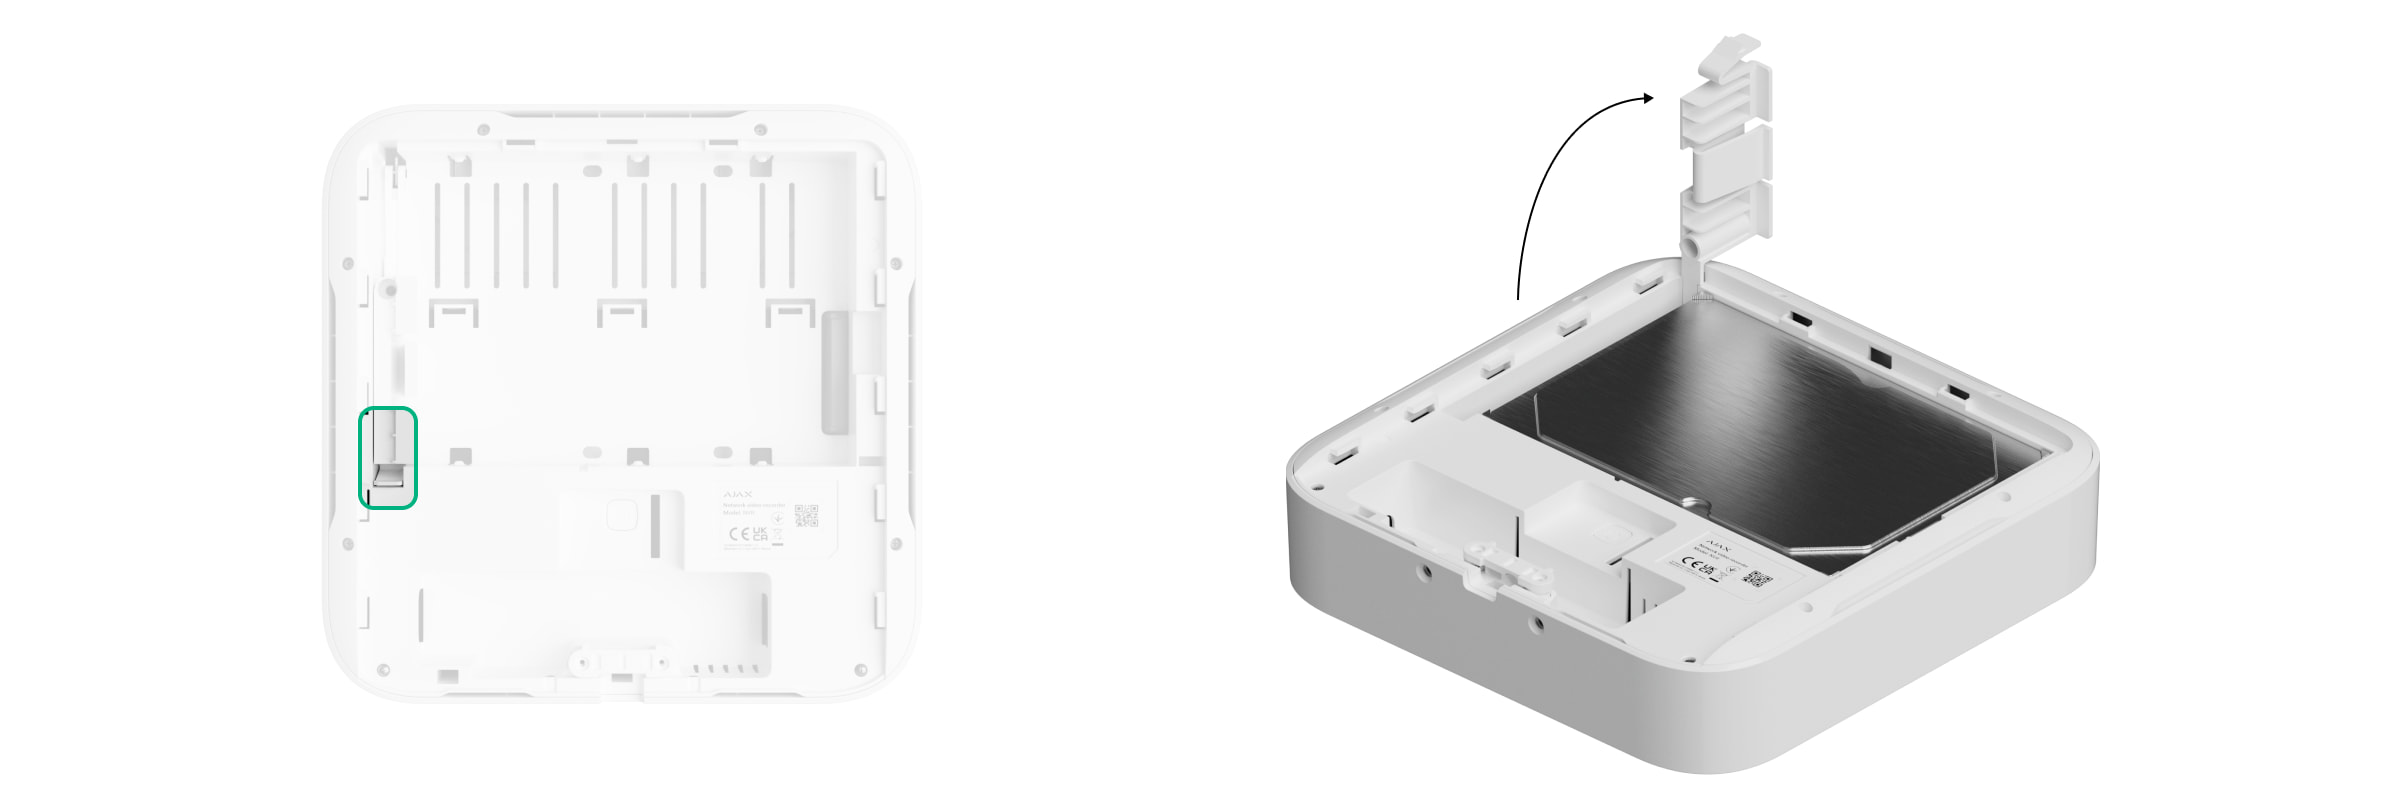
- Butona basarak sabit sürücü mandalını kaldırınız.
Sabit sürücüyü değiştirirken, cihazın güç kaynağıyla bağlantısını kestikten sonra 10 saniye bekleyin. Sabit sürücü hızla dönen plakalar içerir. Ani hareketler veya darbeler mekanizmayı devre dışı bırakarak fiziksel hasara ve veri kaybına yol açabilir.
Sabit sürücünün dönmesi durana kadar NVR’yi hareket ettirmeyin veya çevirmeyin.

- Konektörler eşleşecek şekilde sabit sürücüyü NVR muhafazasına takınız.

- Sabit sürücü mandalını indiriniz.
- Sabit sürücüyü, sabitleme konumunu kullanarak birlikte verilen vida ile NVR muhafazasına sabitleyiniz.

- Harici güç kaynağını ve Ethernet bağlantısını bağlayınız. Güç kaynağını açınız.
- Cihazı sisteme ekleyiniz.
- Video kaydediciyi SmartBracket’e yerleştiriniz.
LED göstergesi sarı renkte yanar ve internet ile bağlantı kurulduktan sonra yeşile döner. Ajax Cloud bağlantısı başarısız olursa logo kırmızı renkte yanar.
Sisteme ekleme
Bir cihaz eklemeden önce
- Bir Ajax uygulaması yükleyiniz.
- Hesabınıza giriş yapınız veya yeni bir hesap oluşturunuz.
- Bir space seçiniz veya yeni bir space oluşturunuz.
- En az bir sanal oda ekleyiniz.
- Space’in devre dışı bırakıldığından emin olunuz.
Yalnızca bir PRO veya sistemi yapılandırma haklarına sahip bir space yöneticisi cihazı space’e ekleyebilir.
Space’e ekleme
- Ajax uygulamasını açınız. NVR’yi eklemek istediğiniz space‘i seçiniz.
- Aygıtlar
sekmesine gidiniz ve Aygıt ekle ögesine dokununuz.
- QR kodunu tarayınız veya manuel olarak giriniz. QR kodunu muhafazanın arkasında SmartBracket montaj panelinin altında ve ambalajın üzerinde bulunuz.
- Cihaza bir ad veriniz.
- Bir sanal oda seçiniz.
- Ekle ögesine dokununuz.
- Video kaydedicinin açık olduğundan ve internete erişimi olduğundan emin olunuz. LED logosu yeşil yanmalıdır.
- Ekle ögesine dokununuz.
Bağlı cihaz Ajax uygulamasındaki aygıtlar listesinde görünecektir.
NVR yalnızca bir space’te çalışır. Video kaydediciyi yeni alana bağlamak için NVR’yi eskisinin cihaz listesinden kaldırın. Bu, Ajax uygulamasında manuel olarak yapılmalıdır.
NVR’ye IP kamera ekleme
Video cihazı hesaplayıcısını kullanarak space’e eklenebilecek kamera ve NVR sayısını hesaplayabilirsiniz.
- Ajax uygulamasını açınız. NVR’nin eklendiği space‘i seçiniz.
- Aygıtlar
sekmesine gidiniz.
- Listeden NVR‘yi seçiniz ve Kameralar‘a dokununuz.
- Kamera ekle‘ye dokununuz.
- Ağ taraması tamamlanana ve yerel ağa bağlı mevcut IP kameralar görünene kadar bekleyiniz.
- Kamerayı seçiniz.
- Kamera üçüncü taraf ise kullanıcı adı ve parolayı giriniz (kamera belgelerinde belirtilmiştir) ve Ekle‘ye dokununuz.
- Kullanıcı adı ve şifre doğru girilirse, eklenen kameradan video önizlemesi görünecektir. Bir hata olması durumunda, girilen verilerin doğruluğunu kontrol edin ve tekrar deneyiniz.
- Videonun eklenen kamerayla eşleştiğinden emin olunuz. Sonraki tuşuna dokununuz.
Video kayıt cihazına bağlı IP kamera, Ajax uygulamasındaki NVR kameraları listesinde görünecektir.
Varsayılan ayarlara sıfırlama
NVR’yi varsayılan ayarlara sıfırlamak için:
- Güç kaynağının bağlantısını keserek kapatınız.
- Sıfırlama butonuna basın ve basılı tutunuz.
- Sıfırlama butonunu basılı tutarken NVR’yi açınız ve LED göstergesi mor renkte yanana kadar bekleyiniz. Bu yaklaşık 50 saniye sürer.
NVR LED göstergesi, video kaydediciyi sıfırlama butonuna basarak çalıştırdıktan sonra 20 saniye boyunca sarı renkte yanar. Ardından 30 saniye boyunca kapanır ve mor renkte yanar. Bu, NVR’nin varsayılan ayarlara sıfırlandığı anlamına gelir.
- Sıfırlama butonunu bırakınız.
Simgeler
Simgeler bazı cihazların durumlarını gösterir. Bunları Ajax uygulamalarında görüntüleyebilirsiniz:
- Ajax uygulamasında bir space seçiniz.
- Aygıtlar
sekmesine gidiniz.
- Listeden NVR‘yi bulunuz.
| Simge | Anlamı |
 |
Sabit sürücü bağlı. |
 |
Sabit sürücü bağlı değil. |
 |
Sabit sürücü biçimlendiriliyor veya periyodik arızaları var. Biçimlendirme başlamazsa, sabit sürücüyü değiştirin. |
 |
Sabit sürücü arızaları algılandı. NVR’nin yeniden başlatılması veya sabit sürücünün biçimlendirilmesi önerilir. |
| Bir aygıt yazılımı güncellemesi mevcut. Açıklamayı görmek ve bir güncelleme başlatmak için cihaz durumlarına gidiniz. | |
| Yeni aygıt yazılımı yükleme işlemi başarısız oldu. | |
| Cihazın Ajax Cloud sunucusu ile bağlantısı kesildi. | |
|
ONVIF üzerinden cihaz bağlantısı etkin. |
Durumlar
Bu durumlarda cihaz ve çalışma parametreleri hakkında bilgiler bulunmaktadır. Ajax uygulamalarında video kaydedicinin durumları hakkında bilgi edinebilirsiniz:
- Ajax uygulamasında bir space seçiniz.
- Aygıtlar
sekmesine gidiniz.
- Aygıt listesinden NVR‘yi seçiniz.
| Parametre | Anlamı |
| Bluetooth ile bağlantı | Bluetooth kullanarak Ethernet ayarlaması. |
| Yazılım güncelleme | Aygıt yazılımı güncellemesi mevcut olduğunda bu alan görüntülenir:
|
| Ethernet | Ethernet üzerinden NVR’nin internete bağlantı durumu:
|
| CPU kullanımı | 0 ila %100 arasında görüntülenir. |
| RAM kullanımı | 0 ila %100 arasında görüntülenir. |
| Sabit sürücü | NVR’ye sabit sürücü bağlantı durumu:
|
| Sabit sürücü sıcaklığı | Sabit sürücünün sıcaklığı. |
| Kameralar (çevrimiçi / bağlı) | Video kaydediciye bağlı IP kamera sayısı. |
| Kapak | Dış gövdenin ayrılmasına veya açılmasına yanıt veren tamper durumu:
|
| Güncel arşiv derinliği | Sabit sürücü kaydının derinliği. İlk kayıttan itibaren kaç gün geçtiğini gösterir. |
| ONVIF entegrasyonu | Cihazın ONVIF entegrasyonunun mevcut durumunu gösterir. Bu durum yalnızca ONVIF entegrasyonu etkinleştirildiğinde görüntülenir. |
| Çalışma süresi | Son yeniden başlatmadan bu yana NVR’nin çalışma süresi. |
| Aygıt yazılımı | NVR’nin aygıt yazılımı sürümü. |
| Cihaz kimliği | NVR Cihaz kimliği/seri numarası. Ayrıca SmartBracket montaj panelinin ve ambalajın altındaki dış gövdenin arka kısmında da mevcuttur. |
Ayarlar
Ajax uygulamasında video kaydedici ayarlarını değiştirmek için:
- Aygıtlar
sekmesine gidiniz.
- Listeden NVR‘yi seçiniz.
- Dişli simgesine
dokunarak Ayarlar bölümüne gidiniz.
- Gerekli parametreleri ayarlayınız.
- Yeni ayarları kaydetmek için Geri’ye dokununuz.
| Ayarlar | Anlamı |
| Adı |
Video kaydedici adı. Cihaz listesinde, SMS metninde ve olay akışındaki bildirimlerde görünür. Video kaydedici adını değiştirmek için metin alanına dokununuz. Belirlenen isimde Kiril alfabesinden en fazla 12 veya Latin alfabesinden en fazla 24 karakter kullanılabilir. |
| Oda |
NVR sanal oda seçimi. Oda adı , SMS metninde ve etkinlik akışındaki bildirimlerde görüntülenir. |
| Yazılım güncelleme | NVR aygıt yazılımı sürümü. |
| Ethernet |
NVR’nin Ethernet üzerinden Ajax Cloud hizmetine bağlantı türünün ayarı. Kullanılabilir bağlantı türleri:
|
| Arşiv |
Maksimum arşiv derinliği seçimi. 1 ile 360 gün arasında bir süre belirlenebilir veya sınırsız olabilir. Sabit sürücüyü biçimlendirmeye izin verir. |
| Servis |
Servis ayarlarını içeren bir menü açar. |
| İzleme |
Bu ayar Ajax PRO uygulamalarında mevcuttur. PRO’nun sistemi AİM olayları için bölge numarasını yapılandırmasına olanak tanır — AİM’ye bildirdiği olaylardaki cihazın benzersiz tanımlayıcısı. NVR’ye bağlı kameralar için ayrıca Algılamalarda olayları AİM’ye gönder seçeneği ayarlanabilir. Bu seçenek, kameranın AİM’ye hareket veya nesne algılama bildirimleri gönderip göndermeyeceğini belirler. Bunu yapmak için bağlı kameranın ayarlarını açınız ve İzleme menüsüne tıklayınız. |
| Sorun bildir | Bir sorunu tanımlamaya ve bir rapor göndermeye izin verir. |
| Kullanım kılavuzu | NVR kullanım kılavuzunu açar. |
| Cihazı sil | NVR’nin space’le eşleşmesini kaldırır. |
Servis ayarları
| Ayarlar | Anlamı |
| Saat dilimi |
Saat dilimi seçimi. Kullanıcı tarafından belirlenir ve IP kameralardan video izlenirken görüntülenir. |
| LED parlaklığı | Cihazın LED çerçevesinin parlaklık seviyesi bir kaydırma çubuğu ile ayarlanır. |
| ONVIF üzerinden bağlantı |
Cihazın ONVIF üzerinden üçüncü taraf VMS’lere bağlantısını yapılandırma. |
| Sunucu bağlantısı | |
| Bulut bağlantı kaybı alarmının gecikmesi, sn |
Gecikme, sunucuyla bağlantının kesilmesiyle ilgili hatalı bir olay riskini azaltmaya yardımcı olur. 30 ile 600 saniye arasında bir gecikme belirlenebilir. |
| Bulut yoklama aralığı, sn |
Ajax Cloud sunucusunu yoklama sıklığı 30 ile 300 saniye aralığında ayarlanır. Bu aralık ne kadar kısa olursa, bulut bağlantısı kaybı o kadar hızlı tespit edilir. |
| Alarm olmadan sunucu bağlantı kaybı olaylarını alın | Geçiş etkinleştirildiğinde, sistem siren uyarısı yerine standart bir bildirim sesi vererek kullanıcıları sunucu bağlantı kaybı konusunda bilgilendirir. |
Bluetooth üzerinden NVR ayarları
NVR sunucu ile bağlantısını kaybettiyse veya yanlış ağ ayarları nedeniyle video kaydediciyi bağlayamadıysa, Bluetooth aracılığıyla Ethernet ayarlarını değiştirebilirsiniz. Bu NVR’nin hesabına eklendiği yönetici haklarına sahip kullanıcının erişimi vardır.
Ajax Cloud ile bağlantıyı kaybettikten sonra NVR’yi bağlamak için:
- Aygıtlar
sekmesine gidiniz.
- Listeden NVR‘yi seçiniz.
- Dişli simgesine
dokunarak Bluetooth üzerinden ayarlara gidiniz.
- Akıllı telefonunuzda Bluetooth’un etkin olduğundan emin olunuz. Sonraki tuşuna dokununuz.
- NVR’yi kapatıp açarak yeniden başlatınız.
Video kaydedicinin Bluetooth’u, güç açıldıktan sonra üç dakika içinde etkinleştirilecektir. Bağlantı başarısız olursa, NVR’yi yeniden başlatınız ve tekrar deneyiniz.
- Gerekli ağ parametrelerini ayarlayınız.
- Bağlan‘a dokununuz.
Gösterge
| Olay | Gösterge | Not |
| NVR güce bağlandıktan sonra önyükleme yapar. | Sarı yanıyor. | NVR Ajax Cloud’a bağlıysa, renk göstergesi yeşile döner. |
| NVR’nin gücü var ve internete bağlı. | Yeşil yanıyor. | |
| NVR internete bağlı değil veya Ajax Cloud sunucusu ile iletişim yok. | Kırmızı yanıyor. | |
|
Ajax Cloud sunucusuyla olan bağlantının durumuna bağlı olarak her saniye yeşil veya kırmızı renkte yanıp söner. | Aşağıdaki koşullardan biri karşılanana kadar gösterge yanıp söner:
|
Bakım
Cihaz bakım gerektirmez.
Teknik özellikler
Garanti
Limited Liability Company “Ajax Systems Manufacturing” ürünlerinin garantisi satın alındıktan sonra 2 yıl boyunca geçerlidir.
Cihaz düzgün çalışmıyorsa, lütfen önce Ajax Teknik Destek ile iletişime geçiniz. Vakaların çoğunda teknik sorunlar uzaktan çözülebilir.
Teknik Destek ile iletişime geçin:
“AS Manufacturing” LLC tarafından üretilmiştir


