
O SpeakerPhone Jeweller é um módulo de voz sem fios para a comunicação de voz bidirecional entre uma empresa de segurança e uma pessoa fisicamente presente no local onde o sistema Ajax e o SpeakerPhone estão instalados. O dispositivo permite que o operador da central recetora de alarmes (CRA) contacte o local imediatamente após um alarme para analisar a situação e responder rapidamente a uma emergência.
O SpeakerPhone Jeweller comunica com um hub através de três protocolos de rádio seguros. O dispositivo utiliza o Jeweller para transmitir alarmes e eventos, o Wings para atualizar o firmware e o VoRF para transmitir áudio. O alcance da comunicação num espaço aberto é de até 5550 ft.
O SpeakerPhone Jeweller é um dispositivo orientado para as centrais recetoras de alarmes. Para que o dispositivo funcione corretamente, é necessário não só configurar o módulo de voz, mas também a telefonia no hub Ajax. Além disso, a empresa de vigilância deve instalar a telefonia SIP por sua conta.
Elementos funcionais

- Altifalante incorporado.
- Microfone omnidirecional.
- Logótipo Ajax com um indicador LED.
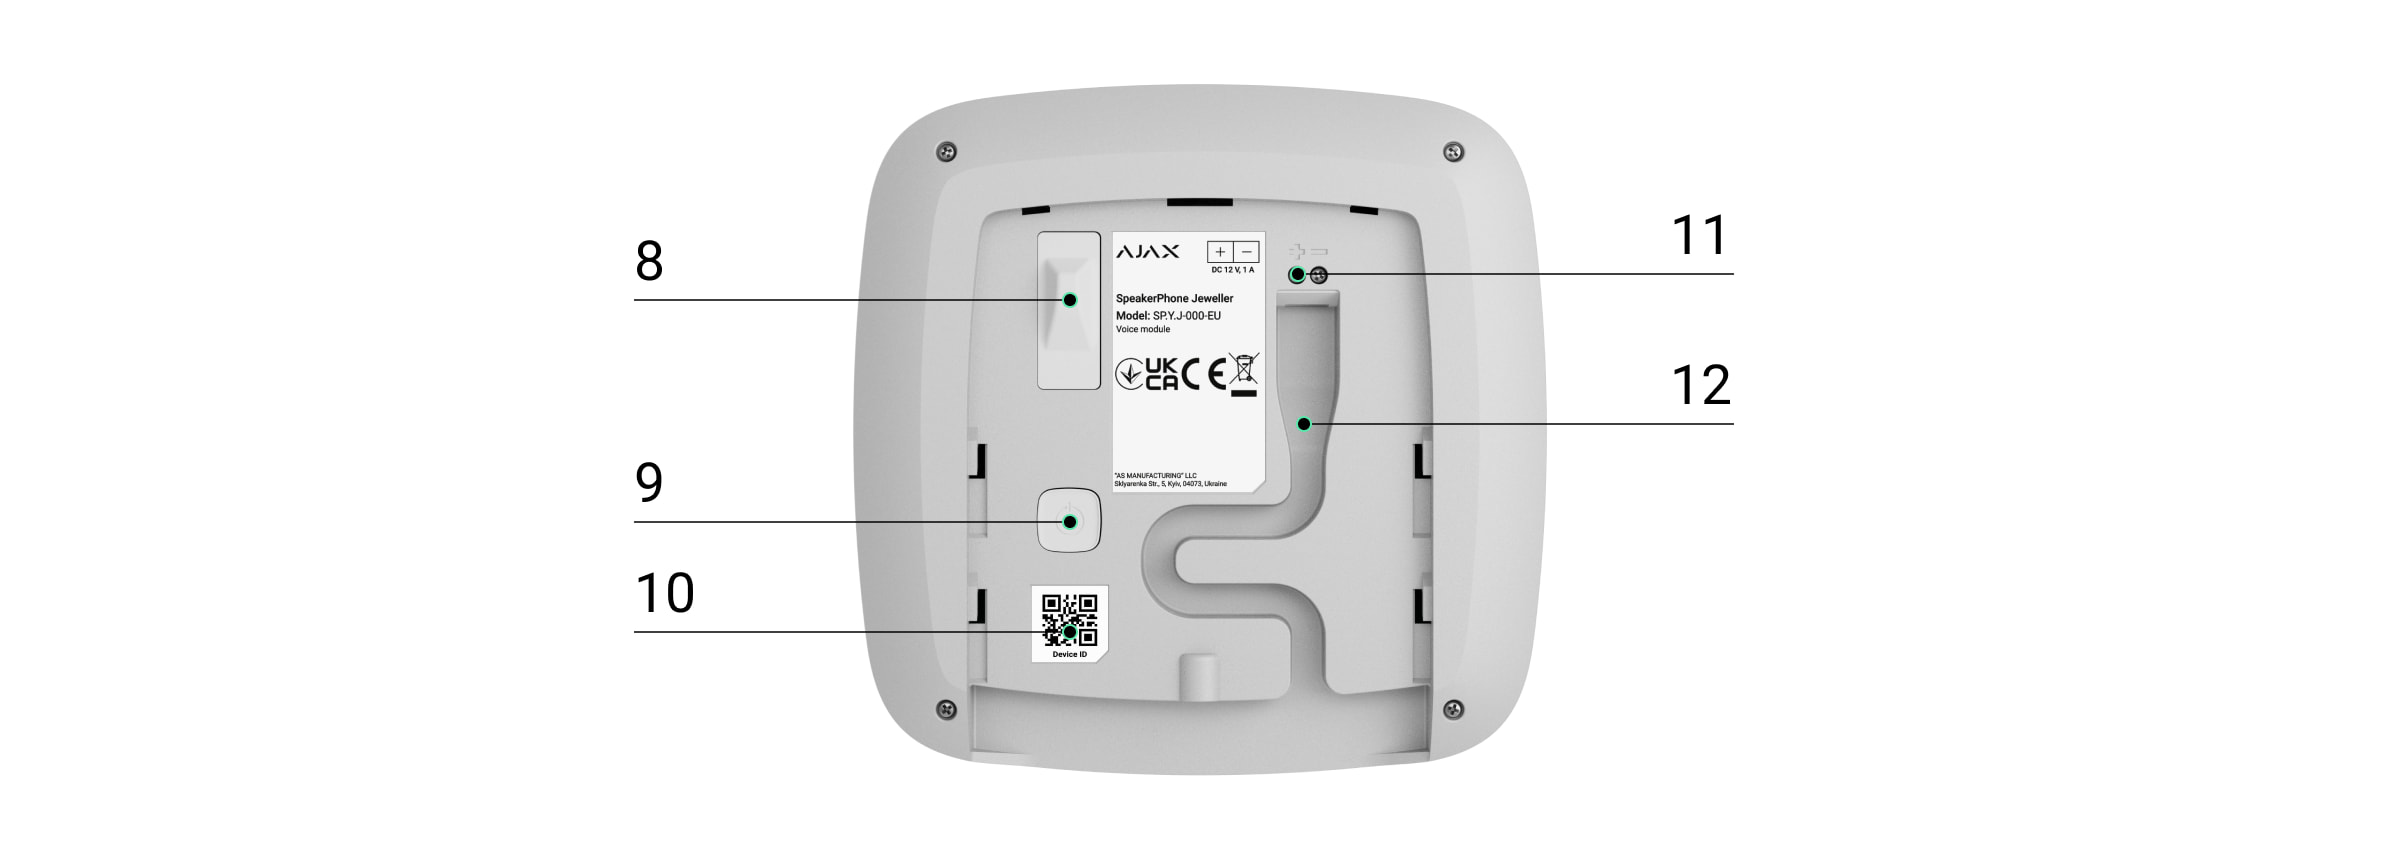
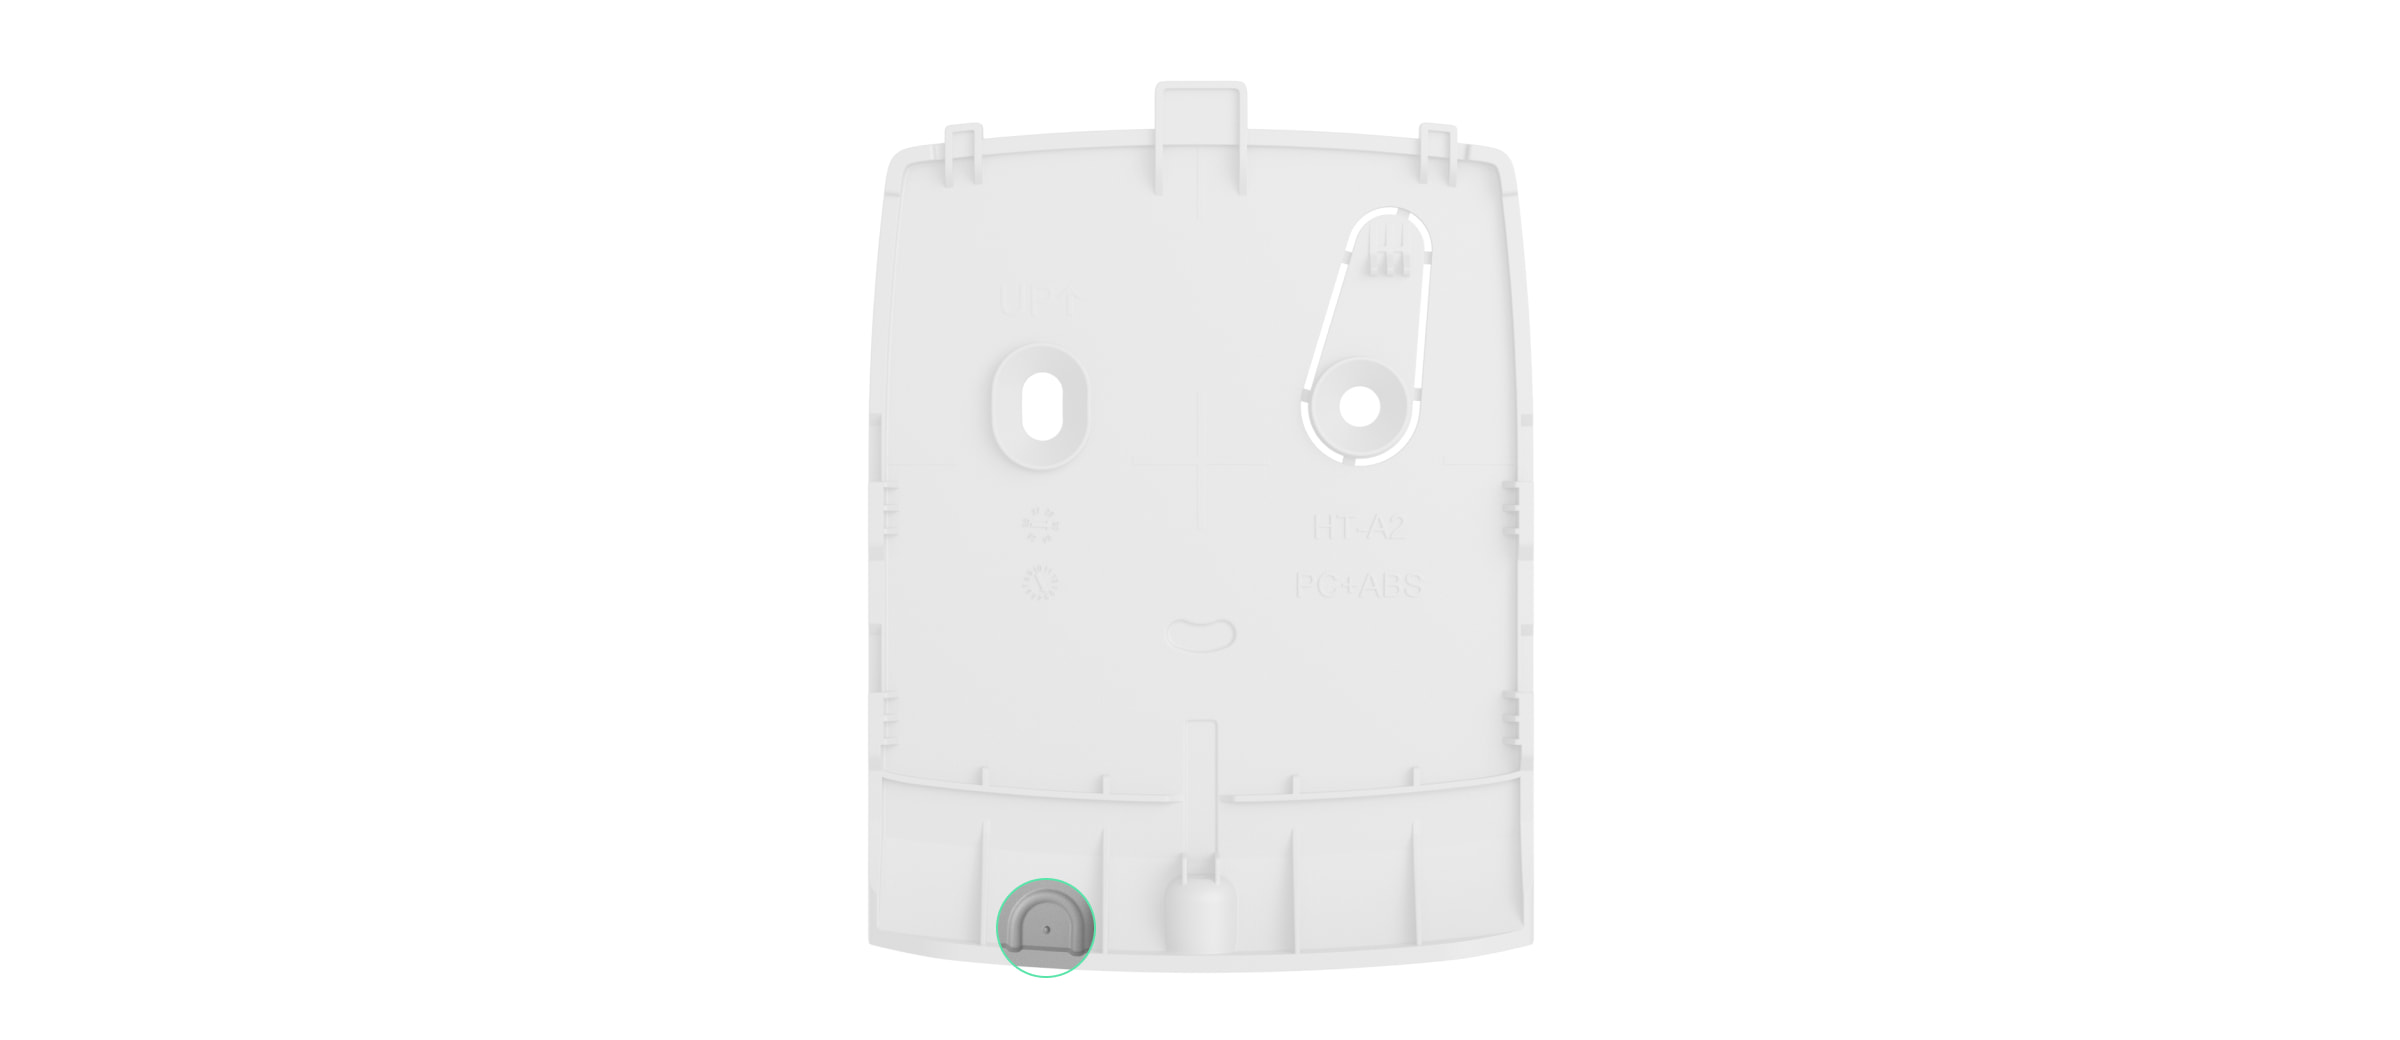
- O painel de instalação SmartBracket. Para retirar o painel, desaperte o parafuso de fixação na parte inferior da carcaça do dispositivo e faça deslizar o painel para baixo.
- Parte perfurada do painel de instalação para acionar um tamper em caso de tentativa de desprender o dispositivo da superfície. Não o parta.
- Pontos de fixação para fixar o SmartBracket à superfície.
- O orifício para fixar o painel de instalação do SmartBracket com um parafuso de fixação.
- Botão de tamper anti-sabotagem. Ativa-se quando é feita uma tentativa de separar o detetor da superfície ou de o retirar do painel de instalação.
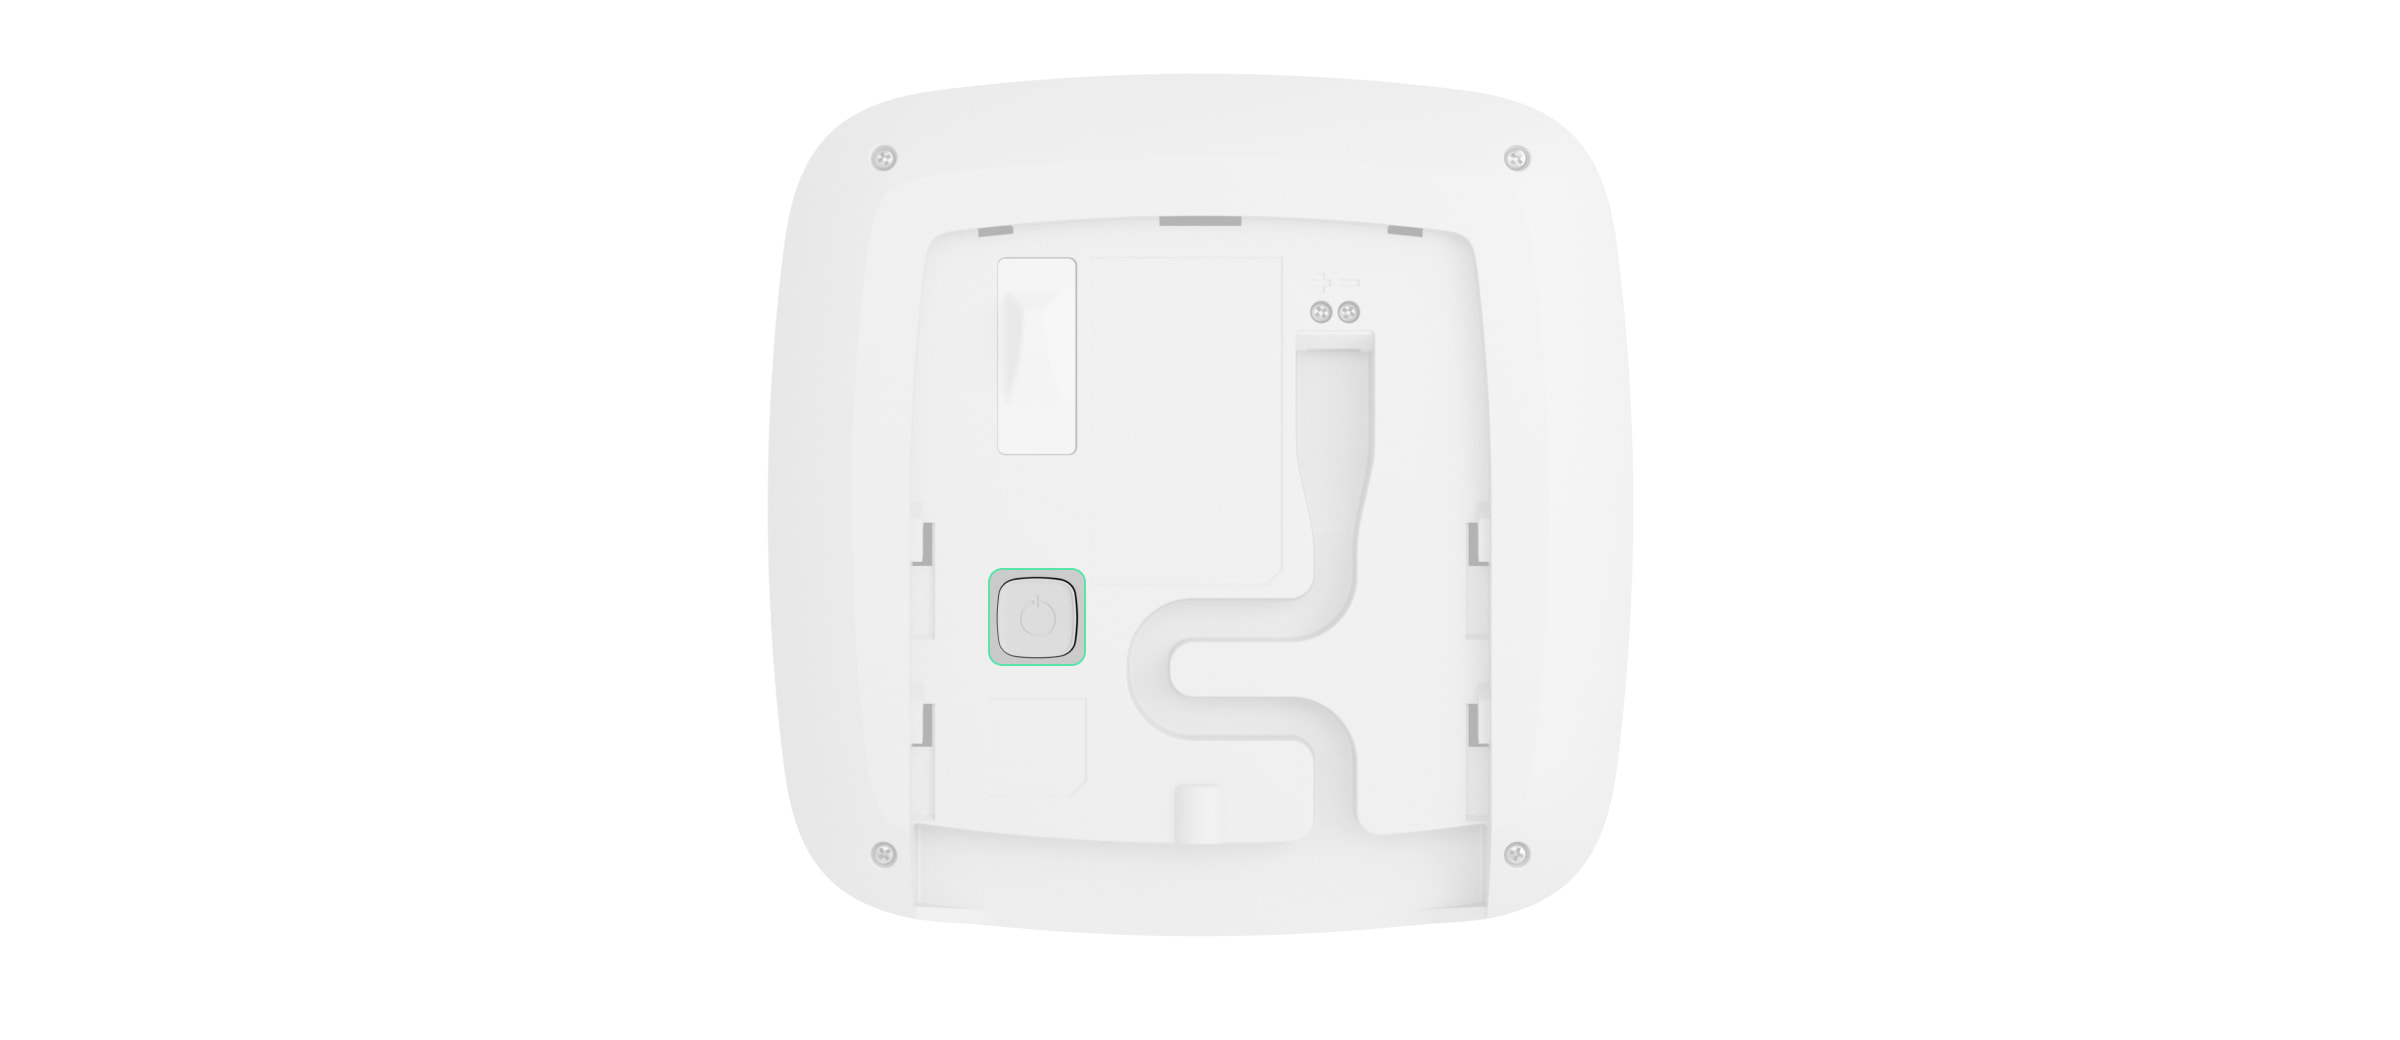
- Botão de alimentação.
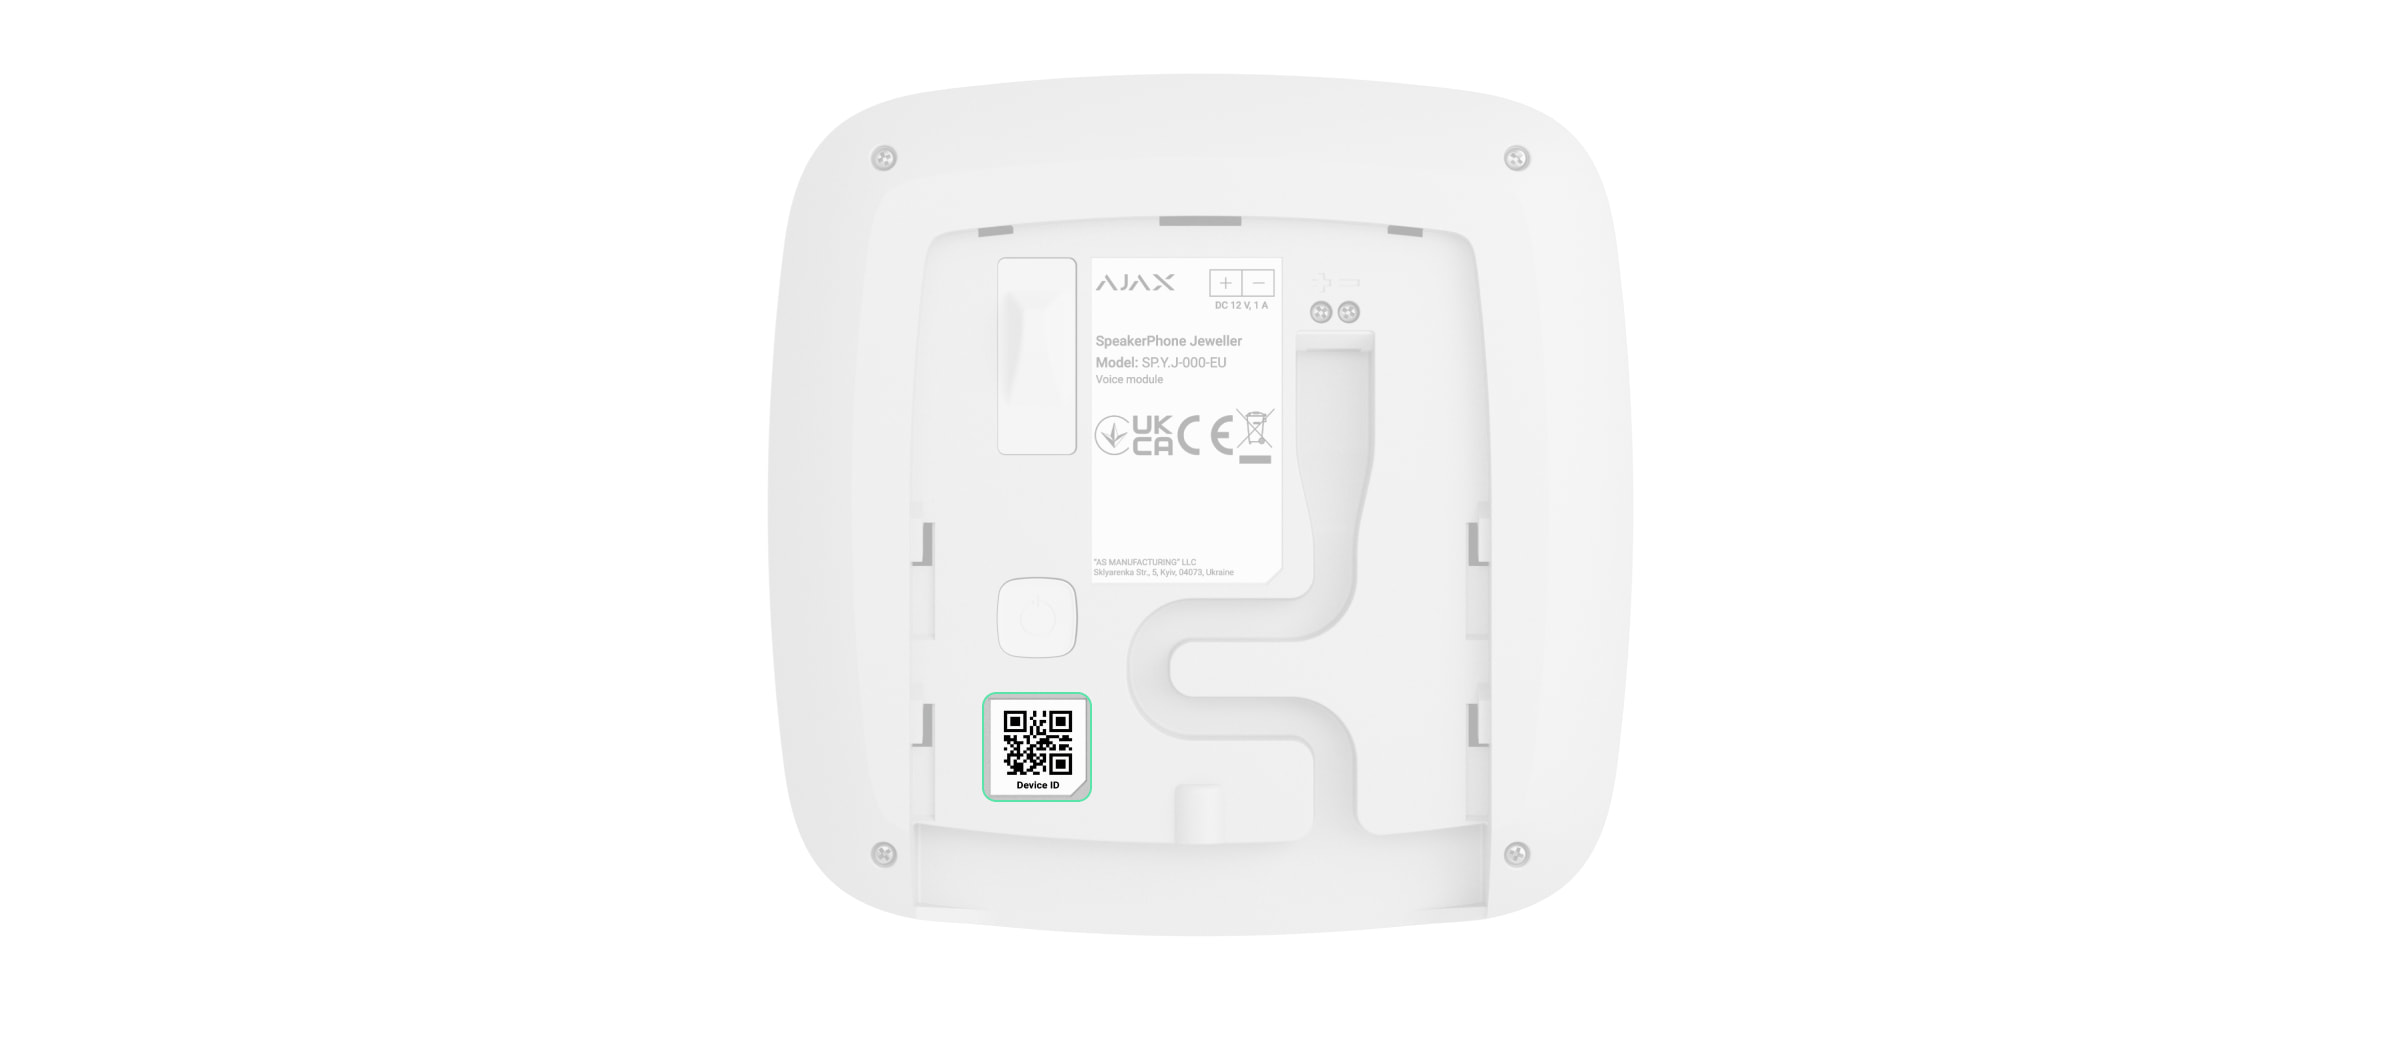
- Código QR com o ID do dispositivo para adicionar o detetor a um sistema Ajax.
- Terminais para ligar uma fonte de alimentação externa (não incluída).
- Canal do cabo para encaminhar o cabo da unidade de alimentação elétrica de terceiros.
Princípio do funcionamento
O SpeakerPhone Jeweller possui um altifalante incorporado com um volume até 103 dB e um microfone omnidirecional. O dispositivo tem um processador de voz especial alimentado por IA para otimização do som. É possível personalizar o estado predefinido desta funcionalidade e alterá-lo durante uma chamada.
Em caso de alarme, depois de a CRA chamar o hub, a pessoa que se encontra no local não precisa de carregar em nenhum botão para estabelecer uma ligação entre o operador e o SpeakerPhone.
O dispositivo executa três tarefas:
- Verificação do alarme. Em caso de alarme, o operador estabelece uma ligação, ouve a situação no local e pede um código de confirmação. Se o código estiver correto, o alarme desliga-se. Se o código estiver errado ou se se tratar de um código de coação, o operador envia a unidade de resposta rápida (RRU).
- Dissuasão de intrusos. Quando um intruso tenta entrar ou já está dentro das instalações, o operador informa-o de que a empresa de segurança está a par e que os guardas ou a polícia estão a caminho.
- Pedido de ajuda. Se o utilizador acionar um alarme auxiliar (por exemplo, premindo o Button Jeweller ou o botão na app Ajax), o operador estabelece uma ligação, pergunta sobre o estado de uma pessoa e pede ajuda.
O módulo de voz suporta também a gravação de áudio pré-alarme e pós-alarme. Consoante a configuração, o dispositivo pode gravar fragmentos de áudio curtos antes ou depois do acionamento do alarme e enviá-los para a CRA. Para reproduzir e descarregar o áudio gravado, o utilizador, o PRO ou a empresa devem dispor das permissões adequadas. Para obter mais informações, consulte a secção Configuração das permissões de gravação de áudio.
O sistema com o hub Ajax com o OS Malevich 2.27 e versões posteriores suporta a adição de até 10 dispositivos SpeakerPhone Jeweller. Dependendo da configuração do sistema, o operador da CRA pode escolher o módulo de voz para comunicação e alternar entre eles, ajustar o volume, ouvir a situação no local e transmitir para todos os dispositivos.
O operador da CRA pode selecionar e ligar ao módulo de voz, ajustar o volume e transmitir para todos os dispositivos apenas quando utilizar um servidor SIP de terceiros. No Ajax PRO Desktop, todas as funcionalidades mencionadas estarão disponíveis em versões futuras..
Cada módulo de voz pode ser atribuído a um grupo específico ou a todos os grupos (se o modo de grupo estiver ativado), permitindo que um operador se ligue ao módulo de voz atribuído a um grupo onde foi registado um alarme.
O dispositivo possui uma fonte de alimentação autónoma e uma carcaça robusta com um parafuso de fixação para fixar o dispositivo. O botão de alimentação está bloqueado quando o sistema está no modo armado.
O operador da CRA não consegue ligar aos módulos de voz adicionados ao hub, que passou para o Modo de poupança (a função de Poupança de bateria deve ser ativada e configurada nas definições do hub).
Nestes casos, o operador da CRA pode ligar e comunicar através de módulos de voz apenas durante o Período de atividade do hub, quando este permanece ligado ao Ajax Cloud. A chamada em curso não pode prolongar o período de atividade do hub; por conseguinte, a chamada terminará automaticamente assim que o hub passar para o Modo de poupança.
Protocolos de transferência de dados Jeweller e Wings
O Jeweller e o Wings são protocolos de transferência de dados sem fios bidirecionais que proporcionam uma comunicação rápida e fiável entre o hub e os dispositivos. O SpeakerPhone utiliza o Jeweller para transmitir alarmes e eventos e o Wings para atualizar o firmware.
Protocolo de transferência de dados VoRF
O VoRF é um protocolo de transmissão de áudio proprietário da Ajax que utiliza duplexação por divisão de tempo (TDD). Esta tecnologia permite a comunicação em ambos os sentidos (a conversa inicia-se automaticamente e não é necessário premir qualquer botão, como num walkie-talkie) no mesmo canal de frequência, utilizando faixas horárias diferentes.
O protocolo VoRF utiliza uma parte do espetro com uma largura de 2 MHz, nomeadamente a banda “K” (863 MHz a 865 MHz).
Envio de eventos para a central de monitorização
O sistema Ajax pode transmitir alarmes para a app de monitorização Ajax PRO Desktop e para a central recetora de alarmes (CRA) nos formatos SurGard (Contact ID), SIA (DC-09), ADEMCO 685, e outros protocolos.
O sistema com o SpeakerPhone Jeweller pode transmitir os seguintes eventos:
- Chamar / terminar chamada.
- Alarme de tamper/recuperação.
- Perda/restauração da ligação com o hub.
- Desativação/ativação permanente do dispositivo.
- Desativação/ativação única do dispositivo.
Para que o dispositivo funcione corretamente, é necessário configurar a telefonia no hub Ajax. Além disso, a empresa de vigilância deve instalar a telefonia SIP por sua conta.
Quando o alarme é recebido, o operador da estação de monitorização da empresa de segurança sabe o que aconteceu e sabe exatamente para onde enviar uma unidade de resposta rápida. A capacidade de endereçamento dos dispositivos Ajax permite enviar não só eventos para o Ajax PRO Desktop ou para a CRA, mas também o tipo de dispositivo, o seu nome, o grupo de segurança e a sala virtual. Note que a lista de parâmetros transmitidos pode ser diferente consoante o tipo de CRA e o protocolo selecionado para a comunicação com a central de monitorização.
O ID e o número do dispositivo podem ser encontrados nos seus estados na app Ajax.
Adicionar ao sistema
O SpeakerPhone Jeweller é incompatível com os repetidores de rádio Ajax e com painéis de controlo de segurança de terceiros.
Para ligar o SpeakerPhone Jeweller ao hub, é necessário colocar o dispositivo na mesma instalação segura que o sistema.
O hub e o dispositivo têm de funcionar com a mesma frequência de rádio; caso contrário, são incompatíveis. O alcance de radiofrequência do dispositivo pode variar consoante a região. Recomendamos comprar e utilizar dispositivos Ajax na mesma região. Pode verificar a gama de radiofrequências operacionais com o serviço de apoio técnico.
Pode adicionar até 10 dispositivos SpeakerPhone Jeweller ao hub Ajax com o OS Malevich 2.27 e versões posteriores. Se o hub Ajax tiver uma versão anterior do SO Malevich, só pode adicionar um SpeakerPhone Jeweller.
Antes de adicionar um dispositivo
- Instale a app Ajax PRO.
- Inicie sessão numa conta PRO ou crie uma nova conta.
- Selecione um espaço ou crie um novo.
- Adicione pelo menos uma sala virtual.
- Adicione um hub compatível ao espaço. Certifique-se de que o hub está ligado e tem acesso à Internet através de Ethernet, Wi-Fi e/ou rede móvel.
- Certifique-se de que o espaço está desarmado e de que o hub não está a iniciar uma atualização, verificando os estados na app Ajax.
Apenas um PRO ou um administrador com direitos para configurar o sistema pode adicionar um dispositivo ao hub.
Conexão ao hub
- Abra a app Ajax. Selecione o hub onde pretende adicionar o dispositivo.
- Aceda ao separador Dispositivos
 . Clique em Adicionar dispositivo.
 - Dê um nome ao dispositivo, leia ou escreva o código QR (colocado no dispositivo e na caixa da embalagem) e selecione uma sala e um grupo (se o modo Grupo estiver ativado).
- Prima Adicionar.
- Ligue o dispositivo mantendo premido o botão de alimentação durante 2 segundos.
Se a ligação falhar, desligue o detetor e tente novamente dentro de 5 segundos. Se o número máximo de dispositivos já foi adicionado ao hub (dependendo do modelo do hub), será notificado quando tentar adicionar um novo dispositivo.
Uma vez emparelhado com o hub, o detetor aparecerá na lista de dispositivos do hub na app Ajax. A frequência de atualização dos estados dos dispositivos na lista depende das definições do Jeweller, com o valor predefinido de 36 segundos.
O SpeakerPhone Jeweller funciona apenas com um hub. Quando adicionado a um novo hub, o dispositivo deixa de enviar eventos para o antigo. Adicionar o detetor ao novo hub não o remove automaticamente da lista de dispositivos do hub antigo. Isto deve ser feito através da app Ajax.
Avarias
Quando é detetada uma avaria, a app Ajax apresenta um contador de avarias no ícone do dispositivo. Todas as avarias são apresentadas nos estados do detetor. Os campos com avarias vão ser indicados com vermelho.
Uma avaria é apresentada se:
- a carcaça do detetor está aberta (o tamper é ativado);
- não existe qualquer ligação com o hub através do Jeweller;
- não há ligação com o hub através do Wings;
- não há ligação com o hub através de VoRF;
- a bateria do detetor está fraca;
- a temperatura do dispositivo está fora dos limites aceitáveis;
- existe uma avaria do hardware.
Ícones
Os ícones apresentam alguns estados do dispositivo. Para aceder aos mesmos:
- Inicie sessão na app Ajax.
- Selecione e espaço.
- Aceda ao separador Dispositivos .
| Ícone | Significado |
|
Intensidade de sinal Jeweller. Apresenta a intensidade do sinal entre o hub e o dispositivo. O valor recomendado é de 2-3 barras. |
|
|
O dispositivo tem uma avaria. A lista de avarias está disponível nos estados do detetor. |
|
|
O nível de carga da bateria do detetor. |
|
|
Está disponível uma atualização de firmware. Aceda aos estados ou definições do detetor para encontrar a descrição e lançar uma atualização. |
|
|
O dispositivo está no modo de teste de atenuação do sinal. |
|
|
O dispositivo está permanentemente desativado. |
|
|
O dispositivo tem os alarmes de tamper permanentemente desativados. |
|
|
O dispositivo é desativado até ao primeiro evento de desarme do sistema. |
|
|
O dispositivo tem os alarmes de tamper desativados até ao primeiro evento de desarmamento do sistema. |
|
| O dispositivo perdeu a ligação com o hub ou o hub perdeu a ligação com o servidor Ajax Cloud. | |
|
O dispositivo não foi transferido para o novo hub. |
Estados
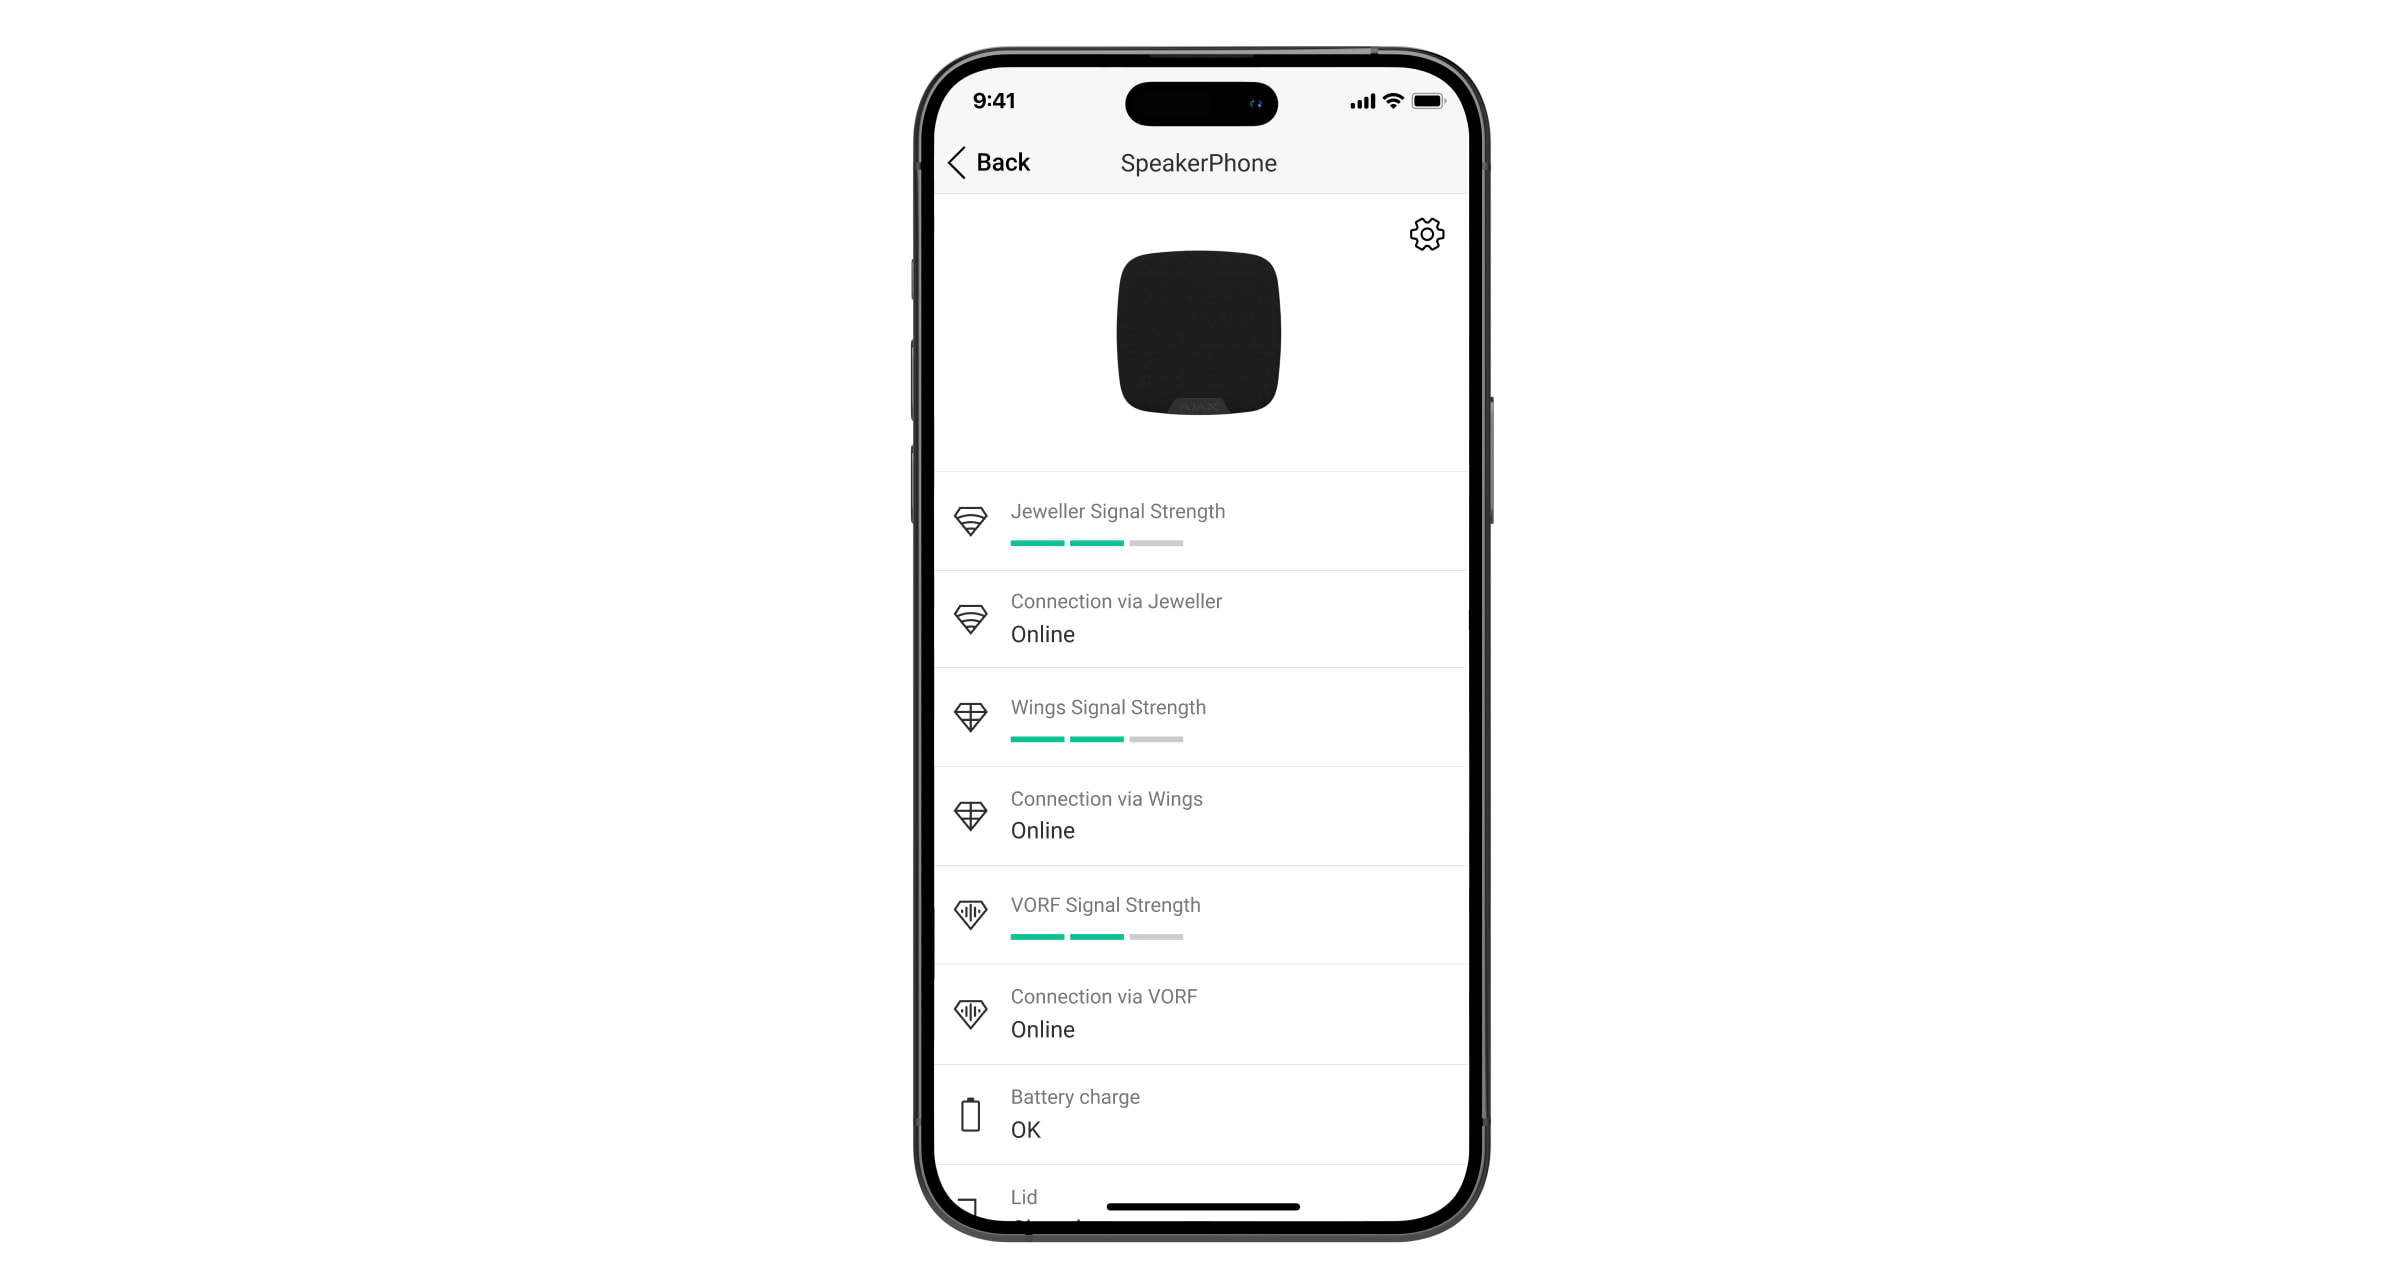
Os estados incluem informações sobre o dispositivo e os seus parâmetros de funcionamento. Os estados do SpeakerPhone Jeweller podem ser encontrados nas apps Ajax:
- Aceda ao separador Dispositivos .
- Selecione SpeakerPhone na lista.
| Parâmetro | Valor |
| Importação de dados | Apresenta o erro aquando da transferência de dados para o novo hub:
|
| Avaria |
Clicar em O campo é apresentado se for detetada uma avaria. |
| Nova versão de firmware disponível |
Clicar em O campo é apresentado se estiver disponível uma nova versão de firmware. |
| Intensidade de sinal Jeweller |
Intensidade do sinal entre o hub e o dispositivo no canal Jeweller. O valor recomendado é de 2-3 barras. O Jeweller é um protocolo para a transmissão de eventos e alarmes do SpeakerPhone. |
| Ligação através de Jeweller | Estado da ligação no canal Jeweller entre o dispositivo e o hub:
|
| Intensidade do sinal de Wings |
Força do sinal entre o hub e o dispositivo no canal Wings. O valor recomendado é de 2-3 barras. O Wings é um protocolo para atualizar o firmware. |
| Ligação via Wings | Estado da ligação no canal Wings entre o hub e o dispositivo:
|
| Intensidade do sinal VoRF |
Intensidade do sinal entre o hub e o dispositivo no canal VoRF. O valor recomendado é de 2-3 barras. O VoRF é um protocolo para transmissão de áudio. |
| Ligação via VoRF | Estado da ligação no canal VoRF entre o hub e o dispositivo:
|
| Potência do transmissor |
Apresenta a potência selecionada do transmissor. O parâmetro aparece quando a opção Máx ou Atenuação é selecionada no menu Teste de atenuação do sinal. |
| Carga da bateria | Nível de carga da bateria do dispositivo:
Quando a bateria estiver fraca, as apps Ajax e a empresa de segurança receberão as notificações adequadas. |
| Tampa | O estado do tamper do detetor que responde à separação ou abertura da carcaça do dispositivo:
|
| Alimentação externa | Estado da ligação da fonte de alimentação externa:
|
| Volume do altifalante | Nível de volume do altifalante:
|
| Indicação LED durante a chamada | Mostra o estado da indicação LED do dispositivo:
|
| Desativação permanente | Mostra o estado da função de desativação permanente do dispositivo:
|
| Desativação única | Apresenta o estado da definição de desativação única do dispositivo:
|
| Firmware | Versão do firmware do dispositivo. |
| ID | ID do dispositivo. Também disponível no código QR na carcaça do dispositivo e na sua caixa de embalagem. |
| Número do Dispositivo | Número do bucle do dispositivo (zona). |
Definições
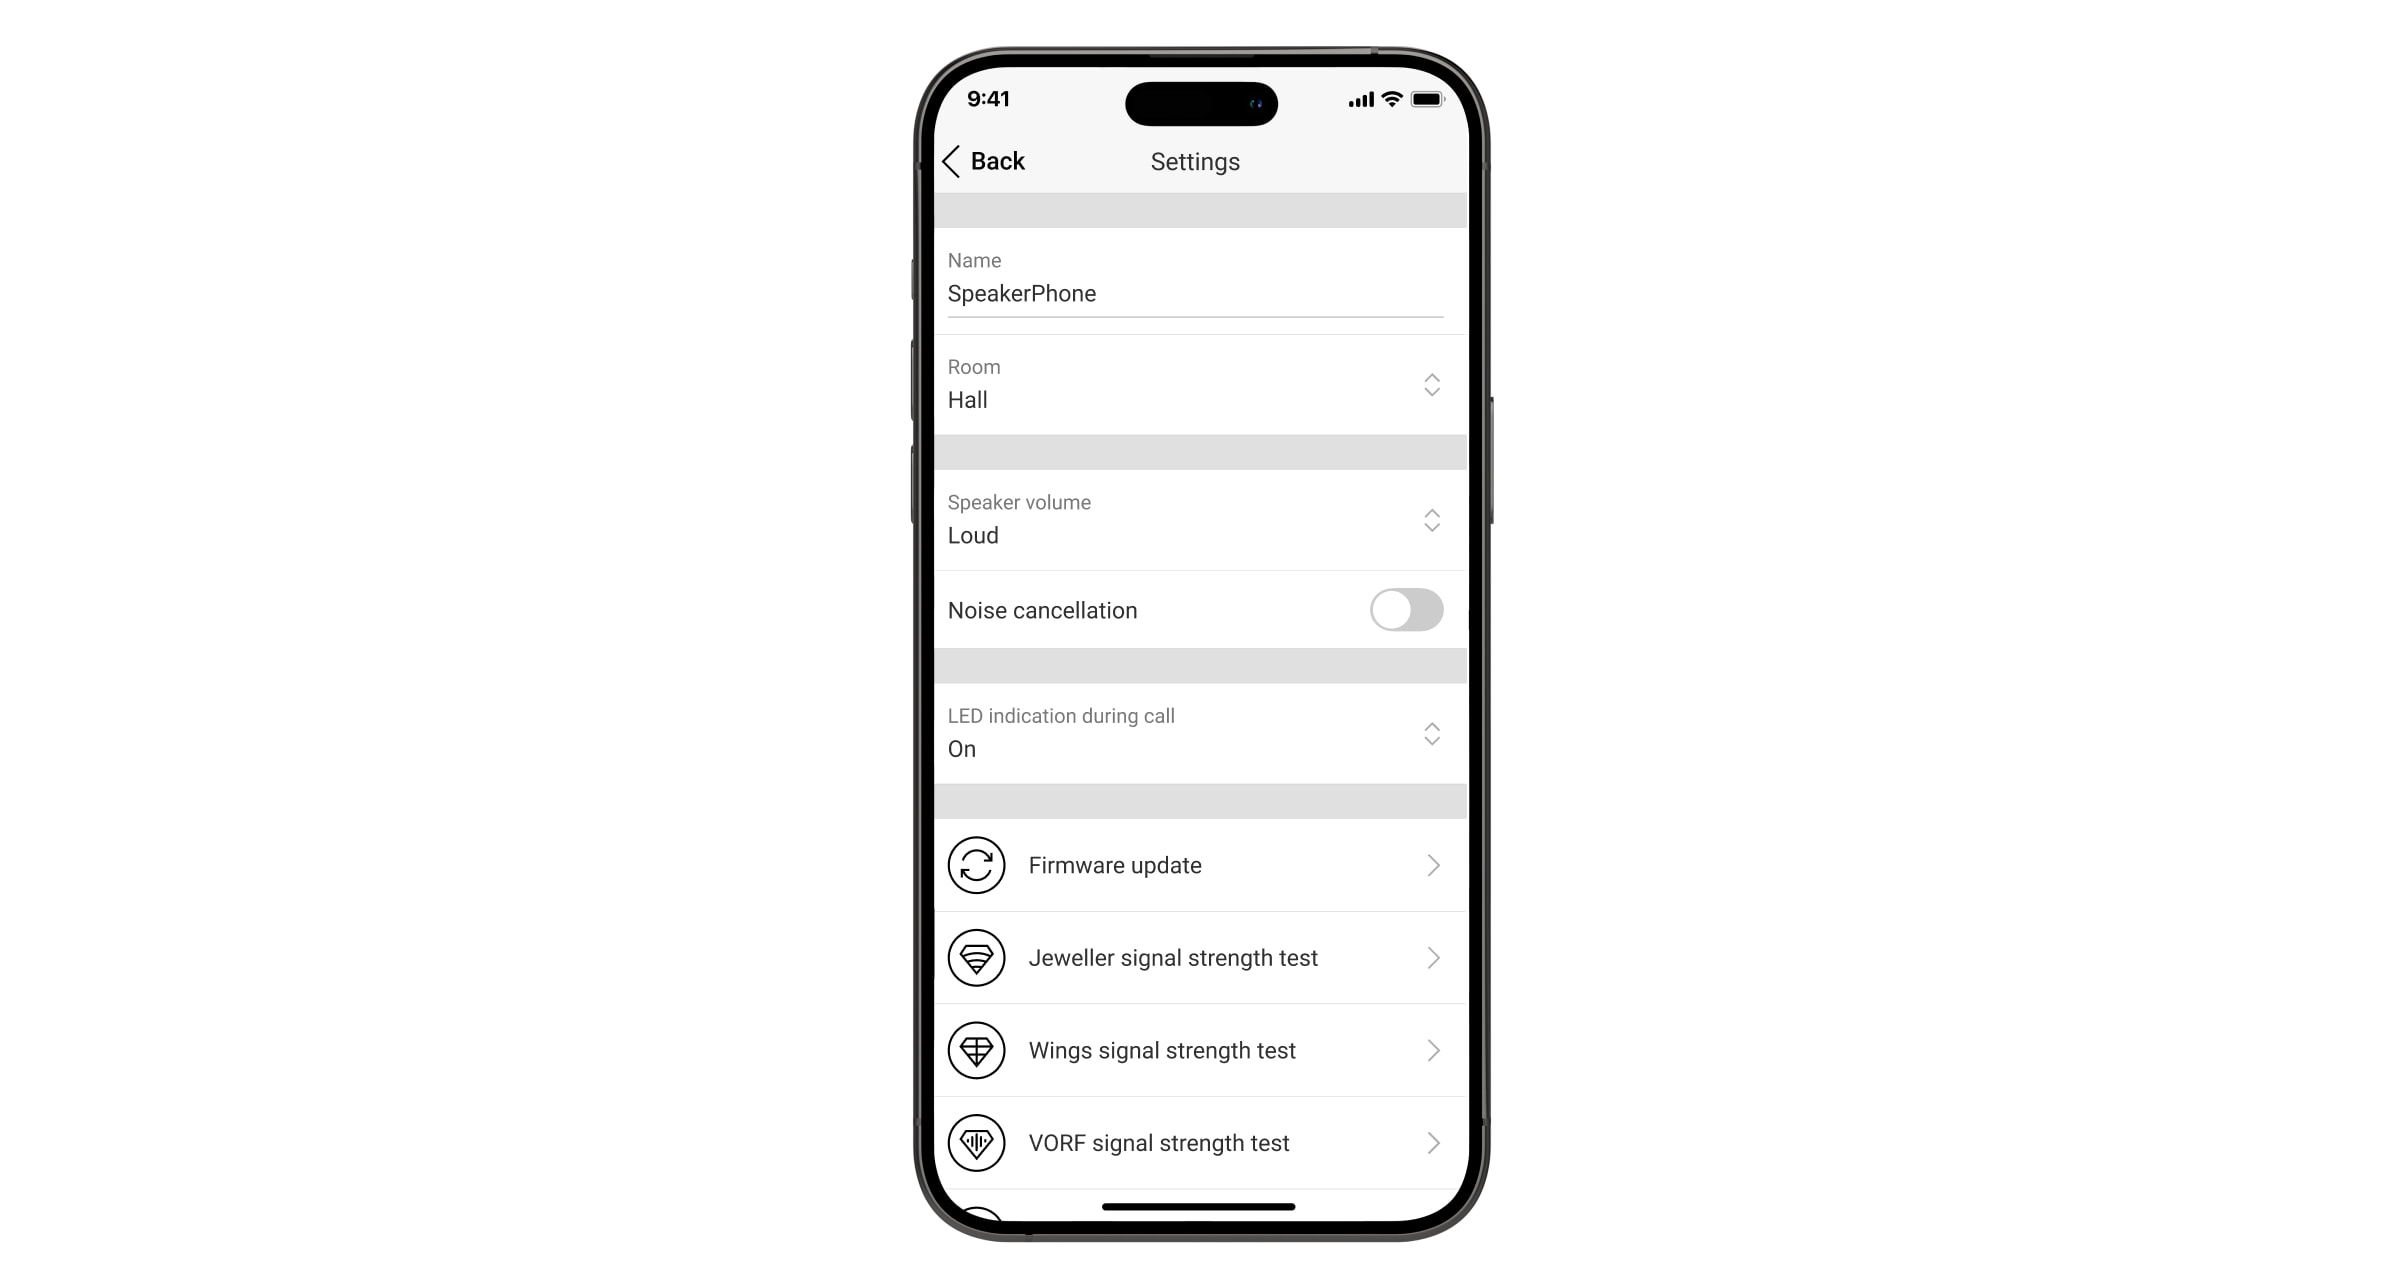
Para alterar as definições do SpeakerPhone na app Ajax:
- Aceda ao separador Dispositivos .
- Selecione SpeakerPhone na lista.
- Aceda as Definições clicando no ícone de engrenagem
 .
. - Defina os parâmetros necessários.
- Clique em Voltar para guardar as novas definições.
| Configuração | Valor |
| Nome |
Nome do dispositivo. Apresentado na lista de dispositivos do hub, texto SMS e notificações no historial de eventos. Para alterar o nome do dispositivo, clique no campo de texto. O nome pode conter até 12 caracteres cirílicos ou até 24 caracteres latinos. |
| Sala |
Selecione a sala virtual à qual o SpeakerPhone está atribuído. O nome da sala aparece no texto do SMS e nas notificações no historial de eventos. |
| Chamada em modo de grupo | Seleção do grupo ao qual o dispositivo está atribuído. É possível selecionar todos os grupos ou um grupo:
A opção está disponível quando o modo de grupo está ativado nas definições de espaço. |
| Volume do altifalante | Selecione o nível de volume do altifalante:
|
| Cancelamento do ruído |
Quando a opção está ativada, o sistema utiliza a supressão de ruídos estranhos. É possível personalizar o estado predefinido desta funcionalidade e alterá-lo durante uma chamada. |
| Indicação LED durante a chamada | Seleção da indicação LED do dispositivo:
|
| Gravação de áudio do alarme | Seleção da condição sob a qual o módulo de voz grava áudio e o envia para a CRA:
Também pode selecionar a duração do áudio gravado antes ou depois do acionamento do alarme. As opções disponíveis são Não gravar ou de 1 a 10 segundos. |
| Atualizações de firmware |
Passa o dispositivo para o modo de atualização do firmware. |
| Teste de intensidade de sinal do Jeweller |
Passa o dispositivo para o modo de teste de intensidade do sinal do Jeweller. |
| Teste de intensidade de sinal do Wings |
Passa o dispositivo para o modo de teste de intensidade do sinal do Wings. |
| Teste de intensidade do sinal do VoRF | Passa o dispositivo para o modo de teste da intensidade do sinal VoRF. |
| Teste de volume |
Passa o dispositivo para o modo de teste de volume. |
| Teste de atenuação do sinal |
Passa o dispositivo para o modo de teste de atenuação do sinal. |
| Monitorização | Quando esta definição está ativada, todas as notificações de eventos do dispositivo são enviadas para a central recetora de alarmes. |
| Manual do utilizador | Abre o manual do utilizador do SpeakerPhone na app Ajax. |
| Desativação permanente |
Permite ao utilizador desativar o dispositivo sem o retirar do sistema. Estão disponíveis três opções:
|
| Desativação única |
Permite ao utilizador desativar eventos do dispositivo até ao primeiro evento de desarme do sistema. Estão disponíveis três opções:
|
| Eliminar dispositivo | Desemparelha o dispositivo, desliga-o do hub e elimina as suas definições. |
Configuração das permissões de gravação de áudio
Por defeito, o acesso à reprodução e ao descarregamento de áudio gravado pelo módulo de voz não é concedido a nenhum utilizador, PRO ou empresa. Um administrador do espaço ou um utilizador com permissão para gerir as definições de privacidade pode conceder esse acesso através das apps Ajax para utilizadores finais. Podem conceder permissões a cada utilizador, instalador privado ou empresa, individualmente para cada dispositivo.
Os utilizadores PRO não podem gerir as definições de privacidade, mas podem reproduzir e descarregar ficheiros de áudio, se lhes tiver sido concedida essa autorização. Consulte o artigo seguinte para saber como configurar as permissões de gravação de áudio.
Indicação

| Evento | Indicação | Nota |
| Ligação o dispositivo. | O indicador LED acende-se uma vez a verde. | |
| Desligação do dispositivo. | O indicador LED pisca três vezes a vermelho. | |
| Está a decorrer uma chamada. | O indicador LED acende-se a verde durante uma chamada. | |
| Bateria fraca. | O indicador LED acende-se suavemente a vermelho. | Se a alimentação externa estiver ligada ao SpeakerPhone, a indicação de bateria fraca não é apresentada. |
| Ativação de tamper. | O indicador LED pisca a vermelho. | |
| Teste de intensidade do sinal Jeweller/Wings/VoRF. | O indicador LED pisca a verde durante o teste. Se não houver ligação através do Jeweller/Wings/VoRF, pisca a vermelho. | Ativa-se após o lançamento de um teste adequado nas definições do dispositivo. |
| Teste de volume. | O indicador LED acende-se a verde durante o teste. | Ativa-se após o lançamento de um teste adequado nas definições do dispositivo. |
| Atualizações de firmware. | O indicador LED acende periodicamente a verde enquanto o firmware está a ser atualizado. | Liga-se após o lançamento da atualização do firmware nos estados do dispositivo. |
Teste de funcionalidade
O sistema Ajax oferece vários tipos de testes para ajudar a selecionar o local de instalação correto para os dispositivos. O teste não começa imediatamente. No entanto, o tempo de espera não excede a duração de um intervalo de consulta entre o hub e dispositivo. O intervalo de consulta pode ser verificado e configurado nas definições do hub(Hub → Definições ![]() → Jeweller).
→ Jeweller).
Para executar um teste, na app Ajax:
- Selecione o espaço pretendido.
- Aceda o separador Dispositivos .
- Selecione SpeakerPhone na lista.
- Aceda às Definições .
- Selecione um teste:
- Teste de intensidade do sinal de Jeweller.
- Teste de intensidade do sinal de Wings.
- Teste de intensidade do sinal de VoRF.
- Teste de volume.
- Teste de atenuação do sinal.
- Execute o teste.
Colocação do dispositivo
O dispositivo destina-se exclusivamente a uso em ambientes interiores.
Ao escolher onde colocar o SpeakerPhone Jeweller, considere os parâmetros que afetam o seu funcionamento:
- Intensidade de sinal Jeweller.
- Teste de intensidade do sinal de Wings.
- Teste de intensidade do sinal de VoRF.
- Distância máxima entre o dispositivo e o hub.
- Presença de obstáculos à passagem do sinal de rádio: paredes, tetos entre pisos, objetos de grandes dimensões localizados na sala.
Considere as recomendações de colocação ao desenvolver um projeto para o sistema de segurança da instalação. O sistema de segurança deve ser concebido e instalado por especialistas. Uma lista de parceiros recomendados está disponível aqui.
Altura de instalação recomendada — 5,2 ft.
Intensidade do sinal
As intensidades dos sinais Jeweller, Wings e VoRF são determinadas pelo número de pacotes de dados não entregues ou corrompidos durante um determinado período de tempo. O ícone ![]() no separador Dispositivos
no separador Dispositivos ![]() indica a intensidade do sinal:
indica a intensidade do sinal:
- Três barras — excelente intensidade de sinal.
- Duas barras — boa intensidade de sinal.
- Uma barra — fraca intensidade de sinal, não é garantido um funcionamento estável.
- Ícone riscado — sem sinal.
Verifique a força do sinal do Jeweller, Wings e VoRF antes da instalação final. Com uma intensidade de sinal de uma ou zero barras, não garantimos o funcionamento estável do dispositivo. Considere a possibilidade de deslocar o dispositivo, uma vez que o reposicionamento, mesmo que seja de 20 cm, pode melhorar significativamente a intensidade do sinal. Se o sinal continuar a ser fraco ou instável após a relocalização, mude o local.
Não instale o detetor
- No exterior. Isto pode levar à falha do dispositivo.
- Em locais onde o sinal acústico possa ser atenuado (dentro de móveis, atrás de cortinas grossas, etc.).
- Nas proximidades de quaisquer objetos metálicos ou espelhos que provoquem atenuação ou interferência do sinal.
- No interior de instalações com temperatura e humidade fora dos limites admissíveis. Isto pode danificar o dispositivo.
- Mais perto do que 3,3 ft do hub. Isto pode levar a uma perda de comunicação com o dispositivo.
- Num local com um nível de sinal baixo. Isto pode resultar na perda da ligação com o hub.
Instalação
Antes de instalar o SpeakerPhone Jeweller, certifique-se de que selecionou o local ideal, em conformidade com os requisitos deste manual.
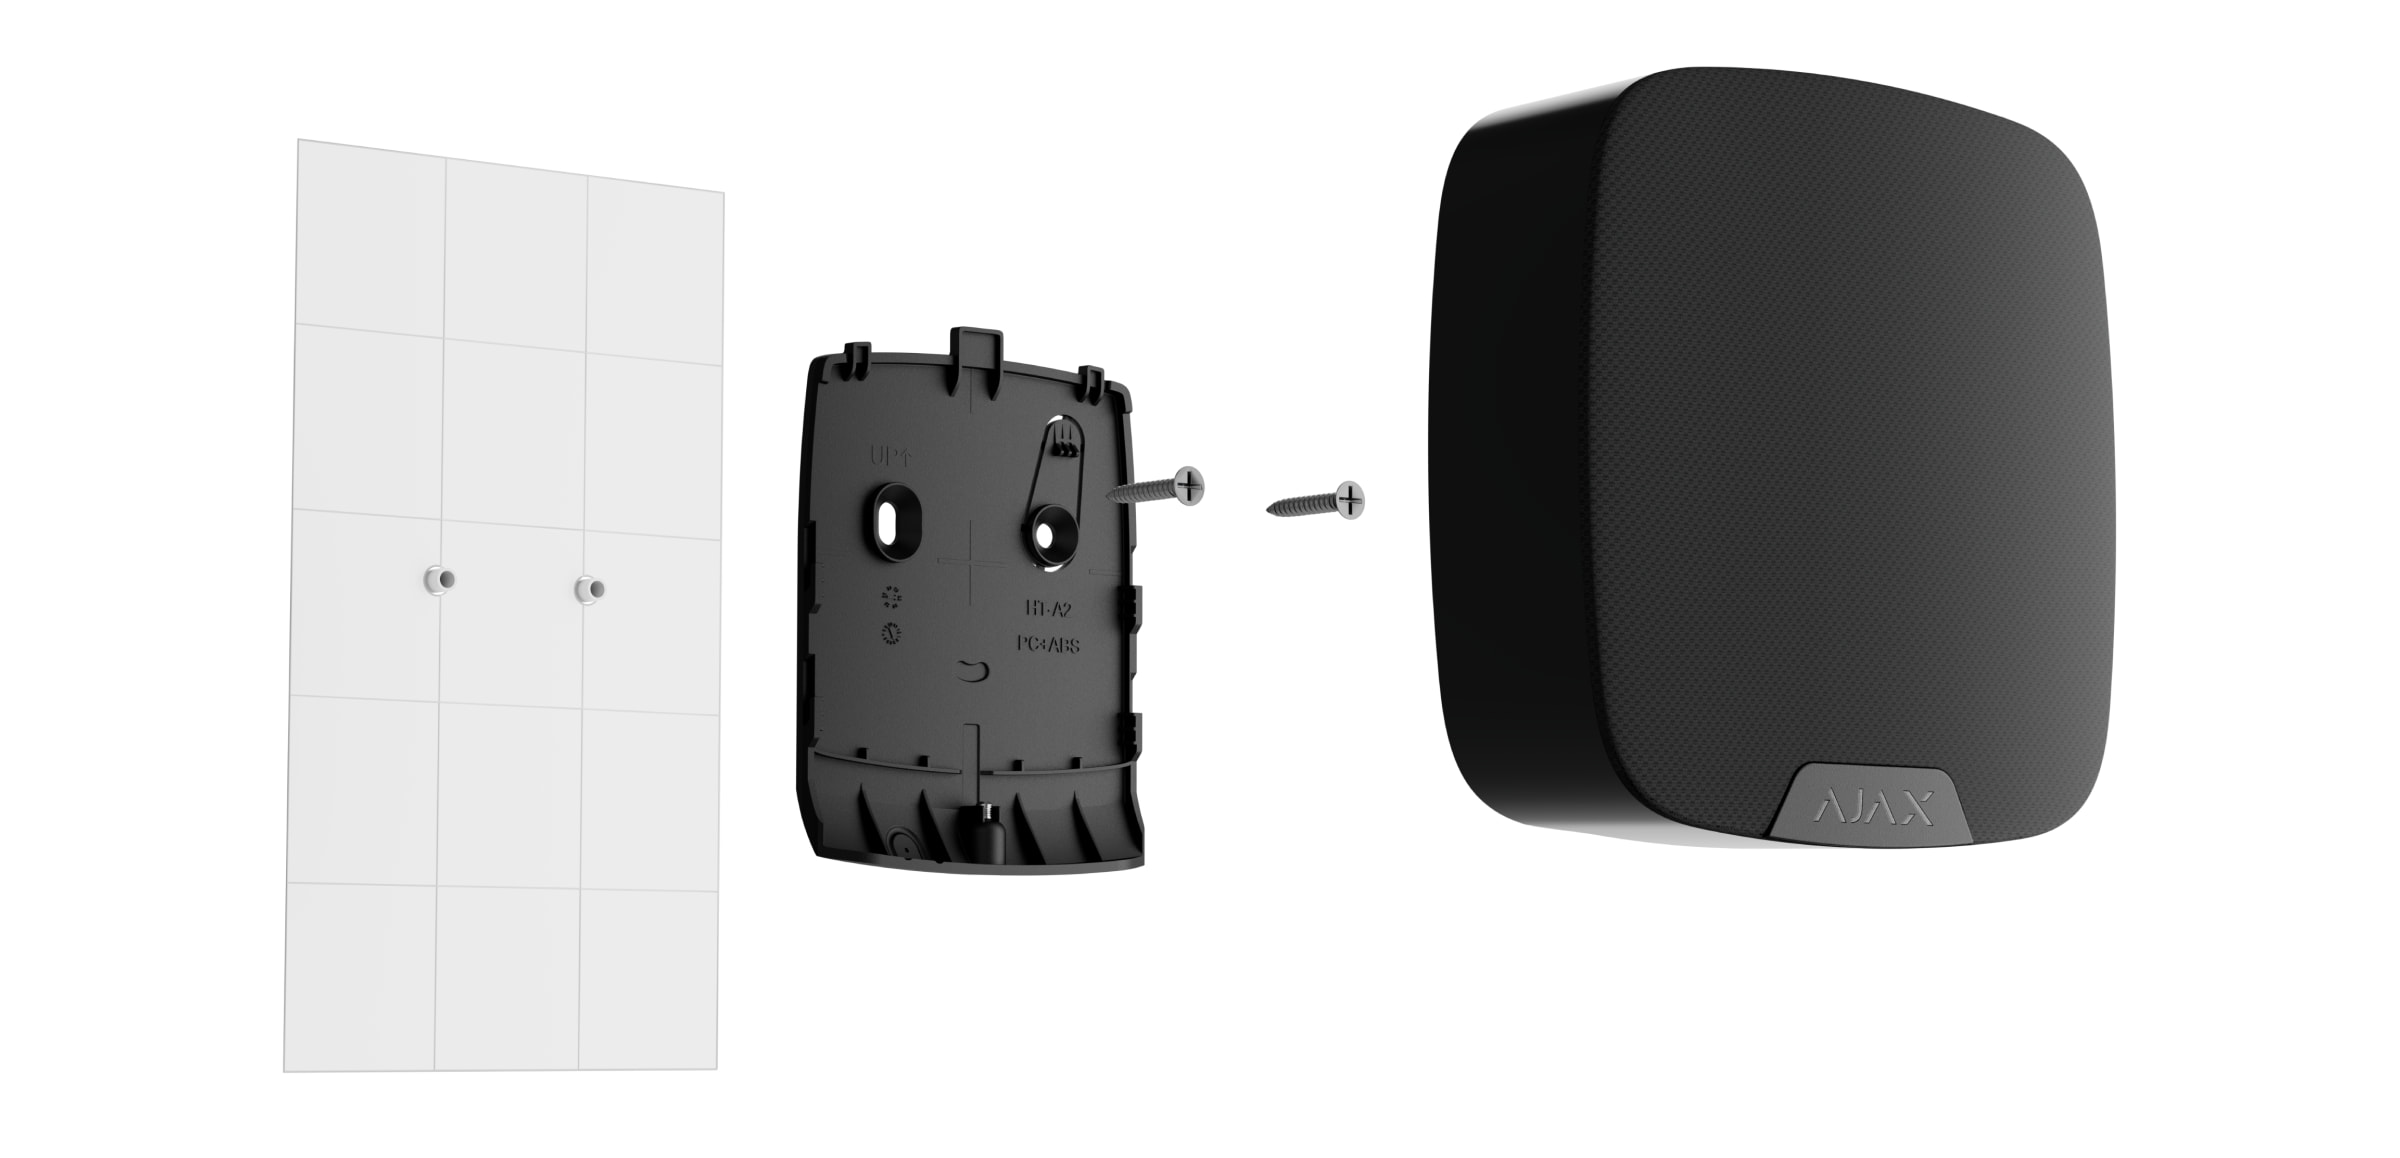
Para montar o dispositivo:
- Retire o painel de instalação SmartBracket do detetor. Desaperte primeiro o parafuso de fixação e faça deslizar o painel para baixo.
- Fixe o painel SmartBracket com fita adesiva de dupla face no local de instalação selecionado.

A fita de dupla face só pode ser utilizada para uma instalação temporária. O dispositivo fixado pela fita adesiva pode soltar-se da superfície em qualquer altura. Desde que o dispositivo esteja colado com fita adesiva, o tamper não será acionado quando o dispositivo for separado da superfície.
- Para fixar o detetor no SmartBracket. O indicador LED do aparelho fica intermitente. É um sinal que indica que a carcaça do dispositivo está fechada.
Se o indicador LED não se acender durante a colocação do dispositivo no SmartBracket, verifique o estado de tamper na app Ajax, a integridade da fixação e o aperto da fixação do dispositivo no painel.
- Execute o teste de funcionalidade.
- Se os testes forem bem sucedidos, retire o dispositivo do SmartBracket.
- Fixe o painel de instalação SmartBracket na superfície utilizando os parafusos incluídos.

Se utilizar outros elementos de fixação, certifique-se de que não danificam ou deformam o painel.
- Coloque o detetor no painel de instalação do SmartBracket.
- Aperte o parafuso de fixação na parte inferior da carcaça do detetor. O parafuso é necessário para uma fixação mais fiável e para proteger o detetor de uma desmontagem rápida.
Ligação de uma fonte de alimentação de terceiros
Quando ligar uma fonte de alimentação de terceiros e utilizar o SpeakerPhone Jeweller, respeite as normas gerais de segurança elétrica para a utilização de aparelhos elétricos, bem como os requisitos dos atos jurídicos regulamentares sobre segurança elétrica.
O SpeakerPhone Jeweller está equipado com terminais para a ligação de uma fonte de alimentação de 12 V⎓. Os parâmetros elétricos recomendados para a fonte de alimentação são: 12 V⎓ com uma corrente de 1 A.
Quando a alimentação externa está ligada, as baterias pré-instaladas funcionam como fonte de alimentação de reserva. Não as retire enquanto estiver a ligar a fonte de alimentação.
Antes de instalar o dispositivo, verifique se os fios não apresentam danos no isolamento. Utilize apenas uma fonte de alimentação com ligação à terra. Não desmonte o aparelho enquanto este estiver sob tensão. Não utilize um dispositivo com um cabo de alimentação danificado.
Para ligar uma fonte de alimentação de terceiros:
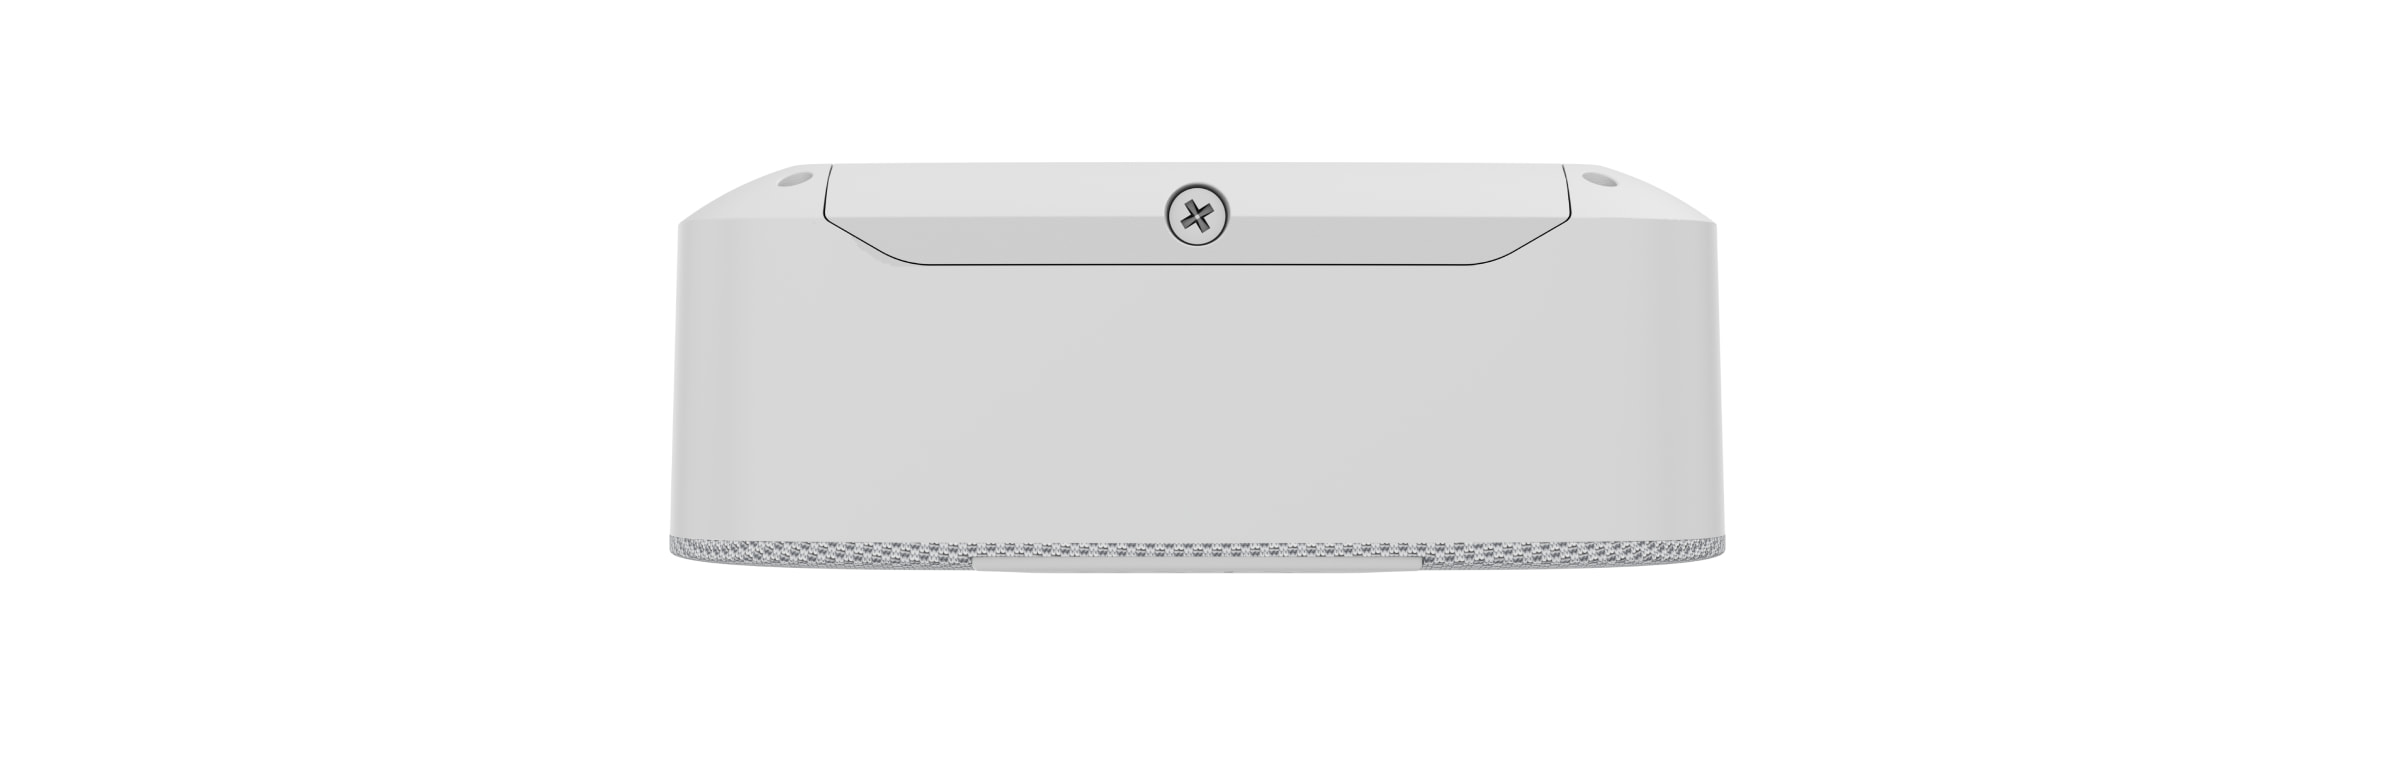
- Retire o painel de instalação SmartBracket. Perfure cuidadosamente a peça adequada da carcaça para preparar o orifício para o cabo:
- Desligue o cabo da fonte de alimentação externa.
- Ligue o cabo aos terminais, respeitando a polaridade (marcada no plástico).
O comprimento do cabo não deve exceder 32 ft utilizando o cabo 2 × 0,35, condutor de cobre.
- Encaminhe o cabo no canal de cabos. Um exemplo de saída do cabo:
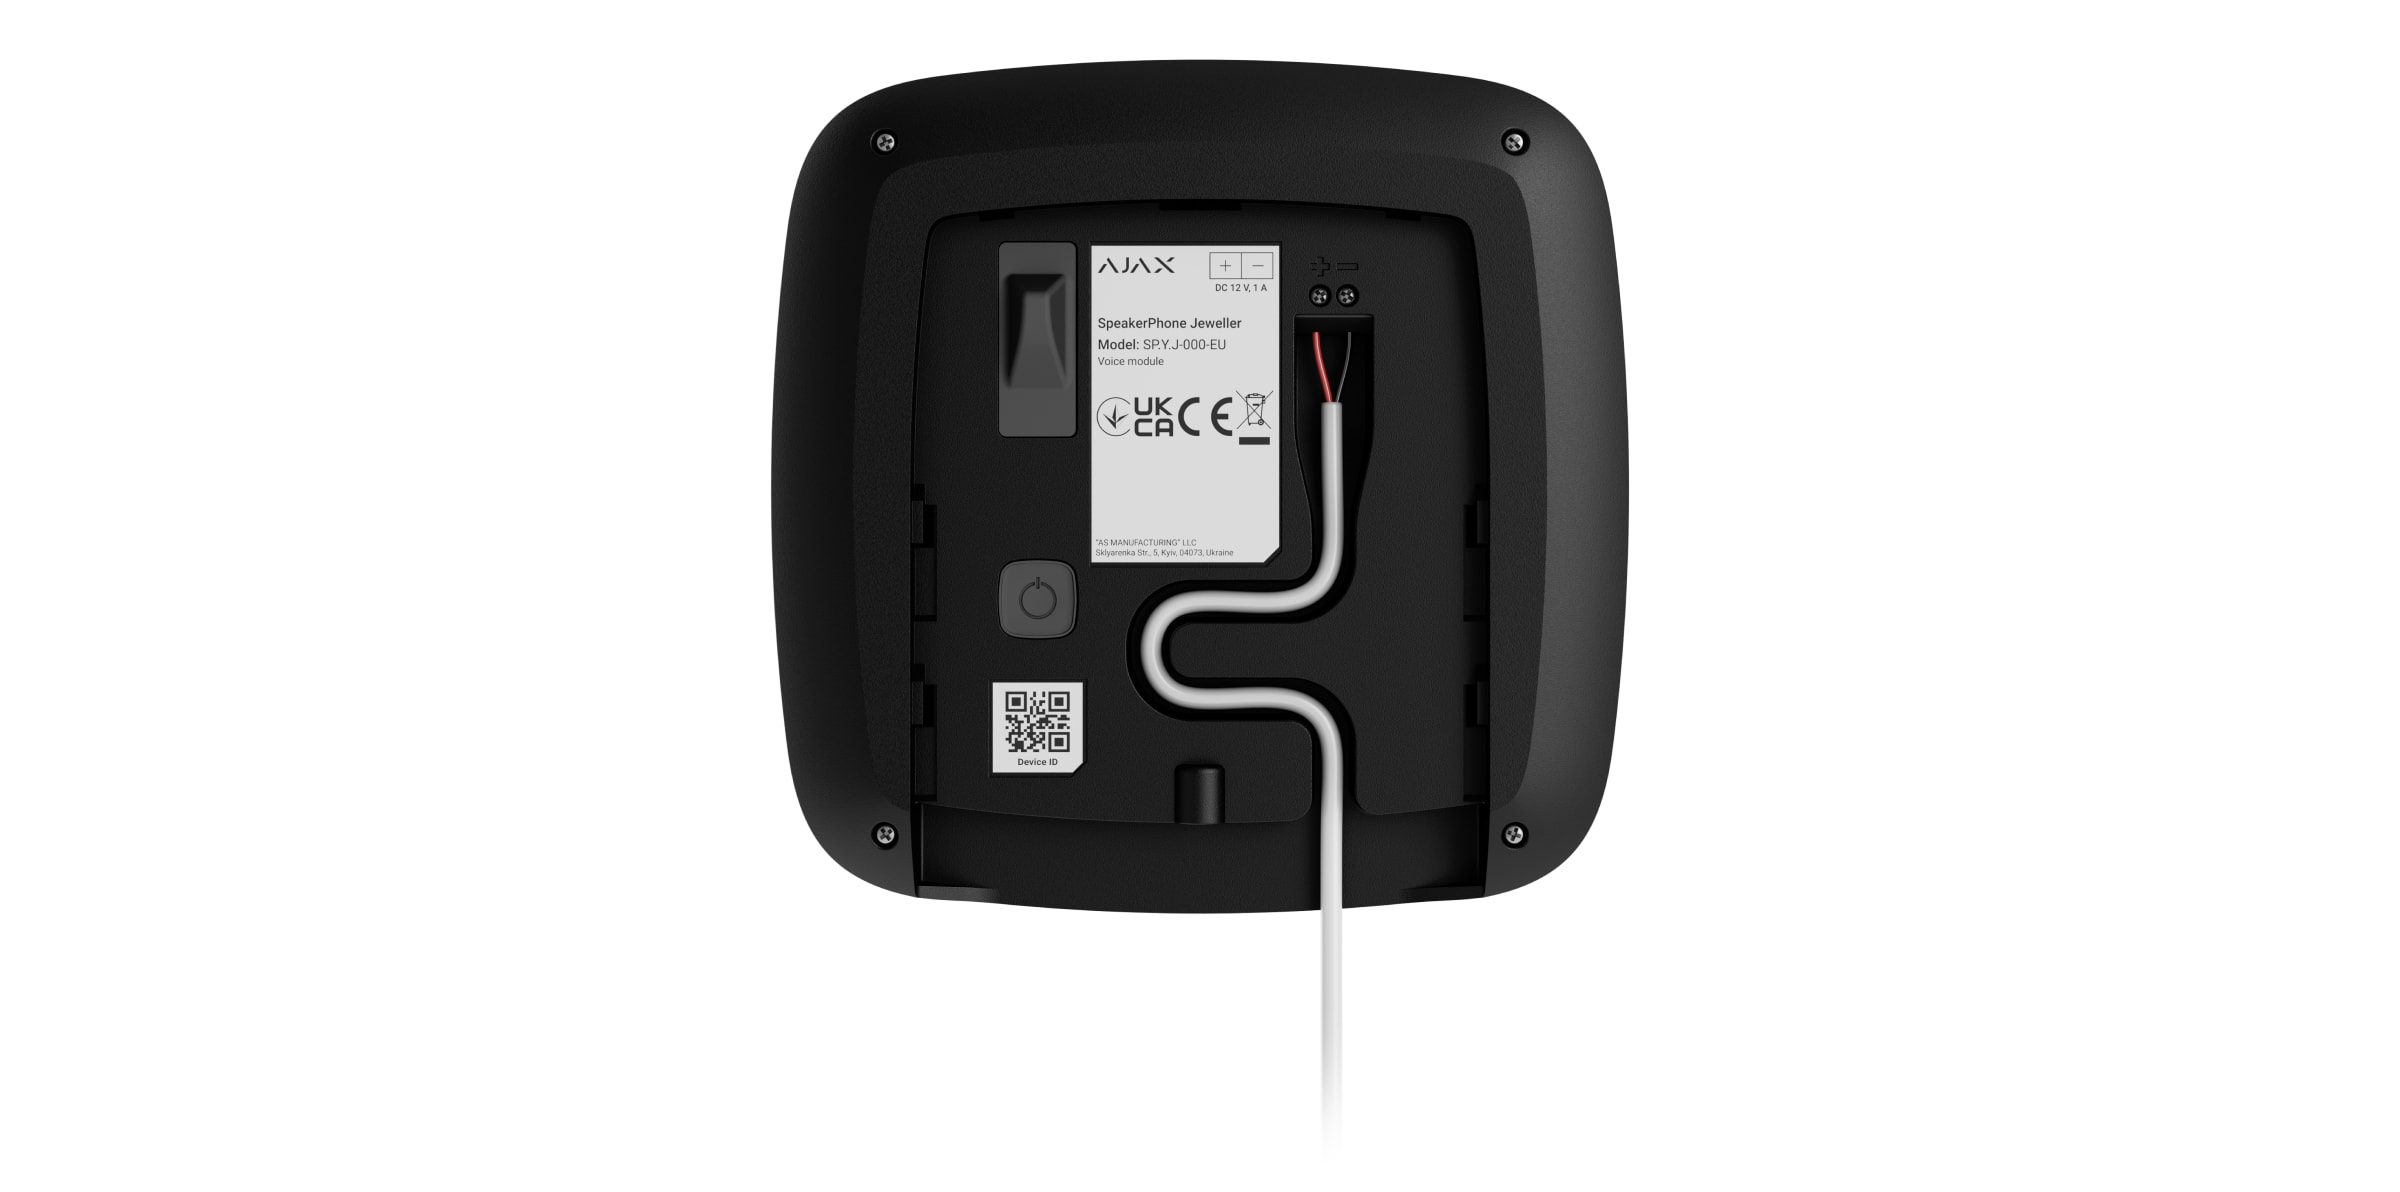
- Ligue o aparelho e coloque-o no painel de instalação. Aperte o parafuso de fixação na parte inferior da carcaça do detetor.
- Verifique o estado das baterias e da alimentação externa na app Ajax e o funcionamento geral do dispositivo.
Atualizações de firmware
A atualização do firmware do SpeakerPhone Jeweller pode ser instalada quando estiver disponível uma nova versão. Pode encontrar essa informação na lista de dispositivos nas apps Ajax PRO: Tool for Engineers e nas apps Ajax PRO Desktop. Se estiver disponível uma atualização, o dispositivo correspondente terá um ícone ![]() . Um administrador ou um PRO com acesso às definições do sistema pode efetuar uma atualização dos estados ou definições do SpeakerPhone Jeweller. Uma atualização demora até 15 minutos.
. Um administrador ou um PRO com acesso às definições do sistema pode efetuar uma atualização dos estados ou definições do SpeakerPhone Jeweller. Uma atualização demora até 15 minutos.
Para atualizar o firmware do SpeakerPhone, é necessário ligar o hub ao Ajax Cloud via Ethernet ou Wi-Fi.
Manutenção
Verifique regularmente o funcionamento do dispositivo. A frequência ideal dos controlos é de três em três meses. Limpe a carcaça do dispositivo do pó, teias de aranha e outros contaminantes à medida que vão surgindo. Utilize um pano seco e macio adequado para a manutenção do equipamento.
Ao limpar o dispositivo, evite o uso de substâncias que contenham álcool, acetona, gasolina e outros solventes ativos.
As baterias instaladas no dispositivo garantem até 3 anos de funcionamento autónomo em modo de espera ou até 12 horas em modo de conversação.
Se a bateria estiver descarregada, o sistema de segurança enviará um aviso antecipado sobre a substituição das baterias.
Características técnicas
Garantia
A garantia dos produtos da empresa de responsabilidade limitada “Ajax Systems Manufacturing” é válida durante 2 anos após a compra.
Se o dispositivo não funcionar corretamente, contacte primeiro o Apoio Técnico Ajax. Em maioria dos casos, os problemas técnicos podem ser resolvidos remotamente.
Contactar o Apoio Técnico:
Fabricado por “AS Manufacturing” LLC
