Socket (type B) Jeweller é uma ficha inteligente sem fios com um monitor de consumo de energia, concebida de acordo com a norma NEMA 5-15 como um adaptador de tomada tipo B. Está equipado com três tipos de proteção: tensão, corrente e temperatura.
A ficha inteligente controla a alimentação dos aparelhos elétricos ligados a ela, com uma capacidade de carga até 1,8 kW. Pode ser operado através da app Ajax, através de cenários de automatização, premindo o botão de controlo na carcaça da ficha, com o Button ou o interrutor inteligente LightSwitch.
Socket (type B) comunica com o hub utilizando dois protocolos seguros. A ficha utiliza Jeweller para transmitir alarmes e eventos, e Wings para atualizar o firmware. O alcance da comunicação num espaço aberto é de até 1100 metros.
O dispositivo é compatível apenas com os repetidores e hubs de sinal de rádio Ajax. A ligação a uartBridge e ocBridge Plus não é suportada.
Elementos funcionais
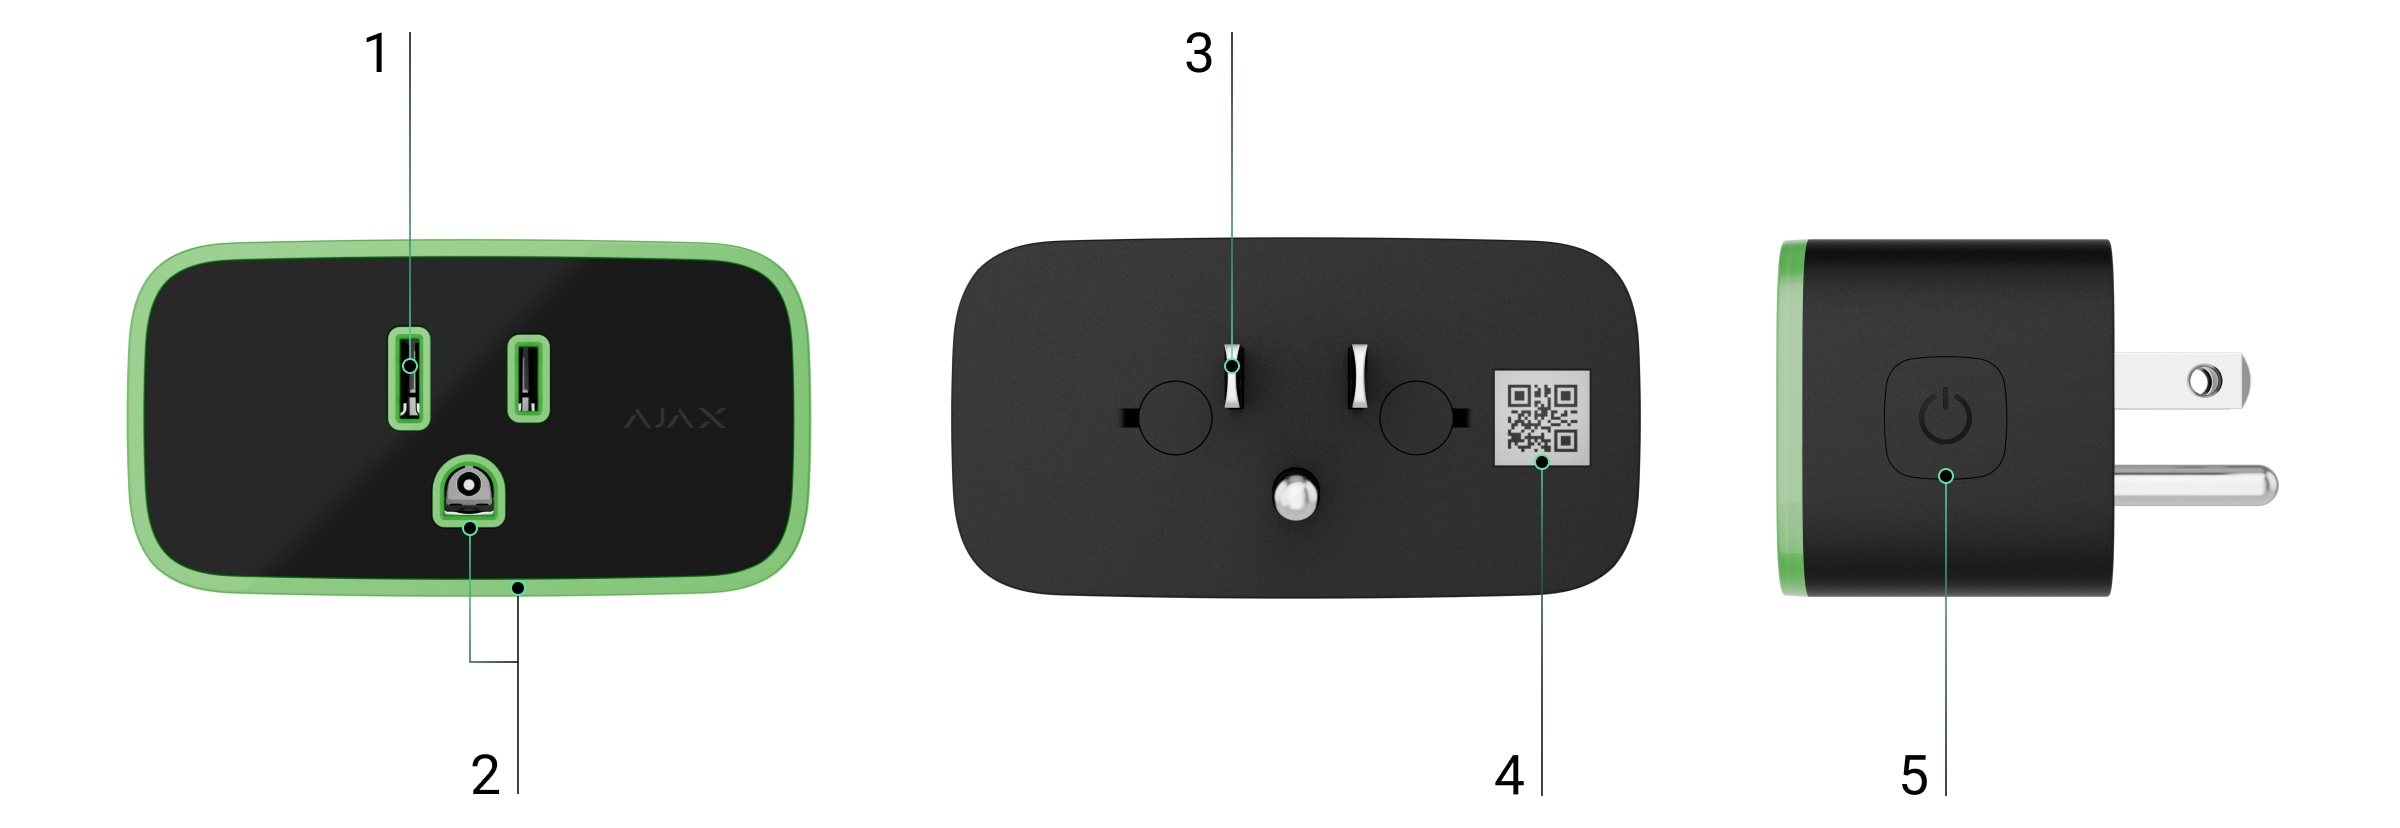
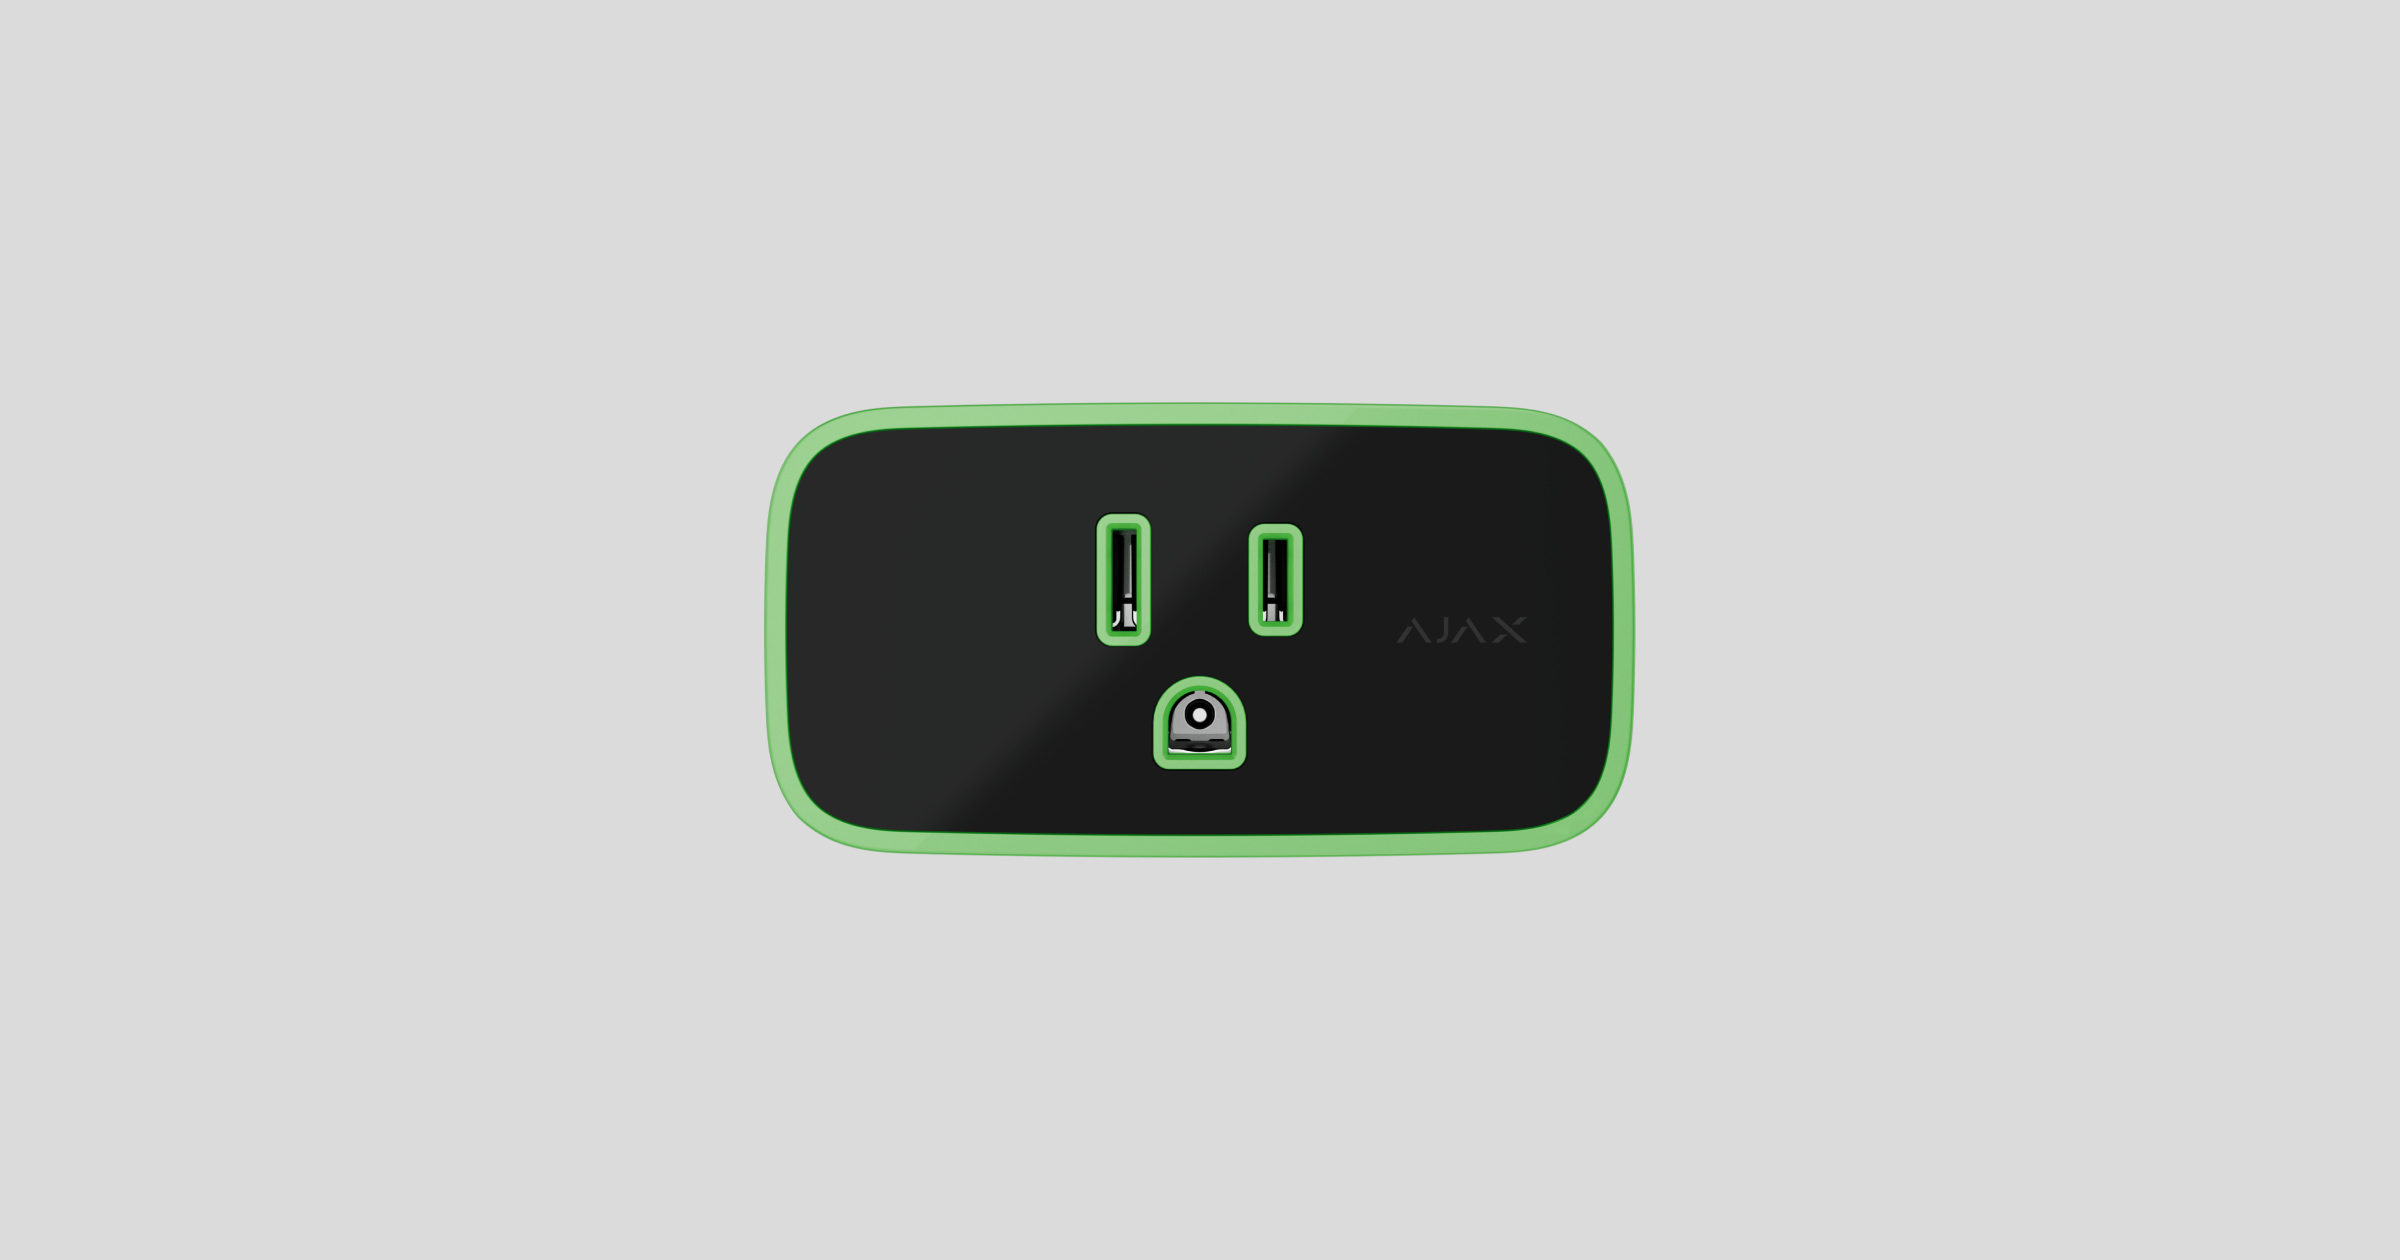
- Tomada de três pinos (type B).
- Indicação LED para mostrar o estado da Sockets (type B) e o nível de carga atual com cores diferentes.
- Ficha de três pinos (type B).
- Código QR com o ID do dispositivo para adicionar a ficha ao sistema Ajax.
- Botão de controlo.
Hubs e repetidores compatíveis
Para que a ficha inteligente funcione, é necessário um hub Ajax compatível com a versão de firmware OS Malevich 2.18 ou posterior. Se for utilizado o Hub (4G) Jeweller, o painel de controlo deve ser atualizado para o OS Malevich 2.28 ou posterior.
Princípio do funcionamento
A Socket (type B) é uma ficha inteligente do sistema Ajax. Controla o fornecimento de energia aos aparelhos ligados através dos cenários, através da app Ajax, ao premir o botão de controlo na carcaça da ficha, com o Button ou LightSwitch.
Socket (type B) pode funcionar em modo de impulso ou biestável, isso pode ser configurado em apps Ajax por um administrador ou PRO com direitos para configurar o sistema. Por defeito, a ficha funciona em modo biestável, ligando ou desligando a alimentação durante o controlo. No modo de impulsos, a ficha fecha ou abre os contactos (consoante o estado normal da ficha) durante o tempo definido nas configurações: de 1 a 255 segundos.
Também é possível selecionar o estado normal dos contactos da ficha nas suas definições:
- Normalmente fechado (NC) — o relé interrompe o abastecimento de energia quando ativado e retoma quando desativado.
- Normalmente aberto (NO) — o relé fornece energia quando ativado e interrompe quando desativado.
Por defeito, a ficha funciona em modo biestável, com os contactos normalmente abertos.
Socket (type B) mede a corrente, a tensão, a potência e o consumo de energia dos aparelhos elétricos ligados. Estes dados, bem como outros parâmetros de funcionamento da ficha, estão disponíveis na secção Estados das apps Ajax. O estado do dispositivo é atualizado aproximadamente a cada segundo se a Socket (type B) alterar o estado do contacto devido a um cenário ou depois de ter sido desligada/ligada utilizando o botão de controlo ou o comando da app. Noutros casos, a frequência de atualização depende das definições Jeweller ou Jeweller/Fibra, com o valor predefinido de 36 segundos.
A carga máxima a longo prazo da ficha é de 1,8 kW (se a proteção de corrente estiver regulada para 15 A). Se estiver ligada uma carga indutiva ou capacitiva, a corrente máxima de comutação desce para 8 A..
Controlo remoto
Cenários de automatização
Os cenários ajudam a automatizar a segurança e a reduzir o número de ações de rotina. Por exemplo, pode definir o horário para ligar as luzes, a televisão e o sistema de áudio. Dessa forma, uma casa não vai parecer vazia e atrair a atenção dos intrusos.
Socket (type B) suporta os seguintes tipos de cenários:
- Por alarme. Por exemplo, os aparelhos de iluminação conectados são ligados quando o DoorProtect ativa o alarme.
- Por alteração do modo de segurança. Por exemplo, o ferro de engomar é desligado quando o sistema está armado.
- Por horário. Por exemplo, o aquecedor é ligado às 19:00 e desligado às 21:00 horas.
- Ao premir o Button. Por exemplo, ligar a luz noturna premindo o Button.
- Por temperatura. Por exemplo, o ar condicionado é ligado quando a temperatura de ambiente excede os 25 °C.
- Por humidade. Por exemplo, o humidificador é ligado quando a humidade na sala desce abaixo dos 40%.
- Por concentração de CO2. Por exemplo, a ventilação de abastecimento é ativada quando a concentração de dióxido de carbono aumenta.
- Ao premir o LightSwitch. Por exemplo, todos os aparelhos elétricos são desligados quando a luz é apagada.
Os cenários por humidade e por concentração de CO2 estão disponíveis quando o LifeQuality é adicionado ao sistema.
Se o dispositivo estiver offline, não executará o cenário, uma vez que não consegue ativar o cenário (por exemplo, durante uma falha de energia ou quando se perde a ligação entre o hub e o dispositivo).
Caso de utilização: A ação automatizada está agendada para as 10h00, portanto deve começar às 10h00. A energia elétrica é cortada às 9h55 e é restaurada dez minutos depois. O cenário de automatização não arranca às 10h00 e não arranca imediatamente após o restabelecimento da energia elétrica. Esta ação programada é falhada.
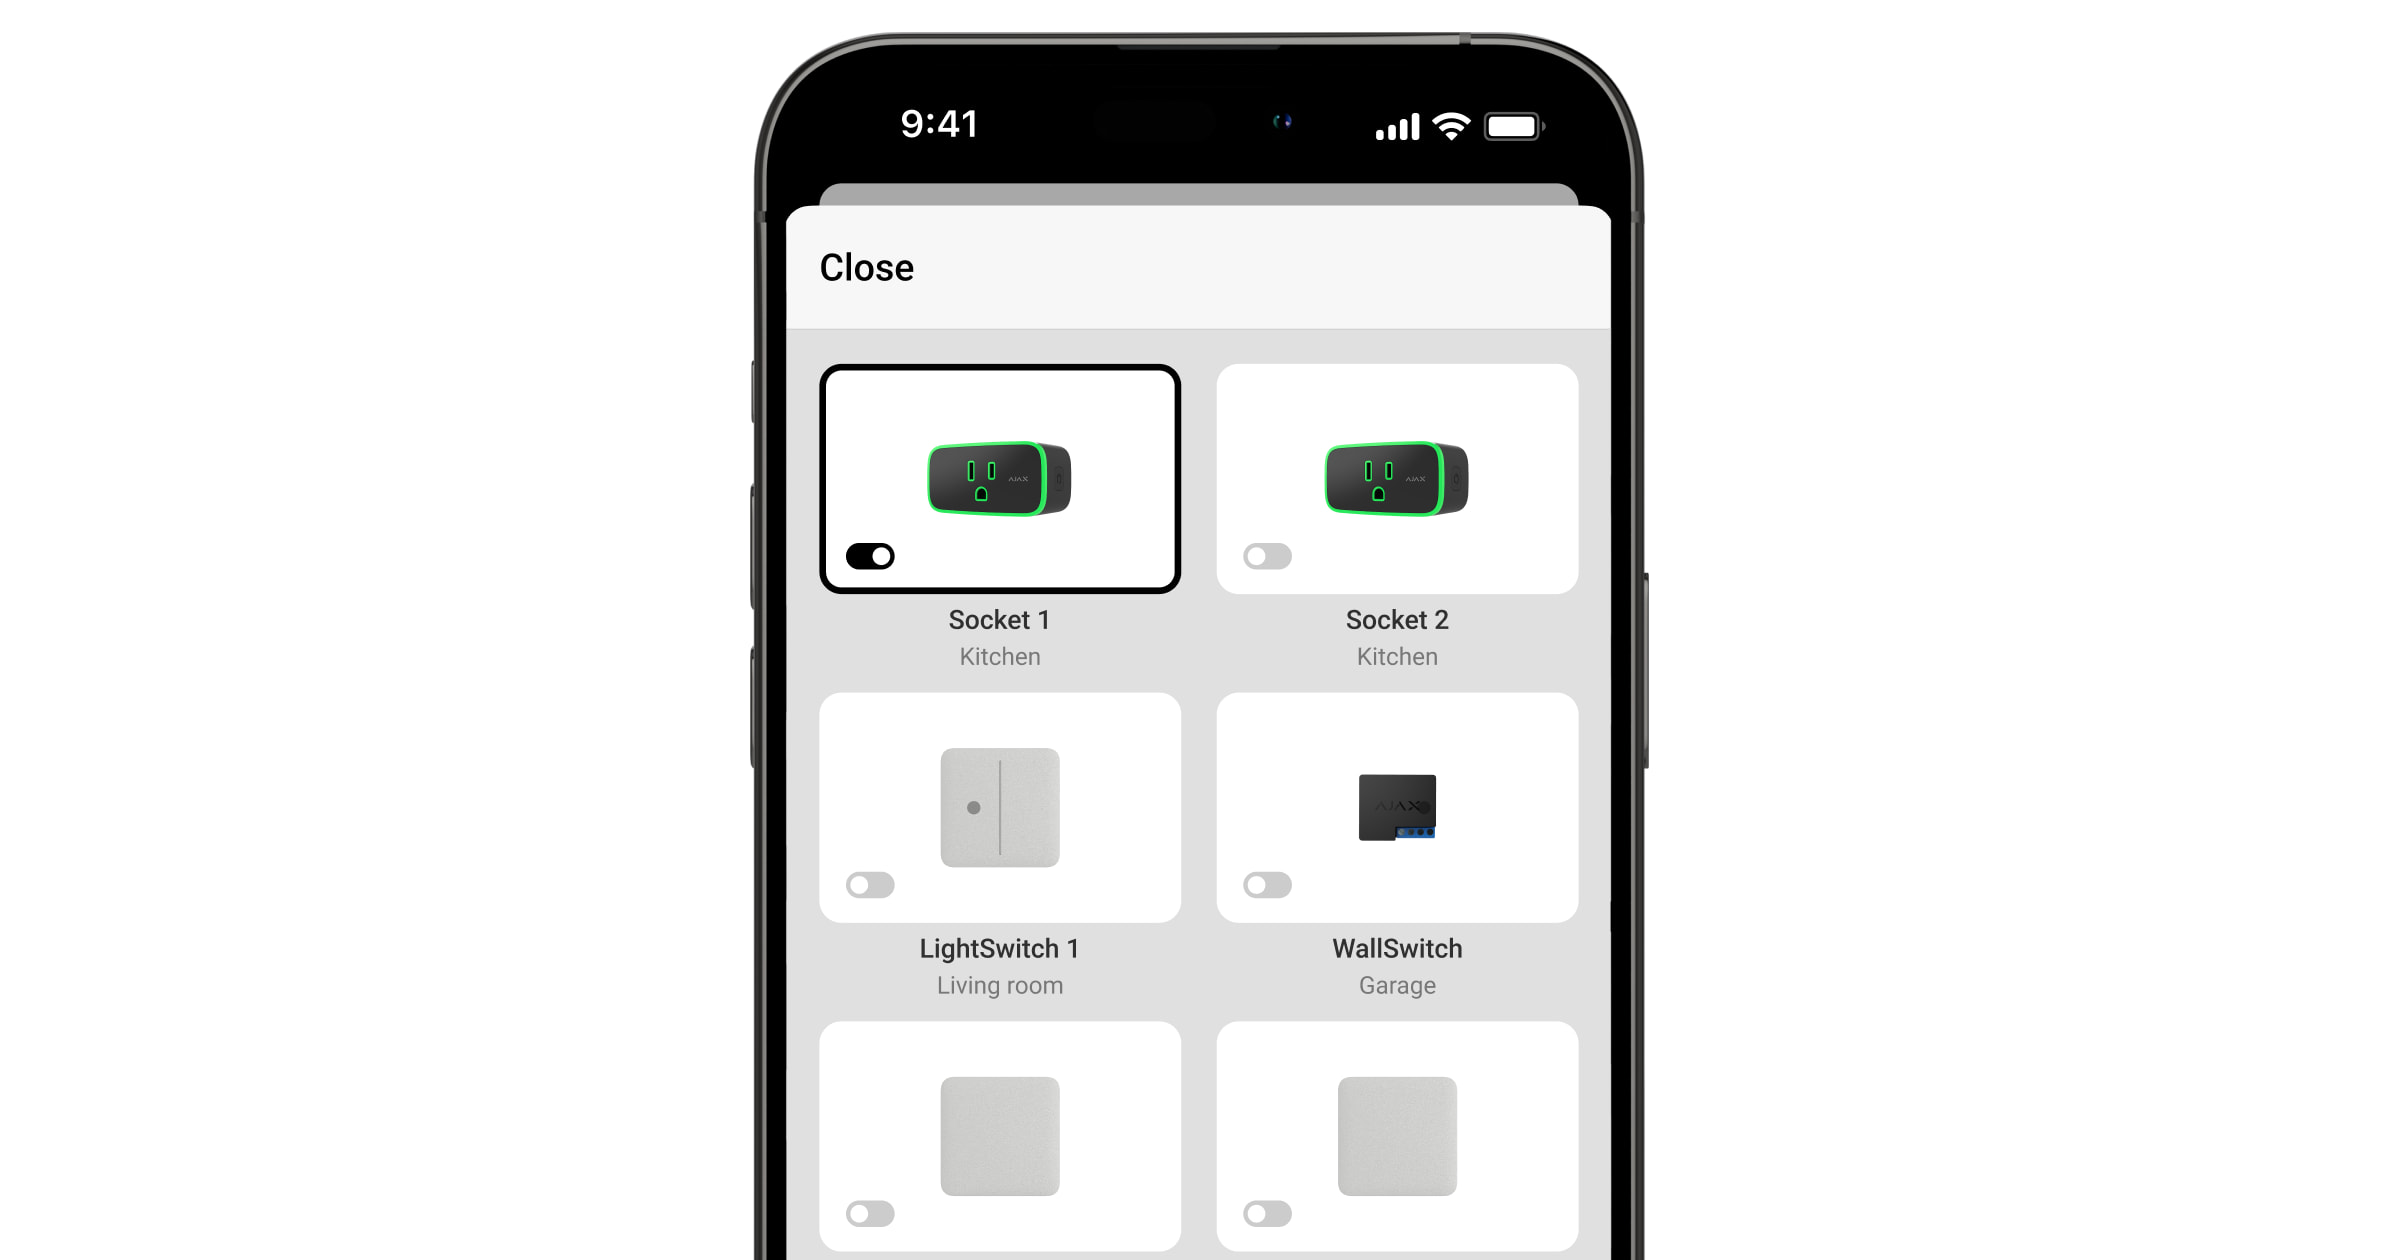
Controlo através da app Ajax
Nas apps Ajax, é possível ligar ou desligar aparelhos elétricos ligados através da Socket (type B). Clique no botão de alternância no campo Socket (type B) no separador Dispositivos ![]() . Depois disso, o estado dos contactos da ficha será invertido e o aparelho ligado será desligado ou ligado. Desta forma, é possível controlar a fonte de alimentação remotamente; por exemplo, ligar previamente um aquecedor ou um humidificador.
. Depois disso, o estado dos contactos da ficha será invertido e o aparelho ligado será desligado ou ligado. Desta forma, é possível controlar a fonte de alimentação remotamente; por exemplo, ligar previamente um aquecedor ou um humidificador.
Se aceder ao separador Controlo ![]() e deslizar para cima, também pode controlar a ficha lá. Todos os dispositivos de controlo adicionados ao hub aparecerão na lista. Utilize o botão de alternância no campo Socket (type B) para ligar ou desligar os aparelhos ligados.
e deslizar para cima, também pode controlar a ficha lá. Todos os dispositivos de controlo adicionados ao hub aparecerão na lista. Utilize o botão de alternância no campo Socket (type B) para ligar ou desligar os aparelhos ligados.
Controlo manual
Existe um botão de controlo na carcaça da Sockets (type B). Controla o fornecimento de energia aos aparelhos ligados sem a app, cenários ou Button. Também elimina a necessidade de desligar os aparelhos da tomada. O algoritmo de funcionamento depende do modo da ficha inteligente: impulso ou biestável.
Quando a Socket (type B) funciona em modo biestável, ao premir o botão de controlo inverte o estado dos contactos da ficha. Por exemplo, se a ficha fornecer energia (os contactos estão fechados), não fornecerá energia depois de premir o botão (os contactos estão abertos).
Quando a Sockets (type B) funciona em modo de impulso, a pressão do botão de controlo fecha ou abre os contactos (consoante o estado normal da tomada) durante o tempo definido nas configurações. Pressionar novamente o botão de controlo vai interromper o comando, e a ficha fechará ou abrirá os contactos (dependendo do estado normal da ficha) até ao fim do impulso.
Tipos de proteção elétrica da ficha
Socket (type B) tem três tipos de proteção: tensão, corrente e temperatura.
Proteção de tensão: é ativada se a tensão da ficha estiver fora do intervalo de 92-132 V~ durante 100 segundos. Isto protege os aparelhos ligados contra picos de tensão.
Proteção de corrente: é ativada se a corrente de carga exceder os limites definidos na app Ajax. Protege os aparelhos ligados e a ficha inteligente contra sobrecorrente. O limite pode ser ajustado dentro do intervalo de 1 a 15 A, em incrementos de 1 A, em definições da Socket (type B). O valor predefinido é 15 A.
Proteção da temperatura: é ativada quando a temperatura dos elementos do relé atinge 75 °C (167 °F), evitando o sobreaquecimento da ficha inteligente.
Se a proteção contra a tensão ou a temperatura for ativada, a Socket (type B) interrompe o fornecimento de energia e retoma-o automaticamente quando a tensão ou a temperatura voltarem ao normal. A alimentação elétrica não será restabelecida automaticamente quando a proteção de corrente for ativada. Pode ser reposta através do comando na app Ajax ou ao premir o botão de controlo.
Monitorização do consumo de energia
A Socket (type B) monitoriza consistentemente os parâmetros de consumo de energia dos aparelhos conectados, incluindo
- tensão;
- corrente de carga;
- consumo de energia;
- energia elétrica consumida.
Todos os dados são apresentados nos estados do dispositivo. Os dados são atualizados aproximadamente a cada segundo se a ficha alterar o estado do contacto de acordo com um cenário ou após ser desligada/ligada pelo botão de controlo ou por um comando na app. Noutros casos, a frequência de atualização depende das definições Jeweller ou Jeweller/Fibra, com o valor predefinido de 36 segundos. Os valores de consumo de energia são apresentados em incrementos de 1 W.
É possível repor os valores de consumo de energia nas Definições da ficha:
- Na app Ajax, aceda ao separador Dispositivos
 .
. - Selecione Socket (type B) na lista.
- Aceda as Definições clicando no ícone de engrenagem
 .
. - Clique em Repor Medidor de Consumo de Energia.
- Clique em Repor na janela pop-up.
Depois de apagar os dados, a data da última reposição dos valores de consumo de energia será apresentada nos Estados da ficha.
Protocolos de transferência de dados Jeweller e Wings
O Jeweller e o Wings são protocolos de transferência de dados sem fios bidirecionais que possibilitam uma comunicação rápida e fiável entre hubs e dispositivos. A ficha inteligente utiliza o Jeweller para transmitir alarmes e eventos e o Wings para atualizar o firmware.
Atualizações de firmware
Se estiver disponível uma nova versão de firmware para a Socket (type B), aparece um ícone nas apps Ajax no separador Dispositivos ![]() . Pode iniciar a atualização em estados ou através das definições da ficha. Siga as instruções no ecrã para atualizar o firmware com êxito.
. Pode iniciar a atualização em estados ou através das definições da ficha. Siga as instruções no ecrã para atualizar o firmware com êxito.
As informações sobre atualizações de firmware e novas versões estão disponíveis apenas para fichas que utilizam o repetidor do sinal de rádio ReX 2 Jeweller e/ou são adicionadas a esses painéis de controlo:
- Hub BP Jeweller;
- Hub 2 (2G) Jeweller;
- Hub 2 (4G) Jeweller;
- Hub 2 Plus Jeweller;
- Superior Hub Hybrid (2G);
- Superior Hub Hybrid (4G).
Os utilizadores receberão informações sobre a nova versão do firmware se a ficha for adicionada ao hub através de ReX Jeweller. No entanto, a atualização só é possível depois de adicionar a ficha diretamente aos painéis de controlo acima referidos.
As atualizações de firmware não estão disponíveis para a Socket (type B) quando operada através do Hub Plus Jeweller.
Envio de eventos para a estação de monitorização
O sistema Ajax pode transmitir alarmes para a app de monitorização PRO Desktop e para a central recetora de alarmes (CRA) nos formatos SurGard (Contact ID), SIA (DC-09), ADEMCO 685, e outros protocolos.
Socket (type B) pode transmitir os seguintes eventos:
- Perda/restauração da comunicação entre o dispositivo e o hub (ou repetidor do sinal de rádio).
- Desativação/ativação permanente da ficha.
Quando o alarme é recebido, o operador da estação de monitorização da empresa de segurança sabe o que aconteceu e sabe exatamente para onde enviar uma unidade de resposta rápida. A capacidade de endereçamento dos dispositivos Ajax permite enviar eventos para a PRO Desktop ou para a CRA, incluindo o tipo de dispositivo, o seu nome, o grupo de segurança e a sala virtual. A lista de parâmetros transmitidos pode variar consoante o tipo da CRA e o protocolo de comunicação selecionado para a estação de monitorização.
O ID e o número do dispositivo podem ser encontrados nos seus estados na app Ajax.
Adicionar ao sistema
Socket (type B) é incompatível com o Hub (2G) Jeweller e com painéis de controlo de segurança de terceiros.
Para adicionar a Socket (type B) ao hub, a ficha deve estar localizada na mesma instalação segura que o sistema (dentro do alcance da rede de rádio do hub). Para a ficha funcione através do repetidor de sinal de rádio ReX Jeweller ou ReX 2 Jeweller, deve primeiro adicioná-la ao hub e, em seguida, adicioná-la a ReX Jeweller ou ReX 2 Jeweller nas definições do repetidor.
O hub e o dispositivo que operam em diferentes radiofrequências são incompatíveis. A gama de radiofrequências do dispositivo pode variar consoante a região. Recomendamos comprar e utilizar dispositivos Ajax na mesma região. Pode verificar a gama de radiofrequências operacionais com o serviço de apoio técnico.
Antes de adicionar dispositivos
- Instale a app Ajax.
- Inicie sessão na sua conta ou crie uma nova conta.
- Selecione um espaço ou crie um novo.

A funcionalidade de espaço está disponível para apps dessas versões ou superiores:
- Ajax Security System 3.0 para iOS.
- Ajax Security System 3.0 para Android.
- Ajax PRO: Tool for Engineers 2.0 para iOS.
- Ajax PRO: Tool for Engineers 2.0 para Android.
- Ajax PRO Desktop 4.0 para macOS.
- Ajax PRO Desktop 4.0 para Windows.
- Adicione pelo menos uma sala virtual.
- Adicione um hub compatível ao espaço. Certifique-se de que o hub está ligado e tem acesso à Internet através de Ethernet, Wi-Fi e/ou rede móvel.
- Certifique-se de que o espaço está desarmado e de que o hub não está a iniciar uma atualização, verificando os estados na app Ajax.
Apenas um PRO ou um administrador com direitos para configurar o sistema pode adicionar um dispositivo ao hub.
Adicionar ao hub
- Ligue a Socket (type B) à tomada de corrente, se ainda não o tiver feito.
- Abra a app Ajax e selecione o hub onde pretende adicionar o dispositivo.
- Aceda ao separador Dispositivos e clique em Adicionar dispositivo.
- Dê um nome ao dispositivo, digitalize ou introduza manualmente o código QR. O código QR está localizado na parte de trás da carcaça da Socket (type B), bem como na embalagem do dispositivo. O ID do dispositivo está localizado por baixo do código QR.
- Selecione uma sala e um grupo (se Modo de Grupo estiver ativado).
- Prima Adicionar.
Se a ligação falhar, tente novamente dentro de 5 segundos. Se o número máximo de dispositivos já foi adicionado ao hub (dependendo do modelo do hub), será notificado quando tentar adicionar um novo dispositivo.
Uma vez emparelhada com o hub, a ficha aparecerá na lista de dispositivos do hub na app Ajax. A frequência de atualização do estado do dispositivo na lista depende das definições Jeweller ou Jeweller/Fibra, com o valor predefinido de 36 segundos.
Socket (type B) funciona com apenas um hub. Quando adicionado a um novo hub, o dispositivo deixa de enviar eventos para o antigo. Para adicionar a ficha ao novo hub:
- digitalize ou introduza manualmente o código QR;
- aguarde que o temporizador de registo do dispositivo comece a contagem decrescente e prima o botão de controlo durante 3 segundos.
Adicionar a ficha ao novo hub não a remove automaticamente da lista de dispositivos do hub antigo. Isto deve ser feito manualmente através da app Ajax.
Avarias
Quando a avaria da Socket (type B) é detetada, a app Ajax apresenta um contador de avarias no ícone do dispositivo. Todas as avarias de funcionamento são indicadas nos estados da ficha. Os campos com avarias estão indicados com vermelho.
Uma avaria é apresentada se:
- a proteção de corrente foi ativada;
- a proteção da temperatura foi ativada;
- a proteção da tensão foi ativada;
- não há comunicação com o hub ou com o repetidor do sinal de rádio.
Ícones
Os ícones da app apresentam alguns estados da ficha. Para aceder aos mesmos:
- Inicie sessão na app Ajax.
- Selecionar hub.
- Aceda o separador Dispositivos .
| Ícone | Valor |
| A Intensidade de Sinal de Jeweler apresenta a intensidade de sinal entre o hub e a ficha. | |
| Avaria detetada. | |
|
Está disponível uma atualização de firmware. Aceda aos estados da ficha para encontrar a descrição e iniciar a atualização. |
|
| O dispositivo comunica com o hub através de um repetidor de sinal de rádio. | |
| A proteção de corrente foi ativada. | |
| Proteção de tensão foi ativada. | |
| A proteção da temperatura foi ativada. | |
|
O dispositivo está permanentemente desativado. |
|
|
O dispositivo fica desativado até ao primeiro desarme do sistema. |
|
| O dispositivo perdeu a ligação com o hub ou o hub perdeu a ligação com o servidor Ajax Cloud. | |
|
O dispositivo não foi transferido para o novo hub. |
Estados
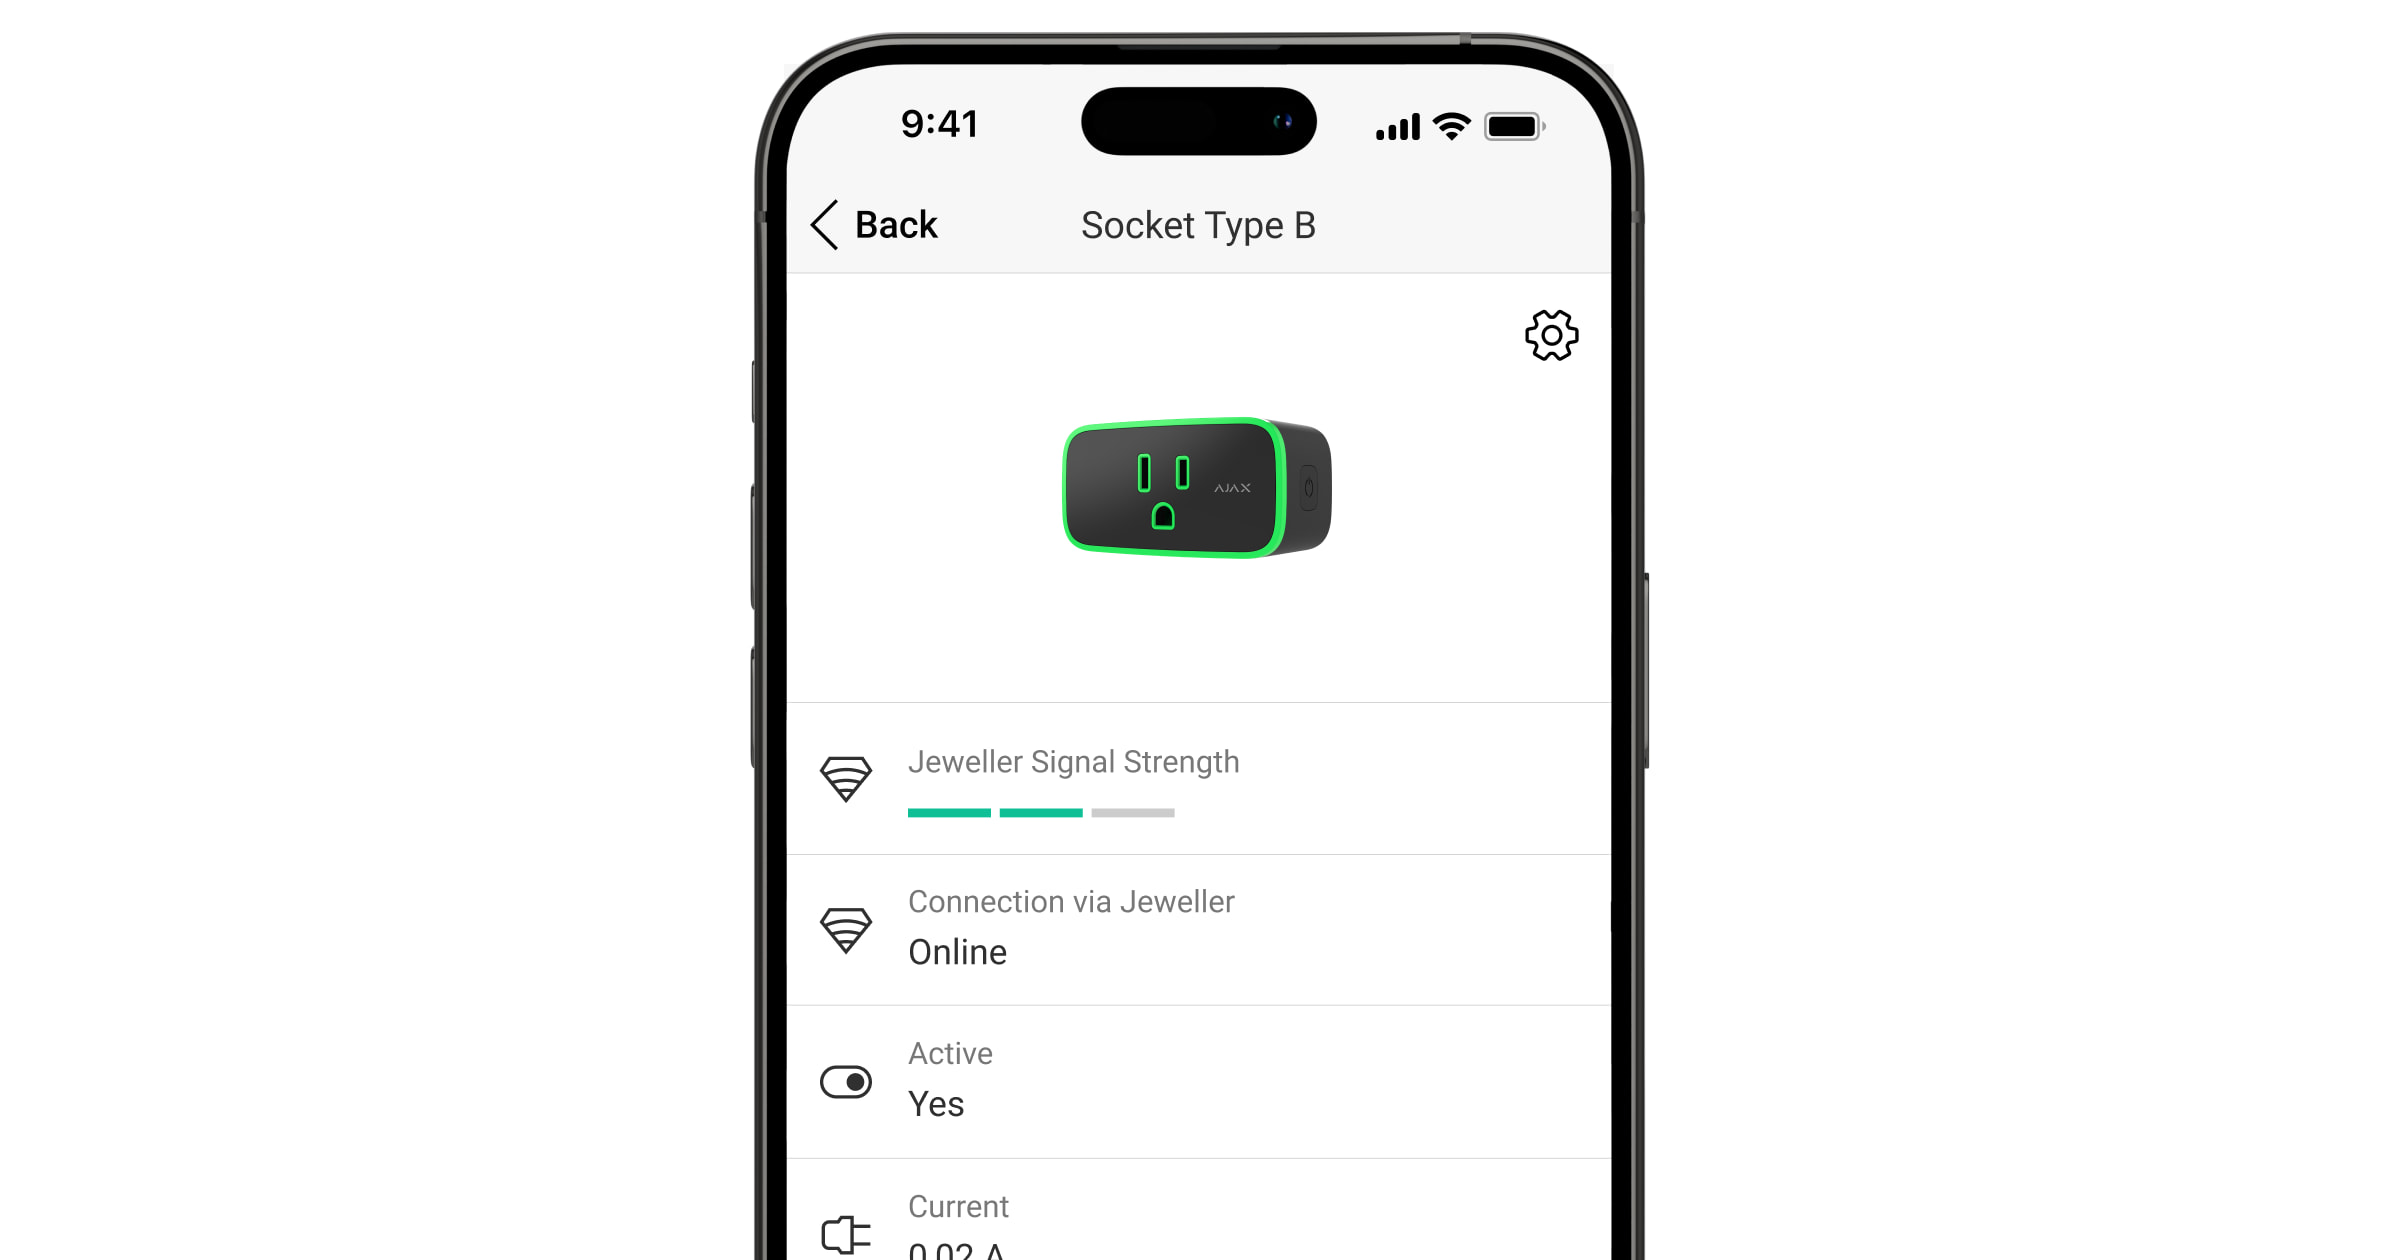
Os estados incluem informações sobre o dispositivo e os seus parâmetros de funcionamento. Pode encontrar os estados da Socket (type B) na app Ajax:
- Aceda ao separador Dispositivos .
- Selecione Socket (type B) na lista.
| Parâmetro | Valor |
| Importação de dados | Apresenta o erro aquando da transferência de dados para o novo hub:
|
| Avaria |
Clicar em O campo aparece apenas se for detetada uma avaria. |
| Nova versão de firmware disponível |
Clicar em O campo aparece se estiver disponível uma nova versão de firmware e se a ficha tiver sido adicionada a qualquer painel de controlo compatível, exceto Hub Plus Jeweller. |
| Intensidade de sinal Jeweller |
Intensidade do sinal do Jeweller entre o dispositivo e o hub (ou o repetidor do sinal de rádio). O valor recomendado é de 2-3 barras. O Jeweller é um protocolo para a transmissão de eventos e alarmes da Socket (type B). |
| Ligação através de Jeweller | Estado da ligação no canal Jeweller entre o dispositivo e o hub (ou o repetidor):
|
| Intensidade do Sinal de Wings |
A intensidade do sinal de Wings entre o dispositivo e o hub (ou o repetidor). O valor recomendado é de 2-3 barras. O Wings é um protocolo para atualizar o firmware e transmitir a lista dos grupos, salas e outras informações adicionais. O campo não aparece se a ficha for adicionada ao Hub Plus Jeweller. |
| Ligação através de Wings | Estado da ligação no canal Wings entre o hub ou o repetidor e o dispositivo:
O campo não aparece se a ficha for adicionada ao Hub Plus Jeweller. |
| ReX | Estado da ligação entre o dispositivo e o repetidor:
O campo aparece se a ficha funcionar através do repetidor do sinal de rádio. |
| Ativo | Estado da ficha:
|
| Corrente |
O valor da corrente comutada pela Socket (type B). A frequência de atualização dos dados é de aproximadamente 1 segundo se a ficha tiver alterado o estado do contacto de acordo com um cenário ou depois de ter sido desligada/ligada pelo botão de controlo ou comando na app. Noutros casos, a frequência de atualização depende das definições Jeweller ou Jeweller/Fibra, com o valor predefinido de 36 segundos. O valor atual é apresentado em incrementos de 10 mA. |
| Tensão |
O valor da tensão comutada pela Socket (type B). A frequência de atualização dos dados é de aproximadamente 1 segundo se a ficha tiver alterado o estado do contacto de acordo com um cenário ou após desligar/ligar através do botão de controlo ou do comando na app. Noutros casos, a frequência de atualização depende das definições Jeweller ou Jeweller/Fibra, com o valor predefinido de 36 segundos. O valor é apresentado em incrementos de 1 V~. |
| Limite de Proteção de Corrente |
O limite de corrente para a proteção de corrente, ajustado nas definições. Quando a tensão ultrapassa os níveis especificados, a tomada desliga-se automaticamente. |
| Proteção de Tensão | Estado de proteção da tensão:
A ficha vai continuar a funcionar automaticamente quando a tensão voltar ao normal. |
| Alimentação |
O consumo de energia de um aparelho ligado à ficha. A frequência de atualização dos dados é de aproximadamente 1 segundo se a ficha tiver alterado o estado do contacto de acordo com um cenário ou após desligar/ligar através do botão de controlo ou do comando na app. Noutros casos, a frequência de atualização depende das definições Jeweller ou Jeweller/Fibra, com o valor predefinido de 36 segundos. O valor é apresentado em incrementos de 1 W. |
| Energia Elétrica Consumida |
A energia consumida por um dispositivo ligado à ficha. A frequência de atualização dos dados é de aproximadamente 1 segundo se a ficha tiver alterado o estado do contacto de acordo com um cenário ou após desligar/ligar através do botão de controlo ou do comando na app. Noutros casos, a frequência de atualização depende das definições Jeweller ou Jeweller/Fibra, com o valor predefinido de 36 segundos. O valor é apresentado em kWh em incrementos de 1 Wh. Pode repor o contador na ficha Definições. Em caso de falha de energia, a app apresenta o último valor guardado. |
| Última reposição do consumo |
A data da última reposição do medidor de consumo de energia. Aparece se os dados do contador tiverem sido repostos a zero. |
| Desativação Permanente | Apresenta o estado da definição de desativação permanente do dispositivo:
|
| Desativação Única | Apresenta o estado da definição de desativação única do dispositivo:
|
| Firmware | Versão do firmware do dispositivo. |
| ID do dispositivo | ID da ficha. Também disponível no código QR na carcaça do dispositivo e na sua caixa de embalagem. |
| Número do dispositivo | Número do bucle do aparelho (zona). |
Definições
Para alterar as definições de Socket (type B), na app Ajax:
- Aceda ao separador Dispositivos .
- Selecione Socket (type B) na lista.
- Aceda as Definições clicando no ícone de engrenagem .
- Defina as definições necessárias.
- Clique em Voltar para guardar as novas definições.
| Definições | Valor |
| Nome |
Nome da ficha. Apresentado na lista de dispositivos do hub, texto SMS e notificações no historial de eventos. Para alterar o nome do dispositivo, clique no campo de texto. O nome pode conter até 12 caracteres cirílicos ou até 24 caracteres latinos. |
| Sala |
Selecionar a sala virtual para a qual Socket (type B) é atribuída. O nome da sala aparece no texto do SMS e nas notificações no historial de eventos. |
| Notificações | Selecionar as notificações da ficha na app:
|
| Limite de Proteção de Corrente |
Selecionar a corrente máxima comutada pela Socket (type B). O limite de corrente pode ser definido de 1 a 15 A, em incrementos de 1 A. O valor predefinido é 15 A. Se o valor definido for ultrapassado, a proteção de corrente é ativada e a ficha deixa de fornecer energia ao aparelho elétrico ligado a ela. É possível restabelecer a alimentação elétrica manualmente na app Ajax ou ao premir o botão de controlo da ficha. |
| Proteção de Tensão | Quando ativado, a alimentação do aparelho ligado à ficha será cortada se a tensão exceder 92-132 V~. |
| Indicação | Definições da indicação LED da ficha:
|
| Brilho do LED |
Regulação do brilho da indicação LED da ficha inteligente: de 0 a 100 (0 — luminosidade mínima, 100 — luminosidade máxima). O nível de brilho é de 100% por defeito. Disponível se a opção Sempre ou Quando ativada estiver selecionada nas definições de Indicação. |
| Modo | Seleção do modo de funcionamento da ficha:
|
| Duração do Impulso, seg. |
Seleção da duração do impulso: 1 a 255 segundos. O valor predefinido é de 5 segundos. A definição está disponível quando a Socket (type B) funciona no modo de impulso. |
| Estado do Contacto | Seleção do estado normal dos contactos da ficha:
|
| Repor o Medidor de Consumo de Energia | Menu para repor os dados de consumo de energia. |
| Cenários |
Abre o menu para criar e configurar os cenários de automatização. Utilize cenários para automatizar a segurança. Por exemplo, para ligar a iluminação da instalação quando um detetor de abertura é acionado. |
| Atualizações de Firmware |
Passa o dispositivo para o modo de atualização do firmware se uma nova versão estiver disponível. O campo não aparece se a ficha for adicionada ao Hub Plus Jeweller. |
| Teste de Intensidade de Sinal do Jeweller |
Passa o dispositivo para o modo de teste de intensidade do sinal do Jeweller. |
| Teste de Intensidade de Sinal do Wings |
Passa o dispositivo para o modo de teste de intensidade do sinal do Wings. |
| Guia de Utilizador | Abre o manual do utilizador da Socket (type B) na app Ajax. |
| Desativação Permanente |
Permite ao utilizador desativar o dispositivo sem o retirar do sistema. Estão disponíveis duas opções:
Depois da desativação, a Socket (type B) mantém o estado que tinha no momento da desconexão: ativo ou inativo. |
| Desativação Única |
Permite ao utilizador desativar os eventos do dispositivo até ao primeiro desarme. Estão disponíveis duas opções:
Depois da desativação, a Socket (type B) mantém o estado que tinha no momento da desconexão: ativo ou inativo. |
| Eliminar Dispositivo | Desemparelha o dispositivo, desliga-o do hub e elimina as suas definições. |
Indicação
A Socket (type B) informa sobre o seu estado e o consumo de energia dos aparelhos ligados através de uma indicação LED. O valor exato de consumo de energia está disponível nos Estados da ficha na app Ajax.
| Nível de carga | Indicação |
| Sem fonte de alimentação | Sem iluminação |
| Socket (type B) está desligada | Ilumina-se a azul |
| Socket (type B) está ligada, carga de 0 a 500 W está conectada | Ilumina-se a verde |
| ~ 600 W | Ilumina-se a amarelo |
| ~ 800 W | Ilumina-se a laranja |
| ~ 1000 W | Ilumina-se a vermelho |
| ~ 1200 W | Ilumina-se a vermelho escuro |
| ~ 1800 W | Ilumina-se a roxo |
| Ativa um ou mais tipos de proteção (por exemplo, corrente e/ou tensão) | Ilumina-se lentamente a vermelho e apaga-se |
Teste de funcionalidade
O sistema Ajax oferece vários tipos de testes para ajudar a selecionar o local de instalação correto para os dispositivos. Estes testes não começam imediatamente; no entanto, o tempo de espera não excede a duração de um intervalo de consulta “hub — dispositivo”. Pode verificar e configurar o intervalo de consulta nas definições do hub (Hub → Definições ![]() → Jeweller ou Jeweller/Fibra).
→ Jeweller ou Jeweller/Fibra).
Para executar um teste, na app Ajax:
- Selecione o hub pretendido.
- Aceda ao separador Dispositivos .
- Selecione Socket (type B) na lista.
- Aceda a Definições .
- Selecione um teste:
- Executar o teste.
Colocação do dispositivo
O dispositivo foi concebido apenas para utilização interior.
Ao escolher um local para o dispositivo, considere os parâmetros que afetam o seu funcionamento:
- Intensidade do sinal do Jeweller e do Wings;
- distância entre a ficha e o hub ou repetidor;
- a presença de barreiras que possam impedir a transmissão de sinais de rádio entre dispositivos, tais como paredes, tetos entre pisos ou objetos de grandes dimensões localizados nas instalações.
Considere as recomendações de colocação ao conceber o projeto de sistema de segurança para o seu objeto. O sistema de segurança deve ser concebido e instalado por especialistas. Uma lista de parceiros recomendados está disponível aqui.
Intensidade do sinal
A intensidade do sinal do Jeweller e do Wings é determinada pelo número de pacotes de dados não entregues ou corrompidos durante um determinado período de tempo. O ícone ![]() no separador Dispositivos
no separador Dispositivos ![]() indica a intensidade do sinal:
indica a intensidade do sinal:
- três barras — excelente intensidade de sinal;
- duas barras — boa intensidade de sinal;
- uma barra — fraca intensidade de sinal, não é garantido um funcionamento estável;
- ícone riscado — sem sinal.
Verifique a intensidade do sinal do Jeweller e do Wings antes da instalação final. Com uma intensidade de sinal de uma ou zero barras, não garantimos o funcionamento estável do aparelho. Considere a possibilidade de mudar o dispositivo de lugar, uma vez que o ajuste da sua posição, mesmo que seja de 20 cm, pode melhorar significativamente a intensidade do sinal. Se o sinal continuar a ser fraco ou instável após a relocalização, considere a utilização do repetidor do sinal de rádio ReX Jeweller ou ReX 2 Jeweller.
Não instalar a Socket (type B)
- No exterior. Isto pode levar à falha da ficha.
- Perto de quaisquer objetos metálicos ou espelhos, que podem causar atenuação do sinal e blindagem.
- Dentro de locais com temperatura e humidade fora dos limites permitidos, uma vez que tal pode danificar o aparelho.
- Mais perto do que 1 metro do hub ou do repetidor do sinal de rádio, para evitar uma perda de comunicação com a ficha.
- Em áreas com níveis de sinal baixos, uma vez que tal pode resultar na perda de ligação com o hub.
Instalação
Antes de instalar a Socket (type B), certifique-se de que escolheu a localização ideal em conformidade com os requisitos deste manual. Ao instalar e utilizar o aparelho, siga as regras gerais de segurança elétrica para a utilização de aparelhos elétricos, bem como os requisitos dos regulamentos de segurança elétrica.
Para instalar Socket (type B):
- Selecione a tomada onde pretende instalar a Socket (type B).
- Encaixe a Socket (type B) na tomada.
- Adicione a ficha ao hub utilizando a app Ajax, caso ainda não o tenha feito.
A Socket (type B) será ativada no dentro de 3 segundos após ser adicionada ao hub. A indicação do dispositivo será iluminada, indicando que o dispositivo está ativado.
Manutenção
Verifique o funcionamento do aparelho regularmente. Limpe a carcaça do dispositivo do pó, teias de aranha e outros contaminantes à medida que vão surgindo. Utilize um pano macio e seco adequado para limpar equipamento eletrónico. Ao limpar o dispositivo, evite o uso de substâncias que contenham álcool, acetona, gasolina e outros solventes ativos.
Especificações técnicas
Conjunto completo
- Socket (type B) Jeweller
- Guia rápido
Garantia
A garantia para os produtos “Ajax Systems Manufacturing” da Limited Liability Company é válida por 2 anos após a data de compra.
Se tiver algum problema com a funcionalidade do dispositivo, recomendamos que contacte primeiro o Apoio Técnico Ajax. Em maioria dos casos, os problemas técnicos podem ser resolvidos remotamente.
Contactar o Apoio Técnico:
