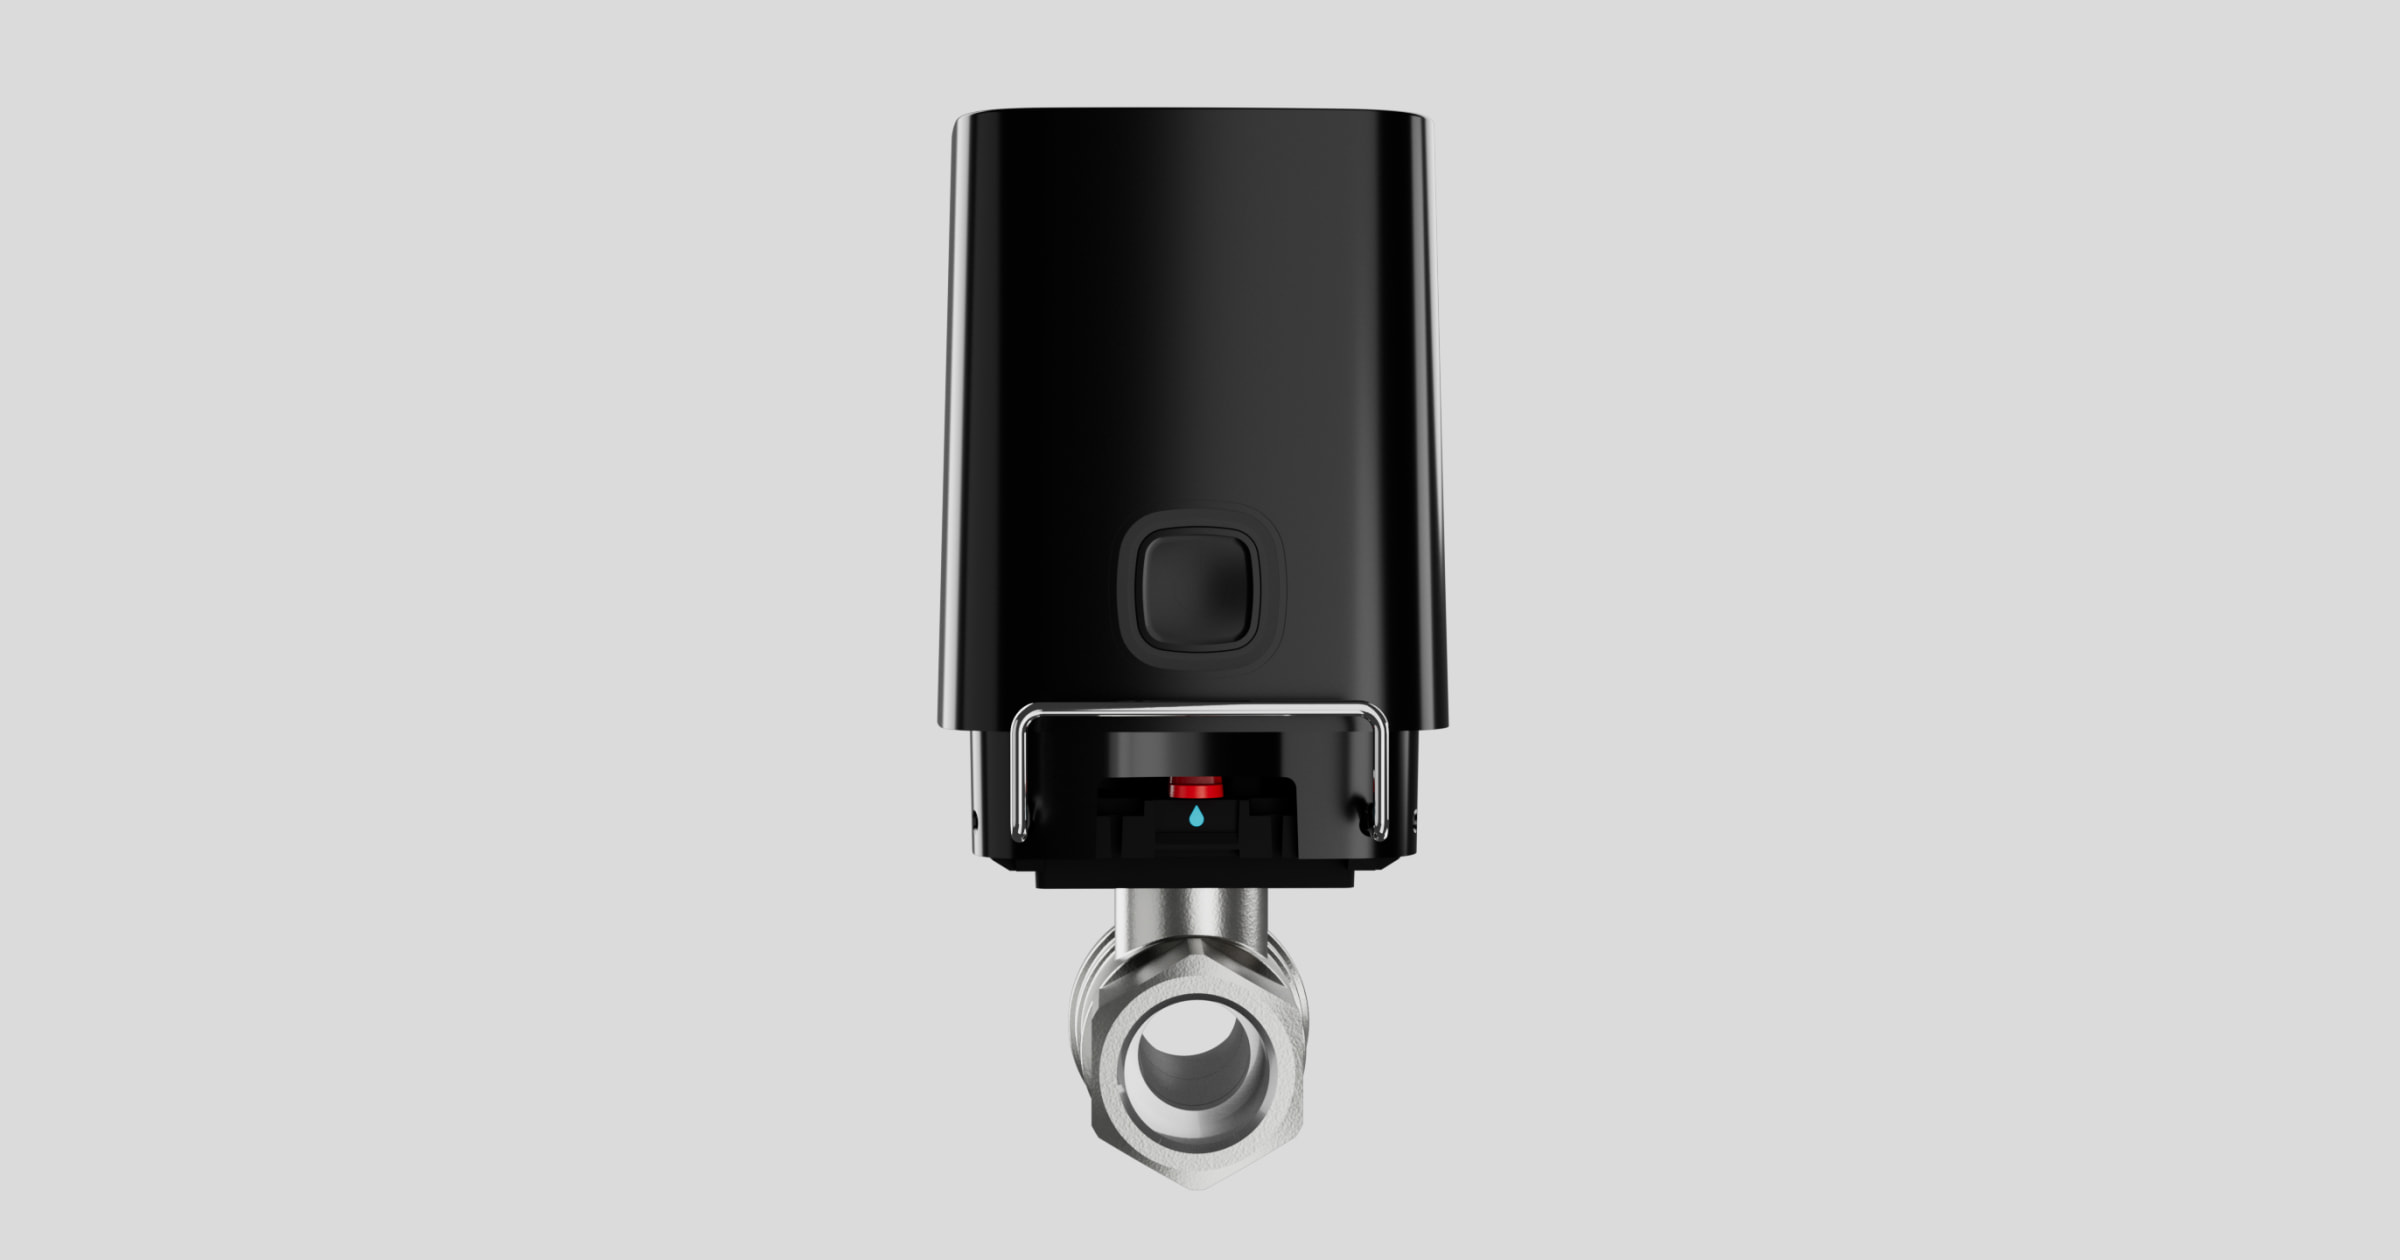
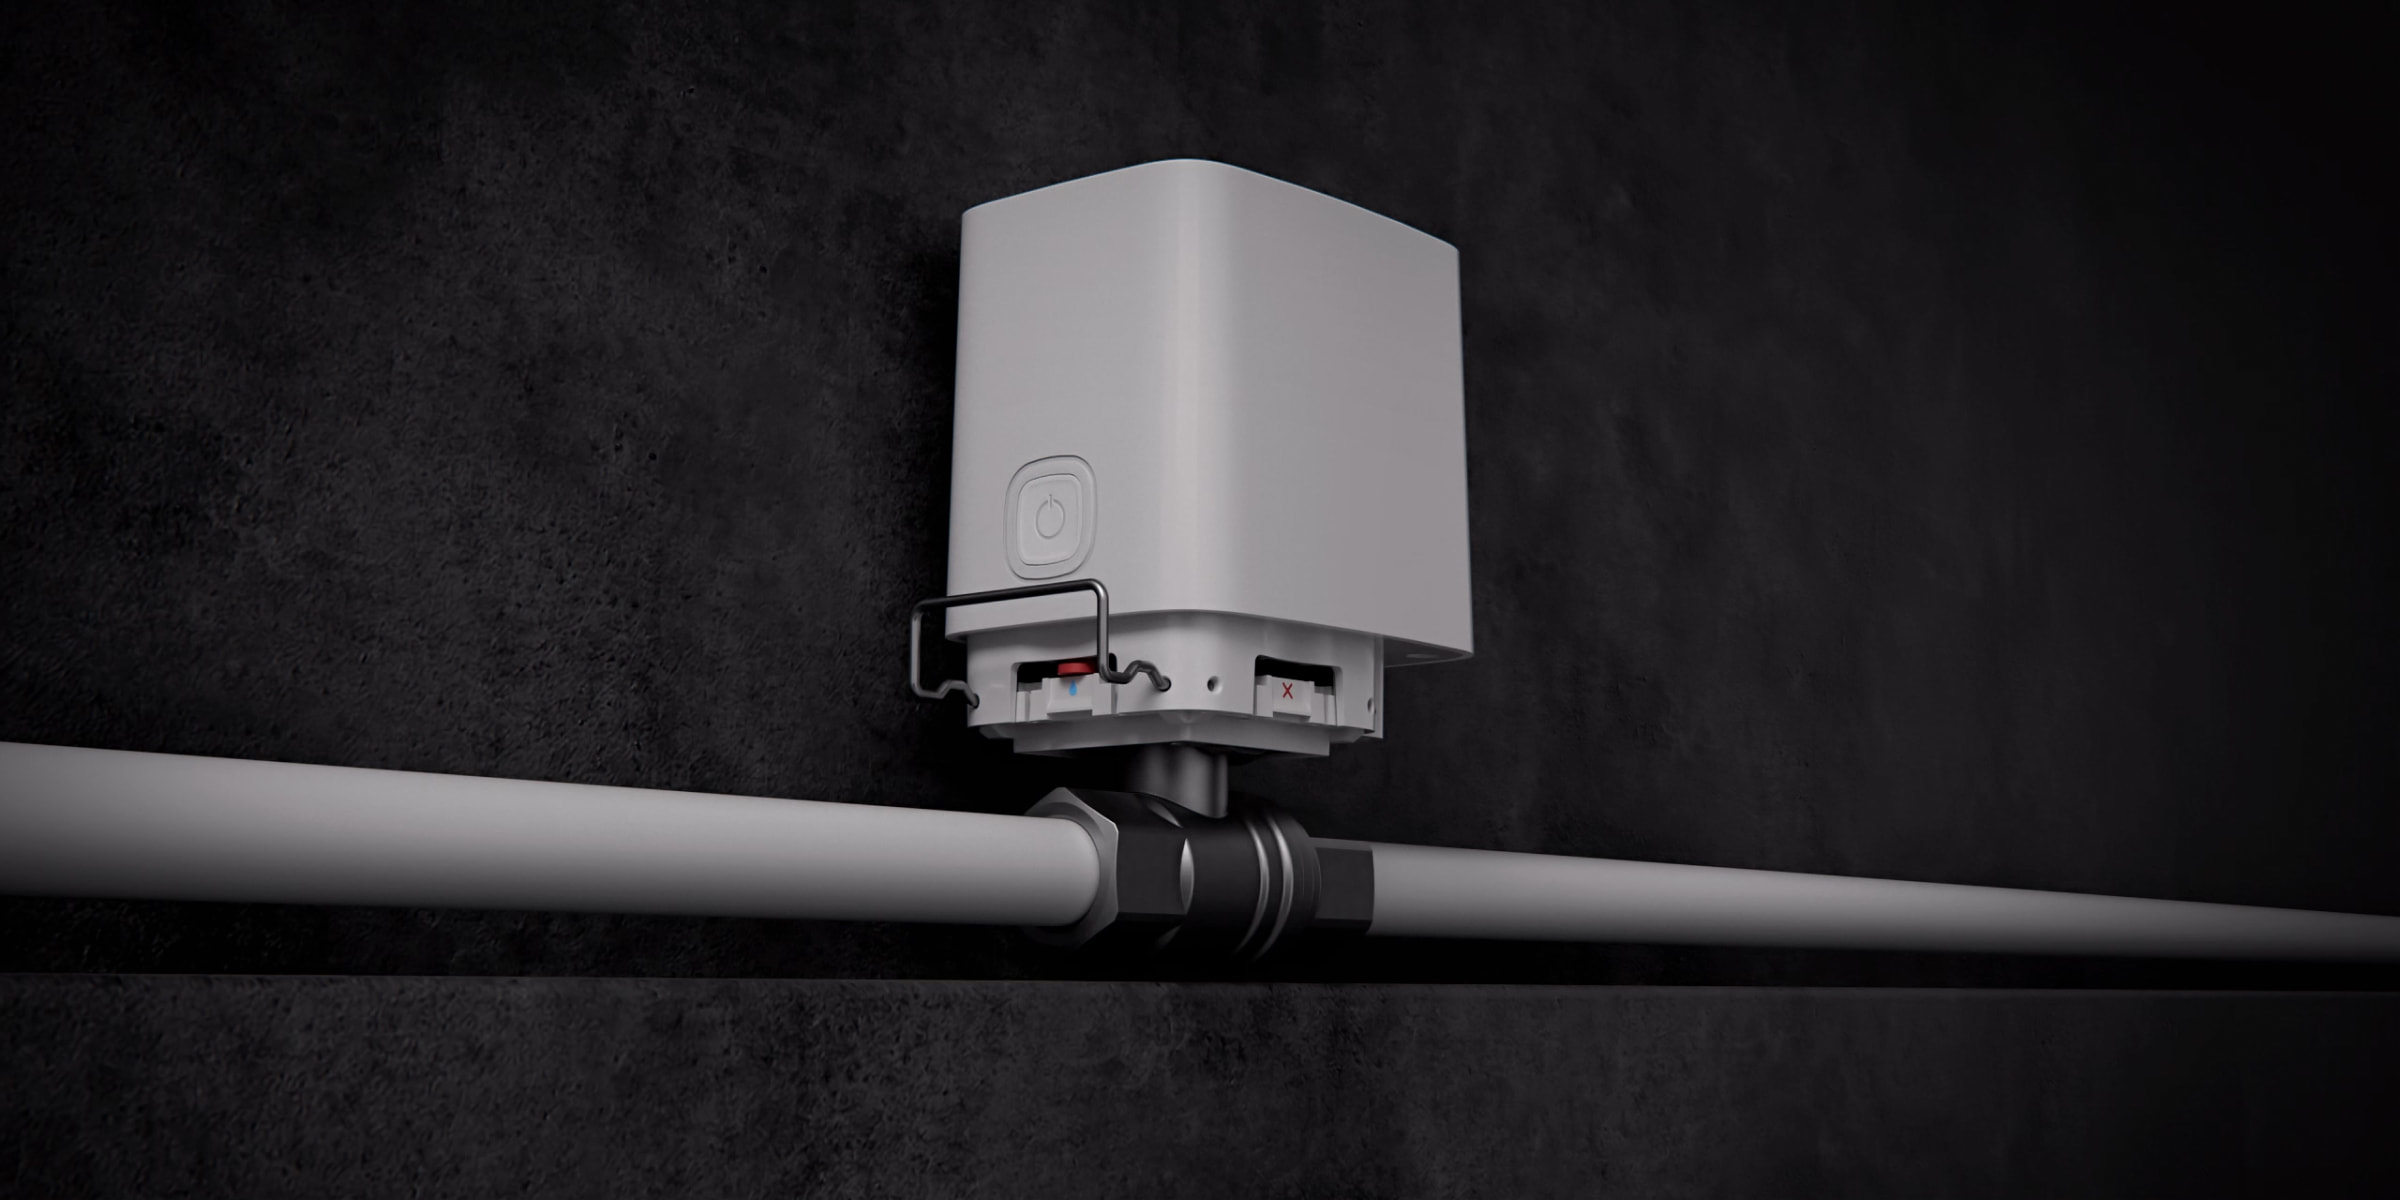
Ajax WaterStop Jeweller akıllı bir su kapatma vanasıdır. Otomatik su kaçağı önleme sisteminin bir parçası olarak çalışır. Ajax uygulamalarında, muhafaza üzerindeki bir düğme, kapatma vanası üzerindeki bir kol ve otomasyon senaryoları aracılığıyla kontrol eder.
Çalışması için bir Ajax hub gereklidir. Uyumlu hub’ların ve kapsama alanı genişleticilerin listesine buradan ulaşabilirsiniz.
Ajax WaterStop, şifrelenmiş bir Jeweller radyo protokolü kullanarak hub ile iletişim kurar. İletişim menzili arada engel olmadan 1.100 metreye kadardır.
Hazır kurulu pillerle üç yıla kadar çalışır. Ayrıca 7.5–14 V⎓ ve en az 1.8 A çalışma akımına sahip üçüncü taraf bir güç kaynağı ünitesi ile de çalıştırılabilir.
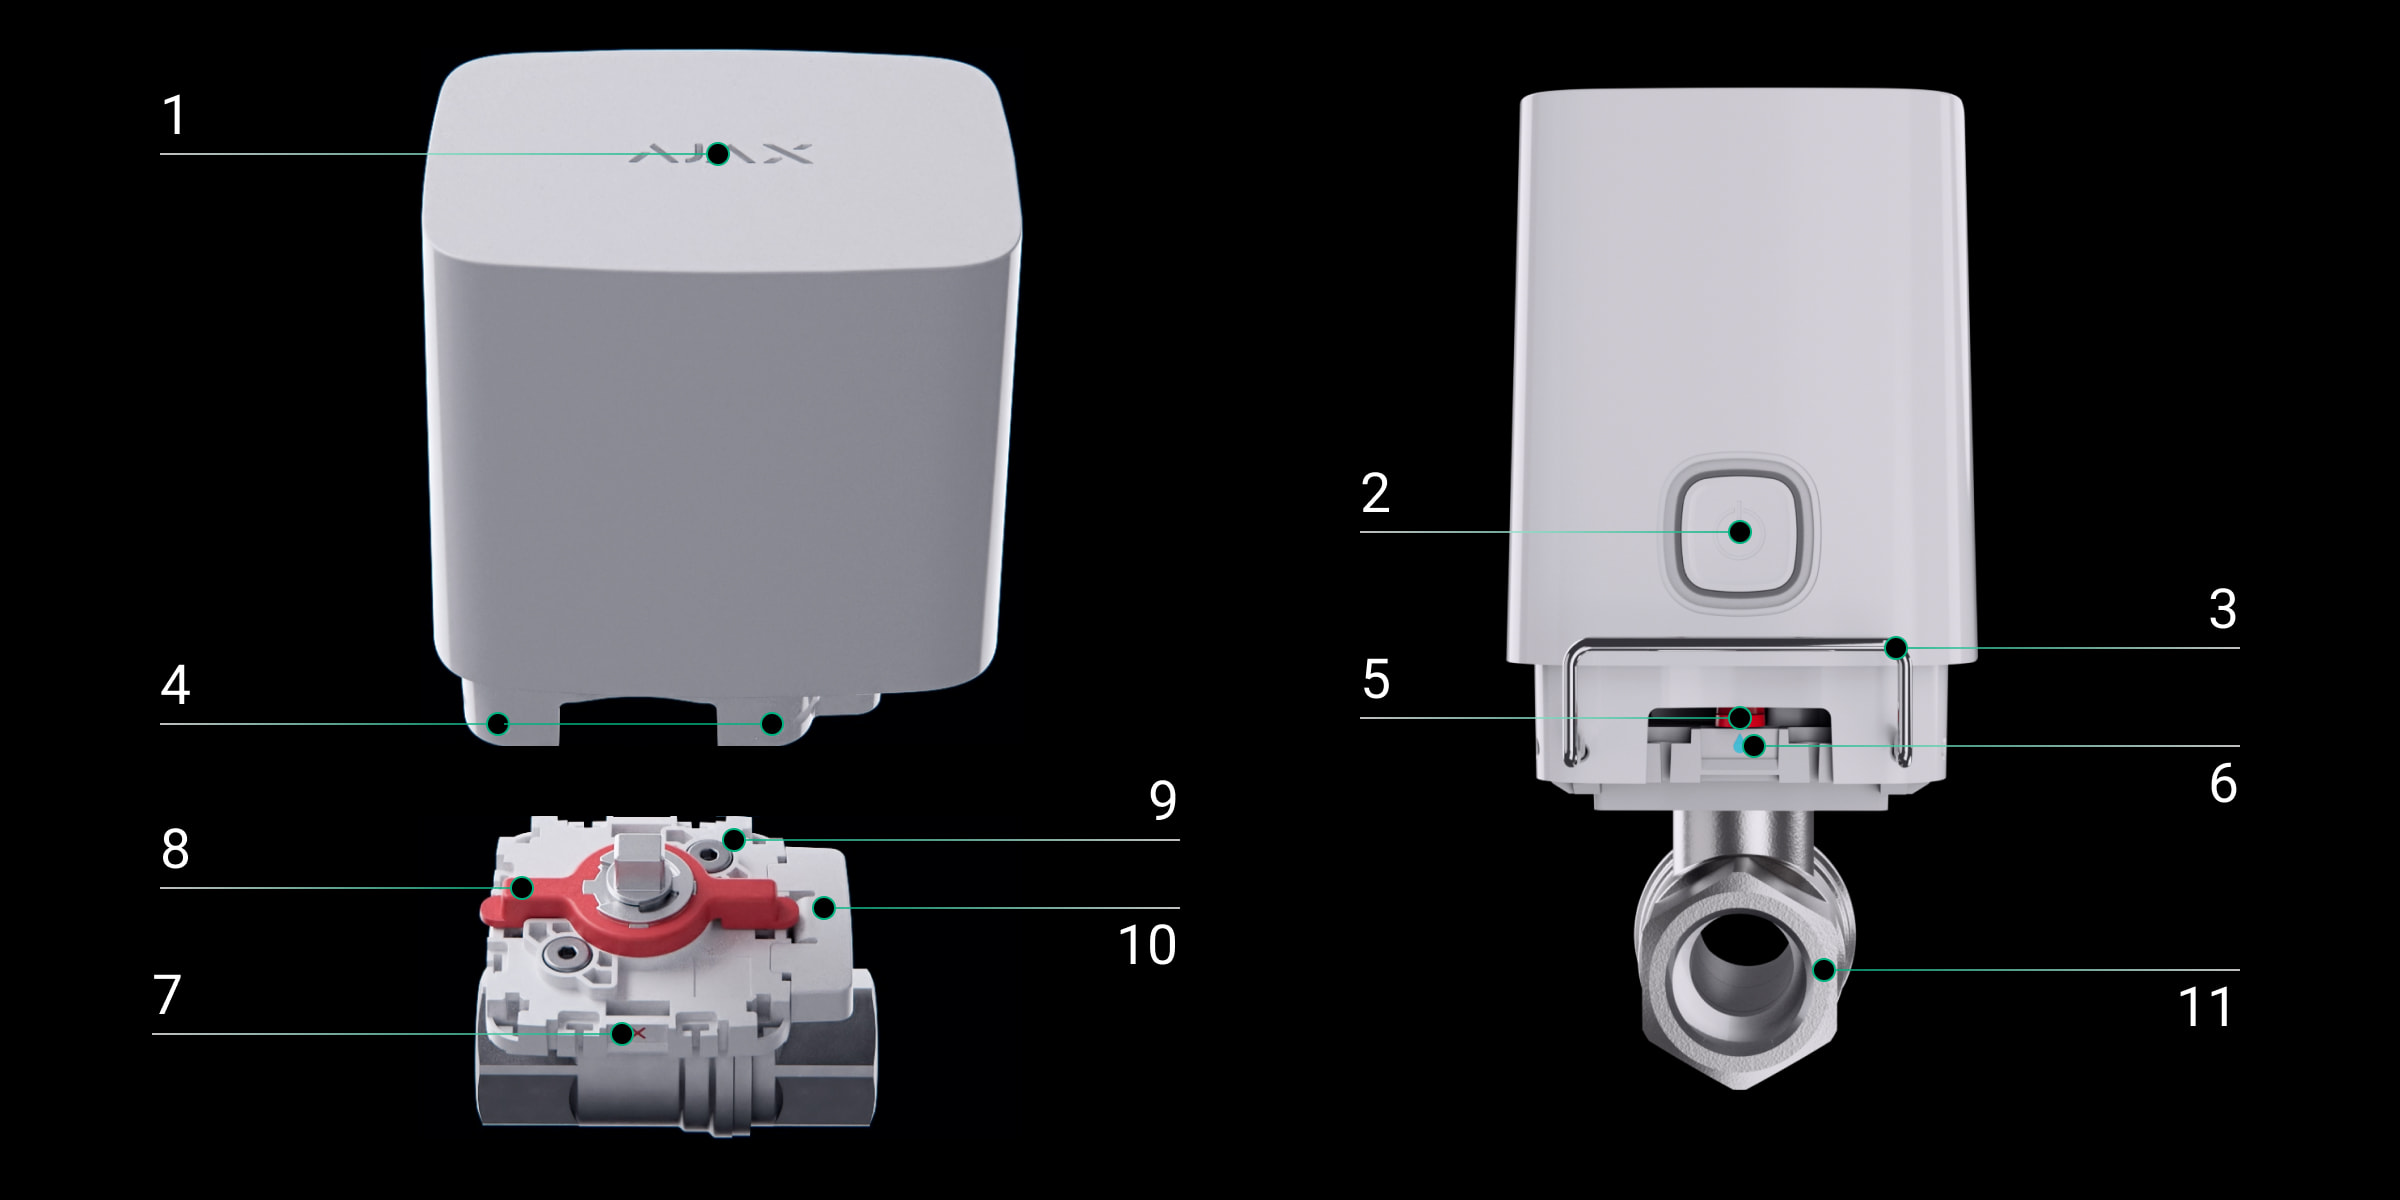
İşlevsel unsurlar
- LED göstergesi. Ajax WaterStop’un durumunu gösterir.
- Kontrol düğmesi. Düğmeye üç saniye basıldığında cihazı etkinleştirir ve devre dışı bırakır. Kısa süreli (bir saniye) basıldığında su kaynağını kontrol eder.
- Montaj kilidi. İki seçenek vardır: Standart (hazır kurulu) ve anti-sabotaj.
- Montaj kilidinin kurulması için delikler. Kilit, Ajax WaterStop’un dört tarafından herhangi birine kurulabilir.
- Kapatma vanası durumunun mekanik göstergesi: Açık veya kapalı.
- Konum işareti Açık. Mekanik gösterge bu konuma karşılık geldiğinde su açıktır.
- Konum işareti Kapalı. Mekanik gösterge bu konuma karşılık geldiğinde su kapalıdır.
- Montaj platformunun üzerindeki kol. Kapatma vanasının manuel kontrolü için tasarlanmıştır.
- Montaj platformu. Kapatma vanası ile elektrikli tahrik arasına monte edilir.
- Montaj platformunun çıkarılabilir parçası. Montaj platformunu çıkarmadan elektrikli vananın konumunun 180° değiştirilmesini sağlar.
- RuB vanası. Ajax WaterStop üç boyuttan birinde BSPP dişli vana ile tedarik edilir: ½” (DN 15, 15 mm), ¾” (DN 20, 20 mm) veya 1″ (DN 25, 25 mm).
- Tamper butonu. Elektrikli aktüatör montaj platformundan çıkarıldığında tepki verir.
- QR kodu ve cihazın kimlik/seri numarası. Ajax WaterStop’u Ajax sistemine bağlamak için kullanılır.
- Su kapatma mekanizmasının döner parçası (elektrikli aktüatör kaplini).
- Üçüncü taraf 7.5–14 V⎓ güç kaynağı bağlantısı için fiş.
Çalışma prensibi
Ajax WaterStop Jeweller, uzaktan kumandalı akıllı bir su kapatma vanasıdır. Ajax sisteminin otomatik su kaçağı algılama sisteminin bir parçası olarak çalışır.
Ajax WaterStop, internetin olduğu dünyanın her yerinden kontrol edilebilir; Ajax uygulamaları, herhangi bir zamanda vananın durumunu kontrol edilmesini ve konumunun değiştirilmesini sağlar.
Ajax WaterStop aşağıdaki bloklardan oluşur:
- Elektrikli aktüatör kapatma vanasını kontrol eder.
- Kapatma vanası bir RuB vanasıdır. Ajax WaterStop, üç boyuttan birinde BSP paralel dişli vana ile birlikte tedarik edilir: ½” (DN 15, 15 mm), ¾” (DN 20, 20 mm) veya 1″ (DN 25, 25 mm).
- Montaj platformu, kapatma vanası ile elektrikli aktüatör arasına kurulur.
- Montaj kilidi, elektrikli aktüatörü kapatma vanasına sabitler. İki seçenek vardır: Standart (hazır kurulu) ve anti-sabotaj (halka açık yerlerde kurulum için).
Uygulama üzerinden kontrol
Ajax WaterStop, Ajax uygulamaları aracılığıyla tesisteki su kaynağını kontrol edebilir. Bildirimler cihazın adını, sanal bir odayı, etkinleştirme zamanını ve su kaynağını açan veya kapatan kullanıcıyı gösterir.
Ajax uygulamalarının Aygıtlar menüsündeki Ajax WaterStop alanındaki geçişe tıklandığında, vana kontaklarının durumu tersine değişir ve su kaynağı durur veya geri yüklenir. Böylece bir kullanıcı, örneğin bir kır evindeki suyu uzaktan kapatabilir.
Kullanıcılar ayrıca Kontrol menüsünden su kaynağını kontrol edebilirler. Bunu yapmak için kullanıcının Kontrol
menüsünü yukarı kaydırması gerekir. Kaydırma işlemi, hub’a bağlı otomasyon cihazlarının bir listesini açar. Ajax WaterStop alanındaki anahtara basıldığında vana durumu tersine döner ve su kaynağı durur veya geri yüklenir.
Manuel kontrol
Kullanıcılar nesneye giden su kaynağını Ajax uygulamaları aracılığıyla ve manuel olarak kontrol edebilir. Ajax WaterStop’u manuel olarak kontrol etmenin iki yolu vardır: Elektrikli aktüatör muhafazası üzerindeki bir düğme ve montaj platformu üzerindeki bir kol.
- Elektrikli aktüatör muhafazası üzerindeki düğme ile. Basıldığında, kapatma vanası açılır/kapanır. Bu su kaynağı kontrol yöntemi, elektrikli aktüatör zaten kurulu olduğunda çalışır. Kapatma vanasının durumu Ajax uygulamasında ve mekanik göstergenin konumuna bakılarak bulunabilir.
Muhafaza üzerindeki bir düğme ile su kaynağını kontrol etme özelliği cihaz ayarlarından devre dışı bırakılabilir.
- Montaj platformu üzerindeki kol ile. Bir kurulumcu veya tesisatçı kolu çevirebilir ve alet kullanmadan suyu açıp kapatabilir. Bu su kaynağını kontrol etme yöntemi yalnızca elektrikli aktüatör çıkarıldığında çalışır.
Bu kontrol yöntemi, bir kapatma vanasının kurulum sırasında, bir elektrikli vana kurarken veya acil durumlarda su kaynağını manuel olarak kapatmak için tasarlanmıştır. Kol kapatma vanasının yanında ise su vanası açıktır. Kol vananın üzerindeyse su kapatılır.
Otomasyon senaryoları
Güvenlik sistemi senaryoları güvenliği otomatikleştirmeye, rutin eylemlerin sayısını azaltmaya ve kullanıcı deneyimini iyileştirmeye yardımcı olur. Ajax WaterStop aşağıdaki senaryo türlerini destekler:
- Alarm reaksiyonları.
- Güvenlik modu değişikliği yanıtları.
- Programlı eylemler.
- Button’a basarak.
- Sıcaklık koruması.
- LightSwitch’e basarak.
- Neme göre.
- CO2 konsantrasyonuna göre.
Nem ve CO2 yoğunluğuna göre senaryolar, LifeQuality sisteme eklendiğinde kullanılabilir.
Örneğin senaryolar kullanılarak, su kaynağı LeaksProtect sızıntı dedektörü alarmları tarafından, bir programa göre veya güvenlik sistemi devreye girdiğinde kapatılabilir.
Aralık dışı sıcaklık bildirimi
Aşırı ısınmayı önlemek için Ajax WaterStop, +60°C’ye kadar ısındığında sizi uyarır.
Bildirim hem son kullanıcı uygulamalarına hem de PRO Desktop’a gönderilir. Bu, yalnızca kullanıcıların değil, aynı zamanda hizmet şirketlerinin temsilcilerinin de sahadaki cihazların durumunu izlemelerine olanak tanır. Bu seçenek Ajax WaterStop’un suyu kapatma ana görevini etkilemez.
Cihaz sıcaklığı normale döndüğünde Ajax uygulamalarına da bildirim gönderilir.
Aşırı ısınmayı önlemek için Ajax WaterStop’u havalandırılan bir alana kurmanızı öneririz. Cihaz sıcaklığı +60°C’nin üzerine çıkarsa, cihazın kurulum yerini ve çalışma koşullarını değiştirmenizi öneririz.
Sıkışmayı önleme
Küresel kapatma vanası kullanılmıyorsa, sıkışmayı önlemek için bakımı yapılmalıdır. Bu yapılmazsa, zamanla vananın içinde kalın bir kireç tabakası oluşabilir. Bu kireç küresel vananın dönme kabiliyetini bozabilir veya engelleyebilir. Sonuç olarak, sahadaki su kaynağını kontrol etmek imkansız hale gelecektir.
Önleyici bakım özelliği ile sıkışma önlenebilir. Bu özellik sayesinde Ajax WaterStop Jeweller’i seçilen bir zaman ve aralıkla (mevcut Bakım aralığı: 7, 30 ve 90 gün) vanayı otomatik olarak açıp kapatacak şekilde ayarlayabilirsiniz.
Önleyici bakım özelliği, OS Malevich 2.24 veya sonrası hub’larla çalışan 5.60.1.64 veya sonrası aygıt yazılımı sürümüne sahip cihazlar için kullanılabilir.
Önleyici bakım özelliği, yalnızca vana açık olduğunda ve önleyici bakımın gerçekleştirilmesini imkansız kılan başka koşullar olmadığında etkinleştirilir. Aksi takdirde Önleyici bakım gerçekleştirilemez, hata bilgisi Ajax uygulamasında cihazın durumlarında görüntülenir ve kullanıcı ilgili bir anlık bildirim alır. Prosedür otomatik olarak gerçekleştirilemezse, cihaz prosedürü daha sonra yeniden gerçekleştirmeye çalışmayacaktır, bu nedenle Önleyici bakım prosedürünü gerçekleştirmek için kullanıcının vanayı manuel olarak veya Ajax uygulaması aracılığıyla açması gerekir.
Önleyici bakım, vananın her açılışından sonra seçilen Bakım aralığı için ertelenir.
İzinsiz sökmeye karşı koruma
 |
|
| Standart montaj kilidi | Anti-sabotaj montaj kilidi |
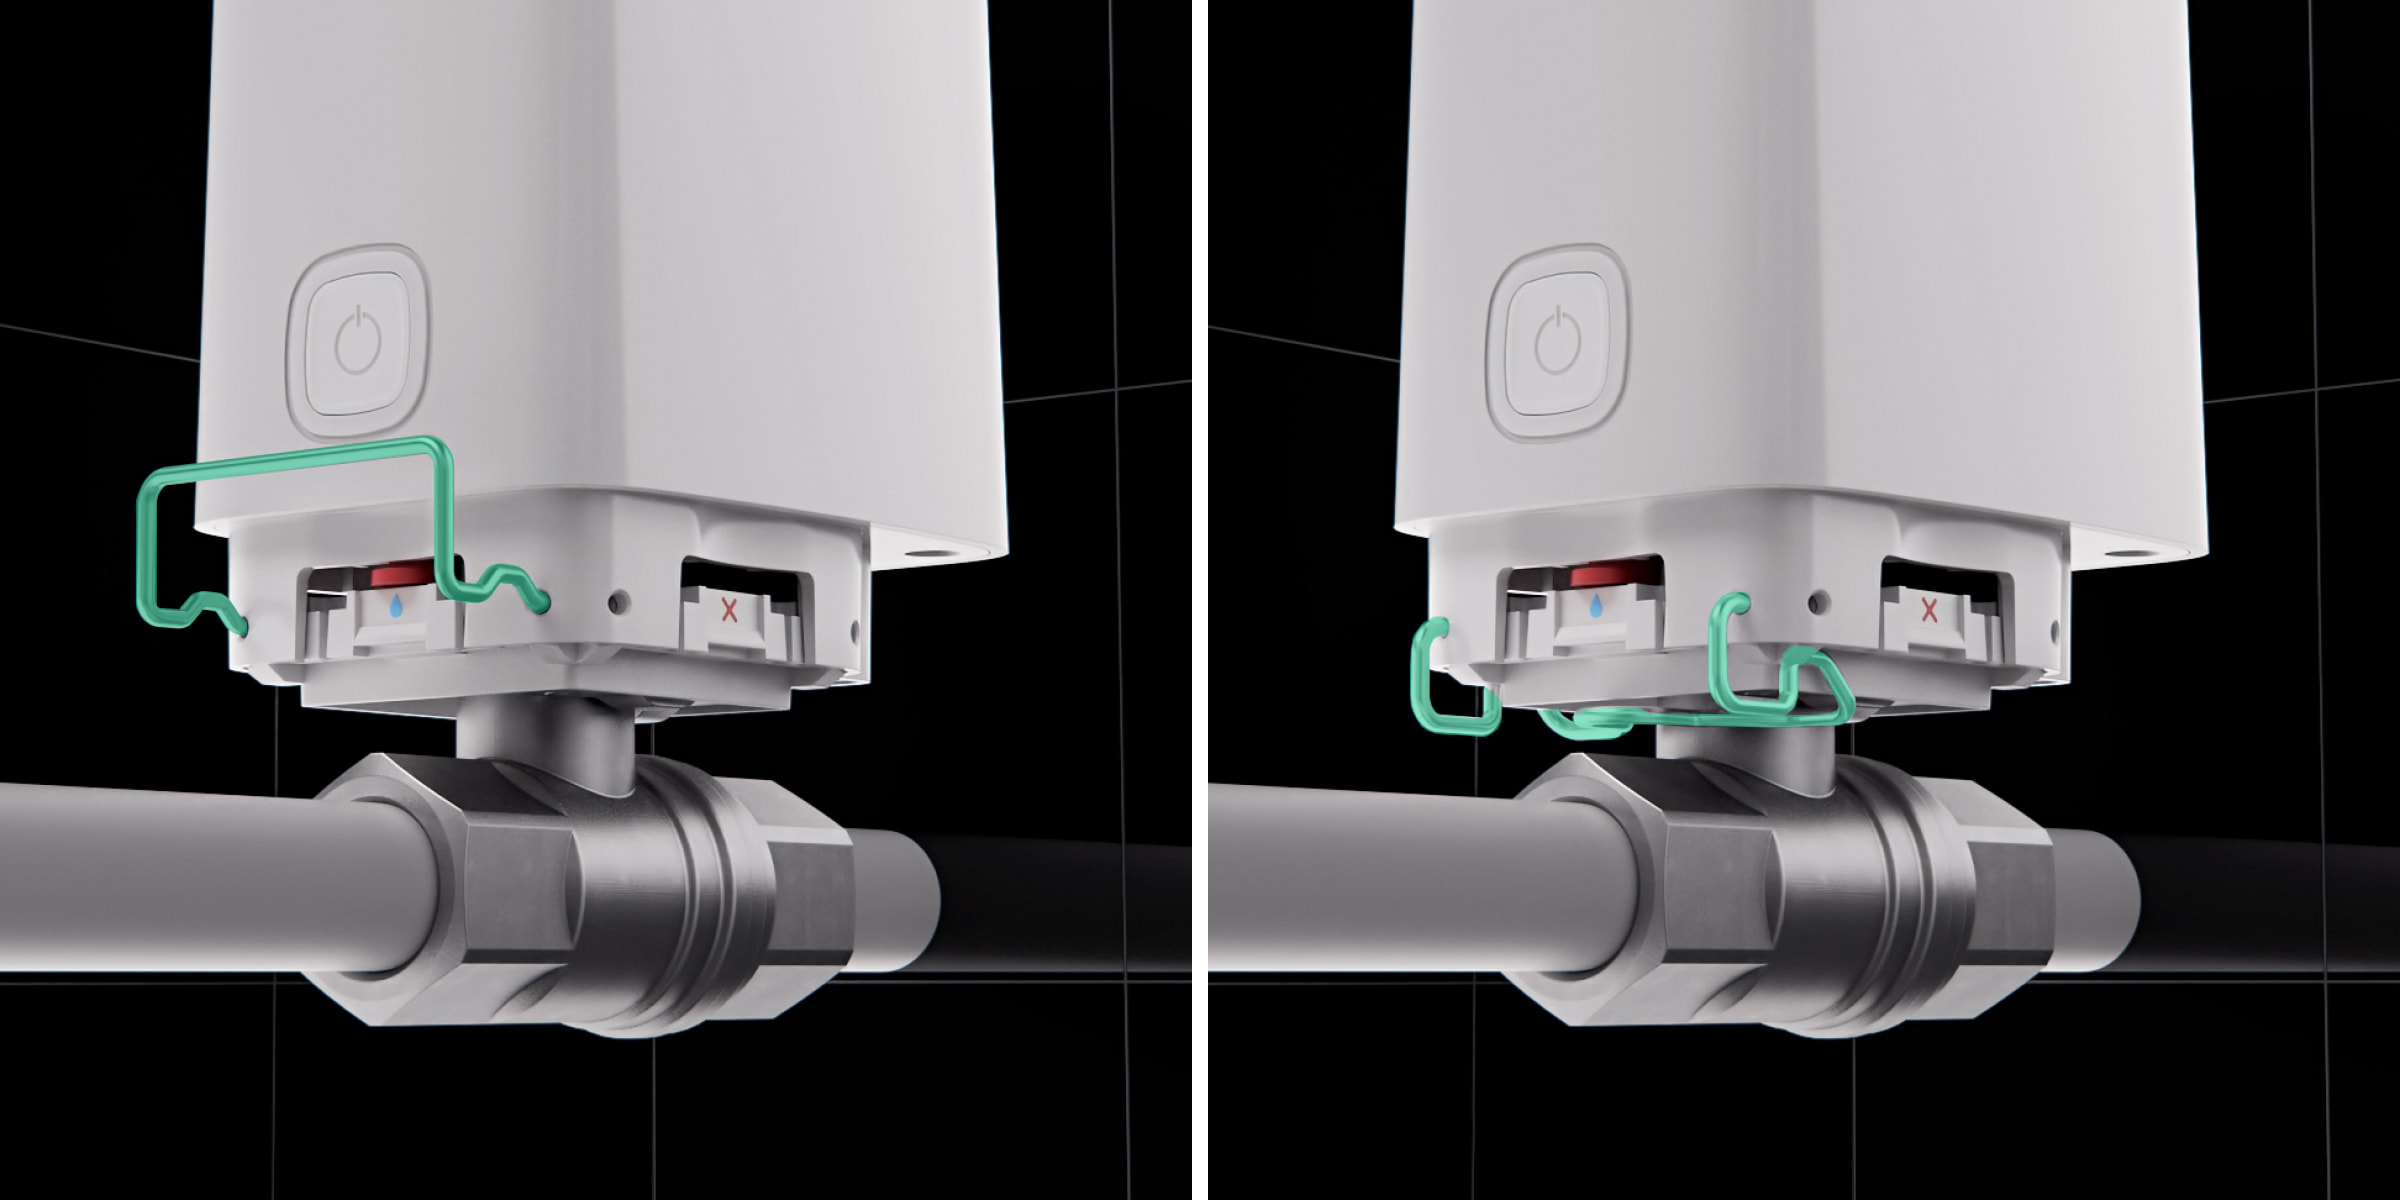
Ajax WaterStop kiti iki kilit içerir:
- Standart (hazır kurulu) kilit — elektrikli aktüatörün kapatma vanasına hızlı bir şekilde sabitlenmesi için. Bir kapatma vanasına erişmek veya elektrikli aktüatörü değiştirmek için kolayca çıkarılabilir.
- Anti-sabotaj kilidi — Ajax WaterStop’un standart kilidi yerine kurulur. Anti-sabotaj kilidini çıkarmak için araçları kullanın. Anti-sabotaj kilidi, elektrikli aktüatörü vana üzerine güvenli bir şekilde sabitler ve birinin yetkisiz bir şekilde denemesi durumunda elektrikli aktüatörün çıkarılmasını zorlaştırır. Bu kilit, örneğin cihazı kafelere, restoranlara, otellere, fabrikalara veya halka açık erişim alanlarına kurarken kullanılır.
Seçilen kilitten bağımsız olarak Ajax WaterStop kurcalaması, kullanıcıları ve izleme şirketini, elektrikli aktüatörü küresel vanadan çıkarma girişimi sırasında kurcalama işleminin tetiklendiği konusunda bilgilendirecektir.
Kilit, Ajax WaterStop’un dört tarafından herhangi birine kurulabilir.
Jeweller veri aktarım protokolü
Jeweller, hub ve bağlı cihazlar arasında hızlı ve güvenilir iki yönlü iletişim sağlayan bir telsiz protokolüdür. Jeweller, sabotajı ve cihaz sahteciliğini önlemek için her iletişim oturumunda değişken bir anahtar ile blok şifrelemeyi ve cihazların kimlik doğrulamasını destekler.
Ajax uygulamaları, sistem cihazlarıyla bağlantıyı izlemek ve durumlarını görüntülemek için bir “hub-detektör” yoklama sistemi sağladı. Yoklama sıklığı: 12 ila 300 saniye arasında. Yoklama sıklığı PRO veya sistem kurulum haklarına sahip bir kullanıcı tarafından hub ayarlarında ayarlanır.
Olayları izleme merkezine gönderme
Ajax sistemi, alarmları ve olayları hem PRO Desktop izleme uygulamasına hem de Alarm İzleme Merkezine (AİM) SurGard (Contact ID), SIA DC-09 (ADM-CID), ADEMCO 685 ve diğer protokol formatlarında iletebilir.
Sadece Ajax WaterStop ile hub (veya telsiz sinyali kapsama alanı genişletici) arasındaki iletişim kaybı olayları AİM’ye iletilir. Tüm cihaz olaylarını almak için PRO Desktop’ı kullanın.
Ajax cihazlarının adreslenebilirliği sayesinde sadece olayları değil, cihazın türünü, atanan adını, sanal odasını ve güvenlik grubunu da PRO Desktop’a ve AİM’ye gönderilebilirsiniz. İletilen parametrelerin listesi AİM’nin türüne ve seçilen iletişim protokolüne bağlı olarak farklılık gösterebilir.
Kimlik ve cihaz loop (zon) numarası cihaz Durumlarında mevcuttur.
Kurulum yerinin seçilmesi
Ajax WaterStop’un kurulumu bir uzman tarafından yapılmalıdır: Bir tesisatçı veya bir kurulumcu. Yetkili Ajax partnerlerinin listesine buradan ulaşabilirsiniz.
Birlikte verilen RuB vanası ile Ajax WaterStop için kurulum yerinin seçilmesi
Birlikte verilen RuB vana ile cihazı nereye kuracağınızı düşünürken aşağıdaki noktalara bakın.
1. Ajax WaterStop boyutları.
Ajax WaterStop için bir konum seçerken boyutlarını göz önünde bulundurun. Elektrikli aktüatörü dört konumdan birine kurmak için planlanan yerde yeterli alan bulunmalıdır. Bir tesisatçı veya kurulumcunun cihaza erişimi olmalıdır: Bakım, onarım ya da kilidi veya elektrikli aktüatörü değiştirmek için.
Kurulumcunun şablonunu kullanın. %100 ölçekte yazdırın ve planlanan kurulum yerine yerleştirin.
2. Birlikte verilen RuB vanasının çapı.
Bir RuB vanayı seçerken çapının boru çapına uygun olduğundan emin olun.
3. Harici güç kaynağı bağlantısı.
Ajax WaterStop’a harici bir güç kaynağı ünitesi bağlarken, önceden yer sağlayın ve güç kablolarını cihaza yönlendirin. Bu bölümde, harici güç kaynağının bağlanması ve gereklilikeri hakkında daha fazla bilgi edinin.
Harici güç kaynağı bağlantısı, elektrikli cihazların kullanımına ilişkin genel elektrik güvenliği kurallarına ve elektrik güvenliği yönetmeliklerinin gerekliliklerine uygun olmalıdır.
4. Ajax WaterStop’u sadece su taşıyan borular için kullanın.
Ajax WaterStop, su kaynağı veya ısıtma borularına kurulur. Cihaz hem soğuk hem de sıcak su için uygundur, zira RuB kapatma vanasının çalışma sıcaklığı aralığı –20 °C ile +170 °C arasındadır.
Cihazı bu sıcaklıkları aşan borulara ve boru hattındaki sıvının donabileceği yerlere kurmaktan kaçının. Bu, hem vanada hem de aktüatörde önemli hasara neden olabilir.
Ajax WaterStop, su dışında evsel veya endüstriyel gaz veya sıvıların tedarikini kontrol etmek için tasarlanmamıştır.
5. Borulardaki basınç 10 bar’ı geçmemelidir.
Ajax WaterStop, 10 bar’a kadar çalışma basıncına sahip boru hatları için tasarlanmıştır. Cihazı daha yüksek basınçlı borulara kurmayın.
6. Jeweller sinyal gücünü göz önünde bulundurun.
Ajax WaterStop’u kurmak için bir yer seçerken Jeweller sinyal gücünü göz önünde bulundurun. Bu değer, belirli bir süre boyunca cihaz ile hub veya kapsama alanı genişletici arasında alışverişi yapılan teslim edilmemiş veya bozulmuş veri paketlerinin sayısına göre belirlenir.
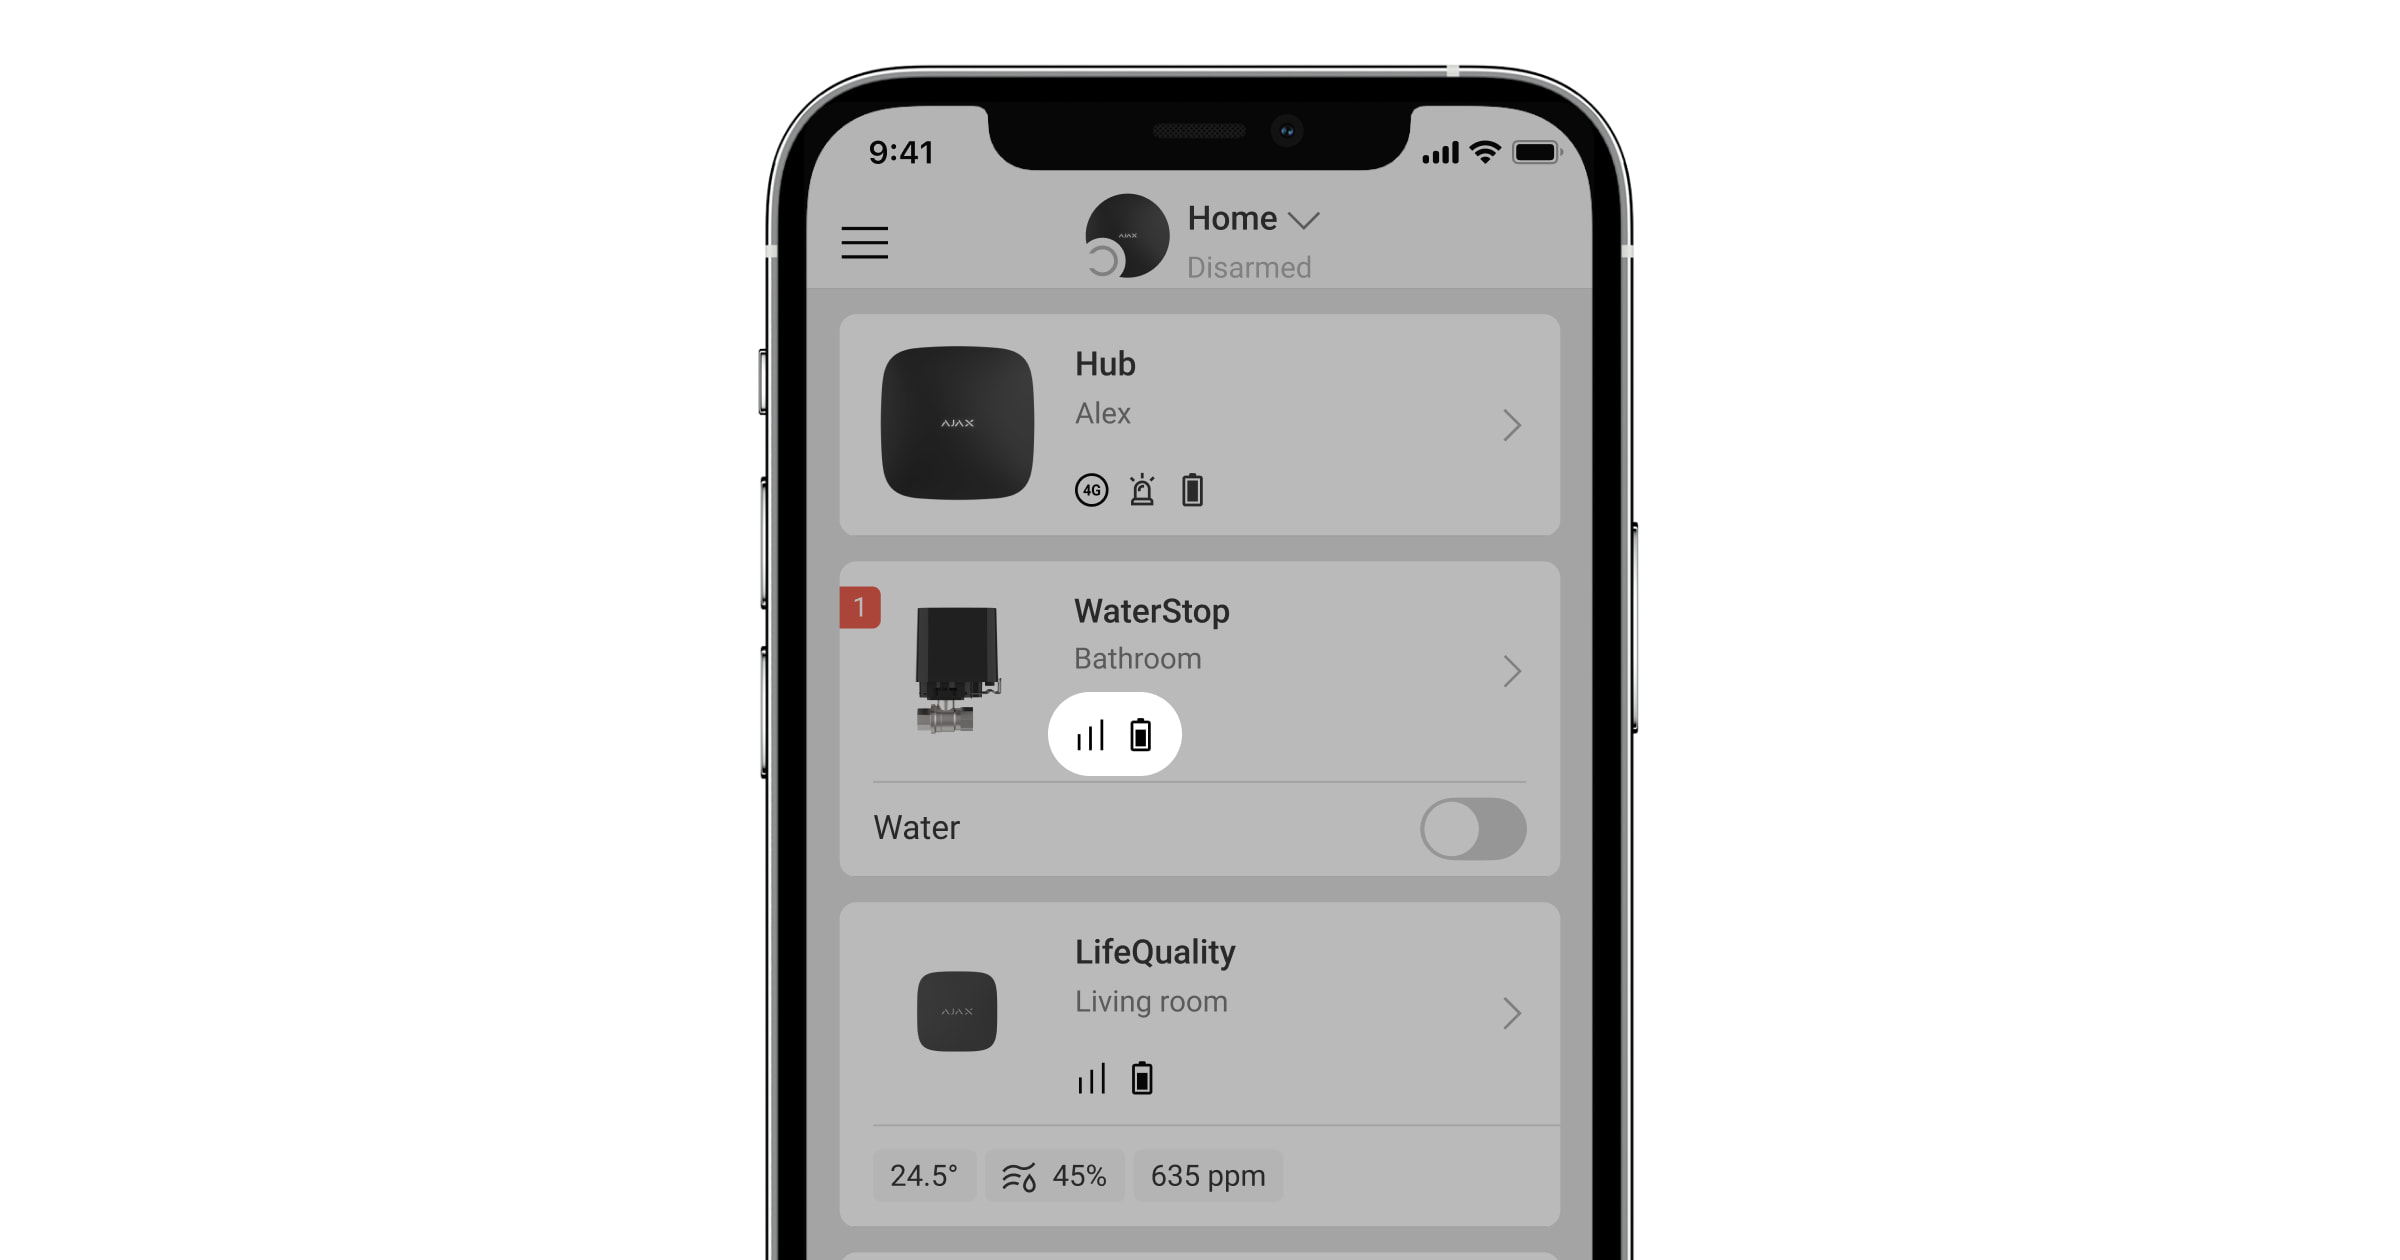
Aygıtlar sekmesindeki simgesi
sinyal gücünü gösterir. Sinyal gücü ayrıca cihaz durumlarında da gösterilir.
Sinyal gücü değeri:
- Üç diş — mükemmel sinyal gücü.
- İki diş — iyi sinyal gücü.
- Bir diş — düşük sinyal gücü. Stabil çalışma garanti edilmez.
- Çarpı işaretli simge — sinyal yok. Stabil çalışma garanti edilmez.
Kurulum yerinde Jeweller sinyal gücünü kontrol ediniz. Ajax WaterStop’un sinyal gücü iki veya üç diş olmalıdır. Kurulum yerindeki sinyal gücünü kabaca hesaplamak için telsiz iletişim menzili hesaplayıcısı aracını kullanınız.
Sinyal gücü bir veya sıfır diş olduğunda, güvenlik sisteminin stabil çalışması garanti edilmez. Seçilen kurulum yerinde sinyal gücü iki dişten azsa telsiz sinyali kapsama alanı genişletici kullanınız.
7. Kurulum yerindeki sıcaklık ve nem seviyelerini kontrol edin.
Ajax WaterStop’un çalışma sıcaklığı aralığı +0°C ila +60°C arasındadır; çalışma nemi %95’e kadardır.
Üçüncü taraf kapatma vanalı Ajax WaterStop için kurulum yerinin seçilmesi
Üçüncü taraf kapatma vanası seçerken ve cihaz kurulum yerini planlarken aşağıdaki noktalara bakın.
1. Kapatma vanasının flanş boyutları.
Üçüncü taraf bir kapatma vanası seçerken boyutlarına dikkat edin. ISO 5211, F03 standardına uygun olmalıdır.
2. Kapatma vanası torku.
Ajax WaterStop’up elektrikli aktüatörünün maksimum tork değeri 8.5 N•m’dir. Kapatma vanası seçerken bu değeri dikkate alın. 7–7.5 N-m’den fazla olmamalıdır.
3. Kapatma vanası çapı.
Kapatma vanası seçerken çapının boru çapına uygun olduğundan emin olun.
4. Ajax WaterStop ve kapatma vanası boyutları.
Ajax WaterStop için bir konum seçerken boyutlarını göz önünde bulundurun. Elektrikli aktüatörü dört konumdan birine kurmak için planlanan yerde yeterli alan bulunmalıdır. Bir tesisatçı veya kurulumcunun cihaza erişimi olmalıdır: Bakım, onarım ya da montaj kilidini veya elektrikli aktüatörü değiştirmek için.
Tam boyutu göz önünde bulundurun: Elektrikli aktüatör ve kapatma vanasının boyutları.
Elektrikli aktüatörün boyutları: 93 × 70 × 95 mm.
5. Harici güç kaynağı bağlantısı.
Ajax WaterStop’a harici bir güç kaynağı ünitesi bağlarken, önceden yer sağlayın ve güç kablolarını cihaza yönlendirin. Bu bölümde, harici güç kaynağının bağlanması ve gereklilikleri hakkında daha fazla bilgi edinin.
Harici güç kaynağı bağlantısı, elektrikli cihazların kullanımına ilişkin genel elektrik güvenliği kurallarına ve elektrik güvenliği yönetmeliklerinin gerekliliklerine uygun olmalıdır.
6. Ajax WaterStop’u sadece su taşıyan borular için kullanın.
Ajax WaterStop, su kaynağı veya ısıtma borularına kurulur. Cihazın çalışma sıcaklığı aralığı +5 °C ila +120 °C arasındadır.
Üçüncü taraf kapatma vanasının çalışma sıcaklığı aralığını göz önünde bulundurun. Cihazı bu sıcaklıkları aşan borulara ve boru hattındaki sıvının donabileceği yerlere kurmaktan kaçının. Bu, hem vanada hem de aktüatörde önemli hasara neden olabilir.
Ajax WaterStop, su dışında evsel veya endüstriyel gaz veya sıvıların tedarikini kontrol etmek için tasarlanmamıştır.
7. Borulardaki basınç 10 bar’ı geçmemelidir.
Ajax WaterStop, 10 bar’a kadar çalışma basıncına sahip boru hatları için tasarlanmıştır. Cihazı daha yüksek basınçlı borulara kurmayın.
8. Jeweller sinyal gücünü göz önünde bulundurun.
Ajax WaterStop’u kurmak için bir yer seçerken Jeweller sinyal gücünü göz önünde bulundurun. Bu değer, belirli bir süre boyunca cihaz ile hub veya kapsama alanı genişletici arasında alışverişi yapılan teslim edilmemiş veya bozulmuş veri paketlerinin sayısına göre belirlenir.
Aygıtlar sekmesindeki simgesi
sinyal gücünü gösterir. Sinyal gücü ayrıca cihaz durumlarında da gösterilir.
Sinyal gücü değeri:
- Üç diş — mükemmel sinyal gücü.
- İki diş — iyi sinyal gücü.
- Bir diş — düşük sinyal gücü. Stabil çalışma garanti edilmez.
- Çarpı işaretli simge — sinyal yok. Stabil çalışma garanti edilmez.
Kurulum yerinde Jeweller sinyal gücünü kontrol ediniz. Ajax WaterStop’un sinyal gücü iki veya üç diş olmalıdır. Kurulum yerindeki sinyal gücünü hesaplamak için telsiz iletişim menzili hesaplayıcısı aracını kullanınız.
Sinyal gücü bir veya sıfır diş olduğunda, güvenlik sisteminin stabil çalışması garanti edilmez. Seçilen kurulum yerinde sinyal gücü iki dişten azsa telsiz sinyali kapsama alanı genişletici kullanınız.
9. Kurulum yerindeki sıcaklık ve nem seviyelerini kontrol edin.
Ajax WaterStop’un çalışma sıcaklığı aralığı +0° C ile +60° C arasındadır; çalışma nemi %95’e kadardır.
Akıllı vana şu yerlere kurmayın
- Dış mekanlara. Bu, cihazın arızalanmasına veya hatalı çalışmasına neden olabilir.
- Nem ve sıcaklığı izin verilen sınırların dışında olan odalara. Aksi takdirde cihaz arızalanabilir veya düzgün çalışmayabilir.
- Düşük veya dengesiz sinyal gücü olan yerlere. Bu, akıllı vana ile hub (veya kapsama alanı genişletici) arasında bağlantı kaybına yol açabilir.
- Borulardaki sıvının donabileceği yerlere.
- Suyun 10 diş’ten daha yüksek bir basınçla taşındığı borulara.
- Sıcaklığı +170 °C üzerinde olan suyun taşındığı borulara.
- Evsel veya endüstriyel gazın taşındığı borulara.
- Su dışında herhangi bir sıvı taşıyan borulara.
Kurulum
Ajax WaterStop’u kurmadan önce, en ideal konumu seçtiğinizden ve bu yerin kılavuzda belirtilen gerekliliklere uygun olduğundan emin olunuz. Cihazın kurulumu ve çalıştırılması esnasında, elektrikli cihazların kullanımına ilişkin genel elektrik güvenliği kuralları ve talimatlarına uyunuz.
Ajax WaterStop elektrikli aktüatör, birlikte verilen bir RuB vanasına ve üçüncü taraf vanaya kurulabilir. Elektrikli aktüatör, ISO 5211 standardını karşılayan vanalarla uyumludur. Bu nedenle, tesisatçı bir gün üçüncü taraf küresel vana kurabilir ve kurulumcu bir elektrikli aktüatörü tamir edebilir ve cihazı Ajax sistemine başka bir gün bağlayabilir.
Birlikte verilen RuB vanası ile Ajax WaterStop kurulumu
- Ajax WaterStop’u sökünüz:
- Montaj kilidini çıkarınız.
- Elektrikli aktüatörü kapatma vanasının montaj platformundan çıkarınız.
- Ajax WaterStop’un kurulacağı devreye giden su kaynağını kapatınız.
- Birlikte verilen RuB vanasını boru hattına kurunuz.
- Elektrikli aktüatörün montaj platformuna kurulum seçeneğini seçiniz. 0, 90, 180 veya 270 derece dönüş açısına sahip bir montaj platformuna kurulabilir.
Ajax WaterStop’un kurulumu ve bakımı kolay olacak şekilde kurulum açısını seçiniz.
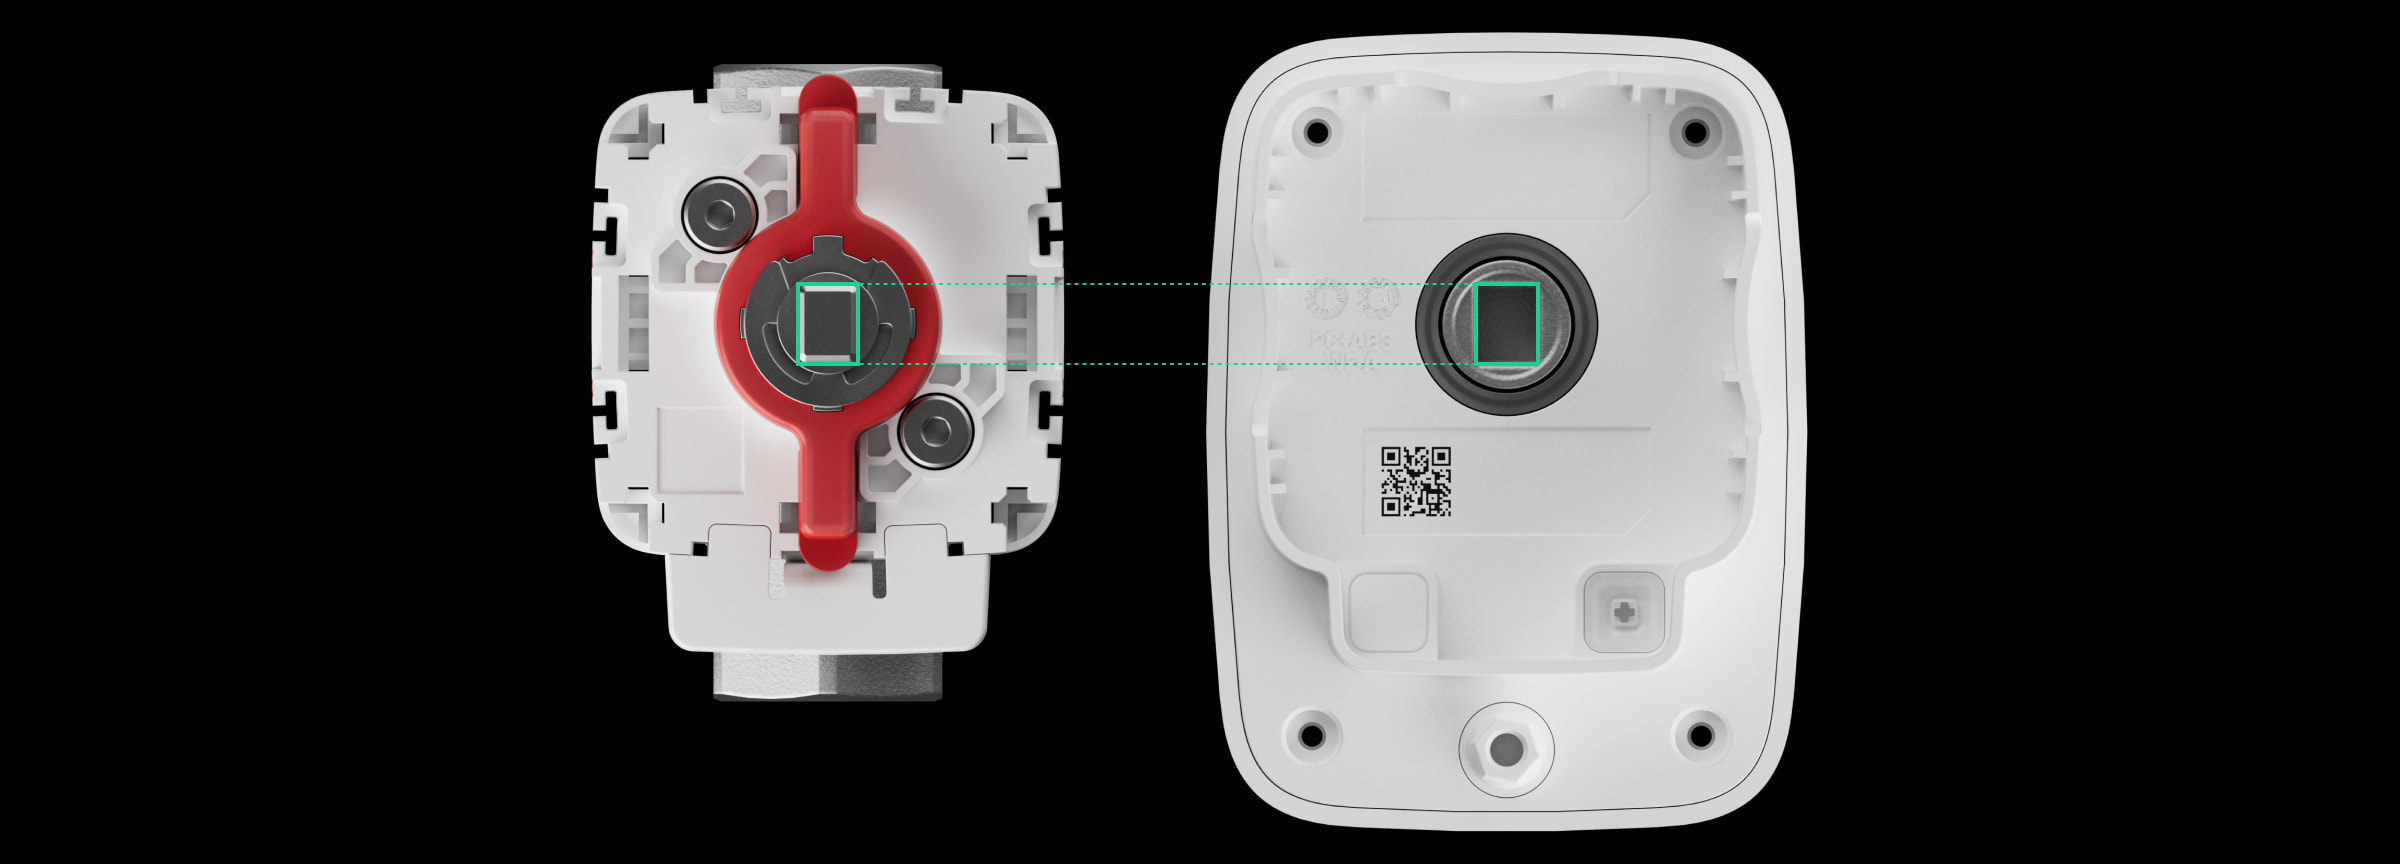
Dönüş açısı 90 veya 270 derece olan bir elektrikli aktüatör kurmak için, elektrikli aktüatör kaplini tarafından döndürülen milin konumunu ayarlamanız gerekir. Aşağıdaki adımları izleyin:
- Alyan anahtarı (⌀ 3 mm) kullanarak montaj platformunu kapatma vanasından çıkarınız.
- Özel bir alet veya düz uçlu bir tornavida kullanarak segmanı çıkarınız ve ardından mili serbest bırakınız.
- Kolu montaj platformundan ayırınız.
- Mili kol konumundan 90 derece döndürünüz.
- Kolu montaj platformuna ilk konumunda yerleştiriniz (segmanı çıkarmadan önce).
- Segmanı yeniden takınız.
- Montaj platformunu kapatma vanasına yeniden takınız.
Açık konum işaretlerinin boru hattı boyunca her zaman hizalı olduğundan emin olun.
- Montaj platformunun çıkarılabilir parçasını gerekli tarafa yerleştiriniz. Dönüş açısı 0 veya 180 derece olan elektrikli aktüatör için Açık konum işaretleriyle hizalayınız. 90 veya 270 derece için Kapalı konum işaretlerini kullanınız.
- Montaj kolunun ve elektrikli aktüatörün aynı konumda olduğundan emin olunuz. Konumlar eşleşmiyorsa, anahtarın veya elektrikli aktüatör kaplininin konumunu değiştiriniz (muhafazadaki düğmeyle konumunu değiştirerek).
Açık konumdaki montaj kolu her zaman boru hattı boyunca yönlendirilmelidir.
- Elektrikli aktüatörü montaj platformuna kurunuz.
- Elektrikli aktüatörü montaj kilidi ile sabitleyiniz.
- Standart kilit, elektrikli aktüatörün hızlı bir şekilde çıkarılmasını sağlar. Özel evler, apartmanlar veya kamuya açık olmayan diğer yerler için uygundur.
- Anti-sabotaj kilidi, elektrikli aktüatörün yetkisiz sökülmesini zorlaştırmak için uygundur. Restoranlarda, çamaşırhanelerde, fabrikalarda ve diğer halka açık veya kalabalık yerlerde kullanılır.
- Ajax WaterStop’u hub’a bağlayınız.
- Su kaynağına devam ediniz.
- Ajax WaterStop’un çalışabilirliğini kontrol ediniz.
Üçüncü taraf kapatma vanası ile Ajax WaterStop kurulumu
- Ajax WaterStop’u sökünüz:
- Montaj kilidini çıkarınız.
- Elektrikli aktüatörü kapatma vanasının montaj platformundan çıkarınız.
- Alyan anahtarı (⌀ 3 mm) kullanarak montaj platformunu birlikte verilen kapatma vanasından çıkarınız.
- Ajax WaterStop’un kurulacağı devreye giden su kaynağını kapatınız.
- Boru hattına üçüncü taraf kapatma vanasını kurunuz.
- Elektrikli aktüatörün montaj platformuna kurulum seçeneğini seçiniz. 0, 90, 180 veya 270 derece dönüş açısına sahip bir montaj platformuna kurulabilir.
Ajax WaterStop’un kurulumu ve bakımı kolay olacak şekilde kurulum açısını seçiniz.
Dönüş açısı 90 veya 270 derece olan bir elektrikli aktüatör kurmak için, elektrikli aktüatör kaplini tarafından döndürülen milin konumunu ayarlamanız gerekir. Aşağıdaki adımları izleyin:
- Özel bir alet veya düz uçlu bir tornavida kullanarak segmanı çıkarınız ve ardından mili serbest bırakınız.
- Kolu montaj platformundan ayırınız.
- Mili kol konumundan 90 derece döndürünüz.
- Kolu montaj platformuna ilk konumunda yerleştiriniz (segmanı çıkarmadan önce).
- Segmanı yeniden takınız.
- Montaj platformunu kapatma vanasına kurunuz. Birlikte verilen bağlantı elemanları ile vanaya sabitleyiniz.
Açık konum işaretlerinin boru hattı boyunca her zaman hizalı olduğundan emin olun.
- Montaj platformunun çıkarılabilir parçasını gerekli tarafa yerleştiriniz. Dönüş açısı 0 veya 180 derece olan elektrikli aktüatör için Açık konum işaretleriyle hizalayınız. 90 veya 270 derece için Kapalı konum işaretlerini kullanınız.
- Montaj kolunun ve elektrikli aktüatörün aynı konumda olduğundan emin olunuz. Konumlar eşleşmiyorsa, anahtarın veya elektrikli aktüatör kaplininin konumunu değiştiriniz (muhafazadaki düğmeyle konumunu değiştirerek).
Açık konumdaki montaj kolu her zaman boru hattı boyunca yönlendirilmelidir.
- Elektrikli aktüatörü montaj platformuna kurunuz.
- Elektrikli aktüatörü montaj kilidi ile sabitleyiniz.
- Standart kilit, elektrikli aktüatörün hızlı bir şekilde çıkarılmasını sağlar. Özel evler, apartmanlar veya diğer halka açık olmayan yerler için uygundur.
- Anti-sabotaj kilidi, elektrikli aktüatörün yetkisiz sökülmesini zorlaştırmak için uygundur. Restoranlarda, çamaşırhanelerde, fabrikalarda ve diğer halka açık veya kalabalık yerlerde kullanılır.
- Ajax WaterStop’u hub’a bağlayınız.
- Su kaynağına devam ediniz.
- Ajax WaterStop’un çalışabilirliğini kontrol ediniz.
Kurulumdan sonra Ajax WaterStop suyu kapatamazsa, montaj platformu yanlış konuma kurulduğu anlamına gelir.
Harici güç kaynağının bağlanması
Ajax WaterStop, birlikte verilen pillerle 3 yıla kadar çalışır. Cihaz, üçüncü taraf 7.5–14 V⎓ güç kaynağı ünitesini bağlayan terminallerle donatılmıştır. Harici güç kaynağının önerilen parametreleri 9–12 V⎓, 2 A’dır.Harici bir güç kaynağını bağlamak için dış çapı 3.0–3.7 mm olan yuvarlak 2 x AWG22 güç kablosu kullanın.
Ajax WaterStop harici kaynağından güç aldığında, daha önce kapalıysa açılacaktır.
Düşük sıcaklıklı yerlerde kurulum yapılması veya sık sık su kesintisi olması durumunda pillerin hızlı boşalmasını önlemek için harici bir güç kaynağının bağlanması önerilir.
Harici güç bağlandığında, hazır kurulu piller yedek güç kaynağı olarak kullanılır. Güç kaynağını bağlarken bunları çıkarmayınız.
Cihazı kurmadan önce, kabloların yalıtımında hasar olup olmadığını kontrol ettiğinizden emin olunu. Topraklanmış bir güç kaynağı kullanmanızı öneririz. Cihazı gerilim altında sökmeyiniz. Hasarlı güç kablosu olan bir cihazı kullanmayınız.
Harici güç kaynağını bağlamak için:
- Gerekirse suyu kapatınız.
- Ajax WaterStop açıksa açma/kapama düğmesini 3 saniye basılı tutarak kapatınız.
- Solenoid vanayı tutarken montaj kilidini dışarı çekiniz.
- Elektrikli aktüatörü kapatma vanasından sökünüz.
- Cihazın Ajax logolu ön tarafını, muhafazayı çizmeyecek şekilde yumuşak bir bezin üzerine yerleştiriniz.
- Elektrikli aktüatör muhafazasının altındaki koruyucu fişi alyan (⌀ 3 mm) kullanarak sökünüz.
- Vidaları bir PH1 çapraz başlı tornavida ile gevşetiniz.
- Mahfazanın ön ve arka tarafını tutarken elektrikli aktüatörü ters çevirin.
- Elektrikli aktüatör muhafazasının ön kısmını çıkarınız.
- Enerjisi kesilmiş güç kaynağı kablosunu birlikte verilen sızdırmazlık somunu ve silikon contadan geçiriniz. Silikon conta, elektrikli aktüatör muhafazasında koruyucu fişin altında bulunur.
- Kabloyu kutuplara dikkat ederek terminallere bağlayınız. Kutuplar plastik üzerinde işaretlenmiştir.
- Elektrikli aktüatör muhafazasının altındaki sızdırmazlık somununu sıkınız (koruyucu fiş yerine).
- Cihaz muhafazasının ön kısmını yeniden kurunuz. Kapak sadece bir (doğru) pozisyonda kurulabilir.
- Muhafazanın ön ve arka tarafını tutarken cihazı ters çeviriniz.
- Dört vidayı PH1 çapraz başlı tornavida ile sıkınız.
- Elektrikli aktüatörü kapatma vanasına yeniden kurunuz.
- Güç kaynağı ünitesini bir prize takınız.
- Ajax WaterStop’u açınız ve Ajax uygulamasında pillerin ve harici gücün durumunu ve cihazın genel çalışmasını kontrol ediniz.
Sisteme ekleme
Bir cihaz eklemeden önce
- Ajax uygulamasını yükleyiniz.
- Hesabınıza giriş yapınız veya yeni bir hesap oluşturunuz.
- Bir space seçiniz veya yeni bir space oluşturunuz.
Space işlevi, aşağıda listelenen sürümler ve üzeri uygulamalarda mevcuttur:
- iOS için Ajax Security System 3.0.
- Android için Ajax Security System 3.0.
- iOS için Ajax PRO: Tool for Engineers 2.0.
- Android için Ajax PRO: Tool for Engineers 2.0.
- macOS için Ajax PRO Desktop 4.0.
- Windows için Ajax PRO Desktop 4.0.
- En az bir sanal oda ekleyiniz.
- Space’e uyumlu bir hub ekleyiniz. Hub’ın açık olduğundan ve Ethernet, Wi-Fi ve/veya mobil ağ üzerinden internete bağlandığından emin olunuz.
- Space’in çözülü olduğundan ve Ajax uygulamasında durumunu kontrol ederek Hub’ın güncelleme başlatmadığından emin olunuz.
Yalnızca bir PRO veya sistemi yapılandırma haklarına sahip bir space yöneticisi hub’a bir cihaz ekleyebilir.
Hub’a bağlanma
Ajax WaterStop, hub’a bağlanabilmesi için hub’ın telsiz ağının kapsama alanı içinde olmalıdır. Bir telsiz sinyali kapsama alanı genişletici aracılığıyla çalışmak için, akıllı kapatma su vanasını hub ile eşleştirmek ve ardından kapsama alanı genişleticiye bağlamak gerekir (ayarlar aracılığıyla).
Hub, farklı frekanslarda çalışan cihazlarla uyumlu değildir. Cihazın radyo frekansı aralığı bölgeye göre değişebilir. Ajax cihazlarının aynı bölgede satın alınması ve kullanılması tavsiye edilir. Çalışma frekansı aralığı hakkında bilgi almak için lütfen Teknik Destek ile iletişime geçiniz.
Ajax WaterStop yalnızca bir hub ile çalışır. Yeni bir hub’a bağlandığında, akıllı su kapatma vanası eskisine komut göndermeyi durdurur. Yeni bir hub’a eklendiğinde, akıllı su kapatma vanası eski hub’ın aygıt listesinden kaldırılmaz. Bu, Ajax uygulaması üzerinden yapılmalıdır.
Ajax WaterStop’u bir hub’a bağlamak için:
- Ajax uygulamasını açınız. Hesabınızla oturum açınız.
- Hesabınızın birden fazla alana erişimi varsa veya PRO uygulamasını kullanıyorsanız, cihazı eklemek istediğiniz alanı seçiniz.
- Aygıtlar
menüsüne gidiniz. Aygıt Ekle‘ye basınız.
- Akıllı vanaya bir isim veriniz.
- QR kodunu tarayınız veya giriniz (cihaz muhafazası ve ambalajı üzerinde bulunur).
- Bir sanal oda ve bir güvenlik grubu seçiniz (Grup modu etkinleştirilmişse).
- Cihaz Ekle‘ye tıklayınız; geri sayım başlayacaktır.
Hub’a maksimum sayıda cihaz eklenmişse, Ajax uygulamasında akıllı vanayı eklemeye çalıştığınızda, cihaz sınırının aşıldığına dair bir bildirim alırsınız. Hub’a bağlanabilecek maksimum cihaz sayısı merkezi ünite modeline göre değişir.
- Güç düğmesini üç saniye basılı tutarak Ajax WaterStop’u açınız.
Başarılı bir bağlantıdan sonra Ajax WaterStop hub cihazları listesinde görünecektir. Bağlantı başarısız olursa, cihazı kapatınız ve 7 saniye içinde tekrar deneyiniz. Listedeki cihaz durumlarının yenilenmesi Jeweller (veya Jeweller/Fibra) göre değişir. Varsayılan değer 36 saniyedir.
Simgeler
Simgeler Ajax WaterStop durumlarından bazılarını gösterir. Durumları Ajax uygulamasındaki Aygıtlar sekmesinde görebilirsiniz.
| Simge | Anlamı |
|
Jeweller Sinyal Gücü, hub ile Ajax WaterStop arasındaki sinyal gücünü gösterir. Önerilen değer 2–3 diştir. |
|
| Cihaz, telsiz sinyali kapsama alanı genişletici aracılığıyla bağlanır. | |
|
Ajax WaterStop pil şarj seviyesi. |
|
|
Ajax WaterStop kalıcı olarak devre dışı. |
|
|
Ajax WaterStop’un tamper tetikleme olayları kalıcı olarak devre dışı bırakılmıştır. |
|
| Vana sıkışmış. | |
| Önleyici bakım yapılandırılmamıştır. | |
| Cihazın hub ile bağlantısı kesildi veya hub’ın Ajax Cloud sunucusu ile bağlantısı kesildi. | |
|
Cihaz yeni hub’a aktarılmamıştır. |
Durumlar
Bu durumlarda cihaz ve çalışma parametreleri hakkında bilgiler bulunmaktadır. Akıllı vana durumları Ajax uygulamasında görülebilir. Bunları görmek için:
- Ajax uygulamasını açınız.
- Birden fazla alanınız varsa veya PRO uygulamasını kullanıyorsanız bir alan seçiniz.
- Aygıtlar
sekmesine giriniz.
- Listeden Ajax WaterStop‘u seçiniz.
| Parametre | Anlamı |
| Verileri İçe Aktarma | Veriler yeni hub’a aktarılırken oluşan hatayı görüntüler:
|
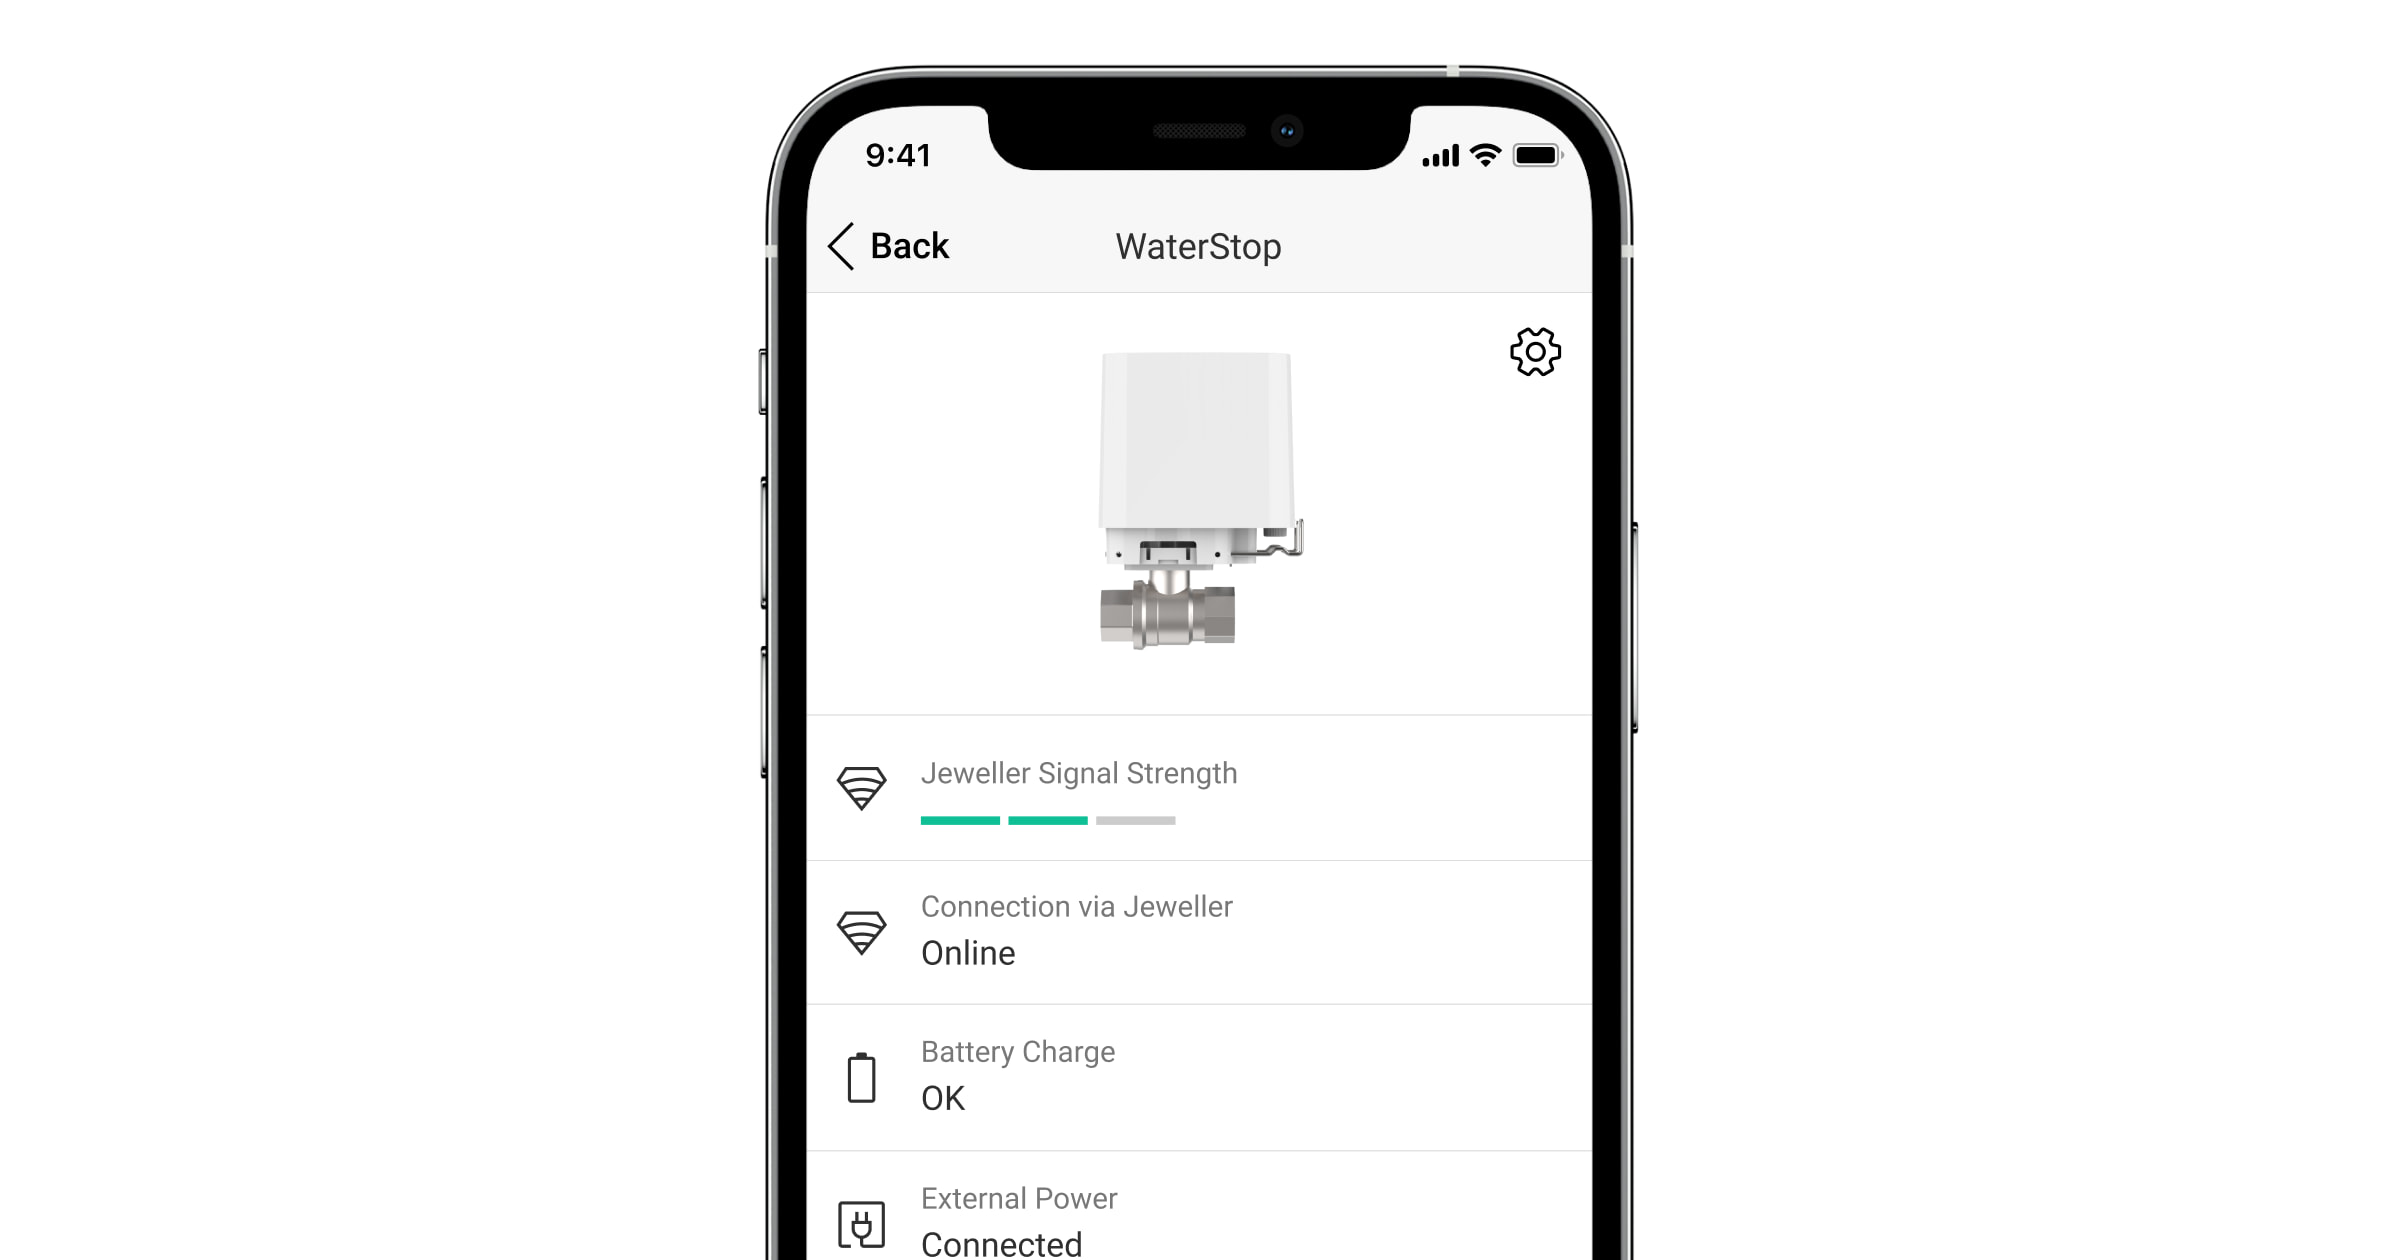
| Jeweller Sinyal Gücü |
Jeweller kanalı üzerinden Ajax WaterStop ve hub (veya kapsama alanı genişletici) arasındaki sinyal gücü. Önerilen değer: 2–3 diş. Jeweller, Ajax WaterStop’un olaylarını ve alarmlarını ileten bir protokoldür. |
| Jeweller üzerinden bağlantı | Jeweller kanalı aracılığıyla Ajax WaterStop ile hub (veya kapsama alanı genişletici) arasındaki bağlantı durumu:
|
| Pil Şarjı | Cihazın pil şarj seviyesi:
Piller zayıfladığında, Ajax uygulamaları ve güvenlik şirketi gerekli bildirimleri alır. Düşük pil bildirimi aldıktan sonra pilleri değiştirmenizi öneririz. Bitmiş pillerle çalışırken Ajax WaterStop’un su vanasını kapatacağını veya açacağını garanti edemeyiz. Pil şarjı nasıl görüntülenir |
| Harici güç | Ajax WaterStop harici güç kaynağı bağlantı durumu:
|
| Kapak | Muhafaza bütünlüğünün ihlal edilmesine veya elektrikli vananın küresel vanadan çıkarılmasına tepki veren Ajax WaterStop kurcalamasının durumu:
|
| Su Kaynağı | Ajax WaterStop’un küresel vana durumu:
Vanayı çeviremezseniz, Su kaynağı durumu (Açık/Kapalı) kırmızı renkte görüntülenir ve durum alanında hata bildirimi |
| Önleyici bakım |
OS Malevich 2.24 veya sonrası hub’larla çalışan, 5.60.1.64 veya sonrası aygıt yazılımı sürümüne sahip cihazlar için kullanılabilir. Kapatma vanasının sıkışmasını önlemek için düzenli otomatik prosedür:
|
| Cihazı Kilitleme Düğmesi | Elektrikli aktüatör muhafazası üzerindeki bir düğmeyi kullanarak su kaynağını kontrol etme yeteneği:
|
| Kalıcı Devre Dışı Bırakma | Cihazın devre dışı bırakma işlevinin durumunu gösterir:
|
| Aygıt yazılımı | Cihaz aygıt yazılımı sürümü. |
| Cihaz kimliği | Cihaz kimliği/seri numarası. QR kodu ayrıca cihazın muhafazası ve paketlendiği kutuda mevcuttur. |
| Cihaz No. | Cihaz loop (zon) numarası. |
Ayarlar
Ajax uygulamasında akıllı vana ayarlarını değiştirmek için:
- Ajax uygulamasını açınız.
- Birden fazla alanınız varsa veya PRO uygulamasını kullanıyorsanız bir alan seçiniz.
- Aygıtlar
sekmesine giriniz.
- Listeden Ajax WaterStop‘u seçiniz.
- Dişli simgesine tıklayarak Ayarlar
bölümüne gidiniz.
- Gerekli ayarları yapınız.
- Yeni ayarları kaydetmek için Geri tuşuna tıklayınız.
| Ayarlar | Anlamı |
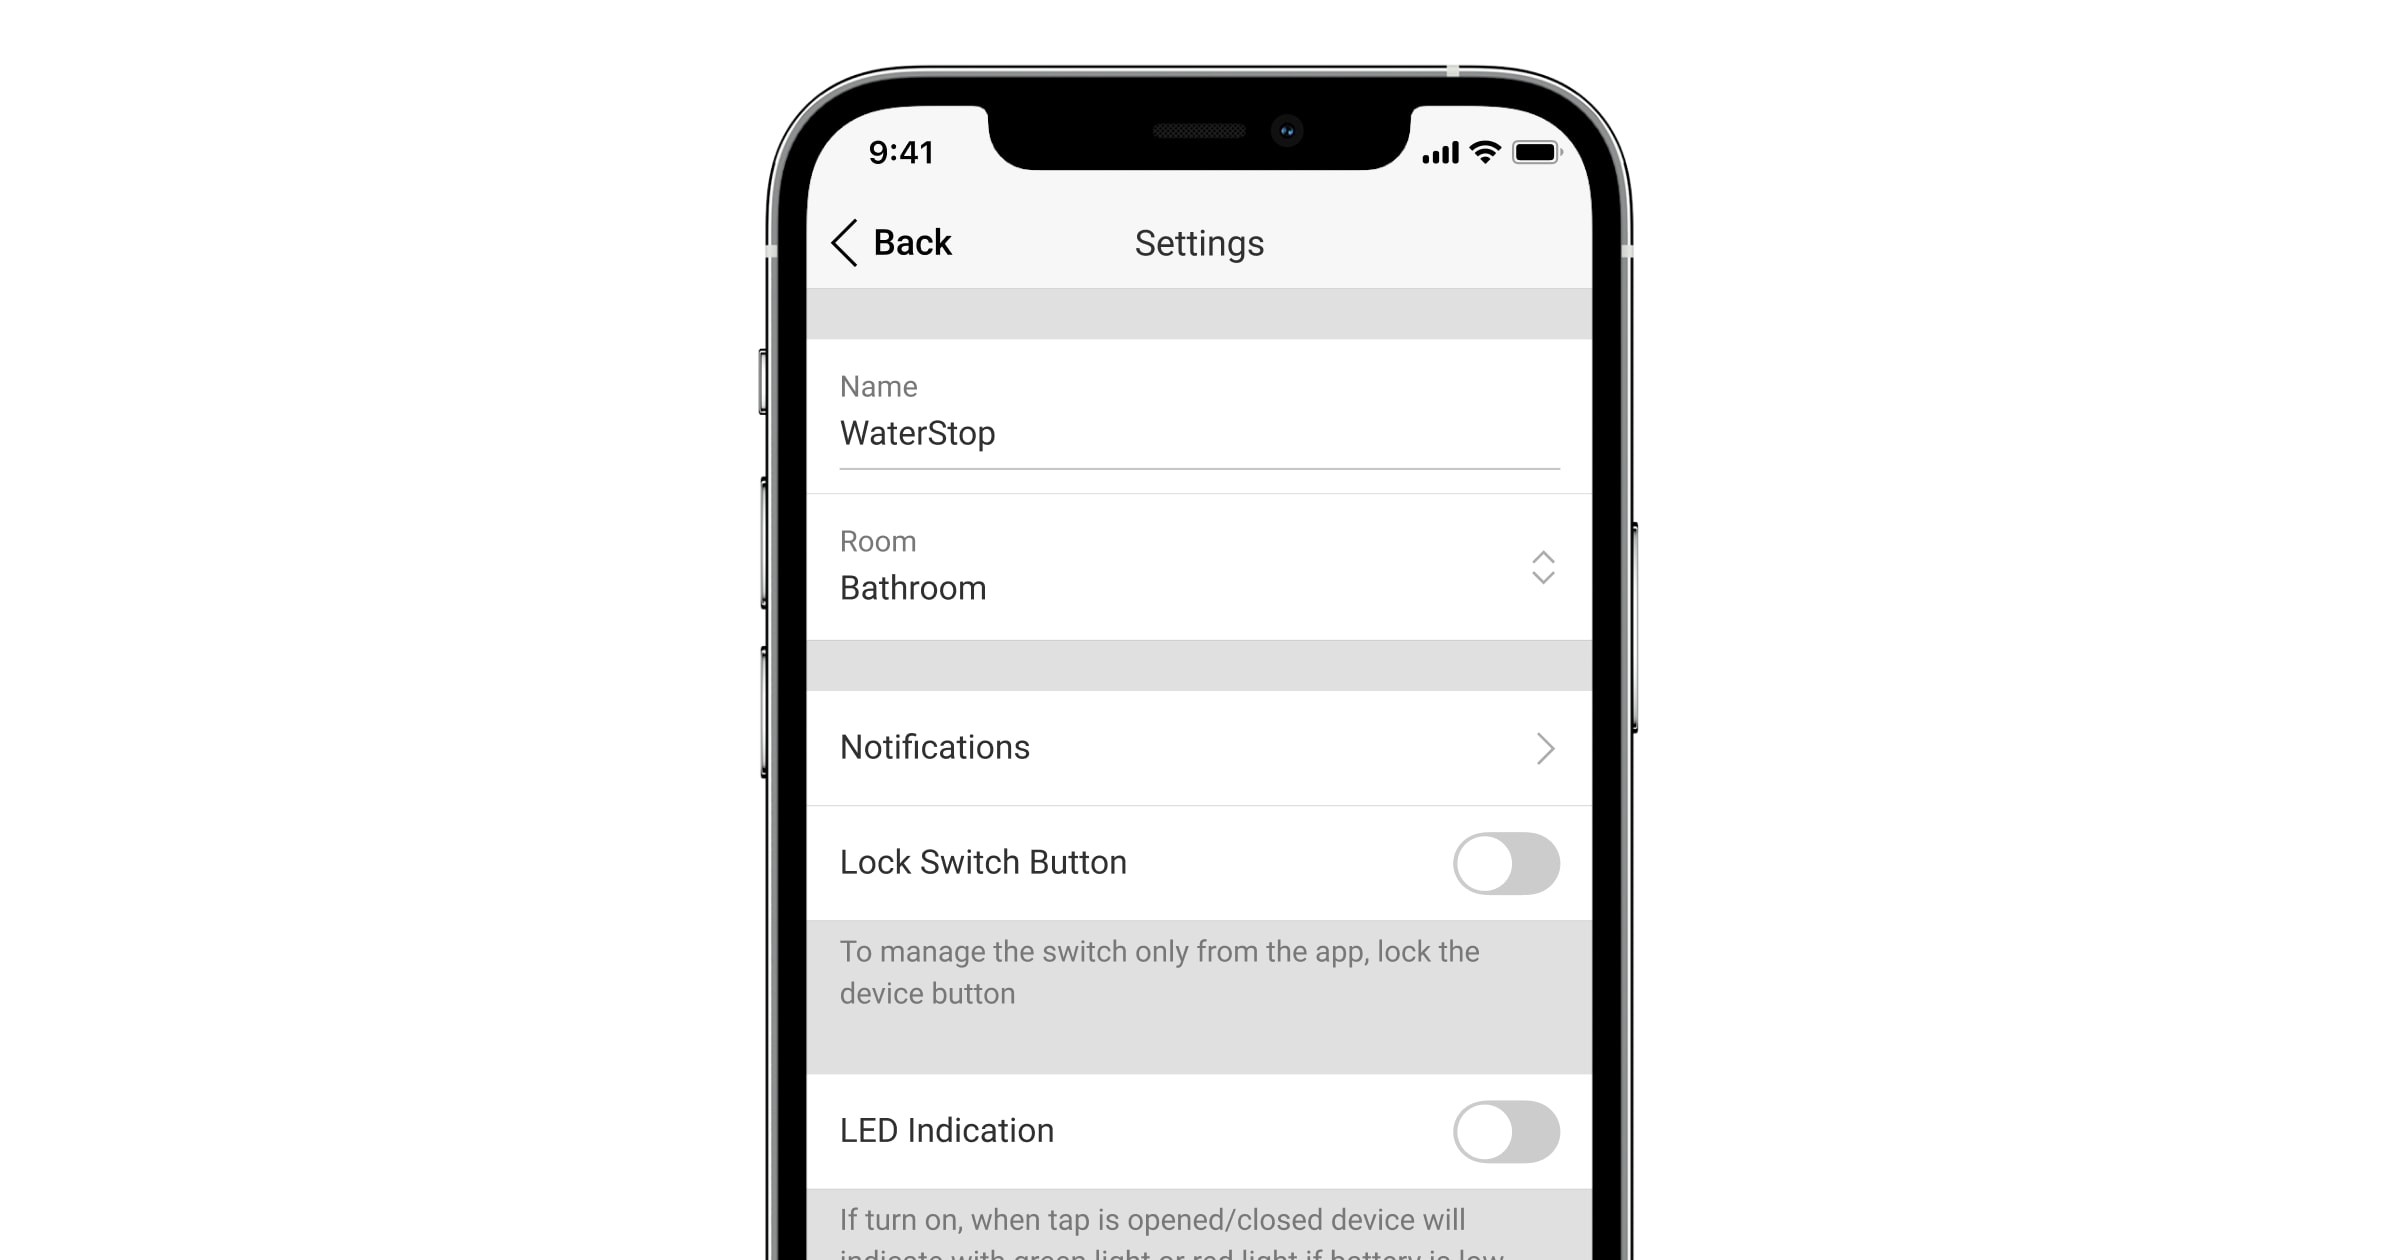
| Adı |
Ajax WaterStop adı. SMS metninde ve olay akışındaki bildirimlerde görüntülenir. Akıllı vana adını değiştirmek için metin alanına tıklayınız. Belirlenen isimde Kiril alfabesinden en fazla 12 karakter veya Latin alfabesinden en fazla 24 sembol kullanılabilir. |
| Oda |
Ajax WaterStop’un atandığı sanal odanın seçilmesi. Oda adı, SMS metninde ve olay akışındaki bildirimlerde görüntülenir. Odayı değiştirmek için alana tıklayınız. |
| Bildirimler | Akıllı vana bildirimlerinin seçilmesi:
Bu ayar, Ajax WaterStop’un tüm hub’lara OS Malevich 2.15 veya sonrası aygıt yazılımı sürümüyle ve aşağıdaki sürüm veya sonrası uygulamalarda bağlı olması durumunda kullanılabilir:
|
| Önleyici bakım |
OS Malevich 2.24 veya sonrası hub’larla çalışan, 5.60.1.64 veya sonrası aygıt yazılımı sürümüne sahip cihazlar için kullanılabilir. Ajax WaterStop’un önleyici bakım prosedürünün ayarlanması. Mevcut seçenekler:
|
| Cihazı Kilitleme Düğmesi |
Elektrikli aktüatör muhafazası üzerindeki düğmeyi kullanarak su kaynağı kontrolünü ayarlayın. Bu seçenek etkinleştirildiğinde, su kaynağı sadece Ajax uygulamalarında ve otomasyon senaryoları kullanılarak kontrol edilebilir. Bu seçenek varsayılan olarak devre dışıdır. |
| LED Göstergesi | Bu seçenek etkinleştirildiğinde LED, Ajax WaterStop durumunu gösterir. |
| Senaryolar |
Ajax WaterStop otomasyon senaryolarını ayarlama. |
| Jeweller Sinyal Gücü Testi |
Ajax WaterStop’u Jeweller sinyal gücü test moduna geçirir. Bu test, cihazın en uygun kurulum yerini belirlemek için Jeweller kablosuz veri aktarım protokolü aracılığıyla hub veya kapsama alanı genişletici ile cihaz arasındaki sinyal gücünü kontrol etmenizi sağlar. |
| Kullanım Kılavuzu | Ajax uygulamasında Ajax WaterStop Kullanım Kılavuzunu açar. |
| Kalıcı Devre Dışı Bırakma |
Kullanıcının cihazı sistemden çıkarmadan devre dışı bırakmasını sağlar. Üç seçenek mevcuttur:
|
| Cihaz Eşleştirmesini Kaldır | Ajax WaterStop’un hub ile eşleşmesini kaldırır ve ayarlarını siler. |
İşlevsellik testi
Ajax güvenlik sisteminde cihazların konumunu doğru seçmek için çeşitli testler vardır. Ajax WaterStop testleri hemen başlamaz, ancak bekleme süresi “hub-detektör” yoklama periyodunun süresini aşmaz (standart hub ayarlarında 36 saniye). Cihaz yoklama süresi hub ayarlarındaki Jeweller (veya Jeweller/Fibra) menüsünden değiştirilebilir.
Ajax uygulamasında bir test çalıştırmak için:
- Ajax uygulamasında hesabınıza giriş yapınız.
- Birden fazla alanınız varsa veya PRO uygulamasını kullanıyorsanız bir alan seçiniz.
- Aygıtlar
sekmesine giriniz.
- Ajax WaterStop‘u seçiniz.
- Dişli simgesine tıklayarak Ayarlar
bölümüne gidiniz.
- Jeweller Sinyal Gücü Testi ögesini seçiniz.
- Uygulamadaki istemleri kullanarak testi çalıştırınız ve gerçekleştiriniz.
Gösterge
| Gösterge | Olay | Not |
| Yaklaşık 1.2 saniyeliğine yeşil yanar. | Cihazı açma. | |
| 3 saniye boyunca yeşil yanar, ardından üç kez kırmızı yanıp söner ve söner. | Cihazı kapatma. | Cihazı kapatmak için kontrol düğmesini 2 saniyeden uzun süre basılı tutunuz. |
| Her 2 saniyede iki kez yeşil renkte yanıp söner. | Cihaz hub’a bağlı değil. | Otomatik olarak 60 saniye sonra veya kontrol düğmesine basıldığında durur. |
| Yaklaşık 1 saniyeliğine yeşil yanar. | Cihazın hub’a bağlanması. | |
| Yavaşça yeşil yanar ve 2 saniye içinde söner. | Kapatma vanasının açılması/kapatılması. | LED Göstergesi geçişi etkinleştirilmişse. |
| Kontrol düğmesine basıldığında yeşil yanar. | Kontrol düğmesine basılması. | Kontrol düğmesine 2 saniyeden fazla basılırsa, Ajax WaterStop kapatılacak veya açılacaktır (başlangıç durumuna bağlı olarak). |
| 1 saniye boyunca yeşil yanar. | Tamper tetiklenmesi. | |
| Her 1.7 saniyede üç kez yeşil renkte yanıp söner. | Düşük pil. | LED Göstergesi geçişi etkinleştirilmişse. |
| İki kez kırmızı yanıp söner. | Elektrikli aktüatörün döndürmesi engellenmiştir. | Uyarı yalnızca başarısız bir aktüatör döndürme denemesinden sonra görüntülenir. |
| Her 3 saniyede beş kez kırmızı yanıp söner. | Pil arızası. |
Arızalar
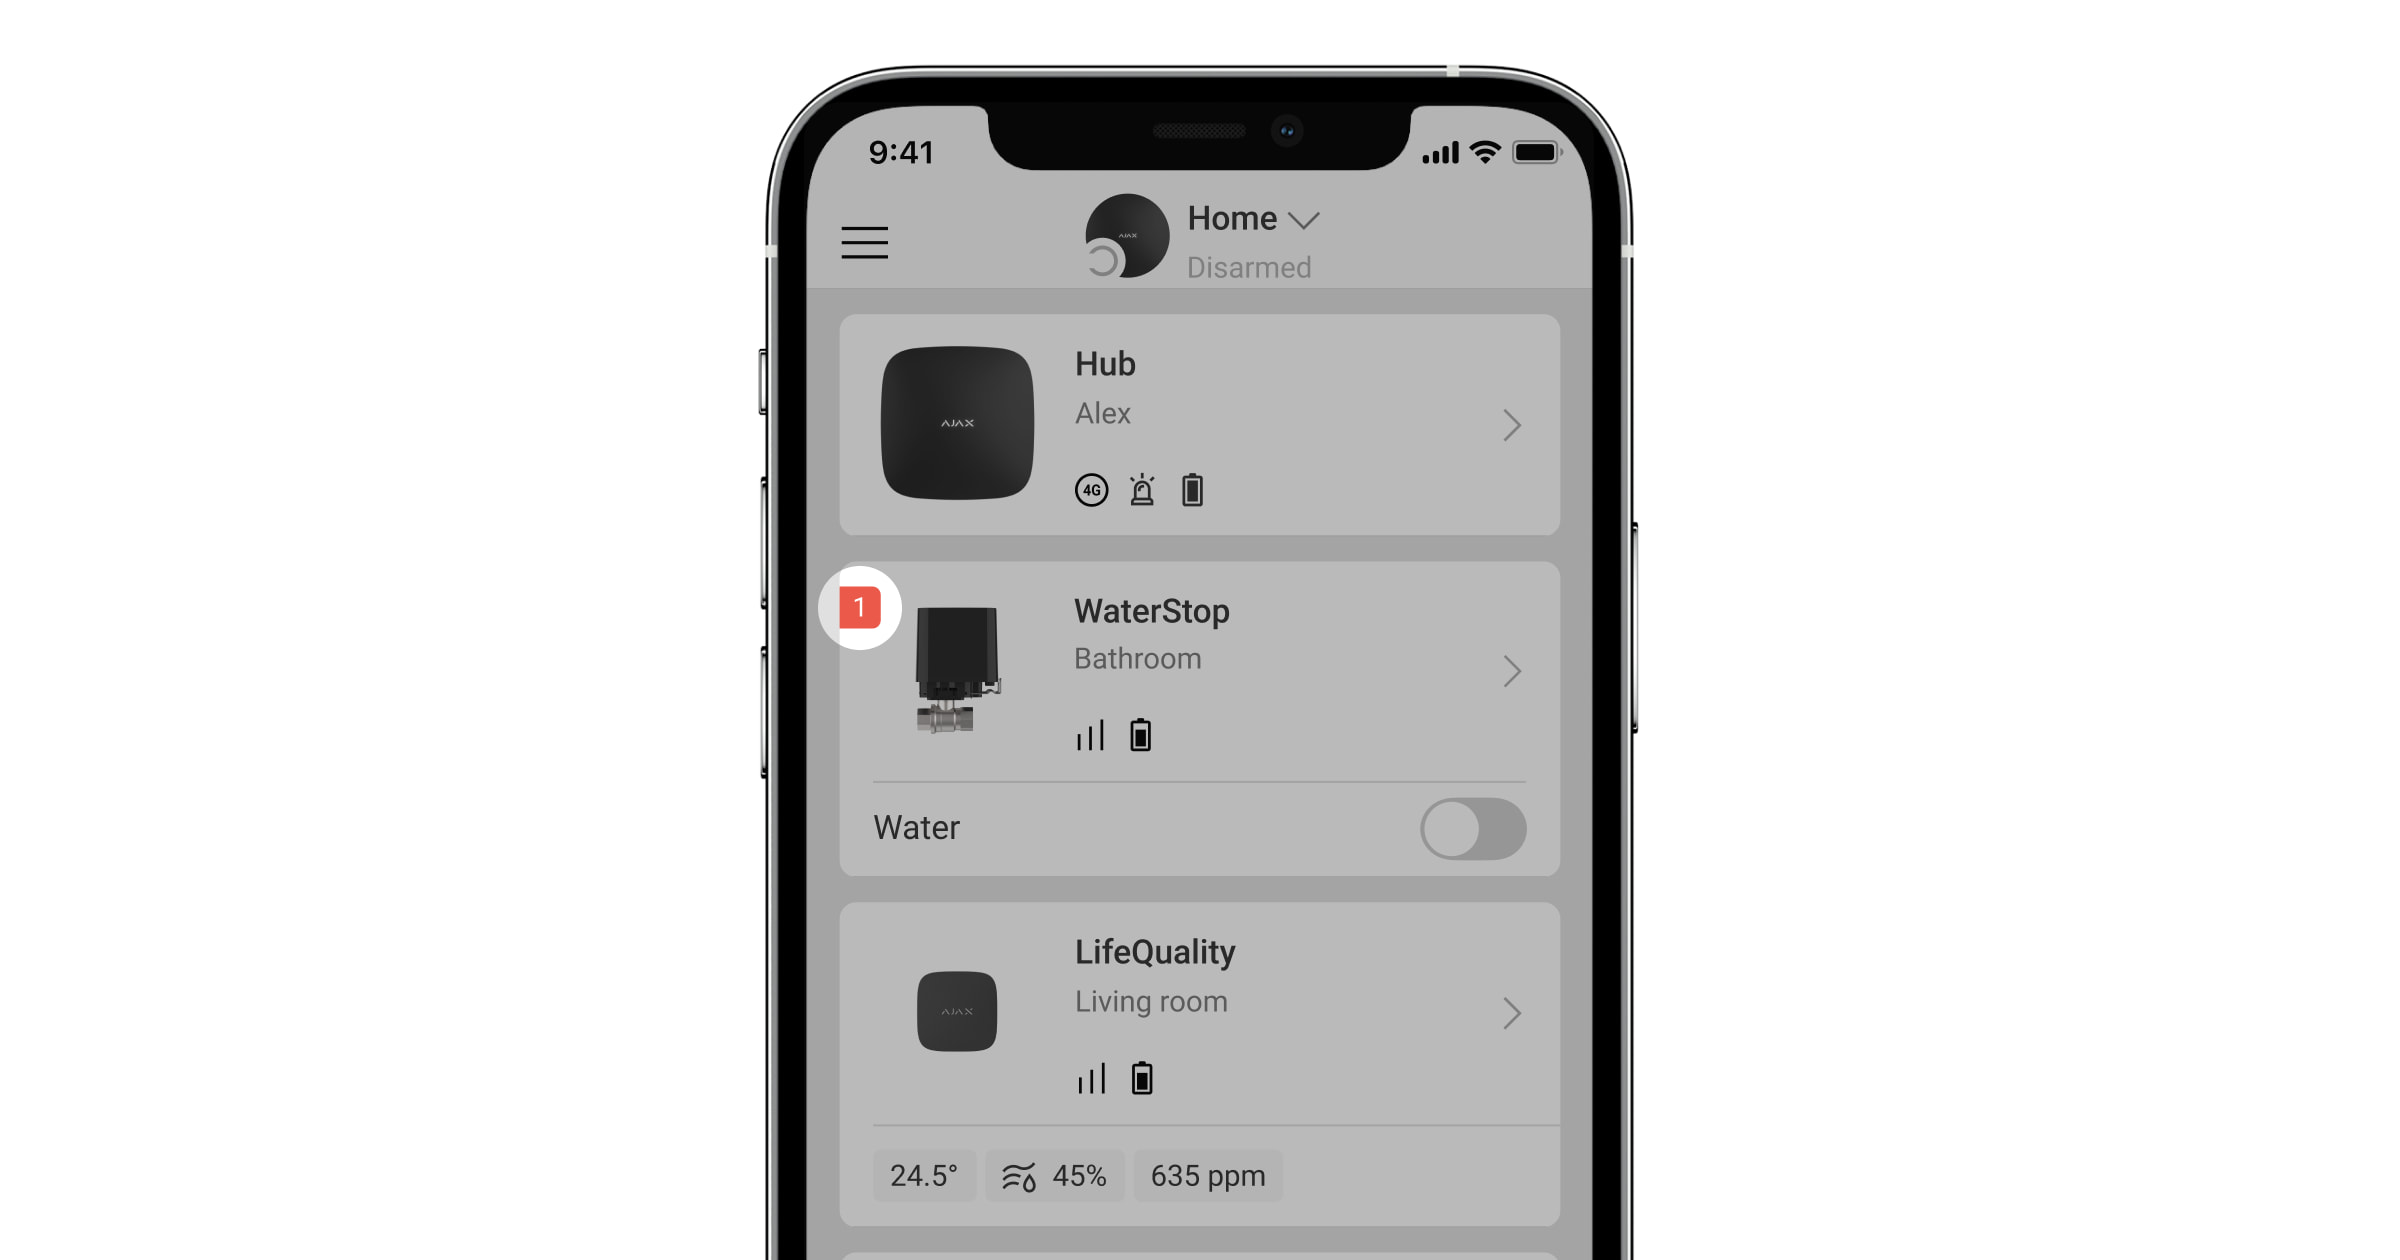
Ajax WaterStop’ta bir arıza algılanırsa (örneğin, hub veya kapsama alanı genişletici ile bağlantı yoksa), arıza sayacı Ajax uygulamasındaki cihaz alanında görüntülenir.
Arızalar kapatma vanası Durumlarında görüntülenir. Arızalı alanlar kırmızı renkle gösterilecektir.
Aşağıdaki durumlarda bir arıza görüntülenir:
- Sıcaklık koruması etkinleştirilmiştir.
- Ajax WaterStop ile hub (veya kapsama alanı genişletici) arasında bağlantı yoktur.
- Ajax WaterStop pilleri boşalmış.
- Vana sıkışmış.
Bakım
Cihazın çalışmasını düzenli olarak kontrol edin: Ajax WaterStop’un su kaynağını nasıl kontrol ettiğini kontrol edin. İdeal kontrol sıklığı üç ayda birdir. Ajax WaterStop muhafazasını toz, örümcek ağı ve diğer maddelerle kirlendikçe temizleyiniz. Ekipman bakımı için uygun yumuşak kuru bir bez kullanınız. Cihazı temizlemek için alkol, aseton, benzin ve aktif çözücü içeren başka maddeler kullanmayınız.
Önleyici bakım özelliğini açmanızı veya bir vanayı periyodik olarak açıp kapatmak için zamanlanmış bir senaryo ayarlamanızı öneririz. Örneğin, haftada bir kez bir dakika. Bu, vananın sıkışmasını önleyecek ve ömrünü uzatacaktır.
Komple set
- Ajax WaterStop Jeweller.
- CR123A piller (hazır kurulu) — 4 adet.
- DN15 (½”), DN20 (¾”) veya DN25 (1″) RuB kapatma vanası (seçilen kite bağlıdır).
- İki montaj kilidi: Standart (hazır kurulu) ve anti-sabotaj.
- Sızdırmazlık somunu.
- Hızlı kurulum rehberi.
Garanti
Limited Liability Company “Ajax Systems Manufacturing” ürünlerinin garantisi satın alındıktan sonra 2 yıl boyunca geçerlidir.
Cihaz düzgün çalışmıyorsa, önce teknik servis ile iletişime geçiniz. Teknik sorunlar vakaların yarısında uzaktan çözülebilmektedir.
Teknik Destek ile iletişime geçin:
