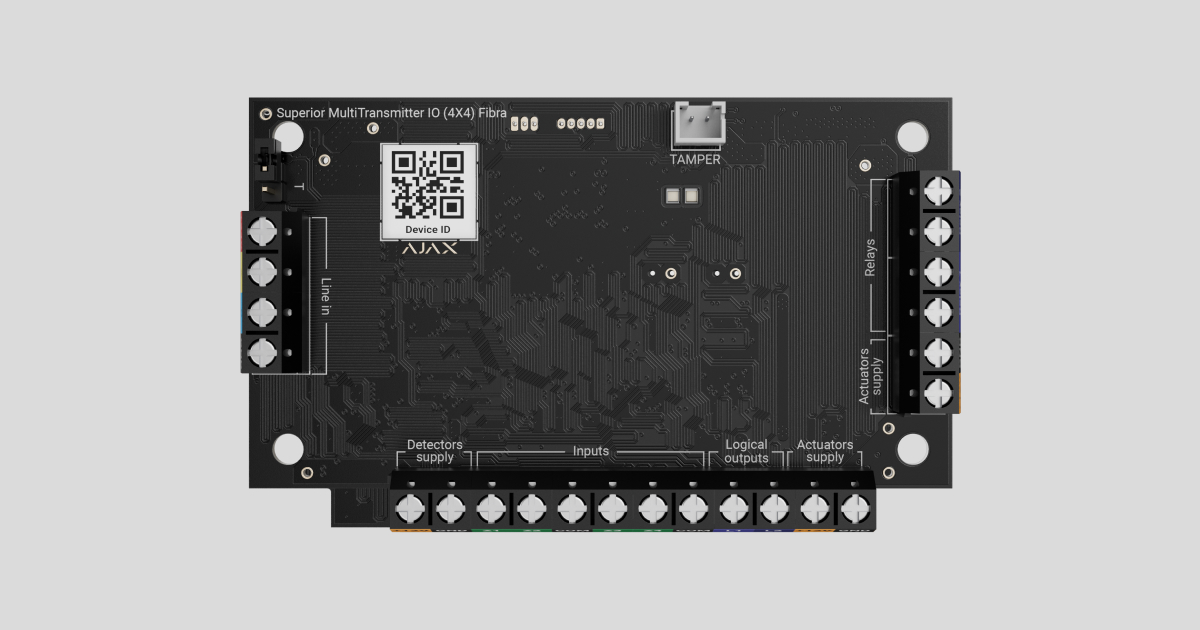
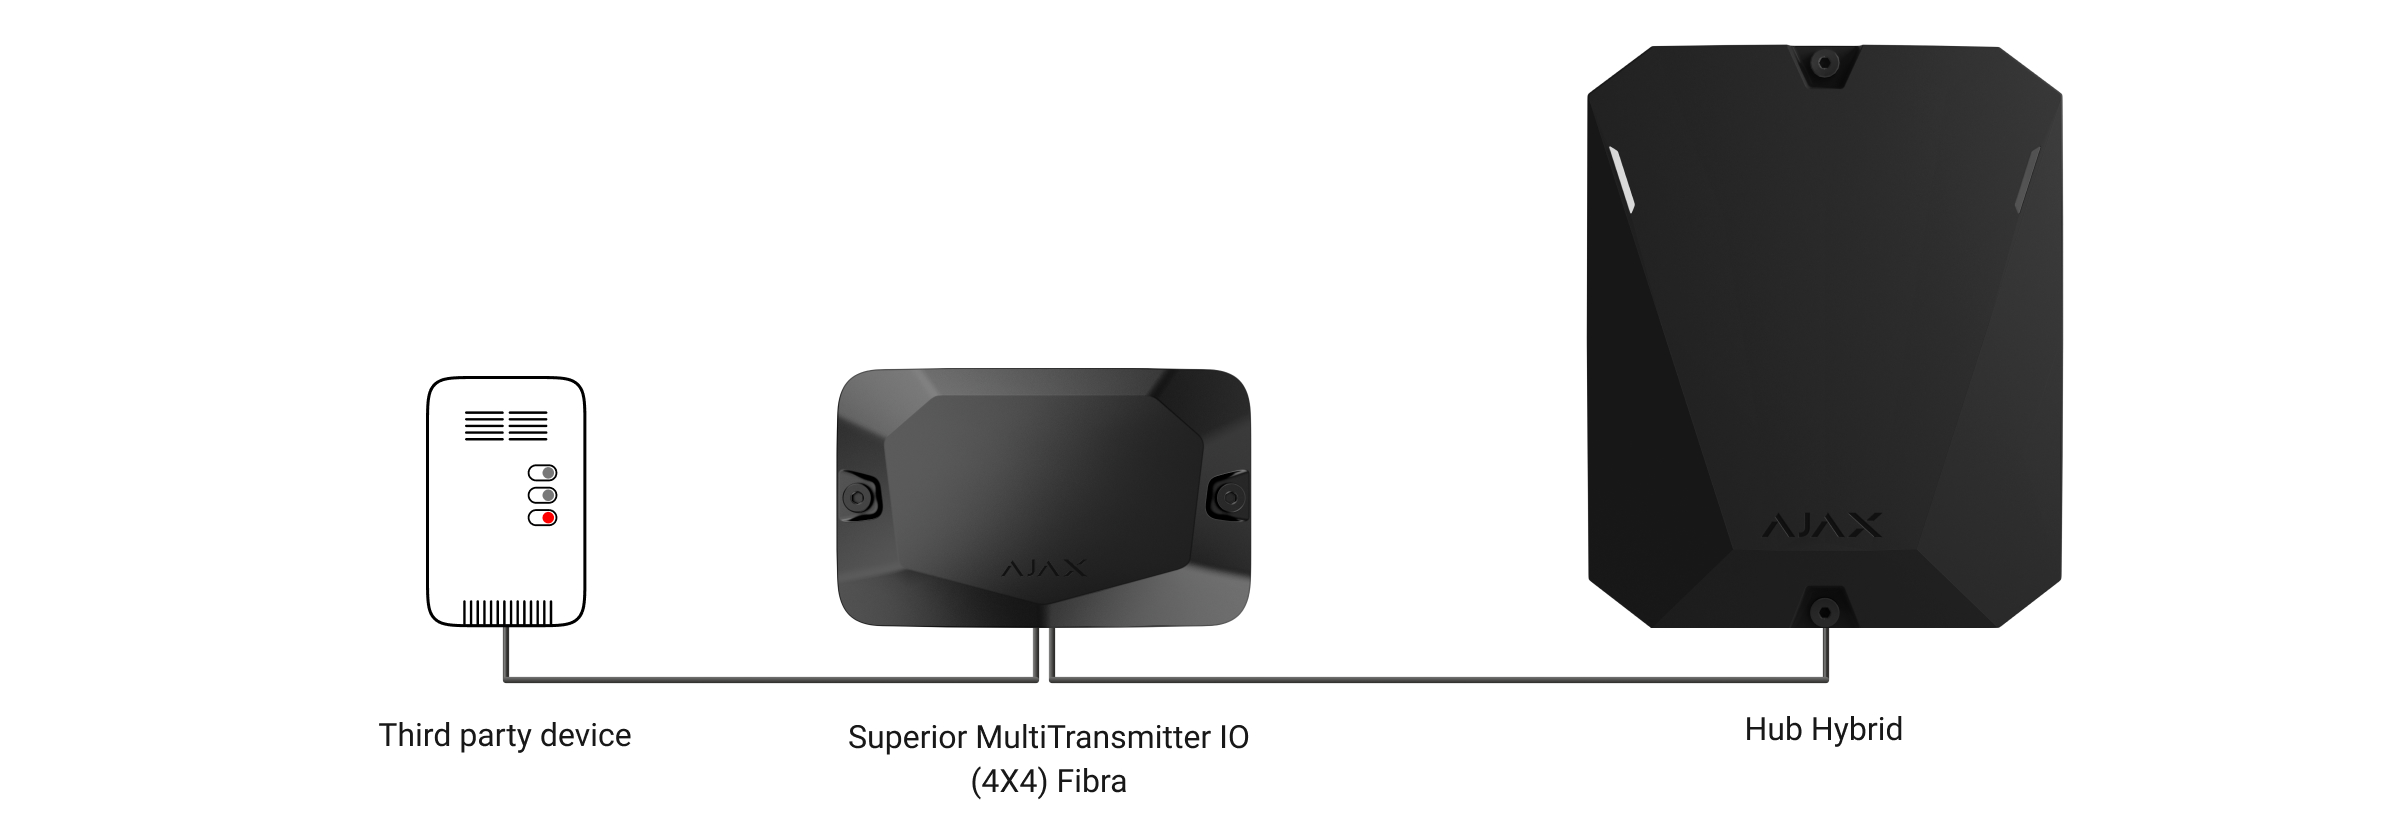
Superior MultiTransmitter IO (4X4) Fibra é um módulo de integração com fios com 4 entradas e 4 saídas projetado para integrar dispositivos de terceiros num sistema Ajax. As suas entradas podem ser utilizadas para receber sinais de persianas, botões de pânico ou auxiliares, detetores de movimento interiores ou exteriores, bem como de detetores de abertura, vibração, quebra de vidro, gás e fugas ou outros dispositivos com fios. As saídas do módulo podem ser utilizadas para controlar os elementos de bloqueio, as fechaduras eletrónicas e outros aparelhos que podem ser controlados com relés e saídas lógicas.
O módulo de integração suporta os tipos de ligação de entrada NC, NO, EOL, 2EOL, 3EOL ou persiana e pode alimentar o dispositivo conectado com 11,6–12,4 V⎓, até 500 mA de potência.
O módulo de integração troca dados com o hub utilizando o protocolo seguro de comunicação por cabo Fibra. A comunicação por cabo pode atingir os 6,550 ft de comprimento quando o dispositivo é ligado utilizando o cabo de par entrançado U/UTP cat.5.
Superior MultiTransmitter IO (4X4) Fibra é o dispositivo da linha de produtos Superior. Apenas os parceiros acreditados da Ajax Systems podem vender, instalar e administrar produtos Superior.
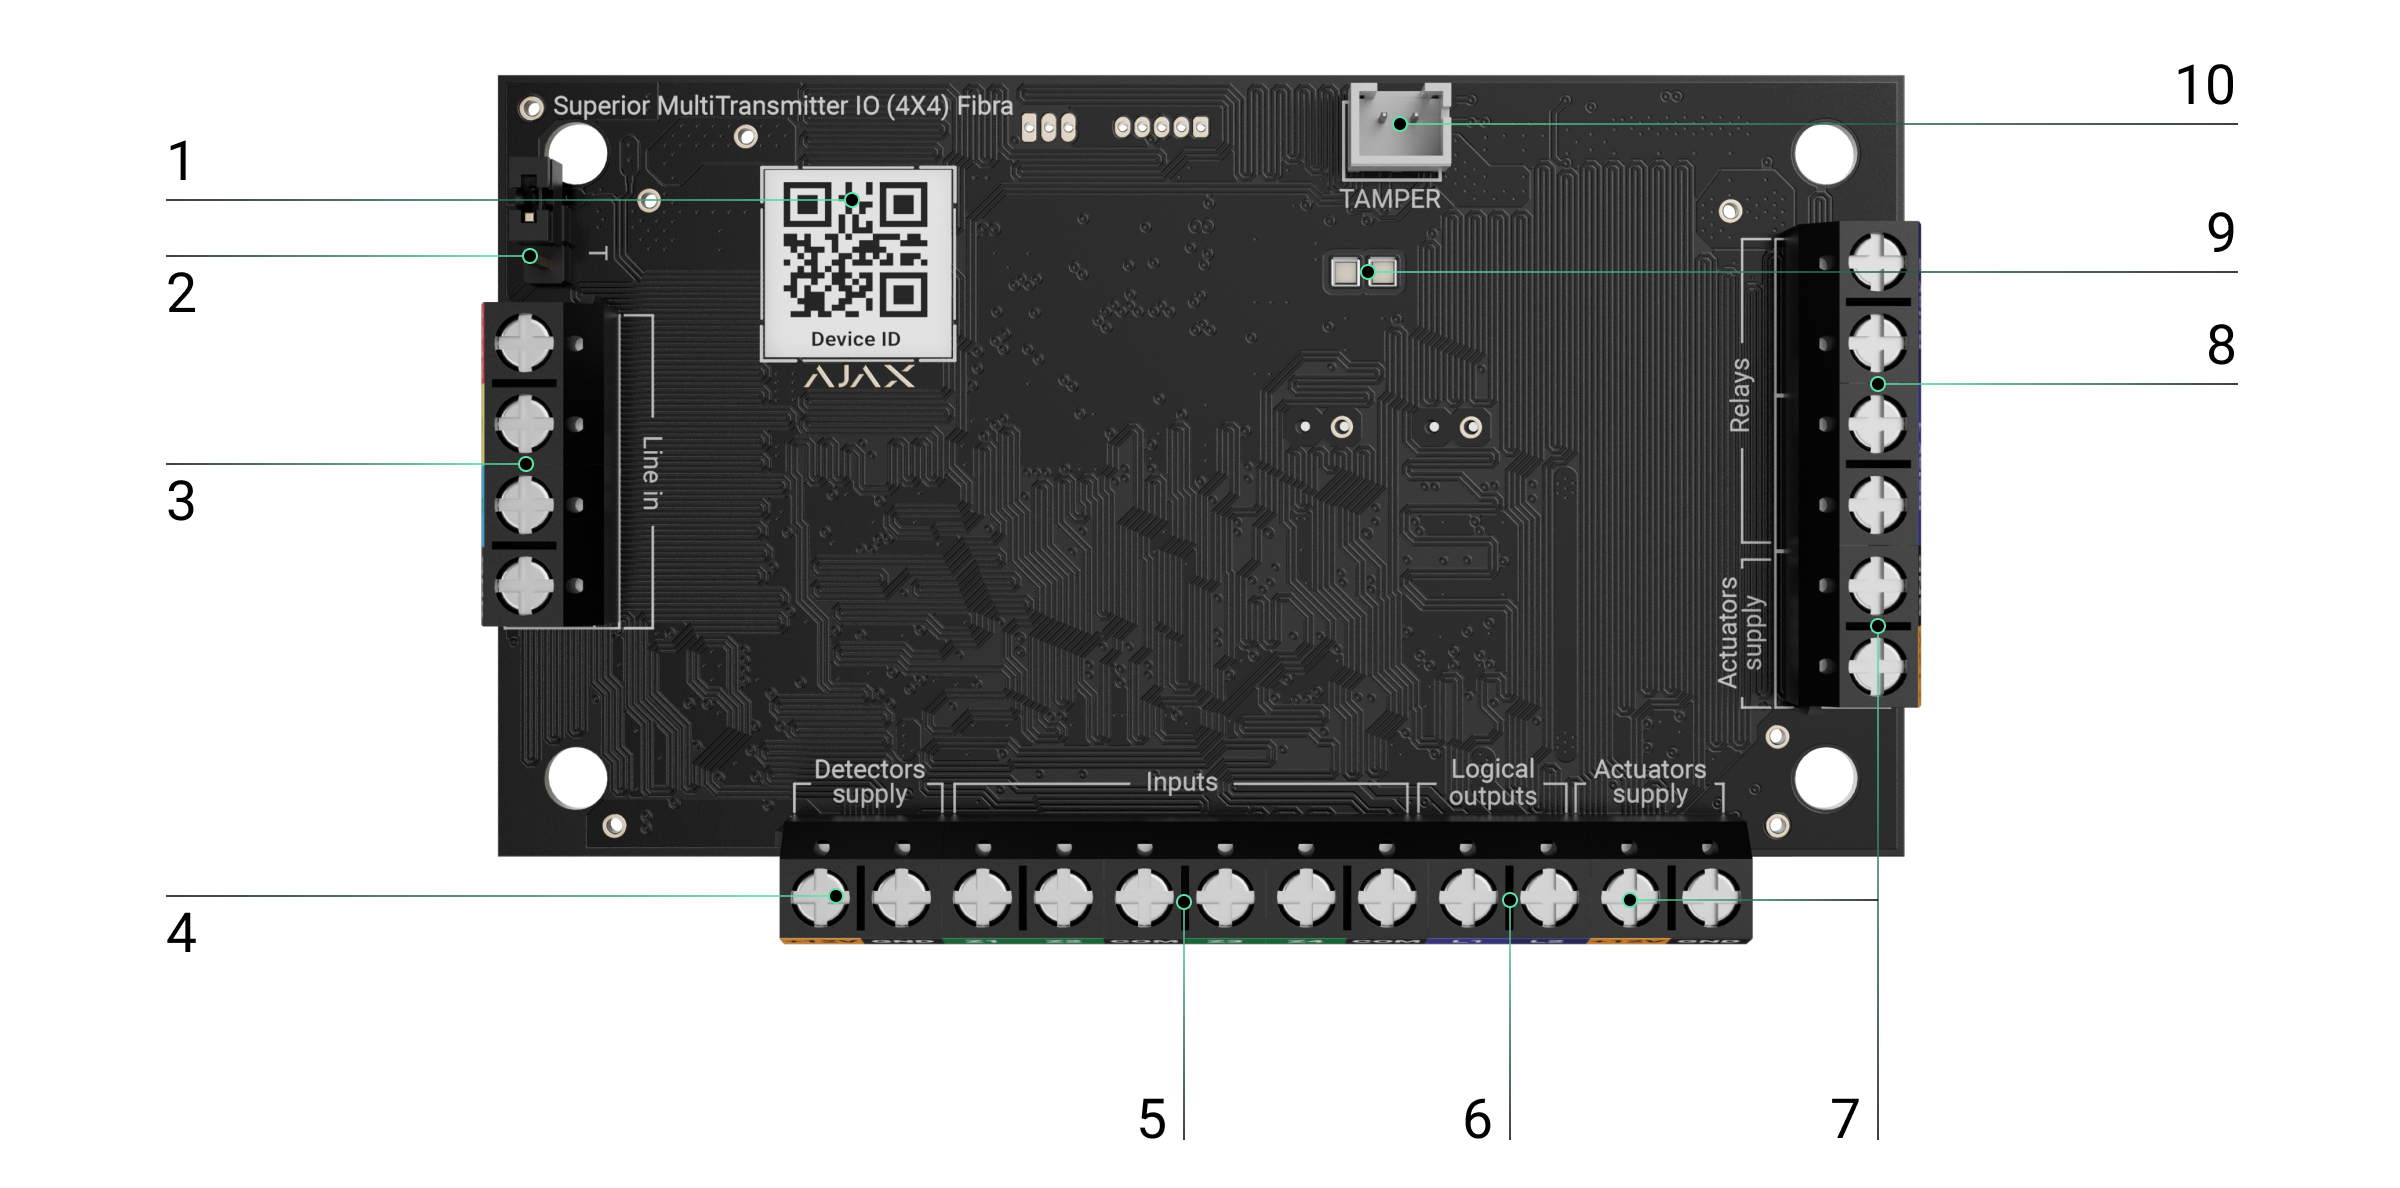
Elementos funcionais
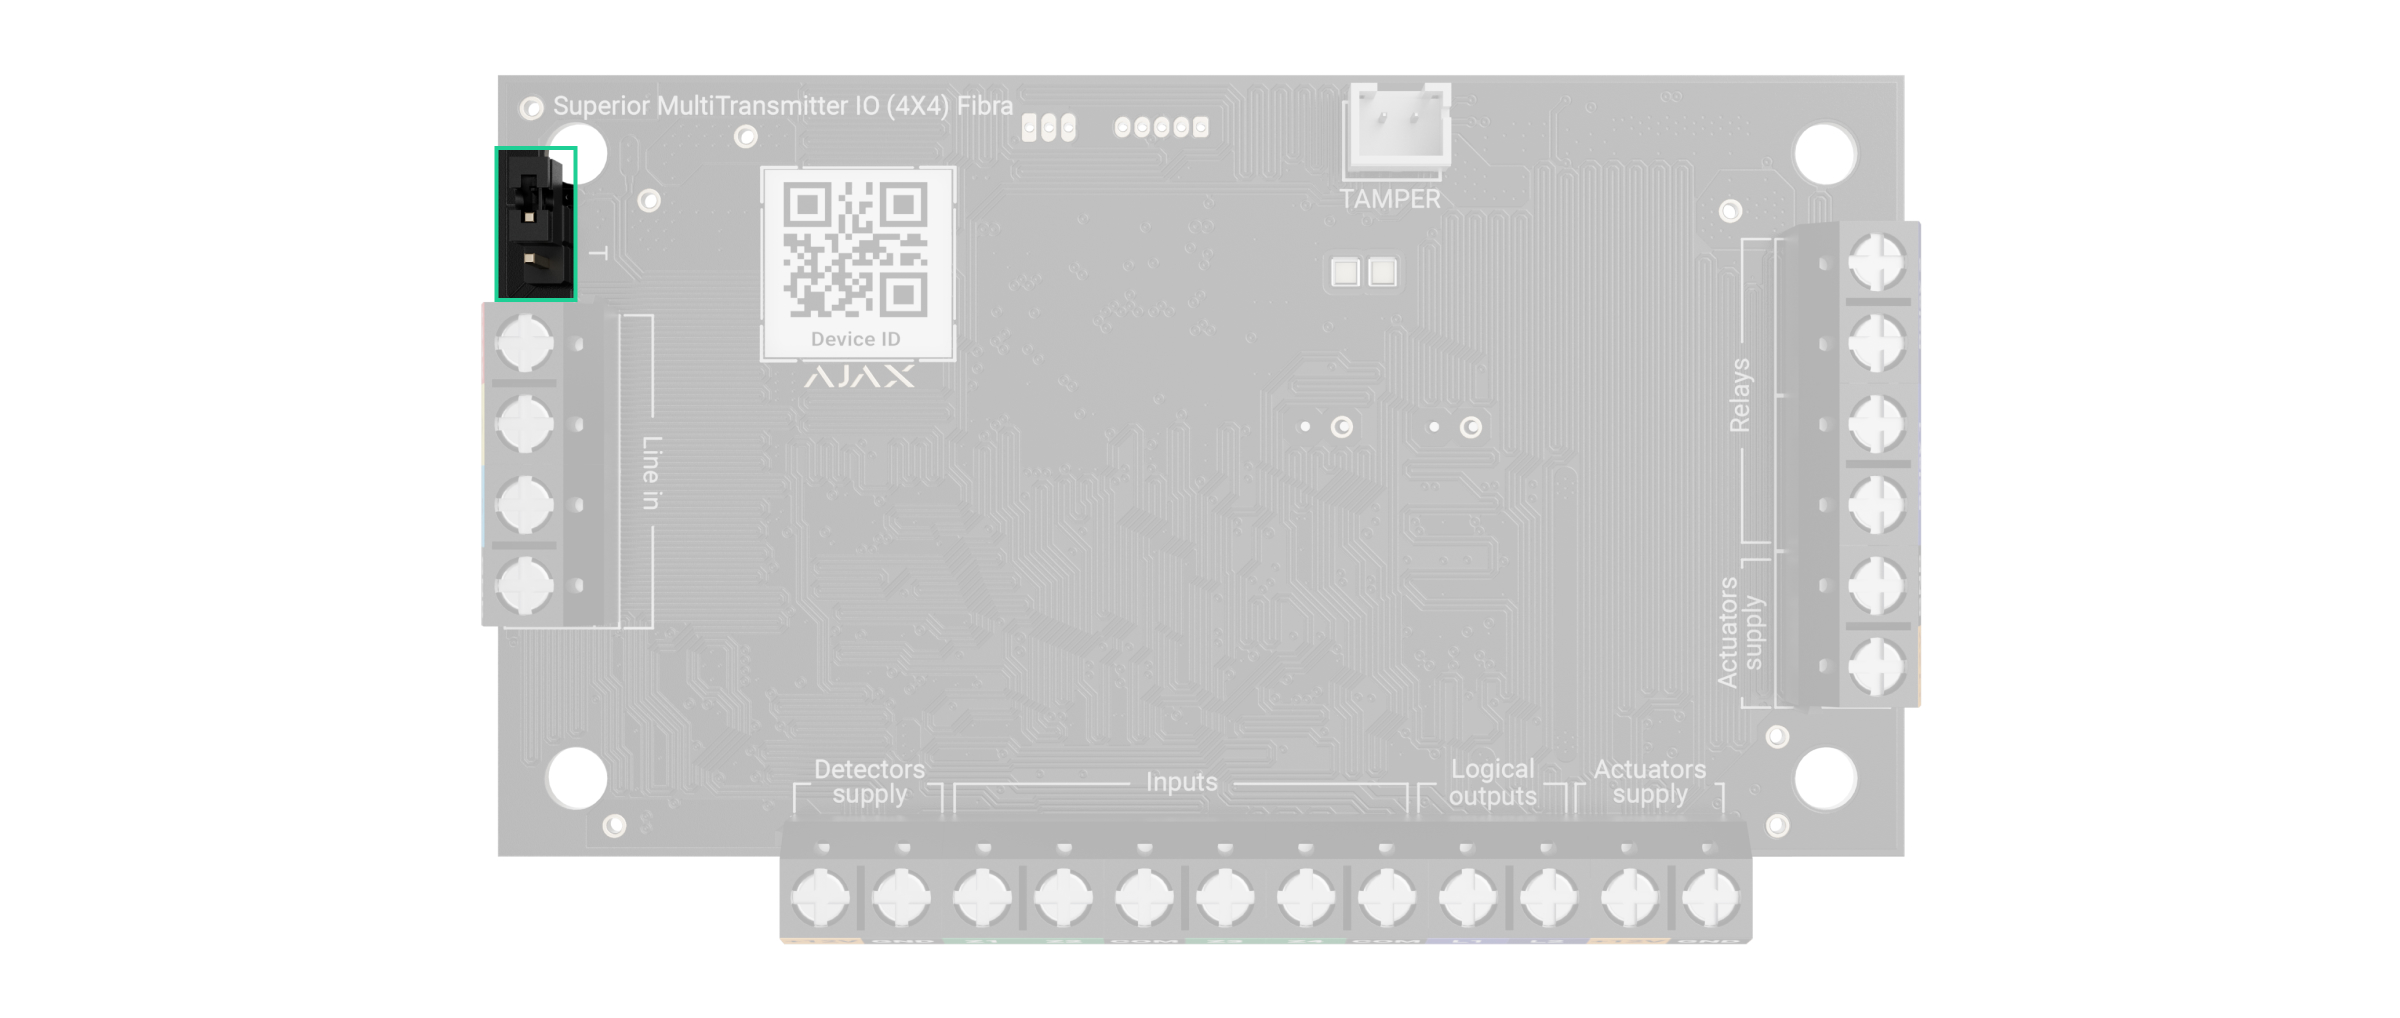
- Código QR com o ID do dispositivo para adicionar o módulo a um sistema Ajax.
- Jumper para resistência de terminação. Se o módulo de integração for o último dispositivo na linha Fibra, os pinos devem ser colocados em curto-circuito.
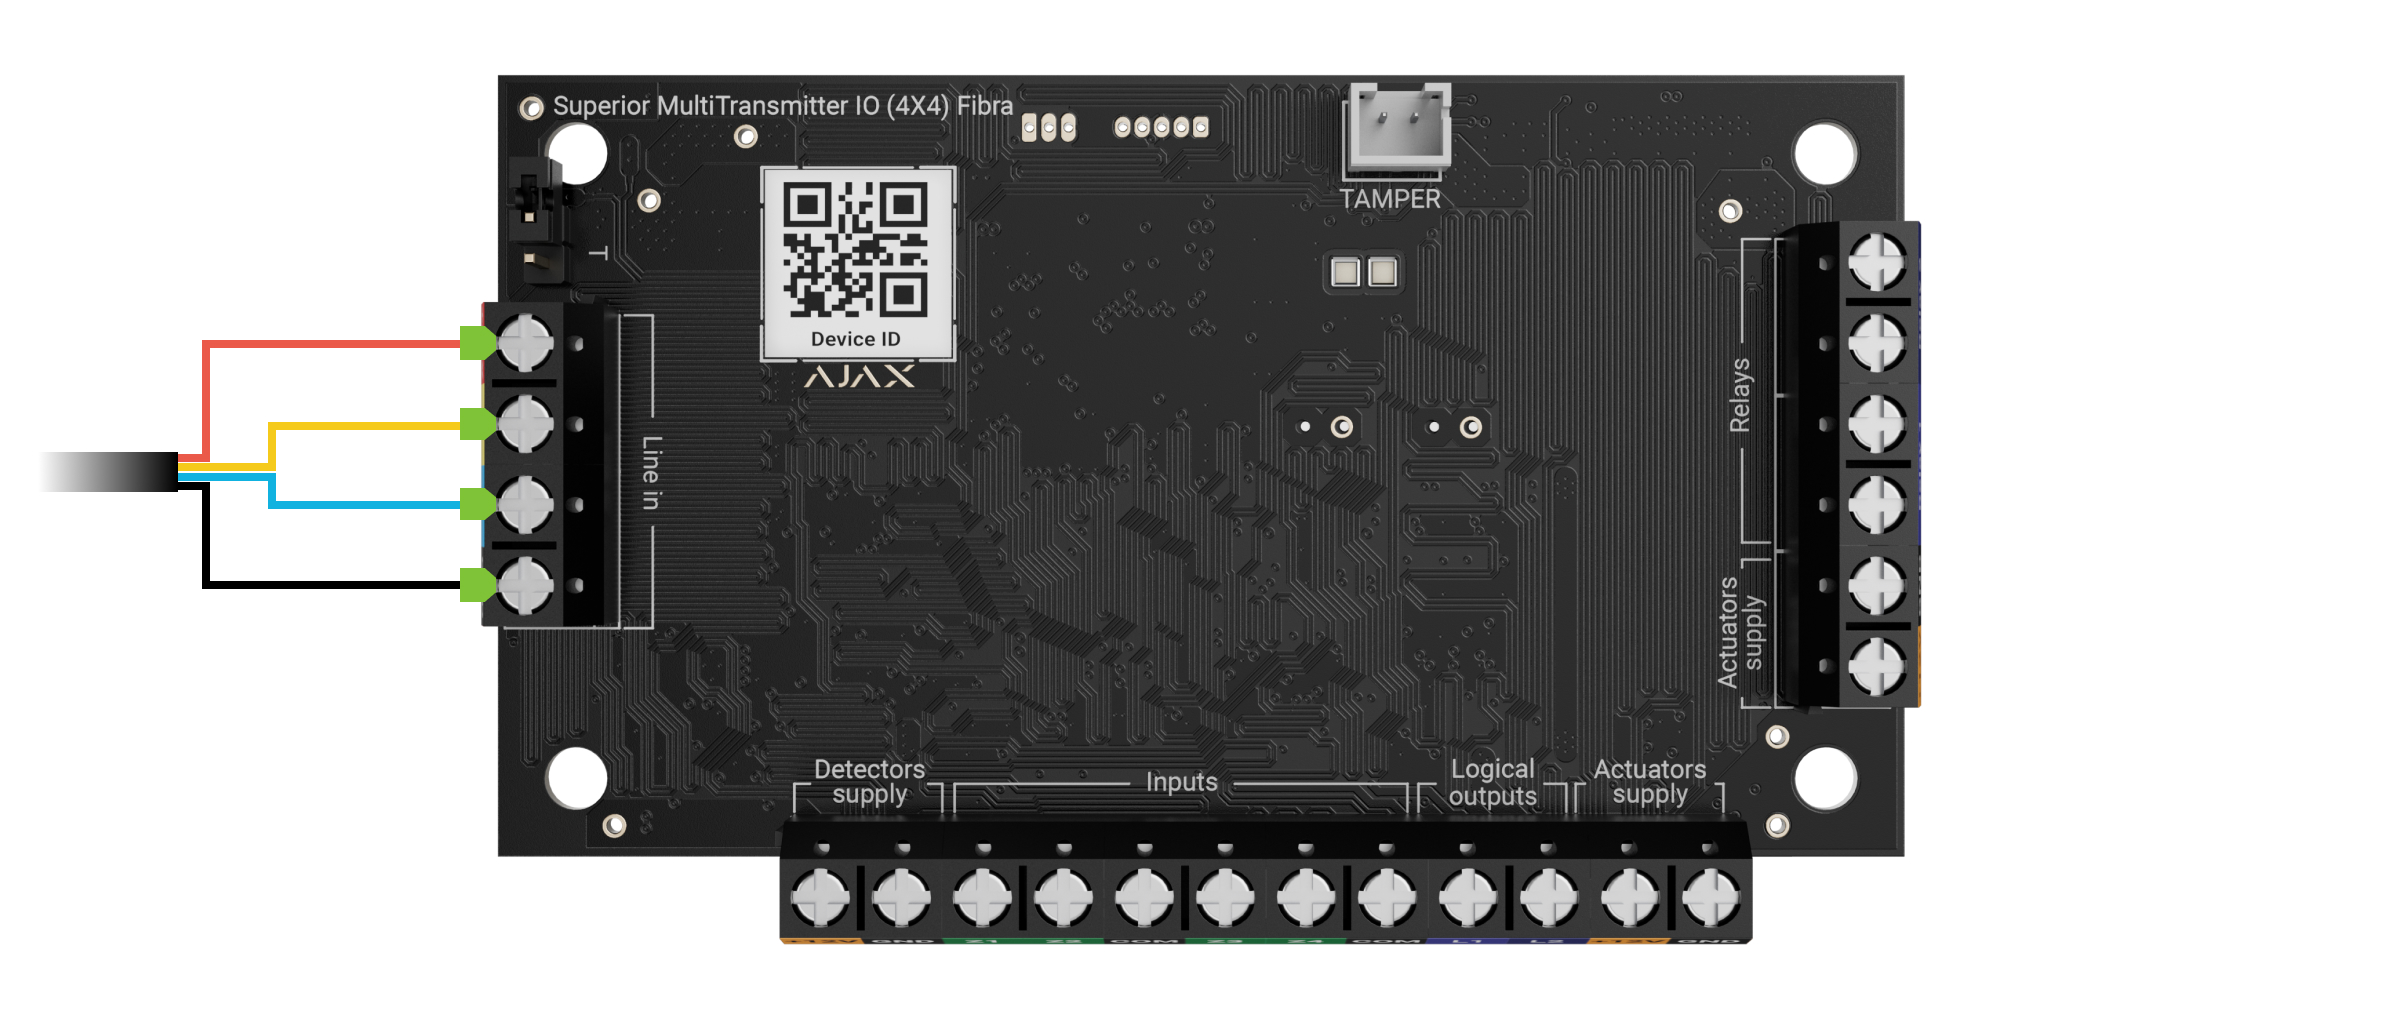
- Terminais de entrada para a ligação da linha Fibra ao Superior MultiTransmitter IO (4X4) Fibra.
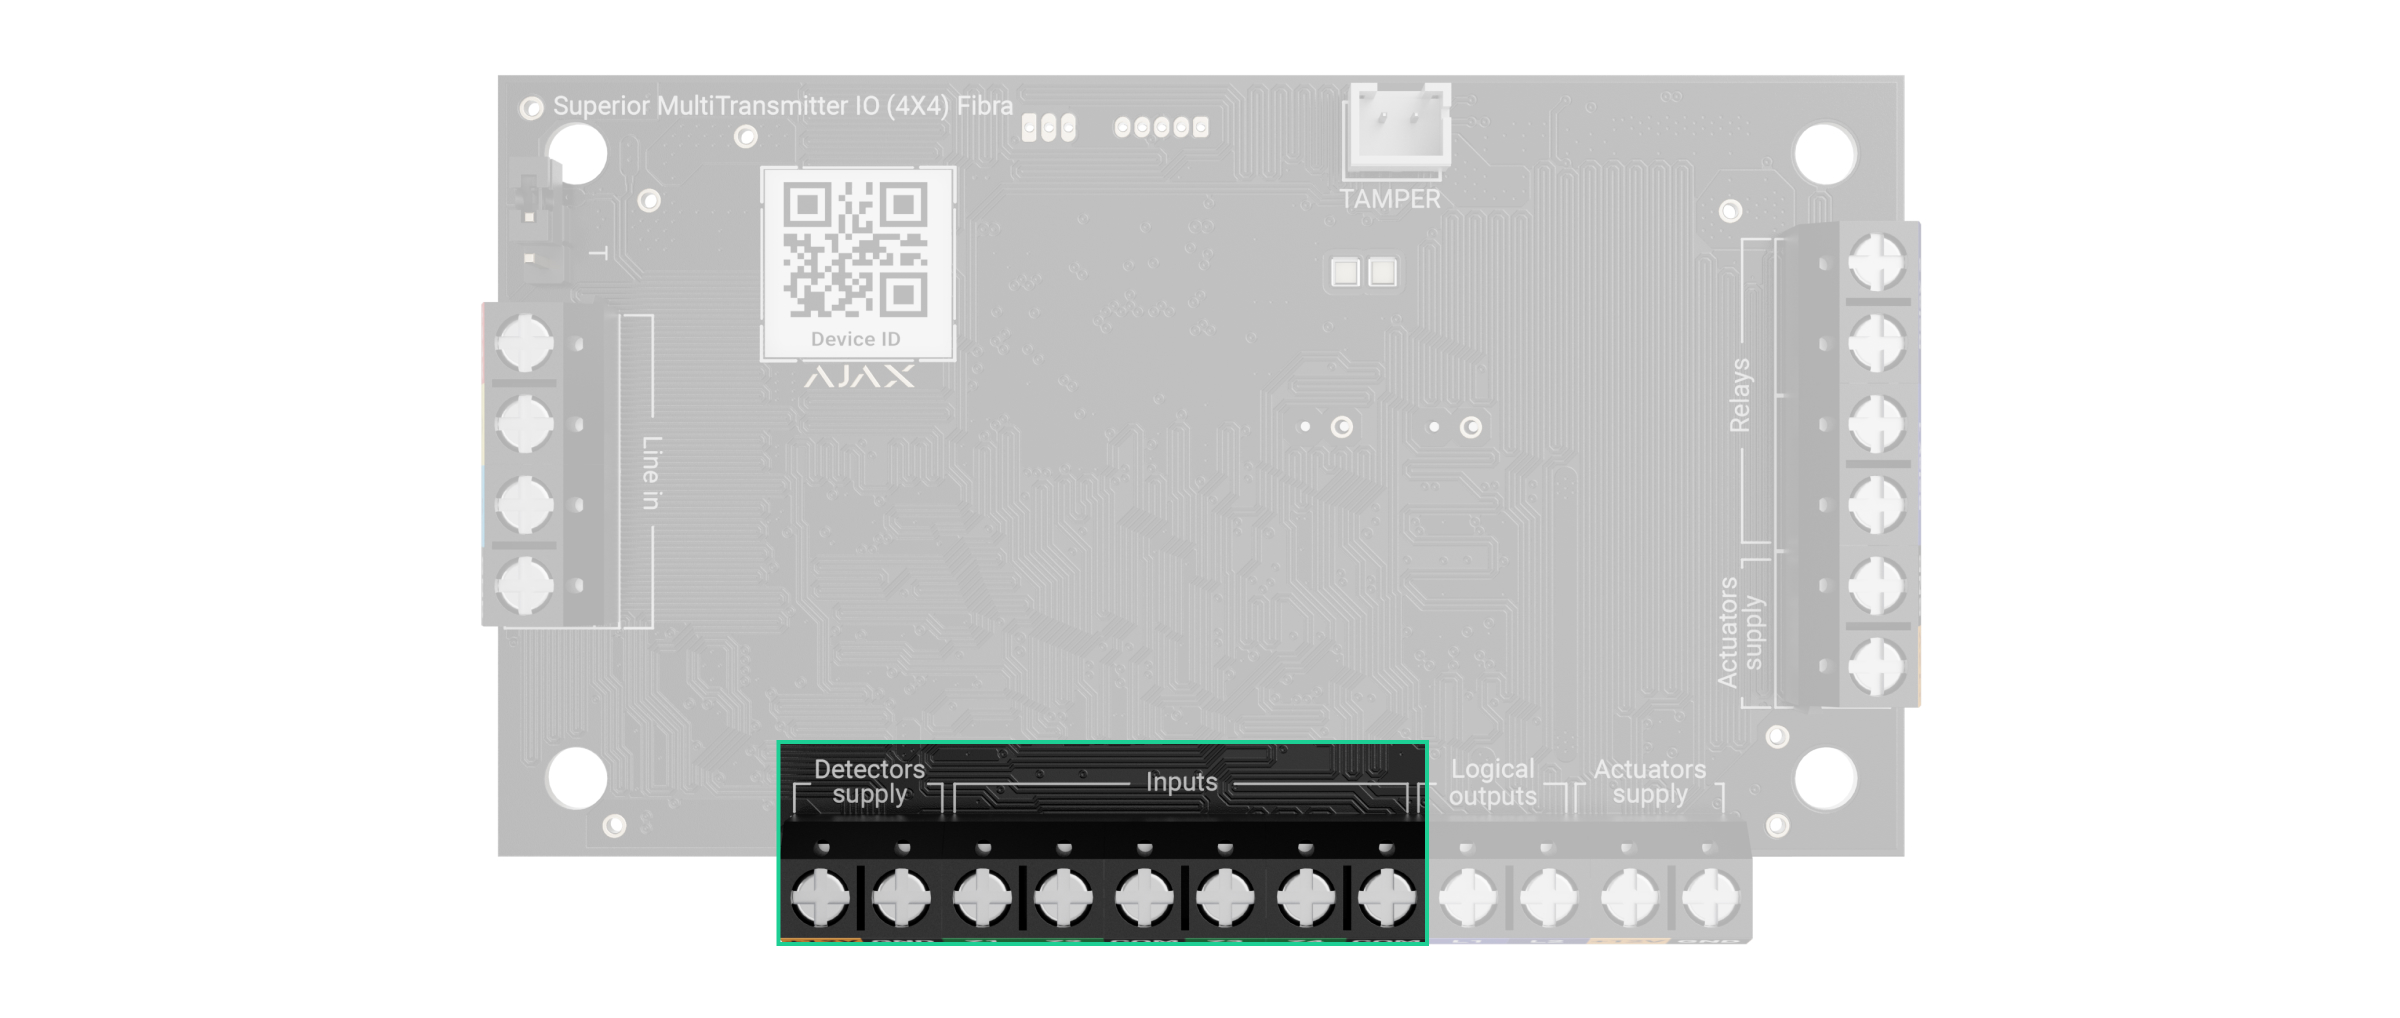
- Terminais para alimentação de dispositivos de terceiros. São utilizados para alimentar dispositivos que estão ligados aos terminais de entrada do módulo de integração.
- Terminais de entrada para ligação de dispositivos de terceiros.
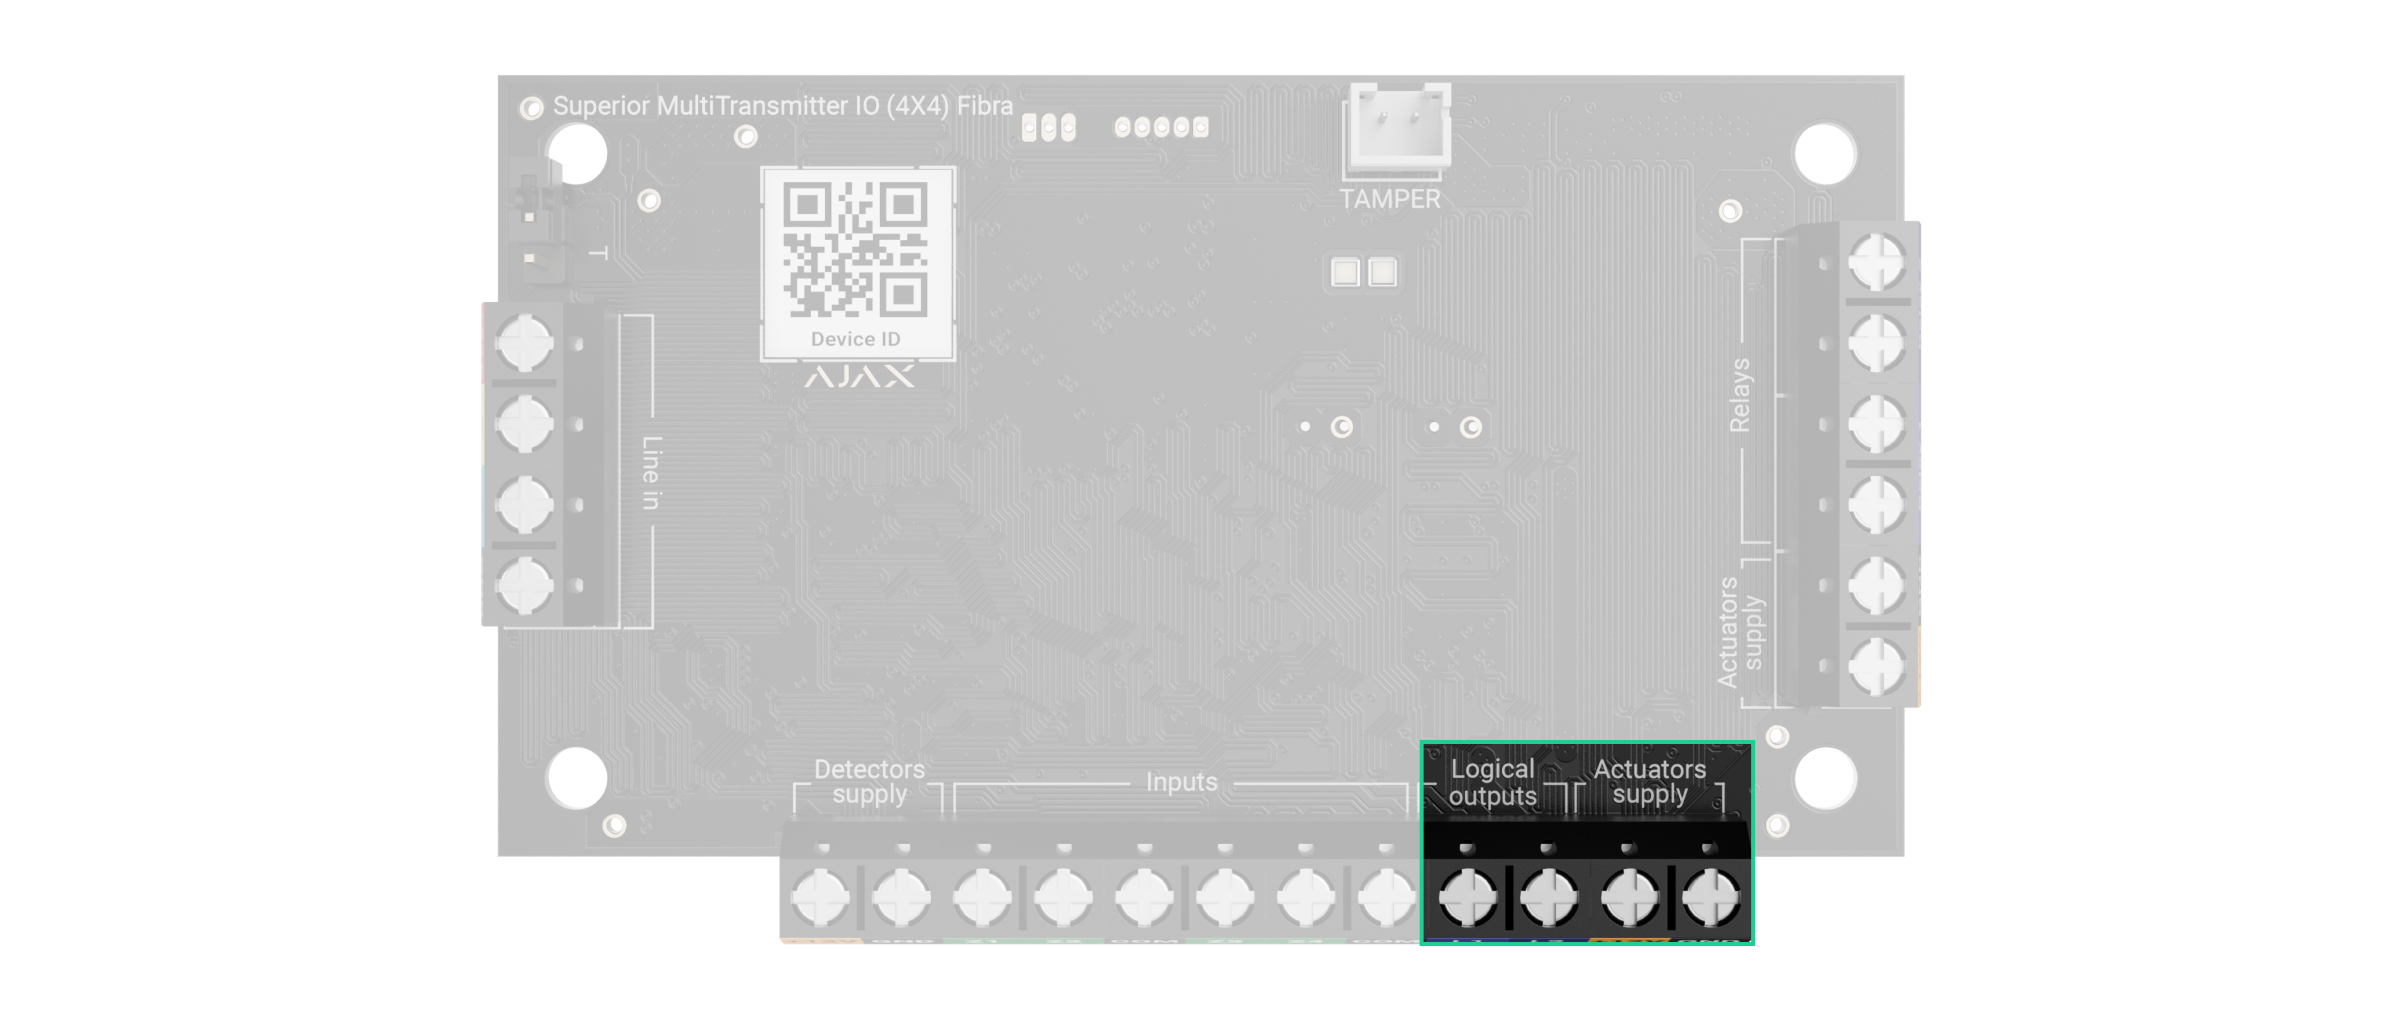
- Terminais de saída lógicos para ligação de dispositivos de terceiros.
- Terminais para alimentação de dispositivos de terceiros. São utilizados para alimentar dispositivos que estão ligados aos terminais de saída do módulo de integração.
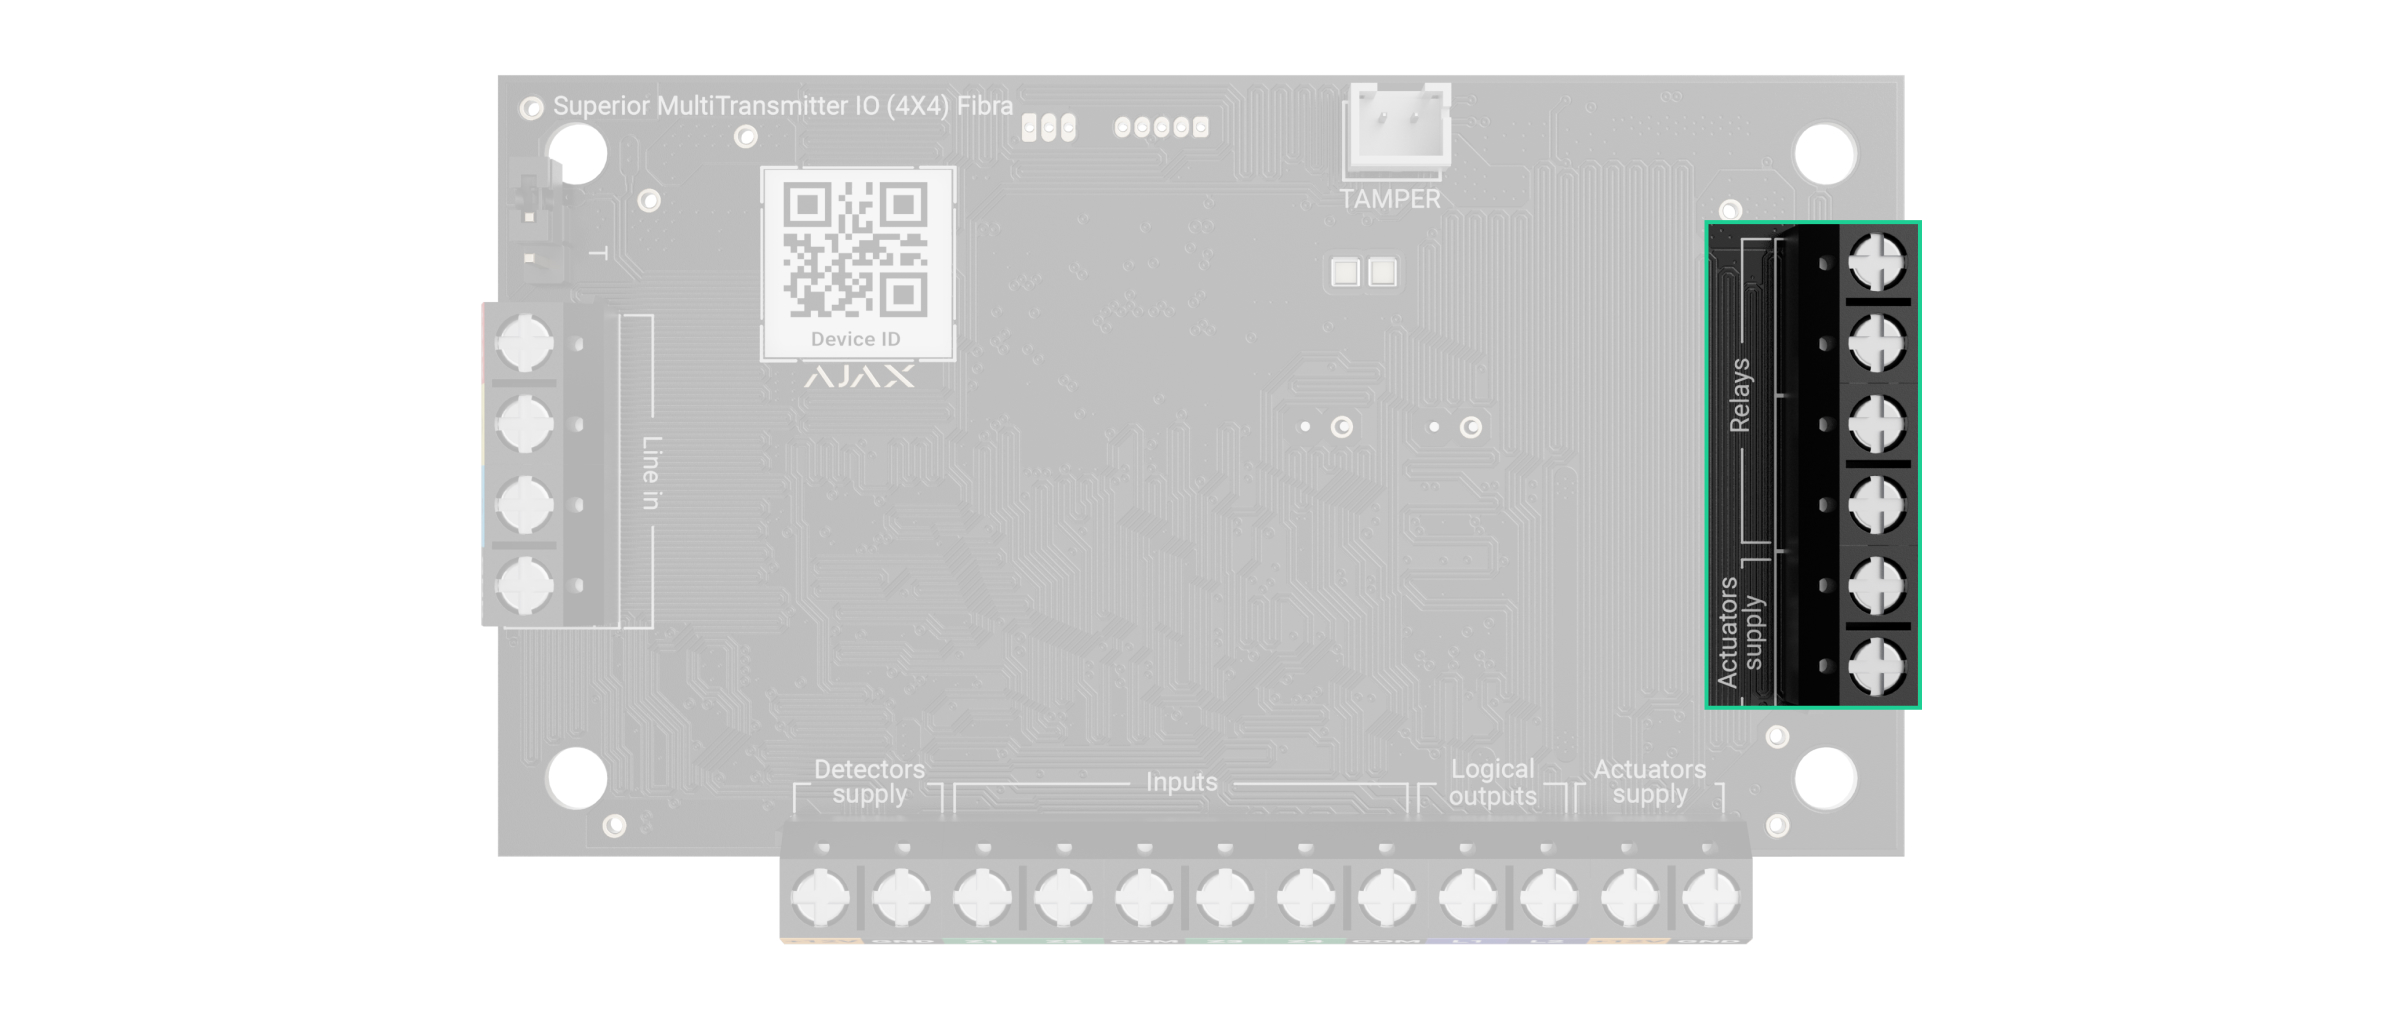
- Terminais de saída de relé para conectar dispositivos de terceiros aos relés do módulo de integração.
- Indicadores LED do módulo. Indicam o estado do módulo de integração.
- Conector para a placa de tamper. A placa de tamper está incluída no conjunto completo da Case compatível.
Hubs e repetidores compatíveis
O Superior MultiTransmitter IO (4X4) Fibra requer um hub Ajax compatível com OS Malevich versão 2.28 e posterior para funcionar.
Princípio do funcionamento
O Superior MultiTransmitter IO (4X4) Fibra é projetado para integrar até 8 dispositivos com fio de terceiros num sistema Ajax. O módulo de integração pode receber informações de dispositivos de entrada e controlar os dispositivos de saída com dois relés com contactos secos sem potencial e duas saídas lógicas. Se necessário, é possível alimentar dispositivos de terceiros a partir do próprio módulo de integração.
O consumo máximo total de corrente por dispositivos de terceiros a uma tensão de 12 V⎓nas saídas de alimentação do módulo de integração não deve exceder 500 mA.
Ligação do dispositivo de entrada
Com o Superior MultiTransmitter IO (4X4) Fibra, é possível integrar dispositivos de entrada como alarme e botões de alerta de pedido auxiliar, detetores de movimentos internos e externos, e detetores que detetam abertura, vibração, quebra de vidro, fugas de gás ou água, etc.
Tipos de ligação de dispositivos de entrada com fios:
- Sem EOL.
- EOL (ligação com uma resistência).
- 2EOL (ligação com duas resistências).
- 3EOL (ligação com três resistências).
- Persiana.
Na app Ajax, é possível selecionar o estado normal (normalmente aberto ou normalmente fechado) para os pares de terminais, como alarme, tamper e avaria. Permite ligar qualquer detetor com contactos secos sem potencial ao Superior MultiTransmitter IO (4X4) Fibra.
Para conectar dispositivos de entrada, utilize os terminais:
- Z1—Z4 — entradas para ligação de dispositivos com fios.
- COM — entrada comum para ligar contactos de sinal de dispositivos com fios.
Se um dispositivo de terceiros necessitar de uma fonte de alimentação externa para o seu funcionamento, pode ser alimentado pelos terminais de alimentação do módulo de integração:
- 12V — 11,6–12,4 V⎓, alimentação total até 500 mA para todos os dispositivos com fios ligados ao módulo de integração.
- GND — terra.
Os dispositivos com fios ligados ao Superior MultiTransmitter IO (4X4) Fibra podem funcionar num dos seguintes modos de sensor:
- Detetar alarmes
- Mudança dos modos de segurança
- Controlo do elemento de bloqueio
- Controlo de fechadura de pistão
PRO pode configurar KeyArm Zone que permite alternar os modos de armar do sistema com um dispositivo de terceiros ligado ao Superior MultiTransmitter IO (4X4) Fibra. O KeyArm permite-lhe armar/desarmar o sistema, grupos individuais ou gerir o Modo Noturno.
O tipo de dispositivo é especificado nas definições da zona à qual o dispositivo com fios está ligado. O tipo selecionado determina o texto das mensagens de alarme e dos eventos do dispositivo ligado, bem como os códigos de evento transmitidos à CRA.
Controlo do elemento de bloqueio e Controlo de fechadura de pistão os modos de sensor são utilizados para integrar elementos de bloqueio de terceiros e contactos de interruptor de pistão no sistema Ajax de acordo com o princípio da inevitabilidade (em alemão: Zwangsläufigkeit).
Tipos de dispositivos com fios
| Modo de funcionamento de deteção de alarmes | ||
| Tipo de evento | Ícone | Significado |
| Alarme de tamper |
 |
Alarme quando o tamper é acionado. |
| Intrusão |
 |
Alarme quando os detetores de movimento, abertura e outros são acionados. |
| Alarme auxiliar |
 |
Alarme quando o botão auxiliar é pressionado. |
| Botão de pânico |
 |
Alarme quando o botão de pânico é premido. |
| Alarme de gás |
 |
Alarme quando a concentração de gás é excedida. |
| Avaria |
 |
Alarme causado por avaria de um dispositivo conectado. |
| Fugas |
 |
Alarme provocado por uma inundação. |
| Quebra de vidro |
 |
Alarme quando o sensor de quebra de vidro é acionado. Este tipo de evento é possível apenas no modo de funcionamento Impulso. |
| Temperatura elevada |
 |
Alarme quando o limite Superior de temperatura é ultrapassado. |
| Temperatura baixa |
 |
Alarme quando o limite de temperatura mais baixa é reduzido. |
| Mascaramento |
 |
Alarme quando mascaramento do dispositivo é detetado. |
| Código de coação (abertura) |
 |
Alarme quando o código de coação é introduzido. Este tipo de evento é possível apenas no modo de funcionamento Impulso. |
| Vibração (sensor sísmico) |
 |
Alarme quando o sensor sísmico é acionado. Este tipo de evento é possível apenas no modo de funcionamento Impulso. |
| Personalizado |
 |
O tipo de evento é personalizado pelo utilizador. Nota: Este tipo de evento não é enviado para a estação de monitorização da empresa de segurança e para os utilizadores via SMS. |
| Incêndio |
 |
Alarme quando os detetores de incêndio são acionados. O portfólio Ajax inclui uma ampla gama de detetores de incêndio sem fio. Recomendamos a sua utilização em vez de detetores de incêndio de terceiros. |
| Mudança dos modos de segurança | ||
| Ícone | Significado | |
 |
PRO pode configurar KeyArm Zone que permite alternar os modos de a armar do sistema com um dispositivo de terceiros ligado ao Superior MultiTransmitter IO (4X4) Fibra. O KeyArm permite-lhe armar/desarmar o sistema, grupos individuais ou gerir o Modo Noturno. |
|
| Controlo do elemento de bloqueio | ||
| Ícone | Significado | |
 |
Można Pode configurar o Controlo do elemento de bloqueio para receber notificação sobre o estado do elemento de bloqueio de terceiros.
Esta funcionalidade faz parte do fluxo do princípio da inevitabilidade. |
|
| Controlo de fechadura de pistão | ||
| Ícone | Significado | |
 |
Pode configurar o Controlo de fechadura de pistão para receber notificações do estado da fechadura de pistão.
Esta funcionalidade faz parte do fluxo do princípio da inevitabilidade. |
|
Ligação às saídas lógicas
Os dispositivos de terceiros podem ser ligados a saídas lógicas para os controlar. Os parâmetros das saídas dos sinais de controlo são 0 V (como zero lógico) e 12 V (como um lógico). A capacidade de carga máxima é de até 25 mA.
Para ligar o dispositivo às saídas lógicas, utilize os terminais:
- L1 — primeiro terminal de saída lógica.
- L2 — segundo terminal de saída lógica.
Se um dispositivo de terceiros necessitar de uma fonte de alimentação adicional para o seu funcionamento, pode ser alimentado pelos terminais de alimentação do módulo de integração:
- 12V — 11,6–12,4 V⎓, alimentação total até 500 mA para todos os dispositivos com fios ligados ao módulo de integração.
- GND — terra.
Ligação às saídas de relé
Ambos os relés devem ser instalados na abertura do circuito elétrico para controlar a alimentação dos aparelhos elétricos ligados a este circuito ou devem ser alimentados pelo próprio módulo. Os relés estão configurados e controlados separadamente.
Vários tipos de dispositivos podem ser conectados aos relés com uma corrente de consumo de até 500 mA quando alimentados pelo módulo integrador. Se o dispositivo for alimentado por uma fonte de alimentação externa, é permitido um consumo de corrente até 500 mA e uma tensão de funcionamento até 48 V.
Para ligar aos relés, utilize os terminais:
- Relé 1 — dois terminais de saída do primeiro relé.
- Relé 2 — dois terminais de saída do segundo relé.
Se um dispositivo de terceiros necessitar de uma fonte de alimentação externa para o seu funcionamento, pode ser alimentado pelos terminais de alimentação do módulo de integração:
- 12V — 11,6–12,4 V⎓, alimentação total até 500 mA para todos os dispositivos com fios ligados ao módulo de integração.
- GND — terra.
Ao ligar um dispositivo com fios de terceiros aos terminais de saída do relé, pode selecionar o estado dos terminais para este dispositivo, nomeadamente normalmente fechado ou normalmente aberto, numa app Ajax.
O relé opera no modo biestável ou no modo Mudança de estado por temporizador. Quando funciona em modo biestável, o relé pode mudar o estado do contacto e o aparelho elétrico ligado liga-se ou desliga-se. Ao usar Mudança de estado por temporizador, o tempo de acionamento do relé pode ser ajustado de 1 segundo a 3 minutos. Mudança de estado por temporizador não está disponível quando o módulo de integração opera no modo Elemento de bloqueio.
Os dispositivos com fios ligados às saídas de relé do Superior MultiTransmitter IO (4X4) Fibra podem funcionar num dos seguintes modos:
- Relé
- Elemento de bloqueio
- Fechadura elétrica
Cenários automatizados
Superior MultiTransmissor IO (4X4) Fibra pode executar vários tipos de cenários dependendo do Modo de saída selecionado para saídas lógicas ou de relé:
| Tipo de cenário | Modos de saída | ||
| Relé | Fechadura elétrica | Elemento de bloqueio | |
| Através da alteração do modo de segurança |
 |
 |
Funciona automaticamente se o VdS for selecionado para o Processo de armar/desarmar nas definições do hub |
| Por alarme |
 |
 |
 |
| Por confirmação de alarme |
 |
 |
 |
| Programação |
 |
— | — |
| Por temperatura |
 |
— | — |
| Por temperatura, humidade, concentração de CO2 |
 |
— | — |
| Ao premir o Button |
 |
 |
— |
| Ao tocar no LightSwitch |
 |
 |
— |
| Ao premir ManualCallPoint Jeweller |
 |
 |
— |
Se o dispositivo estiver offline, não executará o cenário, uma vez que não consegue ativar o cenário (por exemplo, durante uma falha de energia ou quando se perde a ligação entre o hub e o dispositivo).
Caso de utilização: A ação automatizada está agendada para as 10:00, pelo que deve ter início às 10:00. O fornecimento de energia elétrica é interrompido às 9:55 da manhã e é restabelecido dez minutos mais tarde. O cenário de automatização não começará às 10 horas da manhã e não irá iniciar imediatamente após o restabelecimento da energia. Esta ação programada não foi realizada.
Protocolo de transferência de dados Fibra
O módulo de integração utiliza a tecnologia Fibra para transmitir alarmes e eventos. É um protocolo de transferência de dados com fios para uma comunicação rápida e fiável entre o hub e o módulo de integração. Utilizando o método de conexão por bus, Fibra fornece alarmes e eventos instantaneamente, mesmo que estejam conectados 100 dispositivos ao sistema.
Fibra suporta encriptação de bloco com uma chave dinâmica e verifica cada sessão de comunicação com os dispositivos para evitar sabotagem e falsificação. O protocolo prevê a consulta normal de dispositivos pelo hub com uma frequência especificada para controlar a comunicação e apresentar o estado dos dispositivos do sistema em apps Ajax.
Envio de eventos para a central de monitorização
O sistema Ajax pode transmitir alarmes tanto para a app de monitorização PRO Desktop como para a central recetora de alarmes (CRA) nos formatos SurGard (Contact ID), SIA (DC-09), ADEMCO 685 e outros protocolos.
Superior MultiTransmitter IO (4X4) Fibra pode transmitir os seguintes eventos:
- Avaria no módulo de integração.
- Conexão/desconexão da placa de tamper.
- Alarme de tamper/recuperação (se a placa de tamper estiver conectada).
- Eventos e alarmes de dispositivos ligados.
- Eventos do sensor de persiana (se conectado).
- Eventos do elemento de bloqueio (se conectado).
- Bloqueio/desbloqueio da fechadura de pistão (se o sensor estiver conectado).
- Perda/recuperação de comunicação entre Superior MultiTransmitter IO (4X4) Fibra, dispositivos conectados e o hub.
- Desativação/ativação permanente do Superior MultiTransmitter IO (4X4) Fibra e dos dispositivos conectados.
- Desativação única de Superior MultiTransmitter IO (4X4) Fibra e dispositivos conectados.
- Curto-circuito na linha / restabelecimento da fonte de alimentação dos dispositivos conectados.
- Curto-circuito ou danos na linha que liga dispositivos de terceiros ao Superior MultiTransmitter IO (4X4) Fibra (para ligações EOL).
- Falha de resistência de dispositivos conectados.
- Tentativa sem sucesso de armar o sistema (se a Verificação da integridade do sistema estiver ativada).
Quando o alarme é recebido, o operador da estação de monitorização da empresa de segurança sabe o que aconteceu e sabe exatamente para onde enviar uma unidade de resposta rápida. A capacidade de endereçamento dos dispositivos Ajax permite enviar eventos para a PRO Desktop ou para a CRA, incluindo o tipo de dispositivo, o seu nome, o grupo de segurança e a sala virtual. A lista de parâmetros transmitidos pode variar consoante o tipo da CRA e o protocolo de comunicação selecionado para a estação de monitorização.
O ID e o número do dispositivo podem ser encontrados nos seus estados na app Ajax.
Colocação de Superior MultiTransmitter IO (4X4) Fibra
Siga estas recomendações ao conceber o projeto de sistema para um local. Só os profissionais devem conceber e instalar o sistema Ajax. A lista de parceiros autorizados do Ajax está disponível aqui.
Instalação numa carcaça Ajax
Superior MultiTransmitter IO (4X4) Fibra deve ser instalado dentro da Case. É compatível com carcaças Case A (106), Case B (175) e Case D (430). O módulo de integração requer um espaço com as seguintes dimensões mínimas: 93 × 55 × 27 mm. A instalação no interior da carcaça protege o Superior MultiTransmitter IO (4X4) Fibra de impactos externos e protege-o com um alarme de tamper (se a placa de tamper estiver conectada).
Como não instalar o Superior MultiTransmitter IO (4X4) Fibra
- Em locais onde os níveis de temperatura e humidade estão fora dos limites permitidos, pois isso pode danificar o módulo.
- Em locais com uma intensidade de sinal Fibra baixa ou instável, uma vez que isso pode resultar na perda de ligação com o hub.
- Exterior.
- Sem Case compatível.
Design
É fundamental conceber corretamente o projeto do sistema para garantir a instalação e a configuração corretas dos dispositivos. O design deve considerar o número e os tipos de dispositivos no local, suas localizações exatas e alturas de instalação, o comprimento das linhas de Fibra com fios, o tipo de cabo utilizado e outros parâmetros. Consulte o artigo para obter dicas sobre como conceber o projeto do sistema Fibra.
Comprimento e tipo do cabo
Comprar Superior MultiTransmitter IO (4X4) Fibra
O alcance máximo de uma conexão com fio entre o hub e o módulo de integração usando a topologia de Feixe (Cablagem radial) é de 6550 ft, e usando a topologia de Anel é de 1600 ft.
Tipos de cabos recomendados:
- Cabo U/UTP cat.5 4×2×0,51 mm (24 AWG), condutor de cobre;
- Cabo de sinal 4 × 0,22 mm², condutor de cobre.
Por favor, note que o alcance da conexão com fio pode variar se forem usados outros tipos de cabo. Neste momento, nenhum outro tipo de cabo foi testado.
Para dispositivos com fios de outros fabricantes
O comprimento máximo do cabo para ligar dispositivos de terceiros ao Superior MultiTransmitter IO (4X4) Fibra é de 1300 ft com dispositivos do tipo de ligação EOL com fonte de alimentação externa.
Tipos de cabos recomendados:
- Cabo U/UTP cat.5 4×2×0,51 mm (24 AWG), condutor de cobre;
- Cabo de sinal 4 × 0,22 mm², condutor de cobre.
Preparar a instalação
Disposição dos cabos
Antes de colocar os cabos, verifique os regulamentos de segurança elétrica e contra incêndios aplicáveis na sua região. Respeite rigorosamente estas normas e regulamentos. Este artigo fornece sugestões para a disposição dos cabos.
Passagem de cabos
Antes de iniciar a instalação, recomendamos vivamente que reveja cuidadosamente a secção Colocação do dispositivo. Siga o projeto do sistema definido sem alterações. A violação das regras básicas de instalação do Superior MultiTransmitter IO (4X4) Fibra e das recomendações deste manual pode resultar num funcionamento incorreto, bem como na perda de ligação com o dispositivo. Neste artigo estão disponíveis sugestões para o encaminhamento de cabos.
Os dispositivos Fibra são ligados à linha um após o outro. Não é permitida a ramificação de linhas.
Preparação dos cabos para conexão
Em primeiro lugar, remova a camada de isolamento e descasque o cabo com um descascador de isolamento especial. As extremidades dos fios inseridos nos terminais do dispositivo devem ser estanhadas ou cravadas com uma manga. Garante uma conexão fiável e protege o condutor da oxidação. Este artigo contém sugestões para a preparação dos cabos.
Instalação
- Desligue a energia das linhas na app Ajax PRO:
- Hub → Definições
→ Linhas → Fonte de alimentação das linhas.
- Hub → Definições
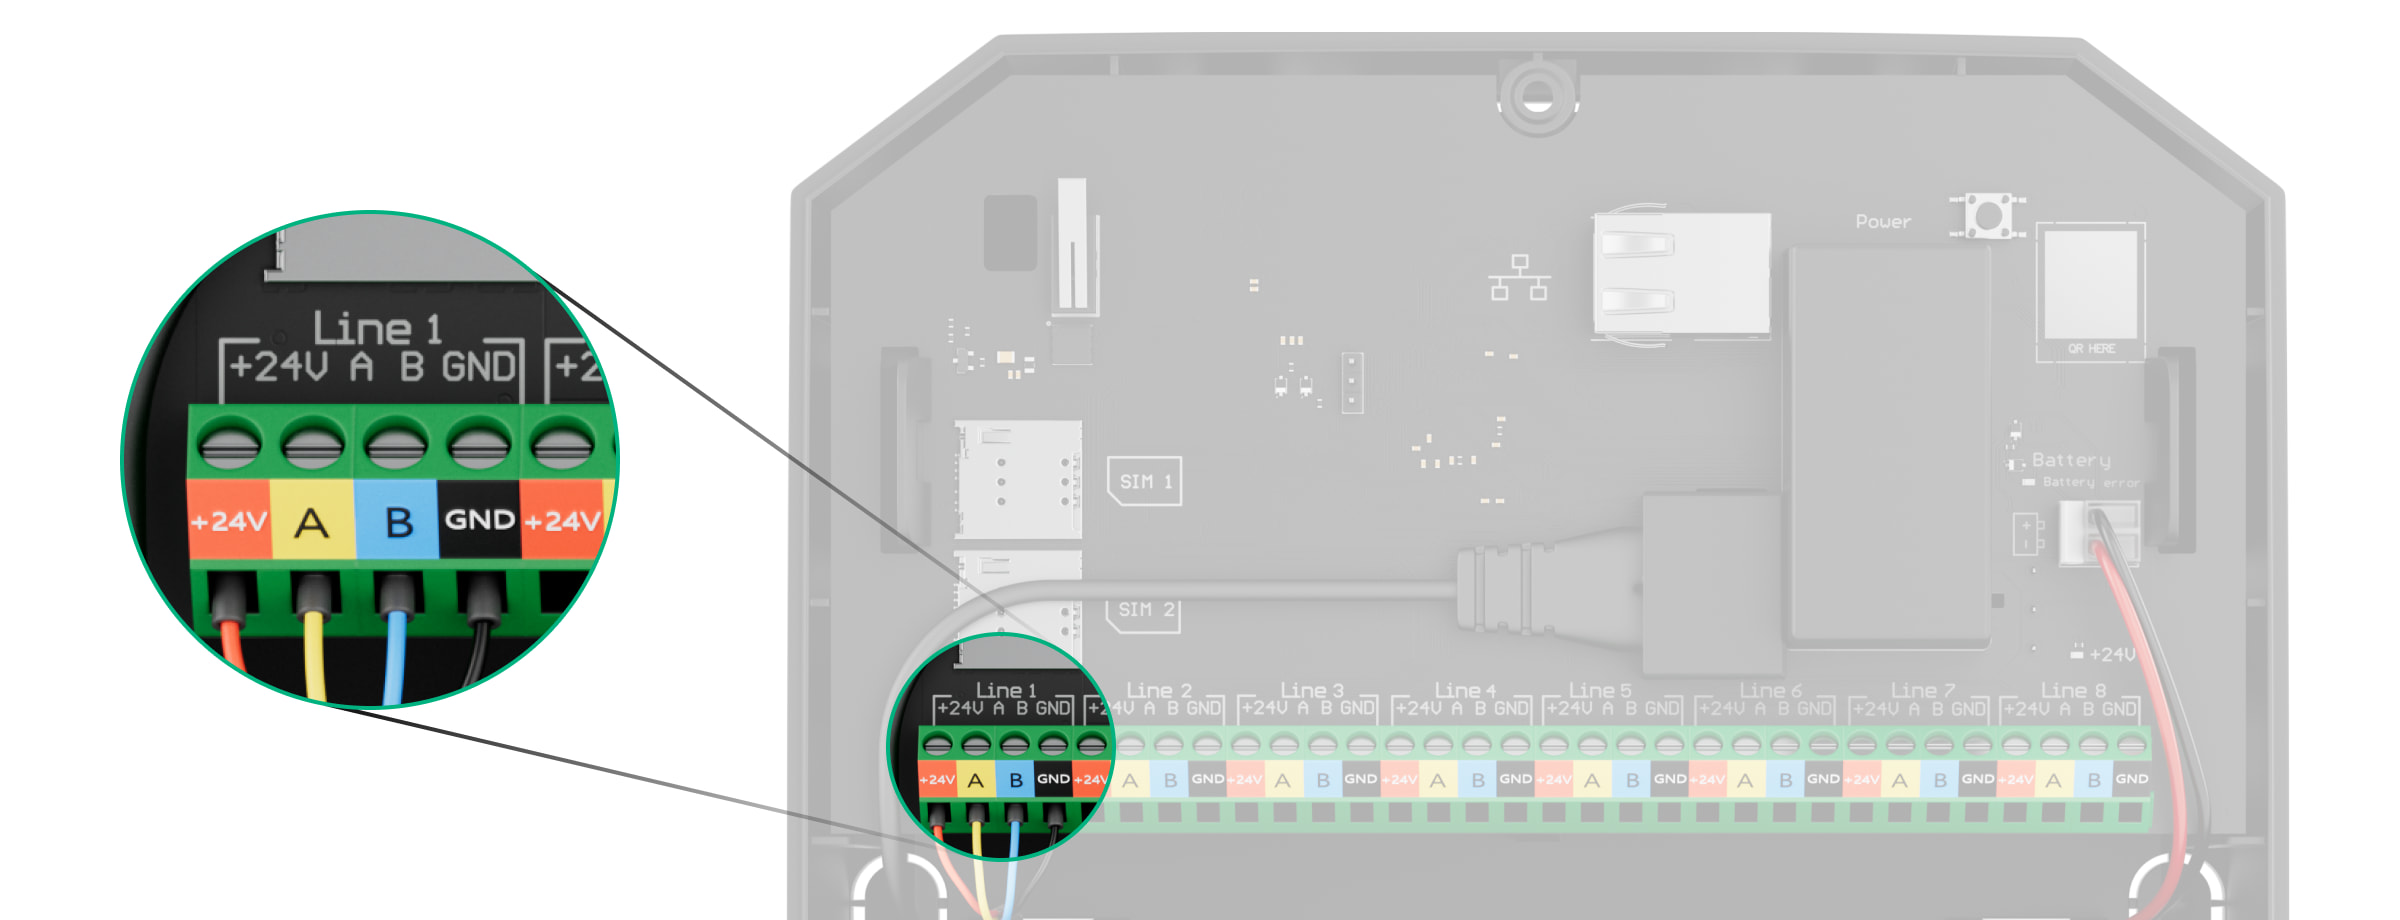
- Encaminhe o cabo para ligar o Superior MultiTransmitter IO (4X4) Fibra à carcaça do hub. Conecte os fios à linha do hub necessária.
+24V — Terminal de alimentação de 24 V⎓.
A, B — terminais de sinal.
GND — terra. - Prepare os furos para os cabos na carcaça dentro do qual o Superior MultiTransmitter IO (4X4) Fibra será instalado.
- Conecte os fios aos terminais de Superior MultiTransmitter IO (4X4) Fibra de acordo com o diagrama abaixo. Certifique-se de que a polaridade e a ordem das conexões dos fios estão corretas. Fixe firmemente o cabo aos terminais.
- Se o Superior MultiTransmitter IO (4X4) Fibra não for o último dispositivo da linha Fibra, prepare previamente um segundo cabo. Conecte os fios aos terminais do Superior MultiTransmitter IO (4X4) Fibra de acordo com a figura abaixo.
- Se o Superior MultiTransmitter IO (4X4) Fibra for o último dispositivo na linha e estiver a utilizar a ligação por Feixe (Radial), instale um jumper nos dois contactos correspondentes na placa do módulo de integração.
- Conecte os fios aos terminais do dispositivo de terceiros e aos terminais correspondentes do módulo de integração. O esquema de ligações pode ser encontrado no manual do utilizador fornecido pelo fabricante do dispositivo com fios. Certifique-se de que a polaridade e a ordem das conexões dos fios estão corretas. Fixe firmemente o cabo aos terminais.
- Conecte a placa de tamper da carcaça ao conector no módulo de integração.
Leia atentamente as instruções do fabricante antes de ligar o dispositivo ao Superior MultiTransmitter IO (4X4) Fibra.
- Ligue a fonte de alimentação das linhas na app PRO Ajax:
- Hub → Definições
→ Linhas → Fonte de alimentação das linhas.
- Hub → Definições
- Adicionar Superior MultiTransmitter IO (4X4) Fibra ao hub.
- Adicione um dispositivo com fio ao sistema.
- Faça o Teste de funcionalidade.
Adição de Superior MultiTransmitter IO (4X4) Fibra ao sistema
Superior MultiTransmitter IO (4X4) Fibra é compatível apenas com Superior Hub Hybrid (2G) e Superior Hub Hybrid (4G). Apenas parceiros verificados podem adicionar e configurar dispositivos Superior nas apps Ajax PRO.
Antes de adicionar um dispositivo
- Instale a app Ajax PRO.
- Inicie sessão numa conta PRO ou crie uma nova conta.
- Selecione um espaço ou crie um novo.
- Adicione pelo menos uma sala virtual.
- Adicione um hub compatível ao espaço. Certifique-se de que o hub está ligado e tem acesso à Internet através de Ethernet, Wi-Fi e/ou rede móvel.
- Certifique-se de que o espaço está desarmado e de que o hub não está a iniciar uma atualização, verificando os estados na app Ajax.
Ligação do Superior MultiTransmitter IO (4X4) Fibra ao hub
Estão disponíveis duas formas de adicionar dispositivos na app Ajax PRO: automaticamente e manualmente.
- Abra o app PRO Ajax e selecione o espaço ao qual deseja adicionar Superior MultiTransmitter IO (4X4) Fibra.
- Aceda ao separador Dispositivos
e toque em Adicionar dispositivo.
- Selecione Adicionar todos os dispositivos Fibra. O hub vai analisar as linhas Fibra. Após a verificação, todos os dispositivos ligados ao hub que ainda não foram adicionados ao sistema serão apresentados.
- Selecione o dispositivo desejado da lista. Após a seleção, o indicador LED piscará para identificar este dispositivo.
- Defina o nome do dispositivo e selecione a sala e o grupo de segurança se o modo de Grupo estiver ativado. Toque em Guardar.
Uma vez ligado ao hub, o módulo aparecerá na lista de dispositivos do hub na app Ajax. A frequência de atualização do estado do dispositivo na lista depende das definições Jeweller ou Jeweller/Fibra, com o valor predefinido de 36 segundos.
Superior MultiTransmitter IO (4X4) Fibra funciona apenas com um hub. Quando conectado a um novo hub, o dispositivo para de enviar eventos para o antigo.
Adicionar o módulo a um novo hub não o remove automaticamente da lista de dispositivos do hub antigo. Isto deve ser feito através da app Ajax.
Adicionar um dispositivo com fios de terceiros ligado
Num sistema Ajax, cada dispositivo ligado ao Superior MultiTransmitter IO (4X4) Fibra ocupa uma ranhura no limite de dispositivos do hub.
- Na app Ajax PRO, aceda ao separador Dispositivos
.
- Encontre Superior MultiTransmitter IO (4X4) Fibra na lista de dispositivos.
- Toque no menu Dispositivos sob o ícone do módulo de integração.
- Toque em Adicionar dispositivo.
- Atribua um nome ao dispositivo.
- Selecione a zona com fios à qual o dispositivo será fisicamente conectado.
- Selecione uma sala virtual e um grupo de segurança se o modo de Grupo estiver ativado.
- Toque em Adicionar dispositivo. O dispositivo será adicionado dentro de 30 segundos.
A atualização do estado do dispositivo depende das definições do Jeweller/Fibra; o valor por defeito é de 36 segundos.
Se a tentativa de ligação falhar, certifique-se de que a ligação com fios está corretamente configurada antes de tentar novamente. Se o número máximo de dispositivos (100 para Superior Hub Hybrid (2G)/(4G)) já tiver sido adicionado ao hub, receberá uma notificação de erro ao adicionar.
Teste de funcionalidade do Superior MultiTransmitter IO (4X4) Fibra
Um sistema Ajax oferece vários tipos de testes para ajudar a selecionar o local de instalação correto para o Superior MultiTransmitter IO (4X4) Fibra. Os testes não começam imediatamente; no entanto, o tempo de espera não excede a duração de um intervalo de consulta “hub—dispositivo”. Pode verificar e configurar o intervalo de consulta nas definições do hub (Hub → Definições → Jeweller/Fibra).
Para executar um teste, na app Ajax:
- Selecione o hub necessário.
- Aceda o separador Dispositivos
.
- Selecione Superior MultiTransmitter IO (4X4) Fibra da lista.
- Aceda a Definições
.
- Efetue o Teste de intensidade do sinal Fibra.
Intensidade do sinal Fibra
A intensidade do sinal Fibra mostra a intensidade da ligação entre o hub e o Superior MultiTransmitter IO (4X4) Fibra. É determinado pelo número de pacotes de dados não entregues ou corrompidos durante um determinado período de tempo. O ícone no separador Dispositivos
indica a intensidade do sinal:
- Três barras — excelente intensidade de sinal.
- Duas barras — boa intensidade de sinal.
- Uma barra — fraca intensidade de sinal, não é garantido um funcionamento estável.
- Ícone riscado — sem sinal.
Teste de alimentação das linhas
É importante efetuar o teste depois de todos os dispositivos de terceiros estarem ligados.
O teste simula o consumo máximo de energia dos dispositivos conectados ao hub. Se o sistema passar no teste, todos os dispositivos têm energia suficiente em qualquer situação.
Durante o teste, Superior MultiTransmitter IO (4X4) Fibra calibra sua saída para a corrente apropriada. Após a calibração, os limiares de carga das entradas e saídas são ajustados ao consumo máximo dos dispositivos de terceiros ligados. Se a configuração do sistema for alterada, é necessário repetir o teste de potência das linhas para recalibrar o dispositivo de acordo com as novas caraterísticas da rede.
Após o teste, a app apresenta uma notificação com o estado de cada linha:
- Teste aprovado.
- Teste passado com avarias.
- Teste falhado.
Avarias
Quando é detetada uma avaria no Superior MultiTransmitter IO (4X4) Fibra, a app Ajax apresenta um contador de avarias no ícone do dispositivo. Todas as avarias são indicadas nos estados do módulo. Os campos com avarias vão ser indicados a vermelho.
É apresentada uma avaria se a ligação com um hub se perder.
Uma avaria do dispositivo conectado é exibida se:
- Case está aberta ou separada da superfície (tamper é acionado).
- Não existe ligação entre o módulo de integração e o dispositivo (os contactos estão danificados).
- Ligação incorreta das resistências (erro de resistência).
- Curto-circuito na linha de alimentação do dispositivo.
- Baixa tensão na linha de alimentação do Superior MultiTransmitter IO (4X4) Fibra.
Controlo através da app Ajax
Nas apps Ajax, um utilizador pode ligar/desligar aparelhos elétricos ligados a um circuito elétrico controlado por saídas de relé do Superior MultiTransmitter IO (4X4) Fibra. Além disso, os utilizadores podem controlar os dispositivos ligados às saídas lógicas. Toque no interruptor no campo Superior MultiTransmitter IO (4X4) Fibra no menu de Dispositivos : o estado do relé ou relés lógicos mudará para o oposto, e o dispositivo elétrico conectado se desligará ou ligará.
O controlo rápido de dispositivos de automatização também está disponível no menu Automatização. É possível abrir o menu em apps Ajax:
- Aceda o separador Dispositivos
.
- Selecione o hub necessário da lista.
- Aceda ao separador Controlo.
- Deslize para cima.
- Controle os dispositivos necessários.
- Deslize para baixo para voltar ao separador Controlo.
Ícones
Os ícones na app apresentam alguns estados de módulos. Para aceder aos mesmos:
- Abra o espaço na app Ajax.
- Aceda o separador Dispositivos
.
- Selecione Superior MultiTransmitter IO (4X4) Fibra da lista.
Ícones de Superior MultiTransmitter IO (4X4) Fibra
| Ícone | Significado |
|
Intensidade do sinal Fibra — apresenta a intensidade do sinal entre o hub e o módulo de integração. O valor recomendado é de 2–3 barras. |
|
|
Um detetor de incêndio conectado ao Superior MultiTransmitter IO (4X4) Fibra registou um alarme. O portfólio Ajax inclui uma ampla gama de detetores de incêndio sem fio. Recomendamos a sua utilização em vez de detetores de incêndio de terceiros. |
|
| Superior MultiTransmitter IO (4X4) Fibra tem uma avaria. Está disponível uma lista de avarias nos Estados do módulo de integração. | |
|
Superior MultiTransmitter IO (4X4) Fibra está desativado. |
|
|
Superior MultiTransmitter IO (4X4) Fibra está desativado até ao primeiro evento de desarme do sistema. |
|
| O dispositivo perdeu a ligação com o hub ou o hub perdeu a ligação com o servidor Ajax Cloud. | |
|
O dispositivo não foi transferido para o novo hub. |
Ícones de dispositivos conectados
| Ícone | Significado |
| A função Chime está ativada. | |
|
|
Atraso na entrada/saída está ativado. |
| O dispositivo funciona no modo Sempre ativo. | |
| O dispositivo funcionará quando o Modo Noturno estiver ativado. | |
|
O estado do dispositivo está OK. Apresentado apenas para ligações EOL, NC, NO e persiana. |
|
|
O dispositivo está em curto-circuito. Apresentado apenas para ligações EOL, NC, NO e persiana. |
|
| O estado de tamper do dispositivo está OK.* | |
| Alarme de tamper do dispositivo.* | |
| O estado dos sensores de intrusão está OK.* | |
| Alarme de intrusão.* | |
| O estado do botão auxiliar está OK.* | |
| Alarme quando o botão auxiliar é pressionado.* | |
| O estado do botão de pânico está OK.* | |
| Alarme quando o botão de pânico é premido.* | |
| O estado do sensor de incêndio está OK.* | |
| O dispositivo detetou um alarme de incêndio.* | |
| O estado do sensor de gás está OK.* | |
| Alarme quando a concentração de gás é excedida.* | |
| O estado do dispositivo está OK.* | |
| Foi detetada uma avaria no dispositivo.* | |
| O estado do sensor de gás está OK.* | |
| O alarme foi causado por uma inundação.* | |
| O estado do sensor de quebra de vidro está OK.* | |
| Alarme foi causado por quebra de vidro.* | |
| O estado do sensor de temperatura elevada está OK.* | |
| Alarme quando o limite Superior de temperatura é ultrapassado.* | |
| O estado do sensor de temperatura baixa está OK.* | |
| Alarme quando o limite inferior de temperatura é reduzido.* | |
| O estado do sensor de mascaramento está OK.* | |
| Alarme de mascaramento.* | |
| O estado do dispositivo do código de coação está OK.* | |
| Alarme acionado quando o sistema é desarmado utilizando o código de coação.* | |
| O estado do sensor de vibrações (sísmico) está OK.* | |
| Alarme de vibrações (sísmico).* | |
| O estado do dispositivo para o qual o tipo de evento personalizado está selecionado está OK.* | |
| O alarme do dispositivo para o qual é selecionado o tipo de evento personalizado.* | |
| O sensor funciona no modo de Mudança dos modos de segurança. | |
| O estado do Elemento de bloqueio. | |
| O estado de Fechadura de pistão. | |
| O dispositivo é automaticamente desativado quando o número de alarmes é ultrapassado. | |
| O dispositivo é automaticamente desativado pelo temporizador de restauro. | |
| O dispositivo é desativado pelo utilizador do sistema. | |
| O dispositivo é desativado até ocorrer o primeiro evento de desarme do sistema. |
* O ícone é apresentado apenas para as ligações 2EOL e 3EOL.
Estados
Estados do Superior MultiTransmitter IO (4X4) Fibra
Os estados contêm informações sobre o módulo de integração e os seus parâmetros de funcionamento. Pode encontrar os estados do Superior MultiTransmitter IO (4X4) Fibra nas apps Ajax:
- Aceda o separador Dispositivos
.
- Selecione Superior MultiTransmitter IO (4X4) Fibra da lista.
| Parâmetro | Significado |
| Importação de dados | Apresenta o erro aquando da transferência de dados para o novo hub:
|
| Atualizações de firmware | Mostra o estado da atualização do firmware se uma nova versão estiver disponível:
|
| Avaria |
Ao tocar em O campo só é apresentado se for detetada uma avaria. |
| Temperatura |
A temperatura do dispositivo. É medido pelo Superior MultiTransmitter IO (4X4) Fibra e varia consoante a temperatura ambiente. É possível criar um cenário por temperatura para controlar dispositivos de automatização. |
| Intensidade do sinal Fibra |
Intensidade do sinal Fibra entre o Superior MultiTransmitter IO (4X4) Fibra e o hub. O valor recomendado é de 2–3 barras. Fibra é o protocolo de transmissão de eventos e alarmes do Superior MultiTransmitter IO (4X4) Fibra. |
| Conexão via Fibra | Estado da ligação na linha Fibra entre o Superior MultiTransmitter IO (4X4) Fibra e o hub:
|
| Tensão da linha | O valor da tensão na linha Fibra à qual o detetor está conectado. |
| Estado do elemento de bloqueio | Estado do elemento de bloqueio:
Este estado é apresentado se Elemento de bloqueio for selecionado para saídas lógicas ou relés. |
| Estado da fechadura elétrica | Estado da fechadura elétrica:
Este estado é apresentado se Fechadura elétrica for selecionada para saídas lógicas ou relés. |
| Estado do relé | Estado dos relés:
Este estado é apresentado para cada relé. |
| Tempo de funcionamento | Mostra o tempo que está definido para o Mudança de estado por temporizador. |
| Tampa | Estado do tamper que é acionado quando a Case é destacada da superfície ou a integridade da carcaça é comprometida:
|
| Fonte de alimentação para dispositivos de entrada | Estado da fonte de alimentação para dispositivos de entrada conectados:
|
| Fonte de alimentação para dispositivos de saída | Estado da alimentação elétrica dos dispositivos de saída conectados:
|
| Desativação permanente | Apresenta o estado da definição de desativação permanente do dispositivo:
|
| Desativação única | Estado da definição de desativação única do dispositivo:
|
| Firmware | Versão do firmware do dispositivo. |
| ID do dispositivo | Superior MultiTransmitter IO (4X4) Fibra ID. Também se encontra na placa do módulo de integração, na parte de trás da carcaça e na embalagem. |
| Número do Dispositivo | Número do bucle do dispositivo (zona). |
| Linha nº. | Número da linha Fibra à qual o Superior MultiTransmitter IO (4X4) Fibra está conectado. |
Estados dos dispositivos ligados
Os estados apresentam informações sobre os dispositivos e os seus parâmetros de funcionamento. Pode encontrar os estados dos dispositivos ligados ao Superior MultiTransmitter IO (4X4) Fibra nas apps Ajax:
- Aceda o separador Dispositivos
.
- Encontre Superior MultiTransmitter IO (4X4) Fibra na lista.
- Toque em Dispositivos sob o ícone Superior MultiTransmitter IO (4X4) Fibra.
- Selecione o dispositivo na lista.
| Parâmetro | Significado |
| Avaria |
Ao tocar no O campo só é apresentado se for detetada uma avaria. |
| Nome do dispositivo com fios conectado | Estado da ligação na linha entre Superior MultiTransmitter IO (4X4) Fibra e o dispositivo com fios conectado:
|
| Estado do Dispositivo | Estado do dispositivo com fios conectado:
|
|
“Nome do tipo de evento selecionado” Sensor 1 Apresentado para os tipos de ligação 2EOL e 3EOL |
Estado do dispositivo com fios conectado:
|
|
Estado do interruptor para armar Apresentado para os tipos de ligação 2EOL e 3EOL quando a opção Mudança dos modos de segurança está selecionada para o Modo do sensor (para Sensor 2). |
Estado do dispositivo com fios conectado:
|
|
Estado do elemento de bloqueio Apresentado para os tipos de ligação 2EOL e 3EOL quando a opção Controlo do elemento de bloqueio está selecionada para o Modo do sensor (para Sensor 2). |
Estado do elemento de bloqueio conectado:
|
|
Estado da fechadura de pistão Apresentado para os tipos de ligação 2EOL e 3EOL quando a opção Controlo de fechadura de pistão está selecionada para o Modo do sensor (para Sensor 2). |
Estado da fechadura de pistão conectada:
|
| Sempre ativo |
Se a opção estiver ativa, o dispositivo conectado ao Superior MultiTransmitter IO (4X4) Fibra está constantemente armado e comunica alarmes. É possível configurar a opção apenas para determinados tipos de eventos. |
|
Resistência do dispositivo Apresentado para os tipos de conexão EOL, 2EOL e 3EOL |
A resistência total do(s) resistor(es) ligado(s) ao dispositivo é medida automaticamente. Os valores também podem ser definidos manualmente em incrementos de 100 Ω. |
| Desativação permanente |
Permite ao utilizador desativar o dispositivo sem o retirar do sistema. Estão disponíveis duas opções:
Também é possível configurar separadamente a desconexão do dispositivo:
A funcionalidade está configurada nas apps Ajax PRO. |
| Desativação única | Estado da definição de desativação única do dispositivo:
|
| Reação do alarme | |
| Modo de funcionamento | Mostra como o detetor reage aos alarmes:
|
| Atraso ao Entrar, seg. |
Atraso ao entrar: 5 a 120 segundos. O atraso ao entrar (atraso de ativação do alarme) é o tempo que o utilizador tem para desarmar o sistema de segurança depois de entrar na área protegida. |
| Atraso ao Sair, seg. |
Atraso ao sair: de 5 a 120 segundos. O atraso ao sair (atraso de armar) é o tempo que o utilizador tem para sair das instalações após o armar do sistema de segurança. |
| Armar no Modo Noturno | Se esta opção estiver ativada, o dispositivo entrará no modo armado quando o sistema passar para o Modo Noturno. |
| Atraso ao entrar no Modo Noturno |
Tempo de atraso ao entrar no Nodo Noturno: de 5 a 120 segundos. O atraso ao entrar (atraso de ativação do alarme) é o tempo que o utilizador tem para desarmar o sistema de segurança depois de entrar na área protegida. |
| Atraso ao Sair no Modo Noturno |
Tempo de atraso ao sair no Nodo Noturno: de 5 a 120 segundos. O atraso ao sair (atraso de armar) é o tempo que o utilizador tem para sair das instalações após o armar do sistema de segurança. |
| Entrada com fios | Superior MultiTransmitter IO (4X4) Fibra número da zona à qual um dispositivo com fio está conectado. |
| Dispositivo Nº. | O número do bucle (zona) do dispositivo. |
Definições
Definições do Superior MultiTransmitter IO (4X4) Fibra
Para alterar as definições do Superior MultiTransmitter IO (4X4) Fibra, numa app Ajax:
- Aceda o separador Dispositivos
.
- Selecione Superior MultiTransmitter IO (4X4) Fibra da lista.
- Aceda às Definições tocando no ícone
.
- Defina as definições necessárias.
- Clique em Voltar para guardar as novas definições.
| Definições | Valor |
| Nome |
Nome do módulo. Apresentado na lista de dispositivos do hub, texto SMS e notificações no historial de eventos. Para alterar o nome do dispositivo, clique no campo de texto. O nome pode conter até 12 caracteres cirílicos ou até 24 caracteres latinos. |
| Sala |
Seleção da sala virtual à qual é atribuído o Superior MultiTransmitter IO (4X4) Fibra. O nome da sala aparece no texto do SMS e nas notificações no historial de eventos. |
| Saídas lógicas | Abre o menu de definições da saída lógica correspondente. |
| Saídas de relé | Abre o menu de definições da saída de relé correspondente. |
| Fonte de alimentação para dispositivos de entrada |
Permite a alimentação elétrica dos detetores ligados. Esta opção está desativada por defeito. |
| Alerta com sirene Se algum dispositivo ligado tiver a fonte de alimentação em curto-circuito |
Quando esta opção está ativada, as sirenes adicionadas ao sistema serão ativadas em caso de curto-circuito na alimentação dos dispositivos. A opção está ativada por predefinição. |
| Cenários | Abre o menu para criar e configurar os cenários. |
| Atualizações de firmware | Passa o dispositivo para o modo de atualização do firmware. |
| Teste de intensidade do sinal Fibra |
Passa o dispositivo para o modo de teste da intensidade do sinal Fibra. |
| Guia do utilizador | Abre o guia do utilizador do Superior MultiTransmitter IO (4X4) Fibra numa app Ajax. |
| Desativação permanente |
Permite ao utilizador desativar o dispositivo sem o retirar do sistema. Estão disponíveis duas opções:
|
| Desativação única |
Permite ao utilizador desativar os eventos do dispositivo até ao primeiro desarme. Estão disponíveis duas opções:
|
| Eliminar dispositivo | Desemparelha o dispositivo, desliga-o do hub e elimina as suas definições. |
Definições de saída lógica
| Nome |
Nome da saída lógica. Apresentado nas definições do módulo de integração, texto SMS e notificações no historial de eventos. Para alterar o nome da saída, toque no campo de texto. O nome pode conter até 49 caracteres. |
| Ativo | Permite aos utilizadores ativar ou desativar a saída lógica. |
| Modos de saída | Permite aos utilizadores selecionar o modo de saída:
|
| Notificações | Abre o menu que permite aos utilizadores ativar ou desativar as notificações do dispositivo:
|
| Tensão de saída predefinida | Permite aos utilizadores controlar a tensão de saída predefinida:
|
| Reagir ao Modo Noturno |
Se a opção estiver ativada, o dispositivo reagirá à ativação/desativação do modo Noturno da mesma forma que ao armar/desarmar. Esta opção está disponível quando o Elemento de bloqueio é selecionado para a definição do Modo de saída. |
| Mudança de estado por temporizador |
Permite aos utilizadores definir o temporizador no qual o dispositivo ligado mudará automaticamente o seu estado para o oposto. Possível de configurar de 1 segundo a 3 minutos com um incremento de 1 segundo. Esta configuração não está disponível quando o Elemento de bloqueio é selecionado para a definição do Modo de saída. |
| Controlo do estado do elemento de bloqueio | Permite aos utilizadores verificar manualmente a funcionalidade do elemento de bloqueio conectado alternando o seu estado. |
Definições da saída de relé
| Nome |
Nome da saída de relé. Apresentado nas definições do módulo de integração, texto SMS e notificações no historial de eventos. Para alterar o nome da saída, toque no campo de texto. O nome pode conter até 49 caracteres. |
| Ativo | Permite aos utilizadores ativar ou desativar a saída de relé. |
| Modos de saída | Permite aos utilizadores selecionar o modo de saída:
|
| Notificações | Abre o menu que permite aos utilizadores ativar ou desativar as notificações do dispositivo:
|
| Estado do contacto | Seleção do estado normal dos contactos do relé:
|
| Reagir ao Modo Noturno |
Se a opção estiver ativada, o dispositivo reagirá à ativação/desativação do modo Noturno da mesma forma que ao armar/desarmar. Esta opção está disponível quando o Elemento de bloqueio é selecionado para a definição do Modo de saída. |
| Mudança de estado por temporizador | Permite aos utilizadores definir o temporizador no qual o dispositivo ligado mudará automaticamente o seu estado para o oposto. Possível de configurar de 1 segundo a 3 minutos com um incremento de 1 segundo. |
| Manter o estado após uma falha de energia |
Quando a alternância está desativada, os contactos do relé voltam ao normal em caso de falta de energia. Quando a alternância está ativada, o estado atual dos contactos do relé é guardado em caso de falha de energia. Esta definição não está disponível quando Mudança de estado por temporizador está ativado. |
| Controlo do estado do elemento de bloqueio | Permite aos utilizadores verificar manualmente a funcionalidade do elemento de bloqueio conectado alternando o seu estado. |
Definições do dispositivo de terceiros ligado
Para alterar as definições do dispositivo ligado, numa app Ajax:
- Aceda o separador Dispositivos
.
- Encontre Superior MultiTransmitter IO (4X4) Fibra na lista.
- Toque em Dispositivos sob o ícone Superior MultiTransmitter IO (4X4) Fibra.
- Selecione o dispositivo na lista.
- Aceda às Definições tocando no ícone
.
- Defina os parâmetros.
- Clique em Voltar para guardar as novas definições.
| Definição | Significado |
| Nome |
Nome do dispositivo com fios. Apresentado na lista de dispositivos do hub, texto SMS e notificações no historial de eventos. Para alterar o nome, clique no campo de texto. O nome pode conter até 12 caracteres cirílicos ou até 24 caracteres latinos. |
| Sala |
Seleção da sala virtual do dispositivo. O nome da sala aparece no texto do SMS e nas notificações no historial de eventos. |
| Tipo de entrada | Selecionar o tipo de ligação de um dispositivo de terceiros:
|
| Modo do sensor | Selecionar o modo do sensor do dispositivo ligado:
|
| Tipos de eventos |
Seleção de um tipo de evento para o dispositivo conectado. Consulte a secção Tipos de eventos de dispositivos de entrada para mais informações. O texto das notificações no feed de eventos e SMS, bem como o código transmitido à estação de monitorização da empresa de segurança, depende do tipo de evento selecionado. Esta definição está disponível se a opção Detetar alarmes estiver selecionada para a definição Modo do sensor. |
| Estado por defeito | Seleção do estado de contacto normal do dispositivo ligado:
|
| Modo de funcionamento | O modo de funcionamento do dispositivo conectado:
Certifique-se de que define um tipo que corresponda ao dispositivo conectado. Um detetor de impulsos em modo biestável gera eventos de restauro desnecessários. Um detetor biestável em modo pulsado, pelo contrário, não enviará eventos de restauro. |
| Definições do interruptor para armar | Configuração do interruptor de armar se a opção Mudança dos modos de segurança estiver selecionada para a definição do Modo de sensor:
|
| Notificação de alterações no estado de fechadura de pistão |
Se a opção estiver ativada, o sistema notificará o utilizador sempre que a fechadura de pistão mudar de estado. Esta opção está disponível se a opção Controlo de fechadura de pistão estiver selecionada para a definição Modo do sensor. |
| Sempre ativo |
Se a opção estiver ativa, o dispositivo conectado ao Superior MultiTransmitter IO (4X4) Fibra está constantemente armado e comunica alarmes. É possível configurar a opção apenas para determinados tipos de eventos. Esta definição não está disponível se a opção Mudança dos modos de segurança estiver selecionada para a definição do Modo do sensor. |
| Tempo de Impulso | Tempo de impulso do dispositivo de deteção de um alarme:
Será ativado um alarme se o impulso do dispositivo durar mais tempo do que o especificado nesta definição. Pode ser utilizado para filtrar falso alarme. |
| Alerta com uma sirene se for detetado um alarme |
Se a opção estiver ativa, as sirenes conectadas ao sistema são ativadas quando é detetado um alarme. Esta definição está disponível se a opção Detetar alarmes estiver selecionada para a definição Modo do sensor. |
| Definições de Chime |
Abre as Definições de Chime. A funcionalidade está disponível apenas para dispositivos biestáveis. As notificações não funcionam para sensores em modo de impulso ou em modo Sempre ativo. |
| Reação do alarme | |
| Modo de funcionamento | Mostra como o detetor reage aos alarmes:
|
| Atraso ao Entrar, seg. |
Atraso ao entrar: 5 a 120 segundos. O atraso ao entrar (atraso de ativação do alarme) é o tempo que o utilizador tem para desarmar o sistema de segurança depois de entrar na área protegida. |
| Atraso ao Sair, seg. |
Atraso ao sair: de 5 a 120 segundos. O atraso ao sair (atraso de armar) é o tempo que o utilizador tem para sair das instalações após o armar do sistema de segurança. |
| Armar no Modo Noturno |
Se esta opção estiver ativada, o dispositivo entrará no modo armado quando o sistema passar para o Modo Noturno. |
| Atraso ao entrar no Modo Noturno |
Tempo de atraso ao entrar no Nodo Noturno: de 5 a 120 segundos. O atraso ao entrar (atraso de ativação do alarme) é o tempo que o utilizador tem para desarmar o sistema de segurança depois de entrar na área protegida. |
| Atraso ao Sair no Modo Noturno |
Tempo de atraso ao sair no Nodo Noturno: de 5 a 120 segundos. O atraso ao sair (atraso de armar) é o tempo que o utilizador tem para sair das instalações após o armar do sistema de segurança. |
| Desativação permanente |
Permite ao utilizador desativar o dispositivo sem o retirar do sistema. Estão disponíveis duas opções:
Também é possível configurar a desconexão do dispositivo separadamente:
A funcionalidade está configurada nas apps Ajax PRO. |
| Desativação única |
Permite a um utilizador desativar eventos do dispositivo até ao primeiro evento de desarme do sistema. Estão disponíveis duas opções:
|
Indicação
O Superior MultiTransmitter IO (4X4) Fibra indicador LED pode acender-se a verde ou vermelho, consoante o estado do dispositivo.
| Evento | Indicação | Nota |
| Adicionar o módulo |
Quando o módulo é adicionado automaticamente: o LED verde pisca rapidamente quando o Superior MultiTransmitter IO (4X4) Fibra é selecionado na lista. Quando toca em Adicionar dispositivo, o LED verde pisca uma vez. Quando o módulo é adicionado manualmente: o LED verde pisca uma vez. |
|
| Removendo o módulo | O LED verde pisca seis vezes. | |
| Teste da fonte de alimentação das linhas | Os LEDs verde e vermelho acendem-se constantemente até o teste estar concluído. | |
| Atualização de firmware | O indicador LED acende periodicamente a verde enquanto o firmware está a ser atualizado. | |
| Ativação do tamper (se a placa de tamper estiver ligada) | O LED verde pisca uma vez. | |
| A ligação de um dispositivo com fios ao Superior MultiTransmitter IO (4X4) Fibra está em curto-circuito ou sobrecarregada | O LED vermelho pisca 4 vezes por segundo até que o curto-circuito deixe de existir. | A cada 3 segundos, o Superior MultiTransmitter IO (4X4) tenta restabelecer a alimentação das linhas de saída. Se a avaria não tiver sido eliminada, o módulo desliga novamente as saídas de potência. Este processo é repetido até que o estado correto da linha seja restabelecido. |
Manutenção
O Superior MultiTransmitter IO (4X4) Fibra não requer manutenção quando montado na Case compatível.
Características técnicas
Conjunto completo
- Superior MultiTransmitter IO (4X4) Fibra.
- Guia rápido.
Garantia
A garantia dos produtos da “Ajax Systems Manufacturing” Limited Liability Company é válida durante 2 anos após a compra.
Se o dispositivo não funcionar corretamente, contacte primeiro o Apoio Técnico Ajax. Em maioria dos casos, os problemas técnicos podem ser resolvidos remotamente.
Contactar o Apoio Técnico:
Fabricado por “AS Manufacturing” LLC
