Ajax Translator is an app to establish communication between Ajax security systems and third-party monitoring software. Acting as a link between the hub and the Central Monitoring Station (CMS), Ajax Translator converts the notifications received from the hub into event protocol supported by the CMS software.
Ajax Translator receives events via the internet. In cities where internet connection is unstable, it is recommended to use VHF transmitters. The vhfBridge transponder is a module for connecting Ajax security systems to third-party VHF transmitters. It can be used as a primary or a backup communication channel.
How to get Ajax Translator
To get Ajax Translator, fill out the online form. If the form is filled out correctly, a link to the current version of Ajax Translator, login, and password for authorization will be sent to your email address within 48 hours.
Your company will also be added to the Security Companies list in the Ajax app. This will allow you to receive user requests to connect security monitoring directly to Ajax Translator: the user selects your company from the list in the app, clicks Send monitoring request, and the request is automatically sent to the email assigned to the security company.
System requirements
| Parameter | Minimum | Recommended |
| Processor | Intel Core i5 4th gen 2.7 GHz (2 cores) or equivalent | Intel Core i5 5th gen 3.2 GHz (4 or more cores) or equivalent |
| Random access memory | 8 GB | 16 GB |
| Storage | 5 GB of free space | More than 10 GB of free space |
| OS | Windows 7 | Windows 10 and higher |
| Java |
A stable operation is guaranteed on version 8 Update from 211 to 371 (Oracle) | |
| Network | 100 Mb/s | |
You can add 5,000 objects (maximum) from one account. If you maintain more than 5,000 objects, please contact our support team to create a second account. Ajax Translator makes it possible to maintain 10,000 objects (maximum) as long as you follow the recommended system requirements and use Socket (TCP/IP).
Installation
Run the Ajax_Translator.jar executable and follow the instructions.
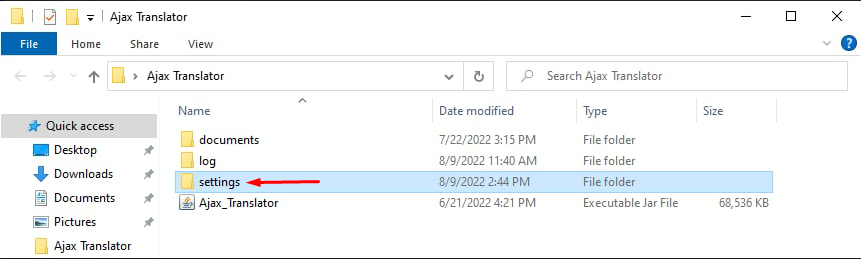
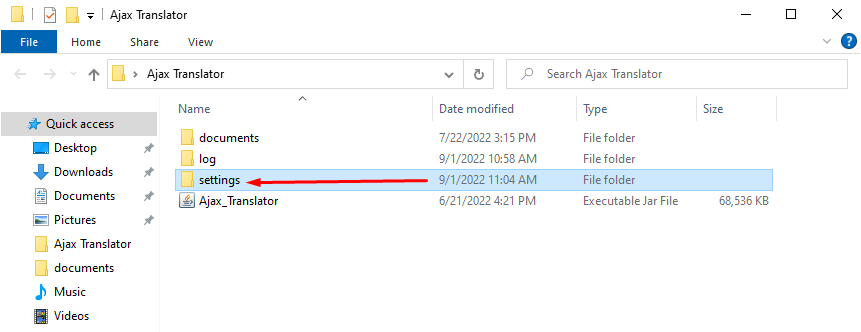
After installation, the Ajax Translator folder contains:
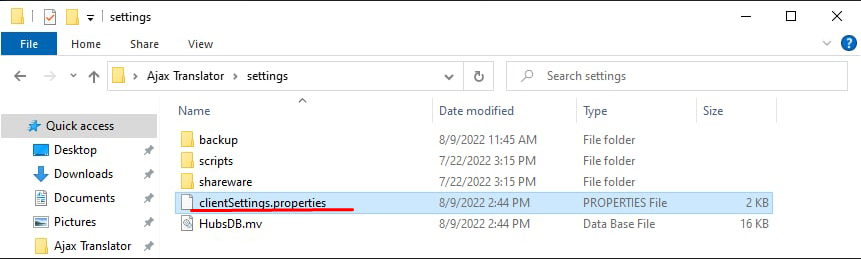
clientSettings.properties — is a file with the default settings for Ajax Translator.
advanced-virtual-com-port.zip, com0com (x86, x64).zip, vspd for example.exe — programs for creating virtual COM ports. Please note that these programs only run on Windows.
Translator app RU, Ajax Translator EN — Quick Start Guides for using the program in two languages in the PDF format.
The executable and other service folders:
log — the folder where Ajax Translator work logs are stored. If the program malfunctions, the data from this folder is sent to Ajax Systems Support Service for analysis.
settings — the folder where the Ajax Translator configuration file as well as database files with backups are stored.
Do not rename or change the location of folders and files inside the Translator Dist folder! This will lead to program malfunctions.
Ajax_Translator.jar — Ajax Ajax Translator application with the version number in the file name. To run the app, Java Version 7 Update from 211 to 271 (Oracle) must be installed on the computer. This can be downloaded from the official site.
Java does not support operating with COM ports. If connection with Ajax Translator via the COM port is needed, use Java 1.8 version.
Do not move the executable file! It should remain in the Translator Dist folder. Create a shortcut on the desktop for easy startup.
After running the Ajax_Translator.jar executable, you will see an account login window.
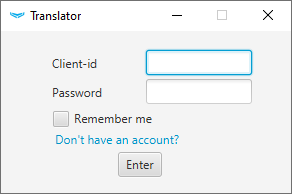
Copy and paste the login and password received from the Support Service. Use the Remember me option not to enter your user name and password each time the program starts.
For Ajax Translator autoload, create a shortcut for the executable file and configure autoload according to your operating system instructions.
How to update Ajax Translator
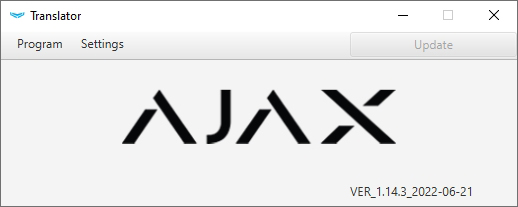
Ajax Translator version 1.8 and higher regularly checks the server for updates. If the program detects a new version, the Update button becomes active in the app.

After clicking the Update button, the current version of the app is downloaded. As soon as downloading is finished, Ajax Translator displays a window with a prompt to install the update.
To install the update, you need to restart Ajax Translator. Install the update in the folder where the program is already installed.
If the Enable auto-login option is active, you will be offered 2 options: automatic and manual installation.
- When you choose automatic installation, the app shuts down and then updates automatically. The Ajax Translator starts again upon completion of the installation.
- If you choose manual installation, follow the instructions in the app to install the update. The Ajax Translator starts again upon completion of the installation.
If the Enable auto-login option is inactive, you can update Ajax Translator in manual mode only.
How to update the app if the Ajax Translator version is lower than 1.8
- Exit Ajax Translator.
- Download the actual version of the app here.
- Unpack the archive and run Ajax_Translator.jar. This is the installation file for Ajax Translator.
- Install the update following the installer instructions. Install the update in the folder containing the old version of Ajax Translator. This will save all linked hubs and program settings.
- Launch Ajax Translator.
Inactive Ajax Translator account policy
An inactive account connected to a CMS via Ajax Cloud will be disabled. An account is considered inactive in the following cases. If for 7 days in a row:
- the user hasn’t been opening the Ajax Translator app;
- the PC with Ajax Translator was off;
- the user opened the app but didn’t log in;
- Ajax Translator was opened, but the Ethernet connection wasn’t established;
- incorrect connection settings were configured.
Disabled accounts can still be recovered by contacting Ajax Technical Support.
How Ajax Translator Works
All data transmitted by the hub is protected by block encryption with a dynamic key. Third-party console software cannot decrypt it independently. Ajax Translator receives a message from the hub, decrypts it, converts it into standardized protocol messages, and translates it into CMS software.
Connecting Ajax Translator to CMS
Ajax Translator transmits messages through the event receiver of the Central Monitoring Station. You can configure communication with the CMS receiver via TCP/IP or via virtual/physical COM port.
Connecting via Socket (TCP/IP)
After you specify the server IP address and port in Ajax Translator settings, you will be able to transfer data both within the same computer (server) and on the local network or via the internet.
Before configuring Ajax Translator, you should create a new event source via TCP/IP in the event receiver of your CMS. When creating an event source, specify the port to which events will be transmitted from Ajax Translator in the Port field (the default value is 9292). In the Address field, leave the value 0.0.0.0 (localhost). This parameter changes if the computer has two or more IP addresses. In this case, you should specify which IP address and port the events will be received at CMS.
Option 1: Ajax Translator and event receiver on the same computer (server)
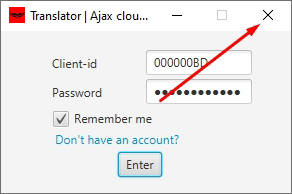
Launch Ajax Translator. Enter your user name and password, and click Enter. If you have specified the localhost IP address and port 9292 when configuring the event receiver, Ajax Translator will start immediately, since these values are set by default.
If another port or IP address has been specified in the event receiver or in Ajax Translator settings, a window with a “Failed to connect to Socket port” error will be displayed with the port number and IP address to which Ajax Translator was trying to connect.
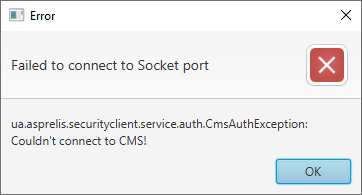
In this case, click OK to proceed to configure them. In the window that opens, enter the port number and IP address that were specified when creating the event source, click Save, and then OK.
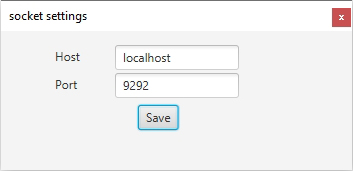
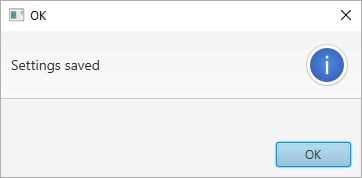
After the settings are saved, the login and password entry window will be displayed.

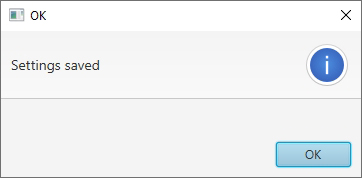
Important: at this stage, close the program by clicking on the cross in the upper right corner to apply the settings. If you click the Enter button, Ajax Translator will not apply the settings and you will not be able to start the program again.
If Ajax Translator was closed correctly, TCP/IP connection will be established during the next startup.
Option 2: Ajax Translator and event receiver on the same local network
If Ajax Translator and the event receiver are installed on different computers but on the same local network, the event receiver is configured the same way as described in the previous option, while Ajax Translator configuration is different.
When starting, Ajax Translator will return an error of failed connection to the Socket port. Click OK to go to the settings.
In the window that opens, specify the IP address of the computer (server) on which the CMS event receiver is installed in the Host field. Also indicate the port number if other than 9292. Click Save, then OK.
After the settings are saved, the login and password entry window will be displayed.

Important: at this stage, close the program by clicking on the cross in the upper right corner to apply the settings. If you click the Login button, Ajax Translator will not apply the settings and you will not be able to start the program again.
If Ajax Translator was closed correctly, TCP/IP connection will be established during the next startup.
Connecting via COM port
If Ajax Translator and CMS event receiver are installed on the same computer (local server), they can be connected via a pair of virtual COM ports. You can also connect separate computers through two physical COM ports.
The number of objects maintained by one Translator is limited according to the COM port bandwidth.
Before you configure the connection through the COM port, make sure you change the default connection settings of Ajax Translator.
Changing Ajax Translator default connection settings
CMS connection via TCP/IP is installed in Ajax Translator by default. You can change the connection parameter in the Ajax Translator configuration file.
Make sure that Ajax Translator is not currently running.
Open the folder with Ajax Translator files, go to the Translator Dist folder and then to the Settings folder.
Open the clientSetting file using the default Notepad application.
Search for the string senderType = SOC and replace the “SOC” with “COM”.
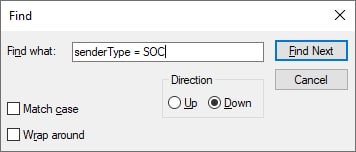
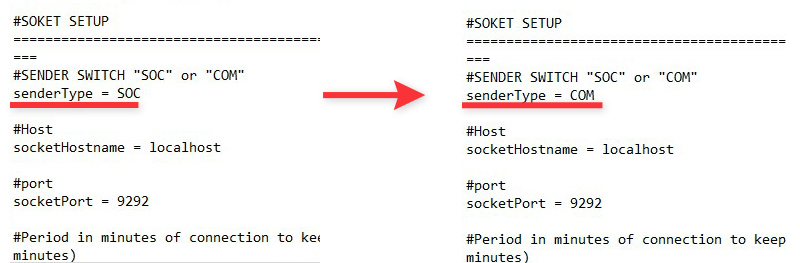
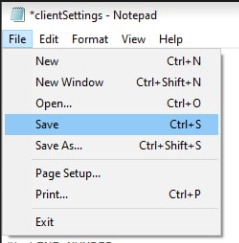
Make sure you save the file. Go to the File menu and click Save.
Creating virtual COM ports
Before you configure Ajax Translator, create a pair of virtual COM ports. Any emulator, for example, com0com, is suitable for creating virtual COM ports. Emulator setup instructions are available from the developer.
Specify one virtual port as the event source in the event receiver of your CMS and the other port in the settings of the CMS Connection menu in Ajax Translator.
Setting up virtual COM ports
After changing the configuration file and creating the virtual COM ports, launch Ajax Translator. Enter your user name, password, and click Enter. Use the Remember me option to not enter your user name and password each time the program starts.
Connection via COM port 3 is established by default in Ajax Translator settings. If your computer has a COM port with this number and it is not busy with any processes, Ajax Translator will connect to it and start. For correct transmission of events to the CMS, change COM settings in Ajax Translator settings and indicate the number of the virtual port you have created: Setting —> CMS Connection —> COM Settings —> Specify COM Port.
If your computer does not have a COM port with this number or the port is busy with another process, the message “Connection to COM port failed” will be displayed.

Click OK to configure the COM port settings.
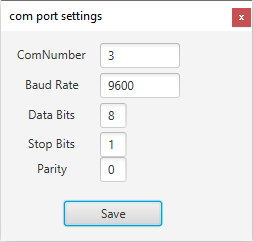
In the window that opens, the following settings will be available:
- ComNumber — COM port number to which data will be transmitted
- Baud Rate — data transfer rate
- Data Bits — data bits
- Stop Bits — stop bits
- Parity — parity control
Enter the number of the other COM port from the previously created pair in the ComNumber field, click Save, and then OK.
The remaining Baud Rate, Data Bits, Stop Bits, and Parity settings shall match the settings on the CMS side.
After the settings are saved, the login and password entry window will be displayed.
At this stage, close the program by clicking on the cross in the upper right corner to apply the settings. If you click the Enter button, Ajax Translator will not apply the settings and you will not be able to start the program again.
If Ajax Translator has been closed correctly, connection via the COM port will be established the next time you start.
Setting up Ajax Translator
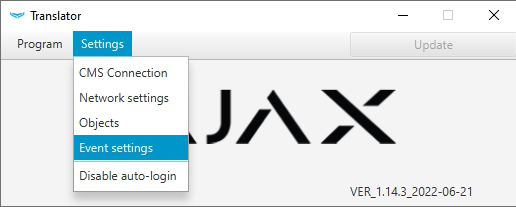
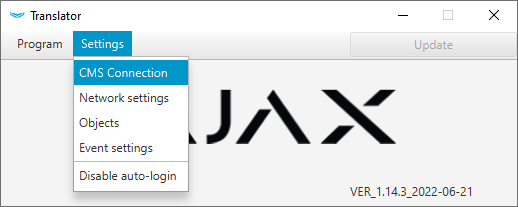
The Ajax Translator settings menu is located in the Settings tab:
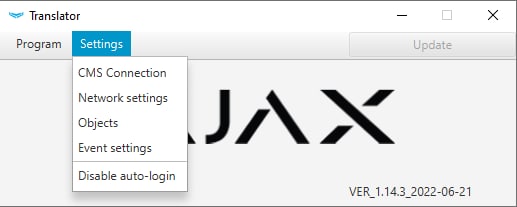
| CMS connection | Configuring the CMS connection settings. |
| Network | Configuring the Ajax Cloud server connection settings. |
| Objects | Menu for adding/removing protected objects and linking them to CMS object numbers. |
| Events | Menu for editing event codes sent to CMS. |
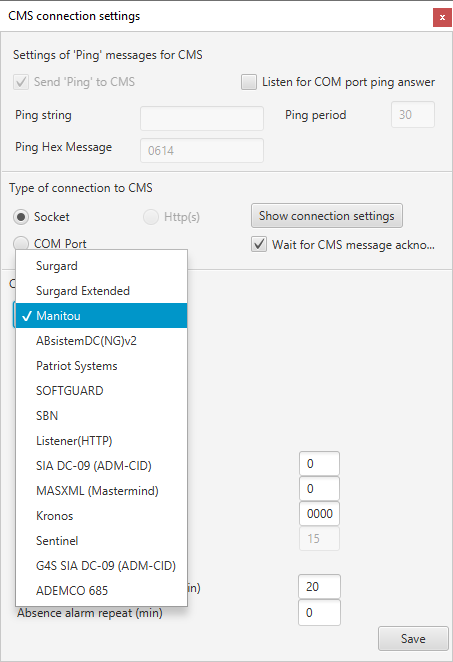
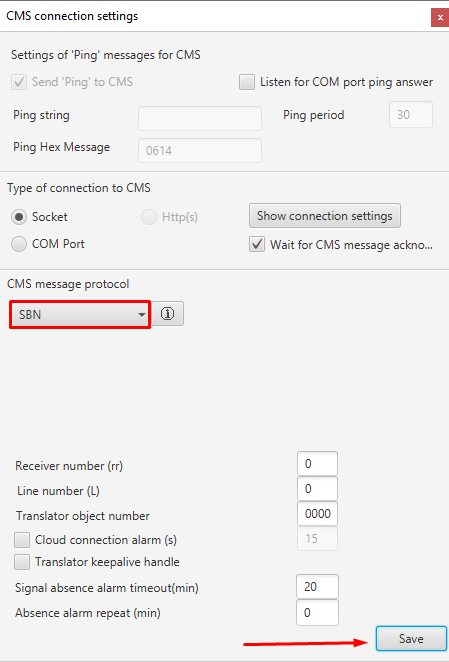
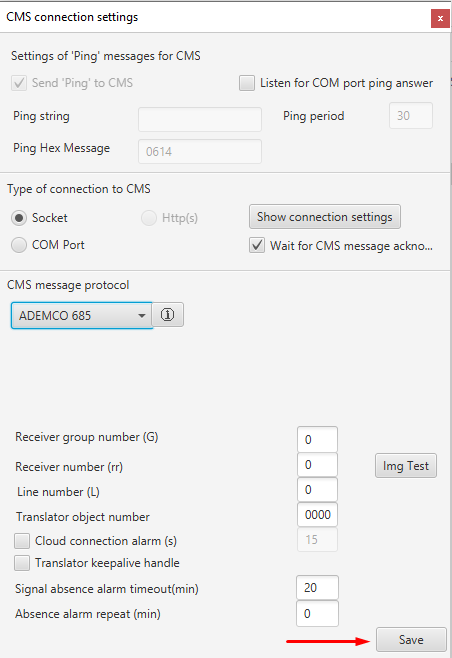
CMS connection
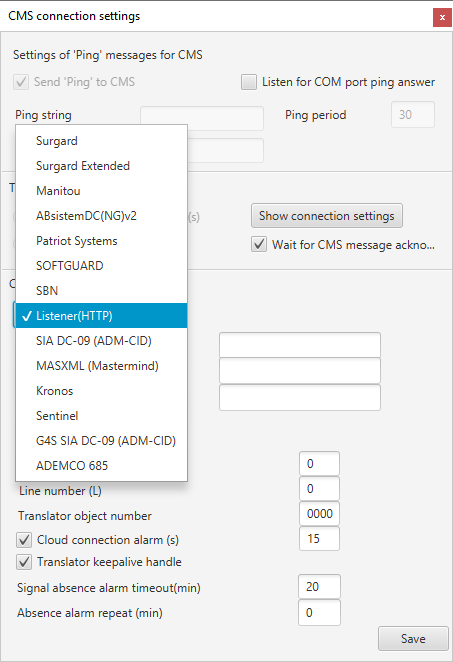
The CMS connection setup menu consists of the following blocks:
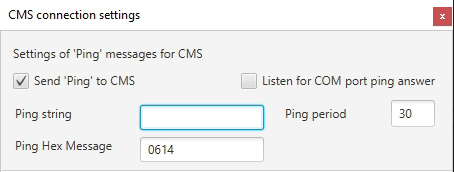
The Settings of “Ping” messages for CMS block is responsible for periodically checking the connection between the CMS and Ajax Translator (it should be configured on the CMS)
Send “Ping” to CMS turns on/off sending of test messages
Ping String — configuration of the string to be sent to CMS
Ping HEX Message — the code of the verification message sent
HEX message is in hexadecimal format (converted to text in the log). For example, HEX message 4444 will be shown as DD. HEX should be used to display ASCII characters and extra spaces at the end of a ping message.
Ping Period — sets the frequency of sending test messages in seconds
Listen for COM port ping answer — an option to control the event reception by your CMS
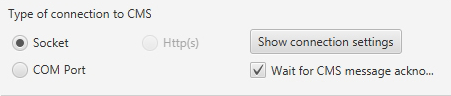
The Type of connection to CMS block allows configuring the connection between CMS software and Ajax Translator via TCP/IP or COM port.
To connect via TCP/IP, disable Wait for CMS message acknowledgement. In this case, Ajax Translator will not wait for a response to the event sent. When connected via a pair of COM ports, Ajax Translator always expects CMS message receipt confirmation. If Ajax Translator does not receive confirmation, it reports that there is no communication with the CMS.
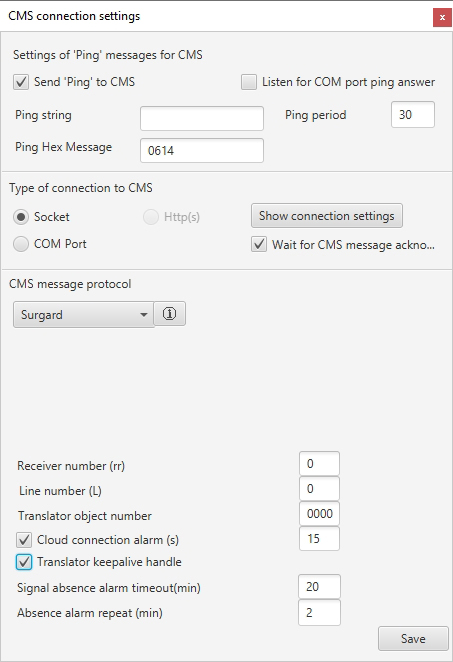
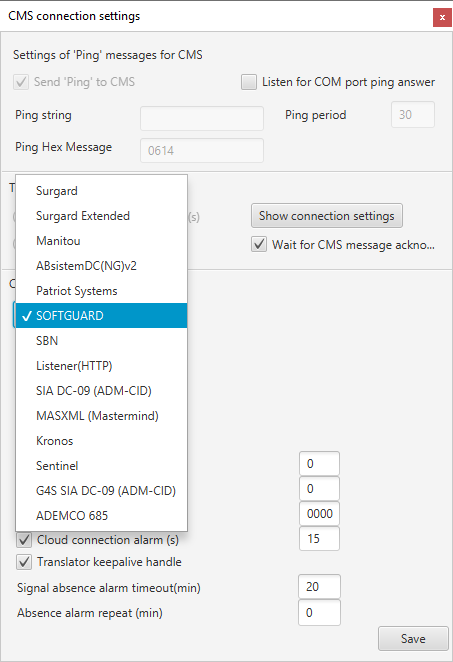
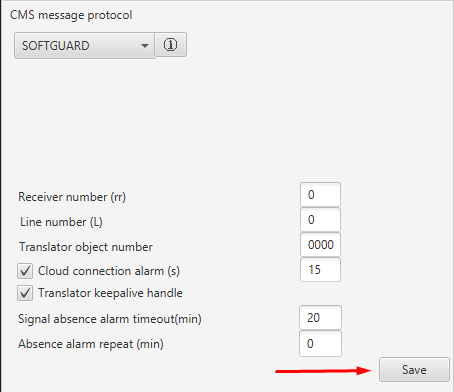
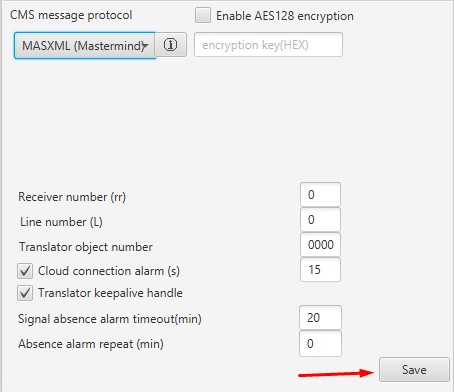
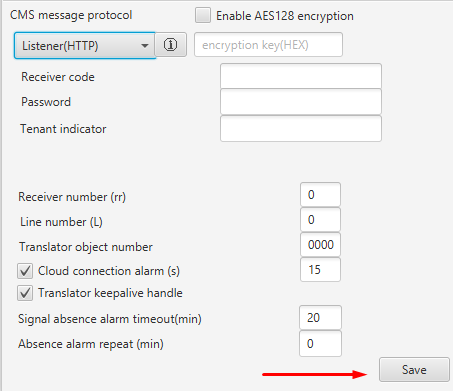
The CMS Message Protocol block is designed to configure the event transmission protocol. It contains:
- Protocol selection drop-down menu.
- Descriptive block with protocol decryption.
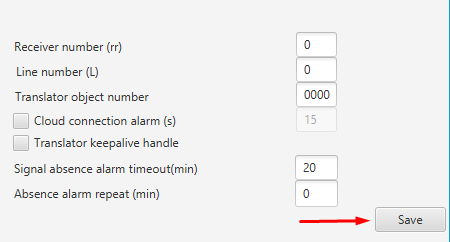
- Receiver number — sets the number of the event receiver. The default value is 00.
- Line number — sets the line number of the event receiver. The default value is 0.
- Translator object number — object number assigned to Ajax Translator, which can be used to control CMS communication.
- Cloud connection alarms — sets the communication absence time (in seconds) after which the CMS will receive a notification on loss of communication between Ajax Translator and Ajax Cloud.
- Translator keepalive handle — enables/disables test messages that are used to verify Ajax Translator hub connection. This also sets their frequency (in minutes).
Read more: How to disable test messages on CMS
Network
Two options are available in Ajax Cloud server connection settings: Host and Port.

Ajax Translator works with DNS over port 443 (by default). All traffic going over this port is encrypted. To ensure the correct operation of Ajax Translator, you need to allow all traffic types on the 443 port.
The address for connecting Ajax Translator is hts.prod.ajax.systems.
If there is no internet connection on the computer, Ajax Translator will generate an error as follows:
“If you have internet connection but the message still appears, check Translator settings in the Network menu.”
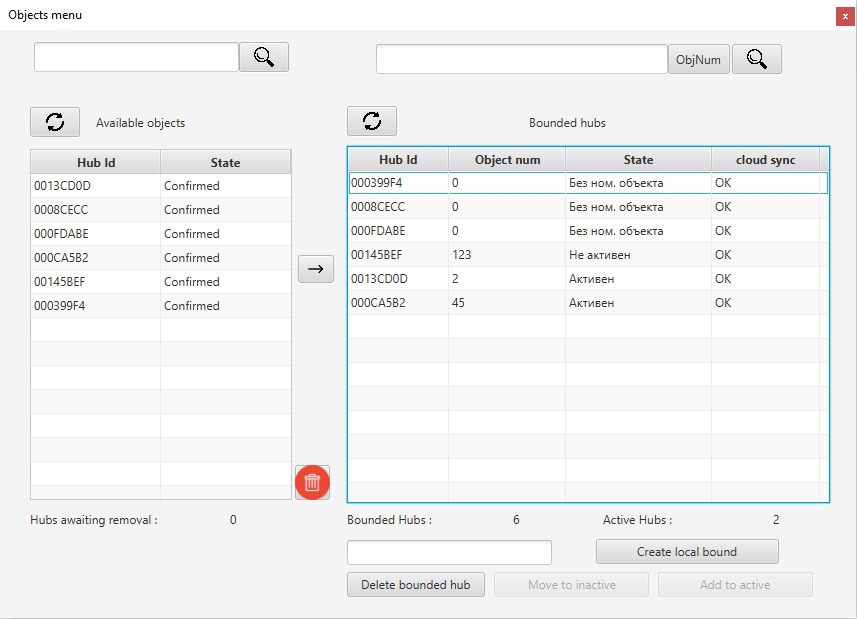
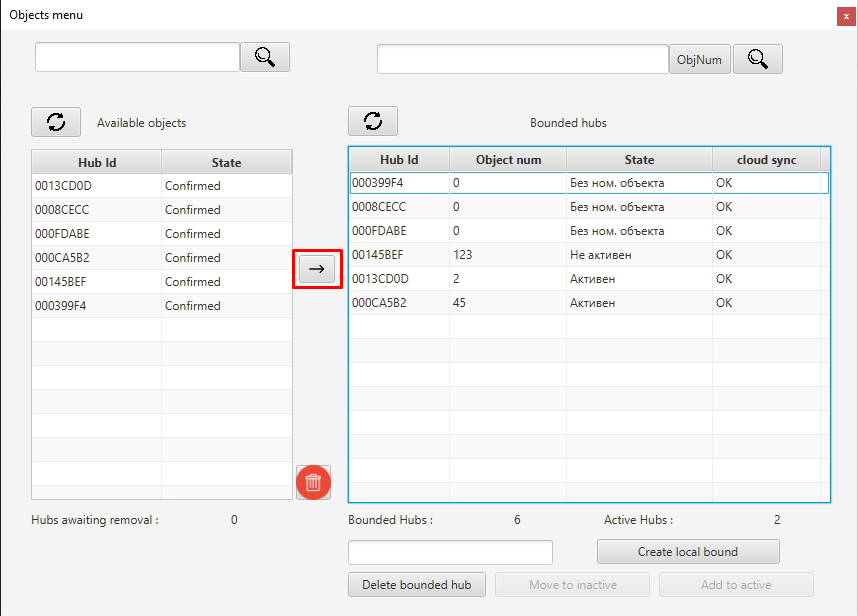
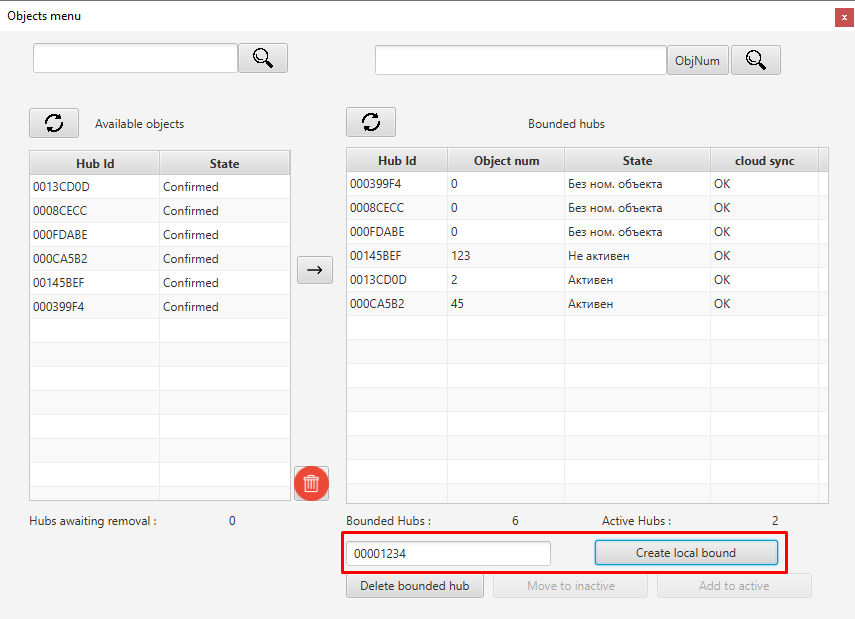
Objects
The Objects menu consists of two tables and allows administering hubs connected to CMS. The table on the left shows the hubs from which users have sent a monitoring request through the Security Companies tab in the Ajax app. The table on the right shows the binding of hub IDs to CMS object numbers.
If the monitoring request was sent for the first time, then the Status line opposite the hub ID displays Not confirmed status. If the hub has already been linked to the CMS object number, the status is Confirmed. If the user has canceled the monitoring request in Ajax application, the status will be indicated as Waiting for removal.
Search by objects
The hub can be found in the list of objects by object number or by hub ID. To correctly search by hub ID, always enter Latin characters in the UPPER case.
By default, the search is performed by object number. To find the hub, enter the object number in the field and click Find:
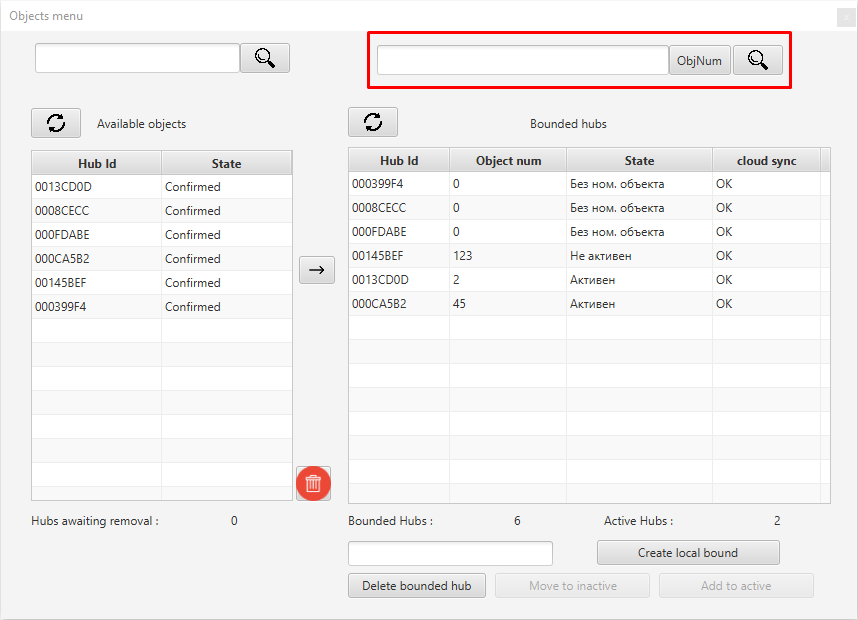
To search by hub ID, click the ObjNum button — its name will change to HubId, enter the hub ID in the search field, and click Search.
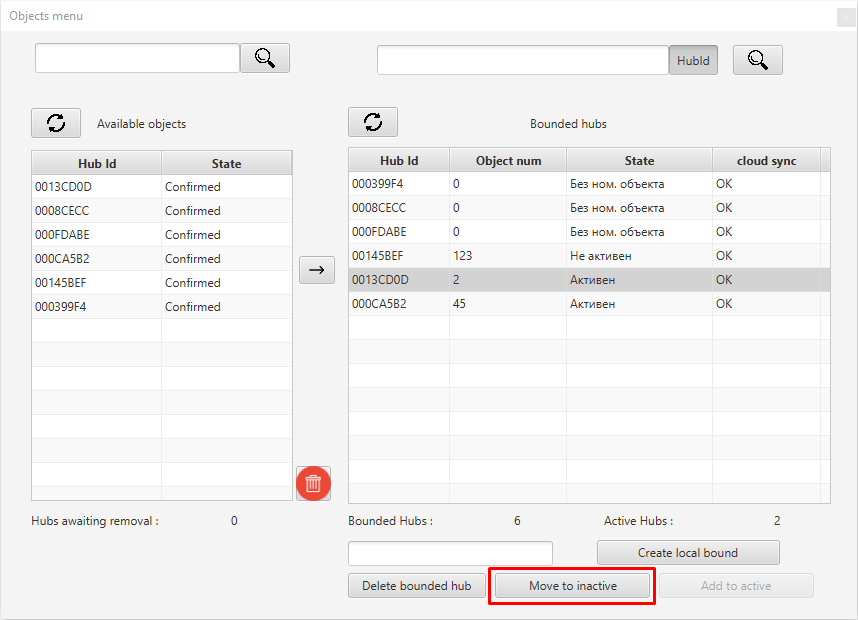
Termination of object monitoring
To suspend receiving events from an object, click on it in the table on the right and then click Move to inactive. The status of the object will change to Inactive, and the object will be displayed at the end of the list. To resume receiving events from the hub, click Add to active.
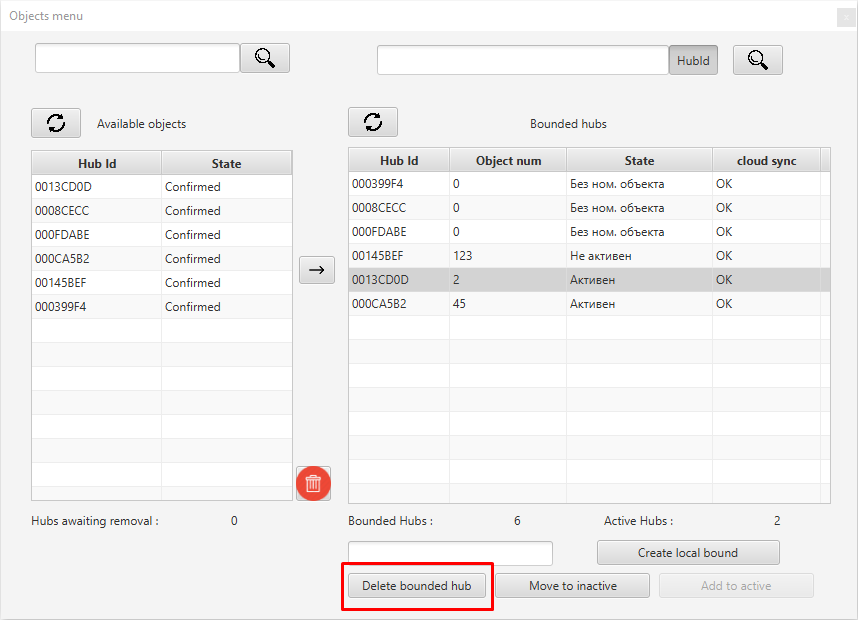
To discontinue monitoring an object, remove the hub from Ajax Translator: select the hub in the right table and click the Delete bounded hub button.
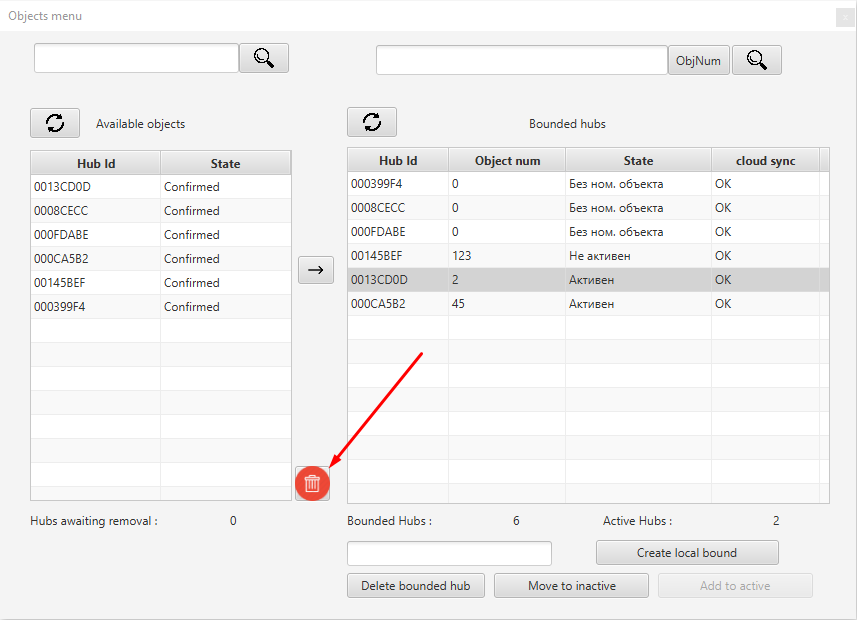
Then select the hub in the table on the left and click the trash icon.
Events
The Events menu allows you to edit event codes. Ajax Translator can transmit the following types of events to CMS:
- Alarms: fire, emergency, security, general, non-security, keyboard, tamper, visual verification (only SIA DC-09 (ADM-CID), Sentinel, Kronos, Manitou, Listener, MASXML and SBN)
- Malfunctions
- Communication problems
- Periodic tests
- Arming and disarming
- Pressing the panic button in the Ajax app (along with coordinates)
Changing event code
Translator app allows changing the default event codes (Contact ID). For example, your CMS uses the E725 code to report loss of communication with the central unit, and the hub sends the E350 code. In order not to change the CMS settings, edit the code in Ajax Translator. This feature is supported by all protocols with the events that can be sent via Ajax Translator.
Go to the Events menu.
In the Replace what field, enter the code that requires adjustment, in the Replace to field, enter the new code, and click the Add button.
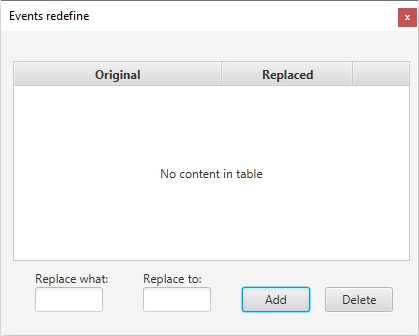
You cannot edit the rules for replacing event codes. If the rule is not relevant, delete it.
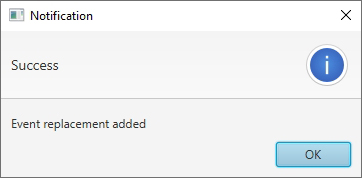
To delete an irrelevant rule, enter the code to be deleted in the Replace what field and click the Delete button. After correct deletion, you will receive a notification as follows.
Configuring the filter of events transmitted to the CMS
Ajax Translator can send only certain hub events to the CMS. Therefore, you can configure the transmission of fire alarms only, without receiving notification of any other events.
To set up a filter:
- Go to the folder where Ajax Translator is installed.
- Go to the Settings folder and open the clientSetting.properties file using the standard Notepad application or a similar text editor.
- Add acceptableCodes = XXX; to the end of the file.
XXX — is the code of the event that you do not want to receive at the CMS. Do not use the E or R prefix. Note that the code must be followed by a semicolon (;). To specify several codes, separate them by a space.
An example of a line with one code: acceptableCodes = 111;
An example of a line with several codes: acceptableCodes = 111; 112; 113; 130;
Ajax Translator event transfer protocols
Ajax Translator supports protocols for transmitting events to CMS:
|
|
|
|
|
|
|
|
|
|
|
|
|
|
|
|
|
|
|
|
|
|
|
|
|
|
Visual alarm verifications are transmitted through the Ajax Cloud server. When a direct connection is used (bypassing the server), a series of photos from MotionCam/MotionCam Outdoor will not be sent to the CMS. In this case, the photos will be transmitted to Ajax apps, including PRO Desktop (if the app is used).
The SIA DC-09 (ADM-CID) message can transmit additional information in the form of a link to a web resource, geographic coordinates, or other standardized data. The SIA DC-09 (ADM-CID) protocol can be used to transfer photos from MotionCam/MotionCam Outdoor motion sensors, and user coordinates to the monitoring station when the panic button is pressed in the Ajax app.
| SIA DC-09 (ADM-CID) message template: <LF><crc><0LLL><“id”><seq><Rrcvr> <Lpref> <#acct> [<pad> | … data …] [x… data…] <timestamp> < CR> |
|
| <LF> | Message beginning marker in ASCII, transmitted in binary value 0x0A. |
| <crc> | Checksum to check the integrity of the message, transmitted as four characters in ASCII. |
| <0LLL> | The message length, where the first character is always 0, and the next three are hex characters in ASCII. |
| <“id”> | Protocol type indicator. ADM-CID is always used. |
| <seq> | The sequence number of the sent message. The range is 0001-9999, after which counting starts over from 0001. |
| <Rrcvr> | Receiver number — not used. |
| <Lpref> | Object number prefix. Constant value is L0. |
| <#acct> | Object number. The # character followed by 3 to 16 hex characters in ASCII. |
| [<pad>|…data…] | Alarm data. In the beginning, the # character and object number are indicated, then the separator “|”, followed by a message, where the first digit is 1 (Alarm) or 3 (Restore), a three-digit event code by the Contact ID protocol, a group number, and a zone number. The message after the separator can contain from 3 to 16 hex characters in ASCII. |
| [x…data…] |
Additional data, which may contain photo confirmation from MotionCam/MotionCam Outdoor detectors or the location of the device on which the user pressed the panic button in the Ajax app. Photo confirmation is sent as a web link, at the beginning of which the data type is indicated — the V character (Verification). Coordinates are transmitted in the format [X30E28.0] [Y50N29.6], where To improve the accuracy of the coordinates by increasing the number of decimal places, add the line “siaDc09PreciseCoordinates=true” to the clientSettings.properties file. The feature is available in version Ajax Translator 1.14.5 or higher. |
| <timestamp> | Timestamp |
| <CR> |
End of message marker in ASCII, transmitted in binary value 0x0D. |
Keep in mind that the series of photos are transmitted as a separate event. Photos will be available immediately after transferring to the Ajax Cloud server. The links to the photos will be valid for 7 days after the transfer to the monitoring station of the security company.
Sample of an event with two photos:
| CB640375″ADM-CID”0086L0#1234[#1234|1130 02 001][Vhttps://ajax-sample.com/first_photo.jpg,https://ajax-sample.com/second_photo.jpg]_16:43:06,10-07-2020 |
The links in the sample of an event are valid. Therefore, you can use it to test how the CMS software works with Translator.
Note that the SurGard (Contact ID) protocol does not support the transmission of visual alarm verifications of the MotionCam/MotionCam Outdoor detectors and the coordinates of the panic button that was pressed in the Ajax app.
| SurGard (Contact ID) message template: 5rrLs18SSSSQXYZGGCCC |
|
| 5 | protocol number |
| rr | receiver number (default 00) |
| L | line number (default 0) |
| s | delimiter (space) |
| 18 | Identifies the receiver and system format |
| SSSS | 4-digit* number of the CMS object, which was linked to the hub ID |
| Q | Event ID (E — event, R — restore) |
| YXZ | 3-digit event code |
| GG | Group number (physical or logical, 2 digits) |
| CCC | Zone, detector, or user number (3 digits) |
* In cases where there are more than 9999 objects on the CMS and the object number consists of more than 4 digits, Ajax Translator provides the ability to specify a number with a maximum of 8 digits. To do this, open the Ajax Translator clientSetting configuration file in Notepad and find the objNumLenght item there. Set the required length of the object number and save the file.

Ajax Translator can also transmit events via Surgard_Ext protocol — advanced event template Contact ID for CMS. This protocol uses the hub ID as the CMS object number; therefore, you do not need to bind the object number in the right column of the Objects menu.
| Surgard_Ext message template: 5rrLs18SSSSSSSSQXYZGGCCC |
|
| 5 | protocol number |
| rr | receiver number (default 00) |
| L | line number (default 0) |
| s | delimiter (space) |
| 18 | Identifies the receiver and system format |
| SSSSSSSS | 8-digit hub ID |
| Q | Event ID (E — event, R — restore) |
| YXZ | 3-digit event code |
| GG | Group number (physical or logical, 2 digits) |
| CCC | Zone, detector, or user number (3 digits) |
If the group mode is not used, all events are sent with group ID 01 and 02. By default, all devices are added to group 01, but if the device responds to Night mode activation, all of its events will be sent from group 02. When arming, the event will be sent from both groups 01 and 02. When using the group mode, the group number in the application will match the group number on the CMS.
Starting with version 1.5, Ajax Translator has added support for sending messages via the MANITOU protocol. This protocol allows receiving visual alarm verification from MotionCam/MotionCam Outdoor detectors, as well as the coordinates of the panic button pressed in the Ajax app.
If the group mode is not used, all events are sent with group ID 01 and 02. By default, all devices are added to group 01, but if the device responds to Night mode activation, all of its events will be sent from group 02. When arming, the event will be sent from both groups 01 and 02. When using the group mode, the group number in the application will match the group number on the CMS.
How to configure event transfer from Ajax Translator to CMS via Manitou
Click on the Settings tab and go to the CMS connection menu.
From the Type of connection to CMS drop-down list, select Manitou.
Click Save at the bottom of the window.
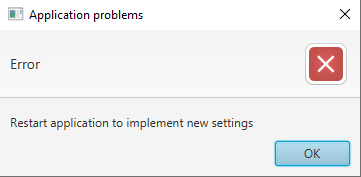
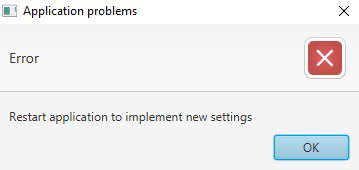
After saving the settings, Ajax Translator will display an error message.
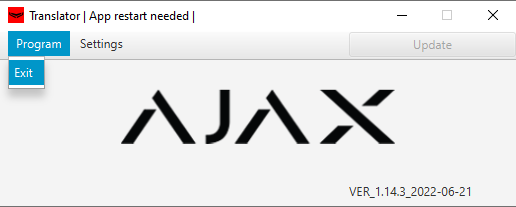
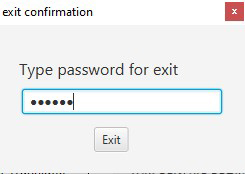
Click OK, go to the Program tab, and click Exit.
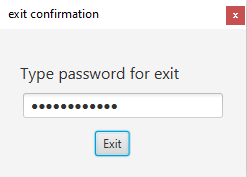
Enter your account password to log out of Ajax Translator.
During the next start, Ajax Translator will use the Manitou protocol to send events.
To receive events, it is also necessary to select the correct protocol in the Manitou settings of the CMS. Configure: bold XML multiframe.
Starting from version 1.6, Ajax Translator supports SBN protocol messaging. This protocol allows you to additionally receive visual alarm verification from MotionCam/MotionCam Outdoor detectors, as well as the coordinates of the panic button pressed in Ajax app.
|
SBN event template with an alarm: String: <?xml version=”1.0″ encoding=”UTF-8″?><sbn_rd xmlns=”http://www.ibsiberia.com/schemas/sbn_rd” version=”1″><event id=”1476139372″ protocol=”CID”><account>2034</account><code>E130</code><zone>1</zone><area>1</area></event></sbn_rd> |
|
| Event id | event ID |
| Protocol | protocol format of the transmitted event |
| Account | 4-digit object number |
| Code |
event code (value from 001 to 999) Test ping sent every 15 minutes with the E602 code |
| Zone | Zone number (event reports) (three digits from 000 to 999) |
| Area | Group or Section Number (two digits 00 to 99). 00 is used to indicate that the group or section information does not apply |
|
SBN event template with visual verification: String: <?xml version=”1.0″ encoding=”UTF-8″?> |
|
| Protocol | protocol format of the transmitted event |
| Account | 4-digit object number |
| Code | event code (value from 001 to 999) |
| Zone | Zone number (event reports) (three digits from 000 to 999) |
| Area | Group or Section Number (two digits 00 to 99). 00 is used to indicate that the group or section information does not apply |
| type | file format identifier |
| ext | file format |
| event_id | event identifier unique to the hub |
| device id | detector identifier, corresponds to the device loop number |
| device_descr | field value is not filled. “no_descr” is always transmitted |
| /ХХХХХХ/ | base64 image array |
|
SBN event template with panic button coordinates: String: <?xml version=”1.0″ encoding=”UTF-8″?><sbn_rd xmlns=”http://www.ibsiberia.com/schemas/sbn_rd” version=”1″><event id=”573186071″ protocol=”CID”><account>123</account><code>E120</code><zone>502</zone><area>1</area></event><georeference id=”1511819941″ type=”type0″ source=”ext0″ event_id=”573186071″><account>123</account><latitude>50.5153576</latitude><longitude>30.6145326</longitude></georeference></sbn_rd> |
|
| Protocol | protocol format of the transmitted event |
| Account | 4-digit object number |
| Code | event code
|
| Zone | User ID (three digits from 000 to 999) |
| Area | Group or Section Number (two digits from 00 to 99). Group 01 is used to transmit the coordinates of the panic button |
| type | file format identifier |
| event_id | event identifier unique to the hub |
| georeference id | Randomly generated identifier |
| latitude | Geographic coordinates (latitude) of the device on which the panic button was pressed in the Ajax app |
| longitude | Geographic coordinates (longitude) of the device on which the panic button was pressed in the Ajax app |
If the group mode is not used, all events are sent with group ID 01 and 02. By default, all devices are added to group 01, but if the device responds to Night mode activation, all of its events will be sent from group 02. When arming, the event will be sent from both groups 01 and 02. When using the group mode, the group number in the application will match the group number on the CMS.
How to configure event transmission from Ajax Translator to CMS via SBN
Click on the Settings tab and go to the CMS connection menu.

From the Type of connection to CMS drop-down list, select SBN and click Save at the bottom of the window.
After saving the settings, Ajax Translator will display an error message.
Click OK, go to the Program tab, and click Exit.

Enter your account password to log out of Ajax Translator.
During the next start, Ajax Translator will use the SBN protocol to send events.
For correct operation, configure the reception of events in the CMS via SBN.
Starting from version 1.9, Ajax Translator has supported sending messages over the Sentinel protocol. This protocol allows you to receive visual alarm verifications from MotionCam/MotionCam Outdoor detectors, as well as the coordinates of the panic button that was pressed in the Ajax app.
| If the group mode is not used, all events are sent with group ID 01 or 02. By default, all devices are added to group 01, but if the device responds to Night mode activation, all of its events will be sent from group 02. When arming, the event will be sent from both groups 01 and 02. When using the group mode, the group number in the app will match the group number on the CMS. |
How to configure event transmission from Ajax Translator to Sentinel CMS
Click on the Settings tab and go to the CMS connection menu.
From the Type of connection to CMS drop-down list, select Sentinel.

Click Save at the bottom of the window.

After saving the settings, Ajax Translator will display an error message.
Click OK, go to the Program tab, and click Exit.
Enter your account password to log out of Ajax Translator.
The next time you start Ajax Translator, it will use the Sentinel protocol to transfer events.
For correct operation, it is necessary to configure the reception of events in the Sentinel CMS.
Starting from version 1.14, Ajax Translator has supported sending messages over the SOFTGUARD protocol. This protocol allows you to receive visual alarm verifications from MotionCam/MotionCam Outdoor detectors, as well as the coordinates of the panic button that was pressed in the Ajax app.
| If the group mode is not used, all events are sent with group ID 01 or 02. By default, all devices are added to group 01, but if the device responds to Night mode activation, all of its events will be sent from group 02. When arming, the event will be sent from both groups 01 and 02. When using the group mode, the group number in the app will match the group number on the CMS. |
How to configure the transmission of events from Ajax Translator to SoftGuard CMS
Click on the Settings tab and go to the CMS connection menu.
From the Type of connection to CMS drop-down list, select SOFTGUARD.
Click Save at the bottom of the window.
After saving the settings, Ajax Translator will display an error message.
Click OK, go to the Program tab, and click Exit.
Enter your account password to log out of Ajax Translator.
Next time you start Ajax Translator, it will use the SOFTGUARD protocol to transfer events.
To receive events, you should also select the correct protocol in the SoftGuard CMS settings.
Starting from version 1.9, Ajax Translator has supported sending messages over the Kronos protocol. This protocol allows you to receive visual alarm verifications from MotionCam/MotionCam Outdoor detectors, as well as the coordinates of the panic button that was pressed in the Ajax app.
| If the group mode is not used, all events are sent with group ID 01 or 02. By default, all devices are added to group 01, but if the device responds to Night mode activation, all of its events will be sent from group 02. When arming, the event will be sent from both groups 01 and 02. When using the group mode, the group number in the app will match the group number on the CMS. |
How to configure the transmission of events from Ajax Translator to the Kronos CMS
Click on the Settings tab and go to the CMS connection menu.
From the Type of connection to CMS drop-down list, select Kronos.
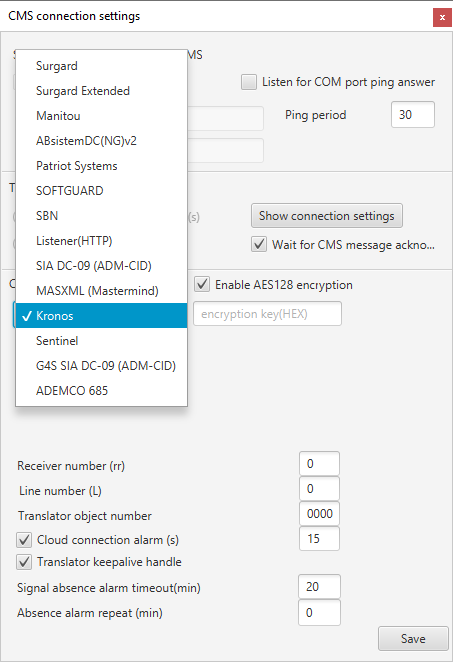
Click Save at the bottom of the window.
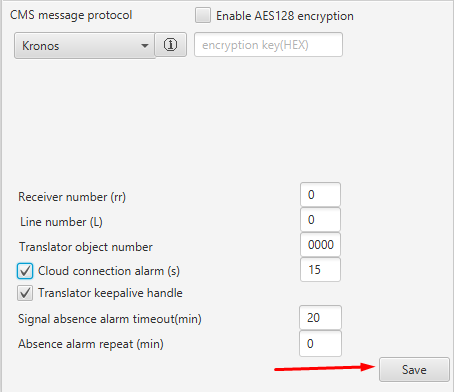
After saving the settings, Ajax Translator will display an error message.
Click OK, go to the Program tab, and click Exit.
Enter your account password to log out of Ajax Translator.
The next time you start Ajax Translator, it will use the Kronos protocol to transfer events.
For correct operation, it is necessary to configure the reception of events in the Kronos CMS.
Starting from version 1.10, Ajax Translator supports message transfer via MASXML protocol. This protocol allows receiving events and alarms, as well as visual alarm verification from MotionCam/MotionCam Outdoor detectors.
| If the group mode is not used, all events are sent with the group ID 01 and 02. By default, all devices are added to group 01, but if the device responds to Night mode activation, all of its events will be sent from group 02. When arming, the event will be sent from both groups 01 and 02. When using the group mode, the group number in the app will match the group number on the CMS. |
How to configure the transmission of events from Ajax Translator to MASterMind CMS
Click on the Settings tab and go to the CMS connection menu.
From the Type of connection to CMS drop-down list, select MASXML.
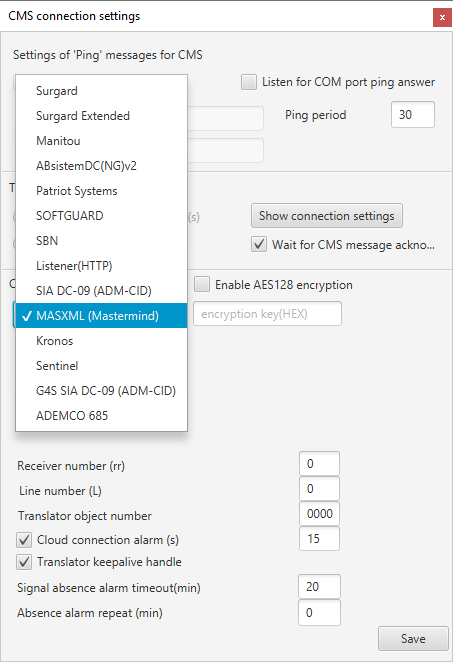
Click Save at the bottom of the window.
After saving the settings, Ajax Translator will display an error message.
Click OK, go to the Program tab, and click Exit.
Enter your account password to log out of Ajax Translator.
Next time you start Ajax Translator, it will use MASterMind protocol to transfer events.
To receive events, you should also select the correct protocol in the MASterMind CMS settings.
Starting with version 1.12, Ajax Translator has added support for sending messages via the Listenerprotocol. This protocol allows receiving visual alarm verification from MotionCam/MotionCam Outdoor detectors, as well as the coordinates of the panic button pressed in the Ajax app.
If the group mode is not used, all events are sent with group ID 01 and 02. By default, all devices are added to group 01, but if the device responds to Night mode activation, all of its events will be sent from group 02. When arming, the event will be sent from both groups 01 and 02. When using the group mode, the group number in the application will match the group number on the CMS.
How to configure event transfer from Ajax Translator to CMS via Listener
Click on the Settings tab and go to the CMS connection menu.
From the Type of connection to CMS drop-down list, select Listener.
Click Save at the bottom of the window.
After saving the settings, Ajax Translator will display an error message.
Click OK, go to the Program tab, and click Exit.
Enter your account password to log out of Ajax Translator.
During the next start, Ajax Translator will use the Listener protocol to send events.
For correct operation, it is necessary to configure the reception of events in the Listener CMS.
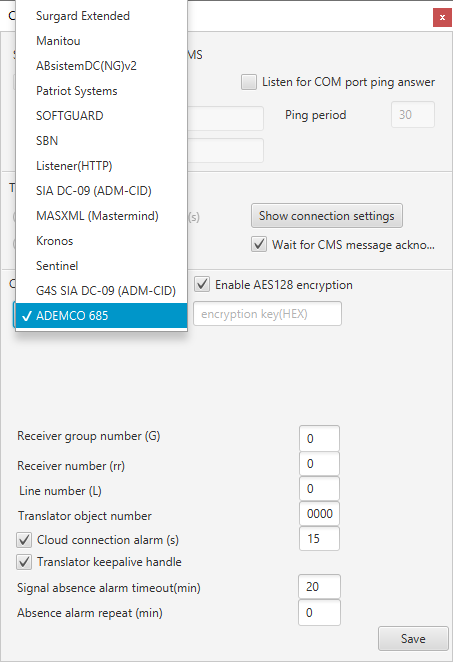
The ADEMCO 685 protocol is available in Ajax Translator starting from version 1.13.4 and later. The protocol does not support the transmission of images taken with the detectors with photo verification, and does not transmit coordinates of the alarm button that was pressed in the Ajax app.
|
Шаблон повідомлення ADEMCO 685: AB SSSS 18 QYXZ GG MCCC |
|
| A | Receiver number: from 1 to 9. The default value is 0. |
| B | Receiver group number: from 0 to 8. The default value is 0. |
| SSSS | 4-digit number of the CMS object that is linked to the hub. Adjustable from 0001 to 9999. |
| Q | Event ID: E (event) or R (restore). |
| YXZ | 3-digit event code. |
| GG | Group number: from 01 to 25. |
| M | Zone (device) or user ID: C (device), U (user). |
| CCC | Zone, device, or user number: from 000 to 999. The device zone number is available in device states, and the user number is available in the user settings menu. |
The protocol uses the following polling system to control communication between the CMS software and Ajax Translator: the 00 OKAY @ message is sent every 30 seconds. The protocol does not allow changing the polling period or the text of the message.
The ADEMCO 685 protocol uses the same event code table as SurGard (Contact ID). To send events, an object number must be assigned to the hub. Without this, Ajax Translator will not send events and alarms to the CMS.
How the events are sent if the Wait for ACK message acknowledgement option is enabled in the Ajax Translator settings:
- If Ajax Translator receives an acknowledgment that the CMS has accepted an event: Ajax Translator continues to send events.
- If Ajax Translator does not receive an acknowledgment that the CMS has accepted an event: Ajax Translator sends this event two more times, and then continues to send the next events.
If the group mode is disabled, events are received with group ID 01 or 02. By default, all devices are added to group 01. But if the device is also on Night mode, its events will also be received with group 02 ID. If armed mode is enabled, the event is received with both groups’ IDs: 01 and 02. If the group mode is used, the group number in the app will match the group number used by the CMS.
How to configure event transmission from Ajax Translator to the CMS supporting ADEMCO 685
Click on the Settings tab and go to the CMS connection menu.
From the Type of connection to CMS drop-down list, select ADEMCO 685.
Click Save at the bottom of the window.
After saving the settings, Ajax Translator will display an error message.
Click OK, go to the Program tab, and click Exit.
Enter your account password to log out of Ajax Translator.
The next time you open Ajax Translator, it will start using the ADEMCO 685 protocol to transmit events.
For correct operation, configure the reception of events in the CMS that uses ADEMCO 685 protocol.
Connecting the hub to Ajax Translator
Communication between the hub and CMS software can be configured:
- via the Ajax Cloud server
- directly (bypassing the Ajax Cloud)
- directly and via Ajax Cloud at the same time
Use both communication channels to provide a more stable connection with the CMS.
How to connect a hub via Ajax Cloud
To connect the hub via a cloud server, the user with administrator rights should send a monitoring request by selecting a security company in Ajax application (Hub —> Settings —> Security Companies —> Select a company —> Send monitoring request). After that, the hub ID will appear in the list of available objects in Ajax Translator (table on the left).
To bind the hub to the CMS object number, highlight the hub ID in the table on the left and press the arrow button. The hub will be added to the table on the right with console number 0.
Double-click the cell in the Object No. column in the row of your hub in the table on the right. Write a free number to the object and press Enter on the keyboard. The object number should be within the range of 1 to 9999. If you enter a number of more than one character, do not put zeros in front of the object number: use “1” instead of “0001”.
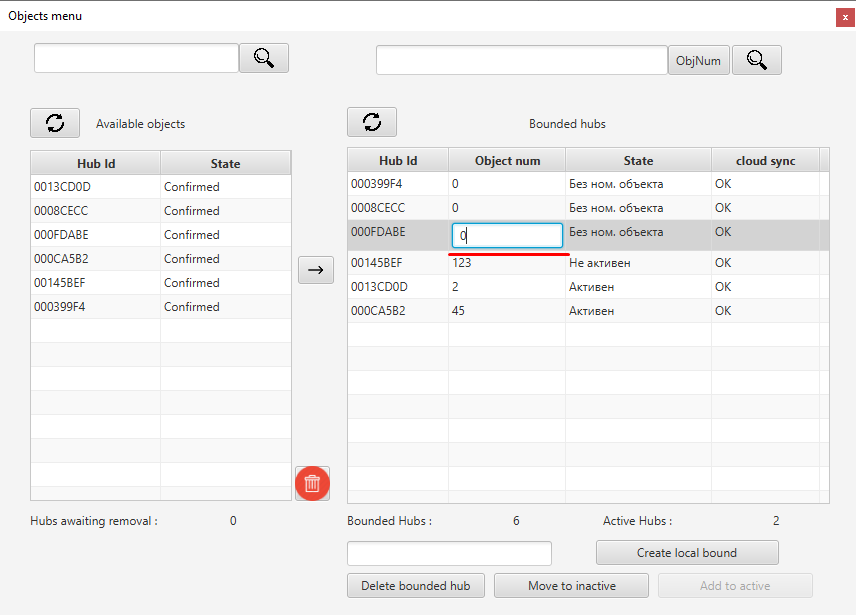
If you change the number and fail to press Enter, the hub will not be added to CMS.
After successful binding, the Status line changes to Active.
In CMS software, create an object with the number matching the number assigned to the hub number in Ajax Translator.
How to connect the hub directly
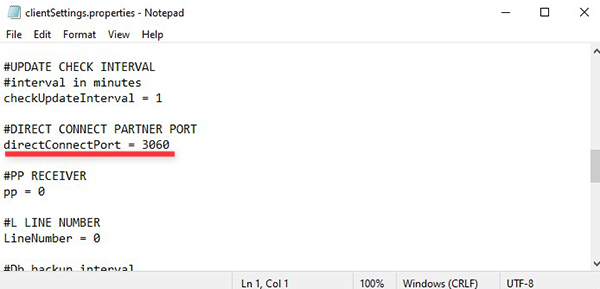
Before you start connecting the hub to Ajax Translator bypassing the Ajax Cloud server, forward any external TCP port to internal port 3060. This way you provide an external static IP address for connection.
If the required port is busy, make changes to the Ajax Translator configuration file.
Open the folder with Ajax Translator files, go to the Translator Dist folder and then to the Settings folder.
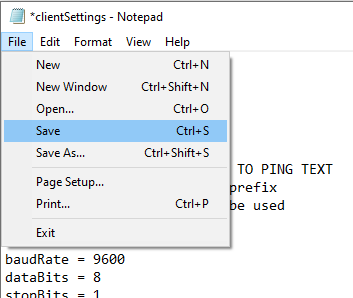
Open the clientSetting file using the default Notepad application.
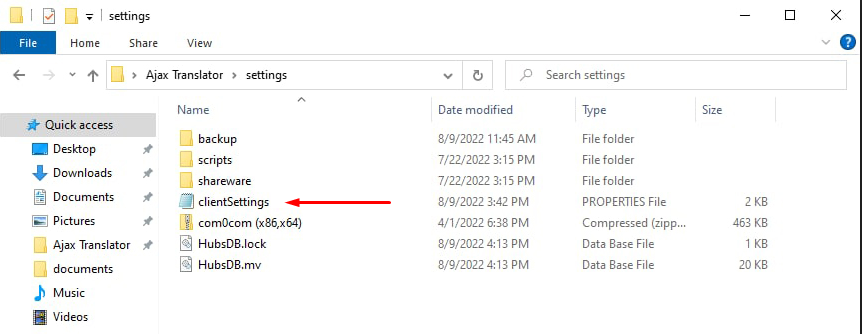
Search for the line directConnectPort = 3060 and replace “3060” with the free port value.
Make sure you save the file. Go to the File menu and click Save. Then restart Ajax Translator.
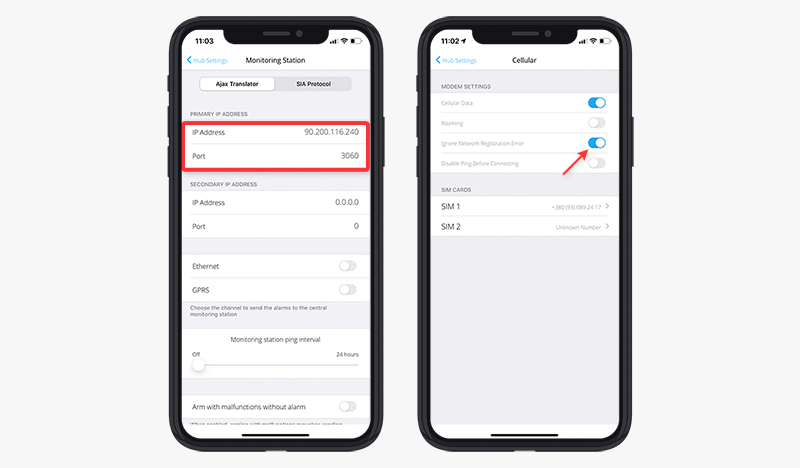
After configuring the connection from the CMS side, go to the Monitoring Station menu in the hub settings in the Ajax app. Indicate the IP address and the number of the forwarded external TCP port. Select the communication channels through which the hub will connect to your server: Ethernet and/or GPRS.
If only the GPRS channel is used for communication, activate the Ignore network registration errors in the cellular data settings.
(Hub —> Settings —> Cellular data)
After configuring the connection between the hub and Ajax Translator via the TCP port, bind the hub ID to the CMS object number.
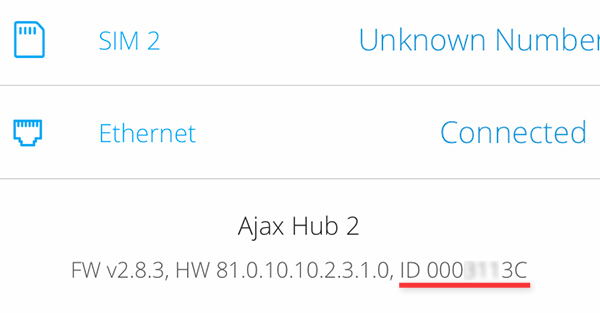
Go to the Objects menu in Ajax Translator, enter the eight-digit hub ID in the input field, and click the Create local bound button.
The hub ID can be seen in Ajax app: go to the Devices tab, click on the hub, and go down the screen.
After you click the Create local bound button, a notification should appear.
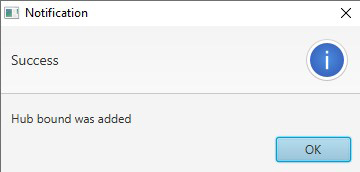
The hub will be added to the table on the right with console number 0. Double-click the cell in the Object No. column in the row of your hub in the table on the right. Write a free number to the object and press Enter on the keyboard.
How to connect the hub directly and via Ajax Cloud
To connect the hub via two communication channels at the same time, follow the connection procedure via Ajax Cloud and then configure direct connection as described in this manual.
The priority of direct connection is higher than the cloud server connection. If direct connection fails for any reason, Ajax Translator starts receiving events from the hub via Ajax Cloud. This way you can provide more stable monitoring of the protected object.

