ReX 2 is a radio signal range extender of a security system with support for alarm photo verification. Communicates with the hub via radio and Ethernet. It is designed for indoor installation.
It has a built-in tamper for protection against tampering and is equipped with a backup battery for 38 hours of battery life.
The range extender only works with compatible Ajax hubs. Connection to other hubs, range extenders, as well as to uartBridge and ocBridge Plus, is not provided.
The device is added to the system and configured via iOS, Android, macOS, and Windows apps. Users will know about ReX 2 events through push notifications, SMS, and calls (if enabled).
Functional elements
- Logo with an LED indicator.
- SmartBracket mounting panel. Slide it down with force to open.

The perforated part is necessary for tamper triggering in case of any attempt to detach the range extender from the surface. Do not break it off.
- Power cable connector.
- Ethernet cable connector.
- QR code with the identifier (service number) of the range extender.
- Tamper button.
- Power button.
Operating principle
ReX 2 expands the radio communication range of the security system, allowing the installation of Ajax devices at a greater distance away from the hub. ReX 2 can communicate with the hub via radio (the Jeweller and Wings protocols) and Ethernet cable if the devices are within the same network.
ReX 2 receives hub signals, transmits them to the connected devices, and sends signals from devices to the hub. The hub polls range extender with the frequency of 12 to 300 seconds (depending on the settings, the default value is 36 seconds). ReX 2 range extender polls all connected devices with the same frequency.
Regardless of the settings, all alarms are delivered in no more than 0.3 seconds.
The communication range between ReX 2 and the device is limited by the radio signal range of the device. Radio signal range is indicated on the device page on the website and in the User Manual.
If the device loses communication with a range extender for some reason, it does not automatically connect to another range extender or hub.
Jeweller and Wings communication protocols
Range extender uses Jeweller technology to transmit alarms and events and Wings to transmit photos. These are two-way wireless data protocols for data transmission that provide fast and reliable communication between the hub, range extender and system devices connected to a range extender.
The protocols support block encryption with dynamic key and device identification at every communication session to protect against sabotage and spoofing.
To control communication with system devices and display their statuses, the Ajax app provides a “hub — devices” polling system with an interval of 12 to 300 seconds. The polling interval is adjusted by the user or PRO with admin rights.
Connection via Ethernet
ReX 2 with the OS Malevich 2.13 firmware supports connection to the hub via radio and Ethernet. The cable can be used as the only or additional communication channel. A single Ajax system can now cover such an object as an office centre with underground parking, a metal hangar, or a warehouse complex of several large buildings.
The hub and ReX 2 must be connected to the same network through a router for this communication channel to work. The router is needed to determine the IP address for the range extender. The network to which ReX 2 connects must allow broadcast queries and an open 4269 port for all types of traffic.
Connecting ReX 2 directly to the hub via an Ethernet cable is not provided.
ReX 2 can work with both static and dynamic IP addresses. If the range extender is unable to establish an Ethernet connection with the hub, the ReX 2 states will display a malfunction. For convenience, the MAC address of the range extender is also available in the error details, which can be used to find and solve the problem.
A communication loss notification is sent in two cases: if the hub completely loses connection with the range extender, and also if the hub loses connection with the range extender via the photos transmitting channel. If communication via Jeweller only or via Wings only is lost (when Ethernet is connected), a notification is not sent.
Support of photo verification
ReX 2 radio signal range extender supports connection of detectors with photo verification. ReX 2 range extender can transmit not only events and alarms but also photos taken by the detectors.
Photo delivery time via range extender depends on the channel of the communication with a hub, the type of detector and the resolution of the images.
Photo delivery time via the Wings radio protocol:
| Detector | Photo resolution | Photo delivery time via range extender |
| MotionCam Jeweller MotionCam (PhOD) Jeweller |
160 × 120 | Up to 8 seconds |
| 320 × 240 (by default) | Up to 18 seconds | |
| 640 × 480 | Up to 31 seconds | |
| MotionCam Outdoor Jeweller MotionCam Outdoor (PhOD) Jeweller |
320 × 176 (by default) | Up to 14 seconds |
| 640 × 352 | Up to 20 seconds |
* Values are calculated assuming that the hub is working via Ethernet or 4G, and there are three bars of a signal level between ReX 2 and the detector, as well as between the hub and ReX 2. If you use the Photo on Demand feature, there may be a short delay (up to 3 seconds) before the detector takes a photo.
Photo delivery time via Ethernet:
| Detector | Photo resolution | Photo delivery time via range extender |
| MotionCam Jeweller MotionCam (PhOD) Jeweller |
160 × 120 | Up to 6 seconds |
| 320 × 240 (by default) | Up to 10 seconds | |
| 640 × 480 | Up to 16 seconds | |
| MotionCam Outdoor Jeweller MotionCam Outdoor (PhOD) Jeweller |
320 × 176 (by default) | Up to 10 seconds |
| 640 × 352 | Up to 17 seconds |
* Values are calculated assuming that the hub is working via Ethernet or 4G, and there are three bars of a signal level between ReX 2 and the detector. If you use the Photo on Demand feature, there may be a short delay (up to 3 seconds) before the detector takes a photo.
Number of connected range extenders and devices
Depending on the model, the following number of range extenders can be connected to the hub:
| Hub model | ReX 2 quantity |
| Hub 2 (2G) | 5 |
| Hub 2 (4G) | 5 |
| Hub 2 Plus | 5 |
| Hub Hybrid (2G) | 5 |
| Hub Hybrid (4G) | 5 |
It doesn’t matter exactly what type of range extender is used: ReX or ReX 2. They can be connected to the system in any combination within the hub limitations.
ReX 2 connects to the hub only directly. Connection to another range extender is not provided.
ReX 2 does not increase the number of devices connected to the hub. The maximum number of devices connected to ReX 2 depends on the hub model.
| Hub model | Number of connected devices |
| Hub 2 (2G) | 99 |
| Hub 2 (4G) | 99 |
| Hub 2 Plus | 199 |
| Hub Hybrid (2G) | 99 |
| Hub Hybrid (4G) | 99 |
Sending events to the monitoring station
Ajax system can connect to the CMS and transmit alarms and events in SurGard (Contact ID), SIA (DC-09), ADEMCO 685 and other proprietary protocol formats. A complete list of supported protocols is available at the link.
The ReX 2 loop (zone) number can be found in the device states. In order to obtain it:
- Sign in to the Ajax app.
- Select the hub if you have several of them or if you are using a PRO app.
- Go to the Devices menu.
- Select ReX 2. The loop (zone) number is displayed at the very bottom of the page.
The ReX 2 loop (zone) number is also available in the Groups menu (Ajax app → Devices ![]() → Hub → Settings
→ Hub → Settings ![]() → Groups). In order to find out the loop (zone) number, select the group in which the range extender is located. The Device Number corresponds to the loop (zone) number.
→ Groups). In order to find out the loop (zone) number, select the group in which the range extender is located. The Device Number corresponds to the loop (zone) number.
Compatible hub models
ReX 2 requires a hub for operation. List of compatible hubs:
Connection to other hubs, radio signal range extenders, ocBridge Plus and uartBridge is not provided.
Connection
The range extender only works with compatible Ajax hubs. Connection to other hubs, range extenders, as well as to uartBridge and ocBridge Plus, is not provided.
Before connecting, make sure that:
- The Ajax app is installed.
- An account is created.
- The required hub has been added to the Ajax app.
- This hub is enabled and at least one room has been created for it.
- You have administrator rights for this hub.
- The hub has internet access via at least one communication channel: Ethernet, Wi-Fi, or a cellular connection. You can check this in the Ajax app or through the hub logo on the faceplate. The logo should light up white or green.
- The hub is disarmed and is not being updated. You can check this through the status of the hub in the Ajax app.
In order to connect ReX 2 to the hub:
- Remove the SmartBracket mounting panel by sliding it down with force. Do not damage the perforated portion, as it is needed to trigger the tamper protecting the range extender from dismantling.
- Connect ReX 2 to external power supply. Connect an Ethernet cable to ReX 2.
To comply with the INCERT requirements, use the Screw terminal block Adapter to connect the external power supply. Read more.
- Sign in to the Ajax app.
- Select the hub if you have several of them or if you are using a PRO app.
- Go to the Devices tab and click Add Device.
- Name the range extender, scan or enter the QR code manually (indicated on the device body and packaging), and select a room and a group (if the group mode is activated).
- Click Add; the countdown will begin.
- Turn on ReX 2 by holding the power button for 3 seconds.


To make sure ReX 2 is connected to the hub, the range extender must be located at the same secured facility as the system (within the range of the hub’s radio network).
After connecting to the hub, the logo will change its colour from red to white within 30 seconds. The connected range extender will appear in the list of hub devices in the Ajax app. The updating rate of the range extender states depends on the Jeweller settings (or Jeweller/Fibra for the Ajax hybrid hubs); the default value is 36 seconds.
If the connection fails, turn off ReX 2 and try again after 5 seconds. Suppose the maximum number of devices has been added to the hub (depending on the hub model) when attempting to add the device. In that case, you will receive a corresponding notification in the Ajax app.
ReX 2 only works with one hub. When connected to a new hub, the range extender stops sending commands to the old one. Once added to a new hub, ReX 2 is not removed from the list of devices of the old hub. This has to be done in the Ajax app.
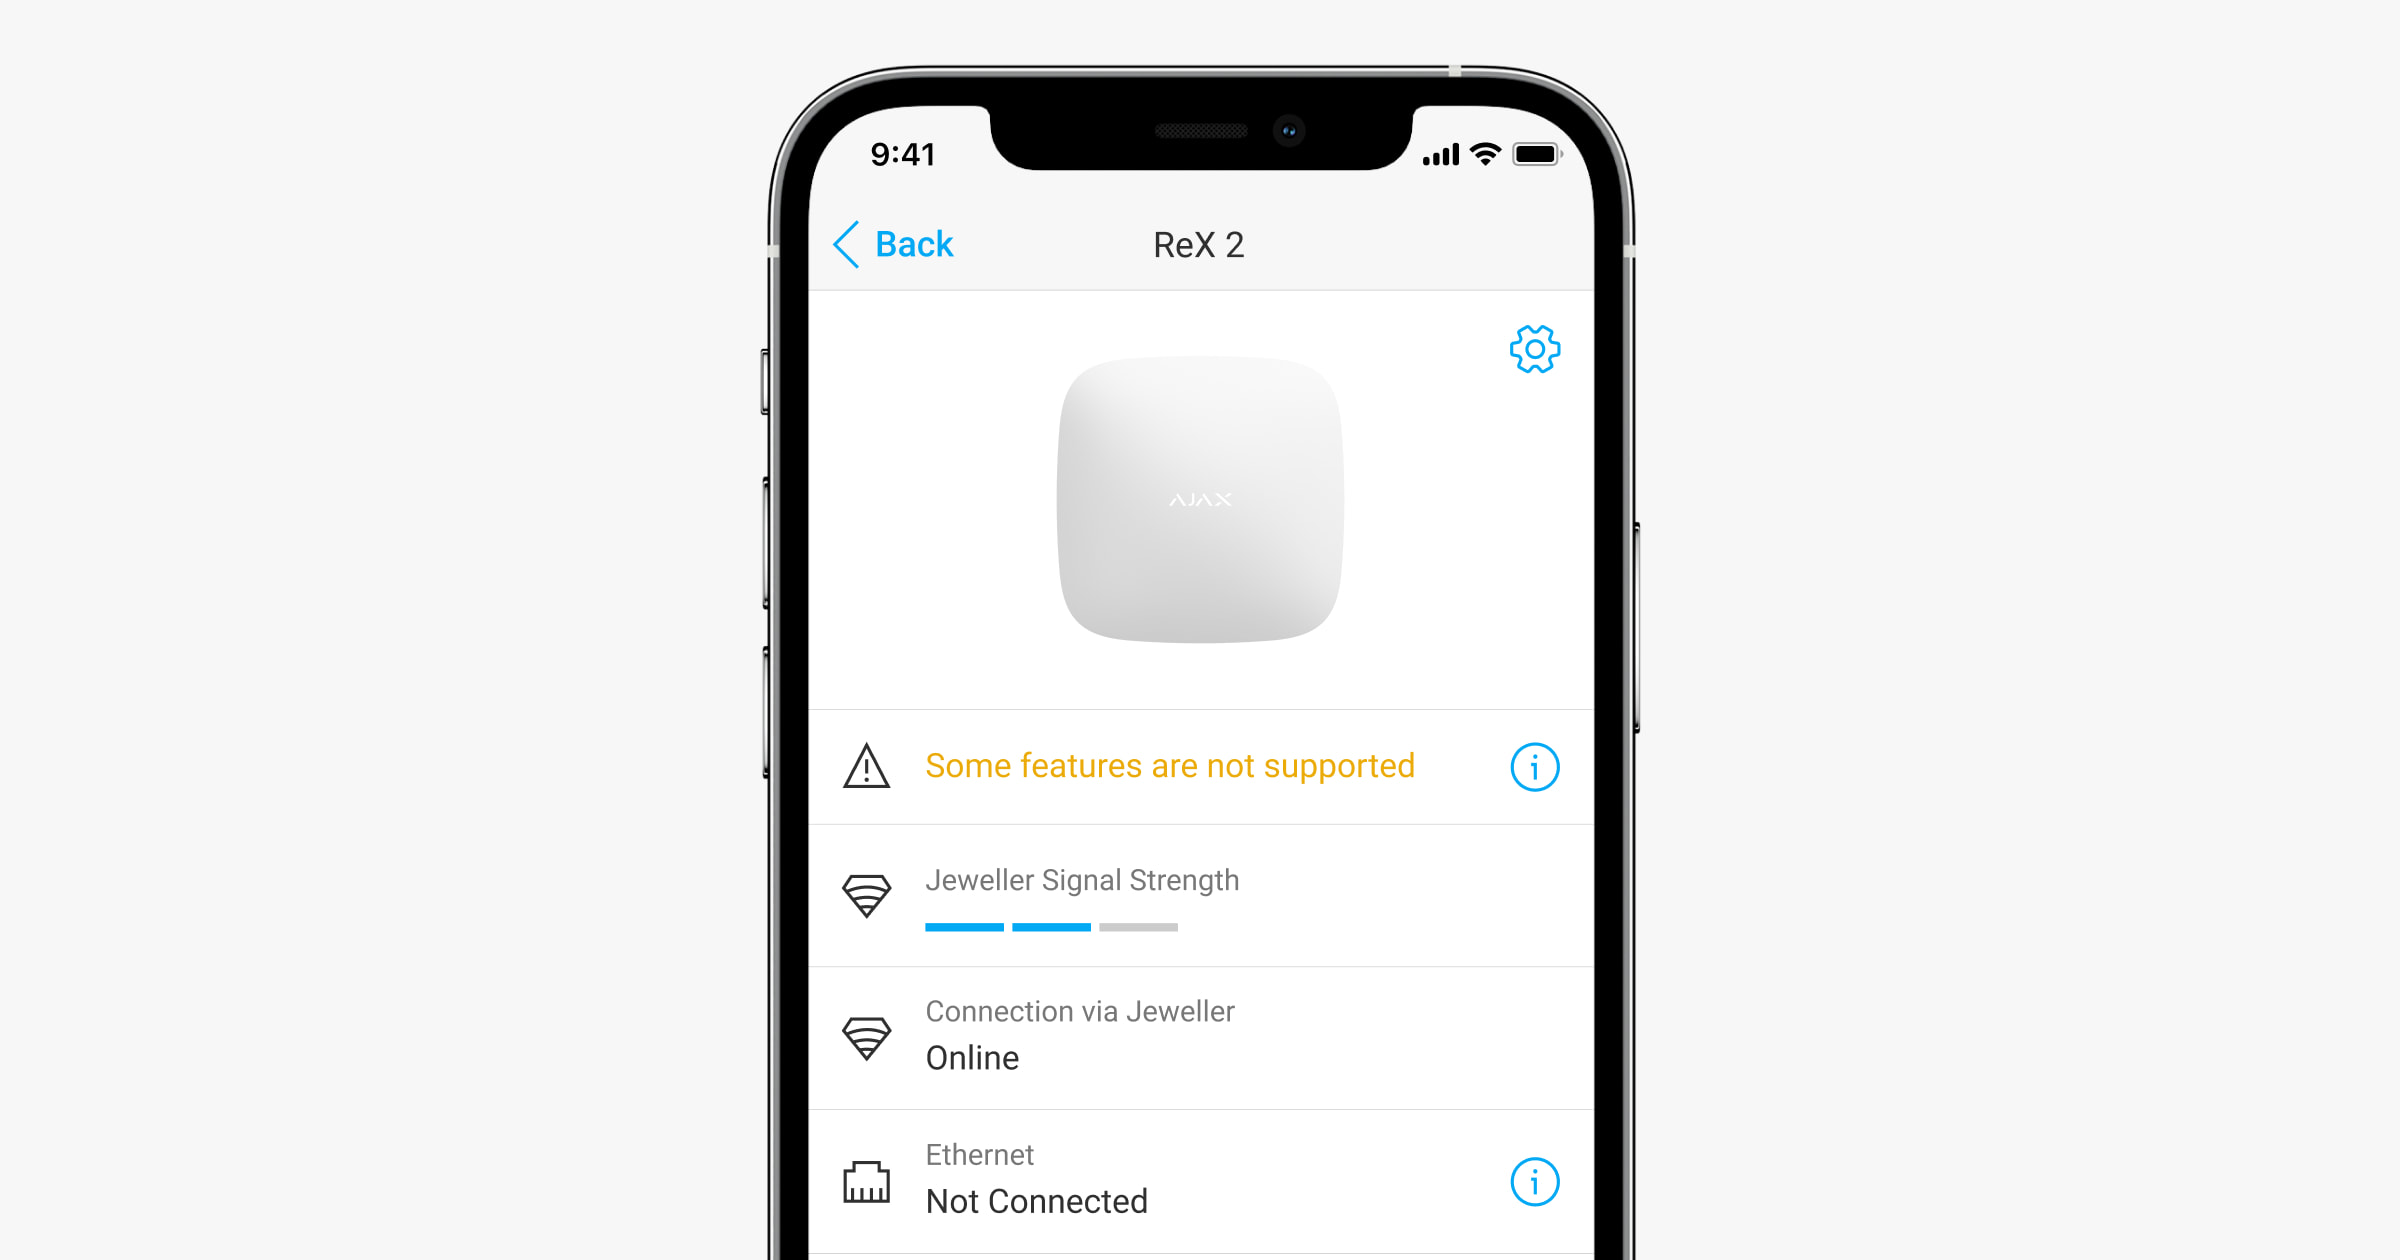
Malfunction badge
When the range extender detects a malfunction (for example, there is no external power supply), the Ajax app displays a badge with counter in the upper left corner of the device icon.
All faults can be seen in the range extender states. Fields with faults will be highlighted in red.
Icons
The icons display some of ReX 2 states. You can view them in the Devices ![]() tab in the Ajax app.
tab in the Ajax app.
| Icon | Meaning |
|
Jeweller Signal Strength. Displays the signal strength between the hub and range extender. The recommended value is 2–3 bars. |
|
|
Battery charge level. |
|
| Malfunction detected. A list and description of malfunctions is available in the range extender states. | |
|
ReX 2 is disabled. |
|
|
ReX 2 has notifications about triggering of the tamper disabled. |
States
The states include information about the device and its operating parameters. ReX 2 states can be found in the Ajax app:
- Select the hub if you have several of them or if you are using a PRO app.
- Go to the Devices tab.
- Select ReX 2 from the list.
| Parameter | Meaning |
| Some functions do not work |
The field is displayed if the firmware versions of the hub and ReX 2 range extender do not match. ReX 2 updates within half an hour if the system is disarmed. To update the firmware, it is important to have a stable:
|
| Malfunction |
Clicking on The field is displayed if a malfunction is detected. |
| Jeweller Signal Strength |
Jeweller signal strength between Hub and ReX 2. Recommended values — 2–3 bars. Jeweller is a protocol for the transmission of events and alarms. |
| Connection via Jeweller | Connection status between the hub and ReX 2 range extender via Jeweller:
|
| Ethernet | Status of connection between the hub and the ReX 2 range extender via Ethernet:
Pressing the |
| Wings Signal Strength |
Wings signal strength between the hub and ReX 2. Recommended values — 2–3 bars. Wings is a protocol for transmitting photos taken by the detectors with photo verification. |
| Connection via Wings | Status of connection between the hub and the ReX 2 range extender via Wings:
|
| Radio transmitter power | The field is displayed if the Attenuation Test is enabled.
|
| Battery charge |
The charge level of ReX 2 backup battery. Displayed in increments of 5%. |
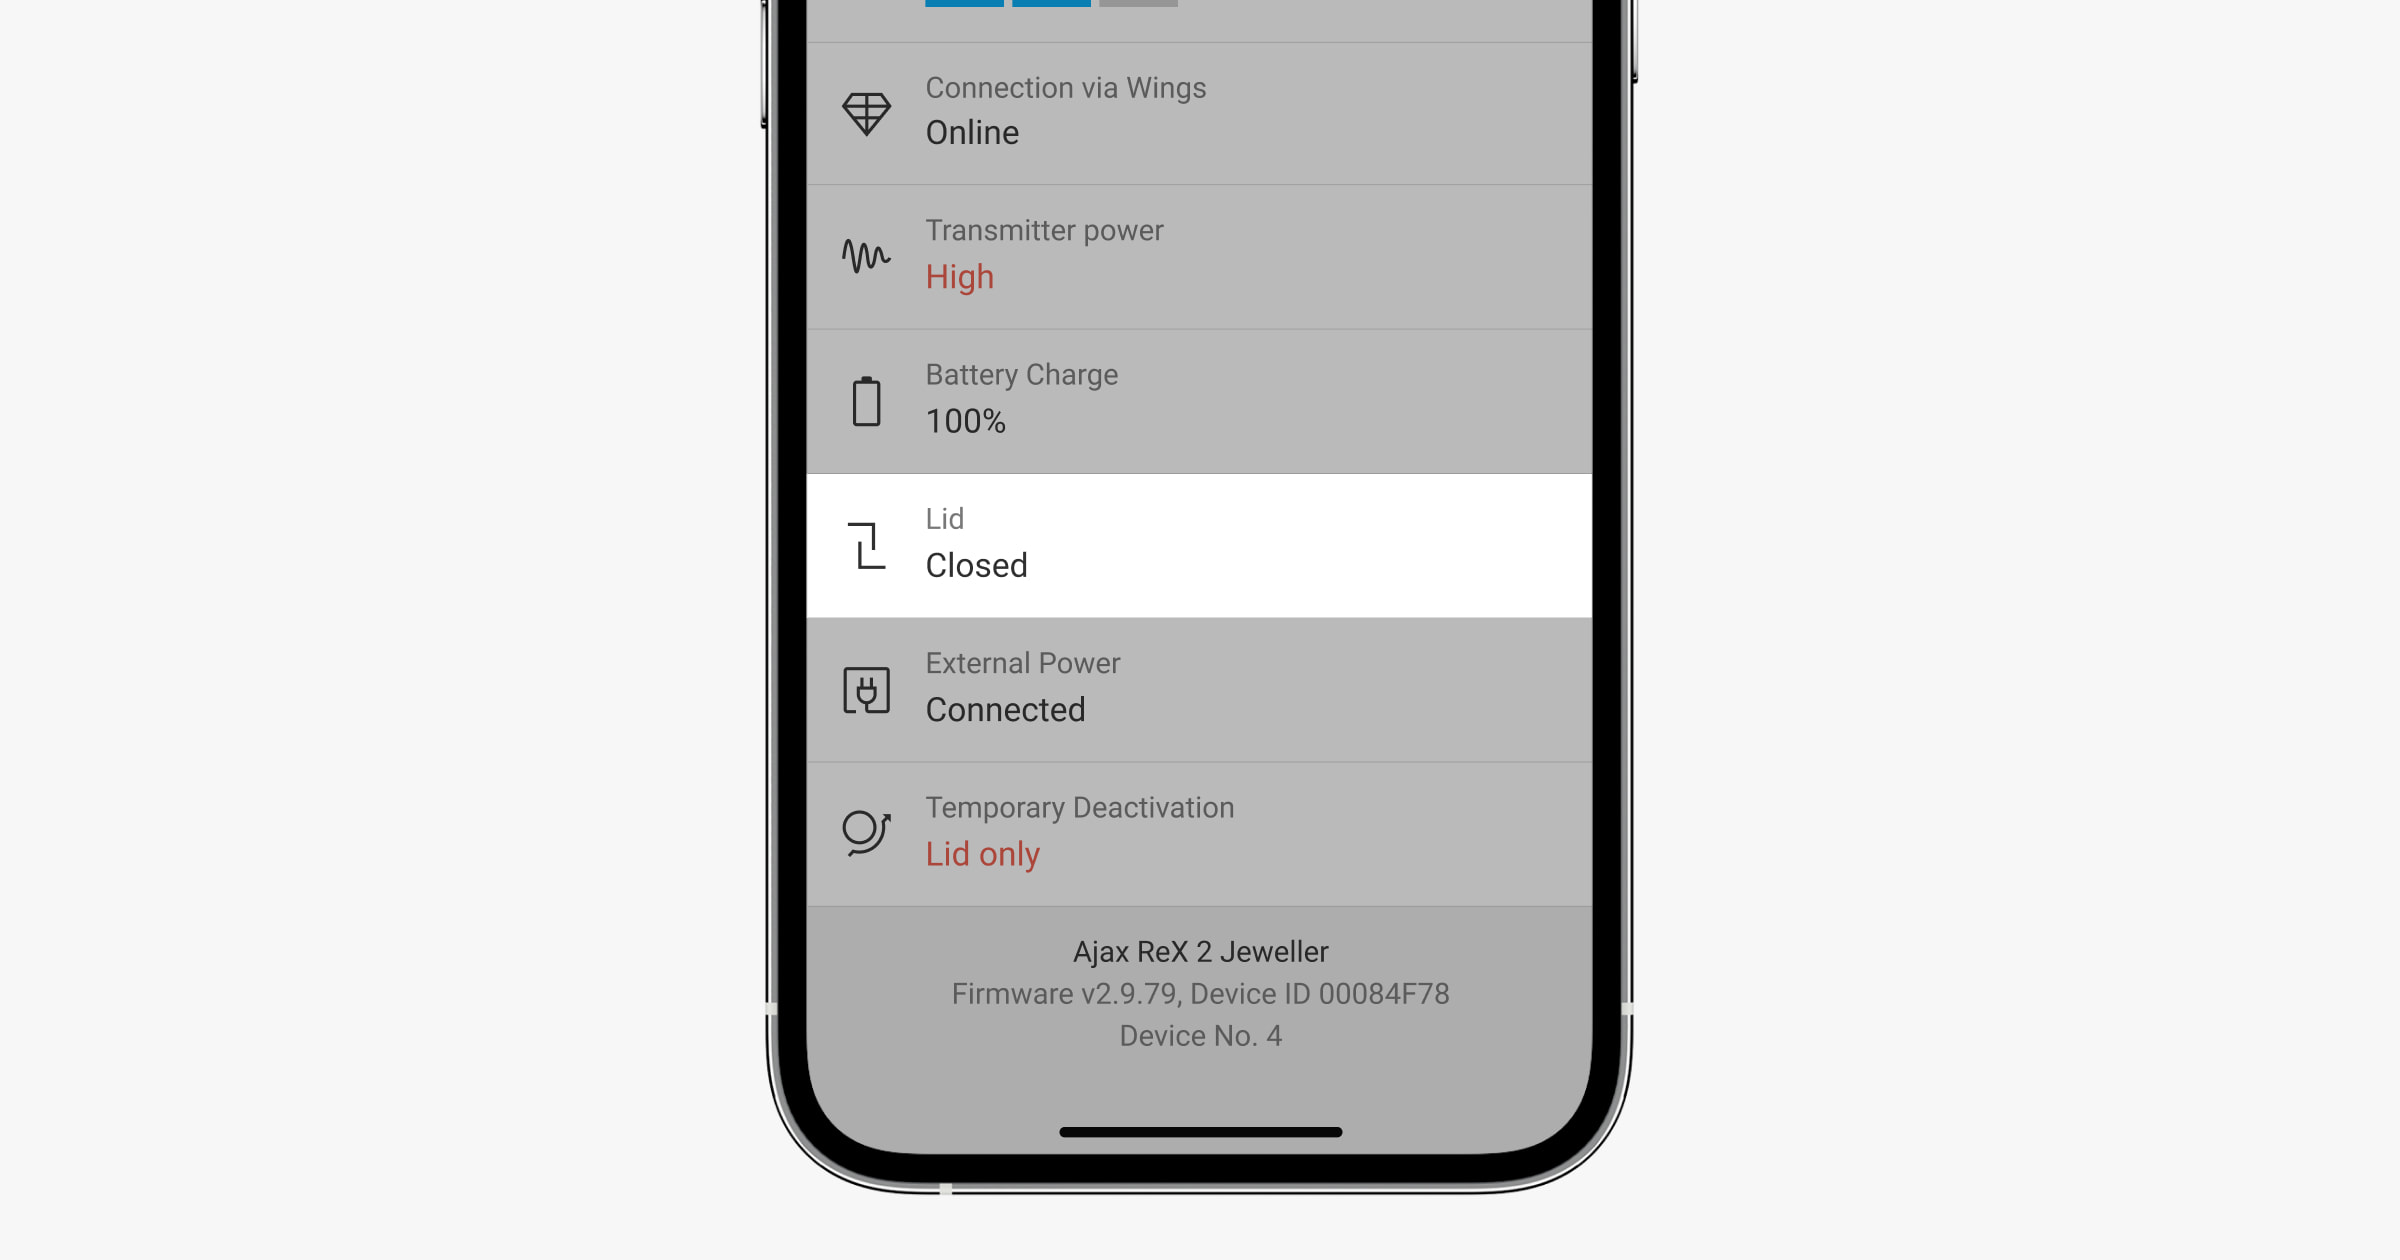
| Lid | The tamper status of the range extender that responds to detachment or violation of the integrity of the body:
|
| External power supply | The presence of external power supply 110–240 V:
|
| Permanent Deactivation | Shows the status of the device permanent deactivation function:
When the range extender is completely turned off, the devices connected to it continue to operate normally via ReX 2. |
| Firmware |
ReX 2 firmware version. Updated remotely as soon as the update is available on the Ajax Cloud server. |
| ID | ReX 2 ID/serial number. Also located on the device box, its board, and the body (under the SmartBracket mount). |
| Device № | Number of the device loop (zone). |
Settings
ReX 2 settings can be changed in the Ajax app:
- Select the hub if you have several of them or if you are using a PRO app.
- Go to the Devices tab.
- Select ReX 2 from the list.
- Go to Settings by clicking on the gear icon in the upper right corner.
- Set the required parameters.
- Click Back to save the new settings.
| Settings | Meaning |
| Name |
ReX 2 name. Displayed in the text of SMS and notifications in the event feed. To change the device name, click on the pencil icon The name can contain up to 12 Cyrillic characters or up to 24 Latin characters. |
| Room |
Selecting the virtual room to which ReX 2 is assigned. The room name is displayed in the text of SMS and notifications in the event feed. |
| Ethernet Settings | Menu for connecting to the hub via Ethernet:
|
| LED Brightness |
Setting the brightness of the Ajax logo backlight on the range extender. Adjustable from 0 to 10 in increments of 1. The default value is 10. |
| Pair with device |
Menu for selecting devices that work via the range extender. |
| Jeweller Signal Strength Test |
Switches ReX 2 to the Jeweller signal strength test mode. The test checks the signal strength between the hub and ReX 2 through the channel for transmitting events and alarms and determines the optimal installation location. |
| Wings Signal Strength Test |
Switches ReX 2 to the Wings signal strength test mode. The test checks the signal strength between the hub and ReX 2 through the photo transmission channel and determines the optimal installation location. |
| Signal Attenuation Test |
Switches ReX 2 to the signal attenuation test mode. The test decreases or increases the radio transmitter power to simulate a change in the environment to check the stability of the communication between the range extender and the hub. |
| Permanent Deactivation |
Allows the hub administrator to disable the device without removing it from the system. Three options are available:
The system will only ignore the disabled device. The devices connected via ReX 2 will continue normal operation. |
| User Manual | Opens ReX 2 User Manual in the Ajax app. |
| Unpair Device |
Unpairs ReX 2 from the hub and deletes its settings. If detectors have been connected to ReX 2, then after unpairing the range extender they will try to reconnect to the hub. |
Connecting devices to ReX 2

In order to assign a device to a range extender, in the Ajax app:
- Select the hub if you have several of them or if you are using a PRO app.
- Go to the Devices tab.
- Select ReX 2 from the list.
- Go to Settings by clicking on the gear icon in the upper right corner.
- Select the Pair with device menu item.
- Select the devices that should operate via the range extender.
- Click Back to save the settings.
Once connected, the selected devices in the Ajax app display the icon ![]() . The device can be paired with one ReX 2 only. When a device is assigned to a range extender, it is automatically disconnected from another connected range extender.
. The device can be paired with one ReX 2 only. When a device is assigned to a range extender, it is automatically disconnected from another connected range extender.
In order to assign a device to the hub, in the Ajax app:
- Select the hub if you have several of them or if you are using a PRO app.
- Go to the Devices tab.
- Select ReX 2 from the list.
- Go to Settings by clicking on the gear icon in the upper right corner.
- Select the Pair with device menu item.
- Uncheck the devices that need to be reconnected to the hub.
- Click Back to save the settings.
Malfunctions
ReX 2 can notify about malfunctions, if any. Malfunctions field is available in Device States. Clicking on ![]() opens the list of all malfunctions. The field is displayed if a malfunction is detected.
opens the list of all malfunctions. The field is displayed if a malfunction is detected.
| Malfunction | Description | Solution |
| Some functions do not work. | The field is displayed if the firmware versions of the hub and ReX 2 range extender do not match. | Make sure that automatic updates are enabled in the hub settings. ReX 2 updates within half an hour if the system is disarmed and a new firmware version is available on the server. |
Indication
The ReX 2 LED indicator may light up white, red, or green, depending on the status of the device and connection via Ethernet.
Indication when connection via Ethernet is disabled
| Indication | Event | Note |
| Lights up white. | Connection is established with the hub through at least one of the channels: Jeweller and/or Wings. | If the external power supply is off, the indicator will flash every 10 seconds. |
| Lights up red. | No communication with the hub. | If the external power supply is off, the indicator will flash every 10 seconds. |
| Lights up for 3 minutes, then flashes every 10 seconds. | The external power supply is disconnected. | The colour of the indication depends on the presence of connection to the hub. |
Indication when connection via Ethernet is enabled
| Indication | Event | Note |
| Lights up white. | Connection is established with the hub via two channels:
|
If the external power supply is off, the indicator will flash every 10 seconds. |
| Lights up green. | Connection is established with the hub at the very least one of two channels:
|
If the external power supply is off, the indicator will flash every 10 seconds. |
| Lights up red. | No communication with the hub. | If the external power supply is off, the indicator will flash every 10 seconds. |
| Lights up for 3 minutes, then flashes every 10 seconds. | The external power supply is disconnected. | The colour of the indication depends on the presence of connection to the hub. |
Functionality testing
ReX 2 functionality tests do not begin immediately, but not later than over a single ping period of the hub–detector (36 seconds with the standard settings of the hub). You can change the ping period of devices in the Jeweller menu of the hub settings.
To run a test, in an Ajax app:
- Select the hub if you have several of them or if you are using a PRO app.
- Go to the Devices tab.
- Select ReX 2.
- Go to Settings .
- Select one of the available tests:
Selection of the installation site

When choosing a location, consider 2 main factors:
- Jeweller Signal Strength.
- Wings Signal Strength.
You should consider the signal strength both between the hub and the range extender and between the range extender and all devices connected to it.
Locate ReX 2 in a place with stable Jeweller and Wings signal strength (2-3 bars in the Ajax app). When choosing a site for installation, consider the distance between the range extender and the hub and any obstacles between the devices hindering the radio signal passage: walls, intermediate floors, or large-size objects located in the room.
ReX 2 should be placed between a hub and a device with a weak signal. The range extender does not amplify the radio signal, so installing it near a hub or device with a signal level of 1 or 0 bars will not give the desired result. Our radio range calculator will help you roughly calculate the signal level at the installation site.
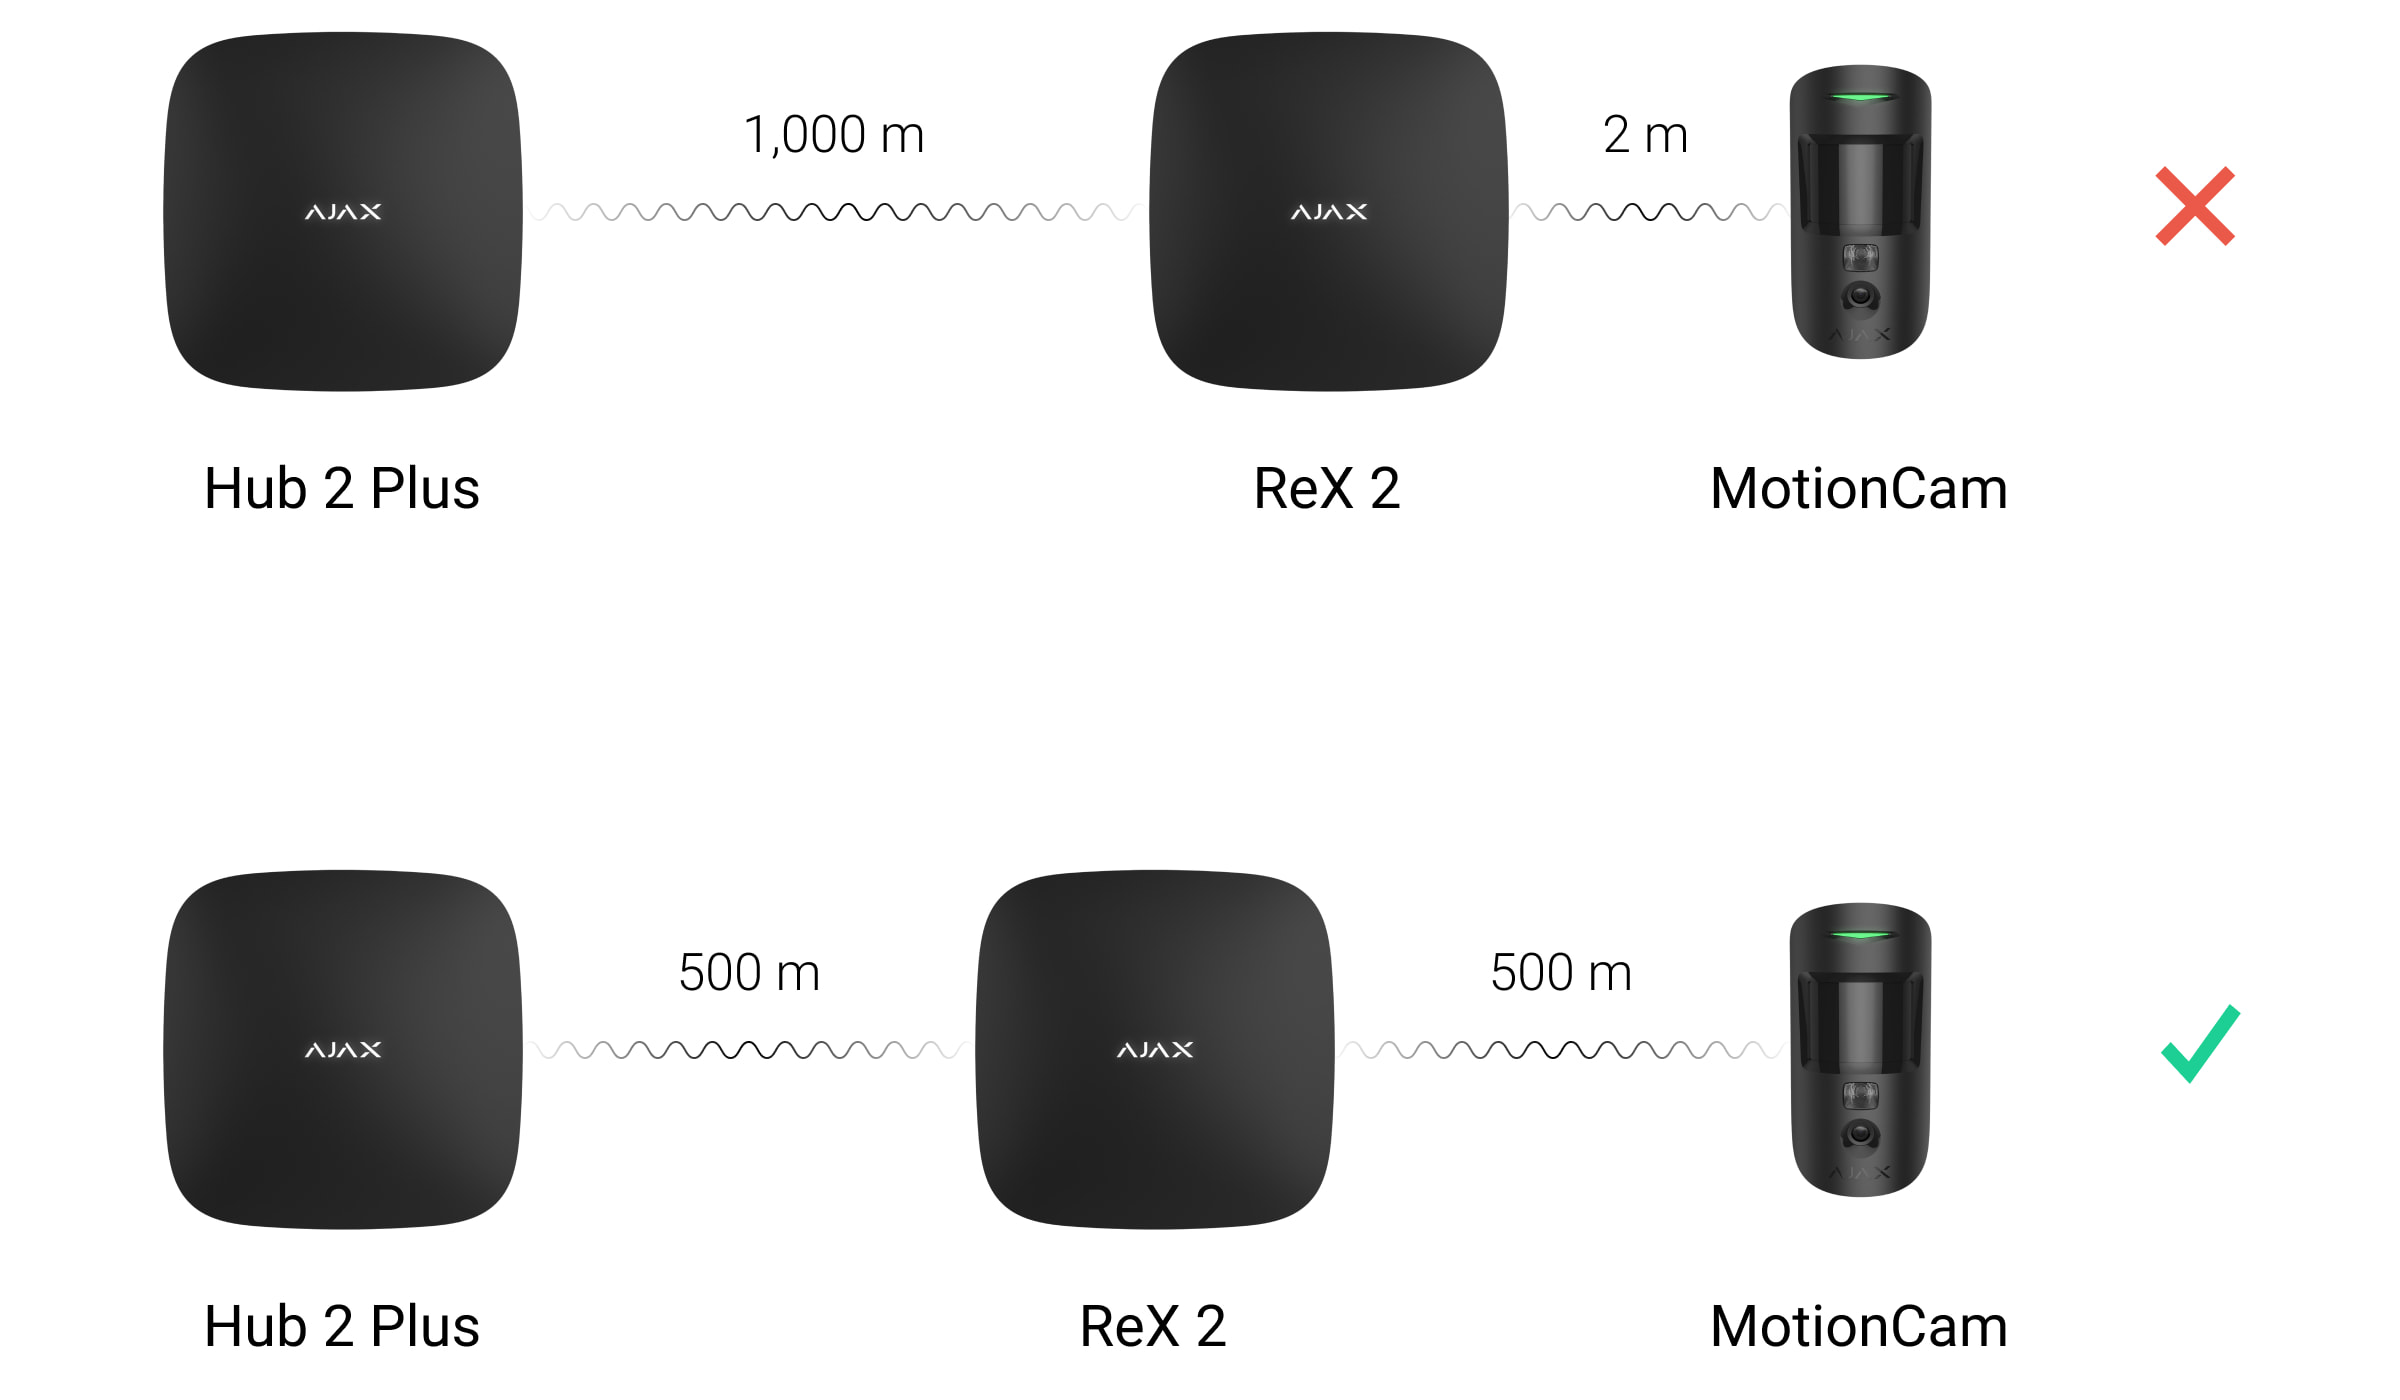
Check the Jeweller and Wings signal strength at the installation site. If the signal strength is low (a single bar), we cannot guarantee the stable operation of the security system. At the very least, relocate the device as repositioning even by 20 cm can significantly improve the signal reception.
If the place of installation has no stable signal level (2-3 bars) via Jeweller and Wings between a range extender and a hub, use Ethernet as an additional or main communication channel. This function allows you to install range extenders in basements, metal hangars, and other places where there is no radio signal.
Ethernet can also be used as an additional communication channel with the hub. Connecting via wire and radio will increase the reliability and fault tolerance of the system.
ReX 2 should be hidden from direct view. This will help reduce the likelihood of sabotage or jamming. Also, keep in mind that the device is intended for indoor installation only.
Do not place ReX 2:
- Outdoors. Doing so may cause the device to malfunction or not work properly.
- Near metal objects or mirrors (for example, in a metal cabinet). They can shield and attenuate the radio signal.
- Inside any premises with the temperature and humidity beyond the range of permissible limits. Doing so may cause the device to malfunction or not work properly.
- Close to radio interference sources: less than 1 meter from the router and power cables. This could result in the loss of connection with the hub or devices connected to the range extender.
- In places with low or unstable signal strength if Ethernet is not used as an alternative or main communication channel. This could result in the loss of connection with the hub or devices connected to the range extender.
Installation

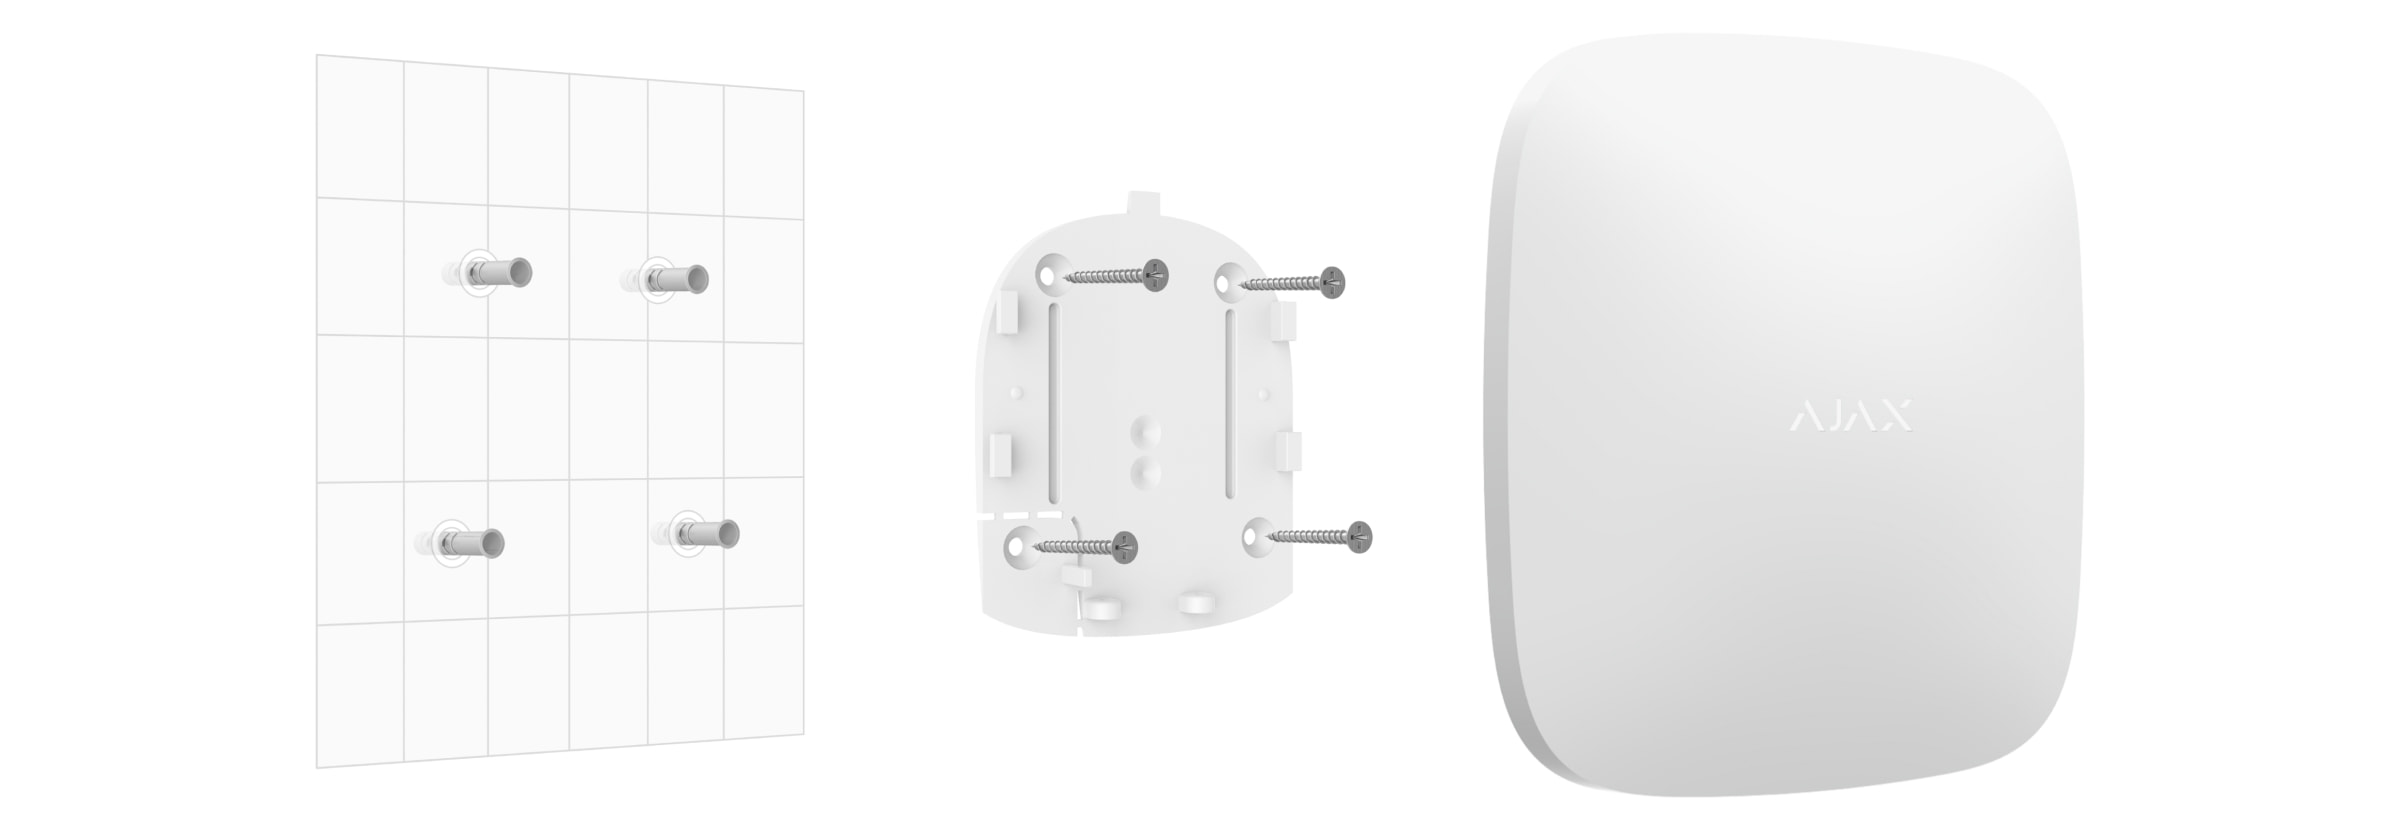
Before installing the range extender, make sure that you have selected the optimal location and that it complies with the requirements of this manual.
When installing and operating the device, follow the general electrical safety rules for using electrical appliances and the requirements of electrical safety regulations.
To install ReX 2:
- Fix the SmartBracket mounting panel with the bundled screws. When using other fasteners, make sure they do not damage or deform the panel. When attaching, use at least two fixing points. To make the tamper react to attempts to detach the device, be sure to fix the perforated corner of SmartBracket.
Do not use double-sided adhesive tape for mounting. This can cause the range extender to fall. The device may fail if hit.
- Connect the power supply cable and an Ethernet cable (if needed) to the range extender. Turn on the device.
- Secure the cable with a plastic retainer plate. This will reduce the likelihood of sabotage, as it takes a lot more to tear away a secured cable.
- Slide ReX 2 onto the mounting panel. After installation, check the tamper status in the Ajax app and then the quality of the panel fixation. You will receive a notification if an attempt is made to tear the range extender off the surface or remove it from the mounting panel.
- Fix ReX 2 on the SmartBracket panel with bundled screws.
Do not turn the range extender upside down or sideways when mounting it vertically (for example, on a wall). When properly fixed, the Ajax logo can be read horizontally.


Maintenance
Check the functionality of ReX 2 regularly. The optimal frequency of checks is once every three months. Clean the body from dust, cobwebs, and other contaminants as they emerge. Use a soft, dry cloth that is suitable for equipment care.
Do not use any substances containing alcohol, acetone, gasoline and other active solvents for cleaning the range extender.
If ReX 2 battery becomes faulty and you wish to replace it, use the following guidance:
Tech specs
Complete set
- ReX 2.
- SmartBracket mounting panel.
- Power supply cable.
- Screw terminal block Adapter (only for INCERT compliance).
- Ethernet cable
- Installation kit.
- Quick Start Guide.
Warranty
Warranty for the Limited Liability Company “Ajax Systems Manufacturing” products is valid for 2 years after the purchase.
If the device does not work correctly, contact the support service first – technical issues can be resolved remotely in half of the cases.
Contact Technical Support:
Manufactured by “AS Manufacturing” LLC

