LifeQuality Jeweller is a wireless air quality detector. Measures temperature, humidity, and CO2 (carbon dioxide) concentration in the room. Reports air pollution using an LED indicator and notifications in Ajax apps, enables automation scenarios.
A hub is required for the detector to operate. The list of compatible hubs and range extenders is available here.
LifeQuality operates as part of the Ajax system, communicating with the hub over two secure radio protocols: Jeweller and Wings: the detector uses Jeweller to transmit measurements, while Wings transmits data backups. The hub communication range is up to 1,700 meters without obstacles.
Functional elements

- LED indicator with a touch button. Reports the air quality and other detector events.
- SmartBracket mounting panel. To remove the panel, turn it counterclockwise.
- Power button.
- Device QR code and ID (serial number). It is used to connect the device to Ajax system.
Operating principle
LifeQuality Jeweller is a wireless air quality detector. The detector monitors the temperature, humidity, and CO2 (carbon dioxide) concentration, measuring them once a minute.
LifeQuality measurements are available in Ajax apps in the Devices ![]() tab. A PRO or a user with system configuration rights can set up comfort thresholds of temperature, humidity, and CO2 (carbon dioxide) concentration. When values go beyond the specified limits, hub users receive notifications pointing out which indicator is outside the norm. This allows you to create an optimal microclimate in the room, reacting in time to the detector measurements.
tab. A PRO or a user with system configuration rights can set up comfort thresholds of temperature, humidity, and CO2 (carbon dioxide) concentration. When values go beyond the specified limits, hub users receive notifications pointing out which indicator is outside the norm. This allows you to create an optimal microclimate in the room, reacting in time to the detector measurements.
Ajax automation devices respond to changes in LifeQuality indicators and perform user-defined actions using automation scenarios. For example, WallSwitch turns on the heating system when the specified minimum temperature is reached. Using LifeQuality with Ajax automation devices, supply systems, humidifiers, and air conditioning, it’s easy to maintain a comfortable microclimate inside.
Temperature and humidity sensor
Temperature and humidity are measured using a built-in combined SHT40 detector with digital sensors from the Swiss manufacturer Sensirion. The detector is installed in an isolated part of the main board. This excludes the influence of other board components and ensures measurement accuracy: the temperature measurement accuracy is ±0.2°C, and humidity is ±1.8%.
LifeQuality provides more accurate temperature measurements than other Ajax devices. Therefore, if the system includes LifeQuality, the Rooms ![]() tab in Ajax apps displays only the temperature measured by LifeQuality. The temperature measurements of other devices are ignored. Microclimate measurements will only consider data from other LifeQuality devices added to the room.
tab in Ajax apps displays only the temperature measured by LifeQuality. The temperature measurements of other devices are ignored. Microclimate measurements will only consider data from other LifeQuality devices added to the room.
CO2 sensor
CO2 concentration is measured using a built-in Sunrise non-dispersive infrared (NDIR) detector from the Swedish manufacturer Senseair. This detector type is protected from measurement errors that may occur due to aerosols, perfumes or vapour of other substances.
The operating principle of the detector is based on detecting changes in the intensity of infrared radiation. Air naturally enters the detector chamber, through which the infrared lamp transmits radiation. The chamber walls allow the infrared beam to reflect and migrate to the infrared sensor, which absorbs radiation. With a special coating technology inside the chamber, the measurement accuracy is ± (30 + 3%) ppm.
In the migration process through the chamber, the radiation intensity changes due to the absorption of radiation part by carbon dioxide molecules. When the radiation reaches the endpoint and is absorbed by the infrared sensor, the detector accurately detects CO2 concentration in the air.
Data storage
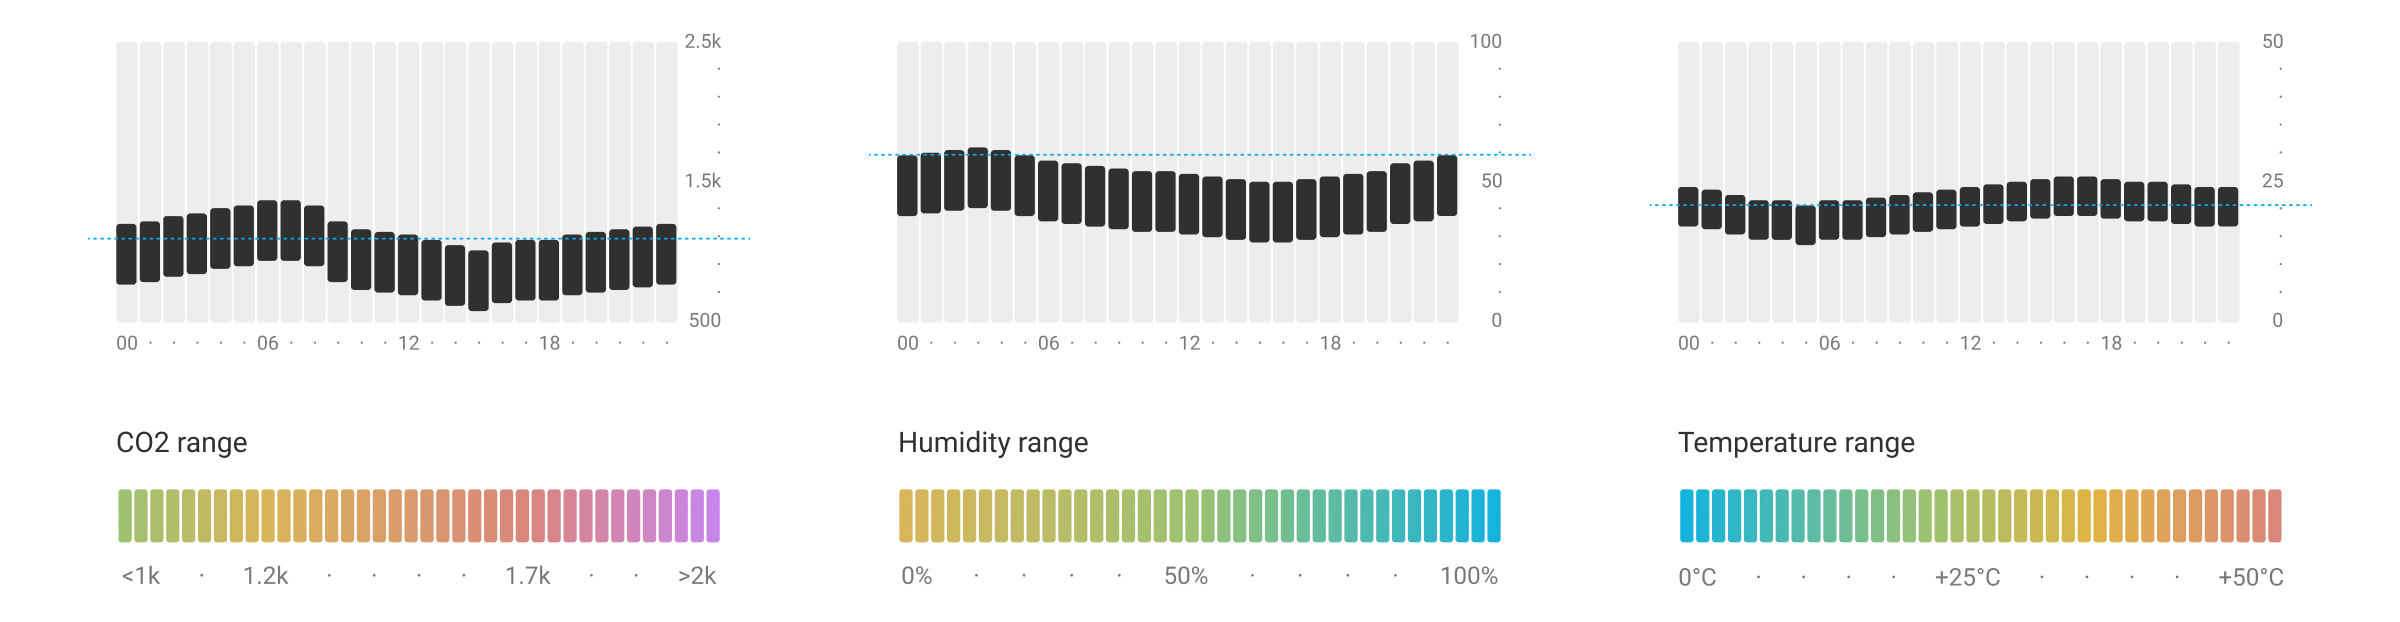
The detector measures temperature, humidity level and CO2 concentration once every minute. In Ajax apps, users can view current LifeQuality measurements and their history. The history of measurements is presented by charts. Charts show the trend of the selected air quality value over the last hour, day, week, month, or year. Ajax system stores this data on the Ajax Cloud server for up to 2 years.
LifeQuality also has built-in memory that allows the detector to store measurements for up to 72 hours if communication with the hub or radio signal range extender is lost. As soon as the connection is restored, all values are sent to Ajax apps and synchronized with the charts.
Calibration
LifeQuality features automatic calibration of the CO2 sensor. This feature allows the sensor continuously transmit the most accurate measurements of the carbon dioxide concentration in the room. At the same time, the temperature and humidity sensor is calibrated at the production stage and does not require additional calibration.
The built-in CO2 sensor is calibrated at the production stage and automatically every 15 days without user or installer interaction. The automatic calibration mode is effective for ventilated rooms where CO2 concentration is reduced to 400 ppm at least once every 15 days. If the detector is used in an unventilated space, we recommend calibrating it manually once a year. You can run the calibration manually in Ajax apps.
The CO2 sensor calibration cannot be reset to the production or previous version. It takes effect as soon as the calibration process is completed. If it is interrupted, the device retains the result of the previous calibration.
Jeweller and Wings data transfer protocols
Jeweller and Wings are two-way wireless protocols for fast and reliable two-sided connection between the hub and connected devices. Jeweller technology is used to transmit events and measured values. If connection is lost, Wings allows you to send data backups from the detector to the hub when connection is restored.
The protocols support floating key block encryption and device recognition on every session to prevent sabotage and spoofing.
To monitor connection with system devices and display their statuses Ajax apps have a system of hub–detector polls with a frequency of 12 to 300 seconds. The polling frequency is set by a PRO or a user with system setup rights in the hub settings.
Sending events to the monitoring station
The Ajax system can transmit events and alarms to the PRO Desktop monitoring app as well as the Central Monitoring Station (CMS) via SurGard (Contact ID), SIA DC-09 (ADM-CID), ADEMCO 685, and other protocols. The list of supported protocols is available here.
Only communication loss events between LifeQuality and the hub (or the radio signal range extender) are transmitted to the CMS. Use PRO Desktop to receive all smart air quality detector events.
Addressability of Ajax devices allows you to send not only events but also the type of the device, the name, virtual room, and security group assigned to it to the PRO Desktop and to the CMS. The list of transmitted parameters may differ depending on the type of the CMS and the selected communication protocol.
The ID and detector loop (zone) number are available in the detector States.
Adding to the system
Before adding a device
- Install the Ajax app.
- Create an account if you don’t have one.
- Add a hub compatible with the detector to your app. Set the necessary settings and create at least one virtual room.
- Make sure that the hub is turned on and has Internet access via Ethernet, Wi-Fi, and/or mobile network. You can do this in the Ajax app or by looking at the hub LED indicator: it lights up white or green.
- Make sure that the hub is disarmed and does not start updating by checking the status in the Ajax app.
Only a PRO or a user with system configuration rights can connect LifeQuality to the hub.
LifeQuality should be within the coverage area of the hub radio network. To operate via a radio signal range extender ReX 2, connect LifeQuality to the hub first. Then connect the detector to the range extender in its settings.
Note that LifeQuality does not work with the ReX radio signal range extender.
How to add LifeQuality Jeweller to the hub
- Open the Ajax app.
- Select the hub if you have several of them or if you are using the PRO app.
- Go to the Devices
 tab. Click Add Device.
 - Specify the name of the device.
- Scan the QR code or enter the ID manually. QR code is located on the enclosure and on the device packaging. The ID can be found under the QR code.
- Select a virtual room and security group (if group mode is enabled).
- Click Add.
If the maximum number of devices is added to the hub, you will be notified about exceeding the hub limit. The number of devices connected to the hub depends on the hub model.
- Turn on LifeQuality by holding the power button for 3 seconds. The hub connection request is sent only if the detector is enabled. If the detector fails to connect to the hub, try again in 5 seconds.
The detector cannot connect to the hub if they operate on different radio frequencies. The radio frequency range of the device may vary by region. Please contact technical support for information on the operating frequency range of your devices.
Once connected, LifeQuality will appear in the device list in the Ajax app. Device status update depends on the polling interval set in the Jeweller or Jeweller/Fibra settings. The default value is 36 seconds.
LifeQuality operates with one hub only. When connected to a new hub, the detector stops transmitting data to the old hub. Once added to a new hub, LifeQuality is not removed from the list of devices of the old hub. This must be done manually in Ajax apps.
Indication
LifeQuality LED indication can report detector’s status as well as air quality with a backlight.
| LED indication | Event | Notes |
| Lights up slowly and goes out slowly after tapping on the device LED. | Level of the selected parameter display: temperature, humidity, the CO2 level, worsening of any indicator. |
The color of the device LED depends on the value of the selected parameter. When temperature, humidity level, or worsening of any indicator is selected:
When the CO2 (carbon dioxide) concentration in the air is selected:
The detector does not respond to tapping on the device LED when the batteries are discharged. |
| Blinks with the current level color once every three seconds. | Level of the selected parameter display: temperature, humidity, the CO2 level, worsening of any indicator. |
The color of the device LED depends on the value of the selected parameter. When temperature, humidity level, or worsening of any indicator is selected:
When the CO2 (carbon dioxide) concentration in the air is selected:
The sensor logo briefly lights up if the Blink on abnormal values option is enabled in the settings. |
| Lights up green for 1 second. | Turning the detector on. | |
| Lights up red, then blinks three times. | Turning the detector off. | |
| Lights up red. | Pressing the power button when the detector is on. | Appears only while the power button is pressed. If the button is pressed for more than 2 seconds, the detector briefly lights up three times and turns off. |
| Blinks red six times then blinks three more times but quicker. | The detector has been removed from the hub. | Lights up when the detector receives information that it has been removed from the hub. |
| Lights up green for 1 second. Blinks red six times then blinks three more times but quicker. | Turning on a detector not added to the hub. | |
| Lights up red slowly three times. | Battery is low. | Lights up after tapping on the device LED. |
| Slowly lights up blue with an interval of 6 seconds. | Calibration of the CO2 (carbon dioxide) sensor. | Calibration takes up to 20 minutes. |
| Lights up red for 1 second. | Accelerometer is triggered, the detector is displaced. |
Functionality testing
The Ajax system provides several tests for choosing the installation place with a stable signal for the devices. Jeweller and Wings signal strength tests are available for LifeQuality. Tests determine the strength and stability of the signal at the intended location of the device.
To run a test in the Ajax app:
- Select the hub if you have several of them or if you are using the PRO app.
- Go to the Devices tab.
- Select LifeQuality.
- Go to the settings by clicking on the gear icon .
- Select the test.
- Perform the test following the tips in the app.
Tests do not start immediately, but not later than over a single hub–device ping interval (36 seconds by default). You can change the device ping interval in the Jeweller (or Jeweller/Fibra) menu in the hub settings.
Icons
Icons show some of the LifeQuality states as well as measured air quality indicators. You can view them in Ajax apps in the Devices ![]() tab.
tab.
State icons
| Icon | Value |
|
Jeweller signal strength between LifeQuality and the hub (or range extender). The recommended value is two or three bars. |
|
|
LifeQuality battery charge level. |
|
| Malfunction detected. The list of malfunctions is available in device states. | |
| LifeQuality operates through the radio signal range extender. | |
|
LifeQuality is disabled. |
Air quality indicators icons
|
Air temperature in the room where LifeQuality is installed. Measured in Celsius or Fahrenheit depending on the app settings. In the normal state, the text is colored black. The text changes color to yellow when the temperature is outside the comfort limits set in the settings. |
|
|
Humidity level in the room where LifeQuality is installed. Measured in percentages. In the normal state, the text is colored black. The text changes color to yellow when the humidity is outside the comfort limits set in the settings. |
|
|
Level of CO2 (carbon dioxide) concentration in the room where LifeQuality is installed. Measured in ppm (parts per million). The color of the text depends on the concentration:
|
States
The states include information about the device and its operating parameters. You can see LifeQuality states in Ajax apps. To access them:
- Open the Ajax app.
- Select the hub if you have several of them or if you are using the PRO app.
- Go to the Devices tab.
- Select LifeQuality from the list.
| Parameter | Value |
| Malfunction |
Clicking the The field is displayed only if a malfunction is detected. |
| Temperature |
Air temperature in the room where LifeQuality is installed. Measured in Celsius or Fahrenheit depending on the app settings. In the normal state, the text is colored black. The text changes color to yellow when the temperature is outside the specified limits. |
| Humidity |
Humidity level in the room where LifeQuality is installed. Measured in percentages. In the normal state, the text is colored black. The text changes color to yellow when the humidity is outside the specified limits. |
| CO2 level |
Level of CO2 (carbon dioxide) concentration in the room where LifeQuality is installed. Measured in ppm (parts per million). The color of the text depends on the concentration:
|
| Jeweller Signal Strength |
Signal strength between LifeQuality and the hub or radio signal range extender via Jeweller. The recommended value is two or three bars. Jeweller is a protocol for transmitting LifeQuality events and alarms. |
| Connection via Jeweller | Connection status between LifeQuality and the hub or range extender via Jeweller:
|
| Wings Signal Strength |
Signal strength between LifeQuality and the hub or the range extender via the Wings channel. The recommended value is two or three bars. Wings is a protocol for transmitting LifeQuality backup data. |
| Connection via Wings | Connection status between LifeQuality and the hub or the range extender via Wings:
|
| Battery Сharge | The battery charge level of the device:
When the charge level is low, the Ajax apps and the security company receive a related notification. After receiving the low battery notification, the detector can operate for several months more under normal conditions. However, we recommend replacing the batteries immediately upon notification. |
| Alert if moved | Alarm status when the accelerometer is triggered:
The alarm is triggered if the enclosure is rotated or removed from the SmartBracket mounting panel. |
| Name of the radio signal range extender | Displayed when the device is operating via a radio signal range extender. |
| Permanent Deactivation | Shows the status of the device deactivation function:
|
| Firmware | LifeQuality firmware version. |
| Device ID | LifeQuality ID (serial number). It is also located on the enclosure under the QR code and the device packaging. |
| Device No. | LifeQuality loop (zone) number. Events are sent to the monitoring station with this number. |
Settings
To change LifeQuality settings in the Ajax app:
- Open the Ajax app.
- Select the hub if you have several of them or if you are using the PRO app.
- Go to the Devices tab.
- Select LifeQuality from the list.
- Go to Settings by clicking on the gear icon .
- Set the required settings.
- Click Back to save the new settings.
| Settings | Value |
| Name |
Detector name. Displayed in the list of hub devices, SMS text, and notifications in the events feed. To change the name, click on the text field. The name can contain up to 12 Cyrillic characters or up to 24 Latin characters. |
| Room |
The virtual room to which LifeQuality is assigned. To change the room, click on the field. The room name is displayed in the text of SMS and notifications in the events feed. |
| Air monitor settings | |
| Temperature |
The settings of the lower and upper limits of a comfortable temperature. If the temperature goes beyond these limits, users will receive notifications. The temperature can be set within the range between 0°C and +50°C. |
| Humidity |
The settings of the lower and upper limits of a comfortable humidity level. If the humidity goes beyond these limits, users will receive notifications. Humidity can be set within the range from 0% to 100%. |
| CO2 level |
The settings of the lower and upper limits of a comfortable carbon dioxide concentration in the air. If the concentration goes beyond these limits, users will receive notifications. The concentration of CO2 can be set within the range from 400 ppm to 2500 ppm. |
| Notifications | Notifications that users receive from LifeQuality:
|
| Sensitivity | The settings of the threshold of sensitivity for device sensors and the period of time after which users will be notified about worsening of air quality:
|
| LED Indication | The settings of the parameter which will be indicated after tapping on the device LED:
If the toggle Blink on abnormal values is enabled, the device will flash with its LED once the selected parameter goes beyond acceptable values specified in device settings. Enabling the option affects the battery life of the device. |
| Scenarios |
The menu for setting up automation scenarios by temperature, humidity, and CO2 level. |
| Jeweller Signal Strength Test |
Switches the device to the Jeweller signal strength test mode. The test helps to check the signal strength between the device and the hub or range extender to determine the optimal installation place for LifeQuality. The recommended value is two or three bars. |
| Wings Signal Strength Test |
Switches the device to the Wings signal strength test mode. The test helps to check the signal strength between the device and the hub or the range extender to determine the optimal installation place for LifeQuality. The recommended value is two or three bars. |
| CO2 Sensor Calibration |
Starts manual calibration of the carbon dioxide sensor. Calibration is required if the detector is installed in an unventilated area. In these conditions it should be manually calibrated once a year. |
| User Guide | Opens LifeQuality User Manual in the Ajax app. |
| Permanent Deactivation | Allows to disable the device without removing it from the system. Two options are available:
|
| Unpair Device | Unpairs LifeQuality from the hub and deletes its settings. |
How to set up scenarios
- Open the Ajax app.
- Select the hub if you have several of them or if you are using the PRO app.
- Go to the Devices tab.
- Select LifeQuality from the list.
- Go to Settings by clicking on the gear icon .
- Go to the Scenarios menu.
- Choose one of the indicators:
- Temperature
- Humidity
- CO2
- Specify the value of the parameters:
- Higher Than or Lower Than to define the event that runs the scenario.
To create a scenario for both options, you should create two different scenarios, one for Higher Than and another for Lower Than.
- The value upon which the scenario is triggered.
Values set as comfort limits in the LifeQuality settings are selected by default. You can change them for the scenario. It will not affect the notification settings upon exceeding the comfort limits.
- Higher Than or Lower Than to define the event that runs the scenario.
- Click Next.
- Select the necessary automation devices that should trigger when the measurements goes beyond the specified in the scenario limit.
- Specify:
- Name of the scenario
- Action of the automation device
- Click Save.
How to view charts of device measurements
Charts are available with firmware version from OS Malevich 2.15 and in apps of the following versions and higher:
- Ajax Security System 2.23.1 for iOS
- Ajax Security System 2.26.1 for Android
- Ajax PRO: Tool for Engineers 1.17.1 for iOS
- Ajax PRO: Tool for Engineers 1.17.1 for Android
- Ajax PRO Desktop 3.6.1 for macOS
- Ajax PRO Desktop 3.6.1 for Windows
- Open the Ajax app.
- Select the hub if you have several of them or if you are using the PRO app.
- Go to the Devices tab.
- Select LifeQuality.
- Select an indicator:
- Temperature
- Humidity
- CO2
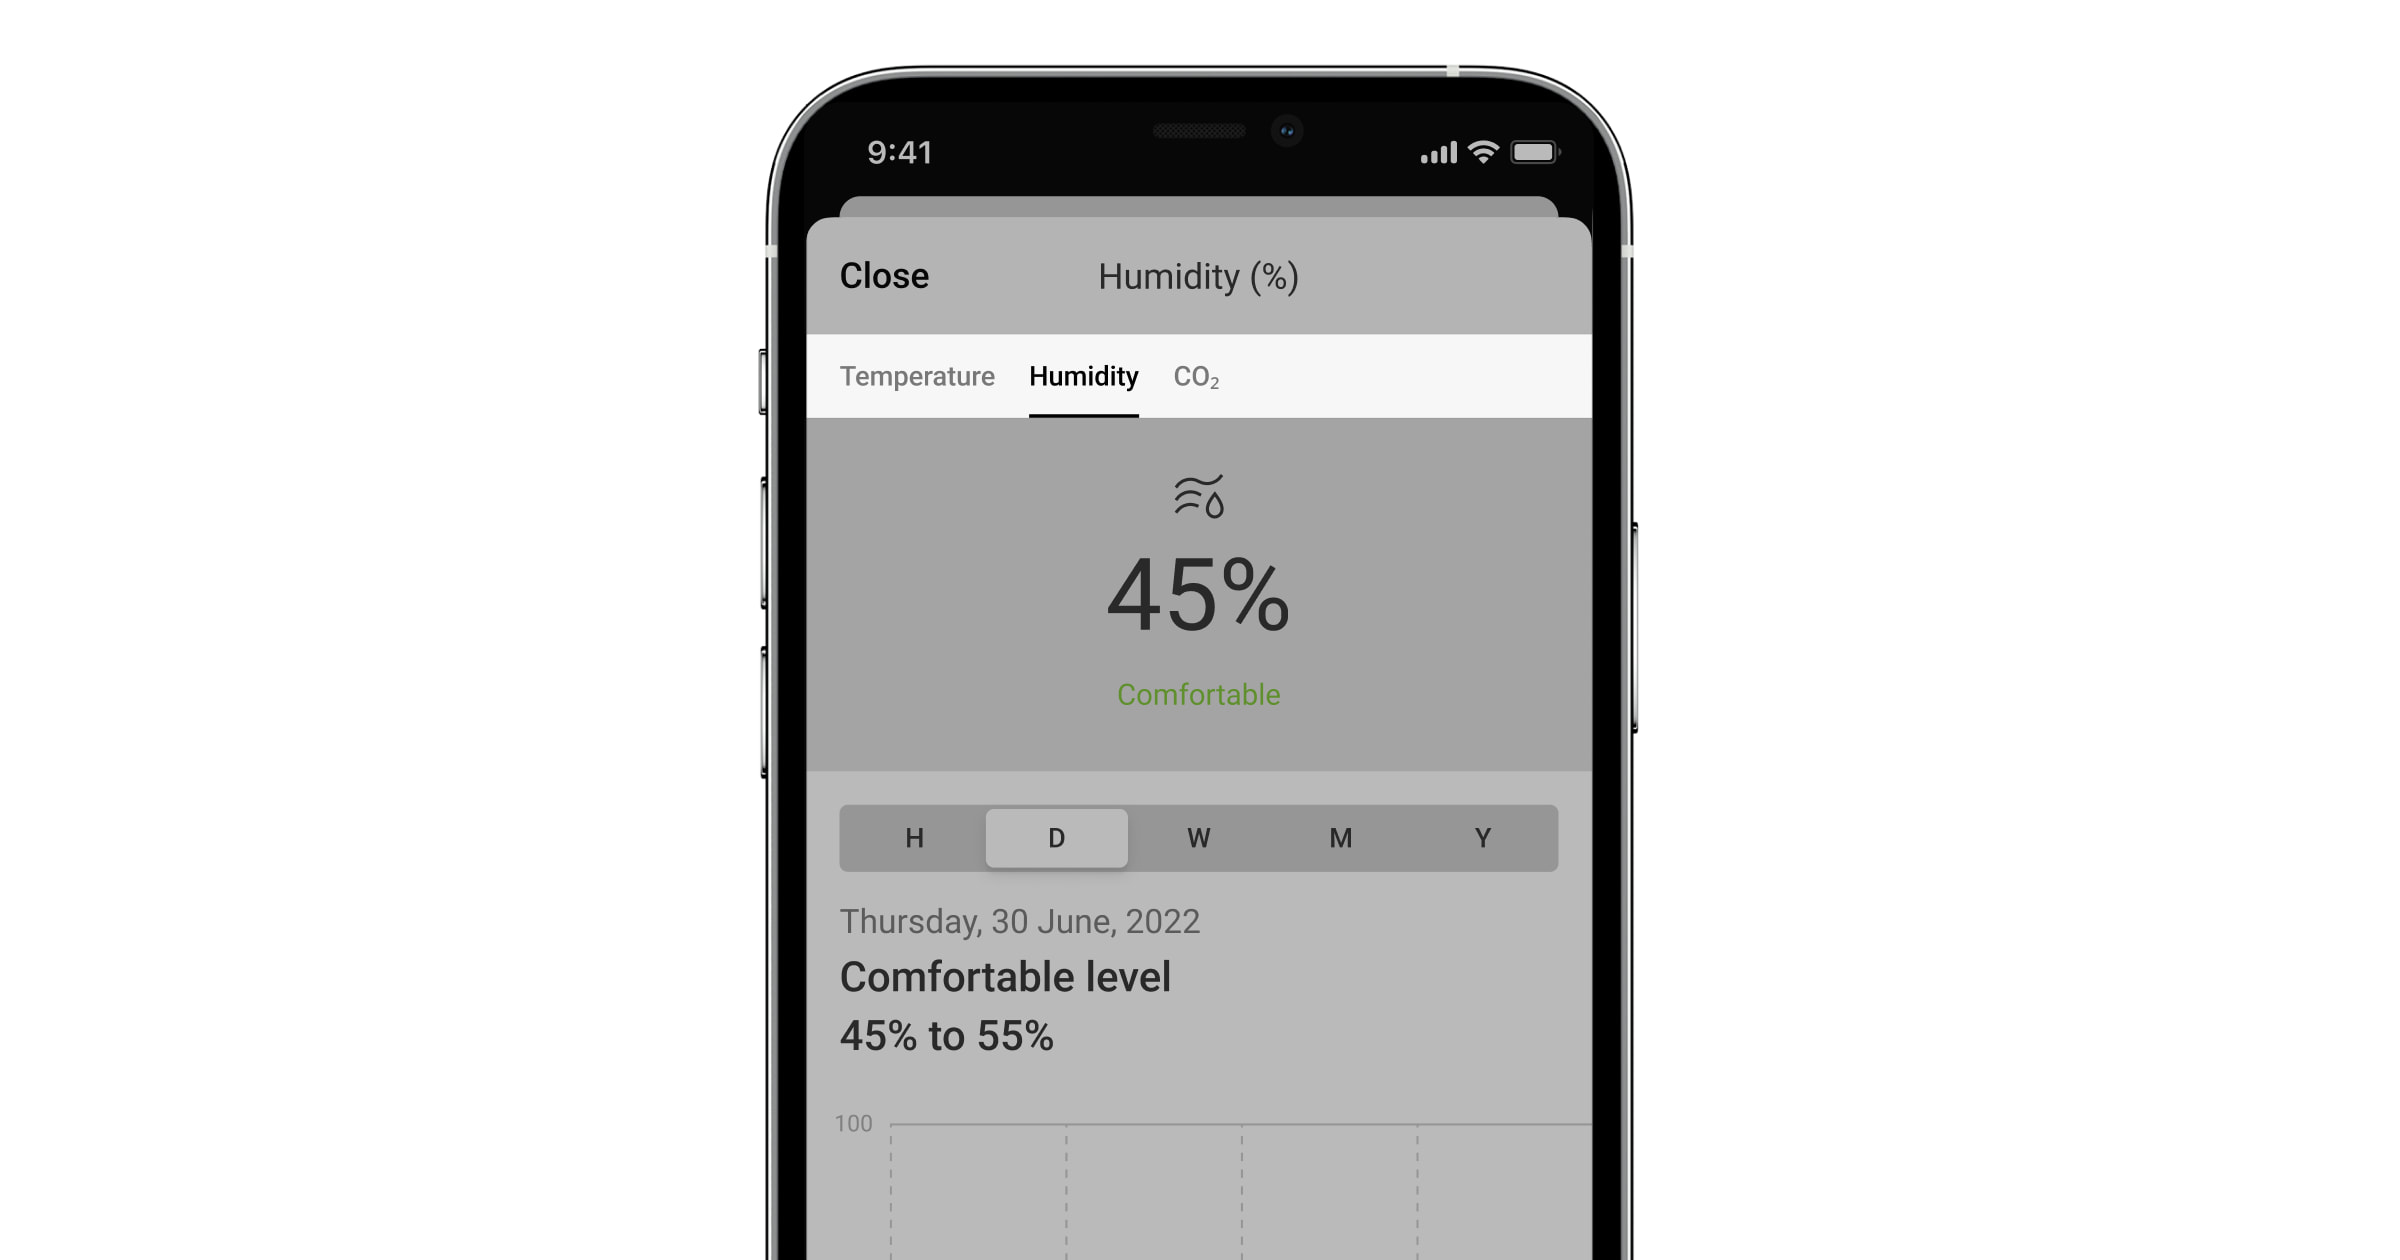
- Select an interval:
- Hour
- Day
- Week
- Month
- Year

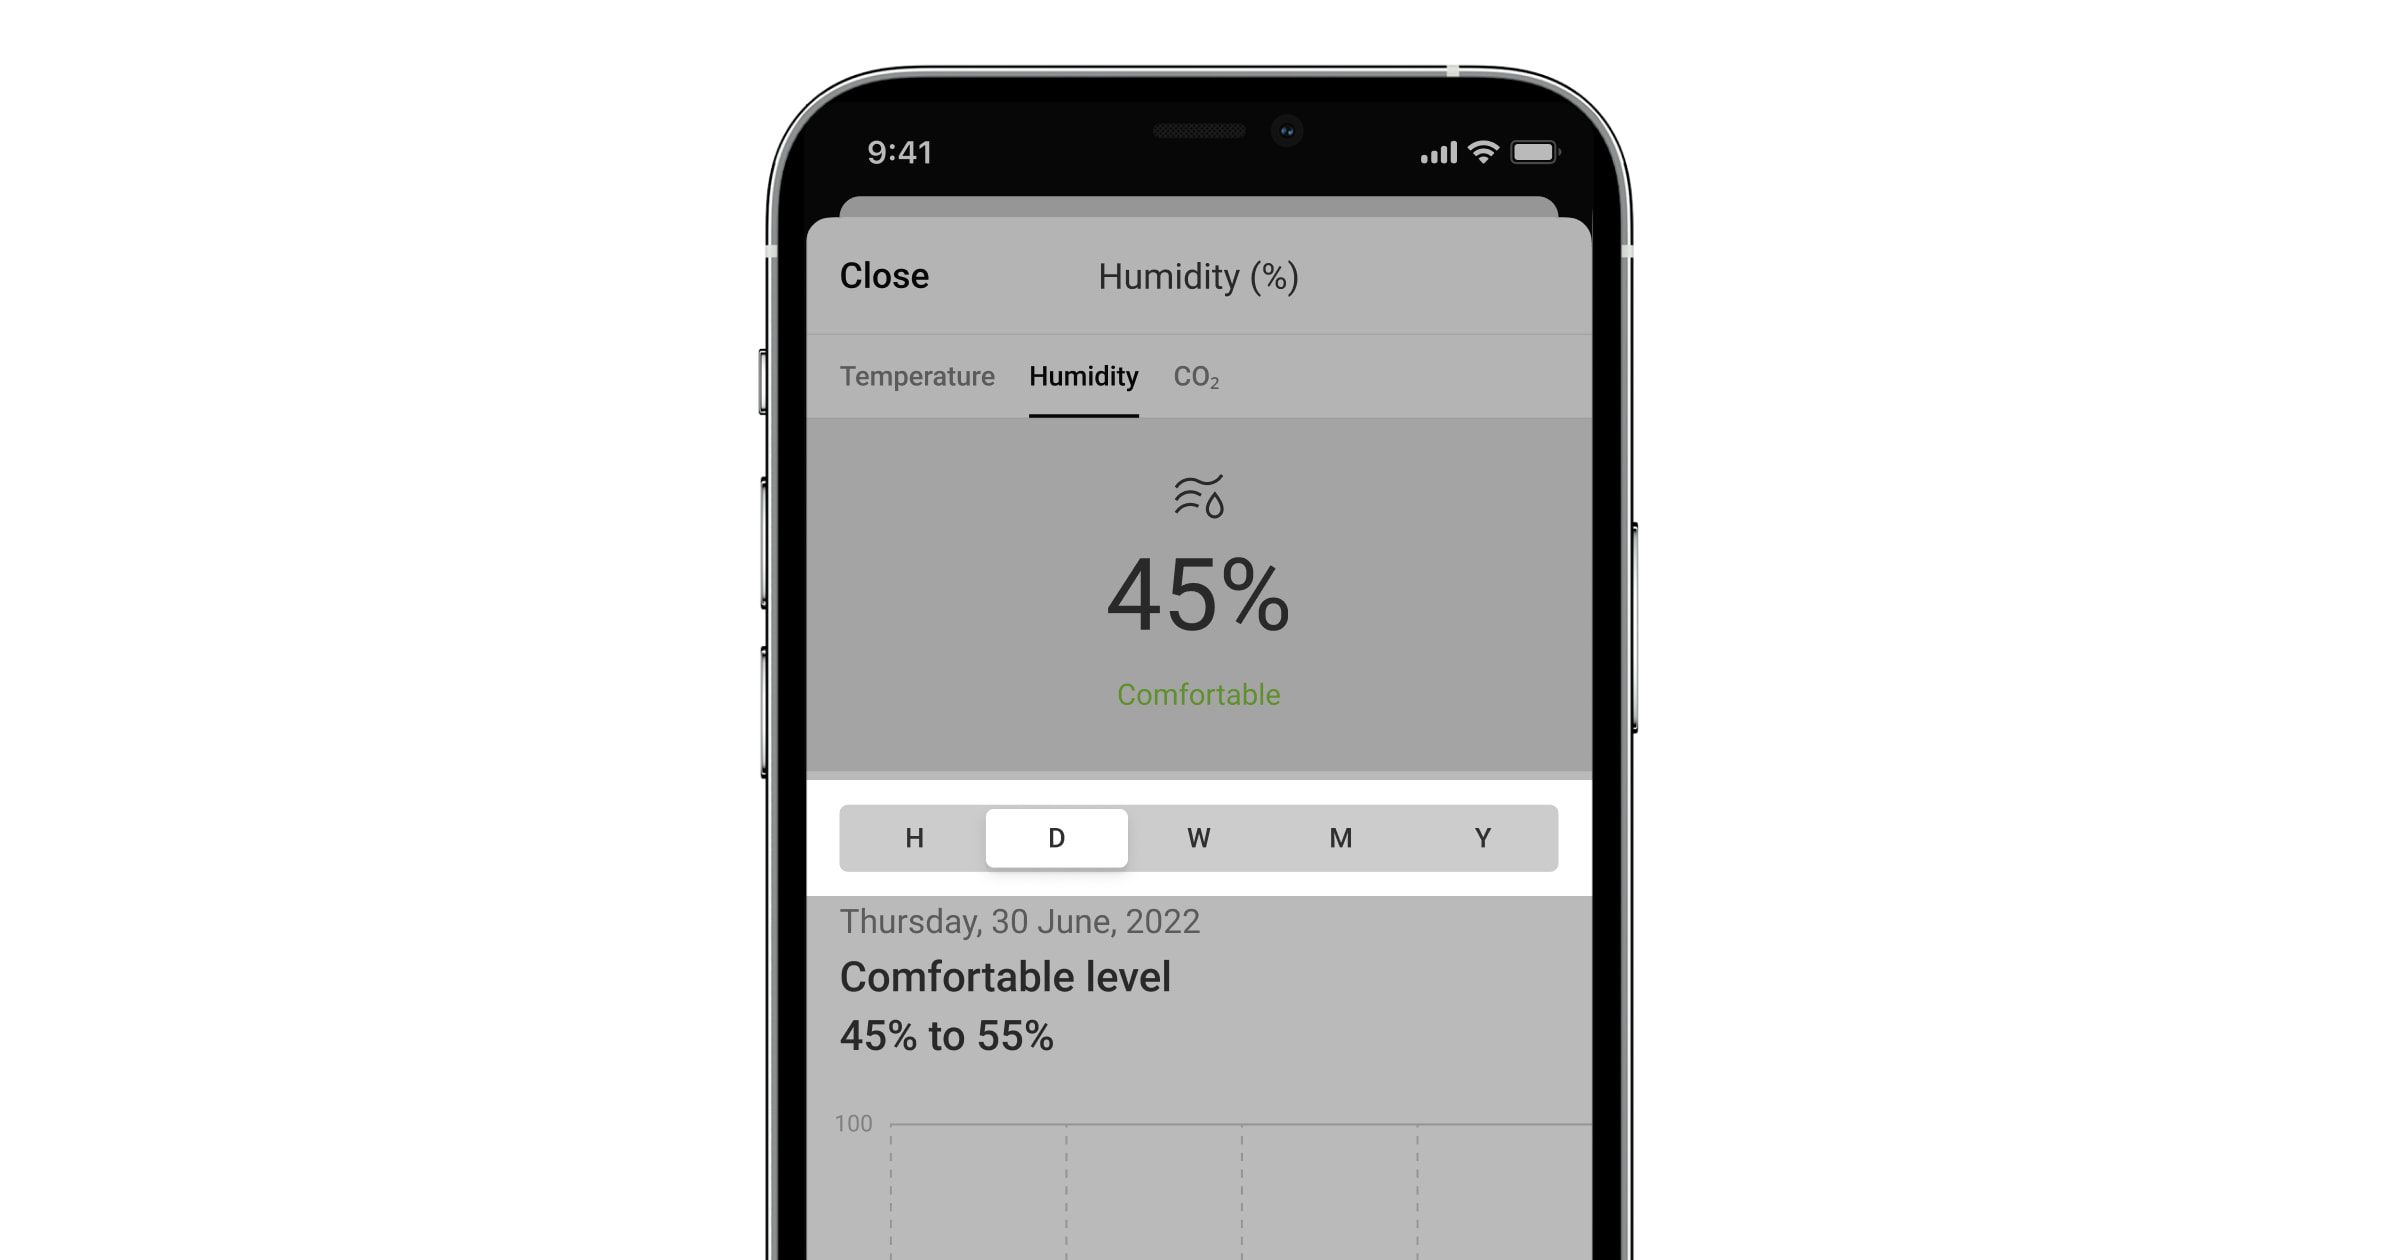
You can also switch between detector measurements inside the screen. To do this, select the indicator in the menu above.
To view the values of measurements for the specified period, click on the corresponding column of the chart.
Charts may have gaps if at that time the connection between LifeQuality and the hub was lost for more than 72 hours or LifeQuality was disabled.
How to start CO2 sensor calibration manually
Locate the detector outdoors and leave it for 10-15 minutes before starting the calibration. For example, take it outside or leave it by an open window. The CO2 sensor is calibrated at the operating temperature of 0°C to +50°C.
To start calibration:
- Open the Ajax app.
- Select the hub if you have several of them or if you are using the PRO app.
- Go to the Devices tab.
- Select LifeQuality from the list.
- Go to Settings by clicking on the gear icon .
- Go to СО2 Sensor Calibration menu.
- Click Start and wait for the calibration to finish.
The CO2 sensor is calibrated for up to 20 minutes. After clicking the Start button, the timer in the app will start the countdown. Calibration ends automatically after the countdown is completed — return LifeQuality to the selected installation place.
Selecting the installation place
The device is for indoor use only.
LifeQuality can be mounted on a vertical surface using an included installation kit. The device can also be placed on a horizontal surface without mounting. We recommend mounting the device on a vertical surface or on a ceiling. It will prevent the device from being displaced or accidentally dropped.
We recommend installing the detector at the height of a human airway. For example, locate it in the office at the sitting person’s head level or in the bedroom next to the bedhead. LifeQuality installs in every room in areas that are expected to be crowded. One detector operates effectively in one room, regardless of its size.
When choosing the location of the detector, consider the parameters that affect its operation:
- Jeweller signal strength.
- Wings signal strength.
- Distance between the detector and the hub.
- Presence of barriers for radio signal passage between devices: walls, interfloor ceilings, large objects located in the room.
Consider the placement recommendations when designing your Ajax system for the object. The security system must be designed and installed by specialists. The list of recommended Ajax partners is available here.
Signal strength
The Jeweller/Wings signal strength is determined by the ratio of the number of undelivered or corrupted data packets to expected ones that are exchanged between the hub and the detector within a certain period of time. Signal strength is indicated by the icon ![]() on the Devices
on the Devices ![]() tab:
tab:
- Three bars — excellent signal strength.
- Two bars — good signal strength.
- One bar — low signal strength; stable operation is not guaranteed.
- Crossed out icon — no signal; stable operation is not guaranteed.
Check the Jeweller and Wings signals strength at the installation place. We cannot guarantee stable operation if the signal strength is as low as one or zero bars. In this case, move the device. Repositioning even by 20 cm can significantly improve signal reception.
If the detector still has a low or unstable signal after it was moved, use ReX 2.
LifeQuality is not compatible with ReX. The list of compatible range extenders is available here.
Do not install the detector
- Outdoors. This could damage the detector.
- In places with fast air circulation. For example, near fans, open windows, or doors. This can lead to incorrect measurements.
- Opposite any objects with rapidly changing temperature. For example, near electric and gas heaters. This can lead to incorrect temperature measurements.
- In places where the detector has low or unstable signal strength. This can lead to a connection loss between the detector and the hub or radio signal range extender.
- Inside premises with temperature and humidity outside the device’s operation limits. This could damage the detector.
- In closed botanic gardens, greenhouses, and rooms with a large number of plants. The detector is not suitable for operation in such conditions.
Installation
- Remove the SmartBracket mounting panel from the detector. To remove the panel, turn it counterclockwise.
- Fix the SmartBracket panel to a vertical surface using double-sided adhesive tape or other temporary fastener. The mounting panel has an UP sign, which indicates the correct position of the panel.
Use double-sided adhesive tape for temporary fixation only. The device fixed permanently with adhesive tape can peel off the surface at any time, leading to damage if the device is dropped.
- Run the Jeweller and Wings signal strength tests. The recommended value is two or three bars.
If the signal strength is a single bar or lower, we cannot guarantee the stable operation of the system. Move the device as repositioning even by 20 cm can significantly improve the signal reception. If low or unstable signal strength is still reported after relocation, use the ReX 2 radio signal range extender.
- Remove the detector from the mount.
- Fasten the SmartBracket panel with bundled screws using all fixation points. If using other fasteners, ensure they do not damage or deform the mounting panel.
- Place the detector on the SmartBracket mounting panel.
Malfunctions
If malfunction is detected (for example, there is no connection with the hub or range extender), the Ajax app displays a malfunction counter in the device field.
Malfunctions are displayed in the detector States. Fields with malfunctions are highlighted in red.

The device can report malfunctions to the monitoring station of the security company, as well as to users through push notifications and SMS.
LifeQuality malfunctions
- CO2 sensor calibration is required.
- No connection to the hub or radio signal range extender.
- The detector registered the fault of one or several built-in sensors.
- The battery charge level is low.
Maintenance
Regularly check the functioning of the detector. The optimal frequency of check-ups is once every three months. Clean the enclosure from dust, cobwebs, and other contaminants as they emerge. Use a soft dry cloth suitable for equipment care. Do not use substances that contain alcohol, acetone, gasoline, and other active solvents to clean the device.
Technical specifications
Complete set
- LifeQuality.
- Installation kit.
- Quick start guide.
Warranty
Warranty for the Limited Liability Company “Ajax Systems Manufacturing” products is valid for 2 years after the purchase.
If the device does not function correctly, please contact the Ajax Technical Support first. In most cases, technical issues can be resolved remotely.
Contact Technical Support:

