
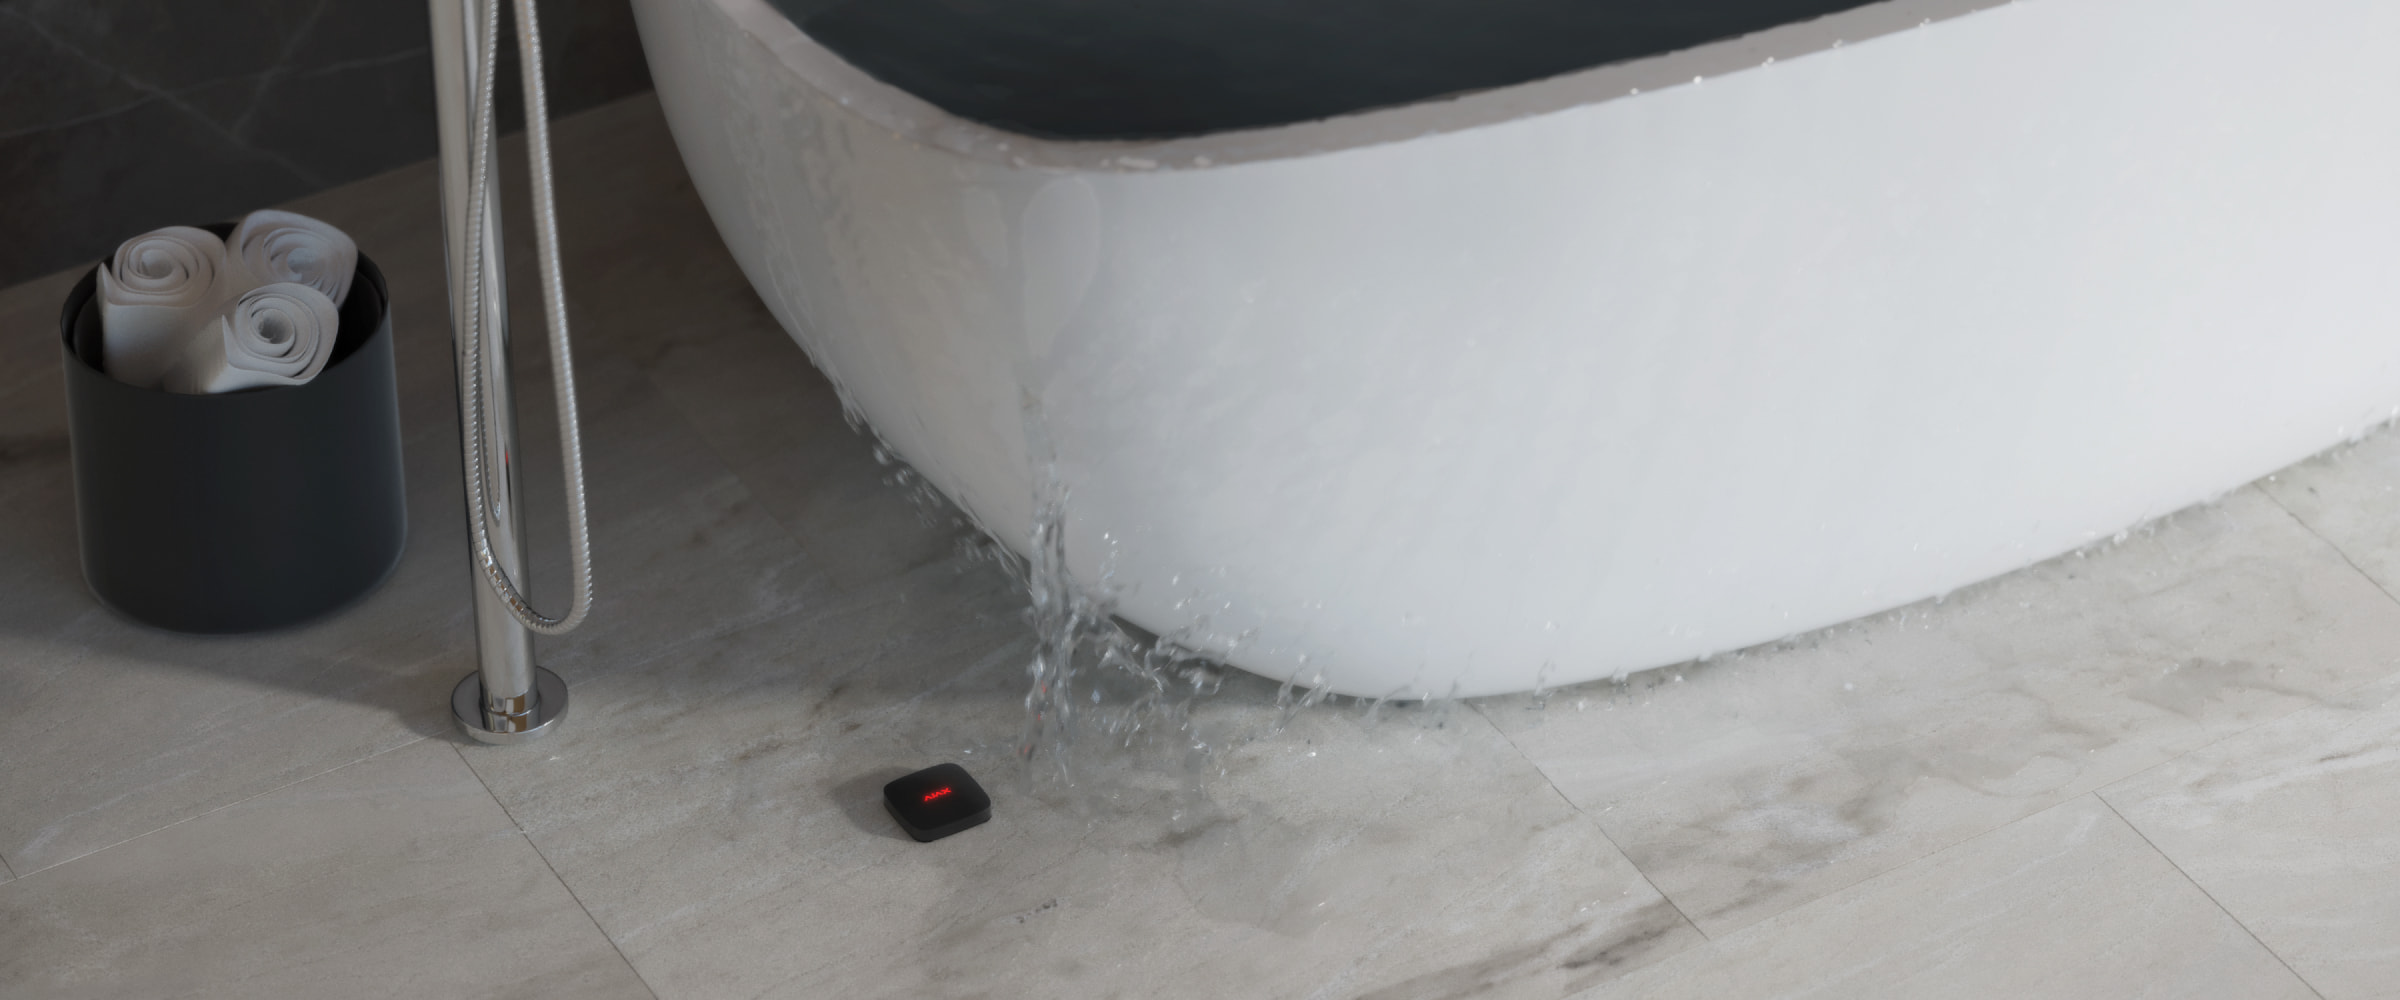
LeaksProtect is a wireless leak detector for indoor use. Detects minimal leaks for you to respond and fix the problem in time.
LeaksProtect connects to the Ajax system via the protected Jeweller radio protocol. The communication range is up to 1300 meters in line of sight.
LeaksProtect can work as part of a water leak detection system together with the Ajax hub and WaterStop smart shutoff valve. Also, LeaksProtect can be connected to third-party security systems using the uartBridge or ocBridge Plus integration modules.
Users can configure LeaksProtect via the Ajax app for macOS, Windows, iOS, or Android. The system notifies users of all events through push notifications, SMS, and calls (if activated).
Functional Elements and Indication
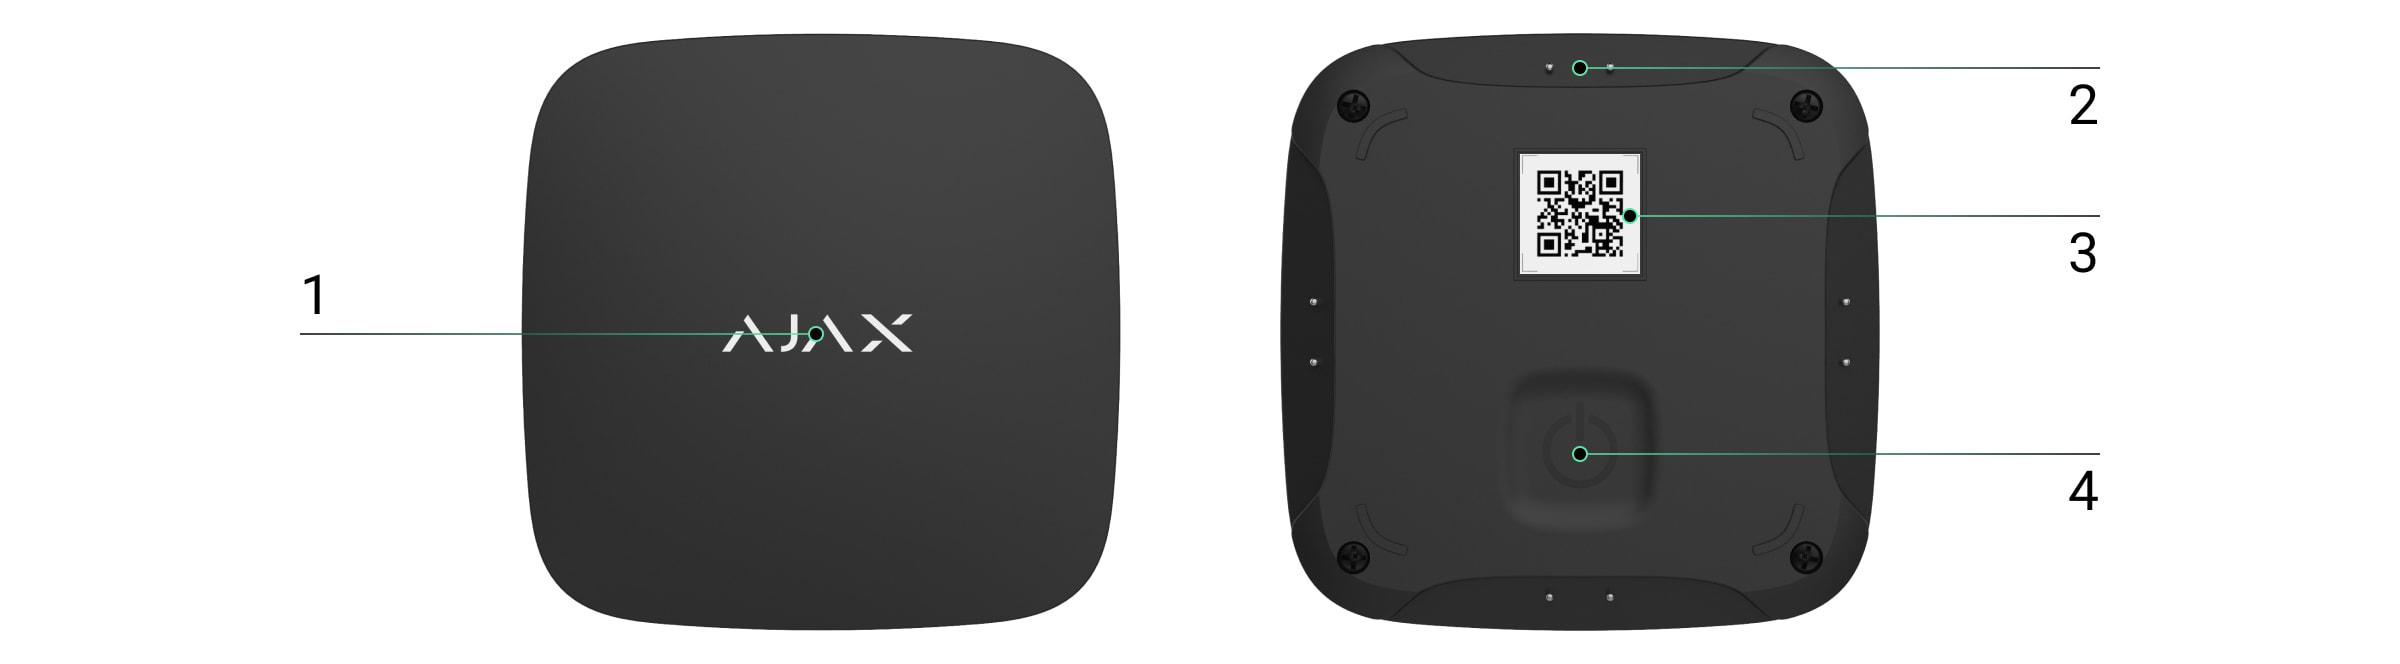
- LED indicator
- Water sensor contacts
- QR code with the device registration key
- On/off button
Operating Principle
At the bottom of its body, LeaksProtect is equipped with four pairs of water-sensitive contacts. If at least one contact pair gets wet, the detector immediately transmits an alarm signal to the hub, notifying the user and security company. Also, the detector notifies users if the water dries out.
When switched on, LeaksProtect is always active and monitors the situation regardless of the security mode: disarmed or armed.
If the leak is detected, LeaksProtect notifies once, and the next alarm is transmitted when the contacts have dried out and gotten wet again.
Operation as part of the water leak detection system
LeaksProtect with a hub and WaterStop smart shutoff valve can operate as a water leak detection system. WaterStop shuts off the water supply as soon as LeaksProtect leak detector transmits an alarm. To do this, connect the necessary devices and configure the automation scenario.
You can configure other automation scenarios, for example, to stop the water supply either by schedule or after arming the system.
Connecting the detector to the Ajax system
Detector connection to hub
Before connecting:
- Following the hub user manual, install the Ajax app. Create an account, add the hub to the app, and create at least one room.
- Check the internet connection (via Ethernet cable and/or GSM network).
- Check the hub status in the app: make sure that it is disarmed and does not update.
Only users with administrator rights can add the device to the hub.
How to pair the detector with hub:
- Select Add Device in the Ajax app.
- Name the device, scan or enter the QR Code (located on the body and packaging), and select the location room.
- Select Add — the countdown will begin.
- Switch on the device.
LeaksProtect has a rigid “ON” button: press it with force to switch the detector on.
For the detection and pairing to occur, the device should be located within the wireless coverage area of the hub (at the same facility).
Request for connection is transmitted for a short time at the moment of switching on the device.
If the connection failed, LeaksProtect switches off after 6 seconds. To retry the connection, you do not need to reboot the device. If LeaksProtect is paired with another hub, switch the detector off, then retry the standard adding procedure.
The detector connected to the hub is displayed in the list of devices in the app. The update of the detector status in the list depends on the device inquiry time set in the hub settings (the default value is 36 seconds).
Connecting to the third-party security systems
To connect the detector to a third-party security central unit using the uartBridge or ocBridge Plus integration module, follow the recommendations in the manual of the respective device.
The detector is always active. When connecting LeaksProtect to third party security systems, it is appropriate to place the detector in a permanently active protection zone.
States
- Devices

- LeaksProtect
| Parameter | Value |
| Temperature |
Temperature of the detector, measured on the processor and changes gradually. Acceptable error between the value in the app and the room temperature — 2°C. The value is updated as soon as the detector identifies a temperature change of at least 2°C. You can configure a scenario by temperature to control automation devices |
| Jeweller Signal Strength | Signal strength between the hub and detector |
| Battery Charge |
Battery level of the device. Displayed as a percentage |
| Lid | The state of the tamper, which reacts to the body being disassembled or damaged |
| ReX | Displays the status of using a radio signal range extender |
| Connection | Connection status between the hub and detector |
| Leakage detected | Alarm if the water sensor contacts wet |
| Permanent Deactivation | Shows the status of the device: active, completely disabled by the user, or only notifications about triggering of the device tamper button are disabled |
| Firmware | Detector firmware version |
| Device ID | Device identifier |
Settings
- Devices
- LeaksProtect
- Settings
| Setting | Value |
| First field | Detector name, can be edited |
| Room | Selecting the virtual room to which the device is assigned |
| Alert with a siren if leakage is detected | If active, sirens added to the system are activated if leakage is detected |
| Jeweller Signal Strength Test | Switches the detector to the signal strength test mode |
| Permanent Deactivation |
Allows the user to disconnect the device without removing it from the system. Three options are available:
|
| User Guide | Opens the detector User Manual |
| Delete Device | Disconnects the detector from the hub and deletes its settings |
Indication
The LeaksProtect LED indicator may light up red or green depending on the device status.
Indication when pressing the power button
| Event | Indication |
| Pressing the power button (detector is switched on) | Lights up red while the button is held down |
| Switching on | Lights up green while the device is switching on |
| Switching off | Initially lights up red, then blinks three times |
Turned-on detector indication
| Event | Indication | Note |
| Detector connection to the hub, ocBridge Plus and uartBridge | Lights up green for a few seconds | |
| Hardware error | Blinks red continuously | The detector requires repair, please contact Support Service |
| Leakage detected | Lights up red for about one second | |
| Battery needs replacing | During the alarm, it slowly lights up red and slowly goes out | Replacement of the detector battery is described in the Battery replacement manual |
Functionality Testing
Ajax system allows conducting tests for checking the functionality of connected devices.
The tests do not start straight away but within a period of 36 seconds when using the standard settings. The test time start depends on the settings of the detector scanning period (the paragraph on “Jeweller” settings in the hub settings).
Selecting the Location
When selecting the device location, please take into account its remoteness from the hub (up to 1300 meters) and the absence of any obstacles between the devices hindering the radio signal transmission: walls, floors, large objects located in the room.
The device developed only for indoor use.
Check the Jeweller signal strength level at the installation place.
If the signal level is low (one bar), we cannot guarantee the stable operation of the device. Take all possible measures to improve the signal strength. At least, move the device: even a 20 cm shift can significantly improve the quality of signal reception.
If after moving the device still has a low or unstable signal strength, use a radio signal range extender.
Install LeaksProtect in the place of potential leakage: on the floor under the bath, sink, washing machine, etc.
Do not install the detector:
- outside the premises (outdoors);
- nearby any metal objects or mirrors causing attenuation and screening of the signal;
- within any premises with the temperature beyond the range of permissible limit;
- on conductive surfaces;
- closer than 1 m to the hub.
Detector Testing
When the liquid gets on the detector contacts, it closes the electrical circuit. It is enough to close one contact pair to activate the alarm.
- To check LeaksProtect, close one contact pair with a wet finger for 3 seconds (the delay prevents false triggering). If water is detected, the detector LED will light up red for 1 second.
- Wipe the contacts with a dry napkin. When the electrical circuit is open, LeaksProtect switches on its LED red for 1 second and notifies that water dried out.
If you drown the detector with soapy water, it may continue signal flooding after getting dry. The issue is about the soapy film closes the contacts. To eliminate the problem, wipe the detector contacts with a napkin moistened with pure water and then dry them up.
Maintenance
Check the LeaksProtect operational capability on a regular basis. We recommend cleaning the detector contacts as it gets dirty, at least, once every 2-3 months. Use an alcohol solution for cleaning the contacts.
Clean the detector body from dust, spider webs and other contaminants as they appear: they can conduct electricity and cause false actuation. Use a soft dry napkin suitable for equipment maintenance.
Do not use any substances containing alcohol, acetone, gasoline and other active solvents for cleaning the detector body.
The batteries installed in the detector ensure up to 5 years of autonomous operation on the average (with the inquiry frequency by the hub of 1 minutes). If the detector batteries are low, the security system sends the notification and the detector LED smoothly lights up and goes out green every hour, if the device is triggered.
To replace the batteries, turn off the detector, loosen the screws and remove the LeaksProtect front panel. Change the batteries with new ones type AAA, adhering to polarity.
How long Ajax devices operate on batteries, and what affects this
Tech specs
| Radio communication protocol |
Jeweller |
| Radio frequency band | 866.0 – 866.5 MHz 868.0 – 868.6 MHz 868.7 – 869.2 MHz 905.0 – 926.5 MHz 915.85 – 926.5 MHz 921.0 – 922.0 MHz Depends on the region of sale. |
| Compatibility | Operates with all Ajax hubs, radio signal range extenders, ocBridge Plus, uartBridge |
| Maximum RF output power | Up to 20 mW |
| Modulation of the radio signal | GFSK |
| Radio signal range |
Up to 1,300 m (any obstacles absent) |
| Power supply | 2 × AAA batteries |
| Battery life | Up to 5 years |
| Dust and moisture protection class | IP65 |
| Installation method | Indoors |
| Operating temperature range | From 0°С to +50°С |
| Operating humidity | Up to 100% |
| Overall dimensions | 56 × 56 × 14 mm |
| Weight | 40 g |
| Service life | 10 years |
Complete Set
- LeaksProtect
- Batteries AAA (pre-installed) — 2 pcs
- Quick start guide
Warranty
Warranty for the Limited Liability Company “Ajax Systems Manufacturing” products is valid for 2 years after the purchase and does not apply to the pre-installed battery.
If the device does not work correctly, you should first contact the support service — in half of the cases, technical issues can be solved remotely!
Technical support: [email protected]

