WallSwitch

Power relay to control 110/230 V~ power supply remotely

FAQ

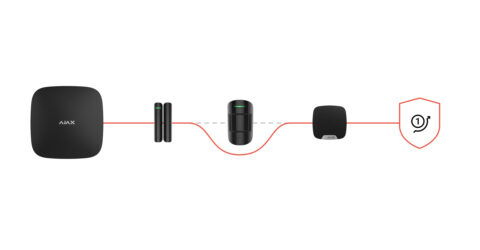
Relay is a low-current relay for remote control of equipment. The device operates at a 7–24 V⎓ supply voltage.

The relay features dry contacts that are electrically isolated to the power supply circuit of the device. This allows using Relay in both low-voltage and domestic power networks.

Relay is designed for controlling anti-flood systems, electric locks, access control systems, security smoke machines, roller shutters, and other devices.

Learn more

WallSwitch is a power relay that can remotely control 110/230 V~ power supply.

This relay does not have galvanic isolation and switches the power received at the input.

WallSwitch is designed for installation in a socket box or for controlling the power supply of lighting, gates, barriers of video surveillance systems, and other devices that obtain power from 110/230 V~ mains.

Learn more

Copied

To install Relay or WallSwitch on a DIN rail, use a DIN Holder bracket.

Copied

The identifier (ID) is the serial number of the device. It is located under the QR code on the body, board, and packaging of the device.

ID at the bottom of the box

ID under the lid

The ID can also be found in the device states in the Ajax app.

  1. Sign in to the Ajax app.
  2. Select the required hub from the list if you have several of them or if you are using a PRO app.
  3. Go to the Devices menu.
  4. Select a device from the list. Device ID information is located at the bottom of the status screen.
Copied

You can do it in WallSwitch settings:

  1. Ajax app
  2. Devices
  3. Select the device
  4. Settings
  5. In the Contact state field, select the required option: Normally Closed or Normally Open

The setting is available for devices with firmware version 5.54.1.0 or higher

Copied

You can do it in WallSwitch settings:

  1. Ajax app
  2. Devices
  3. Select the device
  4. Settings
  5. In the Mode field, select Pulse
  6. In the Pulse Duration field, specify the wanted pulse duration (from 0.5 to 255 seconds)

The setting is available for devices with firmware version 5.54.1.0 or higher

Copied

With OS Malevich 2.9 update, permanent deactivation of devices without removing them from the system has become available.

Deactivation may be necessary if the device is incorrectly installed or configured, loses connection with the hub, or has failed.

To deactivate a device, in the Ajax app:

  • Select a hub if you have several of them or if you are using the PRO app.
  • Go to the Devices menu.
  • Select the device from the list.
  • Go to its Settings .
  • Select the type of permanent deactivation:
    • Entirely — the device does not execute system commands or run automation scenarios, and the system ignores device alarms and other notifications.
    • Lid only — the system ignores the notifications on the detector’s tamper button triggering.
Copied

By default, the hub is set to a hub–detector ping interval of 36 seconds and 30 undeliverable data packets to consider the device lost. With these settings, the hub will detect the loss of the detector in 18 minutes.

To reduce this time, go to the hub settings in the Jeweller section and change the settings. The minimum time for detecting loss of connection with the device is 36 seconds (3 polls of 12 seconds each).

The time before raising the alarm by the communication loss between hub and device is calculated with the following formula:

Detector Ping Interval × Number of missed pings to determine connection failure

Note that with the minimum ping interval, short-term interference can lead to loss of connection with the device. Therefore, set the minimum values only if it is critically important to promptly inform about events in the system.

Copied

The loop (zone) number is required to describe all devices connected to the hub when adding a protected facility to the security company monitoring station.

The number is assigned when adding a device to the hub. The first added device has the first loop (zone) number. After removing the device from the system, its number becomes available. This number can be assigned to the next device to be added to the system.

The loop (zone) number is available in the states of each device in the Ajax app:

Copied

The firmware version can be found in the device states in the Ajax app.

  1. Sign in to the Ajax app.
  2. Select the required hub from the list if you have several of them or if you are using a PRO app.
  3. Go to the Devices menu.
  4. Select a device from the list. The firmware version information is located on the status screen at the bottom.
Copied

Go to the Devices tab , select the device you want to check.

ajax security system application
Copied

Featured articles

How to disable device events once for a time the armed mode is active

How to set up Ajax control of roller blinds or roller shutters. Connection diagrams

How to implement video surveillance that does not compromise privacy

Spelling error report

The following text will be sent to our editors: